DS-1500 - Monitor DoubleSight - Free user manual and instructions
Find the device manual for free DS-1500 DoubleSight in PDF.

User questions about DS-1500 DoubleSight
0 question about this device. Answer the ones you know or ask your own.
Ask a new question about this device
Download the instructions for your Monitor in PDF format for free! Find your manual DS-1500 - DoubleSight and take your electronic device back in hand. On this page are published all the documents necessary for the use of your device. DS-1500 by DoubleSight.
USER MANUAL DS-1500 DoubleSight
natural_image
Computer monitor displaying a blue spiral graphic on a dark screen (no text or symbols visible)USER'S MANUAL
DoubleSight™ Dual 15" LCD Monitor
(Model: DS-15xx Series)
For the latest updates and more information, visit our website at www.doublesight.com.
Trademarks
DoubleSight, DoubleSight Displays, the DoubleSight logo, and other DoubleSight trademarks are the property of DoubleSight Displays, LLC and may be registered in the United States and/or other countries.
Microsoft, Windows, and the Microsoft logo are trademarks or registered trademarks of Microsoft Corporation in the United States and/or other countries. Apple and Macintosh are trademarks or registered trademarks of Apple Computer, Inc. in the United States and/or other countries. Energy Star is a U.S. registered trademark. All other product names, logos, designs, or titles mentioned within this manual may be trademarks of their respective owners.
Disclaimer
DOUBLESIGHT DISPLAYS, LLC MAKES NO WARRANTIES, EITHER EXPRESS OR IMPLIED, REGARDING THIS MANUAL AND THE INFORMATION CONTAINED HEREIN. DOUBLESIGHT DISPLAYS, LLC HEREBY EXPRESSLY DISCLAIMS ANY IMPLIED WARRANTIES OF MERCHANTABILITY OR FITNESS FOR ANY PARTICULAR PURPOSE AND UNDER NO CIRCUMSTANCES SHALL DOUBLESIGHT DISPLAYS, LLC BE LIABLE FOR ANY INCIDENTAL, CONSEQUENTIAL, OR SPECIAL DAMAGES, WHETHER BASED ON TORT, CONTACT, OR OTHERWISE, ARISING OUT OF OR IN CONNECTION WITH THIS MANUAL, INFORMATION CONTAINED HEREIN, OR THE USE THEREOF.
Copyright © 2003-2004 DoubleSight Displays, LLC. All rights reserved. This manual may not be copied, photocopied, reproduced, translated, or converted to any electronic form in whole or in part without prior written consent of DoubleSight Displays, LLC.
DoubleSight Displays, LLC reserves the right to make any modification to this manual or the information contained herein at any time without notice. DoubleSight Displays, LLC assumes no responsibility for errors or omissions in this manual. For the latest modifications and more information, visit our website at http://www.doublesight.com.
Third Edition: January 2004
DoubleSight Displays, LLC
1440 North Harbor Blvd., Suite 305
Fullerton, CA 92835, U.S.A.
TEL: 1-877-TwoLCDs (1-877-896-5237) (U.S. only)
E-mail: info@doublesight.com
Contents
Contents ...... i
Notice to Users .... 1
Important Safety Instructions .... 1
Important Notices Regarding Power Cord.... 1
For the United States and Canada.... 2
For European Countries 2
For The United Kingdom 2
CE Conformity for Europe 3
Additional Safety Information...... 4
Power Connection.... 4
Installation and Maintenance.... 4
Using the Tilt & Swivel 5
Transporting the Monitor 5
Introduction 7
DoubleSight Features.... 7
A Clear View to Productivity 7
Cost-Effective Solution to Display Continuity ...... 7
"Smart Control" Technology 7
Stylish, Yet Sturdy Design 8
Contents in the Box 8
DoubleSight Monitor Overview.... 9
Front 9
Rear 10
Side....10
Setting Up Your Monitor.... 11
Connecting the Display to Base Stand ....11
Connecting the Monitor to a Computer ....12
Setting Up Computer Display Properties ....15
For Microsoft Windows Users....15
For Apple Macintosh Users ....16
AUTO Setting 16
Removing Base Stand from the Display .....17
Key Function Controls.... 19
Working with OSD Functions .....19
Source Select....20
Brightness 21
Contrast....22
Color 22
User Mode 23
Position....24
Image....25
Misc Menu 26
Reset 26
Language 26
OSD Position....27
System Information 27
Recommended Use 29
Placement 29
Ergonomics....30
Technical Information.... 31
Product Specifications (Model: DS-15xx) ....31
Display....31
Input Signals 31
Connections....31
User Controls 32
Power 32
Operating Conditions....32
Physical Characteristics 32
Application Video Timing....33
VESA Modes....33
IBM Modes....33
MAC Modes....34
Troubleshooting & Support 35
Warning Messages....35
Troubleshooting Checklist 36
Support Options 37
Returning for Repair Service 38
Limited Warranty.... 39
Regulatory Information 43
FCC Compliance 43
User Information 44
(This page is left blank intentionally)
Notice to Users
Important Safety Instructions
Please carefully read the following safety instructions as they are designed to reduce the risk of electric shock, personal injury or damage to the LCD monitor.
! WARNING
This device must be operated with the original power supply, part number: HJC HASU05F.
CAUTION: The socket-outlet should be installed near the equipment and should be easily accessible.
CAUTION: Use a power cable that is properly grounded. Always use the appropriate AC cord that is certified for the individual country. Some examples are listed below:
USA .... UL Switzerland ..... SEV
Canada ..... CSA Britain ..... BASE/BS
Germany .... VDE Japan .... Electric Appliance Control Act
Important Notices Regarding Power Cord
The power cord set for this unit has been enclosed, was selected according to the country of destination and must be used to prevent electric shock. Use the following guidelines if it is necessary to replace the original cord set, or if the cord set is not enclosed. The
female receptacle of the cord set must meet IEC-60320 requirements and may look like (Figure A1 below):


For the United States and Canada
In the United States and Canada, the male plug is a NEMA5-15 style (Figure A2), UL Listed, and CSA Labeled. For units that are mounted on a desk or table, type SVT or SJT cord sets may be used. For units that sit on the floor, only SJT type cord sets may be used. The cord set must be selected according to the current rating for your unit. Please consult the table below for the selection criteria for power cords used in the United States and Canada.
| Code Type | Size of Conductors in Cord | Maximum Current Rating of Unit |
| SJT | 18 AWG | 10 Amps |
| 16 AWG | 12 Amps | |
| 14 AWG | 12 Amps | |
| SVT | 18 AWG | 10 Amps |
| 17 AWG | 12 Amps |
For European Countries
In Europe, you must use a cord set which is appropriate for the receptacles in your country. The cord set is HAR-certified, and includes a special mark that appears on the outer sheath or on the insulation of one of the inner conductors.
For The United Kingdom
For your safety please read the following text carefully. If the fitted molded plug is unsuitable for the socket outlet, then the plug should be cut off and disposed of safely. There is a danger of severe electrical shock if the cut off plug is inserted into an appropriate socket. If a new plug is to be fitted, please observe the wiring code as shown below. Please consult a qualified electrician if you have any questions.

WARNING
This appliance must be grounded.
IMPORTANT: The wires in the main lead are colored in accordance with the following codes:
Green-and-Yellow: Grounded
Blue: Neutral
Brown: Live
If the colored wires of the main lead of this appliance do not correspond with the colored markings identifying the terminals in your plug, proceed as follows:
- The wire which is colored GREEN-AND-YELLOW must be connected to the terminal in the plug which is marked by the letter E or by the Earth symbol (for grounded) or colored GREEN or GREEN-AND-YELLOW.
- The wire which is colored BLUE must be connected to the terminal in the plug which is marked with the letter N or colored BLACK. The wire which is colored BROWN must be connected to the terminal in the plug which is marked with the letter L or colored RED.
If you have any questions concerning the proper power cord to use, please consult the dealer where you purchased the product.
CE Conformity for Europe
This device complies with the requirements of the ECC directive 89/336/EEC as amended by 92/31/EEC and 93/68/EEC Art.5 with regard to “Electromagnetic Compatibility”, and 73/23/EEC as amended by 93/68/EEC Art.13 with regard to “Safety”.

Additional Safety Information
To prevent fire or shock hazards, do not expose this monitor to rain, moisture or liquids. Use only a properly grounded plug and receptacle. Do not use this unit's polarized plug with an extension cord receptacle or other outlet unless the prongs can be fully inserted.
DO NOT OPEN THE MONITOR. Opening or removing the monitor covers may expose the user to dangerous shock hazards or other risks. There are no user-serviceable parts inside. Refer all servicing needs to an authorized reseller.
Power Connection
- Only use the correct power cord for your local voltage.
- Use an accessible outlet close to the monitor.
- Damage to the power cord may cause shock or fire.
- Do not bend the plug and wire nor place any heavy objects on the power cord to avoid damage, electric shock or fire.
-
Disconnect the monitor's power cord from the power supply outlet if:
-
The cord becomes damaged or frayed
- The monitor has been dropped or damaged
- You will not use the monitor for an extended period
- A distinct change in performance indicates a need for servicing
- During storms or lightening.
- All cables connected to this monitor must be shielded and grounded. Operation with cables that are not shielded and grounded may result in interference to radio and television reception.
Installation and Maintenance
- Do not place the monitor on an unstable surface or table, or drop the monitor while moving it.
- Do not cover or block the ventilation ports on the rear of the monitor to avoid breakdown or fire.
- Do not install the monitor near heat sources, such as radiators or air ducts, or in locations exposed to direct sunlight, excessive dust, mechanical vibration or shock.
- Do not place the monitor faced down to avoid damage to the TFT-LCD surface.
- Do not clean the monitor using any abrasive materials or solvents, such as alcohol or benzene. Clean the monitor cabinet, controls and screen with a lint-free, non-abrasive cloth lightly moistened with a mild detergent solution.
- Do not rub, touch or tap the surface of the screen with sharp or abrasive items such as pens or screwdrivers to avoid scratching the TFT-LCD surface.
- Do not insert objects of any kind into the monitor's ventilation slots to avoid touching dangerous voltage points, which can be harmful or may cause electric shock, fire or equipment failure.
Using the Tilt & Swivel
Use the monitor's tilt and swivel capability to adjust its vertical and horizontal orientation to an appropriate position. To avoid damage, do not force the display beyond its natural stop-position limits (0\~+20° for tilt; -45\~+45° for swivel).
NOTE
Grip the top corners of the monitor with both hands and tilt to the desired angle.
Transporting the Monitor
When transporting the monitor for repair or shipment, use the original carton and packing materials.
(This page is left blank intentionally)
Introduction
Congratulations on your purchase of DoubleSight, an innovative dual LCD monitor. DoubleSight is designed to harness your information and computing power utilizing unique multiple monitor technology that will enhance your viewing and productivity experience!
By connecting two 15-inch LCD monitor panels side-by-side and using a single “smart” base stand, DoubleSight gives you large monitor real estate in a small footprint at a very affordable price!
DoubleSight Features
A Clear View to Productivity
DoubleSight seamlessly displays as much data as a single 20-inch monitor! You can have an instantly clear view of your programs and documents instead of time-consuming switching between windows. DoubleSight gives you speedy reactions to managing several sources of information—and boosts your overall productivity by approximately 20 to 50 percent! It’s that easy!
Cost-Effective Solution to Display Continuity
Investment in a single, large CRT or expensive LCD monitor is not always effective. DoubleSight is designed to eliminate the wasted desktop space and excess electricity usage typical with CRT monitors. The powerful combination of DoubleSight's productivity gains and cost savings can give you a quick return on investment within weeks!
"Smart Control" Technology
DoubleSight gives you easy one-stop access for controlling dual displays! An intuitive menu-driven on-screen display lets you select
how you want to set up each LCD display. DoubleSight's multi-screen control technology and industrial design employ a single controlling motherboard that seamlessly manages and adjusts the display of multiple monitors. By simply distributing or replicating signals to both display panels, you have the ability to display a different window on each monitor panel at the same time, or stretch windows across two monitors so you can see more information without scrolling. Imagine how easy it would be to use one monitor to do research on the Web, and summarize your data in a Word document on the other monitor panel.
Stylish, Yet Sturdy Design
DoubleSight combines a stylish appearance with a unique, light yet sturdy design that requires a minimum of desk space. Its simplified, slim flat design lets you choose to install DoubleSight on a desk, wall-mount it or hang it from an office cubicle!
Contents in the Box
Your new DoubleSight monitor box ^* should contain the following:
• DoubleSight DS-15xx Dual LCD monitor
- Power Adapter
- Two Video Signal Cables (15-pin D-sub Type)
• Ergonomic Tilt/Swivel Base
- User's Manual
- Quick Start Guide
* Please save your original box and packing materials for transporting or shipping the monitor.
DoubleSight Monitor Overview
Front

text_image
SELECT LED Indicator POWER LED Indicator LEFT SELECT POINT MENU EDIT ALFD POWER| SELECT The | SELECT button is a single control function for selecting the On-Screen Display menu of left-side panel, right-side panel, or both panels. |
| SELECT LED Indicator | Green LEDs indicate the On-Screen Display menu's operational mode for left-side panel, right-side panel, or both panels;Amber LEDs indicate power saving mode. |
| MENU MENU | is the main program button that opens the On-Screen Display window and allows you to select a function, option or value. |
| ◀ Left control | navigates within the On-Screen Display or moves the selected bar to decrease the adjustment. |
| ▶ Right control | navigates within the On-Screen Display or moves the selected bar to increase the adjustment. |
| EXIT The EXIT | button saves your settings, exits the On-Screen Display window and returns to upper level menu. |
| AUTO The AUTO button automatically adjusts the display settings. | |
| POWER The POWER button turns the monitor on and off. | |
| POWER LED Indicator | A green LED indicates the monitor is on. |
Rear

text_image
Wall mounting holes VESA-compliant mounting holes DC-01 VISA VISA1| VGA1 | Connects the first video signal cable |
| VGA2 Connects the second video signal cable | |
| DC-IN Connects the power jack | |
Side
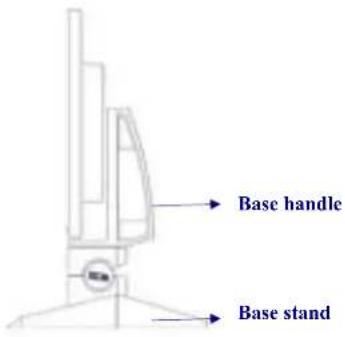
text_image
Base handle Base standSetting Up Your Monitor
Prior to setting up your DoubleSight monitor, it is important to select a location where it will be stable and protected, yet convenient to use. You will need a flat, hard surface, such as a sturdy desk or table, located near a power outlet.
! WARNING
To allow sufficient airflow and prevent overheating, do not block the ventilation ports located on the rear of the monitor. Do not install the monitor near heat sources, such as radiators or air ducts, or in locations exposed to direct sunlight, excessive dust, mechanical vibration or shock.
Connecting the Display to Base Stand
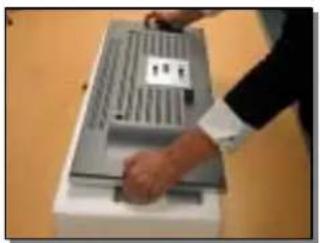
Remove the bottom layer of foam packing material in the box and place on a flat surface. Remove the plastic wrapper bag from the display. Using both hands, firmly grip each outer edge of the dual display frame and place face down on top of the foam packaging. This surface will provide a secure position for proceeding to the next step.
natural_image
Person inserting a card into a device (no visible text or symbols)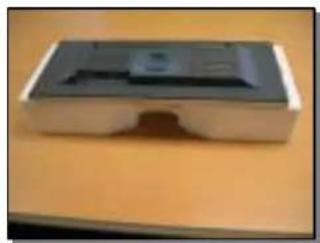
natural_image
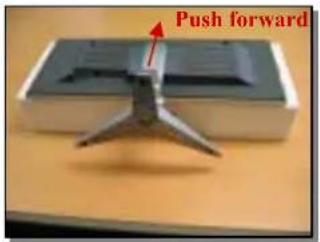
Exterior view of a rectangular electronic device with a central slot and mounting bracket (no visible text or symbols)Holding the base stand handle, insert its three prongs (located on the handle's reverse side) straight down into the three holes on the display's back silver face plate. To secure the prongs into a locked position, push the stand forward until it connects to the display securely. Using both hands, firmly grip the combined display with stand and place upright on a desk with the monitor's back panel facing you. Please ensure that the display and base are securely connected before moving.
text_image
Push forward
natural_image
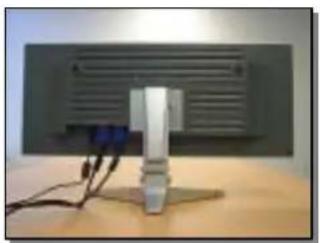
Exterior view of a modern office building (no signage)Connecting the Monitor to a Computer
Locate the blue video signal adapter cables marked 1 and 2. With the small monitor icon facing towards you, insert the blue VGA cable 1 into the monitor's VGA-1 port (right), and then the VGA cable 2 into the VGA-2 port (left). Tighten each of the blue screws to secure.
Next, locate the black power cable and insert it into the monitor's DC-IN port with the ↑ arrow icon facing towards you. Connect the opposite end into a power outlet.
natural_image
Computer monitor with ventilation grille and stand, no visible text or symbols on the device itself
natural_image
Close-up of two blue USB connectors attached to a wall-mounted panel (no visible text or symbols)! WARNING
Only use the correct power cord for your local voltage. The power adapter included in the box automatically supports 100V\~240V.
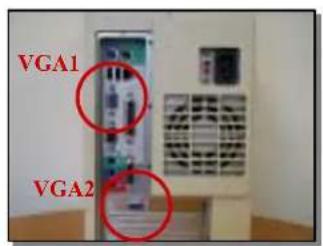
Depending on the configuration of your computer, there are different methods for connecting it to your DoubleSight monitor. If your computer already has two VGA ports, connect the opposite ends of the VGA 1 and 2 cables into each VGA port. If your computer has one VGA port and a DVI port, you will need a DVI-VGA connector.
text_image
VGA1 VGA2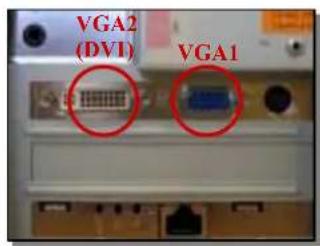
text_image
VGA2 (DVI) VGA1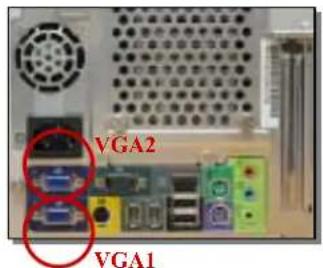
text_image
VGA2 VGA1
text_image
VGA1 VGA2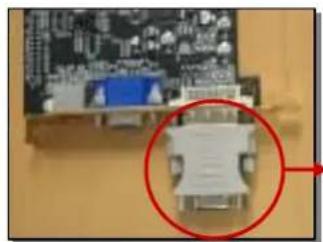
natural_image
Close-up of a computer monitor with an electronic device and a magnified view of its internal components (no visible text or symbols)DVI-VGA connector
NOTE
If your computer does not specify VGA 1 and 2, you can change the order later using your computer display setting or monitor On-Screen Display setting. Refer to the "Setting Up Computer Display Properties" of this section and "Source Select" of "Key Function Controls" section of this User's Manual.
If your computer has only one VGA port, you will need to install an additional graphics card to support a dual monitor. Refer to the "Troubleshooting & Support" section of this User's Manual for details. Additionally, DoubleSight may be connected to two separate computers by attaching one VGA cable to each computer.

text_image
Computer1 Computer2With the two VGA signal cables connected to the computer, turn on the computer. Press the power switch on the monitor. The display should appear.
NOTE
If this is the first time for a dual monitor configuration with your computer, you may need to set up your computer display properties. Refer to the next section. If no display appears even after setting up your computer display properties, refer to the "Warning Messages and Troubleshooting Checklist" in the "Troubleshooting & Support" section of this User's Manual.
Setting Up Computer Display Properties
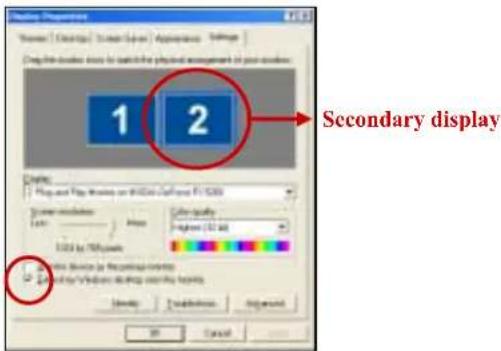
For Microsoft Windows Users
Click the Start button in Windows, then select Settings > Control Panel > Display. On the Settings tab, click the monitor icon that represents the monitor you want to extend your desktop to. Select the "Extend my Windows desktop onto this monitor" checkbox and click Apply or OK.
text_image
Display Properties Shower | ClearType | Screen Type | Appearance | Settings Play the number series to switch the physical appearance in your position. 1 2 Secondary display Options: Play and Play Numbers on Windows Display (F:\100) Power mode: 1.000 MHz Color quality: Highest (32 dB) 100% by 75% pixels Device type (or frequency controls) Operating/Windows display using this device. OK CancelIf you have an OUT OF RANGE message on the secondary display, you may need to adjust its refresh rate. Click the Advanced button on the Settings tab of Display Properties Windows, and then select 75Hz from the list of Screen refresh rate on the Monitor tab. Click Apply or OK to apply the change.

You can rearrange the position of display 1 and 2 without physically switching video adapter signal cables. Simply drag a monitor icon (1 or 2) to a desired position on the Settings tab of Display Properties Windows and select Apply or OK.
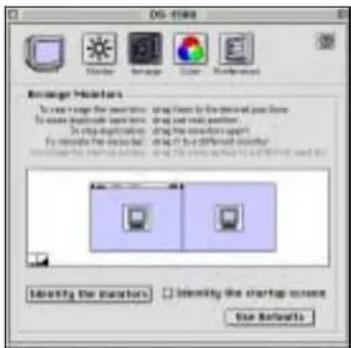
For Apple Macintosh Users
Choose System Preferences from the Apple menu and click Displays. Click the Arrange tab and follow the on-screen instructions to set up the secondary display.
text_image
DOS-8108 Message Posters To save a range the seconds, using time to the next year from To create duplicate the seconds, drag out next seconds. To drop off the second time, drag out the second time again. By removing the second time, drag out the different seconds. Identify the posters Identify the startup screen Use WebpageAUTO Setting
Each LCD panel of your DoubleSight monitor is preset at 1024 x 768 pixels at 75 Hz. While full customization is available, it is strongly recommended that you use the AUTO settings that will automatically adjust display settings to fully optimize your monitor's performance. Simply press the SELECT button three times to choose both panels, and press the AUTO button to engage the AUTO settings. It will make necessary changes to your display settings.
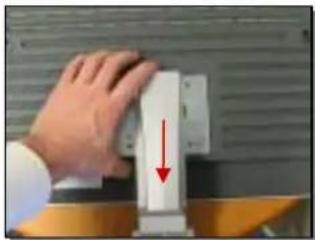
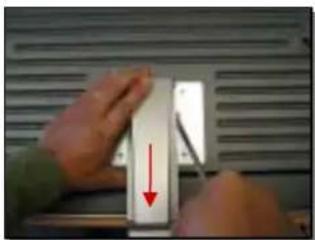
Removing Base Stand from the Display
If you need to disconnect the base stand from the display, use the bottom layer of foam packaging in the box as a secure material to protect the LCD panels. Using both hands, firmly grip each outer edge of the dual display frame and place face down on top of the foam packaging.
Push the base stand handle backward with your left hand. The base stand will be released from the display. If the base stand is not released easily, press the pin in the middle hole on the display's back silver face plate (right side of the base stand handle) using a tool such as a screw driver and push the base stand handle backward.
natural_image
Hand pressing a white object on a wooden table, with a red arrow indicating downward motion (no text or symbols visible)Push backward
natural_image
Close-up of hands holding a white rectangular object with a red arrow pointing downward, against a gray corrugated wall (no text or symbols visible)Push backward
NOTE
DoubleSight monitor supports VESA (Video Electronics Standards Association, display and display interface standard)-compatible mounting method. You can use alternative mounting brackets from other vendors to hold your DoubleSight monitor. For safety, the DoubleSight monitor must be mounted to an arm that guarantees stability under consideration of the weight of the display (5.4 kg or 12 lbs).
(This page is left blank intentionally)
Key Function Controls
DoubleSight features an intuitive, menu-driven On-Screen Display (OSD) that provides a full range of customizable tools to optimize your display. The OSD can be accessed anytime your computer is powered up. (Note: If your computer is in a power saving mode or is powered down, the OSD will be inaccessible.)
Working with OSD Functions
To work with OSD functions:
- By pressing the SELECT button, you can control the left, right, or both panels of your DoubleSight monitor.
- After selecting one panel or both panels, press MENU to open the OSD window. If both panels are selected, only Brightness and Contrast are available for simultaneous adjustments of the two panels. The other OSD functions will be inactive.
- The OSD functions are represented by seven icons across the top of the OSD display. From left to right, the OSD menu functions include:
| Source Select Select video signal source (VGA1, VGA2, or None) | |
| Brightness Adjust brightness of the display | |
| Contrast Adjust contrast of the display | |
| Color Adjust color mixture of the display | |
| Position Change horizontal/vertical position of the display | |
| Image Adjust image performance of the display | |
| Misc Menu Miscellaneous menus including language settings |
-
To scroll through the OSD functions, press the LEFT ◀ or RIGHT ▶ buttons until the desired function's icon is highlighted and its settings are listed.
-
Press the MENU button to select a function. If more than one setting is listed, use the LEFT ◀ or RIGHT ▶ button to make your selection within the selected function.
- Press the LEFT ◀ or RIGHT ▶ button to change the settings as described under each menu function in the following section.
- Press the EXIT button to save your settings.
- Press the EXIT button again until you completely exit the OSD.
Source Select
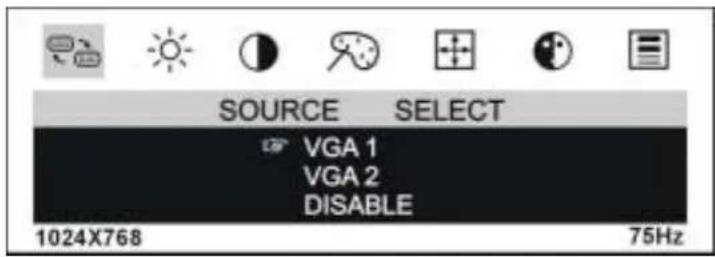
text_image
SOURCE SELECT VGA 1 VGA 2 DISABLE 1024X768 75Hz- Press the LEFT ◀ or RIGHT ▶ button until the Source Select icon is highlighted.
- Press the MENU button to select the Source Select.
- Press the LEFT ◀ or RIGHT ▶ button to move between the options.
- Press the MENU button to engage the setting.
! WARNING
If DISABLE is selected, the display will be turned off after showing a NO SIGNAL sign. The LED indicator for the corresponding panel will turn to amber. To return the panel to the original source, simply press the MENU button.
USEFUL TIP
You can easily change video signal source by simply pressing the LEFT ◀ or RIGHT ▶ button without entering the OSD window. Just press the LEFT ◀ or RIGHT ▶ button anytime to switch video signal source between VGA1 and VGA2 for the corresponding panel.
Brightness
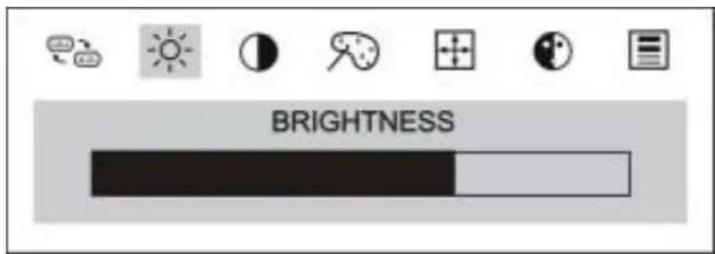
text_image
BRIGHTNESS-
Press the LEFT ◀ or RIGHT ▶ button until the Brightness icon is highlighted.
-
Press the MENU button to select the Brightness icon.
-
Press the LEFT ◀ or RIGHT ▶ button to set the brightness on the 0-100 scale.
-
Press the EXIT button to save settings.
Contrast

text_image
CONTRAST- Press the LEFT ◀ or RIGHT ▶ button until the Contrast icon is highlighted.
- Press the MENU button to select the Contrast icon.
- Press the LEFT ◀ or RIGHT ▶ button to set the contrast on the 0-100 scale.
- Press the EXIT button to save settings.
Color
You can choose from two pre-defined color settings: 9300K for slightly bluish-white and 6500K for slightly reddish-white. The default factory setting is 9300K. To customize your display, select User Mode.

text_image
COLOR 9300K 6500K User Mode-
Press the LEFT ◀ or RIGHT ▶ button until the Color icon is highlighted.
-
Press the MENU button to select the Color icon.
-
Press the LEFT ◀ or RIGHT ▶ button to move between the options.
-
Press the MENU button to change the setting. Notice the "Pointing hand" moves to the new selection.
-
Press the EXIT button to save settings and return to the function selection menu.
User Mode
The RGB Adjust lets you adjust the red, green, and blue values according to your preference or specific application.

text_image
USER MODE RGB ADJUST-
Press the LEFT ◀ or RIGHT ▶ button to select the User Mode from the Color menu.
-
Press the MENU button to open the above User Mode menu.
-
Press the MENU button to select RGB ADJUST; then push the MENU button to open the following menu:
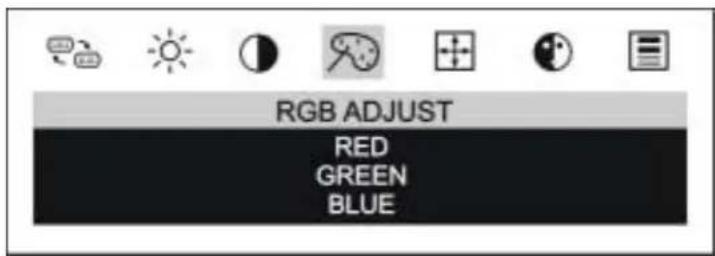
text_image
RGB ADJUST RED GREEN BLUE- Press the LEFT ◀ or RIGHT ▶ button to select the color category.
- Press the MENU button to select the RED, GREEN or BLUE option.
- Press the LEFT ◀ or RIGHT ▶ button to set each color as desired on the 0-100 scale.
- Press the EXIT button to save settings and return to the User Mode menu.
- Press the EXIT button to return to the function selection menu.
Position
Use this setting to fine-tune the display's horizontal or vertical position on the monitor screen.

text_image
POSITION H-POSITION V-POSITION-
Press the LEFT ◀ or RIGHT ▶ button until the Position icon is highlighted.
-
Press the MENU button to select the Position menu.
-
Press the LEFT ◀ or RIGHT ▶ button to choose between the H-POSITION and V-POSITION; then press the MENU button to select the option.
-
Press the LEFT ◀ or RIGHT ▶ button to set the display as desired on the 0-100 scale that appears.
-
Press the EXIT button to save the settings and return to the Position menu.
-
Press the EXIT button to return to the function selection menu.
Image
Use the image settings to adjust the sharpness, white balance, and to fine-tune picture performance to compensate for drifts in the computer signal. PHASE adjusts the focus of the display image; CLOCK minimizes vertical stripes on the display background.
text_image
IMAGE PHASE CLOCK-
Press the LEFT ◀ or RIGHT ▶ button until the Image icon is highlighted.
-
Press the MENU button to select the Image menu.
-
Press the LEFT ◀ or RIGHT ▶ button to choose between PHASE and CLOCK; then press the MENU button to select the option.
-
Press the LEFT ◀ or RIGHT ▶ button to set the display as desired on the 0-100 scale that appears.
-
Press the EXIT button to save settings and return to the Image menu.
-
Press the EXIT button to return to the function selection menu.
Misc Menu
The Misc Menu lets you access sub-menus that include Reset, Language, OSD Position, and the read-only System Information screen.
text_image
MISC MENU RESET LANGUAGE OSD POSITION SYSTEM INFORMATION- Press the LEFT ◀ or RIGHT ▶ button until the Misc Menu icon is highlighted.
- Press the MENU button to select Misc Menu.
Reset
Reset lets you return the display's settings to the factory defaults.
- Press the LEFT ◀ or RIGHT ▶ button until Reset is highlighted.
- Press the MENU button to select Reset.
- Press the LEFT ◀ or RIGHT ▶ button to toggle between YES and NO.
- Press the MENU button to select YES or NO.
- Press the EXIT button to save settings and return to the Misc Menu.
Language
The Language setting lets you select from seven languages for the OSD (Chinese, Japanese, English, German, French, Italian, Spanish).
- Press the LEFT ◀ or RIGHT ▶ button until Language is highlighted.
- Press the MENU button to select Language.
- Press the LEFT ◀ or RIGHT ▶ button to scroll through the languages shown.
- Press the MENU button to select OSD language.
- Press the EXIT button to save settings and return to the Misc Menu.
OSD Position
The OSD Position setting lets you change the location of the OSD window on your monitor.
- Press the LEFT ◀ or RIGHT ▶ button until OSD Position is highlighted.
- Press the MENU button to select OSD Position.
- Press the LEFT ◀ or RIGHT ▶ button to choose between H-Position and V-Position; then press the MENU button to select the option.
- Press the LEFT ◀ or RIGHT ▶ button to move the display through its available positions on the 0-100 scale.
- Press the EXIT button to save settings and return to the OSD Position menu.
System Information
Select System Information from the menu to display the monitor's current settings on horizontal frequency, vertical frequency, and resolution. (Note: This is a display-only screen.)
(This page is left blank intentionally)
Recommended Use
Placement
Correct placement and adjustment of the monitor can reduce eye, shoulder, and neck fatigue. Check the following when you position the monitor:
- Keep the top of the monitor screen at or slightly below eye level. Your eyes should look slightly downward when viewing the middle of the screen.

text_image
It is recommended that you keep the screen below your eye level.- Position your monitor no closer than 16 inches and no further away than 30 inches from your eyes. The optimal distance is 25 inches.
- Position the monitor at a 90° angle to windows and other light sources to minimize glare and reflections. Adjust the monitor tilt so that ceiling lights do not reflect on your screen.
- Use a document holder placed close to the screen.
- Position whatever you are looking at most of the time (the screen or reference material) directly in front of you to minimize turning your head while you are typing.
Ergonomics
To realize the maximum ergonomics benefits, we recommend the following:
- Use the preset Position and Image controls.
- Use the preset Color setting.
- Use non-interlaced signals with a vertical refresh rate between 60-75Hz.
- Do not use primary color blue on a dark background, as it is difficult to see and may produce eye fatigue to insufficient contrast.
Technical Information
Product Specifications (Model: DS-15xx)
Display
| Panel Type Dual 15" TFT-LCD | |
| Viewable Area 608.2mm (24 inches) horizontal; 228.1mm (9 inches) vertical | |
| Resolution 2048 x 768 max. | |
| Colors 16M max. | |
| Brightness 250 cd/m2 | |
| Contrast Ratio 400:1 | |
| Pixel Pitch 0.297mm | |
| Pixel Configuration R,G,B vertical stripe | |
| Response Time 25 ms (Tr+Tf) | |
| Viewing Angle -65~+65° horizontal; -45~+55° vertical | |
| Glass Treatment Anti-glare, hard coating | |
| Lamp Life 30,000 hours min. | |
Input Signals
| Video Analog 0.7 Vp-p; 75 ohms | |
| Frequency 31.5~60.0 KHz horizontal; 56~75 Hz vertical | |
| Sync TTL, positive/negative, separate sync. |
Connections
| Video Connectors Two | 15-pin D-sub type |
User Controls
| Manual Control Buttons | SELECT, MENU, ◀, ▶, EXIT, AUTO, POWER |
| On-screen Display Functions | Select Source, Brightness, Contrast, Color, Position (horizontal/vertical), Image (phase, clock), Misc. Menu (reset, language, OSD position, system information) |
Power
| Voltage Input: AC 100~ | 240V, 50~60Hz; Output: DC+12V, 4.0A max. |
| Consumption 45W max.; 5W max. standby/suspend/off mode | |
| Power Management On: <45 Watts (Green LED); Suspend: <5 Watts (Amber LED); Standby: <5 Watts (Amber LED); Off: <5 Watts (Amber LED) | |
Operating Conditions
| Temperature 32~104°F; 0~+40°C | |
| Humidity 90% max. | |
Physical Characteristics
| Dimensions | 683mm (26 ^7/8 ")W x 397mm (15 ^5/8 ")H x 248mm (9 ^3/4 ")D |
| Weight (including aluminum stand) | 6.3 kg (14 lbs.) (including aluminum base) |
| Tilt/Rotation 0~+20° vertical; -45~+45° horizontal | |
Application Video Timing
VESA Modes
| Mode Resolution Total | Horizontal Vertical | Nominal Pixel Clock (MHz) | ||||
| Nominal Frequency +/- 0.5KHz | Nominal Frequency +/- 1Hz | |||||
| DOS | 720x400@70Hz | 900x449 | 31.500 | 70.000 | 28.322 | |
| VGA | 640x480@60Hz | 800x525 | 31.469 | 59.940 | 25.175 | |
| 640x480@72Hz | 832x520 | 37.861 | 72.809 | 31.500 | ||
| 640x480@75Hz | 840x500 | 37.500 | 75.000 | 31.500 | ||
| SVGA | 800x600@56Hz | 1024x625 | 35.156 | 56.250 | 36.000 | |
| 800x600@60Hz | 1056x628 | 37.879 | 60.017 | 40.000 | ||
| 800x600@72Hz | 1040x666 | 48.077 | 72.188 | 50.000 | ||
| 800x600@75Hz | 1056x625 | 46.875 | 75.000 | 49.500 | ||
| XGA | 1024x768@60Hz | 1344x804 | 48.363 | 60.004 | 65.000 | |
| 1024x768@70Hz | 1328x806 | 56.476 | 70.069 | 75.000 | ||
| 1024x768@75Hz | 1312x800 | 60.023 | 75.029 | 78.750 | ||
IBM Modes
| Mode Resolution Total | Horizontal | Vertical | Nominal Pixel Clock (MHz) | ||
| Nominal Frequency +/- 0.5KHz | Nominal Frequency +/- 1Hz | ||||
| EGA | 640x350@70Hz | 800x449 | 31.469 | 70.086 | 25.175 |
| DOS | 720x400@70Hz | 900x449 | 31.469 | 70.087 | 28.322 |
| VGA | 640x480@60Hz | 800x525 | 31.469 | 59.940 | 25.175 |
| XGA | 1024x768@72Hz | 130 | 4x798 | 57.515 | 72.100 |
MAC Modes
| Mode Resolution Total | Horizontal | Vertical | Nominal Pixel Clock (MHz) | ||
| Nominal Frequency +/- 0.5KHz | Nominal Frequency +/- 1Hz | ||||
| VGA | 640x480@60Hz | 800x525 | 31.469 | 59.940 | 25.175 |
| SVGA | 832x624@75Hz | 1152 | x667 | 49.725 | 74.551 |
| XGA | 1024x768@75Hz | 1328 | x804 | 60.241 | 74.927 |
NOTE
The DS-15xx has two LCD panels that generate a 2048 x 768 resolution together; each panel can be set to a maximum of 1024 x 768.
Troubleshooting & Support
Warning Messages
| Message Solution | |
| OUT OF RANGE The input signal is not acceptable by the monitor.- Please ensure that the video resolution and refresh rate of the graphics card in your computer are within specified ranges for the monitor.- Please check your computer's display settings and change the screen refresh rate properly. For Windows users, press the Advanced button on the Settings tab of Display Properties Window. And then, change the refresh rate of Monitor settings on the Monitor tab to 75Hz.- Please refer to the “Technical Information” section of this User’s Manual to see supported frequency ranges. | |
| NO SIGNAL No signal inputs are detected from the VGA connector.- Check that your computer is ON.- Check that the video signal cable is properly connected.- Ensure that no pins are bent or pushed in the video input connector. | |
| AUTO CONFIG The monitor is detecting the input signal and automatically adjusting the monitor settings.- It takes approximately 5 seconds to finish the entire process.- It is recommended that you auto-adjust by pressing the Auto button every time you change the resolution or refresh rate. | |
| CABLE NOT CONNECTED | The VGA cable is not connected to the computer.- Check that VGA cable is connected to the computer tightly. |
Troubleshooting Checklist
| Symptom Check Items | |
| Computer has only one VGA port | - You need to install an additional graphics card to enable a dual monitor configuration. Check our website atwww.doublesight.com/supportfor recommendations and requirements of selected graphics cards.- If available, consult your computer administrator or supplier for assistance in selecting and installing an additional graphics card. |
| No picture; POWER LED Indicator is not lit | - Check that the monitor power switch is turned on.- Check that the power adapter is properly connected to the monitor.- Check that the power cord is properly connected to the power adapter.- Check that the power cord is properly connected to the power outlet.- Check that there is electrical power coming from the power outlet. Use another device to check for power. |
| No picture; The POWER LED Indicator is green and the SELECT LED Indicator is amber | - Ensure that the computer is not in a power saving mode. (Move the mouse or press a key on the keyboard to wake up the computer.)- Check that your computer is ON.- Check that the video signal cable is properly connected. |
| Text is not solid | - Ensure that the resolution of the video signal is 1024 by 768. Lower resolution may produce distorted display due to automatic expansion of the display.- Select the corresponding panel and press the AUTO button to run automatic adjustment.- Adjust Clock and Phase in the OSD menu to fine tune. (Please refer to the “Key Function Controls” section of this User’s Manual for details.) |
| Screen image is not centered properly; Some lines are missing | - Select the corresponding panel and press the AUTO button to run automatic adjustment.- Adjust H-Position and V-Position to fine tune. (Please refer to the “Key Function Controls” section of this User’s Manual for details.) |
| There are tiny red, green, blue or black dots on the screen. | - The TFT LCD panel consists of millions of small transistors. Defective transistors will each cause a missing red, green or blue dot.- We follow the industry quality standard set by major LCD panel manufacturers. It is customary that some panels have a few defective transistors. These panels are not considered bad quality and you can use them without uncasiness.DoubleSight Displays considers more than six defective transistors per panel to be defective and thus eligible for repair within a one-year warranty period. |
Support Options
If you have any technical questions or concerns about your DoubleSight monitor, it is recommended that you first contact the authorized reseller where you purchased your monitor. Technicians of the authorized reseller will be able to answer most of your questions and solve any problems. In addition, you can visit our website to find additional information. You may also email us directly at support@doublesight.com or call the number below. You
will need to provide the product serial number located on the back of your monitor and proof of purchase to verify your warranty status if you have not registered your monitor within 30 days of purchase.
For technical support (in U.S.A. and Canada):
• Technical Support Line: 1-877-TwoLCDs (1-877-896-5237)
• Hours: 9:00 a.m. – 5:00 p.m. PST (Monday - Friday)
Returning for Repair Service
In some cases, you may need to send your DoubleSight monitor for repair by our own technicians at DoubleSight Displays. Prior to sending your monitor to our repair facility, you will need to obtain a Return Merchandise Authorization (RMA) number. Please call our technical support department at 1-877-TwoLCDs (1-877-896-5237) to make return arrangements and receive special instructions.
Limited Warranty
INTRODUCTION
This Warranty covers DoubleSight Displays, LLC's ("DSD") DS-15xx DoubleSight Dual 15" LCD Monitors ("Product") sold by DSD or DSD's authorized resellers. DSD provides a limited warranty for the originally purchased Products for use, not resale ("Original Purchase"), located in the United States. No DSD authorized reseller may claim any right or interest under this limited warranty.
LIMITED WARRANTY
DSD warrants this Product to be free from defects in material and workmanship for a period of one (1) year from the date of Original Purchase. Spare parts are warranted for ninety (90) days. Subject to the conditions set forth below, if a Product proves to be defective in material or workmanship during the warranty period, DSD will, at its sole option, repair or replace the Product with a similar Product. Replacement Product or parts may include remanufactured or refurbished parts or components and will meet the specifications of the original parts or unit.
This warranty is extended by DSD only to the original purchaser (“you”) of the Product and is not transferable. During the warranty period, DSD shall provide you with limited telephone technical support providing assistance to you solely for the purpose of defining any problem. Repair or replacement of the Product is limited to the United States.
CUSTOMER RESPONSIBILITIES
As the original purchaser you have thirty (30) days in which to review the contents of the Product's packaging for any missing or broken items. After the first thirty (30) days of ownership, beginning from the date of Original Purchase, a charge will be incurred for replacement of any item you, the original purchaser, may wish to order from DSD. Such charges will include handling and shipping costs incurred for delivery of any such items.
WARRANTY EXCLUSIONS
This warranty does not cover:
- Any Product on which the serial number has been defaced, modified or removed.
- Damage, deterioration or malfunction resulting from:
A. Accident, disaster, misuse, neglect, fire, water, lightning, or other acts of nature, unauthorized product modification, or failure to follow instructions and environment specifications supplied with the Product.
B. Repair or attempted repair by anyone not authorized by DSD.
C. Customer supplied interfacing.
D. Improper site preparation and maintenance.
E. Damage to or loss of any programs, data or removable storage media.
F. Software or data loss occurring during repair or replacement.
G. Any damage of the Product due to shipment.
H. Removal or installation of the Product.
- Causes external to the Product, such as electric power fluctuations or failure.
J. Use of supplies or parts not meeting DSD's specifications.
K. Normal wear and tear.
L. Subjecting the Product to displaying of fixed images for long periods of time resulting in image persistence (afterimage effects) or image burn-in.
M. Any other cause which does not relate to a product defect.
- Removal, installation, and set-up service charges.
HOW TO OBTAIN WARRANTY SERVICE
- For information on warranty service, call DSD customer service toll-free in the U.S.A. by calling 1-877-TwoLCDs (1-877-896-5237), or email DSD at support@doublesight.com.
- To obtain warranty service, you will be required to provide
A. The original dated sales slip.
B. Your name.
C. Your address.
D. The serial number of the product.
E. A description of the problem.
- Bring or ship the Product prepaid and insured in the original container, with the associated accessories, to the DSD depot repair site. All Products returned to the DSD depot repair site for service MUST have prior approval which may be obtained by calling the telephone number above.
DISCLAIMER OF WARRANTIES
THERE ARE NO WARRANTIES, EXPRESS OR IMPLIED, WHICH EXTEND BEYOND THE DESCRIPTION CONTAINED HEREIN. THE WARRANTIES CONTAINED HEREIN ARE IN LIEU OF ALL OTHER WARRANTIES EXPRESS OR IMPLIED, INCLUDING, BUT NOT LIMITED TO, THE IMPLIED WARRANTY OF MERCHANTABILITY AND FITNESS FOR A PARTICULAR PURPOSE. DSD MAKES NO OTHER EXPRESS OR IMPLIED WARRANTY OR CONDITION WHETHER WRITTEN OR ORAL. SOME STATES DO NOT ALLOW THE EXCLUSION OF IMPLIED WARRANTIES SO THE ABOVE EXCLUSIONS OR LIMITATIONS MAY NOT APPLY TO YOU. THIS WARRANTY GIVES YOU SPECIFIC LEGAL RIGHTS AND YOU MIGHT ALSO HAVE OTHER RIGHTS THAT VARY FROM STATE TO STATE.
EXCLUSIVE REMEDIES
THE REMEDIES PROVIDED IN THIS STATEMENT OF LIMITED WARRANTY ARE YOUR SOLE AND EXCLUSIVE REMEDIES. IN NO EVENT, WILL DOUBLESIGHT DISPLAYS, LLC BE LIABLE FOR DIRECT, INDIRECT, INCIDENTAL, CONSEQUENTIAL, OR OTHER TYPES OF DAMAGES RESULTING FROM ANY BREACH OF WARRANTY, OR CONTRACT OR ANY TORT (INCLUDING NEGLIGENCE) OR UNDER ANY OTHER LEGAL THEORY, INCLUDING LOST PROFIT, DOWNTIME, GOODWILL, DAMAGE TO OR REPLACEMENT OF EQUIPMENT AND PROPERTY, AND ANY COSTS OF RECOVERING, REPROGRAMMING, OR REPRODUCING ANY PROGRAM OR DATA SORTED IN OR USED WITH THIS PRODUCT, EVEN IF DSD OR A DSD
AUTHORIZED RESELLER FOR THIS PRODUCT HAS BEEN ADVISED OF THE POSSIBILITY OF SUCH DAMAGES, OR FOR ANY CLAIM BASED ON ANY THIRD PARTY CLAIM. DSD LIABILITY WILL BE NO MORE THAN THE AMOUNT YOU PAID FOR THE PRODUCT THAT IS THE SUBJECT OF A CLAIM. THIS IS THE MAXIMUM AMOUNT FOR WHICH DSD WILL BE RESPONSIBLE. SOME STATES DO NOT ALLOW THE LIMITATION OR EXCLUSION OF LIABILITY FOR INCIDENTAL OR CONSEQUENTIAL DAMAGES SO THE ABOVE EXCLUSIONS OR LIMITATIONS MAY NOT APPLY TO YOU.
This Product is warranted in accordance with the terms of this limited warranty. You are cautioned that Product performance is affected by system configuration, software, the application, customer data, and operator control of the system, among other factors. While DSD Products are considered to be compatible with many systems, specific functional implementation by the original purchaser of the Product may vary. Therefore, suitability of a Product for a specific purpose or application must be determined by the original purchaser and is not warranted by DSD.
Regulatory Information
FCC Compliance
This device complies with Part 15 of the FCC Rules. Operation is subject to the following two conditions: (1) This device may not cause harmful interference, and (2) this device must accept any interference received, including interference that may cause undesired operation.
This equipment has been tested and found to comply with the limits for a Class B digital device, pursuant to Part 15 of the FCC Rules. These limits are designed to provide reasonable protection against harmful interference in a residential installation. This equipment generates, uses and can radiate radio frequency energy and, if not installed and used in accordance with the instructions, may cause harmful interference to radio communications. However, there is no guarantee that interference will not occur in a particular installation. If this equipment does cause harmful interference to radio or television reception, which can be determined by turning the equipment off and on, the user is encouraged to try to correct the interference by one or more of the following measures:
- Reorient or relocate the receiving antenna.
- Increase the separation between the equipment and receiver.
- Connect the equipment to an outlet on a circuit different from that to which the receiver is connected.
- Consult the dealer or an experienced radio/TV technician for help.

FCC WARNING
To assure continued FCC compliance, the user must use a ground power supply cord and the provided shielded video interface cable with bonded ferrite cores. If a BNC cable is going to be used, use only a shielded BNC (5) cable. Any unauthorized changes or modifications not expressly approved by the party responsible for compliance could void the user's authority to operate this device.
User Information
Users may find the following booklet, prepared by the Federal Communications Commission, helpful: "How to Identify and Resolve Radio-TV Interference Problems." This booklet is available from the U.S. Government Printing Office, Washington, D.C. 20402, Stock No. 004-000-00345-4.

DoubleSight DISPLAYS
www.doublesight.com
Part No. TINSE3090D8 V3
Printed in Taiwan