HP-FCLUX - Remote control toy Hyperion - Free user manual and instructions
Find the device manual for free HP-FCLUX Hyperion in PDF.

User questions about HP-FCLUX Hyperion
0 question about this device. Answer the ones you know or ask your own.
Ask a new question about this device
Download the instructions for your Remote control toy in PDF format for free! Find your manual HP-FCLUX - Hyperion and take your electronic device back in hand. On this page are published all the documents necessary for the use of your device. HP-FCLUX by Hyperion.
USER MANUAL HP-FCLUX Hyperion
www.Hyperion-world.com


natural_image
Orange plastic object with a small metallic clip, no visible text or symbolsUSER MANUAL Hyperion F3 LUX FLIGHT CONTROLLER
F3 LUX Flight Controller provides high quality flight control using Hyperion's high standards and technological expertise. Please read this manual before soldering or configuring your Flight Controller.
Hyperion F3 Lux Setup Manual
www.Hyperion-world.com
TABLE OF CONTENTS
Table of Contents 2
Specifications and Features 3
Board Layout Top 3
Board Layout Bottom 4
Basics Hardware Setup 5
Pins Configuration and Connections 5
Software Installation/Setup 8
PID Tuning 8
Firmware Upgrade+ 9
Troubleshooting 11
www.Hyperion-world.com
Specifications and Features
• F3 Processor
- MPU6000 ACC/Gyro Sensor connected with SPI
• Supports 2S-6S LiPo battery Input
- Onboard 5V (2A) /12V voltage regulators with LC Filter
• RX: SBUS, PPM, Spektrum Sat
• 6 ESC output - Supports Hexacopter
• ILAP transponder
- RSSI and Current Sensor Input (still requires an sensor)
• Size: 36mm x 36mm
Although being a stand-alone FC without PDB capability, it has basic 5V BEC as well as 12V voltage regulator (with LC filter). That allows you to power the FC directly from battery, and it cleans up the wiring as you won't need to connect additional VBAT cables. The 12V output can be used to power your FPV gear, a pretty neat solution.
It has a bootloader button for easy firmware flash.
natural_image
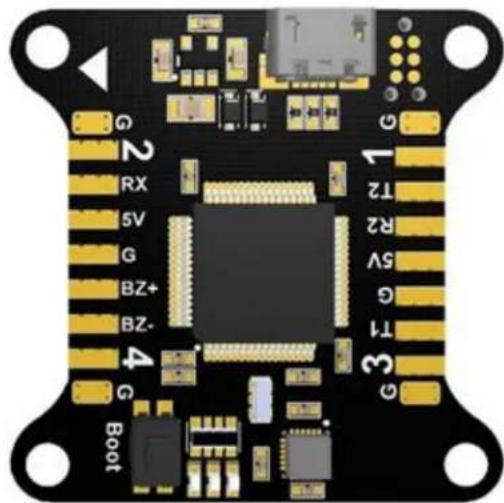
Close-up of a black electronic circuit board with gold and silver traces, labeled pins (G, BZ+, GZ-), and connectors (no readable text beyond labels)Hyperion F3 Lux Setup Manual
www.Hyperion-world.com
Board Top side Layout
| Pin | Function |
| G | Ground |
| 2 | PWM Output (Motor 2) |
| RX | RX Input (PPM,S.BUS, SUMD / 3.3-5v / GND) |
| 5v | Receiver Voltage (3.3v-5v) |
| BZ+ | Buzzer + |
| BZ- | Buzzer - |
| 4 | PWM Output (Motor 4) |
| 1 | PWM Output (Motor 1) |
| T1/T2/R2 | UART1 TX, UART2 TX, UART2 RX |
| 5v | 5v output |
| 3 | PWM Output (Motor 3) |
Board bottom side layout
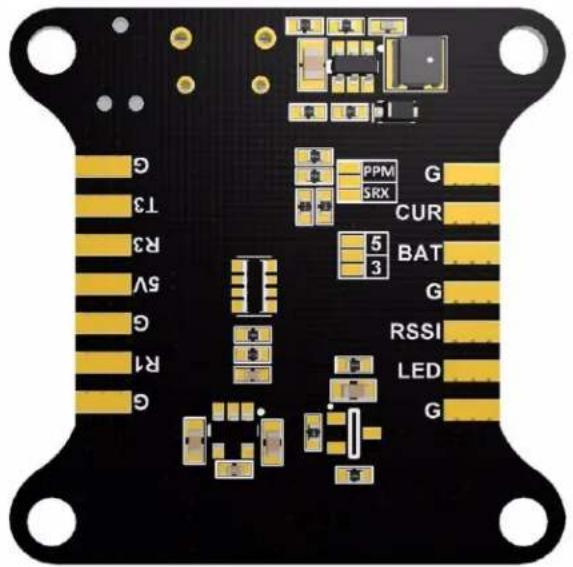
| Pin | Function |
| G | Ground |
| T3/R3/R1 | UART3 TX, UART3 RX, UART1 RX |
| 5v | 5v Output |
| CUR | Current Sensor |
| BAT | Input voltage 6-26v (2-6S lipo) |
| RSSI | RSSI |
| LED | Digital LED Output |
| PPM/SRX | Bridge PPM for PPM. SRX for SBUS, SUMD and serial connections |
Hyperion F3 Lux Setup Manual
www.Hyperion-world.com
The accelerometer and gyroscope need to initialize every time the board is given power.
- Do not disturb the LUX board or your quad while powering on.
- Wait until the initialization sequence is completed. When the activity LEDs settle, you can move the quad/board.
Do not use F3 LUX for unintended applications such as commercial aerial photography.
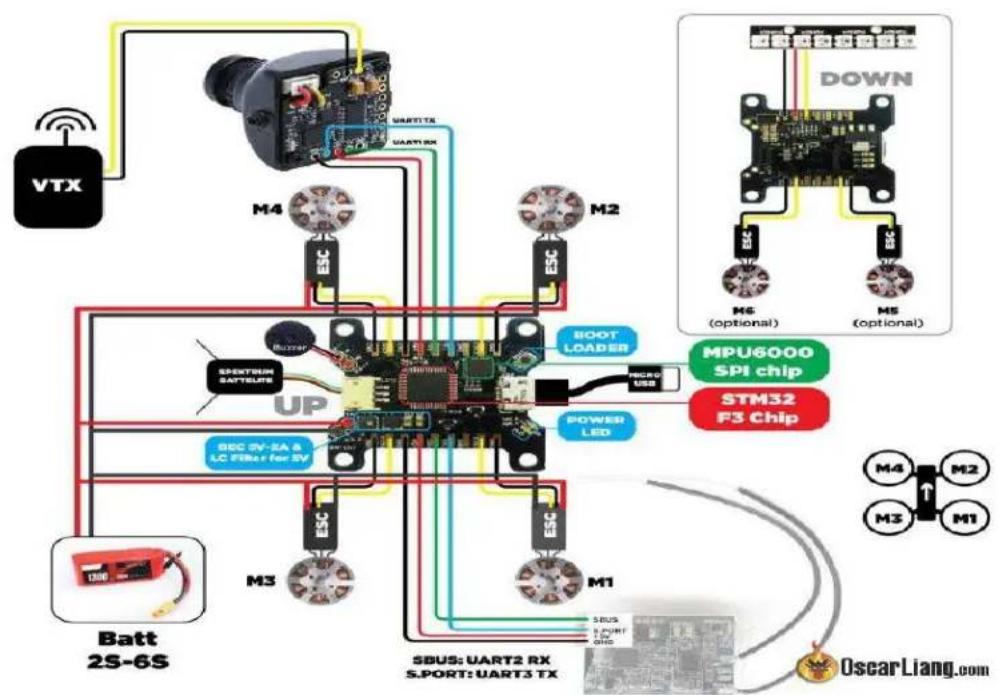
BASIC Hardware Setup
flowchart
graph TD
    A["VTX"] --> B["Motor"]
    B --> C["M4"]
    B --> D["M2"]
    B --> E["M6"]
    B --> F["M5"]
    B --> G["Batt 2S-6S"]
    B --> H["SBUS: UART2 RX S.PORT: UART3 TX"]
    B --> I["BOOT LOADER"]
    B --> J["POWER LED"]
    B --> K["SPENTRUM SATEBUTS"]
    B --> L["BUZAR"]
    B --> M["UP"]
    B --> N["SBUS: UART2 RX S.PORT: UART3 TX"]
    B --> O["MPU6000 SPI chip STM32 F3 Chip"]
    style A fill:#f9f,stroke:#333
    style B fill:#ccf,stroke:#333
    style C fill:#cfc,stroke:#333
    style D fill:#cfc,stroke:#333
    style E fill:#cfc,stroke:#333
    style F fill:#cfc,stroke:#333
    style G fill:#fcc,stroke:#333
    style H fill:#fcc,stroke:#333
    style I fill:#fcc,stroke:#333
    style J fill:#fcc,stroke:#333
    style K fill:#fcc,stroke:#333
    style L fill:#fcc,stroke:#333
    style M fill:#fcc,stroke:#333
    style N fill:#fcc,stroke:#333
    style O fill:#fcc,stroke:#333
    style P fill:#fcc,stroke:#333
    style Q fill:#fcc,stroke:#333
    style R fill:#fcc,stroke:#333
    style S fill:#fcc,stroke:#333
    style T fill:#fcc,stroke:#333
    style U fill:#fcc,stroke:#333
    style V fill:#fcc,stroke:#333
    style W fill:#fcc,stroke:#333
    style X fill:#fcc,stroke:#333
    style Y fill:#fcc,stroke:#333
    style Z fill:#fcc,stroke:#333
Pins Configuration and Connections
Make sure to select your RX input and logic level by bridging the appropriate jumpers.
• Bridge only 3v for SPEKTRUM satellite.
- Bridge only 5v for Futaba, FRSKY S.BUS, ORANGE, etc. (no signal inverter needed).
- Select PPM for PPM, or SRX for Serial RX.
- The 3v jumper only changes voltage output for 5v pad next to RX.
Hyperion F3 Lux Setup Manual
www.Hyperion-world.com
Connect ESC signal wires
- Connect the corresponding ESC signal wires to pins 1, 2, 3, 4 as shown on page 4.
• Ground wires can be connected to the pins labeled G.
Connect RX
- Connect signal (PPM/SRX), power (3.3-5V), and GND pins to your receiver.
Enable Telemetry
- Connect RX port on Receiver to UART pin T1, T2, or T3. Enable feature in CLI: feature TELEMETRY
In the Ports tab in Cleanflight, select the Telemetry dropdown to output data on selected UART.
Connect Buzzer
- Connect buzzer +/- to pins BZ+ and BZ-.
Connect Blackbox Device
OpenLog serial data loggers work over simple serial connections and support microSD cards up to 64GB. Your LUX flight controller has 3 separate hardware serial (UART) TX/RX pin pairs.
- Connect VCC/TX/RX/GND to corresponding pins labeled T1/R1/T2/R2/T3/R3.
Enable feature in CLI: feature
BLACKBOX set
blackbox_device = 0
In the Ports tab in Cleanflight, select the checkbox to enable Blackbox on the UART you choose. It is recommended not to connect a wire from TX pin on OpenLog logger to RX pin on LUX.
Connect LED Strip
You can connect an addressable LED strip (WS2812B) to the LUX flight controller. Connect your LED strip to pins labeled LED.
Enable feature in CLI: feature LED_STRIP
Hyperion F3 Lux Setup Manual
www.Hyperion-world.com
Connect Battery (Main Power connection)
Your LUX flight controller has input voltage 6-26v (2-6S lipo). Connect main power lead to pins labeled 10.
* Always check the polarity before plugging in. There is no reverse polarity protection.
Enable feature in CLI: feature VBAT
Connect Current Sensor
Connect a current sensor signal wire to the pin labeled 9, and corresponding GND wire.
Enable feature in CLI: feature
CURRENT_METER
current_meter_type 1
Connect OSD (On Screen Display)
You can connect a compatible OSD to your LUX flight controller. Connect the corresponding TX and RX pins to UART1 labeled T1/R1.
For MWOSD, remember to change Voltage/Amperage/RSSI to "Use FC".
Connect RSSI
Connect RSSI pin from your receiver to LUX pin RSSI
Connect GPS
GPS features in Cleanflight are experimental. Please share your findings with the developers. GPS works best if the GPS receiver is mounted above and away from other sources of interference. Connect GPS TX/RX/5v/GND pins to corresponding TX and RX pins (TX to RX, RX to TX). Enable feature in CLI: feature GPS
set gps_provider = 0 (nmea only)
set gps_provider = 1 (UBLOX only)
Hyperion F3 Lux Setup Manual
www.Hyperion-world.com
Software Installation/Setup
Hardware Driver
Your Hyperion LUX has a Micro-USB connector. Hold the "boot" button while plugging in for the first time. The LUX has two modes. It switches to "DFU" mode while the "boot" button is pressed as it is plugged in.
Windows users:
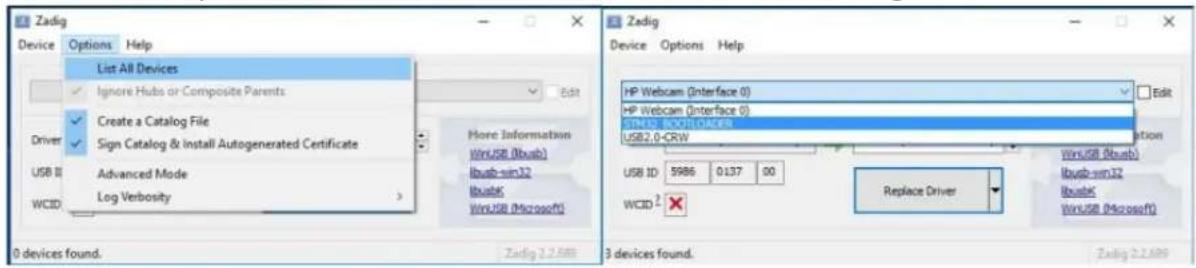
- Download Zadig from http://zadig.akeo.ie
- Open Zadig, choose Options > List All Devices
- Select STM32 Bootloader, WinUSB
- Click "replace driver" or "install driver"
Mac/Linux users:
Driver will install automatically
Cleanflight Configurator
Cleanflight Configurator from the Google Web Store will be used to configure your Hyperion F3 LUX board.
- Download: http://chrome.google.com/webstore
Alternative Firmware Upgrade
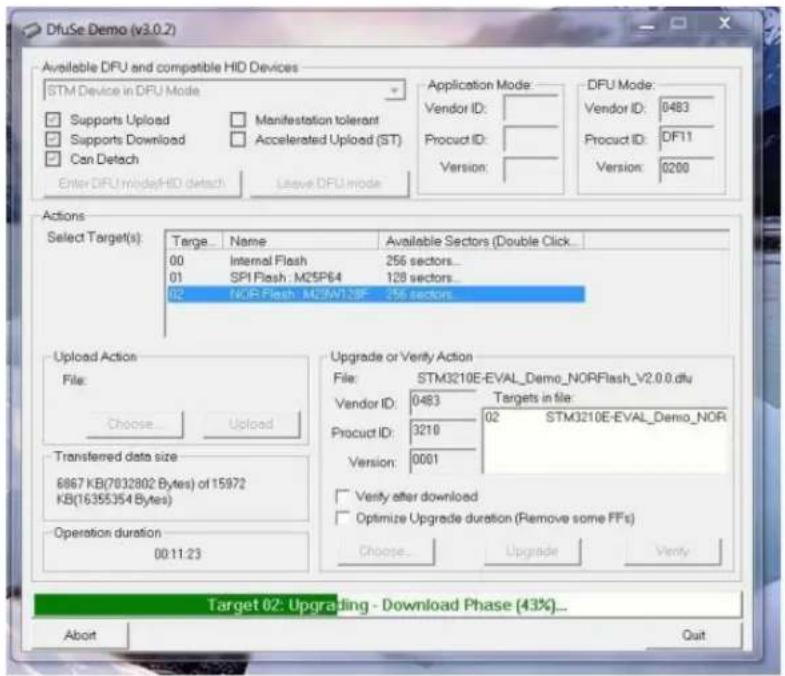
Should Cleanflight Configurator stop working with your device, or your device becomes corrupted, you can restore LUX to factory defaults with a standalone utility.
Windows users:
Firmware upgrade utility - http://bit.do/LUXDfuSe
Use drivers from Windows Update
Mac & Linux:
- "DFU Util" "dfu-util" from the command line.
ADVANCED FEATURES
PID Stick Tuning (OSD)
Hyperion F3 Lux Setup Manual
www.Hyperion-world.com
MW OSD
Your LUX flight controller can be programmed via stick positions, using your OSD (On Screen Display) to display and change settings.
To access the OSD menu, make sure your LUX board is disarmed. Move the Throttle position to middle, Yaw right, Pitch up. Change PID settings by using Pitch/Roll for selecting a value, and Yaw for changing the selected value.
Firmware Upgrade
STM32 DFU MODE
Your LUX board can always be recovered and restored to factory defaults should you ever encounter software issues. Simply hold the "boot" button on your LUX board while plugging in the USB cable. You can release the button after plugging LUX into your computer.
STM32 DFU FLASH TOOL:
Follow the installer prompts, then select your device and firmware file. Windows users will need to uninstall the Zadig driver listed on page 8.
Hyperion F3 Lux Setup Manual
www.Hyperion-world.com
Note:
The gryo used on the LUX is very fast and sensitive. Due to this you can experience a weird twitching when throttling up. The solution to that is soft-mounting the LUX. If you use the included o-rings to mount the LUX you should only tighten the screws until the tension holds the screws in place. The o-ring should not compress when tightening the screws. You can also use two-sided foam tape to hold the LUX if that's your mounting method of choice.
The first step is to install the Drivers:
Install the VCP Drivers
from http://www.st.com/web/en/catalog/tools/PF257938
- Reboot your computer so the drivers can take effect.
• Download Zadig from http://zadig.akeo.ie - Close all instances of chrome (this includes chrome apps such as cleanflight).
- Hold the Bootloader Button and connect the board to your PC via USB. (Once the board is on you should see a solid blue light and you can let go of the button.)
- Open Zadig, choose Options > List All Devices
- Select STM32 Bootloader, WinUSB
- Click "replace driver" or "install driver"
The next step is to flash the board with the latest Cleanflight:
Open Cleanflight and re-connect the flight controller while holding the bootloader button.
(you should see DFU in the port selection area).
Open the Firmware Flasher tab and select LUX_RACE target, enable Full chip erase, then click "Load Firmware [Online]"Once the Flash firmware is Green, confirm that the correct target was loaded and then press the "Flash Firmware" button.
Hyperion F3 Lux Setup Manual
www.Hyperion-world.com
![CLEANFLIGHT CONFIGURATOR 1.2.1 DFU Auto-Connect Connect 2016 04-08 @ 21:41:52 -- Serial port successfully closed Show Log CF 1.12.0 LUX RACE 2016-2-20 14:55 (stable) Available online firmware releases - Select the correct firmware appropriate for your board. No reboot sequence Enable if you powered your FC while the bootloader pins are jumpered or have your FC's BOOT button pressed. Full chip erase Wipes all configuration data currently stored on the board. Manual selection of baud rate for boards that don't support the default speed or for flashing via bluetooth. Note: Not used when flashing via USB DRU Manual baud rate 256000 Show unstable releases Show Release Candidates and Development Releases. Release Info Target: LUX RACE Name/Version: 1.12.0 Binary: cleanflight_LUX_RACE.hex Date: 2016-2-20 14:55 State: Release notes: IMPORTANT: ** Requires >= v1.1.0 configurator ** Flash Firmware Load Firmware [Online] Load Firmware [Local] Port utilization: D: 0% U: 0% Packet error: 0 I2C error: 0 Cycle Time: 0 1.2.1](/content/2026/06/1168202/images/1ccee101c5b11e5191bf6ef06d31891f0a0d7c10e337334045b5ff756e56b339.jpg)
TROUBLESHOOTING
Getting SBUS receiver to work?
Assuming everything is wired correctly and the jumpers are bridged accordingly, you likely will need to switch some ports around in cleanflight.
- Connect the Flight controller to cleanflight and navigate to the ports tab.
- Disable MSP on UART1
- Disable Serial RX on UART2
- Enable Serial RX on UART1 and Save Settings.
- Then go back to the configuration tab and confirm that Serial_RX is still selected.
- Confirm that the receiver is working on the Receiver Tab.
| Identifier | Data | Logging | Telemetry | RX | GPS | |||
| USB VCP | MSP 115200 ▼ | Blackbox 115200 ▼ | Disabled ▼ | AUTO ▼ | Serial RX 57600 ▼ | |||
| UART1 | MSP 115200 ▼ | Blackbox 115200 ▼ | Disabled ▼ | AUTO ▼ | Serial RX 57600 ▼ | |||
| UART2 | MSP 115200 ▼ | Blackbox 115200 ▼ | Disabled ▼ | AUTO ▼ | Serial RX 57600 ▼ | |||
| UART3 | MSP 115200 ▼ | Blackbox 115200 ▼ | Disabled ▼ | AUTO ▼ | Serial RX 57600 ▼ | |||
www.Hyperion-world.com
How do I get my LUX to "Save and Reboot"?
Right now cleanflight is not able to reboot the LUX completely, to complete the process you should do the following:
Press the red Disconnect button in cleanflight.
Unplug your LUX from the computer and wait a few seconds.
Connect the LUX back to the computer and navigate to the settings you just saved to confirm the save.