PDP4211 - TV HISENSE - Free user manual and instructions
Find the device manual for free PDP4211 HISENSE in PDF.

| Product Type | Plasma Television |
| Brand | Hisense |
| Model | PDP4211 |
| Screen Size (Diagonal) | 42 inches |
| Resolution | 1024 x 768 pixels |
| Aspect Ratio | 16:9 |
| Dimensions (W x H x D) without stand | 1030 x 640 x 85 mm |
| Dimensions (W x H x D) with stand | 1030 x 690 x 250 mm |
| Weight without stand | 22.5 kg |
| Weight with stand | 24.8 kg |
| Power Supply | AC 100-240V, 50/60Hz |
| Power Consumption (Typical) | 250 W |
| Power Consumption (Standby) | < 1 W |
| Main Functions | TV, AV input, S-Video, Component, HDMI, USB media playback |
| Sound Output | 2 x 10 W |
| Cleaning and Maintenance | Wipe with a soft dry cloth. Do not use solvents. |
| Safety Precautions | Do not place near heat sources. Ensure proper ventilation. |
| Spare Parts Availability | Contact Hisense service center for replacement parts. |
| Reparability Index | 7.0 / 10 (estimated) |
| User Manual | Available for free download in PDF format. |
Frequently Asked Questions - PDP4211 HISENSE
User questions about PDP4211 HISENSE
0 question about this device. Answer the ones you know or ask your own.
Ask a new question about this device
Download the instructions for your TV in PDF format for free! Find your manual PDP4211 - HISENSE and take your electronic device back in hand. On this page are published all the documents necessary for the use of your device. PDP4211 by HISENSE.
USER MANUAL PDP4211 HISENSE
Thank you for purchasing this Plasma Display TV. We wish you many years of viewing pleasure. The goal of this manual is to guide you through setting up and operating your TV as quickly as possible. Please read all the safety and operating instructions carefully before you begin.
SAFETY CLASS
This is an IEC safety class I product and must be grounded for safety.
CONTENTS
Important Safety Instructions 1
Learning about your new TV 2
Selecting a location for the TV....3
Connecting your TV....3
Connecting to A/V equipments....3
Connecting to a computer 5
Connecting to an antenna 5
Using the remote control 6
Preparing the remote control for use....6
Learning about the remote control 7
Using the TV features....8
Understanding the TV features 8
Basic operations....8
Using the CHANNEL Menu 10
Using the PICTURE Menu 11
Using the SOUND Menu 11
Using the CLOCKSETUP Menu 12
Using the FUNCTION Menu 12
Teletext operations 13
Specifications 15
Cleaning and Care 15
Appendix 16
The Scart Interface 16
Troubleshooting 18
Desktop Quick Installation Guide 19
PDP Wall-mounting Bracket Installation Guide 20
Wall-mounting Quick Guide 21
Design and specifications are subject to change without notice.
To prevent fire or shock hazard, do not expose this appliance to rain or moisture. FIRE AND SHOCK PRECAUTIONS
- Adequate ventilation must be provided to prevent heat build up inside unit. Keep the inside of unit free from foreign objects, such as hairpins, nails, paper, etc. Do not build the set into a bookcase or other enclosures in which it would be poorly ventilated. Do not place it on carpet or a bed as low ventilation holes could become obstructed.
- Do not set liquids, including flower vases and vessels filled with chemicals or water etc., on top of the unit as liquid could get inside the unit. If a hazardous object falls inside the TV set, unplug it immediately and call a qualified technician for removal.
- When placing or moving the TV set, take care to insure that the power cord is fitted into the allocated slot. To avoid damage to the power cord, never allow heavy objects such as the TV set itself to be placed on the power cord. Keep cord away from heat radiating appliances. Do not allow cord to become knotted or tangled. Do not lengthen the cord. When removing the power plug from the socket, always hold onto the plug, never pull by the cord.
WARNING
- Do not remove the back cover of the TV set. Accidental contact with high voltage components could result in electric shock. When internal adjustment is necessary, please contact your distributor.
- If your set produces sound but no picture, or it emits smoke or produces a strange sound or smell, continued operation is dangerous. Immediately turn off power and remove the power plug from the socket and contact your distributor.
- During vacation or other occasions when you will not be using the set for an extended period, remove the power plug from the socket.
● This appliance should not be operated by children or infirm persons without adequate supervision.
Learning about your new TV
You can operate your TV by using the buttons on the front panel or the remote control. The terminals on the back panel provide all the connections you will need to connect other equipment to your TV.
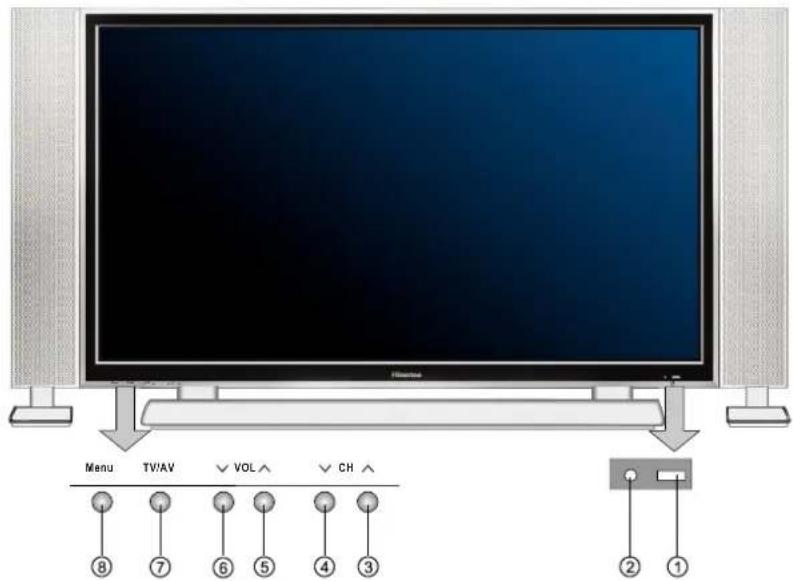
Front Controls
text_image
Menu TV/AV VOL CH ⑧ ⑦ ⑥ ⑤ ④ ③ ② ①English
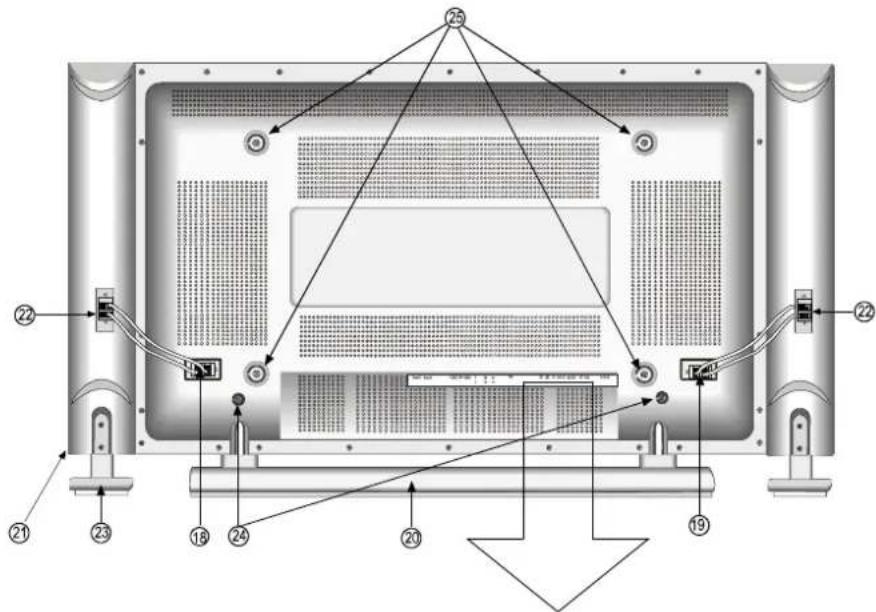
Back Connections
text_image
Technical diagram of a computer monitor rear panel with numbered component labels pointing to internal layout.
text_image
SCART1 SCART2 VIDEO OUTPUT AUDIO OUTPUT VIDEO S-VIDEO V Y Cb Pb Cr Pr PC RS 232 PC AUDIO AUDIO ANT 75Ω POWERNote: The above figures are for reference only, please refer to the actual units to determine their appearance.
Learning about your new TV
① Remote Sensing Window
② POWER indicator
③ Channel up / cursor up
④ Channel down / cursor down
⑤ Volume up / cursor right
⑥ Volume down / cursor left
⑦ TV / AV / PC input select
⑧ Menu button
⑨ AV Video input
⑩ S-Video input
⑪ YPBPR/YCBCR input
⑫ PC VGA input
⑬ RS232C DEBUG input
⑭ PC audio input
⑮ AV audio input
⑯ CATV antenna input
⑰ POWER PLUG
⑱ Audio AMP output L
⑲ Audio AMP output R
⑳ Mounting base
②1 Speakers
②2 Speakers input
②3 Speakers base
⑳ Base locating hole
②5 Wall mounting locating hole
②6 Scart1
⑳ Scart2
⑳ AV Video output
⑲ AV audio output
Selecting a location for the TV
1) Place the TV on the floor or on a sturdy platform in a location where light does not directly hit the screen.
2) Do not use this TV near water. For example, do not use near a bathtub, washbowl, kitchen sink, or laundry tub, in a wet basement, or near a swimming pool, and the like. The Plasma Monitor shall not be exposed to dripping or splashing. No objects filled with liquids, such as vases, shall be placed on the Plasma Monitor.
3) Slots and openings in the cabinet back or bottom are provided for ventilation, to ensure reliable operation of the TV and to protect it from overheating. These openings must not be blocked or covered. The openings should never be blocked by placing the TV on a bed, sofa, rug, or other similar surface. This TV should never be placed near or over a radiator or heat resource. This TV should not be placed in a built-in installation such as a bookcase or rack unless proper ventilation is provided or the manufacturer's instructions have been adhered to.
4) Do not install near any heat sources such as radiators, heat registers, stoves, or other apparatus (include amplifiers) that produce heat.
Connecting your TV
Caution: Do not plug the TV in until you have finished connecting all of your equipment.
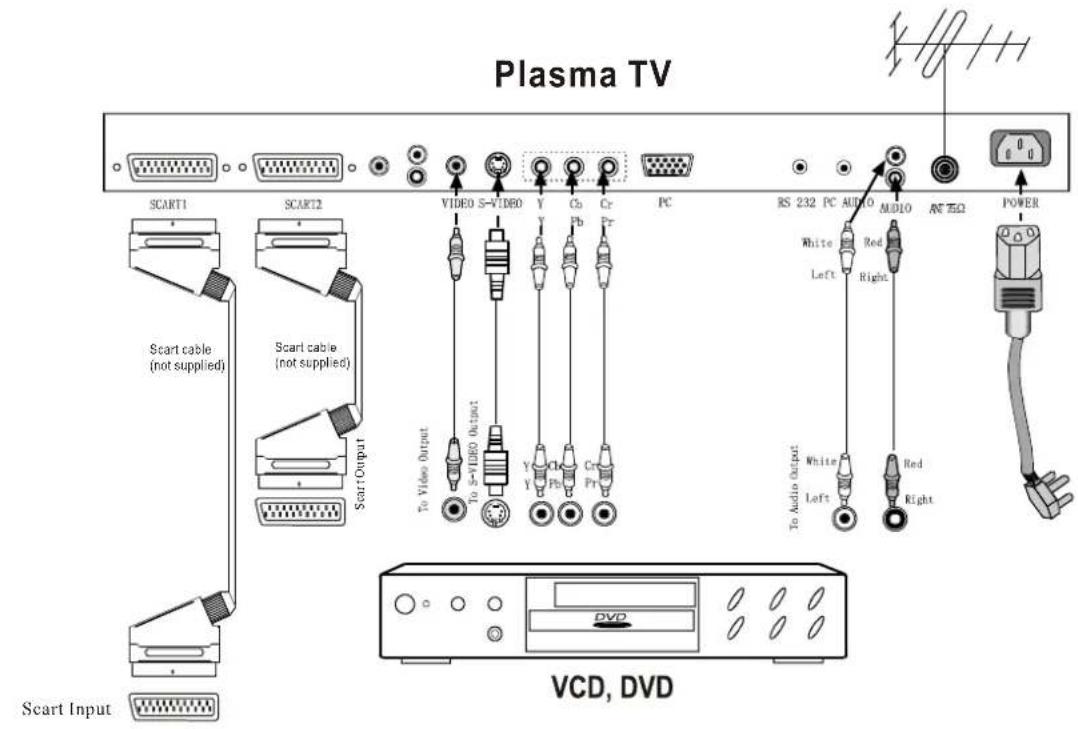
Connecting A/V equipments
To enjoy its multimedia features, you can connect your TV A/V equipments such as VCR, DVD, STB, Satellite receiver, Camcorder, Audio amplifier etc., and select signal sources using your remote control. Connect the devices as shown below.
text_image
Plasma TV SCART1 SCART2 Scart cable (not supplied) Scart cable (not supplied) Scart Output To Video Output To S=VIDEO Output Video S=VIDEO Y Cs Cr PC Y Pb Pr VCD, DVD RS 232 PC AUDIO AUDIO ANT EΩ POWER White Red Left Right To Audio output White Left Red Right Scart Input
natural_image
Line drawing of a camcorder device (no text or symbols on the device itself)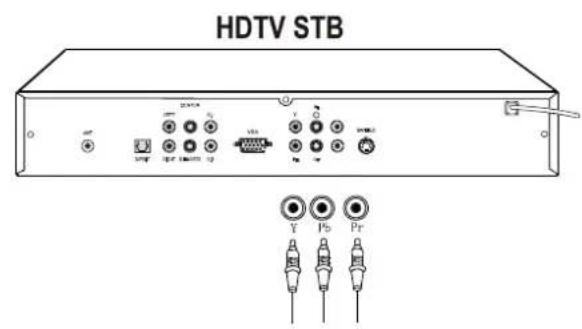
text_image
HDTV STB 22V/14 VDD Y Pb PrNOTE:
1) As some input terminals are internally connected, they must NOT be used at the same time. See the following pairs:
Video input of Scart 1②6 == AV Video input 9, S-Video input of Scart 2②7 == S-Video input 10,
2) The Video/Audio output pins of Scart1 deliver the same signals with those of Scart2, namely, the picture and sound of TV programs.
3) For detailed specifications of Scart1 and Scart2, see Appendix on Page15.
4) The YPbPr input supports all of the following formats: 480p, 720p, 1080i.
5) Do NOT attempt to connect to ANY equipment unless you KNOW what you are doing.
Connecting to a computer
You can use your TV as a monitor/speakers for connecting through its 15pin standard RGB interface and PC audio interface. Connect the devices as shown below.
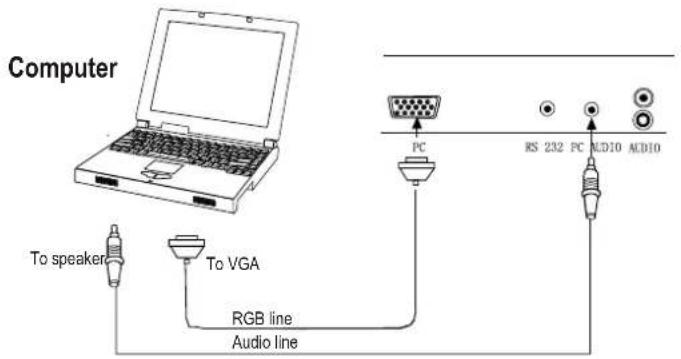
text_image
Computer To speaker To VGA RGB line Audio line PC RS 232 PC AID10 AID10Note: This PDP TV supports up to XGA format display(1024*768).
Connecting to an antenna
To enjoy the terrestrial signal transmitted by your local TV station, you need an indoor or outdoor antenna (not supplied). Perfect picture quality requires a good signal and generally means that an outdoor antenna must be used. The exact type and location of the antenna will depend on your particular area. Consult your local dealer or service personnel for best advice. If you are a subscriber of your local CATV net, the outdoor or indoor antenna is not needed. Connect the equipments as the following figure.
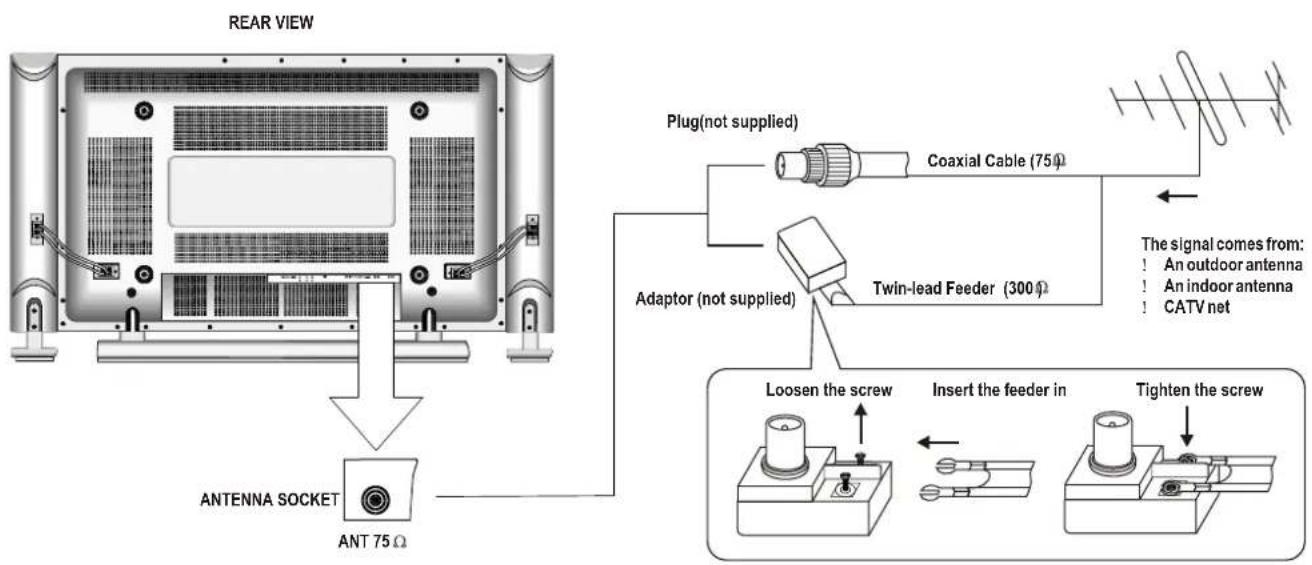
text_image
REAR VIEW ANT 75 Ω Plug(not supplied) Coaxial Cable (75Ω) Adaptor (not supplied) Twin-lead Feeder (300Ω) The signal comes from: An outdoor antenna An indoor antenna CATV net Loosen the screw Insert the feeder in Tighten the screwNote: The above figures are for reference only, please refer to the actual units to determine their appearance.
Preparing the remote control for use
Installing the remote control batteries
- Open the battery cover on the back of the remote control.
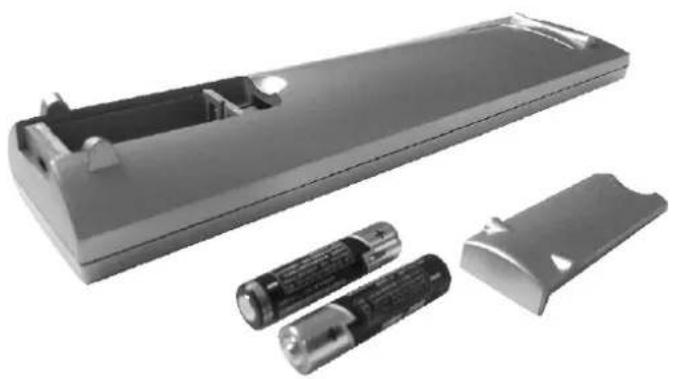
natural_image
Exterior view of a gray remote control box with two batteries and a partially open casing (no text or symbols visible)-
Install two AAA size(1.5V) batteries. Match the + and - signs on the batteries to the signs on the battery compartment.
-
Close the battery cover.
Note:
-
Dispose of your batteries in a designated disposal area. Do not throw your batteries into fire.
-
Do not mix battery types or combine used batteries with new ones.
-
Remove dead batteries immediately to prevent battery acid from leaking into the battery compartment.
-
If you do not intend to use the remote control for a long time, remove the batteries.
-
The effective range of remote control is suggested in the figure.

text_image
30° 30° 3m 3m 8m 1m 30° 8m 30° 1mNote: The above figures are for reference only, please refer to the actual units to determine their appearance.
Learning about the remote control

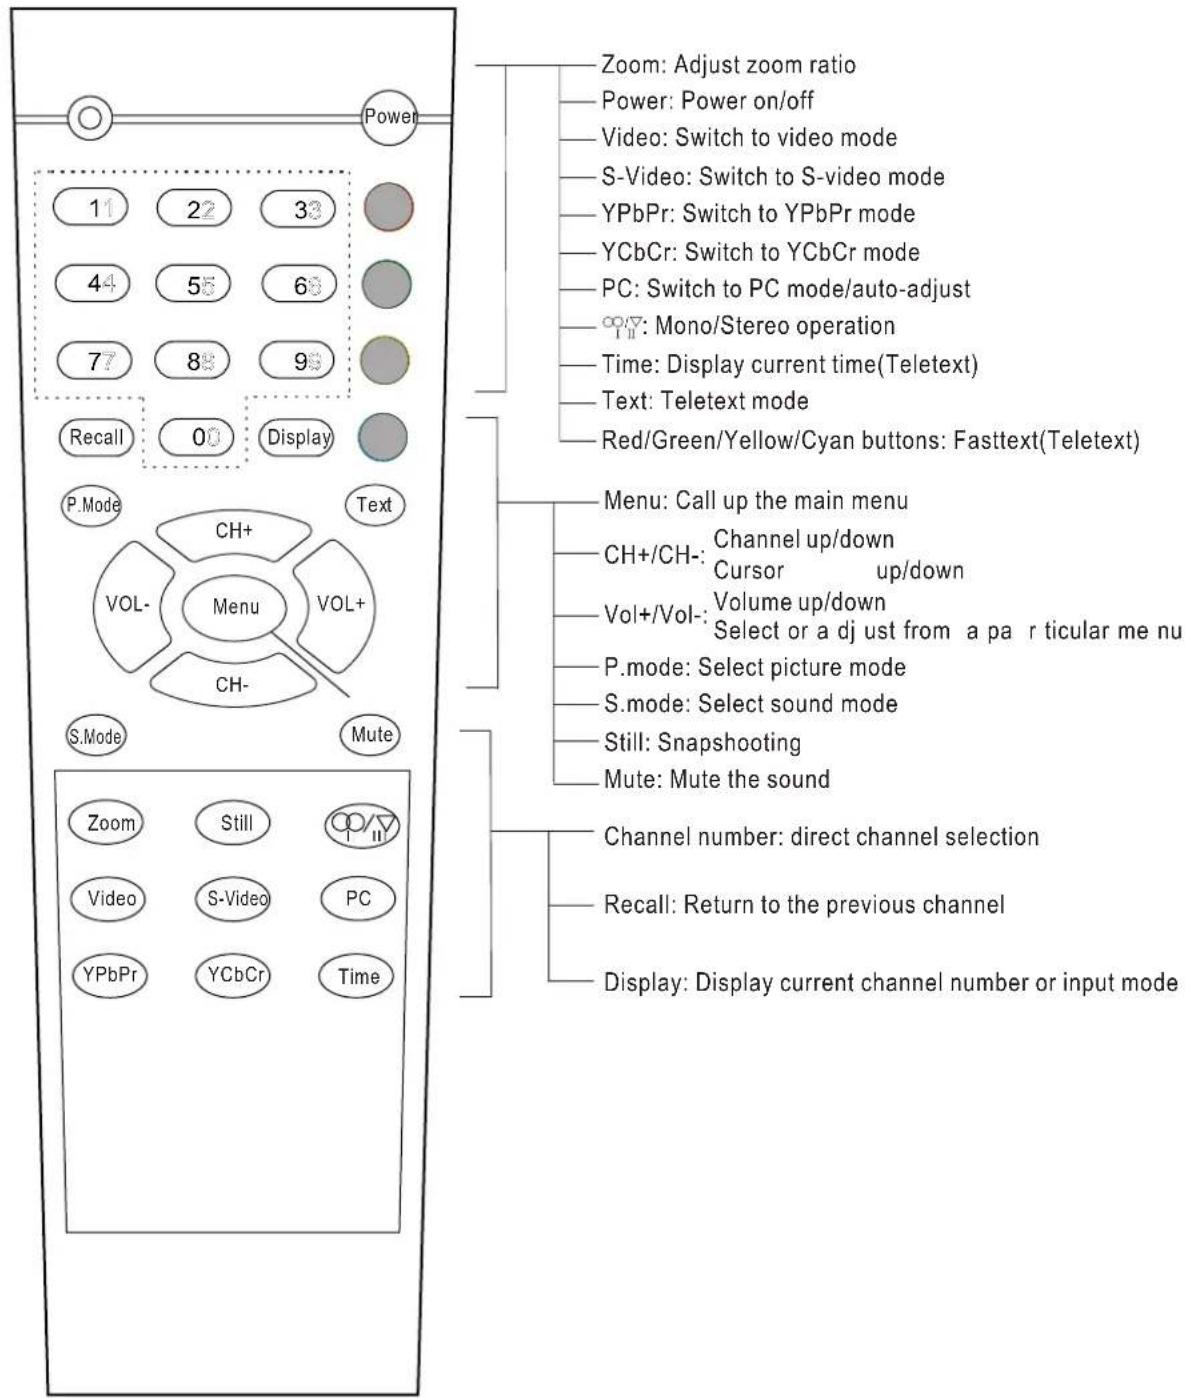
text_image
Power 11 22 33 44 55 68 77 88 98 Recall 00 Display P.Mode Text VOL- Menu VOL+ CH- S.Mode Mute Zoom Still Video S-Video PC YPbPr YCbCr Time Zoom: Adjust zoom ratio Power: Power on/off Video: Switch to video mode S-Video: Switch to S-video mode YPbPr: Switch to YPbPr mode YCbCr: Switch to YCbCr mode PC: Switch to PC mode/auto-adjust Mono/Stereo operation Time: Display current time(Teletext) Text: Teletext mode Red/Green/Yellow/Cyan buttons: Fasttext(Teletext) Menu: Call up the main menu CH+/CH-: Channel up/down Cursor up/down Vol+/Vol-: Volume up/down Select or a dj ust from a pa r ticular me nu P.mode: Select picture mode S.mode: Select sound mode Still: Snapshooting Mute: Mute the sound Channel number: direct channel selection Recall: Return to the previous channel Display: Display current channel number or input modeNote: The above figures are for reference only, please refer to the actual units to determine their appearance.
Understanding the TV features
● Multimedia - TV receiver, HDTV monitor and PC display, all in one.
- Wider viewing angle, 16:9 display - over 160^ viewing angle, 16:9 ergonomic display panel
- Digital display device - truthfully reproducing the images, without distortion or blurring, irrespective of magnetic or geomagnetic effect.
● Auto tuning function with 200 channels storage
- Sleep/wake timer
- TELETEXT
NICAM
- Dual SCART interface
- Multi-language OSD
Basic Operations
Power ON/OFF
- Connect the TV to power outlet, the power indicator will flicker and then turn blue. About 10 seconds later, TV picture will display on the screen.
- Press the POWER button on the remote control to turn off the TV temporarily.
- If you decide to shut off the TV for a long time, it is recommended that you unplug the power from the outlet.

Signal source selection
Press the number [1-9] button or [CH+/CH-] button to select TV input; press the [VIDEO] button to select Video or Scart Video1(from SCART 1) or Scart Video 2(from SCART 2) input; press the [S-VIDEO] button to select S-Video input or Scart S-Video input(from SCART 2); press the [YCbCr] button to select YCbCr input; press the [YPbPr] button to select YPbPr input; press the [PC] button to select PC input.
Select channels by [CH+/CH-]
You can also use [0]e/ocl-chan[0]s.] inOates channel number increase; indicates channel number decrease.
Select channels by numbers
- To select a one-digit channel: Press the 1-9 button to select channel directly.
- To select a two-digit channel: Press a button from 0-9 to select the first number, then press a button from 0-9 again to select the second number. For example, to select channel 28, press the 2 button first, 2-- will appear on the screen, and then press the 8 button, 28- will appear on the screen for 1 second.
- To select a three-digit channel: Press the 0 or 1 button to select the first number, then press buttons from 0-9 successively to select the other two numbers. For example, to select channel 120, press the button 1, 1-- will appear on the screen, then press the button 2 and the button 0 successively.
Adjust Volume
When Menu is not displayed on the screen, press to adjust the volume.Vol+ or Vol-
Use [Recall] button
Press the [ Recall ] button repeatedly to alternate between the present channel and the previous channel.
Display channel number
6 seconds after power on or changing channels, the channel number disappears from the screen. Press [Display] button to display the present channel number, but it will also disappear 6 seconds after your pressing.
Select picture modes
You can select the picture mode from among three preset modes and one user-set mode. Press the [P.mode] button repeatedly to select the desired picture mode.
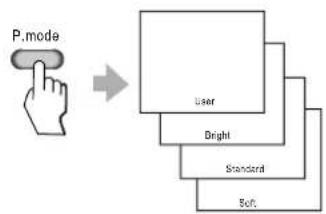
flowchart
graph TD
    A["P.mode"] --> B["User"]
    B --> C["Bright"]
    B --> D["Standard"]
    B --> E["Soft"]
Select sound modes
You can select the sound mode from among three preset modes and one user-set mode. Press the [S.mode] button repeatedly to select the desired sound mode.
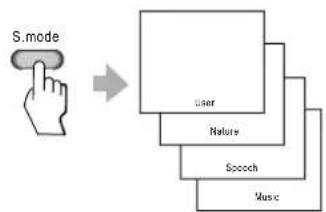
flowchart
graph TD
    A["S.mode"] --> B["User"]
    B --> C["Nature"]
    B --> D["Speech"]
    B --> E["Music"]
Use [Still] button
Press the [ Still] button to snapshot the present picture, and press again to return to normal watching.
Use [Zoom] button
Press the [Zoom] button to adjust the screen aspect ratio and zoom ratio
Mute function
Press [Mute] button repeatedly to switch between mute and unmute mode.
Using the CHANNEL Menu
PROGRAM
1) Press the [Menu] button to enter the main Menu.
2) Press the [Button] select the item CHANNEL, and press the [Monitor CHANNEL Menu.
3) Press the [ObitoGHe]select PROGRAM.
4) Press the [MoltoVde] select the present channel.
TV SYSTEM
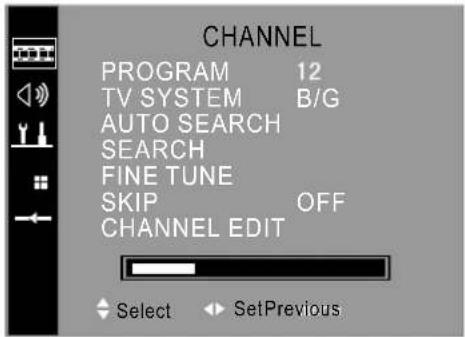
text_image
CHANNEL PROGRAM 12 TV SYSTEM B/G AUTO SEARCH SEARCH FINE TUNE SKIP OFF CHANNEL EDIT Select SetPrevious1) Press the [Menu] button to enter the main Menu.
2) Press the [CuttGlt]channel item, and press [hol to] enter MCHANNEL
3) Press the [Ottt/oHb]select TV system.
4) Press the [Molten/To-switch from among B/G, . D/K, I, L/L]
AUTO-SEARCH
1) Press the [Menu] button to enter the main Menu.
2) Press the [Button] select the item CHANNEL, and press the to enter CHANNEL Menu.
3) Press the [CuttorHe]select AUTO-SEARCH.
4) Press the [Volte/Vto-start auto-searching.
SEARCH
1) Press the [Menu] button to enter the main Menu.
2) Press the [CuttioHe] select the item CHANNEL, and press the to enter CHANNEL Menu.
3) Press the [Button] select SEARCH.
4) Press the [VottoVto-start manual searching.
FINE TUNE
1) Press the [Menu] button to enter the main Menu.
2) Press the [Ottt/Che] select the item CHANNEL, and press the to enter CHANNEL Menu.
3) Press the [Cutt/GHe]select FINE TUNE.
4) Press the [Volto/Vo-f]ne-tune.
SKIP
1) Press the [Menu] button to enter the main Menu.
2) Press the [Button] select the item CHANNEL, and press the to enter CHANNEL Menu.
3) Press the [Dhto/Cto] select SKIP.
4) Press the [Volte/Vto-skip or unskip the present channel.
NOTE: The 'skipped' channels cannot be accessed by [CH+/CH-], but you can access them by digit (direct select) button.
CHANNEL EDIT
1) Press the [Menu] button to enter the main Menu.
2) Press the [60to61] elet the item CHANNEL, and press the to enter CHANNEL Menu.
3) Press the [CultoCto]select CHANNEL EDIT.
4) Press the [w]en]er CHANNEL EDIT Menu.
5) Set Program1 and Program2.
6) Press the [0 to 6] select EXCHANGE, and press the to exchanged Program1 and Program2.
7) Press the [Button] select COPY, and press the to copy Program2.
Using the PICTURE Menu
Adjust picture settings
1) Press the [Menu] button to enter the main Menu.
2) Press the [Button] select the item PICTURE, and press the [Volunteer PICTURE Menu.
3) Press the [Ou] select the item you want to adjust.
4) Press the [Votto/vo-adjust the level.
5) The adjusted data is stored automatically in the user mode.
NOTE: The disabled items will turn gray. For example, HUE is disable unless the colour system is NTSC.

text_image
PICTURE BRIGHTNESS CONTRAST SHARPNESS COLOUR COLOUR TEMP HUE Cool Select Set Previous!Using the SOUND Menu
Adjust sound settings
1) Press the [Menu] button to enter the main Menu.
2) Press the [Button] select the item SOUND, and press the [Monitor] SOUND Menu.
3) Press the [Button] select the item you want to adjust.
4) Press the [b/oten/A]djust the level.
5) The adjusted data is stored automatically in the user mode.
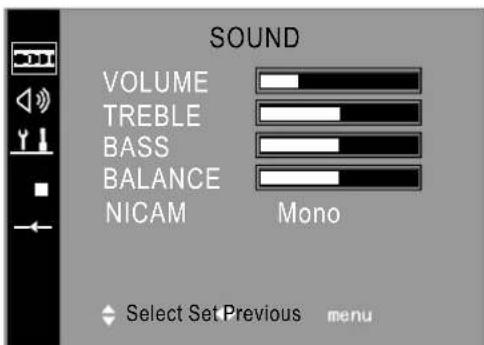
text_image
SOUND VOLUME TREBLE BASS BALANCE NICAM Mono Select Set Previous menuNICAM
1) Press the [Menu] button to enter the main Menu.
2) Press the [CuttGHe] select the item SOUND, and press the to enter SOUND Menu.
3) Press the [Button] select NICAM.
4) Press the [ Button/ob switch between Mono and Stereo.
1. By pressing the ∞/▽ button, you can acquire the same effects.
2. If Stereo is detected, then Stereo is the default sound. If Dual language is detected, then Language 1 is the default sound.
NOTE:
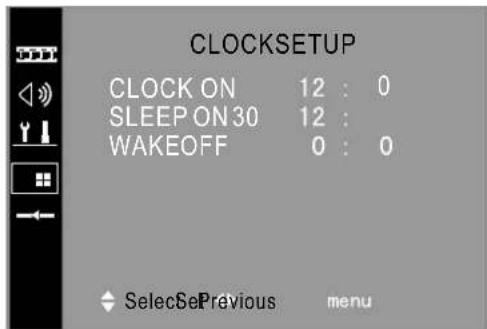
Using the CLOCKSETUP Menu
Set sleep/wake timer
1) Press the [Menu] button to enter the main Menu.
2) Press the [Button] select the item CLOCKSETUP, and press the [Button] to enter CLOCKSETUP Menu.
3) Press the [Button] select the item you want to set.
4) Press the [Volto/Vo-set timer.
NOTE: Only when you turn the timer on will the timer behind be valid.
Using the FUNCTION Menu
LANGUAGE
1) Press the [Menu] button to enter the main Menu.
2) Press the [Button] select the item FUNCTION, and press the [Motor] to enter function Menu.
3) Press the [CutttoGltb]select the LANGUAGE,
4) Press the [Volto/Vol-change OSD language.
CALENDAR
1) Press the Menu button to enter the main Menu.
2) Press the [ChutcHe] select the item FUNCTION, and press the [Votton] to enter function Menu.
3) Press the [Cultic] select the CALENDAR, and press the [VocenNéolCALENDAR Menu.
4) Press the [O###He] select your desired item (year, month, day), and press [Voh] visit the date.
5) After your input, you get the desired calendar.
BLACKSCREEN
1) Press the Menu button to enter the main Menu.
2) Press the [CH+/CH-] button to select the item FUNCTION, and press the [Vol+] button to enter FUNCTION Menu.
3) Press the [OtttOHe] select the item BLACKSCREEN.
4) Press the [Molte/Vto-switch between on and off.
NOTE: When you enable the black screen, the screen will turn into black screen saver mode in case of no incoming signal. 10mm drive state into stand-by mode.
Scart Control
1) Press the Menu button to enter the main Menu.
2) Press the [CH+/CH-] button to select the item FUNCTION, and press the [Vol+] button to enter FUNCTION Menu.
3) Press the [Oltt/CHe]select the item Scart Control.
4) Press the [Molten/td-switch between on and off.
NOTE: When you enable Scart Control, the system will automatically switch to TV or AV, according to pin8 of Scart1.(P16)
text_image
CLOCKSETUP CLOCK ON 12 : 0 SLEEP ON 30 12 : WAKEOFF 0 : 0 SelectSePrevious menu
text_image
FUNCTION LANGUAGE ENGLISH CALENDAR > BLACKSCREEN OFF C.C.B OFF MOTIONDETECT ON Menu POS POS7 Scart Control ON ADVANCE Select Set Previous menu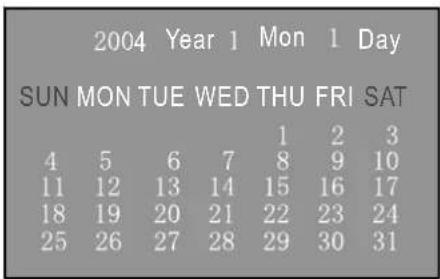
text_image
2004 Year 1 Mon 1 Day SUN MON TUE WED THU FRI SAT 4 5 6 7 8 9 10 11 12 13 14 15 16 17 18 19 20 21 22 23 24 25 26 27 28 29 30 31C.C.B (change channel blackscreen)
1) Press the Menu button to enter the main Menu.
2) Press the [Button to \$100] each the item FUNCTION, and press the button to enter FUNCTION Menu.
3) Press the [Butto/Cto] select the item C.C.B.
4) Press the [button/s] switch between on and off.
NOTE: When you enable C.C.B, the screen will keep black at the interval of changing channels. Otherwise, the screen will freeze at the interval.
MOTION DETECT
1) Press the Menu button to enter the main Menu.
2) Press the [Obit/Oto] select the item FUNCTION, and press the button to enter FUNCTION Menu.
3) Press the [Ottt/Ghe] select the MOTIONDETECT.
4) Press the [Volte/Vob-select between on and off.
NOTE: Enable MotionDetect for better moving effects. Disable MotionDetect for clearer pictures.
Menu POS
1) Press the Menu button to enter the main Menu.
2) Press the [Button] select the item FUNCTION, and press the button to enter FUNCTION Menu.
3) Press the [CultoHe] select the Menu POS.
4) Press the [Volte/Vto-adjust the Menu position.
ADVANCE
1) Press the Menu button to enter the main Menu.
2) Press the [Button] select the item FUNCTION, and press the [Button] to enter FUNCTION Menu.
3) Press the [CH+/CH-] button to select the item ADVANCE, and press the [Vol+] button to enter ADVANCE Menu.
4) Press the [CuttioHe] select the item you want to adjust.
5) Press the [VoltoVto-adjust the levels.
NOTE: The disabled items will turn gray.

text_image
ADVANCE H POSITION V POSITION H WIDTH V WIDTH PHASE FREQUENCY Select Set Previous MENUTeletext Operations
Selecting Teletext Mode
Select the channel that is broadcasting the desired TELETEXT program.
Press [TEXT] button and alternate between TELETEXT mode and normal mode.
NOTE: All the operations below should be under the Teletext mode except TIME operation.
Page selection
You can directly input your desired page number by pressing [0\~9] buttons.
You can sequentially read pages by pressing button.[CH+/CH-]
HOLD
Some TELETEXT information is contained on more than one page, the pages automatically changing after a given reading time.
Press [S-VIDEO] button to stop the page changing.
Press [S-VIDEO] button again to allow the page to change.
REVEAL
Some TELETEXT pages contain quiz or game questions with hidden answers.
Press the [∞/▽] button to see the answers.
Press the [∞/▽] button again to hide the answers.
CANCEL
When a page is selected in TELETEXT mode it may take some time before it becomes available. Press the [YPbPr] button to switch to the TV mode.
When the required page is found, the page number will appear at the top of the TV picture, press the [Y]PbPr button to return to the selected TELETEXT page.
Note: You cannot change TV program while in this mode.
SUB CODE
Some Teletext pages contain sub pages that require you to input the sub code.
Press [YCbCr] button until S**** is displayed, and enter four-digit sub code for the sub page you need.
MIX
You can mix teletext with TV pictures, which means transparent teletext.
Press [Time] to mix, and press [Time] again to cancel the mixed effect.
ZOOM (Top/Bottom/Full)
Using ZOOM to enable easier reading (larger display).
Press the [PC] button to display the TOP HALF of the page.
Press again to display the BOTTOM HALF of the page.
Press again to return to a FULL PAGE display.
(Note: changing pages reverts to a FULL PAGE display.)
TIME
Time information is contained in the teletext broadcast.
In TV mode, press [TIME] to display the time. The display lasts 6 seconds.
FAST TEXT
The RED, GREEN, YELLOW & CYAN buttons are used for quick access to colour coded pages transmitted by FAST TEXT broadcast.
INDEX
Teletext index page guides you quickly to your desired page.
Press [Video] button to enter index page.
| RF system: | B/G, D/K, I, L/L' | ||||
| Colour system: | PAL, SECAM, NTSC(only for AV) | ||||
| Channel coverage: | VHF Low channel (VL)= 48.25 to 160.00 MHz | ||||
| VHF high channel (VH)= 160.00 to 442.00 MHz | |||||
| UHF channel(U)= 442.00 to 863.25 MHz | |||||
| Power supply: | AC 100~240V, 50/60Hz | ||||
| Power consumption: | 390W | ||||
| Audio output: | 7W+7W | ||||
| Speaker Impedance: | 8Ω | ||||
| Panel Resolution: | 852(W)*480(H) | ||||
| Connection interface: | RF input: | 1 CATV RF antenna input | |||
| Video input: | 1 AV input | ||||
| 1 S-terminal (Y/C component) input | |||||
| 1 Y Cb Cr / Y Pb Pr input | |||||
| Graphic input: | 1 analog RGB D-SUB 15pin input | ||||
| Audio input: | 1 AV audio | ||||
| 1 PC audio | |||||
| Scart: | Scart1 | ||||
| Scart2 | |||||
| 1 RS232C input interface for software updating | |||||
| Dimension: | 1043mm×840mm 85mm | ||||
| Weight: | 32.5kg | ||||
| Accessories | Remote control | Batteries | S cable | CATV cable | Power cord User's manual |
| Desktop Stand | Speakers | Wall mounting bracket(optional) | |||
CUSTOMER NOTICE: IMPORTANT
Displaying a still picture for a long time will cause fluorescent burning which means permanent damage to the screen. Therefore, do NOT display the same picture on the screen for more than 10 minutes! This product has auto-pixel-shift protection to alleviate the burning effect. Yet, this protection will NOT avoid fluorescent burning completely.
Operate carefully to prevent damage to the screen.
Cleaning and Care
WARNING: TV sets use high voltage. Do not try to remove the cabinet back. Refer servicing to qualified service technicians.
To clean the TV screen:
1) Unplug the TV to avoid possible shock hazard.
2) Use a clean cellulose sponge or chamois cloth dampened with a solution of mild detergent and warm water to clean the TV screen and trim. Do not use too much water because water spills into the cabinet can cause damage to the TV.
3) Wipe off any excess moisture with a clean dry cloth.
4) Polish the cabinet with a quality furniture polish to maintain the finish and appearance of the cabinet.
Caution: Never use strong solvents such as thinner, benzene, or other chemicals on or near the cabinet.
These chemicals can damage the finish of the cabinet.
The SCART interface.
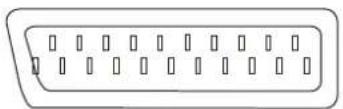
Scart connector
Also known as Peritel, this standard provides a cheap multi-signal connector to domestic TVs and other video equipment.
Arrangement 1 was the original and allows for composite video input/output, RGB inputs and stereo audio.
Arrangement 2 was added to take S-Video (S-VHS and Hi-8) inputs. This made pin 15 chrominance and pin 20 luminance.
See Signal Source Selection on page 8 for selecting SCART input.
Scart Connector Pinout Details
| SCART arrangement 1 | |||
| Pin | Signal | Signal level | Impedance |
| 1 | Audio output B (right) | 0.5V rms | <1kohm |
| 2 | Audio input B (right) | 0.5V rms | >10kohm |
| 3 | Audio output A (left) | 0.5V rms | <1kohm |
| 4 | Ground (audio) | - | - |
| 5 | Ground (blue) | - | - |
| 6 | Audio input A (left) | 0.5V rms | >10kohm |
| 7 | Blue input | 0.7V | 75ohms |
| 8 | Function select (AV control) | High (9.5-12V) - AVmode Low (0-2V) - TV mode | >10kohm |
| 9 | Ground (green) | - | - |
| 10 | |||
| 11 | Green input | 0.7V | 75ohms |
| 12 | |||
| 13 | Ground (red) | - | - |
| 14 | Ground (blanking) | - | - |
| 15 | Red input | 0.7V | 75ohms |
| 16 | RGB switching control | High (1-3V) - RGB Low (0-0.4V) -Composite | 75ohms |
| 17 | Ground (video input & output) | - | - |
| 18 | Ground (RGB switching control) | - | - |
| 19 | Video output (composite) | 1V including sync | 75ohms |
| 20 | Video input (composite) | 1V including sync | 75ohms |
| 21 | Common ground (shield) | - | - |
| SCART arrangement 2 | |||
| Pin | Signal | Signal level | Impedance |
| 1 | Audio output B (right) | 0.5V rms | <1kohm |
| 2 | Audio input B (right) | 0.5V rms | >10kohm |
| 3 | Audio output A (left) | 0.5V rms | <1kohm |
| 4 | Ground (audio) | - | - |
| 5 | Ground | - | - |
| 6 | Audio input A (left) | 0.5V rms | >10kohm |
| 7 | - | - | - |
| 8 | |||
| 9 | Ground | - | - |
| 10 | |||
| 11 | - | - | - |
| 12 | |||
| 13 | Ground | - | - |
| 14 | Ground (blanking) | - | - |
| 15 | Chrominance input | 0.3V | 75ohms |
| 16 | - | - | - |
| 17 | Ground (video input & output) | - | - |
| 18 | - | - | - |
| 19 | Video output (composite) | 1V including sync | 75ohms |
| 20 | Luminance inputVideo input (composite) | 1V including sync | 75ohms |
| 21 | Common ground (shield) | - | - |
WARNING:
Do NOT attempt to work on ANY equipment unless you KNOW what you are doing.
Troubleshooting
Before calling a service technician, please check the following table for a possible cause of the problem and some solutions.
| Symptoms | Possible Solutions |
| TV will not turn on | Make sure the power cord is correctly plugged in, then press [Power].The remote control batteries may be dead. Replace the batteries. |
| No picture, no sound | Check if the TV is turned off or turned into stand-by mode.Check the Antenna/Cable connections.Press [Display] to see if you have selected the right signal input. |
| No sound, picture OK | The sound may be muted. Press [Vol+].The station may have broadcast difficulties. Try another channel.Check the speakers cable connections. |
| Poor sound, picture OK | The station may have broadcast difficulties. Try another channel.Check the speakers cable connections.Check if you have set the correct TV System. |
| Poor picture, sound OK | Check the antenna connections.The station may have broadcast difficulties. Try another channel.Adjust the picture from the Picture Menu. |
| Unable to select a certain channel | The channel may be skipped. See SKIP on page 10. |
| Poor colour or no colour | The station may have broadcast difficulties. Try another channel.Adjust the HUE and COLOUR in the Menu. |
| The remote control does not operate | There may be an obstruction between the remote control and the remote control sensor.The batteries may be installed with a wrong polarity.The remote control batteries may be dead. Replace the batteries.Check if you have entered TELETEXT mode. Press [Text] to quit. |
| Disorder display at power on | This may be caused by too short interval between power off and on.Unplug the power and restart. |
Desktop Quick Installation Guide:
- If the TV is to be desktop mounted,
a. Fasten two aluminum brackets to the plastic mounting base using six ST4*16C bolts as shown in fig.2.
b. Insert the brackets into the aluminum holder at bottom of the TV.
c. Place the TV upright, and then fasten the TV to the stand from backside using two M4*35 bolts.
- If you want to fit the loudspeakers together with the TV,
Fasten the aluminum connectors (already assembled on the speakers) to the TV as shown in fig.1 using six M4*10 bolts (three for each speaker), leaving alone the speaker stands.
- If you want to place the loudspeakers separately,
a. Dismantle the connectors from the speakers as fig.1.
b. Fasten the loudspeakers to the speaker-stands using four M4*16 bolts in the specified place (two for each stand).
Example: M 4 * 16
M: Flush bolt, ST: Pointed bolt
4: Diameter (mm)
16: Length (mm)
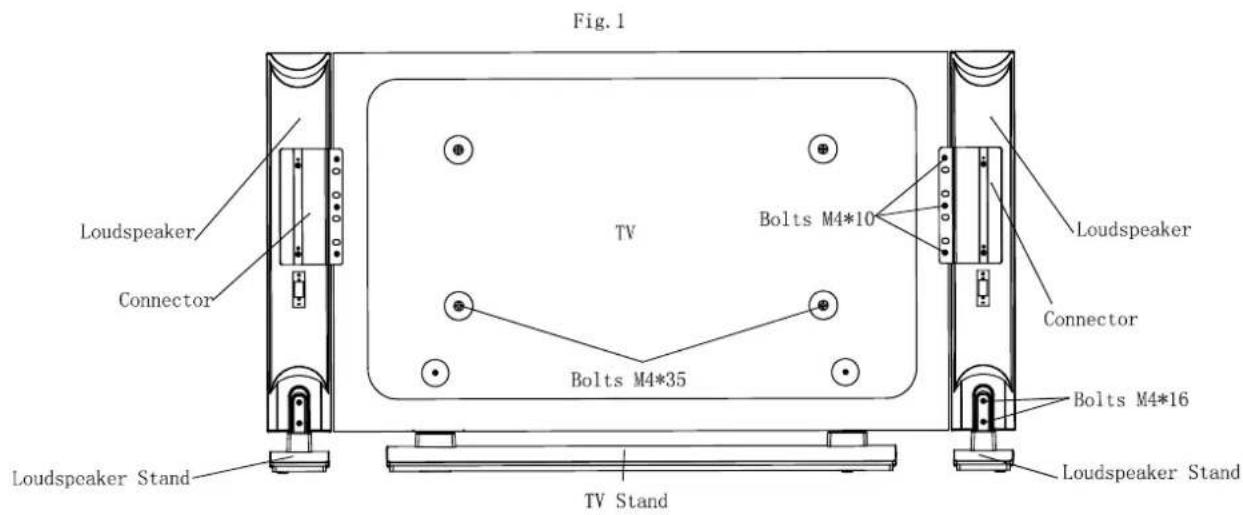
text_image
Fig. 1 Loudspeaker Connector TV Bolts M4*35 Bolts M4*10 Loudspeaker Connector Bolts M4*16 Loudspeaker Stand TV Stand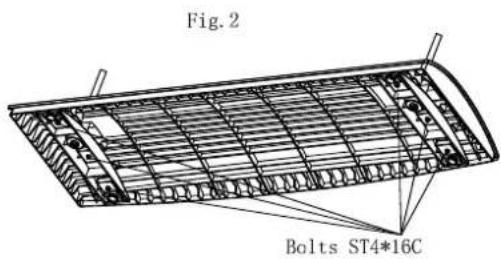
text_image
Fig. 2 Bolts ST4*16CPDP Wall-mounting Bracket Installation Guide
Read carefully before installation!
The installation guide should be retained for future reference.
Caution:
- To avoid mistakes or hazards, do NOT attempt to install the TV by yourself. Refer all installation to qualified servicing personnel.
- Do NOT install the TV on a sloping wall that makes the TV screen slant over 25 degrees from the vertical or it may tumble or cause injury.
- The instructions in this guide must be followed to correctly install the TV.
- It requires more than one person to install the TV.
- Before installation, examine whether the wall conforms to the specifications and whether the supplied parts can be fixed to it. The wall for mounting should sustain the weight of TV and speakers, e.g. cement wall or brick wall. Do NOT attempt to install the TV on a flexible wall such as sheetrock wall or plaster wall, unless the bolts are fixed on an area with standard building rigidity which sustains the weight of the TV and speakers. If the rigidity of the wall can not be measured, every mounting hole should sustain a frontal force of over 100N and a shearing force of over 200N.
- Use the specified electric drill and drill bit for drilling. The drilling holes should conform to the specifications.
- To avoid fire and shock, do NOT place a radiator, heater or humidifier below the installed TV.
- The TV should be kept away from moisture, sensors and power line. The TV should be kept away from impact and vibration.
- Be sure that the power supply is disconnected before installation for fear of fire and shock.
Wall-mounting Installation Steps:
- Take the brackets from the package, and check if there are serious defects (e.g. defective junctures).
- Adjust the bracket to the desired angle. Use the bolt 5 to adjust the angle by joining the holes of column beam 2 and holes of lever 8.
- Drill locating holes of the specified dimension in a vertical wall of concrete or brick. The hole size should be 11mm. The hole depth should accommodate the expanding tube of the bolt.
- Fix the bolts into the drilled holes in step3, and then cover each bolt with a metal washer. Join the four mounting holes in the bracket to the four bolts in the wall, cover each bolt with a metal washer, and then fasten with a screw nut. Check its rigidity by pulling the bracket.
- Fix the fixture disk to the back cover of the TV using four M8*40 bolts.
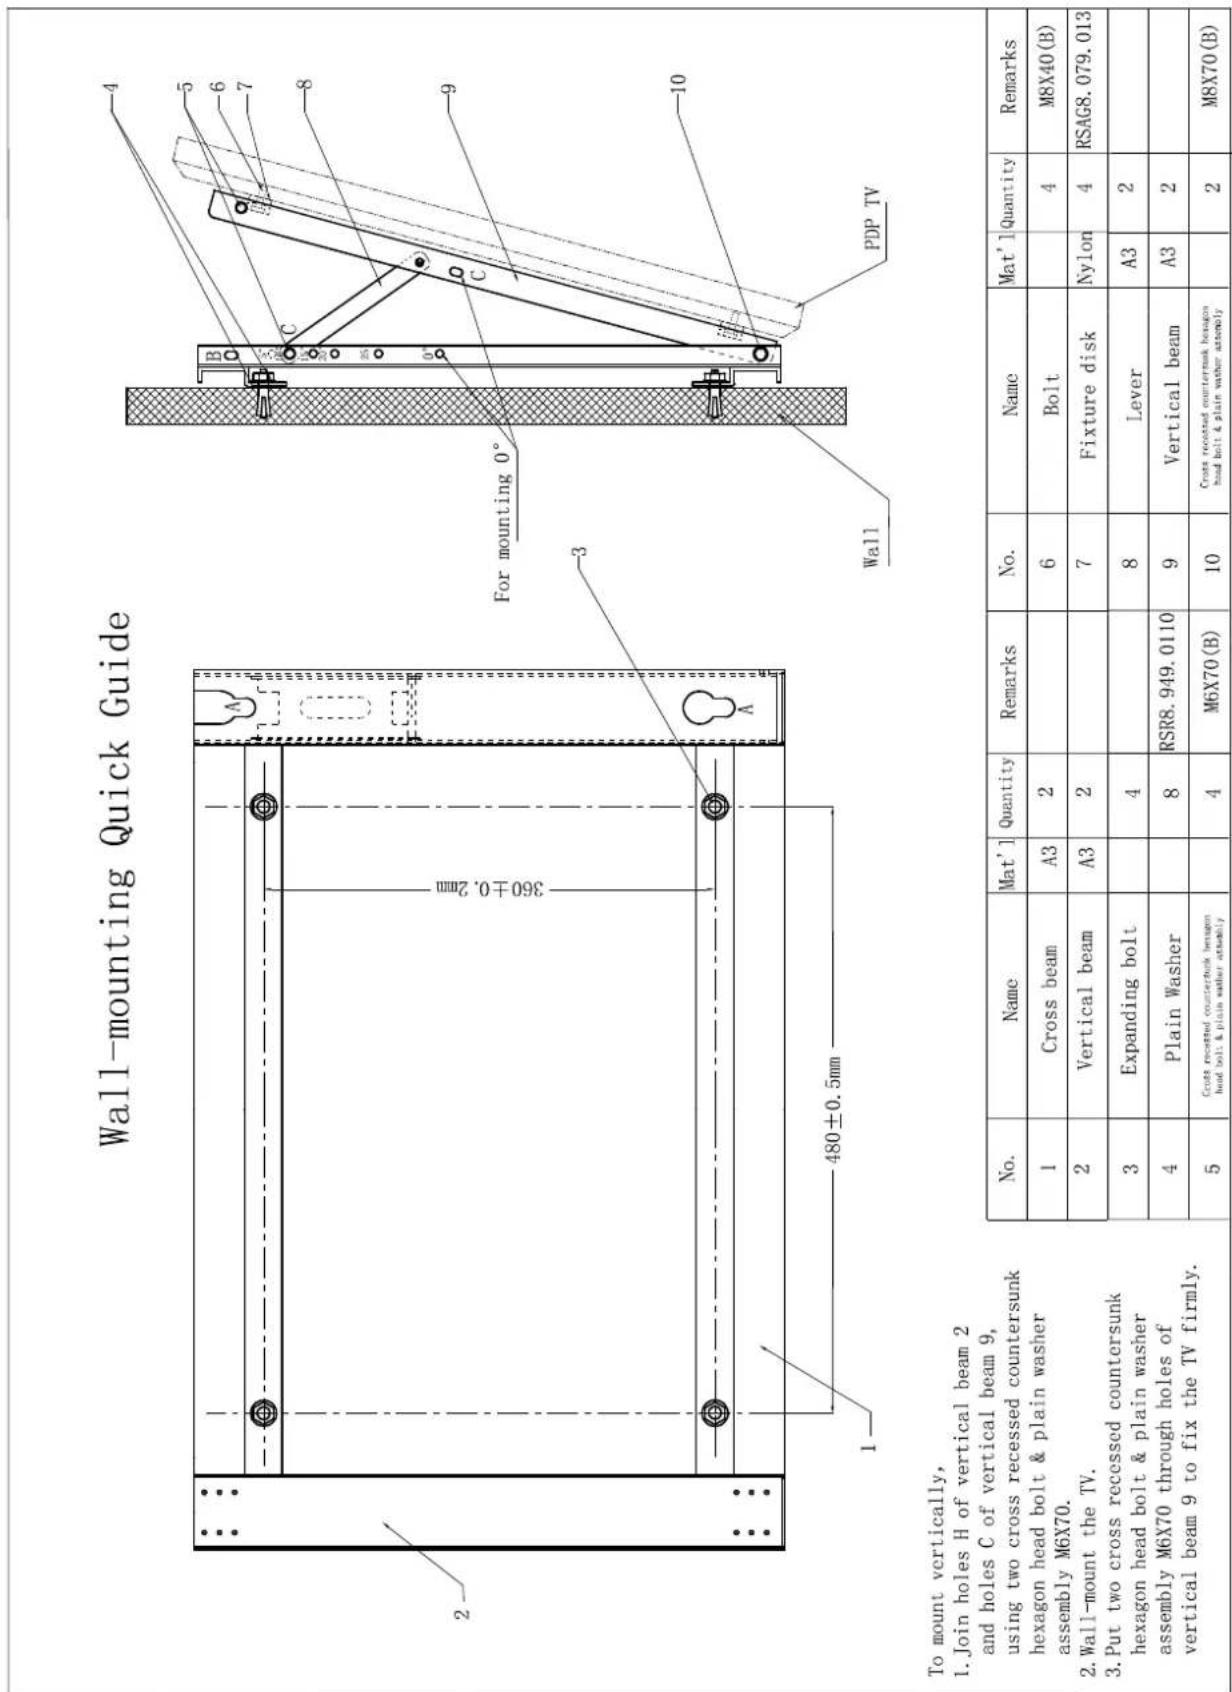
To mount vertically,
1. Join holes H of vertical beam 2
and holes C of vertical beam 9,
using two cross recessed countersunk
hexagon head bolt & plain washer
assembly M6X70.
2. Wall-mount the TV.
3. Put two cross recessed countersunk
hexagon head bolt & plain washer
assembly M6X70 through holes of
vertical beam 9 to fix the TV firmly.