SLRWBK25 - Fitness Equipment SereneLife - Free user manual and instructions
Find the device manual for free SLRWBK25 SereneLife in PDF.


| Product Type | Magnetic Rowing Machine |
| Brand | SereneLife |
| Model | SLRWBK25 |
| Assembled Dimensions (L x W x H) | 70 x 23.6 x 42.1 inches |
| Folded Dimensions (L x W x H) | 32.68 x 23.62 x 66.93 inches |
| Slide Rail Length | 41.34 inches |
| Rowing Distance | 27.72 inches |
| Flywheel Size | 7.09 x 1.18 inches; 4.4 lbs |
| Maximum User Weight | 264.55 lbs (120 kg) |
| Resistance Type | Magnetic |
| Resistance Levels | 8 |
| Display Type | Digital LCD |
| Display Functions | Time, Speed, Distance, Count, Calories, Pulse, Scan |
| Power Source | 2 x AAA batteries (included) |
| Auto Power-Off | After 4 minutes of inactivity |
| Construction Material | Steel alloy, engineered ABS |
| Seat Type | Padded, smooth-gliding |
| Handlebar | Comfortable foam grip, reinforced pull cable |
| Foot Pedals | Pedal-style with adjustable straps |
| Portability | Foldable design with wheels |
| Maintenance | Clean with damp cloth; avoid solvents |
| Safety Features | Max weight limit, stable base, emergency stop (via tension control) |
| Assembly Required | Yes, some assembly required |
Frequently Asked Questions - SLRWBK25 SereneLife
User questions about SLRWBK25 SereneLife
0 question about this device. Answer the ones you know or ask your own.
Ask a new question about this device
Download the instructions for your Fitness Equipment in PDF format for free! Find your manual SLRWBK25 - SereneLife and take your electronic device back in hand. On this page are published all the documents necessary for the use of your device. SLRWBK25 by SereneLife.
USER MANUAL SLRWBK25 SereneLife
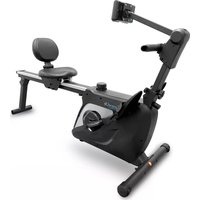
natural_image
Black SRoneLife stationary exercise machine with adjustable arm and head (no visible text or symbols)

Sports Training Row Machine w/ Auto Power-Off Battery Saving Function, Portable Folding Style
User Manual
Please read this manual carefully before using the product, and keep it in a safe place for future reference.
IMPORTANT SAFETY INFORMATION
Please note the following safety precautions before exercising:
- Read all instructions before assembly and operation.
- Check all screws, nuts and other connections before using the bike.
- Do not expose the equipment to damp places, which will cause failure.
- When assembling, it is best to place parts on a mat (rubber or wood) to avoid soiling.
- Before exercise, make sure that no other items are placed within 2 meters around the equipment.
- Clean only with a damp cloth, do not use solvent cleaners and also note after each exercise should be wiped off the sweat on the equipment.
- Incorrect or excessive exercise can damage your health. It is recommended to consult a doctor before exercising. He will give you a maximum amount of training (including pulse, watts, duration, etc.) so that you can exercise and get accurate information.
Note: This equipment is not suitable for therapeutic use.
-
Only when the machine is in normal conditions to exercise, maintenance can only use the original accessories provide by the factory.
-
This machine can only be used by one person at a time.
-
Always wear sport clothes and sports shoes when exercising, especially the sports shoes must fit.
-
If at any time during exercise you feel faint, dizzy or experience pain, stop and consult your physician.
-
Children and disabled persons can only use when they are under guardianship.
-
The design of this car can adjust the size of the resistance to adjust the motion intensity, and can be adjusted back and forth between light and heavy to select your suitable resistance.
-
The maximum weight capacity of this unit is 100 kilograms.
-
This equipment is designed for indoor use only!
Attention: Make sure all screws and nuts are tightened before exercise.
TIP: THE FRONT END CAP CAN BE MOVED, IT ALLOWS YOU TO MOVE THE BIKE
EXPLODED DRAWING AND PARTS LIST

| No Spe Qty No Spe Qty | ||||
| 1 Main frame 1 39 | absorber | 1 | ||
| 2 Front bottom tube 1 40 | Webbing cap | 1 | ||
| 3 slider seat weld 1 41 | Webbing | 1 | ||
| 4 Bolt M8*60 2 | 42 | Monitor | 1 | |
| 5 Washer D17 3 | 43 | Monitor support | 1 | |
| 6 Washer D8 2 44 Handlebar | 1 | |||
| 7 Feet cap with wheel | 2 45 Foam handlebar | 2 | ||
| 8 Cap (anti slider) | 2 46 Nut M10*1 | 4 | ||
| 9 Bolt M12*160 | 4 47 Axis Blade D10 | 6 | ||
| 10 pedals | 2 48 axis 6000RS | 7 | ||
| 11 magnetic board weld | 1 | 49 | webbing roller sleeve | 3 |
| 12 Nylon nut M8 | 10 | 50 | webbing roller | 2 |
| 13 bolt M8*25 | 4 51 Washer D10 | 4 | ||
| 14 Washer Φ16*Φ8.5*1.5 | 10 | 52 | Nylon nut M6 | 7 |
| 15L L Aluminum rock | 1 | 53 | Bolt M6*50 | 1 |
| 15R R Aluminum rock | 1 | 54 | Inner cap+disk | 1 |
| 16 Bolt M5*30 2 55 Bolt M6*15 | 12 | |||
| 17 Magnetic board 2 | 1 | 56 | Nut M10*1*H5 | 4 |
| 18 Bolt M5*15 | 12 | 57 | Belt disk+axis sleeve | 1 |
| 19 slider cushion | 10 | 58 | webbing disk | 1 |
| 20 Bolt M8*130 | 4 59 Spring | 1 | ||
| 21 Slider wheel | 4 | 60 | Webbing disk axis | 1 |
| 22 limit position wheel | 2 | 61 | Webbing disk axis cover | 1 |
| 23 Nylon nut M10 | 1 | 62 | Screw 4*15 | 4 |
| 24 Long bushing | 2 | 63 | flywheel axis | 1 |
| 25 Nut | 2 64 Screw M5*12 | 4 | ||
| 26 Seat chshion | 1 | 65 | Spring washer D6 | 6 |
| 27 Bolt M6*15 4 66 Screw M8*80 | 1 | |||
| 28 slider tube cap | 1 | 67 | monitor frame weld | 1 |
| 29 limit position cushion 2 68 Screw M4*10 | 2 | |||
| 30L L chain cover | 1 | 69 | Snap ring | 1 |
| 30R R chain cover | 1 | 70 | 32-8 axis sleeve | 2 |
| 31 U blade | 2 | 71 | Handle pulse frame 2 | 1 |
| 32 Screw ST4.2*20 | 12 | 72 | Handle pulse frame 1 | 1 |
| 33 Bolt 2 73 Screw M6*98 1 | ||||
| 34 Screw M10*95 1 74 Belt 1 | ||||
| 35 Tension controller 1 75 Magnetic 8 | ||||
| 36 Washer Φ18*Φ5*1.5 1 76 Round magnetic | 1 | |||
| 37 Screw M5*50 1 77 Bolt M5*12 2 | ||||
| 38 Brake frame | 1 | 78 Short bushing | 6 | |
| 79 Nut M10*1.25 | 2 | 113 | Tube Cap S17 | 2 |
| 80 Tube cap | 1 | 114 | Magnetic board | 1 |
| 81 Tube cap | 2 | 115 | Tube cap | 1 |
| 82 Sensor wire | 2 | 116 | PC board 2 | 1 |
| 83 Washer Φ6.2*Φ16*1.5 | 8 | 117 | PC board 1 | 1 |
| 84 Screw ST4.2*20 | 14 | 118 | Crank cover | 2 |
| 85 Cushion | 2 | 119 | flywheel | 1 |
| 86 Webbing flywheel 2 | 1 | 120 | Idler bushing | 1 |
| 87 6900RS | 2 | 121 | Nut M6 | 4 |
| 88L/R 38-6 L&R axis sleeve | 2 | 122 | axis+cover | 1 |
| 89L/R L&R upright decoration cover | 2 | 123 | Axis 6300Z | 1 |
| 90 Knob | 1 | 124 | D35hole ring | 2 |
| 91 Bandage | 2 | 125 | Magnetic board axis | 1 |
| 92 Front upright weld | 1 | 126 | Snap ring D12 | 2 |
| 93 Rear support tube weld | 1 | 127 | Axis 608Z | 6 |
| 94 backrest frame weld | 1 | 128 | Magnetic 1 | |
| 95L/R L&R pedals | 2 | 129 | Bolt M6*40 | 2 |
| 96L/R L&R pedals tie | 2 | 130 | Screw M8*75 | 1 |
| 97 Belt disk | 1 | 131 | Washer Φ10.2*Φ20*2 | 4 |
| 98L/R L&R crank | 2 | 132 | Washer Φ10.2*Φ14*1 | 2 |
| 99 Mid axis+disk | 1 | 133 | Screw M5*5 | 1 |
| 100 Axis 6003Z | 4 | 134 | Washer Φ6*Φ16*1.5 | 2 |
| 101 Snap ring D17 | 6 | 135 | Washer D12 | 1 |
| 102 nylon axis frame | 2 | 136 | Screw M6*20 | 2 |
| 103 Axis blade | 2 | 137 | Bolt M8*20 | 2 |
| 104 Screw M6*10 | 6 | 138 | Adjust feet cushion | 1 |
| 105 Belt | 1 | 139 | 16-8 axis | 2 |
| 106 Nut | 1 | 140 | Single axis | 1 |
| 107 Inner cap | 1 | 141 | Axis 16003 | 2 |
| 108 Plug handlebar | 1 | 142 | Sensor | 1 |
| 109 magnetic frame | 1 | 143 | Round Magnetic | 1 |
| 110 Plastic plug | 2 | A | Wrench S13, 14, 15 | 1 |
| 111 Backrest | 1 | B | Wrench S17,19 | 1 |
| 112 32axis | 2 | C | Inner wrench S5 | 1 |
Assembly Instructions
1. Preparatory Work:
A. Make sure there is enough space before installation;
B. Confirm all of the components are all-ready before installation.
(refer to previous product exploded view which indicates the name and the location of the components);
C. Use the provided tools or the special self-contained tools to install
2. Assembly instruction:
Step 1:
- Loose knob (90), washer (131) rear support tube weld (93); lift rear support tube weld (93), lock well with washer (131), knob (90); secure cap (8)
- Loose the bolt (4), washer (6), nut (25) from front bottom tube (2); secure bolt (4), washer (6), nut (25) front bottom tube (2) to main frame (1).
- Loose knob (106) washer (131) spring plug (110) from front upright (92), lift front upright (92), secure front upright (92) with spring plug (110), lock well with nut (106) washer (131) as pic.

Step 2:
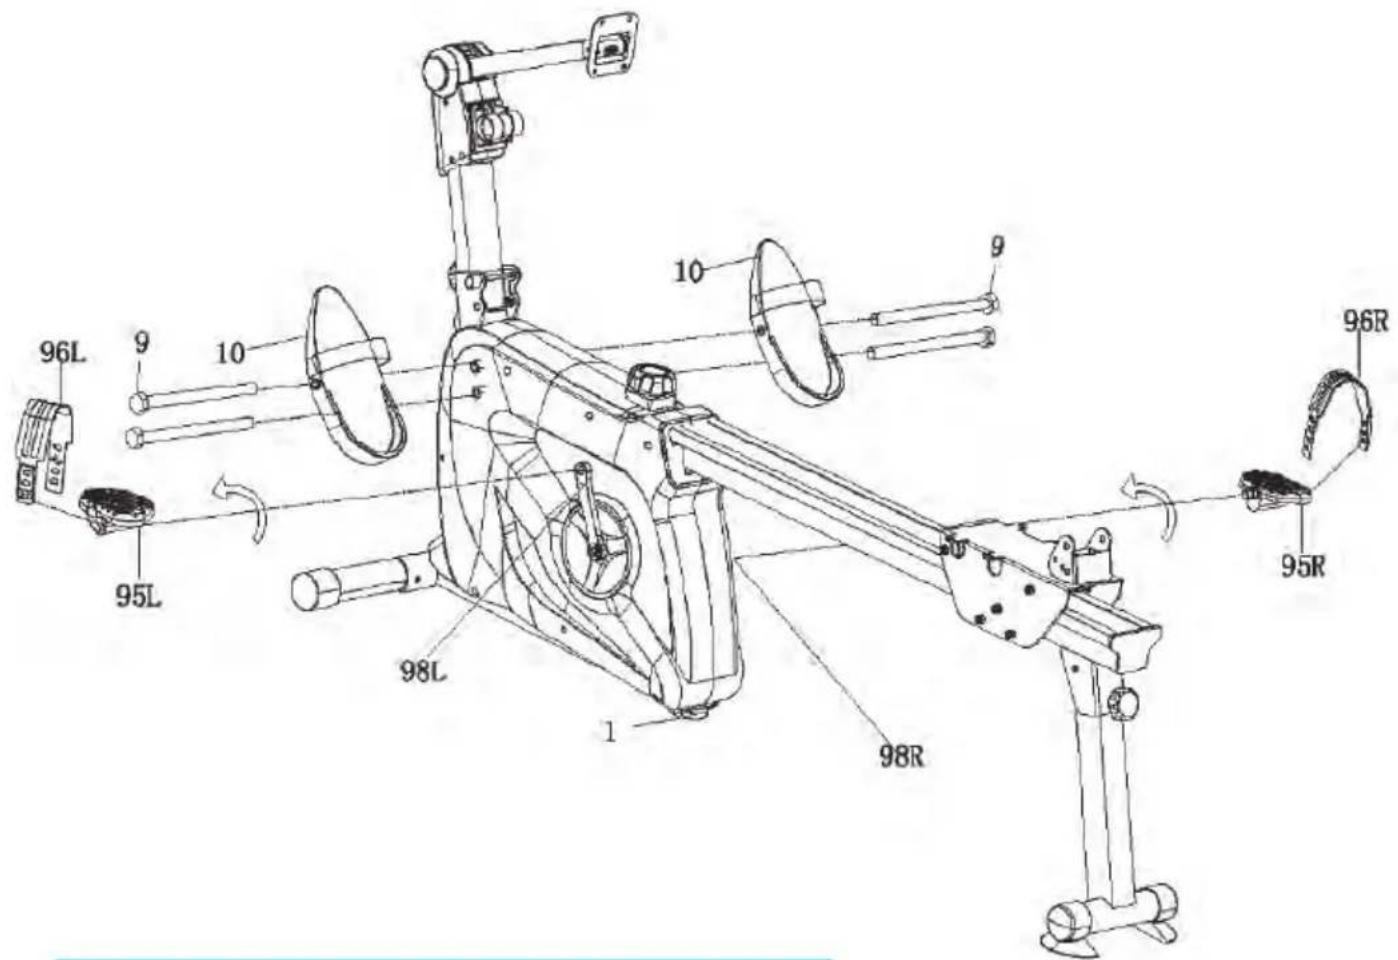
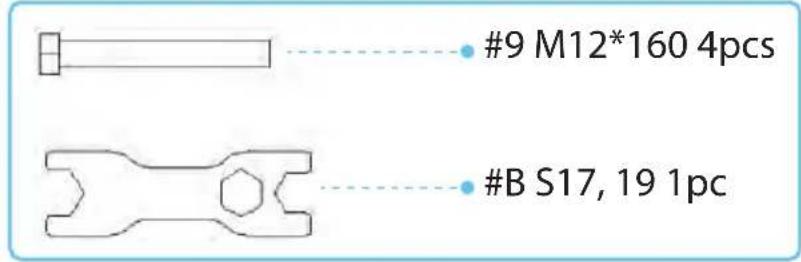
- Secure stepper (10) to main frame (1) with screw (9) as pic.
- Secure L&R pedals (95L/R) to L&R crank (98L/R); secure bandage (96L/R) to L&R pedals (95L/R). (Attn: Lock R pedal (95R) clockwise, lock L pedal (95L) with counter clockwise. Lock well L/R pedals (95L), (95R).
Step 3:
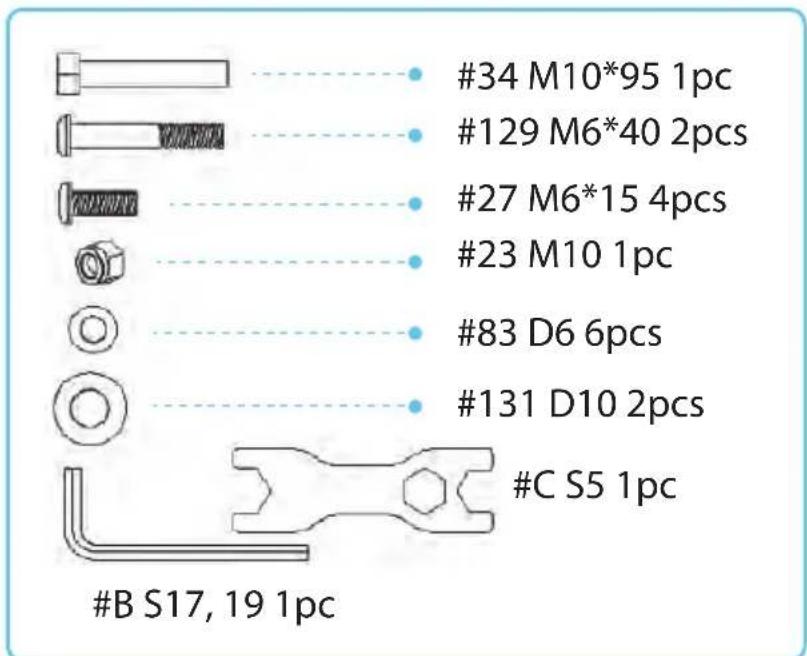
- Loose washer (83) bolt (27) from seat cushion (26); secure seat cushion (26) to slider weld with bolt (27), washer;
-
Secure well backrest (111) to backrest weld (94) with bolt (129) washer (83).
-
Lock well with screw (34) washer (131), slider weld (3), backrest weld (94), washer (131), nylon nut (23), cover cap (131).
- Adjust suitable backrest positon when you use back rest function. Lock plug well (110) with suitable position, fixed backrest weld (94); Adjust suitable seat cushion (26) position, lock well plug handlebar (108) fix the slider seat (3).
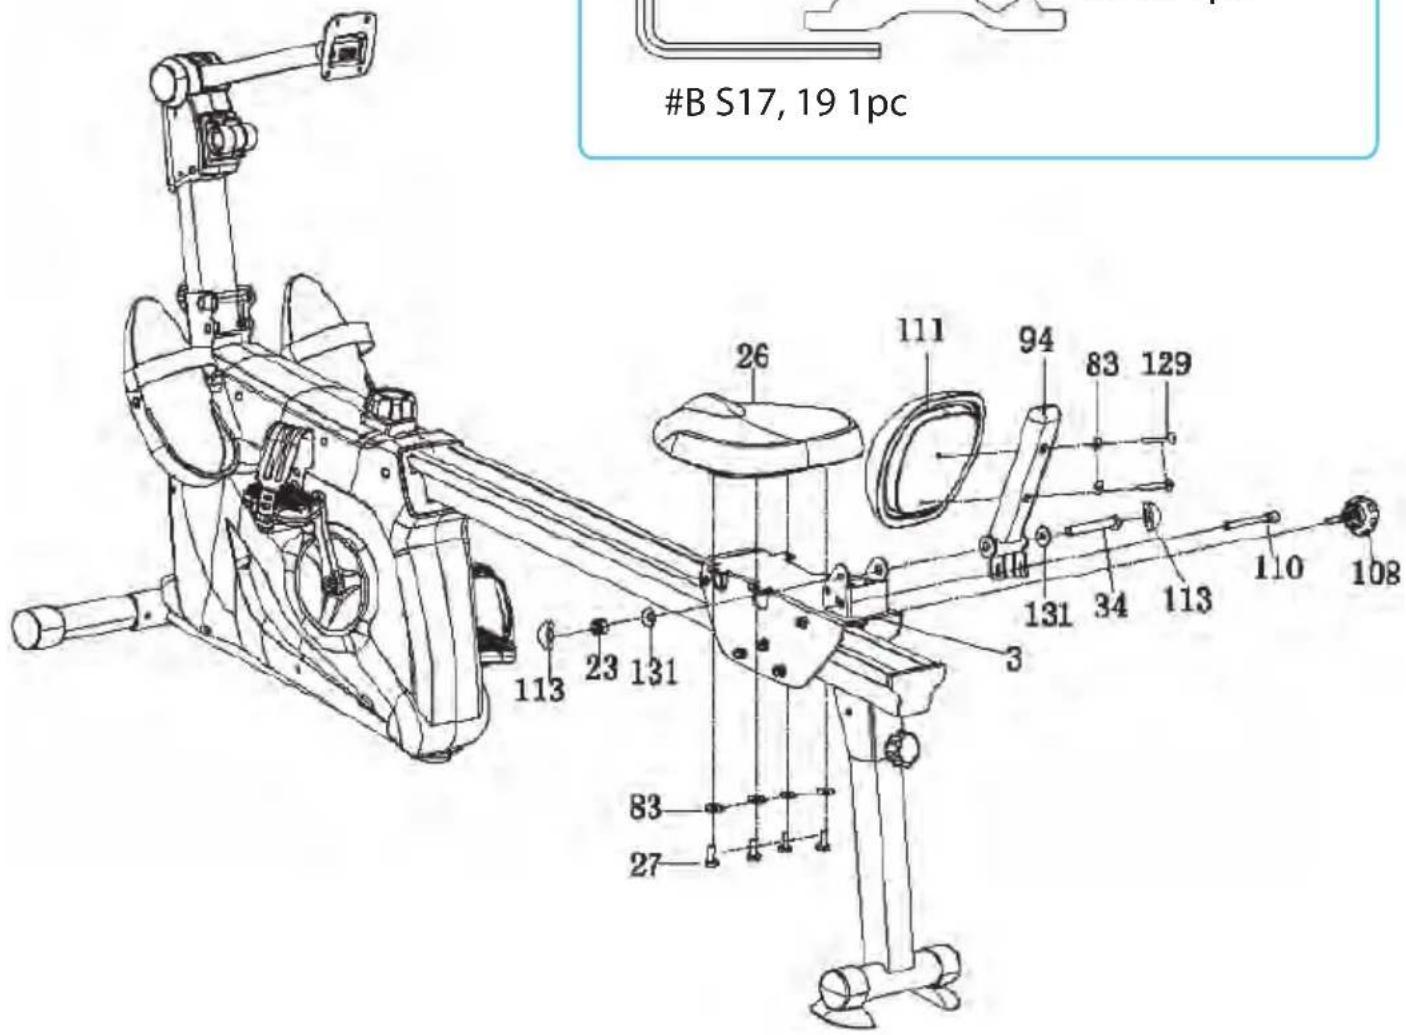
Step 4:
- Secure handlebar (44) to webbing fixed set (40), secure the foam (45) to handle bar (44).
- Connect monitor (42) with sensor wire (82), (142), loose screw (64) of monitor (42); lock well monitor (42) monitor support (43) with screw (64) as pic.

EXERCISE MONITOR INSTRUCTION MANUAL DISPLAY INFORMATION

BUTTONS
1. MODE:
Press this button to changeover display or choose the window needs to be set.
SET: To set value of time, count, distance and calories when not in scan mode.
RESET: Press to reset time, count, distance and calories.
FUNCTIONS
2. SCAN
- Press MODE button until "SCAN" appears. Speed computer will rotate through all the 5 functions: Time, Speed, Distance, Calorie and Pulse (IF HAVE).
Each display will be hold for 6 seconds.
-
Press MODE button until "SCAN" appears. Count computer will rotate through all the 6 functions: Time, Count, Distance, Calorie, Total count and Pulse (IF HAVE). Each display will be hold for 6 seconds.
-
COUNT- count computer:
Display instantaneous count and the range is 0\~9999.X10000 Count.
- SPEED - speed computer:
Display instantaneous speed and the range is 0\~999.9 Mile/H or KM/H.
5. TIME
Count the total time from exercise start to the end and the range is 0:00 \~ 99:59 Minute.
6. CALORIES (CAL):
Count the total calories consumed from exercise start to the end and the range is 0.0 \~ 9999 CAL.
7. DISTANCE (DIST):
Count the total distance from exercise start to the end and the range is 0.00 \~ 999.9KM or Miles.
8. TOTAL COUNT (TCNT) - count computer:
Count the total rowing strokes after installing the battery.
The range is 0\~9999, X10000 Count.
9. PULSE (IF HAVE):
Hold the wireless pulse sensor and read your heart rate per minute.
The range is 40 \~ 240bpm. It will display "P" to pause the pulse test if there is no pulse signal over 4 seconds.
10. AUTO START/STOP
Without any signal of exercise or operation for 4 minutes, the power will turn off automatically. Once receive exercise or operation signal, the monitor will turn on automatically.
11. ALARM
The functions of time, count distance and calorie can be set countdown, any of above value goes to zero, the computer will alarm for 5 seconds.
Press MODE to select the function, then press SET to adjust the value.
BATTERY REPLACE
When the display becomes dim or illegible, remove the battery and replace with SIZE AAA UM4 R03.

The Warm Up Phase
This stage helps get the blood flowing around the body and the muscles working properly. It will also reduce the risk of cramp and muscle injury.
It is advisable to do a few stretching exercises as shown below. Each stretch should be held for approximately 30 seconds, do not force or jerk your muscles into a stretch - if it hurts, STOP.
1. Down Stretch
Bend your knees slightly and body slowly, let your back and shoulders relax, and try to touch your toes. Keep it for 10 \~15 seconds, repeat 3 times.
2. Hamstring Stretch
Sitting on a clean cushion, then bend your right foot. Place your left foot against the inner thigh of your right foot. Try to touch your toes. Keep it for 10 \~15 seconds, repeat each foot 3 times.
3. Calf and Foot Stretching
Stand and place both hands on a wall or a tree, one foot behind. Keep the behind foot stand and it's heel on the floor, then tilt to the wall or tree. Keep it for 10 \~15 seconds, repeat each foot 3 times.
4. Quadriceps Stretch
Place your left hands against a wall or a desk to aid your balance. Then grasp your ankle with your left hand and pull your foot toward your buttocks. Keep it for 10 \~15 seconds, repeat each foot 3 times.
5. Groin Stretch
Sit with your knees flexed and soles of feet together. Hold your ankles and bend at your hips. Keep it for 10 \~15 seconds, repeat 3 times.

Exercise Stage
This stage should last for a minimum of 12 minutes though most people start at about 15\~20 minutes. After repeat it easily for several times, you can increase training strength. After exercising for a period of time, your heart beat will be close to the best position in the graph as below (Shaded part).
Note: This exercising is for your whole life, it can not complete in one night, so you should keep it.
HEART RATE

area
| AGE | MAXIMUM | COOL DOWN | | --- | ------- | --------- | | 20 | 160 | 120 | | 40 | 150 | 120 | | 75 | 150 | 90 |Recovery Phase
This stage is to let your Cardio-vascular System and muscles wind down. This is a repeat of the warm up exercise e.g. reduce your tempo, continue for approximately 5 minutes. Then repeat the exercise phase, please be careful not to force or jerk your muscles. When using elliptical fitness exercises, please don't increase training intensity arbitrarily. It may make your leg muscles sprain, which means you can't continue exercising for a long time.
Equipment Tip
Adjusting the Tension Control can change the resistance of the equipment, the high resistance the harder to step. Users can use this device to find a suitable speed.
Features:
• Smart Fitness Rowing Machine
- Compact Gym Exercise Rower Style
- For Sports Training, Cardio Fitness, Weight Loss Fat Burning
• Measures Time, Distance, Strides, Calories Burned
• Digital LCD Display Computer Panel
- Adjustable Resistance Rower Level Setting
- Portable Folding Stand-Up Design for Easy Storage
- Quiet, Smooth-Gliding Padded Row Seat
- Comfortable Handlebar Grip and Pedal-Style Footrests
- Rugged Construction with Reinforced Handlebar Pull Cable
- Safety Certified Reliable & Lab Tested
• Auto Power-Off Battery Saving Function
- Perfect for Indoor Home & Office Gym
- Some Assembly Required
Technical Specs:
- Rowing Resistance Type: Magnetic
- Adjustable Time Setting: Up to 99 Minutes
• Maximum Rowing Distance Measurement: 999.9 Meters - Selectable Resistance / Row Intensity: (8) Levels
- Construction Material: Steel Metal Alloy, Engineered ABS
- User Weight Capacity: Up to 264.55 lbs.
• Flywheel Size: 7.09" x 1.18" -inches; 4.4 lbs. - Battery Operated Computer, Requires (2) x 'AAA' Batteries, Included
- Slide Rail Length: 41.34" -inches
- Rowing Distance: 27.72" -inches
- Folded: Collapsed Rower Size (L x W x H): 32.68"x 23.62" x 66.93" - inches
- Total Assembled Rower Size (L x W x H): 70" x 23.6" x 42.1" -inches
SereneLife
Questions? Issues?
We are here to help!
Phone: (1) 718-535-1800
Email: support@pyleusa.com


- Please read this manual carefully before using the product, and keep it in a safe place for future reference.
- IMPORTANT SAFETY INFORMATION
- Please note the following safety precautions before exercising:
- Assembly Instructions
- Preparatory Work:
- Assembly instruction:
- Step 1:
- Step 2:
- Step 3:
- Step 4:
- EXERCISE MONITOR INSTRUCTION MANUAL DISPLAY INFORMATION
- BUTTONS
- MODE:
- FUNCTIONS
- SCAN
- TIME
- CALORIES (CAL):
- DISTANCE (DIST):
- TOTAL COUNT (TCNT) - count computer:
- PULSE (IF HAVE):
- AUTO START/STOP
- ALARM
- BATTERY REPLACE
- The Warm Up Phase
- Down Stretch
- Hamstring Stretch
- Calf and Foot Stretching
- Quadriceps Stretch
- Groin Stretch
- Exercise Stage
- Recovery Phase
- Equipment Tip
- Features:
- Technical Specs:
- SereneLife
Brand : SereneLife
Model : SLRWBK25
Category : Fitness Equipment