
SLVBX3 - Fitness Equipment SereneLife - Free user manual and instructions
Find the device manual for free SLVBX3 SereneLife in PDF.


| Product Type | Fitness Vibration Plate |
| Model | SereneLife SLVBX3 |
| Dimensions (L x W x H) | 30 x 30 x 15 cm |
| Weight | 10 kg |
| Power Supply | 120V AC, 60Hz |
| Motor Power | 200W |
| Maximum User Weight | 150 kg |
| Vibration Modes | 10 preset modes |
| Speed Levels | 1-99 adjustable |
| Timer | 1-99 minutes |
| Remote Control | Included (wireless) |
| Display | LED screen |
| Material | ABS plastic + steel frame |
| Non-Slip Surface | Yes, textured rubber mat |
| Auto Shut-Off | Yes, after 30 min inactivity |
| Overload Protection | Yes |
| Cleaning | Wipe with damp cloth; no abrasive cleaners |
| Storage | Store in dry place, <40°C |
| Spare Parts Available | Remote control, power cord, foot pads |
| Warranty | 1 year limited |
Frequently Asked Questions - SLVBX3 SereneLife
User questions about SLVBX3 SereneLife
0 question about this device. Answer the ones you know or ask your own.
Ask a new question about this device
Download the instructions for your Fitness Equipment in PDF format for free! Find your manual SLVBX3 - SereneLife and take your electronic device back in hand. On this page are published all the documents necessary for the use of your device. SLVBX3 by SereneLife.
USER MANUAL SLVBX3 SereneLife
natural_image
Woman sitting on a white surface next to an outdoor black-and-gray weightlifting exercise kit, with no visible text or symbols.serenelife

*☆☆☆☆


Vibrating Platform Exercise
and Workout Trainer
with Adjustable Speed
USER MANUAL
WARNING
To reduce risk of injury, the user must read and understand this instruction manual before using the Standing Vibration Fitness Machine. This machine is intended for home use only in accordance with the instructions provided in this manual.
Please read these instructions carefully and retain for future use.
IMPORTANT SAFETY INSTRUCTIONS
• Not suitable for children or pregnant woman!
- Use for the intended purpose only.
- Only use inside, only use in dry environment.
- Do not use if the product is damaged.
- Do not jump on the plate or the machine.
- Place the device only on a solid, level, and moisture-resistant surface.
• After use, the machine must be switched off and unplugged.
- Do some warming-up exercises before start using the machine.
- Increase speed intensity and duration of exercises gradually.
- Only one person is allowed to use the machine at one time.
- Consult your doctor immediately when you feel: sick, experience pain in joints or other locations, aches abnormal heartbeat rate or any other abnormal symptoms.
- If you have not done any sport for a long time or if you have a heart problem, neurologic problem, circulatory disturbances or orthopedic problems, you should first consult your doctor before operate this machine.
- Stop using the machine immediately if you feel tired, uncomfortable or dizzy.
- Don't use this machine for more than 10 min at a time.
- This appliance is not intended for use by persons with reduced physical, sensory or mental capabilities, or lack of experience and knowledge, unless they have been given supervision or instruction concerning use of the appliance by a person responsible for their safety.
WARNING: Before beginning any exercise programme, consult your physician. This is especially important for persons with pre-existing health problems. The seller assumes no responsibility for personal injury or property damage sustained by or through the use of this product.
MEDICAL RECOMMENDATIONS
You MUST NOT use the Vibration Machine without your doctor's consent if you:
- Are pregnant
- Have had a recent operation or surgery
- Have knee, shoulder, back or neck injuries
- Retinal condition
You are strongly recommended to consult your doctor before using the Vibration Machine if you have any of the following:
• Heart condition or cardiovascular disease
• High blood pressure
- Acute thrombosis
- Acute hernia
- Severe diabetes
- Epilepsy
- Severe migraines
- Malignant tumour
- Pacemaker, metal implant, artificial joint(s) or limb(s), stents or IUDs, metal plates or pins
- Any recent illnesses or infections
- Deep Vein Thrombosis
• Cancer
ASSEMBLY INSTRUCTIONS
STEP 1
- Choose a suitable place for your vibration machine. Leave yourself at least 1 meter of space either side of the machine to avoid injury. Place the machine on a solid, flat level surface with a suitable cover for your floor or carpet.
- Insert 2 x AAA Alkaline batteries into the remote control unit.
STEP 2
Resistance Bands
- Attach the resistance bands by locating the metal arm underneath the machine. Move it out so the arm is pointing out from underneath the disc. Loosen the carabiner lock (if required) on the end of the resistance band, clip it through the hole at the end of the metal bar, then screw the lock on the carabiner clip in place.
Note: Make sure that the carabiner clip is fastened by screwing the lock in place, to ensure the clip does not come loose during use.
Adjusting Resistance Bands
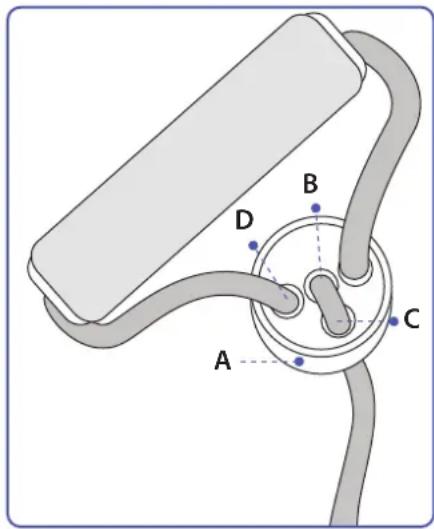
- If you find you need to adjust the length of your resistance band, take Part A in one hand and start to thread through the band from underneath. This should create a small loop at point B. Pull point D away from Part A (whilst keeping hold of Part A) so that the loop disappears.
This will shorten the length of the resistance band overall.
- To lengthen your resistance band, thread a small amount of band through Part A as before to create a loop at point B. Then pull the band at point C so that the handle moves towards Part A. This should increase the loop and now you will need to thread the loop through Part A so it disappears.
Note: When not in use please ensure resistance bands are stored away safely so they are not a potential trip hazard.
FUNCTIONAL DESCRIPTION
Control Panel
Remote Control

Functional Description
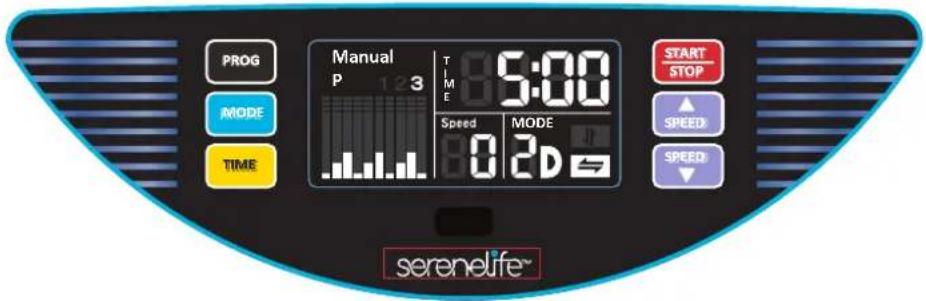
- Ensure the supplied power cord is plugged in to the machine first, then plugged in to a suitable power socket. Turn the power switch on the rear of the machine to the 'I' position ensuring the switch illuminates. The machine will be in Manual Mode, display will read '2D' in the Mode display. '5' in the Time display and '00' in the Speed display.
- Before starting the machine, select which program you wish to use. Choose between Manual, which the machine will be in once it is switched on, program 1, program 2 or program 3. The display will indicate which program you have chosen. To switch between programs either press or hold the 'P' on the display or choose the required program on the remote (P1, P2, P3 or M for manual).
- Once you've chosen your desired program, set the length of time by pressing or holding the Time button on the display or remote. Press the Speed + or – buttons on the display or remote to set the speed levels.
Manual Mode
Once the machine has started it is in manual mode, you will be able to change the length of time of the workout by pressing or holding the Time button on the remote control or display. The speed of the machine can also be changed in this mode by pressing the + (plus) or - (minus) button on the remote control or display. In manual mode the machine will start at the lowest speed, so you will not be able to decrease the speed.
You will be able to stop this workout at any time by pressing the Start/Stop button on the display or remote.
At the end of your workout, turn off the machine using the switch at the back and remove the plug from the mains supply.
Pre-set Programs
There are 3 pre-set programs for you to choose from. Do this by either pressing the P button on the display or the required program button on the remote (P1, P2 or P3). Set your desired length of time as instructed in the Manual program and then press the Start/Stop button on the display or remote to start the machine. Once you have started your pre-set program you will be able to change the mode and length of time but you will NOT be able to change the speed level of the machine. To stop the machine at any time press the Start/Stop button on the display or remote.

natural_image
Black and white photo of a Setro cardio machine with visible branding and control panel (no text or symbols on device body)Programs
The machine has 3 different types of Mode
| TIME (Minutes) | P1 (SPEED) Oscillation+Linear | P2 (SPEED) Oscillation+Linear | P3 (SPEED) Linear |
| 10-9 | 2 | 7 | 1 |
| 9-8 | 4 | 3 | 5 |
| 8-7 | 6 | 7 | 3 |
| 7-6 | 6 | 3 | 1 |
| 6-5 | 6 | 7 | 5 |
| 5-4 | 6 | 3 | 3 |
| 4-3 | 6 | 7 | 1 |
| 3-2 | 6 | 3 | 5 |
| 2-1 | 4 | 7 | 3 |
| 1-0 | 2 | 3 | 1 |
Exercise Guide:

natural_image
Illustration of a woman standing on a black balance scale, wearing athletic wear (no text or symbols)Neutral Stance
Increases balance, great as a warm up
- Place feet parallel to sides of platform.
• Widen stance for greater challenge.

One-Legged Stance
Strengthens legs, increases balance
• Always place foot either above or below the knee.
- Keep hips even and rotate knee out to side.

Deep Squat
Increases blood flow to knees, quadriceps and lower extremities
- Bend knees but keep length in spine, shoulders back, chest forward, and chin parallel to floor
natural_image
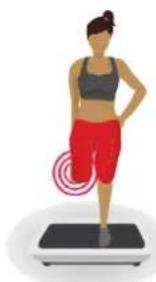
Illustration of a woman standing on a balance scale with a circular motion indicator (no text or symbols)Quadricep Stretch Promotes flexibility & blood flow to feet, ankles and calves, increases balance
- Bend one knee and hold ankle with hand. - Keep knees even & length in spine, shoulders back, and chest forward.
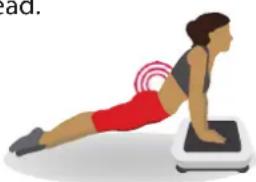
Advanced Push Up
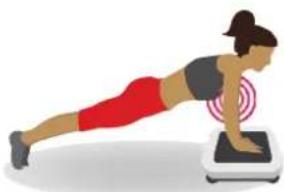
Strengthens and tones abdominal region and upper body (biceps, triceps and pectorals)
- Place hands directly underneath shoulders and tighten abdominal muscles so body is in alignment.
natural_image
Illustration of a person performing a plank exercise on a white scale (no text or symbols)Back Strengthener
Strengthens back and arms, releases tension in shoulders
- Place feet slightly pigeon toed, directly under hips (bend knees slightly if needed). - Tilt the pelvis forward, lengthen through spine, tuck chin under for alignment.

natural_image
Illustration of a person performing a forward bend yoga pose on a white balance scale (no text or symbols)Calf Massage
Soothes tired feet and legs, helps improve circulation to lower extremities
- Allow upper body to relax and feel grounded of this posture. - Lengthen back of neck along floor.
Advanced Tricep Curl
Strengthens whole body and opens up chest
- Place hands parallel and turned towa body. Lift buttocks and lengthen through inner thighs and back. - Lean head back and gaze straight ahead if comfortable, otherwise tuck chin in slightly.
Hip Raise
Strengthens back, stimulates thyroid and parathyroid glands
- Keep neck straight and shoulders relaxed, draw up through inner thighs and buttocks.


natural_image
Illustration of a person performing a plank exercise on a white balance scale (no text or symbols)
natural_image
Illustration of a person performing a glute bridge exercise using a weight monitor (no text or symbols)Lower Back Extension
Opens up lower back, strengthens arms and upper body
- Place hands directly underneath shoulders & tighten abdominal muscles so body is in alignment.
- Bring chest forward, shoulders back, & draw up through inner thighs and buttocks. Look straight ahead.
natural_image
Illustration of a person performing a plank exercise on a white scale (no text or symbols)Core Strengthener
Improves balance, tones and strengthens abdominal muscles and lower back
- Slowly raise legs with thighs on either side of central bar. Keep chest forward, shoulders back, and lower back straight.
- Can be done holding resistance straps for extra support.

natural_image
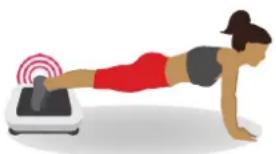
Illustration of a person performing a leg exercise on a stationary bar (no text or symbols)Reverse Push Up
Strengthens body, abdominal and oblique muscles, promotes blood flow into toes and ankles
- Slowly raise legs with thighs on either side of central bar. Keep chest forward, shoulders back, and lower back straight.
- Can be done holding resistance straps for extra support.
natural_image
Illustration of a person performing a plank exercise on a fitness scale (no text or symbols)COMPLEMENTARY WORKOUT
natural_image
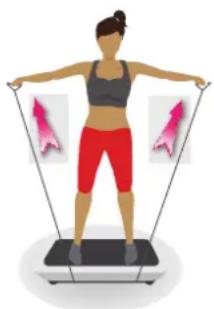
Illustration of a woman performing a balance exercise using a resistance band (no text or symbols)Strengthens and tones abs, thighs, biceps and arms
- Stand up with legs shoulder width apart. Grab resistance straps & place hands against outside of legs.
- Lift arms up at the same time, as far as you can, while holding straps firmly. Keep elbows straight.
- Repeat motion until end of vibration time.

natural_image
Illustration of a woman performing a resistance band exercise on a step (no text or symbols)Strengthens and tones abs, thighs, arms, back and biceps
- Begin in same start position as previous exercise.
- Lift right arm to chest height, with elbow bent at 90^ , then lower. Repeat with left arm.
- Alternate movements until end of vibration time.

natural_image
Illustration of a woman standing on a treadmill with resistance band (no text or symbols)Strengthens and tones abs, thighs, arms, back and biceps
- Begin in same start position as previous exercise.
- With palms facing up, raise left arm bending at elbow. Repeat with right arm.
• Alternate movements until end of vibration time.
CARE AND MAINTENANCE
WARNING
Before cleaning or carrying out any maintenance on your vibration machine, ensure the power is turned off and the power cord removed from the plug socket.
Cleaning
Clean your vibration machine with a damp cloth and mild detergent only, immediately after use. Use a weak solution of anti-bacterial washing up liquid in warm water and a microfibre cloth. Be sure to wring out the cloth so that it is just damp.
Storage
Regularly check the cord/cable for damage before storing. Should the cord/cable be damaged in any way it must ONLY be replaced by an identical cable of the same type and specification. Never pull the cord/cable to disconnect from the power outlet. Always grasp the plug and pull to disconnect. Remove the plug when not in use and store on its feet at all times.
Troubleshooting
- No lights; does not respond to Control Panel or Remote Control.
Check machine is plugged in and switched on at the mains. Check socket works with an alternative electrical product. Replace fuse in plug.
- Remote Control does not operate machine, but unit does respond to Control Panel.
Point Remote Control transmitter directly at the Control Panel's sensor.
Replace batteries in remote control (2 x AAA alkaline batteries are required).
- Speed too fast!
Adjust speed using the speed buttons on the Remote Control or the Control Panel.

natural_image
Exterior view of a Serenelife brand standing balance controller with black and silver casing (no text or symbols on body)Features:
• Revolutionary Design for Fitness that's Fun
• Vibration Assisted Exercise for Core & Full Body Training
- Next-Generation Dynamic 3D Motion Technology
- Two Motors, One for Oscillation Motion, One for Linear Motion, and Combination Motion With LED Light Strips on Two Sides
• Excellent Toning for Abs, Thighs & Buttocks
• Built-in Preset Workout Program Modes
- Adjustable Vibration Speed Intensity & Timer Setting
• High-Powered Vibrations for Accelerated Fat Burning & Weight Loss
• Incorporates Upper Body, Lower Body & Core Workouts
- Lab Tested to Improve Muscle Strength, Flexibility & Circulation
- Detachable Handheld Resistance Bands for More Versatile Routines
- Reduce Appearance of Cellulite, Improves Metabolic Rates
• Digital LCD Display Touch Button Controls
- Compact and Portable Design
- Rubber Grip 'Anti-Slip' Standing Surface Pad
- Convenient Carrying Handle and Rolling Wheels
- Ideal for All Body Types & Age Groups

natural_image
Exterior view of a black and silver outdoor massage device with control buttons (no visible text or symbols)What's in the Box:
• Vibration Machine
- Resistance Bands
- Remote Control
• (2) 'AAA' Batteries
- Power Cord
Technical Specs:
• High Power Output: 300 Watt
• RPM (Revolutions Per Minute): 3300+ RPM
• Maximum Session Time Setting: 16 Minutes
- Adjustable Vibration Speed Intensity: 16 Levels
• Weight Capacity: 265 lbs. Max
• Construction Material: Engineered ABShvz
• Power Cord Length: 5.9' ft.
• Power Output: 120V
- Dimensions (L x W x H):30.70" x 17.52" x 6.69"-inches
- Battery Operated Remote Control, Requires (2) x 'AAA' Batteries, Included

natural_image
Two electrozoelectric thermostats shown from different angles, one with black mesh and display screen, the other with gray base (no visible text or symbols)
WARNING
This products can expose you to a chemical or group of chemicals, which may include "Di (2-ethylhexyl) phthalate (DEHP)" which is known in the state of California to cause cancer, birth defects, or other reproductive harm. For more info, go to https://www.p65warnings.ca.gov/.
serenelife™
Questions? Issues?
We are here to help!
Phone: (1) 718-535-1800
Email: support@pyleusa.com

- WARNING
- IMPORTANT SAFETY INSTRUCTIONS
- MEDICAL RECOMMENDATIONS
- ASSEMBLY INSTRUCTIONS
- STEP 1
- STEP 2
- Resistance Bands
- Adjusting Resistance Bands
- FUNCTIONAL DESCRIPTION
- Manual Mode
- Pre-set Programs
- Programs
- Exercise Guide:
- Neutral Stance
- One-Legged Stance
- Deep Squat
- Advanced Push Up
- Back Strengthener
- Calf Massage
- Advanced Tricep Curl
- Hip Raise
- Lower Back Extension
- Opens up lower back, strengthens arms and upper body
- Core Strengthener
- Improves balance, tones and strengthens abdominal muscles and lower back
- Reverse Push Up
- Strengthens body, abdominal and oblique muscles, promotes blood flow into toes and ankles
- COMPLEMENTARY WORKOUT
- Strengthens and tones abs, thighs, biceps and arms
- Strengthens and tones abs, thighs, arms, back and biceps
- CARE AND MAINTENANCE
- Cleaning
- Storage
- Troubleshooting
- Features:
- What's in the Box:
- Technical Specs:
- serenelife™
Brand : SereneLife
Model : SLVBX3
Category : Fitness Equipment