S2S2U - Steam cleaner VAX - Free user manual and instructions
Find the device manual for free S2S2U VAX in PDF.

User questions about S2S2U VAX
0 question about this device. Answer the ones you know or ask your own.
Ask a new question about this device
Download the instructions for your Steam cleaner in PDF format for free! Find your manual S2S2U - VAX and take your electronic device back in hand. On this page are published all the documents necessary for the use of your device. S2S2U by VAX.
USER MANUAL S2S2U VAX
Vax Ltd., Kingswood Road, Hampton Lovett, Droitwich, Worcestershire, WR9 OQH, UK email: info@vax.co.uk - website: vax.co.uk
Steam mop
steam
hard floor master

natural_image
Sequence of seven gray circles on a black background, no text or symbols present
natural_image
Line drawing of a vacuum cleaner with handle and spout (no text or symbols)Get cleaning...
What's your Vax model number? (Located on the flap of the packaging)
e.g. S2
What's your serial number? (Located on the base of the machine)

natural_image
A row of evenly spaced black-outlined squares with a dashed line in the center (no text or symbols)Note these down in case you need them in future. Please keep instructions for further use.
Machine Overview
1 Handle
2 Upper cord clip
3Lower cord clip
4 Power cord
5 Clean water tank
6 LED indicator
a) Water heating/power on
(orange LED)
b) Steam ready
(orange LED) + (green LED)
7 Floor head
8 Steam release trigger

text_image
Unit 1 2 3 4 5 6 7 8 9 10 11 129 Microfibre cleaning pads x 2 (dependant on model)
10 Carpet glider
11 Long screw
12 Short screw
13 Measuring jug
14 Hard water filter (hidden) (Pre-assembled in unit)
15 Washer x 2
16 Velcro microfibre cleaning pad x 2 (dependant on model)

text_image
Accessories 9 10 11 12 13 14 15 16General Safety Information
This steam mop is intended for household use only and NOT for commercial or industrial use.
IMPORTANT: Please refer to floor manufacturer's care recommendations before use and test the steam mop on a discrete area of flooring to begin with.
PLEASE KEEP INSTRUCTIONS FOR FURTHER USE.
When using the steam mop, basic safety precautions should always be observed, including the following:
WARNING: The stick steam mop head gets very hot during operation.
WARNING: Danger of scalding
-
Do not leave the steam mop unattended when plugged in. Unplug the product from the socket when not in use.
-
Only use the steam mop indoors. Keep the steam mop away from rain and moisture.
-
Turn off the on/off switch on the steam mop controls before disconnecting or connecting from the mains supply.
-
Always unplug the steam mop and allow it to cool before connecting or disconnecting the hose or accessories.
-
Children should be supervised to ensure that they do not play with the appliance.
-
This appliance is not intended for use by children under eight years of age and persons with reduced physical, sensory or mental capabilities or lack of experience and knowledge, unless they have been given supervision or instruction concerning use of the appliance in a safe way and understands the hazards involved.
-
Cleaning and maintenance shall not be made by children without supervision.
-
The appliance should only be used as described in the quick start guide or in the full online user guide.
-
Only Vax recommended attachments should be used with this appliance.
-
Do not use this steam mop if it has been dropped, damaged, left outdoors or dropped into water. Do not use this steam mop with a damaged cord or plug. If the supply cord is damaged return the steam mop to a Vax authorised Service Agent or a suitably qualified person for examination, repair or adjustment.
-
Do not pull or carry this appliance by the cord. Do not use the cord as a handle, close a door on the cord or pull the cord around sharp edges or corners. Do not run the steam mop over the cord. Keep the cord away from heated surfaces.
-
Do not unplug the product by pulling on the cord.
-
Do not handle the plug or the steam mop with wet hands.
-
Do not use without the tank cap in place. Ensure that the water tank cap has been screwed down fully before use.
-
Do not touch any hot areas on the steam mop. It is normal for the steam mop to heat up during operation.
-
Accessories will become hot during use – allow them to cool down before handling.
-
Do not use the steam mop to treat any items of clothing that are still being worn on the body.
-
The force and heat of the steam may have an adverse effect on some materials. Always check whether a surface is suitable for treatment with the steam by carrying out a test before hand on a concealed area.
-
The steam mop must be kept level during operation.
-
Never immerse the steam mop in water or in other liquids.
-
Do not operate the steam mop without water in the tank. Always top up with water in good time.
-
Always remove the mains plug from the socket and allow the steam mop to cool down completely before topping up with water.
-
Never aim the steam mop at people, animals or plants (there is a risk of scalding). Never touch the steam jet from a short distance with your hands. Do not aim the steam mop at electrical items or wires.
-
Keep hair, loose clothing, fingers and all parts of the body away from openings.
-
Never fill the water tank with anything other than water. Never put additives (such as perfume, stain remover or products containing alcohol) in the water as they may damage the steam cleaner or make it dangerous to use.
-
Only carry the steam mop by the carry handle.
-
Store the steam mop in a cool, dry area.
-
Do not use an extension cord with this product.
-
Using improper voltage may result in damage to the steam cleaner and possible injury to the user. The correct voltage is listed on the rating label.
-
Do not use your steam mop if it is damaged or faulty. Please make sure that the product is unplugged from the mains and call the Vax Careline on 0844 412 8455.
-
Do not use the unit on leather, wax polished furniture or floors, synthetic fabrics, velvet or other delicate steam or water sensitive materials.
-
Do not use on acrylic surfaces.
-
In wet rooms, e.g. bathrooms, connect the appliance to sockets with an RCD adaptor connected in series.
-
The device should not be used to clean electrical appliances such as ovens, microwaves, televisions and electrical heating systems etc.
-
Be very careful when cleaning tiled walls with sockets.
-
Keep the unit on the floor.
-
Empty the water tank when the steam mop is not in use.
-
Do not overfill the tank. Do not exceed the maximum prescribed filling level. Please use the measuring jug and funnel included.
-
Always show these instructions to a third party if you are passing the steam mop on to them.
-
Please ensure all parts are correctly fitted before using the product.
-
Do not attempt to remove blockages with sharp objects as they may cause damage.
-
Do not use without the hard water filter in place.
-
Take extra care when cleaning on the stairs.
-
Keep cleaning area well lit.
WARNING: Always switch off and unplug the steam mop from the electrical outlet before assembling, opening or emptying the water tank, or before connecting/disconnecting the attachments.
IMPORTANT: The liquid or steam must not be directed towards equipment containing electrical components, such as the interior of ovens.
IMPORTANT: The steam mop is equipped with a thermostat and a thermal cut-out. If for any reason the unit should overheat, the thermostat will automatically turn the unit off. Should this occur, unplug the steam mop from the electrical outlet and turn off the switch. Let the unit cool, remove and empty the water tank. To re-start the machine, plug it into an electrical outlet and switch it back on.
Operation
Assembling your steam mop
WARNING: To reduce the risk of personal injury, unplug the steam mop when assembling.
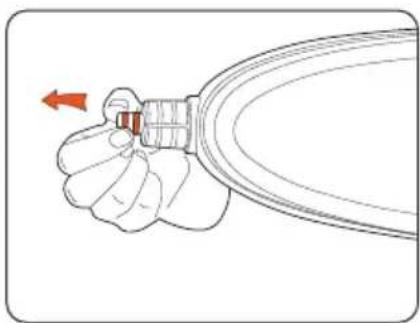
natural_image
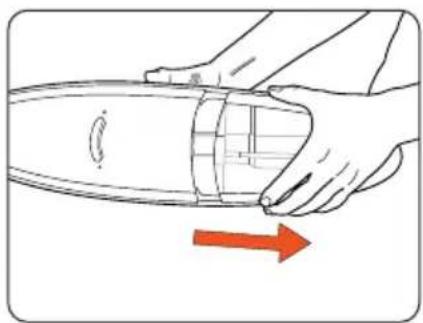
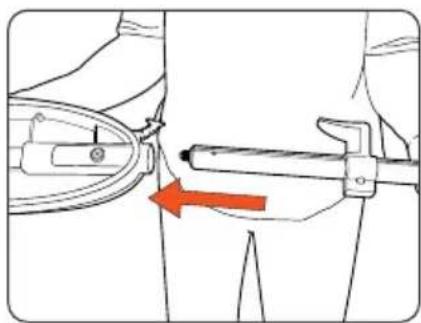
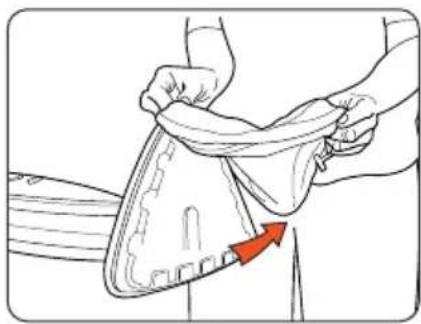
Illustration of hands holding a cylindrical object with a red arrow indicating direction (no text or symbols)Remove clean water tank. Insert handle into main body. Line up the screw holes on the handle and the main body.
natural_image
Mechanical diagram showing a tool interacting with a bracket, with an orange arrow indicating direction (no text or symbols present)
natural_image
Line drawing of a mechanical component with a hand operating a tool, no text or symbols present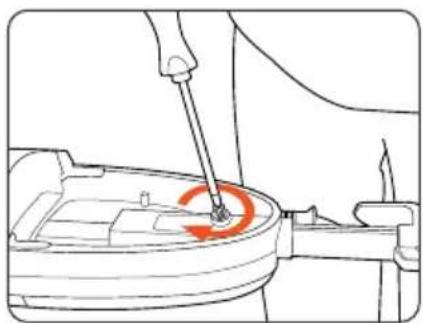
natural_image
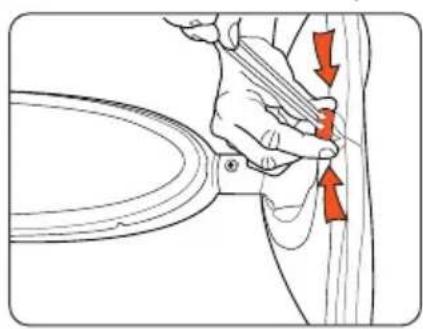
Line drawing of a hand using a tool to adjust or install a component, with no visible text or symbols.Secure the handle in place with one of the screws provided.

natural_image
Diagram showing a medical device dispensing liquid into a triangular container with a red arrow indicating downward motion (no text or symbols)Fit the body of the unit onto the floor head, lining up the screw hole.
natural_image
Line drawing of a mechanical component with a hand operating a tool, no text or symbols presentSecure the floor head with the remaining screw.
Operation
Before you begin cleaning
IMPORTANT: Do not use hot or boiling water to fill clean water tank. Do not overfill the water tank.
NOTE: Always ensure there is water in the clean water tank.
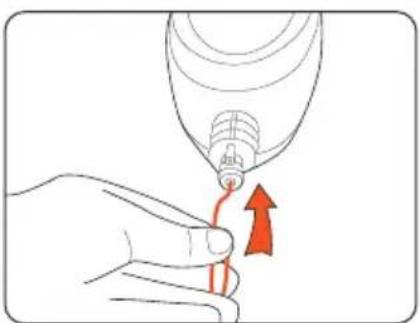
natural_image
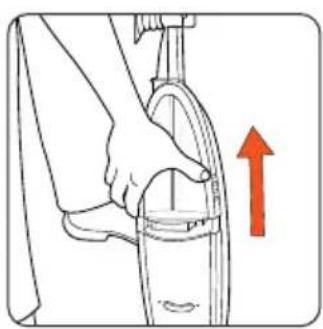
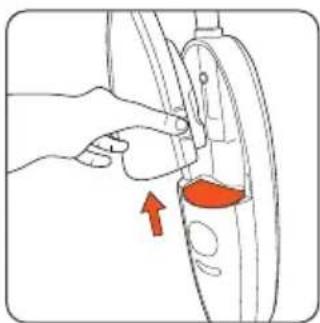
Illustration of a hand holding a tool with an upward arrow indicating motion (no text or symbols)Remove the clean water tank.

text_image
Diagram showing two hands performing a tool manipulation or disassembly process, labeled with numbered annotations.Twist the cap slightly anti-clockwise to remove.
text_image
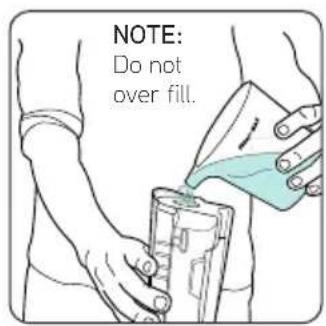
NOTE: Do not over fill.Fill the tank with max 500ml of water and replace the water cap, Tighten by twisting clockwise.

natural_image
Illustration of a hand holding a small object with a red downward arrow indicating compression or reduction (no text or symbols)Replace the clean water tank, clicking into place making sure the hard water filter is in place.
natural_image
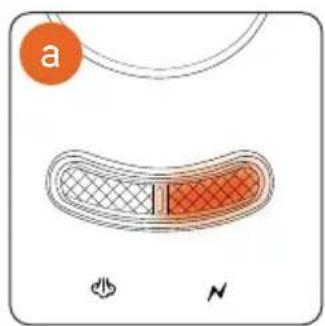
Diagram of a curved object with internal cross-hatching and a labeled circle 'a', accompanied by symbols for north arrow and compass (no readable text or labels)
text_image
b Na Orange LED will illuminate when the unit is switched on at the plug and water is heating.
b Within approximately 1 minute the Green LED will also illuminate showing steam mop is ready to use. The Green LED will go off when unit water is re-heating.
Attaching the cleaning pad
WARNING: To reduce the risk of personal injury, unplug the steam mop when assembling the accessories.
IMPORTANT: Never use the steam mop without the microfibre cleaning pad correctly attached to the floor head.
Microfibre cleaning pad (dependant on model)
natural_image
Illustration of a hand holding a tool near a curved mechanical component, with red arrows indicating direction (no text or symbols present)Undo drawstring.

natural_image
Illustration of a person adjusting a garment with a red arrow indicating direction (no text or symbols)Remove microfibre cleaning pad.
Velcro microfibre cleaning pad (dependant on model)
natural_image
Line drawing of a hand pressing down on a small object with a red arrow indicating motion (no text or symbols)Hold corner of pad down with foot and peel unit away
Operation
Steam cleaning hard floors
IMPORTANT: Please refer to floor manufacturer's care recommendations before use and test the steam mop on a discrete area of flooring to begin with.
WARNING: Never leave the steam mop in one spot on any surface for an extended period of time with a damp or wet microfibre cleaning pad attached as this may damage the floor surface. Your steam mop should only be used on tiles, lino, sealed wood flooring including sealed laminate.
WARNING: Do not operate/use steam mop without water in clean water tank.
IMPORTANT: To reduce the risk of personal injury, unplug the steam mop when assembling the accessories.

natural_image
Hand inserting a power outlet into a grid wall (no text or symbols visible)Plug into mains and wait for the green light (on the main body) to switch on within 1 min.
natural_image
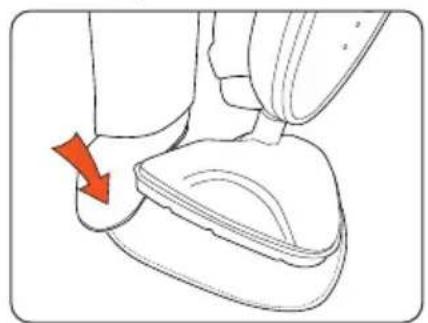
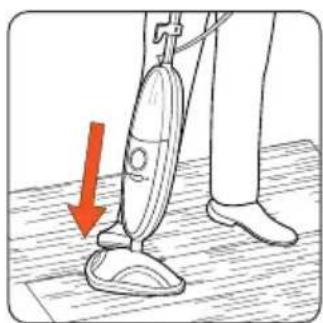
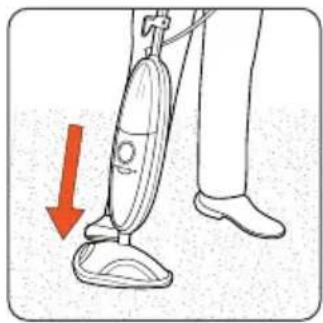
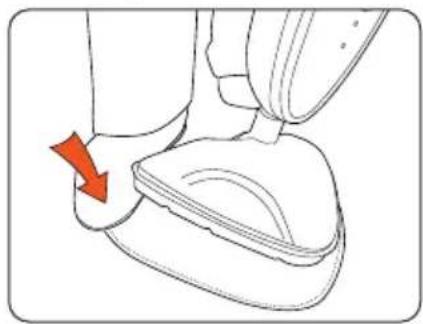
Illustration of a person using a vacuum cleaner on a wooden floor, with a red arrow indicating the motion direction (no text or symbols present)To recline the unit place foot on floor head and tilt handle.
natural_image
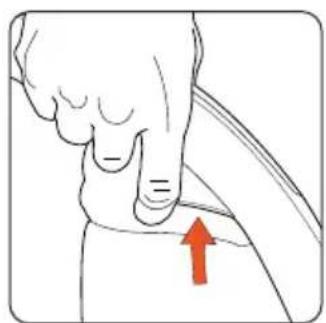
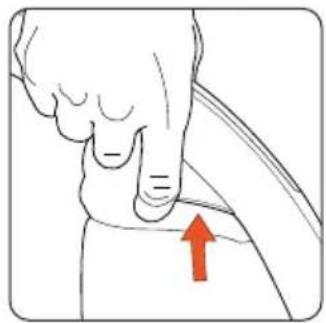
Illustration of a hand pointing to a small object with an upward arrow, no text or symbols presentTo produce steam squeeze the trigger in short bursts. To prevent overly wetting floors, do not hold down continuously.
natural_image
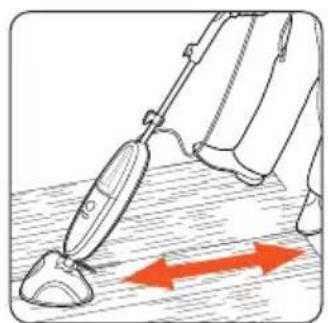
Illustration of a person using a vacuum cleaner on a surface, with red arrows indicating motion direction (no text or symbols)Move the steam mop slowly backwards and forwards across the floor paying particular attention to high traffic areas.
IMPORTANT: For 1 x 500ml water tank = 15 minutes steaming time (aprox).
Refreshing carpets
IMPORTANT: When using on carpets, always ensure the microfibre cleaning pad is properly attached to the floor head.
natural_image
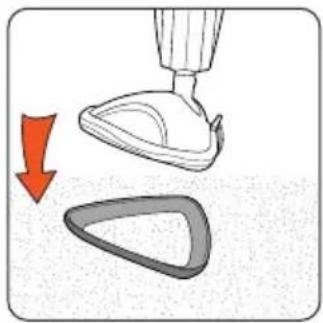
Illustration of a hand holding a small object with a red arrow indicating downward motion (no text or symbols)Place unit into carpet glider.
natural_image
Illustration of a person using a vacuum cleaner with a red downward arrow indicating motion (no text or symbols)To recline the unit place foot on floor head and tilt handle.
natural_image
Anatomical illustration of a human foot and arm with a red arrow pointing to the lower arm area (no text or labels present)To produce steam squeeze the trigger in short bursts. To prevent overly wetting carpet, do not hold down continuously.

natural_image
Illustration of a medical or laboratory procedure showing a tool interacting with a device, with red arrows indicating direction (no text or symbols present)Move the steam mop slowly backwards and forwards across the floor paying particular attention to high traffic areas.
Maintenance (Keep your Vax as good as new)
Empty the water tank
IMPORTANT: Allow the unit to fully cool down before performing any maintenance or troubleshooting checks.

natural_image
Illustration of a person using a bicycle to lift a wheel, with an upward arrow indicating motion (no text or symbols)Remove the clean water tank. Twist the cap slightly anti-clockwise to remove.

natural_image
Illustration of hands holding a medical device with a red arrow indicating rotation (no text or symbols)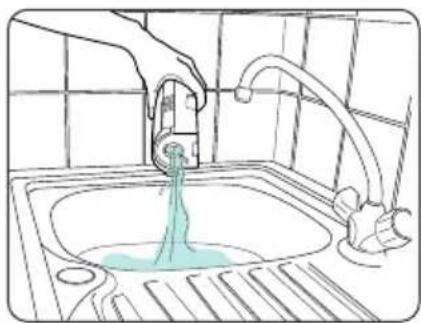
natural_image
Line drawing of a kitchen sink with a hand using a faucet to lift water (no text or symbols)Empty any excess water over the sink, replace water cap and return to the unit.
Removing the cleaning pad
IMPORTANT: Allow the unit to fully cool down before performing any maintenance or troubleshooting checks.
Microfibre cleaning pad (dependant on model)
natural_image
Illustration of a hand holding a tool near a curved object, with red arrows indicating direction (no text or symbols)Undo drawstring.
natural_image
Illustration of a person adjusting a shoe with a red arrow indicating the fold (no text or symbols present)Remove microfibre cleaning pad.
Velcro microfibre cleaning pad (dependant on model)
natural_image
Line drawing of a foot and ankle joint with a red arrow indicating rotation (no text or symbols)Hold corner of pad down with foot and peel unit away
Cleaning the microfibre cleaning pad
IMPORTANT: Never use bleach or fabric softener when washing the microfibre cleaning pad.
1 Machine washable at warm temperature (max 40°C). Always use a mild detergent.
2 Allow to fully dry before use.
Maintenance (Keep your Vax as good as new)
Replacing the hard water filter
IMPORTANT: The condition of the filter affects the performance of your machine.
Check and change filter (depending on level of use). Do not operate unit without hard water filter in place.
Your machine is fitted with a hard water filter. If you live in an area of hard water the filter will discolour/darken over time (2). Depending on water hardness and/or frequency of use the filter should be changed every 12 months, or once the filter has completely darkened.
natural_image
Illustration of a hand adjusting a car wheel component with a red arrow indicating the motion (no text or symbols present)Hard water filter in unit. Hard water filter removed.

natural_image
Illustration of a hand pressing down on a circular device with an arrow indicating motion (no text or symbols)
natural_image
Simple line drawing of a mechanical part with no text or symbols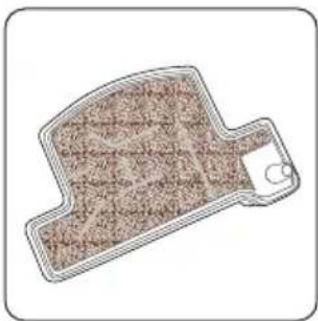
natural_image
Illustration of a mechanical component with textured surface and handle (no text or symbols)New filter. Old filter-discoloured and darkened.
Replacing the washers
IMPORTANT: Allow the unit to cool down fully before performing maintenance or troubleshooting checks.
Over time, the floor head can become loose. You may need to replace the washers at the end of the body unit with the replacement washers provided.
natural_image
Illustration of a hand holding a small mechanical component with a red arrow indicating direction (no text or symbols)
natural_image
Illustration of a hand holding a small mechanical component with a red arrow indicating direction (no text or symbols)Storage
Empty out any remaining water in the tank and clean the external surface with a dry cloth.
Maintenance (Keep your Vax as good as new)
Clearing blockages
IMPORTANT: Turn unit off. Allow unit to fully cool down before performing maintenance or troubleshooting checks.
There is a small opening at the bottom of the trim that goes around the outside of the back of the unit. This opening is a steam exhaust vent should the primary path become blocked. If steam starts to escape from this vent you should:

natural_image
Line drawing of a hairdryer with a red arrow pointing to the tip of the base (no text or symbols)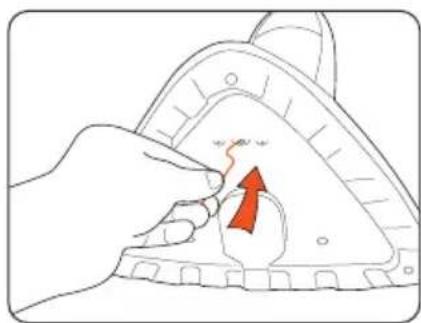
natural_image
Illustration of a hand pressing down on a mechanical component with an upward arrow (no text or symbols)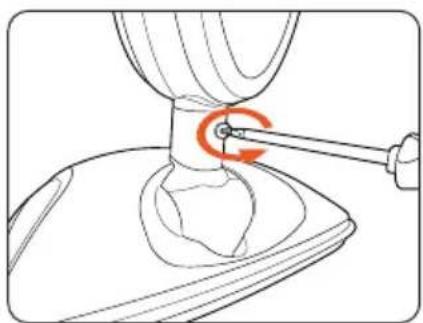
natural_image
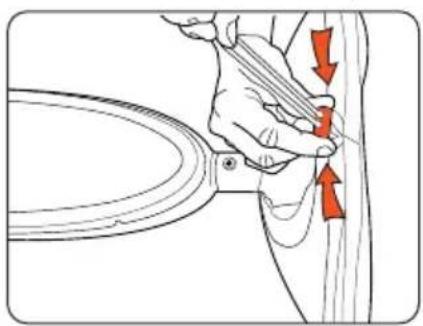
Technical line drawing of a mechanical component with a red circular arrow indicating a turning point (no text or symbols present)Steam exhaust vent. Remove microfibre pad and
inspect unit base for blockages. If a blockage can be seen use a small thin object such as a paper-clip to try to free blockage.
If steam path is still blocked, remove screw on floorhead neck.
natural_image
Illustration of a hand holding a medical device with a red arrow indicating upward motion (no text or symbols)After floor head is removed, using a thin object such as a paper-clip (in the area shown), attempt to remove the blockage.
WARNING: To reduce the risk of personal injury, unplug the steam mop before performing maintenance or trouble shooting checks.
Is there an accessory missing?
- Check the Parts Overview page in the guide to make sure the part is definitely included in your unit.
- If the part is missing we're here to help. Simply call us on: 0844 412 8455
The steam mop cleaner has no power?
- Unit may not be plugged into the electrical outlet correctly, ensure the plug is pushed in securely.
- The electrical outlet may not be working properly, check the fuse or breaker, or consult an electrician.
- The power cord may be damaged, if it is it must be replaced by the manufacturer or Vax authorised agent in order to avoid invalidating the guarantee.
- When in use if the green light goes off the unit may be re-heating. The light should only take 1 minute before this comes on again.
What do I do if an accessory/the unit has become damaged or broken?
- Visit vax.co.uk for parts and spares.
- Please call our Careline to purchase new spares or order a replacement.
Why is the steam mop not producing steam?
- There may be no water in the tank; please refer to the operation section.
- The water tank may not be fitted correctly; please refer to the operation section.
- Hard water filter may be clogged and may need to be replaced. See maintenance section.
- Steam path may be blocked, refer to cleaning blockages section.
Why won't the microfibre cleaning pad pick up dirt?
- The cleaning pad may already be saturated with dirt and needs washing, please refer to the maintenance section.
we're here if you need us
Instead of taking me back to the shop, simply visit:
vax.co.uk/support vaxireland.ie
or call:
(UK) 0844 412 8455
(ROI) 1-800 928 308
This does not affect your statutory rights
UK Service & Help
Vax Careline:
(UK) 0844 412 8455
(ROI) 1-800 928 308
Monday-Friday 8.30am to 6.30pm
Saturday 9.00am to 5.00pm
Any queries or concerns about using your Vax, call the Vax Careline. Calls are charged at the UK local rate.
Please make a note of the serial number and model number of the steam mop before calling. For the nearest Service Agent, please call the Vax Careline or visit vax.co.uk
Consumables
To purchase spares and accessories, please visit vax.co.uk
S2 series hard water filter kit (Type 1): 1-1-130624-00
Microfibre cleaning pads (Type 2): 1-1-130625-00
Velcro microfibre cleaning pads (Type 1): 1-1-131448-00
(dependant on model)
Coral cleaning pads (Type 3): 1-1-131643-00
Guarantee will only be valid with the use of genuine Vax spares and accessories.

For best performance
Protect your guarantee
Technical Specification
Voltage: 220 - 240 v \~ 50Hz
Wattage: 1400W - 1600W (dependant on model)
Water tank capacity: 500ml
Cord length: 6m
Weight: 2.9kg
Subject to technical change without notice.

EEC Statement of Compliance
Manufacturer/EEC importer: Vax Limited, hereby on our own responsibility, declare that the S2 series is manufactured in compliance with the following Directives:

Safety: 2006/95/EC Low Voltage Directive
EMC: 2004/108/EC Electromagnetic Compatibility Directive
Waste electrical products should not be disposed of with household waste. Please recycle where facilities exist. Check with your Local Authority or retailer for recycling advice.