ParaFryer 9125 - Deep fryer Paragon - Free user manual and instructions
Find the device manual for free ParaFryer 9125 Paragon in PDF.

User questions about ParaFryer 9125 Paragon
0 question about this device. Answer the ones you know or ask your own.
Ask a new question about this device
Download the instructions for your Deep fryer in PDF format for free! Find your manual ParaFryer 9125 - Paragon and take your electronic device back in hand. On this page are published all the documents necessary for the use of your device. ParaFryer 9125 by Paragon.
USER MANUAL ParaFryer 9125 Paragon
natural_image
Exterior view of a stainless steel laboratory reactor with control panel and side-mounted dish (no visible text or symbols)Model Numbers
9120
Digital 240V 4400W
9125
Non-Digital 240V 4400W
9130
Digital 120V 1800W
9135
Non-Digital 120V 1800W
Important Owner Information
Record the model number, serial number and voltage in the spaces below (the data plate is located on the operator's side of the fryer in the bottom right). Please have this information available when calling Paragon for service assistance.
Model No. ____
Serial No. ____
Voltage
Business Hours: 8:00 AM to 5:00 PM Central Standard Time (CST)
Telephone: 515-382-8000; 800-433-0333
Email: info@manufacturedfun.com
Fax: 515-382-8001
Additional information can be found by visiting our web site at www.manufacturedfun.com
Register your unit
Completing online warranty registration will prevent delay in obtaining warranty coverage. Go to www.manufacturedfun.com and select "Support Center" and "Register Your Product"
SAFETY PRECAUTIONS
Paragon values your continued safety above all else. Please follow these guidelines when using your equipment to prevent injury and maximize product performance:

Fryer must be properly grounded to prevent electrical shock. Do NOT immerse this equipment in water. Doing so may damage equipment and prevent it from working properly.
Always unplug equipment before cleaning or serving to prevent electrical shock.

Always wear safety glasses when servicing equipment.

No direct contact to equipment by the general public should be allowed when used in food service locations. Only trained personnel should operate this equipment. Carefully read any through this manual before beginning operation of the equipment.
Never make alteration to this equipment. Any alterations made by anyone other than certified Paragon personnel will void warranty and may also create unsafe working conditions.

This fryer is NOT to be operated by anyone under the age of 18.
INTRODUCTION
PARTNER FOR MANUFACTURED FUN.
Our goal is to provide you with the best solutions to attract customers, expand your business, and improve your profits. That's why this product has been specially-crafted to meet precise specifications for performance, efficiency, and output.
Your Paragon Fryer features:
• Stainless steel construction
- Adjustable thermostat
• Digital temperature display on models 9120 and 9130
• High limit shutdown
- Designed and assembled in the USA with select foreign parts
Specifications:
| Model No. | Volts | Watts | Amps | Power Plug Type | Oil Capacity |
| 9120 | 240 | 4400 | 20 | NEMA Style 6-20P | 25 lbs |
| 9125 | 240 | 4400 | 20 | NEMA Style 6-20P | 25 lbs |
| 9130 | 110 | 1800 | 20 | NEMA Style 5-15P | 25 lbs |
| 9135 | 110 | 1800 | 20 | NEMA Style 5-15P | 25 lbs |
Should you have any questions about your equipment, or would like to know more about our other innovative concession equipment and supplies, please contact us at 1-800-433-0333 or visit us on the web at: Manufacturedfun.com
Thank you for your purchase and enjoy!
INSTALLATION INSTRUCTIONS
Inspection of Shipment
Unpack your new fryer and thoroughly check for any damage that might have occurred during transportation. If any damage is identified, please process claims with the transportation company. The manufacturer's warranty does not cover damage that occurs in transit, or damage caused by abuse, or consequential damage made while operating the fryer as it is beyond our control. Please reference warranty in back of manual.
Owners Manual
Please read and understand the owner's manual and all other safety and operating instructions before using this equipment. To obtain additional copies of the owner's manual visit manufacturedfun.com, email or call Paragon customer service at cs@manufacturedfun.com or USA 1-(800)-433-0333 or write to Paragon International, Inc, 731 W 18 ^th Street, Nevada, Iowa 50201.
Unpacking
This fryer is fully assembled and has been tested at the factory.
- Remove all packaging and tape prior to operation.
- Place the fryer in a protected location on a level service and on a sufficiently stable base or table.
Note: The base or table must be strong enough to support the fryer when full of oil.
- Remove accessories from the unit.
- For non-digital fryers, set the thermometer bracket on the rim of the tank in a convenient location, where the dial thermometer can be inserted and monitored without reaching over the tank.
- After setup, the unit should be cleaned prior to use (see Care and Cleaning section of this manual).
Electrical Requirements
The following power supply must be provided:
Models: 9120 and 9125 require the following power supply: 20 Amp 6-20 Receptacle, 60 Hz
Models: 9130 and 9135 require the following power supply: 20 Amp 6-20 Receptacle, 60 Hz
DANGER
The Fryer must be properly grounded to prevent electrical shock to personnel. Failure to do so could result in serious injury, or death. DO NOT immerse any part of this equipment in water. DO NOT use excessive water when cleaning. Keep cord and plug off the ground and away from moisture. Always unplug the equipment before cleaning or servicing. Make sure all fryer switches are in the OFF position before plugging the equipment into the receptacle.
A certified electrician must furnish sufficient power for proper fryer operation and install any supplied receptacle. Paragon recommends that this fryer be on a dedicated and protected circuit. Failure to wire properly will void the warranty and may result in damage to the fryer. It is Paragon's recommendation that this fryer be plugged directly into a wall outlet. The use of extension cords is not recommended due to safety concerns, and may cause sacrificed and/or reduced performance. Ensure the cord is placed such that it will not be a tripping hazard which could result in injury from hot oil, impact of the heavy equipment or injury fall.
Before You Operate the Fryer
- Make sure all fryer switches are OFF before plugging equipment into receptacle.
- Make sure wall outlet can accept the grounded plugs (where applicable) on the power supply cord.
- The wall outlet must have the proper polarity. If in doubt, have a competent electrician inspect the outlet and correct if necessary.
- DO NOT use a grounded to un-grounded receptacle adapter.
- Install unit in a level position.
IMPORTANT FIRE SAFETY NOTICE
The building code in most cities in North America requires that any fryer with more than seven pounds of oil capacity be operated under a vent hood with “Automatic Fire Extinguisher System”. If you operate this fryer outdoors in a trailer or portable concession stand, you may not fall under the building code requirements.
If this fryer or any fryer outdoors, is operated in a concession trailer, booth, or portable concession stand, building code requirements may apply. Consult your local fire protection agency for your area's requirements. Check local fire protection requirements regularly to ensure compliance with local codes and proper operation. Install an automatic fire extinguisher over the fryer and exhaust duct. (Use only fire extinguishers approved for grease, oil, and electrical fire.)
All Paragon fryers have an on/off power button and a temperature control knob. Paragon utilizes the highest quality controls available in its this product. However, in time, all controls wear out. It is therefore recommended an independent thermometer (capable of 500^ F or higher) be immersed in the oil to monitor the oil temperature and make sure the unit is operating properly. DANGER Hot oil is dangerous – severe burns can result when hot oil contacts the skin.
Advanced Safety Measures
KEEP FRYER AREA CLEAN AND MAINTAINED
- Keep your floors clean and free of grease to prevent slips, accidents, and contact with a hot fryer.
- Keep filters and areas above the fryer clean. Oil-soaked lint or dust can ignite easily and flames spread quickly in an oily environment.
EDUCATE PERSONNEL
- Ensure all personnel understand the hazards of hot oil. Instruct them on proper actions to take if they suspect any part of the fryer is malfunctioning.
If your fryer malfunctions, have it serviced by Qualified Service Personnel.
IMPORTANT: If the fryer starts to smoke or boil abnormally, cut off power supply and determine the reason why the fryer is overheating before attempting to use it. There is an Emergency Stop (E-Stop) Switch readily available on the fryer for shutting off the power to the unit. (See Emergency Stop Switch description in the Controls and Their Functions section of this manual.)
- Ensure all personnel understand procedures to follow if the High Limit Control is tripped. (See High Limit Control description in the Controls and Their Functions section of this manual.)
- Educate all personnel on proper procedures to follow if a grease fire should occur. DO NOT USE WATER ON A GREASE FIRE! Never direct the extinguisher in a manner that would blow grease out of the tank. Ensure a fire extinguisher is readily available to extinguish a grease, oil, and electric fire. Make sure all personnel are properly trained in the use of the fire extinguisher.
OPERATING INSTRUCTIONS (Controls and Their Functions)
MAIN POWER SWITCH
The “Red/Yellow” knob is the ON/OFF power switch which mounted on the head at the top left corner of the control panel.
To turn unit ON, you must first unlock the knob clicking the yellow switch at the top of the red know from left to right. Once unlocked, rotate the knob CLOCKWISE and it will release into the operating position. On the digital display models (Models: 9125 and 9130), the digital display will light up and serve as your visual que that the fryer is ON. When operating the non-digital displays (Models 9130 and 9135), a green LED to the right of the red and yellow know will illuminate when the fryer is switch ON.
DIGITAL MODELS (Model: 9120 and 9125)
The digital display displays the temperature of the cooking oil. The control will display the temperature as long as the main power to the head is on. The digital display serves as a temperature display and as a reset button should the fryer encounter and issue or a tripped fuse or become overheated. The fryer has a high limit control inside the control head that will power-off the unit if the fryer overheats, malfunctions or encounters a power surge from the blow circuit breaker. Once the fryer cools down, the fryer can be reset by pushing the reset button (RST Button) on the side of the digital display.
NON-DIGITAL MODELS (Model: 9130 and 9135)
The non-digital display models utilize a manual thermometer (included with your fryer) to measure the temperature of the oil. The fryer has a high limit control inside the control head that will power-off the unit if the fryer overheats, malfunctions or encounters a power surge from the blow circuit breaker. Once the fryer cools down, the fryer can be reset by pushing the small red reset button on the right side of the green LED.
TEMPERATURE CONTROL KNOB
To adjust and set temperature on all Paragon fryer models, use the black heat control knob on the right side of the fryer. Simply turn the knob CLOCKWISE to the desired temperature setting for your food item.
DRAIN VALVE/DRAIN PLUG
The Drain Valve and Drain Plug open to allow efficient draining of the cooking oil from the tank. Always allow hot cooking oil to cool below 140^ F before attempting drain the unit. Note: The Drain Valve has a Safety Collar on the handle. Slide the collar up to allow the drain valve handle to be rotated. Installation
Place the fryer on a suitable bench or table. Allow sufficient side space when using the reversible top cover as a side tray. Position the fryer back enough from the bench top to prevent the drain valve to not extend over the edge.
- Check your local regulation codes. (Some localities may require an exhaust hood and/or an approved fire extinguisher.
- Mount the control panel assembly on to the tank. WARNING: Do not lift the fryer by the control panel.
- Secure the control panel by tightening the two thumb knobs located on the back side.
- Plug the power cord into power outlet.
- Do a start-up test to verify the unit is working:
- Turn on the control panel's power switch
- On initial startup or if power causes the unit to go out, please hold down the Reset (RST Button) until unit stops flashing. It is very important to hold down the button until this process is complete.
- You should hear a noise when the relay turns on
- The digital temperature read out should indicate a temperature
- Turn the temperature knob up to 200F
- Warning: Turn temperature knob back to "Off" after a couple of seconds
- Turn the power switch off
- The heating element should be hot
- Test is completed, the fryer is now ready for use
- WARNING: Do not operate without any cooking oil.
Note: If digital display unit buttons accidentally get pushed causing the unit to display unknown readings, simply turn the Master Switch off then back on. Please proceed with Step #1 as listed above.
Operation
- Be sure the "drain valve" is closed
- Fill the fryer tank with frying oil about 12 inch below the MAX fill line on the tank.
- The fryer is now ready for use.
- WARNING: Some products may require oil temperatures up to 375^ F. Use only trained personal.
- Cleaning
- A fine mesh skimmer may be used to remove crust that forms during cooking periods or during the routine clean-up
- To drain the cooking oil, use the drain valve. An extension on the valve may be used to direct the oil flow. To use the last remaining oil, block the back edge up slightly and also a baster may be use.
- WARNING: Do not drain until the oil is cooled down
- With routine cleaning, a fine grade steel wool may be used to remove the baked-on oil residue in the tank
Tank Preparation
Before operating for the first time, the inside of the fryer tank should be rinsed and thoroughly dried before adding oil. See the Cleaning and Care section of this manual for cleaning instructions. Prior to
each use, check the drain valve to make sure it is securely closed and the drain plug is fully tightened into place. Remove tank cover before turning the power on. DO NOT operate this unit with the tank cover in place.
Filling the Tank with Oil
Tank Capacity: All Funnel Cake Fryer Models (9120, 9125, 9130 and 9135) all hold approximately 25 lbs. of cooking oil. Initially fill the tank to the minimum oil fill line (fill lines are located on the interior side and rear walls of the tank). DO NOT operate this unit with the cooking oil below the minimum oil level.
IMPORTANT: Cooking oil expands upon heating. To safely bring the oil level up to the maximum fill level, carefully add additional increments of oil as it heats until it reaches the maximum fill line. DO NOT over fill the tank, as overfilling could result in a dangerous situation. Hot oil is dangerous - be sure you have thoroughly read the Safety Precautions of this manual. DO NOT allow water to contact oil. Only cook product intended for this appliance. Do not attempt to cook products with high water content or with surface moisture present. Do not operate in the rain or near any source of water. Failure to keep water away from oil may result in explosion and severe burns. Make sure appliance is completely dry after cleaning, including inside any drain valves.
Important Operating Information and Quality Control Tips
- Don't overheat. Don't fry if the oil temperature exceeds 400°F.
- Don't fry food in broken-down frying shortening. Broken down oil is thinned, darkened.
- Don't overload the frying tank.
- Don't fill the basket more than half full.
- Don't shake breaded items over fryer.
- Don't salt items over fryer.
- Don't introduce water to fryer.
• Don't thaw frozen foods before frying.
Operating the Fryer
- Fill tank to minimum oil level with cooking oil, then turn Main Power Switch ON. The Digital Heat Control will display the oil temperature.
- Flip the switch ON to OPERATE (digital models, the digital display will illuminate, and the non-digital model's green LED will light up). As the cooking oil heats and expands, carefully add additional increments of oil until it reaches the maximum fill line. DO NOT overfill the tank, as overfilling could result in a dangerous situation.
- Once the desired temperature is achieved, the fryer is ready for use. (To adjust set temperature, see Adjusting the Set Temperature section.)
- To help maintain oil quality, periodically skim off excess batter (food) particles.
Shutdown Procedure and Draining the Tank
- Once frying is complete, switch the ON/OFF switch to OFF (the digital display will extinguish on the digital models and the green LED will extinguish on the non-digital models).
- Remove any food, the thermometer, and allow the unit to cool completely. Turn the temperature control to OFF.
-
If storing the oil for reuse, cover the oil tank with a clean, dry tank. Be sure the oil has cooled before applying tank cover.
-
If moving the unit from its current location, the oil must be drained. DO NOT move this unit when filled with oil! Allow hot cooking oil to cool below 140^ F before attempting drain the unit.
- To drain the unit, have an appropriate container in place to receive the oil.
- With the drain valve CLOSED, remove the drain plug.
- Slide the safety collar up on the drain valve handle, then OPEN the drain valve to empty the cooking oil from the fryer tank.
- For unit cleaning instructions, see Care and Cleaning section.
Care and Cleaning
Good sanitation practice demands that all food preparation equipment be cleaned regularly (only use non-toxic, food grade cleaners). A clean looking, well-kept fryer is one of the best ways of advertising your product.
Follow the directions below to clean and sanitize the unit each day after use.
- With the fryer OFF, unplug the unit and allow it to cool before attempting to clean it after use. DO NOT move this unit when filled with oil! Allow hot cooking oil to cool below 140^ F before attempting drain the unit.
- Make sure to clean all pans/accessories in order to sanitize them before each use.
- Make sure the drain valve is securely closed and the drain plug is fully tightened into place, then fill the tank with water to the MINIMUM oil level. DO NOT FILL above the minimum oil level or equipment damage may occur.
- Add appropriate amount of dish soap. Paragon also recommend the use of Carbon-Off Cleaner
- Bring solution to a boil (DO NOT heat above 250^ F), then turn the fryer OFF, unplug the unit and allow solution to cool to below 100^ F.
- Once cooled, drain and remove all solution.
- Clean the outside of the unit with a soft cloth, dampened with soap and hot water.
- Wipe the stainless steel parts with a clean cloth and cleaner designed for stainless steel. DO NOT use oven cleaners or abrasive materials as they will damage parts of the fryer.
- Thoroughly dry the unit after cleaning, including inside any drain valves.
ORDERING SPARE PARTS
- Identify the needed part by checking it against the photos, illustrations, and/or parts list. (General images may be used in manual for reference only.)
- Use only approved replacement parts when servicing this unit.
- When ordering, please include part number, part name, and quantity needed.
- Please include your model number, serial number, and date of manufacture (located on the fryer nameplate/data plate) with your order.
-
To order visit manufacturedfun.com, email or call Paragon customer service at cs@manufacturedfun.com or USA 1-(800)-433-0333 or write to Paragon International, Inc, 731 W 18 ^th Street, Nevada, Iowa 50201.
-
CABINET ASSEMBLY

text_image
Control Head Cabinet and Oil Tank Fryer Cover Valve
text_image
Master ON/OFF Switch Digital Display Digital Reset Button Parafryer POWER MAINTAIN PROPER OIL LEVELS Thermo Limit Probe Heating Element Thermostat KnobPARTS LIST - MODELS 9120 and 9125
| Description | 9120 & 9125 |
| Valve | 70121 |
| Fryer Cover | 78640 |
| Thermostat (Bulb) | 78280 |
| Heating Element | 78100 |
| Thermo Limit Probe | 78005 |
| Power Switch On/Off | 12420 |
| Digital Temperature Display | 78001 |
| Thermostat Knob | HDS_0036 |
| Relay | 78210 |
| Power Cord | 12176 |
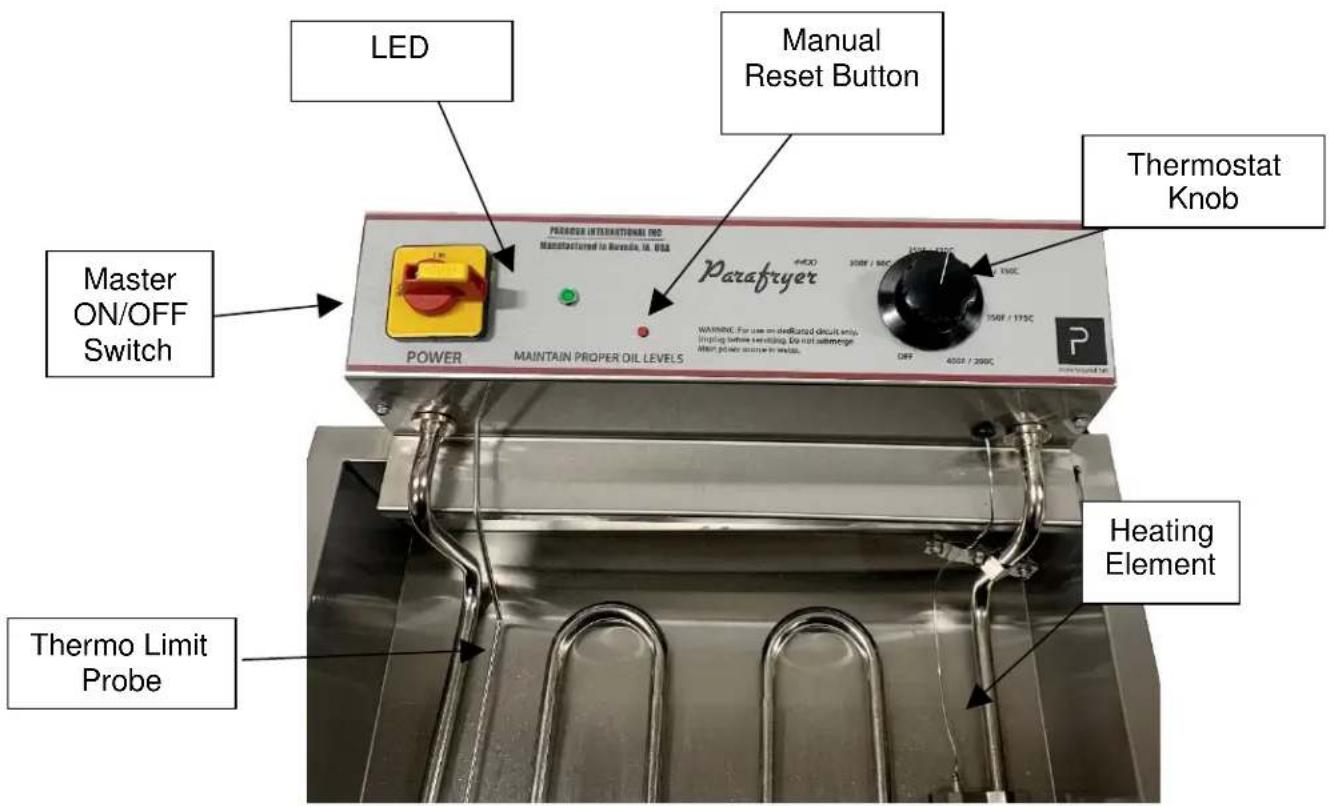
text_image
LED Manual Reset Button Master ON/OFF Switch POWER MAINTAIN PROPER OIL LEVELS PARAFRYER 4400 350V / 120C 150V / 175C OFF 400V / 200C Thermostat Knob Heating Element Thermo Limit ProbePARTS LIST – MODELS 9130 and 9135
| Description | 9125 & 9135 |
| Valve | 70121 |
| Fryer Cover | 78640 |
| Thermostat (Bulb) | 78280 |
| Heating Element | 78100 |
| Thermo Limit Probe | 78005 |
| Thermostat Hi Limit | 78002 |
| Power Switch On/Off | 12420 |
| Reset Button | 78001 |
| Thermostat Knob | HDS_0036 |
| Relay | 78210 |
| LED Green Lamp | 98540 |
| Power Cord | 12176 |
Thermostat (Bulb)
Wiring Diagram - High Voltage Digital Display with Potter Brumfield Relay
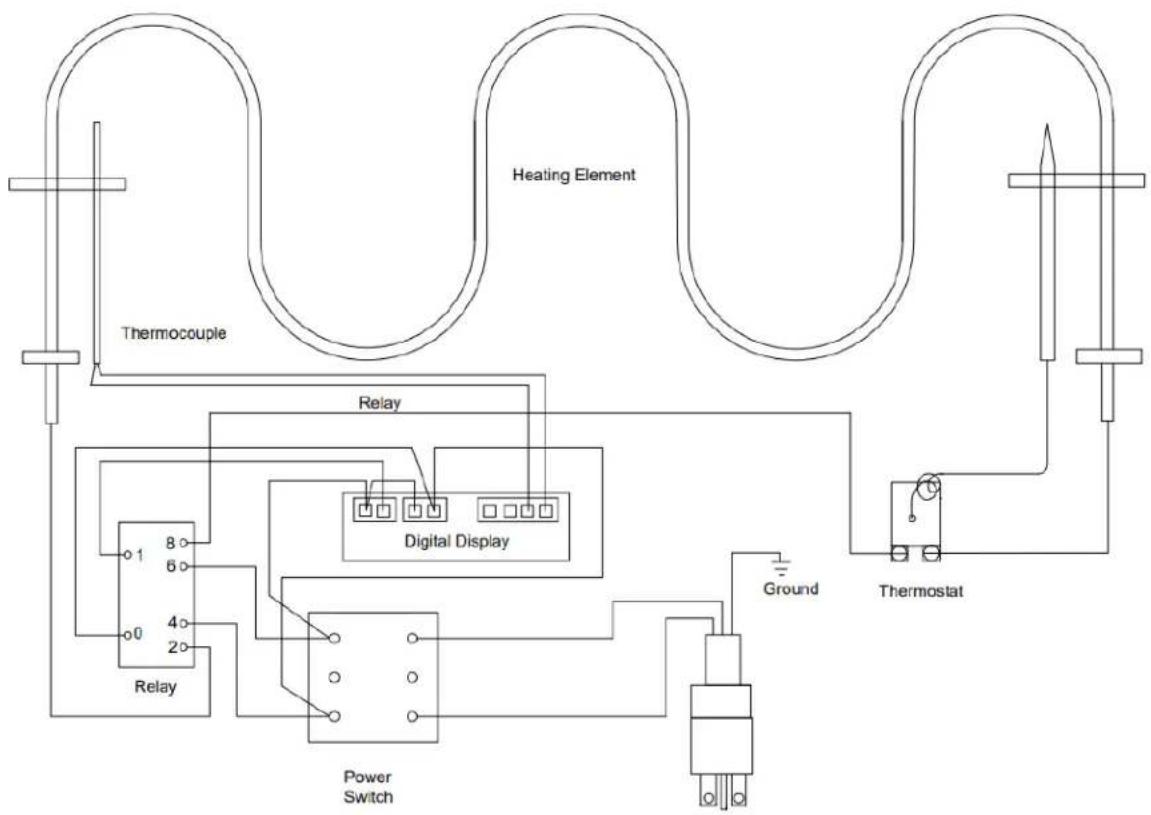
flowchart
graph TD
    A["Thermocouple"] --> B["Heating Element"]
    B --> C["Relay"]
    C --> D["Digital Display"]
    D --> E["Power Switch"]
    E --> F["Thermostat"]
    F --> G["Ground"]
    C --> H["Relay"]
    H --> I["Relay"]
    I --> J["0 8 6 4 2 0"]
    style A fill:#f9f,stroke:#333
    style B fill:#ccf,stroke:#333
    style C fill:#cfc,stroke:#333
    style D fill:#fcc,stroke:#333
    style E fill:#cff,stroke:#333
    style F fill:#ffc,stroke:#333
    style G fill:#fcc,stroke:#333
    style H fill:#ffc,stroke:#333
    style I fill:#cfc,stroke:#333
    style J fill:#fcc,stroke:#333
Wiring Diagram - 120 Volt Digital Display
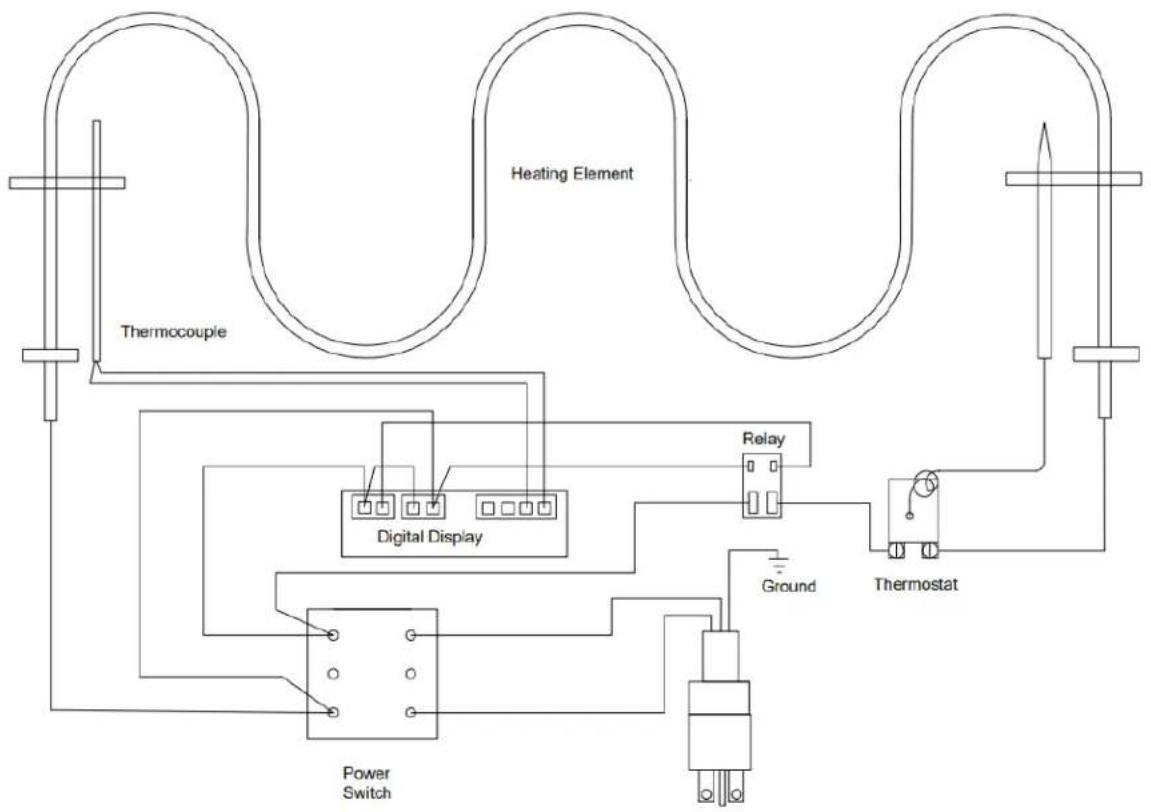
flowchart
graph TD
    A["Thermocouple"] --> B["Heating Element"]
    B --> C["Digital Display"]
    C --> D["Relay"]
    D --> E["Thermostat"]
    E --> F["Power Switch"]
    F --> G["Ground"]
    G --> C
    C --> H["Ground"]
WIRING DIAGRAM - MANUAL RESET
