EKB200 - Keyboard EverFocus - Free user manual and instructions
Find the device manual for free EKB200 EverFocus in PDF.


| Product Type | USB Controller Keyboard for PTZ camera control |
| Dimensions (W x D x H) | 200.5 x 200.5 x 108.9 mm (8.02" x 8.02" x 4.35") |
| Weight | 825 g |
| Power Supply | USB bus power 5 VDC / 80 mA (max) |
| Interface | USB 1.1 (USB 2.0 compatible) |
| Joystick | Industrial-grade 3-axis joystick for Pan/Tilt/Zoom control |
| PTZ Function Keys | 4 dedicated keys: Iris+, Iris-, Focus+, Focus- |
| Programmable Keys | 12 re-assignable keys |
| Mounting Options | Desktop or sunk-in (panel mount kit included) |
| Operating Temperature | 0°C to 50°C |
| Certifications | CE, FCC Class A, RoHS compliant |
| Package Contents | EKB200 keyboard with 1.8m USB cable, Quick Installation Guide, Support CD (Acrobat Reader, User Manual, JoyMapper software, key label templates), Panel Mount Kit, spare key labels |
| Compatible Software | EverFocus JoyMapper (Windows XP/2000/Vista) and PowerCon Management Software v4.3+ |
| Supported Protocols | USB HID class 3-axis game controller (default) |
| Cleaning Instructions | Unplug device, use damp cloth without acid detergent |
| Safety Notes | Do not expose to heat sources, operate only in 0-50°C, avoid liquid ingress, do not open device (warranty void) |
Frequently Asked Questions - EKB200 EverFocus
User questions about EKB200 EverFocus
0 question about this device. Answer the ones you know or ask your own.
Ask a new question about this device
Download the instructions for your Keyboard in PDF format for free! Find your manual EKB200 - EverFocus and take your electronic device back in hand. On this page are published all the documents necessary for the use of your device. EKB200 by EverFocus.
USER MANUAL EKB200 EverFocus
USB Controller Keyboard
Installation / Operation Instructions
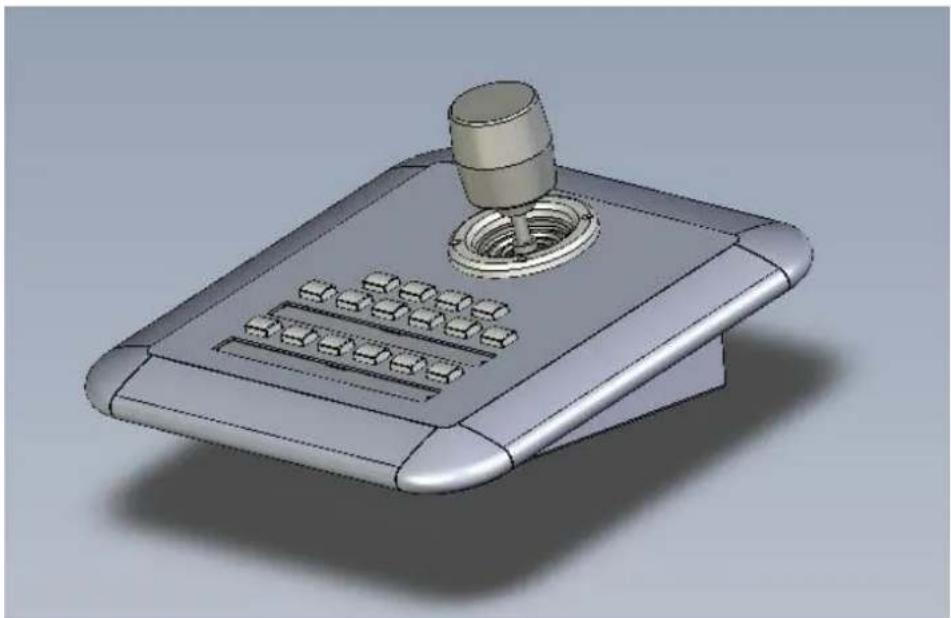
natural_image
3D rendering of a mechanical device with a lever and control panel (no text or symbols visible)Rev. 1.0
SAFETY WARNINGS
- Do not place the device near to heaters, furnaces, other heat sources or under direct solar irradiation.
- Operate the device only in locations providing the tolerable operating temperature range 0°C\~50°C.
- For cleaning, make sure the device is plugged off and only use a damp cloth without acid detergent.
- Install the device only in dry and dustproof surroundings. Protect the device against any liquid's penetration.
- Avoid the penetration of any artefacts, e.g. through ventilation slots.
- Do not open the device yourself. In case of malfunction, contact your local installer or dealer. Unauthorized opening of the device will annul the warranty claim!
- Use the device only for purposes described in this manual.
- Operate the device only with the power source indicated in the technical data.

ATTENTION! This is a class A product which may cause radio interference in a domestic environment; in this case, the user may be urged to take adequate measures.

This equipment has been tested and found to comply to part 15 of the FCC Rules. These limits are designed to provide reasonable protection against harmful interference in a residential installation. This equipment generates, uses and can radiate radio frequency energy and, if not installed and used in accordance with the instructions, may cause harmful interference to radio communications. However, there is no guarantee that interference will not occur in a particular installation. If this equipment does cause harmful interference to radio or television reception, which can be determined by turning the equipment off and on, the user is encouraged to try to correct the interference by one or more of the following measures:
- Reorient or relocate the receiving antenna.
- Increase the separation between the equipment and receiver.
- Connect the equipment into an outlet on a circuit different from that to which the receiver is connected.
- Consult the dealer or an experienced radio/ TV technician for help.

This Product is RoHS compliant.
WEEE

Your EverFocus product is designed and manufactured with high quality materials and components which can be recycled and reused. This symbol means that electrical and electronic equipment, at their end-of-life, should be disposed of separately from your household waste. Please, dispose of this equipment at your local community waste collection/recycling centre. In the European Union there are separate collection systems for used electrical and electronic product. Please, help us to conserve the environment we live in!
The information in this manual was current upon publication. The manufacturer reserves the right to revise and improve his products.
Therefore, all specifications are subject to change without prior notice. Misprints reserved.
Please read this manual carefully before installing and using this unit. Be sure to keep it handy for later reference.
CONTENTS
1 Introduction....2
2 Delivery scope .... 2
3 Specifications....3
Installation....3
Installation....4
3.1 USB - Connection 4
3.2 Sunk-In Desk Installation....4
3.3 Key labels 5
3.4 Function check and Calibration at PC 5
3.5 Installation of JoyMap....8
4 Operation....10
4.1 Assigning Windows functions with JoyMap - application 10
4.2 EKB-200 Operation with PowerCon Management Software....14
1 INTRODUCTION
EverFocus USB Joystick Controller – EKB200 – is designed for facilitating network video surveillance such as PTZ camera control. With its 3-axis joystick, 4 dedicated PTZ function keys (Iris+/-, Focus+/-) and other 12 free programmable switches running with EverFocus JoyMapper® keymapper, EKB200 helps users operate EverFocus PowerCon® in a more intuitive way.
- USB interface, plug and play
• 3-axis joystick for PTZ control function
• Support standard HID class device with high compatibility - Industrial ID design
- Industrial grade 3-axis joystick, long working life
- Four predefined PTZ function keys: Iris+/-, Focus+/-
- Twelve free assignable function keys
- Panel mount kit in package
- No external power supply requirement
- Suitable for right-hand or left-hand operation
• Dedicated EverFocus JoyMapper keymapper software for standard Windows operation
2 DELIVERY SCOPE
• EKB200 USB keyboard with 1.8m USB cable
- Quickly Installation Guide
- Support CD (Acrobat Reader, User manual, EverFocus JoyMapper®, key label templates)
- Panel Mount Kit
- Reserve key labels
3 SPECIFICATIONS
| Interface: | USB1.1 (USB2.0 compatible) |
| PTZ function key: | 4 keys, Iris+, Iris-, Focus+, Focus- |
| Re-assignment key: | 12 keys |
| Default protocol: | USB HID class 3 axis Game controller |
| Mounting method: | Desktop, Sunk-In |
| Power/ power consumption: | USB bus power 5 VDC/ 80mA (maximum) |
| Certification: | CE/FCC class A |
| Operating system for EverFocus JoyMapper application | Microsoft® Windows XP, 2000, Vista |
| Length/Color of USB cable: | 1.8 meter/ Black |
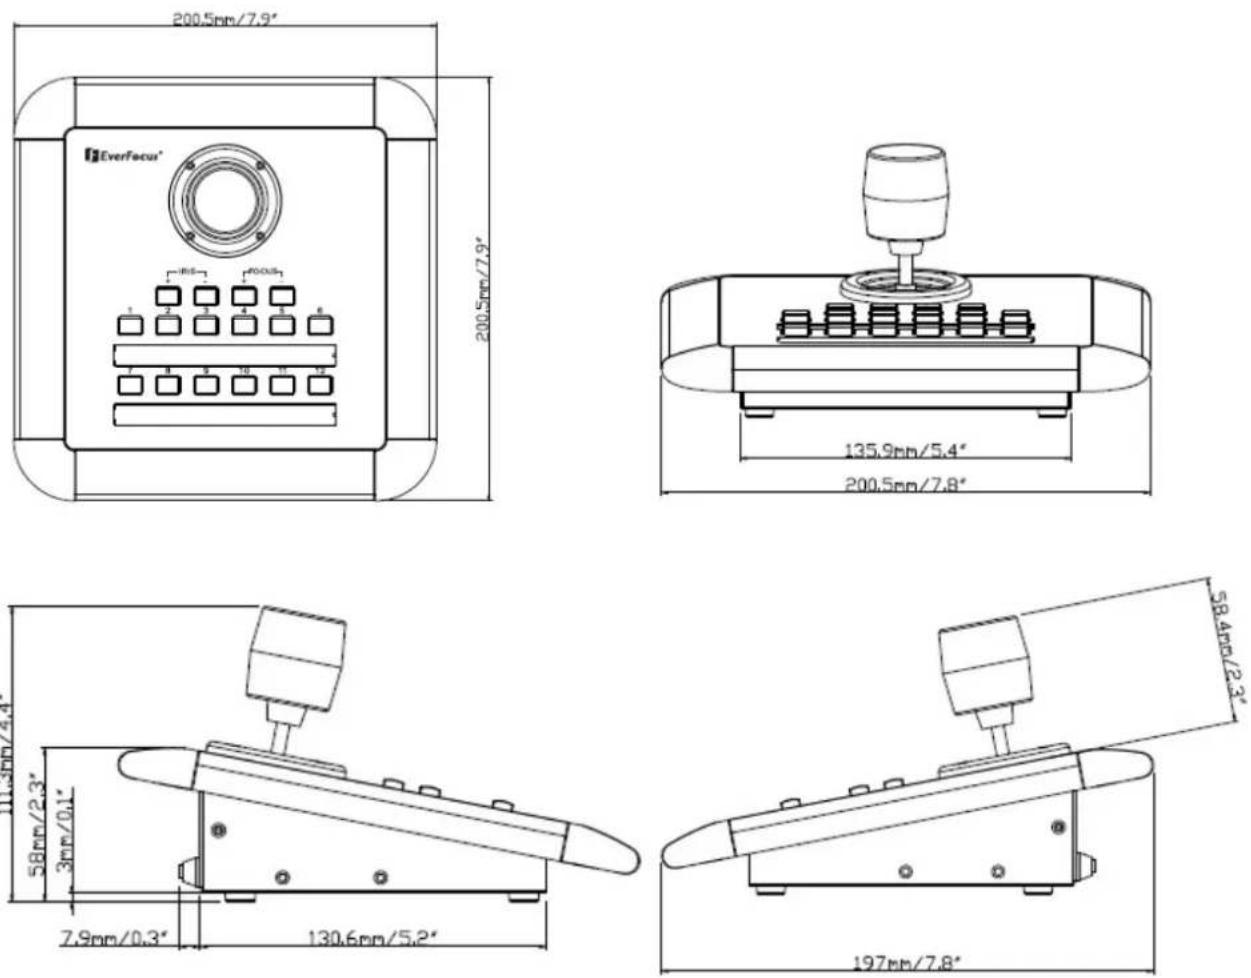
| Dimension: | 200.5 (W) x 200.5 (D) x 108.9 (H) |
| 8.02" x 8.02" x 4.35" | |
| Environmental temperature: | 0°C ~ 50°C |
| Weight: | 825g |
Dimensions
INSTALLATION
3.1 USB - Connection
Connect the USB-cable to the USB port of the PC or device, which supports EKB-200.
The EKB-200 is compatible to USB 1.1 and USB 2.0 interfaces. The EKB-200 will be detected by PC as "USB, 3-Axis, 16 button gamepad".
3.2 Sunk-In Desk Installation
For sunk-in mounting is a cut-out in the panel required. The minimum dimensions are shown in drawing below:
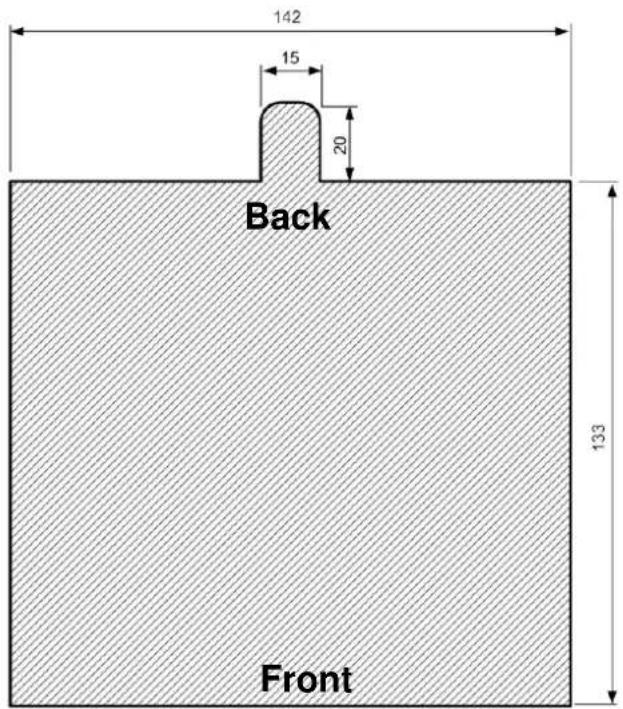
The fixation brackets in the package support a mounting in panels with a maximum thickness of 15 mm.
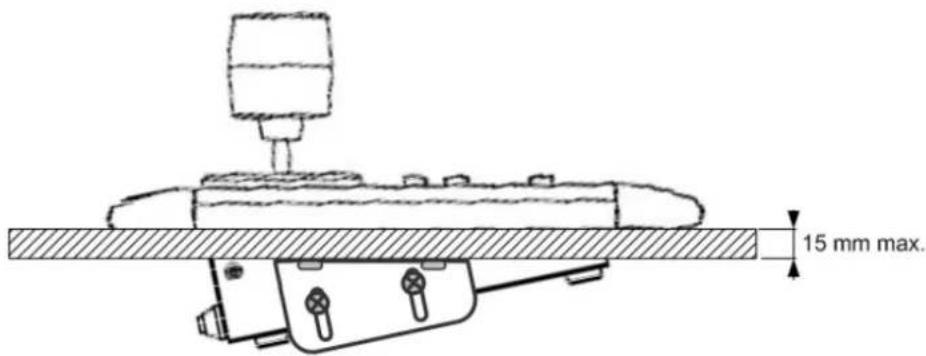
The drawing shows the mounting position of the fixation brackets.
3.3 Key labels
The EKB-200 provides exchangeable key description labels. This allows the user to customize the key labels to his application and the assigned key functions.
Example:
| Pos.1 | Pos.2 | Pos.3 | Pos.4 | Tour 1 | A.Pan |
The label sheets have a size of 104 x 9.5 mm.

A key lable template form in *.doc and *.rtf format can be found at the service CD in the EKB-200 package.
3.4 Function check and Calibration at PC
In case of any problems with keys or joystick provides Microsoft Windows ^® provides a check and calibration option in control panel.
- Go to "Start" -> "Control Panel" -> "Printers and Other Hardware" -> "Game Controllers".
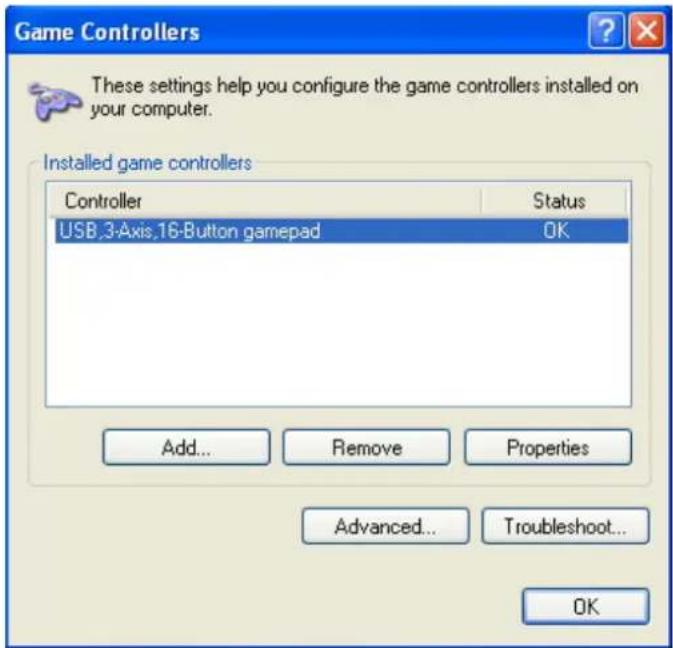
- Select "Properties". In test mode, you can test the EKB200 controller by moving the joystick towards all end stops including the third axis (X-axis, Y-axis & Z-axis) and pressing the buttons. If the controller is not functioning properly, it may need to be calibrated. To calibrate it, go to the Settings page.
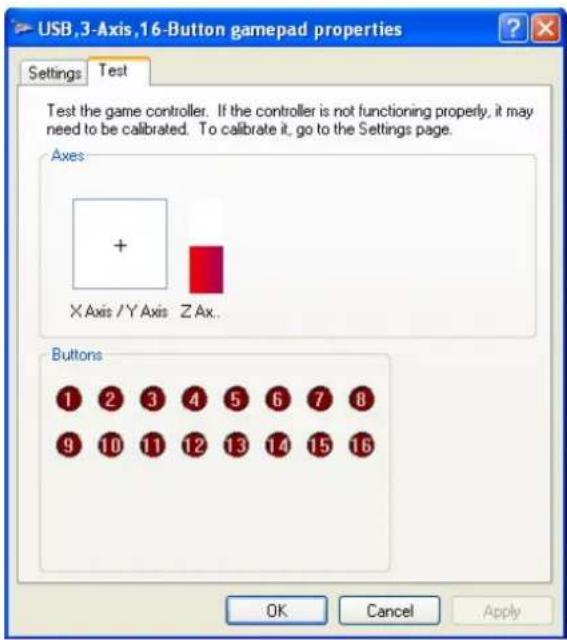
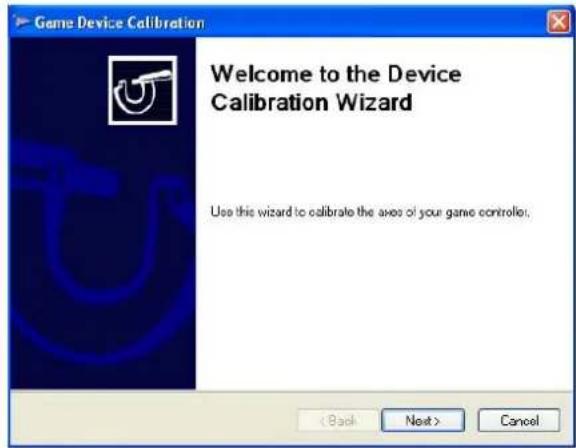
In Settings mode, click "calibrate" button to do calibration.
- In Device Calibration Wizard starting page, click "Next" to continue.
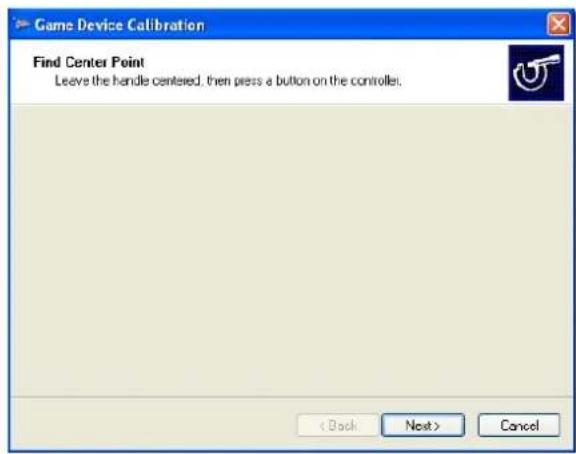
- To find center point, leave the handle centered, then press a button on the controller. Click "Next" to continue.
- Move the handle in complete circles, then press a button on the controller. Click "Next" to continue.
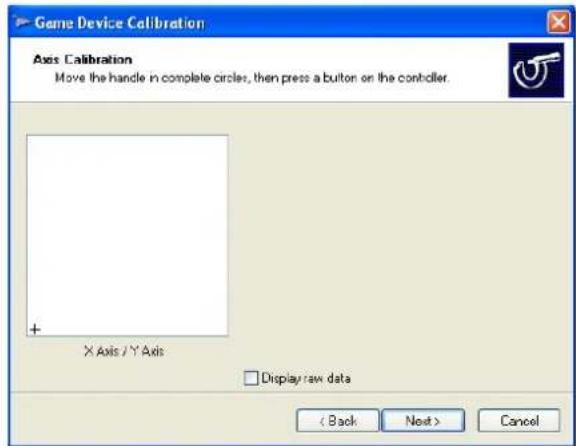
- To verify center point, leave the handle centered, then press a button on the controller. Click "Next" to continue.
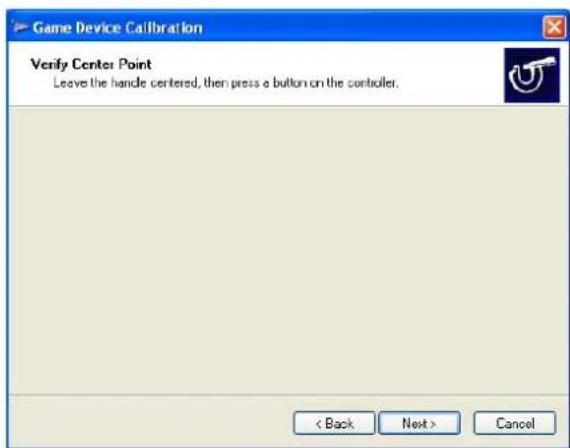
- Move the Z axis all the way up and down, then press a button on the controller. Click "Next" to continue.
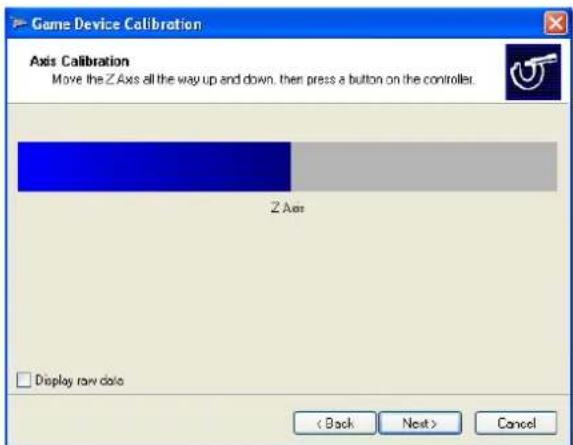
- Calibration is completed. To save your calibration, click "Finish".

- Finally, click "Apply" button to apply the settings to EKB200.
3.5 Installation of JoyMap
The JoyMap tool allows the assignment of standard windows operations to the EKB-200.
Installation steps of JoyMap for EKB200:
Double click "Setup.exe" file.
The installer will guide you through the steps required to install JoyMap for EKB200 on your computer. Click "Next" to continue.
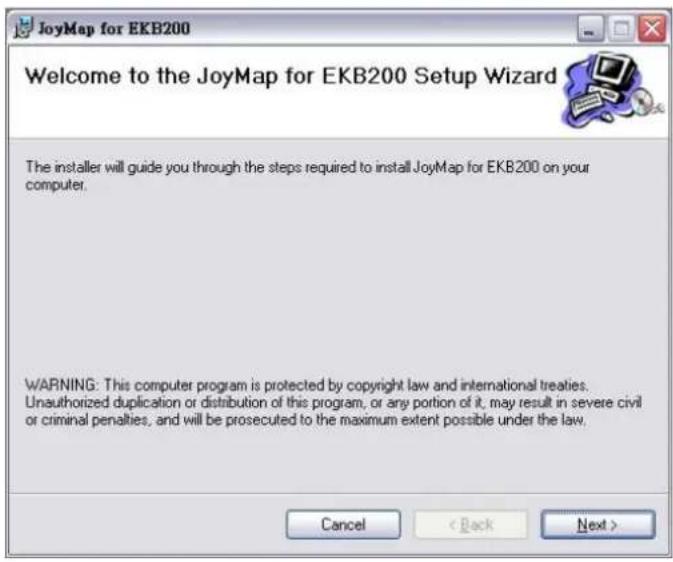
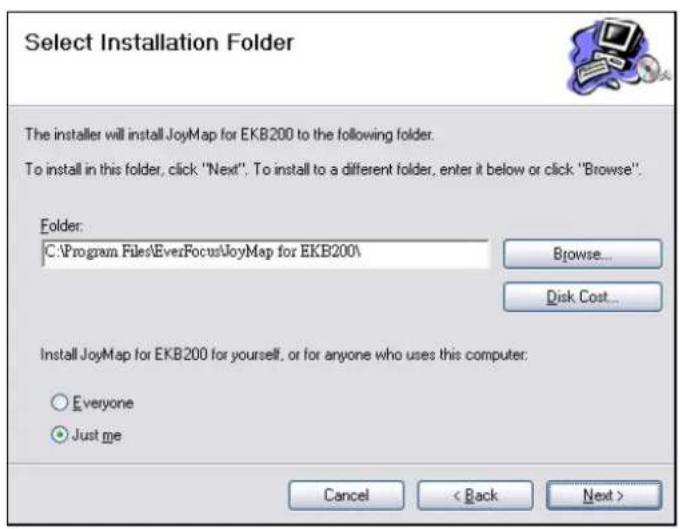
- Direct to the folder where you wish to install the program by pressing "Browse". If you wish to install JoyMap for yourself, select "Just Me". If you allow anyone using this computer to use JoyMap, select "Everyone". Click "Next" to confirm.
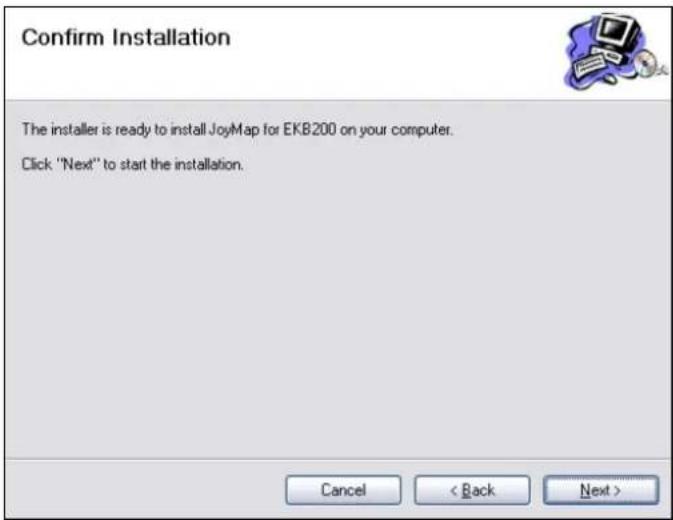
- The installer is ready to install JoyMap for EKB200 on your computer. Click "Next" to start the installation.
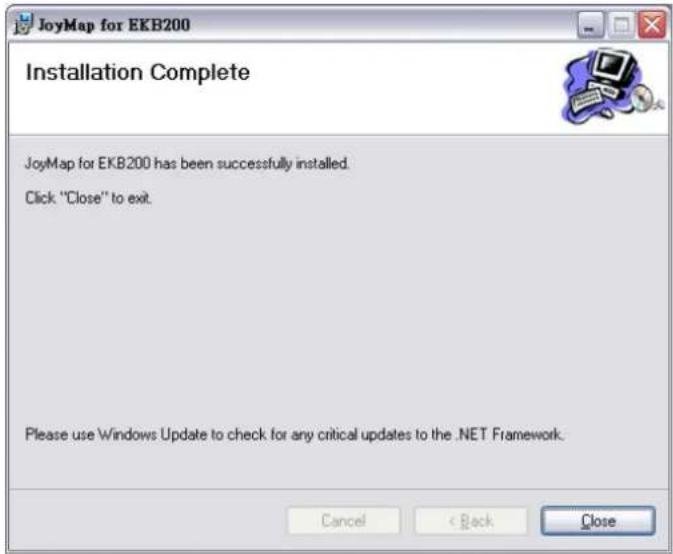
- With the message "Installation Complete" the JoyMapper setup is finished. Click "Close" to exit.
4 OPERATION
4.1 Assigning Windows functions with JoyMap - application
NOTE: The EverFocus JoyMapper application will only work correctly with connected EKB200 keyboards. Other joystick devices are not supported. If no EKB200 is connected, the application will show after start: "DEVICE: No EKB200 found".
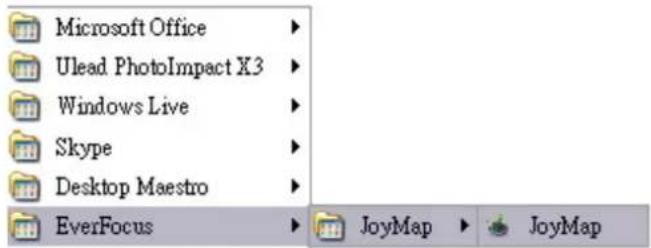
- Go to "Start" -> "Program" -> "EverFocus" -> "JoyMap" -> "JoyMap".
- Double click the JoyMap icon in the task bar to open JoyMap window.

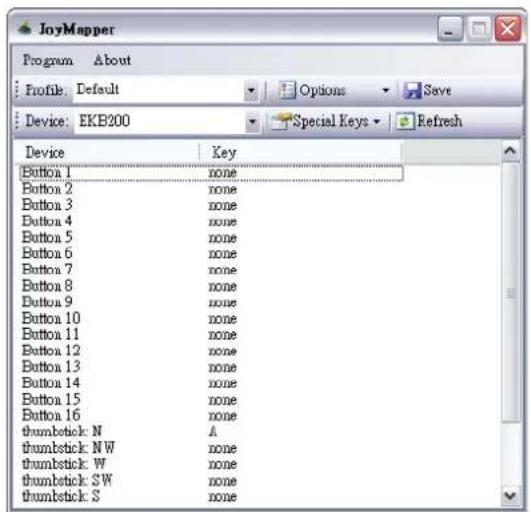
- Press "Program" -> "Settings" for general EKB200 parameters.
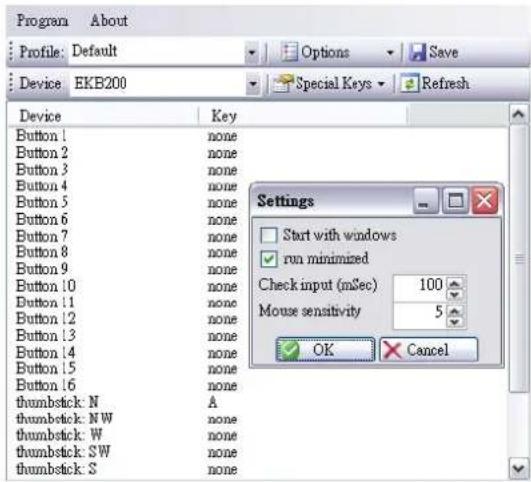
Start with windows: JoyMapper will automatically starts with windows start.
Run minimized: JoyMapper window will be minimized if you check this box.
Check input (mSec): Delay time between the commands coming from the Joystick are read into the application. 100ms means 10 times per second the USB port is read by the AP and the read commands are processed. Default value is 100 mSec. It is selectable from 40\~1000 mSec.
Mouse sensitivity: Select mouse sensitivity level. The higher the number, the more sensitive the joystick simulation for mouse speed.
Press "OK" to confirm or press "Cancel" to cancel the settings.
- Profile: The Joymapper allows to setup different profiles for special key / joystick assignments to Windows functions.
Press Profile > "Options", 4 options are available:
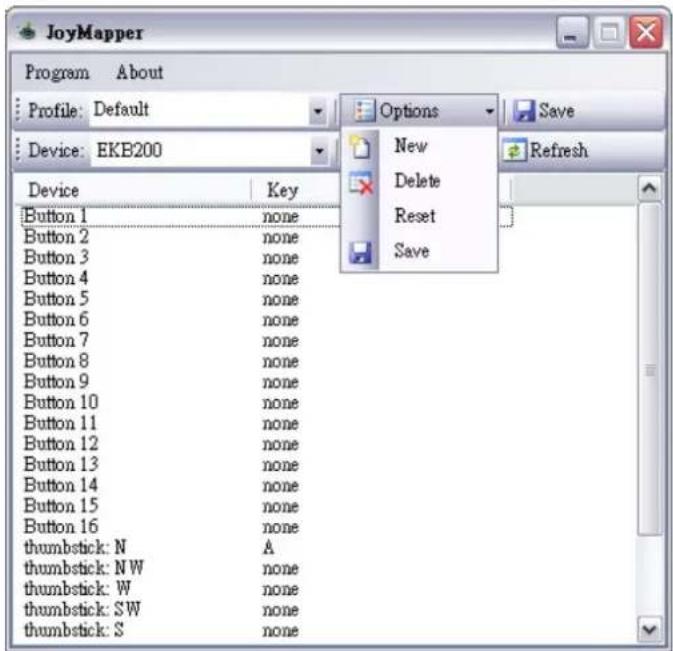
New: create a new profile
Delete: delete a profile
Reset: reset a profile to default values
Save: save the profile
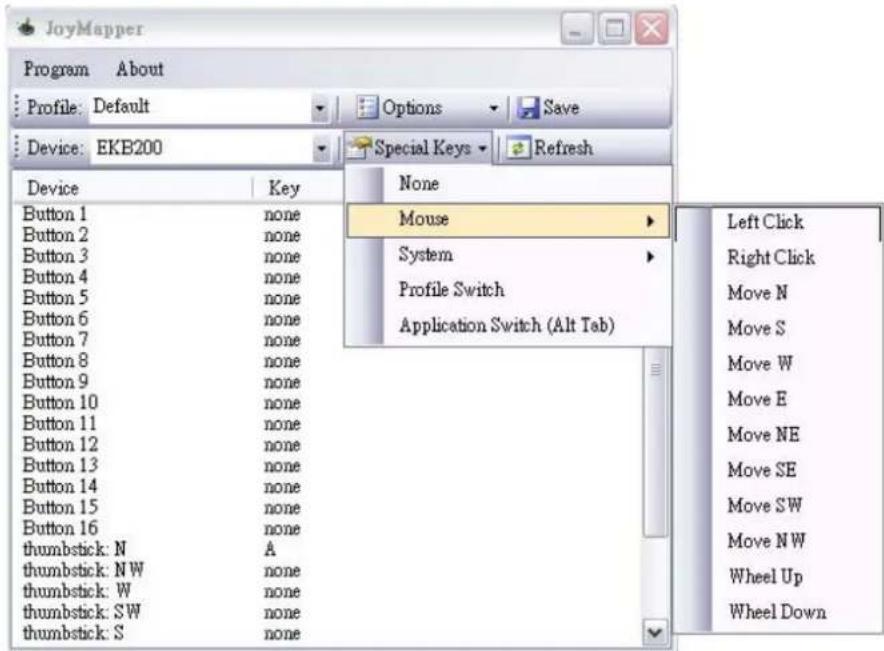
- In "Special Keys", there are 5 options: None, Mouse, System, Profile Switch and Application Switch.
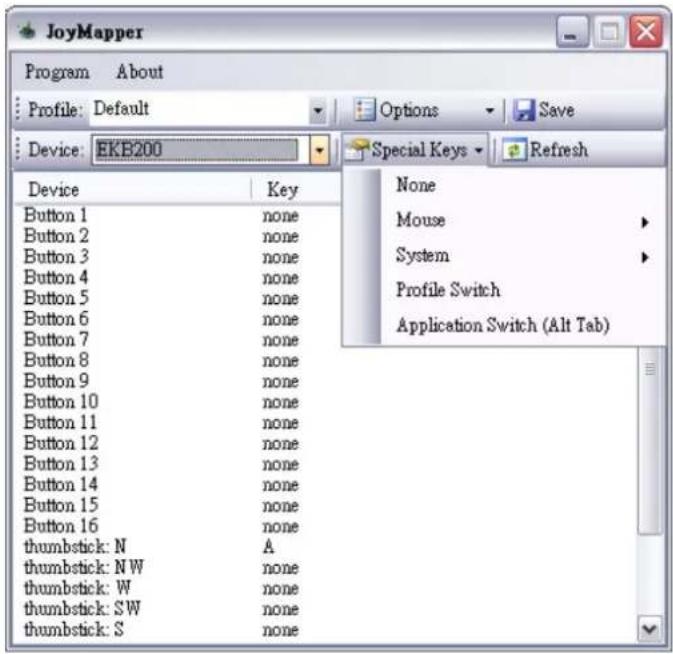
None: Set the device as none if you are not using a special key for the device.
Mouse: Set mouse definition for the device. For example, for button 1, if you wish to set it as a left click button, select left click and mouse definition will be shown in "key" column:
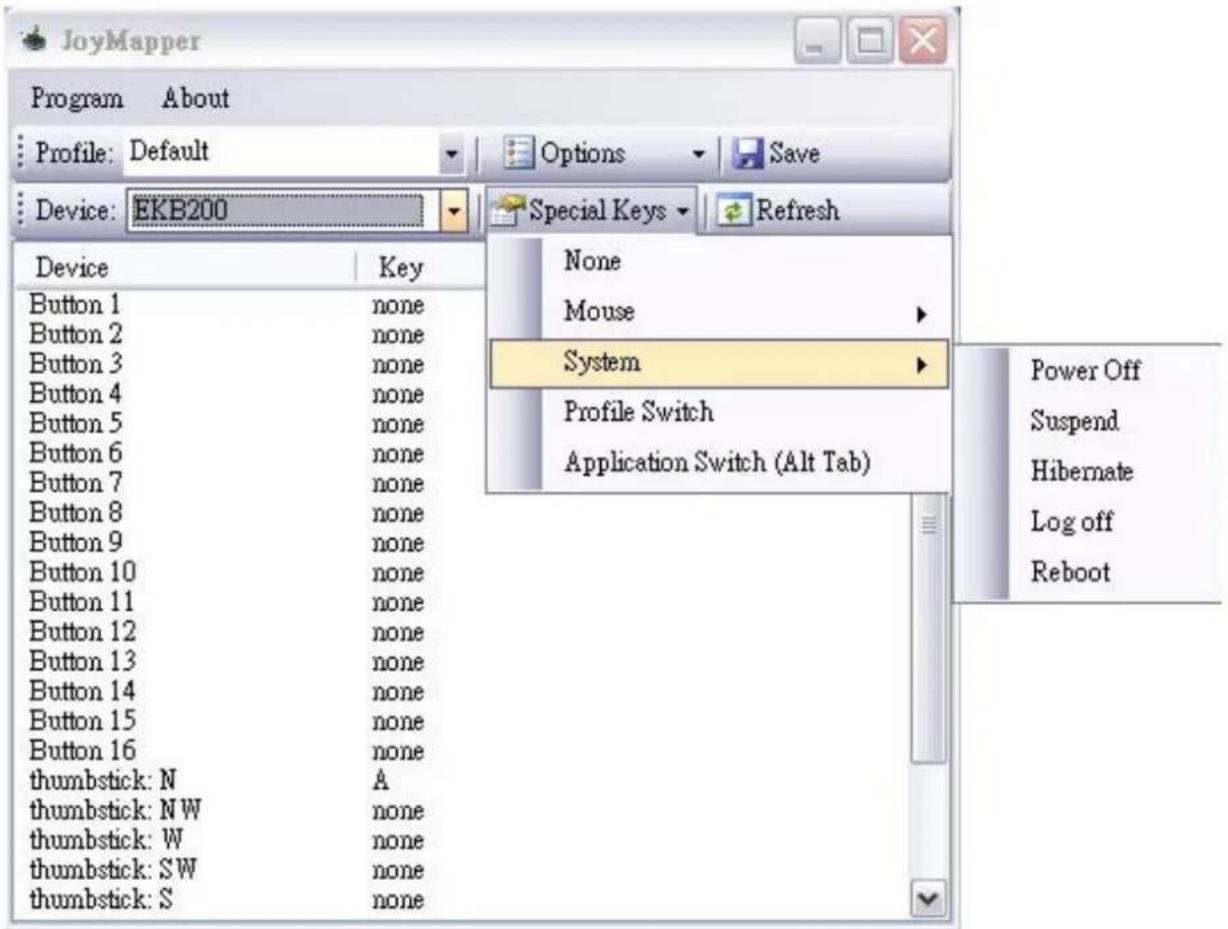
System: Set system function for the device. There are 4 system functions available: power off, suspend, hibernate, log off and reboot. For example, for button 2 if you wish to set it as a power off button, select power off and system function will be shown in "key" column.
Profile Switch: this is used to switch between profiles.
Application Switch: this is used to switch between applications.
4.2 EKB-200 Operation with PowerCon Management Software
The EKB-200 keyboard is supported in PowerCon management software from version 4.3. In factory settings, the keys are assigned to following PTZ functions:
Key
Function
Joystick Pan / Tilt / Zoom (fixed function)
1 Goto Preset 1
2 Goto Preset 2
3 Goto Preset 3
4 Goto Preset 4
5 Goto Preset 5
6 Goto Preset 6
7 Goto Preset 7
8 Goto Preset 8
9 Goto Preset 9
10 Goto Preset 10
11 Goto Preset 11
12 Goto Preset 12
13 Iris Open
14 Iris Close
15 Focus Near
16 Focus Far
For editing the key settings, go to menu bar > System > Configuration > Tab EKB-200 Action List:
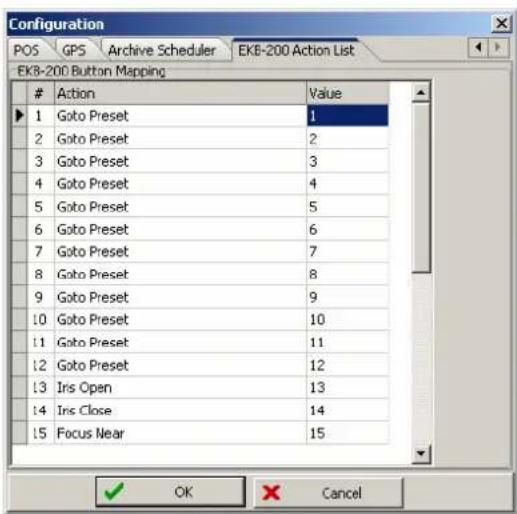
Select a key in the list. Right click in the right corner of any field in the "Action" Column to open a context menu with a selection of available PTZ commands.
If the command requires a value, such as GoTo Preset [x] or Tour [x], enter the number [x] in the field "Value".
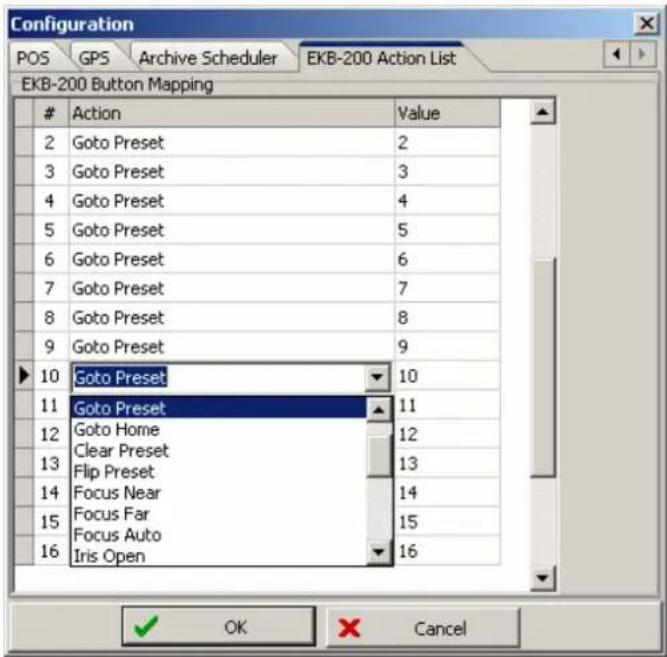
"OK" saves the changes and closes Configuration menu, "CANCEL" closes menu without saving the changes.
EverFocus Electronics Corp.
Head Office:
12F, No.79 Sec. 1 Shin-Tai Wu Road,
Hsi-Chih, Taipei, Taiwan
TEL: +886-2-26982334
FAX: +886-2-26982380
www.everfocus.com.tw
USA L.A. Office:
1801 Highland Ave. Unit A
Duarte, CA 91010, U.S.A.
TEL: +1-626-844-8888
FAX: +1-626-844-8838
www.everfocus.com
USA N.Y. Office:
415 Oser Avenue Unit S
Hauppauge, NY 11788
TEL: 631-436-5070
FAX: 631-436-5027
www.everfocus.com
Europe Office:
D-46446 Emmerich, Germany
TEL: +49-2822-9394-0
FAX: +49-2822-9394-95
www.everfocus.de
China Office:
Room B-05D-1, KESHI PLAZA,
Shangdi Information Industry Base,
Haidian District, Beijing China 100085
TEL: +86-10-62973336/37/38/39
FAX: +86-10-62971423
www.everfocus.com.cn
Japan Office:
1809 WBG MARIBU East 18F,
2-6 Nakase.Mihama-ku.
Chiba city 261-7118, Japan
TEL: +81-43-212-8188
FAX: +81-43-297-0081
www.everfocus.co.jp

EverFocus®
P/N: MKB2G00110

- SAFETY WARNINGS
- WEEE
- CONTENTS
- INTRODUCTION
- DELIVERY SCOPE
- SPECIFICATIONS
- INSTALLATION
- USB - Connection
- Sunk-In Desk Installation
- Key labels
- Function check and Calibration at PC
- Installation of JoyMap
- Installation steps of JoyMap for EKB200:
- OPERATION
- Assigning Windows functions with JoyMap - application
- EKB-200 Operation with PowerCon Management Software
- Key
- Function
- Action Value
- Action Value
- EverFocus Electronics Corp.
- Head Office:
- USA L.A. Office:
- USA N.Y. Office:
- Europe Office:
- China Office:
- Japan Office:
Brand : EverFocus
Model : EKB200
Category : Keyboard