ISeries - Receiver PHOENIX GOLD - Free user manual and instructions
Find the device manual for free ISeries PHOENIX GOLD in PDF.

User questions about ISeries PHOENIX GOLD
0 question about this device. Answer the ones you know or ask your own.
Ask a new question about this device
Download the instructions for your Receiver in PDF format for free! Find your manual ISeries - PHOENIX GOLD and take your electronic device back in hand. On this page are published all the documents necessary for the use of your device. ISeries by PHOENIX GOLD.
USER MANUAL ISeries PHOENIX GOLD
Listening Position: Off
Preset: Rock
USER MANUAL
Table of Contents
Section Pages
Overview
3
Touch Screen LCD Controller
- Home Screen 3
- Subwoofer Level Screen 4
- Factory EQ Preset Screen 4
- User EQ Preset Screen 5
- Listening Position Screen 5
- Tools Menu 6-7
PC Software
- Connecting the PAC-UP to the Amp/PC 8
- Setting the Gains/Crossover Point 8
- Setting and Saving the EQ Presets 9
-
Listening Position 9
-
Text Displays 9
-
Saving Your Settings 10
-
Loading Your Settings 10
Troubleshooting
Warranty
11
12
Overview
Thank you for purchasing the Phoenix Gold iAMP complete plug-n-play solution. This kit comes with everything you need in one box and provides your factory audio system with 800 watts of audio adrenaline!
This manual will cover the features and functions of the iAMP such as the LCD Touchscreen controller, the PC Software and basic troubleshooting.
The touchscreen LCD has many important functions such as subwoofer level control, EQ preset selection, listening position selection and an amp reset function.
The PC Software allows the user to set certain features of the iAMP to their personal preference.
For Installation please refer to the installation manual which is also included in the iAMP kit.
Touchscreen LCD Controller
Home Screen
This screen is the default home screen and displays important information such as the amp temperature, voltage, equalizer setting and listening position. Whenever the iAMP is powered on the LCD will display the following information:
- iAMP Revision Number
- LCD Revision Number
- Factory audio system the amp is configured for (standard or factory amplified
The LCD touchscreen display will always revert back to this screen after 5-10 seconds of inactivity (with the exception of the calibration screen).

IMPORTANT NOTES:
- The temperature display can be adjusted to show Fahrenheit or Celsius depending on the vehicles setting to standard or metric. Please see the vehicle owner's manual on how to make this adjustment.
- When OnStar or Bluetooth is active the home screen will display the text "Audio Compensation Active". The audio compensation allows the best possible sound for these features.
Touchscreen LCD Controller (Cont.)
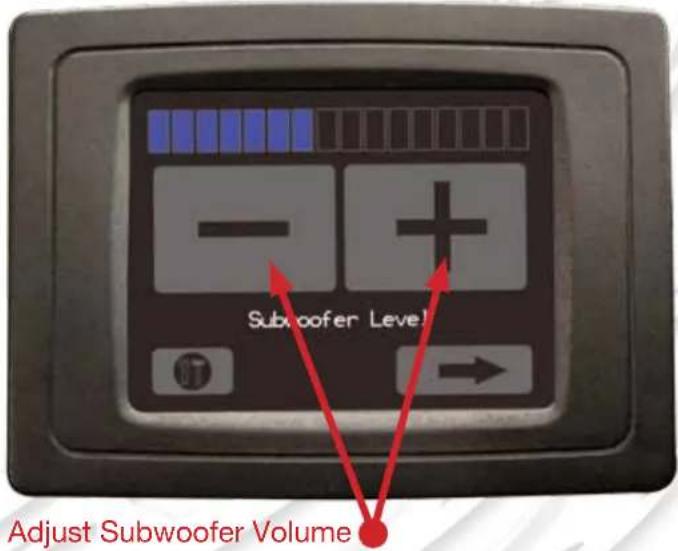
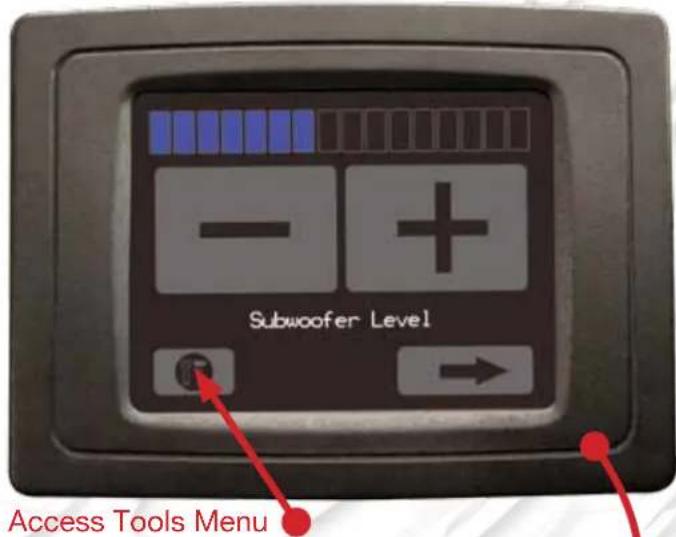
Subwoofer Level Screen
This screen allows adjustment of the subwoofer volume as well as access to the Tools menu (please see page 6 for detailed instructions on the tools menu). To access the subwoofer level screen press anywhere on the home screen.
To adjust the subwoofer volume simply press the (+) or (-) icons to the desired level.
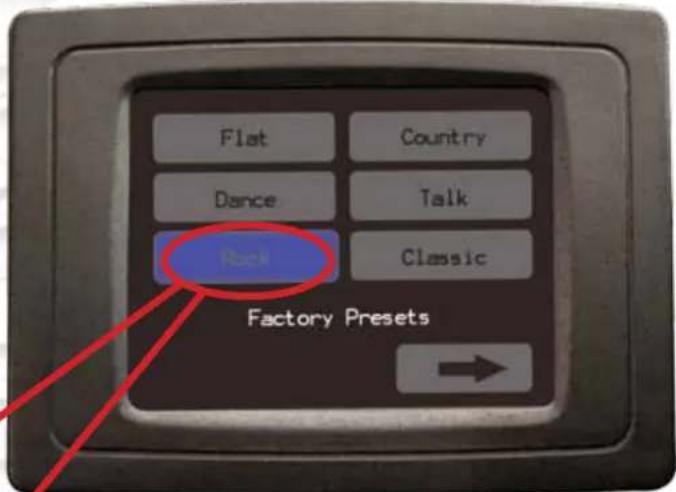
Factory EQ Preset Screen
This screen allows selection of 6 different factory preset equalizer curves. To access this screen follow these steps:
- Touch anywhere on the home screen to access the subwoofer level screen
- Press the right arrow in the bottom right corner of the subwoofer screen
To select different eq curves simply press the desired icon. These settings are preset from the factory and cannot be changed.

Touchscreen LCD Controller (Cont.)
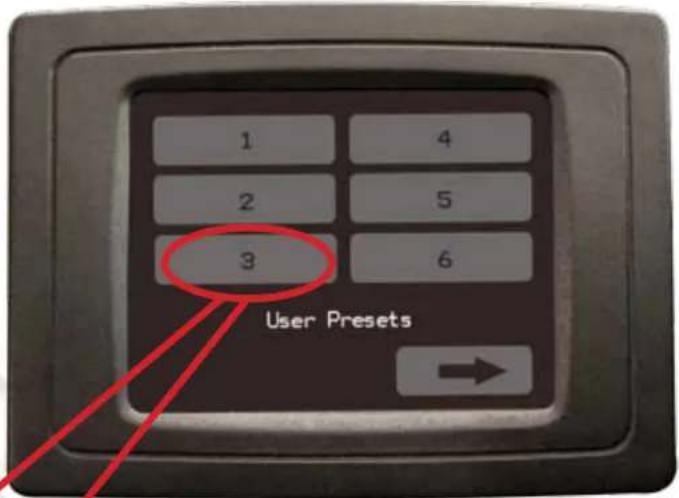
User EQ Preset Screen
This screen allows selection of 6 user preset EQ curves. These can be adjusted and stored with the iAMP PC software as described on page 9. All 6 user presets are set to flat until they are adjusted with the PC software. To access this screen follow these steps:
- Touch anywhere on the home screen to access the subwoofer level screen
- Press the right arrow in the bottom right corner twice
To select different eq curves simply press the desired icon.
Listening Position Screen
This screen allows selection of 4 different listening positions. To access this screen follow these steps:
- Touch anywhere on the home screen to access the subwoofer level screen
- Press the right arrow in the bottom right corner three times
To select listening positions simply press the desired icon. These settings are preset from the factory and cannot be changed.

Touchscreen LCD Controller (Cont.)
Tools Menu
The tools menu is used to calibrate the screen and reset the amp in the event it does not come on or pass audio. To access the tools menu follow these steps:
- Press anywhere on the home screen to access the subwoofer volume screen.
- Press the tools icon located in the lower left corner of this screen.
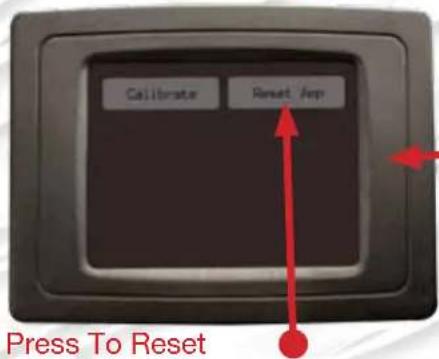
To reset the amp follow these steps:
- Access the tools menu as described above
- Press the reset icon
In the event that you have to update the LCD screen with a new firmware file it must be recalibrated. To calibrate the screen follow these steps:
- Access the tools menu as described above.
- Press the "Calibrate" icon on the top left of the screen.
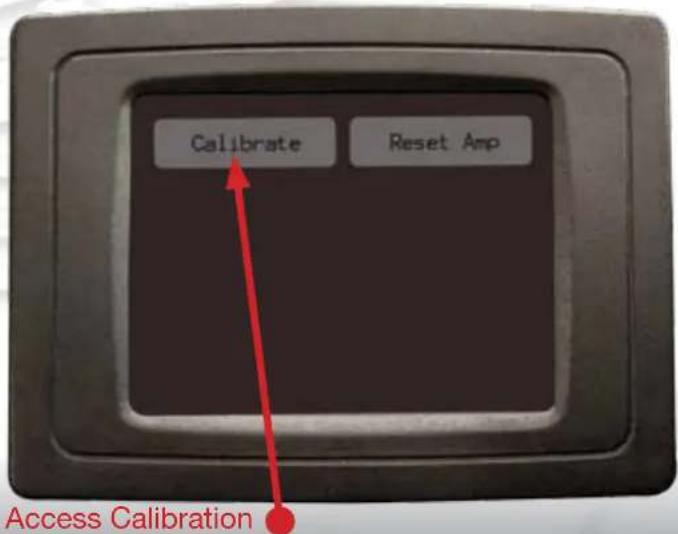
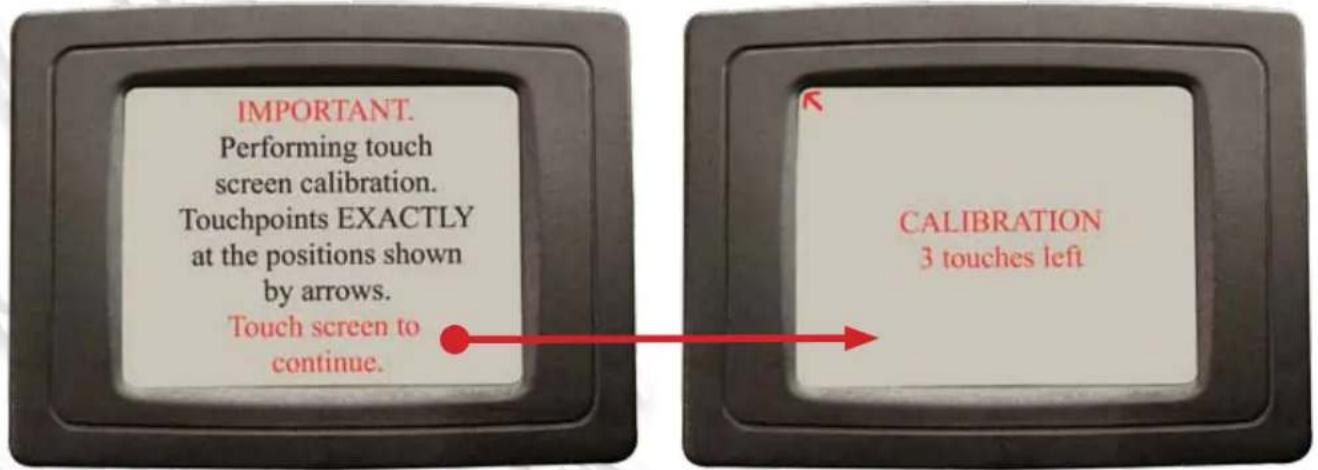
- Once the calibration screen comes up follow the on-screen prompts to calibrate the screen properly.
PC Software
To download the iAMP PC Software please visit www.phoenixgold.com/iamppc. Please follow the instructions included in the download to install the software on your PC.
Once Installed on your PC you can use the software to do the following:
- Set the 6 EQ user presets
- Set the gain of the subwoofer
- Set the low pass filter of the subwoofer
- Set the gain of the center channel (if present).
- Set different listening positions (This can also be done from the touchscreen display but has been added here to allow the user the ability to control it while setting the custom EQ curves).
Connecting the PAC-UP to the Amplifier/PC
In order to use the PC Software you must first connect the PAC-UP to the iAMP and your PC using the supplied cables. The PAC-UP can be connected either at the 5-pin port on the amplifier or the 5-pin port located behind the head unit in the harness with the 44-pin vehicle connectors. If connecting at the amplifier you may want to use the supplied USB extension. Once you are connected to the amp and the PC launch the iAMP PC software you installed on your computer.
PLEASE NOTE: The PC interface can only be used when the amp is installed in the vehicle with the key on and music playing.

natural_image
Close-up of a black electronic device with two connectors and a blue battery connected to a cable (no visible text or symbols)OR

natural_image
Close-up of a black cable with connector and blue electrical component (no visible text or symbols)Setting the Gains/ Crossover Point
This screen allows you to set the gain of the center channel and subwoofer along with the crossover point of the system. The crossover point affects both the sub-woofer and the full range factory speakers.
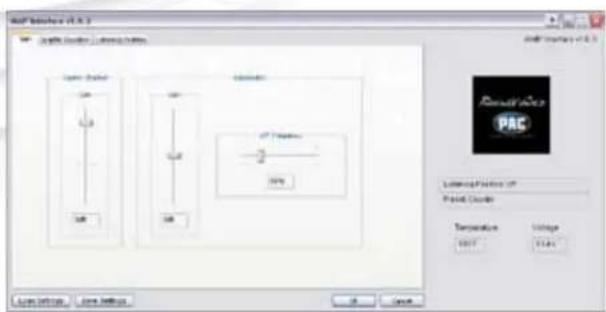
PLEASE NOTE: The center channel gain is only valid when the listening position is set to "Off". The subwoofer gain is not affected by any listening position.
PC Software (Cont.)
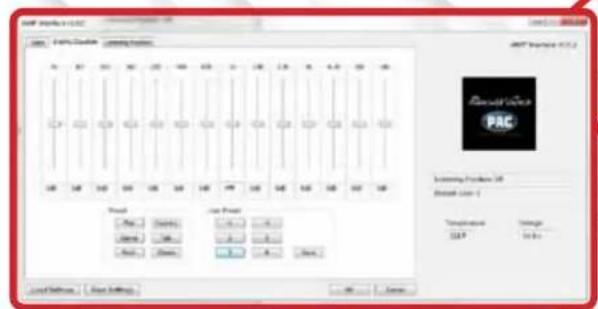
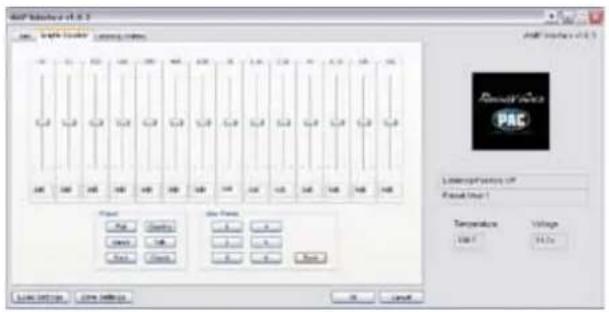
Setting and Saving the Graphic Equalizer
PLEASE NOTE: The accuracy of the iAMP EQ depends on the factory radio's bass, mid-range and treble functions to be set to 0 or flat. Please ensure they are set this way before proceeding
This screen allows you to set the six EQ custom user presets. To set a user preset follow these steps:
- Adjust the EQ accordingly.
- Click the "Save" button to the right of the custom EQ presets and select a preset from the dropdown menu.
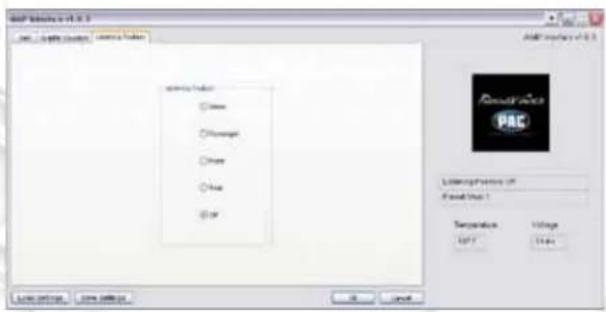
Listening Position
This function can be changed from the touchscreen display but has been included in the PC software so the user can control it while setting the custom EQ curves.
PLEASE NOTE: The accuracy of the listening position is dependant upon the factory radios balance and fade features to be set to the center.
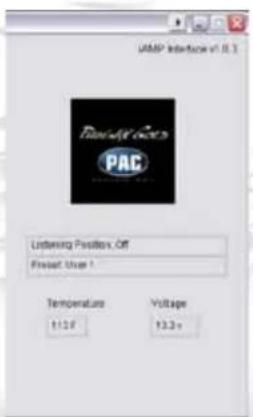
Text Displays
The text displays located above and below the Phoenix Gold/PAC logo will display information such as:
- The revision number of the PC interface.
- The revision number of the iAMP.
- Which factory system the iAMP is configured for.
- Temperature reading.
- Voltage reading.
PC Software (Cont.)
Saving Your Settings
Now that you have made all of the custom settings it is time to save them to your PC. Once saved these files can be re-loaded onto the iAMp at any time. This will allow you to save as many preset files as you like, possibly for different driver preferences.
- Click the "Save Settings" button in the lower left corner of the interface software window (Fig. 1).
- A window will pop up asking you to choose the location where you wish to save the file (Fig. 2). We recommend saving it to your desktop for easy access. Once you have decided on a location, name the file then click the "Save" button in the lower right corner.
Loading Your Settings
Now that you have saved your settings it is time to load them onto the iAMP. This only needs to be done once
- Click the "Load Settings" button in the lower left corner of the interface software window (Fig. 3)
- A window will pop up asking you to browse to the file that you saved in step 2 (Fig. 4). This should be located on your desktop unless you chose an alternate location. Select the file you saved earlier and click the "Open" button in the bottom right corner. The software will now load the file onto the iAMP.
PLEASE NOTE: You may hear some audible data noise as the file transfers, this is normal.
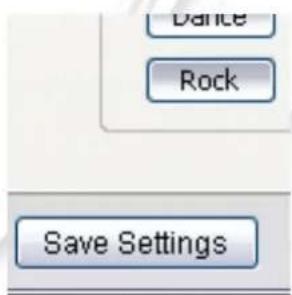
Fig. 1
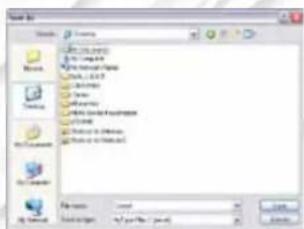
Fig. 2

Fig. 3
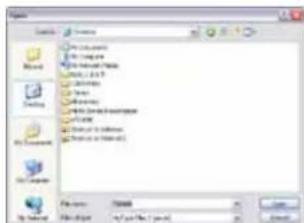
Fig. 4
| Troubleshooting | |||
| Problem Solution 1 | Solution 2 Solution 3 | ||
| No Power Check that all plug and play connections are secure. | Check that the amp is receiving 12v by ensuring it is hooked up properly to the battery. | Check that the in-line fuse is not blown. | |
| No sound Check “No Power” solutions | Amplifier may have reset. Please cycle the ignition. | Go into tools menu on the LCD and press the reset icon. | |
| No sound from subwoofer | Make sure the subwoofer is connected properly to the amplifier. | ||
| Distorted audio Go into tools menu on the LCD and press the reset icon. | |||
| LCD Display turns on but screen is white | Please contact our tech support department at 888-228-5560 for further assistance. | ||
| iAMP PC Interface displays error message upon start up | Amp must be installed in car with ignition on and audio playing. | PAC-UP must be plugged into the PC and the 5-pin port on the iAMP. | Close and re-open the program once all connections and steps are made. |
| Amp is configured to the wrong audio system | Verify that blu/wht wire is connected accordingly for your vehicle and then reset the amplifier via the tools menu. please see the included addendum for proper connection of the blu/wht wire. | ||
| If you are unable to resolve your issue please contact your nearest authorized Phoenix Gold dealer for assistance. You can locate your nearest dealer via our dealer locator at http://www.phoenixgold.com/buy.aspx. | |||

Phoenix Gold
ONLINE WARRANTY REGISTRATION
Thank you for choosing a Phoenix Gold product. Registering your purchase with Phoenix Gold will make it possible to send you updated information on your product and special offers.
TO REGISTER YOUR WARRANTY ONLINE VISIT:
www.phoenixgold.com/register
LIMITED WARRANTY
Phoenix Gold warrants this product to be free of defects in materials and workmanship for a period of three (3) years from the original date of purchase. This warranty is not transferable and applies only to the original purchaser from an authorized Phoenix Gold dealer in the United States of America only. Should service be necessary under this warranty for any reason due to manufacturing defect or malfunction, Phoenix Gold will (at its discretion), repair or replace the defective product with new or remanufactured product at no charge. Damage caused by the following is not covered under warranty: accident, misuse, abuse, product modification or neglect, failure to follow installation instructions, unauthorized repair attempts, misrepresentations by the seller. This warranty does not cover incidental or consequential damages and does not cover the cost of removing or reinstalling the unit(s). Cosmetic damage due to accident or normal wear and tear is not covered under warranty.
INTERNATIONAL WARRANTIES:
Products purchased outside the United States of America are covered only by that country's Authorized Phoenix Gold reseller and not by Phoenix Gold. Consumers needing service or warranty information for these products must contact that country's reseller for information.
Phoenix Gold
A Division of AAMP of America™
13190 56th Court
Clearwater, Florida 33760
P: 888-228-5560
info@phoenixgold.com
www.phoenixgold.com
© 2011 AAMP of Florida, Inc
Designed and Engineered in the USA
Manufactured with components from