KT340G - Food processor CENTURION - Free user manual and instructions
Find the device manual for free KT340G CENTURION in PDF.

| Product Type | Food Processor / Stand Mixer |
| Model | KT340-B/G/P |
| Rated Voltage | 220-240V, 50Hz |
| Rated Power | 1000W |
| Bowl Capacity | 4.3 L |
| Speed Settings | 12 speeds + Off position |
| Attachments Included | Dough hook, flat beater, whisk, bowl cover |
| Tilt Head | Yes, with tilt/release button |
| Bowl Attachment | Clockwise lock on base |
| Attachment Lock | Anti-clockwise turn to lock, clockwise to release |
| Max Continuous Operation | 10 minutes |
| Rest Time Between Cycles | Minimum 20 minutes |
| Dishwasher Safe Parts | Bowl, beater, dough hook, whisk, spatula |
| Cleaning Method | Wipe head and base with damp cloth; do not immerse |
| Safety Features | Auto shut-off not specified, but includes tilt-lock, cord storage |
| Housing Material | Plastic (estimated) |
| Bowl Material | Stainless steel (estimated) |
| Weight | Approx. 5 kg (estimated) |
| Dimensions (approx) | 40 x 30 x 35 cm (estimated) |
| Warranty | Not specified, check retailer |
| Certifications | RoHS, EMF compliant |
Frequently Asked Questions - KT340G CENTURION
User questions about KT340G CENTURION
0 question about this device. Answer the ones you know or ask your own.
Ask a new question about this device
Download the instructions for your Food processor in PDF format for free! Find your manual KT340G - CENTURION and take your electronic device back in hand. On this page are published all the documents necessary for the use of your device. KT340G by CENTURION.
USER MANUAL KT340G CENTURION
natural_image
Three Penturium kitchen models in different colors (pink, cyan, black) displayed side by side, no visible text or symbols on the devices themselves.Svenska, sida 3-10
Norsk, side 11-18
English, page 19-26
SÄKERHETSFÖRESKRIFTER
natural_image
Line drawing of a kitchen mixer with a close-up inset showing the blade and handle (no text or symbols)Fig. 1 Fig. 2

natural_image
Line drawing of a kitchen mixer with a bowl and whisk (no text or symbols)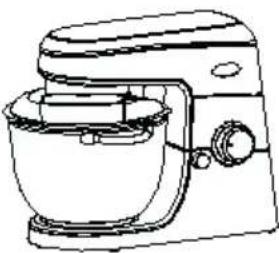
natural_image
Line drawing of a kitchen mixer with a bowl (no text or symbols)Fig. 3
Waste of Electrical and Electronic Equipment (WEEE) - WEEE-direktivet 2012/19/EU
natural_image
Line drawing of a kitchen mixer with a close-up inset showing the blade and handle (no text or symbols)Fig. 1 Fig. 2

natural_image
Line drawing of a kitchen mixer with a bowl and whisk (no text or symbols)
natural_image
Line drawing of a kitchen mixer with a bowl (no text or symbols)Fig. 3
Waste of Electrical and Electronic Equipment (WEEE)
- WEEE-direktivet 2012/19/EU
- Read the instruction manual carefully before use, and save it for future reference.
- Before you connect the appliance: Ensure the voltage rating on the type plate corresponds to your mains voltage (type plate is located on bottom of the unit).
- Check the appliance and the cable for damage on a regular basis. Do not use the appliance if it is damaged.
- If the supply cord is damaged, it must be replaced by the manufacturer, its service agent or similarly qualified persons in order to avoid a hazard.
- Do not try to repair the appliance on your own. Always contact an authorized technician.
- This appliance is not intended for use by persons (including children) with reduced physical, sensory or mental capabilities, or lack of experience and knowledge, unless they have been given supervision or instruction concerning use of the appliance by a person responsible for their safety.
- In order to ensure your children's safety, please keep all packaging (plastic bags, boxes, polystyrene etc.) out of their reach.
- Caution! Do not allow small children to play with the foil as there is a danger of suffocation!
- Close supervision is necessary when this appliance is used near children. Do not allow small children to play with this appliance.
- The appliance is designed exclusively for private use and for the envisaged purpose. This appliance is not fit for commercial use. Do not use it outdoors. Keep it away from sources of heat, direct sunlight, humidity (never dip it into any liquid) and sharp edges. Do not use the appliance with wet hands. If the appliance is humid or wet, unplug it immediately.
- When cleaning or putting it away, switch off the appliance and always pull out the plug from the socket (pull on the plug, not the cable) if the appliance is not being used and remove the attached accessories.
- Do not operate the machine without supervision. If you should leave the workplace, always switch the machine off or remove the plug from the socket (pull the plug itself, not the lead).
- Do not insert anything into the rotating hooks while the machine is working.
- Do not insert the mains plug of the machine into the power socket without having installed all the necessary accessories.
- Keep your fingers away from moving parts and and openings.
- Use only original spare parts.
OVERVIEW OF THE COMPONENTS
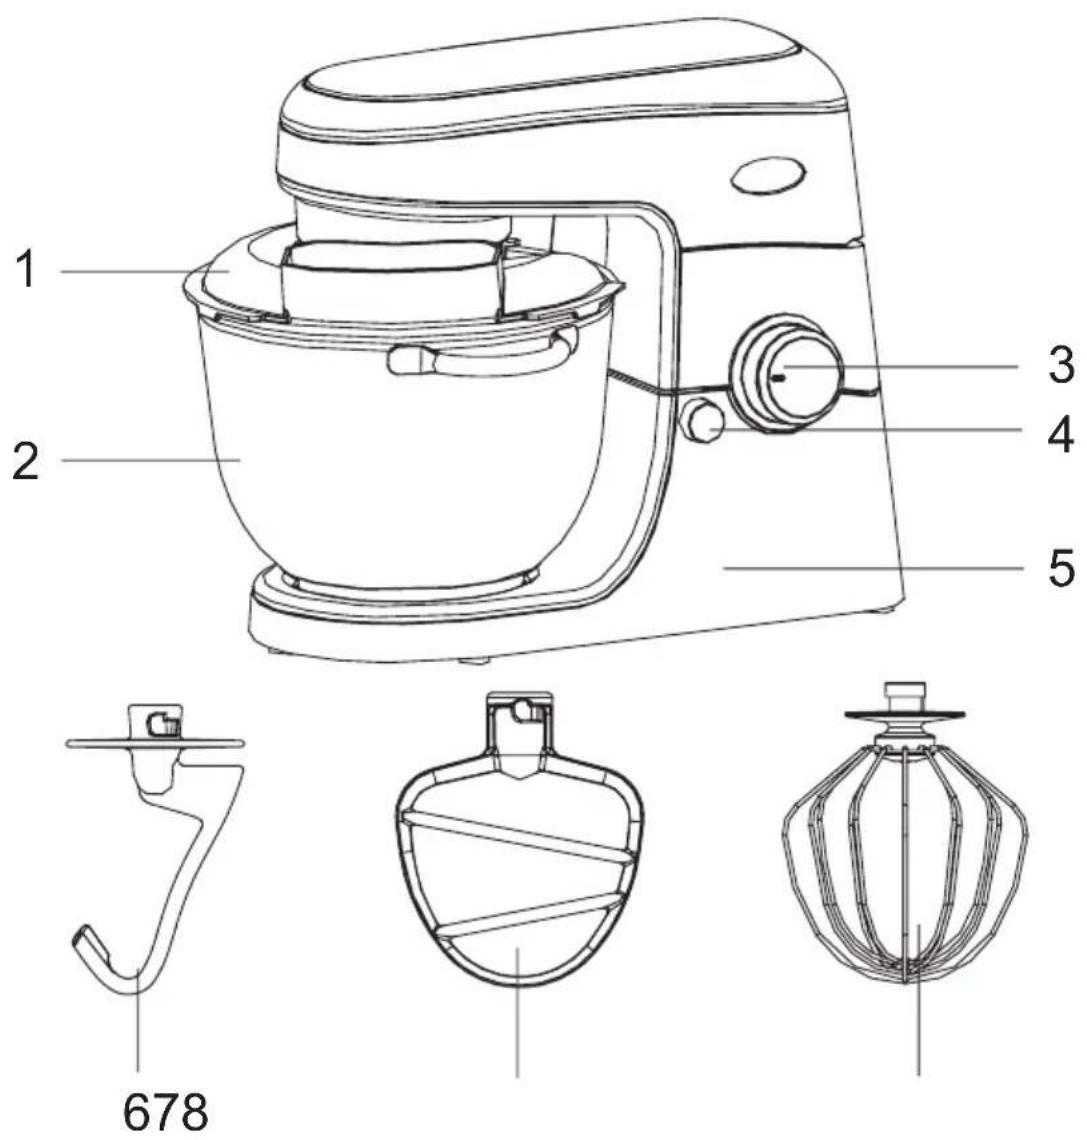
| 1 Bowl cover |
| 2 Bowl |
| 3 Speed control switch |
| 4 Tlt/release button |
| 5 Base |
| 6 Dough hook |
| 7 Flat beater |
| 8 Whisk |
BEFORE USING MIXER
natural_image
Line drawing of a kitchen mixer with a close-up inset showing the blade and handle (no text or symbols)Fig. 1 Fig. 2
natural_image
Line drawing of a kitchen mixer with a bowl and whisk (no text or symbols)
natural_image
Line drawing of a kitchen mixer with a bowl (no text or symbols)Fig. 3
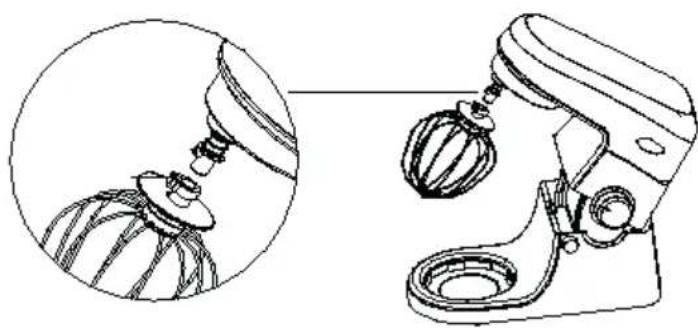
Before assembling the mixer, be sure the power cord is unplugged from the power outlet and the speed selector is in the "Off" position.
- Depressing the tilt/release button, the head of mixer will automatically release and lift it backwards with hand lightly to lock it into tile position.
- Select the desired attachments, which are depending on the mixing task to be performed: Flat beater for normal to heavy mixtures, and dough hook for mixing and kneading yeast dough, the whisk for mixture that need air incorporated.
- Assemble the flat beater / dough hook / whisk into the shaft under the head. Align the rectangle groove of flat beater / dough hook / whisk with the pin on the shaft to insert (see fig.1), then push the attachment upwards as far as possible and turn it in anti-clockwise synchronously hooking beater / dough hook / whisk over pin on shaft. When detaching, firstly push the attachment upwards and turn it in clockwise synchronously, then pull out for detaching.
Note: Ensure the flat beater / dough hook / whisk is fully locked into the shaft, otherwise it may drop out during operation.
-
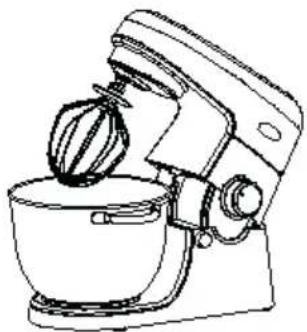
Place bowl on position. First place the bowl on the base, then turn the bowl in clockwise until it lock into position (see fig.2).
-
To lower the head, firstly press the tile/release button and place beater / dough hook / whisk into the bowl by pressing down the head with hand directly. A click sound will be heard when the head has reached the correct position.
Caution: Be careful while lowering the head so you do not jam your finger.
INSTRUCTIONS
-
Ensure that the speed selector is at the "Off" position, then plug in the power source.
-
Turn the speed selector to your desired setting. There are 12 settings.
Warning: Do not stick knife, metal spoons, fork and so on into bowl when operating.
- The max operation time per time shall not exceed 10 minutes and minimum 20 minutes rest time must be maintained between two consecutive cycles. When kneading yeast dough, use low speed for slowing mixing, if using high speed, it may damage the mixer.
Note: During kneading, some flour may be adhered on the inside of the bowl, you shall stop the appliance and remove the bowl cover, scrape the flour on the inside wall of bowl by spatula to obtain well kneading results.
-
During mixing, you can add ingredient according to your task from the opening of bowl cover. When mixing is completed, turn the speed selector to "Off" position, unplug the cord from power outlet.
-
Press down the tilt button, the head of the mixer will automatically lift and lock into the tilt position.
-
If necessary you can scrape the excess food particles from the beater/dough hook by plastic spatula.
-
Firstly push the beater / dough hook / whisk upwards and turn it in clockwise synchronously, then pull out for detaching.
Caution: The speed selector must be at "Off" position and the power outlet must be unplugged before pulling out the beater/dough hook/whisk.
CLEANING
- Unplug the appliance and wait for it to completely cool down before cleaning.
Caution: The mixer cannot be immersed in water or other liquid.
-
Wipe over the outside surface of the head and base with a dampened cloth and polish with a soft dry cloth. Wipe any excess food particles from the power cord.
-
Immerse the bowl, beater, spatula, dough hook and whisk in warm soapy water for complete cleaning. Then rinse under running water and wipe dry. They can also be placed in the dishwasher.
Warning: Any other serving should be performed by an authorized service representative.
COOKING TIPS
-
Refrigerated ingredients, such as butter and eggs, should be at room temperature before mixing begins. Set these ingredients out ahead of time.
-
To eliminate the possibility of shells or deteriorated-off eggs in your recipe, break eggs into separate container first, then add it to the mixture.
-
Do not over-beat. Be careful that you only mix/blend mixtures until recommended in your recipe. Fold into dry ingredients only until just combined. Always use the low speed.
- Climatic conditions. Seasonal temperature changes, temperature of ingredients and their texture variation from area to area all play a part in the required mixing time and the results achieved.
- Always start mixing at lower speed. Gradually increase to the recommended speed as stated in the recipe.
PROCESSING GUIDE
| Accessory | Food | Maximum | Operation Time | Speed |
| Whisk | Cream (include 38%fat) | 250ml 10 minutes 7-12 | ||
| Egg white | 12 pcs | 3 minutes | 7-12 | |
| Dough hook | Flour 1700 g | 10 minutes 1-3 | ||
| Salt 20 g | ||||
| Yeast | 10 g | |||
| Sugar | 10 g | |||
| Water | 1100 g | |||
| Lard 20 g | ||||
| Mixer blade | Flour 100 g | 5 minutes | 1-4 | |
| Caster sugar | 100 g | |||
| Margarine 100 g | ||||
| Egg | 2 pcs | |||
TECHNICAL SPECIFICATIONS
| Model: | KT340-B/G/P |
| Rated voltage: | 220-240V, 50Hz |
| Rated power: | 1000W |
| Bowl capacity: | 4.3L |
ENVIRONMENT
Waste of Electrical and Electronic Equipment (WEEE) - WEEE Directive 2012/19/EU
This symbol on the product or in the instructions means that the electrical and electronic equipment must be disposed of separately from other household waste when it does not work anymore. The EU has separate waste collection systems, contact your local dealer or authority for more information.

LAW AND SAFETY
This product has been manufactured according to current regulations for electromagnetic fields (EMF), which means that it is safe to use if used according to safety instructions.
The product is manufactured according to current regulations within the EU legislation, limiting the use of hazardous substances in electrical and electronic equipment (RoHS Directive 2011/65/EU).

RESERVATIONS
We reserve the right to correct any typographical errors, and reserve the right to make ongoing changes and improvements to the product and related materials.
Brand : CENTURION
Model : KT340G
Category : Food processor