DM System - Uncategorized MAMIYA - Free user manual and instructions
Find the device manual for free DM System MAMIYA in PDF.

| Product Type | Digital Medium Format Camera System |
| Brand | Mamiya |
| Model | DM System |
| Sensor Type | CCD (varies by digital back) |
| Resolution | 22 to 80 megapixels |
| Image File Format | RAW, TIFF, JPEG |
| Storage Media | CompactFlash, SD card |
| Interface | FireWire 800, USB 2.0 |
| Viewfinder | Optical or optional electronic viewfinder |
| Dimensions (Body Only) | Approx. 150 x 120 x 80 mm |
| Weight (Body Only) | Approx. 1200 g |
| Power Source | Li-ion battery pack or AC adapter |
| Battery Life | Approx. 500 shots per charge |
| Functions | Live view, multi-shot, ISO 100-1600 |
| Cleaning | Sensor cleaning using manual or professional cleaning; body cleaning with dry cloth |
| Safety | Use only specified batteries, chargers, and accessories; avoid moisture and extreme temperatures |
| Spare Parts and Reparability | Contact authorized Mamiya service centers for genuine parts and repairs |
| General Information | Designed for professional studio and field photography |
Frequently Asked Questions - DM System MAMIYA
User questions about DM System MAMIYA
0 question about this device. Answer the ones you know or ask your own.
Ask a new question about this device
Download the instructions for your Uncategorized in PDF format for free! Find your manual DM System - MAMIYA and take your electronic device back in hand. On this page are published all the documents necessary for the use of your device. DM System by MAMIYA.
USER MANUAL DM System MAMIYA
natural_image
Close-up of a black Mamiya DSLR camera with lens (no visible text or symbols on body)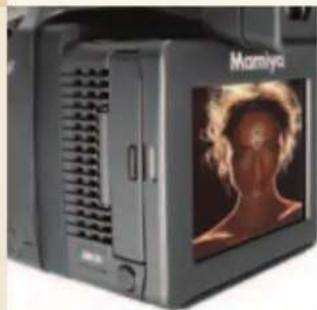
natural_image
Exterior view of a modern office building (no signage)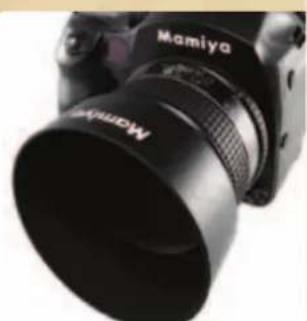
natural_image
Close-up of a black Mamiya DSLR camera lens (no visible text or symbols on body)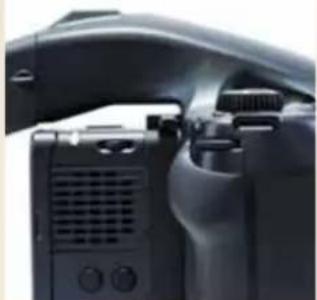
natural_image
Close-up of a black DSLR camera body panel showing front and rear camera components (no visible text or symbols)1 Basic info....1
Thanks for your purchase.... 2
Copyrights/ Trademarks/ Compliances.... 3
Warranty.... 4
Importance of the protective IR filter glass.... 6
Important care notes for the digital back.... 7
Important care notes for the camera body.... 9
2 Getting to know your camera system.... 11
Product overview.... 12
Names of parts and functions.... 13
LCD Displays.... 14
Viewfinder LCD.... 15
Liquid Crystal Display.... 16
Basic description of home screen on digital back.... 17
Digital back charger and battery.... 18
Note on batteries for camera (rechargeable vs. disposable).... 19
Attaching the neckstrap.... 20
Using the eyepiece shutter.... 21
3 Preparing the battery and compact flash card.... 23
Inserting the camera batteries.... 24
Battery power icons.... 25
Camera sleep mode and battery care.... 26
Inserting and removing the digital back battery.... 27
Charging the digital back battery.... 28
Digital Back battery power status.... 29
Formatting the compact flash card in MAC.... 30
Formatting the compact flash card in windows.... 31
Inserting and removing the compact flash card.... 32
Attaching and removing a lens.... 34
Detaching the digital back.... 36
Adjusting the camera diopter.... 37
Replacing the diopter correction lens.... 38
Attaching to a tripod.... 39
4 Basic camera operations....41
Turning on the camera.... 42
Using the shutter.... 43
About the drive dial.... 44
Using the front and rear dial.... 45
Holding the system.... 46
Backlight button.... 47
5 Focusing the camera....49
Focusing the camera.... 50
Focus area.... 51
Manual focus.... 52
Manual focusing using the focus mark.... 52
When auto focus fails.... 53
Using the auto focus function.... 54
AF Assist infrared light.... 55
6 Exposure Modes....57
Program AE.... 58
Aperture Priority AE (Av).... 59
Shutter Priority AE (Tv).... 60
Manual Mode (M).... 61
Sync Mode.... 62
Custom Function Mode.... 63
Auto Mode mechanism.... 64
Exposure Metering Modes.... 65
Exposure warnings.... 66
Exposure compensation.... 67
AE Lock Mode....68
Auto Bracketing Mode.... 70
Taking photos with the mirror up.... 72
Mirror up delay.... 73
Self Timer Mode.... 74
Interval photography.... 75
Long Exposure Mode.... 76
7 Basic digital back operations.... 77
Using the stylus.... 78
Basic steps.... 79
Turning on the digital back.... 80
Turning off the digital back.... 81
Changing the interface language.... 82
Setting the date and time.... 83
Viewing and defining the camera settings.... 84
Creating a folder.... 85
Creating a base name for the shot.... 86
Adding notes or copyrights to your shots.... 87
Connecting the firewire cable for tethered mode.... 88
8 Using the digital back settings and evaluating shots...... 89
Checking the exposure.... 90
Checking the exposure with the picker tool.... 91
Checking the exposure with the over or under exposure alarms.... 92
Checking focus.... 93
Setting the gray balance.... 94
Checking composition using the grid.... 95
Changing the color of the grid lines.... 96
Browsing through images.... 97
Flagging or creating comments in shoot view.... 98
9 Editing images.... 99
Editing view....100
Browsing through images.... 101
Viewing information and EXIF data.... 102
Selecting multiple images.... 103
Flagging, creating comments or deleting images.... 104
Sorting images.... 105
10 Image file management and preferred settings.....107
Selecting a folder.... 108
Moving images.... 109
Opening images in shoot view.... 110
Shooting without overlays.... 111
Working in full screen mode.... 112
Setting grid attributes.... 113
Using the crop mask.... 114
Adjusting the transparency of the crop mask.... 115
Adjusting the transparency of the histogram and info bar.... 116
Setting the exposure alarm.... 117
Resetting the file name counter.... 118
Formatting the compact flash card in portable mode.... 119
Configuring the user button.... 121
Configuring the user button for edit view.... 122
Configuring a long press of the user button.... 123
Aligning the touch screen.... 124
Turning off the backlight.... 125
Turning on the backlight.... 126
Setting the volume for digital back sounds.... 127
Setting personal information.... 128
Restoring factory settings.... 129
Viewing the digital back 130
11 Using the software....131
Activation.... 132
The interface.... 133
Toolbars.... 135
Browser.... 136
Tool palate.... 137
Library/ Capture/ Color.... 138
Exposure/Compose.... 139
Details/ Adjustment.... 140
Process Recipe/ Batch.... 141
Organising the workflow/ Importing images.... 142
Exporting files.... 143
Organising Images.... 144
Moving to folders....145
Working with albums.... 146
Tethered capture.... 147
Using the white balance tool.... 148
Color balance.... 151
Adjusting colors.... 152
Optimising exposure.... 153
Managing exposure using curves and high dynamic range.... 156
Managing highlight and shadows.... 158
Variants.... 159
Cropping an image.... 161
Straightening and rotating an image.... 162
Sharpening an image.... 164
Noise reduction.... 166
Removing post-capture dust and spots.... 167
Contents
Megadata.... 169
Adding and resetting megadata to image files.... 170
Creating a process recipe.... 171
Processing completed images.... 172
About batch.... 173
Creating a web contact sheet.... 174
12 Flash photography....177
Flash photography.... 178
Rear curtain sync.... 179
Flash compensation settings.... 180
13 Custom functions....181
Setting custom functions.... 182
Initializing user functions.... 183
Camera custom functions quick guide.... 184
Types of custom functions.... 185
14 System specifications....189
Camera specifications.... 190
Digital back specifications.... 192
Trouble shooting.... 193
1
GETTING TO KNOW YOUR CAMERA SYSTEM
Thanks for your purchase.... 2
Copyrights/ Trademarks/ Compliances.... 3
Warranty.... 4
Importance of the protective IR filter glass.... 6
Important care notes for the digital back....7
Important care notes for the camera body....9
Thanks for your purchase
The Mamiya DM Systems have been designed for lovers of photography who want to produce outstanding images of professional quality. The Mamiya DM System has been manufactured for heavy professional use and will give you a long service life if properly maintained.
In order to ensure long usage of the Mamiya DM System, we recommend sending it in for annual servicing and keeping it up-to-date with firmware upgrades or tips and techniques for better handling as provided on our webpage. See www.mamiya.com for more information.
Copyright
©Mamiya Digital Imaging Co., Ltd, 2010. All rights reserved.
This document is also distributed in Adobe Systems Incorporated's PDF (Portable Document Format) and ©Phase One A/S 2010. You may reproduce the document from the PDF file for internal use.
Copies produced from the PDF file must be reproduced in whole.
Trademarks
Adobe, Acrobat, Adobe Illustrator, Distiller, Photoshop, PostScript, and PageMaker are trademarks of Adobe Systems Incorporated.
Apple, AppleShare, AppleTalk, iMac, ImageWriter, LaserWriter, Mac OS, Power Macintosh, and TrueType are registered trademarks of Apple Computer, Inc. Macintosh is a trademark of Apple Computer, Inc., registered in the U.S.A. and other countries.
FCC Compliance
Any Mamiya Digital Imaging Co., Ltd. equipment referred to in this document complies with the requirements in part 15 of the FCC Rules for a Class A digital device. Operation of the Mamiya Digital Imaging Co., Ltd. equipment in a residential area may cause unacceptable interference to radio and TV reception, requiring the operator to take whatever steps are necessary to correct the interference.
Equipment Recycling

The European Union, this symbol indicates that when the last user wishes to hard this product, it must be sent to appropriate facilities for recovery and cling.

Electronic information product complies with Standard SJ/T 11363 - 2006 Electronics Industry of the People's Republic of China.
Mamiya Limited Warranty
Warranty Coverage
Mamiya warrants the Mamiya product against defects in materials and workmanship for a period of one (1) year from the date of original retail purchase. Should you discover a defect, Mamiya will, as its option, repair or exchange the Mamiya product at no charge to you provided that you notify Mamiya during the warranty period.
Obtaining Warranty Service
In the event that you believe the Mamiya product requires service, or the system is not operating properly, please first check the online forums on www.mamiya.co.jp. Often problems can be solved simply by adjusting settings or through trouble-shooting. The online forums provide a wealth of information expressly for this purpose.
If the problem can not be resolved through information on the user's forums, please contact your local Mamiya dealer.
Exclusions and Limitations
This warranty does not apply if the Mamiya DM System has been damaged by accident, installation, shipment, abuse, misuse, misapplication, neglect, fire, water, lightning, or other acts of nature; by failure to follow supplied instructions; or by modification or repair by unauthorized personnel.
Mamiya shall not be liable for any indirect damages, including, without limitation, lost profits, damage to other property caused by any defect in the Mamiya DM System, damages based upon inconvenience, loss of use of the Mamiya DM System, loss of time, commercial use, incidental and/or consequential damages for the breach of any expressed or implied warranty, including damage to property and, to the extent permitted by law, damages for personal injury, even if Mamiya has been advised of the possibility of such damages. The Mamiya DM System may contain refurbished parts. Mamiya warrants the refurbished parts in Mamiya products for a period of one year from the date of original retail purchase.
THIS WARRANTY IS IN LIEU OF ALL WARRANTIES, WHETHER ORAL OR WRITTEN, EXPRESSED OR IMPLIED. ALL EXPRESSED OR IMPLIED WARRANTIES FOR THIS MAMIYA DM SYSTEM, INCLUDING THE IMPLIED WARRANTIES OF MERCHANTABILITY AND FITNESS FOR PARTICULAR PURPOSE, ARE LIMITED TO THE WARRANTY PERIOD. NO WARRANTIES, EXPRESSED OR IMPLIED, WILL APPLY AFTER THE WARRANTY PERIOD.
For latest Mamiya product news and updates, visit: www.mamiya.com
Limitation of Liability
The product, software or services are being provided on an "as is" and "as available" basis. Except as may be stated specifically in your contract, Mamiya Digital Imaging Co., Ltd. expressly disclaims all warranties of any kind, whether express or implied, including, but not limited to, any implied warranties of merchantability, fitness for a particular purpose and noninfringement.
You understand and agree that, except as may be stated specifically in your contract, Mamiya Digital Imaging Co., Ltd. shall not be liable for any direct, indirect, incidental, special, consequential or exemplary damages, including but not limited to, damages for loss of profits, goodwill, use, data or other intangible losses (even if Mamiya Digital Imaging Co., Ltd. has been advised of the possibility of such damages), resulting from: (i) the use or the inability to use the product or software; (ii) the cost of procurement of substitute goods and services resulting from any products, goods, data, software, information or services purchased; (iii) unauthorized access to or alteration of your products, software or data; (iv) statements or conduct of any third party; (v) any other matter relating to the product, software, or services.
The text and drawings herein are for illustration and reference only. The specifications on which they are based are subject to change. Mamiya Digital Imaging Co., Ltd. may, at any time and without notice, make changes to this document. Mamiya Digital Imaging Co., Ltd. assumes no liability for technical or editorial errors or omissions made herein, and shall not be liable for incidental, consequential, indirect, or special damages, including, without limitation, loss of use, loss or alteration of data, delays, or lost profits or savings arising from the use of this document.
http://www.mamiya.com
Copyright © 2010 Mamiya Digital Imaging Co., Ltd. All rights reserved.
IMPORTANCE OF THE PROTECTIVE IR FILTER GLASS
The digital back on the Mamiya DM System has a protective IR filter glass over the sensor. The sensor is the most important and expensive part or the DM System.
The protective IR filter glass is located on the underside of the Mamiya DM System's digital back.

WARNING:
The sensor is extremely sensitive to ESD (Electro Static Discharge) and can be damaged by it.
During some stages of the installation process, the protective IR filter glass is exposed to the environment. Do not touch the IR filter glass. Any contamination of the IR filter glass (such as dust or fingerprints) will appear in images that you capture.
IMPORTANT CARE NOTES FOR THE DIGITAL BACK
natural_image
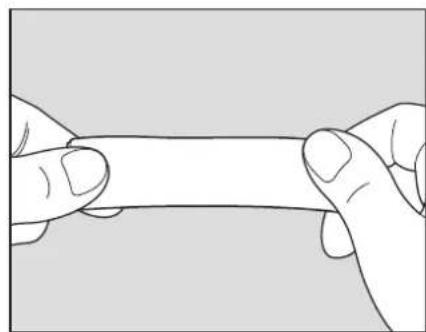
Illustration of two hands holding a rectangular object with a bandage, no text or symbols present1
natural_image
Illustration of two hands holding a rectangular object (no text or symbols)2
natural_image
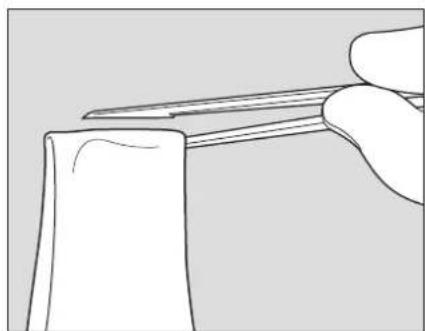
Line drawing of a hand using tweezers to cut a cylindrical object (no text or symbols)3
natural_image
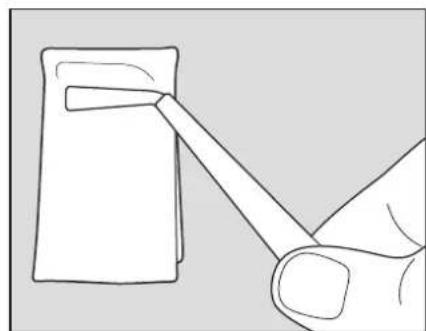
Line drawing of a hand holding a tool interacting with a rectangular object (no text or symbols)4
natural_image
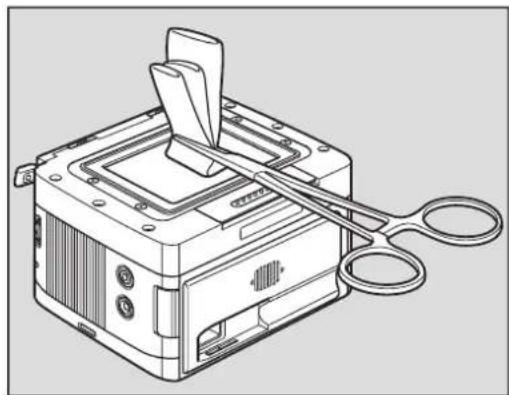
Technical line drawing of a mechanical device with scissors and clamped parts (no text or symbols)5
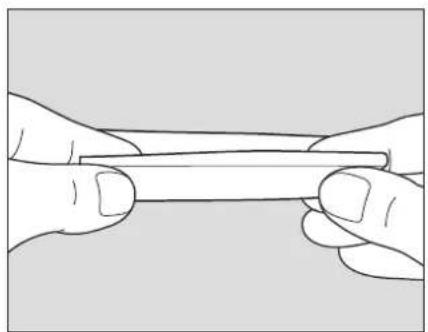
Clean the protective IR filter glass using the steps as illustrated above. Be sure to use a cleaning wipe and cleaning fluid (isopropyl alcohol). These items can be purchased separately from your Mamiya dealer. Spray away from the IR filter glass first to remove any condensation that may be inside the sprayer nozzle, then spray the protective IR filter glass with ionized nitrogen to remove large dust particles.
Prepare the cleaning wipe to fit the width of the protective IR filter glass as shown in the above illustrations. Do not touch any part of the wiping cloth that will come into contact with the protective IR filter.
IMPORTANT CARE NOTES FOR THE DIGITAL BACK

Important:
- Never use a dry cloth for cleaning.
- Never clean the protective IR filter glass with a window or lens cleaner.
The residues from these products may permanently cloud the glass plate. - Never spray compressed air directly on the digital back.
- Do not reuse cleaning wipes.
- Put the protective cover over the sensor plate whenever the digital back is not attached to the system.
- To prevent contamination of the sensor, do not remove the protective IR filter glass.
- The protective IR filter can be replaced only by Mamiya trained service centers.
IMPORTANT CARE NOTES FOR THE CAMERA BODY
Maintenance and care of the camera
- Read instructions prior to use.
- Protect camera against shocks and falls by using the supplied neck strap whenever possible.
- Check the batteries frequently and always carry spares. The sealed batteries supplied with the camera may have been subject to storage conditions which have reduced their service life.
- Wipe battery contacts before installation and watch correct polarity.
- Battery life varies, depending on frequency of use, type, age, storage condition, ambient temperature (use external battery case in very cold weather), etc.
- Always remove the battery when camera is not used for a long period of time.
• Always keep covers on lenses and camera body.
- Do not store the camera at temperatures exceeding 40^ (105°F) and -10°C (15°F).
Avoid humid or sea air environments.
- Prolonged disuse shortens camera life. Periodically exercise the shutter (at different speeds), lens diaphragms (at different apertures) and focusing mechanism.
- Protect camera against rain and moisture.
- Do not touch lens surfaces. Use blower or lens tissue to remove dust particles.
• Always test your equipment before going on important assignments.
The Importance of Proper Maintenance
The camera has mechanisms that are controlled by gears, levers, springs, etc., all of which require occasional lubrication. Ambient conditins can also affect these mechanisms, as well as the optical glass of the lenses. We recommend periodic servicing of the camera and lenses.
2
GETTING TO KNOW YOUR CAMERA SYSTEM
Product overview.... 12
Names of parts and functions.... 13
LCD Displays.... 14
Viewfinder LCD.... 15
Liquid Crystal Display.... 16
Basic description of home screen on digital back.... 17
Battery charger parts and functions.... 18
Note on batteries for camera (rechargeable vs. disposable).... 19
Attaching the neckstrap.... 20
Using the eyepiece shutter.... 21
PRODUCT OVERVIEW
Mamiya DM Systems are digital solutions for photographers who take their art seriously and passionately.
They have been manufactured to cater to photographers who want to take pro-level digital images with a professional feel that only a medium format system can provide. The Mamiya DM Systems boast 35mm handling and speed, fully customizable settings and top quality photographic results. Images are shot in 16 bit RAW files with high resolution, exceptional color accuracy and exquisite detail, of which not a single megapixel is squandered due to the premium quality 33, 28 and 22 megapixel sensors.
A comprehensive range of 16 precision lenses are available for the Mamiya DM System user, all constructed drawing on over 60 years of experience and innovation.
For demanding daylight situations, there are three leaf shutter lenses, developed in collaboration with renowned optical company Schneider Kreuznach.
For other photographic genres, there are lenses suited for landscapes, portraiture, fashion, architecture, commercial and macro.
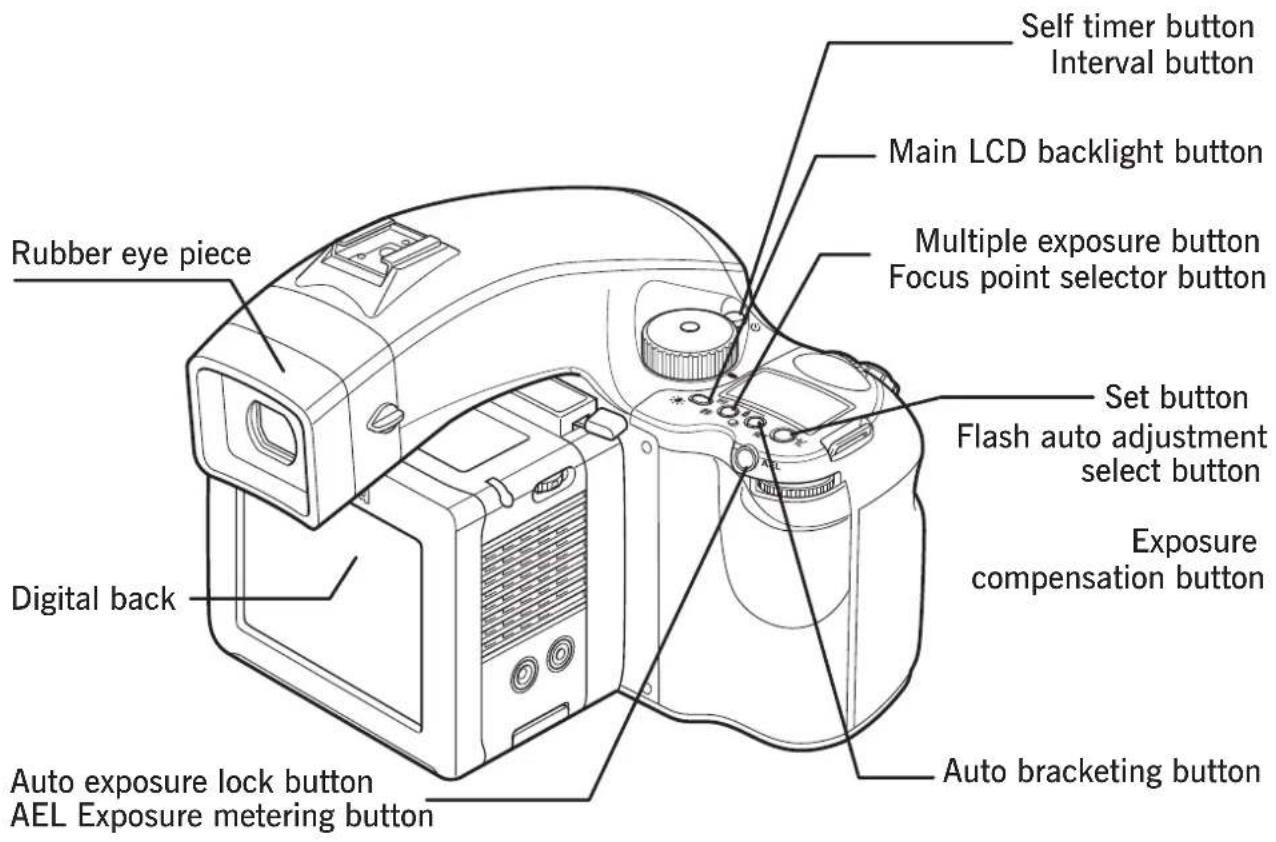
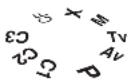
NAMES OF PARTS AND FUNCTIONS
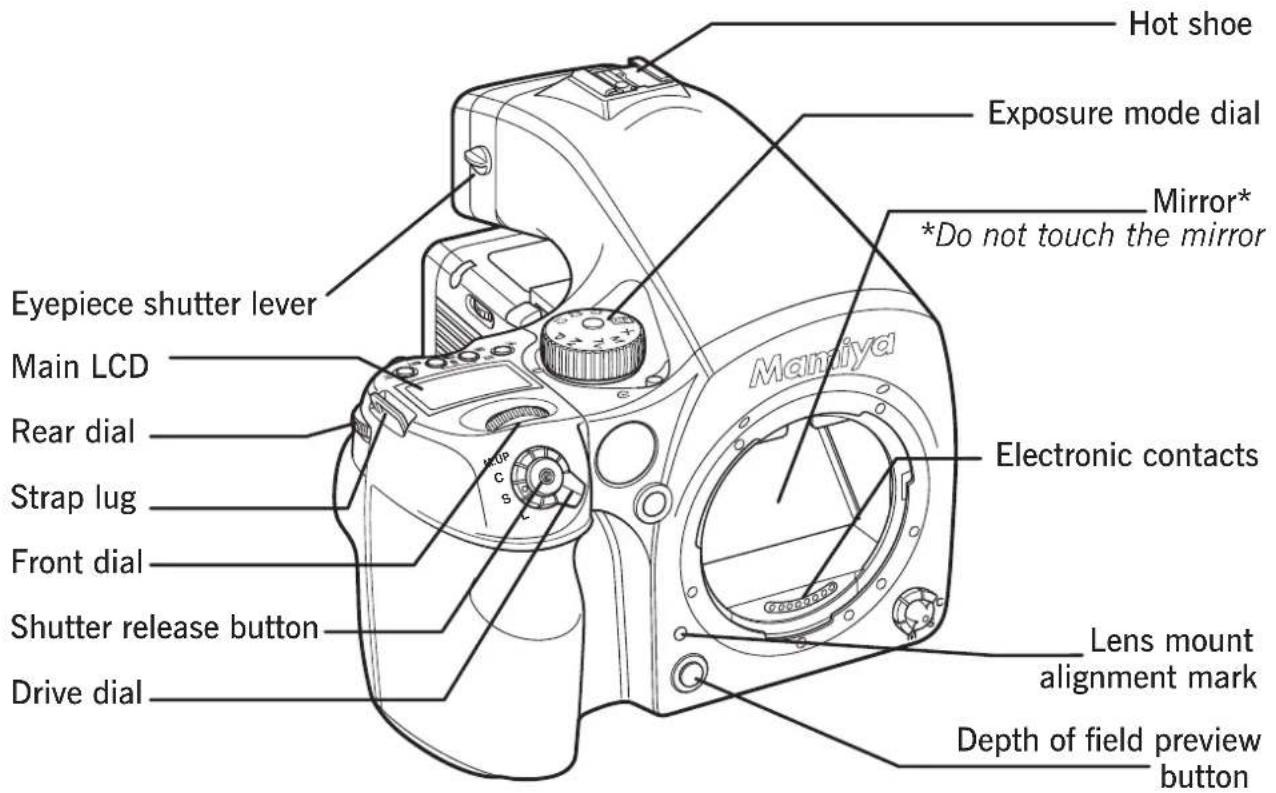
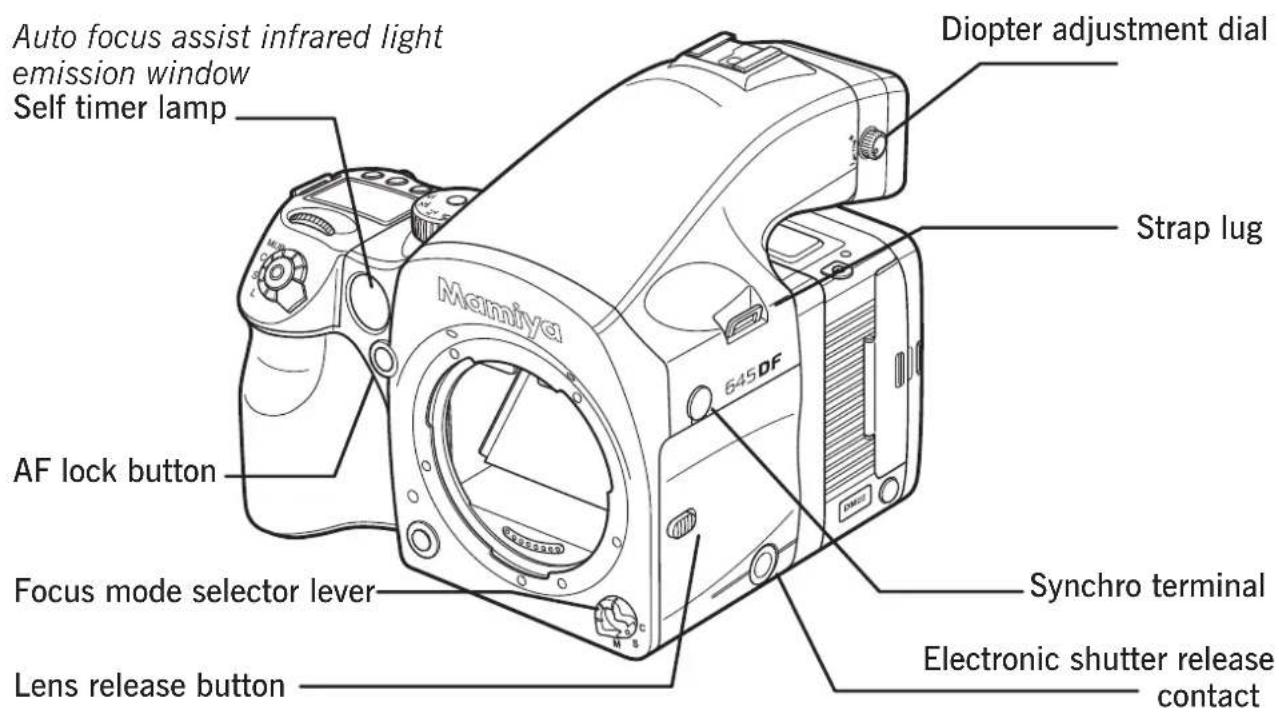
NAMES OF PARTS AND FUNCTIONS
LCD DISPLAYS

VIEWFINDER LCD

During actual use, only the relevant icons and indicators are displayed.
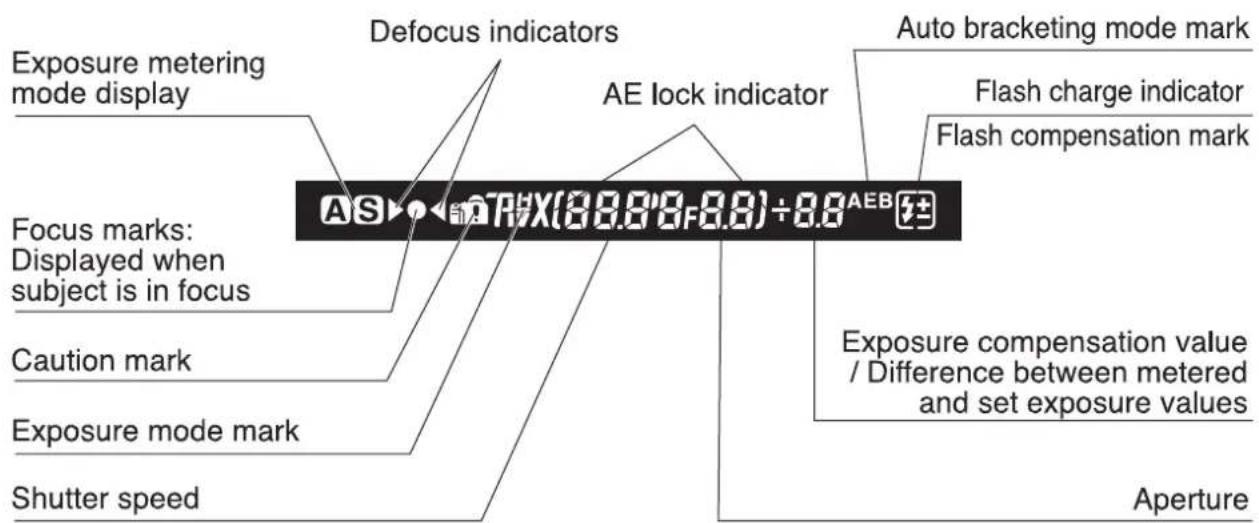
During actual use, only the relevant icons and indicators are displayed.
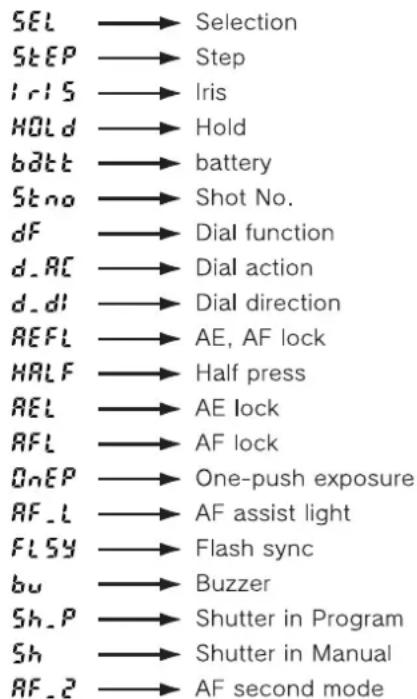
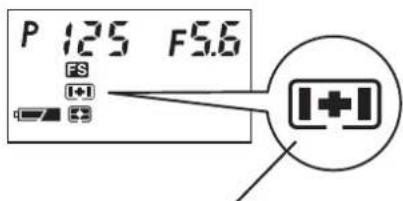
LIQUID CRYSTAL DISPLAY
Liquid Crystal Display
Due to the limitations of the space and letters, words and letters on the LCD are abbreviated.
Display examples of the main LCD
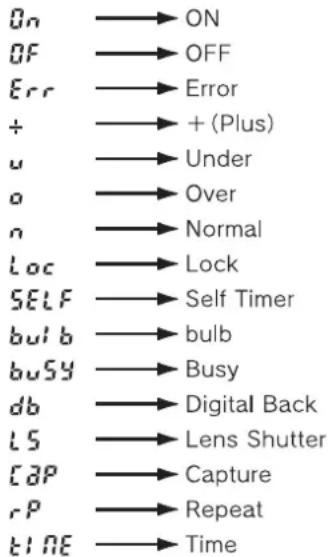
Display examples in the custom function mode
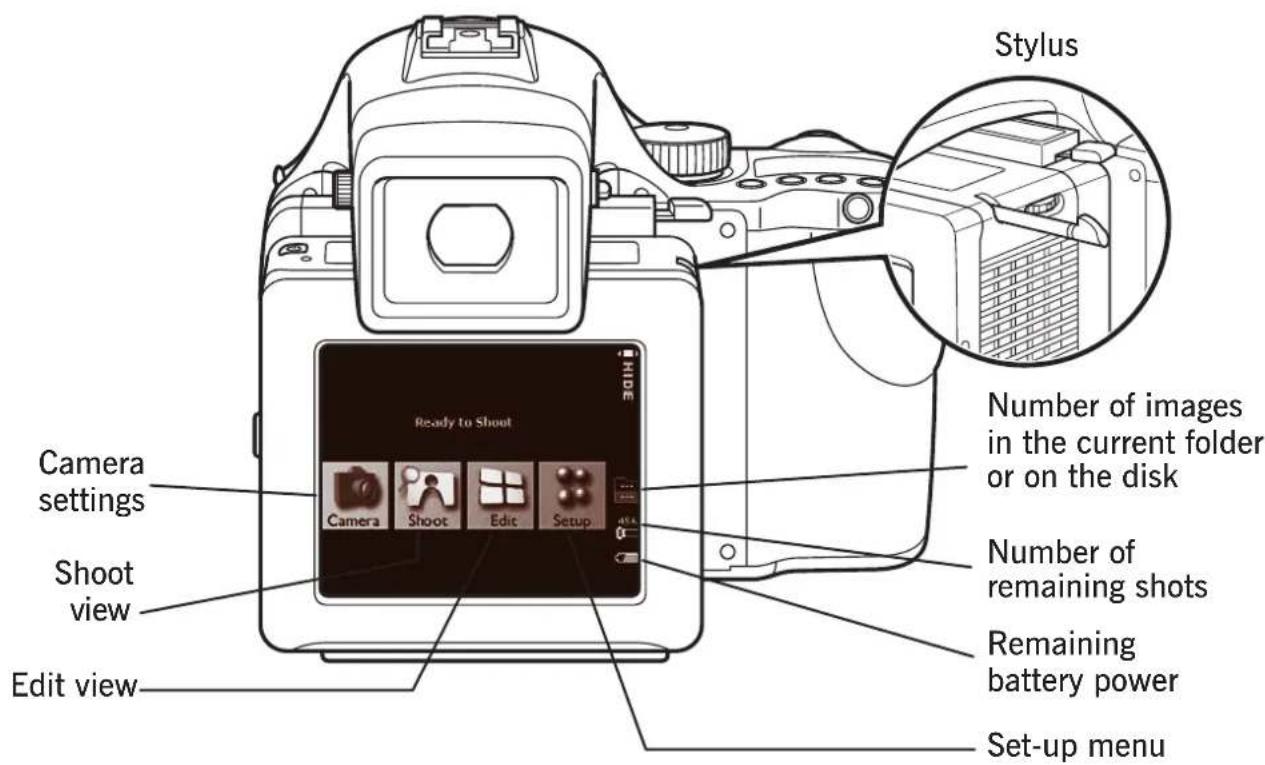
BASIC DESCRIPTION OF HOME SCREEN ON DIGITAL BACK
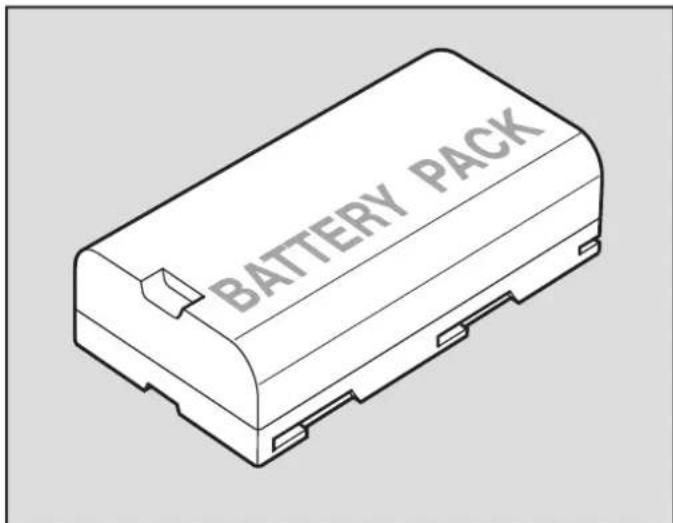
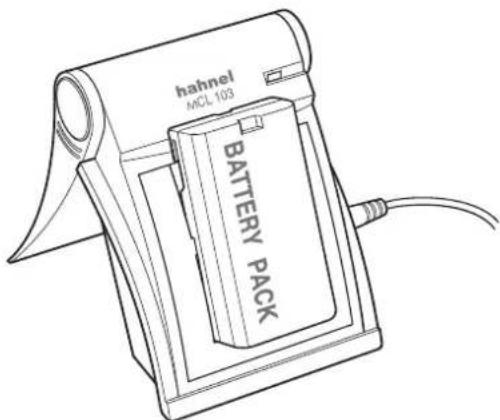
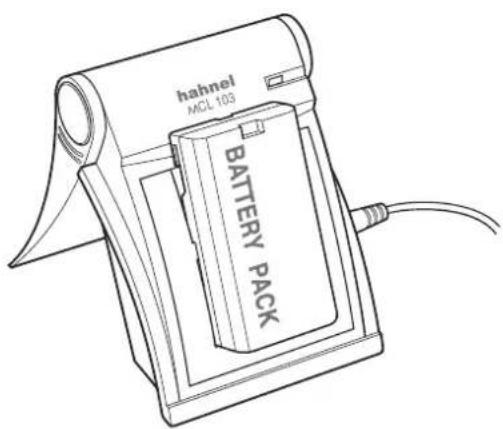
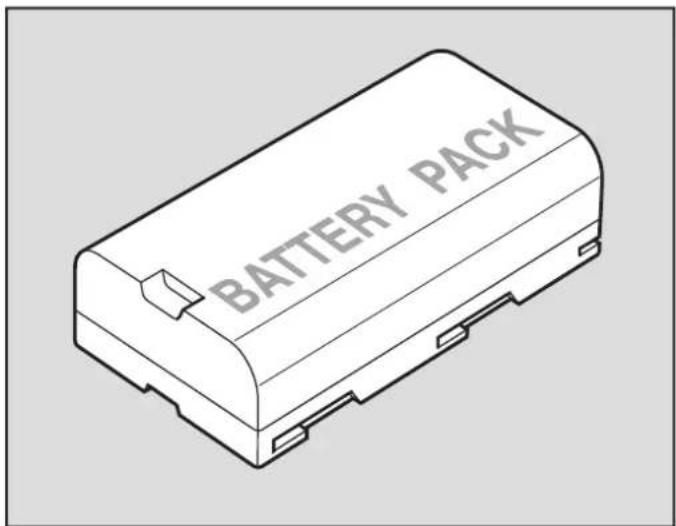
DIGITAL BACK CHARGER AND BATTERY
The Mamiya DM System is sold with a Haenel MCL 103 battery charger with 12 volt DC power supply and a set of 5 international socket plugs. The lithium ion battery is 2350Ah power.
NOTE ON BATTERIES FOR CAMERA (RECHARGEABLE VS. DISPOSABLE)
In addition to disposable alkaline or lithium batteries, rechargeable nickel-metal hydride (Ni-MH) or nickel-cadium batteries can be used. In this case, custom setting 04 (battery type) on the camera body must be changed to #1 (Ni-CD, Ni-MH). Do not mix different types of batteries or old ones with new ones, and ensure the batteries are placed with the correct polarity.
ATTACHING THE NECKSTRAP

natural_image
Line drawing of a DSLR camera with attached cable and adjustment knobs (no text or symbols)Put the neck strap through the mounts and secure it using the buckle as illustrated.
* After attaching the strap, pull it to make sure it does not loosen at the buckle.

Caution:
To ensure safety, pull the ends of the strap taut, and check that they are fastened securely to the metal mounts on the camera.
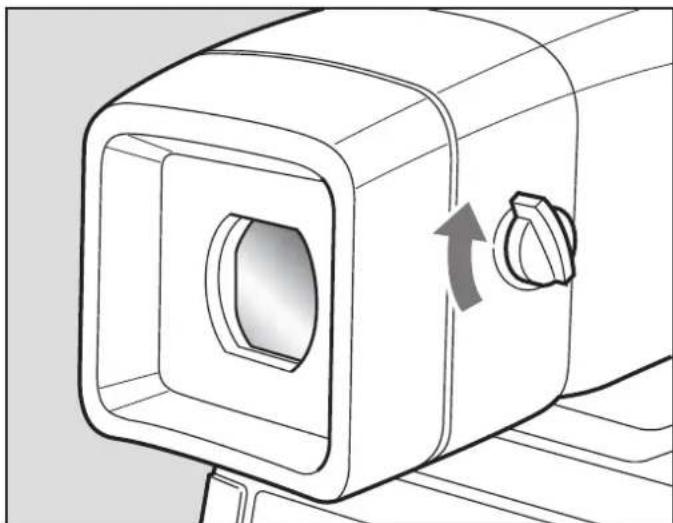
USING THE EYEPIECE SHUTTER
Close the eyepiece shutter when there is a strong light source behind the camera or when pressing the shutter release button without looking through the viewfinder. (This prevents exposure error due to light entering from the viewfinder.)
natural_image
Technical line drawing of a mechanical component with a square opening and directional arrow indicating rotation (no text or symbols)Turn the eyepiece shutter lever in the direction of the arrow.
PREPARING THE BATTERY AND COMPACT FLASH CARD
Inserting the camera batteries.... 24
Battery power icons.... 25
Camera sleep mode and battery care.... 26
Inserting and removing the digital back battery.... 27
Charging the digital back battery.... 28
Digital back battery power icons.... 29
Formatting the compact flash card in MAC.... 30
Formatting the compact flash card in windows.... 31
Inserting and removing the compact flash card.... 32
Attaching and removing a lens.... 34
Detaching the digital back.... 36
Adjusting the camera diopter.... 37
Replacing the diopter correction lens.... 38
Attaching to a tripod.... 39
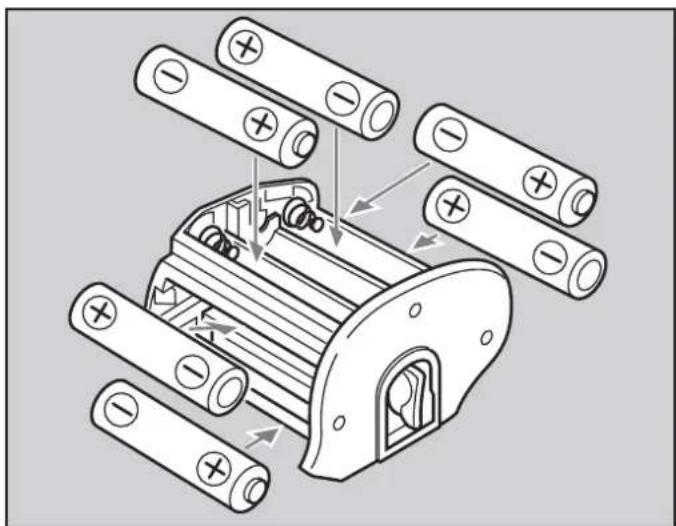
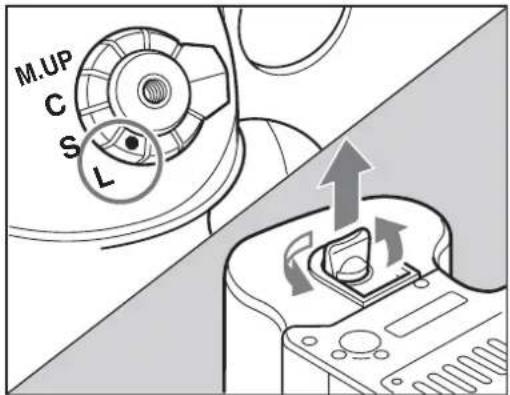
INSERTING THE CAMERA BATTERIES
Set the drive dial to "L" to turn off the power.
Use six "AA" alkaline or lithium batteries.
- Lift the battery case lock lever, turn it counter clockwise and pull out the battery holder.
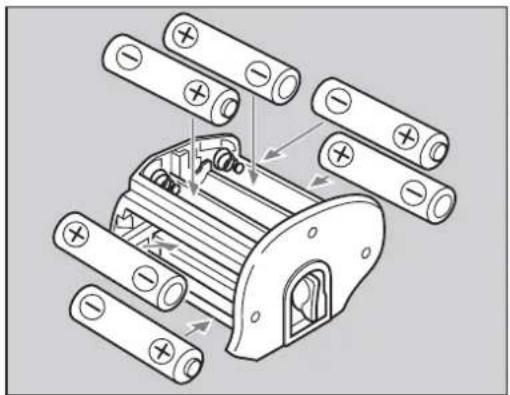
natural_image
Technical diagram of a battery pack assembly with multiple cylindrical components and directional arrows indicating motion (no text or labels)- Insert the batteries while ensuring their polarities are properly aligned with the and markings on the battery case.
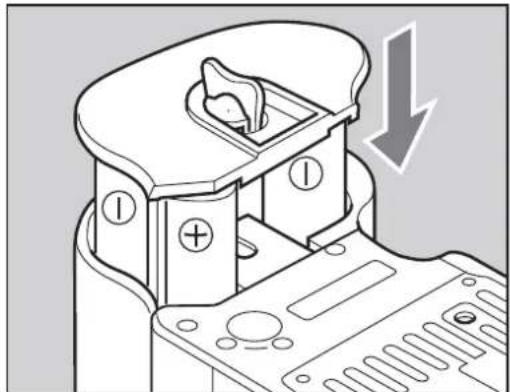
natural_image
Technical diagram of a mechanical component with labeled parts and an arrow indicating downward motion (no text or symbols present)- Return the battery holder to its case and lock it by turning the lever clockwise. Make sure it is fixed firmly in place.
BATTERY POWER ICONS
Set the drive dial to "S" to turn on the power.
Check the battery condition in the lower right corner of the main LCD.

The batteries are sufficiently charged.

There is little power remaining. Have new batteries on hand. Camera will still operate.

Flashing
There is very little power remaining. Camera will stop operating soon.

Flashing
* Set the shutter release mode selector lever to "L" (to turn the power off) and replace the batteries with new ones.
*When the batteries are spent, "batt" flashes on the main LCD and the viewfinder's LCD when the shutter release button is pressed.
* When replacing the batteries, be sure to use six new batteries of the same type. Do not mix different types of batteries or old batteries with new ones.
CAMERA SLEEP MODE AND BATTERY CARE
- Battery life of the originally supplied batteries is dependant on storage conditions.
- Blots and fingerprints on terminals may cause loose connections and corrosion.
Wipe the terminals before inserting the batteries. - We recommend carrying spare batteries in remote or foreign locations.
- Battery performance decreases in low temperatures. Keep them warm when in cold climates or locations.
External battery case PE401 is available as an optional accessory. - Store the batteries in a cool and dry place, away from direct sunlight.
- Remove the batteries from the camera body when not in use for a long time.
- Replace the batteries with new ones as soon as they are spent. Liquid leakage from the battery may damage the camera.
- Read the battery label warnings to ensure proper handling.
INSERTING AND REMOVING THE DIGITAL BACK BATTERY
- Press the button on the underside of the Mamiya DM digital back to remove the battery slot cover.
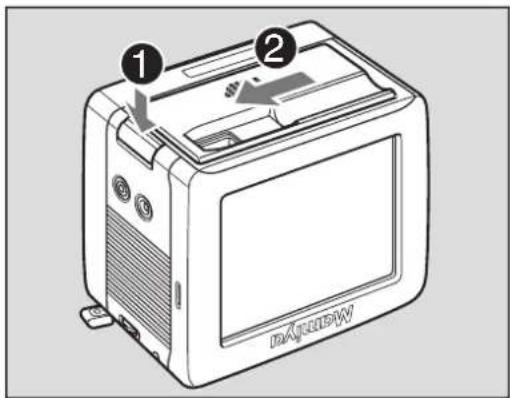
Removing the battery slot cover
- Press the battery into the recess on the bottom of the Mamiya DM System digital back, and then slide it across until it snaps into place.
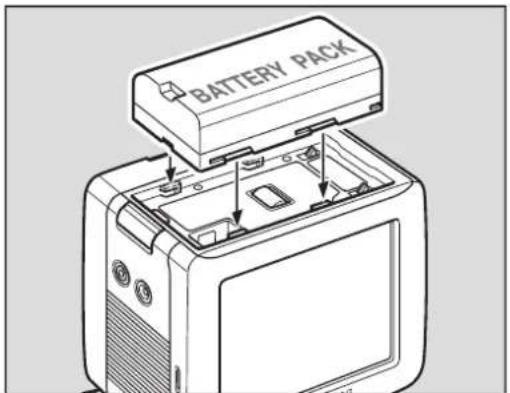

Inserting the battery
CHARGING THE DIGITAL BACK BATTERY
The lithium ion battery used with the Mamiya DM System digital back can be charged using the MCL103 battery charger provided.
Charging the Battery Using the Haenel MCL103
To charge the battery with the 12V DC Power Supply:
-
Connect one end of the 12V DC power supply cable to the Haenel MCL103 battery charger.
-
Connect the 12V DC power supply to a wall outlet, using the correct socket plug for the region.
Attention: Do not use any power supply cables other than the cable provided.
Many factors contribute to the amount of shots that can be taken with a single battery. The following will help increase the battery life:
- Set the Mamiya DM System to enter sleep mode, or turn it off when not in use.
- Set the backlight on the digital back to turn off after the camera has been idle for a certain amount of time.
- Avoid leaving the batteries in the Mamiya DM System when not in use.
- Do not lock the mirror up unnecessarily.
- Do not charge the Mamiya DM System batteries in extreme temperatures. Extreme temperature environments will affect both battery power and charging capacities. The optimal temperature for charging, using and storing batteries is 25^ C/77°F.
DIGITAL BACK BATTERY POWER STATUS
Charging begins when the lithium ion battery is attached to the Haenel charger and the indicator light turns on. The indicator light begins to blink when the battery is 95% charged. Charging is complete when the indicator light turns off.
When charging the battery for the first time, be sure to charge the battery for 12 hours regardless of the indicator light turning off.
The battery should not be left in the charger when the charger is not connected to a power source. If a battery is left in an unpowered charger, the red indicator light on the charger and the green indicator light on the power supply are illuminated on the charger, giving the false impression that the battery is being charged. If the battery is not removed from the charger, the battery will be discharged.
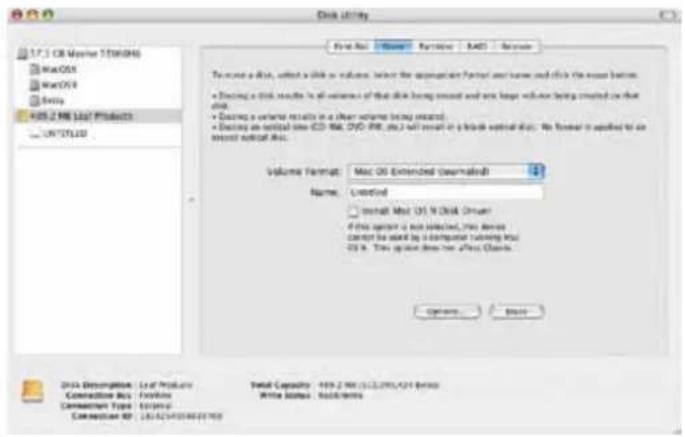
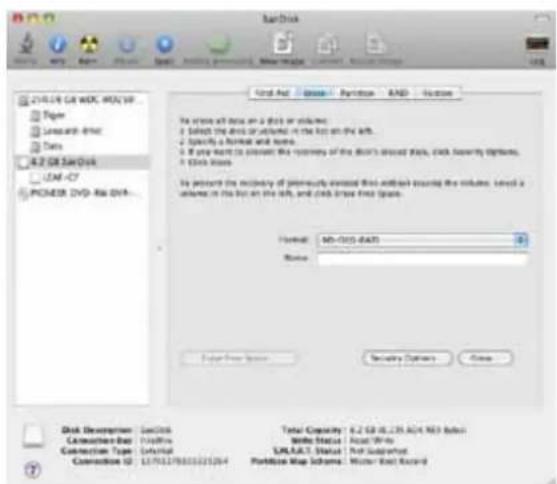
FORMATTING THE COMPACT FLASH CARD IN MAC
Formatting in Mac OS X
- Insert the compact flash card into the card reader or the digital back.
- On the desktop, double-click the system disk.
- Select Applications > Utilities > Disk Utility.
- On the left panel of the Disk Utility dialog box, select the removable disk to be formatted.
- Click the Erase tab.
- In the Volume Format box, select MS-DOS (FAT32).
- In the Name box, type MamiyaCF.
- Click Erase.
- In the confirmation message that appears, click Erase.
Formatting is complete when the progress bar disappears from view, the Volume Format box shows Mac OS Extended (journaled), and the Name box shows Untitled.
-
On the desktop, select the MamiyaCF volume.
-
Select File > Get Info.
-
In the MamiyaCF Info window, ensure that Format shows Macintosh PC Exchange (MS-DOS).
-
Close the Disk Utility application.
-
Drag the MamiyaCF volume to Trash.
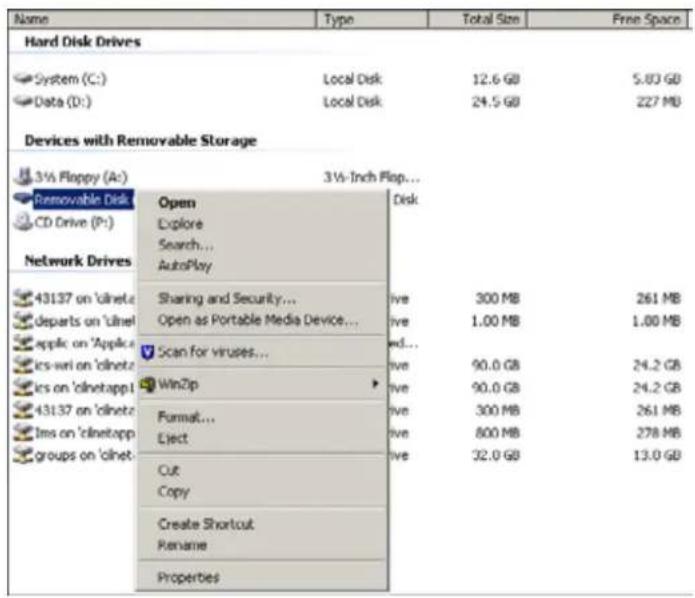
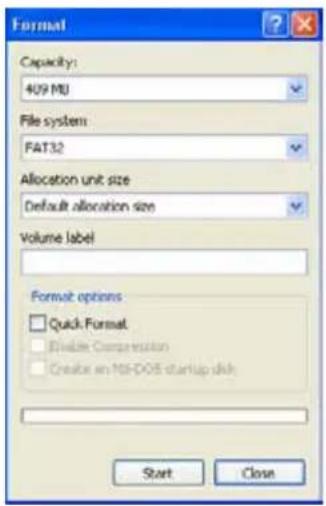
FORMATTING THE COMPACT FLASH CARD IN WINDOWS
Formatting in Windows
- Insert the compact flash card in a card reader.
- On the desktop, click My Computer. Preparing a Compact Flash Card for Shoot 13
- Right-click Removable Disk, and from the menu, select Format.
- In the Format dialog box, in the File System box, select FAT32.
- In the Volume label box, type MamiyaCF.
- Click Start.
- When the format procedure is complete, go to the desktop and click My Computer.
- Right-click Removable Disk, and from the menu, select Eject.
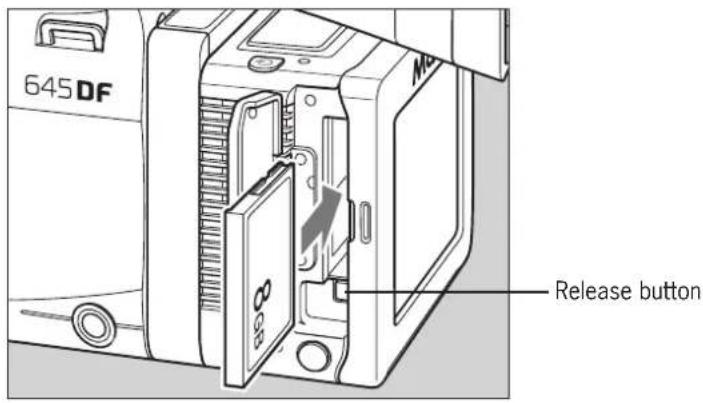
INSERTING AND REMOVING THE COMPACT FLASH CARD
- Open the compact flash door.
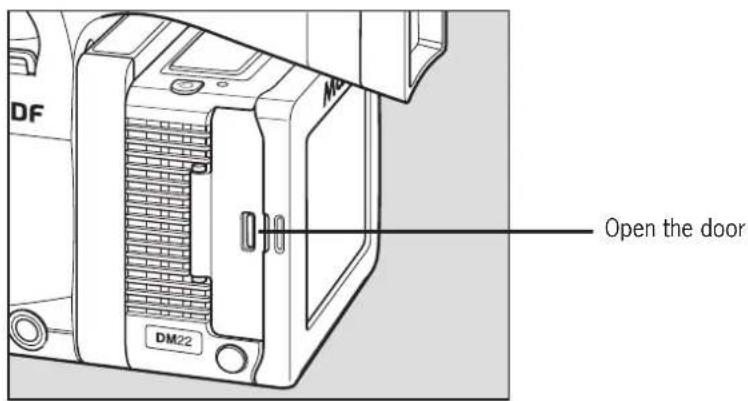
- Insert the compact flash.
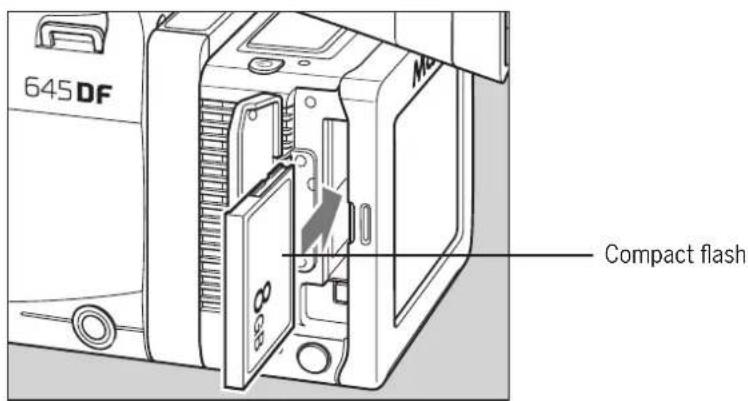
INSERTING AND REMOVING THE COMPACT FLASH CARD
Open the compact flash door, and then press the release button.
ATTACHING AND REMOVING A LENS
ATTACHING
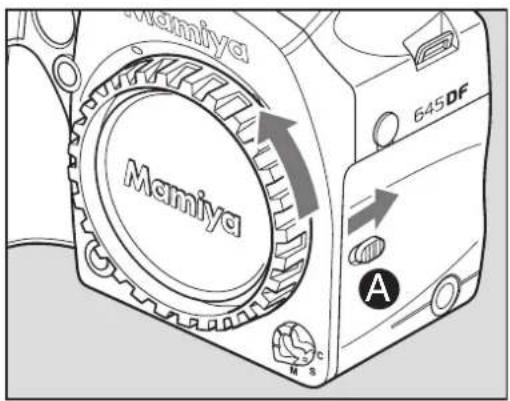
- Remove the front body cap, just like removing a lens, by pushing the lens release button A backward and then turning the front body cap counter clockwise and lift out.
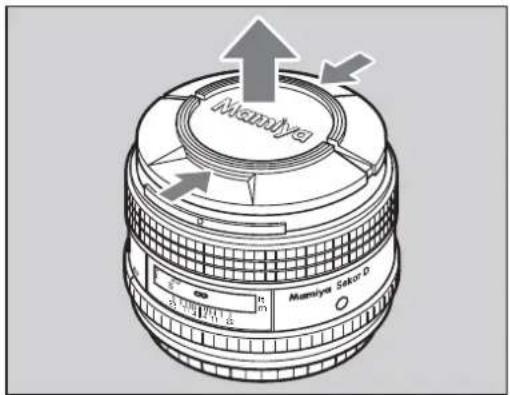
To remove the front lens cap, squeeze the shiny sections together and lift out.
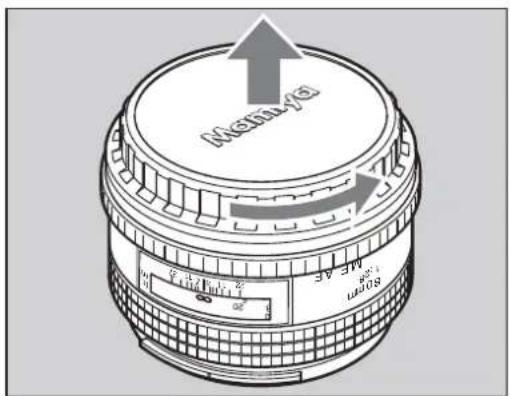
To remove rear lens cap, turn it counter clockwise.
ATTACHING AND REMOVING A LENS
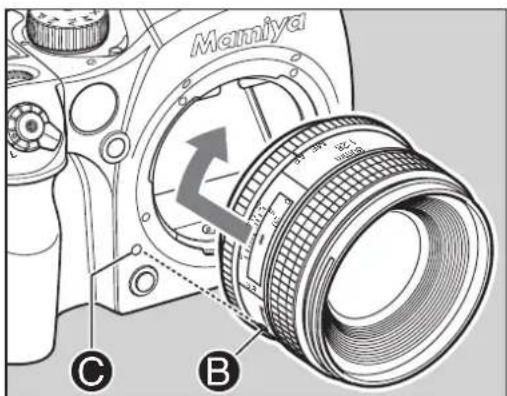
- Line up the lens mount alignment mark Ⓑ with mark ⬙ on the camera to fit the lens in place, then rotate it in the direction of the arrow until it clicks into place.
* Do not touch the distance ring or other rotating parts when attaching the lens. * When installing a lens, do not press the lens release button
REMOVING
While sliding the lens release button back, rotate the lens counter clockwise until it stops and lift it off.
* After removing the lens from the camera body, protect both ends by attaching the caps. * Oil, dust, fingerprints or water on the electronic contacts could result in malfunction or corrosion. Wipe such impurities off with a clean piece of cloth.
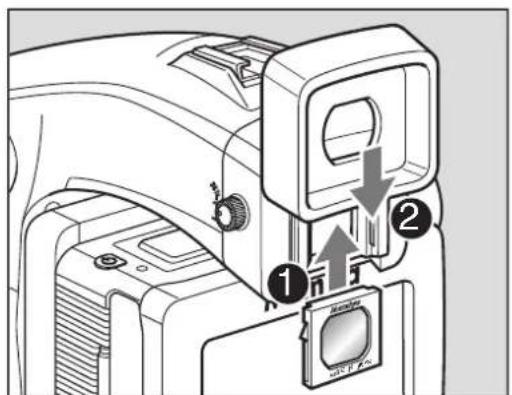
DETACHING THE DIGITAL BACK
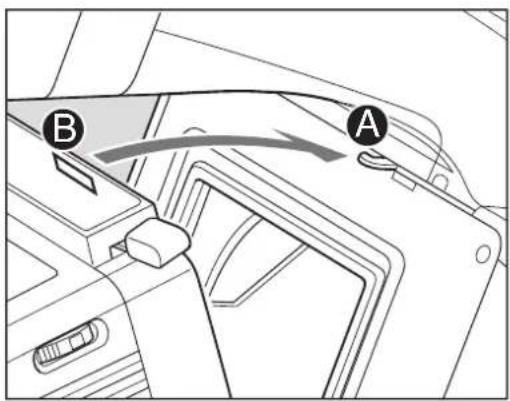
Rest the digital back on the lower ledge of the camera body so the camera body contact pins and digital back contact pins meet. Hold the digital back lever open (on the right side of the digital back) then press the upper part of the digital back A to the camera body B.
When detaching the digital back, pull back the detachment lever (found on the right side) and pull away from the camera body.
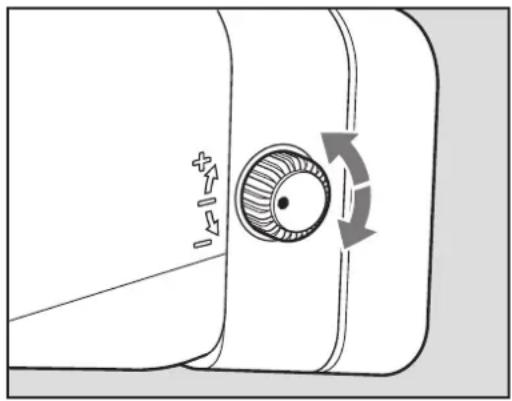
ADJUSTING THE CAMERA DIOPTER
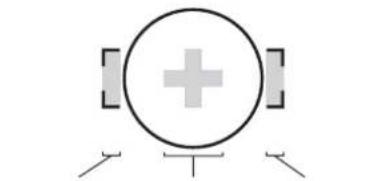
Look through the viewfinder and make sure that the focus frame (rectangle with circle) is in sharp focus. If it is not, turn the diopter adjustment dial in the “−” direction if you are nearsighted and in the “+” direction if you are farsighted. If this is not sufficient consider using an optional diopter correction lens. See below.
natural_image
Diagram of a mechanical component with rotational arrows indicating motion (no text or symbols)* Point the camera at a bright, plain object such as a white wall when making this adjustment.
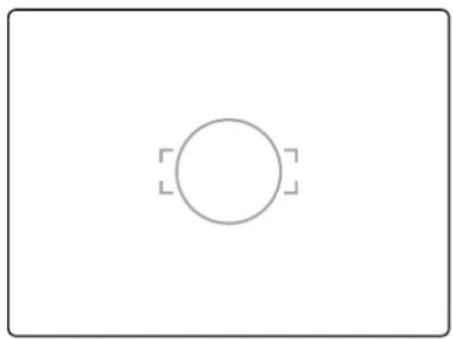
natural_image
Simple geometric diagram with a circle and two corner brackets (no text or symbols)Diopter not matching.

natural_image
Simple geometric diagram with a circle and two perpendicular dashed lines inside a rectangle (no text or symbols)Diopter matching.
Range of adjustment of diopter correction lenses (optional accessory)
| Diopter correction lens Range of adjustment | |
| DE401 (standard) -2.5 to | +0.5 |
| DE402 (for nearsighted users) | -5.0 to -2.0 |
| DE403 (for farsighted users) 0 | to +3.0 |
REPLACING THE DIOPTER CORRECTION LENS
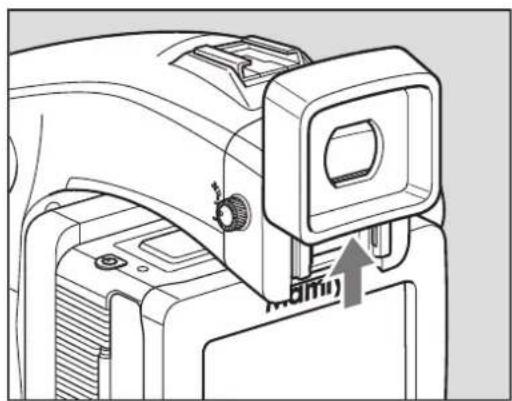
natural_image
Technical line drawing of a camera module with adjustment knob and label (no readable text or symbols)- Remove the rubber eye piece by sliding it upwards.
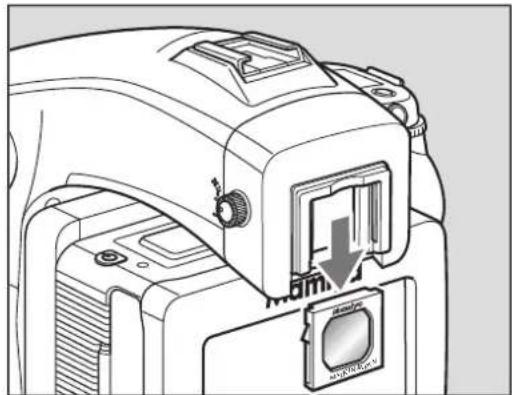
natural_image
Technical line drawing of a camera module with an open aperture and a close-up view showing the aperture (no text or symbols)- Remove the existing diopter by sliding downwards using the fingernail groove and detach.
- Insert a new diopter by aligning it to the base of the diopter holder and sliding it upwards into place then reattaching the rubber eye piece.
* If there is dirt or dust on the lens surface, remove it with a blower or sweep it off gently with a lens brush.
* If there are fingerprints or dirt on the lens surface, wipe away with a piece of clean, soft gauze.
* Using solvents could discolor the diopter correction lens frame.
ATTACHING TO A TRIPOD
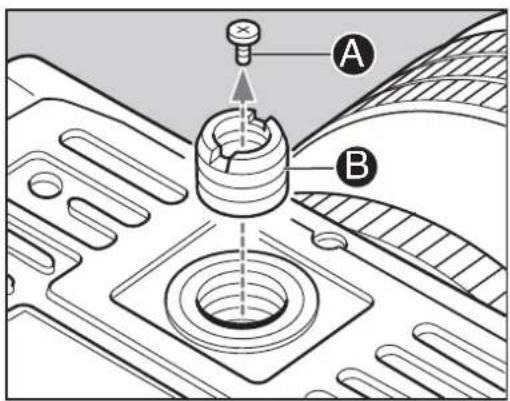
When using a tripod with 3/8" screw (instead of 1/4" screw) remove the small screw A from the tripod screw hole on the bottom of the body using a plus screwdriver, then use a coin to remove the tripod screw adapter bushing B.
BASIC CAMERA OPERATIONS
Turning on the camera.... 42
Using the shutter.... 43
About the drive dial.... 44
Using the front and rear dial.... 45
Holding the system.... 46
Backlight button.... 47
TURNING ON THE CAMERA
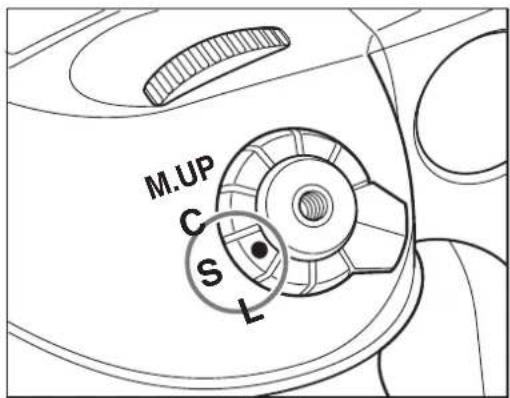
- Set the drive dial to "S" (single-frame advance mode).

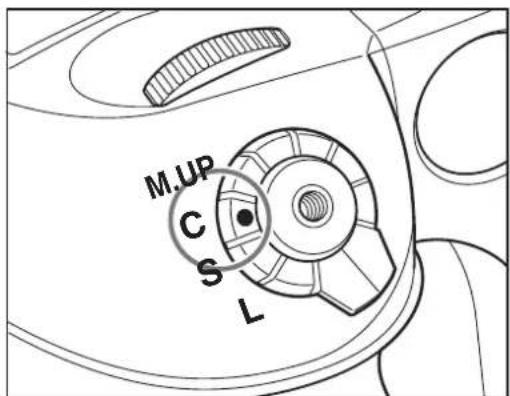
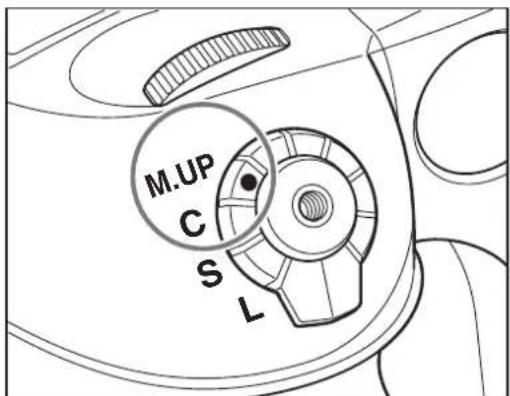
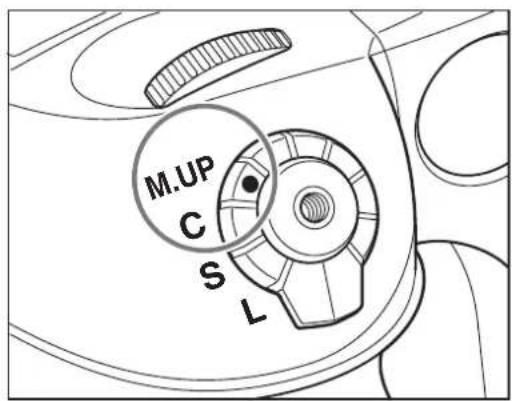
The drive dial has an "S" (single-frame advance mode) setting and a "C" (continuous advance mode) setting. When set to "L," the power is turned off. When set to "M.UP", the mirror moves into the set position.
USING THE SHUTTER
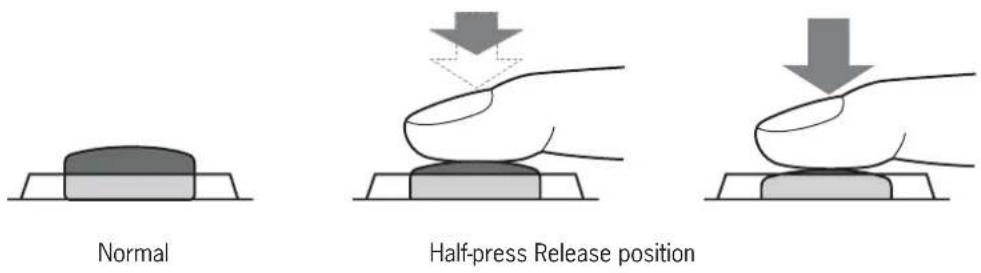
SHUTTER RELEASE BUTTON
The shutter release button has a two-step action. The first step is the "half-press" (when the button is pressed lightly). When "half-pressed", the camera functions are activated. When the shutter button is pressed further down, the shutter is tripped. This position is called the 'release' position.
ABOUT THE DRIVE DIAL
SINGLE-FRAME MODE
The film is advanced by one frame each time the shutter is released.
Set the shutter release mode selector lever to "S".
CONTINUOUS MODE
Photographs are taken continuously as long as the shutter release button is pressed.
Set the shutter release mode selector lever to "C" and hold down the shutter for continuous shooting.
MIRROR UP SHOOTING
Press the shutter button to move the mirror up. Press the shutter button again to trip the shutter and take a picture.
USING THE FRONT AND REAR DIAL
The front and rear dials can be used for selections within different photographic settings such as focus area, changing shutter speed and aperture, selecting exposure metering modes, choosing exposure compensations, choosing auto bracketing modes and designating times for mirror delay, the self timer and interval photography. For details on how to use the front and rear dial for the above mentioned sections, refer to their specific sections in this user's manual.
HOLDING THE SYSTEM
HOLDING THE CAMERA
natural_image
Illustration of a person holding a camera, no text or symbols present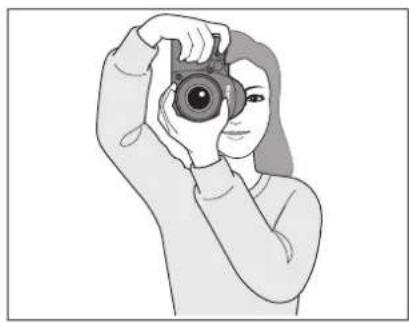
natural_image
Illustration of a person holding a camera, no text or symbols presentHorizontal Vertical
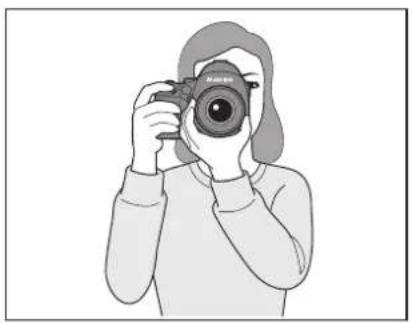
Hold the camera still when taking photos to obtain sharp pictures.
* Grasp the grip firmly, press both elbows against the body and support the camera at the bottom with the left hand.
* At slow shutter speeds, or when using the self timer, it is best to use a tripod and a cable release or an electromagnetic cable release (optional accessories).
BACKLIGHT BUTTON
To see the main panel at night or in dark places, press the backlight button / . The backlight will go on for approximately 20 seconds and then go off unless there is another operation.
* If the backlight button is held down for one second, the light will remain on until the button is pressed again.
* When the backlight is on, the camera will not go into sleep mode, whereby draining the battery power.
5
FOCUSING THE CAMERA
Focusing the camera.... 50
Focus area.... 51
Manual focus.... 52
Manual focusing using the focus mark.... 52
When auto focus fails.... 53
Using the auto focus function.... 54
AF Assist infrared light.... 55
FOCUS AREA
This camera enables the selection of the focus area, best suited to the kind of pictures that will be taken. The selected focus area can be checked on the external LCD panel.
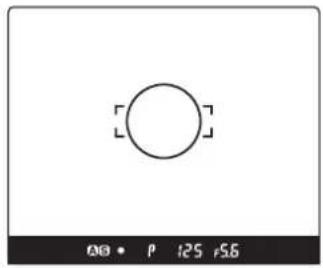
INSIDE THE VIEW-FINDER
Focus point selection mark
natural_image
Simple circular diagram with control arrows, no text or symbols presentNORMAL FOCUS AREA SPOT FOCUS AREA
AF area
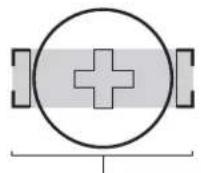
natural_image
Simple diagram with a central plus sign and two side brackets, no text or symbols present.Left AF area
Center AF area
Right AF area
Bring the subject into focus inside the focus frame ⚙ mark on the viewfinder.
Select the frame from among the 2, and 3 focus frame marks on the viewfinder, and bring the subject into focus.
SELECTING THE FOCUS AREA
- When focus point selector button A is pressed for 1 second, the focus point selection mark appears on the display.
- Turn the front or rear dial, and select automatic selection ☐, left ☐, center ☐ or right ☐.
- Press the SET Ⓑ or focus point selector button Ⓐ to enter the setting.
MANUAL FOCUS MODE (M)
The auto focus function can be cancelled, in order to focus manually.
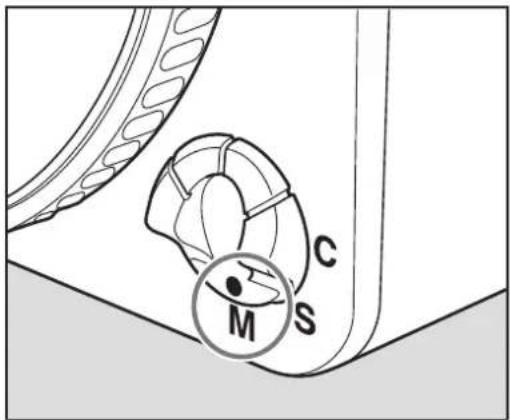
1. Switch to "M" (manual focus mode).
Turn the focus mode selector lever and set it to "M" (manual focus mode). M.F appears on the external LCD panel.
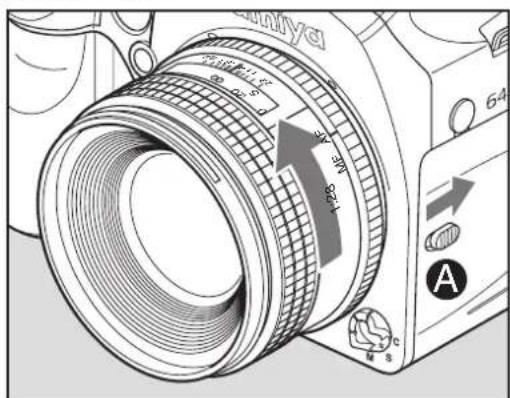
2. Manual focus operation for telephoto and zoom lenses.
All Mamiya 645 AF Telephoto and Zoom lenses can be switched from Auto Focus to Manual Focus by sliding the focusing ring on the lens forward until it clicks. When this is done, the Auto Focus inscription on the lens barrel is covered and the lens can then be focused manually. When the Focusing Ring is set in this position the external LCD display on the top of the camera will show (M.F). It is not necessary to set the Focus Mode Selector on the body to "M". To switch back to auto focus, simply slide the focusing ring back towards the camera and the Auto Focus inscription on top of the lens will again be visible. This method applies to Mamiya 645 AF Telephoto and Zoom lenses only.
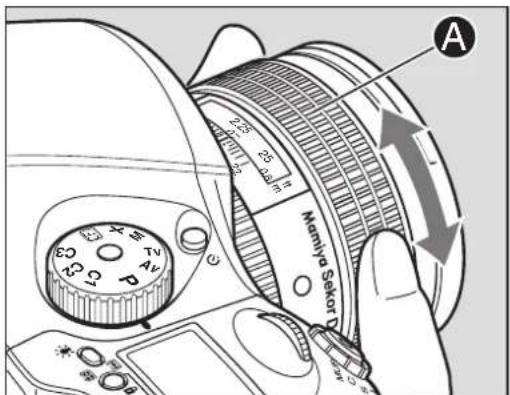
3. Adjust the focus.
Turn the lens focusing ring Ⓐ until the subject is in focus. When it is in focus, the ● focus mark lights in the viewfinder LCD.
MANUAL FOCUS MODE
MANUAL FOCUSING USING THE FOCUS MARK
(Focus confirmation method)
With the shutter release button half-pressed, turn the lens focusing ring to focus on the subject.
When the subject is in focus, the ● focus mark lights in the viewfinder's LCD.
If ▶ is lit in the viewfinder's LCD, the camera is focused on a point behind the object.
If ◀is lit, the camera is focused on a point in front of the object.
natural_image
Black-and-white photo of a person in a mountainous landscape, no visible text or symbols on the main subjectIN FOCUS
A(S) P 125 F5.6
TURN THE FOCUSING RING CLOCKWISE.
AS P 125 F5.6
TURN THE FOCUSING RING COUNTERCLOCKWISE.
* Use the focus mark when taking photos in manual focus mode or using the M645 manual lens.
* If focus is adjusted using the focus mark with an M645 lens, be sure to open the aperture.
This function can be used with a lens of f/5.6 aperture or higher.
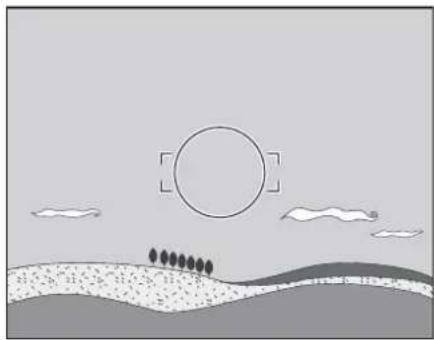
WHEN AUTO FOCUS FAILS
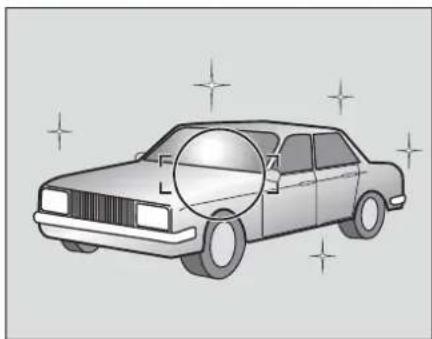
The Auto Focus function requires contrast on the subject. Auto Focusing may fail to achieve accurate focus with certain subjects described below. In such cases, either switch to the manual focus mode and focus manually, or bring into focus an object at the same distance as the object you want to photograph, lock the focus using the focus lock mechanism, then take the picture.
natural_image
Simple landscape illustration with sun, clouds, hills, and trees (no text or symbols)①Low-contrast subject (blue skies, white walls and other objects)
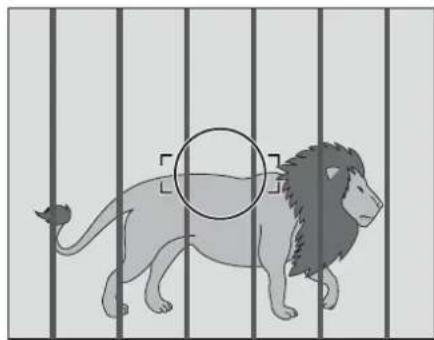
natural_image
Illustration of a lion standing in a row with vertical bars, no text or symbols present●Two or more objects overlapping at different distances within the focus frame : : (animals in cages, etc.)
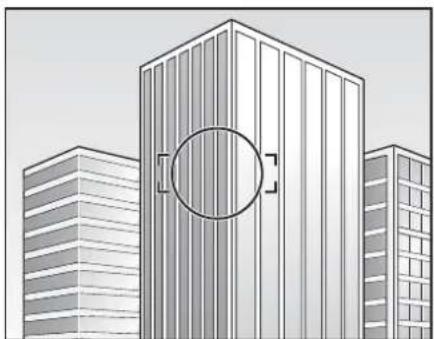
natural_image
Illustration of modern high-rise buildings with a circular highlight on the facade (no text or symbols)⑧Subjects with continuous repeated patterns (building exteriors, blinds, etc.)
natural_image
Illustration of a classic car with star patterns around it, no text or symbols present①Extremely backlit reflective subjects (car bodies, water surfaces, etc.)
⑤When the subject is far smaller than the focus frame
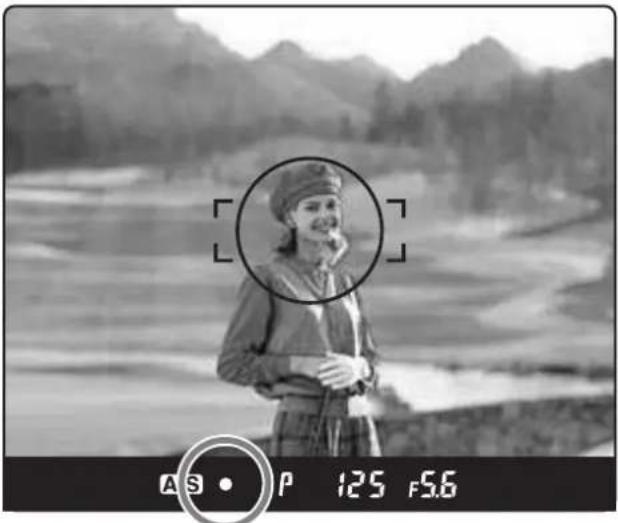
USING THE FOCUS LOCK FUNCTION
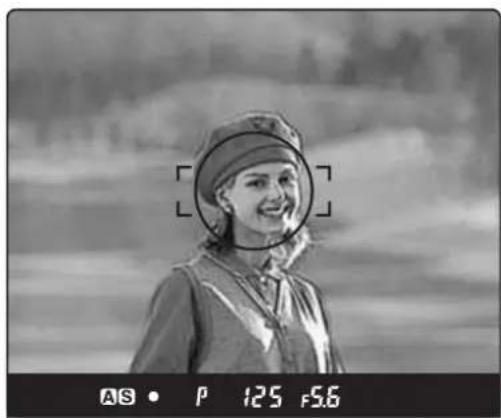
If the object to be focused on is not in the focus frame, the camera focuses on the background at the center. In such cases use the focus lock function to lock the focus before releasing the shutter.
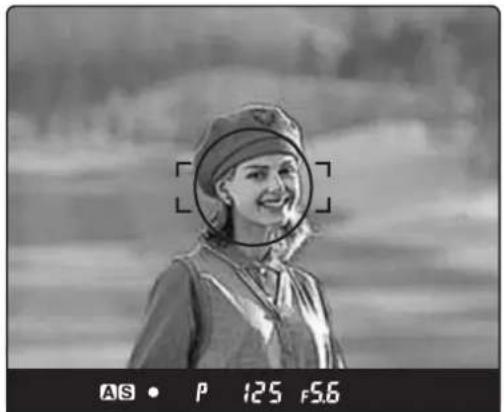
natural_image
Black-and-white photo of a smiling person wearing a helmet and cap, outdoors with sky background (no text or symbols)1. Set the focus mode selector lever to "S" or "C."
Put the subject in the focus frame : : and halfpress the shutter release button.
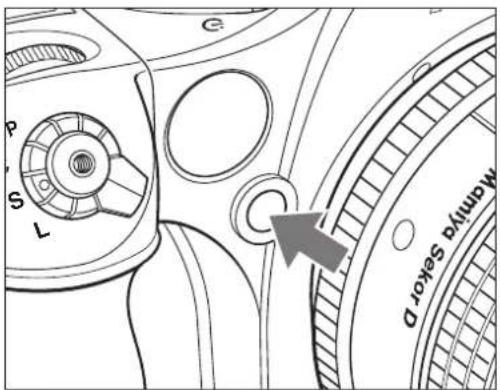
2. Lock the focus.
When the ● focus mark in the viewfinder LCD is lit, press the AF lock button on the front of the camera to lock the focus.
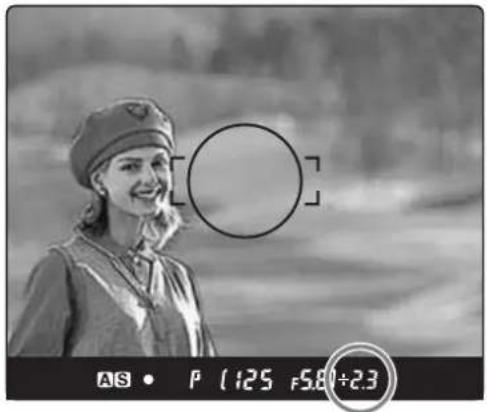
natural_image
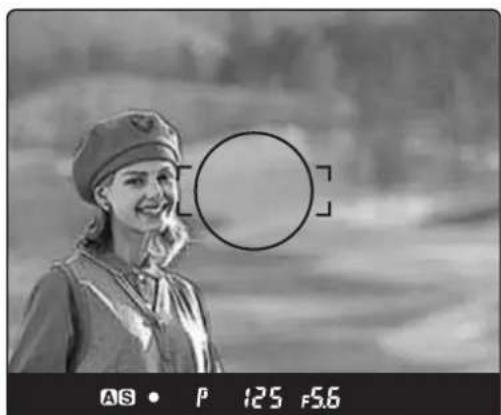
Black-and-white photo of a smiling person wearing a beret, with a circular target overlay and digital display (no readable text or symbols)3. Adjust the composition.
With the shutter release button half-pressed, slide the camera to achieve the desired composition, and release the shutter.
* When the focus mode is set at "S" (single focus mode) and the ● focus mark is lit, hold the shutter release button halfway down to lock the focus.
AF ASSIST INFRARED LIGHT
When the subject is dark or under-exposed and the camera fails to auto-focus, a red lamp may light up on the front of the camera when the shutter release button is half-pressed. This is a light that assists the camera's auto focus function.
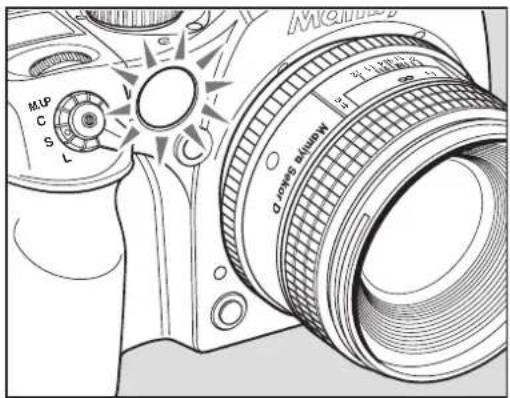
* The AF assist infrared light is emitted only when the focus mode is set to "S" (single focus mode).
* Effective range of the AF assist infrared light is limited. It does not reach distant subjects. Range: 9m/29.5 ft. (using 80 mm f/2.8 lens under test conditions)
* When using a lens hood or a bellows lens hood (sold as an optional accessory) that may interfere with the assist light, set focus before mounting the hood.
EXPOSURE MODES
Program AE.... 58
Aperture Priority AE (Av).... 59
Shutter Priority AE (Tv).... 60
Manual Mode (M).... 61
Sync Mode.... 62
Custom Function Mode.... 63
Auto Mode mechanism.... 64
Exposure Metering Modes.... 65
Exposure warnings.... 66
Exposure compensation.... 67
AE Lock Mode.... 68
Auto Bracketing Mode.... 69
Taking photos with the mirror up.... 70
Mirror up delay.... 72
Self Timer Mode.... 74
Interval photography.... 75
Long Exposure Mode.... 76
PROGRAM AE (P)
The aperture and shutter speed are determined automatically for the optimum exposure, according to the existing ambient light. This mode is best suited for general photography, allowing the user freedom to concentrate on the subject.

Turn the exposure mode setting dial to "P" (program AE) position.
* If a correct exposure cannot be obtained, the shutter speed and aperture value blink. In such cases, the pictures can be taken but they may turn out too bright or too dark.
APERTURE PRIORITY AE (AV)
Set the desired aperture and the camera selects the optimum shutter speed accordingly. Use the Av mode to maintain specific control over depth of field, i.e. taking portraits or landscapes.
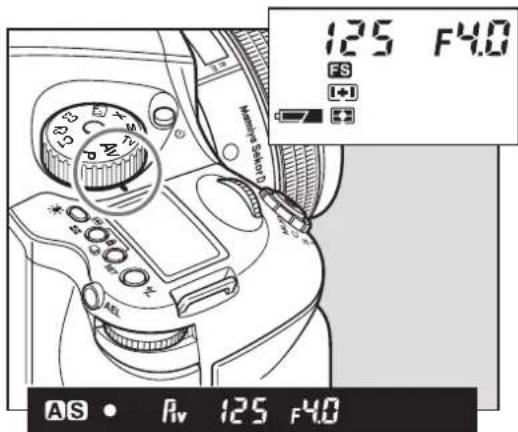
- Turn the exposure mode setting dial to "Av" (aperture priority AE) position.
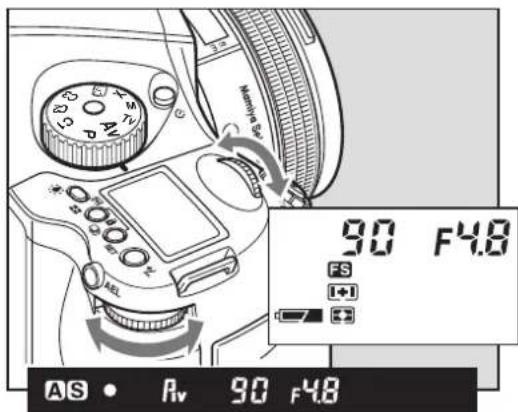
- Turn the front or rear dial to set the desired aperture.
* The shutter speed value will blink when the subject is too dark or too bright for a correct exposure. To obtain the correct aperture, adjust the aperture value until the shutter speed value stops blinking and remains lit.
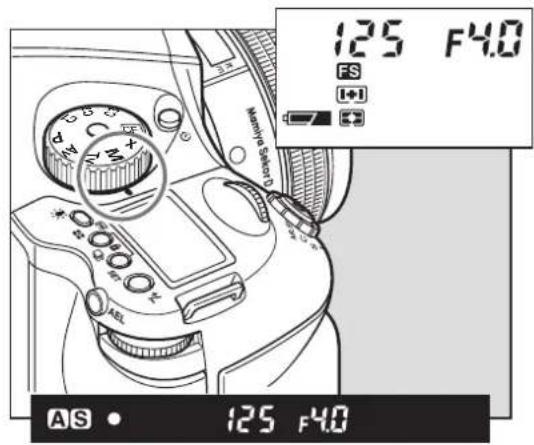
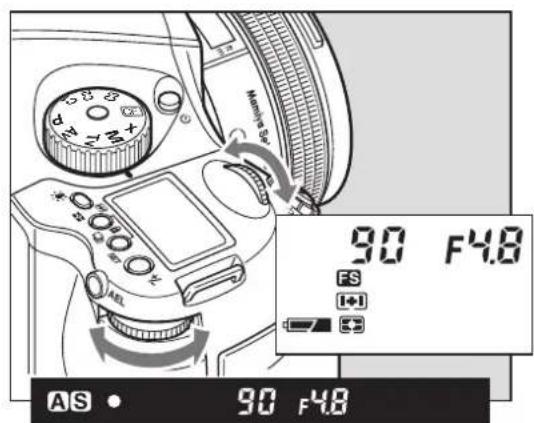
SHUTTER PRIORITY AE (TV)
Set the desired shutter speed and the camera selects the optimum aperture accordingly. Fast shutter speed can be used to freeze motion, and slow shutter speed can be used to blur motion on purpose.
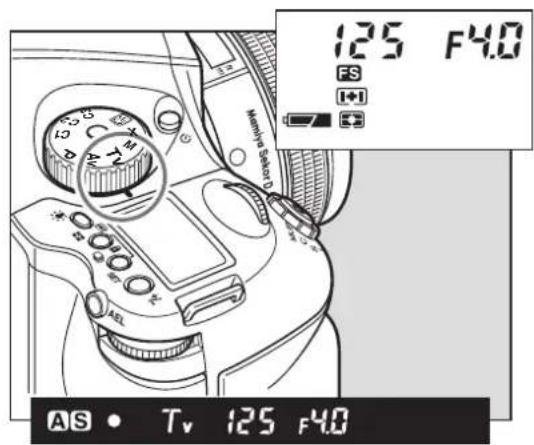
- Turn the exposure mode setting dial to "Tv" (shutter priority AE) position.
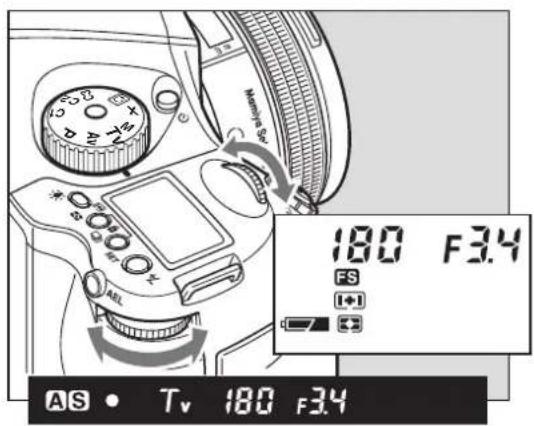
- Turn the front or rear dial to set the desired shutter speed.
* The aperture value will blink when the subject is too dark or too bright for a correct exposure. To obtain the correct aperture, adjust the shutter speed value until the aperture value stops blinking and remains lit.
MANUAL MODE (M)
This mode is used to set both the aperture and shutter speed for total exposure control. Varying shutter speeds can be selected, including "bulb", "tIME" and manually from 60 mins to 1/4000 sec. Aperture values can be set from maximum to minimum aperture.
- Turn the exposure mode setting dial to "M" (Manual) position.
-
Turn the rear dial to set the desired aperture.
-
Turn the front dial to set the desired shutter speed.
SYNCHRO MODE (X)
Select this mode when you use a flash. The shutter speed will be fixed at 1/125 sec. for synchronization. To adjust synchro speed, turn the rear dial.
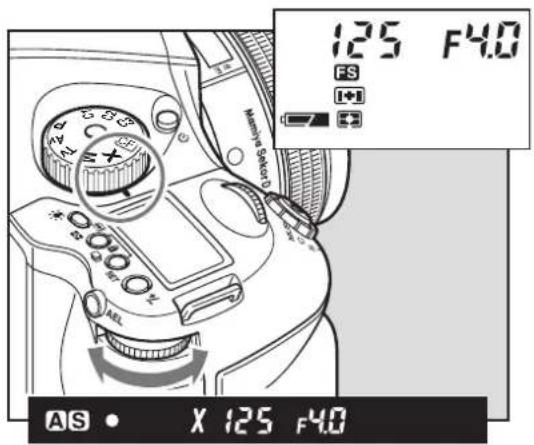
* When using a large flash unit for use in studios, changing the synchronizing speed is recommended.
* When 1/800 sec. shutter speeds can not be achieved even though the leaf shutter lens is attached, try another exposure mode.
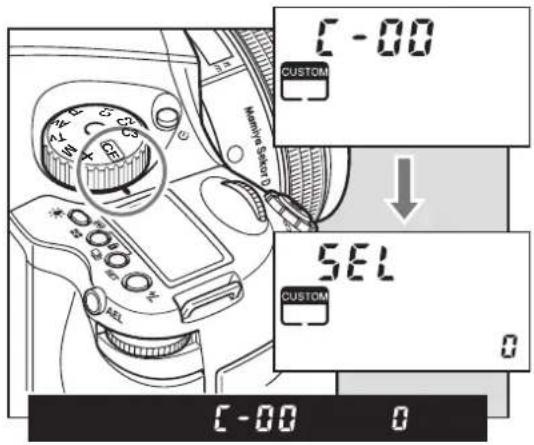
CF (CUSTOM FUNCTION) MODE
Both the camera functions and methods can be changed by using custom functions.
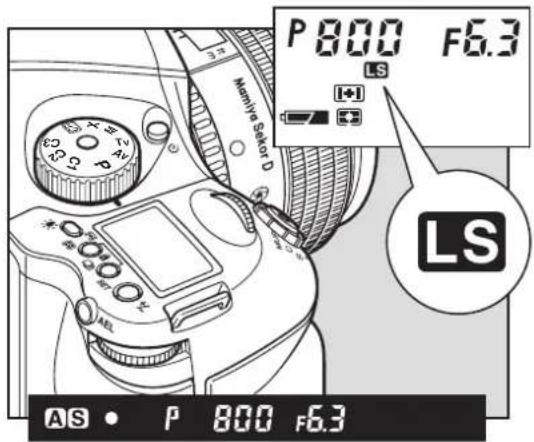
AUTO MODE MECHANISM
When using the leaf shutter lens, the leaf shutter's working range is from 1/800 sec. to 1 sec. For other speeds (1/4000-1/800 sec., 1-60sec., bulb) use the focal plane shutter.
EXPOSURE METERING MODES
There are three exposure metering modes to select a proper exposure modes to suit the subject's lighting condition.
How to select an exposure mode
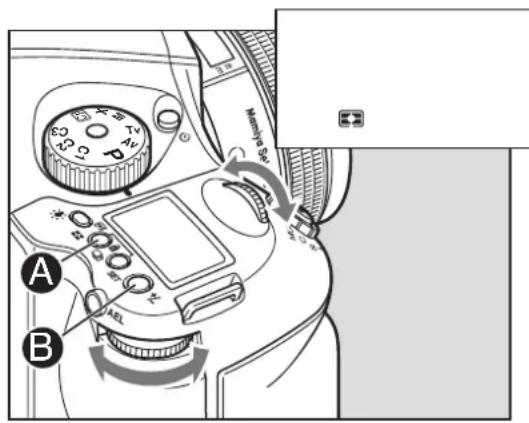
-
Exposure mode mark is displayed when the exposure mode button A is pressed. Since three different exposure modes are displayed sequentially when either the front or rear dial is turned, select an appropriate exposure mode.
-
Press the SET button Ⓑ or exposure metering mode button Ⓐ to enter the setting.
Exposure Metering Modes
| [8xcx] | Average/spot auto exposure metering | Exposure metering is performed after automatically selecting average/spot exposure metering.·Depending on the subject conditions, centerweighted average/ spot exposure metering is selected automatically, and the correct exposure is measured.·Spot exposure metering is automatically selected when the brightness of the spot exposure metering range becomes darker than the brightness of the entire screen.·If there is very little difference between the spot exposure metering value and center-weighted average exposure metering value, the correct exposure level is obtained as the intermediate value. |
| [88y6] | Center-weighted average/spot exposure metering | The average brightness of the entire screen is measured, emphasizing the center of the screen. |
| [3KHx] | Center spot exposure metering | The brightness of an area equivalent to 7.6% at screen center is measured, and the exposure is determined. The circle at screen center serves as a general guideline. This mode is suited to measuring subjects with strong contrasts or measuring only screen portions. |
EXPOSURE WARNINGS
With an inappropriate exposure setting, when shooting subjects that are too light or dark, the user is warned by the flashing external LCD or the LCD inside the viewfinder. At such times, the correct exposure cannot be obtained.
Warnings that the exposure is outside the metering range
○ Program AE (P) ---- P = 8" F4.0
The shutter speed and f-number blink.
○ Aperture priority AE (Av) - - - - - - - - - - - - - - - - - - - - - - - - - - - - - - - - - - - - - - - - - - - - - - - - - - - - - - - - - - - - - - - - - - - - - - - - - - - - - - - - - - - - -
The shutter speed blinks.
○ Shutter priority AE (Tv) - - - - - - - - - - - - - - - - - - - - - - - - - - - - - - - - - - - - - - - - - - - - - - - - - - - - - - - Tv 4000.28
The f-number blinks.
○ Manual mode (M) 4000-22-0
The exposure metering value difference is displayed.

Important:
When a polarizing filter is used, ensure that a circular polarizing filter (circular filter: C-PL) is used. The correct exposure cannot be obtained with a normal polarizing filter (PL).
EXPOSURE COMPENSATION
In some situations, such as a great difference between the subject and background brightness or overall subject tones that will not meter correctly because they are all black or white, the resulting photograph may be under- or overexposed. When this occurs, use the exposure compensation function. Exposure compensation can also be used in order to intentionally create overexposed or underexposed pictures.
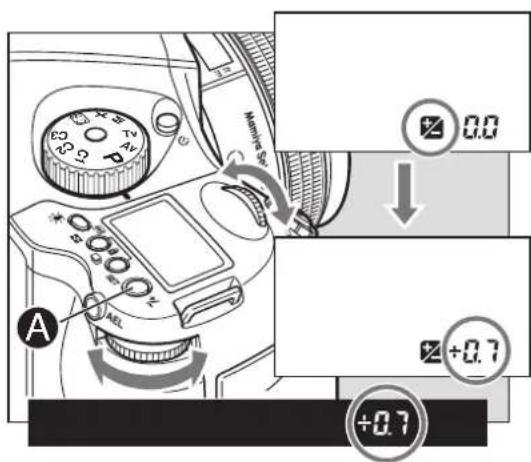
-
When exposure compensation button ⚠ is pressed, ☑ appears on the external LCD. When the front or rear dial is turned counterclockwise, the exposure is increased; conversely, when it is turned clockwise, it is decreased. The exposure compensation value can be checked on the external LCD or LCD inside the viewfinder.
-
After taking the pictures, press exposure compensation button A again to return the exposure compensation value to 0. The exposure compensation value mark on the external LCD is cleared, and the exposure compensation function is released.
* Exposure compensation is also possible during AE lock.
* The shutter speed changes with exposure compensation in manual mode ("M").
Display of the exposure compensation of the viewfinder LCD
(When a Metz flash is not equipped.)
| Exposure mode Exposure compensation display | ||
| P | Program AE | The set value is displayed. |
| Av | Aperture Priority AE | |
| Tv | Shutter Priority AE | |
| M | Manual Mode | The difference between the metered value and the set exposure value is displayed. |
| X | Synchro Mode Not displayed. | |
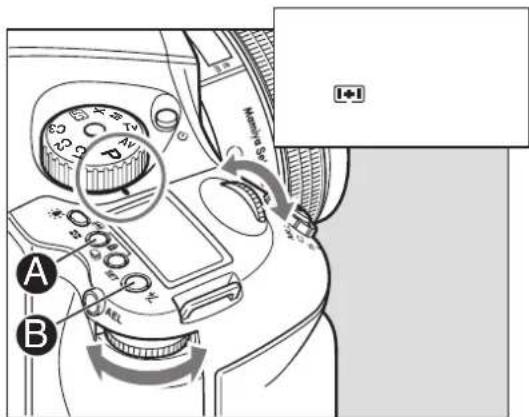
AE LOCK MODE
Shooting with the AE lock function is useful in cases where the desired focal point differs from where the focal point is usually measured, or when it is necessary to measure the exposure using spot metering in order to bring the desired subject into focus.
The AEL button will lock the Auto-exposure value as the photo is being recomposed.
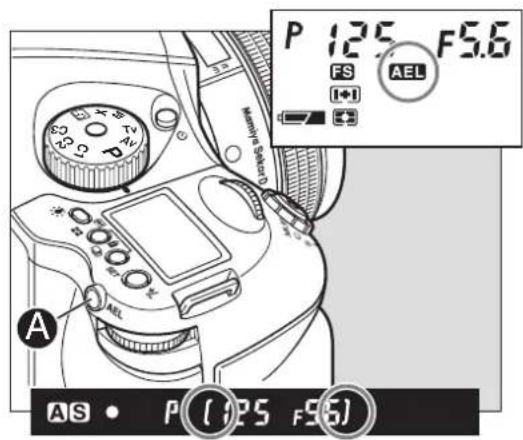
- Turn the exposure mode setting dial and select "P", "Av" or "T".
- Focus on the subject for metering exposure, and press the AEL button Ⓐ on the rear of the grip. ( ) will appear on the viewfinder LCD, indicating that the exposure value is locked.
- Move the camera to recompose the shot, then take the picture.
- By pressing the AEL button Ⓐ, AE lock will be cancelled.
natural_image
Black-and-white portrait of a smiling person wearing a cap and jacket, with no visible text or symbols in the main image area.* [ ] on the viewfinder LCD blinks to indicate the exposure is locked, when continuing to take the next picture in the AE lock mode.
* When the shutter release mode selector lever is turned to the "L" (power OFF) position, or after a lapse of one hour, the AE lock mode will automatically be cancelled.
* In the Manual "M" exposure mode, the AE lock function cannot be used.
* When the exposure metering value difference display appears, press AEL button ☐ for about 1 second. The one-push shift function is now activated to shift to the shutter speed based on the metered result.

natural_image
Black-and-white photo of a smiling person wearing a beret and hat, with a circular target overlay and measurement display below (no readable text or symbols)
Metered-value difference indicator
Keep pressing the AEL button Ⓐ, and the difference between the metered exposure value and the exposure of the new composition will be displayed on the viewfinder LCD. This function can be used to see if an object of very different brightness levels can be properly captured.


* If the difference between the set value and the metered value exceeds 6EV, the viewfinder LCD blinks “- u -” for underexposure and “- o -” for overexposure.
By turning the front or rear dial in the AE lock mode, the aperture and shutter speed value can be changed without changing the exposure value that is set when entered into AE lock mode. In the "P" mode (Program AE) mode, turning either the front or rear dial shifts the program to "PH" and "PL." When in "Av" (Aperture priority AE) or "Tv" (Shutter priority AE), turning one of the dials changes both the aperture and shutter speed values.
* Exposure compensation and auto bracketing function can be used when the camera is in the AE lock mode in normal operation or with the mirror locked up.
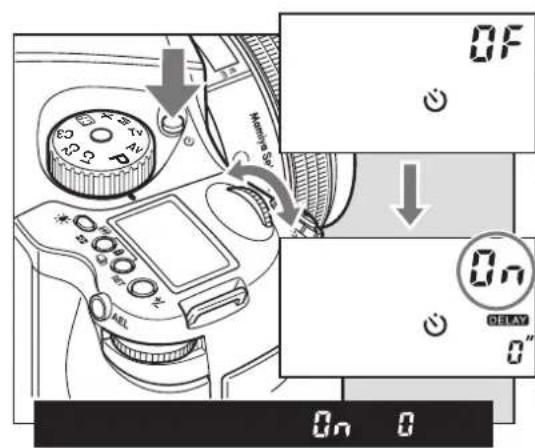
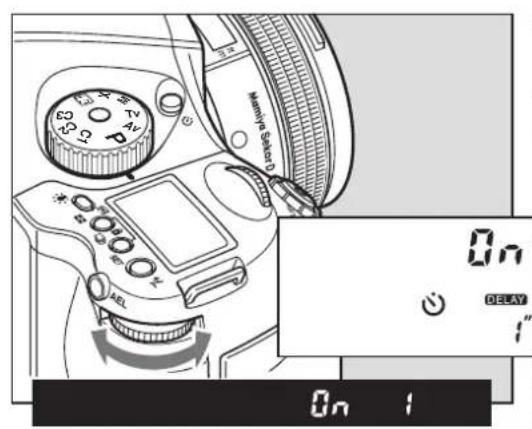
AUTO BRACKETING MODE
When in situations where it is difficult to determine the best exposure compensation, it is advisable to change the exposure setting gradually (from normal to under and over). Continuous turning up of the values eventually leads to auto bracketing.
1. Turn the shutter release mode selector lever to the "S" or "C" position.
When set at the "S" position, one frame can be shot with each press of the shutter release button. In the "C" mode, the camera takes three (or two) frames successively with one press of the shutter release button.
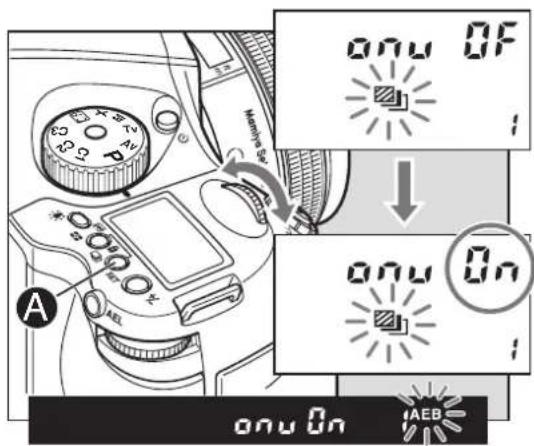
2. By pressing the auto bracketing button, auto bracketing mode is selected.
In the main LCD, the auto bracketing mark will flash on and off. As it is flashing, turn the front dial to "On".
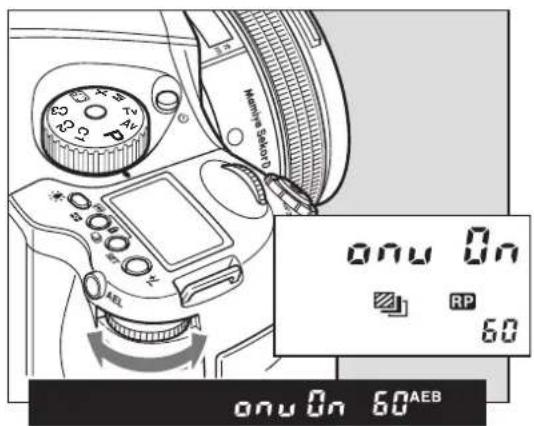
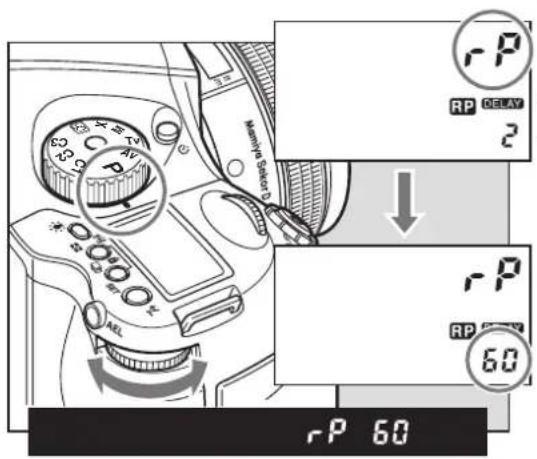
3. By further turning, more values can be selected.
The rear dial can also be used for setting. From 1 to 10 turns the value increases in single units, while 10 to 60 turns means increases by units of 10. "On" allows unlimited values to be set.
* After multiple turns, the mark "RP" will appear in the main LCD.
* Repeat turning will lead to a countdown being displayed on the main LCD and after taking a photo the camera will return to auto bracketing mode.
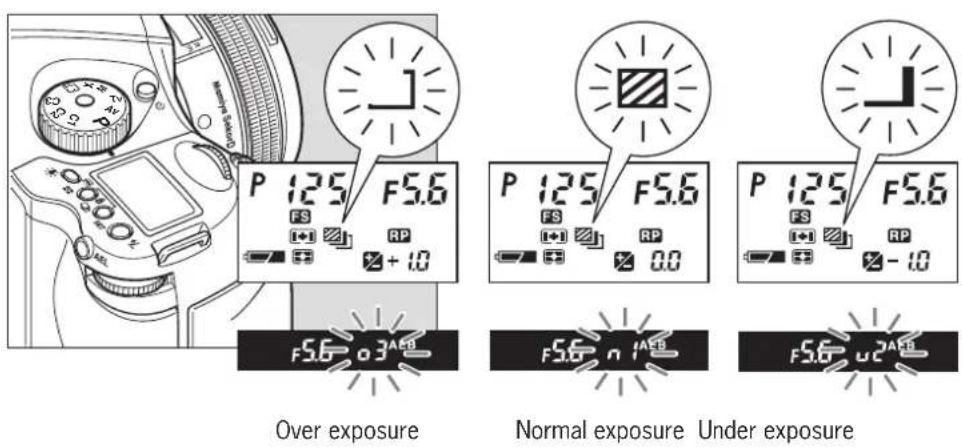
4. Press the shutter button, and take the pictures.
When the shutter button is pressed during shooting in auto bracketing mode, the shooting sequence and auto bracketing mark blink on the LCD inside the viewfinder. Furthermore, the auto bracketing □mark blinks, the bracket step width is displayed, and the shooting sequence can be checked on the external LCD.
5. Press the auto bracketing button, then turn the front dial to "OF" to cancel.
Then press the auto bracketing set button or half-press the shutter button to return to the normal display mode.
TAKING PHOTOS WITH THE MIRROR UP
This function prevents mirror-caused vibrations which may blur the image in close-up photography, when shutter speed is slow, when a telephoto lens is used, or when photographing a poster or another picture.
When using the mirror up, electromagnetic cable release RE401 (optional) is recommended.
Using auto focus and auto exposure
-
Set the drive dial to "M.UP."
-
Select "S" (single focus mode) by turning the focus mode selector lever.
-
Turn the exposure mode-setting dial to choose any of "P", "Av", or "Tv" exposure mode.
-
Focus the subject, and determine composition and exposure.
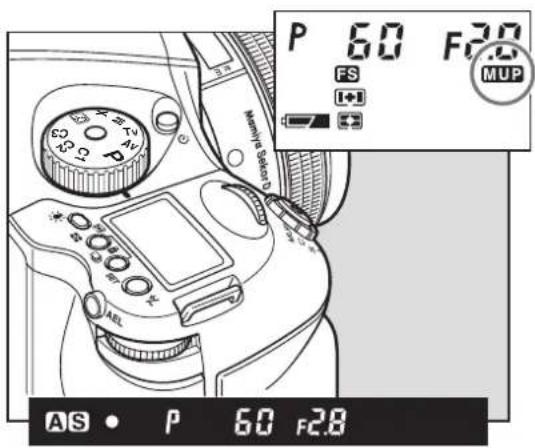
-
The mirror moves up when the shutter button is fully pressed.
-
Press the shutter button again to take pictures.
* Auto bracket exposures can be made when the auto bracketing mode is set before taking photos with mirror up.
* After the set time, mirror up photography will be cancelled.
* The mirror will return to the original position if the lens is removed from the camera body.
MIRROR UP DELAY
To change from the self timer setting to the mirror up setting, press the shutter button so the mirror goes into the upright position and once the set time has expired the shutter will release, and the mirror will return to the lower position. Separately purchased electronic cable release RE401 can be used to eliminate camera shake.
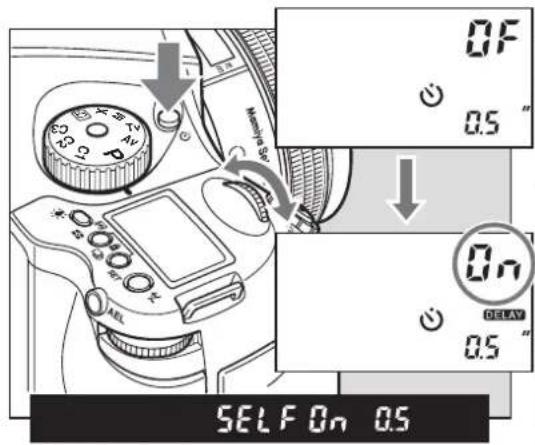
When using auto focus the operational method is the same as 1 to 3.
-
Press the self timer button and turn the front dial to "On"
-
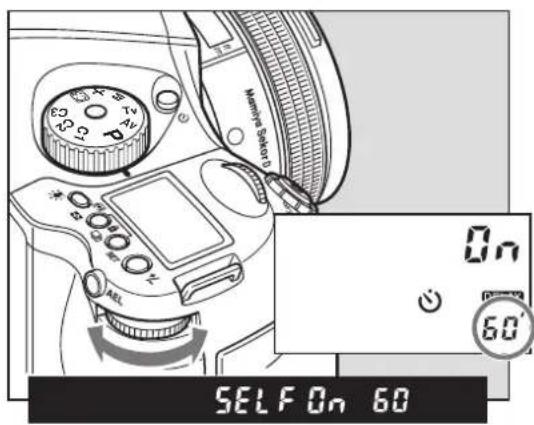
Turn the rear dial to select the time needed. 0.5/1 second to 10 seconds allows for increases by the second, while 10 to 90 seconds increases by 10 seconds per turn. For 2 to 10 minutes the value increases by the minute and 10 to 60 minutes increases by 10 minutes per turn.
-
Line up the photograph through the viewfinder and half press the shutter button to ensure the focus and framing is correct.
-
Press the shutter button completely and the mirror will go to the upper position, then after the set time the shutter will release and the mirror will return to the lower position.
* To cancel mirror up delay photography, turn to the drive dial to any setting other than "M.UP" or turn the self timer setting off.
* By turning the drive dial to the "M.UP" setting (mirror up mode) and selecting the self timer setting, mirror up delay photography can be taken. Another method is to select self timer then turn the drive dial to "M.UP".
SELF TIMER MODE
Once the shutter button has been pressed, the shutter will release after the selected time has passed. The self timer lamp will blink, and three seconds prior to when the shutter releases, the blinking will flash more rapidly. This is a useful function for the photographer to be able to take commemorative shots of his or herself.
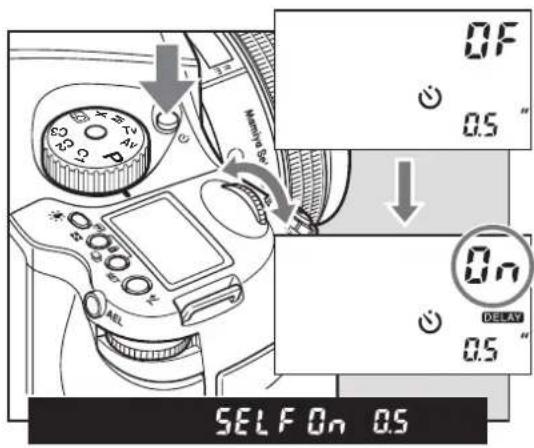
-
Make sure the camera is firmly attached to the tripod.
-
Press the self timer button to set the self timer mode to "💡".
-
Turn the front dial until self timer mode is set to "On"
-
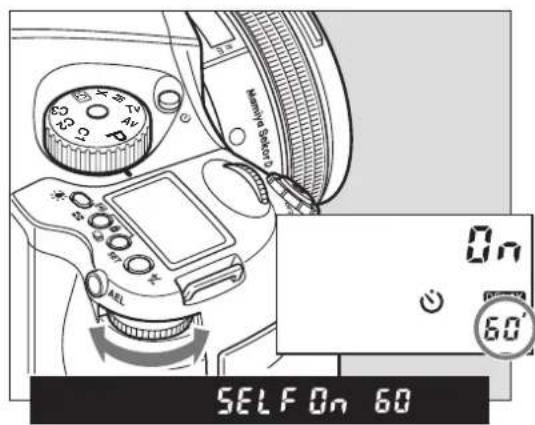
Turn the rear dial to select the countdown time. 0.5/1 second. to 10 seconds is selectable by the second, 10 seconds to 90 seconds is selectable by units of 10 seconds, 2 minutes to 10 minutes is selectable by the minute while 10 to 60 minutes is selectable by units of 10 minutes.
- Check the view through the viewfinder to ensure the image area and focusing are correct then press the shutter button. The shutter will release after the selected time frame.
Releasing self timer mode
- Press the self timer button to set self timer mode.
- Turn the front dial to "OF."
* To release the self timer while it is operating, turn off the power (by setting the drive dial to "L").
* When there is bright light source behind the camera or when you press the shutter button without looking through the viewfinder, light may enter from the viewfinder's eyepiece, adversely affecting the exposure metering. Turn the eyepiece shutter open/close knob to close the eyepiece shutter, then take the pictures.
* Mirror up delay photography can be achieved after setting self timer mode by turning the drive dial to "M.UP" (Mirror up mode).
INTERVAL PHOTOGRAPHY
By repeated turning, the interval time can be set automatically. It can be set to suit scenes such as cloud movement or views of insects in action.
-
Ensure the camera is firmly secured on a sturdy tripod.
-
Hold and press the interval button for the interval mode.
-
Turn the front dial to display interval mode as "On".
-
Turn the rear dial to set the interval time. Settings include 0 seconds (no interval time), 1 to 10 seconds (increased by the second), 10 to 90 seconds (increased in units of 10), 2 to 10 minutes (increased by the minute) or 10 to 60 minutes (increased in units of 10 minutes per turn).
-
Turn the front dial to the repeat mode "rP".
-
Turn the rear dial and choose your preferred duration by turning. Settings can be made from 2 to 10 (in single units), 10 to 60 (in units of 10) or for limitless ("On").
-
Check the focus and framing in the viewfinder then press the shutter for the shutter to be released.
* Repeat turning (according to the number of times) will lead to a countdown appearing in the display.
LONG EXPOSURE MODE (BULB MODE)
To expose film longer than 30 seconds, adjust the shutter speed to "B" (bulb). In order to prevent camera shake, use an electromagnetic shutter release and tripod.
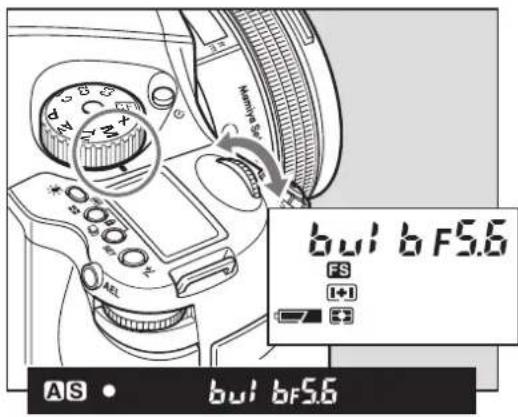
-
Turn the exposure mode dial and set it to "M" (manual mode).
-
Turn the front dial to select "bulb", then turn the rear dial to set the aperture.
-
Determine the composition, focus, then take the picture. The shutter remains open as long as the shutter release button is pressed.
* As the camera is electronically controlled even during exposures, it is recommended to replace batteries before bulb exposure.
7
BASIC DIGITAL BACK OPERATIONS
Using the stylus.... 78
Basic steps.... 79
Turning on the digital back.... 80
Turning off the digital back.... 81
Changing the interface language.... 82
Setting the date and time.... 83
Viewing and defining the camera settings.... 84
Creating a folder.... 85
Creating a base name for the shot.... 86
Adding notes or copyrights to your shots.... 87
Connecting the firewire cable for tethered mode.... 88
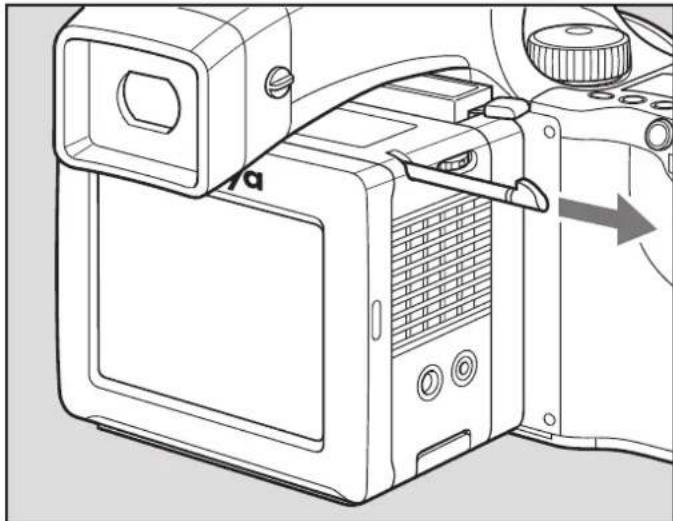
USING THE STYLUS
The digital back is supplied with a stylus. Use the stylus to tap the touch screen.
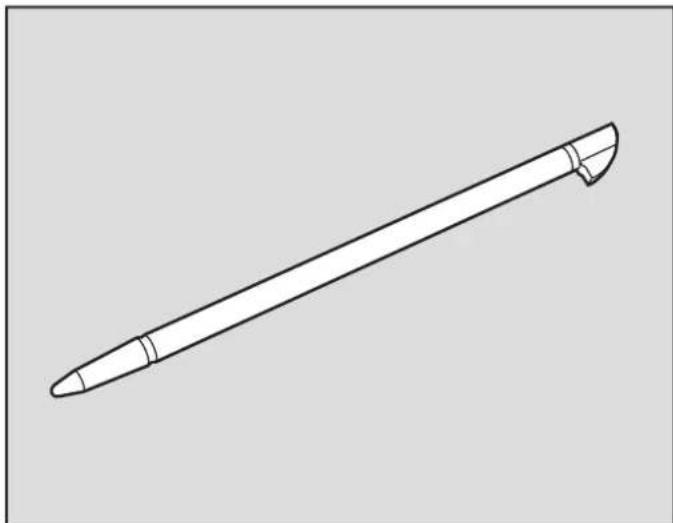
natural_image
Line drawing of a pen or stylus with a long handle and pointed tip, no text or symbols presentTo remove the stylus for use, slide it out of the slot located at the top of the digital camera back.
natural_image
Technical line drawing of a camera module with a handle and control panel, showing no text or symbolsTHE BASIC STEPS
Follow these steps to shoot and edit your images:
Prepare to shoot.
Turn the camera and digital back on and perform some basic steps before taking the first shot.

View the camera settings.
View the predefined camera settings, choose another setting, or make changes to specific camera settings.

Take and evaluate a shot.
Take a shot. Check the exposure, focus, and composition of the shot, and set the gray balance for future shots.
Edit your images.
Organize the images using the Mamiya DM System's digital back editing tools.
Compact Flash Card and Battery
To turn on your Mamiya DM Systems digital back when using a compact flash card and battery:
- Ensure that the battery is charged. For more information, see the Quick Start Guide.
- If this is the first time using the compact flash card with the digital camera back, format the card. For detailed instructions on formatting the compact flash card, see the 'Formatting a compact flash card in MAC/Windows' in chapter 3.
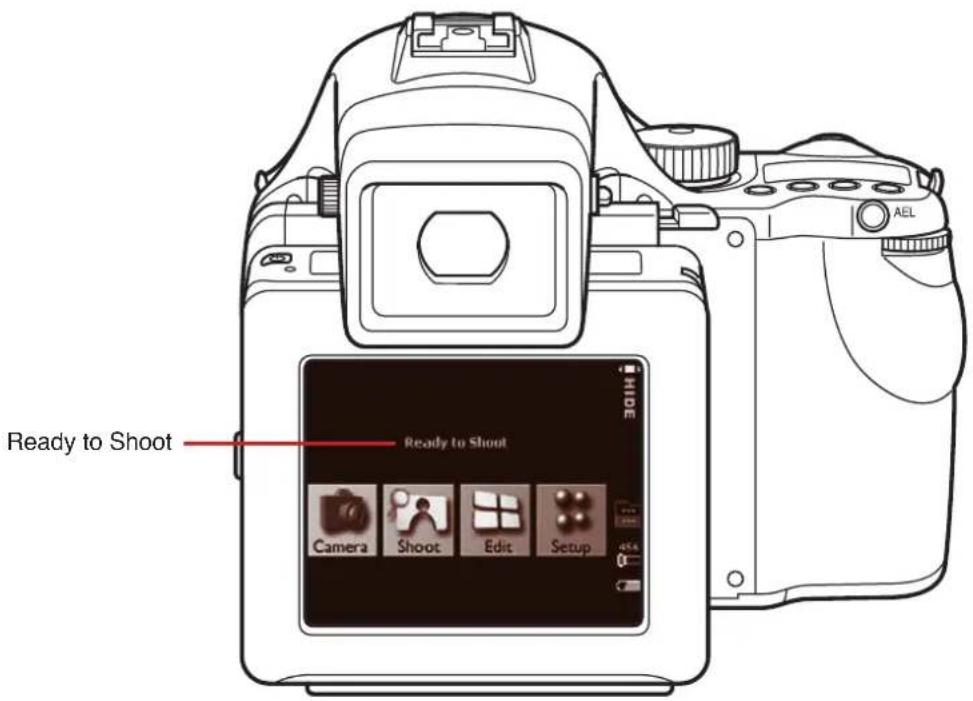
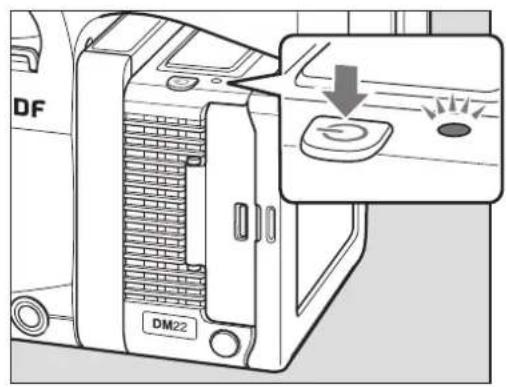
- Press and hold the On/Off button on the camera back until the orange light turns on, and then release the On/Off button. The light turns green and a beep sounds to indicate that the camera is ready for you to shoot.
- Verify that the Ready to Shoot message appears on the touch screen.
Turn the digital back off in one of the following ways:
When using a compact flash and battery:
- Press and hold the On/Off button until the light turns orange. If a setting in the Setup menu has been changed, the camera saves the new setting and then shuts down.
When using a digital magazine:
∅ Press the On/Off button.
When working in tethered mode:
Do one of the following:
- When not using a compact flash card, on the desktop, right-click the compact flash card and select Move to Trash (Apple® Mac OS® X operating system) or Eject (Microsoft® Windows® operating system), and then unplug the FireWire cable.
- If you are not using a compact flash card, unplug the FireWire cable.
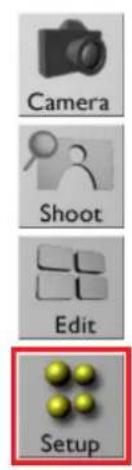
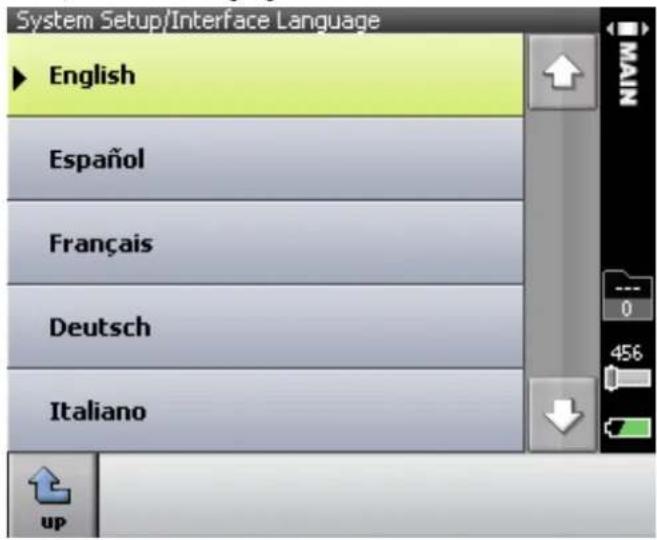
CHANGING THE INTERFACE LANGUAGE
- Scroll down, and then tap Interface Language.
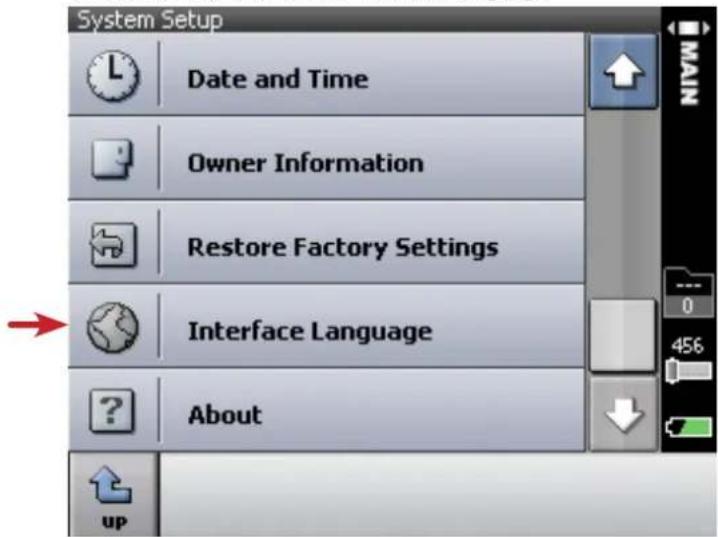
- Tap the desired language.
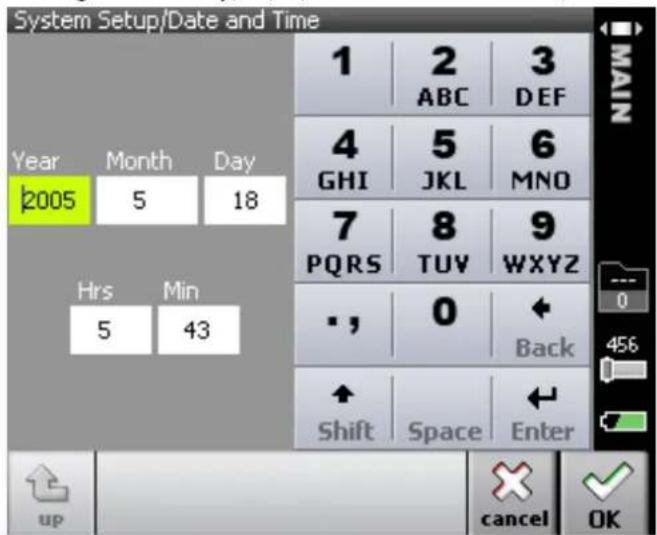
SETTING THE DATE AND TIME
- Scroll down, and then tap Date and Time.
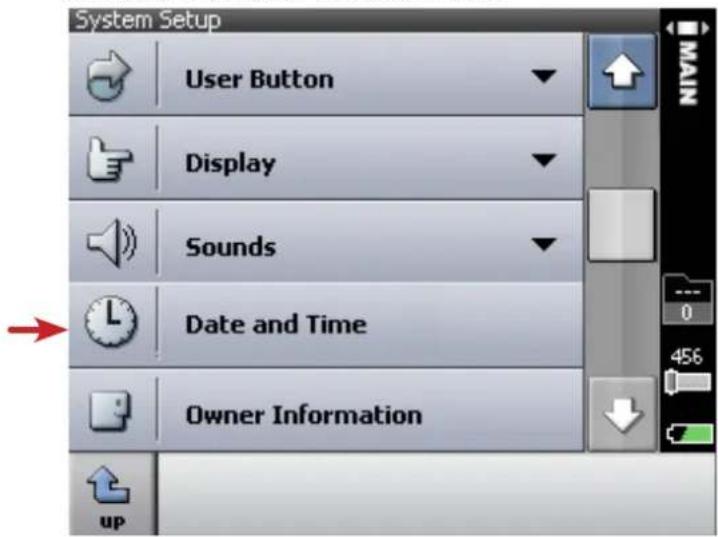
- Using the virtual keypad, tap the date and time values, and then tap ok.
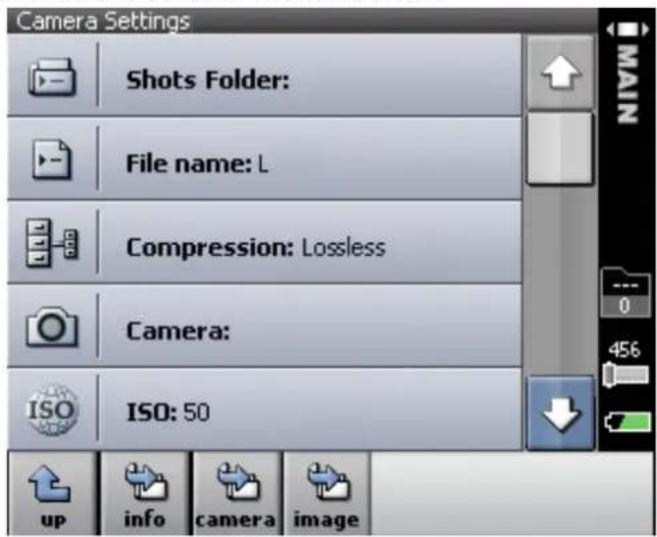
VIEWING AND DEFINING THE CAMERA SETTINGS
Define a base name for your shots. The digital camera back applies this name to all shots, adding a number in sequence each time, until a new base name is defined.
1. Tap File name.
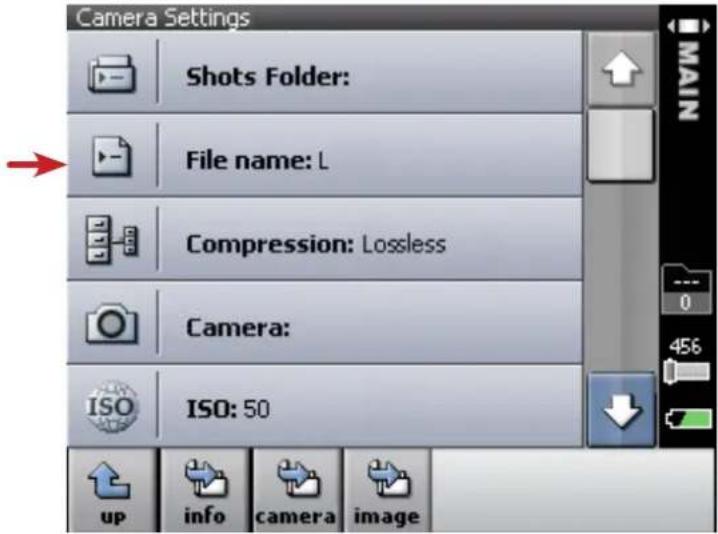
2. Using the virtual keypad, enter a base name for the shot, and then tap ok.
ADDING NOTES OR COPYRIGHTS TO YOUR SHOTS
- Scroll down, and then tap the Info button.
- Click in either the Description or Copyright Notice area.
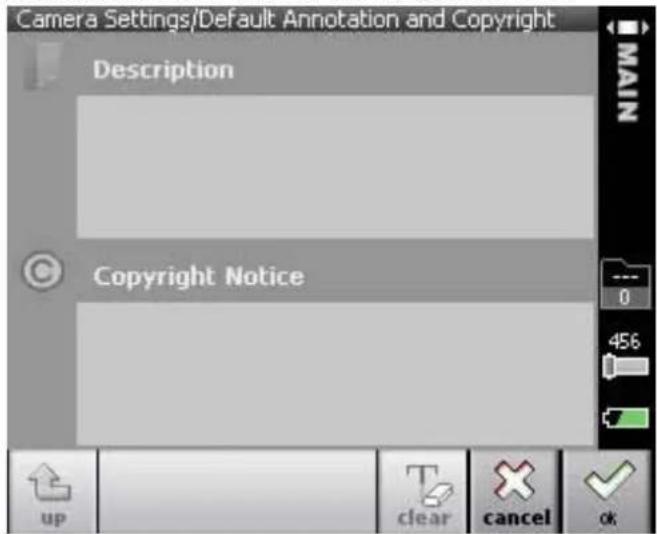
- Use the virtual keypad to enter the desired information, and then tap ok.

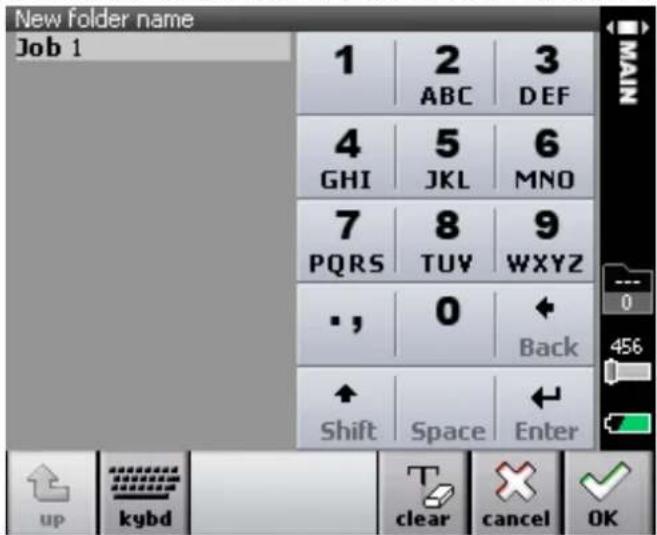
CREATING A BASE NAME FOR THE SHOT
- Using the virtual keypad, tap the name of the folder, and then tap OK. To create a subfolder, tap the new folder, tap open, and then tap new.

Selecting a Folder for Your Shot
Select the folder to save the shots in, tap a folder, and then tap choose.
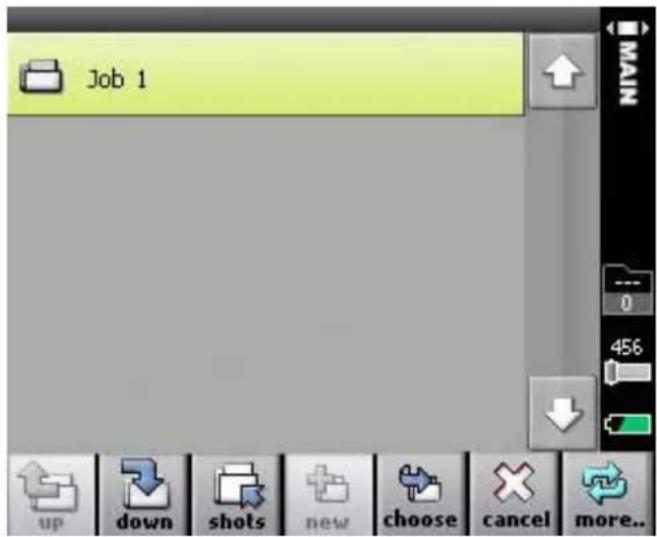
ADDING NOTES OR COPYRIGHTS TO YOUR SHOTS

Shots are automatically saved in the storage unit connected to the camera: digital magazine (DM) or compact flash (CF). To enhance organization, create folders for storing the shots.
1. Tap Shots Folder.
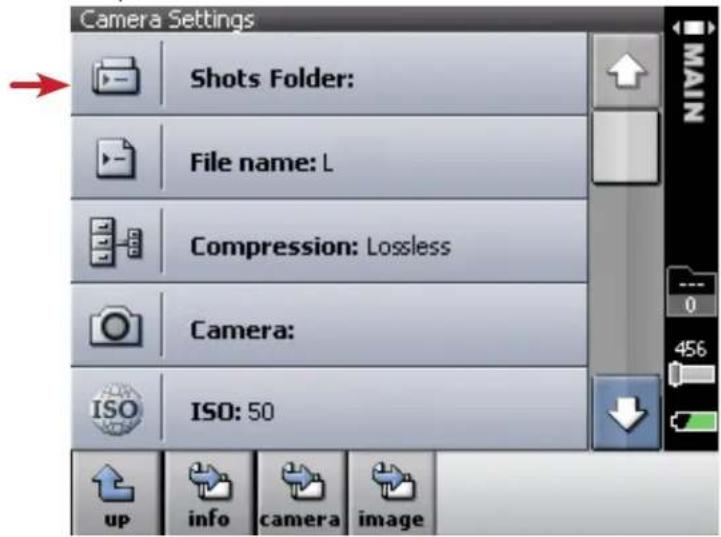
2. Tap down.
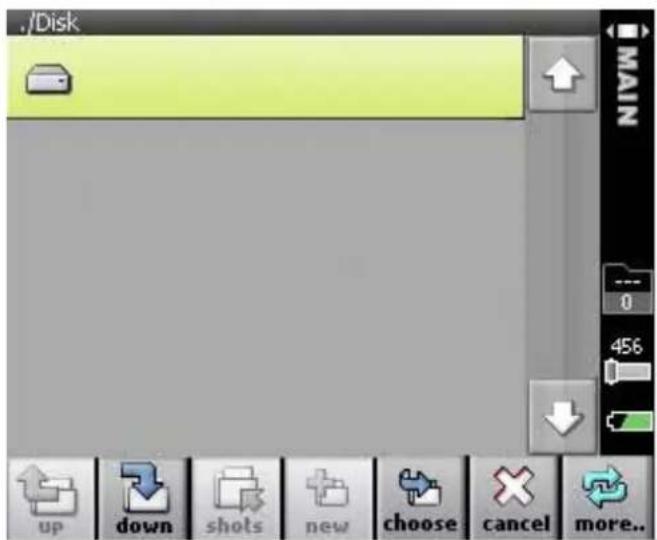
3. Tap new.

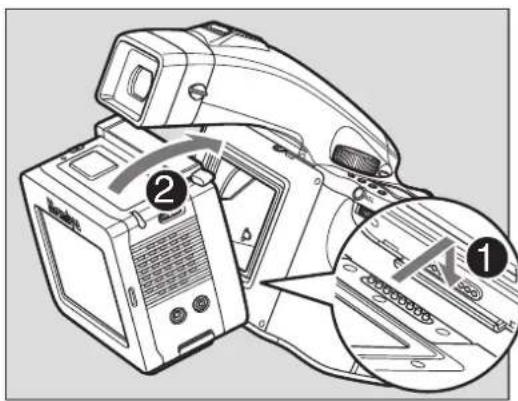
CONNECTING THE FIREWIRE CABLE
Important: To avoid connection problems, use only the Mamiya DM FireWire cable supplied with Mamiya DM System.
The FireWire cable (IEEE 1394A) links the computer to Mamiya DM System. The cable carries both communication signals and electrical power. The cable is a hotplug cable that can be connected or disconnected without turning the computer off or quitting the application.
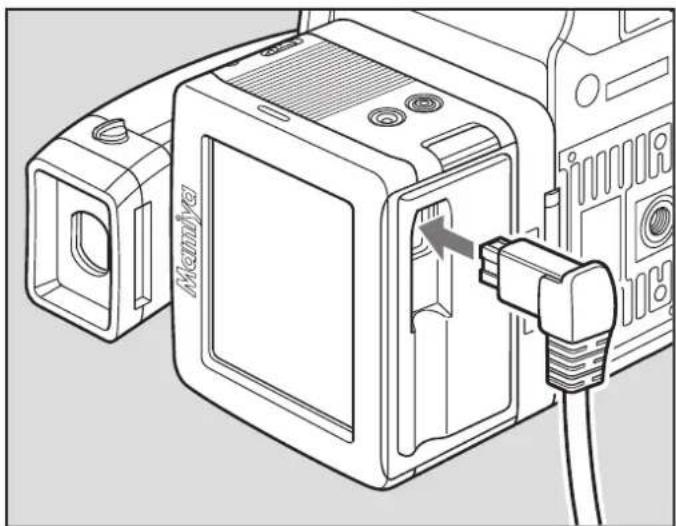
1 Connect one end of the FireWire cable to the port at the bottom of the Mamiya DM System. Make sure that the FireWire cable connector is aligned to the left of the Mamiya DM System.
natural_image
Line drawing of a camera module with an attached plug and cable, showing no text or symbolsConnecting the FireWire cable to the Mamiya DM digital camera back
USING THE DIGITAL BACK SETTINGS AND EVALUATING SHOTS
Checking the exposure.... 90
Checking the exposure with the picker tool.... 91
Checking the exposure with the over or under exposure alarms.... 92
Checking focus.... 93
Setting the gray balance.... 94
Checking composition using the grid.... 95
Changing the color of the grid lines.... 96
Browsing through images.... 97
Flagging or creating comments in shoot view.... 98
CHECKING THE EXPOSURE
Check the exposure of the shot in the following ways:
- Examine the histogram exposure data.
- Use the picker tool to view the exposure data for a specific spot on the image.
- Use the exposure alarms to view the overexposed and underexposed areas of the image.
* Press the user button to view the histogram, the exposure alarms and additional shot information when in Shoot view.
* To maximize the display size of the shot, double-tap the image.
Checking Exposure with the Histogram
- Tap histog.

- Examine the histogram to check that most of the exposure data lies within the exposure limits. Exposure data that lies within the limits is shown in white. Overexposed and underexposed data is shown in gray.
CHECKING EXPOSURE WITH THE PICKER TOOL
- Tap histog to open the histogram.


- Tap 🔍, and then tap a spot on the image. The tapped spot is marked by a magenta circle. A magenta line on the histogram indicates the exposure data related to the spot.
Tap ↑ to enlarge the histogram. The exposure meter, +0.4, shows the overall exposure in f-stops.
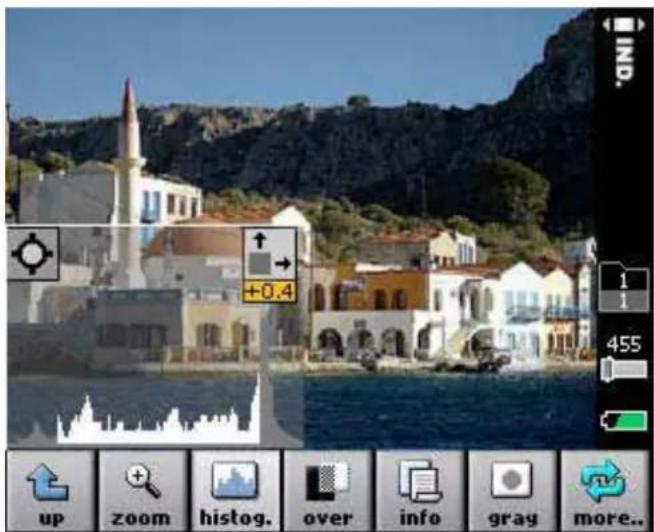
* To remove the spot from the image, tap ☐ on the histogram, and then tap outside the image area.
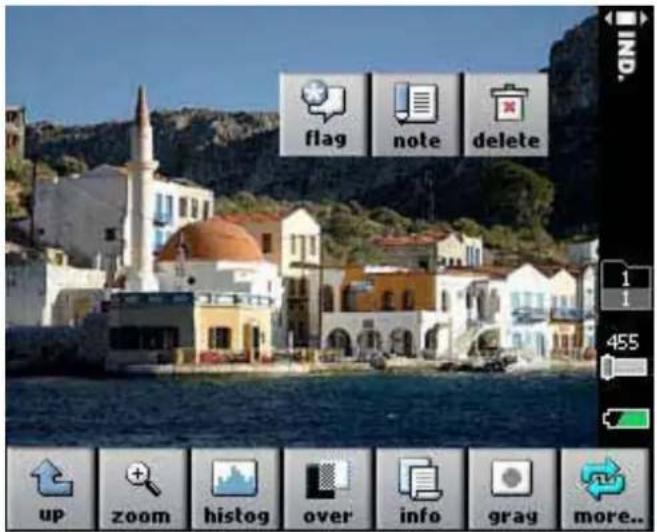
CHECKING EXPOSURE WITH THE OVEREXPOSURE AND UNDEREXPOSURE ALARMS

- Tap over.

A flashing mask covers the overexposed and underexposed areas of the image.
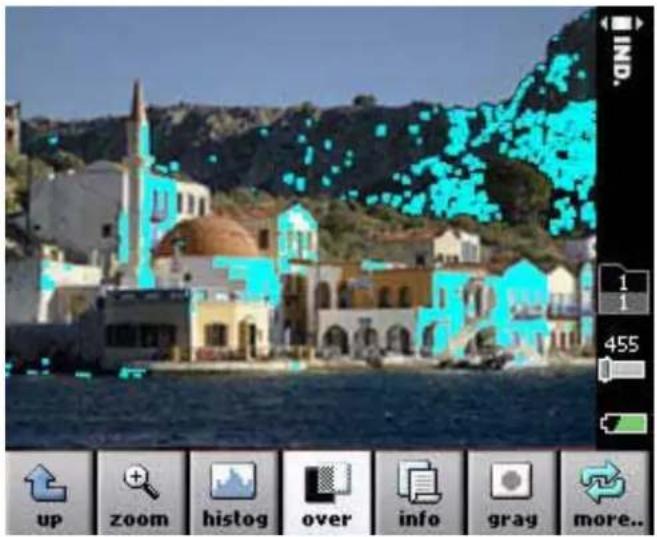
natural_image
Scenic view of a colorful village with domed houses and hills in the background, no visible text or symbols.* It is possible to configure which exposure areas appear, overexposed or underexposed.
CHECKING FOCUS

- Tap zoom.

- To magnify the image area 100% (1:1), tap a desired point on the image.
- To Increase or reduce the magnification, tap either in or out, and then tap the image.

Each tap on the image changes the magnification by a fixed percentage.
- To pan the image, tap the arrows.
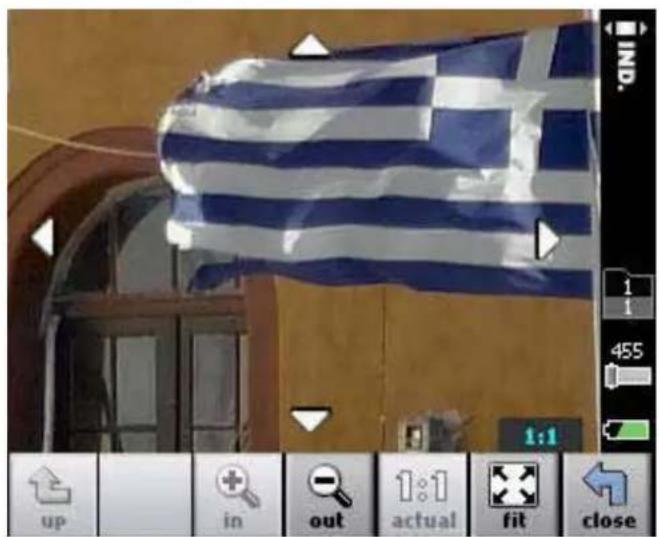
- To revert to a view of the entire image, tap fit.
SETTING THE GRAY BALANCE

To set the gray balance for future shots:
-
Do one of the following:
-
Include a gray card in the shot.
-
Ensure that there is a neutral gray area in the shot.
-
Tap gray.

- Tap the gray card or on a gray area in the image.

natural_image
Pink glass bottle with a lit top, isolated on a plain background (no text or symbols visible)- Tap OK to use the new gray balance setting, or tap cancel.
* If the gray card is not large enough in full-screen view, use the zoom tool to enlarge the picture before setting the gray balance.
CHECKING COMPOSITION USING THE GRID
Place a grid on the shot as an aid for composition and alignment of an image. This task is performed in Shoot view.
- Tap more and then tap grid.

The grid appears over the image.
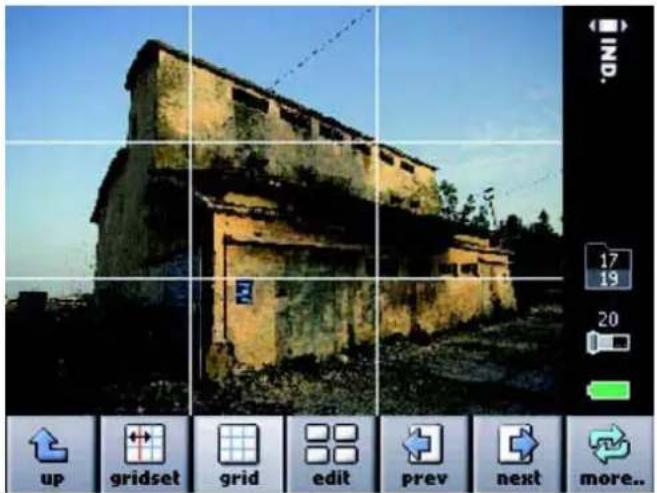
natural_image
Exterior view of a damaged building under clear sky, with grid and editing tool icons visible (no readable text or symbols on main structure)- Evaluate the composition.
Moving the Grid Lines
Move the grid lines to help align the composition. This task is performed in Shoot view.
- Tap more.
- Tap gridset.
- Tap the line to be moved. The selected line is highlighted.
- Use the arrows to move the grid lines as desired.
CHECKING COMPOSITION USING THE GRID

- The longer arrows move the grid lines 10 pixels at a time.

- The shorter arrows move the grid lines 1 pixel at a time.

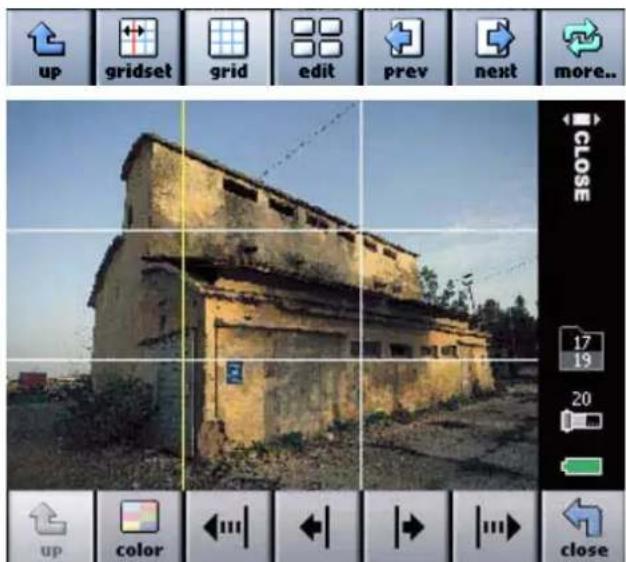
Changing the Color of the Grid Lines
Change the grid line color according to preference.
This task is performed in Shoot view.
- Tap more.
- Tap gridset.
- Tap color.
The color of the grid lines changes.
- To cycle through to view additional colors, continue to tap color.
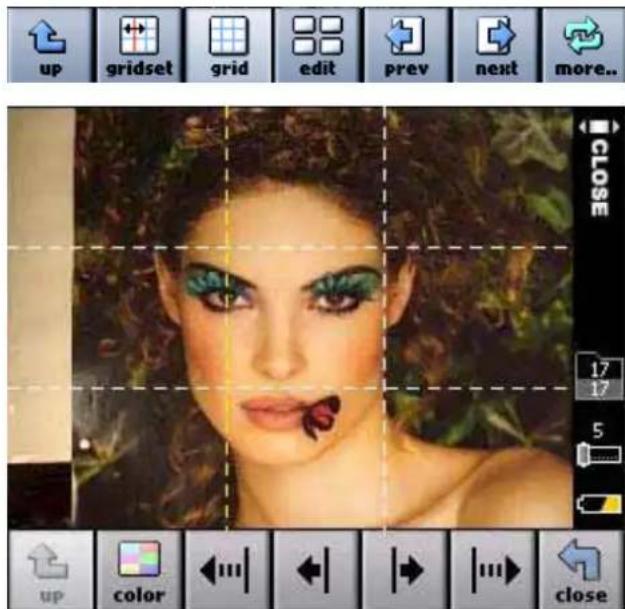
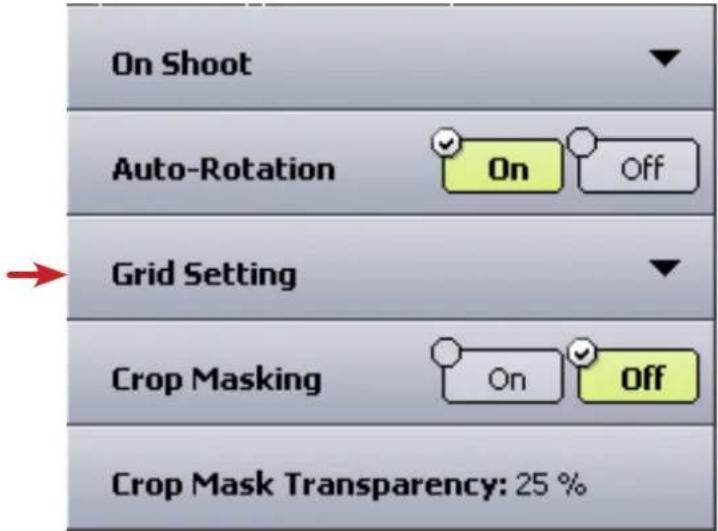
Setting Grid Attributes
Select the number of grid lines and the line type. This task is performed in Setup view.
- Tap Shoot View Options.
- Tap Grid Setting.
-
Set the grid attributes.
-
To set the number of grid lines, tap Horizontal Grid Lines and Vertical Grid Lines, and tap the desired number of lines.
- To set the number of line type, tap Line Type and select the desired line type.
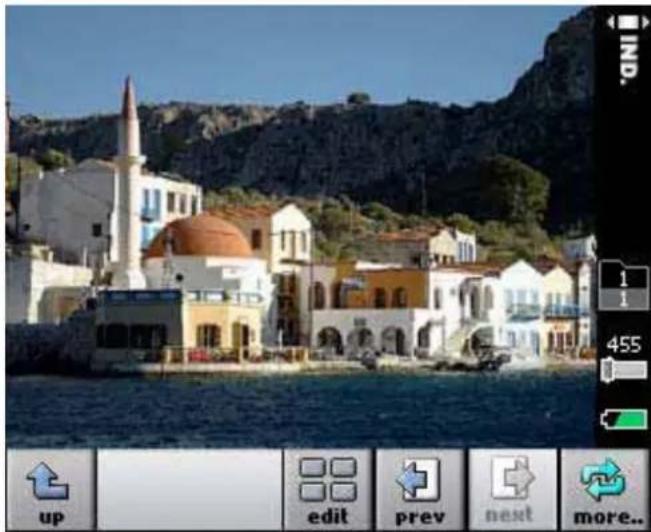
BROWSING THROUGH YOUR IMAGES

Do one of the following:
- Tap more and then tap the prev and next buttons.
- Roll the user button back or forwards.
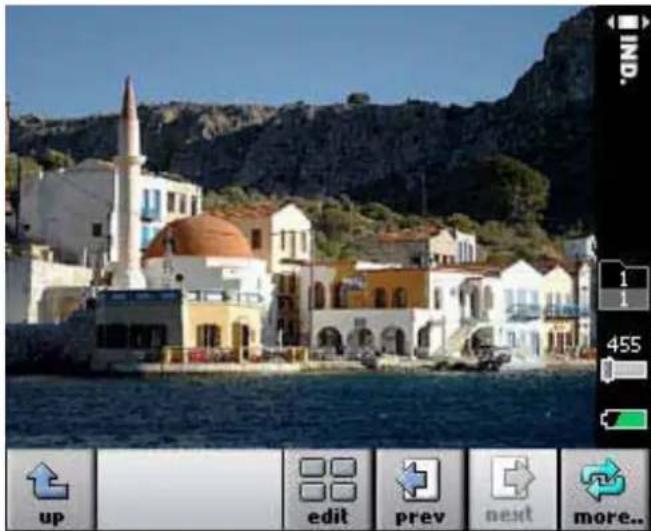
natural_image
Scenic coastal town with colorful buildings and a hill in the background (no visible text or symbols)
FLAGGING AND ANNOTATING IN SHOOT VIEW
While shooting, flag your image or add a note, as desired. Then view the flag or note on the image in Edit view and in the image information.
- Tap the image and hold until the flag, note and delete buttons appear.
-
Do one of the following:
-
Tap flag to flag the image.
- Tap note to add a comment about the image.
EDITING IMAGES
Editing view....100
Browsing through images.... 101
Viewing information and EXIF data.... 102
Selecting multiple images.... 103
Flagging, creating comments or deleting images.... 104
Sorting images.... 105
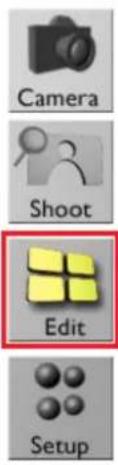
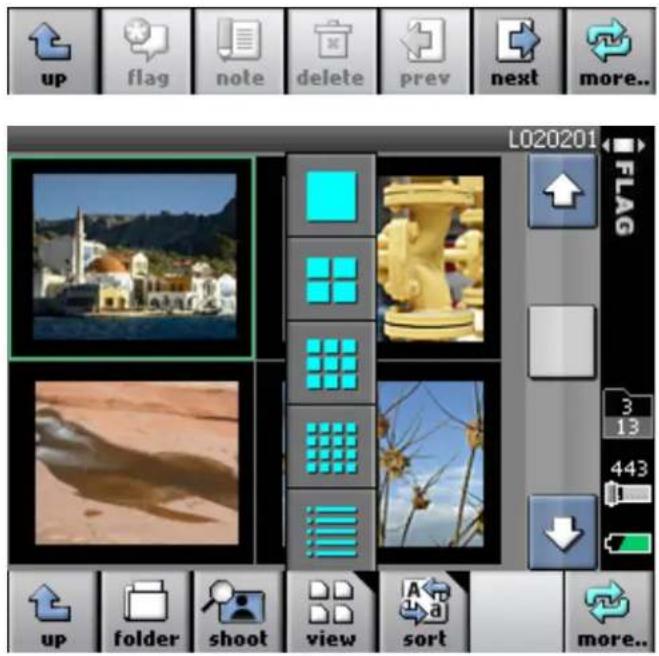
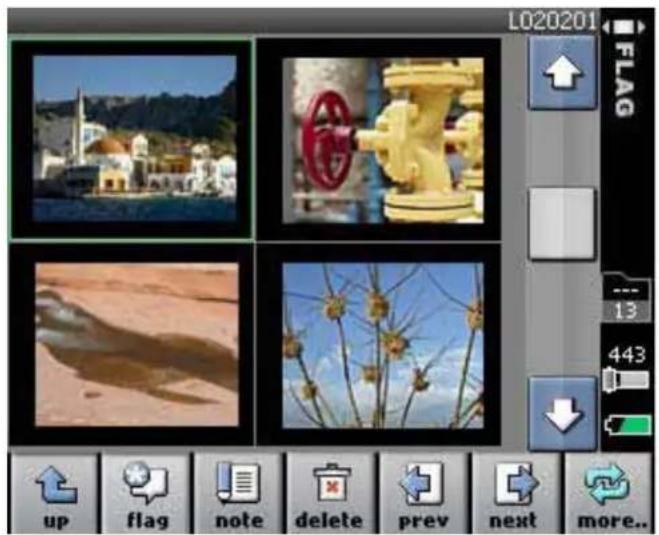
EDIT VIEW
Use Edit view to:
• Display images in various view modes
- Browse through images
- Flag, annotate, and delete single or multiple images
- Move images from one folder to another
Accessing Edit View from Shoot View
When in Shoot view, access Edit view directly without returning to the main menu. In Shoot view, tap edit.
natural_image
Scenic coastal town with colorful buildings and a prominent minaret, set against a mountainous backdrop (no visible text or symbols)The above image is Edit view.
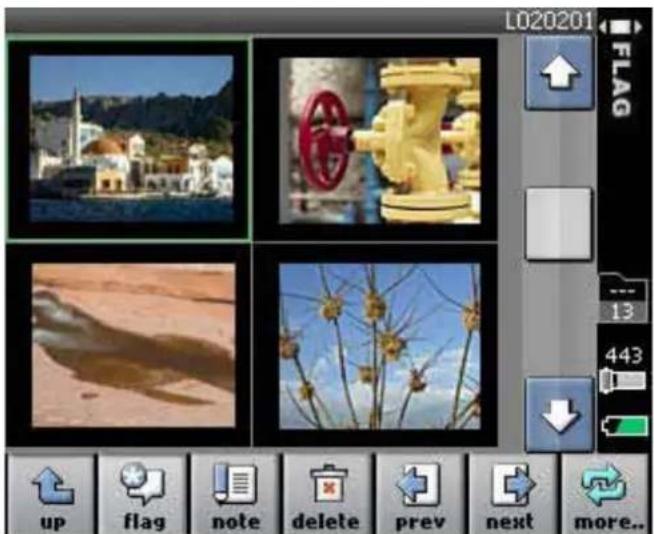
BROWSING THROUGH IMAGES

To browse through images, do one of the following:
- Tap prev and next.
- Use the scroll bar.
- Roll the user button back or forward.
When moving from one image to the next, the image is automatically selected.

VIEWING INFORMATION AND EXIF DATA
- Tap more, and tap an image.
- Tap view, and select a single view.
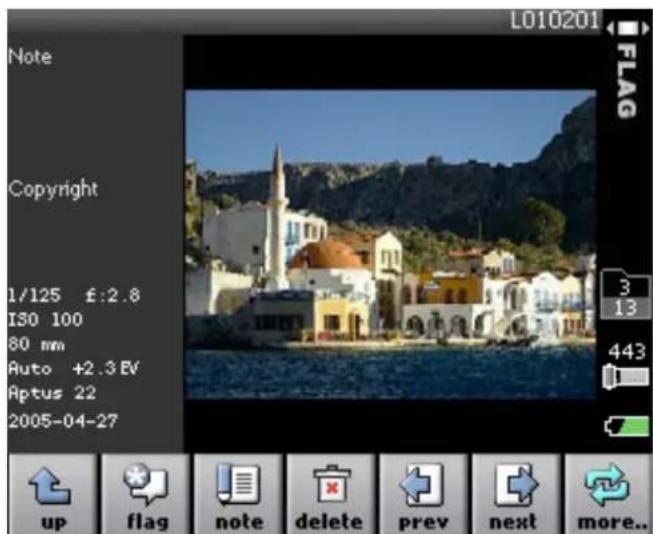
Information saved with the image and the EXIF data appears beside the image.
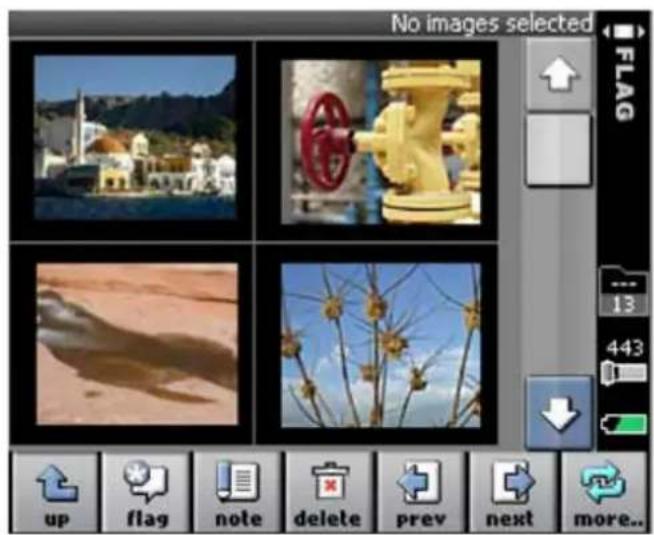
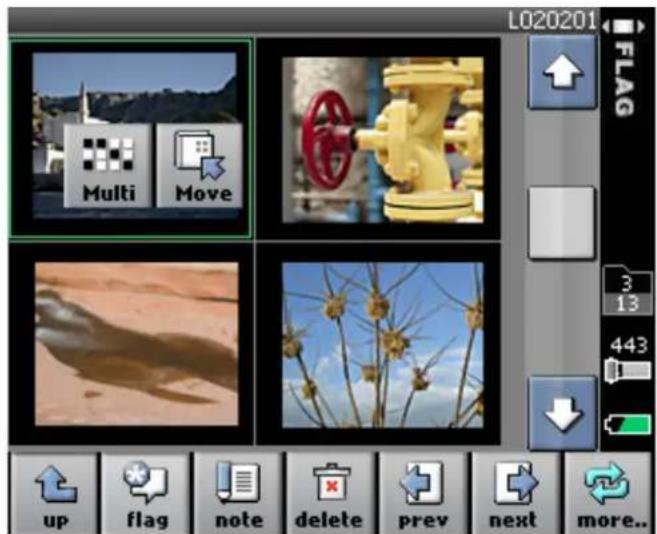
SELECTING MULTIPLE IMAGES
- In Edit view, tap an image and hold the stylus on it until the Multi button appears on the image.


- Tap the Multi button, and then tap the images that you want to select.
FLAGGING, ANNOTATING, AND DELETING IN EDIT VIEW
- Tap the image, and then tap flag, note, or delete.
* If multiple images are selected, the action is performed on all the selected images.
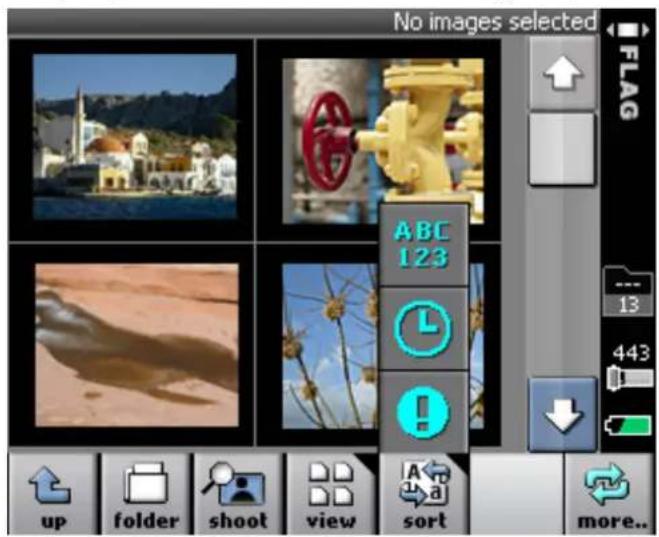
SORTING YOUR IMAGES
- Tap more.

- Tap sort, and select the desired sort method (by name, time or flag).
10
IMAGE FILE MANAGEMENT AND PREFERRED SETTINGS
Selecting a folder.... 108
Moving images.... 109
Opening images in shoot view.... 110
Shooting without overlays.... 111
Working in full screen mode.... 112
Setting grid attributes.... 113
Using the crop mask.... 114
Adjusting the transparency of the crop mask.... 115
Adjusting the transparency of the histogram and info bar.... 116
Setting the exposure alarm.... 117
Resetting the file name counter.... 118
Formatting the compact flash card in portable mode.... 119
Configuring the user button.... 121
Configuring the user button for edit view.... 122
Configuring a long press of the user button.... 123
Aligning the touch screen.... 124
Turning on the backlight.... 125
Turning off the backlight.... 126
Setting the volume for digital back sounds.... 127
Setting personal information.... 128
Restoring factory settings.... 129
Viewing the digital back 130
SELECTING A FOLDER
- Tap more.
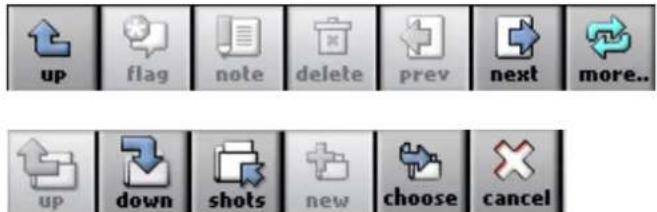
- Tap folder.

- Tap on the desired folder, and tap choose.
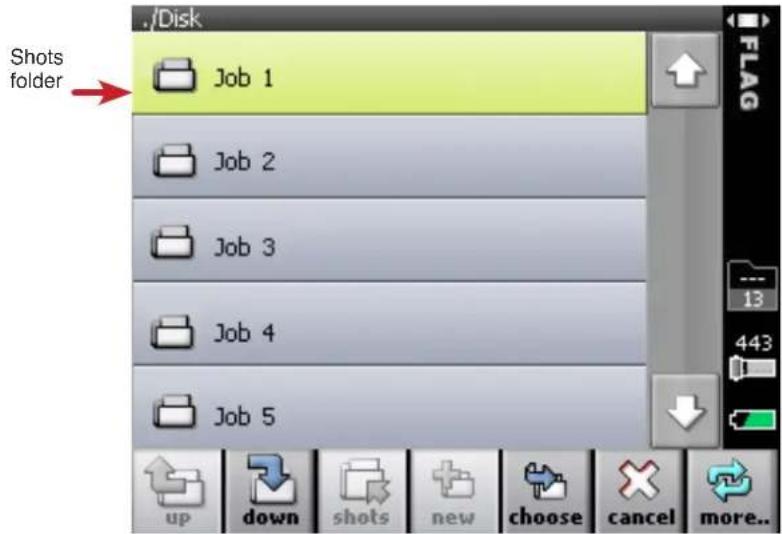
* The Shots folder always appears at the top of the folder list.
MOVING IMAGES
- Tap an image and hold the stylus on it until the Move button appears on the screen.
- Tap the desired destination folder.

- Tap Move.
OPENING IMAGES IN SHOOT VIEW

To view images at full-screen size, individual images can be opened in Shoot view. This is useful for checking focus or composition.
To open a specific image in Shoot view, do one of the following:
- Tap the image and then tap shoot.
- Double-tap the image.
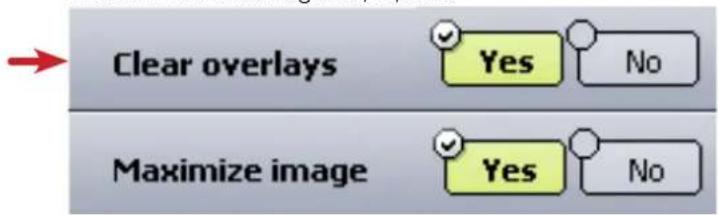
SHOOTING WITHOUT OVERLAYS

After each shot, indicators and information about the shot appear as an overlay. Clear the overlays if this information is not to appear while shooting.
- Tap Shoot View Options.

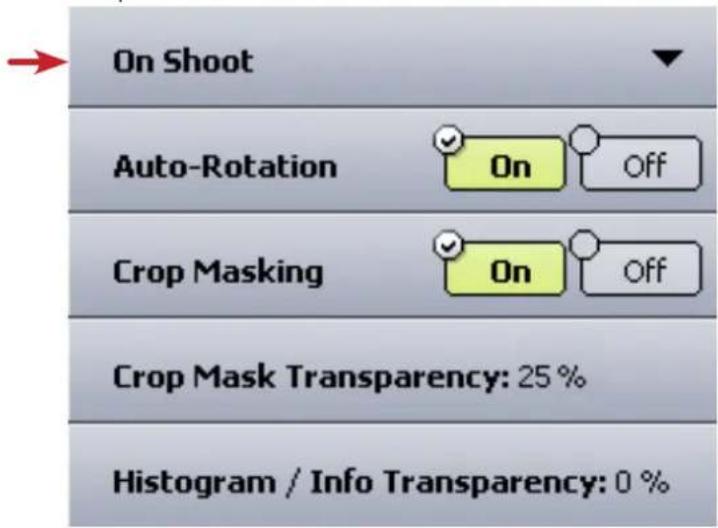
- Tap On Shoot.
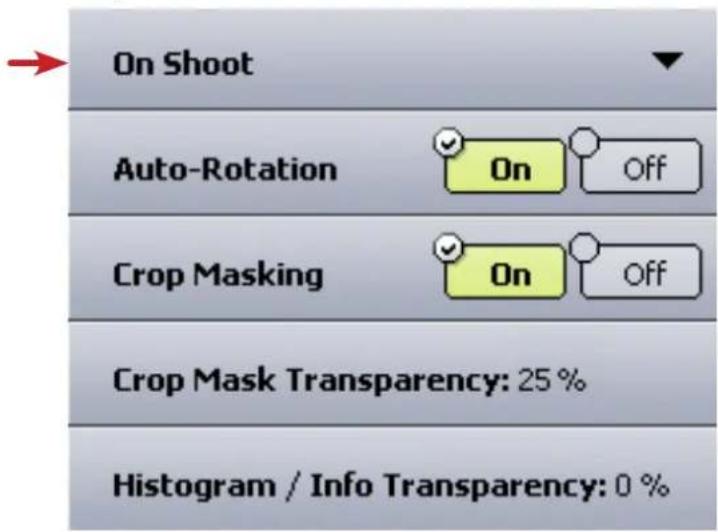
- On the Clear overlays bar, tap Yes.
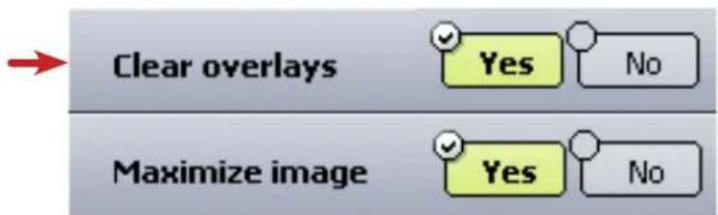
WORKING IN FULL-SCREEN VIEW
If desired, hide the menu buttons and view shots full-screen while you work.
- Tap Shoot View Options.
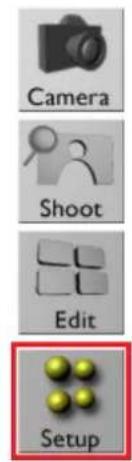
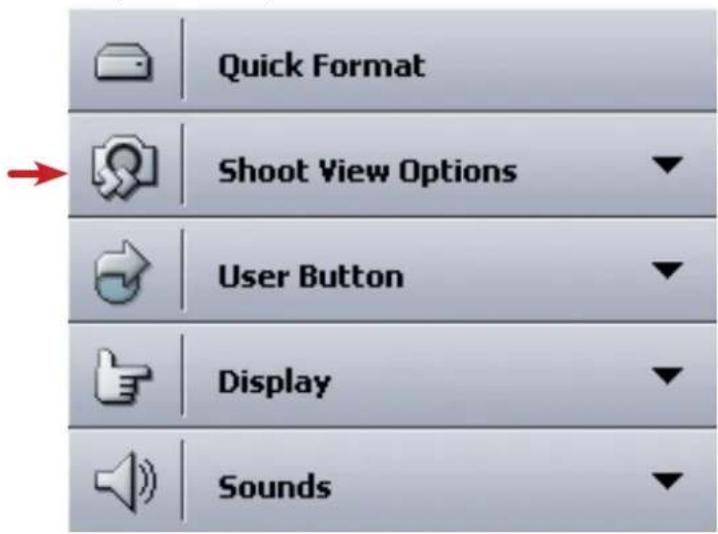
- Tap On Shoot.
- On the Maximize image bar, tap Yes.
To view the menu buttons when working in full-screen view, tap the image.
SETTING GRID ATTRIBUTES

To set the number of lines and line attributes for the grid:
- Tap Shoot View Options.

- Tap Grid Setting.
The grid options appear.
| Horizontal Grid Lines: 2 |
| Vertical Grid Lines: 2 |
- To set the number of horizontal or vertical grid lines, tap Horizontal Grid Lines/Vertical Grid Lines and tap the desired number of lines.
- To set the line type, tap Line Type and select the desired line type.
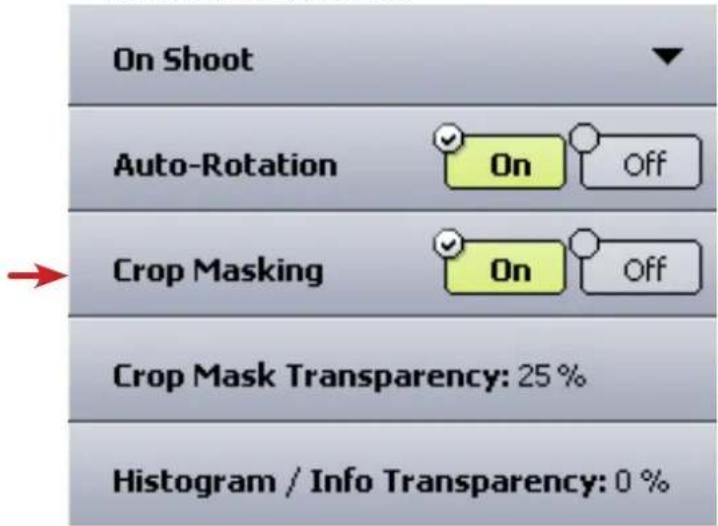
USING THE CROP MASK
To show or hide the crop mask while shooting:
- Tap Shoot View Options.

- In the Crop Masking bar, do one of the following:
• To view the crop mask, tap On.
• To hide the crop mask, tap Off.
ADJUSTING THE TRANSPARENCY OF THE CROP MASK
To show or hide the crop mask while shooting:
- Tap Shoot View Options.

- Tap Crop Mask Transparency.

- Tap the desired intensity, where 0% is opaque and 100% is completely transparent.

bar
| Category | Value (%) | |---|---| | 0 % | 0 | | ▶ 25 % | 25 | | 50 % | 50 | | 75 % | 75 | | 100 % | 100 |ADJUSTING THE TRANSPARENCY OF THE HISTOGRAM AND INFO BAR
- Tap Shoot View Options.

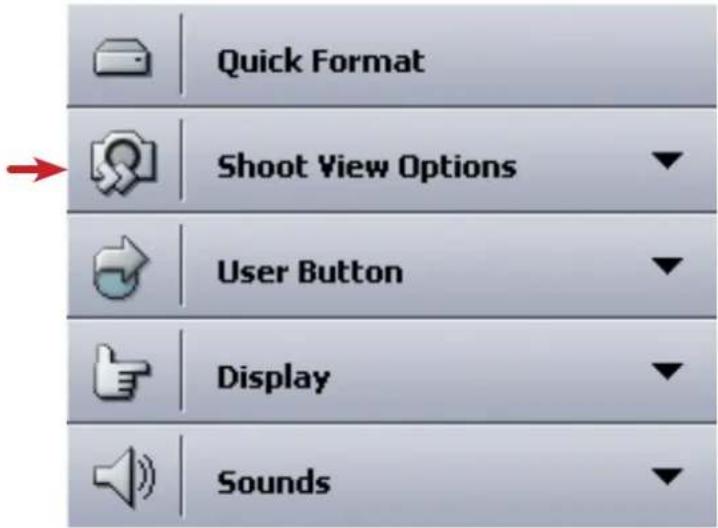
- Tap Histogram/ Info Transparency.
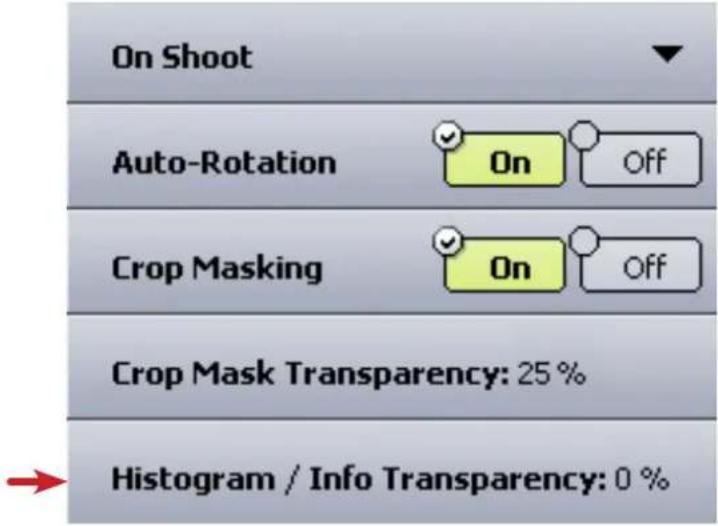
- Tap the desired intensity, where 0% is opaque and 100% is completely transparent.

bar
| Category | Value (%) | |---|---| | 0 % | 0 | | 25 % | 25 | | 50 % | 50 | | 75 % | 75 | | 100 % | 100 |SETTING THE EXPOSURE ALARM

To set the exposure alarm to show underexposed areas, overexposed areas, or both:
- Tap Shoot View Options.
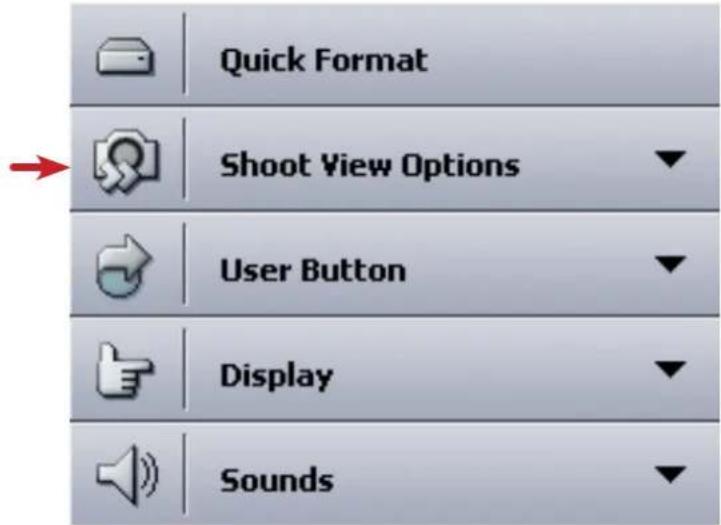
- Tap Exposure Alarm.
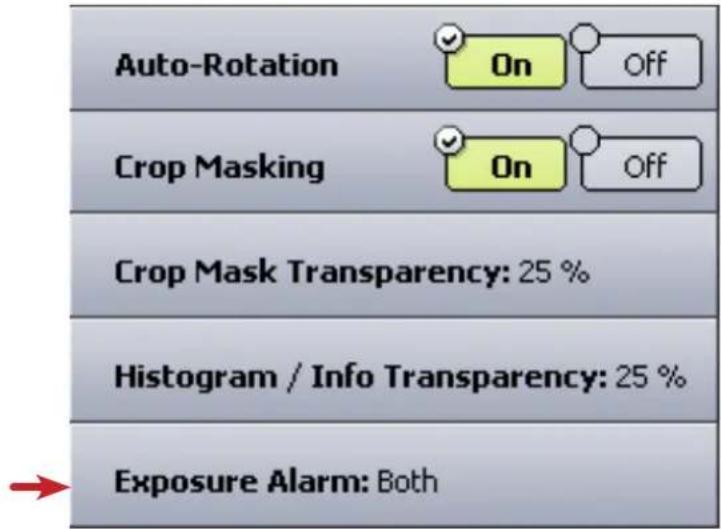
- Tap the desired setting.

RESETTING THE FILE NAME COUNTER

The Mamiya Digital System's digital back adds a number in sequence to the base name that is defined each time a shot is taken. The counter can be reset to zero at any time.
1. Tap File name.
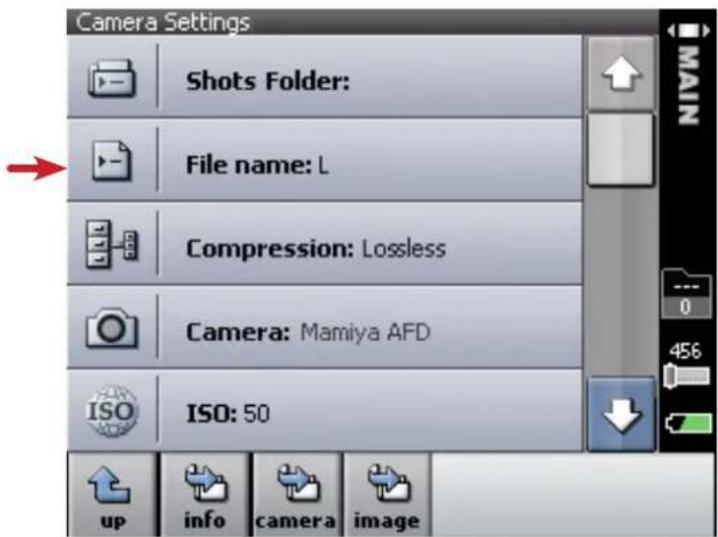
2. Tap reset.
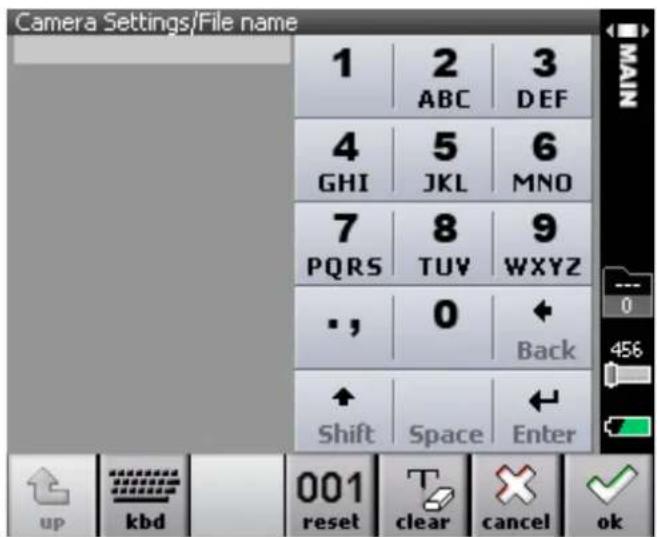
FORMATTING THE COMPACT FLASH CARD IN PORTABLE MODE
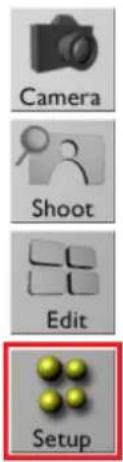
Use this procedure to perform a quick format of the compact flash card. Quick format is useful in the following circumstances:
• To erase all the data on the card.
- If the card is not performing as expected, for example, pictures cannot be saved on the card, saving on the card takes a long time, or if error messages concerning the card appear.
If the compact flash card is new, or if the compact falsh card has been used on a non-digital camera back, do not perform a quick format. Perform the procedure detailed in 'Formatting the compact flash card in MAC/Windows' in chapter 3.
* Formatting the compact flash card erases all data on the card.
1. Tap Quick Format.
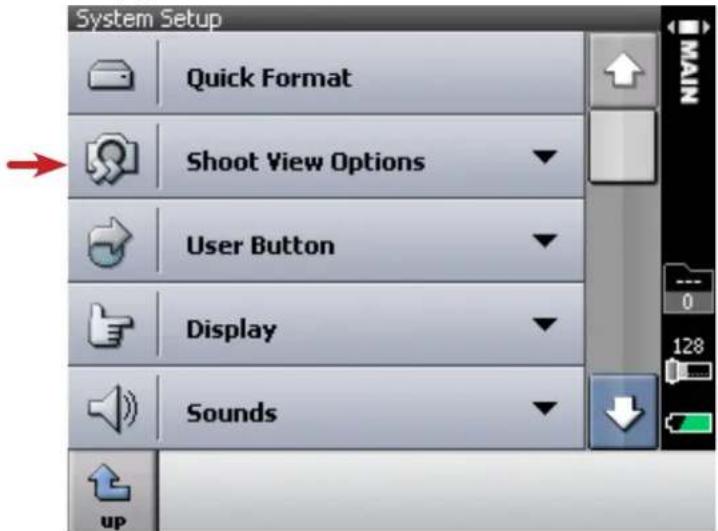
2. Tap the disk to be formatted, and then tap choose.
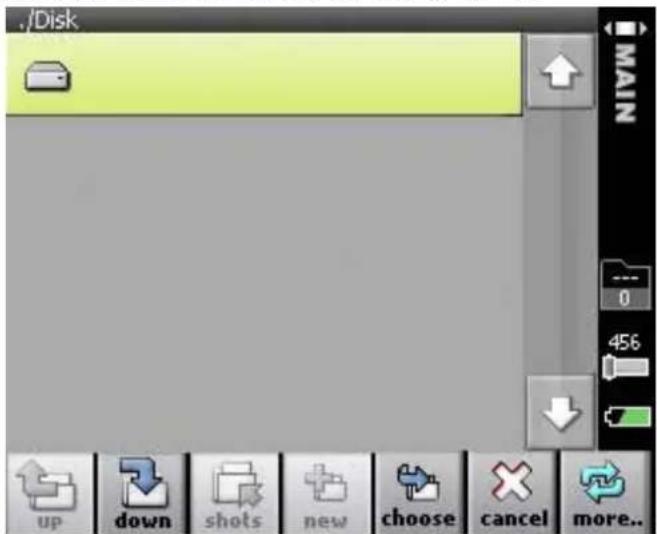

3. Tap ok.
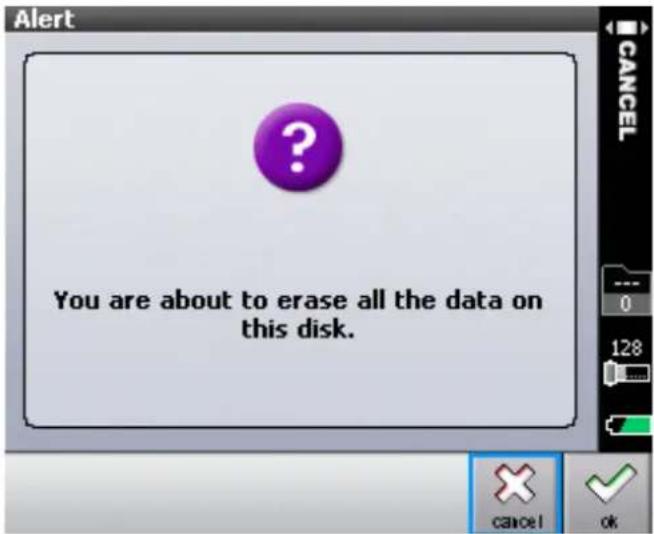
CONFIGURING THE USER BUTTON
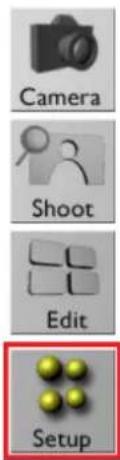
Configure the user button for viewing indicators or flagging images in Shoot view, and for flagging or deleting images in Edit view.
Configuring the User Button for Shoot View
- Tap User Button.
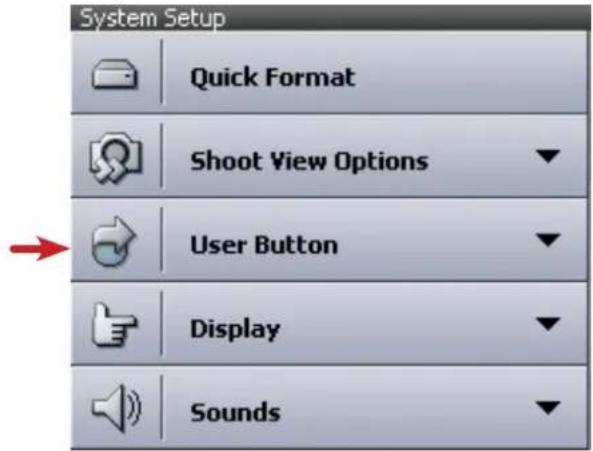
- Tap Shoot view.
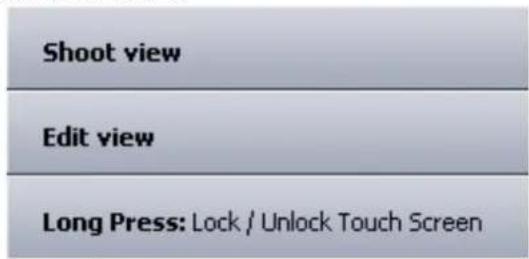
- In the Action bar, select Indicators or Flag.

- If Indicators were selected in step 3, tap Actions Settings and select the desired indicators.
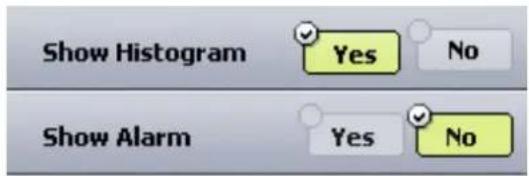
CONFIGURING THE USER BUTTON FOR EDIT VIEW
To configure the user button for flagging or deleting images:
- Tap User Button.

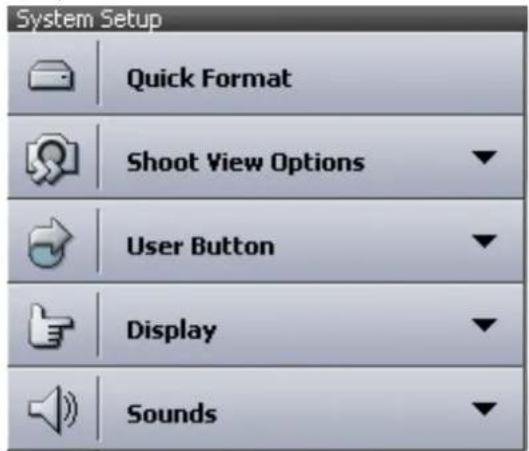
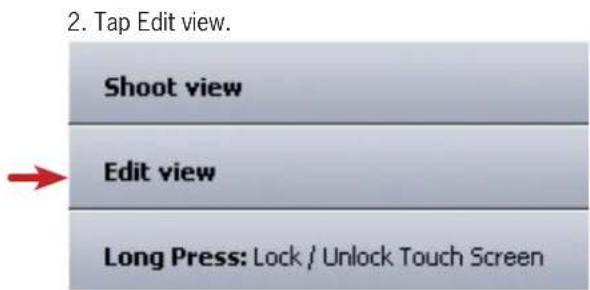
- Tap Flag or Delete.

CONFIGURING A LONG PRESS OF THE USER BUTTON

The User Button can be set so that a long press can either lock or unlock the touch screen, or turn the display on or off.
- Tap User Button.
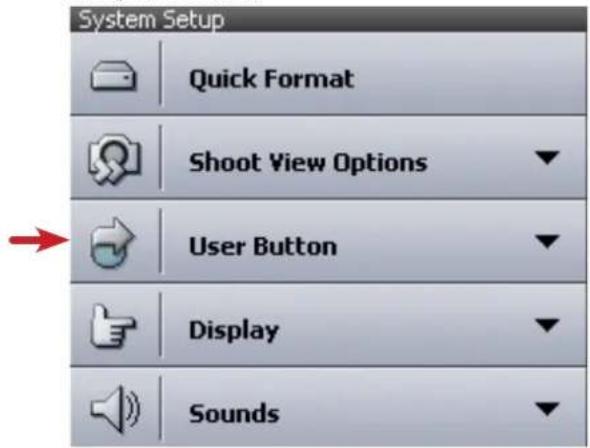
- Tap Long Press.
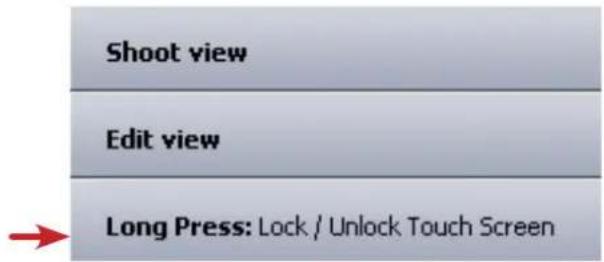
- Select the desired option
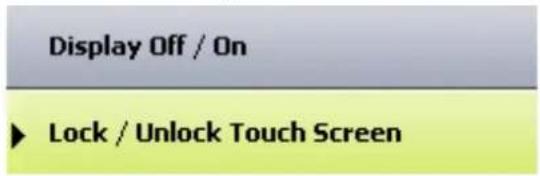
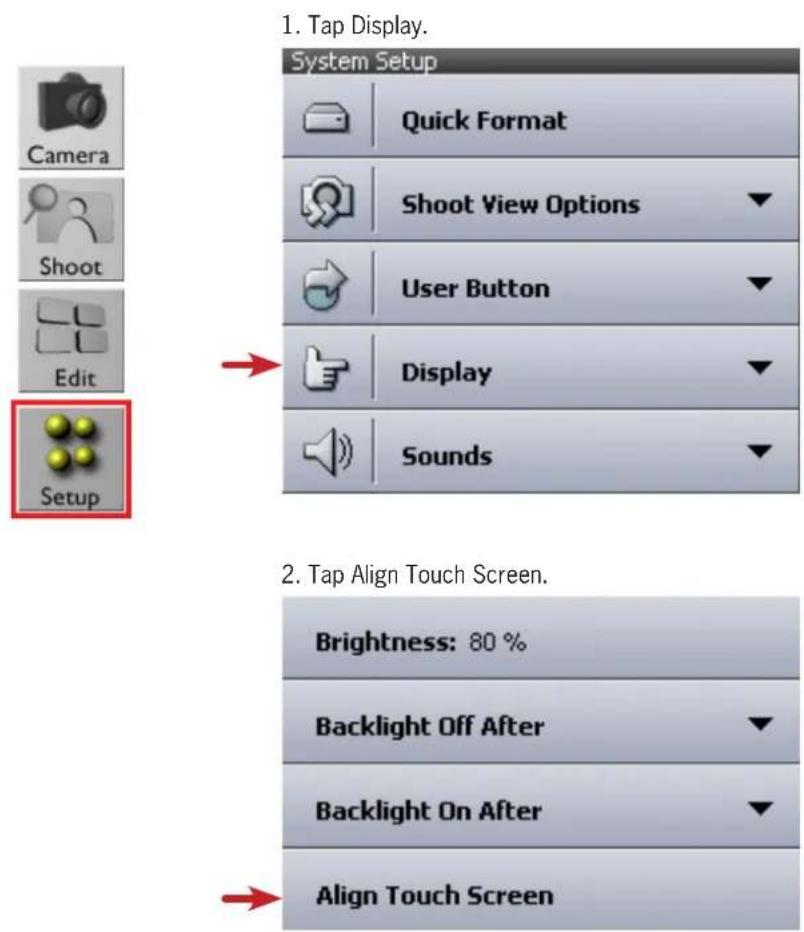
3. Follow the instructions on the screen
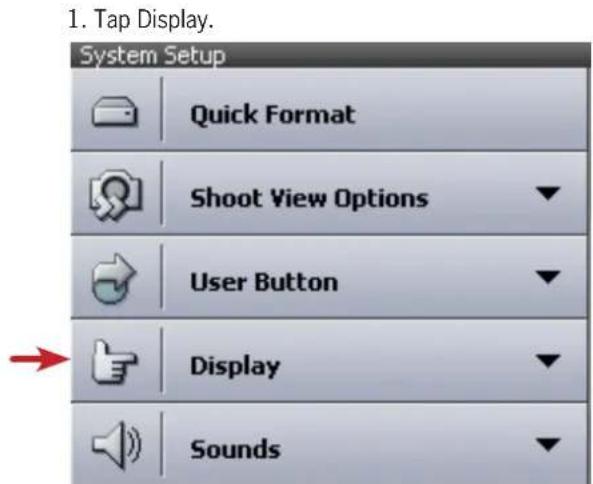
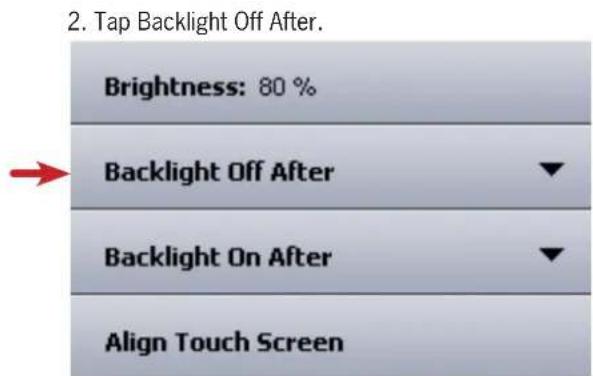


- Tap Backlight Off After.
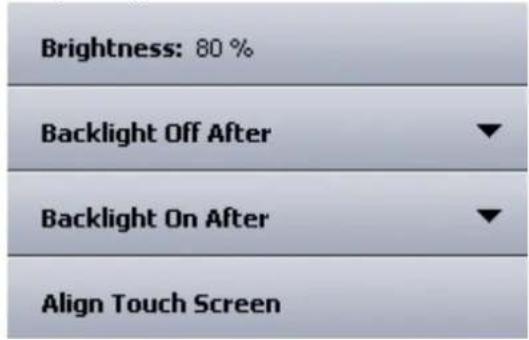
- Select the desired option.
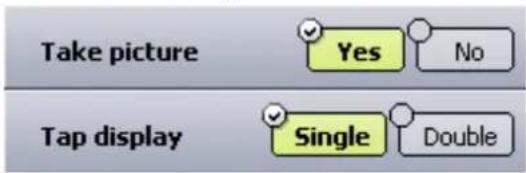
SETTING THE VOLUME FOR THE CAMERA BACK SOUNDS
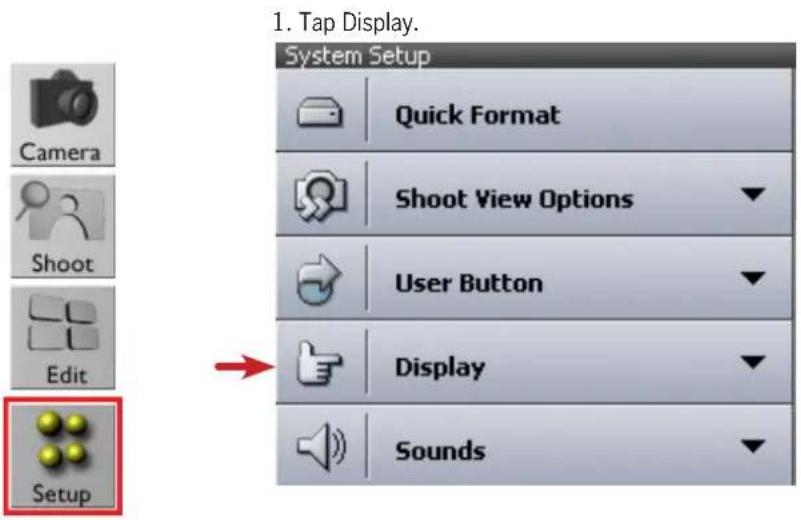
- Tap the desired option and set the volume as desired.
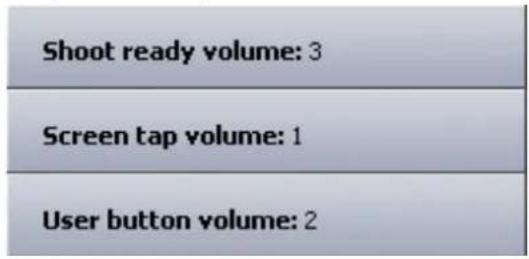
SETTING PERSONAL INFORMATION

1. Tap Owner Information.
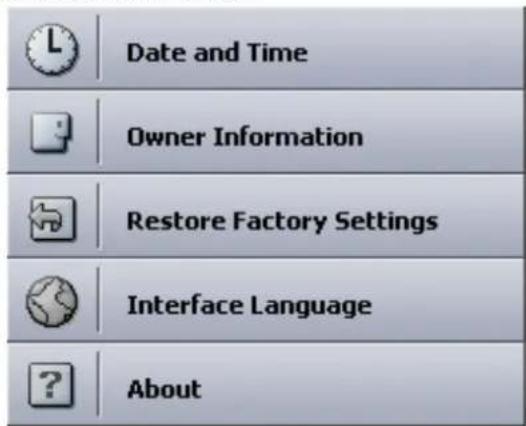
2. Tap the desired option and set the volume as desired.
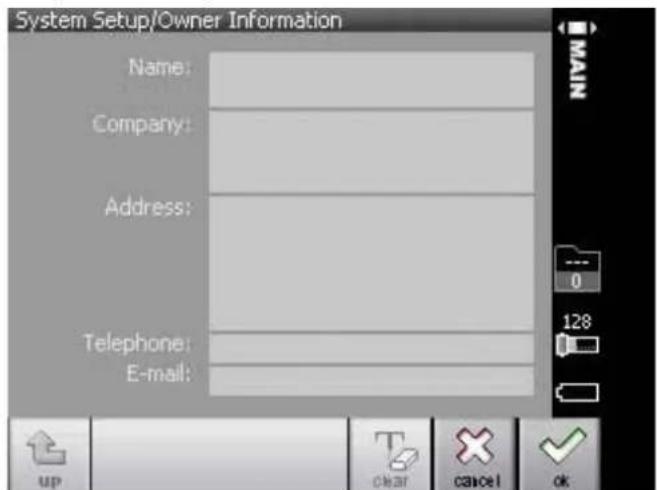
3. Use the virtual keypad to enter the desired information, and tap ok.
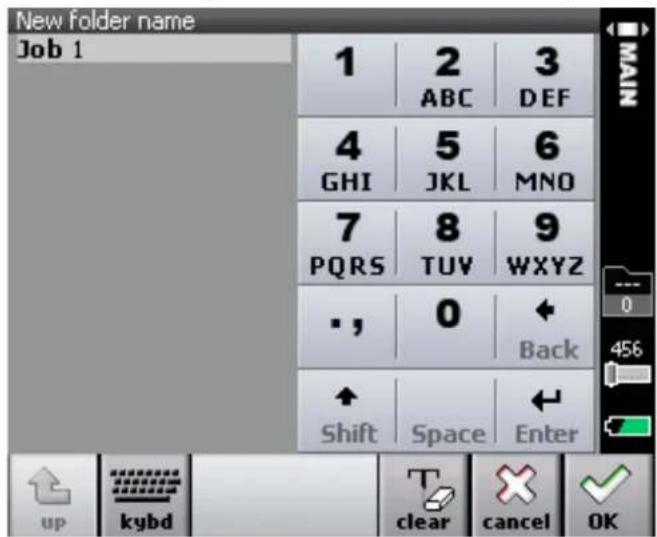
RESTORING FACTORY SETTINGS
- Tap Restore Factory Settings..
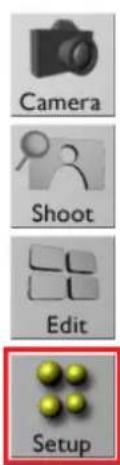

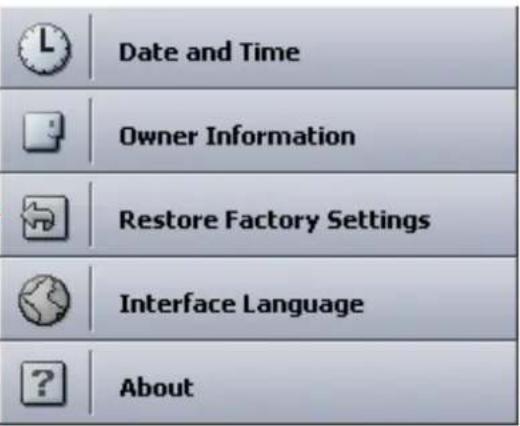
- Tap ok.
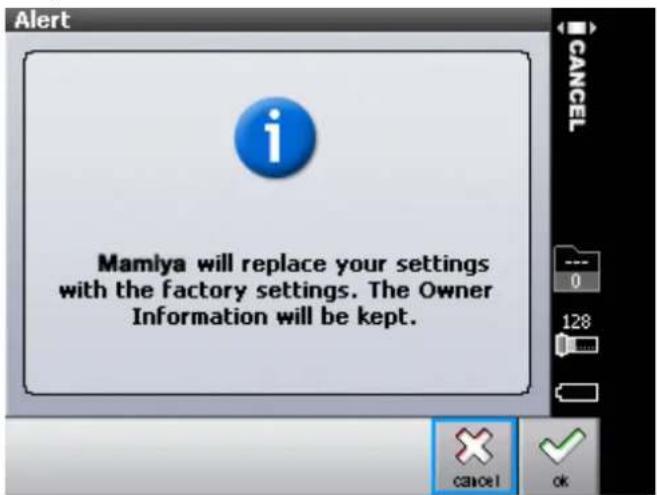
VIEWING THE DIGITAL BACK

Tap About.
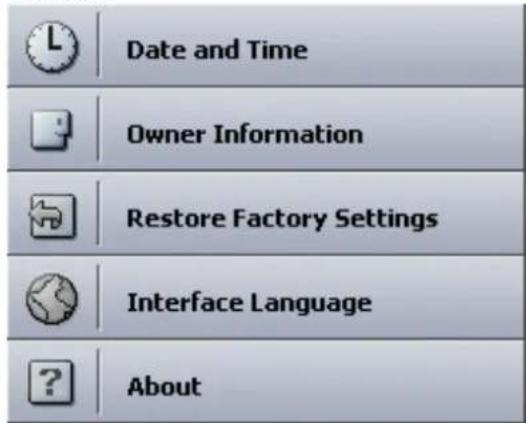
The Mamiya DM System's digital back information is displayed on the About screen.
mamiya
Firmware version: 4.960
Interface version: 1.960
Total Frames: 14
Copyright ©2010 Mamiya Digital Imaging Co., Ltd. All Rights Reserved
11
USING THE SOFTWARE
Activation.... 132
The interface.... 133
Toolbars.... 135
Browser.... 136
Tool palate.... 137
Library/ Capture/ Color.... 138
Exposure/Compose.... 139
Details/ Adjustment.... 140
Process Recipe/ Batch.... 141
Organising the workflow/ Importing images.... 142
Exporting files.... 143
Organising Images.... 144
Moving to folders.... 145
Working with albums.... 146
Tethered capture.... 147
Using the white balance tool.... 148
Color balance.... 151
Adjusting colors.... 152
Optimising exposure.... 153
Managing exposure using curves and high dynamic range.... 156
Managing highlight and shadows.... 158
Variants.... 159
Cropping an image.... 161
Straightening and rotating an image.... 162
Sharpening an image.... 164
Noise reduction.... 166
Removing post-capture dust and spots.... 167
Megadata.... 169
Adding and resetting megadata to image files.... 170
Creating a process recipe.... 171
Processing completed images.... 172
About batch.... 173
Creating a web contact sheet.... 174
ACTIVATION OF CAPTURE ONE
Upon attaching your system to a computer, a dialogue box appears requesting product registration. Click yes and follow the registration procedure. To activate Capture One, connect to the internet.
Activation of Capture One DB is free and compatible with the Mamiya DM System. To activate Capture One 5 or Capture One PRO, you will need to obtain a license key.
Enter license code in the license activation dialogue box. Type in your details in the required fields to activate the software. Once entered, press the "Activate License" button and activation will be validated by Phase One's activation server. The software is now activated and ready for use!
Troubleshooting
If experiencing problems activating the software, follow the instructions provided in the application or visit our website for inspiration and troubleshooting:
http://www.phaseone.com/support
* When running the application, choose Digital Back only mode. This software is free and compatible with the Mamiya DM System.
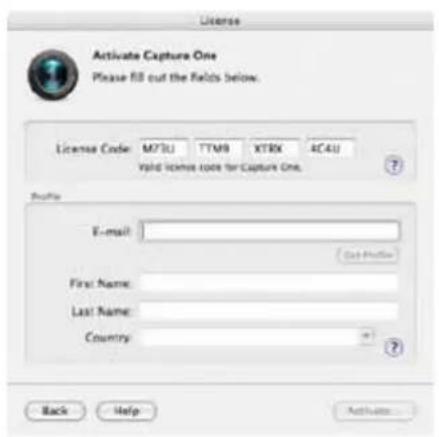
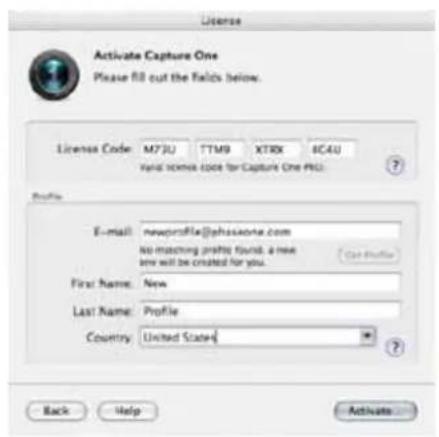
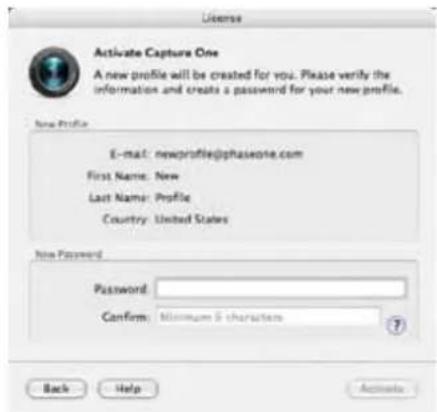
THE INTERFACE
The interface is divided into a number of elements, all providing a set of tools. Familiarize yourself with these elements and the terminology to make this guide clear in its meaning.
The image to the left provides an overview of the interface elements.
Interface explanation
Menu
Similar to other applications, Capture One has a menu structure, where key features are listed and can be operated from.
Toolbar
Below the Menu lies the Toolbar. The Toolbar contains buttons for the most common features in Capture One. The Toolbar can be customized to display only the controls required, or simply hide the Toolbar, which provides more room for images.
Cursor tools
The Cursor tools are part of the general toolbar and one of the most vital and useful collections there within.
The Cursor tools give you immediate access to the most used tools with just the click of the mouse.
The Cursor tools gives access to a number of closely related sub-features (e.g. zoom in and zoom out). The Cursor tools can be activated by simple keyboard shortcuts. Read more on this in the Shotcuts section.
Holding down the 'Shift' button when using a given Cursor tools keyboard shortcut allows cycling through the Cursor tool sub-features.
Trash
When deleting images, the image file will be placed in the session's trash folder, but can still be retrieved from the Trash. Files will not be permanently deleted unless moved to the computer's trash or you select "Delete Permanently" from Capture One.
- To place the files directly in the OS Trash, hold down CMD+Delete. To delete permanently, press Shift+CMD+Delete.
* By holding down the 'Alt' on MAC and use a given Cursor tools keyboard shortcut you activate the 'opposite' cursor tool once, without changing the Cursor tool feature permanently.
THE INTERFACE
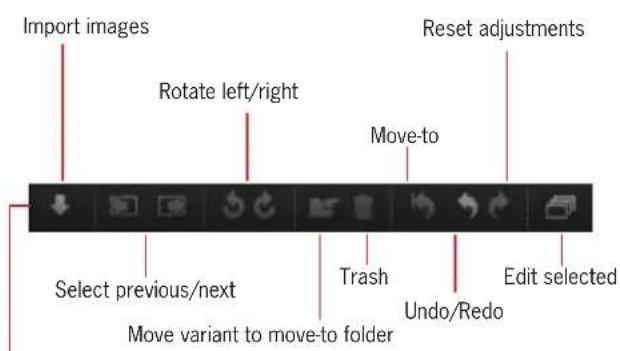
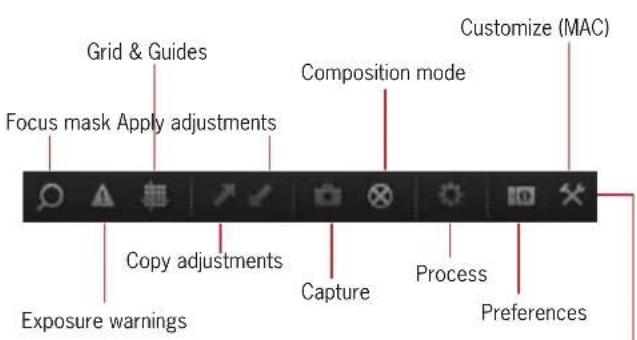
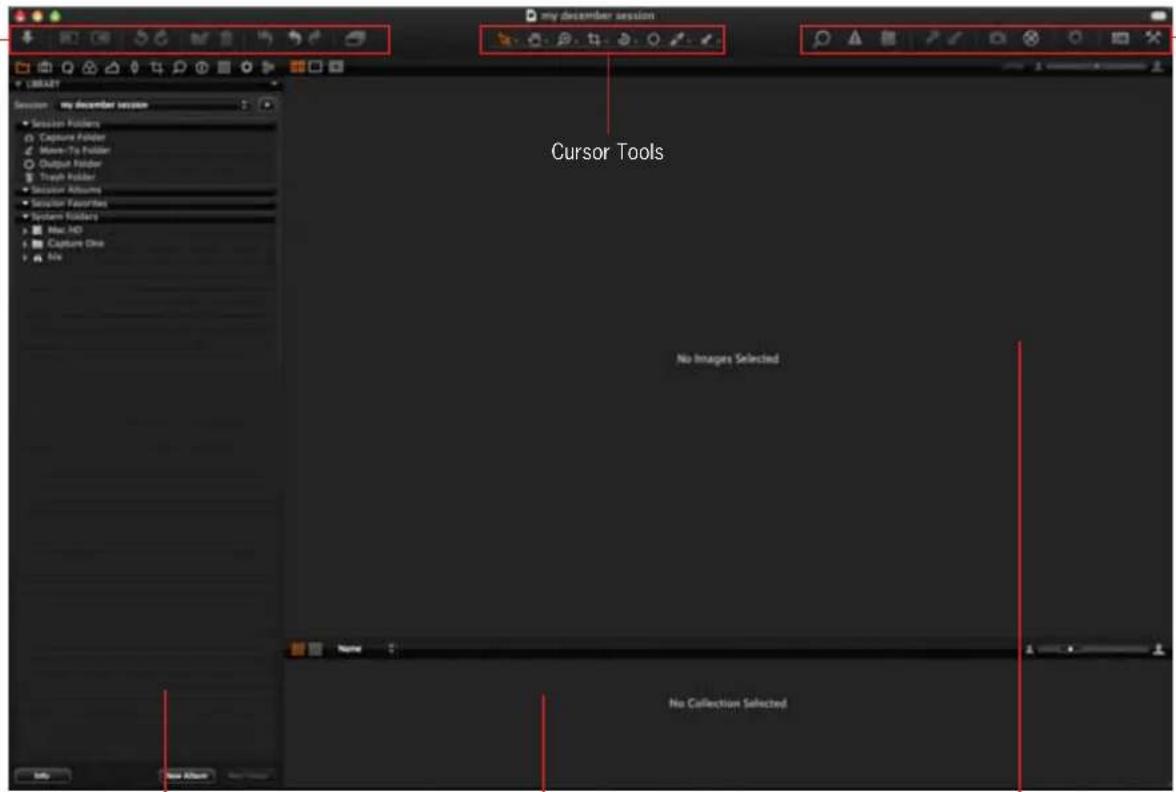
Tool Tab The Browser The Viewer
VIEWER TOOLBAR
The Viewer toolbar provides the option to view a single image or multiple images at once. The zoom level of the images can be controlled. In the center of the Viewer toolbar, the RGB and Lightness, or CMYK readout values are available.
Viewer
The Viewer is the largest element in Capture One, here the images can be viewed and the effects of the adjustments can be checked.
Up to 12 images can be seen simultaneously in the Viewer. With tools such as Compare Item and shortcuts for synchronized zooming and panning, image comparisons can easily be done.
To create more space for the Viewer, hide the Tools and Brower, which provides close to full screen viewing of the images and more room for other interface elements.
The top-left Icon of the Viewer allows choice between one or multiple image viewer.
The Image exposure parameters
The parameters are right on top of the image, indicating the values of RGB.
The last digit is a Lightness or Luminance value, a value created to illustrate the dark/light average of the different color channels, eg. in RGB.
The darkest will be 0, the clean white will be 255. this scale could also be compared to the HS scale. If using CMYK gamut, the value shown will be the CMYK values..
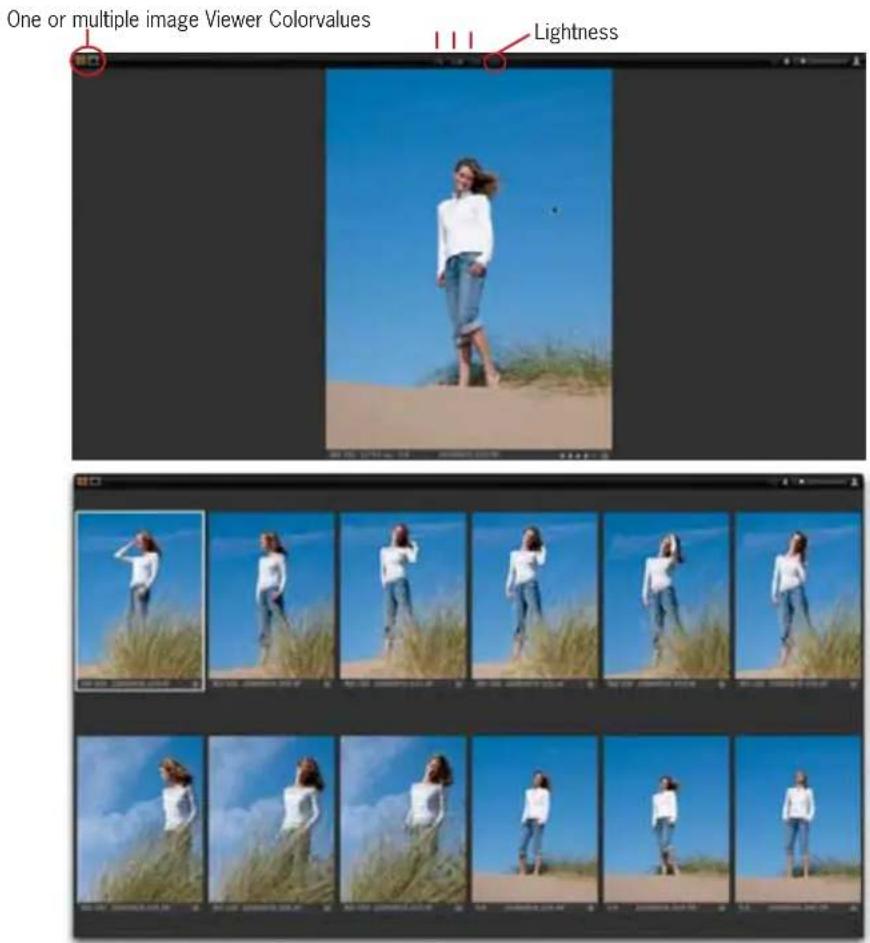
BROWSER
Thumbnails of all recognized images in a given folder or Album are shown in the Browser. The browser will show Thumbnails as they are corrected, and show the entire view and mask if the image is cropped. Use the Browser to navigate images in a collection and to select images. Many actions can be performed in the Browser, such as rating images and some cursor tools can be used directly on the thumbnails..
By hiding the Browser there is more space for the Viewer. Place the Browser next to or below the Viewer, if desired. Play with the configurations to find out which is most suitable.
Browser toolbar
The Browser toolbar controls how the thumbnails in the Browser are displayed. Here you can choose to show the thumbnails in grid or list mode. Grid mode shows thumbnails, whereas list mode shows the images in a tabular format along with key exposure information.
The size of the thumbnails in the Browser toolbar can also be controlled.
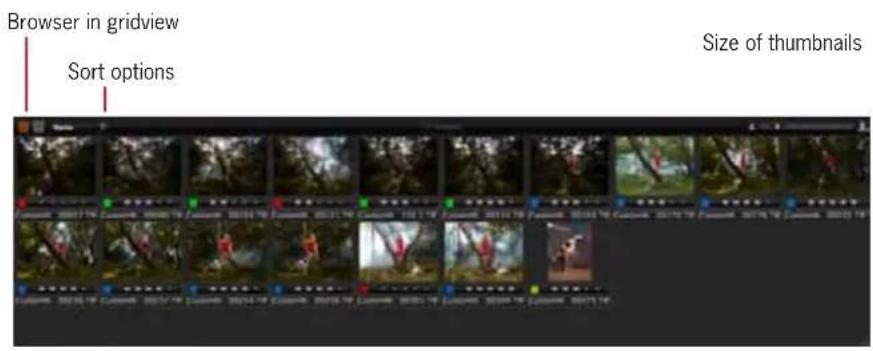
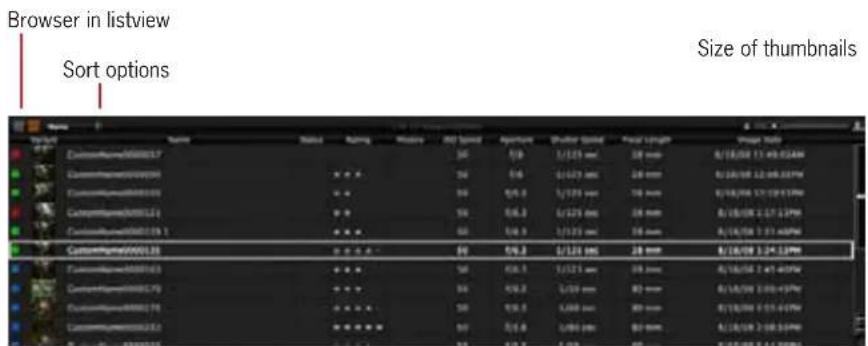
TOOL PALETTE
Tool Palette is the common name for a group of tools forming an interface element. The tools found here give access to controls for adjusting the images. Here you can also browse through albums and process adjusted raw files. This is your image control center.
The Tool Palette consists of a number of Tool tabs, which, when read from left to right, outlines the most favored workflow sequence. The Palette can be placed to the left or right of the interface or hidden.
Tool Tab
There are many Tool Tabs, each giving access to features that will allow, amongst other things, the adjusting and processing of images.
Each Tool Tab contains a number of tools. Each tool has its own set of controls to adjust the image file.
The color space of the histograms
Placed at the top of several of the Tool Tabs is a guidance histogram. This histogram provides an up to date visualization of the exposure in the image.
The histogram reflects the output RGB color space.
If the image has been changed into BW, then the histogram displays monochrome. It is worth noticing that even though the histogram displays monochrome, the processed image will still be RGB.
All tools in the Tool Tabs of Capture One have up to 3 automation shortcuts: Auto, Presets, Reset and Local Copy
The Auto feature optimizes the image from the controls in the specific tool. Reset cancels all changes made to controls in a given tool. The Presets feature lets you define and save tool settings for later use.

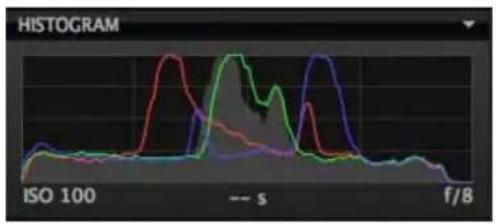
LIBRARY/ CAPTURE/ COLOR
The Library tool allows access to the images within the Albums you have created as well as to any image collections stored in folders on a computer or networked resource. The Library is very similar to the file browser in the operating system (Finder on Mac, Explorer on Windows ^® ) and is closely connected with the file browsers in the operating system. Browsing through the image collections is simple due to the hierarchical tree structure of the library.
The Library tool allows you to designate an Output folder, a Move to folder, a Capture folder and a Trash folder. More information on these folders will be discussed later on in this guide.
Quick
The Quick tool tab includes a selection of key tools which gives easy access to tools for fast image enhancement. In Base characteristics you can choose between different ICC camera profiles and film curves. An ICC profile is automatically applied according to the make and model of the selected RAW file.
We have created several specialized ICC profiles to many cameramodels, to fit all needs.
Use curve to set the basic behavior of the pixels, standard/high/low contrast film or linear(especially for scientific photography).
Adjusting the white balance and exposure and processing the selected image can be done from here.
* The ICC file will follow the primary selected RAW file not all files in the folder. To apply an ICC profile to many RAW files at once, use Copy/Apply Adjustments.
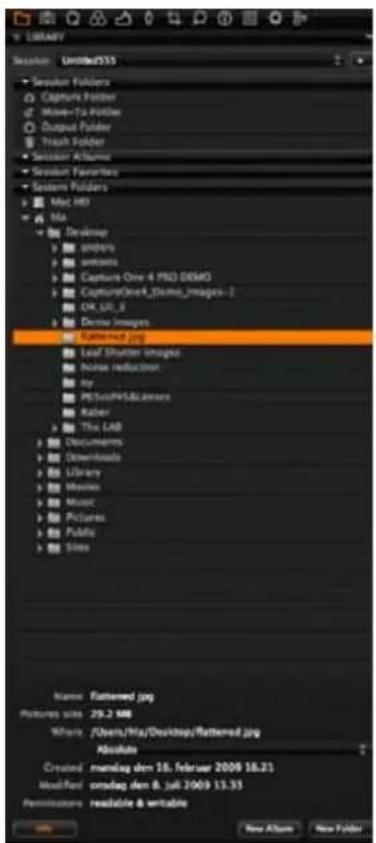
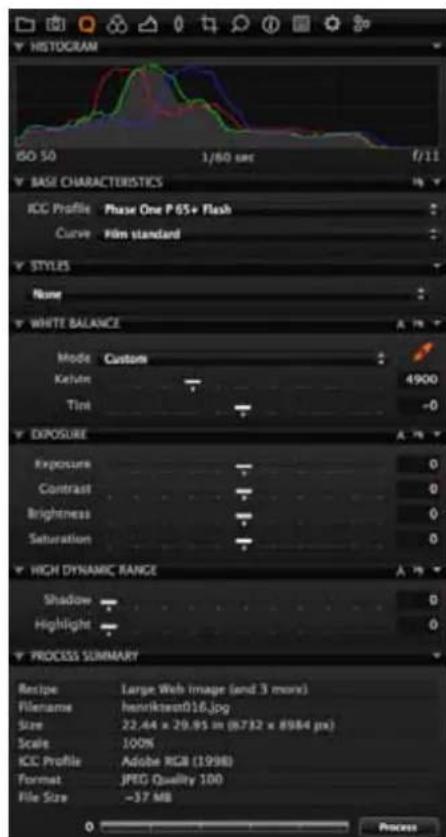
EXPOSURE/ COMPOSE
Exposure
The Exposure tool tab provides controls to adjust the exposure of images. There are basic controls (e.g. Exposure Compensation) which affect the whole image, and there are also advanced controls (e.g. Curves) which allow for fine-tune adjustments. Levels and Curves can adjust overall lightness values, but also in the individual Red, Green and Blue color channels.
Composition
The Composition tool tab provides the crop feature and it's related settings. Here aspect ratios can be applied to images to meet output format needs. Rotate and Straighten tools are also available from this tool tab.
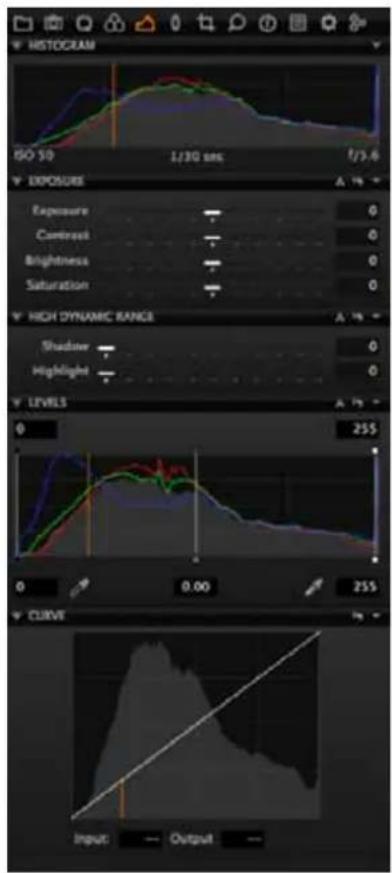
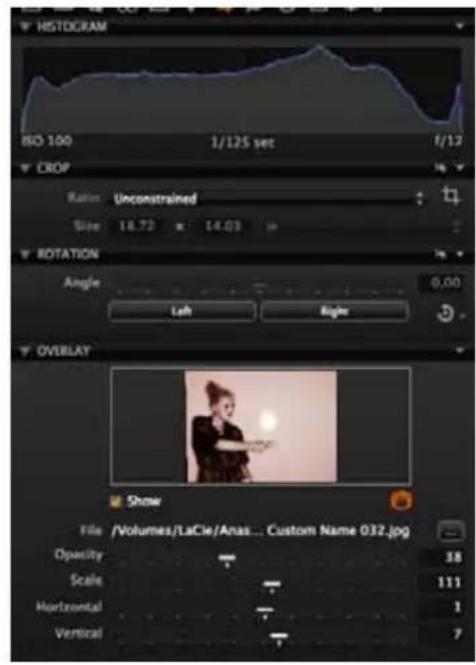
DETAILS/ ADJUSTMENT
Details
Image sharpness and noise reduction is controlled from the Details tool tab as well as the PRO features Moiré and Clarity.
The Details tool tab includes a navigation tool and focus tool that allow a quick check of the details anywhere on the image at any zoom level.
Use the Focus window to keep track of the sharpness in 100% view, and the Spot Removal tool to get rid of dust and spots.
Adjustments
The Adjustments tool tab provides a clipboard with image adjustments which can be copied from one image and applied to other images. The default copy contains only the parameters where actual adjustments are made to the settings of the source image.
Here is where one can deselect specific adjustments not required for other images and save a set of adjustments as a Style for later use.
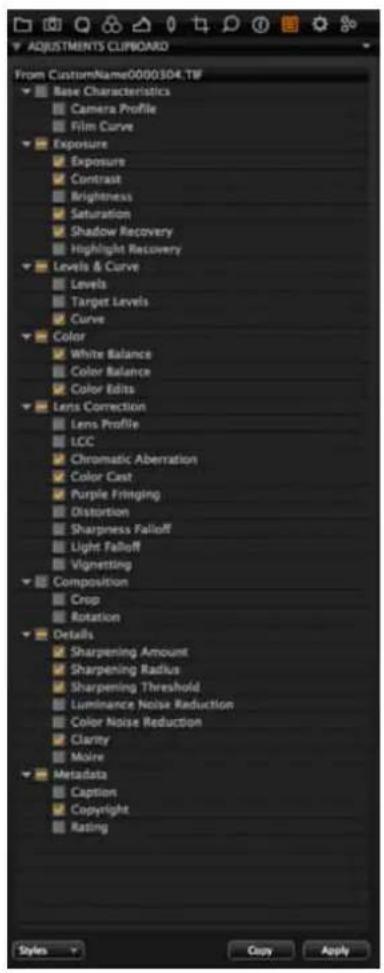
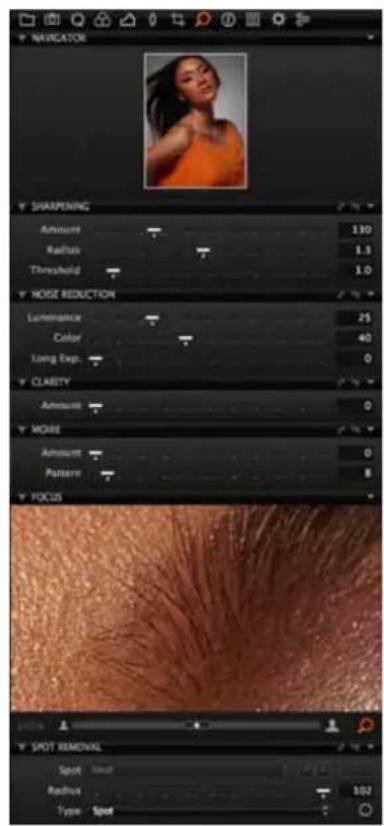
PROCESS RECIPE/ BATCH
Process Recipe
This tab allows the process parameters to be defined and for the images to be processed.
A process Recipe can be defined; parameters such as file formats, quality, color space, resolution, and size can be configured.
You can decide what metadata will be included in the processed image file and it is also possible to systematically rename the output files, as desired.
Batch
Enable the user to see which images are in queue for processing and which images have been processed previously within the Batch tool tab. The order of processing can be changed by drag-and-drop; images can be deleted from the batch queue by marking and pressing backspace. Upon pressing Process, the batch will start.
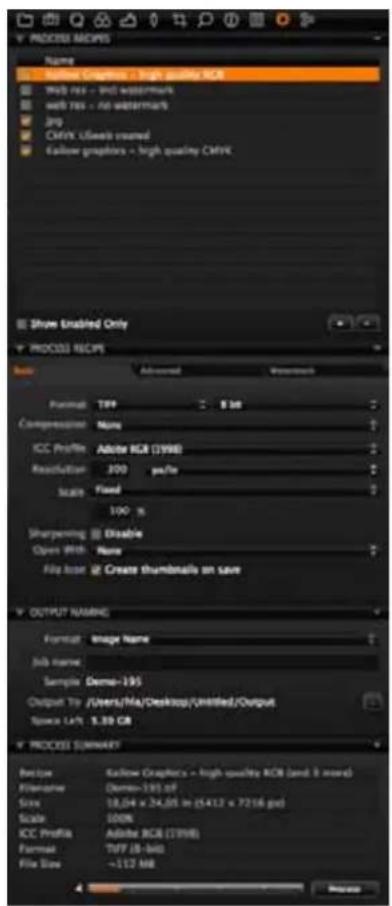
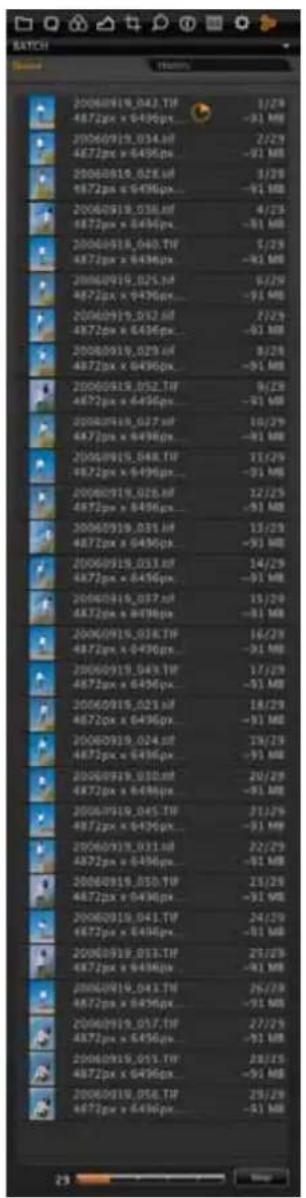
ORGANISING THE WORKFLOW/ IMPORTING IMAGES
Organizing the workflow
The Library tool tab in Capture One is where all file import and file and folder organization takes place.
In the folders section of the Library Tool Tab, navigate through the folders to one that contains image files. When the folder is highlighted, thumbnails of the image files will be created and displayed in the browser.
The Library Tool Tab provides an overview of all folders on the local machine and even on the network if sharing has been enabled.
Importing files
How to import images
Browse to a disk containing image files on a local or network computer or by importing directly from a memory card in a card reader.
Choose File > Import images or select the import images button to begin the import process. Immediately, a large dialogue box appears showing a preview of files to be imported. This dialogue box also provides a range of options from which to choose.
Inserting a memory card into a card reader will also bring up the import dialogue window. The Import window offers a range of options to make importing a quick and straightforward task.
It is important to remember that you are importing images from one location to another. Create or define a folder to which the files will be imported to. This can be done manually or through the Locations tab on the file importer window.
Capture One can automatically create subfolders, named by date or userdefined. When importing you can also choose to rename the files, as they are imported from the camera or cd/memorycard. The file names can be changed by doubleclicking on the filename in the browser or when exporting the files.
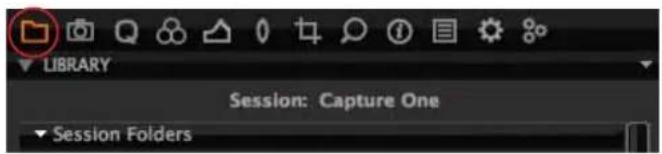
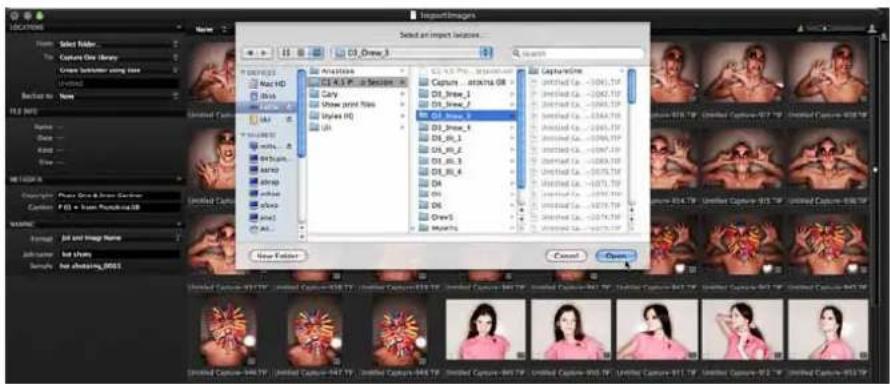
EXPORTING FILES
How to export files
Files can be exported in several ways from Capture One. The Original image files are never changed by the application, so they can be exported to another application or folder at any point.
It is important to emphasize that when exporting files – the image file is processed meaning a new file is created based on the image file containing the editing added. After process and export to another folder the original raw file can be found in the original folder.
Processed files can be exported in a range of formats that can be opened by industry standard imaging applications. Read more on fileformats in the output chapter.
All files can be exported to any folder on the local machine or connected network. Copyright and captions can already be added at import.
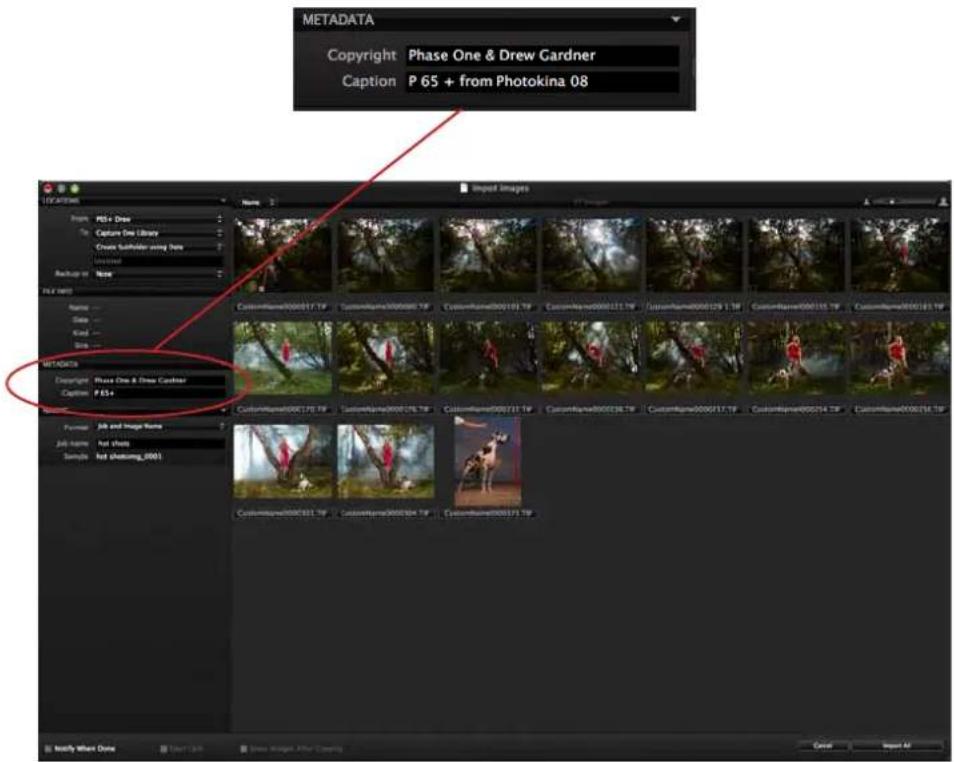
ORGANISING IMAGES
How to organise images
Capture One allows the organisation of images in a variety of ways.
We recommend importing images to a folder on a main drive using the importer dialogue (File > Import Images). At the same time, the images can be copied to an archive or backup disk for greater data security.
The images should be edited. Move the best examples or those with the highest rating to a separate folder using the [Move To] function.
Once rated and moved, the best images can be quickly optimized before proofing to clients as JPEGs or creating web gallery. The web gallery function built into Capture One is extremely quick (File>Make Web Contact Sheet). The web contact sheet will, in addition to the images, show caption and copyright information, which can be added when importing files.
Once the client has approved or selected the best images, they can be further refined using the built in tools.
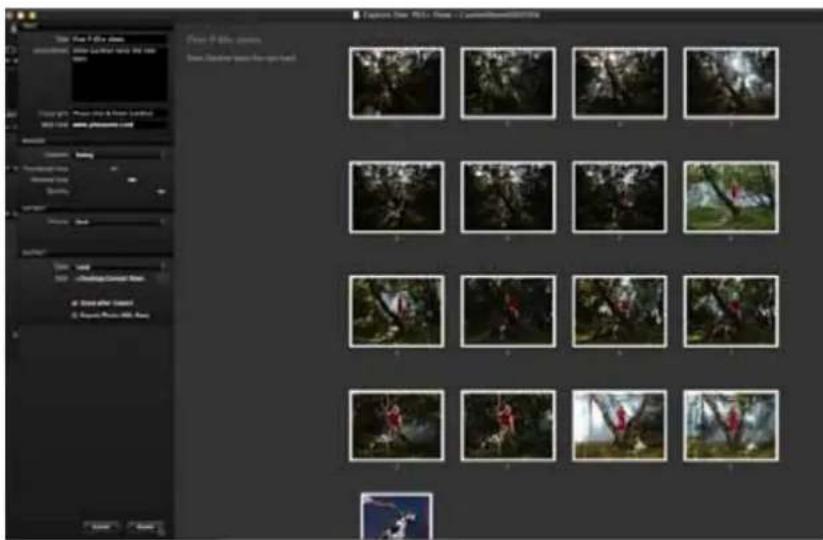
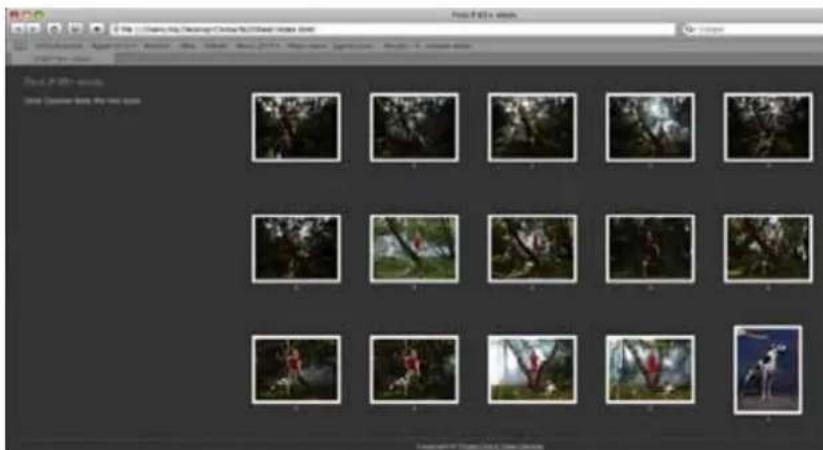
MOVE TO FOLDERS
About Move To Folders
Move To folders help create an effective and extremely rapid workflow by moving great images to a separate folder, rather than rating, selecting and then moving the images.
How to use Move To functionality
Select the folder with your image files, Right Click > Add New Folder.
Name it appropriately (Select, Best, Keepers) and then select it, Right Click > Set as Move To Folder.
When moving through images in the main image folder, any file can be selected and moved to the new folder by clicking on the Move To button or using Cmd/Ctrl J
To see the images that have been transferred to the Move To folder, go to Library > Application Folders > Move To Folder
An alternative way of working is to create a single folder that will always serve as the Move To for all images. Follow the same procedure or simply navigate to a chosen folder, highlight and Right Click > Set as Move To.
Output Folder
In the same way that Move To folders can be specific to a group of images or a nominated folder on the hard disk, the output or process folder can be set in the same way, depending on the preferred way of working.
To add it as a sub folder for a group of images, follow the procedure for Move To above and when Right Clicking, choose 'Set as Output Folder'.
To create a single output folder on the hard disk, double click on
Application Folders > Output Folder.
A dialogue box will appear. Navigate to the folder you wish to use for your outputs or processed files.
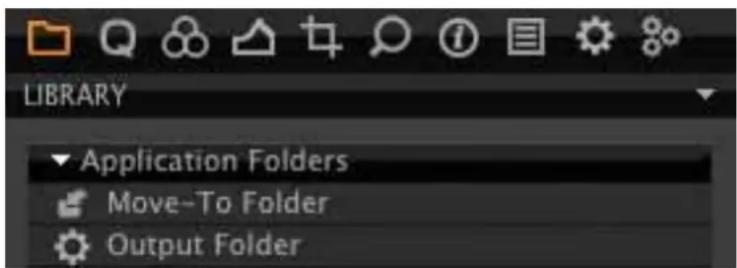
WORKING WITH ALBUMS
Album folders are virtual collections. Using albums is an easy way to compare images from different folders, without having to place the images in the same folder. In addition to this, albums only references images from folders, it doesn't copy them. Making changes to images in albums will however affect the source image.
How to create a new album
A new album can be created in several ways.
File > New album or Library Tool panel: Right click > Add New Album
How to add images to an album
Images can simply be dragged individually or as a group, to an album. When the images are moved a variant is created, so the original remains in its location.
How to remove images from an album
Select the image to be removed and hit the backspace/delete key or right click on the image and select delete. Only the variant in the album is deleted, the original image file in its folder remains.
How to move images between Capture One and the OS file browser
Images can be dragged and dropped from the Capture One Browser into the OS file browser and vice versa. Using the Option key during the drag/drop operation allows you to switch between move and copy operations.
If the image movement is initiated from Capture One then the associated settings file will also be moved along with the image. Your image settings changes will not be lost.
If the image movement is initiated from the Finder then the associated settings file is not moved; unless you manually move the settings separately any changes will be lost when reading the image from the new location.
How to remove an album
Highlight the album and click Edit > Delete Album. Alternatively, right click > Delete.
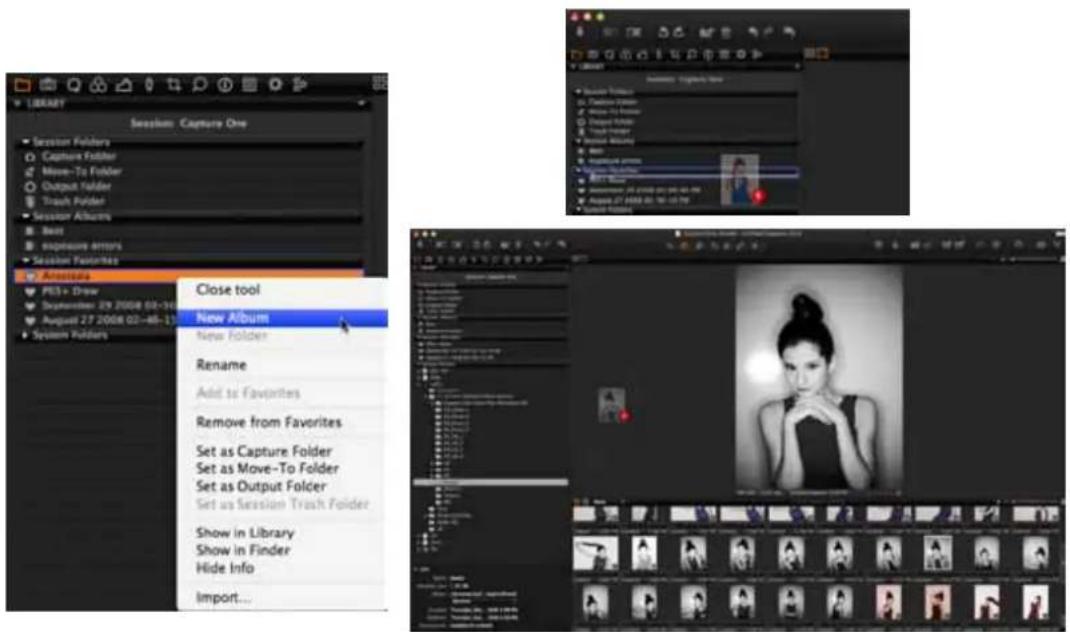
TETHERED CAPTURE
Introduction
With Capture One you can speed up the creative process by capturing images directly to the computer and have them appear almost instantly in the application.
Tethered capture
Capture One allows tethered shooting with the Mamiya DM System which means you are shooting images directly onto the computer without any interim storage.
To shoot tethered connect the Mamiya DM System to the computer using a FireWire cable. The digital back will automatically be recognized. USB can be used if necessary.
The Capture Tab is the control center for shooting tethered. To connect the firewire cable, see 'Connecting the firewire cable for tethered mode' section in chapter 7.
When shooting tethered select the folder where you want to store the captured images. This can be done directly from the Capture Tab or alternatively in the Library tab.
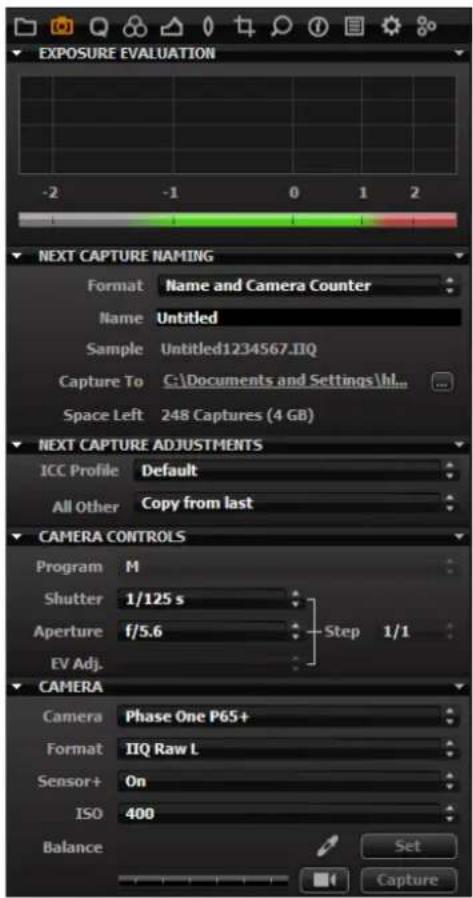
USING THE WHITE BALANCE TOOL
When the image contains a wrong color balance
There are many variables that can cause incorrect color, but a good starting point is to set the white balance correctly. Always bring a greycard to your shoot, if you want to make sure the images and camera can be controlled properly.
When to apply white balance adjustments to the image
The best practice is to set the white balance of an image or group of images before making other adjustments. When the white balance is set, then choose to add a color tone to affect the look of the image.
Using the White Balance controls in the tool panel
Mode
Provides a list of different white balance presets e.g. daylight, tungsten, fluorescent and such but also camera custom and shot, which is the white balance used by the camera when the image was shot. Advanced users may prefer to create their own or to choose alternative options.
Kelvin
Changes the color temperature of the image within the range 800 to 14000 degrees Kelvin. By moving the slider to the right, the image will become warmer (yellowish) and to the left cooler (blueish). To fine tune the green/magenta balance, it is necessary to use the tint slider.
Tint
Tint allows for fine tuning of the green and magenta balance. The scale on the slider represents actual Kelvin value, subject to slight variations from camera to camera.
* Capture One allows you to use your own camera profiles and third-party camera profiles for particular lighting conditions.
Load the profiles in the correct color profile folder for your OS, currently ColorSync on Mac OS X. These profiles will be available in the profile menu, once the application has been re-started. - Windows users may have to restart the OS for the profiles to be available.
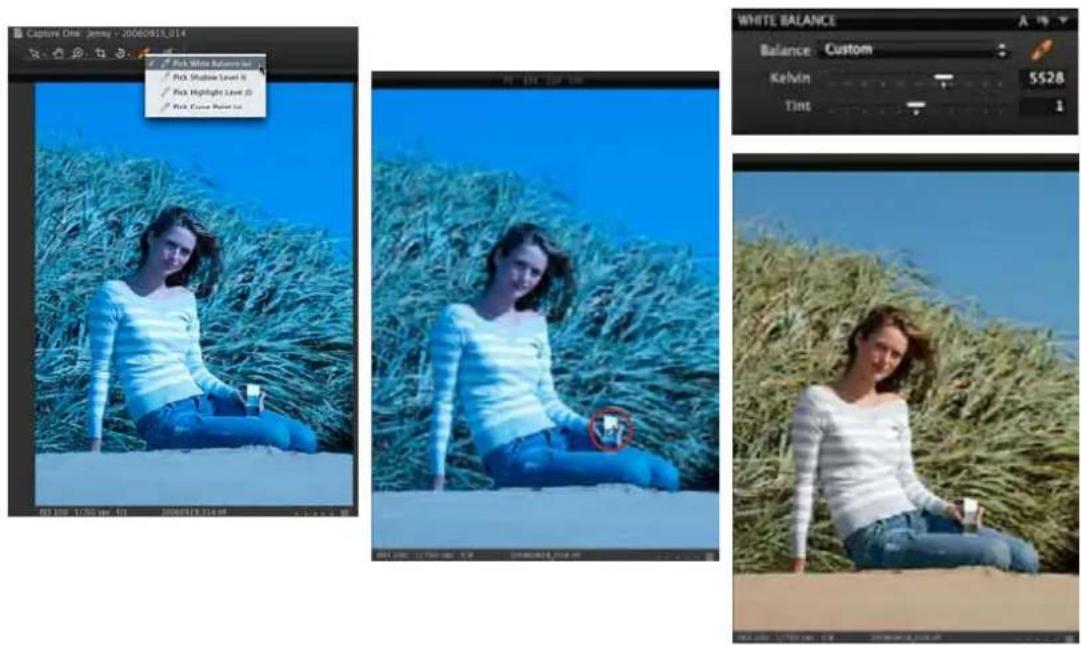
USING THE WHITE BALANCE TOOL
The best part of the image to use a the White Balance source
White balances should be created from a special white balance card. If unavailable, try to find an area that is neutral grey. Remember - the slightest color in the area will affect all colors in the image. Try to find a clean bright grey or neutral area, the darker the area is, the larger is the chance that there can be noise making it very hard to do a precise leveling of the colors.
How to White Balance images with the pick white balance tool
To do a 'click balance', select the white balance picker (w) in the tool menu bar, Quick or Cursor Tool bar. The button will go orange to confirm that it is active.
Select an area of the image that looks neutral (a grey or dark white area if possible). The color picker takes this value as neutral grey and uses that information to map all other colors.
Auto White Balancing images
Capture One has a built-in auto white balance. Select the image to be neutralized and then click the auto white balance picker. The image will be automatically corrected by the software.
To apply auto white balance to a range of images, first select the images to be adjusted, then click the auto white balance button.
How to get the 'as shot in camera' White Balance
Go to the Quick tool tab or the White Balance Tool Tab and select the Mode pull-down menu. Choose the shot setting and all selected images will revert to the white balance they were captured with.
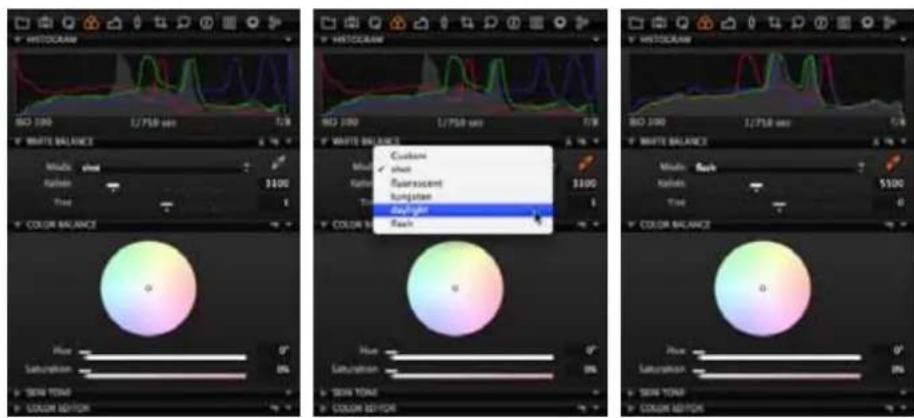

natural_image
Two side-by-side photos of a woman in outdoor setting with tall grass, one holding a small object (no text or symbols visible)USING THE WHITE BALANCE TOOL
How to apply white balance from one image to another
Select an image with the white balance and color balance settings you like. Copy them with Adjustments>Copy Adjustments in the menu bar. Select the images you want to modify and use the Apply settings button on the menu bar to paste the settings to the image.
* Images that are too dark can be lightened by up to 2.5 stops (made 6 times brighter). Bright images can theoretically be made darker by the same amount.
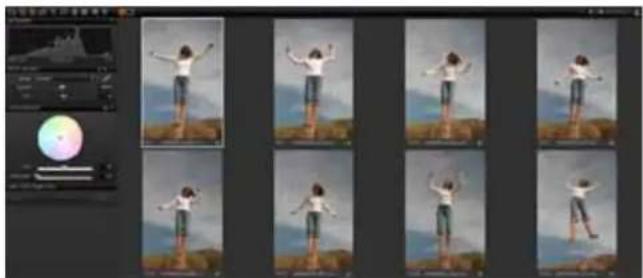
natural_image
Sequence of nine frames showing a person standing on a hill with arms raised, captured in various angles and poses (no text or symbols visible)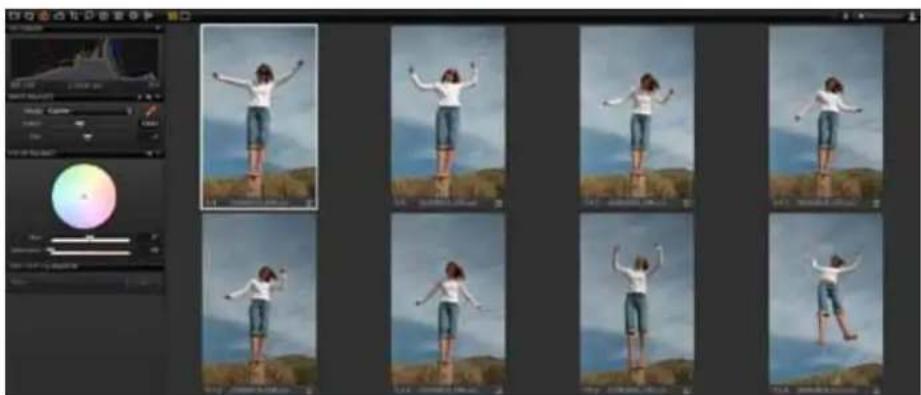
natural_image
Sequence of nine frames showing a person standing on a hillside against a blue sky, captured in a photo editing interface (no text or symbols visible)COLOR BALANCE
The Color Balance tool allows the opportunity to create a unique look.
How to fine tune the image's color balance
Fine tuning of color to the highest standards is possible in Capture One, but the accuracy of the results is dependent on having a well calibrated monitor to accurately reflect the changes made to images.
First, an accurate white balance should be set. Then color adjustments can be made to create the desired mood for the image. Like other settings in Capture One, these changes can be saved as a preset and applied to additional images.
The advantage to setting the white balance first is because saved color adjustment presets are relative to the colorvalues, created in whitebalance or at import. A group of images can be white balanced to a neutral value and then a preset can be applied. An example would be to use a preset to warm up the colors in a selected group of images.
Using the different controls in the color balance panel
The Color wheel
Changes the color balance of the image by moving the neutral point around the color wheel. Drag it using the mouse but fine tuning should be done with the H and S sliders.
'H' Hue
Moves the color-tone point around the color wheel to provide subtle color changes.
'S' Saturation
Increases the saturation by moving in or out along the radius of the color wheel.
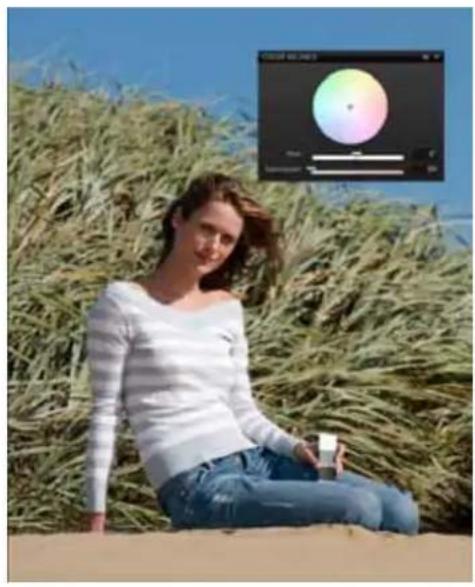
natural_image
Woman sitting on a sandy beach with tall grass and a colorful CD player displayed in the background (no text or symbols on the main subject)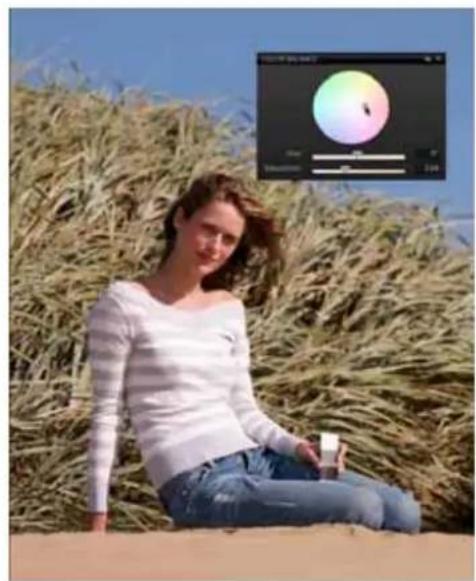
natural_image
Woman sitting on a sandy beach with a photo editing interface overlay (no readable text or symbols)ADJUSTING COLORS
How to edit defined colors only
The Color Editor allows you to select a narrow color area, and adjust this area without affecting other colors in the capture.
The Color Editor tool is split by basic and advanced, Basic is created for standard editing, whereas Advanced provides a much more specialized tool for editing defined shades of color in saturation, brightness, hue and smoothness.
Working in slices
Working in larger areas of color will avoid the image to appear unnatural. The slice will allow your adjustments to all shades of the selected color slice.
Select the color area to be adjusted using the basic color correction picker, now only one "pie-slice" is highlighted. The black circle indicates the picked color value, and the thin black lines indicates the end of the smoothness effect. Smoothness indicates how far the mixture will be applied, this ensuring a natural look to the selective changed colors. Images like the feathers, showing many colors in the relation with each other, keep smoothness on a lower level.
It is also possible to "just" select one color slice from the menu below the sliders. or choose global if you want to affect all colors at once. This is however a more creative tool that shouldn't be used instead of colorbalance.
To help you determining the areas that actually changes, you can check-mark "View selected color range" this will remove color from all not selected colors.
Blocking entire color areas
The Color editor can be used not only to change colors, but also to saturate or desaturate specific colors or groups of colors. Saturation is created to adjust up to 80% in both directions, so repeat de-saturation 2-3 times and you will have black/white areas whilst preserving other colors than the selected.
Marking up the "view selected color changes" will automatically desaturate all notselected colors.
You can make up to 30 selective color changes in one image.
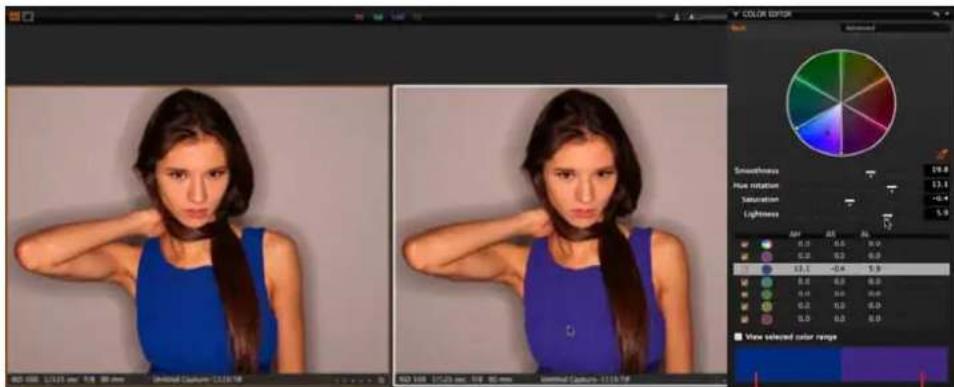
Original color Target color
OPTIMIZING EXPOSURE
Basic controls
Adjusting an image that is too dark/bright
The best way to lighten or darken an image is to use the exposure slider.
For more precise and advanced control, the exposure slider should be used to centre the data within the histogram and define an initial exposure, ensuring that no highlight or shadow clipping occurs. When this stage has been completed, use the levels controls to fine tune the lightness and darkness of the mid-tones of the image.
How to use the image adjustment slider
Sliders provide the best way to adjust exposure and contrast. Use one tool at a time before moving onto the next tool.
Exposure
Adjusts the exposure in much the same way as the controls on the camera do. The slider is calibrated to provide a range of +/- 2.5 stops.

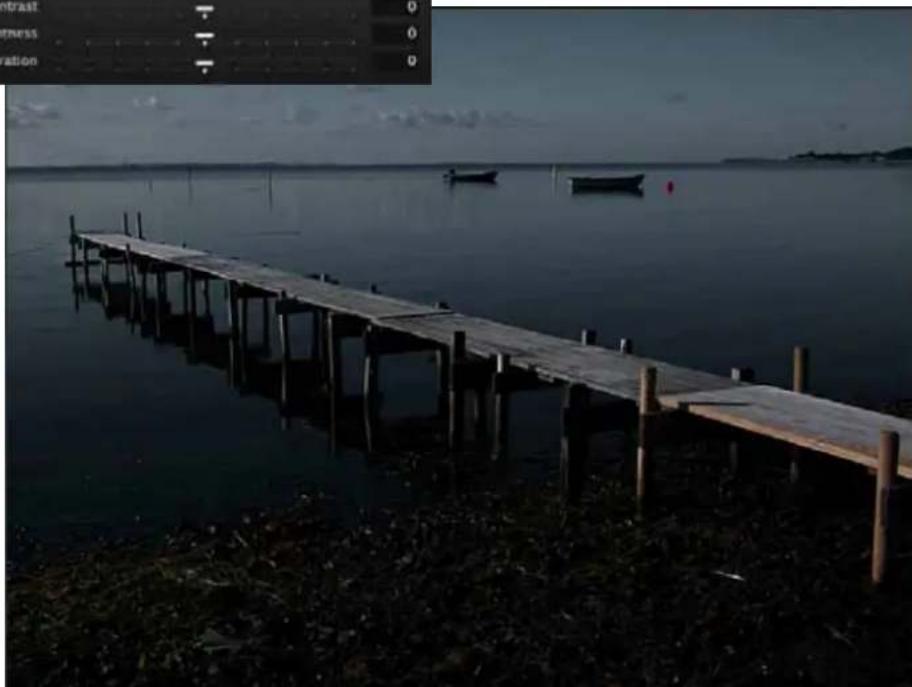
natural_image
Long wooden pier extending into calm water at dusk, with two small boats visible in the distance (no text or symbols)OPTIMIZING EXPOSURE
Contrast
Moving the slider to the right increases contrast throughout the image. Moving to the left decreases.
Brightness
Provides a tool to primarily brighten the mid-tones of the image; this tool has the effect of increasing mid-tone contrast. By contrast the gamma or centre slider of the levels tool works on the mid-tones, but has the effect of lightening shadow areas and reducing contrast.
Saturation
Increases or decreases saturation of the image. When saturation is decreased the image is black and white. Then the histogram changes from RGB to monochrome though the image is still in a RGB color space chosen as out output color space. The saturation slider is not "just" saturation, but intelligent saturation. The negative values represent regular saturation settings, the positive values are comparable to what 3rd party software would call "vibrance" – Vibrance is more gentle to the skintones, and will be able to enhance for instance blue sky without oversaturating the rest of the image.
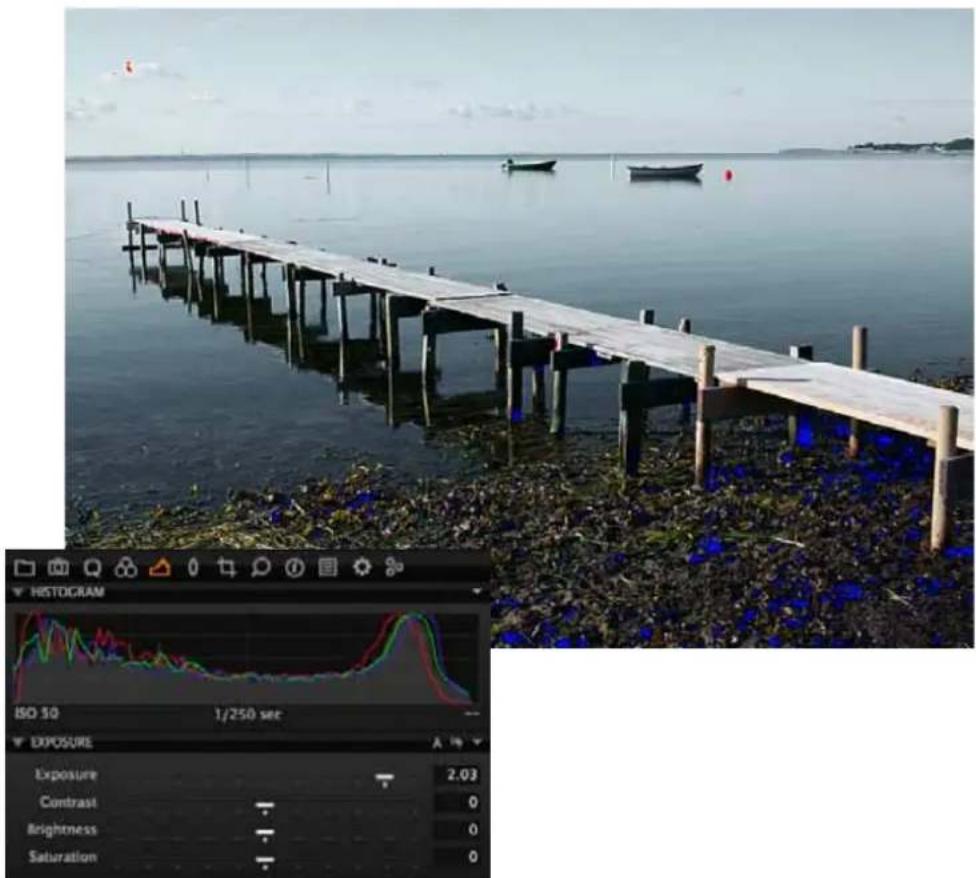
OPTIMISING EXPOSURE
For advanced exposure adjustment, it is recommended that levels are adjusted first, followed by curves. The curves tool has been designed not to clip image information and will only operate on tones within the defined white and black points of the image.
The correct Level settings
In an ideal situation, levels should be adjusted to slightly clip the end points of the image histogram at the shadow end and to the maximum highlight level on the right side of the histogram.
The images below show before and after adjusting the levels for an image.
As shown, black point and white point adjustments have been brought in very slightly. This has the effect of lightening the lighter tones and darkening the shadow tones in the image, at the same time increasing contrast slightly. The process has to be done very carefully in order to preserve the feeling that the image evokes.
The highlight warning function can be configured to provide visual feedback when adjusting the levels.
Once the highlight and shadow points of the image have been fixed, the density or mid-tone values of the image can be adjusted using the centre or gamma slider on the levels tool.
* The fastest way to use levels is by using the auto tool as a starting point. This will not clip information – if the result is not desired you can fine tune the result manually
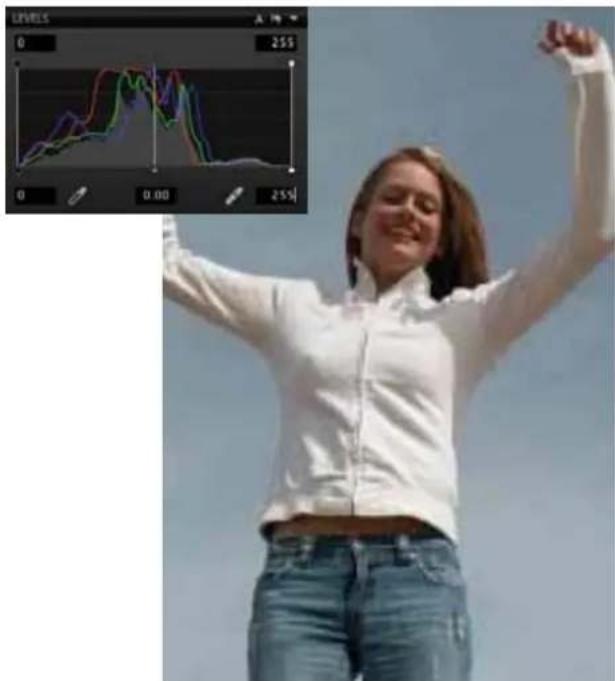
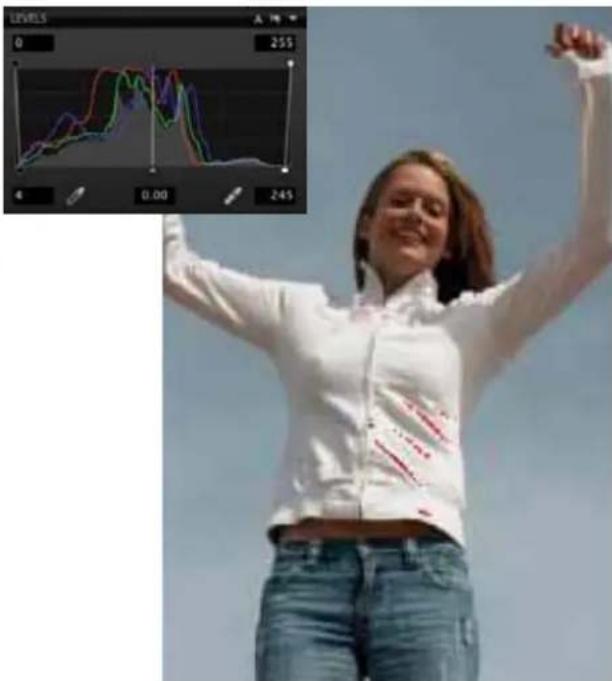
Highlight warning shows where the levels should be set – here app 245
MANAGING EXPOSURE – USING CURVES
How to work with curves
Levels are used to control the overall tonal distribution of an image. Curves provide the ability to remap the area within the shadow and highlight limits set by the Levels tool areas to produce a desired image.
There are certain 'classic' curves that are used in image applications to achieve specific results in images. Best known is the "S" curve which is used to increase contrast in an image.
The S curve achieves the increase in contrast by pulling down the shadow values, normally on the quarter tones and increasing the values of the tones at the three-quarter tone mark as shown in the image.
The brightness values at the quarter tones, before applying the curve, are around 65 (with image tonal values from black 0 to white at 255). The curve darkens these tones to around 50, whilst the three-quarter tones at 190 are raised to 200, lightening them in the final image.
The inverse S curve has the opposite effect of lightening the shadows and darkening the highlight tones, causing a reduction in contrast.
For advanced use, the Pick Curve point picker tool (p) can be used to pick a specific tonal area within an image. This value is added to the curve to allow adjustment of the values for that part of the image.
The image below clearly shows how the value picked on the image translates to the image curve.
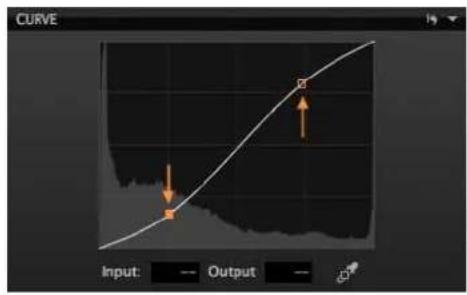
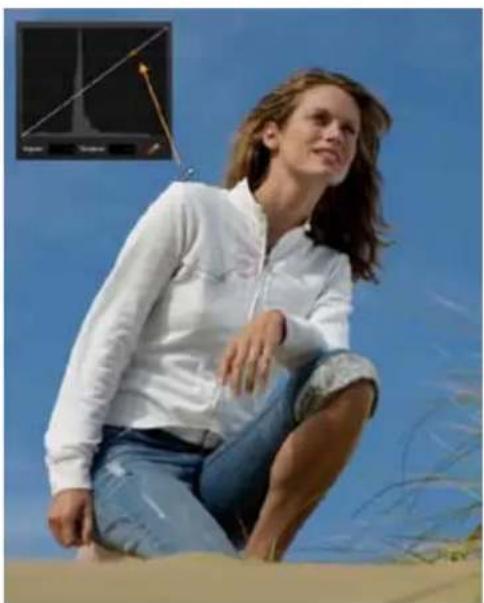
natural_image
Woman in white jacket sitting on sand with blue sky background, no visible text or symbols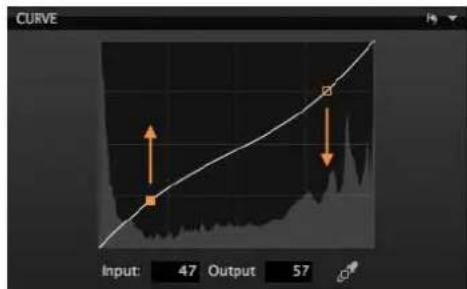
MANAGING EXPOSURE – USING HIGH DYNAMIC RANGE TOOL
The bulk of image adjustments can be done with the exposure slider and the levels/curves tools.
There are two scenarios where the High Dynamic Range tool may prove to be essential.
In certain situations, image contrast is such that clipping may occur at both ends of the histogram. In such cases the HDR tool provides a means of optimizing the image to deal with the extreme contrast and prevent the clipping of highlights and shadows.
High Dynamic range also provides the means to make use of images that have been accidentally over or underexposed to an extent that render them unusable with conventional exposure tools.
How to optimize the dynamic range of an image
The dynamic range of an image is optimized at the shooting stage by adjusting exposure to capture the maximum amount of data. This may result in an image that does not look optimal on the LCD display.
Bear in mind that around 1/2 - 1 stop of additional data can be recovered from overexposed highlights.
Once the image has been opened in Capture One, it is optimized by using the various tools within the software to adjust the data. The High Dynamic Range tools can help with 'difficult' images, where contrast is extreme. Applying a soft-proof profile for the output should be configured in order to edit for this output device.
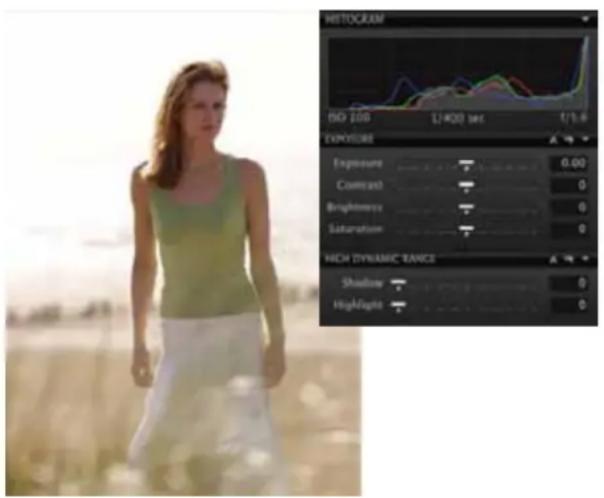
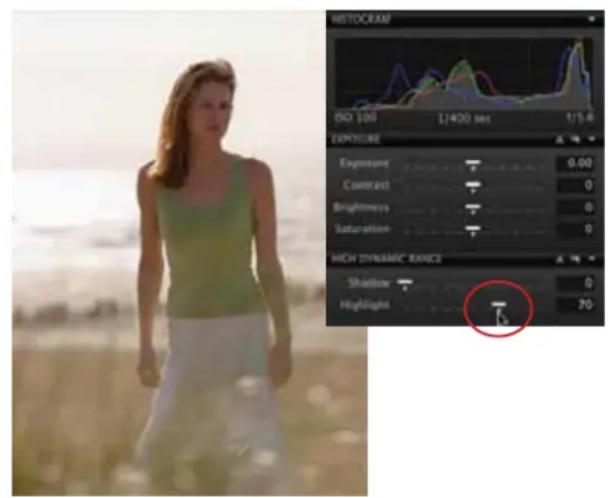
MANAGING HIGHLIGHT AND SHADOWS
How to lighten shadowed areas and darken highlighted areas in an image
A good way to adjust the shadows and highlights in your image is with the curves tool.
Use the Pick Curve Point tool (u) to click in the area of the image to be adjusted. A point will be put on the curve and this allows very precise adjustment of the exact tonal area of the image that you prefer. To fine tune this, use the arrow keys on the keyboard. This practice is much more accurate compared to relying on the sliders in levels to achieve an overall result.
How to prevent loss of detail in highlighted and shadowed images
Correct exposure in combination with the dynamic range tool, where necessary, prevents highlight and shadow detail loss.
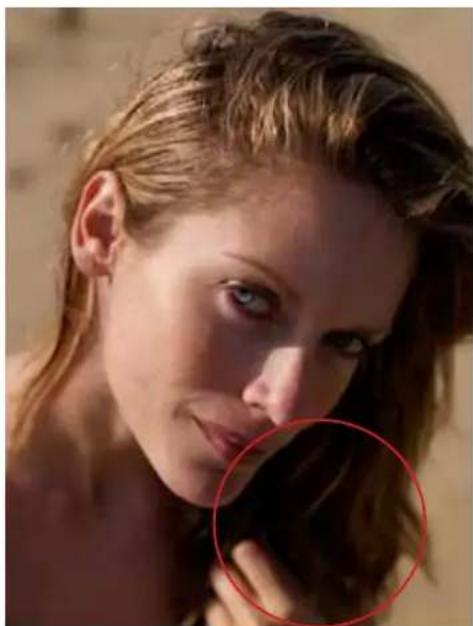
natural_image
Close-up portrait of a woman with brown hair and blue eyes, no visible text or symbols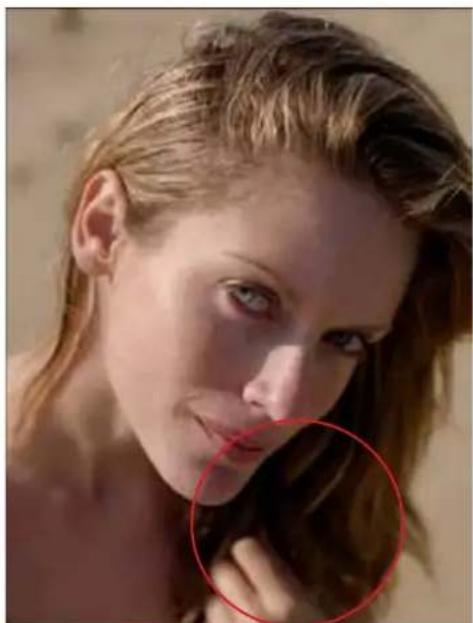
natural_image
Close-up portrait of a woman with long brown hair, no visible text or symbolsVARIANTS
Introduction
A variant is actually a copy of the settings used to create an image preview; it is not a duplicate of the original file. This means that it is possible to create multiple image variants without using any significant disk space.
Variants provide an easy way to try different settings or modify the work you have done on an image without risk. Original image data is untouched by any changes made.
How to create different expressions from one image
Variants provide an easy way to try different settings or modify the work you have done on an image without risk and without copying the image files.
New Variant creates a duplicate of the image using default settings. The image is created as it came out of the camera or DNG file except rotation.
Clone Variant creates an exact duplicate of the image you are working on; complete with any changes made.
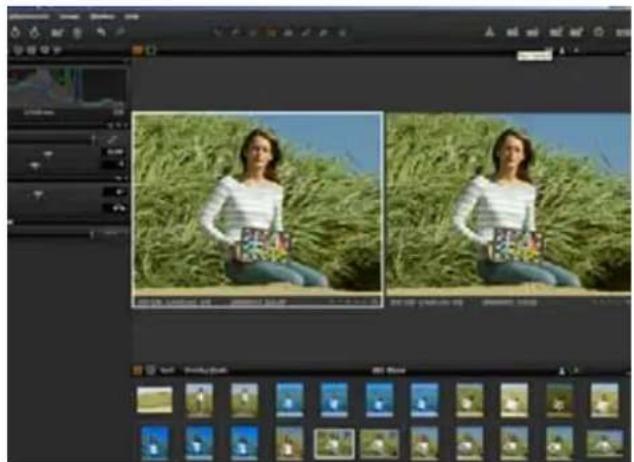
natural_image
Screenshot of a photo editing software interface showing two side-by-side photos of a woman in a grassy field, with tool panels and no visible text or symbols.* The white frame of one image in the Viewer shows you which image you are working on. In this case you work on the original NOT the Variant.
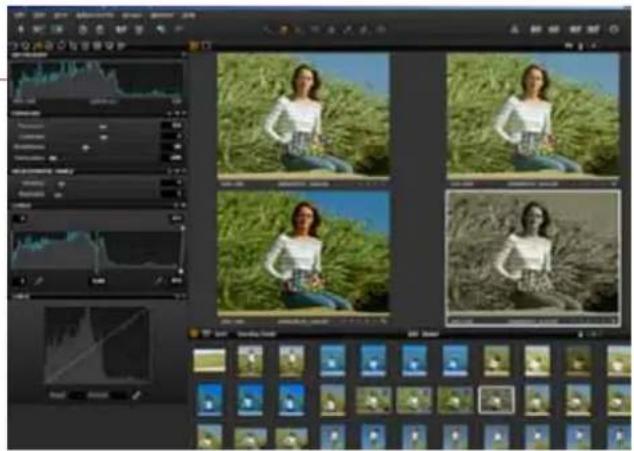
* You have adjusted the exposure, stopped the highlight clipping and fine tuned the shadows when you want to make a BW copy black and white image: No problem: Create a clone variant, go to Quick Tool tab > Saturation and set saturation to -100. – Alternatively, choose a Black and White profile in Profile pull-down.
* When you change an image to BW the Histogram and Levels automatically switches to monochrome
VARIANTS
How to delete Variants
The easiest way to delete a Variant is marking the variant in the Viewer or browser and pressing Delete or on PC press Backspace. You can also right-click and choose Delete from the menu.
When a Variant is deleted, only the settings file for the Variant is deleted. The original image file is untouched.
The settings inherited by a Variant from the original image
Normal Variants inherit the raw default settings from the original image + metadata and Lens Cast corrections (where appropriate with Digital Back files).
Clone Variants inherit all settings from the original image, including white balance, color, exposure and other changes that have been made in Capture One.
With the exception of Lens Cast correction (Digital Backs only) and metadata, any changes made to an original image can also be applied to a variant. Lens Cast is a special case, as it is regarded as a correction of the original image. That correction is applied to the original and automatically applied to any variant.
When creating a variant, metadata information is not changed because the content and the creator of the image have not changed.
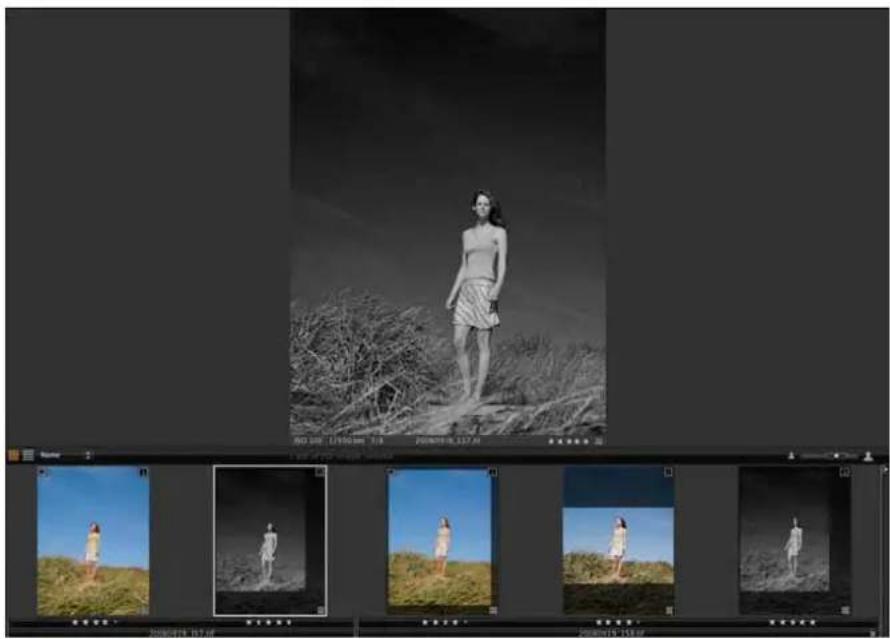
natural_image
Black-and-white photo of a woman standing on a path under a cloudy sky, with multiple close-up frames showing the same person in different outdoor settings (no text or symbols visible)CROPPING AN IMAGE
How to crop an image
To crop an image, select the crop button in the Composition tool panel or the cursor tool selector.
To quickly free crop an image, make sure that 'Unconstrained' is selected and simply drag a crop frame in the image area. Depending on the preferences that have been set, there will be a semi-transparent mask hiding the area that is being cropped. The dimensions will indicate the size of the cropped image.
To view the cropped image, select another cursor tool and the image will be shown in its final form. You can still see the original image with the cropping mask in the thumbnails. Re-selecting the crop tool at any time will allow adjustment of the crop settings.
The best practice is to drag the edges of the preview inwards (the cursor will turn into a two-way arrow) until the desired crop has been achieved. To reposition the cropped area, click in the middle and the button will turn into a cross. Move the cropped area. When the desired result has been achieved, select any other button from the cursor tool selector. The crop will be applied and the updated preview will fill the viewer.
How to reuse a crop setting from one image to another
Once an image has been cropped the settings can be copied and pasted to multiple images in the same way that other settings can be. Adjustments > Copy Adjustments and then select other image(s) and Adjustments > Apply Adjustments.
How to set a crop aspect ratio
Select one of the predetermined Aspect Ratios from the drop-down menu. Your crop will automatically be constrained to these aspect proportions. When you make a crop in an image the crop orientation (landscape vs. portrait) will automatically switch to maximize the crop area staying within the aspect ration constraints.
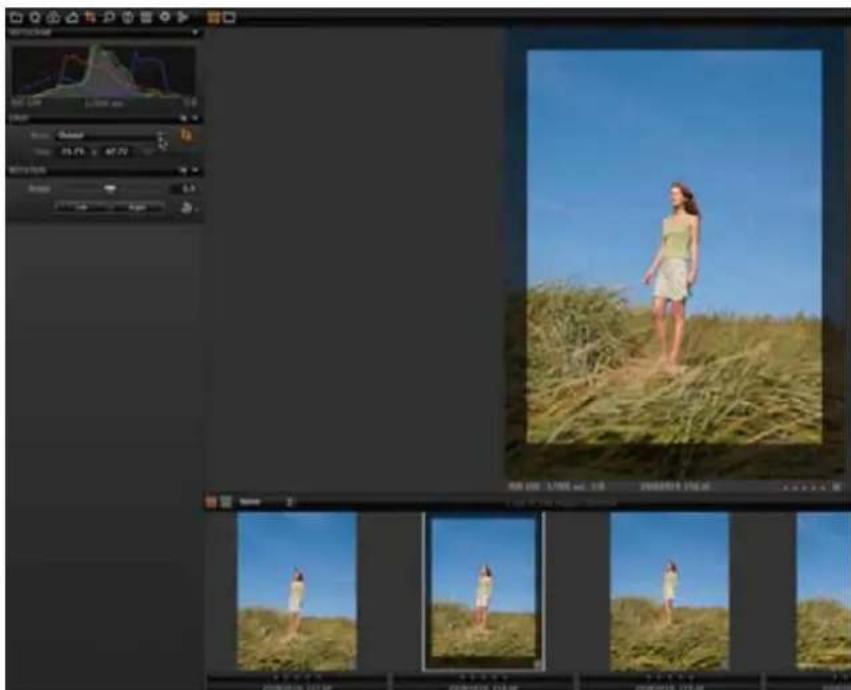
natural_image
Video editing software interface displaying a woman standing in tall grass under a clear blue sky, with multiple preview thumbnails below (no readable text or symbols)STRAIGHTENING AND ROTATING AN IMAGE
Straightening
How to straighten an image
Nothing is more irritating than an image where the horizon is just a few degrees away from horizontal or a vertical building that is crooked. Capture One was the first RAW workflow software to allow rotation. Capture One 5 now offers an even more sophisticated straightening tool.
Select the Rotation/Straighten button in the cursor tool palette or in the composition tool and drag along a straight edge that should be vertical or horizontal. Fine tune the straightening or rotating by mouse scroll over the slider, changing the degree of rotation by 0.1 at the time if carefully scrolled.
When to crop an image that requires straightening
It is easier to rotate the image first, as the software automatically crops the rotated image to the maximum usable dimensions. Following this, the crop can be fine tuned by the user, perhaps to fit to a specific aspect ratio such as 6x4 inches/10x15cm.
Applying straighten or crop settings to a group of images
Straighten the image as required, optimize the crop and then copy the settings using the Copy/Apply buttons on the menu bar.
Select the next image/group of images that you want to apply the same settings to and click the Apply button. To apply to a group of images, first copy adjustments, edit the copied adjustments in Adjustments Clipboard Tab then select the image files you wish to apply the crop and identical crop and rotations will be applied to all images.
To enhance the functionality of the copy and paste settings, it is possible to select which of the settings are pasted – see the Settings chapter for a full explanation of this feature.
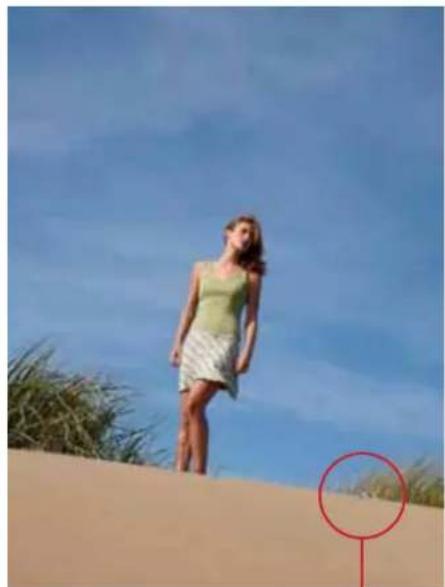
natural_image
Woman standing on a sandy beach under a clear blue sky, with grass and a red circular marker in the corner (no text or symbols)Straight lineguide

natural_image
Woman standing on a sandy beach under a clear blue sky, framed by a decorative frame (no text or symbols visible)STRAIGHTENING AND ROTATING AN IMAGE
Rotate Freehand
To adjust the image by eye, move the slider on the angle tool to left or right. A grid appears, making it easy to align vertical or horizontal lines. If you wish to freehand rotate more images at once, firstly freehand rotate one image, then use Copy/Apply Adjustments.
Capture One allows adjustments up of to 45 degrees. For adjustments greater than this, use rotate left/right.
Rotate Left/Right
Allows rotation of 90 degree to the left or right. By pressing shift while rotating Left/Right you will rotate all selected image files. Fine tune the rotation or rotating by mouse scroll over the slider, this way you will change the degree of rotation by 0.1 at the time if carefully scrolled. Rotate more than one image at the time by first selecting the images, then simply press Rotate icon.
How to revert to the uncropped image
Undoing any change in Capture One is performed by using Edit>Undo or the Undo button. In the rotation tool, it is possible to select the reset button or use Preset drop-down menu > Rotate snap 90°.
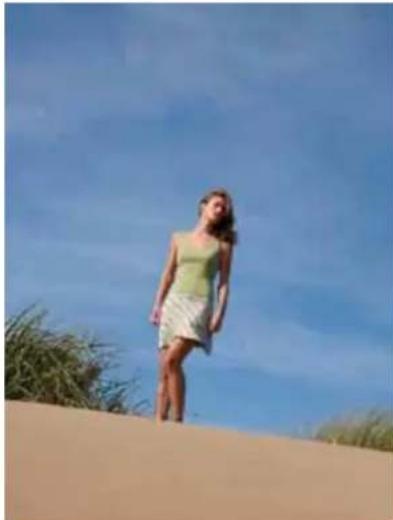
natural_image
Woman standing on a sandy beach under a clear blue sky, no visible text or symbols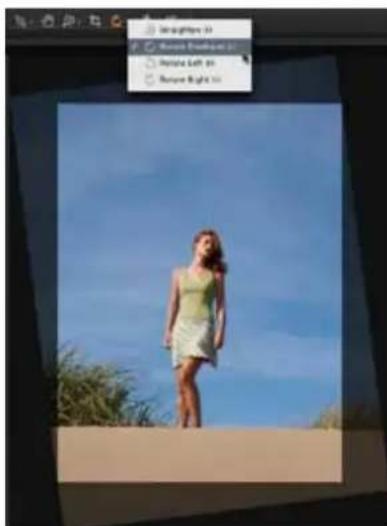
natural_image
Woman standing outdoors against a clear blue sky, with no visible text or symbols in the image itself.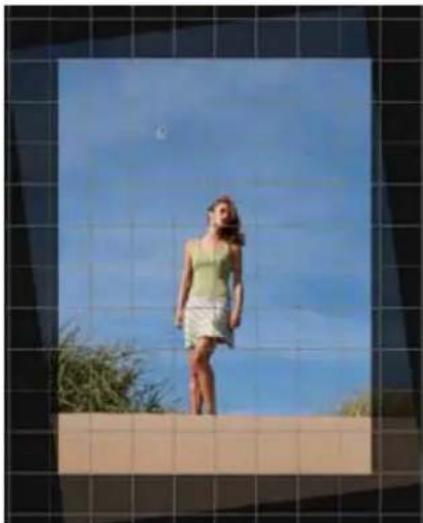
natural_image
Woman standing outdoors under a clear blue sky, wearing a green sleeveless top and white skirt (no text or symbols visible)SHARPENING AN IMAGE
Sharpening is an essential process when working with images created by digital cameras. The Capture One sharpening is a newly designed and enhanced unsharp mask. The purpose is to compensate for the effect of internal filters in all DSLRs that soften the image and to compensate for the softening effect that occurs when the images are printed.
By default, Capture One sharpening settings have been configured to provide a good looking image on screen. Additionally, the software comes with a number of presets that are accessed from the pull-down menu. Any of these presets can be activated and set as a default for all images.
When an image is destined for post-production or retouching in other software, we recommend processing the image without sharpening applied.
How to sharpen an image
Capture One has a range of presets, formulated to provide good starting points for sharpening images for most purposes.
If the concept of sharpening is unfamiliar, take a little time to look at how the settings change the appearance of images on screen at 100%, and compare these to final prints.
Typically, an image that is sharpened, for print or press, will look overly sharp on screen but produce a pleasing result when printed.
Inkjet printer settings
Inkjet printers vary, from small desktop models, to ultra-wide, large format machines.
Start with the supplied inkjet setting, check the result and if desired, adjust. If you modify the settings, then the new settings may be named uniquely and saved as a preset.
* When using Pan[H] – doubleclick anywhere on the image; the area you click on will go to 100%
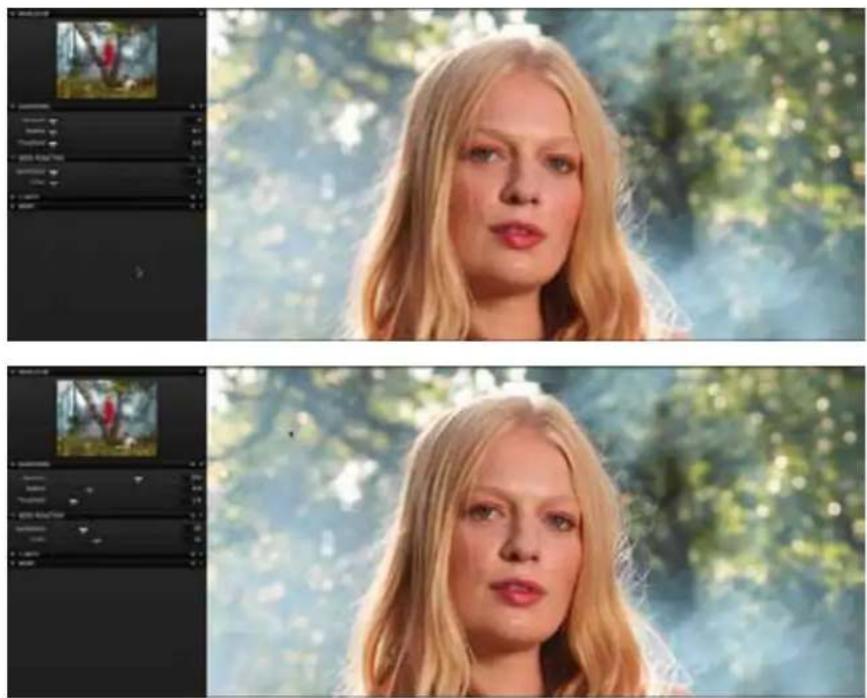
SHARPENING AN IMAGE
Magazine or brochure printer settings
If images are processed for later printing the amount of sharpening needed varies. A good starting point would be:
Amount: 350
Radius: 0.9
Threshold: 2
Fine tune this to suit your needs and the recommendation from the printing place and save as preset.
How to see the effects of sharpening
The effects of sharpening and noise reduction are shown as they will appear in the final image, in the viewer.
Zoom to 100% either by using the Zoom tool – or if you are using the hand cursor just double-click where you want to check details.
When you are at 100% it is easy to see the changes as you work with the detail tools.
How to determine the right amount of sharpening
A rule of thumb for sharpening used to be that the image should look over-sharp on screen to look correct in print. These ideas have been superseded.
The current thinking is that a 2 stage workflow is better. First sharpen the fine detail in the image.
Use the capture or raw pre-sharpening setting.
Secondly, a more aggressive sharpening affect can be used. This should be applied when the image has been sized according to printing dimensions.
There is no accurate measure of 'what is the right amount'. Sharpening is a skill that is learned over time.
If you feel insecure on the right amounts of sharpening, try out one of the many Sharpening presets. After selecting the preset, you can always edit the parameters further.
How to turn off image sharpening
Turn sharpening off by selecting 'Disable Sharpening'.
There is no sharpening applied behind the scenes.
NOISE REDUCTION
Luminance noise exists in every digital image. This noise is caused by the light sensitive chip, regardless of ISO. Normally this noise is more visible at high ISO values.
Higher Noise levels at high ISO values are caused because the signal has been amplified.
Luminance
Removes the pattern-like noise often present in shadow areas. Best practice is to set Luminance to 25, even for low ISO images. Images with noise that is displeasing increase the setting value and check the effect in the Viewer at 100% magnification.
Color
Removes color noise from images, typically noticeable as subtle green/magenta patterns. It is very difficult to recommend specific settings as noise varies from camera to camera, but the program defaults provide a good starting point. The viewer provides a clear view of the effect of filters on image noise.
How to remove noise from images
Noise should be removed from the images using a combination of the above tools. Capture One automatically applies some noise reduction to images, based on the ISO and exposure data from the camera that is contained in the image metadata. The default settings provide a good starting point for further adjustments.
Removing noise from Capture One
Capture One allows the removal of luminance and color noise from images using the color and luminance noise reduction sliders.
* Both sharpening and noise reduction tools allow the user to create presets, making it extremely easy to create regular settings for a specific camera or type of image. Simply click the preset button and select 'add preset' to create a new preset.
* Use the default setting (applied automatically by the software) and then zoom into 200% to fine tune settings for an image – if you have a group of similar images, apply the resulting setting to all images or create a new preset.
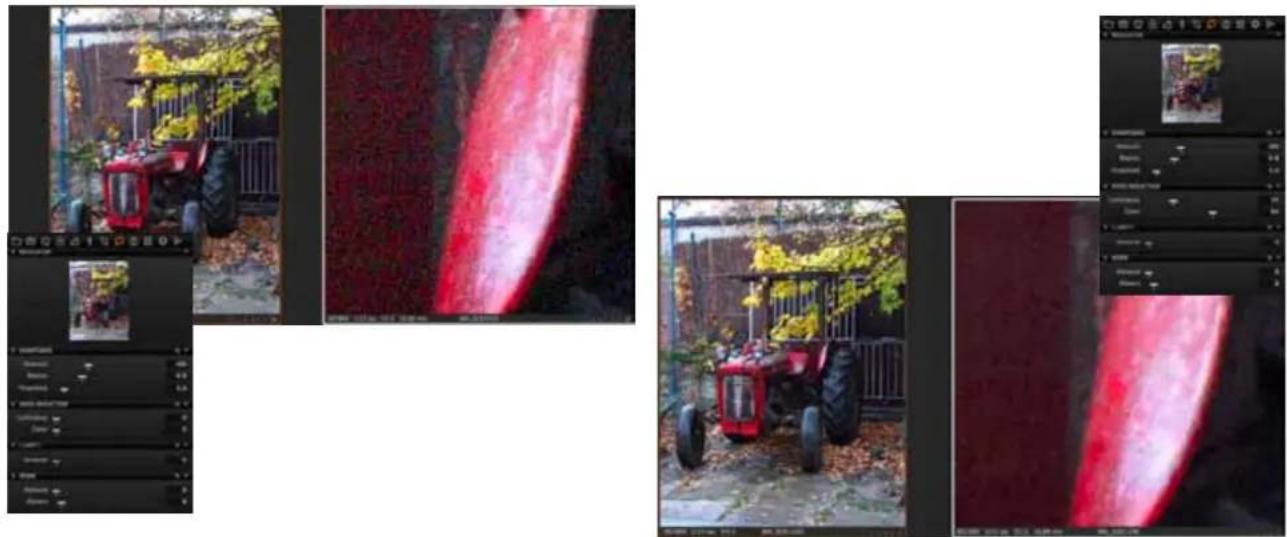
natural_image
Collage of four photos showing a red tractor in a garden setting, with close-ups of the crop and trees; no visible text or symbols.REMOVING POST-CAPTURE DUST AND SPOTS
How to get rid of dust on the images
Dust is not uncommon when doing medium format photography. A lot can be avoided, by using air, and keeping the protection plate on the back as clean as possible. Even so the chip creating the image is by far too sensitive to not see a tiny, tiny dust particle.
Dust particles will appear to be unsharp. The Dust removal tool is created to find the unsharp edges, and remove the dust particle perfectly by analyzing the underlying colors.
The dust removal tool is a part of the spot removal tool.
After selecting Dust removal tool in the Type drop-down menu, mark up the dust spots on the image using the Spot cursor tool.
The size of the spot cursor tool can be adjusted by pulling the sides of the cursor tool circle or by using the Radius slider; the dust removal circle is moved by placing the cursor inside the circle and moving it.
Switch between the individual removal circles in the Spot drop-down menu. The active marking is orange - this way you can change the size of a circle from dust to spot removal and adjust size.
When all dust particles are marked up and removed, it will save time to copy the dust removal filters and paste into the rest of your images, as the dust particle normally do not move.
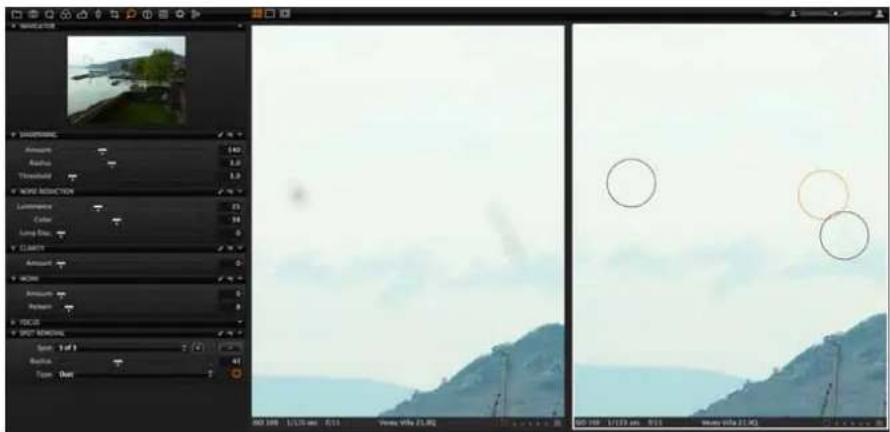
REMOVING POST-CAPTURE DUST AND SPOTS
How to get rid of a spot on the model
Unlike dust, spots on your motive will usually be sharp or nearly sharp. However, from time to time it is necessary to remove these spots.
The Spot removal tool is created to find the sharp edges, and remove the spot perfectly by analyzing the underlying colors and structure.
After selecting Spot removal tool in the Type drop-down menu you can now mark up the spots on the image using the spot cursor tool.
The size of the Spot cursor tool can be adjusted by pulling the sides of the cursor tool circle or by using the Radius slider; the spot removal circle is moved by placing the cursor inside the circle and moving it.
Switch between the individual removal circles in the spot drop-down menu. The active marking is orange - this way you can change the size of a circle from dust to spot removal and adjust size.
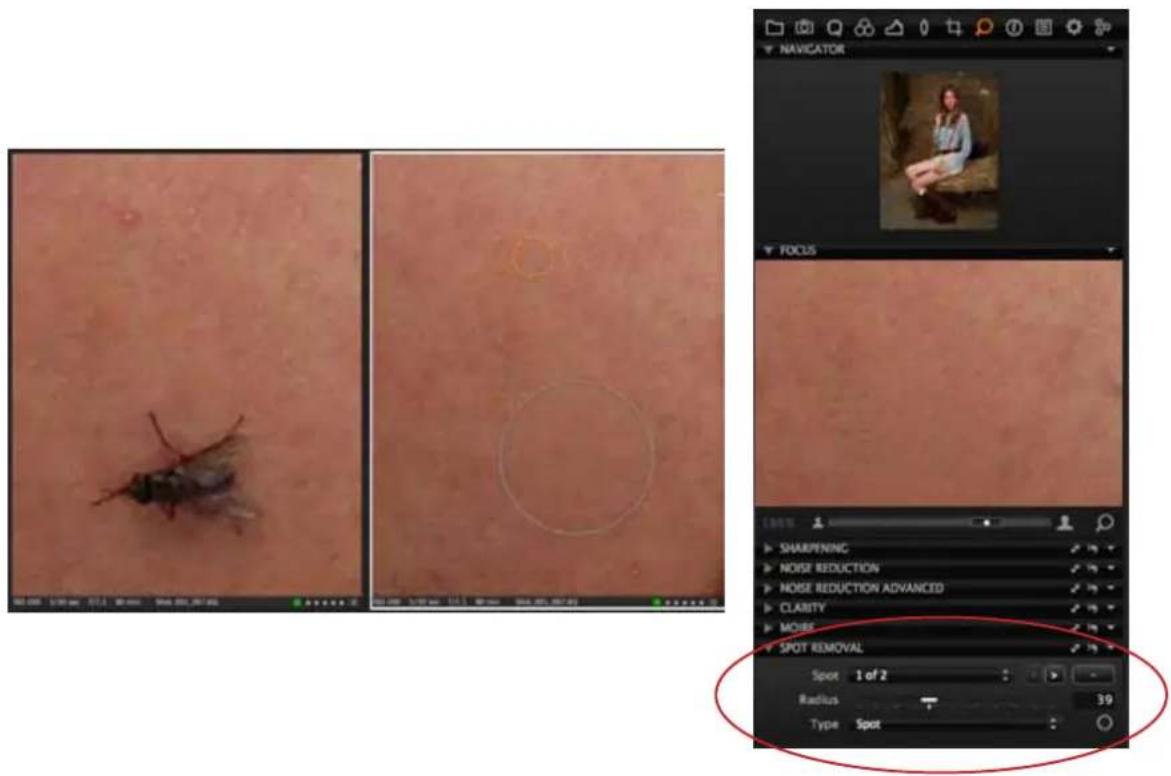
METADATA
Metadata is a term that means data about data. In photographic terms it refers to data that describes your image and how it was taken.
Raw files holds metadata in up to 4 different places:
Embedded EXIF, Embedded IPTC-IIM, Embedded XMP, .XMP Sidecar file – these 4 types of metadata will be automatically updated and read by Capture One.
Many users merely use metadata to keep keywords or simply copyright information.
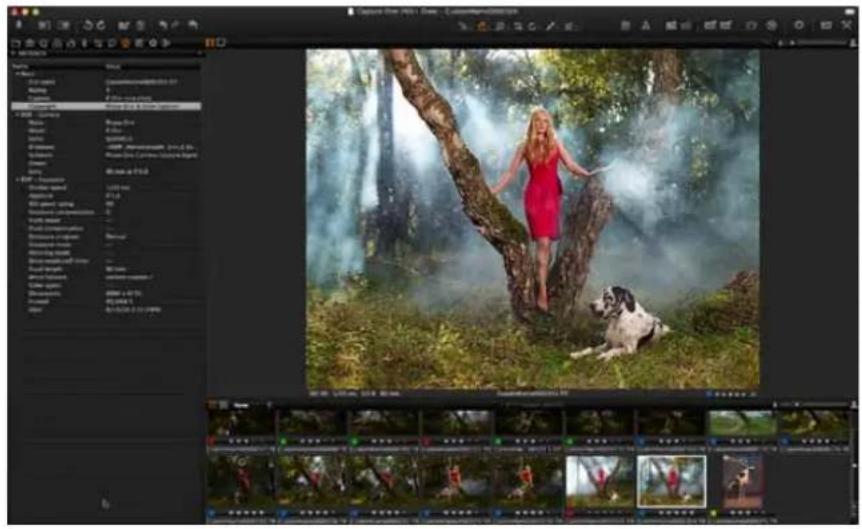
natural_image
Screenshot of a photo editing software interface displaying a forest scene with a woman in a red dress and a dog, both surrounded by misty trees (no visible text or symbols on the scene itself).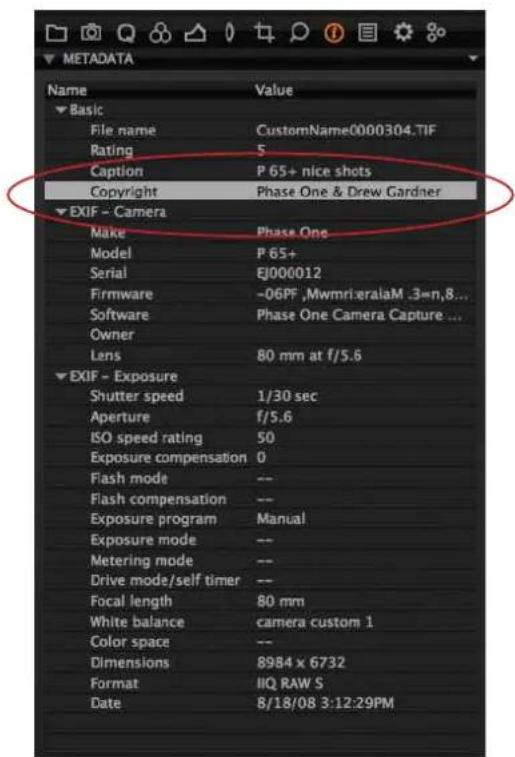
ADDING AND RESETTING MEGADATA TO IMAGE FILES
How to reset metadata
When pressing reset adjustments on Primary Variant, Capture One will reset all adjustments made to the image file except metadata, is to prevent from removing information such as copyright from the image file by mistake.
If you have added metadata to an image file and wish to delete all added metadata, use the local reset button.
How to add the same metadata to image files in the same session
After adding the metadata, the Local Copy allows you to select which of the metadata you wish to copy, and then select the target images, and apply.
| Shot_001_152.IIQ | Today, 10.44 | 40,7 MB |
| Shot_001_152.xmp | Today, 10.44 | 8 KB |
| Shot_001_153.IIQ | Today, 10.45 | 40,8 MB |
| Shot_001_153.xmp | Today, 10.45 | 8 KB |

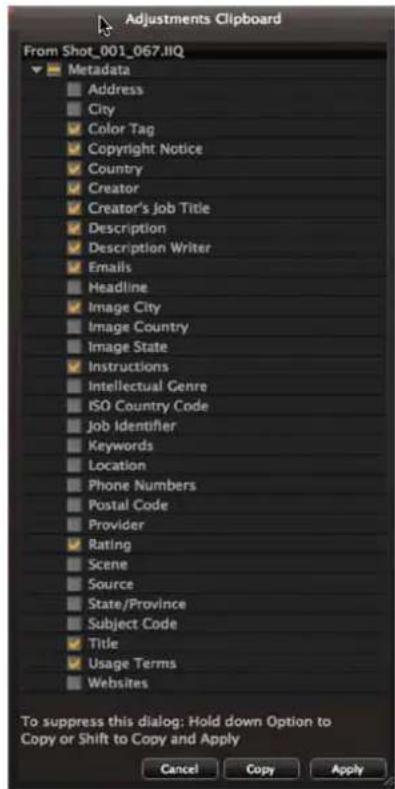
CREATING A PROCESS RECIPE
Images can be processed from Capture One as TIFF or JPEG files, with options for file compression, bit depth and color space, in addition to the normal options for resolution and size.
There is also the option to create contact sheets for web use.
For archival use, Capture One can export images to the open standard Digital Negative, .DNG files.
Images intended for manipulation or post production in other software should be exported as 16-bit TIFF files in the Adobe RGB or ProPhoto RGB color spaces.
16-bit output increases the color graduations from black to white in each of the three color channels from 256 in 8 bit output, to 65,536 per channel in 16-bit. This makes a huge difference in the way that an image can be adjusted without visible damage. It also prevents banding on gradients, such as skies.
How to create a process recipe
Process Settings consist of a selection of options to create and output images as required. The Process Settings tool tab provides many choices for the output of your images.
Here is a summary of what each setting does:
Format
Choose the output file format, depending on the determined use of the file.
TIFF for maximum quality or JPEG for size and convenience.
TIFF files provide the option of 16 bit output.
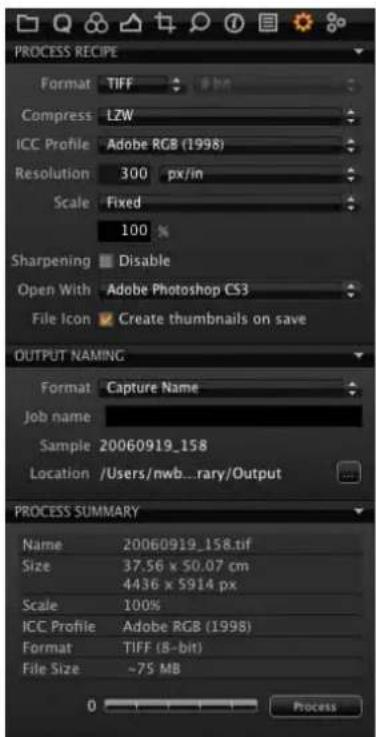
Example of output recipe for compressed TIFF
PROCESSING COMPLETED IMAGES
Open with
Allows Capture One to automatically open the processed file in an application. Most users choose Adobe Photoshop ^™ to open the file immediately after processing.
The best practice when processing a batch of files is to set Open with to None. This will prevent computer related resources from being depleted.
Naming
Output naming provides a range of options for naming the processed files. Adding a job name in the blank field increases these options and the helpful sample panel provides a preview of how the chosen convention will work.
Process destination
Beneath naming, is the heading 'Location'. This is where you choose the output destination for processed files. Click on the button and navigate to a suitable folder. This can be on a local or networked drive. This can also be set on the output location on the Library tool tab.
Process Summary
The Process Summary window provides an overview of all the settings chosen for an image before processing.
This includes the actual and final processed size, name, format and file size.
Clicking Presets provides a choice to process the primary or variant image.
When you press the Process button, the file or files will start processing the Primary Capture automatically.
Output to DNG
Many see a benefit of using DNG for archival purposes.
Outputting to DNG format in Capture One in essence creates a new RAW file. There are no options for size or compression with this format. All changes made to the image will be discarded when creating the DNG file.
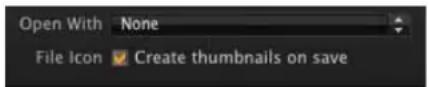
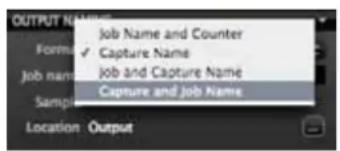
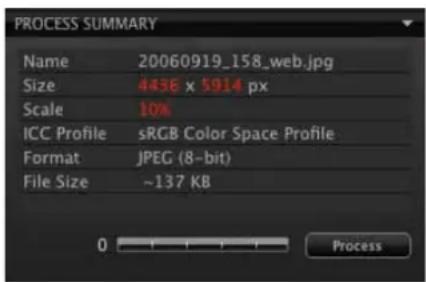
ABOUT BATCH
About batches
After the output recipe is created, mark the files to be processed. Now choose File>Process, or press Process button. The batch of files will be processed to the selected output folder.
If you wish to Process all selected instead of just one, first select the images you wish to process then press Process or choose File>Process.
Capture One has been designed to process batches of images quickly and efficiently.
The Batch of files will start processing immediately after choosing File>Process or Process button.
Batch processing can work in two ways depending on your preference:
By default, processing happens in the background without noticeable effect on the performance of the application.
There is the option to stop the batch queue, enabling it to process images when other work has finished or overnight.
To set the application to work in this way, go to the Batch Tool tab. At the bottom of the tab, press the Stop button. Processing will not commence until this has been reset to Start.
When there are a large number of images in the batch queue, processing priority can be changed by dragging and dropping unprocessed files around in the queue.
You can always remove files from the batch queue by marking the file or files and pressing backspace(mac).
History
The batch tool tab shows a history of all recent files that have been processed. If for any reason, there is a need for further copies of these images, the relevant ones can be selected and the 'Reprocess' button selected.
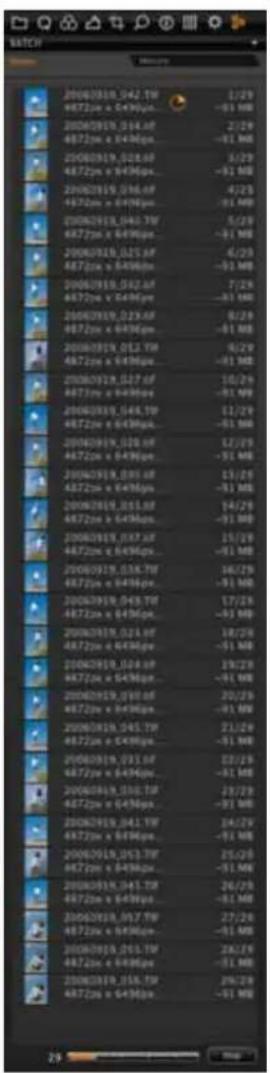
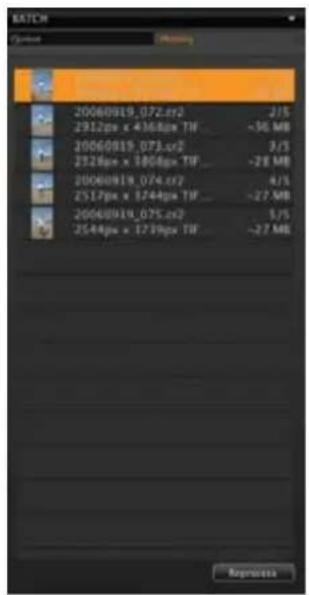
CREATING A WEB CONTACT SHEET
To output a group of images to a web based contact sheet, select the images and choose File > Make Web Contact Sheet.
A dialogue presents itself offering the opportunity to provide information such as title, description, etc.
The best practice is to choose the dark grey background color. Light grey background color option is also available, if preferred.
An amazing feature of the web contact sheet is that the size of the images and thumbnails can be customized. If you have access to a secure server or a password-protected web folder, it makes sense to preview images to clients at 800 pixels so they can see the quality of the images. You can see the pixel size of thumbnails or preview size when adjusting the slider; the number indicates how many pixels the images are wide.
Once all options have been selected, choosing Export outputs a complete folder to add to your web site.
It is important that the name is in lower case and without spaces – you can use hyphens or underscores.
* When generating a Web Contact Sheet, Capture One uses the generated proxies in order to achieve a much faster result. However, if the proxies have not been generated yet, the Web Contact Sheet must wait for this to happen. This can take quite some time, so if you are experiencing slow progress in the sheet, missing proxies is most likely to be the reason.
* When asked for a name after export, remember that the name you choose will be the folder name and will appear on your web site – for example: www.adomain.com/foldername
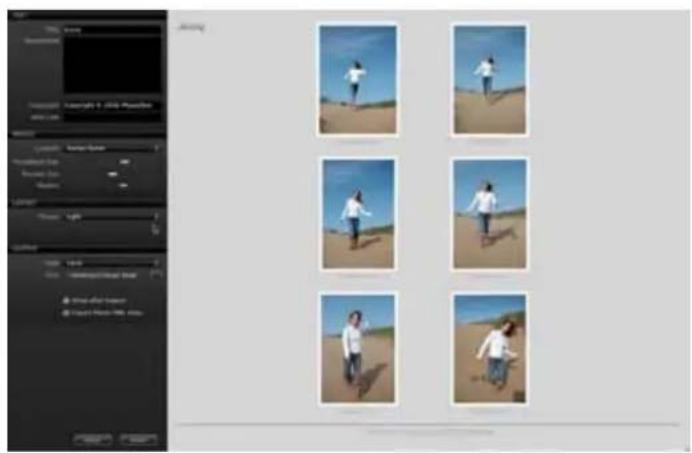
natural_image
Screenshot of a photo editing software interface showing six sequential photos of a person running on a sandy beach under blue sky (no text or symbols visible)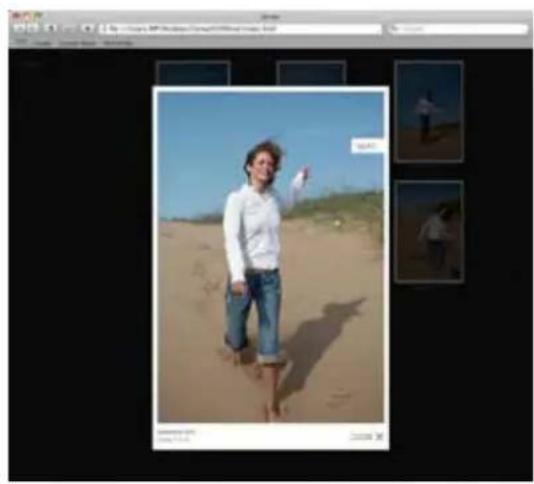
natural_image
Person standing on a sandy beach under clear sky, with two small inset photos of people in the background (no text or symbols visible)CREATING A WEB CONTACT SHEET
Adding/disabling sharpening for contact sheets
Sharpening can be applied to the images themselves, not to the web contact sheet as a whole.
Workflow for adjusting exposure for images meant for the web
The most effective way to adjust images quickly for output is to fine tune exposure and contrast, then copy the settings and then to select all similar images and paste the settings to them.
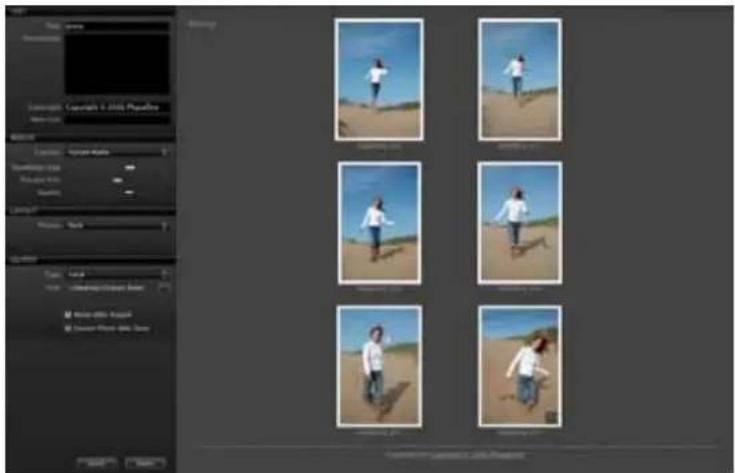
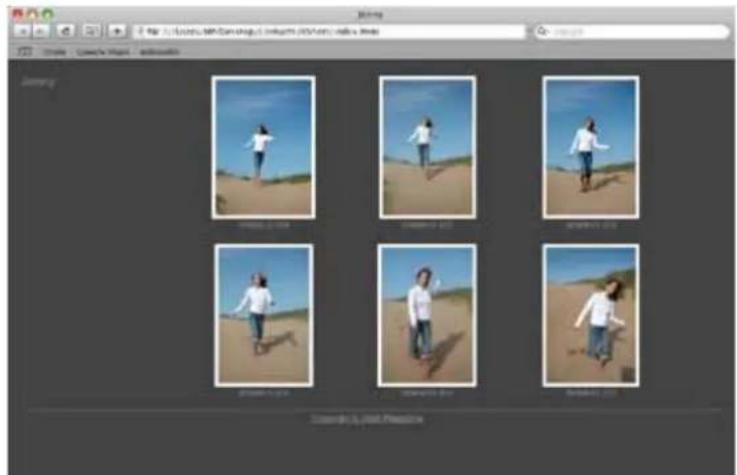
natural_image
Six identical photos of a person walking on a sandy beach under clear sky, displayed in a photo editing interface (no text or symbols on the images themselves)12
FLASH PHOTOGRAPHY
Flash photography.... 178
Rear curtain sync.... 179
Flash compensation settings.... 180
FLASH PHOTOGRAPHY
In addition to its standard flash sync system, the Mamiya DM System's camera features TTL (through the lens), electronic flash exposure metering. A flash sensor located inside the camera body reads the flash reflected off the sensor at the moment of exposure. The sensor is connected via the Mamiya DM System camera's dedicated hot-shoe to a shoe- or handle-mount style Metz flash unit via the Metz SCA 3952 TTL Adapter. Maximum flash sync speed is 1/125 sec., making daytime synchronization possible.
To utilize the TTL flash feature with all TTL-operable Metz flash units, a Metz SCA 3952 Module is required. Please see the chart below for compatibility and/or additional adapters that may be necessary.
The resulting flash exposure automation determines correct flash exposure and automatically adjusts the output of the flash. It also automatically corrects for exposure compensation normally required when using filters, close-up bellows or extension tubes.
| Adapter SCA3952S CA3000C | |||
| Metz Flash Unit | Type of Flash | ModuleC | onverter |
| Metz 44 MZ-2 Shoe-mountx | |||
| Metz 54 MZ-3 Shoe-mountx | |||
| Metz 45 CL-3 and -4 Handle-mountx x | |||
| Metz 60 CT-4 Handle-mountx x | |||
| Metz 70 MZ-5 and -4 Handle-mountx | |||
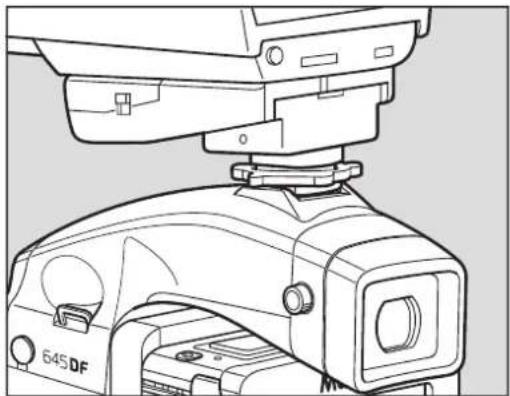
natural_image
Technical line drawing of a camera assembly with no visible text or symbols-
Mount the SCA3952 adapter onto the Metz flash, insert fully into the camera's hot shoe, then tighten with the locking knob Ⓐ.
-
Set the exposure mode, then check the shutter speed and aperture.
| Exposure mode Shutter speedA perture | |||
| P P | Program AE | Automatically set by camera to 1/60 sec. when the metered shutter speed is 1/60 or slower, and 1/125 when it is 1/125 sec. or faster. | Automatically set by camera |
| Av | Aperture priority AE | Any aperture | |
| Tv | Shutter priority AE | Automatically set by camera to 1/125 when the set shutter speed is 1/125 sec. or faster. | Automatically set by camera |
| M | Manual mode | Any aperture | |
| X Synchro mode | 1/60 to 1/125 sec. | Any aperture | |
* With TTL flash photography, the reflection of the flash is metered and the intensity of the flash is adjusted automatically, so TTL flash photography may not be suitable to all conditions. In the cases described below, we recommend using a flash meter to check the intensity of the flash or to use a manual flash setting.
REAR CURTAIN SYNC MODE
Use the Rear Curtain Sync Mode for any of the below conditions:
- When the size of the subject you want to light with the flash is relatively small within the picture
- When the background behind the subject is extremely bright or when there is a strongly reflective object in the background
- When the background behind the subject is extremely dark (outdoors at night, etc.)
- When light from the flash is incorrectly directed and falls too widely from the subject.
When a moving subject has been shot under this function, the flash of light appears after the moving subject.
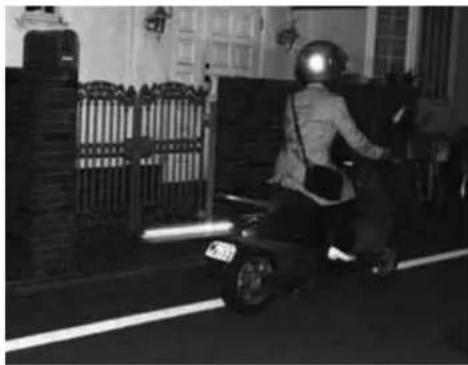
natural_image
Person riding a skateboard in a dimly lit room with a decorative fence and wall-mounted equipment (no visible text or symbols)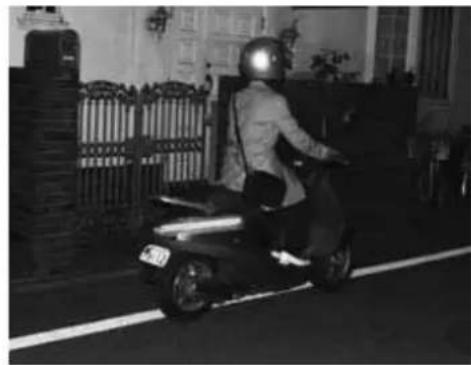
natural_image
Person riding a scooter in an indoor setting with ornate metal fence and wall-mounted equipment (no visible text or symbols)Rear curtain sync mode Front curtain sync mode
FLASH COMPENSATION SETTINGS
By combined use of a Metz flash and the SCA3952 adapter, the camera adjusts for flash. It can be adjusted within ±3 EV in increments of 1/3 steps.
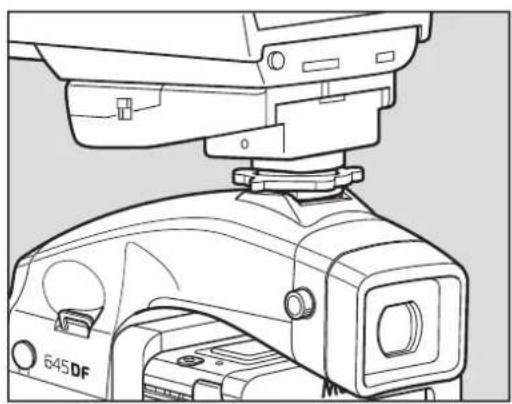
natural_image
Technical line drawing of a camera assembly with no visible text or symbols- Turn on the power. Install the SCA3952 adapter on the Metz flash, and put it on the camera then lock the flash in place using the locking knob on the flash shoe. Turn the shutter release mode selector lever to the "S" or "C" position, and turn ON the flash power switch.
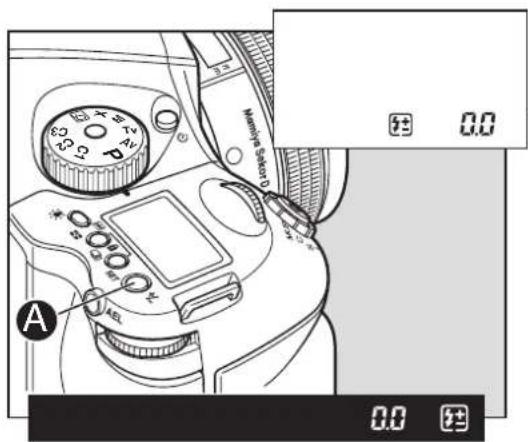
- When the flash charge confirmation lamp lights, press the set button Ⓐ in. The “☐” display appears on the main LCD panel.
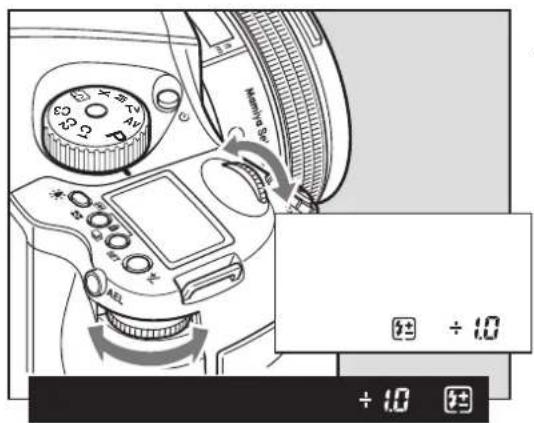
- Turn the front or rear dial to select the flash compensation value.

flowchart
graph TD
    A[" "] --> B["- 1.0"]
    A --> C["0.0"]
    B --> D[" "]
    C --> E["÷ 1.0"]
13
CUSTOM FUNCTIONS
Setting custom functions.... 182
Initializing user functions.... 183
Camera custom functions quick guide.... 184
Types of custom functions.... 185
SETTING CUSTOM FUNCTIONS
The custom functions allow you to change the method for using or accessing the camera functions as you like. Take photographs the way you are most comfortable with. The custom functions can store separate settings for 3 users. You can preset the functions for indoor, outdoor or portrait photographs and for other conditions. When at C-00, chose 1 (A), 2 (B), or 3 (C) to store a specific set of user function selections for the group of custom settings from C-01 to C-19.
However, if you set C-00 to 0, the settings used will be the default set.
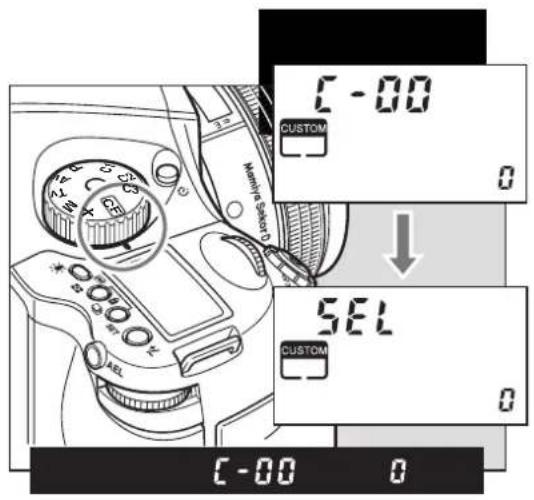
- Turn on the power.
Turn the shutter release mode lever to the "S" or "C" position.
- Turn the exposure mode dial to select "CF"
(Custom Function mode).
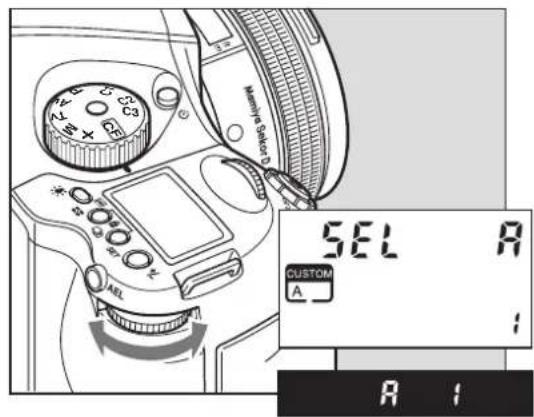
- Turn the rear dial to select the settings for user A, B, or C.
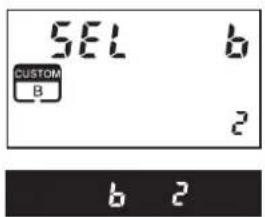
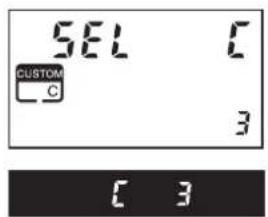
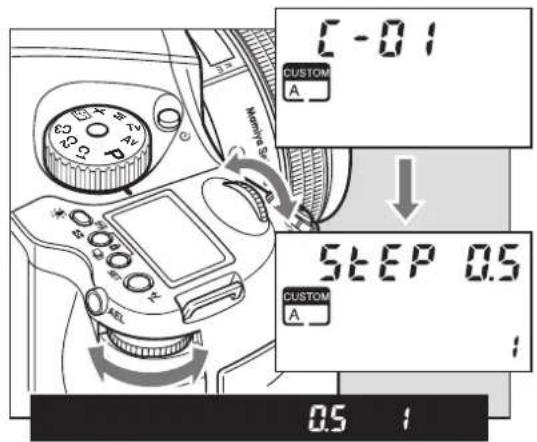
- Turn the front dial to select the item you want to set.
* There are 19 items from C-01 to C-19.
INITIALIZING USER FUNCTIONS
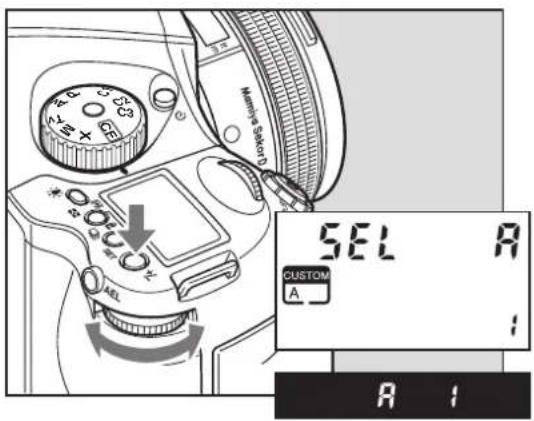

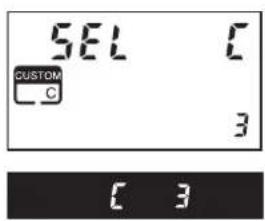
- By turning the exposure mode dial, "CF" (custom function mode) can be selected.
- By turning the rear dial, user "A", "b" or "C" can be selected.
- Press and hold down set button A (for longer than 1 second) and settings for A,B,C can be initialized, or the settings can be returned to "default".
* The default user setting is "User 0".
CAMERA CUSTOM FUNCTIONS QUICK GUIDE
| No. | Item Initial setting (0) 1 2 3 | ||||
| C-00 | Custom Function User Last used User A User B User C | ||||
| C-01 | Steps of aperture, shut-ter speed, Exposure compensation | 0.31/3 EV step | 0.51/2EV step | 1.01 EV step | |
| C-02 | Aperture setting after lens change | Previous aperture value | Open Minimum | ||
| C-03 | Time to sleep 15 sec. 30 sec. 60 sec. ON | ||||
| C-04 | Battery type Alkaline NiMH or NiCD Future feature | ||||
| C-05 | Auto Bracketing steps | 3 | 5 | 7 | |
| C-06 | Front/Rear dial function exchange in manual mode | Front: TVRear : AV | Front:AvRear :Tv | ||
| C-07 | Disable Rear dial in P mode | Yes | No | ||
| C-08 | Dial Function direction | No switching | SwitchedCCW : IncreaseCW : Decrease | ||
| C-09 | AEL & AFL button exchange | Front: AFLRear : AEL | Front: AELRear : AFL | ||
| C-10 | Shutter half-press func-tion | AF operation | AF operation & AE Lock | OFF(no function) | |
| C-11 | AEL function lock/unlock mode | Continuous | One shot | While the shutter button is pressed | |
| C-12 | AFL lock mode setting | Set with AF lock only | AF operation | Continuous | |
| C-13 | One push function M-Mode | Shutter speed shift | Aperture value shift | Off | |
| C-14 | AF assist beam | Fires | Does not fire | ||
| C-15 | Flash sync. timing | Front Curtain | Rear Curtain | ||
| C-16 | Beep | ON (AF) ON | OFF | ||
| C-17 | Choose shutter function (P, Av or Tv mode) | Mixed.(When inside the range of the leaf shutter lens) | Only Leaf shutter | Only Focal plane shutter | |
| C-18 | Shutter function in Manual mode | Mixed.(When inside the range of the leaf shutter lens) | Only Leaf shutter | Only Focal plane shutter | |
| C-19 | AF Speed High Speed mode | High accuracy mode | |||
| C-97 | Mamiya ZD digital back support | NO Mamiya ZD back | Mamiya ZD back | ||
| C-98 | Lens Firmware version | ||||
| C-99 | Body Firmware version | ||||
TYPES OF CUSTOM FUNCTIONS
C-00 Custom functions profile [SEL]
0: None (default=0)
1: A
2: B
3: C
When "0" has been selected and set, none of the custom items can be set.
C-01 EV-Steps [StEP]
This function is used to set the size of increments concerning the shutter speed, f-number and exposure compensation value.
0: 0.3 (1/3EV step: default setting)
1: 0.5 (1/2EV step)
2: 1.0 (1EV step)
C-02 Lens change [IrIS]
This function is used to set the f-number display method for the previously used lens when the lenses have been interchanged. The default setting is "0" in which case the f-number of the lens prior to the changeover is displayed.
0: Previous f-number
1: Aperture open
2: Minimum aperture setting
C-03 Sleeptimer [HOLd]
This function is used to set the time for sleep mode to be established after the camera's power is turned on. The default setting is 15 seconds.
0: 15 seconds
1: 30 seconds
2: 60 seconds
3: Disabled
The batteries will continuously lose power when "On" (no sleep mode) has been set.
C-05 Bracketing [Stno]
Setting bracket's width for auto bracketing setting
0: 3 Exposures
1: 5 Exposures
2: 7 Exposures
C-06 Front/Rear dial [dF]
This function is used to interchange the functions of the front and rear dials in the M (manual mode).
0: Front dial: TV, rear dial: Av [OF]
1: Front dial: AV rear dial: Tv [On]
C-07 Rear dial in P mode [d\_AC]
Initializing the P mode on the rear dial then changing the function to the front dial will cancel out P mode function on the rear dial.
0: Enable
1: Disable
C-08 Dial Direction [d\_dl]
This function is used to determine the direction in which the electronic dial is to be rotated to increase and decrease shutter speed, the f-number, and exposure compensation.
0: CW: Decrease [OF]
1: CW: Increase [On]
C-09 AEL & AFL button [AEFL]
This function is used to set whether to interchange the operations of the front and rear AEL and AFL buttons.
0: Default setting
(front: AFL, rear: AEL) [OF]
1: Switched (front AEL, rear: AFL) [On]
C-04 Battery Type [batt]
This function is used to set the batteries used in the camera so that the remaining battery charge will be displayed correctly on the external LCD panel.
0: Alkaline
1: Ni-CD, Ni-MH
2: Li-ION
(ONLY FOR USE WITH VERTICAL GRIP)
TYPES OF CUSTOM FUNCTIONS
C-10 Release button [HALF]
This function is used to set the AE lock and AF operations when the shutter release button is half-pressed.
0: AF operation (default setting)
1: AF & AE operation
2: Only shutter release
C-11 AEL function lock/unlock mode [AEL]
This function is used to set the method of operating the AEL button to lock AE. At the default setting, when the AEL button is pressed, AE is locked; pressing the button again releases the AE lock. At the "1" setting (released after one shot), after AE lock is set, it is released when the shutter is triggered. At the "2" setting, AE lock is only kept while the AE lock button is being pressed.
0: One shot
1: Continuous
2: While pressed
C-12 AFL [AFL]
This function is used to set the AF lock method when the AFL button is operated. AF >> Lock is activated with one press of the auto-lock button then deactivated with a second press.
0: While pressed (default setting)
1: AF operation
2: Continuous
C-13 M-mode AEL [OnEP]
When using M (manual mode) one push function, the shutter speed or aperture value can be set automatically by pressing AEL button.
0: Shutter speed shift [tv]
1: Aperture value shift [Av]
2: No [no]
C-14 AF assist setting [AF\_L]
The AF auxiliary light fires automatically when the subject is too dark to perform AF, but this function can be used to prevent the AF auxiliary light from firing.
0: On [On]
1: Off [OF]
C-15 Flash sync. [FLSY]
When shooting moving subjects with flash you can set the synchronization timing. This allows you to have the flash fire at the beginning of the exposure or at the end of the exposure.
0: First (default setting)
1: Second
C-16 Beep [bu]
When the SET button is pressed a beep sounds 0: ON (AF) (Default setting)
1: ON
2: OFF
When using P, Av or Tv mode and the leaf shutter lens is attached but you prefer to use the focal plane shutter.
0: Mixed. Default (Focal Plane shutter operation at < 1S)
1: Leaf shutter
2: Focal plane shutter
C-18 Shutter in M & X [Sh]
When initializing the setting, use of the lens shutter (and its respective ranges) or the focal plane shutter can be chosen when the leaf shutter lens is attached.
0: Mixed. Default (Focal Plane shutter operation at < 1S)
1: Leaf shutter
2: Focal plane shutter
C-19 AF Priority [AF\_2]
Accuracy of auto-focusing priority (default setting) or speed priority can be decided.
0: Speed
(Aperture to f/ 8 is recommended when using this function.)
1: Accuracy (default setting) recommended for lenses with long focal length
TYPES OF CUSTOM FUNCTIONS
C-97 Support for Mamiya ZD backs
This function should ONLY be activated when shooting on a Mamiya ZD back.
0: Default setting NO Mamiya ZD back on the camera body
1: Mamiya ZD back on camera body
C-98 Lens firmware version
The current firmware version can be checked.
C-99 Body firmware version
The current firmware version of the body can be checked.
Liquid Crystal Display
Due to the limitations of the space and letters, words and letters on the LCD are abbreviated.
Display examples of the main LCD
| On | → | ON |
| OF | → | OFF |
| Err | → | Error |
| + | → | +(Plus) |
| u | → | Under |
| a | → | Over |
| n | → | Normal |
| Loc | → | Lock |
| SELF | → | Self Timer |
| bulb | → | bulb |
| buSy | → | Busy |
| db | → | Digital Back |
| LS | → | Lens Shutter |
| CAP | → | Capture |
| rP | → | Repeat |
| HIF | → | Time |
| batt | → | battery |
Display examples in the custom function mode
| SEL | → | Selection |
| STEP | → | Step |
| Iris | → | Iris |
| HOLD | → | Hold |
| batt | → | battery |
| Stno | → | Shot No. |
| dF | → | Dial function |
| d_RC | → | Dial action |
| d_di | → | Dial direction |
| REFL | → | AE, AF lock |
| HALF | → | Half press |
| REL | → | AE lock |
| AFL | → | AF lock |
| OnEP | → | One-push exposure |
| RF_L | → | AF assist light |
| FLSY | → | Flash sync |
| bu | → | Buzzer |
| Sh_P | → | Shutter in Program |
| Sh | → | Shutter in Manual |
| AF_2 | → | AF second mode |
14
SYSTEM SPECIFICATIONS
Camera specifications.... 190
Digital Back specifications.... 191
Trouble shooting 193
CAMERA SPECIFICATIONS
Camera type : 6 x 4.5cm format, electronically controlled focal-plane shutter, TTL multiple mode AE, AF single lens reflex
Actual image size : 56 x 41.5 mm
Lens mount : Mamiya 645 AF Mount, compatible with M645 Mount (manual focus confirmation, focus aid, stopped-down exposure metering)
Viewfinder : Fixed prism viewfinder magnification x0.71; built-in diopter adjustment (-2.5 to +0.5, optional diopter correction lenses provide adjustment ranges of -5 to -2 diopter and 0 to +3 diopter); built-in eye-piece shutter
Focusing screen : Interchangeable, Matte (standard), Checker, and Microprism Type C for Non-AF M645 lenses
Field of view : 94%* of actual image
Viewfinder information : Focus mark, defocus mark, warning mark, aperture value, shutter speed, metering mode (A, S, A/S), exposure compensation value (difference between set value and metered value) and flash ready / OK lamp with TTL Metz connection
Auto focus method : TTL phase difference detection method; sensor: CCD line sensor (I+I type); operating range: EVO to EV18 (ISO 100)
Focus area : Displays the focus area in the viewfinder screen
AF assist beam : Activates automatically under low light, low contrast. Range: 9m (when using AF80mm f/2.8 D lens)
AF lock : By pressing the shutter release button halfway down in the AF-S mode, or by pressing the AFL button.
Exposure modes : Aperture Priority AE, Shutter Priority AE, programmed AE (PH, PL setting possible), and manual
AE metering mode : TTL metering, center-weighted average (AV), spot (S), and variable ratio (A-S auto)
Increments of shutter speed and aperture : Both the shutter speed and the aperture level can be set to 1/3 or 1/2 using the electronic dial lock function
Metering range : EV 2 to EV 19 (with ISO100 and AF80mm f/2.8 D lens)
Exposure compensation : Expandable to ±5 EV
AE lock : With AEL button; canceled by pressing the button again. When AEL button is pressed, exposure compensation and metering difference is displayed in the viewfinder. (+6EV, 1/3 steps in M mode).
Shutter : Electronically controlled vertical metal focal-plane shutter. (vertical travel)
Shutter speed : AE 30 to 1/4000 sec. (1/8 step), manual 30 to 1/4000 sec. (1/2 or 1/3 steps), 1 min-60 sec. (1 step), X, bulb (Bulb, electronically controlled), tIME, shutter curtain protection mechanism
CAMERA SPECIFICATIONS
Auto bracket shot : Enable with auto bracket button (3 frame shots, 5 frame or 7 frame shot with auto bracketing). Specify 1/3, 1/2, 2/3 or 1EV steps.
Flash synchronization : X contact point, 1/125 seconds. Synchro speed can be changed away from terminal.
Flash control : TTL direct flash control, supports Metz SCA3002 system (SCA3952 Adapter)
Mirror up shot : Select by pressing the mirror up button.
LCD displays : Program AE mode icon, synchro mode icon, shutter speed, aperture, custom function icon, user function icon, focal plane mode icon, lens shutter mode icon, AE lock icon, auto focus lock icon, mirror up icon, focus area icon, auto bracketing icon, self timer icon, repeat mode icon, delay mode icon, remaining battery power icon, spot metering icon, dial lock icon, flash compensation icon, exposure compensation icon, exposure compensation, delay time.
Sync terminal : X contact (sync speed 1/125 sec.)
Cable release socket : On shutter button
Remote-control terminal : On side of body; electromagnetic cable release RE401 and RS402 can be purchased separately.
Self timer : Self timer intervals can be set from 0.5 to 90 sec.: 0.5-10 sec. by the second, 10 to 90 sec. in 10 sec. units, 2 to 10 mins by the minute and 10 to 6 mins in units of 10 minutes.
Depth-of-field confirmation : Preview Button on body
Custom settings : 19 items
Tripod socket : U 1/4 inch and U 3/8 included
Power requirements : 6 AA-size batteries (alkaline-magnesium, lithium, nickel-hydride or nickel-cadmium rechargeable batteries).
External power socket : An external battery case can be connected.
Size & weight : 6 "(W)X5 "(H)X6 "(D) / 153(W)X128(H)X152(D)mm : 2.3 pounds / 1,030 g (body only)
* This information is based on a linear (horizontal/vertical) measurement.
DIGITAL BACK SPECIFICATIONS
Mamiya DM System digital back types
Digital back DM33 DM28 DM22
CCD size (mm) 48x36 44x33 48x36
Number of pixels 6726x5040 6144x4622 5356x4056
Resolution 33MP 28MP 22MP
Capture rate (sec/frame) 1.1 1 0.9
| File size (MOS) | 67MB | 53MB | 42MB |
| MOS lossless compression | 47MB | 31MB | 21MB |
| TIFF 16 bit | 190MB 159MB | 128MB | |
| 8 bit RGB | 102MB 80MB 63MB | ||
| 8 bit CMYK | 136MB | 106MB | 84MB |
| ISO sensitivity | 50-800 | 50-800 | 25-400 |
| LCD screen | (touchscreen with stylos) | ||
| LCD size | 6x7cm | ||
| Image viewing | Up to 20 images on LCD screen with 1.1 zoom | ||
| Viewing tools | Histogram/ spot meter (f-stop)/ average exposure meter/ expos | ||
Languages English/ German/ French/ Spanish/ Italian/ Japanese/ Chinese
Properties
Operation conditions Temperature 0-40°C / Humidity 15%-80% RH (non-condensing)
Portable power supply 1x lithium ion battery 2350Ah power
Image storage CF card FireWire 800 (tethered mode) (portable mode)
Optional camera interfaces Mamiya Pro II/ Mamiya Pro IID/ 4x5 Graflock
Dimensions (WxHxD) 95x82x59mm
Weight 600g
TROUBLE SHOOTING
For your benefit, there are user's forums on our web page (www.mamiya.com). In the event that you think something is wrong or faulty with your Mamiya DM System, please consult these pages first to see if the problem can be rectified before handing the System to your dealer for servicing.
mamiya
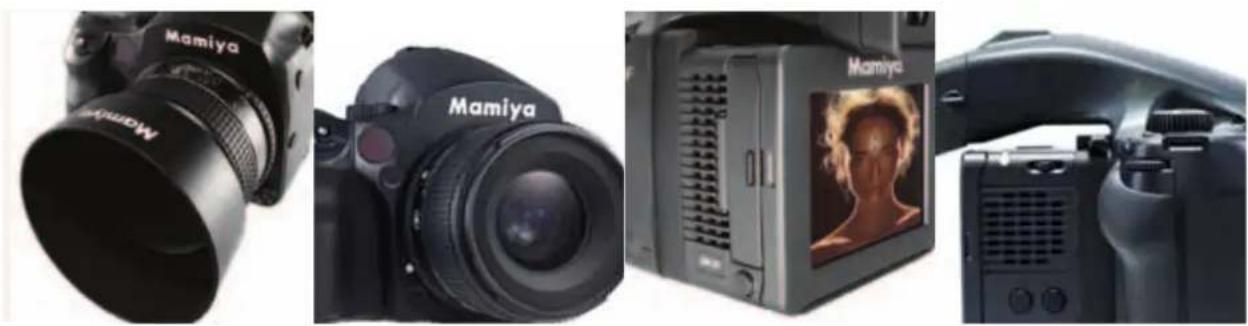
natural_image
Four black DSLR cameras with visible branding and front angles, no text or symbols on the devices themselves.www.mamiya.com