
DMSW002BK - Waffle Maker Dash - Free user manual and instructions
Find the device manual for free DMSW002BK Dash in PDF.

| Product Type | Mini Waffle Maker |
| Brand | Dash |
| Model | DMSW002BK |
| Color | Black |
| Power Rating | 350W |
| Voltage | 120V ~ 60Hz |
| Number of Units | 2 (2-Pack) |
| Cooking Surface | Nonstick |
| Indicator Light | Yes (shuts off when preheated) |
| Handle | Cool-touch cover handle |
| Dimensions (approx.) | 6 x 6 x 4 inches per unit |
| Weight (approx.) | 1.5 lbs per unit |
| Material | Plastic body, nonstick coating |
| Cord Length | Short (approx. 2 ft) |
| Cleaning Method | Wipe with damp soapy cloth; not dishwasher safe |
| Warranty | 1-year limited warranty |
| Included Accessories | Recipe guide, instruction manual |
| Customer Support | 1-800-898-6970 or support@bydash.com |
Frequently Asked Questions - DMSW002BK Dash
User questions about DMSW002BK Dash
0 question about this device. Answer the ones you know or ask your own.
Ask a new question about this device
Download the instructions for your Waffle Maker in PDF format for free! Find your manual DMSW002BK - Dash and take your electronic device back in hand. On this page are published all the documents necessary for the use of your device. DMSW002BK by Dash.
USER MANUAL DMSW002BK Dash
recipes inside!
DMSW002
MINI MAKER
2 PACK
Instruction Manual | Recipe Guide

MINI WAFFLE MAKER
Important Safeguards....4-7
Parts & Features....8
Using Your Mini Waffle Maker 9-12
Cleaning & Maintenance 13
Recipes....15-23
Customer Support 46
Warranty....47

IMPORTANT SAFEGUARDS IMPORTANT SAFEGUARDS
IMPORTANT SAFEGUARDS: PLEASE READ AND SAVE THIS INSTRUCTION AND CARE MANUAL.
When using electrical appliances, basic safety precautions should be followed, including:
- Read all instructions.
- Remove all bags and packaging from the appliances before use.
- Never leave the appliances unattended when in use.
• Make sure the appliances are cleaned thoroughly before using. - Do not use appliances for other than intended use. For household use only. Do not use outdoors.
- WARNING: Hot surfaces! Never touch the Cooking Surface or Cover while the appliances are in use. Always lift and lower the Cover by the Cover Handle.
- DO NOT lift the Cover so that your arm is over the Cooking Surface as it is hot and may cause injury. Lift from the side.
• To prevent the risk of fire, electric shock or personal injury, do not put cord, plug or appliances in or near water or other liquids.
• The Mini Makers are NOT dishwasher safe. - Never use abrasive cleaning agents to clean your appliance as
this may damage the Mini Makers' nonstick Cooking Surfaces.
- Do not operate appliances with a damaged cord, damaged plug, after the appliances malfunction, are dropped or damaged in any manner. Return appliances to the nearest authorized service facility for examination, repair or adjustment.
- DO NOT use the Mini Makers near water or other liquids, with wet hands or while standing on a wet surface.
- For maintenance other than cleaning, please contact StoreBound directly at 1-800-898-6970 from 7AM - 7PM PST Monday - Friday or by email at support@bydash.com.
- Do not use metal utensils on the Cooking Surfaces as this will damage the nonstick surface.
• Appliances are not intended for use by persons (including children) with reduced physical, sensory or mental capabilities, or lack of experience and knowledge unless they are provided with supervision
and instruction concerning use of the appliances by a person responsible for their safety.
- Do not place appliances on or near a hot gas burner, hot electric burner or in a heated oven.
- Be cautious when moving appliances containing hot oils or other hot liquids.
- Refrain from using attachments that are not recommended by the appliance manufacturer, as this may result in fire, electric shock or personal injury.
- Allow the Mini Makers to cool completely before moving, cleaning or storing.
- Do not let the cord touch hot surfaces or hang over the edge of tables or counters.
• Always be sure to unplug the appliances from outlet prior to moving, cleaning, storage and when not in use. - StoreBound shall not accept liability for damages caused by improper use of the appliances.
- Improper use of the Mini Makers
can result in property damage or personal injury.
- Each appliance has a polarized plug (one blade is wider than the other). To reduce the risk of electric shock, this plug will fit in a polarized outlet only one way. If the plug does not fit in the outlet, reverse the plug. If it still does not fit, contact a qualified electrician. Do not attempt to modify the plug in any way.
- A short power supply cord is provided to reduce the risk resulting from becoming entangled in or tripping over a longer cord. An extension cord may be used if care is exercised in its use. If an extension cord is used, the marked electrical rating of the extension cord should be at least as great as the electrical rating of the appliance. If the appliance is of the grounded type, the extension cord should be a grounding 3-wire cord.
- The extension cord should be arranged so that it will not drape over a countertop or tabletop where it can be pulled on by children or tripped over unintentionally.
IMPORTANT SAFEGUARDS: PLEASE READ AND SAVE THIS INSTRUCTION AND CARE MANUAL.
GARANTIES IMPORTANTES
GARANTIES IMPORTANTES
GARANTIES IMPORTANTES: VEUILLEZ LIRE ET CONSERVER CE MODE D'EMPLOI ET D'ENTRETIEN
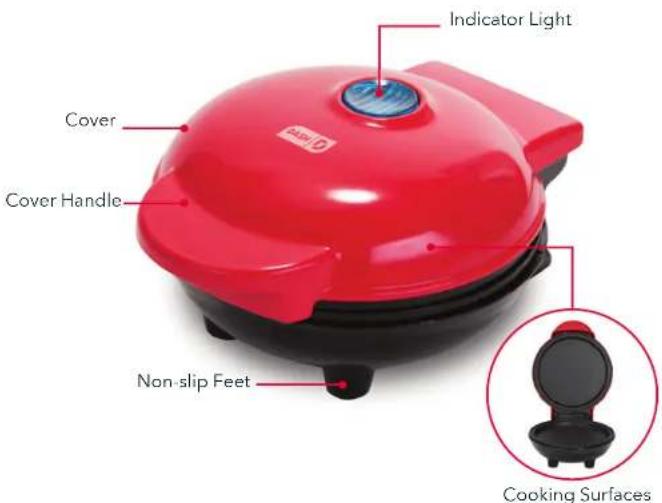
PARTS & FEATURES USING YOUR MINI WAFFLE MAKER

BEFORE FIRST USE
Remove all packaging material and thoroughly clean your Mini Waffle Maker.

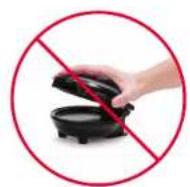
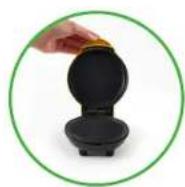
Never touch the Cooking Surface or Cover while appliance is in use.

DO NOT lift the Cover so that your arm is over the Cooking Surface as it is hot and may cause injury.

Always lift and lower the Cover by the Cover Handle. Lift from the side.
USING YOUR MINI WAFFLE MAKER USING YOUR MINI WAFFLE MAKER

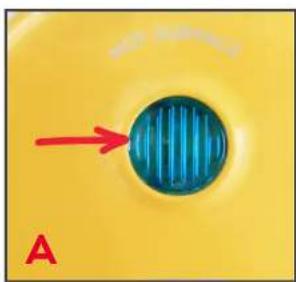
1 Place the appliance on a stable and dry surface. Plug the cord into a power outlet. The Indicator Light (photo A) will illuminate, signaling that the Mini Waffle Maker is heating up.

natural_image
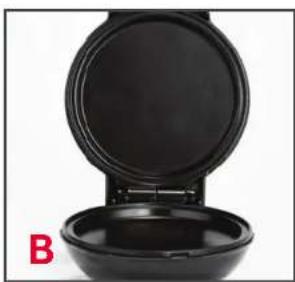
Black waffle-shaped object with red lid and grid pattern, labeled 'B' in bottom-left corner (no other text or symbols)2 Once the Cooking Surface reaches the optimal cooking temperature, the Indicator Light will automatically shut off. Now, you're ready to get cooking (photo B)!

natural_image
Hand holding a green spray bottle next to an open black waffle-shaped oven (no text or symbols visible)3 Carefully lift the Cover by the Cover Handle and spray both Cooking Surfaces with a small amount of cooking spray (photo C).

natural_image
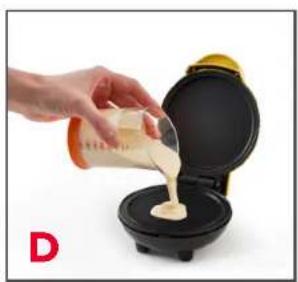
Person pouring liquid into a waffle-shaped oven using a measuring cup (no text or symbols visible)4 Place or pour batter onto the Cooking Surface (photo D) and close the Cover.
USING YOUR MINI WAFFLE MAKER
CLEANING & MAINTENANCE
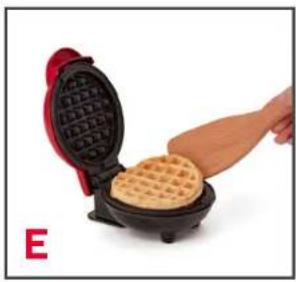
natural_image
Hand placing a waffle into a black frying pan (no text or symbols visible)5 Once waffle is cooked to your preference, carefully remove it from the Cooking Surface with a heat-resistant nylon or silicone cooking utensil (photo E).
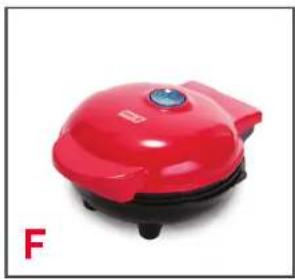
natural_image
Red electric stove or appliance with a black handle and circular base, labeled 'F' in the corner (no visible text or symbols on the device itself)6 When you have finished cooking, unplug your Mini Waffle Maker and allow it to cool before moving or cleaning (photo F).

NOTE: Do not use metal utensils to remove or place food on the Cooking Surface as this will damage the nonstick surface.
Always allow the appliance to cool completely before moving, cleaning or storing.
In order to keep your Mini Waffle Maker in pristine working order, thoroughly clean the appliance after each use. This will prevent the build-up of food or oil.
- Unplug your Mini Waffle Maker and allow it to cool completely.
- Using a damp, soapy cloth, wipe down the Cooking Surface and Cover. Thoroughly rinse the cloth and wipe again.
- Do not submerge the appliance in water or any other liquids.
• Thoroughly dry the Mini Waffle Maker before storing. - If there is food burned onto the Cooking Surface, pour on a little cooking oil and let sit for 5 to 10 minutes. Scrub the Cooking Surface with a sponge or soft bristled brush to dislodge food. Use a damp, soapy cloth to wipe down the Cooking Surface. Thoroughly rinse the cloth and wipe again. If any food remains, pour on cooking oil and let sit for a few hours, then scrub and wipe clean.
- Never use abrasive cleaning agents to clean your appliance as this may damage the Mini Waffle Maker and its nonstick Cooking Surface.

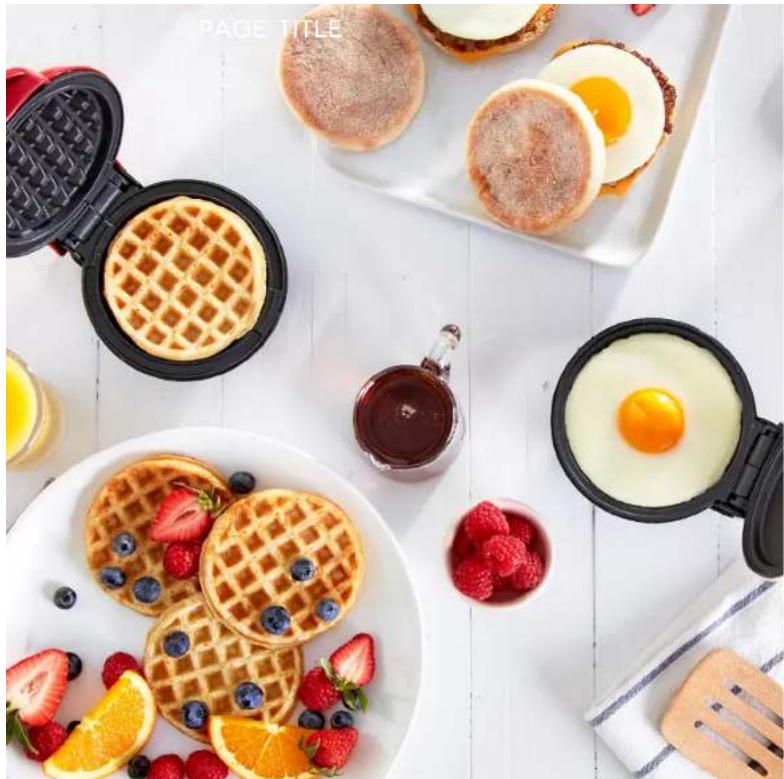
natural_image
Top-down view of a breakfast arrangement featuring waffles, blueberries, strawberries, and a fork on a marble surface (no text or symbols visible)RECIPE GUIDE

Follow us!
@bydash | recipes, videos, & inspiration
@unprocessyourfood | veg & vegan-friendly meals

CLASSIC WAFFLES
Ingredients:
1 cup flour
1 tbsp sugar
2 tsp baking powder
14 tsp salt
1 egg
1 cup milk
2 tbsp vegetable oil or butter, melted
Directions:
- In a medium bowl, sift the flour, sugar, baking powder and salt. Whisk the egg, milk and melted butter in a separate bowl. Add the wet ingredients to the dry and mix until just incorporated.
- Grease the Mini Waffle Maker with butter or coat with a light coat of cooking spray. Pour 1/4 cup of batter into the Mini Waffle Maker and cook until golden brown. Repeat with the remaining batter.
- Serve with a drizzle of maple syrup and fresh berries, if desired.

natural_image
Electric waffle being opened with a golden baffle, surrounded by fresh strawberries and glasses (no text or symbols visible)
PALEO WAFFLES
Ingredients:
2 large eggs
1/4 cup almond flour
½ banana, mashed
1 ½ tbsp coconut flour
34 tsp maple syrup
Pinch of salt
12 tsp vanilla extract
12 tsp baking powder
Directions
- Mix together eggs, banana, vanilla extract and maple syrup in a small bowl.
- Whisk together dry ingredients in a separate bowl. Add the wet ingredients to the dry and mix until just incorporated.
- Add ¼ cup of batter to your Mini Waffle Maker and cook until golden brown on both sides.

GINGERBREAD WAFFLES
Ingredients:
1 cup all-purpose flour
1 tsp baking soda
12 tsp cinnamon
1 egg
14 tsp cloves
34 cup buttermilk
14 tsp nutmeg
2 tbsp molasses
1 tsp ground ginger
2 tbsp safflower oil
14 tsp sea salt
Directions:
- In a medium bowl combine flour, spices, salt and baking soda.
- Whisk together the egg, buttermilk, molasses and safflower oil.
- Add the wet ingredients to the dry ingredients.
- Pour 1/4 cup of batter onto the Mini Waffle Maker. Repeat with remaining batter. Top with maple syrup and bananas.

SNICKERDOODLE WAFFLES
Ingredients:
1½ cups milk
13 cup unsalted butter
2 cups all-purpose flour
2 tsp kosher salt
4 tsp baking powder
13 cup sugar
4 tsp cinnamon
3 tsp cream of tartar
2 large eggs
2 tsp vanilla extract
-
For cinnamon sugar garnish:
14 cup granulated white sugar
1 tbsp ground cinnamon
[Non-Text]
Directions:
- In a small pan over low heat, combine milk and butter. Stir until milk is warm and butter is melted.
- Mix together flour, salt, baking powder, sugar, cinnamon and cream of tartar in a large bowl.
- Whisk together eggs and vanilla. Slowly pour in the warmed milk and butter.
- Pour dry ingredients into the wet in three stages, incorporating all dry ingredients before adding the next.
- Pour about 14 cup of batter onto your Mini Waffle Maker and cook until golden brown on both sides.
- Remove waffle. Set on a wire rack and sprinkle with cinnamon sugar garnish.

natural_image
Close-up of golden waffles topped with white whipped cream and fresh strawberries on a white plate (no text or symbols visible)MORE RECIPE IDEAS
| RECIPE IDEA | INGREDIENTS | COOKING TIME |
| Protein Waffle | Classic Waffle Recipe (pg 16)1 scoop protein powder | 4-6 min |
| Cornbread Waffle | 14 cup cornbread batter | 6-8 min |
| Mashed Potato Bite | 3 tbsp mashed potatoes | 5 min |
| Smore Biscuit | 1 refrigerated biscuit dough, sliced lengthwise2 squares milk chocolate5 mini marshmallows | 5-7 min |
| Grilled Cheese | 2 slices white or wheat bread, buttered2 slices American Cheese | 5 min |
| Chocolate Chip Cookie | 2 tbsp cookie dough | 5-7 min |
| Waffle Omelette | 1 egg beaten2 tbsp chopped veggies1 tbsp grated Swiss cheese | 5 min |

natural_image
Top-down view of a breakfast and waffle setup with blueberries, strawberries, and egg yolk on a white wooden table (no text or symbols visible)

MINI MAKER GRIDDLE
Parts & Features....28
Using Your Mini Maker Griddle....29-32
Cleaning & Maintenance....33
Troubleshooting....34-35
Recipes....37-45
Customer Support 46
Warranty 47

PARTS & FEATURES USING YOUR MINI MAKER GRIDDLE
BEFORE FIRST USE
Remove all packaging material and thoroughly clean your Mini Maker Griddle.
Never touch the Cooking Surface or Cover while appliance is in use.

DO NOT lift the Cover so that your arm is over the Cooking Surface as it is hot and may cause injury.
Always lift and lower the Cover by the Cover Handle. Lift from the side.
USING YOUR MINI MAKER GRIDDLE USING YOUR MINI MAKER GRIDDLE
natural_image
Close-up of a blue circular object with red arrow pointing to it, set against a yellow background (no text or symbols)1 Place the appliance on a stable and dry surface. Plug the cord into a power outlet. The Indicator Light (photo A) will illuminate, signaling that the Mini Maker Griddle is heating up.
natural_image
Black plastic coffee maker with open lid and base, labeled 'B' in red (no text or symbols on the object itself)2 Once the Cooking Surface reaches the optimal cooking temperature, the Indicator Light will automatically shut off. Now, you're ready to get cooking (photo B)!

natural_image
Hand pouring yellow liquid from a glass bowl into a black waffle-shaped container, with a green spray bottle nearby (no text or symbols visible)3 Carefully lift the Cover by the Cover Handle and spray both Cooking Surfaces with a small amount of cooking spray (photo C).
natural_image
Hand pouring liquid into a black frying pan (no text or symbols visible)4 Place or pour batter onto the Cooking Surface (photo D) and close the Cover.
USING YOUR MINI MAKER GRIDDLE
CLEANING & MAINTENANCE

natural_image
Open waffle being filled with a wooden spatula, no text or symbols visible5 Once food is cooked to your preference, carefully remove it from the Cooking Surface with a heat-resistant nylon or silicone cooking utensil (photo E).
natural_image
Yellow circular device with a green circular button and label 'F' in red at bottom left (no other text or symbols)6 When you have finished cooking, unplug your Mini Maker Griddle and allow it to cool before moving or cleaning (photo F).

NOTE: Do not use metal utensils to remove or place food on the Cooking Surface as this will damage the nonstick surface.
Always allow the appliance to cool completely before moving, cleaning, or storing.
In order to keep your Mini Maker Griddle in pristine working order, thoroughly clean the appliance after each use. This will prevent the build-up of food or oil.
- Unplug the Mini Maker Griddle and allow it to cool completely.
- Using a damp, soapy cloth, wipe down the Cooking Surface and Cover. Thoroughly rinse the cloth and wipe again.
- Do not submerge appliance in water or any other liquids.
• Thoroughly dry the Mini Maker Griddle before storing. - If there is food burned onto the Cooking Surface, pour on a little cooking oil and let sit for 5 to 10 minutes. Scrub the Cooking Surface with a sponge or soft bristled brush to dislodge food. Use a damp, soapy cloth to wipe down the Cooking Surface. Thoroughly rinse the cloth and wipe again. If any food remains, pour on cooking oil and let sit for a few hours, then scrub and wipe clean.
- Never use abrasive cleaning agents to clean your appliance as this may damage the Mini Maker Griddle and its nonstick Cooking Surface.
TROUBLESHOOTING
TROUBLESHOOTING
While Dash products are durable, you may encounter one or more of the problems listed below. If the issue is either not solved by the solutions recommended below or not included on this page, please contact our Customer Support Team at 1-800-898-6970 or support@bydash.com.
| ISSUE SOLUTION | |
| The light on the Mini Maker keeps shutting off. | This is normal. During the cooking process, the heating element will automatically turn on and off to regulate the temperature and ensure that the Cooking Surface does not get too hot or cold. When this occurs, the Indicator Light turns on and off. |
| How do I know when the Mini Maker is heated and ready to use? | When the Mini Maker reaches the optimal temperature, the Indicator Light shuts off and that means you're ready to get cooking! |
| There is no On/Off Button.How do I turn the Mini Maker off and on? | To turn on, simply plug in the power cord.When you're done cooking, turn off the Mini Maker by unplugging it. |
| ISSUE SOLUTION | |
| When using my Mini Maker, the Cover gets very hot. Is this normal? | Yes, this is completely normal. When using your Mini Maker, always lift and lower the Cover by the Cover Handle. To prevent personal injury, DO NOT lift the Cover so that your arm is over the Cooking Surface as it is hot and may cause injury. Lift from the side. |
| After using my Mini Maker a few times, food is starting to stick to the surface. What is happening? | There is probably a build-up of burnt food residue on the Cooking Surface. This is normal, especially when cooking with sugar. Allow the appliance to cool fully, pour on a little cooking oil and let sit for 5-10 minutes. Scrub Surface with a sponge or soft bristled brush to dislodge food. Use a damp, soapy cloth to wipe down the Cooking Surface. Rinse the cloth and wipe again. If food remains, pour on cooking oil and let sit for a few hours, then scrub and wipe clean. |
| The Indicator Light will not turn on and the Cooking Surface is failing to heat. | 1. Ensure that the power cord is plugged into the power outlet.2. Check to make sure the power outlet is operating correctly.3. Determine if a power failure has occurred in your home, apartment or building. |
natural_image
Close-up of a light blue electric fryer with a side dish, a white cup of dark sauce, and two cracked eggs on a table (no text or symbols visible)RECIPE GUIDE

Follow us!
@bydash | recipes, videos, & inspiration
@unprocessyourfood | veg & vegan-friendly meals

CLASSIC HOMEMADE PANCAKES
Ingredients:
1 cup flour
1 tbsp sugar
2 tsp baking powder
14 tsp salt
1 egg
1 cup milk
2 tbsp vegetable oil or butter, melted
Directions:
- In a medium bowl, sift the flour, sugar, baking powder and salt. In a separate bowl, whisk together the egg, milk, and butter. Combine the wet ingredients with the dry and whisk until just incorporated.
- Pour ¼ cup of batter onto the heated Mini Maker Griddle, close the Cover, and cook for about 5 minutes until golden brown. Repeat with the remaining batter.

natural_image
Stack of pancakes topped with fresh berries and blueberries, with a glass of red liquid in the background (no text or symbols visible)
CHOCOLATE BROWNIE PANCAKES
Ingredients:
1 banana
2 tbsp sugar
1 egg
2 tbsp unsweetened cocoa
2 tbsp butter, melted
14 tsp salt
½ cup flour
milk, as needed
1 tsp baking soda
Directions:
- Mash the banana. Mix in the egg and melted butter. Sift together the flour, baking soda, sugar, cocoa and salt. Combine the wet and dry ingredients.
- If needed, add small amount of milk to reach your desired consistency. Pour 14 cup of batter into the Mini Maker Griddle and cook until golden.
- Top the pancakes with chocolate syrup and serve!

natural_image
Stack of chocolate pancakes with glossy glaze being poured into it, served on a white plate with fork (no text or symbols visible)
SAUSAGE.
EGG & CHEESE
BREAKFAST SANDWICH
Ingredients:
1 English muffin
1 sausage patty
1 egg
1 slice cheddar or American cheese
2 slices tomato
Directions:
- Toast English muffin in the Mini Maker Griddle.
- Cook the sausage patty. Place the patty and cheese on the English muffin.
- Break an egg onto the Cooking Surface and cook for one minute.
- Place the egg on the sandwich and top with tomato slices and the other half of the English muffin.

natural_image
Close-up of a sandwich with lettuce, tomato, and cheese on a wooden board (no text or symbols visible)
POTATO PANCAKE HASH BROWNS
Ingredients:
2 medium potatoes.
peeled and shredded
½ tsp salt
14 tsp cracked black pepper
½ yellow onion, finely diced
1 egg
2 tbsp flour
½ tsp onion powder
Directions:
- Combine all of the ingredients in a large bowl and mix until well-combined.
- Scoop out small amounts of the potato mixture and form into patties. Spray or grease the Mini Maker Griddle with a small amount of oil. Cook patties one at a time in the Mini Maker Griddle.
- Serve with Greek yogurt and applesauce.
MORE RECIPE IDEAS
| RECIPE IDEA INGREDIENTS | COOKING TIME | |
| Cinnamon Roll | 1 piece of refrigerated cinnamon roll dough | 7-9 min |
| Grilled Ham & Cheese Pocket | Refrigerated crescent roll dough, rolled and cut into 2 (4") circles1 slice ham1 slice cheese | 6-8 min |
| Brie en Croute | Refrigerated crescent roll dough, rolled and cut into 2 (4") circles1 slice Brie cheese1 tsp raspberry jelly | 6 min |
| Cheeseburger Slider | 3 oz 90% lean ground beef1 tbsp shredded cheese | 10 min |
| Quesadilla | 4" tortilla (corn or flour)1⁄2 cup grated Mexican cheese blend2 tbsp salsa | 4-6 min |
| Cheesy Biscuit | 1 biscuit, sliced in half lengthwise1⁄2 cup shredded cheddar cheese | 6-8 min |
| Waffle Omelette | 1 egg, beaten2 tbsp chopped veggies1 tbsp grated Swiss cheese | 5 min |
CUSTOMER SUPPORT
WARRANTY

Dash values quality and workmanship and stands behind this product with our Feel Good Guarantee ^2 . To learn more about our commitment to quality, visit bydash.com/feelgood.
Our customer support teams in the US and Canada are at your service Monday - Friday during the times below. Contact us at 1 (800) 898-6970 or support@bydash.com

Hey Hawaii! You can reach our customer service team from 5AM to 5PM. And, Alaska, feel free to reach out from 6AM to 6PM.
STOREBOUND, LLC - 1 YEAR LIMITED WARRANTY
Your StoreBound product is warranted to be free from defects in material and workmanship for a period of one (1) year from the date of the original purchase when utilized for normal and intended household use. Should any defect covered by the terms of the limited warranty be discovered within one (1) year, StoreBound, LLC will repair or replace the defective part. To process a warranty claim, contact Customer Support at 1-800-896-6770 for further assistance and instruction. A Customer Support agent will assist you by troubleshooting minor problems, if troubleshooting fails to fix the problem, a return authorization will be issued. Proof of purchase indicating the date and place of purchase, as well as the unit's model number and serial number is required and should accompany the return. You must also include your full name, shipping address, and telephone number. We are unable to ship returns to a PO box. StoreBound will not be responsible for delays or unprocessed claims resulting from a purchaser's failure to provide any or all of the necessary information. Freight costs must be prepaid by the purchaser.
Send all inquiries to support@bydash.com.
There are no express warranties except as listed above.
Warranty is voided if used outside of the 50 states of the United States, the District of Columbia or the 10 provinces of Canada. Warranty is voided if used with an electric adapter/converter or used with any voltage plug other than 120V.
REPAIR OR REPLACEMENT AS PROVIDED UNDER THIS WARRANTY IS THE EXCLUSIVE REMEDY OF THE CUSTOMER. STOREBOUND SHALL NOT BE LIABLE FOR ANY INCIDENTAL OR CONSEQUENTIAL DAMAGES OR FOR BREACH OF ANY EXPRESS OR IMPLIED WARRANTY ON THIS PRODUCT EXCEPT TO THE EXTENT REQUIRED BY APPLICABLE LAW. ANY IMPLIED WARRANTY OF MERCHANTABILITY OR FITNESS FOR A PARTICULAR PURPOSE ON THIS PRODUCT IS LIMITED IN DURATION TO THE DURATION OF THIS WARRANTY.
Some states do not allow the exclusion or limitation of incidental or consequential damages, or limitations on how long an implied warranty lasts. Therefore, the above exclusions or limitations may not apply to you. This warranty gives you specific legal rights and you may also have other rights, which vary from state to state. Refurbished items or items not purchased through an authorized retailer are not eligible for warranty claims.
REPAIRS
DANGER! Risk of electric shock! The Dash Mini Waffle Maker and Mini Maker Griddle are electrical appliances. Do not attempt to repair the appliance yourself under any circumstances.
Contact Customer Support regarding repairs to the appliance.
TECHNICAL SPECIFICATIONS
Voltage 120V - 60Hz
Power Rating 350W
Stock#: DMSW002 20210510 V5


This product has passed food safety testing in accordance with FDA guidelines.

- DMSW002
- MINI MAKER
- PACK
- MINI WAFFLE MAKER
- IMPORTANT SAFEGUARDS IMPORTANT SAFEGUARDS
- IMPORTANT SAFEGUARDS: PLEASE READ AND SAVE THIS INSTRUCTION AND CARE MANUAL.
- GARANTIES IMPORTANTES
- GARANTIES IMPORTANTES: VEUILLEZ LIRE ET CONSERVER CE MODE D'EMPLOI ET D'ENTRETIEN
- PARTS & FEATURES USING YOUR MINI WAFFLE MAKER
- BEFORE FIRST USE
- USING YOUR MINI WAFFLE MAKER USING YOUR MINI WAFFLE MAKER
- USING YOUR MINI WAFFLE MAKER
- CLEANING & MAINTENANCE
- RECIPE GUIDE
- CLASSIC WAFFLES
- Ingredients:
- Directions:
- PALEO WAFFLES
- Directions
- GINGERBREAD WAFFLES
- SNICKERDOODLE WAFFLES
- MINI MAKER GRIDDLE
- PARTS & FEATURES USING YOUR MINI MAKER GRIDDLE
- USING YOUR MINI MAKER GRIDDLE USING YOUR MINI MAKER GRIDDLE
- USING YOUR MINI MAKER GRIDDLE
- TROUBLESHOOTING
- CLASSIC HOMEMADE PANCAKES
- CHOCOLATE BROWNIE PANCAKES
- SAUSAGE.
- EGG & CHEESE
- BREAKFAST SANDWICH
- POTATO PANCAKE HASH BROWNS
- CUSTOMER SUPPORT
- WARRANTY
- STOREBOUND, LLC - 1 YEAR LIMITED WARRANTY
- REPAIRS
- TECHNICAL SPECIFICATIONS
Brand : Dash
Model : DMSW002BK
Category : Waffle Maker