
AR5A130D - Household Fan ARDES - Free user manual and instructions
Find the device manual for free AR5A130D ARDES in PDF.


| Product Type | Ceiling fan with light kit |
| Brand | Ardes |
| Model | AR5A130D |
| Blade Sweep Diameter | 130 cm (51 in) |
| Number of Blades | 5 |
| Blade Material | Wood with straw insert (double sided) |
| Motor Type | AC (alternating current) |
| Control Method | Pull cord chains (speed and light) |
| Reversible Function | Yes (for summer/winter operation) |
| Light Socket | E27, max 60W (bulb not included) |
| Light Shade | Decorative glass |
| Mounting | Ceiling mount with support plate and hook |
| Minimum Installation Height | 2.3 m from floor to bottom of fan |
| Electrical Rating | 230 V ~ 50 Hz (estimated) |
| Power Connection | Flexible cable plug or all-pole switch (not supplied) |
| Usage Location | Indoor only |
| Safety Features | Overvoltage category III, must be grounded |
| Maintenance | Clean with soft dry cloth; do not use solvents or water |
| Warranty | 24 months |
| Approximate Weight | 7 kg (15.4 lbs) |
| Package Contents | Fan motor, blades, blade supports, cap, screws, pull cords, light kit, hardware |
Frequently Asked Questions - AR5A130D ARDES
User questions about AR5A130D ARDES
0 question about this device. Answer the ones you know or ask your own.
Ask a new question about this device
Download the instructions for your Household Fan in PDF format for free! Find your manual AR5A130D - ARDES and take your electronic device back in hand. On this page are published all the documents necessary for the use of your device. AR5A130D by ARDES.
USER MANUAL AR5A130D ARDES
natural_image
Black-and-white photo of a five-petal ceiling fan with a visible propeller and bulb, labeled '5A130D' (no other text or symbols)natural_image
Simple line drawing of an open box with a cluster of round objects inside (no text or symbols)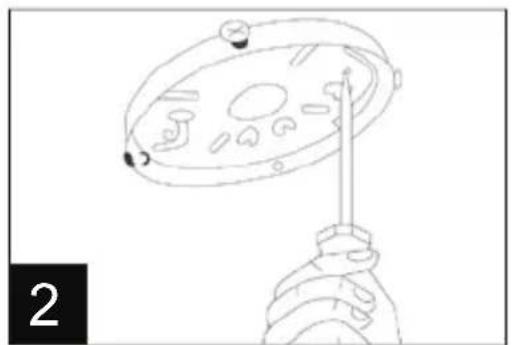
natural_image
Line drawing of a mechanical device with a handle and internal components (no text or symbols)
natural_image
Illustration of a hand using a tool to press or install a mechanical component, with a downward arrow indicating motion (no text or symbols present)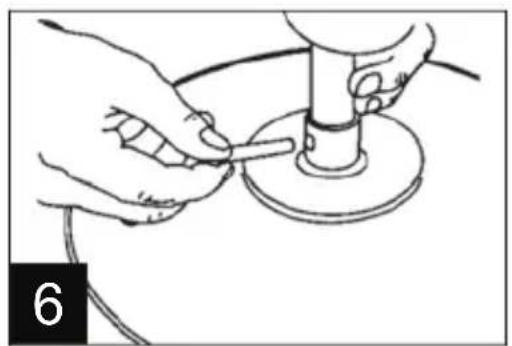
natural_image
Illustration of hands using a tool to apply material to a mechanical component (no text or symbols visible)
natural_image
Illustration of hands using a sewing machine to adjust a circular component (no text or symbols visible)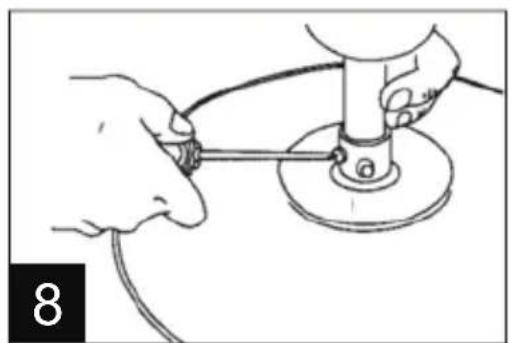
natural_image
Illustration of hands using a power tool to lift a circular component (no text or symbols visible)
natural_image
Diagram of a hand holding a device with wires and components, no visible text or symbols
natural_image
Mechanical assembly diagram showing a rotating component with a tool inserted, labeled '12' (no text or symbols on the diagram itself)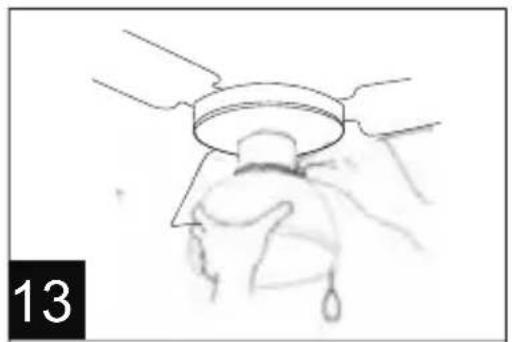
natural_image
Hand holding a small object with a circular top, possibly a lamp or fixture (no text or symbols visible)This appliance may be used by children 8 years of age and older and people with reduced physical, sensory or mental capacities or with a lack of experience and knowledge if they are adequately supervised or have been instructed on the safe use of the appliance and are aware of the related dangers.
Children must not play with the appliance.
Cleaning and maintenance operations must not be performed by children without supervision.
This appliance must be installed by professionally qualified personnel.
Since the installation of the equipment sets, the power of the network must be done, according to the installation rules, through flexible cable plug or by all pole switch that provide full disconnection under overvoltage category III conditions. Contacts opening distance shall not be less than 3 mm.
Equipment must be installed at the height of at least 2,3 meters from the floor (2,3 meters means from the floor to the bottom of the fan).
Warnings
ATTENTION : read this booklet carefully it contains important instructions for a safe installation, use and maintenance. Important instructions to be kept for future reference.
Remove the packing and make sure that the appliance is intact. In case of doubt do not use it and address to an after-sales service recommended by the manufacturer. Do not allow packaging materials like bags and staples can be reached by children.
Before connecting the appliance, check if the electrical voltage and frequency of the circuit correspond to those indicated on the appliance.
The manufacturer is not responsible for any eventual damages caused by improper or faulty use.
The unit must be connected to a good ground conductor.
Equipment must be installed at the height of at least 2,3 meters from the floor (2,3 meters means from the floor to the bottom of the fan).
Since the installation of the equipment sets, the power of the network must be done through flexible cable plug or by pole switch with contact opening distance not less than 3 mm.
For the installation of the apparatus used a cable type H05 VVF.
Before maintenance and cleaning operations turn off the product and disconnect from the mains power supply turning off the system switch.

This appliance must not be supplied through an external switching device, such as a timer, or connected to a circuit that is regularly switched on and off by the utility.
If the appliance is out of work, switch it off without tampering it. If any repair is required please contact only our after-sales centres and ask for original spare parts. Otherwise safety of the appliance can be compromised.
The use of every electrical appliance calls for the awareness of some basic rules, such us:
-do not touch the appliance with wet hands or feet
-never expose the appliance to atmospheric conditions (rain, sun...)
Do not use the device in the presence of potentially explosive or flammable liquids or gases.
Do not leave the appliance plugged in when not in use. Swith it off and unplug it when it is not in use.
Technical informations

- Screw terminal
- Support plate
- Support hook
- Support rod
- Screws for fixing the cap (4 pcs.)
- Cap
- Pin for fix the support rod
- Safety stopper and washer
- Motor
- Switch for reversible function
- Screws for fix the decotative glass
- Lamp holder
- Decorative glass
- Screws for secur the blades to the motor
- Blades
- Blades support
- Screws and nuts for secur the blades to the blades support
- Pull cords chain
Assembling

natural_image
Simple line drawing of an open box with a cluster of round objects inside (no text or symbols)
natural_image
Line drawing of a mechanical component with a tool inserted, no text or symbols present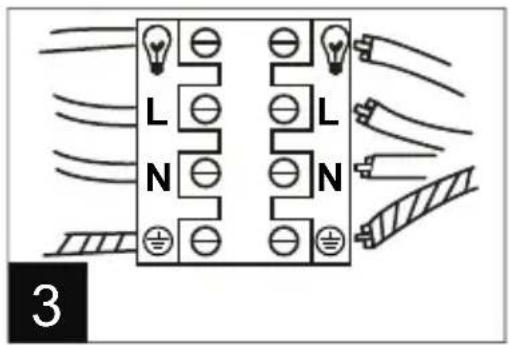


natural_image
Illustration of a hand using a tool to press or install a mechanical component, with a downward arrow indicating motion (no text or symbols present)
natural_image
Illustration of hands using a tool to adjust or install a mechanical component (no text or symbols visible)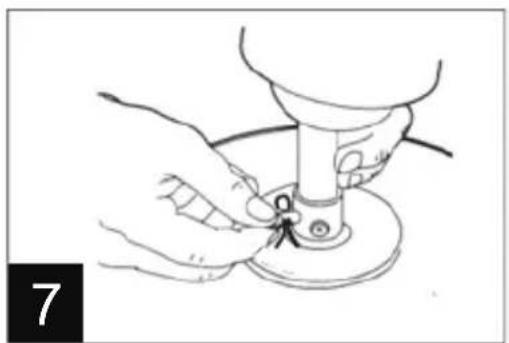
natural_image
Line drawing of hands using a sewing machine to adjust a circular component (no text or symbols)
natural_image
Illustration of hands using a power tool to lift a circular component (no text or symbols visible)
natural_image
Diagram of a lamp or stand with wires and components, no visible text or symbols

natural_image
Mechanical assembly diagram showing a rotating component with a tool inserted, labeled '12' (no text or symbols on the diagram itself)
natural_image
Hand holding a circular object with a ring, possibly a lamp or device (no text or symbols visible)Make sure you have all the components before beginning installation. To prevent damage, attach the motor to the support rod on a soft surface or use the polystyrene contained in the package.
-Open the carton box and take out the fan (fig. 1)
-Assemble the support plate on the ceiling using two or more screw anchors and appropriate washers. Attention: the provided screw are for wood joist. The electric cables coming out from the ceiling must be insert on the central holes of the support plate (fig. 2).
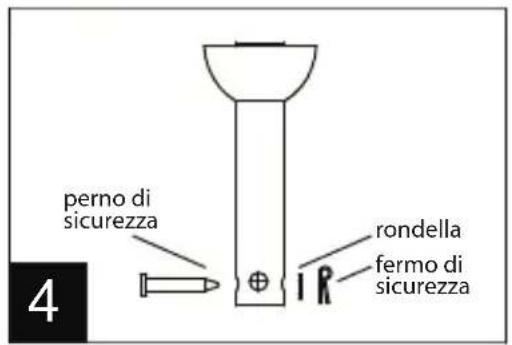
- Remove the safety stopper and washer from the safety pin then remove the safety pin from the support rod (fig. 4). Insert the support rod through the cap.
-Loosen the screw placed on the bottom part of the support rod and insert the electric cables coming out from the motor through the support rod (fig. 5).
-Fix the support rod to the motor housing using the safety pin and lock it using the washer and the safety stopper (fig. 6 and 7).
-Tighten the screw placed on the bottom part of the support rod (fig. 8).
-Unscrew the 4 screws placed on the support plate.
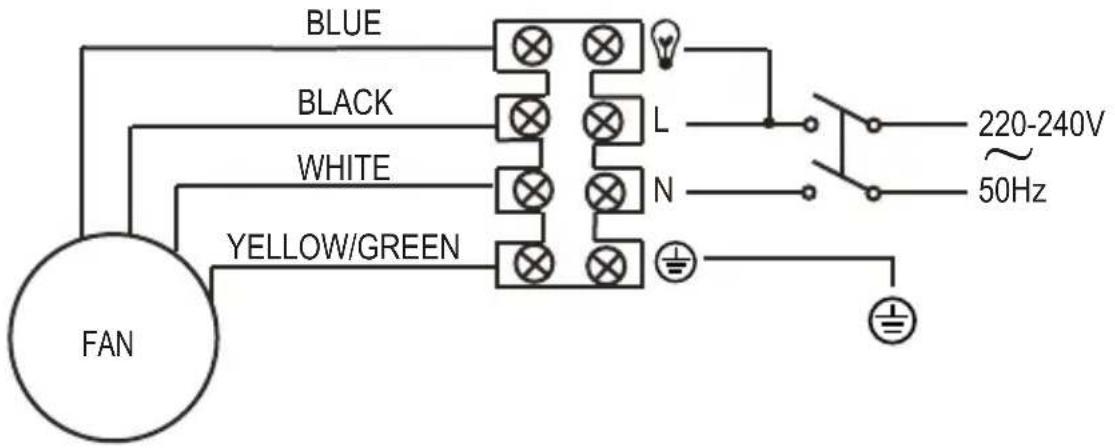
-Hang the fan to the hook on the support plate using the cap's hole and connect the electrical cables (fig. 9). NB: arrange the electrical connection as shown in fig. 3.
-Remove the fan from the hook and fix the cap to the support plate making sure the holes of the cap are coincident to the holes of the support plate. Fix the cap by using the 4 screws previously unscrewed.
ATTENTION: make sure to tighten the screws very well and that the groove of the plastic ball fit the jut of the cap (fig. 10).
-Fix the blade support to the blades by using the provided screws and nuts (fig. 11). N.B: The blades are double face - one side is wood and another side is wood with straw insert. Before fix the blades support take care of the blades's side that you prefer.
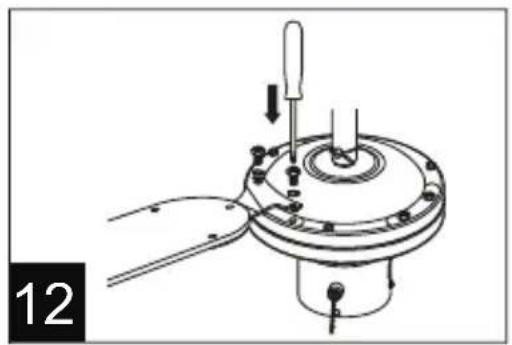
-Unscrew the screws and washer from the motor and remove the paper protection. Place the blades with blade support on the motor making sure that the holes are coincident and fix them by using the washer and screws previously unscrewed (fig. 12).
-Install the light bulb (E27 type Max 60W not provided) in the lamp holder -Install the decorative glass and fix it using the provided screws. Take care to do not tight the screws too much or the decorative glass can get broken (fig. 13).
ELECTRICAL CONNECTION:
Instructions for use
The ceiling fan is provided with 2 pull cord chain and switch for reversible function that allows to invert the rotation of the blades.
The pull cord chains control the light and the speed; the function of the pull cord chains are as below:

Speed pull cord chain: you can select maximum speed (pulling the chain once), medium speed (pulling the chain twice) or minimum speed (pulling the chain thrice).
Light pull cord chain: you can turn on or off the light of the fan.
Maintenance
Before carrying out the regular cleaning operations and before replacing the lamp turn off the fan and disconnect it from the electrical supply.
For external cleaning use a soft and dry cloth.
DO NOT dip the device in water, or splash it with any other liquids.
DO NOT use solvents or any other chemical products for cleaning it.
GARANZIA
Condizioni
Terms and Conditions
The guarantee is valid for 24 months.
This guarantee applies only if it has been duly filled in and is submitted with the receipt showing the date of purchase.
The guarantee covers the replacement or repair of parts making up the appliance which were faulty at source due to manufacturing faults.
After the guarantee has expired, the appliance will be repaired against payment.
The manufacturer declines any responsibility for damage to persons, animals or property due to misuse of the appliance and failure to observe the directions contained in the instructions.
Limits
All rights under this guarantee and any responsibility on our part will be voided if the appliance has been:
- mishandled by unauthorized persons
- improperly used, stored or transported.
The guarantee does not cover damage to the outward appearance or any other that does not prevent regular operation.
If any faults should be found despite the care taken in selecting the materials and in creating the product, or if any information or advice are required, please contact your local dealer.

USER INFORMATION
Implementation of Directive 2012/19/EU on Waste Electrical and Electronic Equipment (WEEE)", pertaining to reduced use of hazardous substances in electrical and electronic equipment, as well as to waste disposal".
The symbol of the crossed-out wheelie bin on the equipment or on its packaging indicates that the product must be disposed of separately from other waste at the end of its service life.
The user must therefore take the dismissed equipment to suitable separate collection centres for electrical and electronic waste, or return it to the dealer in case they purchase a new device of equivalent type, at a one-to-one-ratio.
Suitable segregated collection of the equipment for subsequent recycling, treatment or environmentally-friendly disposal helps prevent damage to the environment and to human health, and encourages the re-use and/or recycling of the materials that make up the equipment.
Abusive disposal of the product by the user shall result in the application of administrative fines in accordance with the laws in force.
Ardes
Poly Pool S.p.A. Via Sottocorna, 21/B
24020 Parre (Bergamo) - Italy
Tel. +39 035 4104000 r.a. - Fax +39 035 702716
http://www.ardes.it - e-mail:info@ardes.it
MADE IN CHINA


Brand : ARDES
Model : AR5A130D
Category : Household Fan