
Mare - Water pump Neno - Free user manual and instructions
Find the device manual for free Mare Neno in PDF.

| Product Type | Double Electronic Breast Pump |
| Brand | Neno |
| Model | Mare |
| Pump Dimensions | 77 x 95 mm |
| Gross Weight | 748 g |
| Power Input | 110-240V, 50-60Hz |
| Power Output | 5V, 2A |
| Battery Type | Rechargeable Li-ion, 3.7V, 2000mAh |
| Charging Time | Approximately 2 hours |
| Operating Time | Up to 2 hours |
| Suction Levels (Stimulation) | 5 levels (L1-L5, 3.9-20.5 kPa) |
| Suction Levels (Expression) | 9 levels (L1-L9, 18.9-42.9 kPa) |
| Modes | Stimulation and Expression (automatic switch after 2 minutes) |
| Display | Touch screen with timer and battery indicator |
| Memory Function | Saves last used settings |
| Auto Shut-off | After 30 minutes of use |
| Material | BPA-free silicone and plastic |
| Single/Double Mode | Switchable via D/S button |
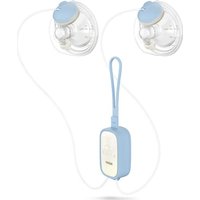
| Included Accessories | 2 breast shields, 2 caps, 2 connectors, 2 membrane covers, 2 membranes, 2 valves, 2 milk bottles, 2 bottle holders, 2 teat sets, charging cable (USB-C), pumping device, tube |
| Warranty | 24 months |
| Cleaning | Wash milk-contact parts with soap and water; sanitize by boiling for 10 minutes. Pump body wipe with damp cloth. |
Frequently Asked Questions - Mare Neno
User questions about Mare Neno
0 question about this device. Answer the ones you know or ask your own.
Ask a new question about this device
Download the instructions for your Water pump in PDF format for free! Find your manual Mare - Neno and take your electronic device back in hand. On this page are published all the documents necessary for the use of your device. Mare by Neno.
USER MANUAL Mare Neno
natural_image
Two stylized white clouds on a white background, no text or symbols presentneno ^TM
mare
INSTRUKCJA OBSŁUGI

Szanowny Kliencie,

3. WYŚWIETLACZ I IKONY
natural_image
Simple line drawing of a container with a handle and three circular symbols inside (no text or labels)
4. ROZPOCZYNANIE PRACY Z URZĄDZENIEM
natural_image
Simple line drawing of a megaphone and a jar with a downward arrow (no text or symbols)natural_image
Simple line drawing of a megaphone with a downward arrow indicating compression or disassembly (no text or symbols)natural_image
Simple line drawing of a megaphone with an arrow indicating direction (no text or symbols)natural_image
Diagram of a funnel-shaped device with an arrow indicating upward motion, alongside three circular components (no text or symbols)natural_image
Diagram showing two mechanical components with a downward arrow indicating motion (no text or symbols)natural_image
Simple line drawing of a megaphone with an arrow indicating motion (no text or symbols)natural_image
Line drawing of a medical device with a bell and a cylindrical tube connected by tubing (no text or symbols)natural_image
Pure technical line drawing of a symmetrical mechanical component without any text or symbolsnatural_image
Line drawing of a hand holding a bottle, no text or symbols presentnatural_image
Illustration of a mechanical device with a pin and base, showing a transformation arrow (no text or symbols)inspired by Children, designed by Parents

neno ^TM
mare
USER'S MANUAL

Dear Customer,
Thank you for buying the double electronic breast pump Neno Mare. The pump is designed to express milk from a mother after birth. The pump can express milk from two breasts at once.
Plese refer to the user manual before use.
INDEX:
- Safety
- Elements
- Display panel and icons
- Before first use
- Cleaning and disinfection
- Assembling the device
- First use
- Functions
- Feeding
- Troubleshooting
- Long-term storage
- Specification
- Warranty
1. SAFETY
- Do not use the breast pump during pregnancy – it can cause preterm birth.
- Do not use the pump if you suffer from chronic diseases or hypersensitivity, which could make it painful for you to use.
- Always unplug the device immediately after finishing using it if you do not plan to charge the battery. Never leave the device plugged in without adult supervision.
- Do not use the device near flammable objects.
- Do not store the breast pump in spaces where it can fall or be pushed into the tub or sink.
- The breast pump and its accessories are not heat resistant. Keep them away from hot surfaces and fire.
- Immediately stop using the device if it is visibly damaged, the cord is damaged, the pump does not work correctly, or it was dropped on the ground.
- Do not use the breast pump if it was exposed to water or other liquids. Do not use the device under shower or in the bath. Do not submerge the device under water or other liquids, do not wash the pump under running water.
- Do not clean the device or its parts with abrasive cleaners.
- Due to hygienic reasons, only one person should use breast pump. Using the device by more than one person will cause loss of warranty.
- Do not try to repair the breast pump yourself. If any damage occurs, contact the authorized service center.
- Before each use make sure that no part of the breast pump is damaged.
- Do not boil or heat the expressed milk in a microwave, it can burn your child's mouth.
- Before first use, wash and sterilize all the parts of the breast pump that will be in direct contact with the breast or milk.
- Keep the pump out of reach of children. Be particularly careful when using the device around children.

2. ELEMENTS
A) Cap x2
B) Breast shield x2
C) Connector x2
D) Membrane cover x2
E) Membrane x2
F) Valve x2
G) Milk bottle x2
H) Bottle holder x2
I) Teat set x2
J) Charging cable
K) Pumping device
L) Tube


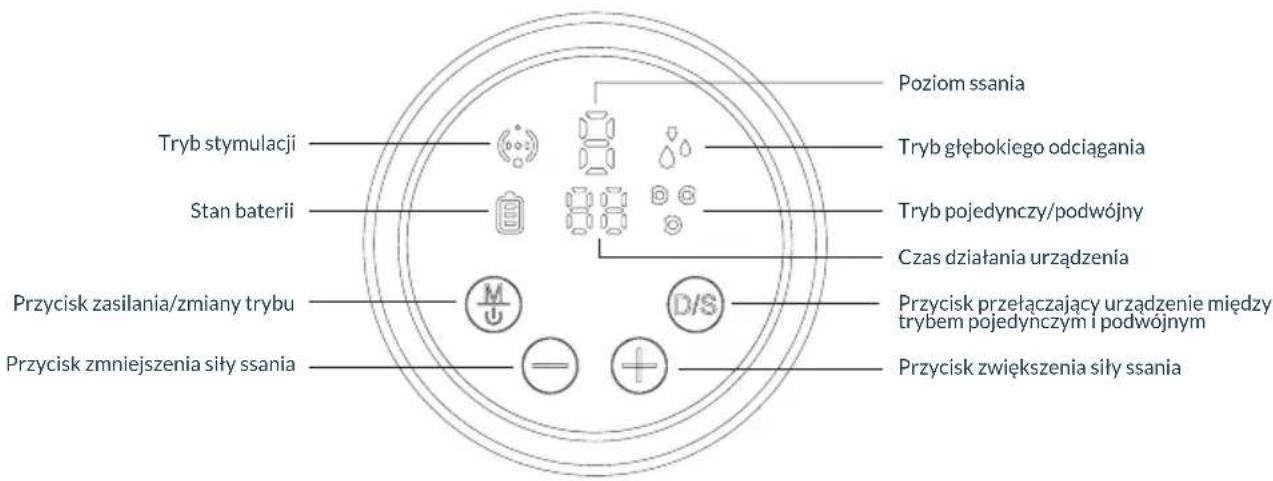
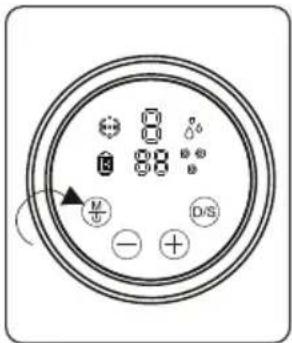
3. WYŚWIETLACZ I IKONY
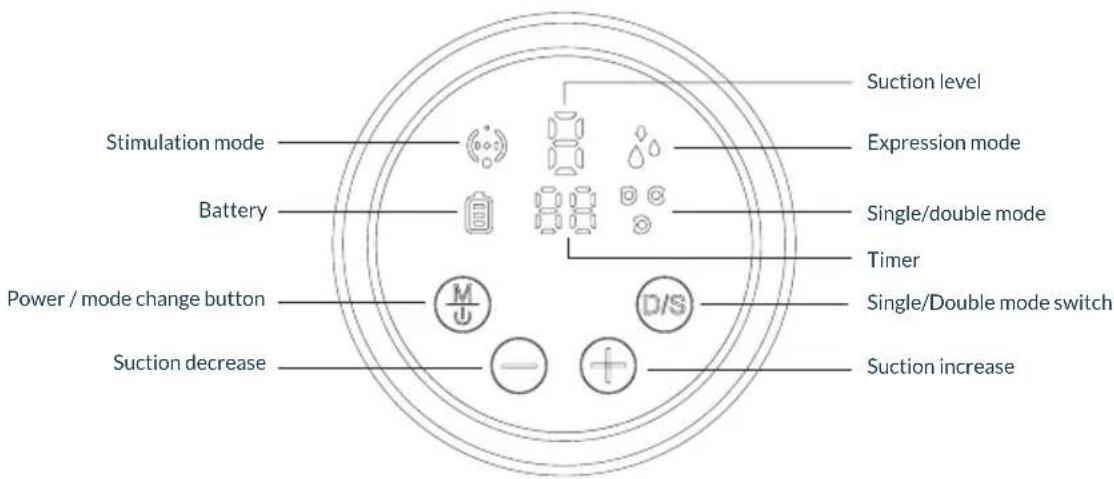
Power/mode change button: Press and hold the 📂 button for 2 seconds to turn the breast pump on or off. Press the button shortly to change the mode.
The device will automatically switch from stimulation to expression mode after 2 minutes. Additionally, the breast pump saves previous settings and is equipped with a timer. After turning on the device, the last used settings will appear. The device will automatically turn off after 30 minutes of use.
Suction level: + increases the suction level, - decreases the suction level. Stimulation mode has 6 levels (L1-L6). Expression mode has 9 levels (L1-L9).
Battery: Battery status: Indicates the remaining battery power. Charge the breast pump if the battery is low.
Timer: Indicates the working time of the pump. The device will automatically turn off after 30 minutes.
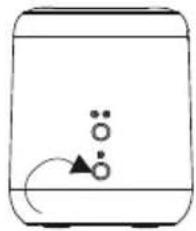
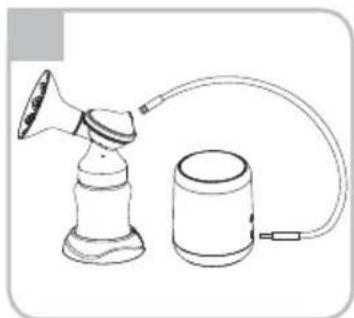
Single/double mode: Press the D/S button to switch the expression mode from one breast to both breasts. If you want to express milk from one breast, connect the tube and accessories to the port indicated on the picture.
natural_image
Simple line drawing of a container with three circles and a curved arrow, no text or symbols present.4. BEFORE FIRST USE
If you are using the breast pump for the first time:
-
Plug the device to a charger. Charge the batteries for 2 hours.
-
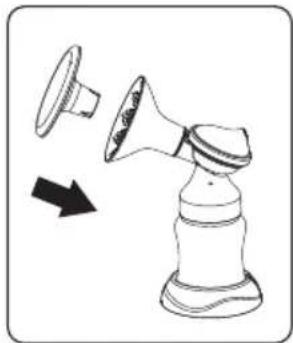
Disconnect all of the elements of the set that will be in direct contact with the breast or milk.
natural_image
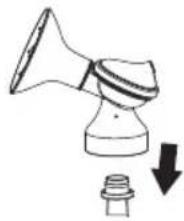
Simple line drawing of a megaphone and a jar with a downward arrow (no text or symbols)Screw the bottle from the connector
natural_image
Simple line drawing of a megaphone with a downward arrow indicating compression or disassembly (no text or symbols)Pull the membrane out of the connector
natural_image
Simple line drawing of a chess piece with a cleaver and arrow indicating movement (no text or symbols)Take the lid off the breast shield
natural_image
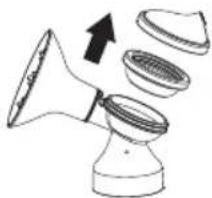
Diagram of a funnel-shaped device with an arrow indicating upward motion, alongside three circular components (no text or symbols)Separate the membrane lid and the membrane from the connector
- Wash elements of the set according to the "cleaning and disinfection" chapter.
5. CLEANING AND DISINFECTION
Cleaning and sanitizing are two different things. They need to be done separately, to protect your child and to ensure proper functioning of the breast pump.
Cleaning - cleaning the surface and getting rid of stains and dirt.
Sanitizing – getting rid of the bacteria and viruses that can be present on the surface of the device.
| Frequency of cleaning Breast shield | Breast pump elements (connector, suction bowl, suction cap) | Bottle and teat set |
| Before first use | Clean and sanitize Clean and sanitize Clean and sanitize | |
| After every use Clean Clean Clean | ||
| Once a day Sanitize Sanitize Sanitize |
The pumping device, charging cord and plug cannot be washed and sanitized in water. Do not use brushes or any other abrasive materials that can puncture the pump elements to clean the device. Disconnect the elements from the pump right after use, to help prevent growth of bacteria and accumulating residue. When washing and disinfecting of the pump use only water that is safe to drink.
Washing the breast pump in the sink
- Disconnect from each other the elements of the breast pump that come in contact with the breast or milk.
- Rinse the elements under running water to get rid of remaining milk.
- Soak the elements in water with soap for 5 minutes and rinse.
- Take the elements out and let them air-dry.
- Store the breast pump and elements in a dry place.
Sanitizing the breast pump in boiling water
- Fill a pot with water and heat it up. Remember to pour enough water to fully cover all elements of the breast pump.
- Bring the water to boil.
- Soak the accessories of the pump in boiling water for 10 minutes.
- Take the elements out and let them air-dry.
- Store the breast pump and elements in a dry place.
Cleaning the pumping device
Clean the pumping device using a damp cloth to prevent accumulation of dust on the device. Do not immerse the device under water and do not wash it under running water. Do not use abrasive materials and chemicals to clean the device.

6. ASSEMBLING THE DEVICE
Before each use, make sure that all elements of the set are clean, dry, and not damaged.
natural_image
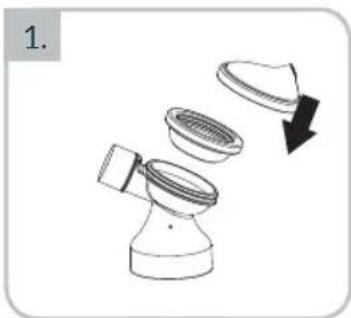
Diagram of a mechanical component with three parts and a downward arrow indicating motion (no text or symbols)- Place the membrane and the membrane lid on the connector

natural_image
Simple line drawing of a megaphone with an arrow indicating motion (no text or symbols)- Place the breast shield on the connector
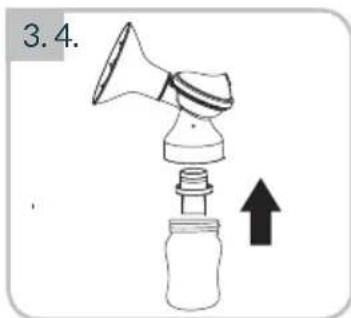
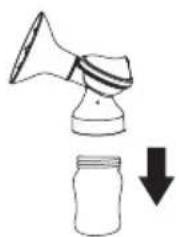
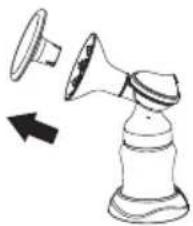
- Put the valve in the connector. Screw the milk bottle to the connector clockwise until it sits tightly in place
natural_image
Line drawing of a medical device with a bulb and cylindrical body connected by tubing (no text or symbols)-
Connect the tube to the membrane lid and to the corresponding port on the pumping device.
-
If you want to express milk from two breasts at the same time, repeat the 1-4 steps for the second set of elements included in the kit.

FIRST USE
natural_image
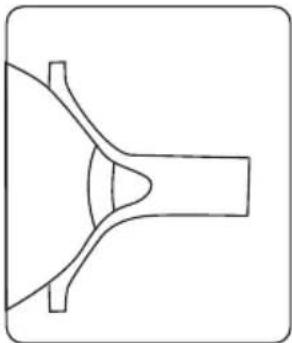
Pure technical line drawing of a symmetrical mechanical component without any text or symbols- Place the breast shield on the breast so that the nipple is inside the suction tube.
natural_image
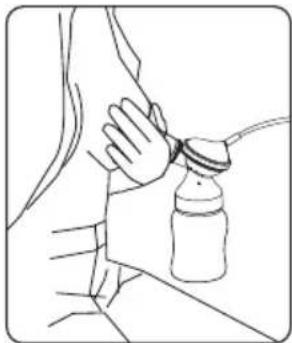
Line drawing of a hand holding a bottle, with no text or symbols present- Hold the breast pump set with your thumb and index finger. Support the breast with your hand.
- Turn on the breast pump by pressing the power button. Pick the most suitable suction power for you.
natural_image
Illustration of a hand holding a small object with an arrow indicating direction (no text or symbols)- After use, turn off the device by pressing and holding the power button for 2 seconds. Place the lid on the breast shield to protect the device and expressed milk from accumulating dust and dirt.
The device will start work in stimulation mode. In this mode, the breast pump mimics the natural sucking motion of the baby, to stimulate the milk flow.
Use the +/- buttons to set the sucking level. We recommend using a higher sucking level up until you feel a slight discomfort (not pain) and then decreasing the suction level by one.
After 2 minutes, the breast pump will automatically switch to the expression mode. When in expression mode, the device slowly pumps the milk out of the breast.
Set the highest most comfortable suction level for you using the +/- buttons. If the milk begins to flow out of your breast before 2 minutes pass, press the power/ change mode button to switch to manual milk expression.

8. FUNCTIONS
1. Smart device
- 5 stimulation levels
• 9 expression modes
• 2-phase pump technology: stimulation/ expression - 4-phase smart function: stimulation/ expression/ automatic mode change/ memory
2. Designed to prevent backflow of milk
A closed system of milk expression ensures the milk does not retract to the breast and keeps the tube hygienic and the milk fresh.
3. Delicate, silicone breast shield
An elastic, delicate breast shield is comfortable to use, reduces the pressure and massages the breast to improve the flow of breast milk.
4. Quiet and portable
The breast pump is discreet and can be used anywhere. Designed for all busy mothers that need to express milk several times during the day.
5. Smart touch screen
The screen has user memory that remembers the last used settings, helps to track operation history, and ensures easy use.
6. Rechargeable battery with an USB-C port
An efficient li-ion battery supports up to 2 hours of uninterrupted work. Connect the device into the power outlet using the USB cable to start charging the pump.
7. BPA-free
The breast pump and its accessories are made from BPA-free materials. The pump is compatible with most of the baby bottles available on the market.
9. FEEDING
Do not defrost or heat the milk in a microwave or with boiling water, it can burn your child's mouth. Defrosted milk should be stored in a fridge. Do not freeze the milk again. You can quickly defrost the milk by holding the bottle/ milk bag under warm, running water. Place a closed bottle or a milk bag in a bowl with warm water for 20 minutes to bring the milk to body temperature.
Feeding:
Always check the bottle, teat, and other components before and after every use. If the teat is damaged or torn, immediately stop using it. Test the teat strength by tugging on its round tip to ensure the teat wont tear and choke your child. Do not enlarge the hole in the teat. During feeding, the child needs to be under adult supervision. Bottle teat cannot be used to calm the baby when crying.
10. FAQ
1. The device does not start.
make sure that the breast pump is connected to a working power outlet. If the device is not connected, the display panel will not light up and an error message will not appear on the screen.
2. Poor/no suction.
make sure that all the elements of the pump are correctly positioned. Disassemble the device and make sure that all of the parts are clean and not damaged. Assemble the device according to the instructions in the “assembling the breast pump” section.
3. The breast produced more milk than the bottle can hold.
Turn the device off and unplug it from the outlet. Use a damp (not wet) cloth to wipe the breast pump. When all elements of the device are dry, reassemble them.
11. LONG-TERM STORAGE
The breast pump has a built-in battery accumulator. To save the accumulator from damage, the device switches into a storage mode after a long period of inactivity. To turn the storage mode off, plug the device into a power outlet and charge it for 2 hours.
Before storing the device, wash it thoroughly and make sure the battery accumulator is fully charged.
12. SPECIFICATION
Input power: 110-240V 50-60Hz
Output power: 5V 2A
Battery: 3.7V, 2000mAh Li-ion
Gross weight: 748 g
Pump dimensions: 77x95 mm
| Expression mode: | L1 L2 | L3 L4 | L5 L6 L7 | L8 L9 | |||||
| Suction (kPa): 18.9 | 21.5 | 24.5 | 30.7 | 33.8 | 36.9 | 38.9 | 40.9 | 42.9 | |
| Stimulation mode: | L1 L2 | L3 L4 | L5 | ||||||
| Suction (kPa): 3.9 | 9,7 | 12.8 | 17.4 | 20.5 | |||||

13. WARRANTY
The product is covered by a 24-month warranty.
The terms of the guarantee can be found at: https://neno.pl/gwarancja
Details, contact and website address can be found at:
https://neno.pl/kontakt
Specifications and contents of the kit are subject to change without notice.
We apologise for any inconvenience.

The crossed out trash can symbol indicates that unusable electrical or electronic devices, its accessories (such as power supplies, cords) or components (for example batteries, if included) cannot be disposed of upside with household waste. In order to dispose of the devices or its components (for example, batteries) deliver the device to the collection point, where it will be accepted free of charge. Disposal is subject to the recast version of the WEEE Directive (2012/19 / EU) and the Directive on batteries and emulators (2006/66 / EC). Proper disposal of the device prevents radiation of the natural environment. Information about the collection of facilities is issued by the competent local authorities. Incorrect visual of waste is subject to penalties provided for by the law in force in the area.
Manufacturer:
KGK Trade sp. z o.o. sp. k.
Ujastek 5b,
31-752 Cracow, Poland
Made in PRC

CE
neno
www.neno.pl
inspired by Children, designed by Parents
neno
inspired by Children, designed by Parents

- neno TM
- mare
- Szanowny Kliencie,
- WYŚWIETLACZ I IKONY
- ROZPOCZYNANIE PRACY Z URZĄDZENIEM
- Dear Customer,
- INDEX:
- SAFETY
- ELEMENTS
- BEFORE FIRST USE
- CLEANING AND DISINFECTION
- Washing the breast pump in the sink
- Sanitizing the breast pump in boiling water
- Cleaning the pumping device
- ASSEMBLING THE DEVICE
- FIRST USE
- FUNCTIONS
- Smart device
- Designed to prevent backflow of milk
- Delicate, silicone breast shield
- Quiet and portable
- Smart touch screen
- Rechargeable battery with an USB-C port
- BPA-free
- FEEDING
- Feeding:
- FAQ
- The device does not start.
- Poor/no suction.
- The breast produced more milk than the bottle can hold.
- LONG-TERM STORAGE
- SPECIFICATION
- WARRANTY
- neno
Brand : Neno
Model : Mare
Category : Water pump