PXRSK-250 - Saw Ozito - Free user manual and instructions
Find the device manual for free PXRSK-250 Ozito in PDF.

| Product Type | Saw |
| Brand | Ozito |
| Model | PXRSK-250 |
| Power Source | Electric (corded) |
| Voltage | 230-240V |
| Power | 1500 W |
| Blade Diameter | 250 mm |
| Cutting Depth (90°) | 65 mm |
| Cutting Depth (45°) | 45 mm |
| Bevel Capacity | 0-45° |
| No Load Speed | 4500 RPM |
| Weight | 4.5 kg |
| Dimensions (L x W x H) | 400 x 250 x 280 mm |
| Safety Features | Blade guard, safety switch, spindle lock |
| Maintenance | Clean after use, check carbon brushes regularly |
| Accessories Included | Rip fence, blade wrench, dust extraction adaptor |
| Spare Parts Availability | Yes, through Ozito service centers |
| Application | Wood, plywood, MDF; not for metal |
Frequently Asked Questions - PXRSK-250 Ozito
User questions about PXRSK-250 Ozito
0 question about this device. Answer the ones you know or ask your own.
Ask a new question about this device
Download the instructions for your Saw in PDF format for free! Find your manual PXRSK-250 - Ozito and take your electronic device back in hand. On this page are published all the documents necessary for the use of your device. PXRSK-250 by Ozito.
USER MANUAL PXRSK-250 Ozito
CORDLESS RECIPROCATING SAW
INSTRUCTION MANUAL
SPECIFICATIONS
Voltage: 18V
No Load Speed: 0-2600spm
Stroke Length: 22mm
Blade Fitment: Tool-free
Cutting Capacities: Timber 100mm
Non Alloy Steel 6mm
Weight: 1.5kg
ozito.com.au


natural_image
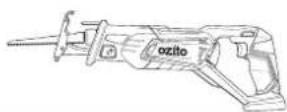
Line drawing of a mechanical tool labeled 'ozito' with no additional text or symbolsWHAT'S IN THE BOX
Reciprocating Saw

Timber Cutting Blade
WARRANTY
IN ORDER TO MAKE A CLAIM UNDER THIS WARRANTY YOU MUST RETURN THE PRODUCT TO YOUR NEAREST BUNNINGS WAREHOUSE WITH YOUR BUNNINGS REGISTER RECEIPT. PRIOR TO RETURNING YOUR PRODUCT FOR WARRANTY PLEASE TELEPHONE OUR CUSTOMER SERVICE HELPLINE:
Australia 1800 069 486
New Zealand 0508 069 486
TO ENSURE A SPEEDY RESPONSE PLEASE HAVE THE MODEL NUMBER AND DATE OF PURCHASE AVAILABLE. A CUSTOMER SERVICE REPRESENTATIVE WILL TAKE YOUR CALL AND ANSWER ANY QUESTIONS YOU MAY HAVE RELATING TO THE WARRANTY POLICY OR PROCEDURE.
WARNING
The following actions will result in the warranty being void.
- If the tool has been operated on a supply voltage other than that specified on the tool.
- If the tool shows signs of damage or defects caused by or resulting from abuse, accidents or alterations.
- Failure to perform maintenance as set out within the instruction manual.
- If the tool is disassembled or tampered with in any way.
The benefits provided under this warranty are in addition to other rights and remedies which are available to you at law.
Our goods come with guarantees that cannot be excluded at law. You are entitled to a replacement or refund for a major failure and for compensation for any other reasonably foreseeable loss or damage. You are also entitled to have the goods repaired or replaced if the goods fail to be of acceptable quality and the failure does not amount to a major failure.
Generally you will be responsible for all costs associated with a claim under this warranty, however, where you have suffered any additional direct loss as a result of a defective product you may be able to claim such expenses by contacting our customer service helpline above.
5 YEAR REPLACEMENT WARRANTY
Your Product is guaranteed for a period of 60 months from the original date of purchase and is intended for DIY (Do It Yourself) use only. If a product is defective it will be replaced in accordance with the terms of this warranty. Lithium Ion
batteries and chargers are covered by a 36 month
warranty and are excluded from the warranty extension. Warranty excludes consumable parts, for example: cutting blades, etc.
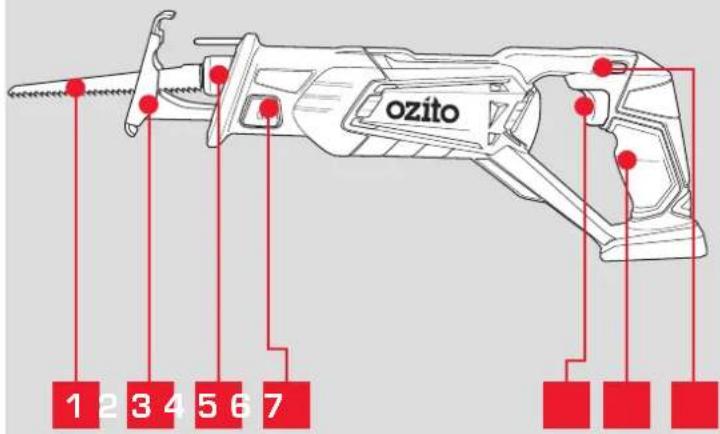
KNOW YOUR PRODUCT
CORDLESS RECIPROCATING SAW
1 Timber Cutting Blade
5 Variable Speed Trigger
2 Pivoting Shoe (Adjustable)
6 Sure Grip Handle
3 Blade Holder
7 Lock-Off Button
4 Shoe Locking Button
BATTERY & CHARGER
This tool is compatible with all battery and chargers from the Ozito Power X Change Range.
ONLINE MANUAL
Scan this OR Code with your mobile device to take you to the online manual.

SETUP & PREPARATION
1. ASSEMBLY

WARNING: ENSURE THE TOOL IS SWITCHED OFF AND THE BATTERY IS REMOVED BEFORE PERFORMING ANY OF THE FOLLOWING TASKS.
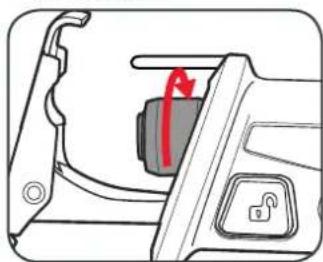
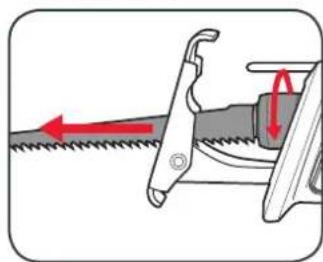
Fitting a Cutting Blade
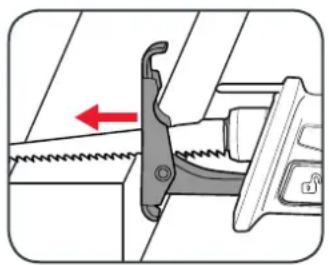
1 Rotate and hold the blade holder anti-clockwise.
natural_image
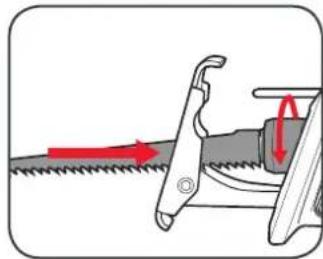
Diagram of a car interior showing a lock and a red arrow pointing to the door panel (no text or symbols)2 Insert the blade and release the blade holder.
natural_image
Diagram showing a saw cutting process with red arrows indicating direction (no text or symbols)3 Ensure the blade is secure by pulling on the blade.
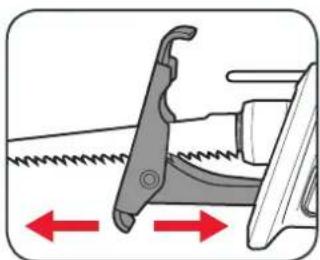
Removing a Cutting Blade
1 Rotate and hold the blade holder anti-clockwise.

natural_image
Diagram of a mechanical switch or latch mechanism with a red arrow indicating rotation (no text or symbols present)2 Remove the blade and release the blade holder.
natural_image
Diagram of a saw cutting process showing blade and blade assembly with red directional arrows indicating motion (no text or symbols)Adjusting the Pivot Shoe
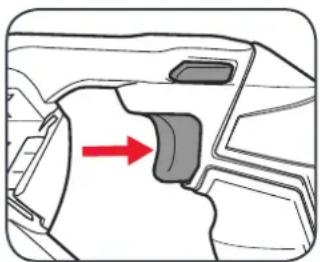
1 Push the shoe locking button in from the left side of the saw to unlock the shoe.
2 Push the shoe in or out into the desired position.
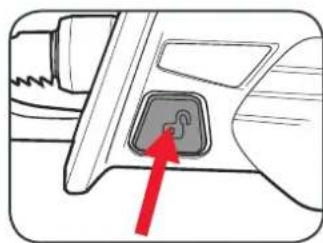
natural_image
Diagram of a car interior showing a highlighted switch or plug (no text or symbols present)3 Secure in place by pressing the shoe locking button in from the right side of the saw.
natural_image
Diagram of a mechanical tool with a spring and directional arrows indicating movement (no text or symbols)
natural_image
Diagram of a mechanical tool with a red arrow indicating a specific component (no text or symbols present)OPERATION
Inserting & Removing the Battery
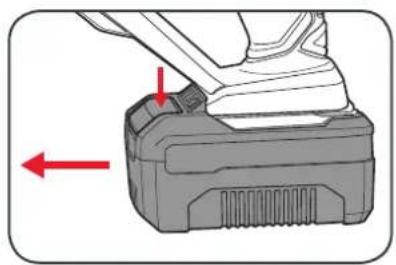
1 Align the ribs of the battery with the recess at the base of the saws rear handle and push in until it clicks into place.
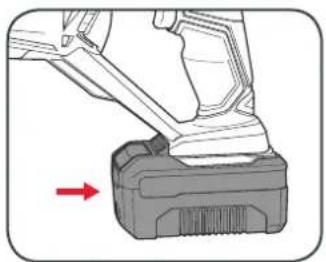
natural_image
Mechanical component with a red arrow pointing to a base (no text or symbols visible)2 To remove, press and hold the battery release tab and then slide out.
natural_image
Mechanical component with red arrows indicating a specific part, no visible text or symbolsBattery protection system
The tool is equipped with the battery protection system, which helps to ensure a long service life.
The output power automatically cuts off during operation when the tool and/or battery are placed under the following situations:
- When the tool is overloaded:
If this occurs, release the trigger switch and remove causes of overload, then pull the switch trigger again to restart.
- When the remaining battery capacity becomes low:
Recharge the battery pack.
Note: The battery protection system does not in any way damage the tool.
Note: The indicated capacity may be lower than the actual level during use or immediately after using the tool.
3. CONTROLS2. FITTING THE BATTERY
Turning On and Off
1 Press and hold the lock-off button.
2 Squeeze the on/off trigger to start operating.

natural_image
Technical line drawing of a mechanical component with a red arrow pointing to a specific feature (no text or symbols present)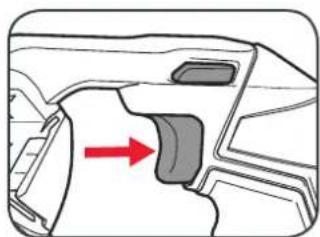
natural_image
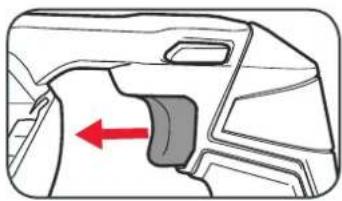
Diagram of a car interior showing a highlighted component with a red arrow indicating direction (no text or symbols present)Note: The lock-off button can be released once operating
3 To stop the saw, release the on/off trigger.
natural_image
Diagram of a car interior showing a highlighted seat with a red arrow indicating direction (no text or symbols)4. CUTTING PROCEDURE 5. TROUBLESHOOTING
Cutting Procedure
1 Firmly press the pivoting shoe against the work piece.
2 Support the front of the tool from underneath and ensure your hands do not move past the lip and contact the blade.
natural_image
Mechanical assembly diagram showing a spring-loaded clamp and lever mechanism (no text or symbols)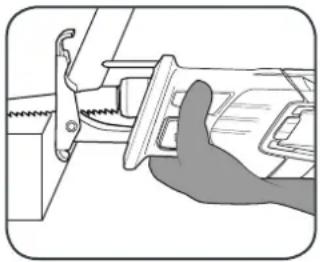
natural_image
Illustration of a hand using a tool to adjust or install a mechanical component (no text or symbols visible)3 Start the reciprocating saw. 4 Keep the adjustable pivot shoe firmly against the work piece throughout the cut.
natural_image
Diagram of a car interior showing a highlighted component with red arrow indicating direction (no text or symbols)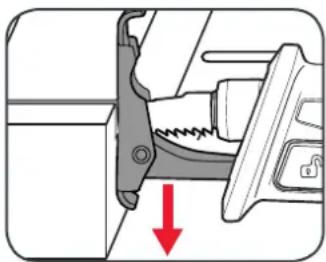
natural_image
Mechanical assembly diagram showing a clamping mechanism with a red arrow indicating force direction (no text or symbols present)Note: Do not apply excessive pressure, allow the blade to do the work.

CAUTION: DO NOT ALLOW THE TOOL TO BOUNCE. IF THE PIVOT SHOE IS HELD AWAY FROM THE WORK PIECE DURING OPERATING, STRONG VIBRATION AND/OR TWISTING MAY OCCUR CAUSING THE BLADE TO SNAP DANGEROUSLY.
LED lights do not illuminate on charger
Check the charging adaptor is securely plugged into the wall out let. Check the battery is firmly connected to the charging cradle. Check that the charging jack is securely connected to the charging cradle.
The battery has a short run time
Ensure the battery is properly charged. It will take 4-5 charging cycles before the battery reaches optimum charge and run time. On the initial charge, the battery requires 5 hours of charging. Subsequent charging only requires 3-5 hours.
Sparking visible through the housing vents
A small amount of sparking may be visible through the housing vents. This is normal and does not indicate a problem.
Excessive sparking visible through the housing air vents and/or the reciprocating saw failing to operate
May indicate the carbon brushes have worn out and need to be replaced. Carbon brushes should only be replaced by a qualified electrician or power tool repairer.
Shoe locking button will not lock after repositioning
The shoe lock will only lock once the shoe is in 1 of its 3 positions. Push the shoe in or out until the shoe can be locked.
MAINTENANCE

WARNING! ALWAYS ENSURE THE TOOL HAS COMPLETELY STOPPED AND THE BATTERY IS REMOVED PRIOR TO ANY MAINTENANCE.
- After each use, blow air through the tool housing to ensure it is free from all dust, dirt, etc. Build up of dust, dirt particles may cause the tool to overheat and shorten the life of the tool.
- If the housing of the reciprocating saw requires cleaning, do not use solvents but a moist soft cloth or soft brush only.
- Never let any liquid get inside the tool, never immerse any part of the tool into liquid.
- When not in use, the reciprocating saw should be stored in a dry, frost free location not within the reach of children.
Note: Ozito Industries will not be responsible for any damage or injuries caused by the repair of the reciprocating saw by an unauthorised person or by mishandling of the reciprocating saw.
SPARE PARTS
Spare parts can be ordered from the Special Orders Desk at your local Bunnings Warehouse.
For further information, or any parts not listed here, visit www.ozito.com.au or contact Ozito Customer Service:
Australia 1800 069 486
New Zealand 0508 069 486
E-mail: enquires@ozito.com.au
DESCRIPTION OF SYMBOLS
| V | Volts | Hz | Hertz |
| ac/~ | Alternating current | Ah | Amp hour |
| dc/-- | Direct current | No | No load speed |
 | Regulatory Compliance Mark (RCM) |  | Read instruction manual |
 | Warning |  | Strokes per minute |
CARING FOR THE ENVIRONMENT

Power tools that are no longer usable should not be disposed of with household waste but in an environmentally friendly way. Please recycle where facilities exist. Check with your local council authority for recycling advice.
Recycling packaging reduces the need for landfill and raw materials. Reuse of recycled material decreases pollution in the environment.
Please recycle packaging where facilities exist. Check with your local council authority for recycling advice.

ELECTRICAL SAFETY

WARNING! When using mains-powered tools, basic safety precautions, including the following, should always be followed to reduce risk of fire, electric shock, personal injury and material damage.
Read the whole manual carefully and make sure you know how to switch the tool off in an emergency, before operating the tool. Save these instructions and other documents supplied with this tool for future reference.
The charger has been designed for 230V and 240V only. Always check that the power supply corresponds to the voltage on the rating plate.
Note: The supply of 230V and 240V on Orito tools are interchangeable for Australia and New Zealand.

This tools charger is double insulated therefore no earth wire is required.
If the supply cord is damaged, it must be replaced by an electrician or a power tool repairer in order to avoid a hazard.
Note: Double insulation does not take the place of normal safety precautions when operating this tool. The insulation system is for added protection against injury resulting from a possible electrical insulation failure within the tool.
The power supply for this products charger should be protected by a residual current device (rated at 30mA
or less). A residual current device reduces the risk of electric shock.

GENERAL POWER TOOL SAFETY WARNINGS

WARNING! Read all safety warnings and all instructions. Failure to follow the warnings and instructions may result in electric shock, fire and/or serious injury.
Save all warnings and instructions for future reference. The term "power tool" in the
warnings refers to your mains-operated (corded) power tool or battery-operated (cordless) power tool.
- Work area safety
a. Keep work area clean and well lit. Cluttered or dark areas invite accidents.
b. Do not operate power tools in explosive atmospheres, such as in the presence of flammable liquids, gases or dust. Power tools create sparks which may ignite the dust or fumes.
c. Keep children and bystanders away while operating a power tool. Distractions can cause you to lose control.
- Electrical safety
a. Power tool plugs must match the outlet. Never modify the plug in any way. Do not use any adapter plugs with earthed (grounded) power tools. Unmodified plugs and matching outlets will reduce risk of electric shock.
b. Avoid body contact with earthed or grounded surfaces, such as pipes, radiators, ranges and refrigerators. There is an increased risk of electric shock if your body is earthed or grounded.
c. Do not expose power tools to rain or wet conditions. Water entering a power tool will increase the risk of electric shock.
Do not abuse the cord. Never use the cord for carrying, pulling or unplugging the power tool. Keep cord away from heat, oil, sharp edges or moving parts. Damaged or entangled cords increase the risk of electric shock.
When operating a power tool outdoors, use an extension cord suitable for outdoor use. Use of a cord suitable for outdoor use reduces the risk of electric shock.
-
Personal safety
-
Stay alert, watch what you are doing and use common sense when operating a power tool. Do not use a power tool while you are tired or under the influence of drugs, alcohol or medication. A moment of inattention while operating power tools may result in serious personal injury.
b. Use personal protective equipment. Always wear eye protection. Protective equipment such as dust mask, non-skid safety shoes, hard hat, or hearing protection used for appropriate conditions will reduce personal injuries.
c. Prevent unintentional starting. Ensure the switch is in the off-position before connecting to power source and/or battery pack, picking up or carrying the tool. Carrying power tools with your finger on the switch or energising power tools that have the switch on invites accidents.
d. Remove any adjusting key or wrench before turning the power tool on. A wrench or a key left attached to a rotating part of the power tool may result in personal injury.
e. Do not overreach. Keep proper footing and balance at all times. This enables better control of the power tool in unexpected situations.
f. Dress properly. Do not wear loose clothing or jewellery. Keep your hair, clothing and gloves away from moving parts. Loose clothes, jewellery or long hair can be caught in moving parts.
g. If devices are provided for the connection of dust extraction and collection facilities, ensure these are connected and properly used. Use of dust collection can reduce dust-related hazards.
h. Do not let familiarity gained from frequent use of tools allow you to become complacent and ignore tool safety principles. A careless action can cause severe injury within a fraction of a second.
- Power tool use and care
a. Do not force the power tool. Use the correct power tool for your application. The correct power tool will do the job better and safer at the rate for which it was designed.
b. Do not use the power tool if the switch does not turn it on and off. Any power tool that cannot be controlled with the switch is dangerous and must be repaired.
c. Disconnect the plug from the power source and/or the battery pack from the power tool before making any adjustments, changing accessories, or storing power tools. Such preventive safety measures reduce the risk of starting the power tool accidentally.
d. Store idle power tools out of the reach of children and do not allow persons unfamiliar with the power tool or these instructions to operate the power tool. Power tools are dangerous in the hands of untrained users.
e. Maintain power tools. Check for misalignment or binding of moving parts, breakage of parts and any other condition that may affect the power tool's operation. If damaged, have the power tool repaired before use. Many accidents are caused by poorly maintained power tools.
f. Keep cutting tools sharp and clean. Properly maintained cutting tools with sharp cutting edges are less likely to bind and are easier to control.
g. Use the power tool, accessories and tool bits etc. in accordance with these instructions, taking into account the working conditions and the work to be performed. Use of the power tool for operations different from those intended could result in a hazardous situation.
h. Keep handles and grasping surfaces dry, clean and free from oil and grease. Slippery handles and grasping surfaces do not allow for safe handling and control of the tool in unexpected situations.
- Service
a. Have your power tool serviced by a qualified repair person using only identical replacement parts. This will ensure that the safety of the power tool is maintained.

RECIPROCATING SAW SAFETY WARNINGS

WARNING!
- Hold power tool by insulated gripping surfaces, when performing an operation where the cutting accessory may contact hidden wiring or its own cord. Cutting accessory contacting a "live" wire may make exposed metal parts of the power tool "live" and could give the operator an electric shock.
- This appliance is not intended for use by persons (including children) with reduced physical, sensory or mental capabilities, or lack of experience and knowledge, unless they have been given supervision or instruction concerning use of the appliance by a person responsible for their safety.
- Wear a safety helmet, safety glasses and/or face shield. It is also highly recommended that you wear a dust mask, ear protection and padded gloves.
- Check the blade carefully for cracks or damage prior to operation. Replace cracked or damaged blades immediately.
- Hold the tool firmly during operation. Always hold the adjustable pivoting shoe firmly against the work piece.
- Ensure no one is below you when using the tool in elevated conditions.
- Do not point the tool at anyone in the immediate vicinity.

WARNING! When making a "blind" cut (you can't see behind what is g cut), be sure that hidden electrical wiring or water pipes are not in path of the cut. If wires are present, they must be disconnected at their power source by a fixed person or avoided to prevent the possibility of lethal shock or fire.
- Water pipes in "blind" areas must be drained and capped before cutting.
-
If the blade hits against objects during operation, damage to the tool or dangerous blade breakage may occur.
-
Watch out for cut-off portions of the work piece being cut. They may fall and cause injury to you or someone near you.
- When cutting metals, be cautious of hot flying debris.
- Do not touch the blade or the work piece immediately after operation; they may be extremely hot and could potentially burn your skin.
- If you withdraw the blade from the work piece during operation, a strong reaction could be produced, which could cause the blade to snap or cause you to lose your grip and/or control of the saw. Always switch off the tool and wait until the blade has come to a complete stop before with drawing the blade from the work piece.

WARNING! Some dust created by power sanding, sawing, grinding, drilling and other
construction activities contain chemicals known to cause cancer, birth defects or other reproductive harm.
Some examples of these chemicals are:
- Lead from lead-based paints;
• Crystalline silica from bricks, cement and other masonry products, and; - Arsenic and chromium from chemically-treated timber.
The risk from such exposures vary depending on how often you do this type of work.
To reduce your exposure to these chemicals; work in a well ventilated area, and work with approved safety equipment, such as those dust masks that are specifically designed to filter out microscopic particles.
Always wear eye protection and a dust mask for dusty applications and when drilling/chiselling overhead. Sanding particles can be absorbed by your eyes and inhaled easily and may cause health complications.
18V LITHIUM ION
2.5Ah BATTERY
INSTRUCTION MANUAL
SPECIFICATIONS
Input: 18V
Battery Capacity: 2.5Ah Li-ion
Power Consumption: 45Wh
Weight: 0.46kg
ozito.com.au
- Battery Release Button
- Charge Indicator Button
- Battery
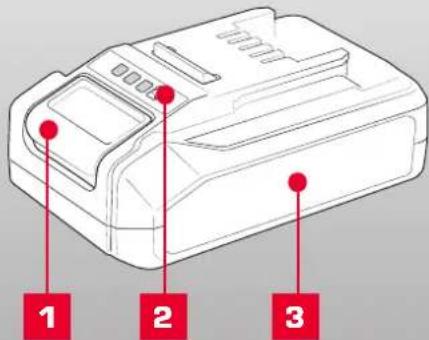

PXBP-250
DESCRIPTION OF SYMBOLS
| V | Volts Hertz | Hz | |
| ac/~ | Alternating Current | W | Watts |
| dc | Direct Current | Ah | Amp Hour |
| mA | Milliamperes | Wh | Watt Hour |
| [SHDC] | Warning | MAX MTS | Do not store or use battery in temperatures exceeding 50°C |
| [ZWAA] | Recycle Battery | Do not put in the rubbish | |
 | Do not incincrate | Do not get battery wet | |
| [XXXO] | Regulatory Compliance Mark (RCM) | Do not store battery when the charge is low; store between 40-60%. | |
| [YS22] | Lithium Ion Battery | Do not expose to rain. | |
| [ZS47] | Read Instruction Manual | ||
CARING FOR THE ENVIRONMENT
Power tools that are no longer usable should not be disposed of with household waste but in an environmentally friendly way. Please recycle where facilities exist. Check with your local council authority for recycling advice.

Recycling packaging reduces the need for landfill and raw materials. Reuse of recycled material decreases pollution in the environment. Please recycle packaging where facilities exist. Check with your local council authority for recycling advice.
BATTERY & CHARGER SAFETY WARNINGS
Before using the charger or battery read all instructions and cautionary markings on the charger, battery pack and the product using the battery pack. Do not lose these safety instructions.
Battery Warnings
- The battery pack is not fully charged out of the carton. First read the safety instructions and then follow the charging notes and procedures.
- For optimum battery performance avoid low discharge cycles. Charge the battery pack frequently.
- Use and store the battery pack in dry conditions with low humidity between 0-50°C, ideally at 15°C. Avoid exposing battery pack and charger to direct sunlight.
- Do not keep battery pack in places where temperatures are liable to reach over 50°C, such as in a car, metal shed or similar that is in direct sunlight.
- Do not ignite the battery pack or expose it to fire. There is a risk of explosion!
- Do not exhaustively discharge batteries. Exhaustive discharge will damage the battery cells. The most common cause of exhaustive discharge is long-term storage and continued use of low-charge batteries. Always store the battery with some charge. Charge the batteries every 2-3 months to restore charge. Stop working as soon as the performance of the battery falls noticeably or the electronic protection system triggers.
- Protect batteries and the tool from overloads. Overloads will quickly result in overheating and cell damage inside the battery housing without this overheating being apparent externally.
B. Avoid damage and shocks. Do not use batteries which have been dropped from a height of more than one meter or strong external impact, even if the housing of the battery pack appears to be undamaged. The battery cells inside the battery may have suffered serious damage. - If the battery pack suffers overloading and overheating, the integrated protective cut-off will switch off the equipment. Do not press the ON/OFF switch on the tool if the protective cut-off has actuated. This may damage the battery pack. Allow the battery to cool to room temperature before use.
- Use only original battery packs. The use of other batteries may result in injuries, explosion and a fire risk
- Protect your rechargeable battery against moisture, rain and high humidity. Moisture, rain and high humidity can cause dangerous cell damage. Never charge or use batteries which have been exposed to moisture, rain or high humidity.
- Never attempt to open the battery pack for any reason. If the plastic housing of the battery pack is damaged, do not use the battery.
- When battery pack is not in use, keep it away from other metal objects, like paper clips, coins, keys, nails, screws or other small metal objects, that can make a connection from one terminal to another. Shorting the battery terminals together may cause burns or a fire.
- Under abusive conditions, liquid may be ejected from the battery; avoid contact. If accidental contact occurs, flush with water and seek medical help immediately. Liquid ejected from the battery may cause irritation or burns.
- Do not use a battery pack or tool that is damaged or modified. Damaged or modified batteries may exhibit unpredictable behaviour resulting in fire, explosion or risk of injury.
- Do not expose a battery pack or tool to fire or excessive temperature. Exposure to fire or temperature above 130^ C may cause explosion.
- Never service damaged battery packs. Service of battery packs should only be performed by the manufacturer.
- Do not disassemble Battery. This may result in a risk of electric shock, electrocution or fire.
Charger Warnings
- Please check the data marked on the rating plate of the battery charger. Ensure to only connect the battery charger to a power supply with the voltage marked on the rating plate.
- Protect the battery charger and its cable from damage and sharp edges. Have damaged cables repaired by an authorised service agent before use.
- Keep the battery charger, batteries and the cordless tool out of children's reach.
- Do not use damaged battery chargers.
- Do not use the supplied battery charger to charge other cordless tools. Only charge Ozito Power X Change rechargeable batteries with an Ozito Power X Change Charger.
- The battery pack may become warm during use. Allow the battery pack to cool to room temperature before commencing with the charging.
- Do not over-charge batteries. Do not exceed the maximum charging times. These charging times only apply to discharged batteries. Frequent insertion of a charged or partly charged battery pack will result in over-charging and cell damage. Do not leave fully charged batteries in the charger.
- Charge the battery pack in dry conditions with low humidity between 10-40°C. Avoid exposing battery pack and charger to direct sunlight.
- Do not use batteries which have suffered deformation during the charging process or shows any other signs of abnormalities including, excessive curvature of the housing, gassing, hissing or cracking.
- Never fully discharge the battery pack. A complete discharge of the battery pack will lead to premature ageing of the battery cells.
- Never charge the batteries unsupervised
- Do not cover or place any object on top of the charger, place the charger away from heat sources.
- To reduce risk of damage to the electric plug and cord, pull by the plug rather than the cord when disconnecting the charger.
- Make sure the cord is located so that it will not be stepped on, tripped over, or otherwise subjected to damage or stress.
- An extension cord should not be used unless necessary. Use of an improper extension cord could result in the risk of fire, electric shock or electrocution.
- Do not disassemble charger. This may result in a risk of electric shock, electrocution or fire.
- To reduce risk of electric shock, unplug the charger from the outlet before attempting any cleaning. Removing the battery pack will not reduce this risk.
- Do not use the cordless tool or the battery charger near vapours and inflammable liquids
ELECTRICAL SAFETY

WARNING! When using mains-powered tools, basic safety precautions, including the following, should always be followed to reduce risk of fire, electric shock, personal injury and material damage.
Read the whole manual carefully and make sure you know how to switch the tool off in an emergency, before
operating the tool. Save these instructions and other documents supplied with this tool for future reference.
Note: The supply of 230V and 240V on Ozito tools are interchangeable for Australia and New Zealand
If the supply cord is damaged, it must be replaced by the manufacturer, its service agent or similarly qualified persons in order to avoid hazard.
Note: Double insulation does not take the place of normal safety precautions when operating this tool. The insulation system is for added protection against injury resulting from a possible electrical insulation failure within the tool.
Using an Extension Lead
Always use an approved extension lead suitable for the power input of this tool. Before use, inspect the extension lead for signs of damage, wear and ageing. Replace the extension lead if damaged or defective.
When using an extension lead on a reel, always unwind the lead completely. Use of an extension lead not suitable for the power input of the tool or which is damaged or defective may result in a risk of fire and electric shock.
To reduce the risk of electric shock, we recommend the use of a residual current device (rated 30mA or less).
This appliance is not intended for use by persons (including children) with reduced physical, sensory or mental capabilities, or lack of experience and knowledge, unless they have been given supervision or instruction concerning use of the appliance by a person responsible for their safety.
Children should be supervised to ensure that they do not play with the appliance.
1. OPERATION
Only use the battery pack with Ozito Power X Change 18V cordless products.
This battery is compatible with chargers from the 18V Ozito Power X Change range available through your local Bunnings Warehouse. Product availability may differ.
CHARGING YOUR LITHIUM ION BATTERY
This battery has been shipped in a low charge condition, and requires charging prior to use. Allow several cycles of charging and discharging (through use with a compatible tool) for the battery to reach its optimum performance / runtime.

WARNING! DO NOT COVER OR PLACE ANY OBJECT ON TOP OF THE CHARGER; PLACE THE CHARGER AWAY FROM HEAT SOURCES.
- Insert the power plug of the charger into the mains socket outlet. The green LED will begin to flash when properly connected to power supply.
- Insert the battery pack into the battery charger.
- Remove battery from the charger once fully charged. Disconnect the charger from the power supply.
Note: The battery pack can become a little warm during the charging. This is normal.
If the battery pack fails to charge, check:
if there is voltage at the socket outlet that the battery and charger are properly connected.
If the battery pack still fails to charge, please contact our customer service center.
BATTERY CHARGE INDICATOR
The purchased battery is equipped with a battery charge indicator to show the state of the battery charge.
Press the charge indicator button and look to see which LED lights.
natural_image
Pure architectural line drawing of a building facade with no text or symbols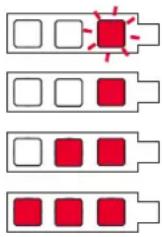
Battery requires immediate charging
Low state of charge, requires charging soon.
Mid state of charge
Full state of charge.
Note: The battery needs to be removed from the tool to check the state of charge.
BATTERY PROTECTION SYSTEM
The tool is equipped with a battery protection system, which helps to ensure longevity of the battery.
The output power automatically cuts off during operation when the tool and/or battery are placed under the following situations:
- When the tool is overloaded:
If this occurs, release the trigger switch and remove causes of overload, then pull the switch trigger again to restart. - When the remaining battery capacity becomes low:
Recharge the battery pack.
Note: The battery protection system does not in any way damage the tool.
Note: The indicated capacity may be lower than the actual level during use or immediately after using the tool.
WARRANTY
IN ORDER TO MAKE A CLAIM UNDER THIS WARRANTY YOU MUST RETURN THE PRODUCT TO YOUR NEAREST BUNNINGS WAREHOUSE WITH YOUR BUNNINGS REGISTER RECEIPT. PRIOR TO RETURNING YOUR PRODUCT FOR WARRANTY PLEASE TELEPHONE OUR CUSTOMER SERVICE HELPLINE:
Australia 1800 069 486
New Zealand 0508 069 486
TO ENSURE A SPEEDY RESPONSE PLEASE HAVE THE MODEL NUMBER AND DATE OF PURCHASE AVAILABLE. A CUSTOMER SERVICE REPRESENTATIVE WILL TAKE YOUR CALL AND ANSWER ANY QUESTIONS YOU MAY HAVE RELATING TO THE WARRANTY POLICY OR PROCEDURE.
The benefits provided under this warranty are in addition to other rights and remedies which are available to you at law.
Our goods come with guarantees that cannot be excluded at law. You are entitled to a replacement or refund for a major failure and for compensation for any other reasonably foreseeable loss or damage. You are also entitled to have the goods repaired or replaced if the goods fail to be of acceptable quality and the failure does not amount to a major failure.
Generally you will be responsible for all costs associated with a claim under this warranty, however, where you have suffered any additional direct loss as a result of a defective product you may be able to claim such expenses by contacting our customer service helpline above.
36 MONTH REPLACEMENT WARRANTY
Your product is guaranteed for a period of 36 months from the original date of purchase and is intended for DIY (Do It Yourself) use only. If a product is defective it will be replaced in accordance with the terms of this warranty. Warranty excludes consumable parts.
WARNING
The following actions will result in the warranty being void.
- If the tool has been operated on a supply voltage other than that specified on the tool.
- If the tool shows signs of damage or defects caused by or resulting from abuse, accidents or alterations.
- Failure to perform maintenance as set out within the instruction manual.
- If the tool is disassembled or tampered with in any way.
ONLINE MANUAL
Scan this QR Code with your mobile device to take you to the online manual.

OZITO Australia/New Zealand (Head Office) 25 Fox Drive, Dandenong South, Victoria, Australia 3175.
18V LITHIUM ION
COMPACT FAST CHARGER
INSTRUCTION MANUAL
SPECIFICATIONS
Input: 200-250V \~AC 50-60Hz, 72W
Output: 20V DC, 3A
Battery Charge Time: 30Min - PXBP-150 (18V 1.5Ah)
40Min - PXBP-200 (18V 2.0Ah)
50Min - PXBP-250 (18V 2.5Ah)
60Min - PXBP-300 (18V 3.0Ah)
75Min - PXBP-400 (18V 4.0Ah)
120Min - PXBP-520 (18V 5.2Ah)
100Min - PXUBP-520 (18V 5.2Ah Ultra)
ozito.com.au
- Charging Unit
- Charging Unit LED
PXCG-030C
3 YEAR REPLACEMENT WARRANTY
DESCRIPTION OF SYMBOLS
| V | Volts Hertz | Hz | |
| A | Amperes Amp Hour | Ah | |
 | Read Instruction Manual | Double Insulated | |
 | Indoor Use Only | Do not dispose of in rubbish | |
 | Do not charge battery in temperatures exceeding 40°C | Regulatory Compliance Mark (RCM) | |
| [DBK3] | 3.15A Slow Blow Fuse | Warning |
CARING FOR THE ENVIRONMENT
Power tools that are no longer usable should not be disposed of with household waste but in an environmentally friendly way. Please recycle where facilities exist. Check with your local council authority for recycling advice.

Recycling packaging reduces the need for landfill and raw materials. Reuse of recycled material decreases pollution in the environment. Please recycle packaging where facilities exist. Check with your local council authority for recycling advice.
BATTERY & CHARGER SAFETY WARNINGS
Before using the charger or battery read all instructions and cautionary markings on the charger, battery pack and the product using the battery pack. Do not lose these safety instructions.
Battery Warnings
- The battery pack is not fully charged out of the carton. First read the safety instructions and then follow the charging notes and procedures.
- For optimum battery performance avoid low discharge cycles. Charge the battery pack frequently.
- Use and store the battery pack in dry conditions with low humidity between 0-50°C, ideally at 15°C. Avoid exposing battery pack and charger to direct sunlight.
- Do not keep battery pack in places where temperatures are liable to reach over 50°C, such as in a car, metal shed or similar that is in direct sunlight.
- Do not ignite the battery pack or expose it to fire. There is a risk of explosion!
- Do not exhaustively discharge batteries. Exhaustive discharge will damage the battery cells. The most common cause of exhaustive discharge is long-term storage and continued use of low-charge batteries. Always store the battery with some charge. Charge the batteries every 2-3 months to restore charge. Stop working as soon as the performance of the battery falls noticeably or the electronic protection system triggers.
- Protect batteries and the tool from overloads. Overloads will quickly result in overheating and cell damage inside the battery housing without this overheating being apparent externally.
B. Avoid damage and shocks. Do not use batteries which have been dropped from a height of more than one meter or strong external impact, even if the housing of the battery pack appears to be undamaged. The battery cells inside the battery may have suffered serious damage. - If the battery pack suffers overloading and overheating, the integrated protective cut-off will switch off the equipment. Do not press the ON/OFF switch on the tool if the protective cut-off has actuated. This may damage the battery pack. Allow the battery to cool to room temperature before use.
- Use only original battery packs. The use of other batteries may result in injuries, explosion and a fire risk.
- Protect your rechargeable battery against moisture, rain and high humidity. Moisture, rain and high humidity can cause dangerous cell damage. Never charge or use batteries which have been exposed to moisture, rain or high humidity.
- Never attempt to open the battery pack for any reason. If the plastic housing of the battery pack is damaged, do not use the battery.
- When battery pack is not in use, keep it away from other metal objects, like paper clips, coins, keys, nails, screws or other small metal objects, that can make a connection from one terminal to another. Shorting the battery terminals together may cause burns or a fire.
- Under abusive conditions, liquid may be ejected from the battery; avoid contact. If accidental contact occurs, flush with water and seek medical help immediately. Liquid ejected from the battery may cause irritation or burns.
- Do not use a battery pack or tool that is damaged or modified. Damaged or modified batteries may exhibit unpredictable behaviour resulting in fire, explosion or risk of injury.
- Do not expose a battery pack or tool to fire or excessive temperature. Exposure to fire or temperature above 130^ C may cause explosion.
- Never service damaged battery packs. Service of battery packs should only be performed by the manufacturer.
-
- Do not disassemble Battery. This may result in a risk of electric shock, electrocution or fire.
Charger Warnings
- Please check the data marked on the rating plate of the battery charger. Ensure to only connect the battery charger to a power supply with the voltage marked on the rating plate.
- Protect the battery charger and its cable from damage and sharp edges. Have damaged cables repaired by an authorised service agent before use.
- Keep the battery charger, batteries and the cordless tool out of children's reach.
- Do not use damaged battery chargers.
- Do not use the supplied battery charger to charge other cordless tools. Only charge Ozito Power X Change rechargeable batteries with an Ozito Power X Change Charger.
- The battery pack may become warm during use. Allow the battery pack to cool to room temperature before commencing with the charging.
- Do not over-charge batteries. Do not exceed the maximum charging times. These charging times only apply to discharged batteries. Frequent insertion of a charged or partly charged battery pack will result in over-charging and cell damage. Do not leave fully charged batteries in the charger.
- Charge the battery pack in dry conditions with low humidity between 10-40°C. Avoid exposing battery pack and charger to direct sunlight.
- Do not use batteries which have suffered deformation during the charging process or shows any other signs of abnormalities including, excessive curvature of the housing, gassing, hissing or cracking.
- Never fully discharge the battery pack. A complete discharge of the battery pack will lead to premature ageing of the battery cells.
- Never charge the batteries unsupervised.
- Do not cover or place any object on top of the charger, place the charger away from heat sources.
- To reduce risk of damage to the electric plug and cord, pull by the plug rather than the cord when disconnecting the charger.
- Make sure the cord is located so that it will not be stepped on, tripped over, or otherwise subjected to damage or stress.
- An extension cord should not be used unless necessary. Use of an improper extension cord could result in the risk of fire, electric shock or electrocution.
- Do not disassemble charger. This may result in a risk of electric shock, electrocution or fire.
- To reduce risk of electric shock, unplug the charger from the outlet before attempting any cleaning. Removing the battery pack will not reduce this risk.
- Do not use the cordless tool or the battery charger near vapours and inflammable liquids.
ELECTRICAL SAFETY
WARNING! When using mains-powered tools, basic safety precautions, including the following, should always be followed to reduce risk of fire, electric shock, personal injury and material damage.
Read the whole manual carefully and make sure you know how to switch the tool off in an emergency, before operating the tool. Save these instructions and other documents supplied with this tool for future reference.
Note: The supply of 230V and 240V on Ozito tools are interchangeable for Australia and New Zealand. This tools charger is double insulated therefore no earth wire is required.
If the supply cord is damaged, it must be replaced by the manufacturer, its service agent or similarly qualified persons in order to avoid hazard.
Note: Double insulation does not take the place of normal safety precautions when operating this tool. The insulation system is for added protection against injury resulting from a possible electrical insulation failure within the tool.
Using an extension lead
Always use an approved extension lead suitable for the power input of this tool. Before use, inspect the extension lead for signs of damage, wear and ageing. Replace the extension lead if damaged or defective.
When using an extension lead on a reel, always unwind the lead completely. Use of an extension lead not suitable for the power input of the tool or which is damaged or defective may result in a risk of fire and electric shock.
To reduce the risk of electric shock, we recommend the use of a residual current device (rated 30mA or less).
This appliance is not intended for use by persons (including children) with reduced physical, sensory or mental capabilities, or lack of experience and knowledge, unless they have been given supervision or instruction concerning use of the appliance by a person responsible for their safety.
Children should be supervised to ensure that they do not play with the appliance.
1. CHARGING A BATTERY 2. MAINTENAN

WARNING! THE CHARGER SHOULD BE PROTECTED BY A RESIDUAL CURRENT DEVICE (RATED AT 30MA OR LESS).

WARNING! DO NOT COVER OR PLACE ANY OBJECT ON TOP OF THE CHARGER; PLACE THE CHARGER AWAY FROM HEAT SOURCES.
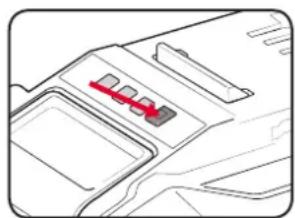
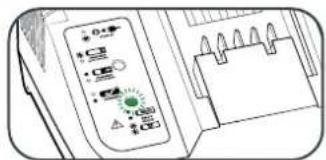
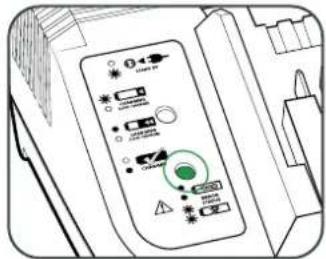
- Connect the charger to the power supply and the LED will flash green showing power is being supplied to the charger.
natural_image
Illustration of a handheld electronic device with control knobs and a grid notebook (no visible text or symbols)- Align and then slide the ribs on the battery into the recess in the charger.
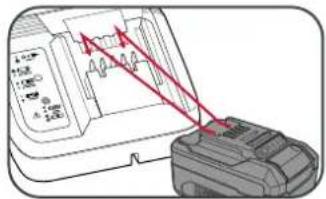
-
The red LED will illuminate while the battery charges.
-
The green LED will illuminate once the battery is charged.
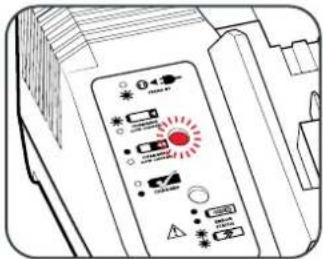
Charger LED Indicator Lights
| LED Indicator Situation | |
| GREEN (Flashing) Stand By (no battery pack is inserted) | |
| RED (Flashing) Battery is charging (low charge) | |
| RED (Illuminated) Battery is fast charging (mid charge) | |
| GREEN (Illuminated) Battery is 85% - 100% charged and is ready for use. | |
| BOTH(Illuminated) Battery pack is too hot or too cold (charging will begin automatically when battery reaches correct charging temperature). | |
| BOTH (Flashing) The battery is defective, charging is no longer possible. Do not charge. Contact Ozito Customer Service. |
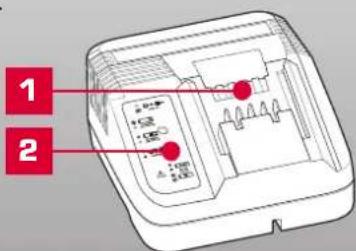
Mounting The Charging Unit On A Wall
The charging unit can be mounted to a wall or workbench. The correct dimensions for drill holes can be found on the back of the charging unit; a template for the mounting hole locations can also be found on the Ozito website.
Note: When mounting on a wall you must use suitable screws, e.g.M3 pan-head screws, in order to prevent damage to the housing and risk of falling.
ONLINE MANUAL
Scan this QR Code with your mobile device to take you to the online manual.

- Disconnect the charger from power source before cleaning.
- Keep the charger in a dry place out of reach of children.
- If the enclosure of the charger requires cleaning, do not use solvents. Use a dry, soft cloth only to wipe down the surface. Never let any liquid get inside the charger; never immerse any part of the charger.
- There are no other parts inside the charger which require maintenance. Do not take the charger apart. If the charger is damaged, contact your supplier or the manufacturer.
WARRANTY
IN ORDER TO MAKE A CLAIM UNDER THIS WARRANTY YOU MUST RETURN THE PRODUCT TO YOUR NEAREST BUNNINGS WAREHOUSE WITH YOUR BUNNINGS REGISTER RECEIPT. PRIOR TO RETURNING YOUR PRODUCT FOR WARRANTY PLEASE TELEPHONE OUR CUSTOMER SERVICE HELPLINE:
Australia 1800 069 486
New Zealand 0508 069 486
TO ENSURE A SPEEDY RESPONSE PLEASE HAVE THE MODEL NUMBER AND DATE OF PURCHASE AVAILABLE. A CUSTOMER SERVICE REPRESENTATIVE WILL TAKE YOUR CALL AND ANSWER ANY QUESTIONS YOU MAY HAVE RELATING TO THE WARRANTY POLICY OR PROCEDURE.
The benefits provided under this warranty are in addition to other rights and remedies which are available to you at law.
Our goods come with guarantees that cannot be excluded at law. You are entitled to a replacement or refund for a major failure and for compensation for any other reasonably foreseeable loss or damage. You are also entitled to have the goods repaired or replaced if the goods fail to be of acceptable quality and the failure does not amount to a major failure.
Generally you will be responsible for all costs associated with a claim under this warranty, however, where you have suffered any additional direct loss as a result of a defective product you may be able to claim such expenses by contacting our customer service helpline above.
36 MONTH REPLACEMENT WARRANTY
Your product is guaranteed for a period of 36 months from the original date of purchase and is intended for DIY (Do It Yourself) use only. If a product is defective it will be replaced in accordance with the terms of this warranty. Warranty excludes consumable parts.
WARNING
The following actions will result in the warranty being void.
- If the tool has been operated on a supply voltage other than that specified on the tool.
- If the tool shows signs of damage or defects caused by or resulting from abuse, accidents or alterations.
- Failure to perform maintenance as set out within the instruction manual.
- If the tool is disassembled or tampered with in any way.