HT159L - Hedge Trimmers Maruyama - Free user manual and instructions
Find the device manual for free HT159L Maruyama in PDF.

| Product Type | Hedge Trimmer |
| Brand | Maruyama |
| Model | HT159L |
| Engine Type | 2-cycle, air-cooled |
| Engine Model | MITSUBISHI T50-PZ-D2 |
| Displacement | 15.9 cc |
| Max. Output | 0.5 ps |
| Carburetor | Diaphragm type |
| Fuel Tank Capacity | 0.35 L (1/10 gal) |
| Spark Plug | NGK BM6A |
| Fuel-Oil Mix Ratio | 20:1 to 25:1 |
| Blade Overall Length | 400 mm (15.7 in) |
| Blade Tooth Pitch | 35 mm (1.37 in) |
| Blade Speed | 996 mm/sec @ 7,000 rpm |
| Clutch Engagement | 3,000 - 3,500 rpm |
| Transmission | Spur gear, two series cam drive |
| Lubrication (Engine) | Fuel-oil mixture |
| Lubrication (Gears) | Grease |
| Dry Weight | 4.5 kg (9.9 lbs) |
| Dimensions (L×W×H) | 847 × 233 × 216 mm (33.3 × 9.1 × 8.5 in) |
| Safety Features | Throttle lock, stop switch, blade guard |
| Recommended Cutting Capacity | Up to 7 mm diameter branches |
| Blade Adjustment | Via truss screw and nut |
| Front Handle | Included, bolted assembly |
| Warranty | Refer to manual |
Frequently Asked Questions - HT159L Maruyama
User questions about HT159L Maruyama
0 question about this device. Answer the ones you know or ask your own.
Ask a new question about this device
Download the instructions for your Hedge Trimmers in PDF format for free! Find your manual HT159L - Maruyama and take your electronic device back in hand. On this page are published all the documents necessary for the use of your device. HT159L by Maruyama.
USER MANUAL HT159L Maruyama
natural_image
Illustration of a mechanical tool with chains and a camera, no text or symbols presentIMPORTANT SAFETY INSTRUCTIONS

Safe Operation Practices for Hedge Trimmer
TRAINING
I. Read the Operating and Service Instruction Manual' carefully. Be thoroughly familiar with the controls and proper use of the equipment.
-
Never allow children to operate trimmer.
-
Keep area of operation clear of all persons, particularly small children and pets.
-
Regard your unit as a piece of power equipment and teach this regard to all who operate the equipment.
PREPARATION
-
Thoroughly inspect the area where trimmer is to be used, and remove all ,wire,string and other foreign objects which might jam the blades.
-
Do not operate trimmer without gloves, head and ear protection. Always wear substantial foot wear, safety glasses, and pants or slacks that cover your legs when operating trimmer.
-
Check the fuel before starting the engine. Do Not fill the fuel tank indoors, when the engine is running, while smoking, or while the engine is still hot. Replace fuel cap securely and wipe up spilled fuel. Dispose of gas saturated rags properly, in a well ventilated area to avoid possibility of spontaneous combustion. Never use fuel as a cleaner.
-
Do Not use trimmer unless your hands are protected.
-
Use only in daylight or in good artificial light.
-
Never operate equipment in wet grass. Always be sure of your footing: keep a firm hold on the handle and walk, never run.
-
Do not attempt to fill fuel tank from fuel container unless the container spout or funnel fits INSIDE the fuel tank filler neck. The use of too large a spout or funnel, or no funnel, may result in spilled fuel, creating highly flammable vapors. This could result in fire and/or explosion, causing severe bodily injury.
OPERATION
- Start the engine carefully. Keep hands and feet well away from cutting edge.
2.Do not change engine governor setting or overspeed engine.
-
Never swing blades toward bystanders, nor allow anyone near machine while it is in operation.
-
If blades become jammed, stop the engine and inspect trimmer for damage: repair damage before starting engine.
-
If trimmer should start to vibrate abnormally, stop the engine and check for the cause. Vibration is generally a warning of trouble.
-
Stop the engine whenever you leave the trimmer, and when making repairs or inspections.
-
When repairing or inspecting, make certain all moving parts have stopped. Disconnect spark plug wire and keep wire away from plug to prevent accidental starting.
8.Do Not run engine indoors.
9.Shut engine off and wait until blade comes to a complete stop before removing branches that made blade jam.
-
Watch out for traffic when working near roadways.
-
Stay alert for uneven sidewalks, holes in terrain or other hidden hazards when operating.
MAINTENANCE AND STORAGE
-
Keep all nuts, bolts and screws tight to be sure equipment is in safe working condition.
-
Never store trimmer with fuel in the tank in a building where fumes may reach an open flame or spark. Be sure engine has cooled before storing in any enclosure.
-
To reduce fire hazard, keep engine free of cutting, leaves or excessive grease.
-
After operating engine, never touch exhaust muffter until it has cooled completely.
-
Keep trimmer in good operating condition and keep safety devices in place.
We would like to express our sincere thanks to you for purchasing our Hedge Trimmer Model HT159. For your safety when operating and for optimum performance, please read this manual very carefully to understand the operation and correct handling of the trimmer. Be particularly careful about safety.
SPECIFICATIONS
| ENGINE | ModelTypeDisplacementOutput(Max.)CarburetorFuel tank capacitySpark plugLubrication | MITSUBISHI T50-PZ-D2 cycle-air cooled15.9cc0.5psDiaphragm type1/10 gal. 0.35 litreNGK BM6AFuel-oil Mix 20 and 25 to 1 |
| BLADES | Overall lengthTooth pitchSpeedReciprocating | 15.7 inches 400mm1.37 inches 35mm996mm/sec/7,000rpm28.5 times/sec/7,000rpm |
| TRANSMISSION | Clutch typeClutch inGearDriveLubrication | Dry type3,000-3,500rpmSpur gearTwo series cam driveGrease |
| DRY WEIGHT | Dry weight | 9.9 lbs. 4.5kg |
| DIMENSIONS | (L×W×H) | 33.3×9.1×8.5 847×233×216mm |
*Specifications subject to change without notice or liability.
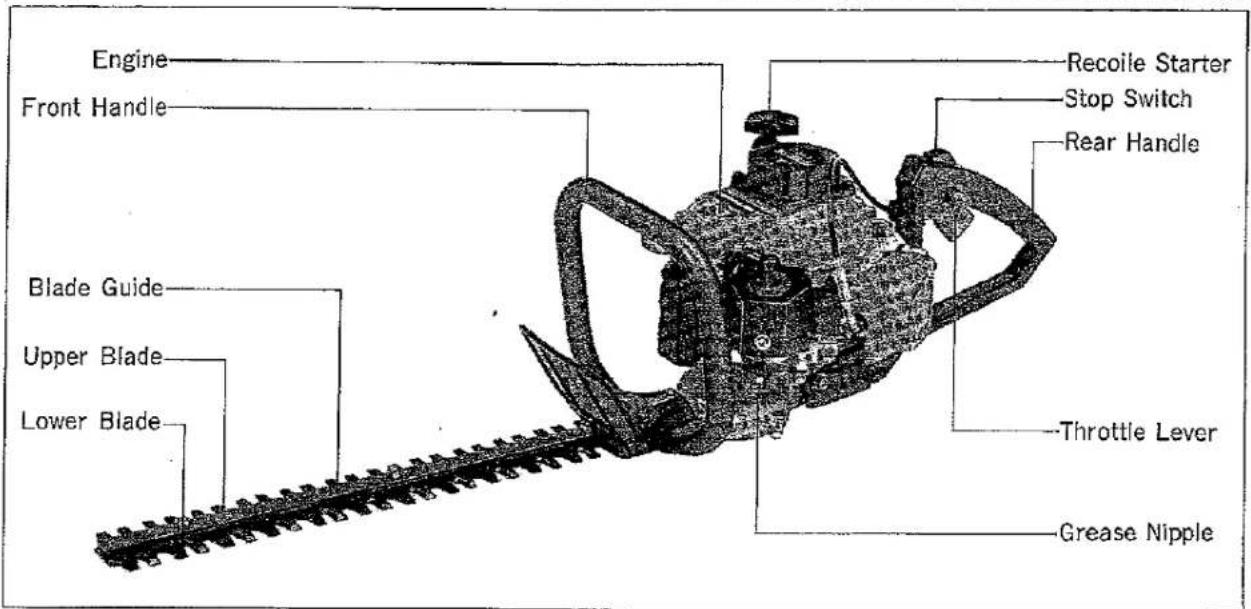
OUTWARD VIEW OF TRIMMER AND NAMES OF PARTS
PRECAUTIONS BEFORE OPERATION
- Before operation, make sure that the screws are not loose or missing, that the components are not damaged, and that the blades are not chipped off or cracked. If a blade is chipped or cracked, always replace it with a new one.
- Refuel the trimmer, check or adjust the different parts after the engine has stopped and cooled down.
a. Do not remove the fuel tank cap while the engine is rotating or when it is still hot.
b. Handle the fuel in a clean place and beware of fire particularly.
Do not smoke near fuel and always move fuel away from open flames.
c. Take care not to spill any fuel. If it is spilled, wipe it off clean.
d. Never operate on gasoline only. As this engine is a 2-cycle, use an oil an fuel mixture. The ratio is 25 parts regular gas to 1 part 2-cycle oil.
3.Do not operate the machine when your physical condition is not good.
4. Refrain from operating the machine at a place where the ventilation is poor.
5. Before starting the engine, make sure that the blade is clear of any obstacle. Start the engine by a safe procedure (lay the Hedge Trimmer on a flat place so the blades will not move when the recoil starter is pulled) with the blades directed toward no person.
6.Wear safety clothes (safety shoes, goggles, carmuffs, gloves, etc.)
7. Keep people or animals away from the working area. When two operators work together in the same place, maintain at least a 5-meter distance from each other and exchange warning shouts if necessary.
8. Stop the engine and pay special attention to the blades whenever you carry the Hedge Trimmer from one place to the next before and after operation.
STARTING AND STOPPING

- Pull the throttle lever a little and push in the throttle-fixing knob.
- Make sure that the throttle lever is locked, and then pull the recoil starter to start the engine. If the switch is at stop, the engine will not start.
- Pull the throttle lever a little and then release it. If the throttle-fixing knob is overridden, the engine idles and the blades stop. If throttle cable is maladjusted, the blades might not stop even by pushing back the throttle lever to zero. In such a case, regulate the cable adjustor.
- After starting the engine, warm up engine (for about 5 minutes at medium a speed).
5.To stop the engine, push back the throttle lever to idle the engine and then set the stop switch to stop.
PRECAUTIONS DURING OPERATION

-
If the blades have stopped on account of a branch caught during the trimming, first be sure to stop the engine and eliminate the branch. Refrain from cutting too hard or too thick a branch (over 1/4 in or 7mm in diameter). While larger diameter branches may be cut, this will proportionally increase the wear and tear of the machine.
-
When the machine is running, never touch the blades. Never swing the blades toward a person.
-
Absolutely avoid handling the machine with a single hand because it might cause jerking, dropping of the Hedge Trimmer, or loss of control.
-
The engine speed must not be excessive but just enough to cut the foliage. Run the Hedge Trimmer at a rated speed(5500-8000rpm)whenever possible.
-
To avoid a burn, do not touch the engine during the operation or immediately after stopping the engine. Handle the engine after it is completely cooled.
-
During the operation, the stance must be firm. And do not work in an unstable condition. Refrain from working in an unnatural position or in a risky manner.
-
Do not use the Hedge Trimmer continuously for a long time. It is normal to take a break of 10 to 20 minutes after every 50-minute operation.
-
In every 10-20 hours, inject a proper amount of grease through a grease nipple installed in the crank case of the Hedge Trimmer.
-
Stop the engine before lubricating the blades during the operation.
-
Stop the engine before leaving the Hedge Trimmer.

natural_image
Two black-and-white photos showing a mechanical device and a gear mechanism, no visible text or symbols.8
9
-
Clean every part, repair faulty sections, and apply a thin coat of oil on metallic parts to prevent rust.
-
If the Hedge Trimmer is to be stored for long periods, drain the fuel from the tank, then start the engine and keep the engine running until it has consumed all the fuel left in the carburetor and stops.
-
Store the Hedge Trimmer in a place free from excessive humidity so as to prevent the dust from soiling the machine.
-
Remove the spark plug, inject a small amount of engine oil through the spark plug hole. Then pull the recoil starter a few times to put a thin coat of oil on the cylinder. Install the spark plug again when the piston has stopped at a top dead point.
ADJUSTMENT OF BLADES

- The blades wear away with long use. When you find that you no longer have a clean cut, adjust the blades in the following ways:
(1)Turn nut (1) loose.
(2)Screw(2)in with the driver lightly till it stops turning, and then screw it back one-fourth to a half turn.
(3)Turn nut (1) tight.
(4)Lubricate the blades after adjustments above.
(5) Start the engine and operate the blades at the highest speed of motor revolution for a minute or so.
(6)Stop the engine and touch the blades with your hand. If they are just warm enough for you to keep your hand on them, you have made the proper adjustments, but if they are too hot for you to keep touching them, give screw.(2)a little more turnback and repeat(5)to see if they are properly adjusted.
1
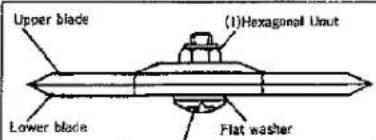
(2)+truss screw
Cross-sectional view of blades
Note: Never fail to stop the engine before making the adjustments. The blades have a slot around screw(2). In case you find the dust on the ends of the slots, remove it clean.
ASSEMBLY PROCEDURE
1.Fix the front handle with two hexagon bolts M6×30(for both SW and PW)and two hexagon nuts M6.
2. Loosely settle the engine with two hexagon bolts M6×15(for SW also).
3. Connect the engine ground wire with the rear handle ground wire, and fasten the rear handle with a hexagon bolt M6×40(for both SW and PW), a hexagon bolt M6×50(for SW and PW) and a hexagon nut M6. The ground wire terminal is tightened jointly with M6×40.
4.Tighten the loosely fixed point securely.
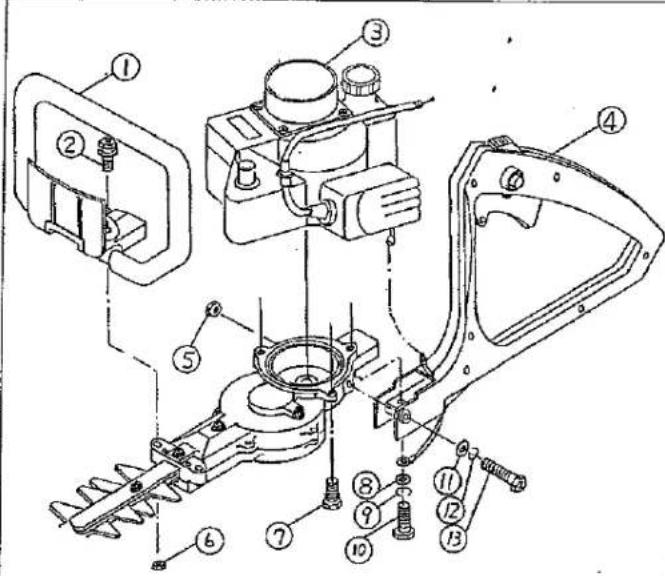
| Ref. No. | Part Name | Quantity | Description |
| 1 | FRONT HANDLE | 1 | |
| 2 | BOLT M6×30 | 2 | (W/SW & PW) |
| 3 | ENGINE(MITSUBISHI) | 1 | T50PZ |
| 4 | REAR HANDLE ASSY | 1 | |
| 5 | HEXAGON NUT M6 | 1 | |
| 6 | HEXAGON NUT M6 | 2 | |
| 7 | BOLT M6×15 | 2 | (W/SW) |
| 8 | .WASHER,plain M6 | 1 | |
| 9 | WASHER,spring M6 | 1 | |
| 10 | BOLT M6×40 | 1 | |
| 11 | WASHER,plain M6 | 1 | |
| 12 | WASHER,spring M6 | 1 | |
| 13 | BOLT M6×50 | 1 |
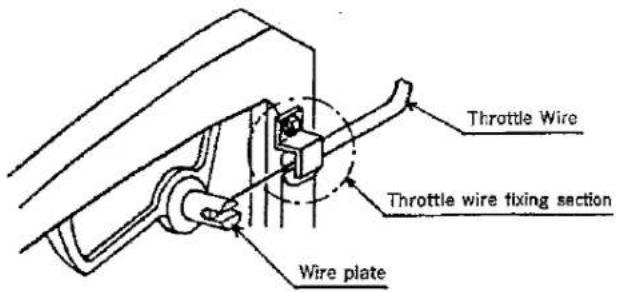
THROTTLE CABLE ASSEMBLY PROCEDURE

-
Pass the throttle cable through the throttle cable-fixing section of the rear, handle, hook one cable end with the other and engage it with the groove.
-
Regulate the adjustor piece so there will be a certain allowance on the throttle wire.
* Please make certain that the blades come to a complete standstill when the engine is idling.

MARUYAMA U.S., INC.
301-30th St. NE, Suite 118, Auburn, WA 98002.
1-253-735-7368


- IMPORTANT SAFETY INSTRUCTIONS
- Safe Operation Practices for Hedge Trimmer
- TRAINING
- PREPARATION
- OPERATION
- MAINTENANCE AND STORAGE
- OUTWARD VIEW OF TRIMMER AND NAMES OF PARTS
- PRECAUTIONS BEFORE OPERATION
- STARTING AND STOPPING
- PRECAUTIONS DURING OPERATION
- ADJUSTMENT OF BLADES
- ASSEMBLY PROCEDURE
- THROTTLE CABLE ASSEMBLY PROCEDURE
Brand : Maruyama
Model : HT159L
Category : Hedge Trimmers