MH 990 QJH - Rototiller Herkules - Free user manual and instructions
Find the device manual for free MH 990 QJH Herkules in PDF.

| Product Type | Rototiller |
| Brand | Herkules |
| Model | MH 990 QJH |
| Engine Type | 4-stroke gasoline engine |
| Engine Displacement | 196 cc |
| Power Output | 6.5 hp |
| Fuel Tank Capacity | 3.6 L |
| Oil Capacity | 0.6 L |
| Tilling Width | 60 cm (24 inches) |
| Tilling Depth | Adjustable up to 25 cm (10 inches) |
| Number of Tines | 4 pairs (8 tines) |
| Tine Material | Heat-treated steel |
| Transmission | Chain drive |
| Forward Gears | 2 |
| Reverse Gear | Yes |
| Wheel Drive | Yes |
| Wheel Size | 10 inches |
| Weight | 45 kg (99 lbs) |
| Dimensions (L x W x H) | 90 x 60 x 70 cm (35 x 24 x 28 inches) |
| Starting System | Recoil starter |
| Handle Type | Adjustable ergonomic handles |
| Safety Features | Safety lever, engine kill switch, shield guard |
| Maintenance | Regular oil change, air filter cleaning, spark plug check |
| Spare Parts Availability | Common parts available online |
| Reparability | User-serviceable with basic tools |
Frequently Asked Questions - MH 990 QJH Herkules
User questions about MH 990 QJH Herkules
0 question about this device. Answer the ones you know or ask your own.
Ask a new question about this device
Download the instructions for your Rototiller in PDF format for free! Find your manual MH 990 QJH - Herkules and take your electronic device back in hand. On this page are published all the documents necessary for the use of your device. MH 990 QJH by Herkules.
USER MANUAL MH 990 QJH Herkules
text_image
Herkules®
(Original instructions) User's Manual
Read the instructions in the User's Manual.
Familiarise yourself with the machine's controls and operation.
DE
EN
natural_image
Line drawing of a manual tiller machine with no text or symbols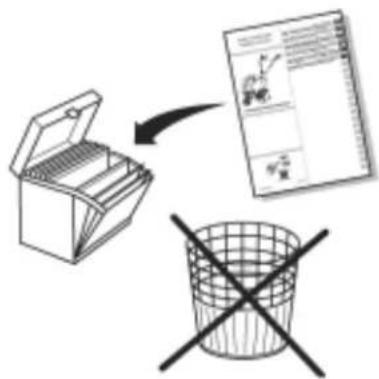
text_image
Diagram illustrating a box open with a document and a crossed basket, symbolizing a waste sorting or disposal process.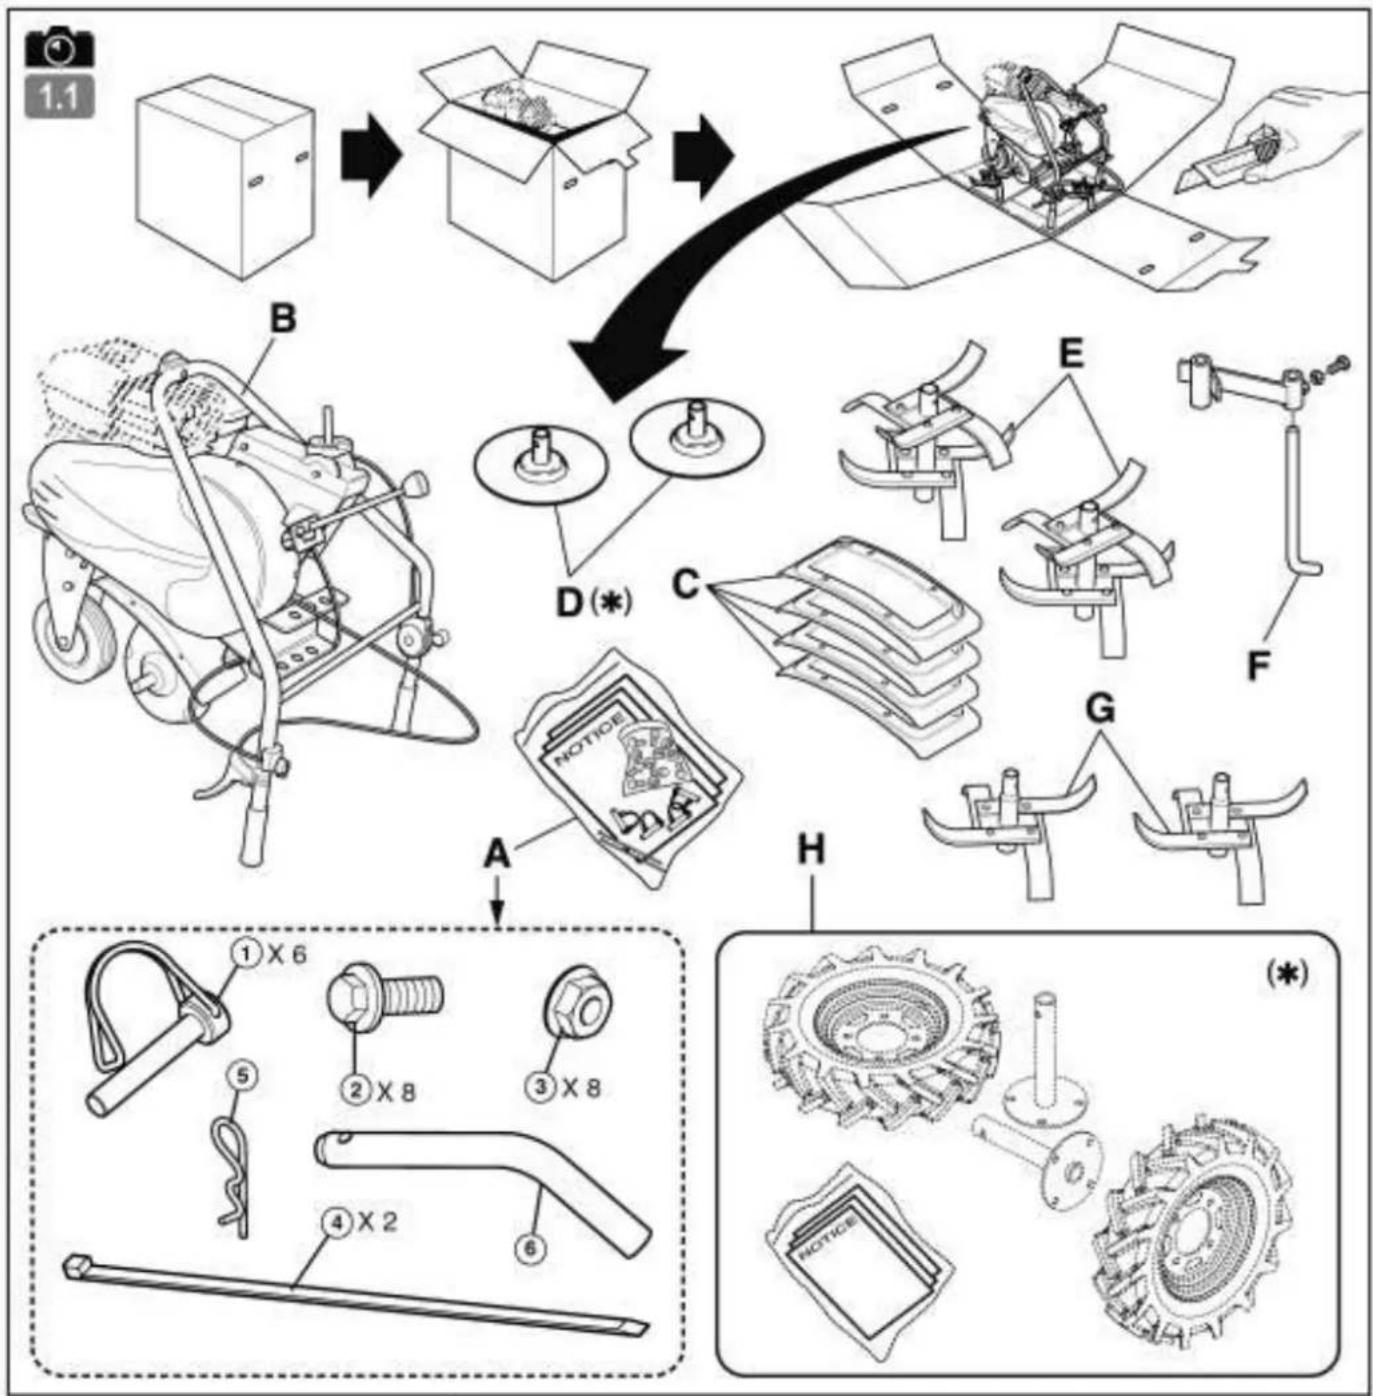
text_image
1.1 B D(*) C E F A G H ①X6 ②X8 ③X8 ④X2 (*)
text_image
1.2 ⑥ ⑤ F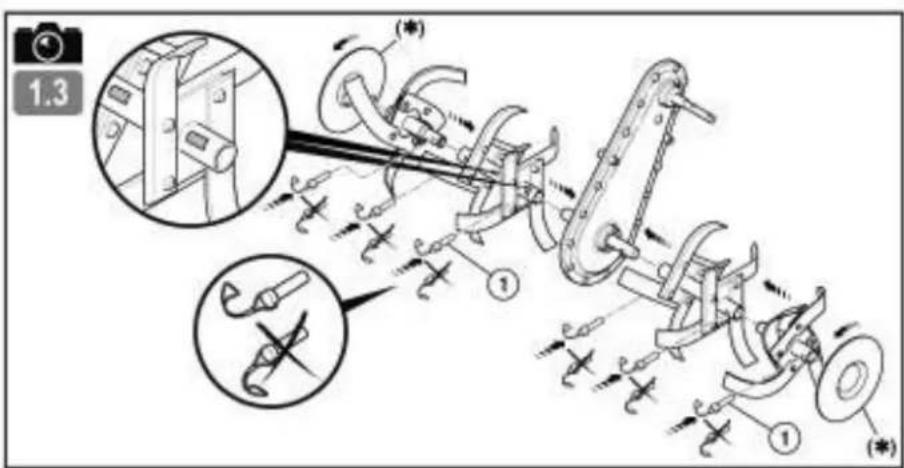
text_image
1.3 (*) ① ① (*)(•): FR : (suivant version) - EN : (depending on the version) - DE : (je nach Ausführungsvariante) - BG : (sporéd варианта)
HR : (ovisno o verziji) - DA ; (Afhaengigt af version) - ES : (Según versión) - ET : (járgmine versioon) - FI : (mallista rippuen)
EL : (aváloya με το μοντέλο) - HU : (verziótól függően) - IT : (A seconda del modelo) - LV : (atkaribā no versijas)
LT : (priklausomai nuo versijos) - NL : (Naar gelang model) - NO : (Avhengig av versjon) - PL : (Zależnie od wersji)
PT : (Consoante versão) - RO : (In functie de versiune) - TR : (versiyona göre) - SK : (v závislosti od verzie) - SL : (odvisno od verzije)
SV : (beroende på version) - CZ : (v závislosti na provedení) - UK : (в залежності від верої) - RU : (В зависимости от модификации)
text_image
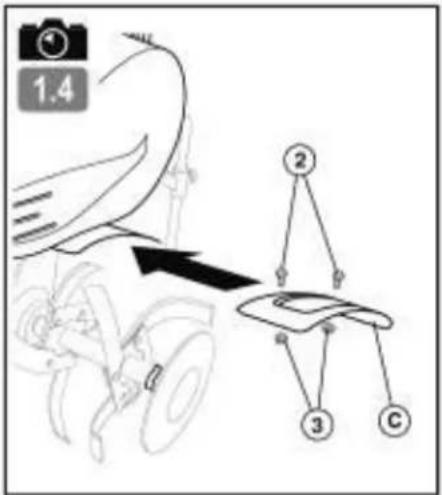
1.4 ② ③ C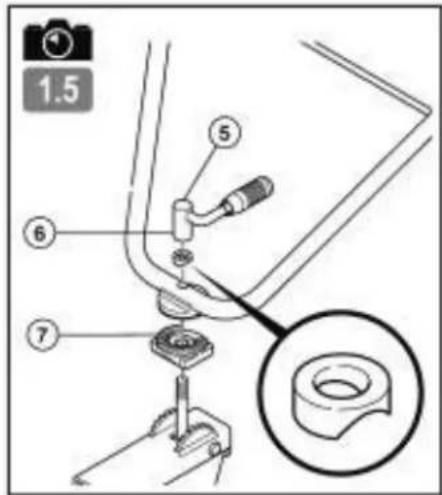
text_image
1.5 ⑤ ⑥ ⑦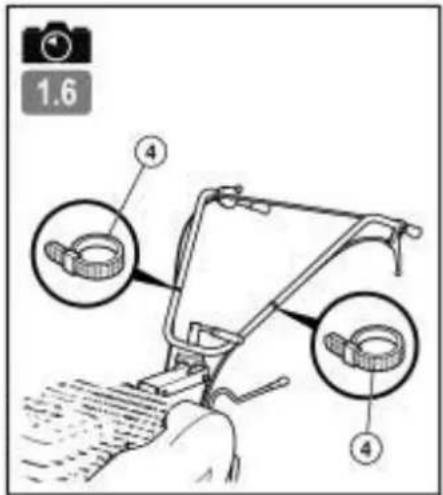
text_image
1.6 ④ ④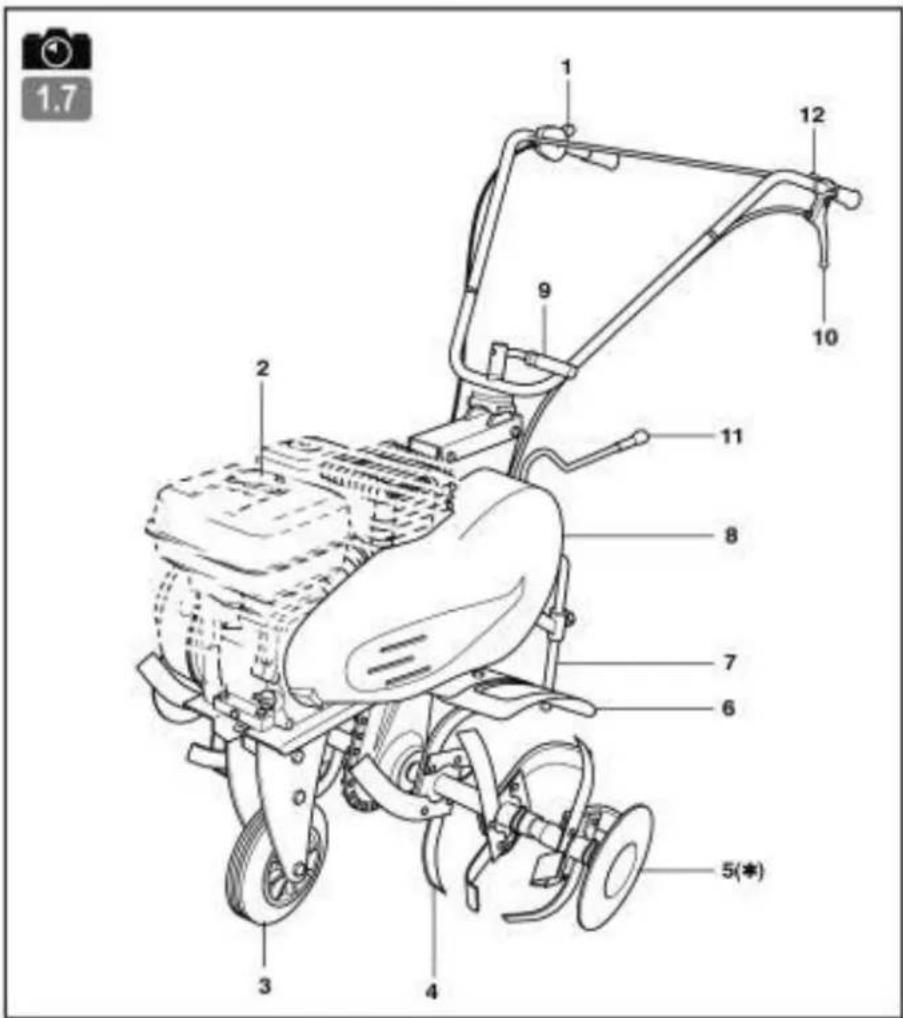
text_image
1.7 12 9 10 11 8 7 6 5(*) 3 4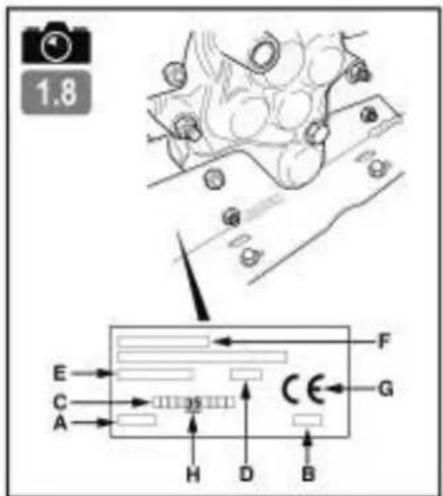
text_image
1.8 E C A 35 H D B F G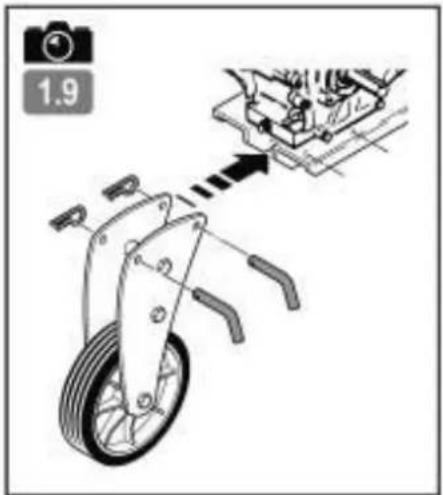
text_image
1.9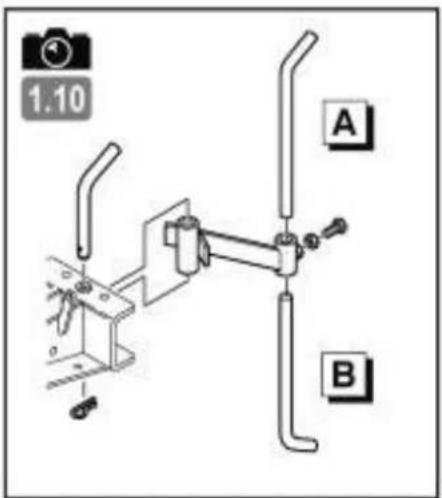
text_image
1.10 A B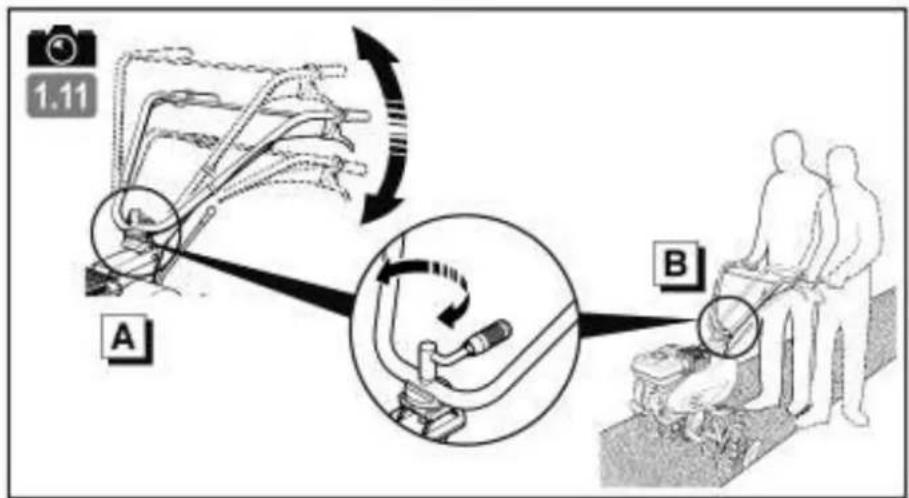
text_image
1.11 A B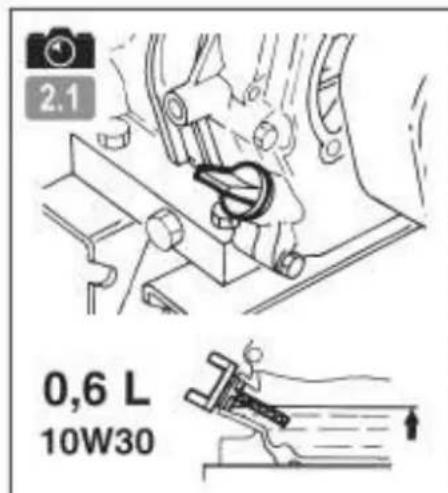
text_image
2.1 0,6 L 10W30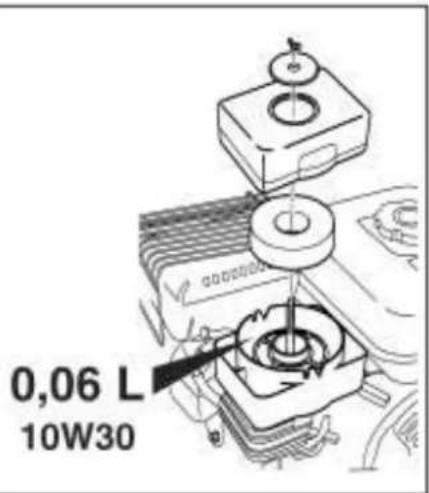
text_image
0,06 L 10W30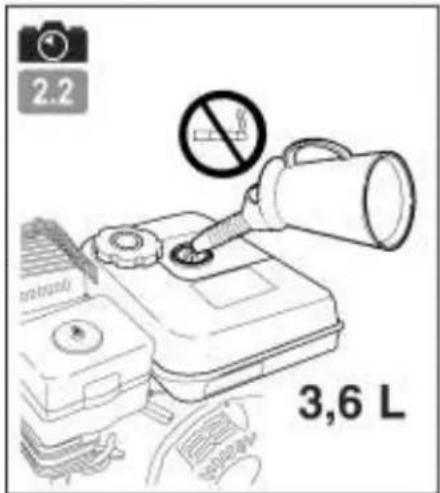
text_image
2.2 3,6 L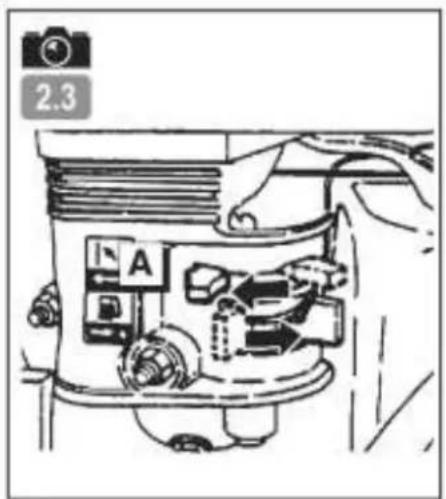
text_image
2.3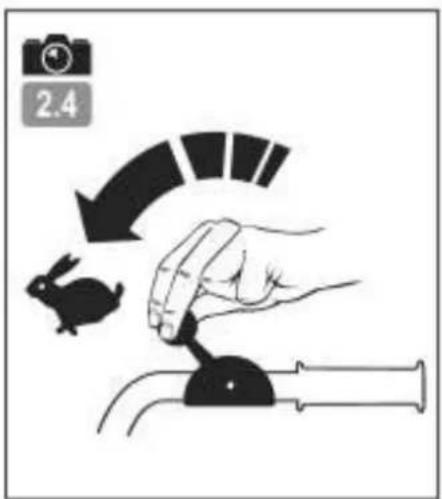
text_image
2.4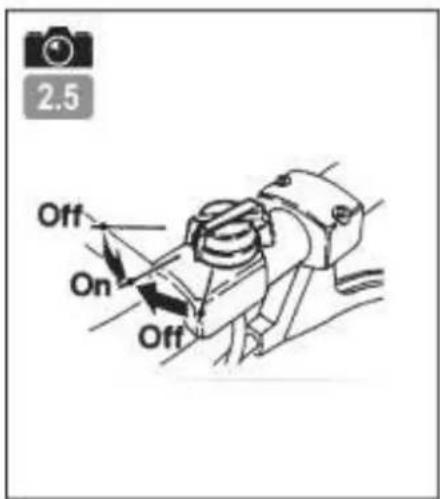
text_image
2.5 Off On Off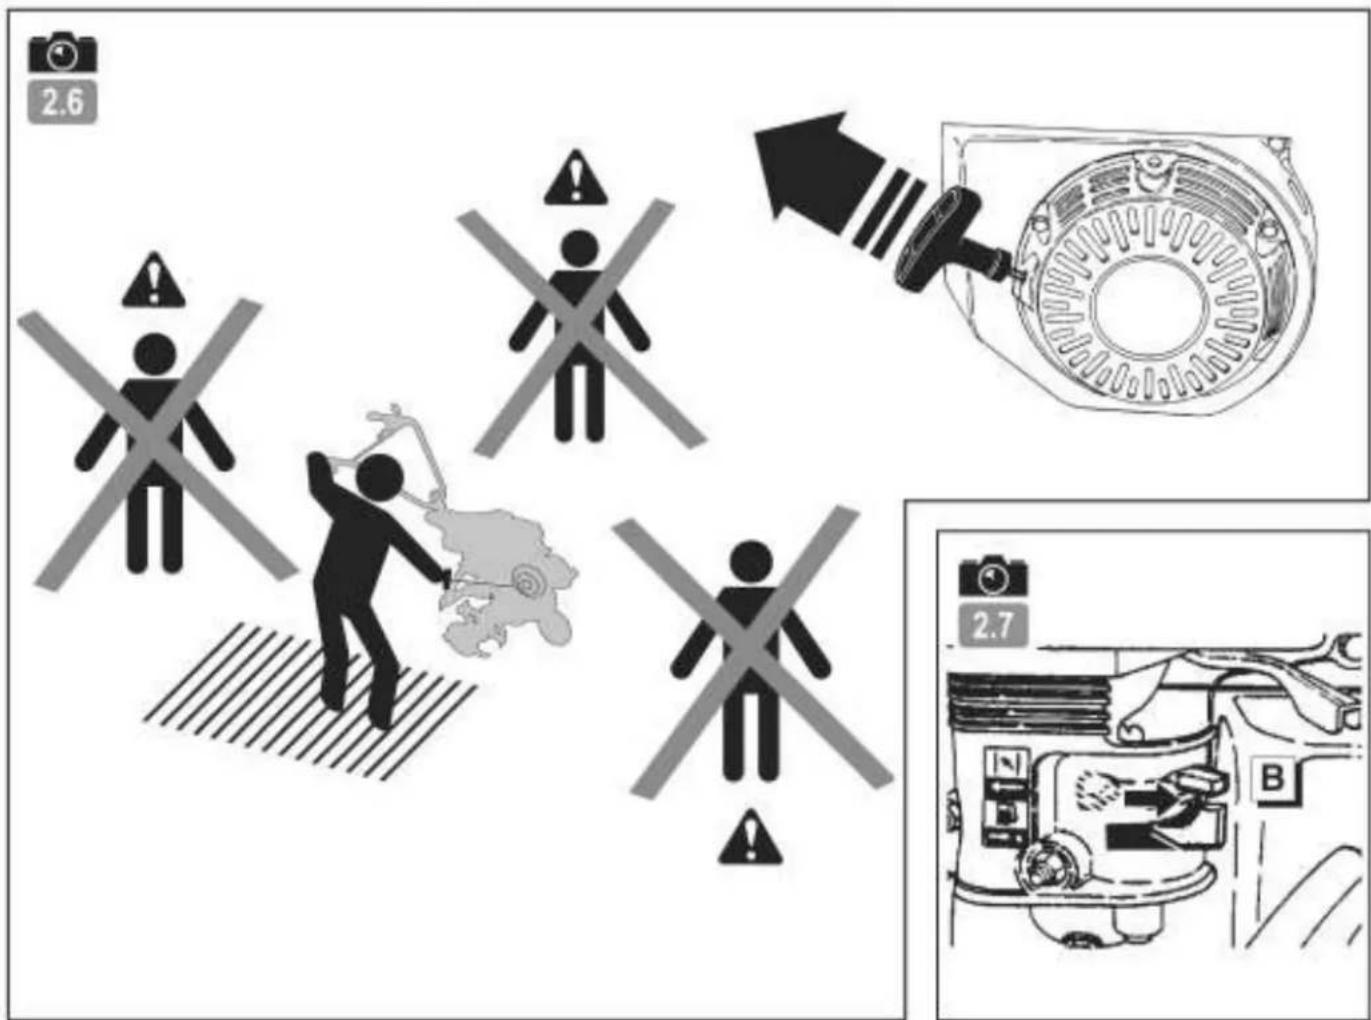
text_image
2.6 2.7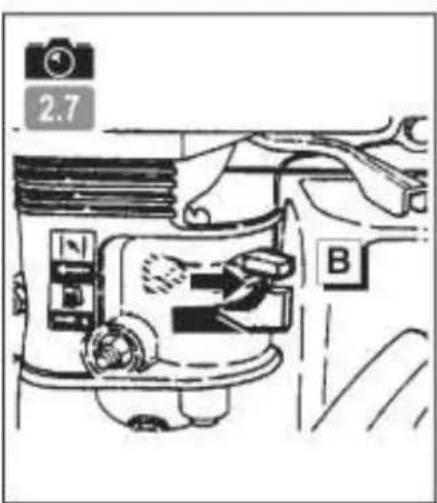
text_image
2.7 B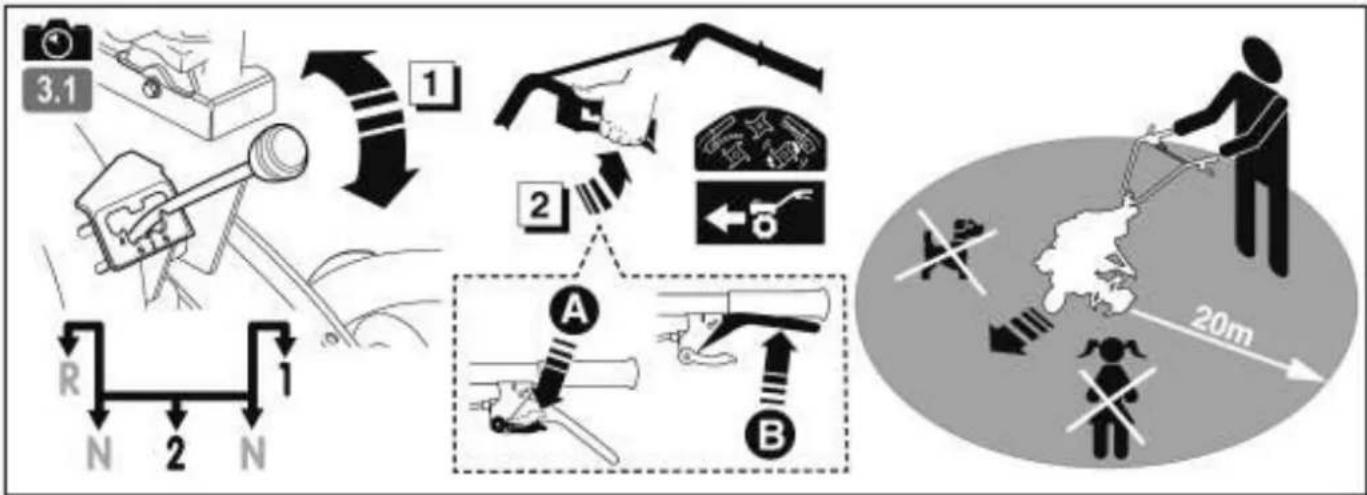
flowchart
graph TD
    A["Camera Monitoring"] --> B["Car Pickup"]
    B --> C{Check Check}
    C -->|Yes| D["Car Maintenance"]
    C -->|No| E["Stabilizing Vehicle"]
    D --> F["Car Safety"]
    E --> G["Stabilizing Vehicle"]
    F --> H["Car Maintenance"]
    G --> H
    style A fill:#f9f,stroke:#333
    style H fill:#ccf,stroke:#333
text_image
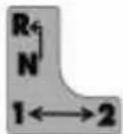
3.2 1 2 3 4 5 6 7 8 9 10 11 12 13 14 15 16 17 18 19 20 N 2 N A B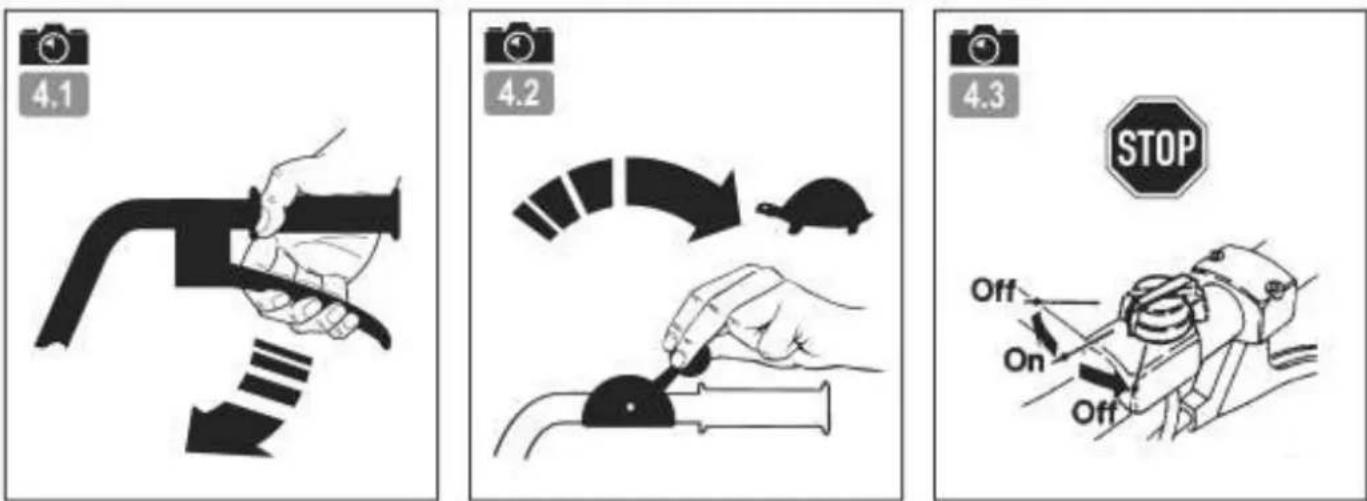
text_image
4.1 4.2 4.3 STOP Off On Off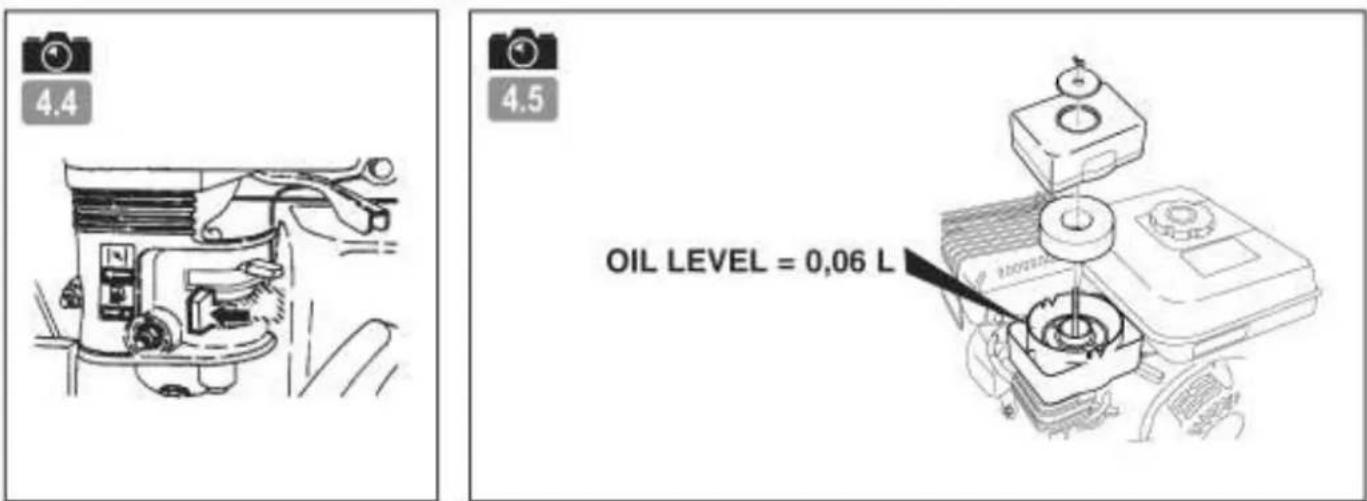
text_image
4.4 4.5 OIL LEVEL = 0,06 L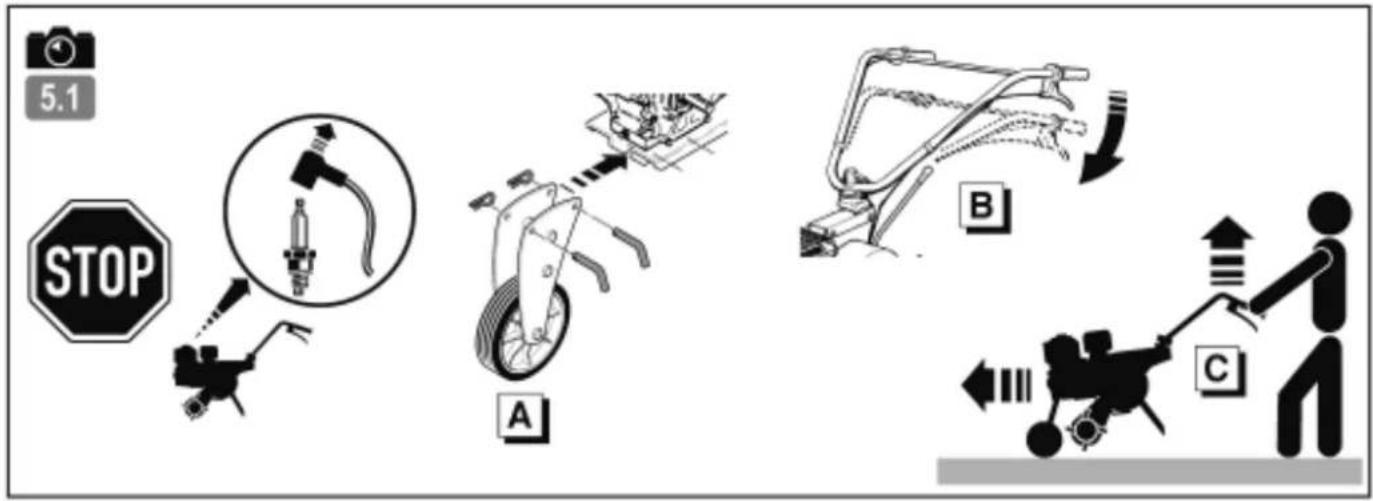
text_image
STOP 5.1 A B C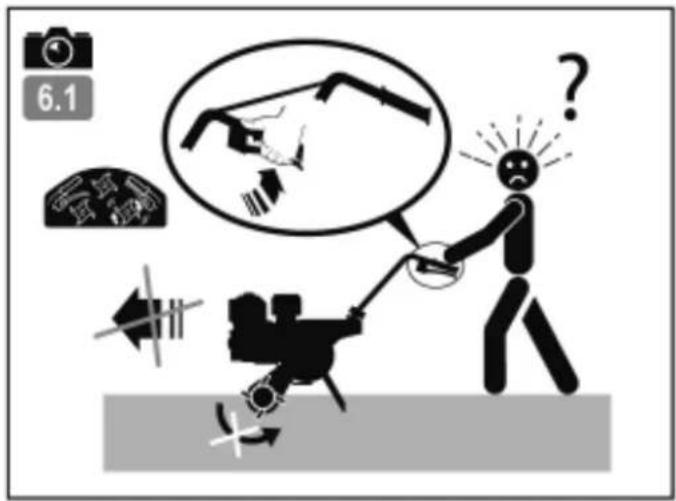
text_image
6.1 ###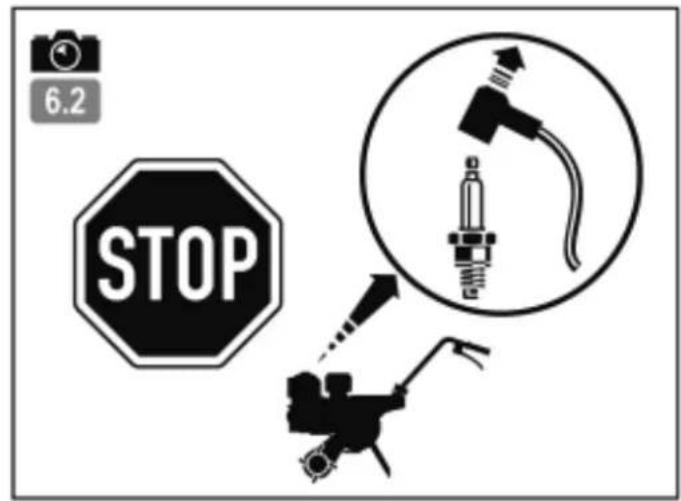
text_image
6.2 STOP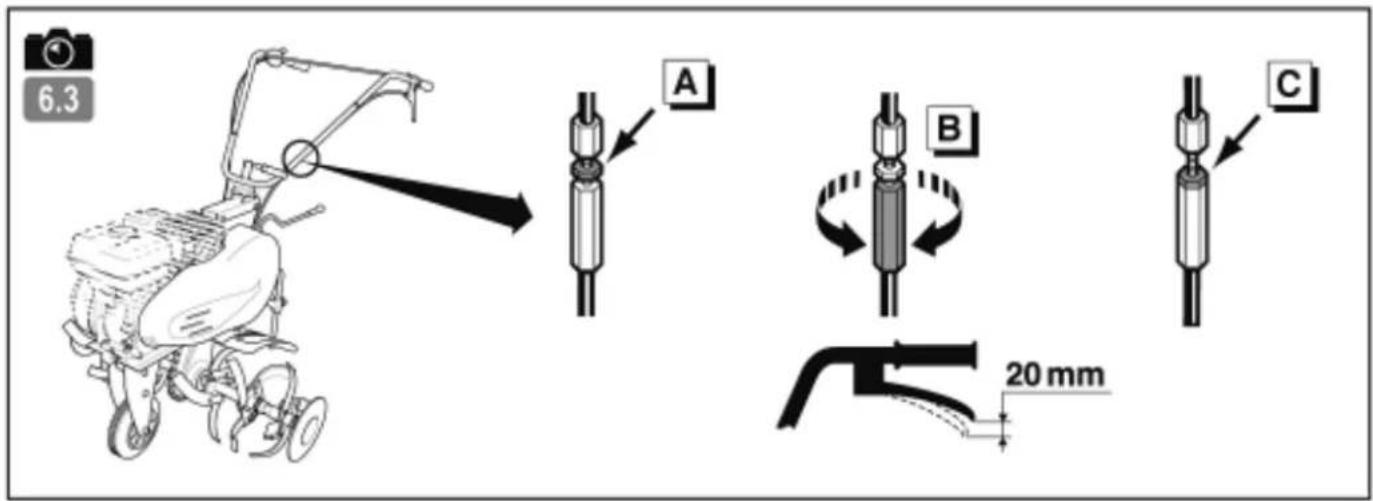
text_image
6.3 A B C 20 mm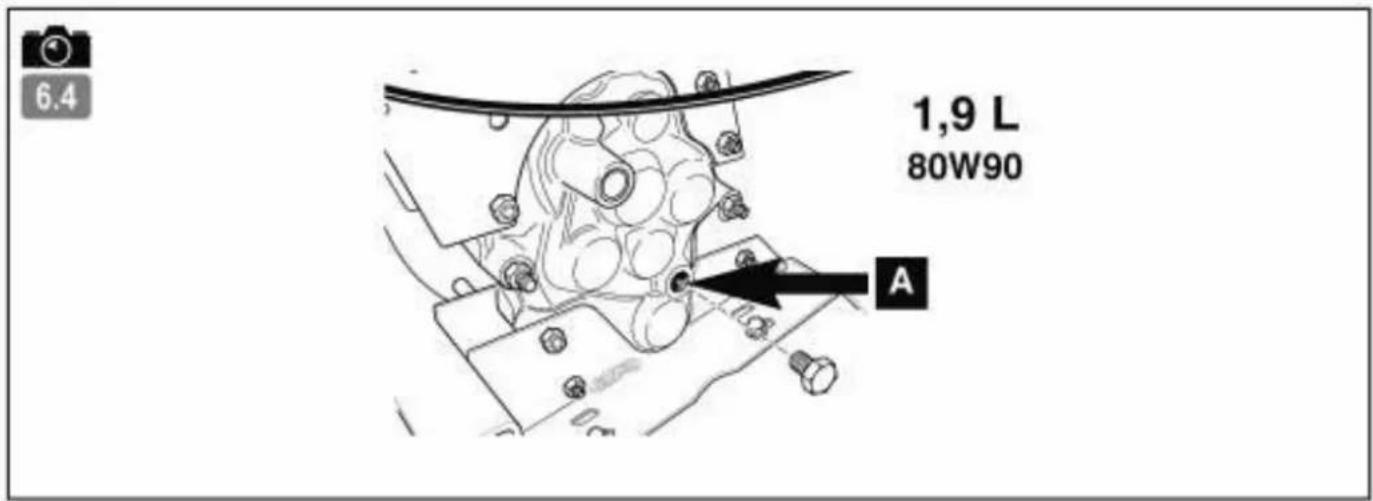
text_image
6.4 1,9 L 80W90 ASchutzvorrichtung in
Gebrauch nehmen
Pay particular care to the sections marked as follows:

DANGER : This indicates a strong likelihood of serious or even fatal injury if the instructions are not followed.
WARNING : . This indicates a risk of injury or damage to the equipment if the instructions are not followed.
NOTE : This indicates useful information.

This symbol reminds you to take care with certain operations.
If you have any problems or questions about the cultivator, please contact your approved supplier.

DANGER: The machine is designed for safe and reliable service if used as instructed. Before using your machine, please make sure you have understood the contents of this manual. Otherwise you could be injured and your equipment could be damaged.
Training / Information
- Familiarise yourself with the correct use and the controls before using the machine. Know how to stop the motor rapidly.
- The machine must always be used according to the recommendations given in the instruction manual.
- Remember that the user is responsible for any accidents or dangerous reactions occurring to other people or their belongings. It is his responsibility to assess the potential risks of the ground to be cleared and to take all precautions necessary to ensure it is safe, in particular on slopes and on loose, slippery or uneven ground.
- Never allow children or people unfamiliar with these instructions to use the machine. There may be local laws which set a minimum age for users.
- Never work when there are people, especially children, or animals within a radius of 20 meters of the machine; the operator must necessarily remain at the controls of the handles.
- Do not use the machine if you have been taking medicine or other substances that might slow your reactions or make you drowsy.
- Pay particular attention on hard ground, because the machine has the tendency to be much less stable than on cultivated ground.
- Always wear sturdy, non-slip footwear and tight long trousers when working. Do not use the machine in bare feet or sandals. Ear protectors are recommended.
- Use the machine for the purpose it is designed for - digging the ground. Any other use may be dangerous or cause damage to the machine.
Preparation :
- Carefully inspect the area where the machine is to be used and remove any objects that might be projected by the machine (stones, wire, glass, metal objects ...).
- Before use, always check over the machine to ensure that the tools and deflectors are not worn or damaged. Replace any worn or damaged parts.
- Maintain the electrical cables that stop the motor in good condition so that you can be sure to turn the motor off.
- Check that no petrol or oil are leaking.
- Do not use the machine without its protective casings and ensure that all the fittings are tight.
Use :
- Never transport people on the machine.
- Take care when starting the motor, following the manufacturer's instructions and keeping your feet away from the blade(s).
- Stop the motor when the machine is not in use.
- When holding the machine, walk don't run.
- Take great care when pulling the machine towards you or reversing the direction of rotation (if fitted).
- Keep a safe distance from the rotating blades, set by the length of the steering column.
- Do not place your hands or feet near or beneath rotating parts.
-
If there is
-
abnormal vibration,
- a blockage,
- a problem engaging or disengaging the clutch.
- a collision with a foreign object,
- deterioration of the engine halt cable (following model).
- Stop the engine immediately (if the Engine halt cable is severed, use the starter control as described in paragraph "start the engine" to stop the Engine), let the machine cool down, unplug the spark-plug lead, inspect the machine and have the necessary repairs carried out by an approved repairer before using again.
- Work only by daylight or in good artificial light.
- Do not use the machine on slopes greater than 10° (17%).
- Work across slopes, not up or down them.
- Make sure to keep your footing on sloping ground, change direction very carefully.
- Using accessories other than those recommended may make the machine dangerous and cause damage to your machine which will not be covered by your guarantee.
Maintenance / storage
- Stop the motor and disconnect the spark plug before cleaning, inspecting, adjusting or maintaining the machine or changing the tool(s).
-
Stop the motor, disconnect the spark plug and use thick gloves when changing the tool(s).
-
Keep all nuts and bolts tight to ensure safe conditions of use.
- To reduce fire risk, keep the motor, the silencer and the fuel storage area free of plants, waste oil, or any other inflammable material.
- If the exhaust silencer is defective, have it replaced by an approved repairer.
- Do not mend parts; replace them by the maker's own spares.
- Replace the cutting blades in complete sets to keep them balanced
- For your own safety, do not alter the characteristics of your machine. Do not the motor speed settings and do not run the motor at excess speeds. Regular maintenance is essential for safety and to maintain the level of performance.
- Allow the motor to cool down before putting the machine away.
Danger! Petrol is highly inflammable!
- Store fuel in containers specially designed for it. Always fill the tank outdoors and do not smoke while doing it.
- Do not unscrew the fuel cap or top up with petrol while the motor is running or still hot.
- If petrol is spilt on the ground, do not try to start the motor; Carry the machine elsewhere and avoid all naked flames until the petrol vapour has dispersed.
- Store the machine in a dry place. Never store the machine in a building where the petrol vapour can reach a flame, spark or source of intense heat.
- Replace the caps of the fuel tank and the petrol can correctly.
- Limit the amount of petrol in the tank to reduce spillage.
- Do not run the motor in a confined space where carbon monoxide vapour might accumulate.
- Carbon monoxide can be fatal. Ensure good ventilation.
Moving, handling, transporting.
- Any action on the machine apart from ground digging must be performed with engine stopped and spark plug disconnected.
- Except when (ground digging) the machine must be moved by using the transport wheel as described in "Moving" chapter.
- Handling: do not try and lift the machine. The machine's weight is indicated on the manufacturer's plate, at the end of this manual. Use a method of handling adapted to the weight of the machine and to the situation to guarantee the safety
- When loading or unloading the machine to or from a trailer, use a suitable ramp. Lash the machine down correctly for safe transport.
- The machine should be transported in a trailer; do not use any other method of transport.
DEFINITION OF THE PICTOGRAMS

text_image
Vertical sequence of six black-and-white icons representing warning symbols, including a triangle, gear, open book, microscope, gear with wings, and a crossed-out circle.WARNING
Danger
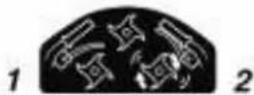
WARNING
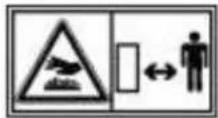
Rotating tools
WARNING
Read the User's Manual
WARNING
Consult the User's Manual and remove the sparkplug before performing any work.
WARNING
Do not use without protection (rotating elements).
Gas control

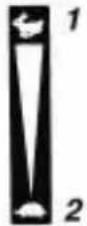
1 - Fast
2 - Slow
3 - Stop

Circuit cutout

Stop
GO
Stop


Reverse
Clutch lever
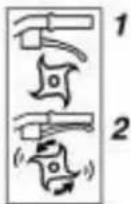
1 - Disengaged
2 - Engaged
Gear lever


Disengaging
Do not touch any hot surfaces.

The exhaust gases are dangerous. Do not use in a poor ventilated area.

Switch off the engine before topping up the fuel.

Do not smoke, ignite a flame or approach with a naked flame.
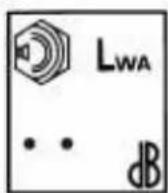
Guaranteed sound power level

Pictograms present or not depending on the model of the machine.
TECHNICAL INFORMATION
| Machine model | MH 990 QJH | Acoustic pressure level at driver's seat | |||
| Weight | kg | 70 | (EN709:1997/A4:2009) | dB(A) | 85 |
| Engine model | GX160 | Measurement uncertainty | dB(A) | 1 | |
| Net output (*) | KW | 3.6 | Measured acoustic pressure level | ||
| For engine revolutions | rpm | 3600 | (EN709:1997/A4:2009) | dB(A) | 98 |
| Nominal power | KW | 3.3 | Measurement uncertainty | dB(A) | 1 |
| Nominal engine revolutions | rpm | 3300 | Vibration level transmitted to operator's hands | ||
| Guaranteed acoustic pressure level | (EN709:1997/A4:2009) | m/s ^2 | 7 | ||
| dB(A) | 100 | Measurement uncertainty | % | 2 | |
* The engine power indicated in this document is the net output obtained by testing an engine from a production run according to Standard SAE J 1349 at a given speed of rotation. The power of another production run engine may differ from this indicated value. The actual power of an engine installed in a machine depends on various factors such as the speed of rotation, the temperature, humidity, atmospheric pressure and maintenance conditions and other factors.
UNPACKING / ASSEMBLY
DE
EN
NB: In his constant desire to improve his products, the manufacturer states that the whole of this manual is not contractual and reserves the right to modify the specifications of his machines without notice.

1.1
Unpacking

WARNING:
Inappropriate assembly of this rotary tiller could cause severe injuries. Ensure that you follow all the instructions carefully.

WARNING:
Take care not to cut the cables or scratch the machine's paint-work when cutting the edges of the case.
| Rep. | Contents of the case |
| A | Instructions pouch + parts + nuts and bolts pouch |
| B | Engine block |
| C | Protective wings |
| D | Plant-protection disk |
| E | Initial cutters |
| F | Adjustable stand |
| G | Disc cutters |
| H | Wheel kit option |

1.2
Fitting
the stand

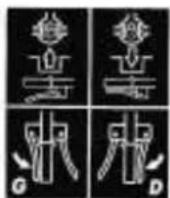
1.3
Fitting
the tools
- Diameter of the working tools: 320mm
- Working width (4 or 6 blades) 590/850mm

Do not use rotating tools with a diameter greater than 320mm and a working width over 850mm.
Pay attention to the direction in which the blades and pins are fitted.

1.4
Fitting
the protective wings

1.5
Fitting
the handlebars

1.6
Fitting
the cable clamps

1.7
Description
of the elements
1 - Gas control
2 - Engine
3 - Transport wheel
4 - Rotating tools
5 - Plant-protection disk
6 - Protective wings
7 - Earthing spur
8 - Belt cover
9 - Handlebar adjustment handle
10 - Clutch lever
11 - Gear lever
12 - Circuit cut-out (depending on the type of engine)

1.8
Machine
identification plate
A - Nominal power
B - Weight in kilograms
C - Serial number
D - Year of manufacture
E - Type of machine
F - Manufacturer's name and address
G - CE identification
H - XX = Rotary tiller with IC engine

1.9
Removing
the transport wheel

It is essential to remove the transport wheel in order to operate the machine.

1.10
Positions
of the earthing spur
A = Hard soil
B = Soft soil

1.11
Adjusting
the handlebars
A = Height adjustment.
B = Offset adjustment.
STARTING THE MACHINE

2.1
Filling with oil
■ Top up the oil level in the engine casing.
■ Top up the air filter box with identical oil up to the OIL LEVEL mark.

2.2
← Topping up the petrol
Super or lead-free
or SP95 E10.

2.3
Open the fuel valve
and set the starter to position A

2.4

Accelerator
Put the lever to:


2.5
Circuit cutout
Set the circuit cutout to ON

2.6
- Pull the handle on
the ignition cord

When the machine starts, remain within the safety zone.

2.7
Starter
Set the starter to position B.
USE

3.1

Do not operate the gear lever without first disengaging the clutch lever.

Maintain a safety zone of 20 m in radius around the machine.

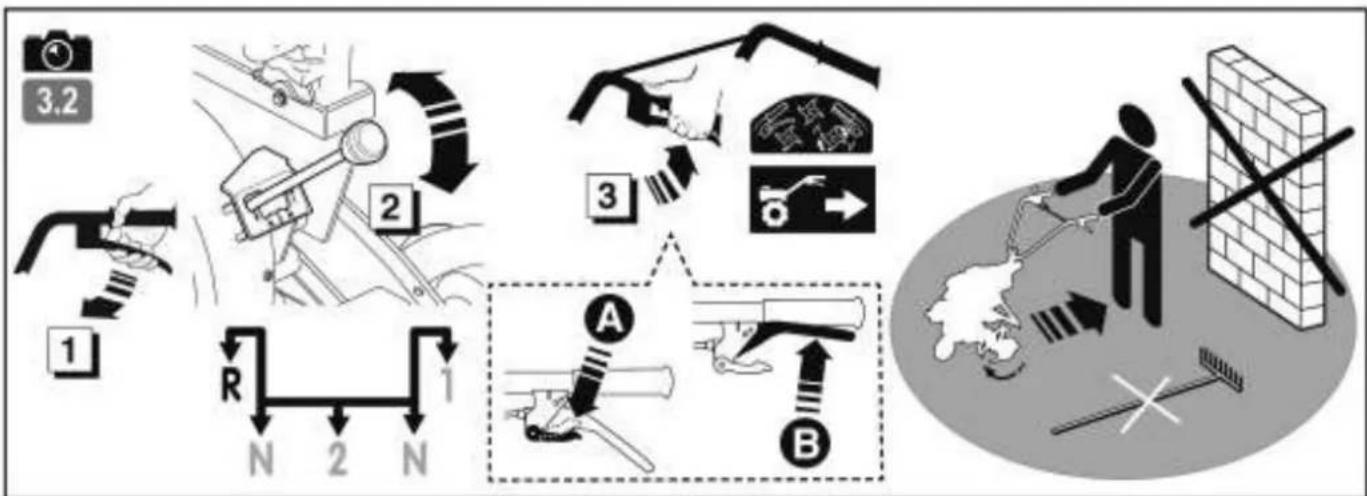
3.2

Disengaging the clutch is essential before operating the gear lever.

Maintain a safety zone of 20 m in radius around the machine.
Reverse

The use of reverse is dangerous. Ensure that there are no obstacles behind you and reduce the engine revs before engaging the clutch.
DE
EN
STOPPING

4.1

Stopping the cutting tools
Release the clutch lever.

4.2

Reduce the gas
Set the accelerator control to:


4.3
Set the circuit cutout to OFF
Stopping the engine


Close the fuel tap
4.4
MAINTENANCE TABLE
| Daily checks | First month or after 20 hours |
| Before starting the engine, check the following points.■ There must be no loosened or broken nuts or bolts.[IMAGE]←■ Cleanliness of the air filter element and the oil level.4.5[IMAGE]Do not use inflammable solvent to clean the foam air filter element.[IMAGE]←■ Engine oil level.2.1■ No leaks of petrol or engine oil.[IMAGE]←■ Sufficient petrol.2.2■ Environment protection.■ No vibrations or excessive noise. | ■ Renew the engine oilEvery 3 months or 50 hours■ Clean the air filter (1)Every 6 months or 100 hours■ Renew the engine oil■ Clean decantation cup■ Clean the spark shields■ Clean fuel tank and fuel filterEvery year or 300 hours■ Replace the ignition spark plug■ Check – Adjust the tickover speed (2)■ Check – Adjust the play in the valves (2)After every 500 hours■ Clean the combustion chamber (2)Every 2 years (Replace if necessary)■ Check the fuel pipe (2)NOTE(1) Service the air filter more often when it is used in dusty environments.(2) These operations must be entrusted to an approved Honda dealer, If the user does not have the necessary tools and is not mechanically qualified. Please refer to the Honda workshop manual. |
MOVING AND HANDLING
text_image
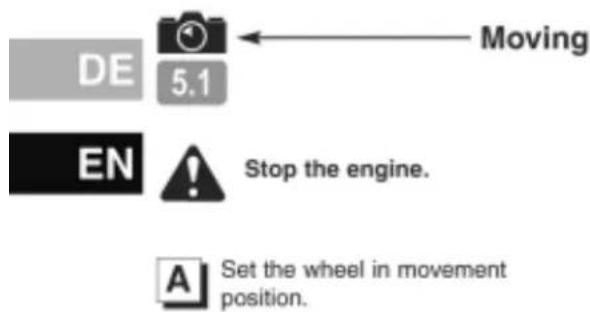
DE 5.1 Moving EN Stop the engine. A Set the wheel in movement position.B Set the handlebars in the low position to facilitate moving the machine.
C Lift the blades from the ground using the handlebars and then advance forwards.
ADJUSTING THE CLUTCH CABLE
When advancing jerkily or when the blades are not turning in the "Clutch engaged" position, adjust the clutch cable.
Stop the machine and disconnect the spark plug.

A Release the cable tensioning nut on the clutch cable.
B Set the tensioning nut to provide 20mm play at the end of the lever.
C Relock the nut. Reconnect the sparkplug. Start the machine and try again. If the problem persists, contact your retailer.
FILLING THE TRANSMISSION AND CHECKING THE OIL LEVEL

text_image
Oil level 6.4A Level
Before using the machine, first check the oil level.
-
PUBERT FRANCE
-
PUBERT HENRI SAS
-
GX160
-
Ets Henri-Pubert SAS ZI Pierre Brune 85110 Chantonnay France
-
3500**03**
-
MH 990 QJH
-
2006/42/CE - 2000/14/CE
EC Declaration of conformity
I, the undersigned (13) (2) declare by the present document that the machine described below complies with the provisions of the Machine Directives (7). Description: Rotary tiller with IC engine; manufacturer (1); model (4); Type (5); Commercial Name (6); Serial Number (13). Authorised representative to validate the technical documentation (3). Reference to harmonised standards (8). Guaranteed acoustic power level (9). Measured acoustic power level (10). Drawn up at: (11) date: (12), signatory: (13) signature: (14). See Serial No. (15) on last page
-
EN 709 A4
-
100 dB(A)
-
98 ±1 dB(A)
-
Chantonnay
-
23-07-2009
-
Jean-Pierre PUBERT
14.

(15)