
TFD-1903 - Television DENVER - Free user manual and instructions
Find the device manual for free TFD-1903 DENVER in PDF.


| Product Type | 19-inch LCD TV with built-in DVD player |
| Screen Size | 19 inches (diagonal) |
| Resolution | 1440 x 900 pixels |
| Response Time | 8 ms |
| TV Systems | PAL BG/DK/I, SECAM BG/DK |
| Inputs | VGA, RF, S-Video, SCART, Composite AV, PC Audio, Coaxial (RF) |
| DVD Playback | DVD, SVCD, VCD, CD, HD-CD, WMA, MP3, JPEG |
| Audio Output Power | 2 x 3W |
| Power Supply | 12V DC, 5A via external adapter |
| Power Consumption | 60W |
| Remote Control Type | Infrared |
| Remote Control Range | 5 m (30° horizontal) |
| Remote Control Batteries | 2 x AA (1.5V) |
| Remote Control Dimensions | 50 x 160 x 28 mm |
| Remote Control Weight | 100 g |
| Channel Search | Automatic and manual |
| Auto Power Off | Yes, when no signal input |
| On-Screen Display Languages | Multiple European languages (English, etc.) |
| Safety Features | Overload protection, auto-shutdown, no user-serviceable parts inside |
| Cleaning Instructions | Use a soft, clean, dry cloth. No solvents. |
Frequently Asked Questions - TFD-1903 DENVER
User questions about TFD-1903 DENVER
0 question about this device. Answer the ones you know or ask your own.
Ask a new question about this device
Download the instructions for your Television in PDF format for free! Find your manual TFD-1903 - DENVER and take your electronic device back in hand. On this page are published all the documents necessary for the use of your device. TFD-1903 by DENVER.
USER MANUAL TFD-1903 DENVER
natural_image
Line drawing of a computer monitor with a blank screen and base (no text or symbols)DENVER ELECTRONICS A/S
CE
www.denver-electronics.com
Safety Information
To ensure reliable and safe operation of this equipment, please read carefully all the instructions in this user guide, especially the safety information below.
Electrical safety
- The TV set should only be connected to a mains supply which matches that stated on the label on the mains adaptor.
- To prevent overload, don't share the same mains supply socket with too many other items of equipment.
- Be careful to route the mains power cable away from areas where people can trip over it.
- Be sure to hold the plug - not the cable, when disconnecting it from the mains supply socket.
- During a thunderstorm, or when the set is not to be used for a long time, disconnect both the aerial and the mains power cable.
• Take care not to expose the set or the remote control to water or moisture. -
Pull the plug out immediately, and seek professional help if:
-
the mains plug or cable is damaged
- liquid is spilt onto the set, or if it is accidentally exposed to water or moisture
- anything accidentally penetrates the ventilation slots
-
the set doesn't work normally.
-
Never remove the cover. There are NO user-serviceable parts inside. Allow only qualified service personnel to repair this equipment.
• To avoid leakage, take out the remote control batteries when: -
the batteries are exhausted
- you are not going to use the remote control for a long time.
- Dispose of the batteries properly - do not put them into a fire.
Physical safety
- Make sure the set is positioned at least 5cm (2") from the wall or furniture.
- Never tap or shake the screen for any reason.
• Take care not to drop or sit on the remote control. - Clean the set using only a soft, clean, dry cloth. Do not use any solvents.
Contents
Safety Information 2
Electrical safety 2
Physical safety 2
In the box....4
Connecting up 5
Rear connection panel 5
Getting Started 6
Top panel controls 6
Profile panel controls 7
The Remote Control 7
Using the remote control for normal TV functions .....7
The Menus 10
Using the menus 10
The Video menu 11
The DVD menu....12
The PC menu 13
The Audio menu 14
The TV menu 15
The General menu 16
DVD Operation.... 17
Place a disc.... 17
Additional operation.... 18
System Operation.... 23
General Steps of Setup Menu....23
Menu Specification....23
Any Problems? 27
Features 28
Specifications 28
In the box
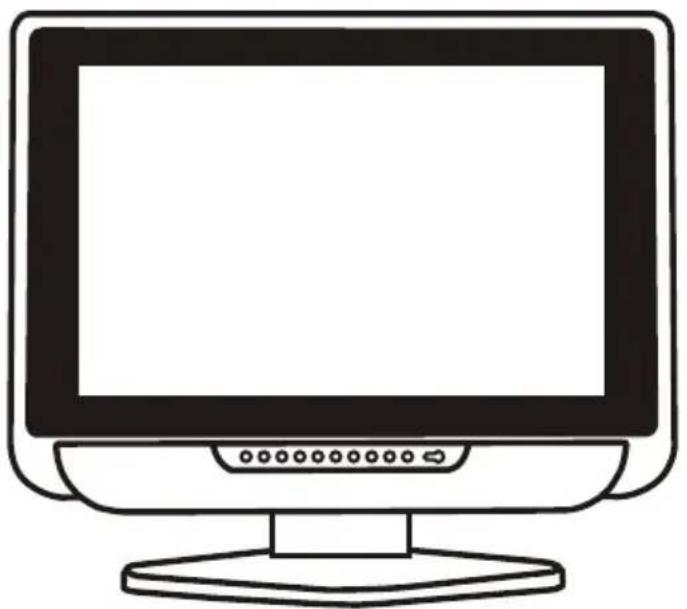
natural_image
Line drawing of a computer monitor with blank screen and base (no text or symbols)TV set
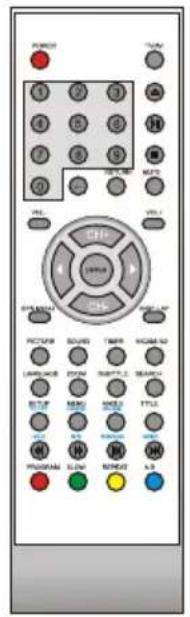
Remote control
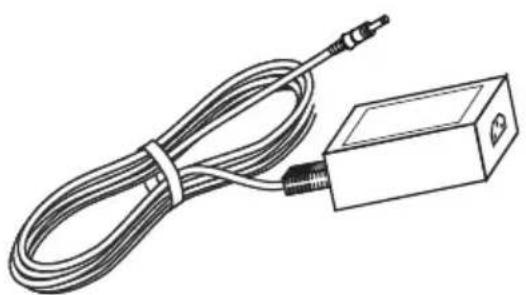
natural_image
Line drawing of a cable and rectangular device with connectors (no text or symbols)Mains adaptor
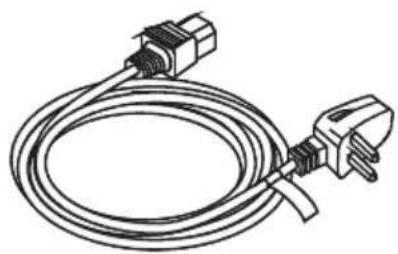
natural_image
Line drawing of a coiled electrical plug with two connectors (no text or symbols)Mains cable
this User Guide
If any of the accessories are missing, then contact your dealer as soon as possible. Keep all the original packaging in case you need to return the set to the dealer.
Connecting up
Rear connection panel
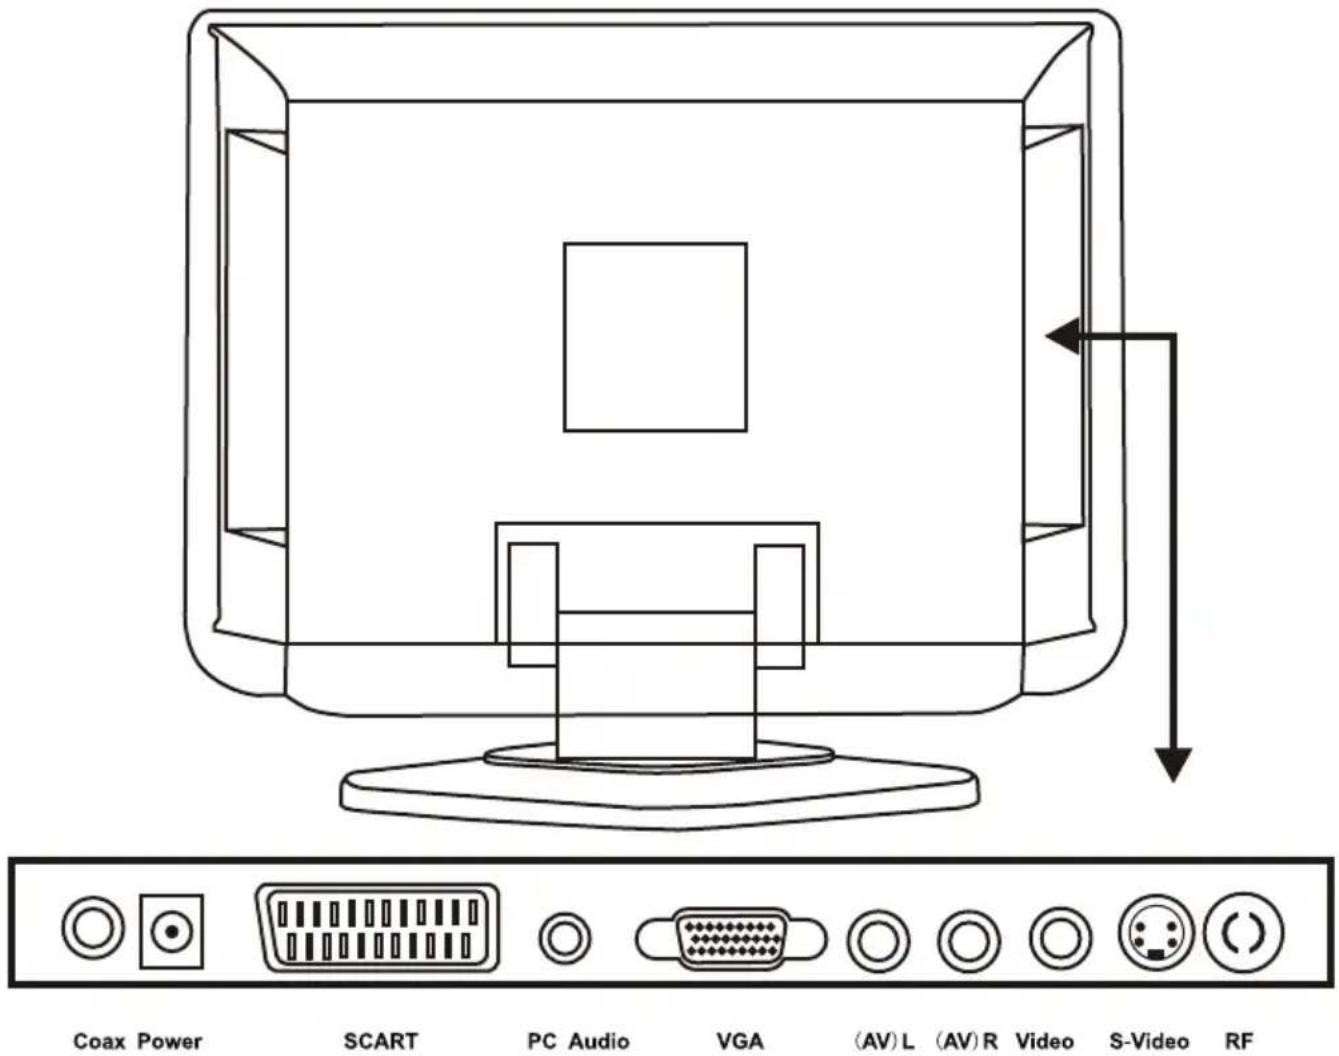
| Name | Function Depiction |
| Coax | Connect to Coaxial cable |
| Power | Connect to Adapter |
| SCART | Connect to the composite terminal of yourDVD /VCR |
| PC Audio | Audio signal input for pc |
| VGA | VGA signal of computer input |
| R (AV) L (AV) | Audio signal input for AV |
| Video | Video signal input |
| S-Video | S-video input |
| RF | Connect to cable or air |
Getting Started
1 Connect the aerial or input source to the appropriate input socket at the rear of the set. (see page 5).
2 Connect the small round plug on the power adaptor cable to the power input socket at the rear of the set.
3 Connect the mains cable between the power adaptor and the mains supply.
4 Switch the power on by pressing the POWER button on the front panel or the remote control the LED will show green.
5 Use the TV/AV button on the front panel or the remote control to select which input source to use: TV, PC-RGB, AV, S-VIDEO, SCART or DVD.
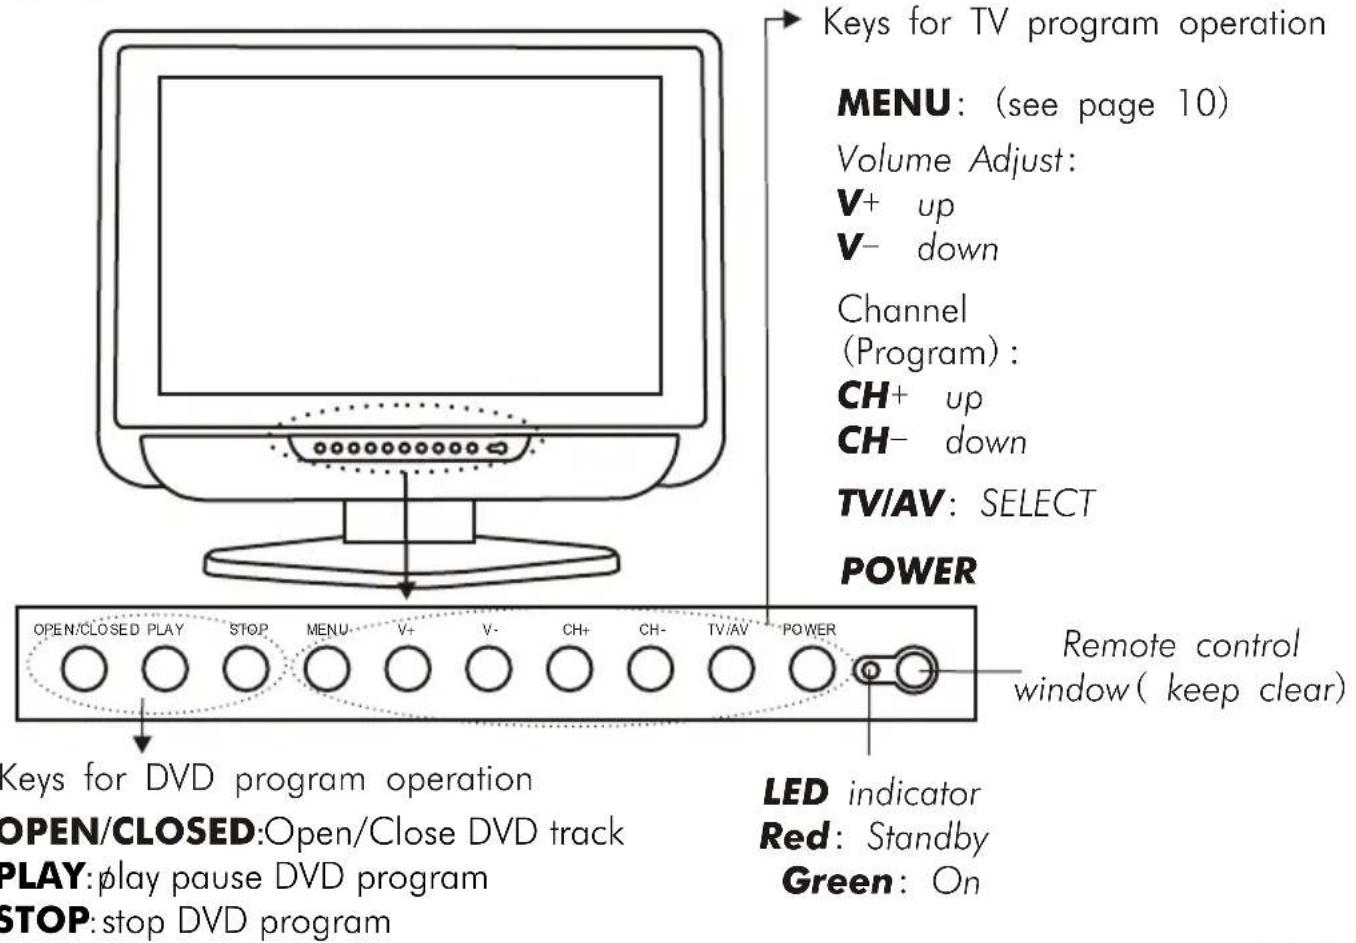
You can use the front panel controls to adjust the volume or select a channel, as shown below, or you can use the remote control (see page 7).
6 To switch the set off for a short time, press the POWER button, the set will go into Standby and the LED will show red. If you are not going to use the set for some time, switch the power off completely by unplugging the mains cable.
Top panel controls
The Remote Control
Using the remote control for normal TV functions
- Fit two AA batteries, making sure that they are the correct way round, as marked on the case.
- Aim the remote control at the window to the right side of the screen, and keep the window clear at all times.
- Do not press the buttons on the remote control too quickly-allow time for the set to respond.
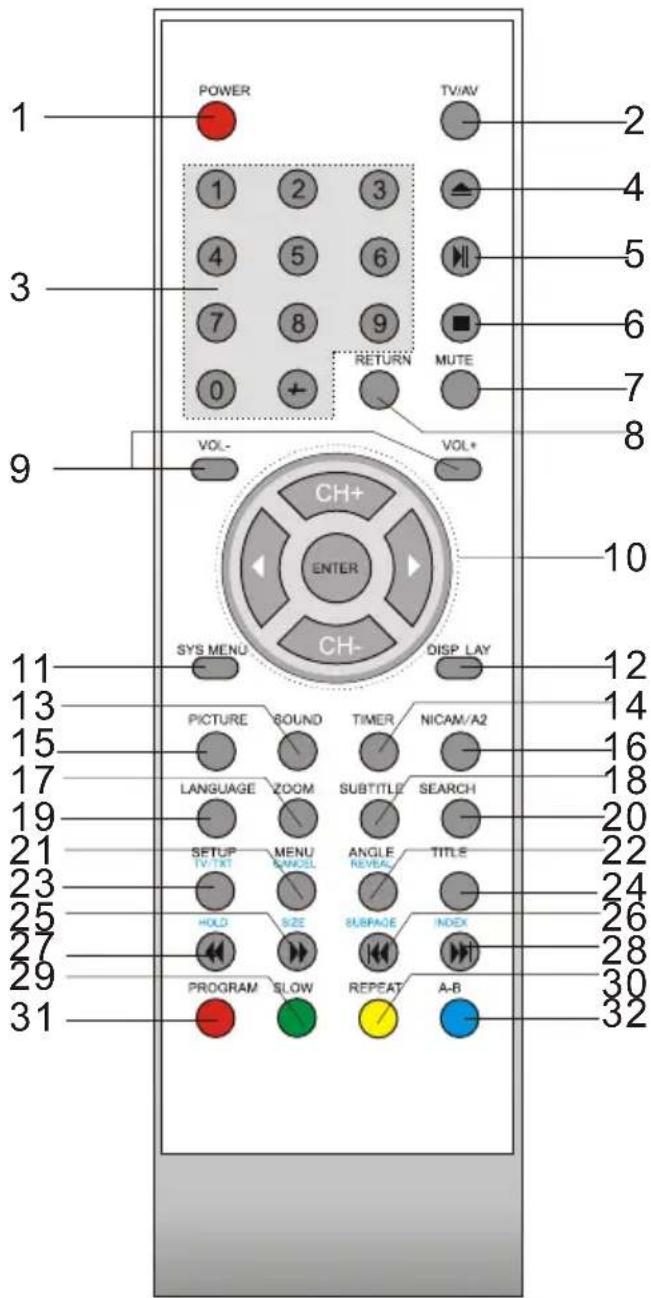
| Number | Name | Function Depiction |
| 1 | Power | Power button |
| 2 | TV/AV | TV/AV/S-VIDEO/DVD/PC/SCART switch |
| 3 | 0-9, -/-- | Choose channel |
| 4 | EJECT | Open/Closed DVD |
| 5 | PLAY/PAUSE | Play/Pause DVD |
| 6 | STOP | Stop DVD |
| 7 | MUTE | Silence |
| 8 | RETURN | Go to play the program you latest saw |
| 9 | VOL-/VOL+ | Volume-/+ |
| 10 |  (CH+/−)ENTER (CH+/−)ENTER | Direction (CH+/−)Comfirm |
| 11 | SYS MENU | System menu (TV) |
| 12 | DISPLAY | TV/DVD STATUS MESSAGE |
| 13 | SOUND | Sound adjust (personal/voice/nmusic/theatre) |
| 14 | TIMER | Time shut down install |
| 15 | PICTURE | Picture adjust (Personal/standard/mild/fresh) |
| 16 | NICAM/A2 | NICAM |
| 17 | ZOOM | Enlarge the picture in DVD state |
| 18 | SUBTITLE | DVD SUBTITLE ON/OFF |
| 19 | LANGUAGE | DVD LANGUAGE (SUBTITLES) |
| 20 | SEARCH | SEARCH TRACKS OR CHAPTERS |
| 21 | MENU | DVD PLAY LIST/DISC MENU |
| CANCEL | CANCEL | |
| 22 | ANGLE | ADJUST THE ANGLE OF DVD PICTURE |
| REVEAL | TELETEXT HIDDEN ANSWERS | |
| 23 | SETUP | DVD SYSTEM SETUP |
| TV/TXT | TV/TELETEXT | |
| 24 | TITLE | DVD TITLE |
| 25 | OPERATIONS OF DVD PALY | |
| SIZE | ||
| 26 | OPERATIONS OF DVD PALY | |
| SUBPAGE | SUB PAGE SELECTION | |
| 27 | OPERATIONS OF DVD PALY | |
| HOLD | TELETEXT HOLD | |
| 28 | OPERATIONS OF DVD PALY | |
| INDEX | TELETEXT INDEX PAGE | |
| 29 | GREEN | Colour coded keys for navigation links |
| SLOW | Slow DVD play | |
| 30 | YELLOW | Colour coded keys for navigation links |
| REPEAT | Repeat DVD plays title or chapter | |
| 31 | RED | Colour coded keys for navigation links |
| PROGRAM | PROGRAM PALY | |
| 32 | BLUE | Colour coded keys for navigation links |
| A-B | Repeat DVD A-B segment |
Note: it will go to TV mode when you press number keys、-/-- key、return key or ▲▼ keys in the mode of AV、PC-RGB、S-Video and SCART.
The Menus
Using the menus
-
For all the buttons mentioned below, you can use those on the front panel, or you can use those on the remote control.
• To see the menus, press the MENU button. The first press will show either: -
the VIDEO menu, if the set is switched to TV, AV, S-Video, SCART.
- the PC menu, if the set is switched to PC-RGB.
- the DVD menu, if the set is switch to DVD.
Press the MENU button again, to see the other menus:
- another press to see the AUDIO menu
- another press to see the TV menu (only when switched to TV)
- another press to see the GENERAL menu
-
another press to turn the menus off.
-
To select a menu item, for example COLOUR, press the CH+ and CH- buttons to scroll up and down the list.
- When a menu item is highlighted, use the VOL+ and VOL- buttons to change the setting.
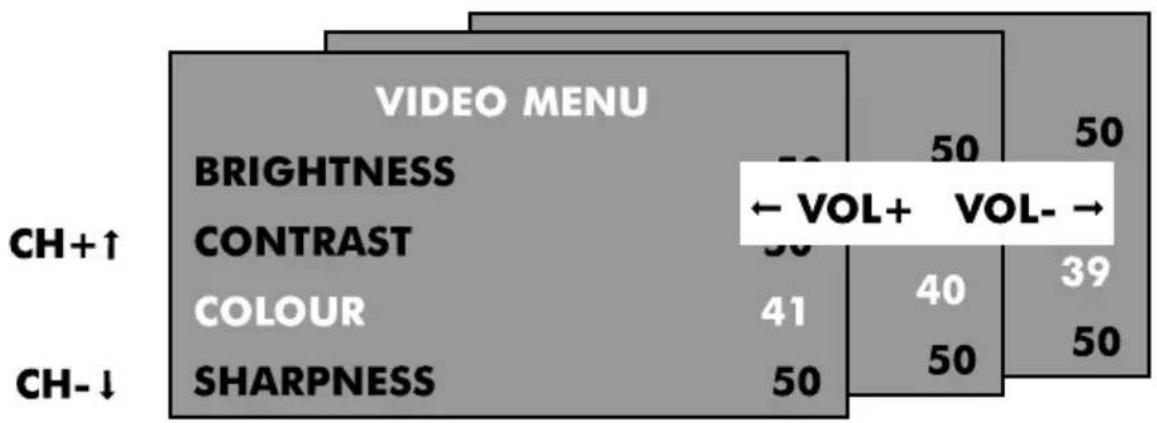
other
| Category | CH+↑ | CH-↓ | |---|---|---| | BRIGHTNESS | 50 | 50 | | CONTRAST | 50 | 50 | | COLOUR | 41 | 50 | | SHARPNESS | 50 | 50 | ← VOL+ VOL- → | | COLOUR | 40 | 50 | | SHARPNESS | 39 | 50 | | BRIGHTNESS | 50 | 50 | | CONTRAST | 50 | 50 | | COLOUR | 41 | 50 | | SHARPNESS | 50 | 50 | The data is already in the image. The text 'VIDEO MENU' appears to be a label or placeholder at the top of the table.- When you have changed the settings, you can exit from the menu:
- by waiting ten seconds without pressing any buttons
- by pressing the MENU button a few times until the menus turn off.
The Video menu
The first press of the MENU button will show either:
- the VIDEO menu, if the set is switched to TV AV, S-Video, SCART.
- the PC menu, if the set is switched to PC-RGB. (See page13)
- the DVD menu, if the set is switch to DVD.(see next page).
| VIDEO MENU | |
| BRIGHTNESS | 50 |
| CONTRAST | 50 |
| COLOUR | 40 |
| SHARPNESS | 50 |
Brightness
Use the VOL+ and VOL- buttons to adjust the brightness of the picture.
Contrast
Use the VOL+ and VOL- buttons to adjust the contrast of the picture.
Colour
Use the VOL+ and VOL- buttons to adjust the colour of the picture.
Sharpness
Use the VOL+ and VOL - buttons to adjust the sharpness of the picture.
The DVD Menu
The first press of the MENU button will show either:
- the VIDEO menu, if the set is switched to TV AV, S-Video, SCART. (see previous page)
- the PC menu, if the set is switched to PC-RGB. (see next page).
- the DVD menu, if the set is switch to DVD.
| DVD MENU | |
| BRIGHTNESS | 50 |
| CONTRAST | 50 |
| COLOUR SETTING | USER |
Brightness
Use the VOL+ and VOL- buttons to adjust the brightness of the picture.
Contrast
Use the VOL+ and VOL- buttons to adjust the contrast of the picture.
Colour SETTING
Use the VOL+ and VOL- buttons to choose the mode of the color: USER, 9300K, 6500K.
The PC menu
The first press of the MENU button will show either:
- the VIDEO menu, if the set is switched to TV AV, S-Video, SCART. (See page11)
- the PC menu, if the set is switched to PC-RGB.
- the DVD menu, if the set is switch to DVD. (see previous page)
| PC MENU | |
| BRIGHTNESS | 50 |
| CONTRAST | 50 |
| COLOUR SETTING | USER |
| AUTO CONFIG | → |
| H.POSITION | 0 |
| VPOSITION | 0 |
| PHASE | 0 |
| CLOCK | 0 |
Brightness
Use the VOL+ and VOL- buttons to adjust the brightness of the picture.
Contrast
Use the VOL+ and VOL- buttons to adjust the contrast of the picture.
Colour setting
Use the VOL+ and VOL-buttons to select from 6500K, 9300K or USER.
If you select USER, you can use the VOL+ and VOL- buttons to adjust the RED, GREEN and BLUE values individually. Press MENU when you have finished adjusting.
Auto configuration
Press the VOL+ button to have the following settings configured automatically:
Horizontal and Vertical position
Use the VOL+ and VOL - buttons to adjust the position of the picture on the screen.
Phase
Use the VOL+ and VOL- buttons to adjust the phase of the ADC sampling clock relative to the HSync signal, until a stable image is obtained.
Clock
Use the VOL+ and VOL- buttons to adjust the pixel clock frequency, until the image size is maximised for the screen.
The Audio menu
Press the MENU button again to see the AUDIO menu.
| AUDIO MENU | |
| VOLUME | 20 |
| BALANCE | 50 |
| AUDIO PRESET | PERSONAL |
| TREBLE | 50 |
| BASS | 50 |
Volume
Use the VOL+ and VOL- buttons to adjust the volume of the sound.
Balance
Use the VOL+ and VOL- buttons to adjust the left/right balance of the sound.
Audio Preset
Use the VOL+ and VOL- buttons to select from PERSONAL, VOICE, MUSIC or THEATRE.
If you select PERSONAL, you can adjust the following settings:
Treble and Bass
Use the VOL+ and VOL- buttons to adjust the tone of the sound.
The TV menu
Press the MENU button again, to see the TV menu. (only if switched to TV)
| TV MENU | |
| CHANNEL | 0 |
| SYSTEM | DK |
| SKIP | OFF |
| AFC | ON |
| FINE TUNE | 487.25MHz |
| SWAP | → |
| MANUAL SEARCH | → |
| AUTO SEARCH | → |
Channel
Use the VOL+ and VOL- buttons to select a channel.
System
Use the VOL+ and VOL- buttons to select from DK, BG, I TV display systems.
Skip
Use the VOL+ and VOL-buttons to turn the channel skip:
ON - this channel will be skipped when changing channel using the CH buttons OFF - this channel will be included when changing channel using the CH buttons
Automatic Frequency Control
Use the VOL+ and VOL- buttons to turn AFC ON or OFF:
Fine Tune
Use the VOL+ and VOL- buttons to fine tune the frequency if you are having problems with a weak signal on the current channel.
The AFC will turn off if you use the Fine Tune controls.
SWAP
Press the VOL+ button to enter the SWAP menu. Press the VOL+/- button to select the channel that you want the program to be put in "FROM" menu, then press the CH- button to go to the "TO" menu, press the VOL+/- button to select the channel whose program you want. Press the VOL+/- button to confirm in "SWAP" menu.
Manual Search
Press the VOL+ button once, then again to select from DOWN or UP
Press the MENU button to start the Manual Station Search. When the search is finished, the first station found will be allocated to the current channel.
Auto Search
Press the VOL+ button once. The Automatic Station Search will start.
When the search is finished, then for example, if 12 stations have been found, they will be allocated to the first 12 channels.
The General menu
Press the MENU button again to see the GENERAL menu.
| GENERAL MENU | |
| LANGUAGE | ENGLISH |
| BLUE SCREEN | ON |
| NOISE REDUCE | ON |
| INPUT SOURCE | TV |
| RESET | → |
Language
Use the VOL+ and VOL-buttons to select from a number of European languages.
Blue Screen
Use the VOL+ and VOL- buttons to turn the blue screen:
ON - the screen will turn blue when the signal strength is very poor
OFF - the picture and sound will be noisy when the signal is very poor.
(use this if reception cannot be improved, to stop the screen from turning blue)
Noise Reduce
Use the VOL+ and VOL- buttons to turn the noise reduction system:
ON - to reduce noise when reception is poor
OFF - to improve picture and sound quality when reception is good.
Input Source
Use the VOL+ and VOL- buttons to select which input source to use:
TV, SCART, PC-RGB, AV or S-VIDEO, SCART.
Reset
Press the VOL+ button to return the set to the factory default settings.
All the settings in the VIDEO, PC and AUDIO menus, and Blue Screen in the
GENERAL menu will be returned to the settings shown in this User Guide.
DVD OPERATION
Press the Power button on the player or the remote controller, then press TV/AV button to enter DVD mode. At this time "Read" appears on the TV screen. If there is not a disc in the DVD player, after press PLAY/PAUSE key, "No disc" will be displayed on the screen.
Place a disc
Insert a disc with the label facing away. It will be loaded automatically. Press “EJECT” key on TV set or remote control to eject the disc from DVD loader.
Play
The contents of each disc menu vary according to how the disc was authored and what features are included. The disc menu will be turned on for you to select, when Menu button is pressed. Also play and pause can be switched with the Pause button on the remote. Different play modes are offered, such as menu play, sequence play etc.
Menu Play
- Compatible with DVD, SVCD or VCD2.0.
- If the disc is a DVD, ROOT MENU will appear on the screen. If it is SVCD or VCD2.0, please press PBC button to let the menu out.
- When a DVD disc is loaded, you can press Arrow buttons to highlight the menu item you want to choose; As SVCD or VCD2.0, you can press Numeric buttons to select a track to play.
- Press Enter or Play button, you can begin play when they are highlighted.
- Return when playing: When a DVD disc is playing, press Menu (PBC) button, and you can return to Root Menu; As SVCD, VCD2.0, and PBC is on, press Menu (PBC) button or RETURN button, you can return to the menu.
Title Play
- Compatible with DVD discs only.
- During DVD playback, press Title button to display the DVD title content.
- Press the Arrow buttons to highlight the title you want to choose, and press Enter; also you can press numeric buttons to choose.
- The DVD player begins with the chapter 1 of the chosen title.
Sequence Play
- Compatible with DVD, SVCD, VCD, CD, HD-CD, WMA, MP3/JPEG discs.
-
When a SVCD or VCD disc is loaded and PBC is on, once PBC button pressed PBC switches off. Then the player can play in sequence playback mode; when PBC button pressed twice, PBC switches on.
-
Except for SVCD or VCD discs, in the stop state, when press Play button, the player then enters sequence playback mode. This feature is effective to all the compatible discs.
Program Play
- Compatible with DVD, SVCD, VCD, CD, HD-CD, WMA, MP3/JPEG discs.
- The Program Playback option allows you to enter the order in which you want chapters or tracks to play, maximum to 16.
- Program Menu: If PBC is on, this operation will turn PBC off while the chapters / tracks plays in programmed order.
- According to the highlight, use the Numeric buttons to enter the chapters / tracks in the order you want them to play. Then press Play or use Arrow buttons to highlight the "PLAY" item and press Enter. The chapters / tracks will play in the programmed order. You can program maximum 16 titles / chapters / tracks.
- According to the Direction Indicator on the menu, you can press Arrow buttons to highlight where you want to enter.
- During Program Playback, if program button is repressed, the program order and the contents will be displayed on the screen, and the Program Playback will be stopped; also you can press Stop and Play to resume normal playback.
- Notes:
To clear the program order, use Arrow buttons to highlight the "CLEAR" item, then press Enter.
To modify the program order, use Arrow buttons to highlight the item you are changing and enter the new chapter / track you want to program directly. - The program indicator in the screen, and the playing chapter / track illuminate.
Additional operation
Selecting Tracks
- Compatible with DVD, SVCD, VCD, CD, HD-CD, WMA, MP3/JPEG discs.
- When playing a DVD disc, press Numeric buttons on the menu or title page to select tracks; During DVD playback, you can input desired title numbers directly.
- During sequence playback of a SVCD or VCD disk, press the numeric buttons to select tracks. (During Program Playback and when the PBC is on, you can only press Prev / Next button to select)
- As for CD, HD-CD, discs, press Numeric buttons directly to select tracks.
- When playing WMA, MP3 / JPEG discs, press Numeric buttons to select different tracks on current track list.
Skipping Tracks
- Compatible with DVD, SVCD, VCD, CD, HD-CD, WMA, MP3/JPEG discs.
-
To skip forward to the beginning of the next title / chapter / track on a disc, press Next on the remote or the right side of the player.
-
To skip backward to the beginning of the preceding title / chapter / track on a disc, press Prev on the remote or the right side of the player.
Multispeed Fast/Slow Motion Play
- Compatible with DVD, SVCD, VCD, CD, HD-CD, WMA, MP3/JPEG discs.
- Press the Multispeed Fast/Slow button on the remote during play to search through a disc. Multispeed Fast/Slow has three speeds: ×2, ×4, ×8, ×20. With each consecutive press of the button, the search speed increases. If you press the button five times, Fast Multispeed Fast/Slow cycles back to normal play.
- During DVD play, when Multispeed Fast/Slow gets to the beginning of the next title / chapter, it resumes normal play; During SVCD or VCD play with PBC on, when Fast Forward Play gets to the beginning of the next track, it resumes normal play.
Multiphase Slow Motion Play
- Compatible with DVD, SVCD, VCD, CD, HD-CD, WMA, MP3/JPEG discs.
- Multiphase Slow has five speeds: 1/2, 1/3, 1/4, 1/5, 1/6, 1/7 of the normal speed play when press Slow button consecutively in playing discs.
- When press Play button or press the slow button seven times, it goes to normal station.
Freeze Frame
- Compatible with DVD, SVCD, VCD, CD, HD-CD, WMA, MP3/JPEG discs.
- During CD, HD-CD, WMA or MP3 / JPEG playback, press Pause once to freeze playback; Press Play button to resume normal playback.
Using the Repeat Feature
- Compatible with DVD, SVCD, VCD, CD, HD-CD, WMA, MP3/JPEG discs.
- While a disc is playing, press Repeat button once, and the repeat banner appears to show current repeat mode.
a) In SVCD, VCD, CD, HD-CD, WMA, or MP3 / JPEG sequence playback mode. Press Repeat button again to turn on repeat mode. Press the button again on the remote to turn to the next repeat mode. There are three repeat options: Off, Track Repeat, and Disc Repeat. With each consecutive press of the button, the repeat mode switches. If you press the button four times, repeat mode cycles back to Off.
b) In DVD playback, press Repeat button again to turn on repeat mode. There are three repeat options: Off, Chapter Repeat, and Title Repeat. With each consecutive press of the button, the repeat mode switches. If you press the button four times, repeat mode cycles back to Off.
c) In WMA, MP3 / JPEG playback, press Repeat button again to turn on repeat mode.
There are four repeat options: Off, Track Repeat, Directory Repeat, and Disc Repeat. With each consecutive press of the button, the repeat mode switches. If you press the button five times, repeat mode cycles back to Off.
Using the Display Feature
-
Compatible with DVD, SVCD, VCD, CD, HD-CD, WMA, MP3 discs.
-
Loading and playing DVDs (two pages)
-Press Call button once to show the first page:
-"Disc Type, Title * / * (the playing title / total titles), Chapter * / * (the playing chapter / total chapters), Elapsed Time of the Disc".
-Press the button again to show the second page:
-"Language * / * (the serial number of playing language / the amount of optional languages) or Off, Language Type, Audio Type, Subtitle * / * (the serial number of playing subtitle / the amount of optional subtitles) or Off, Angle * / * (the serial number of playing angle / the amount of optional angles) or Off".
-Press the button for the third time, the display menu fades out.
- Loading and playing SVCD discs (two pages)
-Press Display button once to show the first page:
-"Disc Type, Track * / * (the playing track / total tracks), Mute, PBC, Repeat Mode, Elapsed Time of the Playing Track".
-Press the button again to show the second page:
-"Language * / * (the serial number of playing language / the amount of optional languages) or Off, Language Type, Audio Type, Subtitle * / * (the serial number of playing subtitle / the amount of optional subtitles) or Off".
-Press the button for the third time, the display menu fades out.
- Loading and playing VCD
-Press Display button once to show the first page:
-"Disc Type, Track * / * (the playing track / total tracks), Mute, PBC, Repeat Mode, Elapsed Time of the Playing Track".
-Press the button again, the display menu fades out.
- Loading and playing CD, HD-CD, WMA, MP3 / JPEG discs
-Press Display button once to show the first page:
-"Disc Type, Track * / * (the playing track / total tracks), Mute, Repeat Mode, Elapsed Time of the Playing Track".
-Press the button again, the display menu fades out.
Using the Search Feature
-
Compatible with DVD, SVCD, VCD, CD, HD-CD discs.
-
You can use Search feature to select a title / chapter / track number or go to a specific point in a title. First, press Search button on the remote controller to bring up the search menu and enter the edit state; Secondly, press Arrow buttons to highlight the title / chapter / track number or the time option; Thirdly, use Numeric buttons to enter the title / chapter / track you want to play or the elapsed time you want to go to in that title; At last, press Enter button to start playback. For example, entering 01:23:56 will start playback one hour, twenty-three minutes and fifty-six seconds into the title.
-
Notes
a) This feature does not work in Program Play mode.
b) If PBC is on, it will turn off automatically when Search Playback starts.
c) When playing WMA, MP3 / JPEG discs, Search Feature does not work.
Changing the Soundtrack or Language
- Compatible with DVD SVCD, VCD, CD, HD-CD, WMA, MP3/JPEG discs.
- Press the LANGUAGE button to display current soundtrack.
a) Press the button to switch soundtracks.
b) Press the button again on the remote to turn to next soundtrack.
- When playing a SVCD or VCD disc, there are five soundtracks: Stereo (L/R), L/L, R/R, L/L Auto A/D Detect, and R/R Auto A/D Detect. With each consecutive press of the button, the soundtrack switches. If you press the button six times, soundtrack cycles back to Stereo.
- When playing a CD, HD-CD, WMA, or MP3 disc, there are three: Stereo (L/R), L/L, and R/R.
- When playing a DVD or SVCD disc, press LANGUAGE button to display current language, press the button again to turn to next language if the disc has different languages.
Subtitles
- Compatible with DVD, SVCD discs.
- Press the Subtitle button on the remote once, and the subtitle info banner appears.
- When a DVD or SVCD is recorded with subtitles, you can use the Subtitle feature to view the subtitles on-screen. By default, subtitles are off. The info banner will display Subtitle Off.
- To display subtitles, press the Subtitle button again. The default language with its responding serial number will be displayed in the info banner and subtitles will be displayed in that language. There are 8 supported subtitles: Chinese, English, Japanese, French, Spanish, Portuguese, Germany and Latin. With each consecutive press of the Subtitle button, the subtitle switches. For example, "Language Icon: [1 English DTS 6CH] or [Off]" (the availability of the subtitles are disc-dependent). To turn subtitles off, press the Subtitle button until Subtitle Off is displayed.
Mute the Audio Output
- Compatible with DVD, SVCD, VCD, CD, HD-CD, WMA, MP3/JPEG discs。
- Pressing the Mute button allows you to reduce sound to an inaudible level, and the icon of "MUTE" will be displayed on screen. Press the button again or press the Vol +/- button to return to the normal condition.
- If the player playback disc without sound, please try to press Mute button to resume.
Zoom In the Video Image
- Compatible with DVD, SVCD, VCD, JPEG discs.
- The Zoom Function allows you to enlarge the video image.
- Press Zoom repeatedly to activate the function and choose the required zoom factor: Zoom 1, Zoom 2, Zoom 3, Zoom 1/2, Zoom 1/3, Zoom 1/4, Zoom Off.
Repeat a Specific Segment on the Disc that You Define
- Compatible with DVD, SVCD, VCD, CD, HD-CD, WMA, MP3 discs.
- During the normal or fast motion playback, press the A-B button once, and "REPEAT A-" will appears on the screen. This indicates the start of the loop to be repeated.
- During the normal of fast motion playback, press A-B again, and "REPEAT A-B" will appears on the screen. It indicates the end of the loop.
- Looping will run from set point A to set point B until you turn off Repeat.
- Press A-B again to cancel A-B loop mode.
- When playing a SVCD, VCD, or CD disc, you can repeat a specific segment only in one track. When the next track begins, A-B Repeat turns off automatically.
- When playing a DVD disc, you can repeat a specific segment only in one title.
MP3 Play
- Compatible with MP3 disc.
- The set will search the directory of the disc automatically, after that, the directory will appear on the screen.
3.Then the set will play the MP3 automatically according to the directory listed.
4.You can use the direction button to change the directory.
System operation
System operation will define the setting of the set, these definition will be stored until you change them again.
General Steps of Setup Menu
- Press SETUP button of the remote control, the main menu will appear on the screen, and the system will be pause.
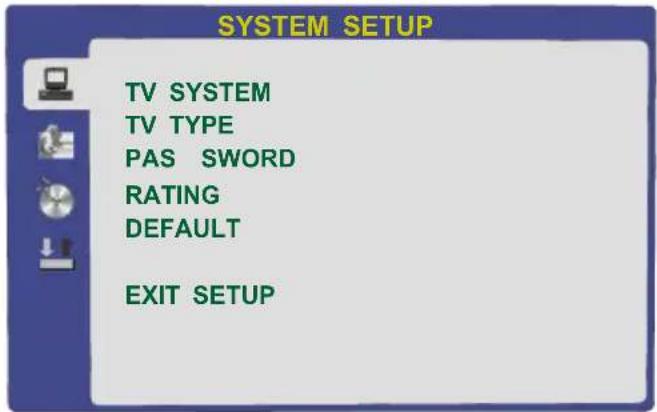
- Press (◀ ▶) arrow buttons to highlight the icon of the desired page, then press the (▲▼) arrow button to activate that page; For example, if you want to setup the video page, press to highlight the video icon, the video page will be displayed on the screen.
- Press ▼arrow button to highlight the desired option. Press Enter or press to select the choices of that option appear on the right.
- Press the Arrow buttons to highlight the Exit Setup option, then press Enter or Setup again to exit Setup Menu.
- When launching the setup routine, the pressing of the following buttons will turn off the setup menu, while the choices that have been changed will be saved: Subtitle, F.F, F.R, Vol +/-, PBC, Title, Return, Play/Pause, Stop, Next, Prev, S.F, S.R, Zoom, Display, Program, Repeat, A-B, language, Mute, Setup.
Menu specification
1.SYSTEM SETUP
The system setup options are illustrated below:
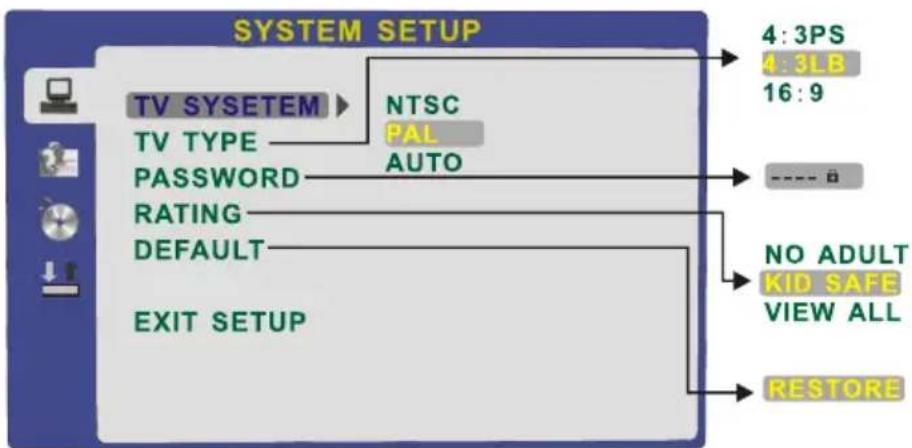
flowchart
graph TD
    A["TV SYSTEM"] --> B["NTSC"]
    B --> C["PAL"]
    B --> D["AUTO"]
    D --> E["Password"]
    E --> F["RATING"]
    F --> G["DEFAULT"]
    G --> H["EXIT SETUP"]
    I["4:3PS"] --> J["4:3LB"]
    J --> K["16:9"]
    L["----"] --> M["No ADULT"]
    M --> N["KID SAFE"]
    N --> O["VIEW ALL"]
    P["RESTORE"] --> Q["EXIT SETUP"]
-TV SYSTEM: According to the Color System of the TV, you can choose the TV System..
-PASSWORD: The password option is initialized as locked, and you cannot set the ratings limit or change the password. In order for the Ratings feature work, the password mode must be turned on. If you want to set the ratings limit, you will need to enter the default password, which is 0000, then press Enter to confirm. To change the password, you will be prompted for the old password, then be prompted for a new. Enter a 4-digit number (this is your password).
-RATING: The Rating feature is a rating limit system, like movie ratings. It works with DVD discs that have been assigned a rating. This helps you control the types of DVDs that your family watches.
■ There are two rating options: NO ADULT and KID SAFE.
- Select the VIEW ALL option to cancel the rating limit.
The default setting is VIEW ALL.
-DEFAULT: Choose this option to resume all the setup options to default settings.
2. LANGUAGE SETUP
The language setup options are illustrated below:
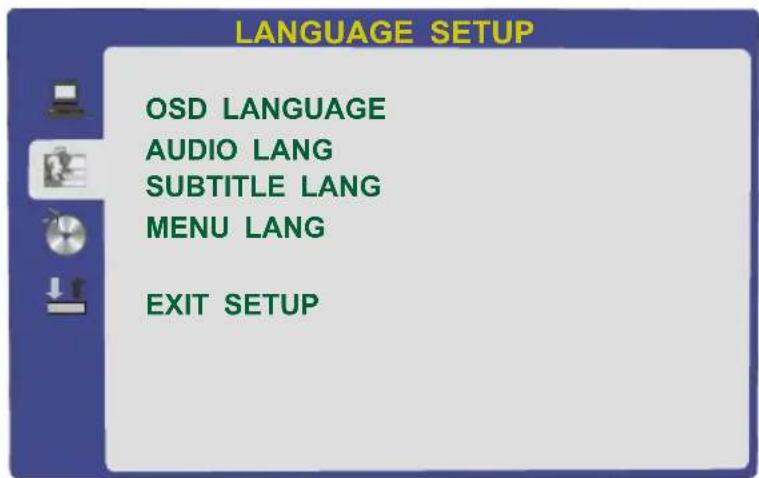
-OSD LANGUAGE: The OSD will display in the language you choice. There are 5 optional OSD languages: English....
-AUDIO LANG: If the disc you are playing has the language you choice, it will output audio in that language. There are 8 optional audio languages: English...
-SUBTITLE LANG: If the disc you are playing has the language you choice, it will displays subtitles in that language; There are 8 optional audio languages: English. . . .
-MENU LANG: If the disc you are playing has the language you choice, it will displays menu in that language; There are 8 optional menu languages: English. . . .
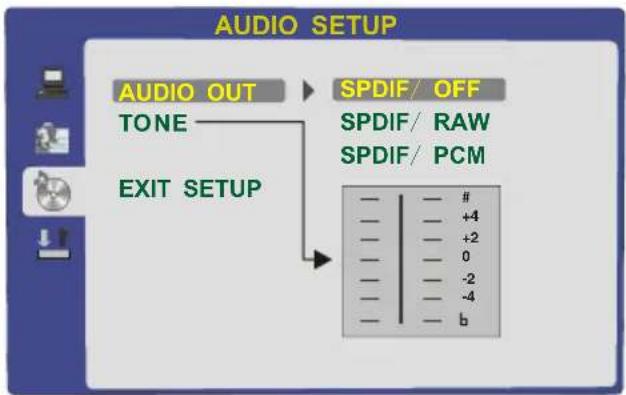
3. AUDIO SETUP
The audio setup options are illustrated below:
flowchart
graph TD
    A["AUDIO OUT"] --> B["TONE"]
    B --> C["EXIT SETUP"]
    C --> D["SPDIF/ OFF"]
    D --> E["SPDIF/ RAW"]
    D --> F["SPDIF/ PCM"]
    G["—"] --> H["#"]
    I["—"] --> J["+4"]
    K["—"] --> L["+2"]
    M["—"] --> N["0"]
    O["—"] --> P["-2"]
    Q["—"] --> R["-4"]
    S["—"] --> T["b"]
-Highlight the AUDIO OUT option, and press the Arrow buttons to choose the audio output mode you prefer. Press Enter to confirm; There are 3 optional audio output modes: SPDIF / OFF, SPDIF / RAW, and SPDIF/ PCM.
-TONE: Use the Up and Down arrow button to move the scroll and adjust the tone.
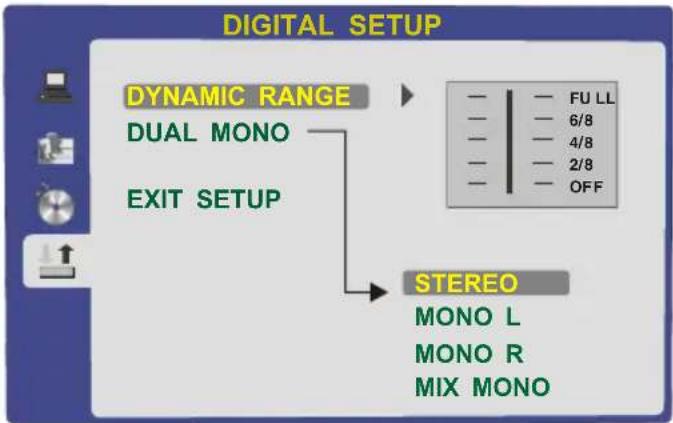
4.DIGITAL SETUP
The video setup options are illustrated below:
-DYNAMIC RANGEO: Use the Up and Down arrow button to move the scroll and adjust the dynamic rangeo.
-DUAL MONO: Choose the mode of the audio output. Three are four modes: STEREO, MONO L, MONO R, MIX MONO.
flowchart
graph TD
    A["DYNAMIC RANGE"] --> B["DUAL MONO"]
    A --> C["EXIT SETUP"]
    D["STEREO"] --> E["MONO L"]
    D --> F["MONO R"]
    D --> G["MIX MONO"]
    H["FULL"] --> I["6/8"]
    H --> J["4/8"]
    H --> K["2/8"]
    H --> L["OFF"]
| Any Problems? | |
| problem | solution |
| TV won't switch on | Check the mains cable is connected properly to both the mains supply and the mains adaptor.Check the cable from the mains adaptor is connected properly to the TV set.The electronic circuitry may have reset. Pull the plug out, wait for 60 seconds, then plug back in again. |
| No picture | Check the aerial or other input is connected properly.Check that the correct input is selected, using the TV/AV button or theGENERALmenu.Check the brightness and contrast settings in theVIDEOorPCmenu. |
| No sound | Check that theVOLUMEisn't turned down, or theMUTEbutton pressed.Check that the audio cables are connected to the correct inputs. |
| Picture is the wrong colour | Check that the correct input is selected, using the TV/AVbutton or theGENERALmenu. |
| The picture is unstable when used with a PC. | Check that the settings in thePCmenu match the video output settings of the PC. |
| There are a few coloured spots on the screen. | High resolution LCD screens often have a small number of faulty pixels. This is normal and within the bounds of our quality control checks. |
19" LCD TV DVD Combo
Features
- High quality display
• VGA, RF Video, S-Video, DVD ,SCART. - Stereo audio inputs
• Automatic or manual channel search
• Auto-shutdown to save power when no signal input
Specifications
TV
| TV System | PAL BG/DK/I SECAM BG/DK |
| Screen size | 19"(diagonal) |
| Definition | 1440 (RGB) x 900 |
| Response time | 8ms |
| Aerial input | 75 Ω (unbalanced) |
| Audio output power | 2 x 3W |
| Mains power | 12V 5A |
| Power consumption | 60W |
Remote control
| Type | infra-red |
| Control distance | 5m |
| Control angle | 30° (horizontal) |
| Batteries | 2 x 1.5V size AA |
| Dimensions | 50 x 160 x 28mm |
| Weight | 100g |
ENGLISH
Instructions on environment protection

Do not dispose of this product in the usual household garbage at the end of its lifecycle; hand it over at a collection point for the recycling of electrical and electronic appliances. The symbol on the product, the instructions for use or the packing will inform about the methods for disposal.
The materials are recyclable as mentioned in this marking. By recycling, material recycling or other forms of re-utilization of old appliances, you are making an important
ALL RIGHTS RESERVED
COPY RIGHT DENVER ELECTRONICS A/S

www.denver-electronics.com
- Safety Information
- Electrical safety
- Physical safety
- Contents
- Safety Information 2
- In the box....4
- Connecting up 5
- Getting Started 6
- The Remote Control 7
- The Menus 10
- DVD Operation.... 17
- System Operation.... 23
- Any Problems? 27
- Features 28
- Specifications 28
- In the box
- Connecting up
- Getting Started
- The Remote Control
- Using the remote control for normal TV functions
- The Menus
- Using the menus
- The Video menu
- Brightness
- Contrast
- Colour
- Sharpness
- The DVD Menu
- Colour SETTING
- The PC menu
- Auto configuration
- Horizontal and Vertical position
- Phase
- Clock
- The Audio menu
- Volume
- Balance
- Audio Preset
- Treble and Bass
- The TV menu
- Channel
- System
- Skip
- Automatic Frequency Control
- Fine Tune
- SWAP
- Manual Search
- Auto Search
- The General menu
- Language
- Blue Screen
- Noise Reduce
- Input Source
- Reset
- DVD OPERATION
- Place a disc
- Play
- Menu Play
- Title Play
- Sequence Play
- Program Play
- Additional operation
- Selecting Tracks
- Skipping Tracks
- Multispeed Fast/Slow Motion Play
- Multiphase Slow Motion Play
- Freeze Frame
- Using the Repeat Feature
- Using the Display Feature
- Using the Search Feature
- Changing the Soundtrack or Language
- Subtitles
- Mute the Audio Output
- Zoom In the Video Image
- Repeat a Specific Segment on the Disc that You Define
- MP3 Play
- System operation
- General Steps of Setup Menu
- Menu specification
- 1.SYSTEM SETUP
- LANGUAGE SETUP
- AUDIO SETUP
- 4.DIGITAL SETUP
- 19" LCD TV DVD Combo
- Features
- ENGLISH
- Instructions on environment protection
Brand : DENVER
Model : TFD-1903
Category : Television