
CM2030B - Coffee maker BLACK & DECKER - Free user manual and instructions
Find the device manual for free CM2030B BLACK & DECKER in PDF.


| Product Type | Programmable 12-Cup Coffeemaker |
| Brand | Black & Decker |
| Model | CM2030B |
| Capacity | 12 cups (approx. 60 oz) |
| Power Supply | 120 V, 60 Hz |
| Control Type | Digital LCD display with programmable clock |
| Programmable Features | Auto Brew delay start, Brew Strength Selector (3 levels: Regular, Strong, Bold), 1-4 Cup setting |
| Brewing Technology | Evenstream™ Showerhead for even saturation |
| Carafe | Perfect Pour™ carafe with drip-reducing spout (glass, part CM2030-03) |
| Water Window | Easy-view water window for accurate filling |
| Sneak-A-Cup™ | Allows pouring a cup before brew cycle ends (return carafe within 20 seconds) |
| Fresh Brew Timer | Shows time since brewing up to 120 minutes |
| Auto Shutoff | Carafe plate shuts off 2 hours after brewing |
| Removable Brew Basket | Dishwasher safe (top rack), part CM2030-01 |
| Cord Storage | Built-in cord storage to keep countertop tidy |
| Auto Clean™ System | Alerts after 60 brews to descale automatically using vinegar |
| Filter Type | Standard paper basket filters |
| Dimensions (approx.) | 10.5 x 8.5 x 14 inches |
| Weight (approx.) | 3.5 lbs |
| Material | Plastic housing, glass carafe |
| Safety Features | Polarized plug, tamper-resistant screw, short cord |
| Warranty | 2-year limited warranty (US and Canada) |
| Replacement Parts | Brew basket (CM2030-01), carafe lid (CM2030-02), carafe (CM2030-03) |
| Cleaning | Hand wash or dishwasher top rack for removable parts; descale with vinegar using Auto Clean |
| Household Use | For household use only |
Frequently Asked Questions - CM2030B BLACK & DECKER
User questions about CM2030B BLACK & DECKER
0 question about this device. Answer the ones you know or ask your own.
Ask a new question about this device
Download the instructions for your Coffee maker in PDF format for free! Find your manual CM2030B - BLACK & DECKER and take your electronic device back in hand. On this page are published all the documents necessary for the use of your device. CM2030B by BLACK & DECKER.
USER MANUAL CM2030B BLACK & DECKER
natural_image
Blackgrazed coffee maker with digital display and glass lid (no visible text or symbols)CM2030B
natural_image
Close-up of a petri dish containing a culture with bubbles and a central dish, no visible text or symbols.Please Read and Save this Use and Care Book.
IMPORTANT SAFEGUARDS.
When using electrical appliances, basic safety precautions should always be followed to reduce the risk of fire, electric shock, and/or injury, including the following:
- Read all instructions.
- Do not touch hot surfaces. Use handles or knobs.
- To protect against fire, electric shock and injury to persons do not immerse cord, plugs or appliance in water or other liquid.
- Close supervision is necessary when any appliance is used by or near children.
- Unplug from outlet when not in use and before cleaning.
- Allow to cool before putting on or taking off parts, and before cleaning the appliance.
- Do not operate any appliance with a damaged cord or plug, or after the appliance malfunctions or has been damaged in any manner. Contact Consumer Support at the number listed in this manual.
- The use of accessory attachments not recommended by the appliance manufacturer may result in fire, electric shock or injury to persons.
- Do not use outdoors.
- Do not let cord hang over edge of table or counter, or touch hot surfaces.
- Do not place on or near a hot gas or electric burner, or in a heated oven.
-
To disconnect, press Power button until power light goes off, then remove plug from wall outlet.
-
Do not use this appliance for other than intended use.
- Do not open filter basket lid during brewing cycle. Scalding and/or burns may occur.
- Keep lid on the carafe when in use.
- Scalding may occur if the lid is removed during the brewing cycles.
- The carafe is designed for use with this appliance. It must never be used on a range top.
- Do not set a hot carafe on a wet or cold surface.
- Do not use a cracked carafe or a carafe having a loose or weakened handle.
- Do not clean carafe with cleansers, steel wool pads or other abrasive material.
- This appliance is not intended for use by persons (including children) with reduced physical, sensory or mental capabilities, or lack of experience and knowledge, unless they have been given supervision or instruction concerning use of the appliance by a person responsible for their safety.
- Children should be supervised to ensure that they do not play with the appliance.
SAVE THESE INSTRUCTIONS.
This product is for household use only.
POLARIZED PLUG (120V models only)
This appliance has a polarized plug (one blade is wider than the other). To reduce the risk of electric shock, this plug is intended to fit into a polarized outlet only one way. If the plug does not fit fully into the outlet, reverse the plug. If it still does not fit, contact a qualified electrician. Do not attempt to modify the plug in any way.
TAMPER-RESISTANT SCREW
Warning: This appliance is equipped with a tamper-resistant screw to prevent removal of the outer cover. To reduce the risk of fire or electric shock, do not attempt to remove the outer cover. There are no user-serviceable parts inside. Repair should be done only by authorized service personnel.
ELECTRICAL CORD
- A short power-supply cord is provided to reduce the risk resulting from becoming entangled in or tripping over a longer cord.
- Extension cords may be used if care is exercised in their use.
- If a long detachable extension cord is used:
a) The marked electrical rating of the power cord or extension cord should be at least as great as the electrical rating of the appliance.
b) If the appliance is of the grounded type, the extension cord should be a grounding-type 3-wire cord.
c) The cord should be arranged so that it will not drape over the countertop or tabletop where it can be pulled on by children or tripped over.
Note: If the power cord is damaged, please contact the warranty department listed in these instructions.
Thank you for your purchase! Gracias por su compra!

Should you have any questions or concerns with your new product, please call our Customer Service Line at 1-800-231-9786 (US and Canada). Please do not return to the store.
Congratulations on your purchase of the Black + Decker 12-Cup Programmable Coffeemaker. We have developed this guide to ensure optimal product performance and your complete satisfaction. Save this use and care manual and be sure to register your appliance online at www.prodprotect.com/applica.
CONTENTS
IMPORTANT SAFEGUARDS 2
TABLE OF CONTENTS 4
GETTING TO KNOW YOUR COFFEEMAKER 5
GETTING TO KNOW YOUR CONTROL PANEL 6
FEATURES AND BENEFITS 7
PROGRAMMING YOUR COFFEEMAKER 8
AUTO BREW DELAY 8
1-4 CUP SETTING 9
BREW STRENGTH SELECTOR 9
BEFORE BREWING 9
BREWING COFFEE 10
CARE AND CLEANING 10
TROUBLESHOOTING 12
WARRANTY AND CUSTOMER SERVICE INFORMATION 13

WARNING
RISK OF FIRE OR ELECTRIC SHOCK. DO NOT OPEN.
The lightning symbol refers to "dangerous voltage"; the exclamation symbol refers to maintenance instructions. See below.
Warning: To reduce the risk of fire or electric shock, do not remove the cover of the coffeemaker. There are no user-serviceable parts inside. Repair should be done by authorized service personnel only.
SAVE THESE INSTRUCTIONS.
This product is for household use only.
GETTING TO KNOW YOUR COFFEEMAKER
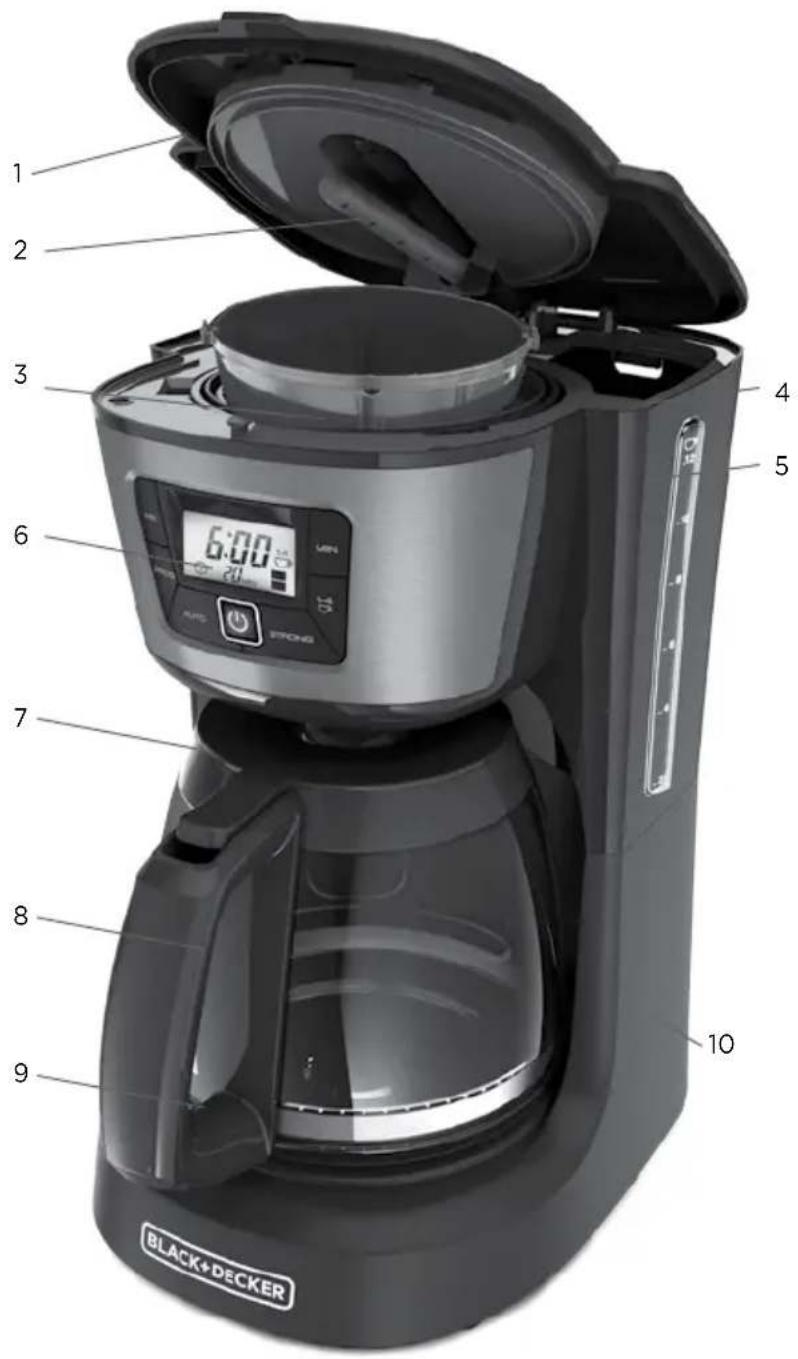
USE WITH
THESE FILTERS:

- Filter Basket Lid
- Evenstream ^TM Showerhead
- Washable Brew Basket (Part # CM2030-01)
- Water Reservoir
-
Easy-view Water Window
-
Control Panel
- Carafe Lid (Part # CM2030-02)
- Perfect Pour ™ Carafe (Part # CM2030-03)
- Nonstick "keep hot" carafe plate
- Cord Storage
GETTING TO KNOW YOUR CONTROL PANEL
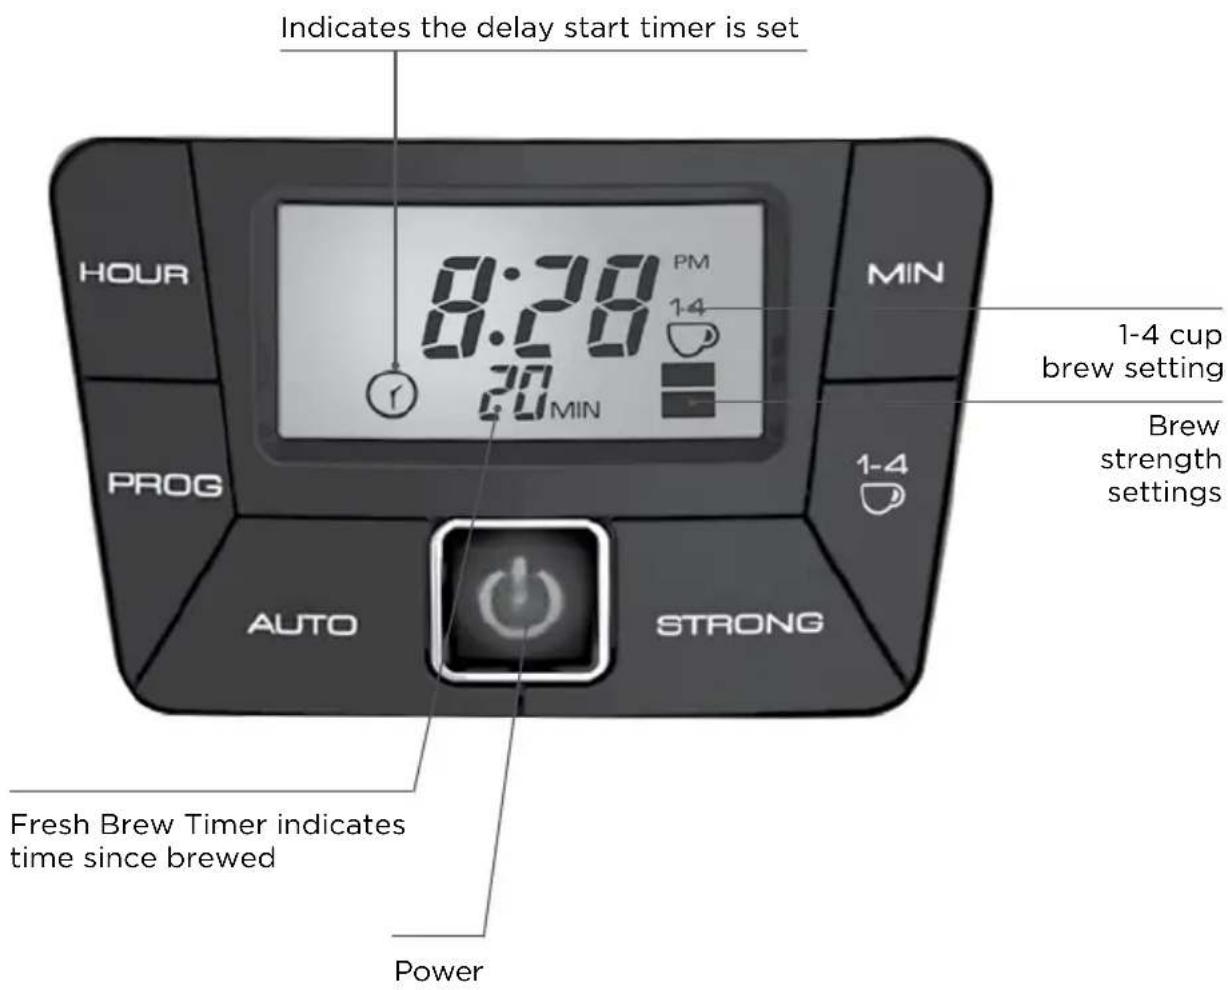
LCD Display with Digital Clock
Hour: Use to program the digital clock (see "Programming Your Coffeemaker" section)
Program: To begin programing the Auto Brew delay start, press and release button once (see "Programming Your Coffeemaker" section for details)
Auto: Turns on the Auto Brew delayed start.
Minute: Use to program the digital clock (see "Programming Your Coffeemaker" section)
1-4 Cup: Press to maintain bold coffee flavor when brewing 1-4 cups of coffee
Power: Start and stop brewing with this lighted button
Strong: Select from 3 levels of brew strength
No bars = regular
1 bar (■) = strong
2 bars (■) = bold
FEATURES AND BENEFITS
Evenstream™ Showerhead
This custom engineered technology provides even saturation across all coffee grounds producing an optimally flavored cup.
Perfect Pour™ Carafe
Specially designed to reduce dripping, the Perfect Pour ^™ spout keep your counters clean.
Easy Viewing Water Window
The water window shows the amount of water in the reservoir for easy and accurate filling.
Digital Clock
For your convenience, a programmable digital clock located on the LCD display.
Auto Brew
Program your coffee to brew at any time, day or night, with 24-hour Auto Brew delay start.
Brew Strength Selector
Customize the flavor of your coffee by selecting from three brew strength settings: regular, strong, or bold.
1-4 Cup Brew Option
This brew setting optimizes water temperature and speed, so you can maintain bold coffee flavor when brewing 1-4 cups of coffee.
Sneak-A-Cup ^™ Feature
Can't wait for the full pot of coffee to finish brewing? Sneak-A-Cup ^TM stops the flow of coffee into your carafe, so you can fill your cup before the brew cycle ends. Replace the carafe within 20 seconds to prevent brew basket overflow.
Fresh Brew Timer
After completing a brew cycle, your coffeemaker will display the time since brewed, in 1-minute increments, up to 120 minutes.
Auto-Shutoff
For peace of mind, the “keep hot” carafe plate will automatically shut off 2 hours after the brewing cycle is complete.
Removable Brew Basket
After brewing, simply remove brew basket for easy washing by hand or on your dishwasher's top rack.
Cord Storage
Keep excess cord out of the way and your countertop neat with simple cord storage.
Auto Clean™ System
Your brewer will flash ‘CL’ on the display after every 60 brews, alerting you that it is time to run Auto Clean to automatically de-scale your coffeemaker. This helps to maintain your brewer and coffee quality.
PROGRAMMING YOUR COFFEEMAKER
SETTING THE DIGITAL CLOCK
- Plug your coffeemaker into a standard electrical outlet.
- The digital clock will flash "12:00" to indicate that the time has not yet been set.
- Press the HOUR button until the correct hour appears on the display.
A “PM” symbol will appear in the upper right hand corner of the digital display to indicate afternoon time settings. This symbol will not appear for AM settings. - Press the MIN (minute) button until the correct minute value appears on the display.
- Your clock is now set.
SETTING THE AUTO BREW DELAY START
- Ensure the digital clock has been set (see "SETTING THE DIGITAL CLOCK" section for assistance).
- Press the PROG (program) button. The display will flash "12:00."
- Press the HOUR and MIN buttons until they indicate the time you would like automatic brewing to begin.
A “PM” symbol will appear in the upper right hand corner of the digital display to indicate afternoon time settings. This symbol will not appear for AM settings. - The Auto Brew display will flash for a few moments before switching back to the digital clock.
TIP: After programming, press the PROG button to check the preset Auto Brew time.
ACTIVATING THE AUTO BREW DELAY
- Ensure the Auto Brew delay time has been set (see "SETTING THE AUTO BREW DELAY" section for assistance).
- Press the AUTO button once. The timer icon ( Ⓤ ) will appear, indicating that Auto Brew has been activated.
- If Auto Brew is activated, be sure to have both coffee grounds and water in your coffeemaker. When the time of day and programmed Auto Brew time match, your coffeemaker will automatically brew a fresh pot of coffee.
- To deactivate Auto Brew, press the AUTO button again. The timer icon ( Ⓡ) will disappear.
Note: If the unit is unplugged or power is interrupted, the digital clock and Auto Brew settings will need to be reprogrammed.
USING THE 1-4 CUP SETTING
Simply push the "1-4 Cup" button and an icon will appear on the LCD display indicating the setting has been activated.
Your coffeemaker will optimize water temperature and speed, to maintain bold coffee flavor when brewing 1-4 cups of coffee.
SETTING THE BREW STRENGTH SELECTOR
Customize the boldness of your coffee by selecting from three brew strength settings: regular, strong, and bold.
To find your ideal flavor setting, simply press the STRONG button. Press once for strong and twice for bold. Press a third time and you'll be back to regular strength coffee.
When using the Brew Strength Selector, the lower right hand corner of LCD display will display:
a. No bars = regular (default setting)
b. 1 bar (■) = strong
c. 2 bars (■) = bold
BEFORE BREWING
- To register your product, go to www.prodprotect.com/applica
- Carefully unpack your coffeemaker, removing all packaging materials, labels, stickers and the plastic band around the power plug.
- Clean all removable parts of your coffeemaker in warm, soapy water. Rinse and dry these parts prior to placing them back into your coffeemaker.
- Clean the inside of your coffeemaker by running two full brewing cycles with water only, no coffee.
a. Make sure your coffeemaker is plugged in.
b. Fill the entire water reservoir with fresh, cool water and place carafe onto the carafe plate.
c. Press the Power button.
d. Once the cycle is finished, discard water.
e. Turn off appliance, unplug and allow to cool down for 15 minutes before repeating.
BREWING COFFEE
- Open your coffeemaker's filter basket lid.
- Fill the water reservoir with fresh, cool water using the easy view water window lines as a guide. Do not fill past the highest marked line.
- Place appropriate paper filter into the brew basket (see GETTING TO KNOW YOUR COFFEEMAKER section for assistance in filter selection).
- Add ground coffee (we suggest 1 tablespoon per cup) into the paper filter
- Ensure brew basket is secured in place.
- Close filter basket lid.
- Ensure the carafe is placed on the carafe plate with lid closed or secured tightly. Coffee may run over if carafe lid is not correctly in place.
- For immediate brewing press the Power button. To use the Auto Brew Delay Start, Brew Strength Selector or 1-4 Cup setting, follow the instructions in the "PROGRAMMING YOUR COFFEEMAKER" section of this guide.
- While brewing, the Sneak-A-Cup™ feature stops coffee flow out of the unit, allowing you to pour a cup of coffee before the brew cycle finishes. Always return the carafe on to the carafe plate within 20 seconds to prevent coffee overflow.
- When the brewing cycle is complete, the Fresh Brew Timer will begin.
- To turn off the coffeemaker at any time, press the Power button.
- When coffee grounds are cool, carefully remove and dispose of the used grounds and filter.
- Clean your coffeemaker according to the instruction in the "CARE AND CLEANING" section.
CARE AND CLEANING
Follow the directions below to clean your coffeemaker after each use.
Cleaning
- Make sure your coffeemaker is unplugged and cool.
- Open your coffeemaker's filter basket lid and remove the brew basket.
- Throw away the used paper filter and coffee grounds.
- Wash the brew basket and carafe by hand in warm, soapy water or on the top rack of your dishwasher.
- Wipe the outside of the coffeemaker, power cord and carafe plate with a soft, damp cloth.
- To clean the inside of the filter basket lid, open the filter basket lid and wipe with a damp cloth.
Note: Do not use abrasive cleansers or scouring pads, and never immerse the coffeemaker in water.

| COFFEEMAKER PART CLEANING INSTRUCTIONS | |
| HousingCarafe PlatePower Cord | Wipe with a soft, damp cloth. |
| Carafe LidBrew BasketGlass Carafes | Wash by hand in warm soapy water, or in the dishwasher (top rack only). |
| Thermal Carafes | Wash by hand in warm soapy water |
DE-SCALING WITH AUTO CLEAN
Over time, calcium deposits or “scale” may build up in your brewer. Scale is nontoxic but if left unattended can hinder brewer performance. Regularly de-scaling your brewer helps to maintain quality coffee as well as the lifespan of the heating element, and other internal parts that come in contact with water throughout the brew process.
To make the de-scaling process as effortless as possible, an Auto Clean system has been programmed into your coffeemaker.
When is it time to Auto Clean?
After every 60 brews, an icon reading ‘CL’ will begin to flash prior to brewing your coffee. This is to alert you that it is time to de-scale your coffeemaker. After you run the Auto Clean system, the alert will reset and blinking will stop, until it is time to clean the unit again.
How do I use Auto Clean?
Follow the simple steps below. Your coffeemaker will take care of the rest.
- Fill the water reservoir approximately half-way with white vinegar.
- Fill the remaining half of the water reservoir with cool water.
- Place a paper basket filter into the brew basket, close the lid and place the empty carafe onto the carafe plate.
- Press and hold both the 'AUTO' button for five seconds to start the Auto Clean system.
Note: The icon reading 'CL' will remain lit to indicate that the Auto Clean system is activated.
- Leave unit to Auto Clean for approximately 60 minutes.
- When Auto Clean has finished, the 'CL' icon will turn off.
- Discard the liquid in the carafe.
- Using water only, run a minimum of two full brew cycles through your coffeemaker.
- Wash, rinse and dry each removable piece of your coffeemaker (see the Basic Cleaning section of this guide for specific instructions).
TROUBLESHOOTING
| PROBLEM POSSIBLE | CAUSE SOLUTION | |
| Coffeemaker does not turn on. | Coffeemaker is not plugged in. | Make sure appliance is plugged into a working outlet. |
| Coffeemaker is leaking. | Water reservoir may be overfilled. | Make sure water reservoir has not been filled beyond the 12-cup line. |
| Cover may not be correctly placed on carafe. | Make sure cover is correctly placed and tightened on carafe | |
| Carafe may not be correctly placed on the carafe plate. | Make sure carafe is placed securely onto the carafe plate. | |
| The brew basket overflows. | The carafe has been removed for longer than 20 seconds when using the Sneak-A-CupTM feature. | Make sure to replace the carafe within 20 seconds during the brewing cycle. |
| Excessive amount of coffee is used. | Reduce the amount of coffee used. | |
| Coffee sediment in brewed cup of coffee. | The paper filter and/or the brew basket are not properly placed. | Insert basket-shaped paper filter into brew basket and insert basket properly into holder. |
| The coffeemaker brews slowly. | The coffeemaker needs cleaning. | Follow the instructions in the “Descaling with Vinegar” section. |
If additional assistance is needed, please contact our consumer service team at 1-800-231-9786.
WARRANTY AND CUSTOMER SERVICE INFORMATION
For service, repair or any questions regarding your appliance, call the appropriate 800 number listed within this section. Please DO NOT return the product to the place of purchase. Also, please DO NOT mail product back to manufacturer, nor bring it to a service center. You may also want to consult the website listed on the cover of this manual.
Two-Year Limited Warranty (Applies only in the United States and Canada)
What does it cover?
- Any defect in material or workmanship provided; however, Spectrum Brands, Inc.'s liability will not exceed the purchase price of product.
For how long?
- Two years from the date of original purchase with proof of purchase.
What will we do to help you?
- Provide you with a reasonably similar replacement product that is either new or factory refurbished.
How do you get service?
- Save your receipt as proof of date of sale.
- Visit the online service website at www.prodprotect.com/applica, or call toll-free 1-800-231-9786, for general warranty service.
- If you need parts or accessories, please call 1-800-738-0245.
What does your warranty not cover?
• Damage from commercial use
- Damage from misuse, abuse or neglect
- Products that have been modified in any way
- Products used or serviced outside the country of purchase
- Glass parts and other accessory items that are packed with the unit
- Shipping and handling costs associated with the replacement of the unit
- Consequential or incidental damages (Please note, however, that some states do not allow the exclusion or limitation of consequential or incidental damages, so this limitation may not apply to you.)
How does state law relate to this warranty?
- This warranty gives you specific legal rights. You may also have other rights that vary from state to state or province to province.
San Jose, Costa Rica
Tel. (506) 257-5716 / 223-0136
administracion@masterecuador.com
Ecuador
Col. Centro, Cuauhtemoc,
México, D.F.
Tel. 01 800 714 2503
Nicaragua
ServiTotal
City Market Nivel Plaza Local 153
Diagonal Hotel Melia,
Caracas.
Tel. (582) 324-0969
www.applicaservice.com
servicio@applicamail.com
© 2015 The Black & Decker Corporation
and Spectrum Brands, Inc.,
Middleton, WI 53562
Made in People's Republic of China
- Please Read and Save this Use and Care Book.
- IMPORTANT SAFEGUARDS.
- SAVE THESE INSTRUCTIONS.
- This product is for household use only.
- POLARIZED PLUG (120V models only)
- TAMPER-RESISTANT SCREW
- ELECTRICAL CORD
- Thank you for your purchase! Gracias por su compra!
- CONTENTS
- WARNING
- RISK OF FIRE OR ELECTRIC SHOCK. DO NOT OPEN.
- GETTING TO KNOW YOUR COFFEEMAKER
- GETTING TO KNOW YOUR CONTROL PANEL
- LCD Display with Digital Clock
- FEATURES AND BENEFITS
- Evenstream™ Showerhead
- Perfect Pour™ Carafe
- Easy Viewing Water Window
- Digital Clock
- Auto Brew
- Brew Strength Selector
- 1-4 Cup Brew Option
- Sneak-A-Cup ™ Feature
- Fresh Brew Timer
- Auto-Shutoff
- Removable Brew Basket
- Cord Storage
- Auto Clean™ System
- PROGRAMMING YOUR COFFEEMAKER
- SETTING THE DIGITAL CLOCK
- SETTING THE AUTO BREW DELAY START
- ACTIVATING THE AUTO BREW DELAY
- USING THE 1-4 CUP SETTING
- SETTING THE BREW STRENGTH SELECTOR
- BEFORE BREWING
- BREWING COFFEE
- CARE AND CLEANING
- Cleaning
- DE-SCALING WITH AUTO CLEAN
- When is it time to Auto Clean?
- How do I use Auto Clean?
- WARRANTY AND CUSTOMER SERVICE INFORMATION
- Two-Year Limited Warranty (Applies only in the United States and Canada)
- What does it cover?
- For how long?
- What will we do to help you?
- How do you get service?
- What does your warranty not cover?
- How does state law relate to this warranty?
- Ecuador
- Nicaragua
Brand : BLACK & DECKER
Model : CM2030B
Category : Coffee maker