Standard Cruiser (2000) - Motorcycle Victory - Free user manual and instructions
Find the device manual for free Standard Cruiser (2000) Victory in PDF.


| Product Type | Motorcycle |
| Brand | Victory |
| Model | Standard Cruiser (2000) |
| Engine Displacement | 1507 cc |
| Engine Type | V-Twin, SFI (Sequential Fuel Injection) |
| Transmission | 5-speed manual |
| Fuel Type | Unleaded 87 pump octane or higher |
| Oil Type | 20W-40 semi-synthetic |
| Oil Capacity (with filter change) | 6 quarts (6.7 L) |
| Spark Plug | Champion RA8GHC, gap 0.040 in (1.0 mm) |
| Tire Pressure (Front) | 34 psi (235 kPa) |
| Tire Pressure (Rear) | 36-40 psi (250-275 kPa) |
| Maximum Load Capacity | 454 lbs (206 kg) |
| Gross Vehicle Weight Rating (GVWR) | 1150 lbs (522 kg) |
| Brakes | Front and rear disc brakes |
| Battery | Maintenance-free, 12V |
| Display | Multi-function LCD (odometer, trip, clock, fuel, voltage, diagnostics) |
| Safety Features | Steering lock, clutch interlock, sidestand switch |
| Maintenance Interval (Oil Change) | Every 2,500 miles (4,000 km) |
| Maintenance Interval (Spark Plug) | Replace every 30,000 miles (48,000 km) |
| Warranty | 1 year limited warranty |
| Country of Manufacture | USA |
Frequently Asked Questions - Standard Cruiser (2000) Victory
User questions about Standard Cruiser (2000) Victory
0 question about this device. Answer the ones you know or ask your own.
Ask a new question about this device
Download the instructions for your Motorcycle in PDF format for free! Find your manual Standard Cruiser (2000) - Victory and take your electronic device back in hand. On this page are published all the documents necessary for the use of your device. Standard Cruiser (2000) by Victory.
USER MANUAL Standard Cruiser (2000) Victory
2000
V92COwner'sManual

WARNING
Theengineexhaustfromthis productcontainschemicalsknown tocausecancer,birthdefector otherreproductiveharm.
FOREWORD
Congratulations on choosing a Victory Motorcycle! You should feel very satisfied knowing you will have such a tremendous amount of experience riding with you on the highway. Experience in design, engineering and manufacturing that went hand in hand to produce one of the best motorcycles on the market today.
All machines, no matter how well engineered, require a certain amount of maintenance. Before using your motorcycle, read through this manual and familiarize yourself with maintenance and operation procedures. It may be the most important time spent in knowing how to keep your machine running perfectly every day.
This manual gives minor maintenance and repair procedures. Any major repairs should be performed at your Victory dealer by a skilled technician. Attempting major repairs yourself could lead to serious injury or death.
Victory has done its part to make your machine safe. However, ultimately, safety depends on you. Pay close attention and heed the following:
▲ Perform a pre-ride inspection before each outing;
▲ Always be alert when operating your motorcycle;
▲ Never drive while under the influence of drugs or alcohol;
▲ Know all local, state/province riding laws; and,
▲ Always ride within the limits of the law.
All of us on the Victory team extend to you our best wishes for plenty of fun-filled, safe riding on your new motorcycle.
All information in this manual is based upon the latest product data and specifications available at the time of printing. Victory Motorcycle Division, Polaris Sales Inc. reserves the right to make product changes and improvements which may affect illustrations or explanations.
No part of this manual shall be reproduced or used without the written permission of Victory Motorcycle Division, Polaris Sales Inc.
Illustrations included in this manual are general representations of parts having a similar function. Your model may differ.
Design & manufacture of machine fully complies with all federal, state, and local emission and safety standards. To maintain these high standards, it is important that you and your dealer pay close attention to the recommended maintenance schedules and operating instructions contained within this manual.
The Polaris Preferred Registered Owners (PRO) Family Your Owners Program
As the owner of a new Polaris vehicle, you are entitled to a FREE two - year membership in the Polaris PRO Family - the Preferred Registered Owners Family. It's an owners program for Polaris owners like you, people who have chosen the finest vehicle available, people who share an interest in Polaris and its products.
Once your new vehicle's warranty is registered, you will receive a PRO Family membership packet that will include:
★ A letter of welcome to the PRO Family
★ A PRO Family card with your name and membership number
★ A colorful sticker of the PRO logo
★ A PRO merchandise brochure and order form.
As a PRO Family member, you're entitled to opportunities such as:
★ A free subscription to PRO Spirit, the official magazine of the PRO Family
The chance to buy insurance for your Victory motorcycle. The toll-free insurance telephone number is: 1-800-473-0111
The chance to arrange travel through the Polaris Travel Center. The toll-free travel telephone number is: 1-800-267-1915
The chance to apply to serve on PRO Consumer Councils that provide input into the Polaris vehicles of the future
The chance to serve as a PRO Field Evaluator and provide feedback on your new vehicle
The chance to purchase exclusive PRO Family merchandise
And more!
To order PRO merchandise, you'll complete the order form you receive with your membership packet, take the form to your Polaris dealer and pay for the merchandise. The merchandise will be shipped directly to your home from the PRO merchandise fulfillment center.
Watch for your PRO membership packet and the next issue of PRO Spirit magazine. This quarterly magazine will keep you informed about Polaris news and events, and special PRO merchandise, travel, and ride opportunities.
Enjoy your new Polaris vehicle and welcome to the family—The Polaris PRO Family
CONTENTS
UNDERSTANDING WARNINGS .... 1
SAFETY INFORMATION 2-12
VEHICLE DESCRIPTION 13-15
CONTROL PARTS AND FUNCTIONS 16-23
PRE-RIDE INSPECTION 24-29
OPERATION 30-33
MAINTENANCE 34-51
BATTERY 52
MULTI-FUNCTION DISPLAY 53-54
TROUBLESHOOTING 55
CLEANING AND STORAGE 56-57
IDENTIFICATION 58
SPECIFICATIONS 59-60
REPORTING OF SAFETY DEFECTS 61
CONSUMER INFORMATION 62-63
EMISSIONS CONTROL SYSTEM WARRANTY 64-67
VICTORY MOTORCYCLE WARRANTY POLICY ..... 68-69
INDEX 70
UNDERSTANDING WARNINGS
Safety Alert
The following precautionary signal words are used throughout this manual to convey the following messages:

This is the safety alert symbol. When you see this symbol on your machine or in this manual, be alert to the potential for personal injury. Your safety is involved!
⚠ WARNING
Indicates a potential hazard which could result in serious injury or death.
⚠️ CAUTION
Indicates a potential hazard which may result in minor personal injury or damage to the motorcycle.
NOTE
The word "NOTE:" in this manual will alert you to key information or instructions.
NOTE: This manual should be considered a part of the motorcycle and should remain with the motorcycle even if the machine is sold to another owner. All references to "Right" and "Left" are with rider seated in normal riding position on the motorcycle.
Victory has made every attempt to ensure the information contained in this manual is current and correct. However, as Victory continually advances its product design, there may be slight discrepancies between your motorcycle and this manual. If there is any question concerning the information contained in this manual, please contact your Victory dealer.
SAFETY INFORMATION

WARNING:
Please read this manual carefully and completely before operating this motorcycle.
Do not attempt to operate this motorcycle until you have familiarized yourself with the controls and operating features.
Do not attempt to operate this motorcycle until you have been trained in safe and proper riding techniques.
Pre-ride inspections, following the recommended maintenance intervals, along with proper riding skills, can ensure that you will safely enjoy the capabilities and the reliability of this motorcycle.
SAFETY FIRST
Protective Apparel

WARNING: Head injuries are the main cause of motorcycle fatalities. The
use of an approved safety helmet is critical to the prevention or reduction of head injuries.
NOTE: Both the operator and the passenger should observe the following guidelines.
- Always wear a D.O.T. or SNELL approved helmet.
- Always use a face shield or goggles to protect your eyes. Impaired vision can contribute to accidents.
- Always wear heavy boots, long sleeved jacket, gloves, and trousers to reduce the severity of lacerations, abrasions or burns.
- Never wear loose fitting clothing. Loose fitting clothing can impair the operation of controls, become entangled in moving parts (wheels, drive belt, etc.), or impair vision and/or control and cause an accident.
- The engine and exhaust become very hot during operation and stay hot for a period after operation. Never touch any part of the engine or exhaust during or after operation. Always wear clothing that covers your legs, ankles, and feet.
SAFETY INFORMATION
Safe Riding

WARNING: The safe use and operation of motorcycles is dependent on proper riding techniques. Every operator needs to know the following items before riding any motorcycle.
- Obtain complete instructions from a knowledgeable source on all aspects of motorcycle operation.
- Observe all WARNINGS, SAFETY ALERTS, CAUTIONS, and NOTES as they are discussed in this manual.
- Obtain professional and qualified training to learn safe and proper riding techniques.
- Obtain professional technical service for maintenance items found in the owner's manual and as mechanical conditions warrant.

WARNING: Make pre-ride inspections a habit before each ride. Thorough inspections can help prevent accidents.

WARNING: This motorcycle is designed to transport the operator and one passenger only.

WARNING: Failure to be seen is the number one cause of motorcycle/automobile accidents. Making yourself conspicuous lessens the chance that an auto-mobile operator will not see you. To make yourself more visible you should:
- Wear brightly colored and reflective clothing and helmet.
- Use extra caution when negotiating intersections. Intersections are the most likely place for a motorcycle accident to occur.
- Don't ride in other motorist's blind spots. Make sure they can see you in their mirrors.

WARNING: Inexperienced operators are a leading cause of motorcycle accidents.
- Professional and qualified training is available, make sure you are qualified before you begin riding your machine. Do not lend your machine to inexperienced operators.
- Ride within your skills and limits. Don't be afraid of slowing down or taking another route until you are confident of your abilities.
- Practice riding your motorcycle out of traffic areas until you are comfortable with the characteristics of the machine and its controls.

WARNING: Many motorcycle accidents are caused by operator error. Excessive speed is an operator error that contributes to many motorcycle accidents.
• Always obey posted speed limits.
- Reduce your speed if conditions warrant it.
SAFETY INFORMATION
- Always signal before turning or changing lanes. Don't take it for granted that other motorist have seen you. Check your mirrors and turn your head before changing lanes.

WARNING: The operator and the passenger are integral parts of the han-characteristics of a motorcycle.
- The operator should keep both hands on the handlebars and both feet on the operator footrests whenever the machine is being operated.
- The passenger should always hold on to the operator or the handhold strap and keep both feet on the passenger footrests.
- Never carry a passenger unless he or she can firmly place both feet on the passenger footrests.

WARNING: Never use alcohol or drugs before or while operating this vehicle.

WARNING: This motorcycle is designed for paved road use only. It is not able for off-road use.
Modifications

WARNING: Modifications made to your motorcycle not approved by Victory render your motorcycle unsafe for use and may cause accidents. This in-s the removal of original equipment. Modifications may also make your mo-cle illegal to use and, in some instances, can void warranty

WARNING: Adding accessories or cargo can affect handling and stability be the weight distribution can be altered. Use caution if adding cargo or access to your motorcycle.
Accessories

WARNING: Genuine Victory accessories are specifically designed for the 3 and have been tested for fit, function and safety. Victory cannot test all other essories which may be available. You should use extreme caution when instal-nd using any non-Victory accessories. If you choose to use non-Victory ac-ories, you will personally be responsible for the use, proper installation, and tion of the accessory.
SAFETY INFORMATION
Loading
WARNING: The total weight of the operator, passenger, accessories and cargo must not exceed the maximum load limit of 454 lbs.
WARNING: Accessory and cargo weight should be kept as low and close to the center of gravity of the machine as possible. Distribute the weight evenly on both sides of the machine.
WARNING: Shifting weights while operating the machine can upset the handling of the motorcycle. It is imperative to attach cargo and accessories securely. Inspect all accessory mounts and cargo attachments every time before riding your machine. Loose cargo can become entangled in wheels, belts, etc., and cause a serious accident.
WARNING: Heavy, large items should never be carried on the handlebars, front forks, or the front fender. Carrying large, heavy, bulky items in these areas will create ill-handling and/or slow steering response.
WARNING: Your Victory motorcycle was not designed to pull trailers or attach sidecars. Doing so will drastically change the handling characteristics and is not recommended by Victory.
WARNING: Do not install accessories or carry cargo that changes the design parameters of the machine. After installing accessories or cargo, carefully inspect the machine to determine if:
• Ground clearance has been reduced
• Cornering clearance has been reduced.
- Suspension travel has been reduced.
• Steering travel has been reduced or restricted.
• Control operation has been obscured or restricted.
● Lights or reflectors have been covered.
NOTE: Bulky accessories and/or cargo may change the aerodynamics of the machine and affect stability during normal riding, crosswinds or wind created by passing vehicles.
WARNING: Adding electrical accessories may exceed the capacity of the electrical system. This could lead to an electrical failure which could cause a dangerous loss of lights and/or engine power.
WARNING: Improper loading of your Victory motorcycle can adversely affect its handling and overload the tires.
• This can cause a loss of control or a tire blow-out.
● Always follow recommendations in this manual for loading of the motorcycle and care of tires. See especially pages 5 and 29.
SAFETY INFORMATION
Safe Operating Rules
Before operating your new motorcycle it is your responsibility to read and follow operating and maintenance instructions in this manual. Follow these basic rules for your personal safety.
- Know and respect the rules of the road. Read and observe the Motorcycle Safety booklets included with this Owner's Manual. You should also read and know the contents of your state's motorcycle handbook.
- Use only genuine Victory approved parts and accessories. Use of certain other manufacturer's performance parts will void your new motorcycle warranty. See your dealer for details.
- Gasoline is extremely flammable and is explosive under certain conditions. Refuel in a well ventilated area with the engine turned off. Remove fuel filler cap slowly. Do not smoke or allow open flames or sparks when refueling or servicing the fuel system. Do not fill fuel tank above the bottom of the filler neck insert. Leave air space to allow for fuel expansion.
WARNING: Motorcycle exhaust contains poisonous carbon monoxide gas.
Do not inhale exhaust gases and never run the engine in a closed garage or confined area.
- Before starting engine, check for proper operation of brake, clutch, shifter, throttle controls, correct fuel and oil supply.
- Be certain that the sidestand is up before riding the motorcycle. Riding with the sidestand unretracted can cause a serious crash, leading to injury or death.
- A new motorcycle must be operated according to the special break-in procedure explained in this manual on page 33.
- Operate the motorcycle only at moderate speed and out of traffic until you have become thoroughly familiar with its operation and handling characteristics under all conditions. If you are an inexperienced rider we recommend that you obtain information and formal training in correct motorcycle riding technique.
- Do not exceed the legal speed limit or drive too fast for existing conditions. Always reduce speed when poor driving conditions exist. High speed increases the influence of any other condition affecting stability and possibility of loss of control.
- Pay strict attention to road surfaces and wind conditions. Any two wheeled vehicle may be subject to upsetting forces. Wind blasts from passing cars and trucks can cause stability to be upset. Be sure to stay aware of traffic surrounding you, road conditions, and weather conditions and adjust your riding style accordingly.
SAFETY INFORMATION
Fuel

WARNING
Gasoline is extremely flammable and explosive under certain conditions.

Always stop the engine and refuel outdoors or in a well ventilated area.

Do not smoke or allow open flames or sparks in or near the area where refueling is performed or where gasoline is stored.

Do not overfill the tank. Do not fill the tank neck above the fuel tank insert. Leave air space to allow for fuel expansion.

If you get gasoline in your eyes or if you swallow gasoline, see your doctor immediately. Never try to syphon gasoline using mouth suction.

If you spill gasoline on your skin or clothing, immediately wash it off with soap and water and change clothing.

Never start the engine or let it run in an enclosed area. Gasoline powered engine exhaust fumes are poisonous and can cause loss of consciousness and death in a short time.

WARNING
The engine exhaust from this product contains chemicals known to cause cancer, birth defects or other reproductive harm.
SAFETY INFORMATION
Parking
NOTE: When leaving the machine unattended make sure to remove the ignition key and lock the steering lock.

WARNING: The engine and exhaust pipes may be hot. Park the machine in an area where children aren't likely to touch these hot areas.

WARNING: The machine may fall over if parked on uneven and/or soft ground. Make sure to park your machine on level, firm surfaces. Be particularly careful when parking on black top especially in summer. The more asphalt warms, the softer it gets and when asphalt gets soft, the sidestand will sink into the pavement, causing the bike to fall. Avoid this by placing a small (6" x 6" x 1/4") board under the foot of the stand.

WARNING: Do not park the machine near flammable sources or open flame.
Important Labels
Your vehicle has a number of warning labels. Please read and understand them before riding your motorcycle.
1
| TIRE INFORMATION | ||
| Cold Tire Pressures: | ||
| Up to 200 lbs. (90 kg) Load | Front | 34 psi (235 kpa) |
| Rear | 36 psi (250 kpa) | |
| Up to Maximum Load Capacity | Front | 34 psi (235 kpa) |
| Maximum Load Capacity: 454 lbs. (206 kg) | Rear | 40 psi (275 kpa) |
| Tire Brand/Type: | Front | Dunlop 491 Elite il |
| Rear | Dunlop 491 Elite II | |
| Tire size: | Front | MT90HB16 71H |
| Rear | 160/80HB16 75H | |
| Minimum Recommended | Front | 1.6 mm (.063") |
| Tire Center Tread Depth | Rear | 2.0 mm (.080") |
| TIRES ARE TUBELESS | READ OWNER'S MANUAL | |
2
MADE IN U.S.A.
3
UNLEADED FUEL RECOMMENDED

WARNING
- READ AND UNDERSTAND WARNINGS AND OWNER'S MANUAL BEFORE OPERATION. SEVERE INJURY OR DEATH CAN RESULT FROM IGNORING WARNINGS OR IMPROPER USE. If you do not have the Owner's Manual for this motorcycle, call 1-800-342-3764 to have one provided at no extra charge.
- For your protection and your passengers, always wear an approved helmet, eye protection, and protective clothing. Wear brightly colored and reflective clothing for greater visibility in traffic, especially at night. Avoid loose, flowing garments and scarves.
- Improper loading can cause loss of control.
• See "Loading and Accessories" in Owner's Manual for instructions.
7077937
SAFETY INFORMATION
Important Labels
Your vehicle has a number of warning labels. Please read and understand them before riding your motorcycle.
4
Vehicle Emission Control Information Label (49 State)
VEHICLE EMISSION CONTROL INFORMATION
ENGINE DISPLACEMENT: 1507cc
ENGINE FAMILY: YVMCC01.5V92
THIS VEHICLE CONFORMS TO US EPA
REGULATIONS APPLICABLE TO 2000 MODEL
YEAR NEW MOTORCYCLES
ENGINE EXHAUST CONTROL SYSTEMS: SFI
ENGINE TUNE-UP SPECIFICATIONS
IGNITION TIMING: TIMING MARK CENTERED
IDLE SPEED: 950 ± 50 RPM
IDLE MIXTURE: EFI CONTROLLED
VALVE CLEARANCE: HYDRAULIC TAPPET, SELF-ADJUSTING
SPARK PLUG: CHAMPION, RA8GHC SPARK PLUG GAP: 0.040" (1mm)
FUEL: 87 PUMP OCTANE OR HIGHER
OIL: 20W-40
VICTORY MOTORCYCLE DIVISION, Polaris Industries Inc
1225 HWY 169 NORTH
MINNEAPOLIS, MN 55441

MOTORCYCLES USA
MOTORCYCLE NOISE EMISSION CONTROL INFORMATION
THIS 2000 VICTORY VMD42C1507 MOTORCYCLE, WITH EXHAUST asm.
no. 1261031, MEETS US EPA NOISE EMISSION REQUIREMENTS OF 80
dBA AT 2750 RPM BY THE FEDERAL TEST PROCEDURE. MODIFICATIONS
WHICH CAUSE THIS MOTORCYCLE TO EXCEED FEDERAL NOISE
STANDARDS ARE PROHIBITED BY FEDERAL LAW.
SEE OWNER'S MANUAL
7078530
5
MFG BY VICTORY MCTORCYCLE DIVISION, POLARIS INDUSTRIES INC.
GVWR-1150 Lbs (522 Kg) GAWR F-400 Lbs (181Kg) WITH 34 psi (235KPA) MT90HB16 71H
GAWR R-750 Lbs (340Kg) WITH 40 psi (250KPA) 160/80HB16 75H
THIS VEHICLE CONFORMS TO ALL APPLICABLE FEDERAL MOTOR VEHICLE SAFETY
STANDARDS IN EFFECT ON THE DATE OF MANUFACTURE SHOWN ABOVE.

MOTORCYCLES USA
MOTORCYCLE
7078647
Important Labels
Your vehicle has a number of warning labels. Please read and understand them before riding your motorcycle.
6
VEHICLE EMISSION CONTROL INFORMATION (49 STATE) LABEL AND EMISSION CONTROL ROUTING (CALIFORNIA)
VEHICLE EMISSION CONTROL INFORMATION
ENGINE DISPLACEMENT: 1507cc
ENGINE FAMILY: YVMCC01.5V92
THIS VEHICLE CONFORMS TO US EPA AND CALIFORNIA REGULATIONS
APPLICABLE TO 2000 MODEL YEAR NEW MOTORCYCLES AND IS
CERTIFIED TO 1.4 HC G/KM ENGINE FAMILY EXHAUST EMISSION
STANDARD IN CALIFORNIA
ENGINE EXHAUST CONTROL SYSTEMS: SFI
ENGINE TUNE-UP SPECIFICATIONS
IGNITION TIMING: TIMING MARK CENTERED
IDLE SPEED: 950 ± 50 RPM
IDLE MIXTURE: EFI CONTROLLED
VALVE CLEARANCE: HYDRAULIC TAPPET, SELF-ADJUSTING
SPARK PLUG: CHAMPION RA&GHC SPARK PLUG GAP: 0.040" (1mm)
FUEL: 87 PUMP OCTANE OR HIGHER
OIL·20W-40
VICTORY MOTORCYCLE DIVISION, Polaris Industries Inc.
1225 HWY 169 NORTH
MINNEAPOLIS, MN 55441

MOTORCYCLES USA
MOTORCYCLE NOISE EMISSION CONTROL INFORMATION
THIS 2000 VICTORY VMD42C1507 MOTORCYCLE, WITH EXHAUST asm.
no. 1261031 MEETS US EPA NOISE EMISSION REQUIREMENTS OF 80
dBA AT 2750 RPM BY THE FEDERAL TEST PROCEDURE. MODIFICATIONS
WHICH CAUSE THIS MOTORCYCLE TO EXCEED FEDERAL NOISE STANDARDS
ARE PROHIBITED BY FEDERAL LAW. SEE OWNER'S MANUAL
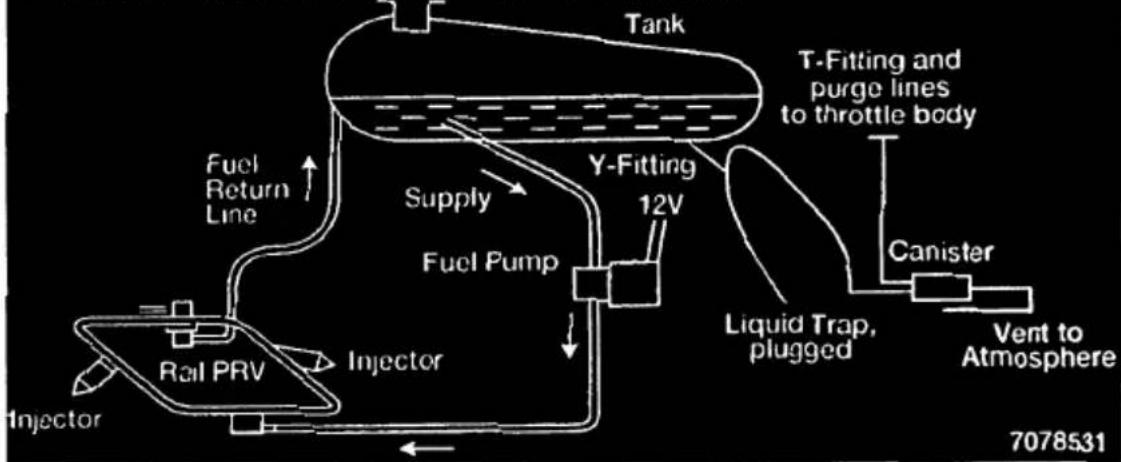
EVAP FAMILY: YVMCC0000V92
EVADORAATIVE SYSTEM LOSE ROUTING DIAGRAM:
flowchart
graph TD
    A["Injector"] --> B["Rail PRV"]
    B --> C["Injector"]
    C --> D["Fuel Pump"]
    D --> E["Supply"]
    E --> F["Tank"]
    F --> G["Y-Fitting"]
    G --> H["Liquid Trap, plugged"]
    H --> I["Canister"]
    I --> J["Vent to Atmosphere"]
    J --> K["T-Fitting and purge lines to throttle body"]
SAFETY INFORMATION
Important Labels
Your vehicle has a number of warning labels. Please read and understand them before riding your motorcycle.
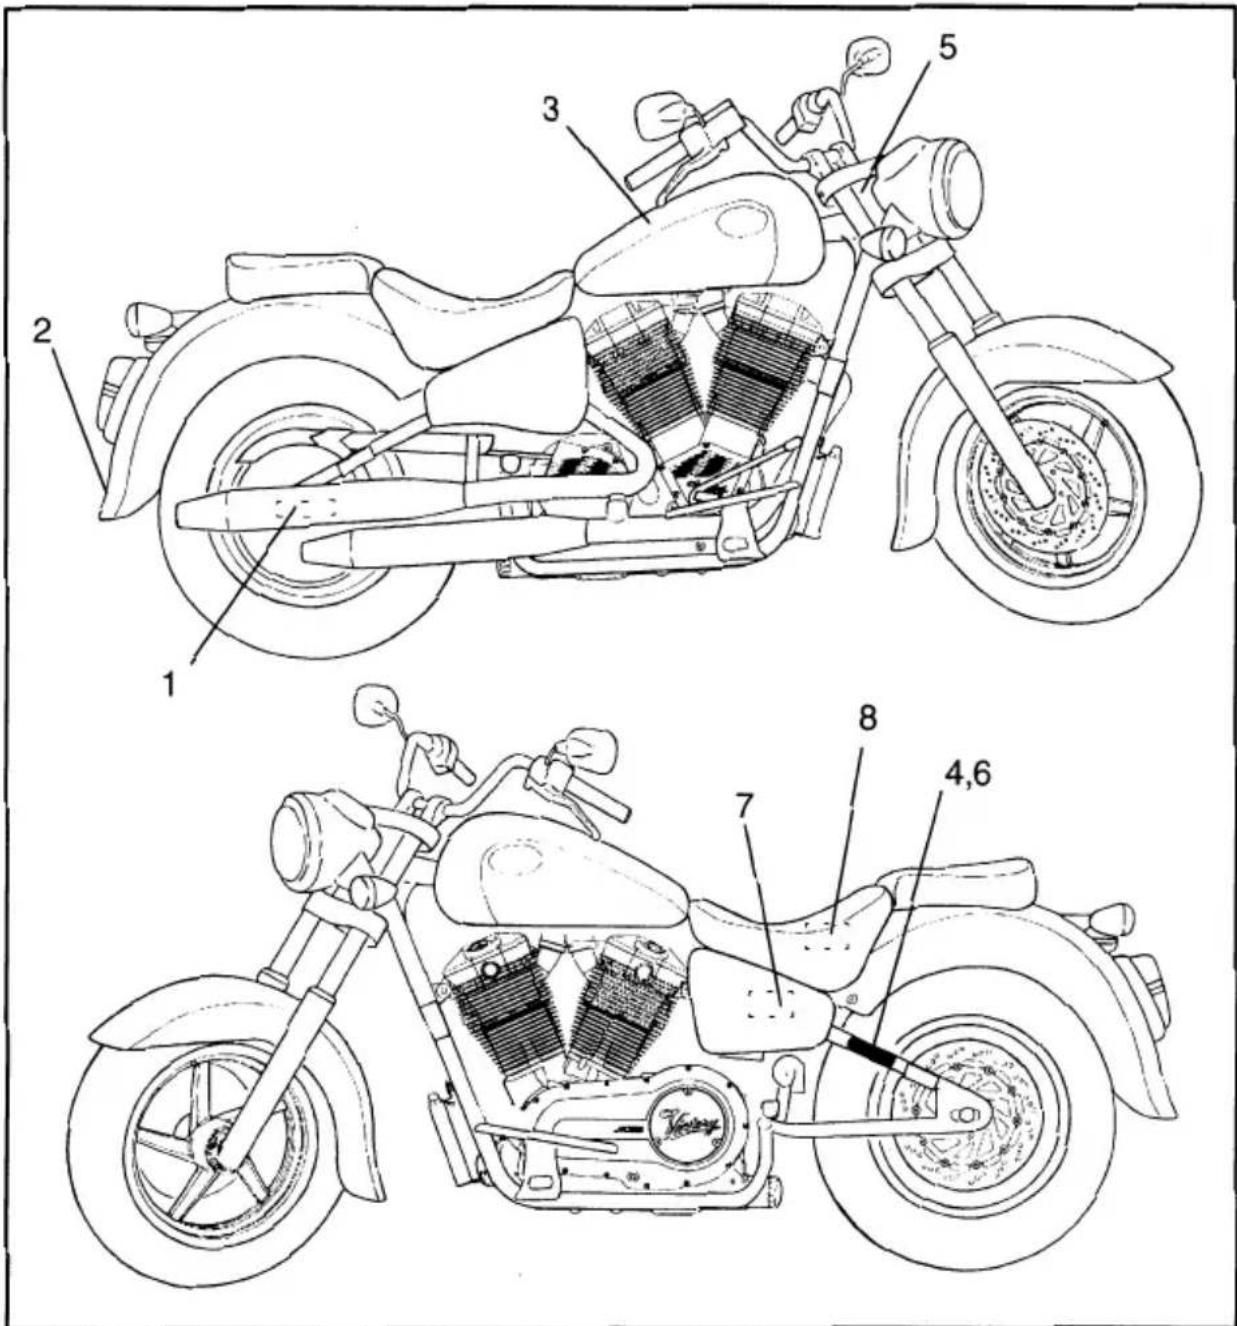
- Tire Information (located on lower swing arm)
- USA/Flag
- Fuel, Operation and Loading Decal
- Vehicle Emission
- VIN Decai
- Vehicle Emission (California)
- Fuse Box Layout (Located in fuse box under LH side cover, see page 47)
- Patent Pending (Located under seat on subframe)
Left Side of Motorcycle
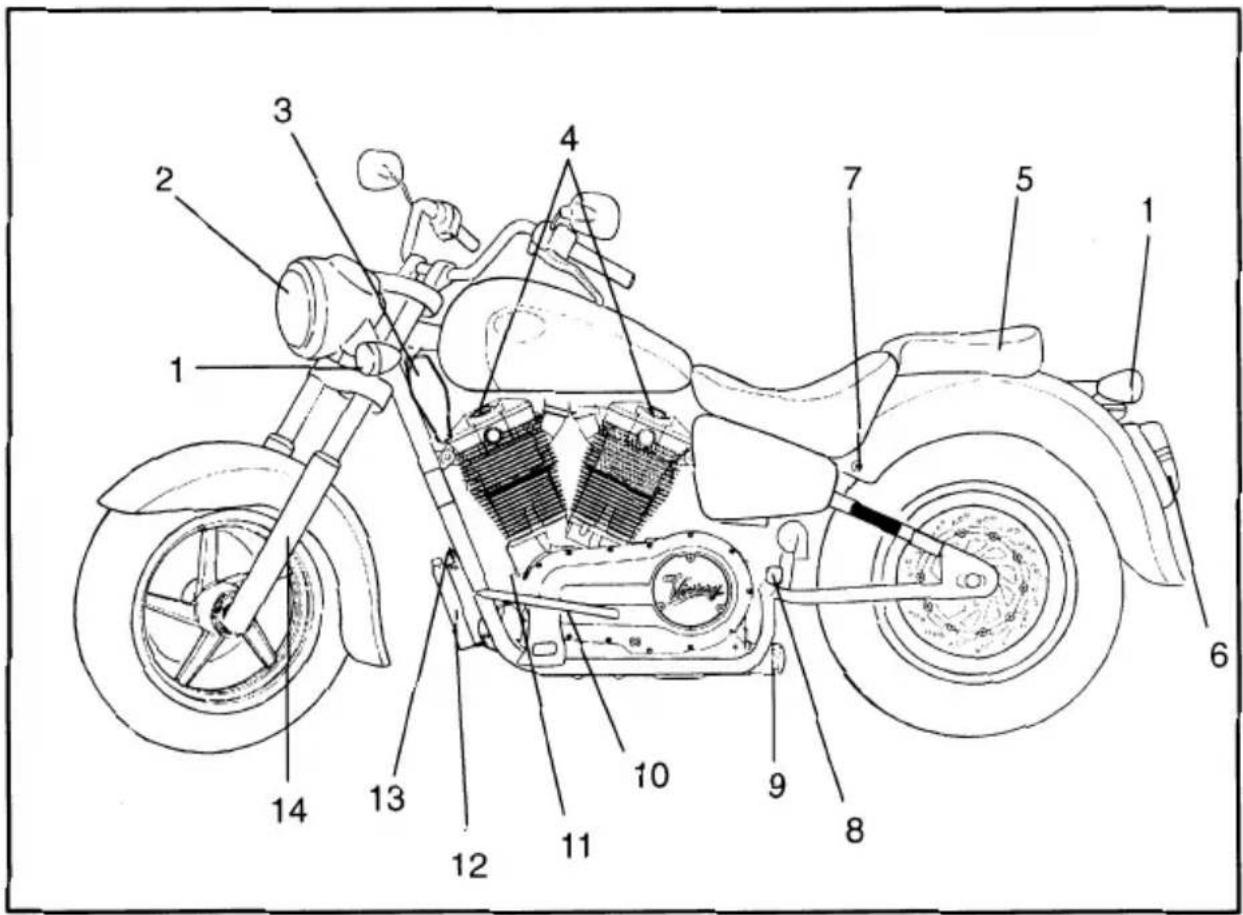
- Left Turn Signal
- Headlamp
- Air Filter
- Spark Plugs
- Passenger Seat
- Tail/Brake Lamp
- Seat Latch (key)
- Passenger Foot Rest
- Oil Filter
- Operator Foot Rest
- Shift Lever
- Oil Cooler
- Rear Brake Reservoir (general location)
- Front Fork
VEHICLE DESCRIPTION
Right Side of Motorcycle
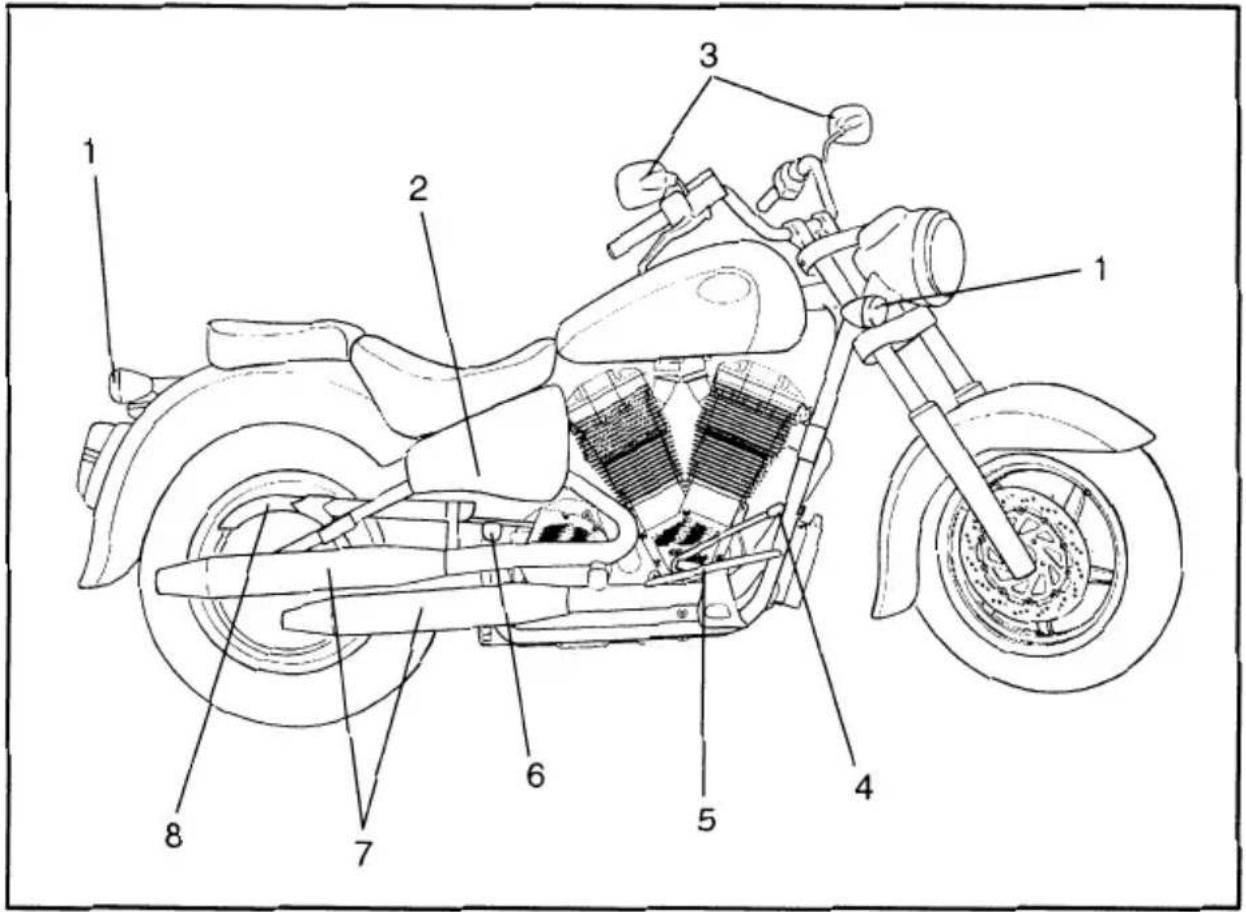
- Right Turn Signal
- Right Side Cover
- Rear View Mirrors
- Rear Brake Pedal
- Operator Foot Rest
- Passenger Foot Rest
- Exhaust Mufflers
- Drive Belt Guard
VEHICLE DESCRIPTION
Top View of Motorcycle
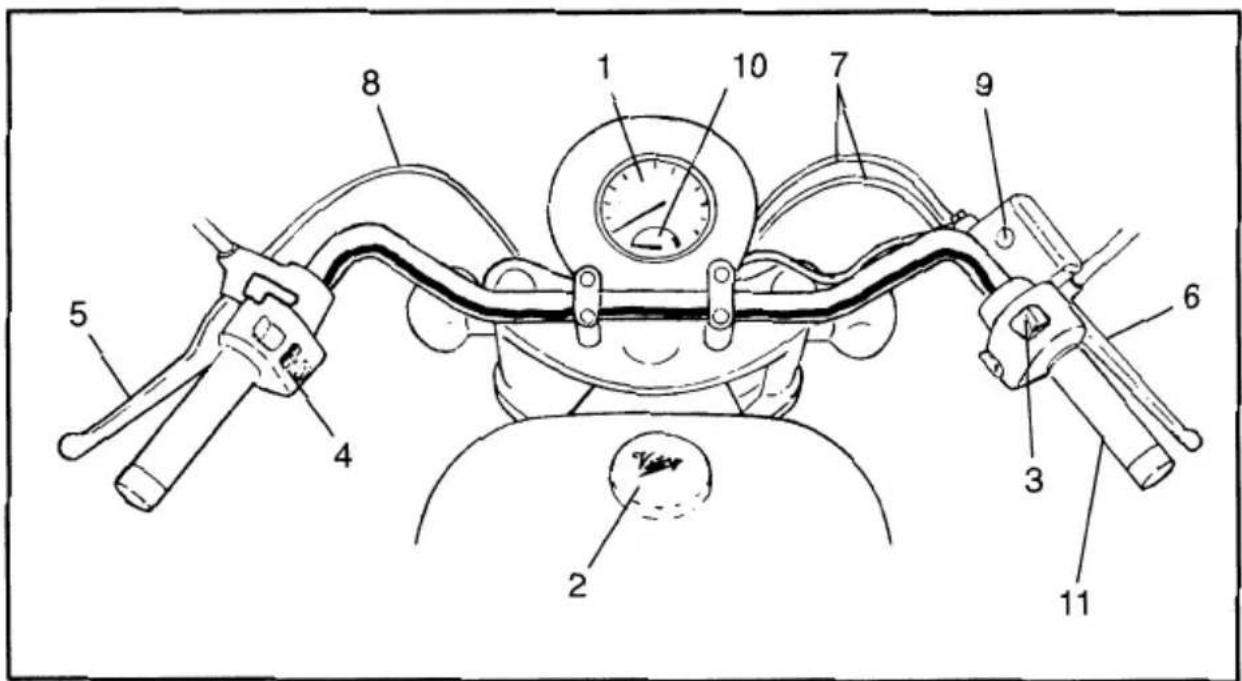
- Speedometer
- Fuel Cap
- Right Handlebar Control
- Left Handlebar Control
- Clutch Lever
- Front Brake Lever
- Throttle Cabies
- Clutch Cable
- Front Brake Fluid Reservoir Level Indicator
- Tachometer
- Throttle Control (twist grip)
CONTROL PARTS AND FUNCTIONS
Main Switch Controls
The main switch is located underneath the gas tank on the left-hand side. It controls the ignition and lighting systems. Its operation is described below:
ON: Electrical circuits are switched on, and the headlight, meter light, taillight and front running lights come on. The engine can be started. The key cannot be removed in this position.
OFF: All electrical circuits are switched off. The key can be removed in this position.
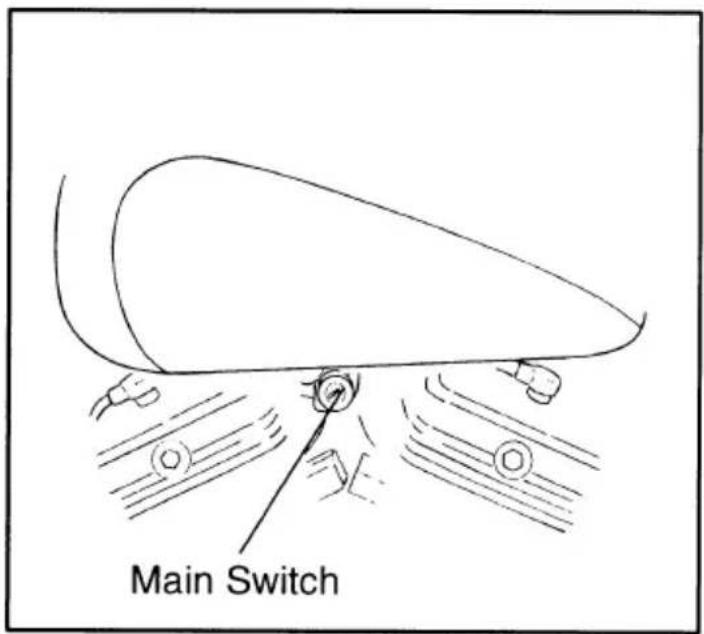
PARK: To get the switch into park, you must push the key in while turning. When the switch is in park, the taillights and running lights come on and the key can be removed.
NOTE: Always turn the main switch "OFF" and remove the key when the motor-cycle is unattended. Do not rely on the emergency stop switch for normal stop circumstances.
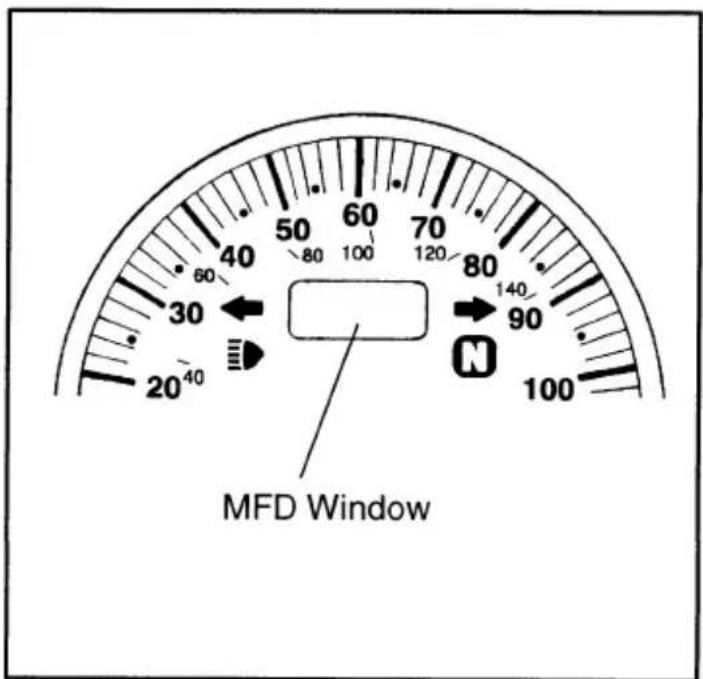
Multi-Function Display (MFD)
The speedometer is equipped with an MFD window.
Using the trip function of the MFD will allow you to determine how far you can ride on a tank of fuel. Each operator will get varying MPG depending upon riding style and conditions. This information will allow you to plan for fuel stops.
CONTROL PARTS AND FUNCTIONS
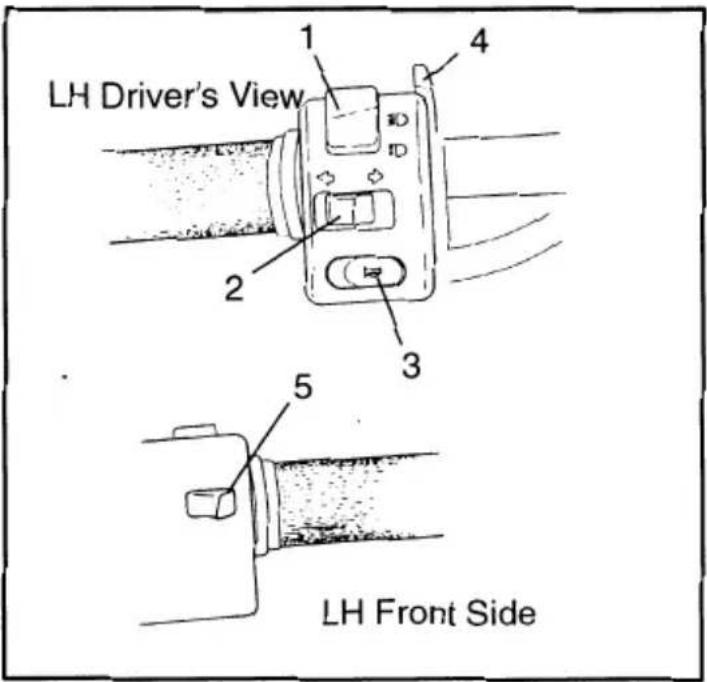
Left Handlebar Controls
-
Dimmer and passing light switch is pushed up for the high beam, middle position is low beam and bottom position is momentary passing beam.
-
Turn signal switch is pushed to the right to signal a right hand turn and pushed to the left to signal a left hand turn. Once the switch is released it will return to the center position. To cancel the signal, push the switch in after it has returned to the center position. NOTE: The turn signals are self cancelling at speeds above 6 miles per hour.
-
Horn switch sounds the horn when pressed.
-
Fast idle lever is for cold starting (See page 30 for starting procedure).
-
Set Selector: Odometer, Trip Odometer, Clock, Back Light Dimming, High Beam Icon Dimming, Fuel Level, Charging System Voltage, Diagnostics, English/Metric Display. NOTE: These features are used in conjunction with the mode selector. (See page 53 for setting procedure.)
CONTROL PARTS AND FUNCTIONS
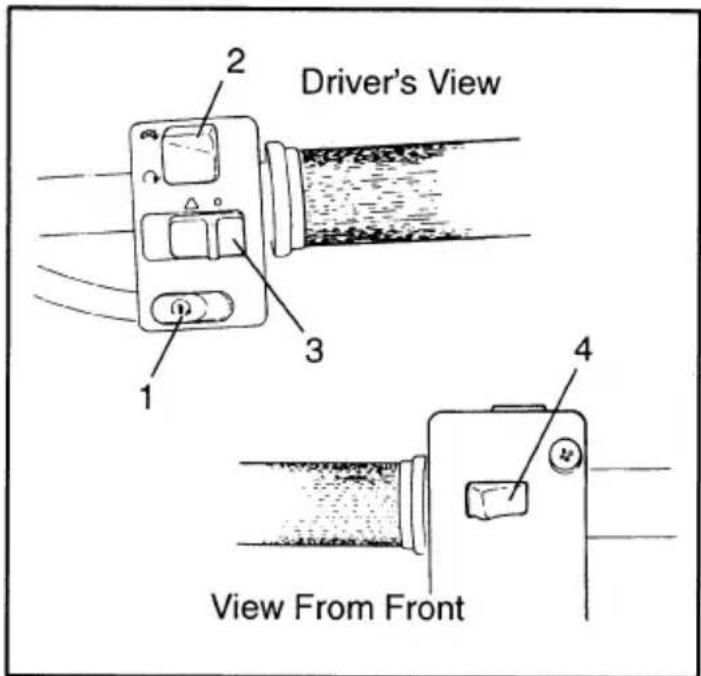
Right Handlebar Controls
-
Starter switch cranks the starter motor when pushed.
-
Engine Stop Switch is a safety device for use in an emergency such as when the motorcycle overturns or if trouble occurs in the throttle system. To start the engine, the switch must be moved down. In case of emergency, move the switch up to stop the engine.
-
Hazard Switch turns on flashing hazard lights.
-
Mode Selector Refer to page 53 for functions and setting procedure.
Many of these features are used in conjunction with the Set Switch.
- Clock: Digital from 0 to 12:00 without am/pm indicator, includes icon.
- Odometer: Switchable between miles and kilometers, includes icon, default startup mode is in miles.
- Trip Odometer: Can be reset to zero, displays miles or kilometers, includes icon.
- Fuel Level: Indicates in 1/10th gallons or liters, no icon.
- High Beam Icon Dimming: 4-bar scale, 3 bars "on" is default, no icon, only HB text.
- Back Lighting Dimming: 6-bar scale, 4 bars "on" is default, includes icon.
- Charging System Voltage: When engine is running LCD will display charging voltage, battery voltage is displayed when engine is not running.
- Diagnostics: ECU fault/engine control fault indicator display is "CK ENG", if engine is not idling the LCD will flash "CK ENG".
CONTROL PARTS AND FUNCTIONS
Indicator Lights
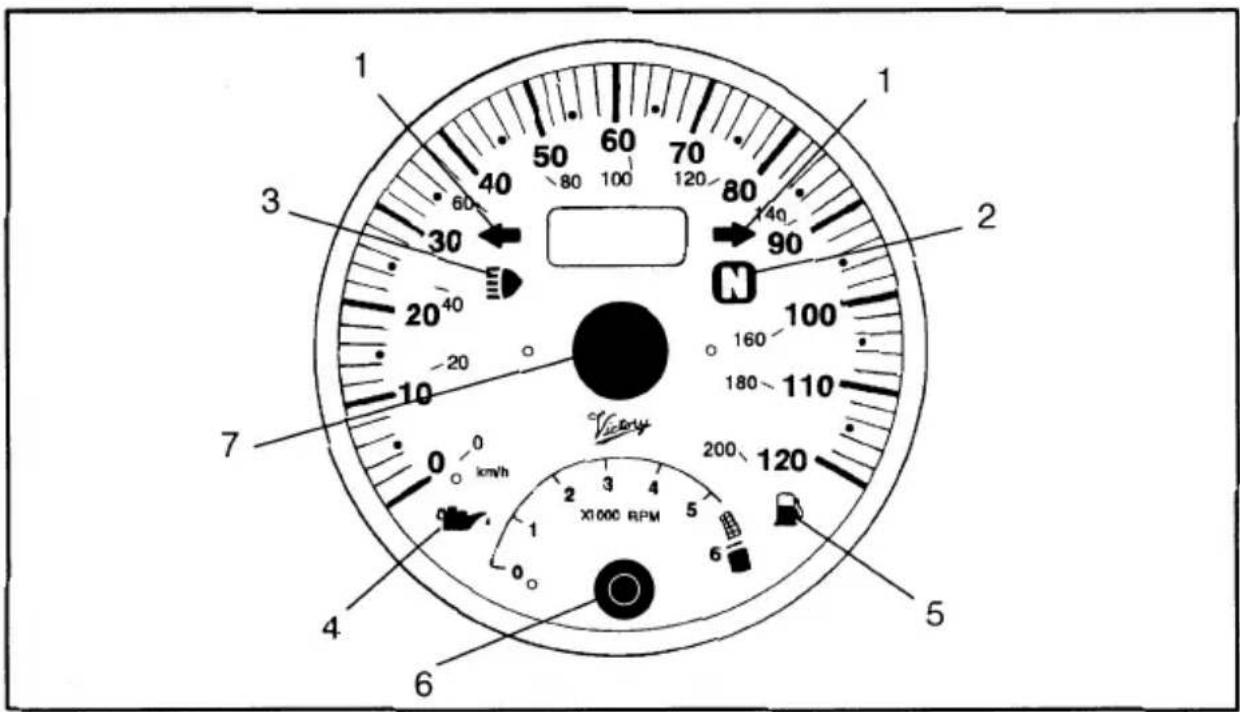
- Turn Indicator Light - flashes when the turn switch is moved to the left or right. NOTE: A failed turn signal bulb will cause the turn signal indicator to flash at a high rate of speed (i.e. greater than twice the normal frequency). If this is observed by the operator, he/she should immediately inspect the function of the turn signals and make any necessary repairs.
WARNING: Failure to fix faulty turn signal bulbs could result in serious injury or death if another driver does not see you and collides with you.
- Neutral indicator light "N" - comes on when the transmission is in neutral. When the key is initially turned on, the neutral indicator light also cycles "on" for 1 to 2 seconds for a bulb check.
- High beam Indicator light - comes on when the headlight high beam is used.
- Low oil pressure indicator light - comes on if the oil pressure is low.
- Fuel level indicator light - comes on when the fuel level is low.
- Tachometer - indicates engine rpm
- Speedometer - indicates vehicle speed in mph or kph
CONTROL PARTS AND FUNCTIONS
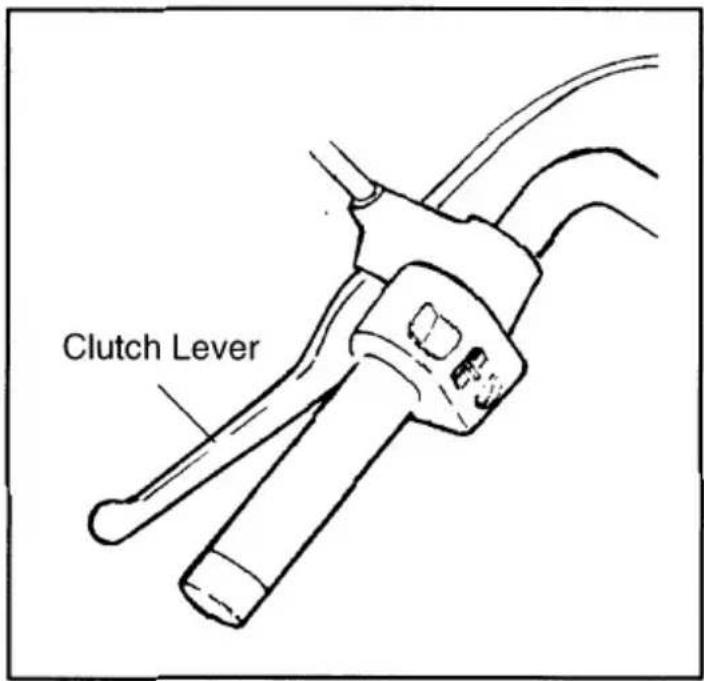
Clutch Lever
This machine is equipped with a manually actuated clutch. The clutch lever is located on the left handlebar. Pull the lever completely to the handlebars to disengage the clutch, and release the lever to engage the clutch. The lever should be pulled in rapidly and released slowly and smoothly for smooth clutch operation
This machine is equipped with a clutch interlock switch. This switch prevents starting the machine with the transmission in gear unless the clutch is disengaged (lever pulled in).
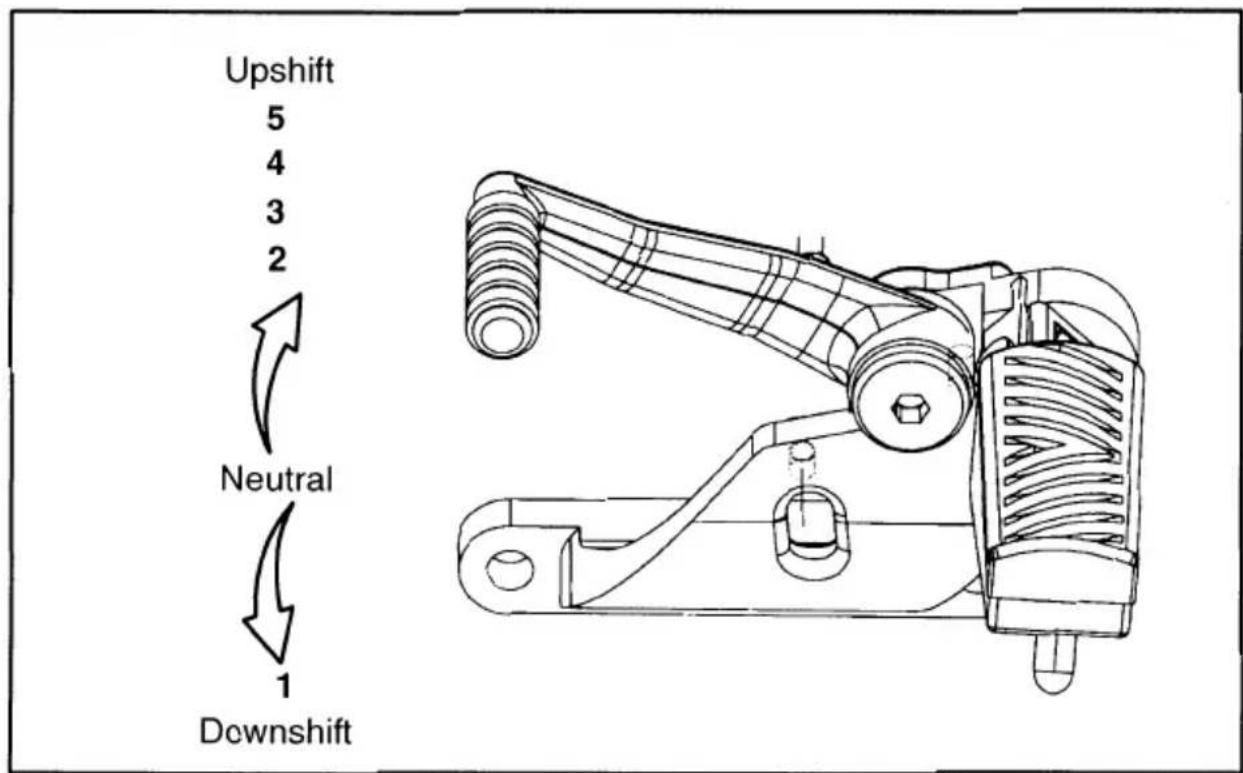
Shift Pedal
The shift pedal is located on the left side of the engine and is used in combination with the clutch when shifting.
CONTROL PARTS AND FUNCTIONS
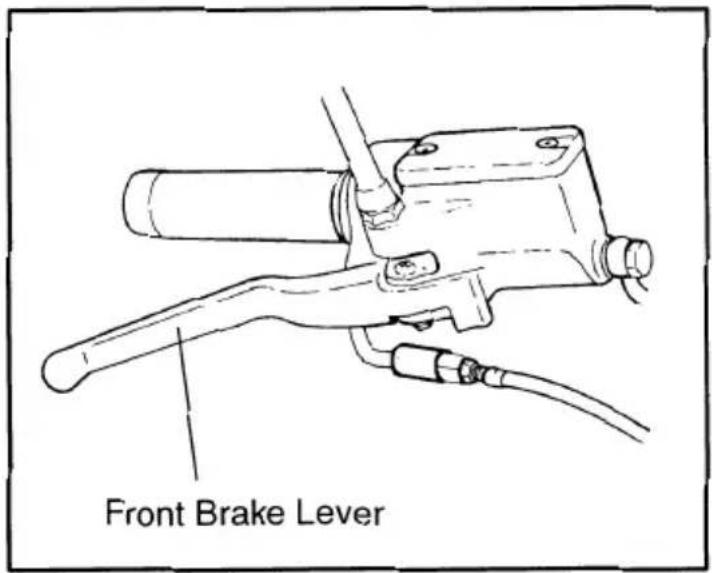
Front Brake Lever
The front brake lever is located on the right handlebar. Pull it toward the handlebar to apply the front brake.
WARNING: The front brake on this motorcycle is very powerful and can stop the front wheel rotation causing a skid, which can lead to an immediate and deadly crash. Always use both brakes in a coordinated manner. Do not brake suddenly or abruptly. Obtain training from a qualified instructor before riding your new Victory motorcycle.
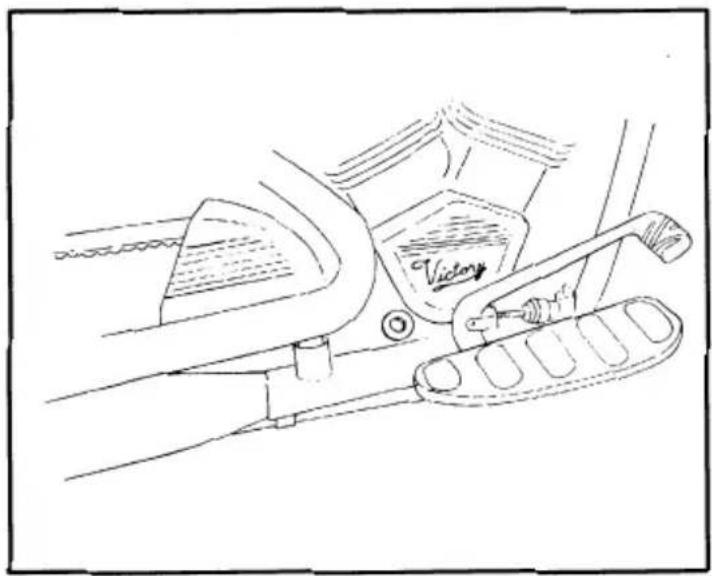
Rear Brake Pedal
The rear brake pedal is located on the right side of the motorcycle. Press down on the brake pedal to apply the rear brake.
WARNING: Most of the braking power of your Victory motorcycle is in the front wheel brake. Do not rely upon the rear brake only for slowing or stopping, but use both brakes in a coordinated manner.
natural_image
Line drawing of a vehicle's seatbelt mechanism with no text or symbolsCONTROL PARTS AND FUNCTIONS
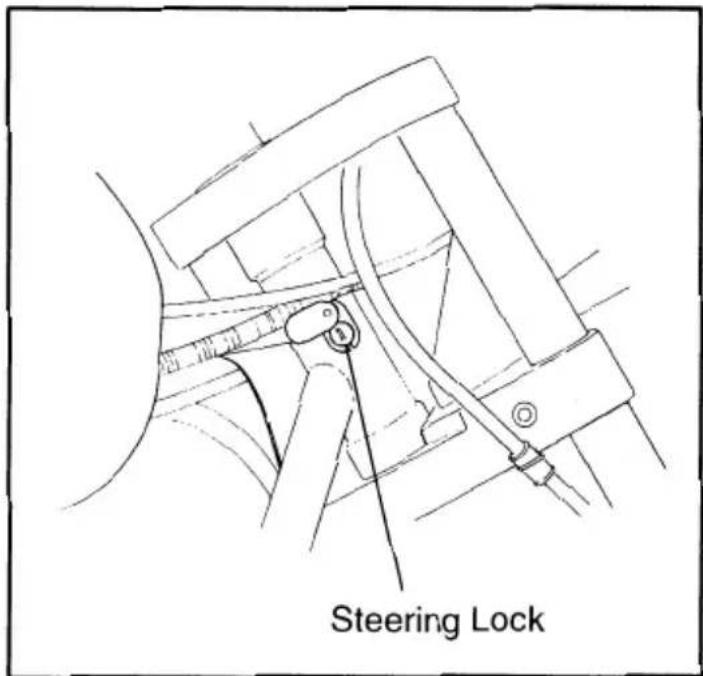
Steering Lock
There is a steering lock located on the right side of the steering head. To lock the steering, turn the handlebars all the way to the left. Open the steering lock cover, push the key inward and turn it 1/8 turn counterclockwise. Remove the key from the lock and close the cover. To unlock the steering, turn the key to the original position. It may be necessary to turn the handlebars slightly to the left or right to relieve pressure on the steering lock pin.
WARNING: Operation of the vehicle with the steering locked could cause an upset resulting in injury or death. Never push or operate your motorcycle with the steering locked.
CONTROL PARTS AND FUNCTIONS
Seat
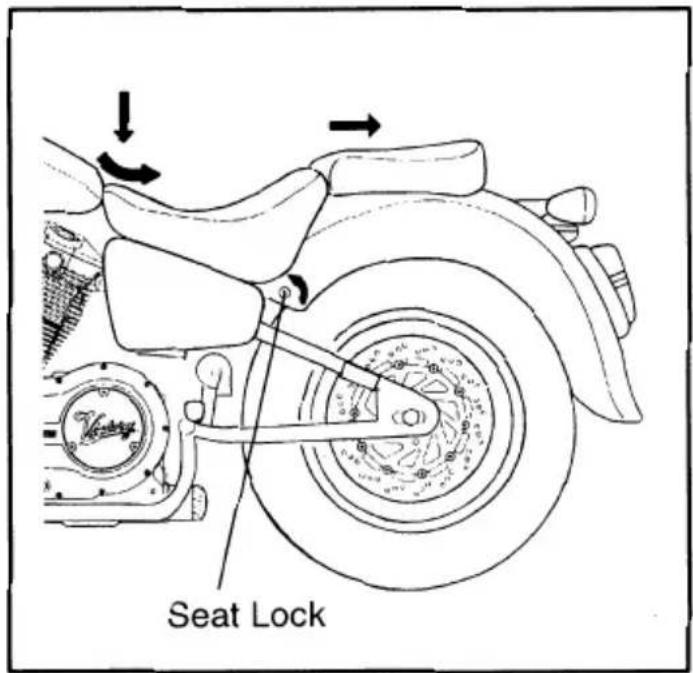
The seat lock is located behind the seat on the left side. Take the following steps to unlock the seat:
- Insert the key and turn it counterclockwise.
- Lift and remove the seat.
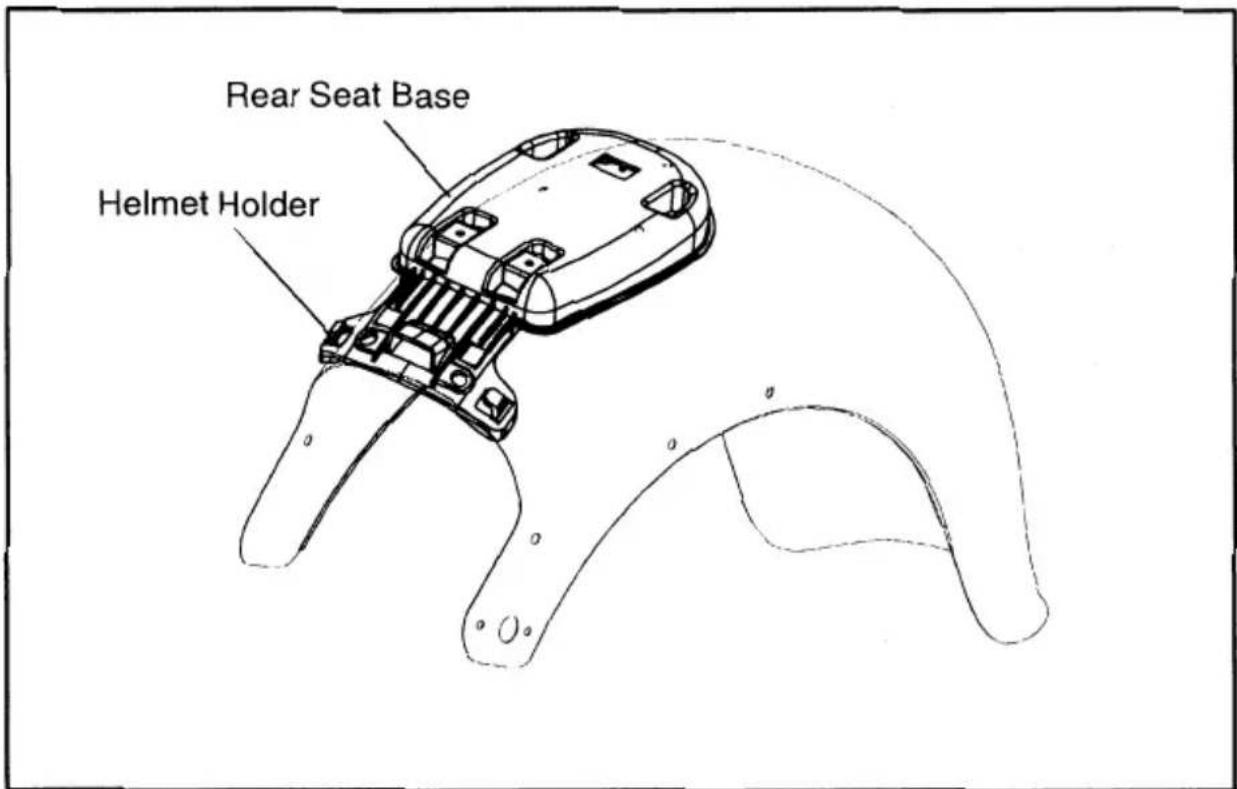
- To lock the seat, insert the tongue of the front seat into the holder of the rear seat base. Push down on the front of the seat to engage the seat lock.
NOTE: Make certain the seat is securely fitted.

WARNING: Never ride with a helmet in the helmet holder. The helmet may
hit objects, causing loss of control and possibly an accident.
PRE-RIDE INSPECTION

WARNING: Failure to perform a proper pre-ride inspection could lead to serious injury or death. A Pre-Ride Inspection should be made before each use.
| No. | ITEM | PROCEDURE | PAGE |
| 1 | Engine Oil | Check level, add oil if necessary | 26 |
| 2 | Fuel | Check level, add fuel if necessary | 25 |
| 3 | Front & Rear Brakes | Check fluid level and check for leaks. Inspect wear indicator on brake pads. Verify operation. | 27 |
| 4 | Clutch | Check operation, adjust if necessary. | 28 |
| 5 | Drive Belt | Check tension. Check for wear and damage. | 48 |
| 6 | Tires | Check pressure and wear. Check for damage. | 29 |
| 7 | Throttle Operation | Check for smooth operation and proper return. | 28 |
| 8 | Lights, signals, and switches | Check for proper operation | 28 |
| 9 | Fittings & fasteners | Check all chassis fittings and fasteners. | 28 |

WARNING: If any item in the Pre-Operation check is found to be in need of r, have it inspected and repaired before operating the motorcycle.
The engine and exhaust system will be very hot after operating the motorcycle. Be careful not to touch any of these components or allow any clothing item to contact them during your inspection.
PRE-RIDE INSPECTION
Fuel Cap
Make sure there is sufficient fuel in the fuel tank.
Grasp the fuel cap and turn it counter-clockwise to remove it.
To install the fuel cap, place the fuel cap in position and turn it clockwise until it ratchets. Do not turn the fuel cap counterclockwise to align the Victory logo. This may cause the fuel cap to loosen during operation.
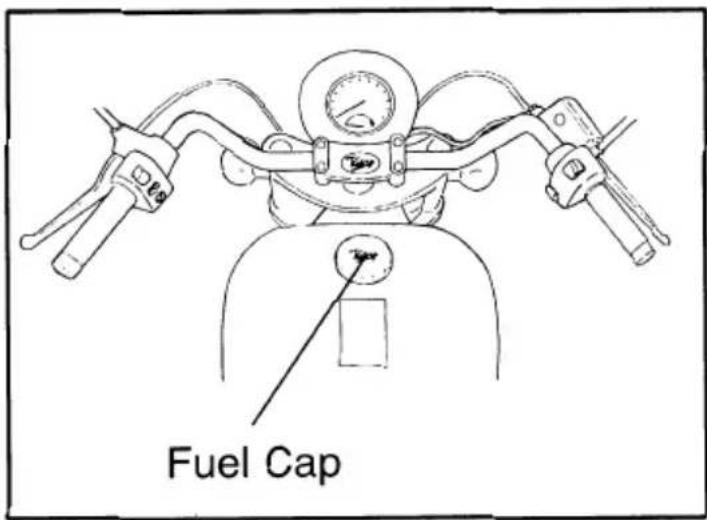
WARNING: Do not overfill the fuel tank. Avoid spilling fuel on a hot engine. Do not fill the fuel tank above the bottom of the filler tube as shown in the illustration or it may overflow when the fuel heats up and expands.
WARNING: Be sure the fuel cap is properly installed before riding the motorcycle.
PRE-RIDE INSPECTION
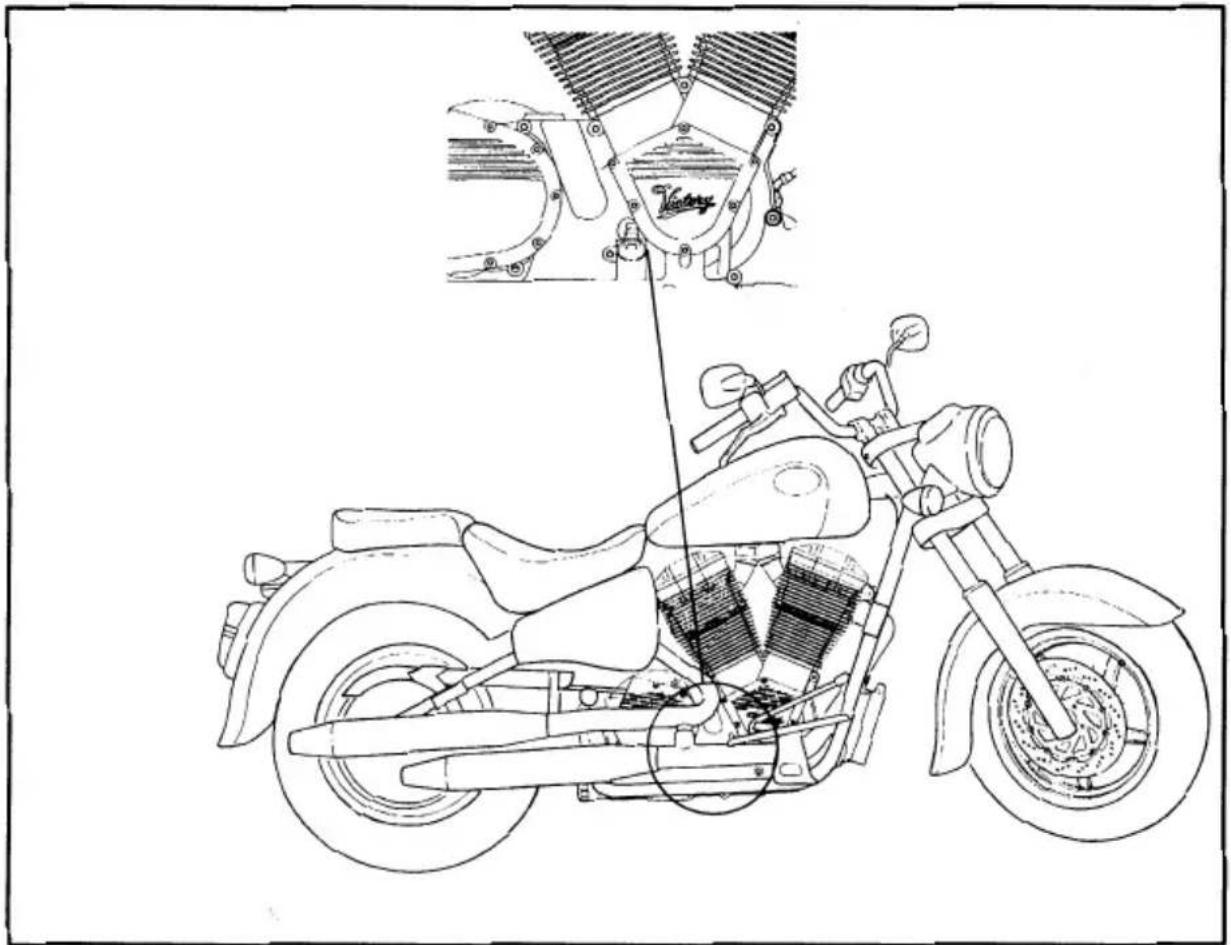
Engine Oil
natural_image
Line drawing of a motorcycle with internal components and a close-up inset showing engine components (no text or symbols)The engine lubrication oil is Victory 20W-40 semi-synthetic oil. It is specially formulated for the Victory engine for lubrication and cooling attributes.
Make certain the engine oil is at the specified level. Fill with oil as necessary. Refer to page 38 for proper procedure.
WARNING: Running with low oil level can lead to engine overheating and seizure.
Front and Rear Brakes
Make certain both the front brakes and rear brakes are working properly. Check at low speed shortly after starting out. To check the brake fluid for the front master cylinder, have the bike resting on the sidestand. Turn the handlebars to full left stop position.
WARNING: A soft, spongy feeling in the brake lever (and/or brake pedal could indicate a hazardous condition in the brake system. Do not operate the motorcycle until the failure in the brake system is corrected. Ask a Victory dealer for immediate repairs. A soft spongy feeling indicates a hazardous condition.
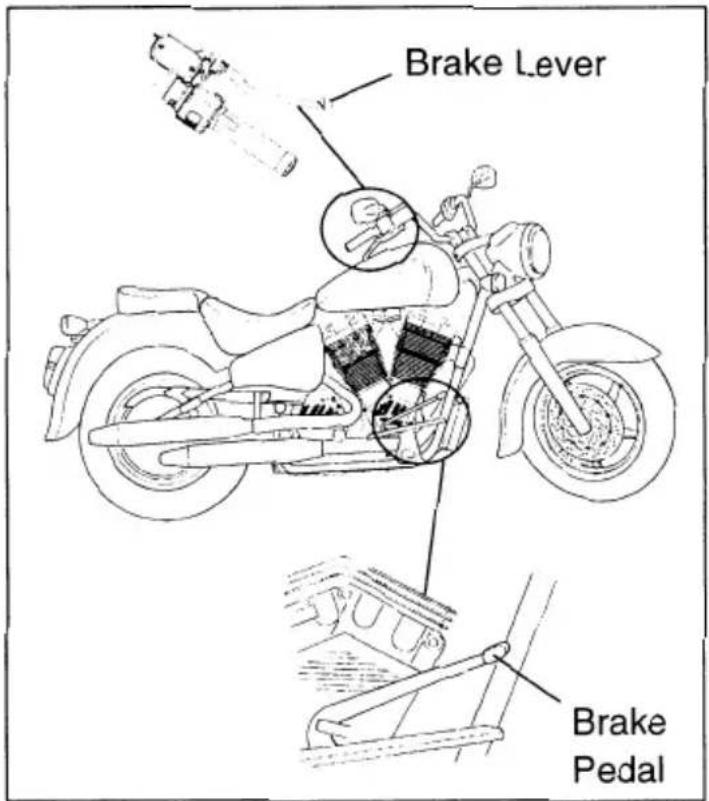
Brake Fluid Level/Leakage
Check the brake fluid in both the front master cylinder reservoir and the rear brake fluid reservoir.
WARNING: Low brake fluid levels may let air enter the brake system, possibly creating poor on non-existent braking. Before riding, check the levels of the brake fluid and add if necessary. (See Pg. 41)
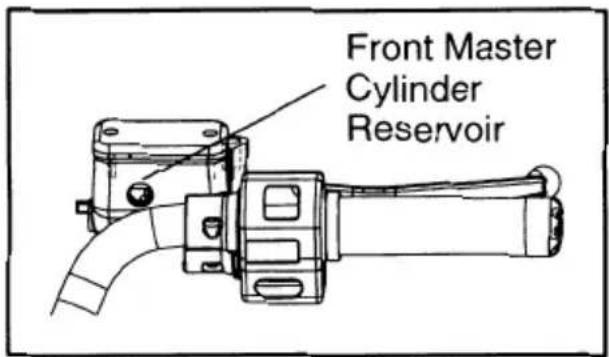
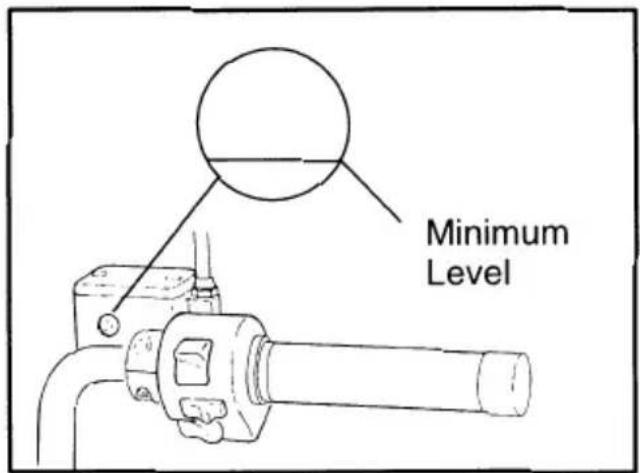
Brake fluid must be visible in the window on the front master cylinder reservoir. To check the level, rest the bike on the sidestand and turn the handlebars to the far left position. The level must be above the "min" mark on the front master cylinder fluid reservoir.
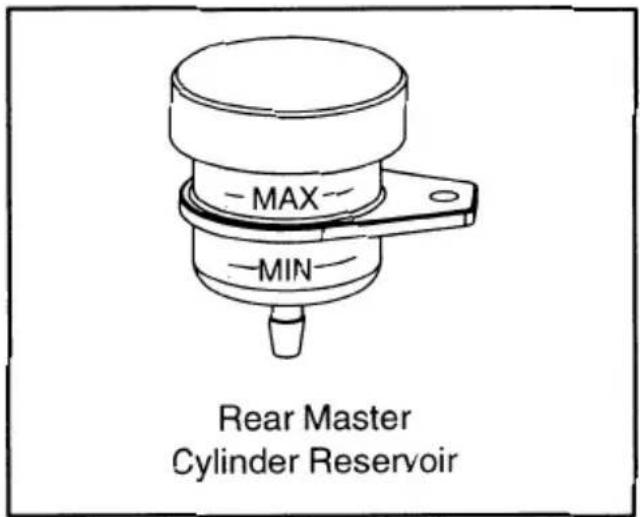
To check the rear brake fluid, stand the bike up in the vertical position. Check the level between the max and min lines on reservoir (see page 13 for location of rear brake reservoir). Apply each brake for several seconds. Check to see if any fluid leaks out from the hoses, joints, master cylinders or calipers. If any leakage is found, take the motorcycle to a Victory dealer for repairs. Do not operate the vehicle if leaks are present.

WARNING: Do Not Mix Fluids. Use only DOT4 brake fluid.
PRE-RIDE INSPECTION
Clutch
Make certain the clutch is working properly. Operate the clutch a few times and check for smooth operation and proper free-play (.080"/2mm). If adjustment is necessary, refer to page 43.
Throttle
Make sure the throttle grip operates properly and check the freeplay. The grip should return when released. If the throttle does not rotate smoothly to the idle position, the bike should be taken immediately to a Victory dealer for adjustment.
WARNING: A throttle that does not return freely presents a serious hazard. Do not ride a bike with a throttle that does not work perfectly! Doing so can lead to a serious crash.
Engine Idle
Before each ride, the operator should inspect engine idle speed. After the engine has reached operating temperature the idle speed should be at 950 rpm ± 50. If the idle speed is incorrect, the bike should be taken to a Victory dealer for adjustment.
Lights, Signals and Switches
Check the headlight, front position lights, turn signals, taillight, brake light, speedometer lights and all the indicator lights to make sure they are in working condition.
Check the operation of the horn switch, start switch, engine stop switch and main switch.
Fittings and Fasteners
Always check the tightness of chassis fittings and fasteners before a ride. Take the motorcycle to a Victory dealer or refer to the Service Manual for correct tightening torque.
PRE-RIDE INSPECTION
Tires
To ensure maximum performance, long service and safe operation, note the following:
Tire Air Pressure
Tire air pressure should be checked and adjusted before operating the motorcycle and also when a passenger or luggage is carried. Refer to the tire pressure chart below to determine which tire pressures should be used for different loads and riding conditions.
Tire Inspection
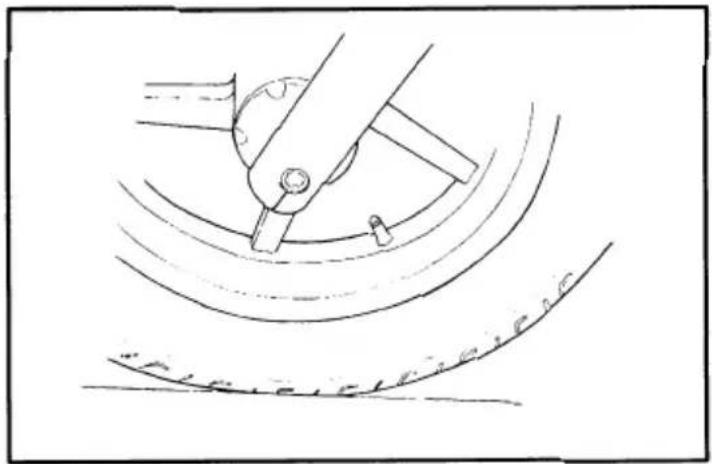
A tire inspection should be performed before operating the motorcycle. If a tire tread shows crosswise lines (minimum thread depth), if the tire has a foreign object, or if the sidewall is cracked, contact a Victory dealer and have the tire replaced. Using a tread depth gauge, measure the tread of the tires. You should have at least 1/16" (1.6 mm) of tread.

WARNING: it is dangerous to ride with a worn tire. The minimum recommended tire center tread depth is 1.6 mm
natural_image
Technical line drawing of a mechanical component with curved surfaces and a central knob (no text or symbols)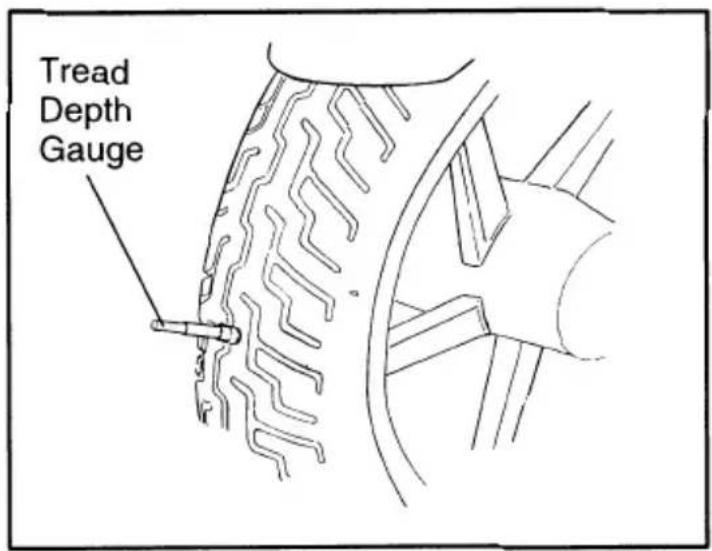
(.063") for the front tire and 2.0 mm (.080") for the rear tire. When a tire has less than the recommended tread, have a Victory dealer replace the tire immediately.
Brakes, tires, and related wheel parts replacement should be performed by a Victory Service Technician.
NOTE: The Victory motorcycle is equipped with tubeless tires and cast wheels.
| TIRE PRESSURE CHART | |||
| Cold Tire Pressures | Up to 200 lbs. (90 kg) | Front | 34 PSI (235 KPa) |
| Rear | 36 PSI (250 KPa) | ||
| Up to maximum weight capacity of 454 lbs. (206 Kg) | Front | 34 PSI (235 KPa) | |
| Rear | 40 PSI (275 KPa) | ||
OPERATION
Tire Inspection (cont.)

WARNING:
- This motorcycle was produced with the designated tires as original equipment. The testing that was done to ensure stability and superior handling included these tires. The use of other tires may cause instability. Failure to use Victory original equipment tires could result in poor motorcycle stability and handling, which can lead to a crash and subsequent serious injury or death. Use only the recommended tire at the recommended tire pressure.
- The use of tire valves and valve cores other than original equipment replacement Victory parts could cause tire deflation during extended driving. Always use genuine Victory parts or their equivalent for replacement.
- Be certain to install the valve caps securely. Not doing so may lead to air pressure leakage during extended driving.

WARNING:
- Before riding this motorcycle, become thoroughly familiar with all operating controls and their functions. Consult a Victory dealer regarding any control or function you do not fully understand.
- Never start your engine or let it run for any length of time in an enclosed area. The exhaust fumes are poisonous and can cause loss of consciousness and death within a short time. Always operate your motorcycle in an area with adequate ventilation.

WARNING:
• The motorcycle must not be ridden when the sidestand is down.
- Be certain vehicle sidestand is up before riding the motorcycle. If not, it could contact the road surface, causing a momentary disturbance, which could cause loss of vehicle control.
Starting and Warming up a Cold Engine
NOTE: This motorcycle is equipped with a starter interlock system. The engine can be started only under the following conditions:
• The transmission is in neutral.
• The the transmission is in gear and the clutch disengaged

CAUTION: If the fuel indicator light comes on, check the fuel level and, if ssary, add fuel.
- Shift the transmission into neutral.
NOTE: When the transmission is in neutral, the neutral indicator light should be on. If the light does not come on, ask a Victory dealer to inspect it.
OPERATION
Starting and Warming up a Cold Engine (cont.)
- Engage the fast idle lever by pulling the lever towards the rider until it comes to a stop.
- Turn the key to "ON" and ensure that the stop switch is in the "RUN" position.
- Start the engine by pushing the start switch.
- The fast idle lever may be returned to the rest position as soon as the engine has warmed sufficiently so it will idle smoothly.
NOTE: If the engine fails to start, release the start switch, wait a few seconds, then try again. Each attempt should be as short as possible to preserve the battery. Do not crank the engine more than 10 seconds on any one attempt.
NOTE: The oil pressure light should come on when the start switch is pushed and should go off when the start switch is released. If the oil pressure light flickers or remains on, immediately stop the engine and check the engine oil level and, if necessary, add oil. Also check for oil leakage. If the oil pressure light still stays on, consult your Victory dealer.
Shifting
The transmission lets you control the amount of power you have available at a given speed for starting, accelerating, climbing hills, etc. The use of the shift pedal is shown in the illustration on page 20.

CAUTION
Do not coast for long periods with the engine off, and do not tow the motorcycle a long distance. Even with gears in neutral, the transmission is only properly lubricated when the engine is running. Inadequate lubrication may damage the transmission.
Always use the clutch when changing gears. The engine, transmission, and drive line are not designed to withstand the shock of forced shifting and can be damaged by shifting without using the clutch.
To Start out and Accelerate
- Pull the clutch lever to disengage the clutch.
- Shift into first gear. The neutral indicator light should go out.
- Open the throttle gradually, and at the same time, release the clutch lever slowly.
- At the recommended shift point in the table on page 32, close the throttle, and at the same time, quickly pull in the clutch lever.
- Smartly lift the gear lever with your left toe to shift into second gear. NOTE: Be careful not to shift into neutral.
- Open the throttle part way and gradually release the clutch lever.
- Follow the same procedure when shifting to the next higher gear. Always shift gears at or below the recommended speeds.
OPERATION
Deceleration
- Apply both the front and the rear brakes at the same time in a coordinated manner to slow the motorcycle.
- When the motorcycle reaches 10 mi/hr (16 km/hr), shift into first gear. Anytime the engine is about to stall or runs very roughly, pull the clutch and use the brakes to stop.
Recommended Shift Points
Acceleration Shift Points
| UP-SHIFT | Mi/Hr | Km/Hr |
| 1st to 2nd | 20 | 32 |
| 2nd to 3rd | 35 | 55 |
| 3rd to 4th | 45 | 72 |
| 4th to 5th | 55 | 88 |
Deceleration Shift Points
| DOWN-SHIFT | Mi/Hr | Km/Hr |
| 5th to 4th | 40 | 64 |
| 4th to 3rd | 30 | 48 |
| 3rd to 2nd | 20 | 32 |
| 2nd to 1st | 10 | 16 |
OPERATION
Engine Break-in
There is never a more important period in the life of your motorcycle than the period between zero and 500 miles (830 km). Because the engine is brand new, you must not put an excessive load on it for the first 500 miles (830 km). The various parts in the engine wear and polish themselves to the correct operating clearances. During this period, prolonged full throttle operation, or any condition which might result in excessive heating of the engine, must be avoided. Read the following information and follow each step in the break-in of your vehicle.
| GUIDELINES FOR ENGINE BREAK-IN | ||
| Miles | Throttle Position | Notes |
| 0-90 miles | 0-1/3 throttle position | Avoid prolonged operation above 1/3 throttle. Vary the speed of the motorcycle. Do not operate the machine at one set throttle position. |
| 90-300 miles | 0-1/2 throttle position | Avoid prolonged operation above 1/2 throttle. Follow the other guidelines in the step above. |
| 300-500 miles | 0-3/4 throttle position | Avoid cruising speeds above 3/4 throttle. |
| 500 miles | Replace the engine oil and engine oil filter. See pages 38 and 39 for more information. Have the 500 mile service performed. | |
| 500 miles and beyond | Avoid prolonged full-throttle operation. Vary the engine speed occasionally. Follow the pre-ride inspection (pg 24) and the periodic maintenance chart on pages 35 and 36. | |

CAUTION
If any operating trouble should occur during the break-in period, consult a Victory dealer immediately.
Parking
When parking the motorcycle, stop the engine and remove the main switch key.

WARNING: Do not come in contact with the muffler or exhaust pipes after the engine has been running. They will be very hot and will cause serious burns if touched. Park the motorcycle in a place where pedestrians or children are not likely to touch the motorcycle. Do not park the motorcycle on a slope or soft ground; the motorcycle may fall over.
MAINTENANCE
Periodic Maintenance
Periodic inspection, adjustment, and lubrication will keep your motorcycle in the safest and most efficient condition possible. Safety is an obligation of the motorcycle operator and owner. Some important points of motorcycle inspection, adjustment, and lubrication are explained in the following pages.
WARNING: If you are not experienced in motorcycle service, this work should be done by a qualified Victory dealer.
Proper periodic maintenance of your motorcycle is important in order to enjoy long, pleasurable service. Especially important are the maintenance services related to emissions control. These controls not only function to ensure cleaner air but are also vital to proper engine operation and maximum performance. In the following tables of periodic maintenance, the services related to emissions control are grouped separately. These services require specialized data, knowledge and equipment. Victory dealers are trained and equipped to perform these particular services.
Tool Kit
The information provided concerning periodic maintenance is intended to provide necessary but limited information to assist you to complete some of your own preventive maintenance and minor repairs. The tools provided are meant only to assist with some of the preventive maintenance duties. Additional tools may be required to perform some maintenance tasks.
WARNING: Modifications to this motorcycle not approved by Victory may cause loss of performance, excessive emissions, reduce reliability, and make the machine unsafe for use. Consult a Victory dealer before making any changes.
Periodic Maintenance Chart
| ITEM | PROCEDUREI = Inspect L = LubricateR = Replace T = Torque | Initial | Odometer readings | |||||
| 500 miles or 1 month | 2,500 miles or 6 months | 5,000 miles or 12 months | 7,500 miles or 18 months | 10,000 miles or 24 months | 12,500 miles or 30 months | |||
| Valve Clearance | Not necessary. Your Victory motorcycle engine utilizes hydraulic valve lash adjusters. | |||||||
| Spark Plug | -Check condition-Adjust gap and clean-Replace every 30,000 miles | I | ||||||
| √ | Crankcase Ventilation System | -Check ventilation hose for cracks or damage-Replace if necessary | I | I | I | I | I | |
| √ | Fuel Lines | -Check fuel hoses for cracks or damage-Replace if necessary | I | I | I | I | I | |
| √ | Fuel Filters | -Replace every 17,500 miles | R(17,500 Miles) | |||||
| √ | Exhaust System | -Check for leakage-Retighten if necessary-Replace gaskets if necessary | T | I | I | T | I | I |
| √ | Battery | Inspect terminal condition and tightness. Check open cell voltage | I | I | I | I | I | I |
| √ | Throttle Operation | Check for smooth operation. Throttle should return to the idle position | I | I | I | I | I | I |
| √ | Clutch Cable Freeplay | Adjust cable free play and inspect for smooth operation | I | I | I | I | I | I |
| √ | Evaporative emission control system (for California only) | -Check control system for damage.-Replace if necessary | I | |||||
| Engine Oil and Oil Filter | Replace | R | R | R | R | R | R | |
| Air Filter * | InspectReplace if necessary | I | I | I | I | I | I | |
| √ | Compression Pressure | Inspect engine compression and record | I | I | I | I | I | I |
√- Requires special tools, data and technical skills for servicing. Take the motor-cycle to a Victory dealer when these items need servicing.
NOTE: For odometer readings or time periods higher than 12,500 miles or 30 months, repeat the same maintenance as listed in the table from the 2,500 mile interval.
* The air filter needs more frequent service if you are riding in unusually wet or dusty conditions.
MAINTENANCE
Periodic Maintenance Chart
| ITEM | PROCEDUREI = Inspect L = LubricateR = Replace T = Torque | Initial | Odometer readings | |||||
| 500 miles or 1 month | 2,500 miles or 6 months | 5,000 miles or 12 months | 7,500 miles or 18 months | 10,000 miles or 24 months | 12,500 miles or 30 months | |||
| Brake System | Replace brake fluid every 30,000 miles or 24 months.Check/replace pads if necessary. Inspect operation of brakelight switches. | I | I | I | I | I | I | |
| √ | Drive Belt | Adjust tension and alignment. Inspect for damage and wear. Replace every 30,000 miles. Have dealer inspection annually. | I | I | I | I | I | I |
| Headlight Aim | Inspect and adjust as necessary | I | I | I | I | I | I | |
| Control Cables | Apply cable lube | I | L | L | L | L | L | |
| √ | Rear Swing Arm Pivot | Check bearing assembly for looseness. | I | I | I | I | I | I |
| √ | Brake / Clutch lever pivot shaft | Apply light weight grease | L | L | L | L | L | |
| √ | Brake pedal / Shift pedal shaft | Apply light weight grease | L | L | L | L | L | |
| Sidestand Pivot | Check operation and apply light weight grease | I | L | L | L | L | L | |
| Sidestand Pad | Inspect, replace if necessary | I | I | I | I | I | ||
| √ | Front Fork | Check operation and for leakage; Replace fork fluid every 15000 miles or 24 months | I | I | I | I | R | I |
| √ | Rear Shock | Check operation and for leakage. | I | I | I | I | I | L |
| √ | Steering Bearings | Check bearing assembly for looseness and adjust as necessary Repack every 15,000 miles | I | I | I | I | I | I |
| √ | Wheel Bearings | Check bearings for smooth operation | I | I | I | I | I | I |
| √ | Rear Shock Pivot Bearing | Apply light weight grease | L | |||||
| √ | Tires | Inspect for wear and damage. Adjust tire pressure | I | I | I | I | I | I |
| Nuts, Bolts, fasteners | Inspect fastener torque, - as necessary | I | I | I | I | I | I | |
√ - Requires special tools, data and technical skills for servicing. Take the motorcycle to a Victory dealer or refer to the service manual when servicing these items. NOTE: For odometer readings or time periods higher than 12,500 miles or 30 months, repeat the same maintenance as listed in the table from the 2,500 mile interval.
Spark Plug
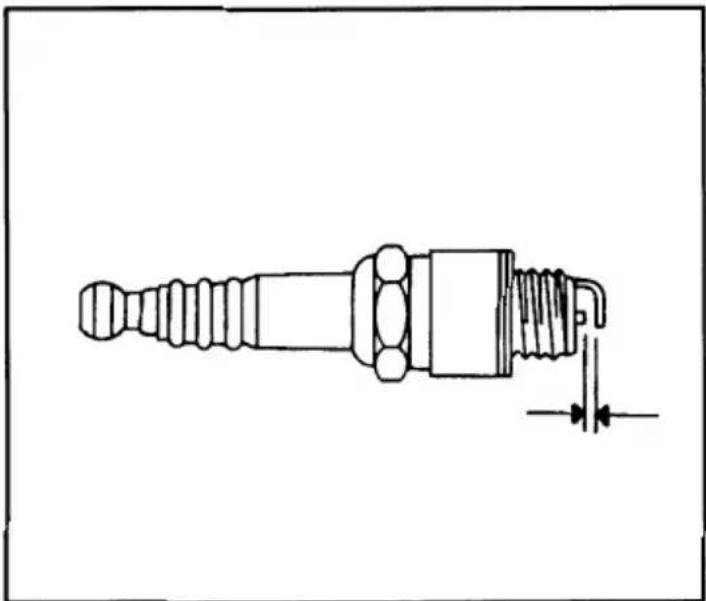
| Specified Spark Plug | RA8GHC Champion |
| Spark Plug Gap | 0.040" (1.0 mm) |
| Tightening Torque | 12 – 14 ft. lbs. |
The condition of the spark plugs can often times indicate abnormal engine conditions. They are important engine components and are easy to check. Refer to page 13 for spark plug location.
You should periodically remove and inspect the spark plugs because heat and deposits will cause any spark plug to erode away its electrodes. If electrode erosion is excessive or if foreign deposits are excessive, you should replace the spark plug with the specified spark plug.
natural_image
Technical line drawing of a spark plug (no text or symbols)Normally, both of the spark plugs from the same engine should have the same color on the spark plugs center insulator. The ideal color is a medium tan color for a motorcycle being operated normally. If one or more spark plugs show a distinctive different color it could be an indication of an engine problem. Do not attempt to diagnose such problems yourself. Have your Victory dealer determine what, if anything, is wrong with your motorcycle.
Always measure the electrode gap with a wire type thickness gauge before installing new or used spark plugs in your engine. If necessary, adjust the electrode gap to the specifications.
Before installing the spark plugs, clean the gasket surface. Ensure that the spark plug's threads are clean and undamaged. It is a good idea to put a drop of clean engine oil or a very small amount of anti-seize compound on the spark plug's threads before installation. Tighten the spark plugs to the specified torque value.
CAUTION Do not over-tighten or under-tighten the spark plug. Looseness can cause pre-ignition because heat is not dissipated through the threads. Excessive tightness can damage the threads of both the cylinder head and spark plug.
MAINTENANCE
Engine Oil Level
Use the following procedure to check the engine oil level.
-
Warm up the machine for several minutes.
-
Stop the engine and wait 3-5 minutes.
-
Remove the dipstick and clean the oil off of the dipstick.
-
Place machine on a level area and hold it in an upright position.
-
Check the engine oil level with the motorcycle held upright, 3-5 minutes after having been run with the dipstick screwed in and seated.
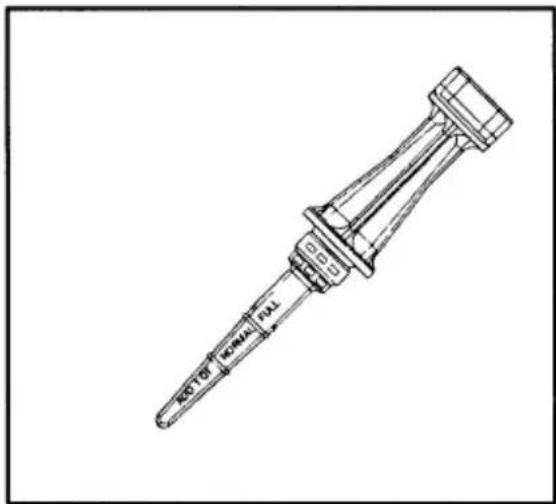
- Remove the dipstick and read the oil level. The oil level should be between the maximum and minimum marks. If the level is low, add oil to raise it to the specified level.
Engine Oil and Oil Filter Replacement

CAUTION
An oil filter wrench is required when replacing the oil filter. Take your machine to a Victory dealer or refer to the service manual when replacing the oil filter.
-
Warm up the engine for several minutes.
-
Stop the engine. Securely support the machine on its sidestand.

CAUTION
Take care not to upset the machine while working on it.
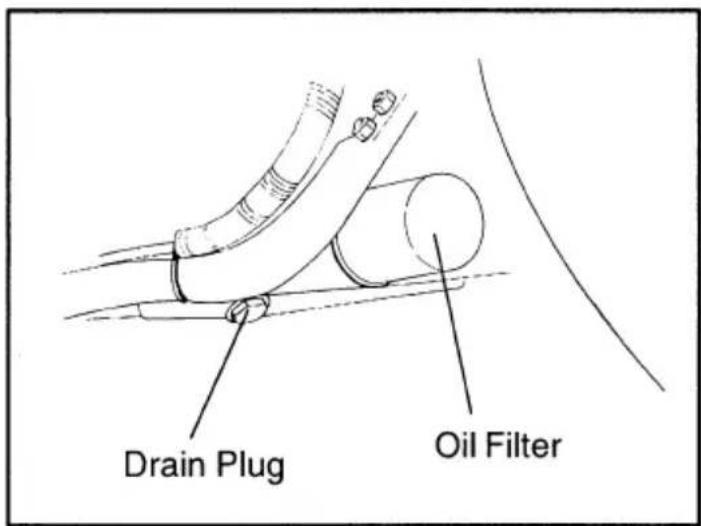
- Place an oil pan under the engine and remove the oil filler cap.
- Remove the drain plug and drain the oil.
- Remove the oil filter.
- Reinstall the drain plug with a new sealing washer (if the used washer is damaged) and tighten it to 28 ft. lbs.
- Apply a light coat of engine oil to the O-ring of the new oil filter. Make sure the O-ring is seated properly.
Engine Oil and Oil Filter Replacement (Continued)
-
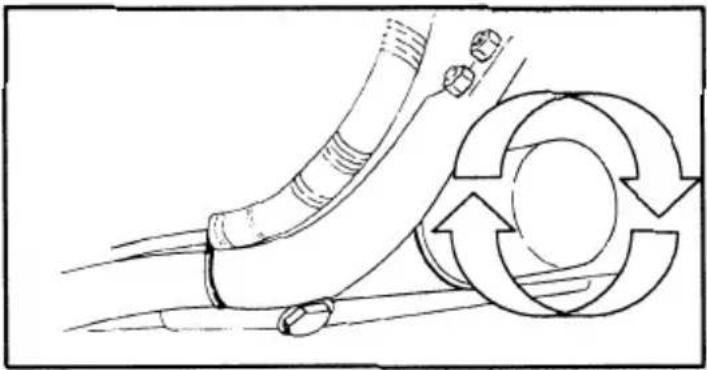
Install the new oil filter. Tighten the filter one full turn after O-ring contacts engine case.
-
Fill the engine with 6 quarts of oil and install the oil filler cap.
-
Check the dipstick again after filling.
natural_image
Technical line drawing of a mechanical component with circular flow arrows indicating motion (no text or symbols)
CAUTION
Do not put in any chemical additives. Victory's motorcycle oil has been specially designed for this application and any additional additives are not necessary and have not been tested by Victory.
Take care not to allow foreign material to enter the crankcase.
Start the engine and warm it up for several minutes. While warming up, check for oil leaks. If any leaks are found, stop the engine immediately and determine the source of the problem before starting the engine again. Consult your Victory dealer if you cannot determine or repair the source of the problem.
After the engine is started, the oil indicator light should go off.

CAUTION
If the indicator light flickers or remains on, immediately stop the engine and take your motorcycle to a Victory dealer.
| TIGHTENING TORQUE | |
| Drain Plug | 28 ft. lbs. (3.9 kg-m) |
| Oil Filter | 1 full turn after O-ring contacts the sealing surface |
| OIL QUANTITY | |
| Oil and Filter Change | 6 quarts (6.7 liters) |
MAINTENANCE
Air Filter
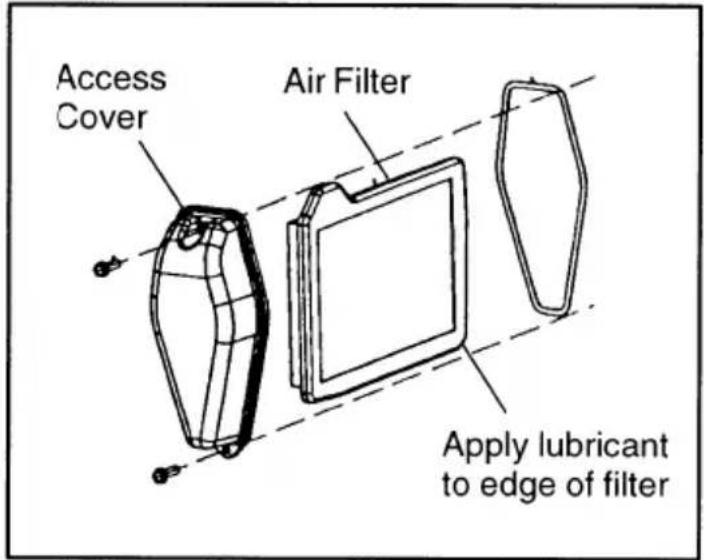
Inspect the air filter on a regular basis. Inspect more often if riding in unusually wet or dusty conditions. Replace filter if necessary. Refer to page 35 for maintenance schedule. Refer to page 13 for filter location.
- To remove the air filter access cover, remove the two screws securing the cover to the unit.
- Slide the "panel type" air filter out to inspect.
- Replace filter.
NOTE: If replacing with a new filter, it may be helpful to apply a small amount of lubrication to the edge of the filter to allow it to slide in more easily.
- Reinstall the access cover.
Brake System
WARNING: Be sure the brakes are working properly. A soft or spongy feeling in the brake lever or pedal can indicate the presence of air in the brake system. This air must be removed by bleeding the brake system before the motorcycle is operated. Air in the system will cause greatly diminished braking capability and can result in loss of control and an accident. Have a Victory dealer inspect and bleed the brake system if necessary.
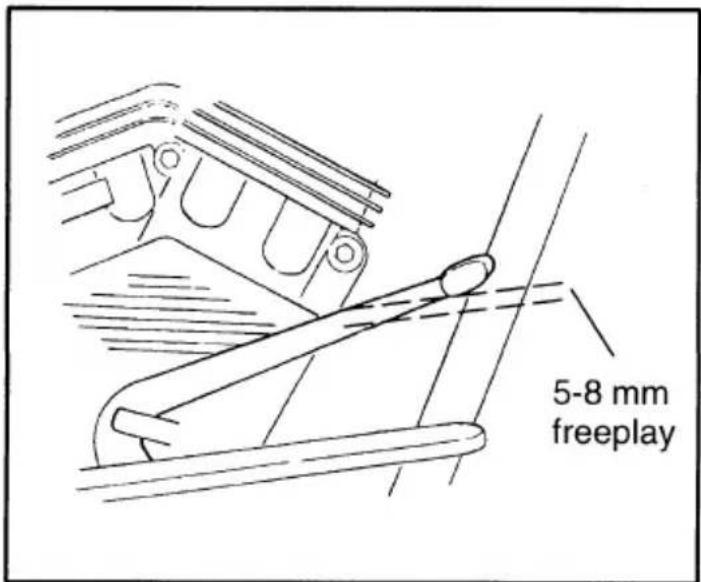
Brake Pedal Freeplay Adjustment
-
Measure pedal freeplay travel as illustrated. The freeplay measurement should be 5 - 8 mm when light downward pressure is applied to the pedal. NOTE: No movement of the master cylinder piston should occur.
-
If the pedal freeplay is outside of specification, loosen the locking nuts and turn the adjustment rod in or out as necessary to achieve the correct brake pedal freeplay.
-
Tighten the lock nut and verify that the rear wheel rotates freely without drag or binding.
Fluid Level Inspection

WARNING: Low brake fluid levels may let air enter the brake system, possibly creating poor on non-existent braking. Before riding, check the levels of the brake fluid and add if necessary. (see page 13 for location of rear brake reservoir) Observe the following precautions:
- When checking the level of the brake fluids, make sure the master cylinder is level. It may be necessary to move the handlebars or stand the motorcycle upright.
- Use only DOT 4. Otherwise, leakage or poor brake performance may result.
- Refill with the same type brake fluid. Mixing different types of fluids may result in detrimental chemical reactions and lead to loss of braking performance.
- Do not let water enter the master cylinder when refilling. Water will significantly lower the boiling point of the fluid and may result in non-operative braking.
- Brake fluid attacks many painted surfaces and plastic parts. Always clean up spilled fluid immediately with large quantities of water and mild detergent.
- A lowering of the brake fluid level is normal as the brake pads wear. If you notice a constant or sudden lowering of the brake fluid level, have your Victory dealer inspect your machine for the cause of the problem.
MAINTENANCE
Front Brake Pad Inspection
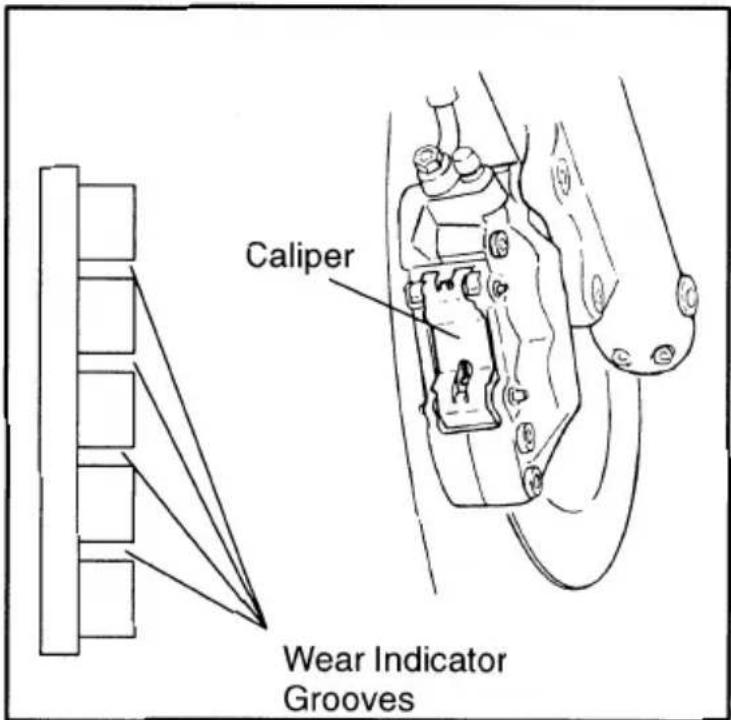
Four wear indicator grooves are provided on each front brake pad. These indicators allow for a visual indication of brake pad wear without disassembly of the caliper. Inspect the grooves, if they have almost disappeared, have a Victory dealer replace the brake pads.
Rear Brake Pad Inspection
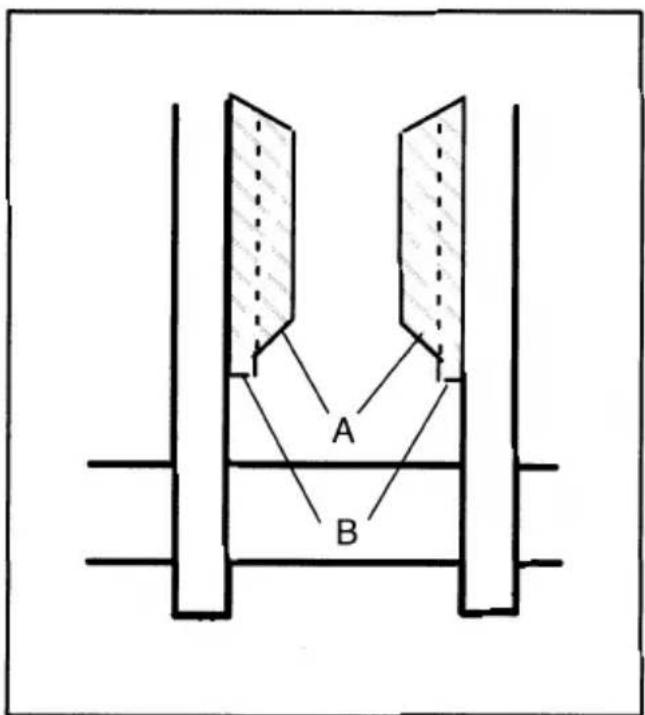
The rear brake pads do not have wear indicator grooves but rely on chamfers (A) for wear indication. When the pads are worn to the point that the chamfer no longer exists, on the end with the wear indicator (B), the brake pads must be replaced.
Brake Pad Replacement
When it is determined that brake pads need to be replaced, take your motorcycle to a Victory dealer.
Clutch Adjustment
Make certain the clutch is working properly.
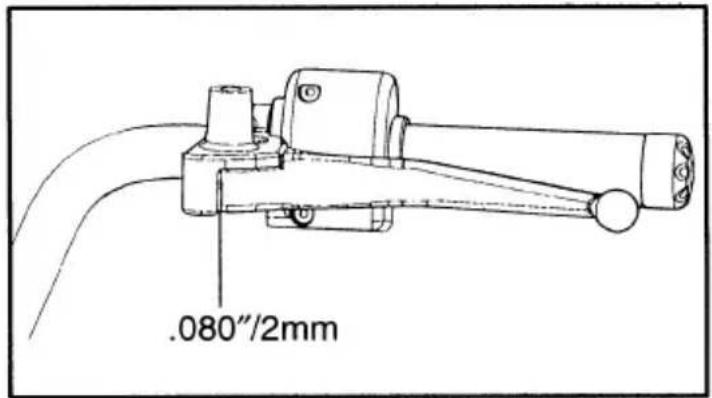
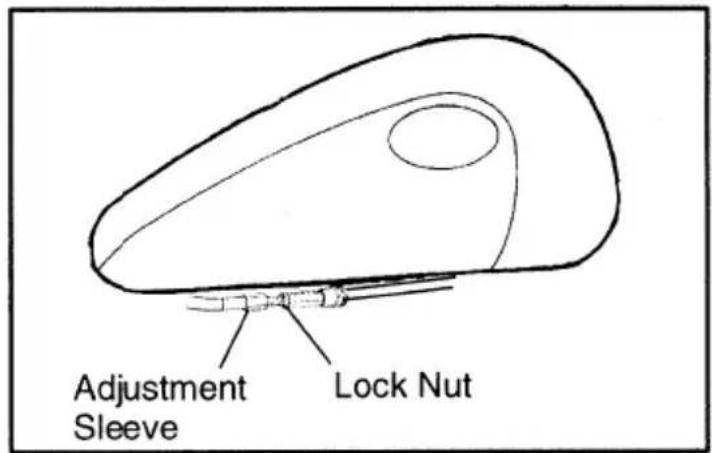
Operate the clutch a few times and check for smooth operation and proper free-play (.080"/2mm).
If the free-play is incorrect, loosen the lock nut and turn the adjustment sleeve until free-play is correct. Tighten the lock nut after you are finished.
If the operation of the clutch cable is not smooth, ask your Victory dealer to inspect the operation and determine if any repair or lubrication is needed.
NOTE: Starter interlock is dependent on the clutch lever free-play being set correctly to assure activation of the clutch safety switch.
MAINTENANCE
Lubrication Points
NOTE: Steering head bearings should only be serviced by a Victory Technician. NOTE: Pure Moly Lube Polaris starter grease should be used for cable lube (PN 2871460).
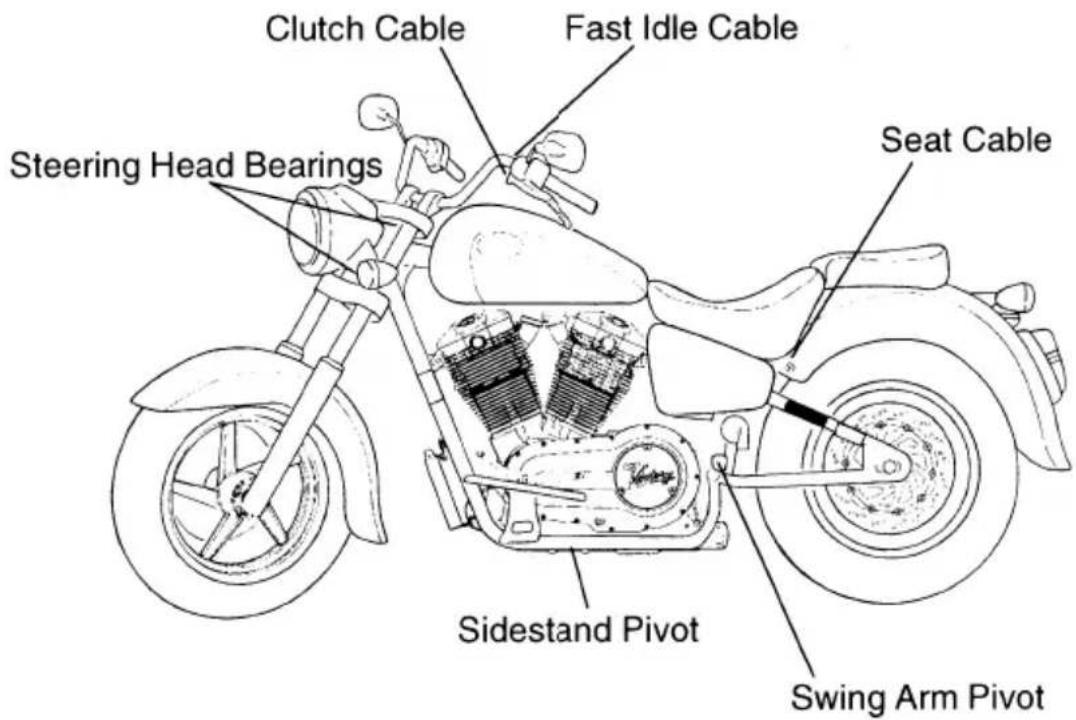
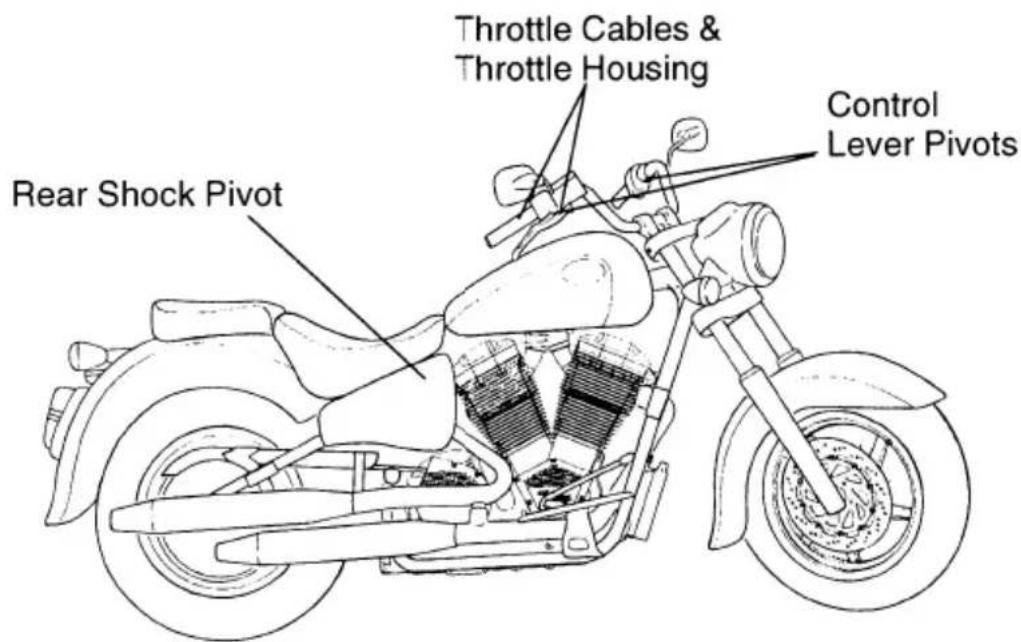
Sidestand Pivot
- Support the motorcycle in an upright position.
- Inspect the sidestand spring for damage or loss of tension.
- Inspect the sidestand for smooth movement. Lubricate if necessary.
- Inspect the sidestand pivot bolt nut for proper torque (36 ft. lbs. - 5.0 kg·m).
- Make sure that the sidestand is not bent. If it is, it must be replaced. Do not attempt to straighten the sidestand if it is bent.
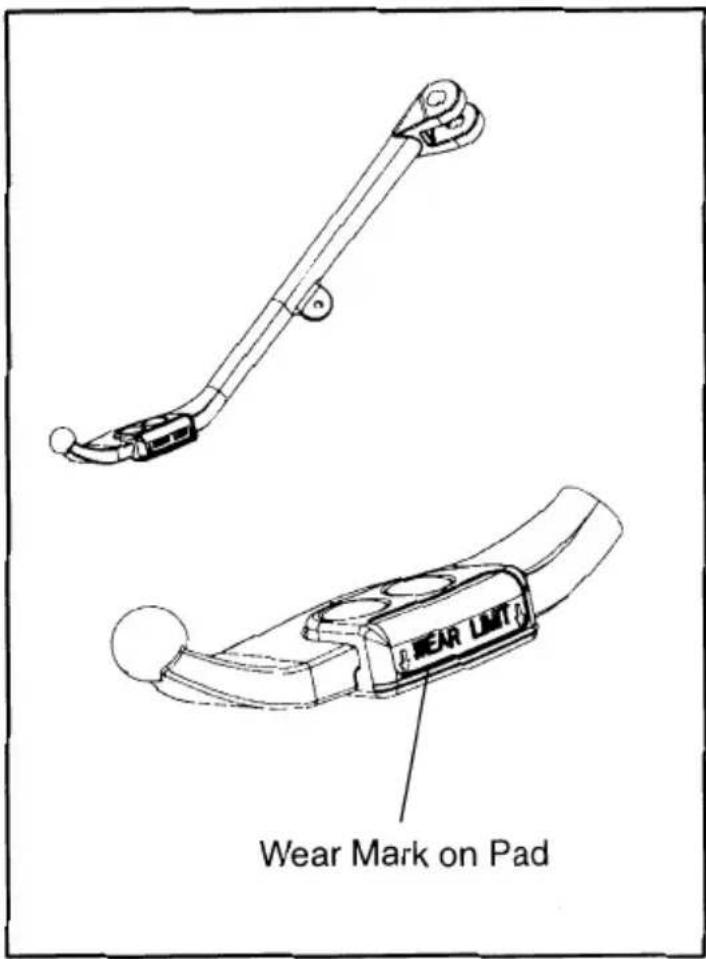
- Inspect the sidestand's rubber pad for wear. Be sure the pad is secured properly in place. Replace the pad when it is worn beyond the wear mark.
MAINTENANCE
Front Fork Inspection
CAUTION: Securely support the motorcycle so there is no danger of it falling.
Oil Leak Check
Check for oil leakage. If any leakage is detected, take the machine to a Victory dealer for repairs.
Operation Check
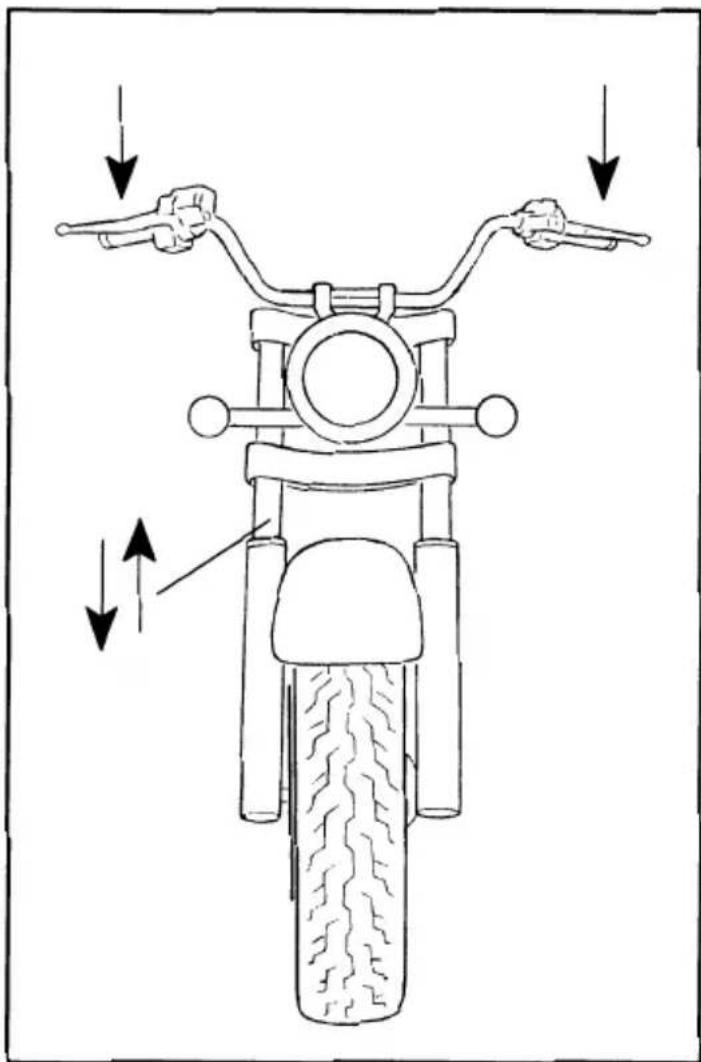
Place the machine on a level place. Hold the machine in an upright position and apply the front brake. Push down hard on the handlebars several times to determine if the forks operate smoothly. Check for loose steering or abnormal noise. Check tightness of all fasteners.
CAUTION
If unsmooth movement, damage, looseness or abnormal noise is detected in front fork, take your motorcycle to a Victory dealer for inspection.
natural_image
Diagram of a motorcycle's front view showing steering wheel, blade, and tire (no text or labels)WARNING: Do not operate a motorcycle with faulty suspension. Loose, damaged, worn or improperly adjusted suspension parts impair vehicle stability and control.
Rear Wheel Alignment Inspection & Adjustment
See your Victory dealer for wheel alignment inspections and adjustments.
Fuse Replacement
The fuses are located on the left side of the motorcycle under the left body side cover.
- To access the fuses, remove seat.
- Rotate fasteners 1/4 turn counter clockwise and lift upward until disengaged.
- Pull top of cover outward (toward you) until cover is clear of the battery.
- Push cover down to disengage locating pin on bottom of cover. Set cover aside.
natural_image
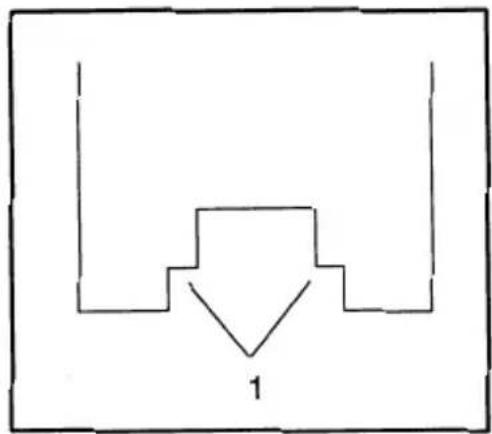
Simple line drawing of a symmetrical geometric shape with a downward arrow and the number 1 at the base (no text or symbols beyond the numeral)- Push back the tabs on each side of the fuse box cover and lift cover off. NOTE: the cover must be installed with the double cut-out (1) facing forward.
| Fuse Size for Application | |
| Specified Fuse | Size |
| Main Fuse “A” | 10 amp “Blade” type fuse |
| Main Fuse “B” | 20 amp “Blade” type fuse |
| All other fuses | 10 amp “Blade” type fuses |
If any fuse is blown, turn off the main switch and determine which fuse is blown. Install a new fuse of the specified amperage. Turn on the switches and see if the system operates correctly. If the fuse blows again, see your Victory dealer.
CAUTION Do not use fuses of a higher amperage rating than what is specified. If the correctly rated fuse continues to blow, something is wrong and needs to be corrected. Substituting a higher amperage fuse can lead to extensive electrical system damage and possibly a fire.
Fuse Box Diagram
| IGNITION RELAY | HEADLAMP RELAY | ECM RELAY | ||
| TO POWER CORD | ||||
| 10A Brake Main Ignition | 20A Horn Headlamp | 10A Flasher Ignition | FUEL PUMP RELAY | |
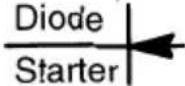 | 10A ECM | 10A Fuel Pump | ||
MAINTENANCE
Headlight Adjustment
- Inspect tire pressures, correct if necessary.
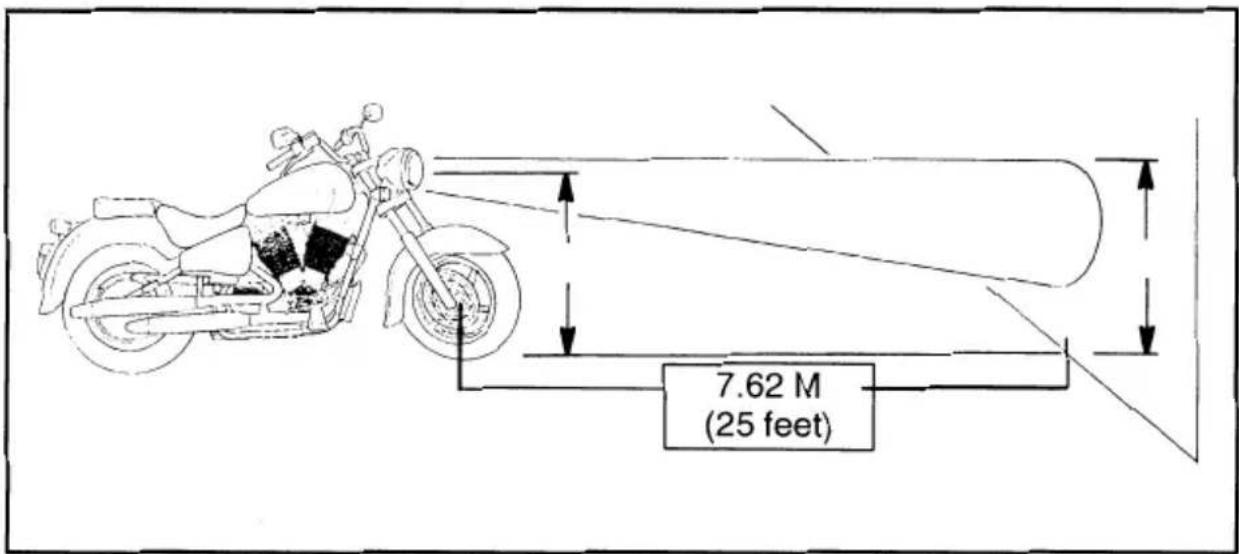
- Select a level area with low lighting and enough room to place the motorcycle's front tire 25 feet from the wall or temporary screen.
- Measure from the center of the headlight to the floor. Draw a horizontal line on the wall or screen that equals this measurement.
- Have someone who is approximately the same weight as the primary rider sit on the motorcycle.
- Place the motorcycle upright with the handlebars centered and turn on the high beam of the headlight.
- The top of the light beam must be even or below the horizontal line on the wall or screen.
- The light beam should project evenly to the right and left of the motorcycle's center line.
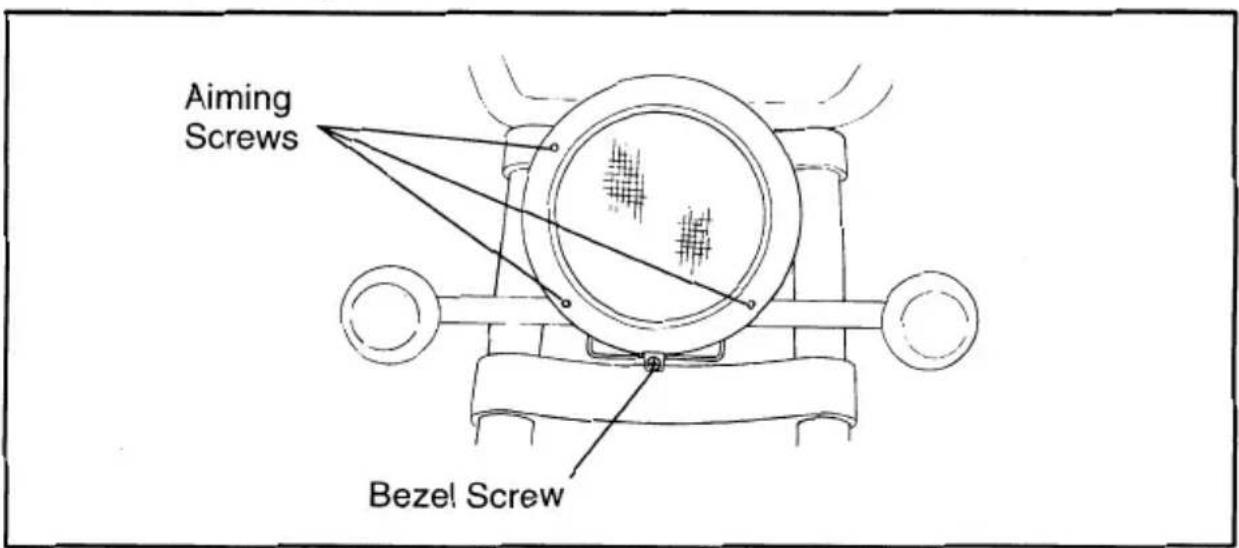
- If headlight adjustment is necessary, remove the headlight bezel by removing screw. Turn the headlight aiming screws in or out as needed.
- Reinstall headlight bezel.
MAINTENANCE
Drive Belt Inspection
NOTE: It is recommended that your Victory dealer inspect the drive belt annually.
-
Visually inspect the drive belt for cuts, excessive wear, foreign substance (oil, etc.), missing teeth, delamination of the outer belt covering, or any unusual damage.
-
If any damage is found, the belt should be replaced. See Victory dealer if your belt needs to be replaced.
Drive Belt Sprockets Inspection
- Inspect sprockets for wear or damage from foreign material or an accident. See your Victory dealer for replacement if damage is found.
Drive Belt Tension Inspection
-
Secure the motorcycle in an upright position.
-
Place a tape measure or ruler next to the belt in the location shown.
-
Place the O-ring on the 10 lb. mark of the belt tension gauge.
-
Determine the center of the belt and place the belt tension gauge squarely against the belt.
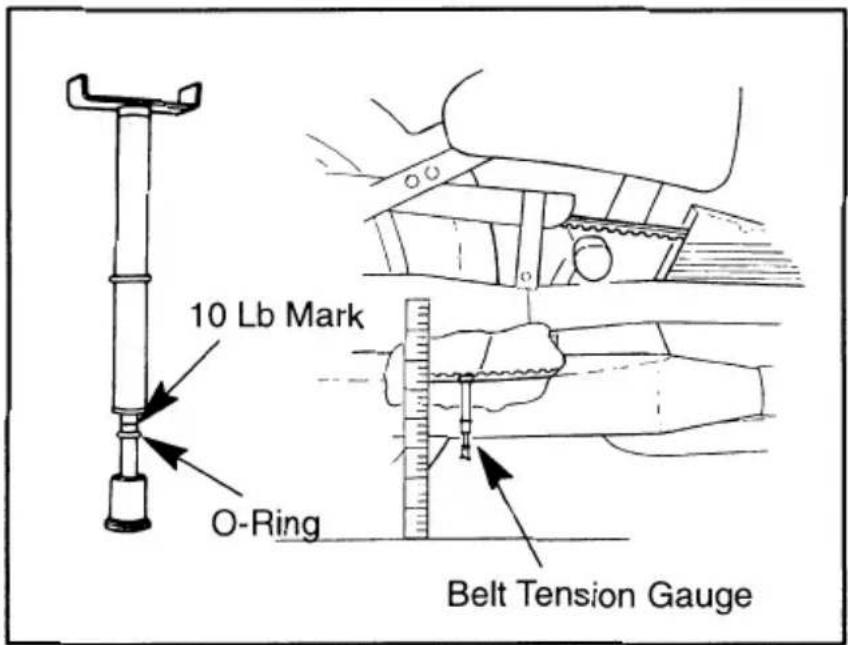
- Push up on the belt tension tool. When the O-ring just touches the tool body, belt deflection should be 8mm (0.31").
CAUTION The belt tension gauge must be kept at a 90° angle to the belt in order to obtain an accurate measurement.
-
If the belt moved more than 8mm, with 10 lbs. of force, the belt must be tightened. If the belt moved less than 8mm, with 10 lbs. of force, the belt must be loosened.
-
See your Victory dealer for drive belt tension adjustment.
MAINTENANCE
Spring Pre-Load Adjustment
The rear shock pre-load adjustment should be set to insure the bike has the correct amount of suspension travel and ground clearance. NOTE: Two or three people will be required to make this adjustment.
-
Remove the motorcycle from its sidestand and balance it on the two wheels. Compress the rear suspension a couple of times by pushing down on the seat and releasing. The suspension should move freely without binding.
-
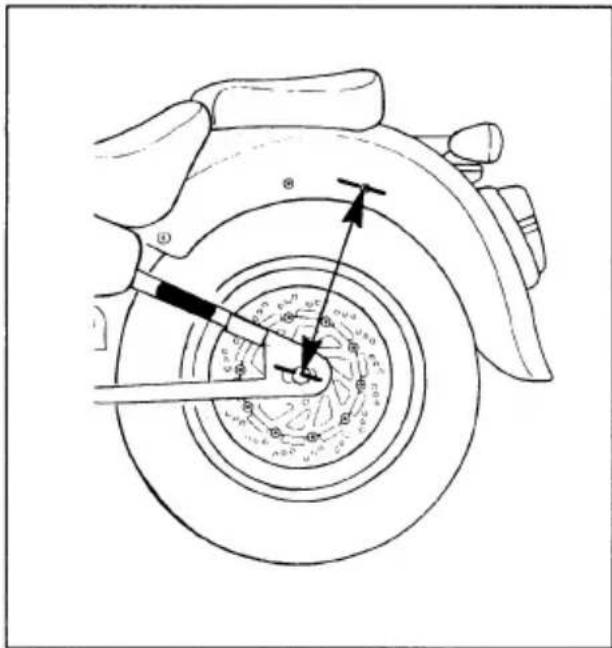
Measure from the center of the rear axle to the center fender attachment bolt. Refer to illustration.
-
Load the motorcycle as it is intended to be ridden. This could include rider, passenger, riding gear, and any cargo or accessories.
-
Measure again from the center of the rear axle to the center fender attachment bolt. Again with the bike balanced on the two wheels, compress the rear suspension a couple of times as in step 1. Make certain the suspension moves freely without binding.
-
Subtract the second measurement from the first. The resulting number is called "sag," and should be between 0.5 and 1.0 inches. If it's not, the pre-load must be adjusted.
-
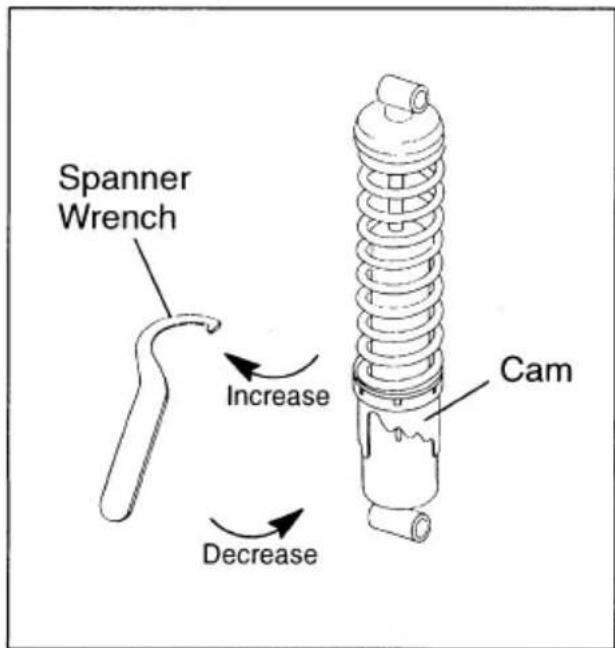
To adjust the pre-load, remove the driver's seat and tool kit from the right side cover. Use the spanner wrench to increase or decrease pre-load. Refer to illustration.
-
After making the adjustment, repeat the measurement procedure until the sag equals 0.5 to 1.0 inches. If the proper sag cannot be obtained, the motorcycle may be overloaded. Consult your Victory dealer for additional assistance.
Rear Wheel Alignment Inspection & Adjustment
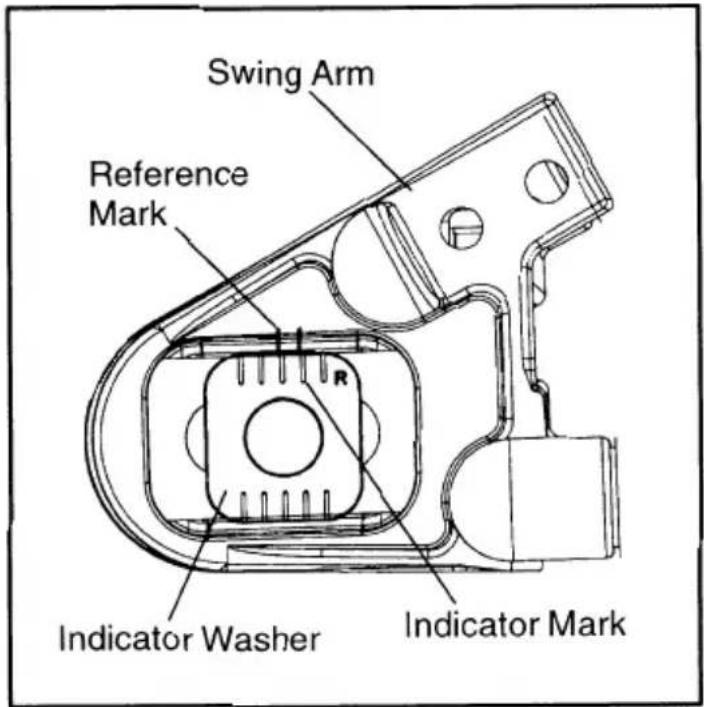
NOTE: The swingarm has an indicator washer with reference marks to be used for positioning the rear wheel. Before removing the wheel, note the relationship of the reference marks on the washer and swingarm. When reinstalling the wheel, reposition it to this location.
-
Secure the machine in an upright position.
-
When wheel alignment is correct, inspect belt tension and adjust as necessary.
-
Continue working back and forth between belt tension adjustment and wheel alignment adjustment until both are correct. (Refer to Victory Service Manual.)
-
Tighten rear axle nut to specification and install new cotter key. (Refer to Victory Service Manual.)
-
Tighten wheel adjuster bolts lightly.
-
Tighten wheel adjuster lock nuts.
-
Pump the rear brake pedal several times until the pedal is firm.
-
See your Victory dealer for rear wheel alignment inspection and adjustment.
BATTERY
WARNING
Battery electrolyte is poisonous. It contains sulfuric acid. Serious burns can result from contact with skin, eyes or clothing. Antidote:
External: Flush with water.
Internal: Drink large quantities of water or milk. Follow with milk of magnesia, beaten egg, or vegetable oil. Call physician immediately.
Eyes: Flush with water for 15 minutes and get prompt medical attention.
Batteries produce explosive gases. Keep sparks, flame, cigarettes, etc. away. Ventilate when charging or using in an enclosed space. Always shield eyes when working near batteries. KEEP OUT OF REACH OF CHILDREN.
Battery
This motorcycle is equipped with a maintenance free battery and is located under the left frame cover. It is not necessary to check the electrolyte or add distilled water to the battery. If the battery discharges, see your Victory dealer.

CAUTION
Whenever removing the battery, disconnect the negative (black) cable first. When reinstalling the battery, connect the negative (black) cable last.
Do not remove the battery cables while the engine is running. Doing so may damage the Electronic Control Unit (ECU).
Take great care not to reverse the battery leads when installing the battery. Reverse power applied to the ECU will damage it instantly.
Battery Connections
Battery terminals and connections should be kept free of corrosion.
If cleaning is necessary, remove the corrosion with a stiff wire brush. Wash with a solution of one tablespoon baking soda and one cup water. Rinse well with tap water and dry off with clean rags. Coat the terminals with dielectric grease or petroleum jelly.
Battery Storage
When the motorcycle is not used for periods of one month or longer, remove the battery and store it in a cool, dry area. The battery should be recharged monthly using a 12 volt battery charger with a maximum charge rate of 2 amp-hr.
MULTI-FUNCTION DISPLAY
MFD Functions
- Odometer
- Trip Odometer
- Clock
- Backlight dimming
- Hi-Beam Dimming
- Fuel Level
- Voltmeter
- Check Engine
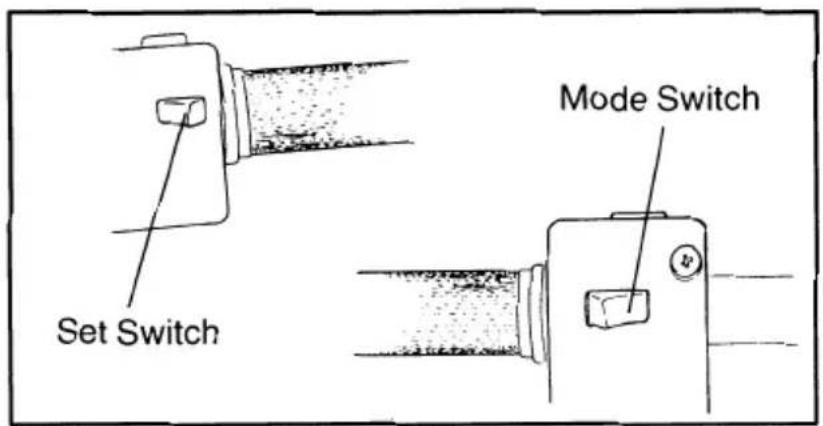
MODE SWITCH - Toggles all Multi-LCD display functions except "Check Engine." The indicator scrolls from left to right, displaying selection.
SET SWITCH - Function varies with selected function mode. It's used to set the clock, to select English or metric while in "ODO" mode and resets the trip odometer while in trip mode.
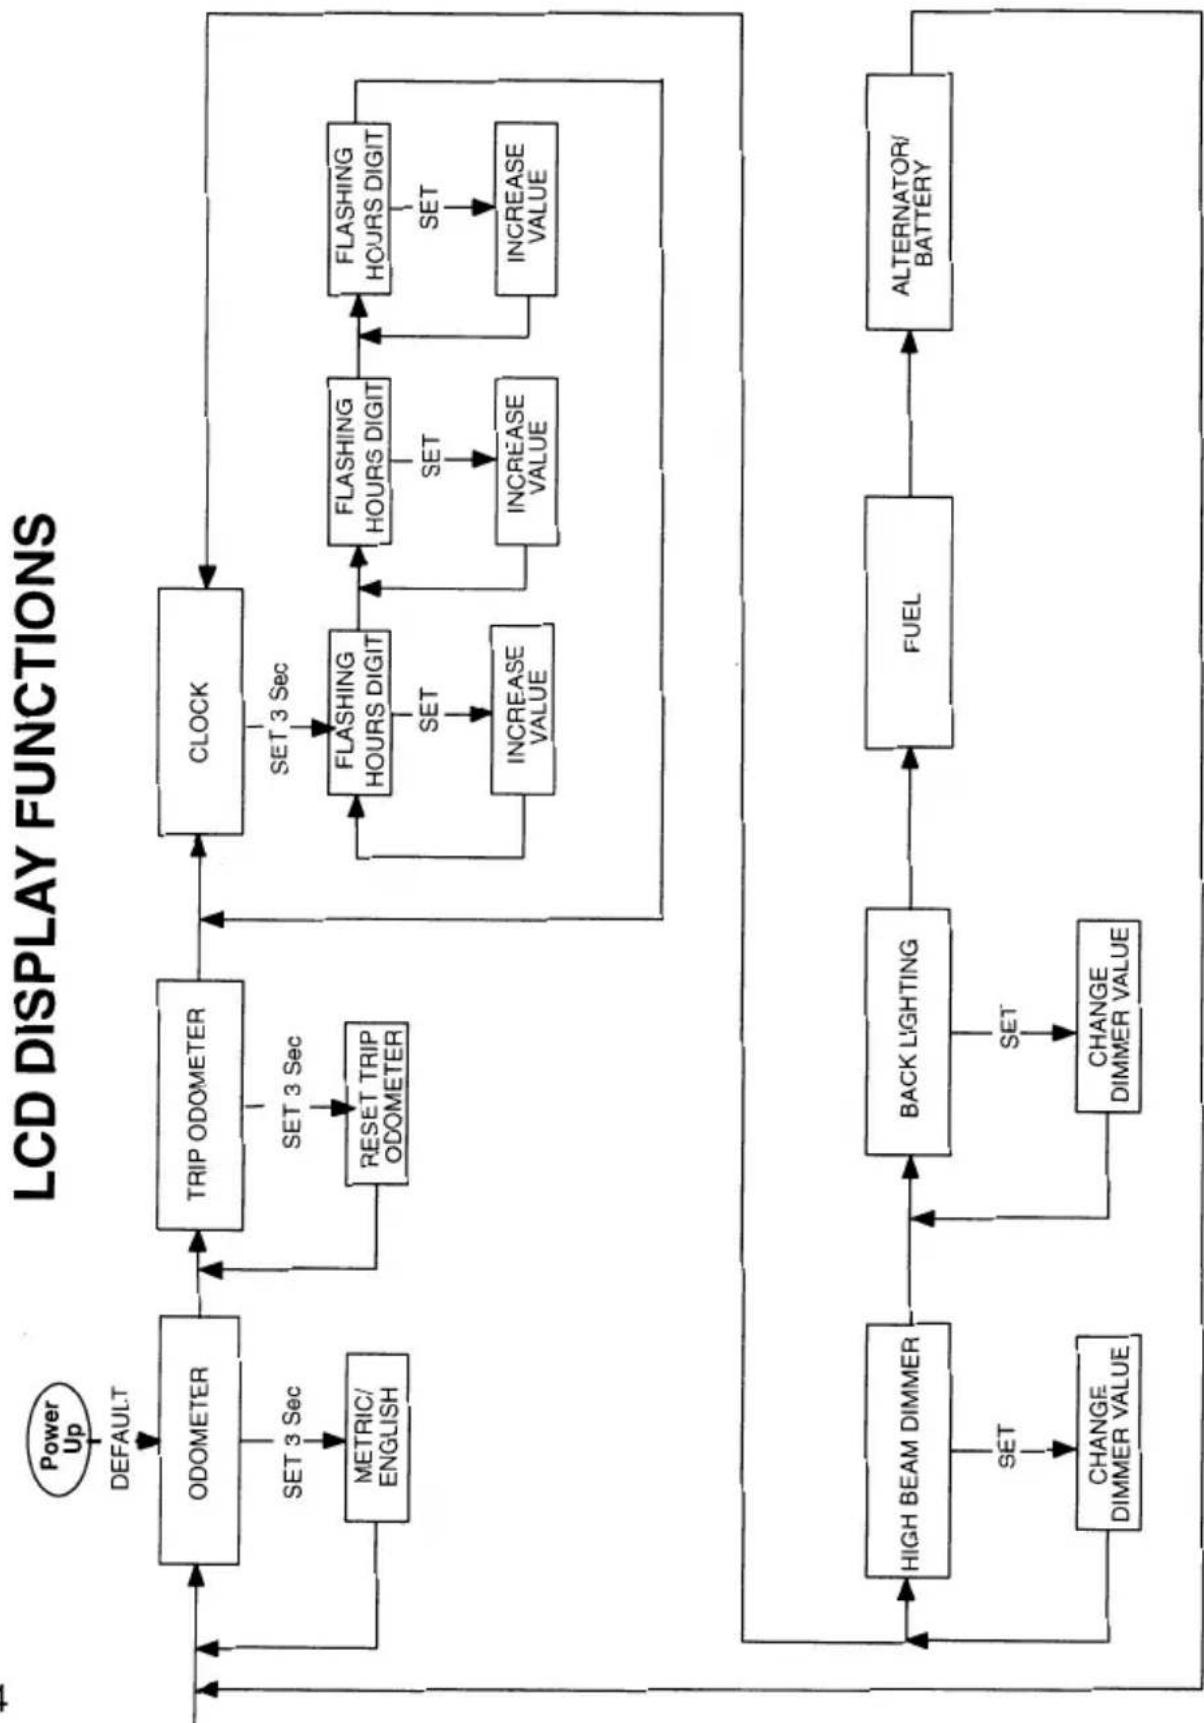
ODOMETER - Default function on LCD when starting the machine. It accumulates the distance of the vehicle. The global numeric system can be toggled between English and metric by pressing the SET button for 3 seconds while in this function. Pressing the mode button will change to the next LCD function.
TRIP ODOMETER - This function also accumulates and stores distance but can be reset to zero by pressing the SET button for 3 seconds while in this mode. TRIP MI or TRIP KM indicators are on when in this mode (depending on the current numeric system of choice). Pressing once the MODE button will change to the next LCD function.
CLOCK - the clock function on the LCD shows the time. The CLOCK indicator is on when in clock mode. You must be in CLOCK mode to set the time. To set the time, hold SET key for 3 seconds (hours digits start flashing), press SET to select the hour and MODE to enter the set hour; the first digit of minutes will begin to flash. press SET to select the number and MODE to enter it; continue with this procedure for the final digit. After the last digit is entered, the display will return to normal operational mode (colon flashing). After the clock is set, pressing the MODE button will change to the next LCD function.
BACKLIGHT DIMMING - the intensity of the backlight of the module can be changed to one of 6 levels by pressing the SET button. The LCD display will show in bars the proportional part of the dimming. Pressing the MODE button will change to the next LCD function.
HIGH BEAM INDICATOR DIMMING - The intensity of the high beam indicator can be set to one of 4 levels by pressing the SET button. The LCD display will show HB followed by bars, indicating the proportional part of the dimming. In this mode, the DIM indicator is still on and pressing the MODE button once will change to the next LCD function.
FUEL - Fuel of the vehicle will be shown on the LCD display in gallons or liters according to the current numeric system of the module. The range goes from 0 to 5 gallons. In this function all indicators will be off, pressing the MODE button once will change to the next LCD function.
MULTI-FUNCTION DISPLAY
VOLTMETER - The voltage of the battery will be shown on the LCD display. (i.e. Alt 12.3). In this function, all indicators will be off, pressing the MODE button once will change back to the first LCD function.
CHECK ENGINE - In this function, the microcontroller is checking the the Check Engine input line; the LCD will be shown CH Eng every time this line turns low. This screen will be on for a period of two seconds every 5 seconds as long as the Ch Engine line remains low.
flowchart
graph TD
    A["Power Up"] --> B["DEFAULT"]
    B --> C["ODOMETER"]
    C --> D["SET 3 Sec"]
    D --> E["METRIC/ENGLISH"]
    E --> F["TRIP ODOMETER"]
    F --> G["SET 3 Sec"]
    G --> H["RESET TRIP ODOMETER"]
    H --> I["CLOCK"]
    I --> J["SET 3 Sec"]
    J --> K["FLASHING HOURS DIGIT"]
    K --> L["INCREASE VALUE"]
    L --> M["FLASHING HOURS DIGIT"]
    M --> N["INCREASE VALUE"]
    N --> O["FLASHING HOURS DIGIT"]
    O --> P["SET"]
    P --> Q["INCREASE VALUE"]
    Q --> R["FLASHING HOURS DIGIT"]
    R --> S["SET"]
    S --> T["FLASHING HOURS DIGIT"]
    T --> U["INCREASE VALUE"]
    U --> V["FLASHING HOURS DIGIT"]
    V --> W["SET"]
    W --> X["FLASHING HOURS DIGIT"]
    X --> Y["INCREASE VALUE"]
    Y --> Z["FLASHING HOURS DIGIT"]
    Z --> AA["SET"]
    AA --> AB["FLASHING HOURS DIGIT"]
    AB --> AC["INCREASE VALUE"]
    AC --> AD["FLASHING HOURS DIGIT"]
    AD --> AE["SET"]
    AE --> AF["FLASHING HOURS DIGIT"]
    AF --> AG["INCREASE VALUE"]
    AG --> AH["FLASHING HOURS DIGIT"]
    AH --> AI["SET"]
    AI --> AJ["FLASHING HOURS DIGIT"]
    AJ --> AK["INCREASE VALUE"]
    AK --> AL["FLASHING HOURS DIGIT"]
    AL --> AM["SET"]
    AM --> AN["FLASHING HOURS DIGIT"]
    AN --> AO["INCREASE VALUE"]
    AO --> AP["FLASHING HOURS DIGIT"]
    AP --> AQ["SET"]
    AQ --> AR["FLASHING HOURS DIGIT"]
    AR --> AS["INCREASE VALUE"]
    AS --> AT["FLASHING HOURS DIGIT"]
    AT --> AU["SET"]
    AU --> AV["FLASHING HOURS DIGIT"]
    AV --> AW["INCREASE VALUE"]
    AW --> AX["FLASHING HOURS DIGIT"]
    AX --> AY["SET"]
    AY --> AZ["FLASHING HOURS DIGIT"]
    AZ --> BA["INCREASE VALUE"]
    BA --> BB["FLASHING HOURS DIGIT"]
    BB --> BC["SET"]
    BC --> BD["FLASHING HOURS DIGIT"]
    BD --> BE["INCREASE VALUE"]
    BE --> BF["FLASHING HOURS DIGIT"]
    BF --> BG["SET"]
    BG --> BH["FLASHING HOURS DIGIT"]
    BH --> BI["INCREASE VALUE"]
    BI --> BJ["FLASHING HOURS DIGIT"]
    BJ --> BK["SET"]
    BK --> BL["FLASHING HOURS DIGIT"]
    BL --> BM["INCREASE VALUE"]
    BM --> BN["FLASHING HOURS DIGIT"]
    BN --> BO["SET"]
    BO --> BP["FLASHING HOURS DIGIT"]
    BP --> BQ["INCREASE VALUE"]
    BQ --> BR["FLASHING HOURS DIGIT"]
    BR --> BS["SET"]
    BS --> BT["FLASHING HOURS DIGIT"]
    BT --> BU["INCREASE VALUE"]
    BU --> BV["FLASHING HOURS DIGIT"]
    BV --> BW["SET"]
    BW --> BX["FLASHING HOURS DIGIT"]
    BX --> BY["INCREASE VALUE"]
    BY --> BZ["FLASHING HOURS DIGIT"]
    BZ --> CA["SET"]
    CA --> CB["FLASHING HOURS DIGIT"]
    CB --> CC["INCREASE VALUE"]
    CC --> CD["FLASHING HOURS DIGIT"]
    CD --> CE["SET"]
    CE --> CF["FLASHING HOURS DIGIT"]
    CF --> CG["INCREASE VALUE"]
    CG --> CH["FLASHING HOURS DIGIT"]
    CH --> CI["SET"]
    CI --> CJ["FLASHING HOURS DIGIT"]
    CJ --> CK["INCREASE VALUE"]
    CK --> CL["FLASHING HOURS DIGIT"]
    CL --> CM["SET"]
    CM --> CN["FLASHING HOURS DIGIT"]
    CN --> CO["INCREASE VALUE"]
    CO --> CP["FLASHING HOURS DIGIT"]
    CP --> CQ["SET"]
    CQ --> CR["FLASHING HOURS DIGIT"]
    CR --> CS["INCREASE VALUE"]
    CS --> CT["FLASHING HOURS DIGIT"]
    CT --> CU["SET"]
    CU --> CV["FLASHING HOURS DIGIT"]
    CV --> CW["INCREASE VALUE"]
    CW --> CX["FLASHING HOURS DIGIT"]
    CX --> CY["SET"]
    CY --> CZ["FLASHING HOURS DIGIT"]
    CZ --> DA["INCREASE VALUE"]
    DA --> DB["FLASHING HOURS DIGIT"]
    DB --> DC["SET"]
    DC --> DD["FLASHING HOURS DIGIT"]
    DD --> DE["CLOCK"]
TROUBLESHOOTING
Troubleshooting
Victory motorcycles receive a rigid inspection before shipment from the factory. However, trouble may occur during operation.
Any problem in the fuel, combustion, or ignition systems can cause hard starting and loss of power. If your motorcycle requires any repair, take it to your Victory dealer.
The skilled technicians at a Victory dealership have the tools, experience, and know-how to properly service your motorcycle. Use only genuine Victory parts on your motorcycle. Imitation parts may look like Victory parts but are often inferior. Consequently, they have a shorter service life and can lead to expensive repair bills or a hazardous operating condition.
CLEANING AND STORAGE
Cleaning
Complete and thorough cleaning of your Victory motorcycle will accomplish many things, such as:
- Extend the useful life of many components.
- As a part of the cleaning process you will also be performing a complete and thorough visual inspection that may reveal items in need of repair that you might otherwise not find.
• Enhance the value of your motorcycle. - Extend the useful life of many cosmetic items.
Before cleaning your motorcycle do the following:
- Block off the end of the exhaust pipes to prevent water from entering the exhaust system.
- Make sure the spark plugs and all filler caps are securely installed.
- Avoid spraying the air filter assembly.
NOTE: Degreaser may be applied to excessively greasy areas. If you choose to use such a product, do not apply the degreaser to any cosmetically painted or plated areas. Also, do not apply the degreaser to any areas that depend upon grease for proper functioning such as brake and shifting pivot points. If degreaser is necessary in these areas, make sure to re-grease the affected areas after your cleaning is finished.
Rinse the dirt and degreaser off with a low pressure garden hose.

CAUTION
Excessive hose pressure may cause water seepage into bearings and pivoting or sliding areas. Wheel bearings, transmission seals and electrical parts can become damaged if excessive pressure is used.
The use of extremely high pressure washing wands (such as coin operated car washes) are the cause of many expensive repair bills.
Once the bulk of the dirt has been rinsed off, wash all surfaces with warm water and a mild detergent.
Rinse the motorcycle off immediately with clean, low pressure water and dry the surfaces with a chamois cloth or clean soft absorbant cloth.
Repetitive polishing and cleaning will accelerate the wear of your tank badge.
CLEANING AND STORAGE
Storage
To prevent storage damage due to long-term storage (60 days or more) the following guidelines should be followed.
- Clean the motorcycle completely.
- Top off the fuel tank with fresh fuel and add fuel stabilizer to the fuel. The machine should be run for 15 minutes or so to distribute the fuel stabilizer throughout the fuel system.
- Change the engine oil as outlined on page 38.
- Block the frame to take some of the weight off of both the front and rear wheels. (See illustration)
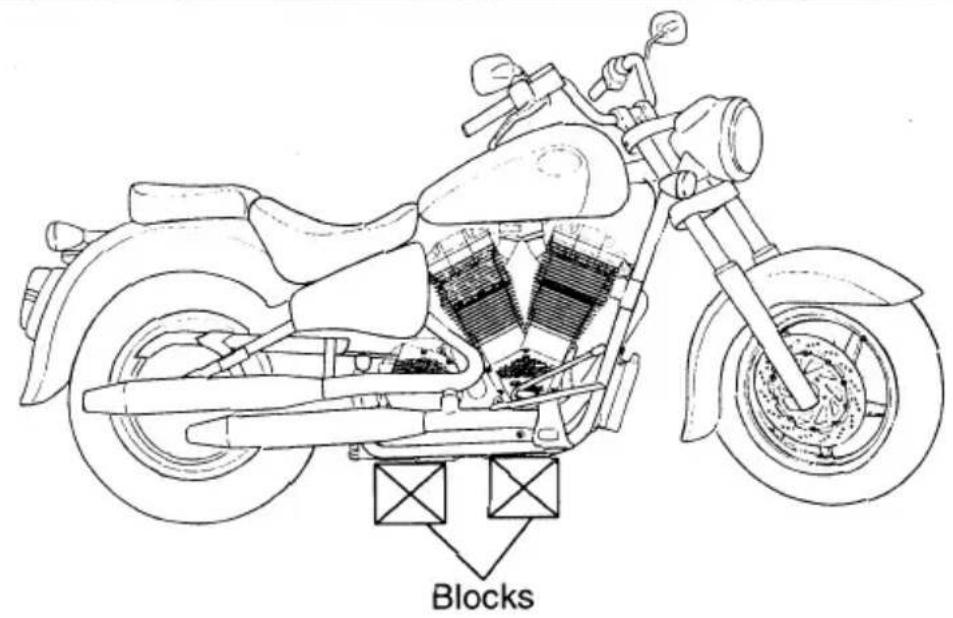
Set floor jack under the center of the engine. Raise Vehicle off the floor and set 2 blocks underneath the bike as shown. Set bike down on blocks.
- Secure a plastic bag over the exhaust outlets to prevent moisture from entering the exhaust system. IMPORTANT: Make certain the system is cool prior to securing the plastic.
- Remove the battery and charge it. Store it in a cool, dry area. The battery should be recharged monthly using a charger that uses tapering current, not a constant current type charger. This will prevent overcharging, which is the most common cause of battery damage.
IDENTIFICATION
Identification Numbers Record
Record the following information in the spaces provided to help you when ordering parts or in the event that your machine is stolen.
Key Identification Number
The key identification number is stamped on the key tag. You will need this information in the event that you need to purchase a new key.
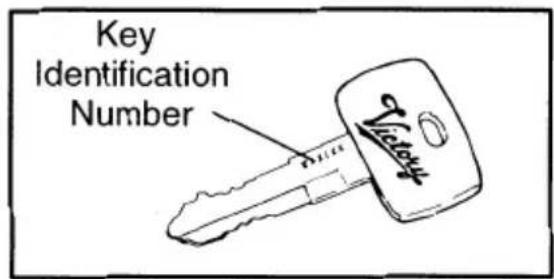
Vehicle Identification Number (VIN)
The vehicle identification number is stamped on the front of the steering head. NOTE: The VIN is used to identify your motorcycle and will be used to register your motorcycle with the licensing authority in your state.
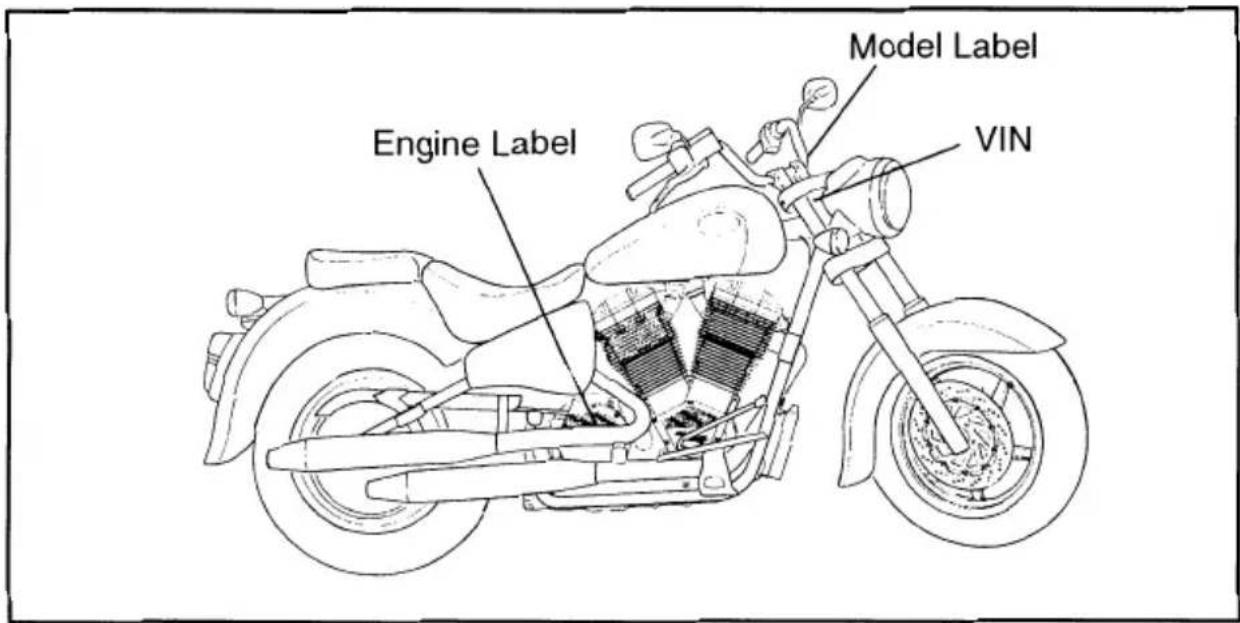
Model Label
The model label is located on the left side of the steering head. This information will be needed to order parts or accessories from your Victory dealer.
Engine Label
The engine label is located on top of the crankcase behind the rear cylinder. This label identifies the engine model and serial number. The engine serial number is also stamped on the crankcase to the right of the oil filter.
| Key Identification Number | |
| Vehicle Identification Number (VIN) | |
| Model Label Information | |
| Engine Identification Number/Transmission Identification Number |
| CAPACITIES | Oil Capacity (Quarts) | 6 |
| Fuel Capacity (U.S. gallons) | 5 | |
| Wheelbase (inches) | 63.3 | |
| Seat Height (inches) | 28 | |
| Footpeg Height (inches) | 10.2 | |
| Front Wheel Travel (inches) | 5.1 | |
| Rear Wheel Travel (inches) | 4.00 | |
| Rear Suspension Type | Single Shock | |
| Claimed Dry Weight | 657 lbs. | |
| Claimed Wet Weight | 696 lbs. | |
| Overall Length (inches) | 94 | |
| Overall Width (inches) | 29.5 | |
| Overall Height (inches) | 44.5 | |
| Ground Clearance | 5.5 | |
| Passenger Capacity | 1 | |
| ENGINE | Engine Model Number | MCVT1507D-01 |
| Engine Configuration | 50^ , V-Twin | |
| Engine Displacement | 1507cc (92 cubic in) | |
| Engine Cooling System | Air/Oil Cooling | |
| Compression Ratio | 8.5:1 | |
| Valves Per Cylinder | 4 | |
| Bore x Stroke | 97 x 102 mm | |
| Starter | Direct Drive | |
| Throttle Body Bore Size | 44 mm | |
| Exhaust System Type | Staggered Dual Exhaust | |
| Lubrication System | Wet Sump | |
| Engine Speed @ 60 mph | 2540 rpm | |
| Spark Plug | RA8GHC | |
| Spark Plug Gap | 0.040" (1.0mm) |
SPECIFICATIONS
| DRIVESYS | Transmission Type | Manual 5 Speed |
| Clutch Type | Wet Clutch | |
| Clutch Spring Type | Compression | |
| Primary Drive | Gear with Torque Compensator | |
| Primary Drive Gear Teeth (Ratio) | 1.5:1 | |
| TIRES | Front Wheel | 16" x 3" |
| Rear Wheel | 16" x 3.5" | |
| Front Tire | MT90HB16 71H | |
| Rear Tire | 160/80HB16 75H | |
| SUSP | Front Type | Conventional Telescopic |
| Front Travel (inches) | 5.1 | |
| Rear Type | Single-Shock | |
| Rear Travel (inches) | 4.00 | |
| BRAKES | Brake Type | Disc/Disc |
| Front Brake | Rotor 300 x 5 mm4 Piston Fixed Caliper | |
| Rear Brake | Rotor 300 x 5mm2 Piston Floating Caliper | |
| LIGHTS | Headlight | 5.5 amps |
| Brake/Tail Light | 2.1/1.6 amps | |
| Turn Signal Light (Front) | 2.1 amps | |
| Turn Signal Light (Rear) | 1.6 amps | |
| Instrument Cluster LightsBacklighting Dimming Feature | 1.3 amps | |
| Neutral Indicator | LED | |
| Turn Signal Indicators | LED | |
| High Beam Indicator | LED | |
| Oil Pressure Indicator | LED | |
| Fuel Warning Indicator | LED |
REPORTING OF SAFETY DEFECTS
Reporting Safety Defects
NHTSA (National Highway Traffic Safety Administration) info.
If you believe that your vehicle has a defect which could cause a crash or could cause injury or death, you should immediately inform the National Highway Traffic Safety Administration (NHTSA) in addition to notifying Polaris Sales Inc. If NHTSA receives similar complaints, it may open an investigation, and if it finds that a safety defect exists in a group of vehicles, it may order a recall and remedy campaign. However, NHTSA cannot become involved in individual problems between you, your dealer, or Polaris Sales Inc. To contact NHTSA, you may either call the Auto Safety Hotline toll-free at 1-800-424-9393 (or 366-0123 in Washington, D.C. area) or write to: NHTSA, U.S. Department of Transportation, Washington, D.C. 20590. You can also obtain other information about motor vehicle safety from the Hotline.
CONSUMER INFORMATION
Motorcycle Noise Regulation
Tampering Warning: Motorcycle Noise Regulations
Tampering with Noise Control systems Prohibited. Federal law prohibits the following acts or causing thereof:
(1) The removal or rendering inoperative by any person other than for purposes of maintenance, repair, or replacement, of any device or element of design incorporated into any new vehicle for the purpose of noise control prior to its sale or delivery to the ultimate purchaser or while it is in use, or
(2) The use of the vehicle after such device or element of design has been removed or rendered inoperative by any person.
Among those acts presumed to constitute tampering are the acts listed below:
(1) Removal of, or puncturing the muffler, baffles, header pipes or any other component which conducts exhaust gases.
(2) Removal of puncturing of any part of the intake system.
(3) Lack of proper maintenance.
(4) Replacing any moving part of the vehicle, or parts of the exhaust or intake system, with parts other than those specified by the manufacturer.
This product should be checked for repair or replacement if the motorcycle noise has increased significantly through use. Otherwise, the owner may become subject to penalties under state and local ordinances.
CONSUMER INFORMATION
Maintenance Record
Copies of repair orders and/or receipts for parts and/or service work you purchase is required to document that maintenance has been completed in accordance with the manufacturer's warranty policy and Federal/State emission's Warranty policies. The following chart is supplied only for your convenience so it may remind you that the maintenance work is required. It is not acceptable proof of maintenance work.
| Interval | Date | Mileage | Dealer | Notes |
| 500 | ||||
| 2,500 | ||||
| 5,000 | ||||
| 7,500 | ||||
| 10,000 | ||||
| 12,500 | ||||
| 18,000 | ||||
| 21,000 | ||||
| 24,000 | ||||
| 27,000 | ||||
| 30,000 |
EMISSIONS CONTROL SYSTEM WARRANTY
Victory Motorcycles, Polaris Sales Inc. - Emission Control System Warranty Statement
Your Warranty Rights and Obligations
The California air resources board and Victory Motorcycle Division, Polaris Sales Inc. (hereinafter Victory) are pleased to explain the emission control system warranty on your 2000 and later motorcycle. In California, new motor vehicles must be designed, built and equipped to meet the state's stringent anti-smog standards. Victory must warrant the emission control system on your motorcycle for the periods of time listed below provided there has been no abuse, neglect or improper maintenance of your motorcycle.
Your emission control system may include parts such as the carburetor or fuel-injection system, the ignition system, catalytic converter and engine computer. Also included may be hoses, belts, connectors and other emission-related assemblies.
Where a warrantable condition exists, Victory will repair your motorcycle at no cost to you, including diagnosis, parts and labor.
MANUFACTURER'S WARRANTY COVERAGE
Class I motorcycles (50-169 cc): for a period of use of five (5) years or 12,000 kilometers (7,456 miles), whichever first occurs.
Class II motorcycles (170 to 279 cc): for a period of use of five (5) years or 18,000 kilometers (11,185 miles), whichever first occurs.
Class III motorcycles (280 cc and larger): for a period of use of five (5) years or 30,000 kilometers (18,641 miles), whichever first occurs.
If an emission-related part on your motorcycle is defective, the part will be repaired or replaced by Victory. This is your emission control system DEFECTS WARRANTY.
OWNER'S WARRANTY RESPONSIBILITIES
As the motorcycle owner, you are responsible for the performance of the required maintenance listed in your owner's manual. Victory recommends that you retain all receipts covering maintenance on your motorcycle, but Victory cannot deny warranty solely for the lack of receipts or for your failure to ensure the performance of all scheduled maintenance.
You are responsible for presenting your motorcycle to a Victory dealer as soon as a problem exists. The warranty repairs should be completed in a reasonable amount of time, not to exceed 30 days.
As the motorcycle owner, you should be aware that Victory may deny your warranty coverage if your motorcycle or part has failed due to abuse, neglect, improper maintenance or unapproved modifications.
If you have any questions regarding your warranty rights and responsibilities, you should contact Victory Motorcycle Division, Polaris Sales Inc., 1225 Hwy 169 No., Minneapolis, MN 55441, or the California Air Resources Board, P.O. Box 8001, 9528 Telstar Avenue, El Monte, CA 91734-8001.
EMISSIONS CONTROL SYSTEM WARRANTY
Victory Motorcycle Division, Polaris Sales Inc. - Limited Warranty on Emission Control System
Victory Motorcycle Division, Polaris Sales Inc., (hereinafter Victory) warrants that each new 2000 and later Victory motorcycle, that includes as standard equipment a headlight, taillight and stoplight, and is street legal:
A. is designed, built and equipped so as to conform at the time of initial retain purchases with all applicable regulations of the United States Environmental Protection Agency, and the California Air Resources Board; and
B. is free from defects in material and workmanship which cause such motorcycle to fail to conform with applicable regulations of the United States Environmental Protection Agency or the California Air Resources Board for a period of use, depending on the engine displacement, of 12,000 kilometers (7,456 miles), if the motorcycle's engine displacement is less than 170 cubic centimeters; of 18,000 kilometers (11,185 miles), if the motorcycle's engine displacement is equal or greater than 170 cubic centimeters but less than 280 cubic centimeters; or of 30,000 kilometers (18,641 miles), if the motorcycle's engine displacement is 280 cubic centimeters or greater; or 5 (five) years from the date of initial retain delivery, whichever occurs first.
I. COVERAGE. Warranty defects shall be remedied during customary business hours at any authorized Victory motorcycle dealer located within the United States of America in compliance with the Clean Air Act and applicable regulations of the United States Environmental Protection Agency and the California Air Resources Board. Any part or parts replaced under this warranty shall become the property of Victory.
In the State of California only, emission related warranted parts are specifically defined by the state's Emission Warranty Parts List. These warranted parts are: carburetor and internal parts; intake manifold; fuel tank; fuel injection system; spark advance mechanism; crankcase breather; air cutoff valves; fuel tank cap for evaporative emission controlled vehicles; oil filler cap; pressure control valve; fuel/vapor separator; canister; igniters; breaker governors; ignition coils; ignition wires; ignition points; condensers, and spark plugs if failure occurs prior to the first scheduled replacement; and hoses, clamps, fittings and tubing used directly in these parts. Since emission related parts may vary from model to model, certain models may not contain all of these parts and certain models may contain functionally equivalent parts.
In the State of California only, Emission Control System emergency repairs, as provided for in the California Administrative Code, may be performed by other than an authorized Victory dealer. An emergency situation occurs when an authorized Victory dealers is not reasonably available, a part is not available within 30 days, or a repair is not complete within 30 days. Any replacement part can be used in an emergency repair. Victory will reimburse the owner for expenses, including diagnosis, not to exceed Victory's suggested retail price for all warranted parts replaced and labor charges based on Victory's recommended time allowance for the warranty repair and the geographically appropriate hourly labor rate. The owner may be required to keep receipts and failed parts in order to receive compensation.
EMISSIONS CONTROL SYSTEM WARRANTY
II. LIMITATIONS. This Emission Control System warranty shall not cover any of the following:
A. Repair or replacement required as a result of:
(1) accident
(2) misuse
(3) repairs improperly performed or replacements improperly installed
(4) use of replacement parts or accessories not conforming to Victory specifications which adversely affect performance and/or
(5) use in competitive racing or related events.
B. Inspections, replacement of parts and other services and adjustments required for required maintenance
C. Any motorcycle on which the cdometer mileage has been changed so that actual mileage cannot be readily determined.
III. LIMITED LIABILITY
A. The liability of Victory under this Emission Control System Warranty is limited solely to the remedying of defects in material or workmanship by an authorized Victory motorcycle dealer at its place of business during customary business hours. This warranty does not cover inconvenience or loss of use of the motorcycle or transportation of the motorcycle to or from the Victory dealer. VICTORY SHALL NOT BE LIABLE FOR ANY OTHER EXPENSES, LOSS OR DAMAGE, WHETHER DIRECT, INCIDENTAL, CONSEQUENTIAL OR EXEMPLARY ARISING IN CONNECTION WITH THE SALE OR USE OF OR INABILITY TO USE THE VICTORY MOTORCYCLE FOR ANY PURPOSE. SOME STATES DO NOT ALLOW THE EXCLUSION OR LIMITATION OF ANY INCIDENTAL OR CONSEQUENTIAL DAMAGES, SO THE ABOVE LIMITATIONS MAY NOT APPLY TO YOU.
B. NO EXPRESS EMISSION CONTROL SYSTEM WARRANTY IS GIVEN BY VICTORY EXCEPT AS SPECIFICALLY SET FORTH HEREIN. ANY EMISSION CONTROL SYSTEM WARRANTY IMPLIED BY LAW, INCLUDING ANY WARRANTY OF MERCHANTABILITY OR FITNESS FOR A PARTICULAR PURPOSE, IS LIMITED TO THE EXPRESS EMISSION CONTROL SYSTEM WARRANTY TERMS STATED IN THIS WARRANTY. THE FOREGOING STATEMENTS OF WARRANTY ARE EXCLUSIVE AND IN LIEU OF ALL OTHER REMEDIES. SOME STATES DO NOT ALLOW LIMITATIONS ON HOW LONG AN IMPLIED WARRANTY LASTS SO THE ABOVE LIMITATIONS MAY NOT APPLY TO YOU.
C. No dealer is authorized to modify this Victory Limited Emission Control System Warranty.
IV. LEGAL RIGHTS. THIS WARRANTY GIVES YOU SPECIFIC LEGAL RIGHTS, AND YOU MAY ALSO HAVE OTHER RIGHTS WHICH VARY FROM STATE TO STATE.
V. THIS WARRANTY IS IN ADDITION TO THE VICTORY LIMITED MOTORCYCLE WARRANTY.
EMISSIONS CONTROL SYSTEM WARRANTY
VI. ADDITIONAL INFORMATION. Any replacement part that is equivalent in performance and durability may be used in the performance of any maintenance or repairs. However, Victory is not liable for these parts. The owner is responsible for the performance of all required maintenance. Such maintenance may be performed at a service establishment or by any individual. The warranty period begins on the date the motorcycle is delivered to an ultimate purchaser.
Victory Motorcycle Division, Polaris Sales Inc.
1225 HWY 169 No.
Minneapolis, MN 55441
NOISE EMISSION WARRANTY
Victory Motorcycle Division warrants that this exhaust system, at the time of sale, meets all applicable U.S. EPA Federal noise standards. This warranty extends to the first person who buys this exhaust system for purposes other than resale, and to all subsequent buyers. Warranty claims should be directed to: Victory Motorcycle Division, Polaris Sales Inc., 1225 Hwy 169 No., Minneapolis, MN 55441
VICTORY MOTORCYCLE WARRANTY POLICY
LIMITED WARRANTY
Victory Motorcycle Division, Polaris Sales Inc., 1225 Highway 169 No., Minneapolis, Minnesota 55441-5078, gives a ONE YEAR LIMITED WARRANTY on all components of the Victory Motorcycle against defects in material or workmanship. This warranty covers the parts and labor charges for repair or replacement of defective parts which are covered by this warranty. This warranty begins on the date of purchase. This warranty is transferrable to another consumer during the warranty period through a Victory Motorcycle dealer.
REGISTRATION
At the time of sale, the Warranty Registration Form must be completed by your dealer and submitted to Victory Motorcycle Division, Polaris Sales Inc. within ten days. Upon receipt of this registration, Victory Motorcycle Division, Polaris Sales Inc. will record the registration for warranty. No verification of registration will be sent to the purchaser as the copy of the Warranty Registration Form will be the warranty entitlement. If you have not signed the original registration and received the "customer copy", please contact your dealer immediately. NO WARRANTY COVERAGE WILL BE ALLOWED UNLESS YOUR VICTORY MOTORCYCLE IS REGISTERED WITH VICTORY MOTORCYCLES DIVISION OF POLARIS SALES INC.
Initial dealer preparation and set-up of your Victory Motorcycle is very important in ensuring trouble-free operation. Purchasing a machine in the crate or without proper dealer set-up will void your warranty coverage.
WARRANTY COVERAGE AND EXCLUSIONS:
LIMITATIONS OF WARRANTIES AND REMEDIES
The warranty excludes any failures that are not caused by a defect in material or workmanship. This warranty does not cover accidental damage, normal wear and tear, abuse or improper handling. This warranty also does not cover any Victory Motorcycle that has been altered structurally, modified, neglected, improperly maintained, used for racing, or used for purposes other than for which it was manufactured, or for any damages which occur during trailer transit or as a result of unauthorized service or the use of unauthorized parts. In addition, this warranty does not cover physical damage to paint or finish, stress cracks, tearing or puncturing of upholstery material, corrosion, or defects in parts, components or Victory Motorcycle due to fire, explosions or any other cause beyond Victory Motorcycle Division, Polaris Sales Inc. control.
This warranty does not cover the use of unauthorized lubricants, chemicals, or fuels that are not compatible with the Victory Motorcycle.
VICTORY MOTORCYCLE WARRANTY POLICY
The exclusive remedy for breach of this warranty shall be, at Victory Motorcycle Division, Polaris Sales Inc. exclusive option, repair or replacement of any defective materials, or components or products. THE REMEDIES SET FORTH IN THIS WARRANTY ARE THE ONLY REMEDIES AVAILABLE TO ANY PERSON FOR BREACH OF THIS WARRANTY. VICTORY MOTORCYCLES DIVISION OF POLARIS SALES INC. SHALL HAVE NO LIABILITY TO ANY PERSON FOR INCIDENTAL, CONSEQUENTIAL OR SPECIAL DAMAGES OF ANY DESCRIPTION, WHETHER ARISING OUT OF EXPRESS OR IMPLIED WARRANTY OR ANY OTHER CONTRACT, NEGLIGENCE, OR OTHER TORT OR OTHERWISE. Some states do not permit the exclusion or limitation of incidental or consequential damages or implied warranties, so the above limitations or exclusions may not apply to you if inconsistent with controlling state law.
ALL IMPLIED WARRANTIES (INCLUDING BUT NOT LIMITED TO THE IMPLIED WARRANTIES OF MERCHANTABILITY AND FITNESS FOR A PARTICULAR PURPOSE) ARE LIMITED IN DURATION TO THE ABOVE ONE YEAR WARRANTY PERIOD. VICTORY MOTORCYCLES DIVISION OF POLARIS SALES INC. FURTHER DISCLAIMS ALL EXPRESS WARRANTIES NOT STATED IN THIS WARRANTY OTHER THAN EMISSIONS AND EXCISE WARRANTIES. Some states do not allow limitations on how long an implied warranty lasts, so the above limitation may not apply to you if inconsistent with controlling state law.
HOW TO OBTAIN WARRANTY SERVICE
If your Victory Motorcycle requires warranty service, you must take it to a Victory Motorcycle Servicing Dealer. When requesting warranty service you must present your copy of the Warranty Registration form to the dealer. (THE COST OF TRANSPORTATION TO AND FROM THE DEALER IS YOUR RESPONSIBILITY). Victory Motorcycles division of Polaris Sales Inc. suggests that you use your original selling dealer; however, you may use any Victory Motorcycle Servicing Dealer to perform warranty service.
Please work with your dealer to resolve any warranty issues. Should your dealer require any additional assistance they will contact the appropriate person at Victory Motorcycles division of Polaris Sales Inc.
This warranty also gives you specific legal rights, and you may also have other rights which vary from state to state.
If any of the above terms are void because of state or federal law, all other warranty terms will remain in effect.
ENGINE OIL
- Always use Polaris engine oil.
- Never substitute or mix oil brands as serious engine damage and voiding of warranty can result.
INDEX
Accelerating 31
Air Filter 40
BacklightDimming 53
Battery 52
Battery Connections 52
Battery Storage 52
Brake Fluid Leakage 27
Brake Fluid Level 27
Brake Lever, Front 21
Brake Pad Inspection, Front 42
Brake Pad Inspection, Rear 42
Brake Pad Replacement 42
Brake Pedal Freeplay Adjustment ... 40
Brake Pedal, Rear 21
Brake System 40
Brakes, Front 27
Brakes, Rear 27
Check Engine 54
Cleaning 56
Cleaning and Storage ..... 56-57
Clock 53
Clutch 28
Clutch Adjustment 43
Clutch Lever 20
ConsumerInformation 62-63
Control Parts and Functions ..... 16-23
Deceleration 32
Dimmer Switch 17
Drive Belt Inspection 49
Drive Belt Sprockets Inspection ..... 49
Drive Belt Tension Inspection ..... 49
Emissions Control System Warranty .... 64-67
Engine Break-in 33
Engine Idle 28
Engine Label 58
Engine Oil 26
Engine Oil Level 38
Engine Oil Replacement 38-39
Fast idle lever 17
Fittings and Fasteners 28
Fluid Level Inspection 41
Fork Inspection, Front 46
Fuel 7,53
Fuel Cap 25
Fuse Box Diagram 47
FuseReplacement 47
Handlebar, Left 17
Handlebar, Right 18
Hazard Switch 18
HeadlightAdjustment 48
High Beam Indicator Dimming ..... 53
Horn switch 17
identification 58
ImportantLabels 9-12
Indicator Lights 19
Key Identification Number 58
Left Side of Motorcycle 13
Light switch 17
Lights, Signals and Switches ..... 28
Loading 5
Lubrication Points 44
Main Switch 16
Maintenance 34-51
Maintenance Record 63
Mode Selector 18
Mode Switch 53
ModelLabel 58
Modifications 4
Motorcycle Noise Regulation ..... 62
Multi-FunctionDisplay 16,53-54
Noise Emission Warranty 67
Noise Regulation 62
Odometer 53
Oil Filter Replacement 38-39
Oil Leak Check 46
Operation 30-33
Operation Check 46
Parking 8,33
PeriodicMaintenance 34
Periodic Maintenance Chart .....35-36
Pre-Ride Inspection 24-29
Protective Apparel 2
Rear Wheel Alignment 46,51
Reporting Safety Defects 61
Right Side of Motorcycle 14
Safe Operating Rules 6
Safe Riding 3
Safety Alert 1
Safety Information 2-12
Seat 23
Set Selector 17
Set Switch 53
Shift Pedal 20
Shift Points 32
Shifting 31
Sidestand Pivot 45
Spark Plug 37
Specifications 59-60
Spring Pre-Load Adjustment ..... 50
Starter switch 18
Starting a Cold Engine 30-31
Steering Lock 22
Stop Switch 18
Storage 57
TamperingWarning 62
Throttle 28
Tire Air Pressure 29
Tire Inspection 29-30
Tire Pressure Chart 29
Tool Kit 34
Top View of Motorcycle 15
Trip Odometer 53
Troubleshooting 55
Turn signal switch 17
Understanding Warnings ..... 1
Vehicle Description 13-15
Vehicle Identification Number (VIN) .. 58
Voltmeter 54
WarrantyCoverage 64
Warranty Policy 68-69
Warranty Responsibilities 64
Warranty Rights and Obligations .... 64
MAINTENANCE RECORD
MAINTENANCE RECORD
MAINTENANCE RECORD
MAINTENANCE RECORD
POLARIS®
SALES INC.
PartNo.9915255
PRINTEDINTHEU.S.A.
- 2000
- V92COwner'sManual
- WARNING
- FOREWORD
- The Polaris Preferred Registered Owners (PRO) Family Your Owners Program
- As a PRO Family member, you're entitled to opportunities such as:
- CONTENTS
- UNDERSTANDING WARNINGS
- Safety Alert
- ⚠ WARNING
- ⚠️ CAUTION
- NOTE
- SAFETY INFORMATION
- WARNING:
- SAFETY FIRST
- Protective Apparel
- Safe Riding
- Modifications
- Accessories
- Loading
- Safe Operating Rules
- Fuel
- Parking
- Important Labels
- 4
- 5
- VEHICLE EMISSION CONTROL INFORMATION (49 STATE) LABEL AND EMISSION CONTROL ROUTING (CALIFORNIA)
- Left Side of Motorcycle
- VEHICLE DESCRIPTION
- Right Side of Motorcycle
- Top View of Motorcycle
- CONTROL PARTS AND FUNCTIONS
- Main Switch Controls
- Multi-Function Display (MFD)
- Left Handlebar Controls
- Right Handlebar Controls
- Indicator Lights
- Clutch Lever
- Shift Pedal
- Front Brake Lever
- Rear Brake Pedal
- Steering Lock
- Seat
- PRE-RIDE INSPECTION
- Fuel Cap
- Engine Oil
- Front and Rear Brakes
- Brake Fluid Level/Leakage
- Clutch
- Throttle
- Engine Idle
- Lights, Signals and Switches
- Fittings and Fasteners
- Tires
- Tire Air Pressure
- Tire Inspection
- OPERATION
- Tire Inspection (cont.)
- Starting and Warming up a Cold Engine
- Starting and Warming up a Cold Engine (cont.)
- Shifting
- CAUTION
- To Start out and Accelerate
- Deceleration
- Recommended Shift Points
- Engine Break-in
- MAINTENANCE
- Periodic Maintenance
- Tool Kit
- Engine Oil Level
- Engine Oil and Oil Filter Replacement
- Engine Oil and Oil Filter Replacement (Continued)
- Air Filter
- Brake System
- Brake Pedal Freeplay Adjustment
- Fluid Level Inspection
- Front Brake Pad Inspection
- Rear Brake Pad Inspection
- Brake Pad Replacement
- Clutch Adjustment
- Lubrication Points
- Sidestand Pivot
- Front Fork Inspection
- Oil Leak Check
- Operation Check
- Rear Wheel Alignment Inspection & Adjustment
- Fuse Replacement
- Fuse Box Diagram
- Headlight Adjustment
- Drive Belt Inspection
- Drive Belt Sprockets Inspection
- Drive Belt Tension Inspection
- Spring Pre-Load Adjustment
- BATTERY
- Battery Connections
- Battery Storage
- MULTI-FUNCTION DISPLAY
- MFD Functions
- TROUBLESHOOTING
- CLEANING AND STORAGE
- Cleaning
- Storage
- IDENTIFICATION
- Identification Numbers Record
- Key Identification Number
- Vehicle Identification Number (VIN)
- Model Label
- Engine Label
- REPORTING OF SAFETY DEFECTS
- Reporting Safety Defects
- CONSUMER INFORMATION
- Motorcycle Noise Regulation
- Tampering Warning: Motorcycle Noise Regulations
- Maintenance Record
- EMISSIONS CONTROL SYSTEM WARRANTY
- Your Warranty Rights and Obligations
- MANUFACTURER'S WARRANTY COVERAGE
- OWNER'S WARRANTY RESPONSIBILITIES
- NOISE EMISSION WARRANTY
- VICTORY MOTORCYCLE WARRANTY POLICY
- LIMITED WARRANTY
- REGISTRATION
- WARRANTY COVERAGE AND EXCLUSIONS:
- LIMITATIONS OF WARRANTIES AND REMEDIES
- HOW TO OBTAIN WARRANTY SERVICE
- INDEX
Brand : Victory
Model : Standard Cruiser (2000)
Category : Motorcycle