
SKY-211 - NAS AIRLIVE - Free user manual and instructions
Find the device manual for free SKY-211 AIRLIVE in PDF.


| Product Type | USB VoIP Gateway |
| Model | SKY-211 |
| Brand | AirLive |
| Main Function | Make and receive Skype calls using a standard telephone handset |
| Phone Line Compatibility | PSTN (regular telephone line) |
| Computer Interface | USB 1.1/2.0 |
| System Requirements | Windows 2000/XP, Pentium III 667MHz, 128MB RAM, 50MB free disk, Skype software |
| VoIP Features | SkypeOut calling, speed dial, call forwarding, 3-way conferencing, call waiting, voicemail access |
| Telephone Answering Machine | Built-in IVR-based TAM with remote access and PIN security |
| Call Recording | Manual and automatic recording in WAV format |
| Indicators | PSTN LED, VoIP LED, system tray icon with status |
| Connectors | 1x RJ-11 PHONE, 1x RJ-11 LINE, 1x USB Type-B |
| Power Supply | USB bus-powered (no external power adapter) |
| Dimensions (approx.) | 95 x 60 x 25 mm (estimated) |
| Weight (approx.) | 50 g (estimated) |
| Package Contents | USB VoIP Gateway, USB cable, RJ-11 cable, CD-ROM (driver/manual/QSG), Quick Setup Guide |
| Warranty | Refer to seller |
Frequently Asked Questions - SKY-211 AIRLIVE
User questions about SKY-211 AIRLIVE
0 question about this device. Answer the ones you know or ask your own.
Ask a new question about this device
Download the instructions for your NAS in PDF format for free! Find your manual SKY-211 - AIRLIVE and take your electronic device back in hand. On this page are published all the documents necessary for the use of your device. SKY-211 by AIRLIVE.
USER MANUAL SKY-211 AIRLIVE
natural_image
Collection of network equipment including OvisLink, Ethernet, and various electronic devices (no visible text or labels)Contents
- Introduction 1
- Product Overview 2
- Hardware Installation 4
4.Driver Installation 6 - Enabling USB VoIP Gateway 12
- USB VoIP Gateway States 14
- Testing USB VoIP Gateway 15
- Making & Receiving Calls 17
- Switching Between VoIP and Regular Calls 22
- Conference Call Between VoIP and Regular Calls 23
- 3-Ways Conferencing 24
- Forwarding Calls 25
- Telephone Answering Machine 29
- Interactive Voice Response (IVR) 31
- Toll Bypass 33
- Skype Voicemail 34
- Call Recorder 35
- Changing the Default Settings 38
- Disabling USB VoIP Gateway 39
- Uninstall The USB VoIP Gateway 40
- Trouble Shooting 42
1. Introduction
Congratulations on your purchase of this outstanding AirLive USB VoIP Gateway. This device is an USB VoIP Gateway which is an exciting new device that let's you make and receive Skype™ calls using your standard telephone handset.
After you follow the simple installation you will be able to do the following:
☑ Continue to make and receive regular calls as you normally do
√ Make and receive Skype™ calls using your standard telephone
☑ Forward Skype™ calls to your mobile phone
Make Skype™ calls from your mobile phone even when you are away from your computer
☑ Switch between a Skype™ call and a regular phone call
This USB VoIP Gateway is fully compatible with Skype™ applications that can save cost for long distance and international calls while establishing voice communications from PC to PC over the Internet.
This User Manual will help you get the most out of your new device. Please read it carefully and keep it handy for future reference.
2. Product Overview
This AirLive USB VoIP Gateway let's you make and receive Skype™ calls using your standard telephone handset. It delivers the seamless integration of traditional and IP-based telephony to residential and SOHO users by turning any PSTN telephone into a dual function PSTN and VoIP handset. This USB VoIP Gateway's intelligent forwarding features enable forwarding of incoming VoIP calls to your mobile phone, toll bypass from your mobile phone, and 3-ways conferencing in between VoIP and PSTN. Intelligent bridging features enable conference calling and call switching without a subscription fee.
This USB VoIP Gateway is a professional grade, Voice over free Internet device with superior sound quality, clean styling and unmatched ease of use.
Basic System Requirement
Before continuing with the installation please make sure you have the following minimum system requirements:
☑ Pentium III 667MHz compatible Processor and above.
☑ Computer running with Windows XP or Windows 2000 operating systems.
☑ Computer system with installed Skype™ software and a valid Skype™ registered account.
☑ High speed or broadband Internet access.
☑ Telephone (regular telephone, cordless phone, DECT phone, ...)
☑ Telephone service (for conf call, 3 way calling and forwarding features)
☑ Computer System with installed 128MB RAM or more.
☑ At least 50MB of free hard disk space for driver installation.
☑ An installed CD-ROM Drive.
☑ One free USB port.
Package Content
The USB VoIP Gateway package contains the following items:
☑ One USB VoIP Gateway.
☑ One USB Cable.
☑ One RJ-11 Cable.
☑ One CD-ROM (Driver / Manual / Quick Setup Guide).
☑ Quick Setup Guide
If any of the above items are damaged or missing, please contact your dealer immediately.
USB VoIP Gateway – Front Panel
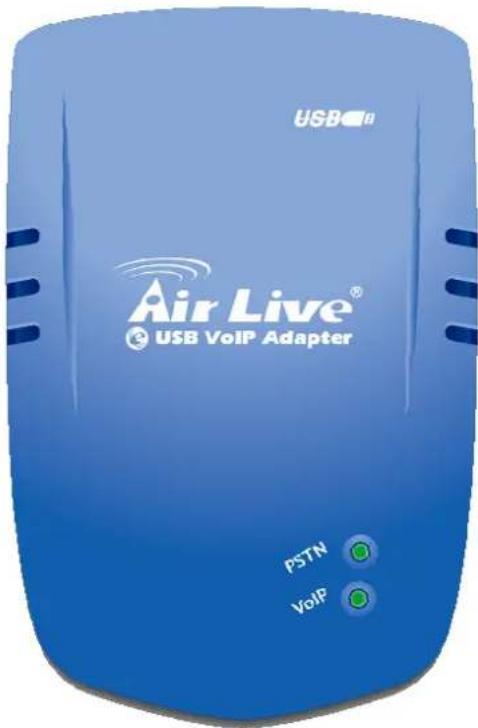
☑ PSTN: PSTN LED lights up indicates a PSTN call (Default Mode).
☑ VoIP: VoIP LED lights up indicates an Internet VoIP call.
USB VoIP Gateway – Back Panel
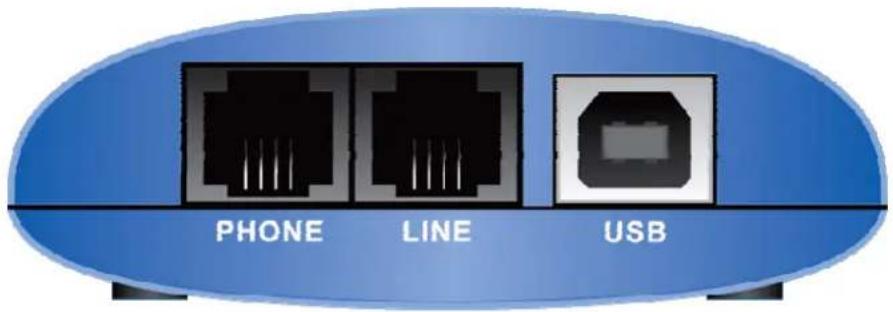
☑ PHONE: RJ-11 Jack connecting to a regular analogue telephone set.
☑ LINE: RJ-11 Jack connecting to PSTN line.
☑ USB: USB port for host computer connection.
3. Hardware Installation
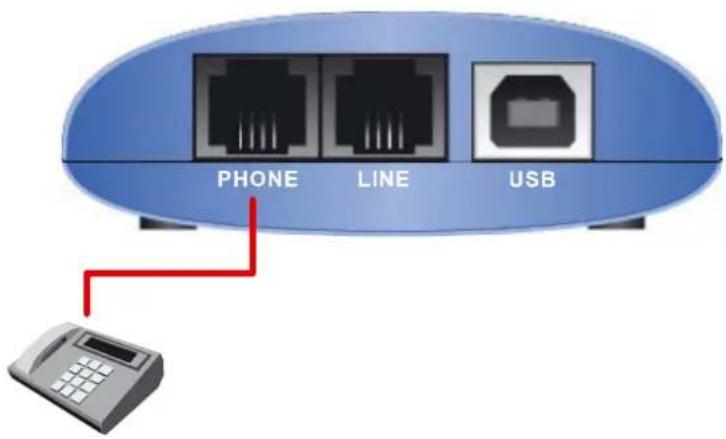
Step A: Connect a standard telephone handset to the USB VoIP Gateway's "PHONE" jack using a telephone cable as shown below:
Step B: Connect a telephone cable between the USB VoIP Gateway's "LINE" jack and a wall as shown below.
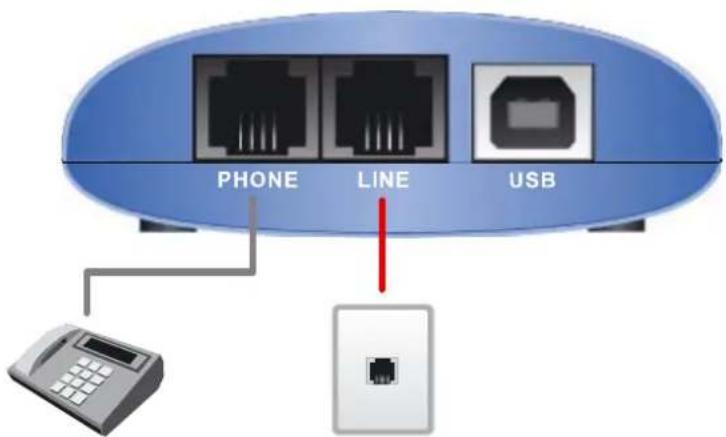
Note that this is only required for making regular phone calls or for forwarding Skype™ calls to your mobile (or other off-site) phone or for toll bypass applications.
Step C: You final configuration should resemble the following:
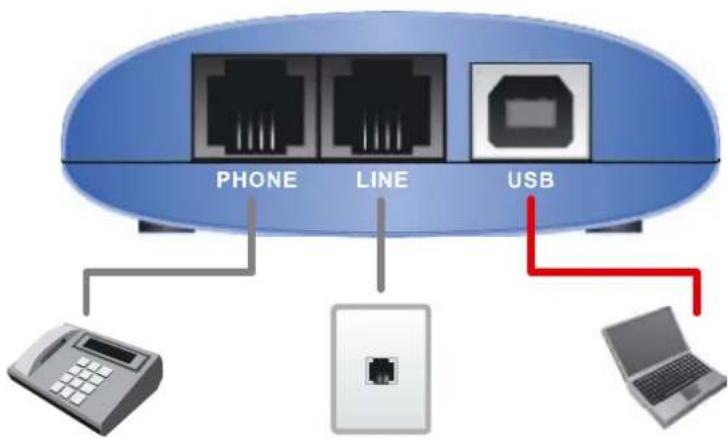
flowchart
graph TD
    A["Router"] -->|PHONE| B["Telephone"]
    A -->|LINE| C["Device"]
    A -->|USB| D["Laptop"]
    style A fill:#333,stroke:#fff,color:#fff
    style B fill:#999,stroke:#000
    style C fill:#ccc,stroke:#000
    style D fill:#666,stroke:#000
4. Driver Installation
This section describes the USB VoIP Gateway Driver installation procedures. Follow the following instructions step by step to complete the USB VoIP Gateway driver installation.

Please make sure you have your broadband Internet access connected before installing this USB Internet Phone driver.
Step 1: Turn on your Computer.
Step 2: Check the availability of your broadband Internet access by simply access the “Google” web site (Launch your web browser and enter the Google web address: www.google.com in the address field the press “Enter”). The Google website index page will display on your screen if your broadband connection is correctly set and access to the Internet is available.
Step 3: Connect the USB cable provided to the USB port of the USB VoIP Gateway, and connect the other end of the USB cable to a USB port on your computer.
A "Found New Hardware Wizard" screen will pop-up as shown below. Click "Cancel" to close the wizard.
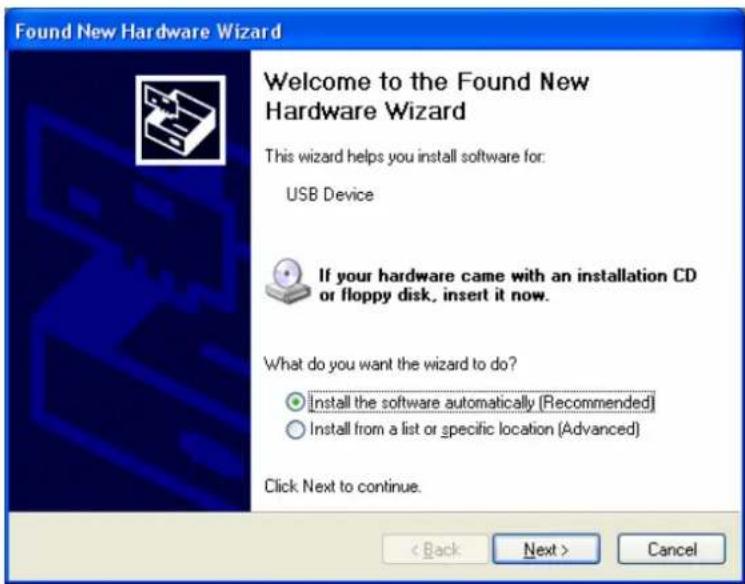
Step 4: Insert the provided CD-ROM into your computer CD-ROM Drive. The following screen will pop-up. Click "Driver & Utility" to install the USB VoIP Gateway driver to your computer system.
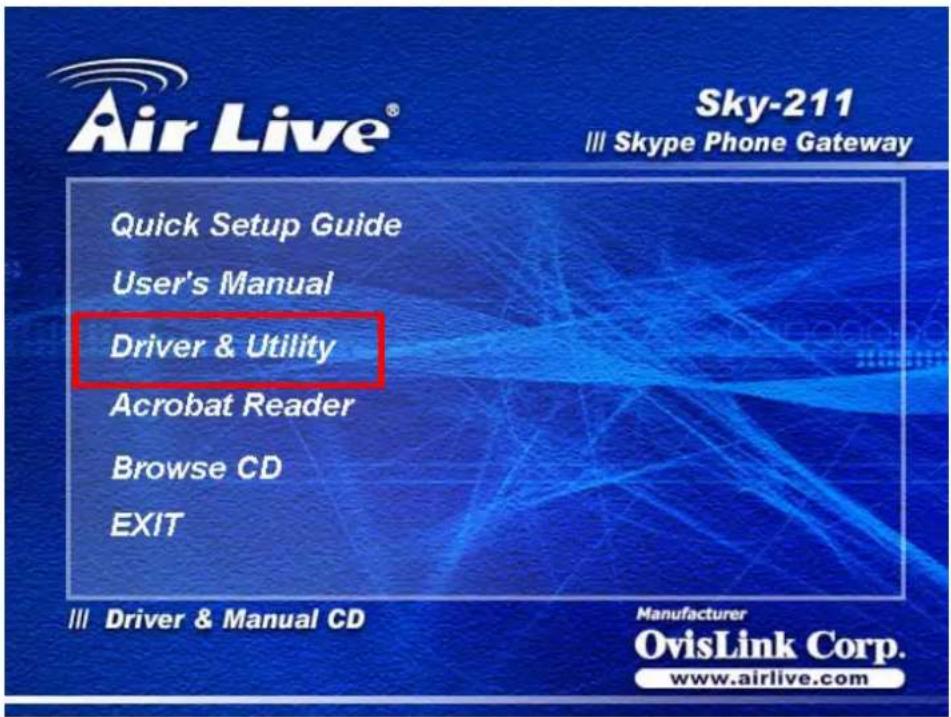

It is strongly recommended that you use the Setup CD provided to install the USB VoIP Gateway.
I. Skype™ - New User
Step A: If you are a new user to Skype™ or your Windows System is not yet installed Skype™ software, the following screen will pop-up when clicking the "Driver Install" button at "Step 4":
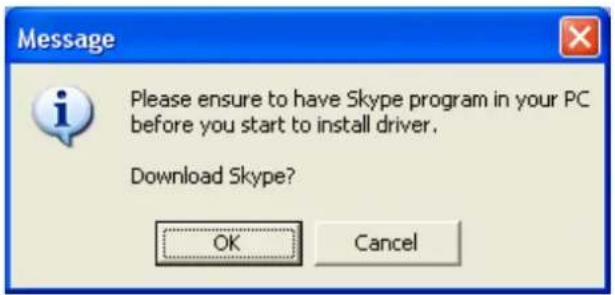
Click "OK" to download the SkypeTM software and follow the instruction to properly install and register the SkypeTM software to your Windows System.
Please go to http://www(skype.com and check for technical support if you have any installation or registration problems.
Step B: The USB VoIP Gateway driver will install automatically at the same time while you are installing or registering your Skype™ software. The following screen will pop-up when the USB VoIP Gateway driver is properly installed.
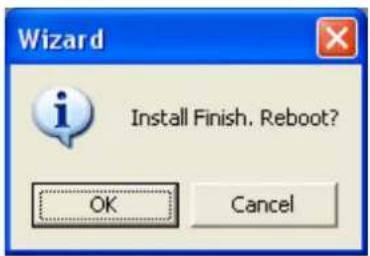
Click "Cancel" to close the "Wizard" and continue your Skype™ Software installation or registration procedures.
Step C: The following screen will pop-up when you'd completed your Skype™ installation/registration and the Skype™ software is successfully loaded and running in your Windows System:
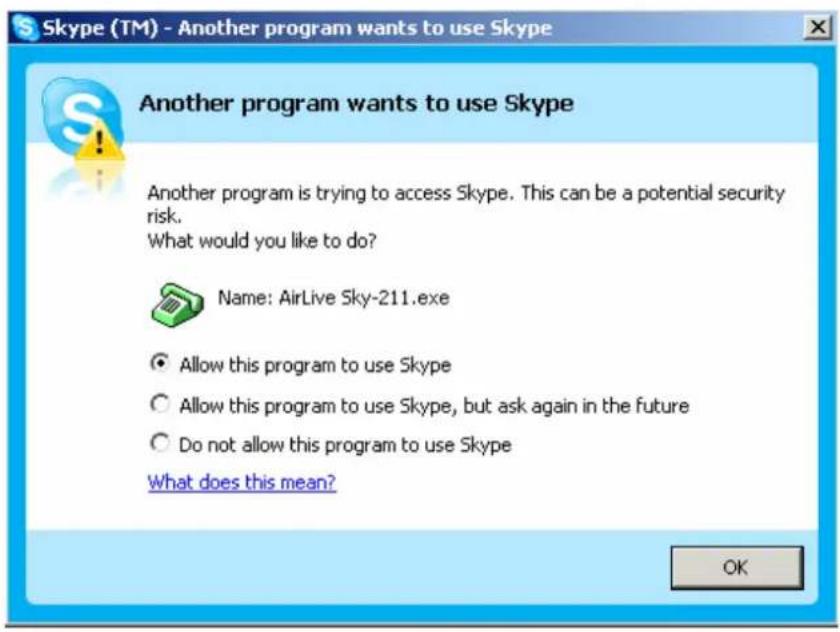
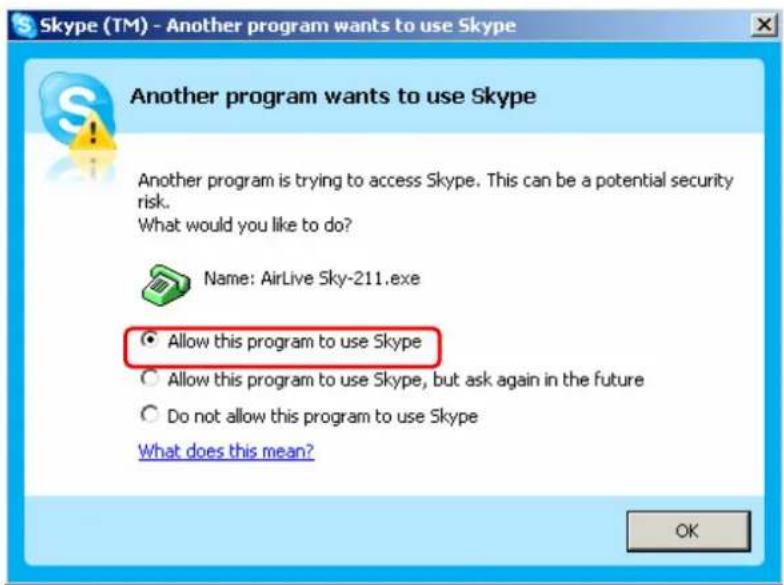
Click "Allow this program to use Skype" then click the "OK" button to allow the USB VoIP Gateway's middleware to access Skype™.
II. Skype™ - Existing User
Step A: If you are an existing and registered Skype™ user, double click the Skype™ icon to enable/login your Skype™.
Step B: The Skype™ software checking process will be omitted after clicking the “Driver Install” button at “Step 4”. USB VoIP Gateway driver will install automatically and start copying all the necessary files to your Windows System.
Step C: The following screen will pop-up when the USB VoIP Gateway's middleware has successfully detect your Skype™ is loading and running.
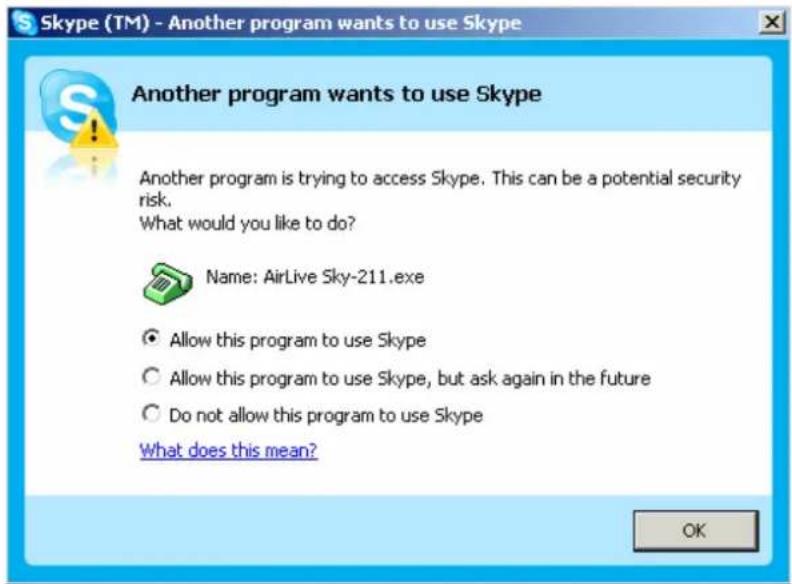
Click "Allow this program to use Skype" then click the "OK" button to allow the USB VoIP Gateway's middleware to access Skype™.
Step D: The following screen will pop-up at the same time when the USB VoIP Gateway's driver is properly installed.
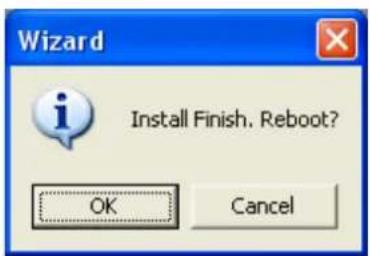
Click "Cancel" to close the "Wizard".
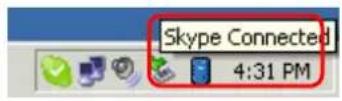
Step 5: When the installation completes you should see the following message appear near your system tray and a new telephone icon (circled in red below) in your system tray as shown below.
The telephone icon indicates that the USB VoIP Gateway's software is installed and running.
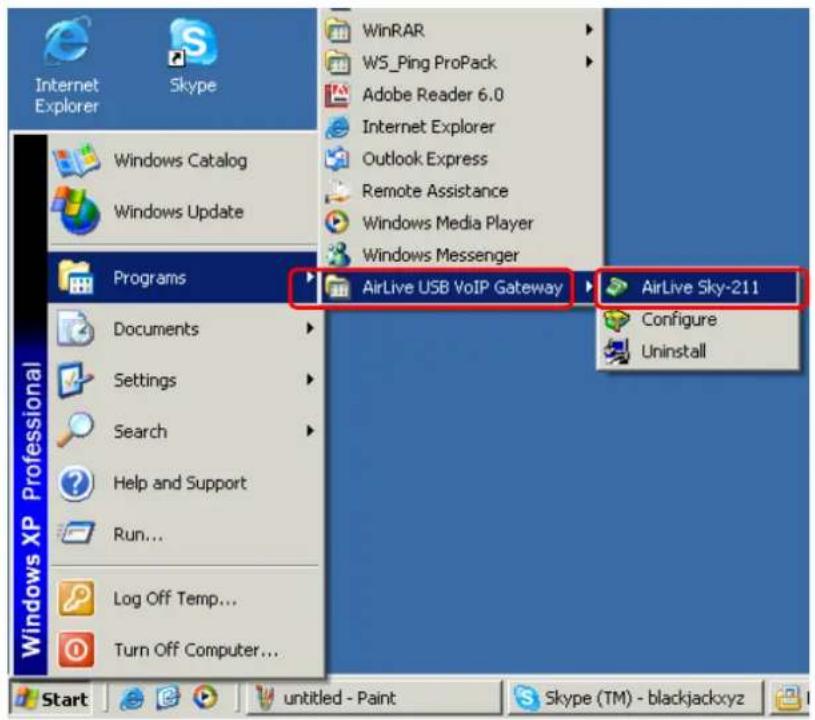
You will see a new program group named "AirLive USB VoIP Gateway". Accessed from Start → Programs as shown below.

Don't forget to "Reboot and Restart" your computer to activate your setting.
5. Enabling USB VoIP Gateway
In order to use USB VoIP Gateway and it's features:
-
The USB VoIP Gateway must be plugged into the PC.
-
A telephone handset must be plugged into the USB VoIP Gateway "PHONE" jack.
-
The USB VoIP Gateway "LINE" jack must be connected to the telephone wall jack.
Note: This is only required for making regular phone calls or for forwarding Skype™ calls to your mobile (Or other off-site) phone or for toll bypass applications.
- The USB VoIP Gateway agent must be running (A "Blue" adapter icon in the Windows System Tray).
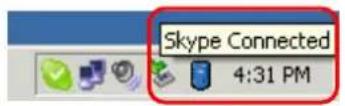
- The Skype™ must be running (A "Green" tick in the Windows System Tray).
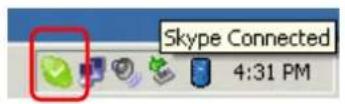
Note: If the USB VoIP Gateway Agent is not running (i.e. no green telephone in the system tray), make sure the USB VoIP Gateway is connected to the PC and start the USB VoIP Gateway Agent.
Follow the sequence to enable the USB VoIP Agent: Start → Programs → AirLive USB VoIP Gatway → AirLive Sky-211
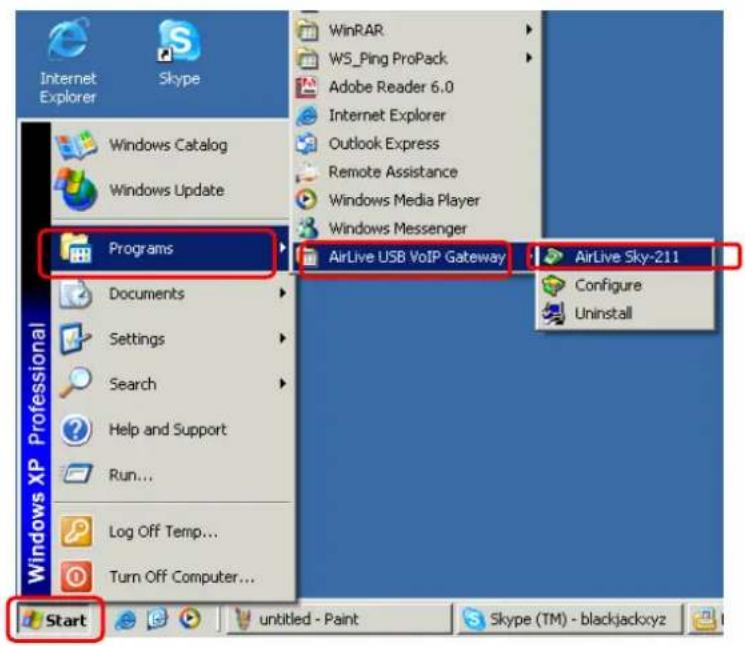
You may see the following screen, select the option, "Allow this program to use Skype" and press the "OK" button.
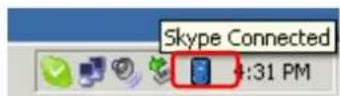
You should now see the USB VoIP Gateway agent in the Windows System Tray as shown below.
You are now ready to use the USB VoIP Gateway.
6. USB VoIP Gateway States
When the USB VoIP Gateway is installed and the software is installed properly, then you will see a "blue" adapter icon in the system tray as shown below:
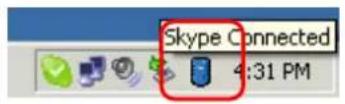
If the USB VoIP Gateway Agent is running and the USB VoIP Gateway is removed or Skype™ is not running, then the adapter icon will be show "RED Cross Mark" on the left corner as shown below:

During an incoming or outgoing Skype™ call, the adapter icon will display green line around the icon as shown below, indicating an VoIP call is being initiated.

When the USB VoIP Gateway Agent is not running, there is no adapter icon in the system tray.
7. Testing USB VoIP Gateway
Skype™ provides a useful feature to test your connection. This special feature let you leave a message which will be playback to you. This will help you verify that your USB VoIP Gateway, USB VoIP Gateway driver and the Telephone set are all connected and installed properly. Follow the following procedures to check your connection:
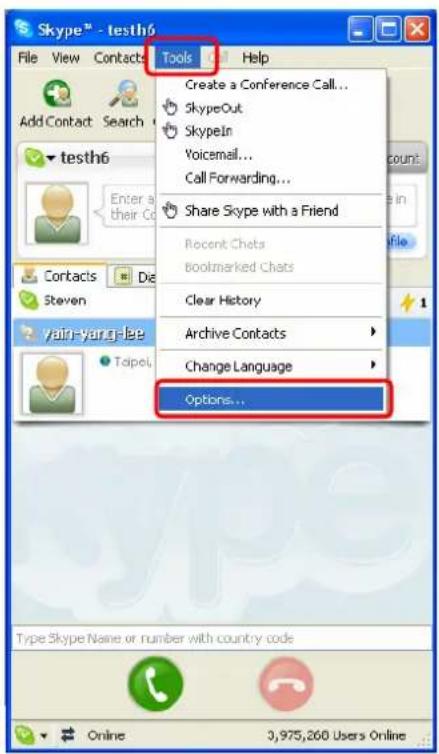
- Double click on the Skype™ icon in your system tray, the following screen will pop-up. Click on "Tools" → "Options". The "Skype™ – Options" screen will pop-up.
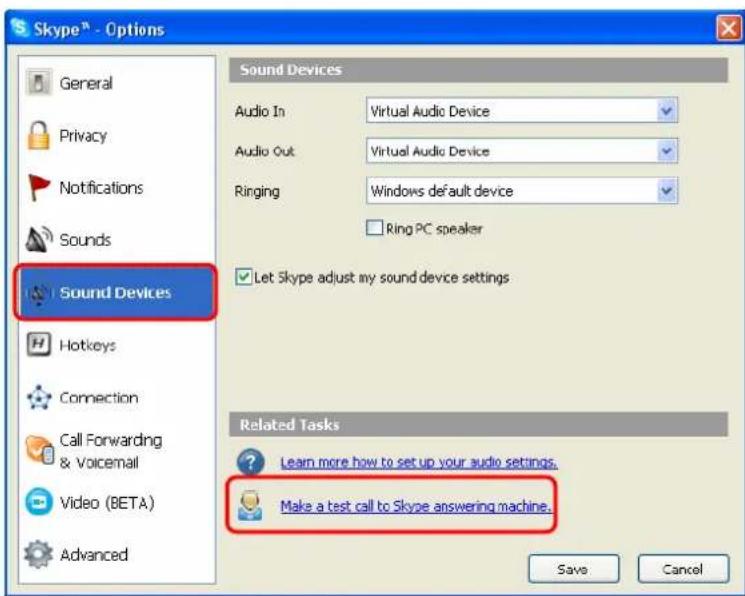
- Click "Sound Devices" then click on "Make a test call to Skype answering machine."
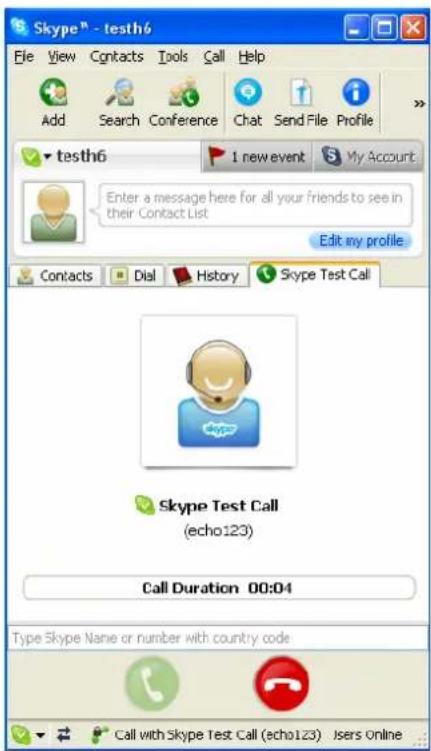
- Within a few seconds, you should see the following screen. Pick up the telephone handset and follow the instructions. The Echo Test Service will ask you to leave a message which will be played back immediately. This will help you verify that the USB VoIP Gateway, USB VoIP Gateway driver and the telephone handset are all connected and installed properly.
8. Making & Receiving Calls
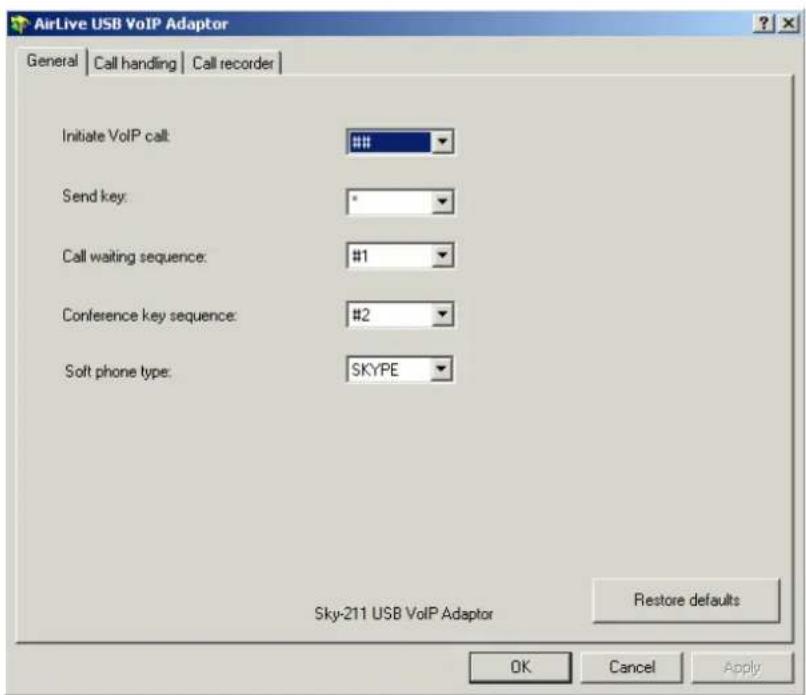
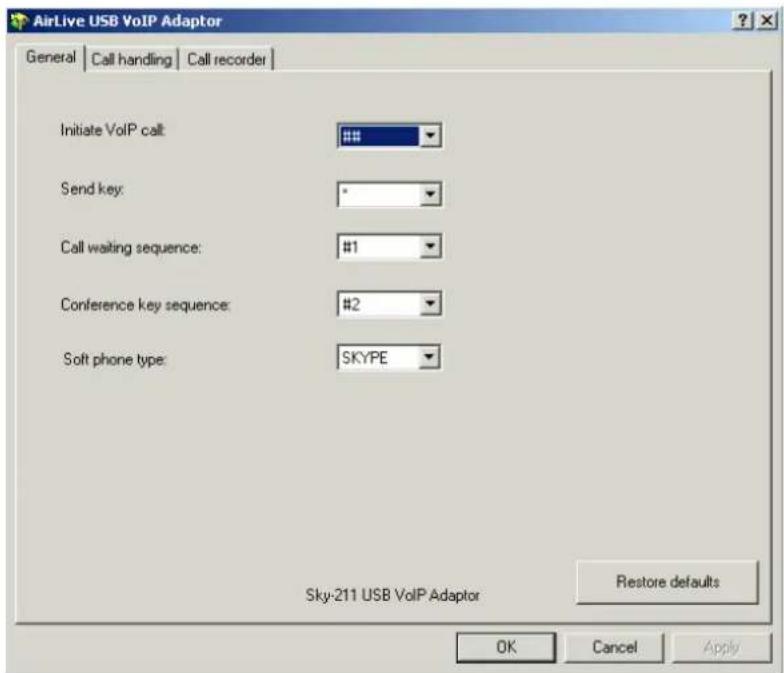
You can change the default settings for sending a call, activating a Skype™ call, switching between a Skype™ call and a regular call (call waiting) and conference calling, by running the USB VoIP Gateway configuration.
Double click on the USB VoIP Gateway Agent in the System tray, you will see the configuration tab as shown below:
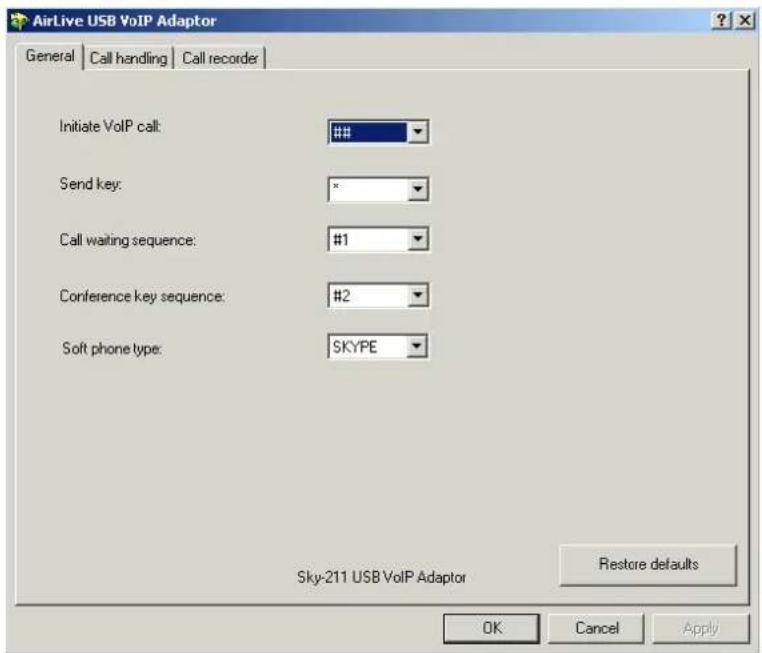
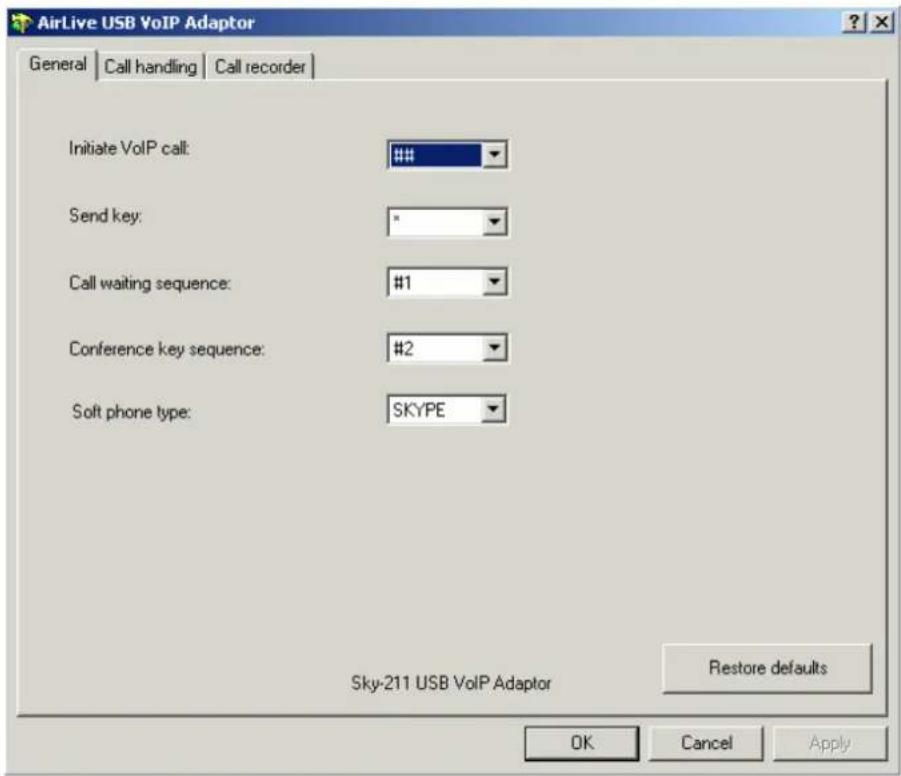
☑ Initiate VoIP call: Press these keys to get a VoIP dial-tone. You can now dial a SkypeOut™ call or a Skype™ speed dial call from your telephone handset.
☑ Send key: Press this key following the phone number (or speed dial number) when making a VoIP call.
☑ Call waiting sequence: Press these keys during a call to switch between a VoIP and regular call. For example to switch from a regular telephone call to an incoming Skype™ call or to switch from a Skype™ call to an incoming regular phone call.
☑ Conference key sequence: While on a Skype™ call and you receive a regular call or while on a regular call and you receive a Skype™ call, press these keys conference together the two calls.
√ Soft phone type: selects which softphone you would like to work with.
√ Restore defaults: Press this button if you want to restore all sequences to their factory shipped settings.
You can continue to use the telephone handset connected to the USB VoIP Gateway to make and receive standard telephone calls as you used without any change.
To make a standard phone call, just pick up the handset and dial as you normally would. To answer (Receive) a standard phone call, just pick up the handset when the phone rings.
To answer the call, just pick up the handset and speak as you normally would. To end the call, simply hang up the handset as you normally would.
If you have SkypeOut™, you can use the USB VoIP Gateway connected handset to make SkypeOut™ calls by picking up the handset, pressing “# #”, to indicate to the USB VoIP Gateway that this is not a standard call but a Skype™ call, dialing as per the SkypeOut™ recommended dialing sequence:
00 + Country Code + Telephone Number (e.g. 0060124552883) and pressing the asterisk “*” key.
In order to make a call to a Skype™ contact, you will need to use the Skype™ program to assign a speed dial (as described in the next section) to each person you would like to call from the USB VoIP Gateway connected handset. Then simply pick up the handset, press “# #” key, to indicate to the USB VoIP Gateway that this is not a standard call but a Skype™ call, you will hear a new dial-tone, press the speed dial number (e.g. 99) and then press the asterisk “*” key.
Setting Up Skype™ Speed Dial
This section describes how to setup speed dials in Skype™. This is required in order to use a USB VoIP Gateway connected handset to dial to a Skype™ contact (Refer to example describe in next section). It is not required for making SkypeOut™ calls using a USB VoIP Gateway connected handset.
Step 1: Double click on the Skype™ icon at the system tray, the following screen will pop-up.
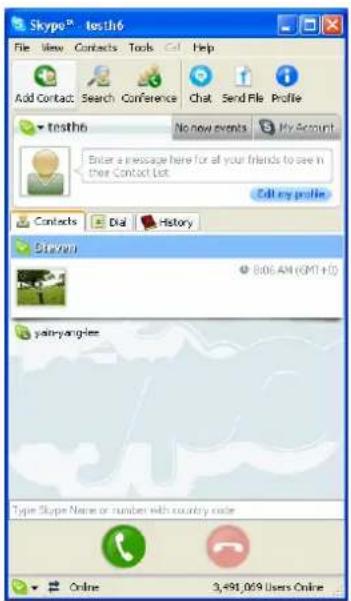
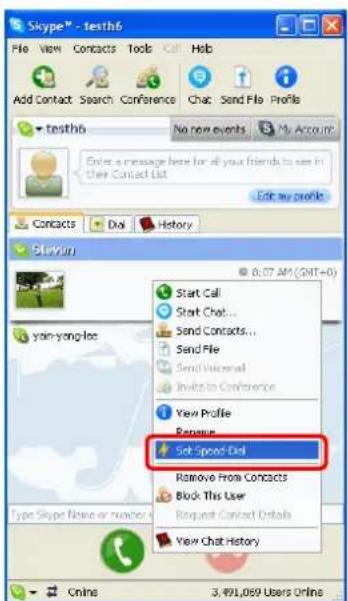
Step 2: Right click on the desired contact as shown below and select "Set Speed-Dial":
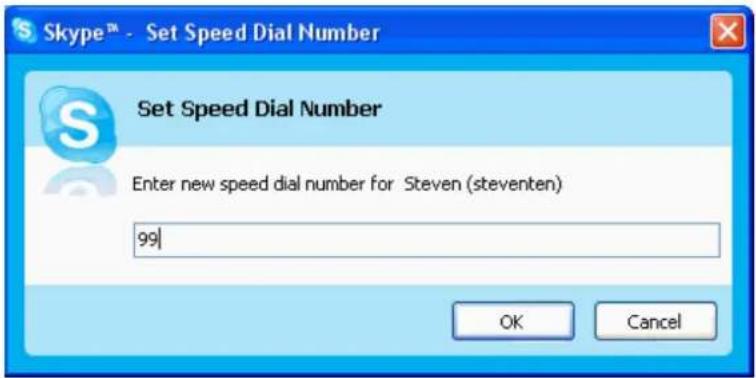
Step 3: Enter the desired speed dial number (e.g. 99) as shown below and press the "OK" button.
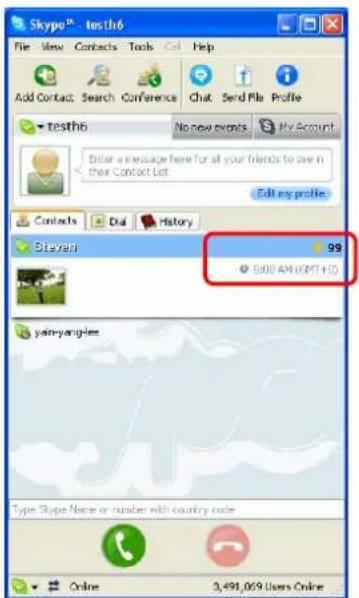
Step 4: You will now see an indication that the Skype™ contact has a speed dial associated with them as shown below.
Making Speed Dial Call
When you'd successfully setup speed dials in Skype™ (Refer to previous section on how to setup a speed dial), double click on the Skype™ icon at the system tray, the following screen will pop-up. Follow the procedures describe below to make a Skype™ Speed-Dial call.
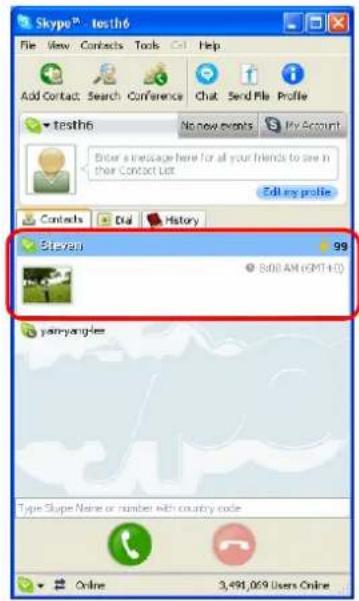
Step 1: Pick up the Telephone handset which is connected to the USB VoIP Gateway. You will hear the PSTN dial-tone.
Step 2: Press the “# #” key to switch the PSTN mode to VoIP mode (The VoIP LED will lights up after pressing the “# # “ key). The PSTN dial-tone will stop immediately and soon a new dial-tone appear.
Step 3: Enter the Speed-Dial number previously set, for example, "99" and follow by "*" key.
9. Switching Between VoIP and Regular Calls
While on a regular phone call you may receive a Skype™ call or while on a Skype™ call you may receive a regular call. The USB VoIP Gateway will indicate an incoming call with an audible call waiting tone and you can do the following:
Press “# 1” to answer new call keeping current call on-hold. Press “# 1” again to return previous call.
☑ Press “# #” to answer call and terminate current call.
Once having 2 active calls, you may:
Press “# 1” putting current call on-hold switching to other call. Press “# 1” again to return previous call.
☑ Press “# #” terminating current call switching to other call.
☑ Press “# 2” to conference the calls together (see next section).
While on a regular phone call, if you receive a Skype™ call, you can see the Skype™ username on your telephone (if it has alphanumeric CLID display).
Please refer to section 8 for key function or key setting.
10. Conference Call Between VoIP and Regular Calls
While on a regular phone call you may receive a Skype™ call or while on a Skype™ call you may receive a regular call. The USB VoIP Gateway will indicate an incoming call with an audible tone and you can conference in the additional caller by pressing “# 2”.
While in a conference call, you may press “# 1” to return to 2 active calls (with PSTN active, VoIP on-hold), and than as described above to switch between calls (“# 1” – put current on hold, “# #” terminate current), or conference them again using “# 2”.
11. 3-Ways Conferencing
During an active Skype™ call the user may press '#1' to put current Skype™ call on-hold and get a PSTN dial tone to establish a PSTN call.
You may then:
☑ Press “# 1” to switch between active calls keeping current call on-hold.
☑ Press “# #” to terminate current call and switch to call on-hold.
☑ Press “# 2” to conference the calls together.
12. Forwarding Calls
The AirLive USB VoIP Gateway can be configured to forward incoming Skype™ calls to another telephone number, such as your mobile phone.
- Double click on the USB VoIP Gateway Agent (blue Adapter in the Windows System Tray) and you will see the USB VoIP Agent Configuration screen as shown below.
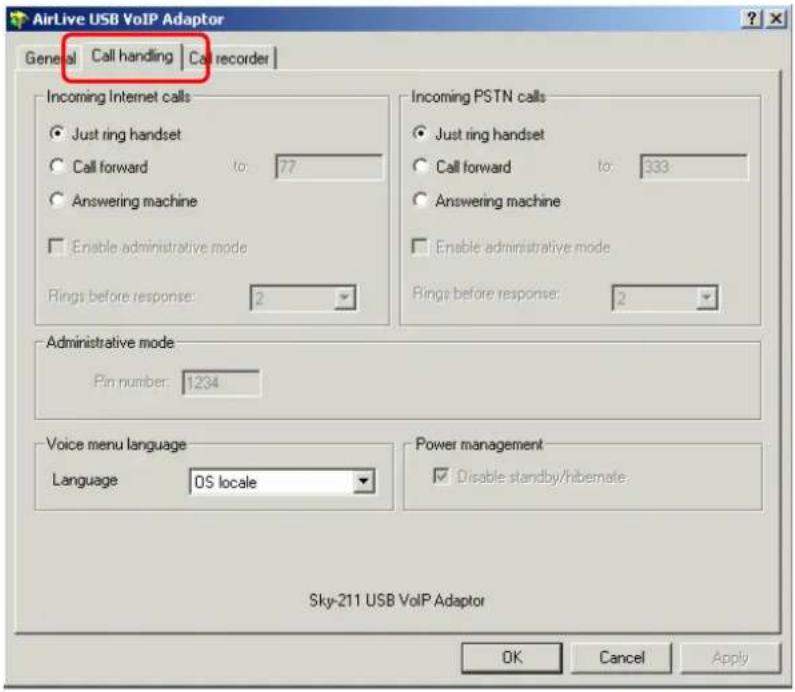
- Press the Call Handling tab to see the Call Handling parameters as shown below.
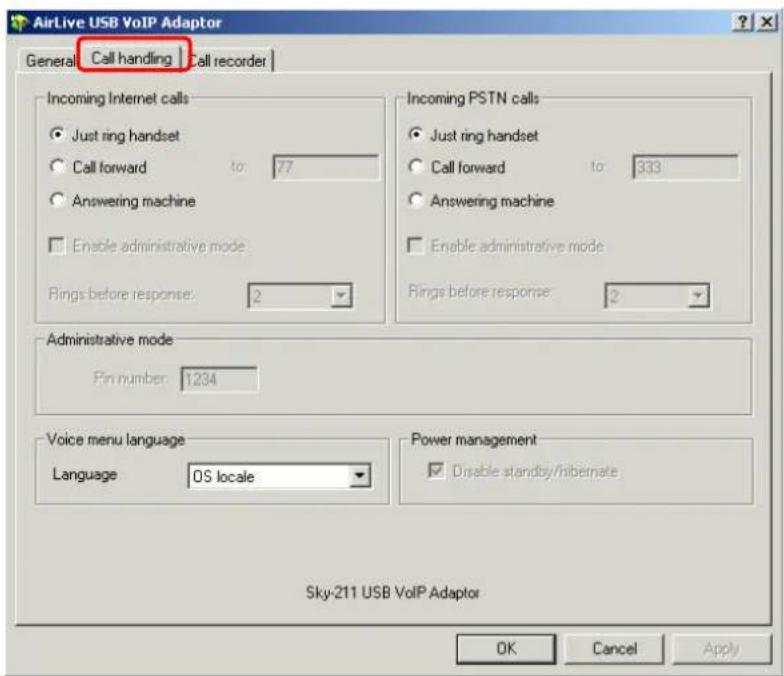
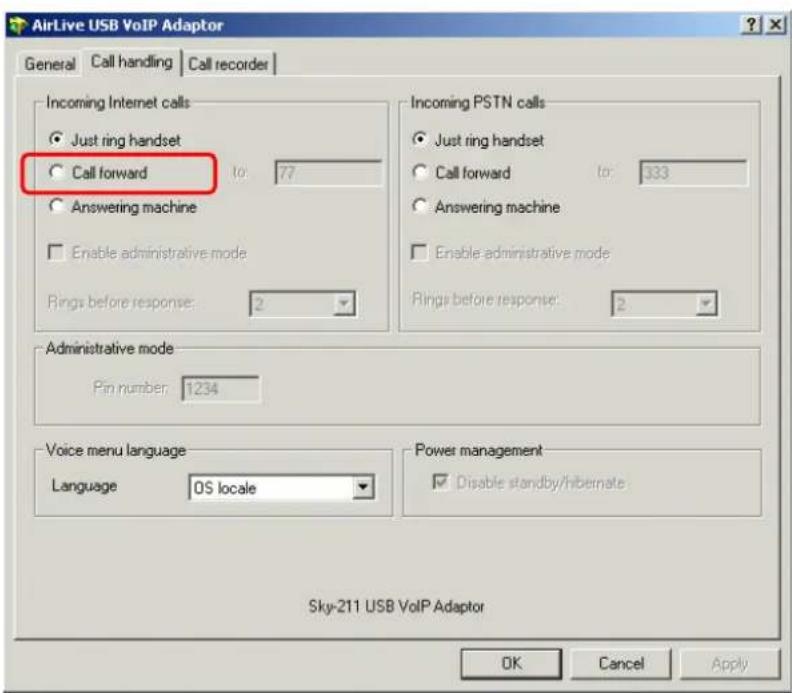
- In order to forward incoming Skype™ calls to a telephone number such as your mobile phone, change the Incoming Internet Calls settings as follows:
- Check the Call Forward checkbox as shown below..
- Select the number of rings before the forwarding takes place as shown below..
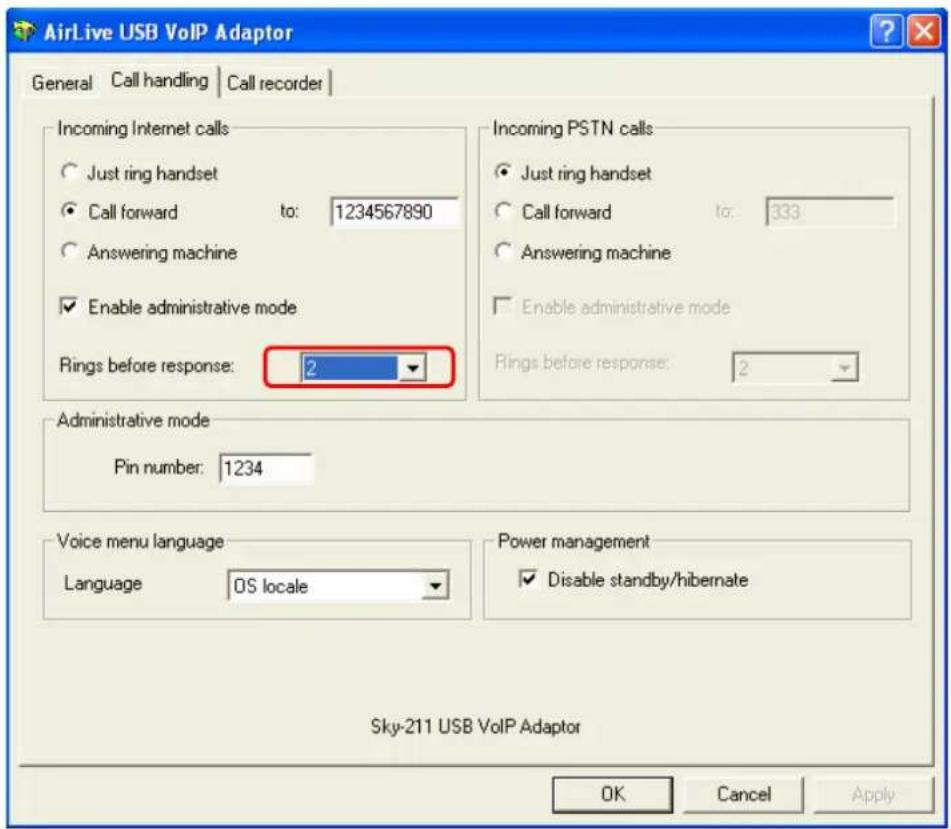
Then select the telephone that should be dialed on the telephone line and press the Apply and/or OK button as shown below. Enter the telephone exactly as you would dial it if you were to pick up a telephone directly connected to the phone line.
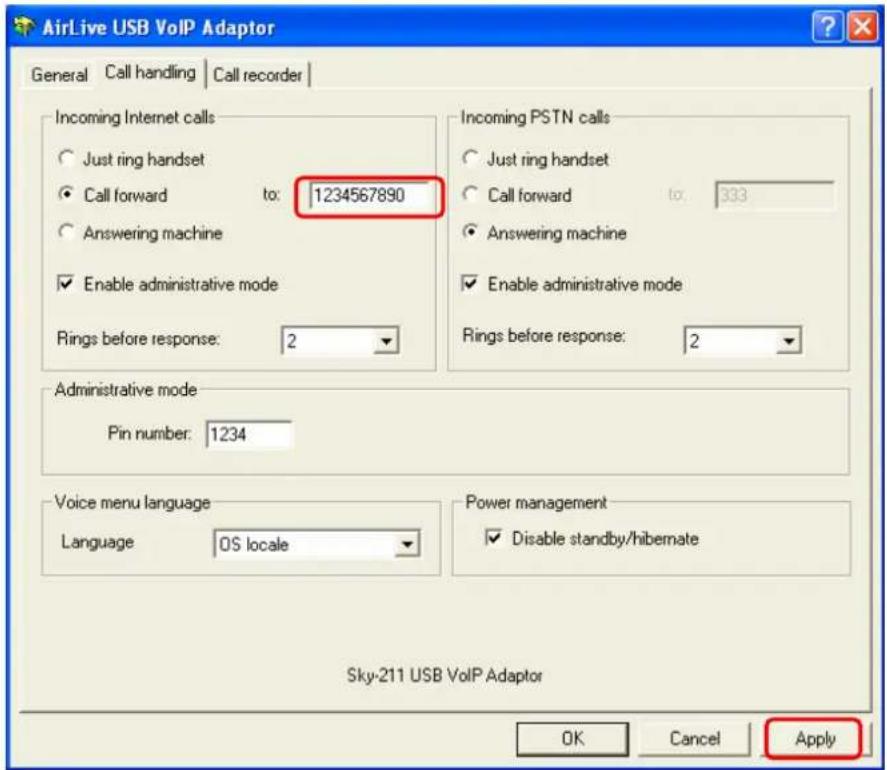
If you are on a PBX, you may need to press a digit to get an outside line (i.e. 9). In this case you would enter 9,,16175551212. You may need to experiment with the number of commas to enter. This is related to the time it takes the PBX to provide a dial tone after pressing the outside line digit (i.e. 9).
The instructions above describe how to forward incoming VoIP calls to the PSTN. In order to forward incoming PSTN calls to a VoIP call, such as through SkypeOut™ or to a Skype account, the instructions above for the “Incoming PSTN Calls” fields. For the number to dial, enter a speed dial number (e.g. 77) associated with the Skype User without the * key (as shown above).or enter the SkypeOut™ number (e.g. 0016175551212).
As you can see in the screenshot above, when forwarding is enabled, the driver will disable the computer's ability to go to standby mode. When the computer tries to go into a standby mode, you will see the following popup:
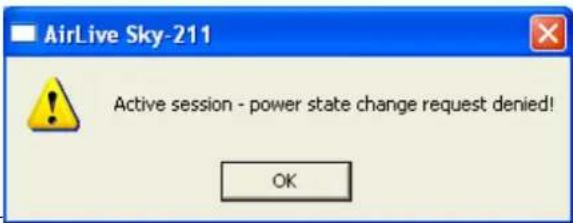
If the computer goes to sleep, then toll bypass will not work. To turn this feature off, uncheck the "Disable Standby/Hibernate" check box. When call forwarding is enabled, incoming callers will hear a voice message indicating that the call is being forwarded. This let's the incoming caller know what is transpiring.
13. Telephone Answering Machine
AirLive USB VoIP Adapter includes a telephone answering machine (TAM) and can be configured to answer incoming VoIP and PSTN calls. The answering machine can be accessed and configured from the local telephone handset connected to TLink as well as remotely by calling into the PSTN line connected to TLink. The access is enabled via the TLink Interactive Voice Response (IVR) system.
The TLink TAM can be used in conjunction with or independent of any VoIP voicemail service you may be subscribed to. When you access the TLink TAM, you will be able to access the VoIP service voicemail, if subscribed, as well as the TLink voice messages. The answering machine is disabled by default. In order to enable the TLink TAM, bring up the TLink Agent -> Call handling tab and press the Answering machine radio dial for Incoming Internet calls (for incoming VoIP calls) and/or Incoming PSTN calls (for incoming phone calls) and select the desired number of rings before the TAM answers as shown below.
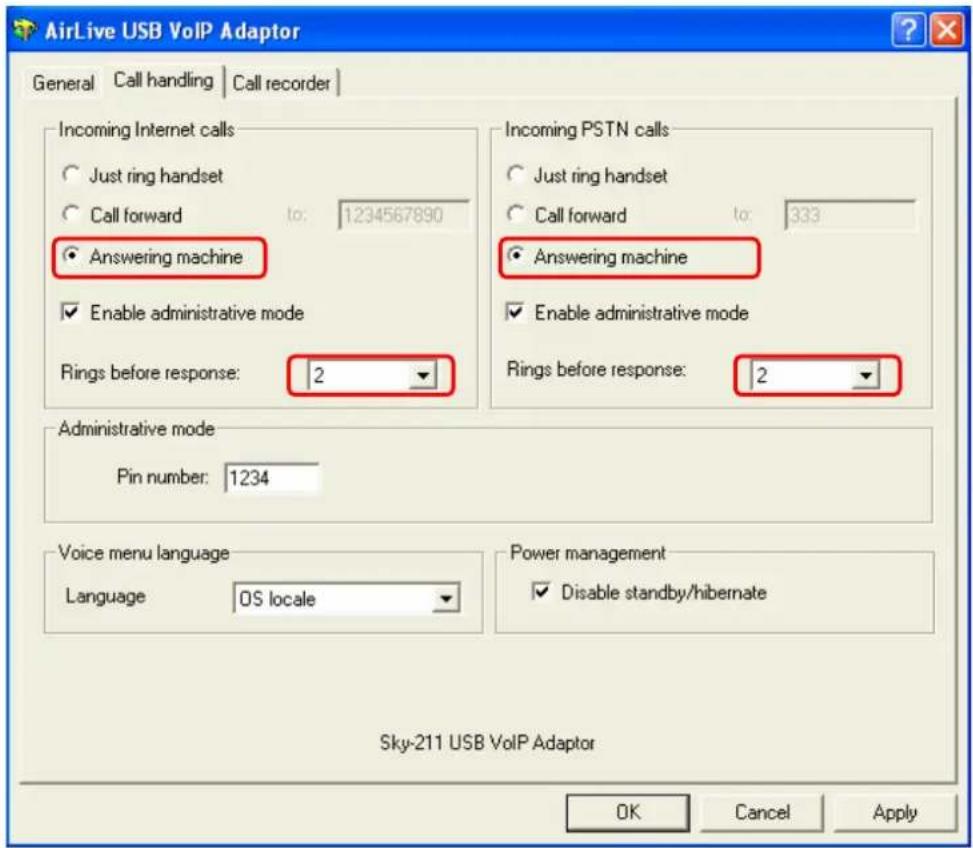
Note your Pin number. This can be changed and will be required in order to check messages or change the TAM options remotely. After all changes are made, press Apply and then OK.
At this point, the AirLive USB VoIP Adapter TAM will answer incoming calls after the desired number of rings. The caller will then hear the Outgoing message and have a chance to leave an incoming message.
Voicemail messages are stored on the computer in WAV format in the following folder:
C:\program files\Ovislink\Sky-211 USB VoIP Adapter\IVR\VoiceMail
14. Interactive Voice Response (IVR)
The IVR system provides access to the TLink TAM for managing recorded messages as well as configuring the TAM. In addition, the IVR provides access to Toll Bypass (explained in the Toll Bypass section) and the VoIP service provider Voicemail. The IVR system can be accessed from the local telephone handset connected to TLink as well as via calling in remotely (explained in the Remote Administrative Access section). Not all features are supported in all modes (i.e. local access versus remote access). See Appendix A for a detailed flow chart of the IVR system.
Local IVR Access
The IVR is accessed locally by picking up the TLink connected telephone handset, going off-hook and switching to VoIP dialtone. (if you have pending VoIP service or AirLive VoIP Gateway TAM voice messages, the VoIP dialtone will have a stutter dial) and pressing the '*' key. At this point the IVR system will provide all the necessary voice queues for the following:
- Listen to locally TLink TAM recorded voice mails
- Delete locally TLink TAM recorded voice mails
- Access the VoIP service provider voice mail system
- Configure the TLink TAM (record new outgoing message, restore the factory default outgoing message, ...) You can press DTMF digits while the menu is being played if you are familiar with the menu options and flow. There is no need to wait until then end of each voice queue. The same applies for voice messages browsing – you may repeat the voice message ('1'), delete the voice message ('2') or skip to next voice message ('3'), while the voice message is being played. Each menu will be played up to 3 times (5 sec silence between repetitions), if no user action taken within this time the call would disconnect with goodbye message.
Remote IVR Access
In order to access the IVR remotely, the Answering Machine OR Call forward option AND Enable administrative mode option must be set for the network (Internet and/or PSTN) you would like to call in on as shown below.
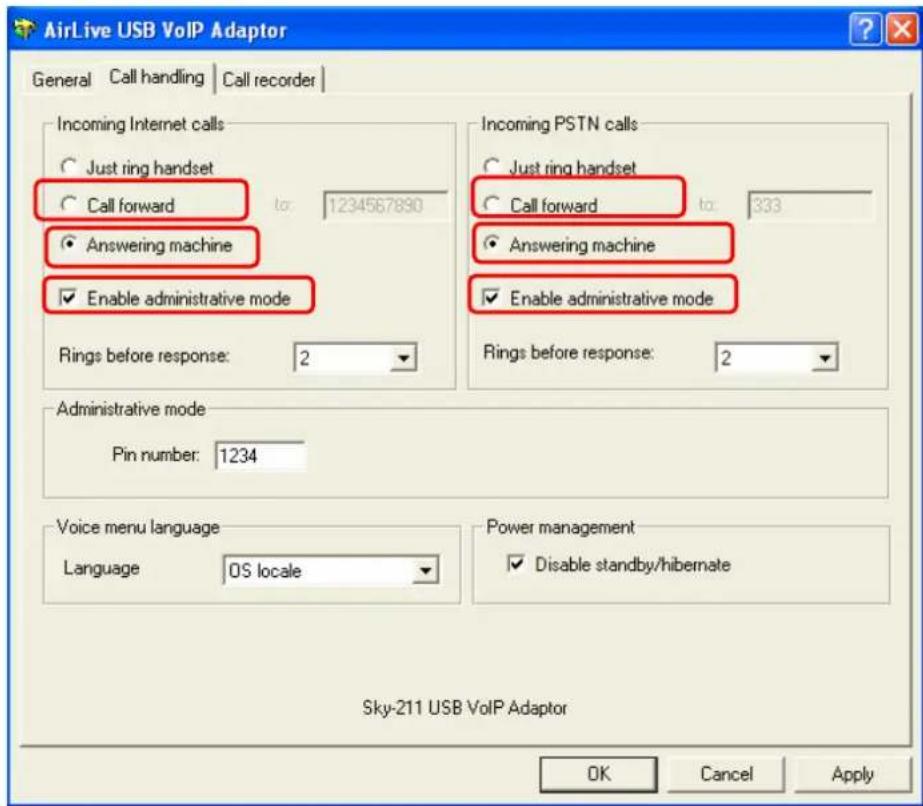
Once enable, you can call in to your PSTN line or your VoIP account to remotely access AirLive USB.VoIP Adapter. When you call in, you will hear the outgoing message or the call forward message. During the message, you should press the '*' key followed by the pin code and '*' key again. You have 3 trials to enter the pin code before the call is disconnected. Once authenticated you can do the following by listening to and responding to the IVR voice prompts:
- Make a toll bypass call (explained in the Toll Bypass section)
- Listen to and/or delete TLink TAM recorded voice messages
- Change the outgoing message
- Access the VoIP service voicemail (when calling from PSTN)
Your pin code can be between 4 and 8 digits.
15. Toll Bypass
Once authenticated (as explained in the Remote IVR Access section), you can make a call on the other network. This is referred to as toll bypass. For example, you can call in on the VoIP network and make a PSTN call or you can call in on the PSTN line and make a VoIP call.
In order to make a call, simply enter the desired number or speed dial number followed by the '*' key and you call will be placed.
If you call in via PSTN and make a VoIP Toll Bypass call, you can terminate the call by
pressing ‘##’ (for quick termination) or simply hang up. If you call in via the VoIP
network and make a PSTN Toll Bypass call, you can terminate the call by ending the VoIP session.
16. Skype Voicemail
With TLink active, the attached telephone handset can be used to check for, and listen to your Skype voicemail.
When you have a new Skype voicemail that you have not listened to, you will hear an intermittent beep in the VoIP dial tone.
If you have no new voicemail (i.e. either no voicemail or voicemail that you have already listened to), the standard VoIP dial tone will be heard.
You can access your voice mail only when there is no call in progress. In order to access your voicemail:
- Pick up the attached telephone handset.
- Press “# #” to get VoIP dial tone.
- If a new Skype voice message exists the VoIP dial tone will have an intermittent beep.
- Press “*” to access voice mail mode.
- Once in voice mail mode the first message is played automatically.
- At the end of each message a trailing "Beep" is played.
- At the end of the last messages a trailing "Beep-Beep-Beep" is played.
- During the playing of current message and within 5 seconds following the end of the message, you can press the 1, 2, 3, 9 in order to perform the following actions:
| User Action Key | |
| Repeat current message | 1 |
| Delete current message, move to next | 2 |
| Keep current message, move to next | 3 |
| Delete all messages | 9 |
- If you don't enter any valid key within 5 sec after message has ended, the system will behave as if you pressed "3".
To exit voicemail mode press “# #” or place the attached telephone in the handset (i.e. on hook). Alternatively, pressing “# 1” will also exit voicemail mode. In either case, the currently playing message will be stopped.
17. Call Recorder
With USB VoIP Gateway active, the attached telephone handset can be used to check for, and listen to your Skype voicemail.
- Double click on the USB VoIP Gateway Agent (Green telephone in the Windows System Tray) and you will see the USB VoIP Agent Configuration screen as shown below.
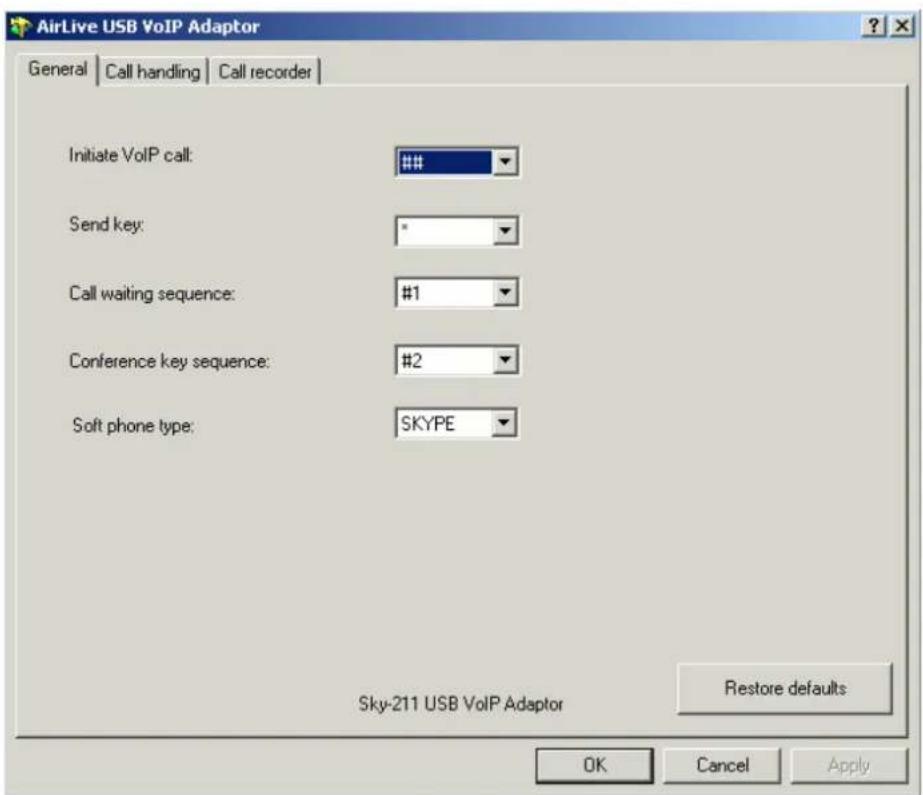
- Click the Call recorder tab, the following screen appears.
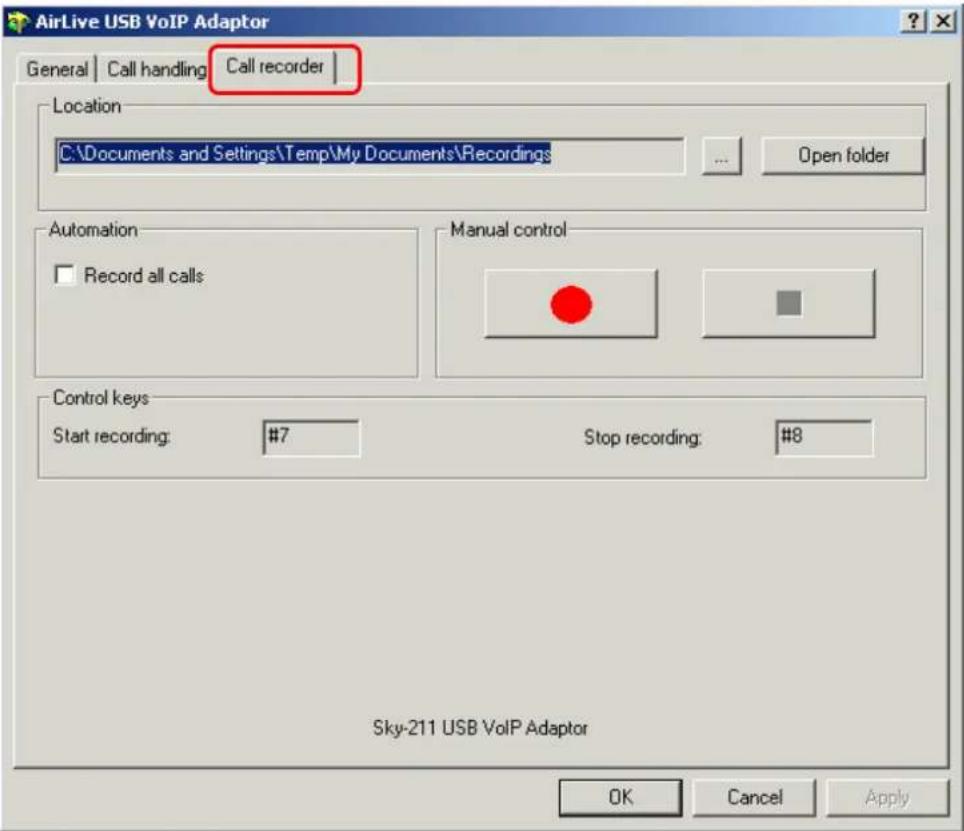
You can change the default location where the recordings will be stored by pressing the button (with three dots) immediately to the right of the location field. The folder containing the recordings can be accessed by pressing the Open folder button. With the location folder open you can access the individual recordings.
Recordings are named according to the following naming convention:
Call_
For example: Call_15-7-2005_11:55:45.wav.
The wave files can be played through any application that supports wave files (e.g. Windows Media Player).
Recording is controlled by two mechanisms: Automation and Manual.
☑ Manual control: Recording has two modes:
- Through the Call Recorder screen above: Controlled by pressing the Record (Red dot) and stop (Black square) buttons.
- From the telephone handset: Controlled by pressing the “# 7” keys (Start recording) and “# 8” keys (Stop recording) on the telephone handset connected to Usb VoIP Gateway.
☑ Automation: All calls will be recorded.

The recorder is storing files to your hard disk drive. We are not responsible for any issues that arise from using the recording function.

We are not responsible for any legal issues that may arise from recording phone calls.
18. Changing the Default Settings
You can change the default settings for sending a call, activating a Skype™ call, switching between a Skype™ call and a regular call (call waiting) and conference calling, by running the USB VoIP Gateway configuration.
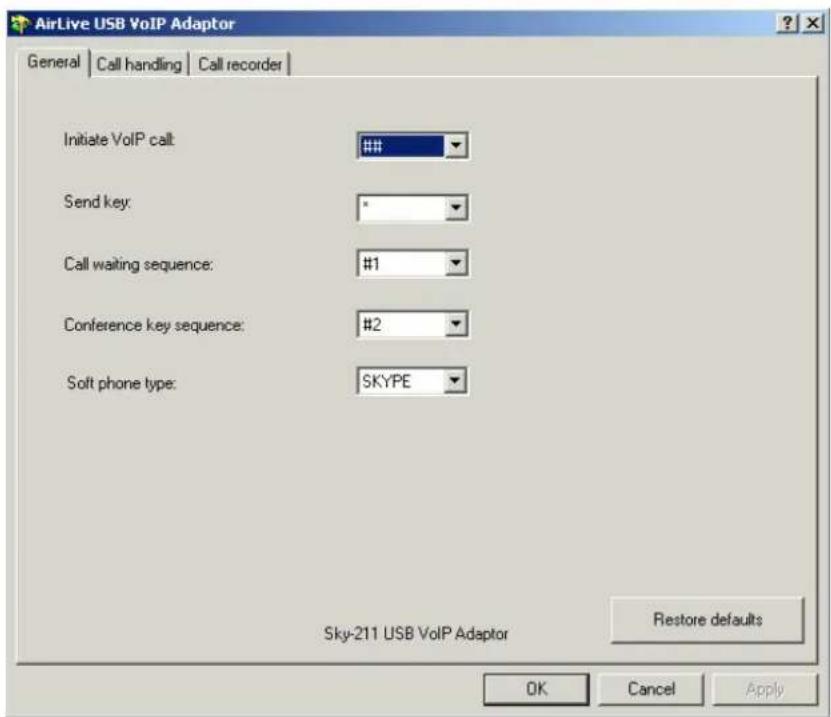
Double click on the USB VoIP Gateway Agent (Green telephone in the Windows System Tray) and you will see the USB VoIP Agent Configuration screen as shown below.
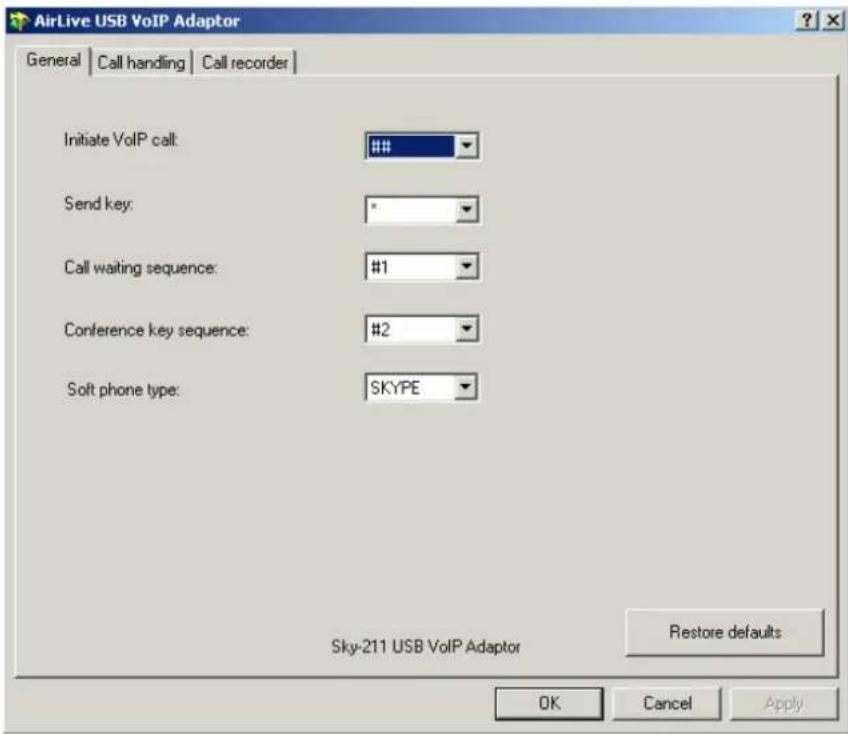
☑ Initiate VoIP call – press these keys to get a VoIP dial-tone. You can now dial a SkypeOut™ call or a Skype™ speed dial call from your telephone handset.
☑ Send key – press this key following the phone number (or speed dial number) when making a VoIP call.
☑ Call waiting sequence – press these keys during a call to switch between a VoIP and regular call. For example to switch from a regular telephone call to an incoming Skype ^™ call or to switch from a Skype ^™ call to an incoming regular phone call.
☑ Conference key sequence – while on a Skype call and you receive a regular call or while on a regular call and you receive a Skype call, press these keys conference together the two calls.
☑ Set phone type – selects which softphone you would like to work with.
Restore defaults – press this button if you want to restore all sequences to their factory shipped settings.
19. Disabling USB VoIP Gateway
In order to disable USB VoIP Gateway, right click on the USB VoIP Gateway Agent in the system tray and select Exit as shown below.
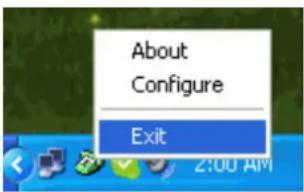
You can now disconnect the USB VoIP Gateway from the PC.
20. Uninstall The USB VoIP Gateway
To uninstall your USB VoIP Gateway from your Windows System, Move your cursor as following sequence "Start" → "Programs" → "AirLive USB VoIP Gateway" and click "Uninstall".
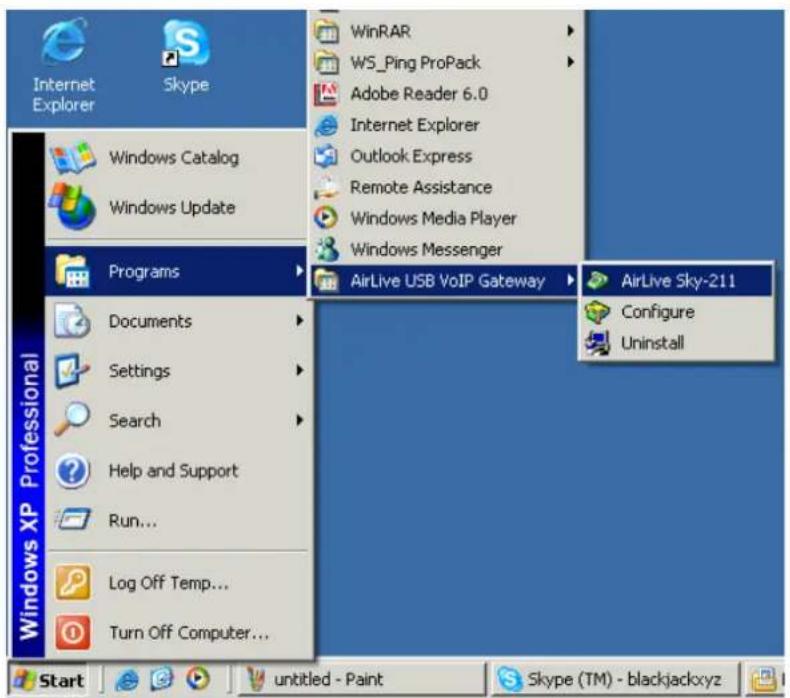
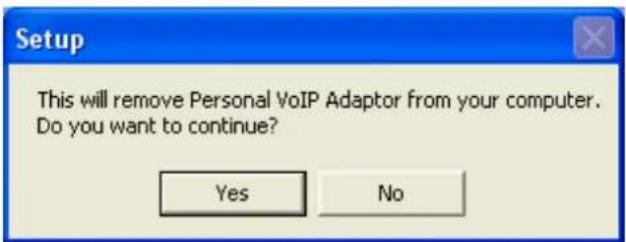
You will see the uninstall notice indicator as follows. Click "Yes" to uninstall the USB VoIP Gateway from your Windows System.
You will see the uninstall indicator as follows.
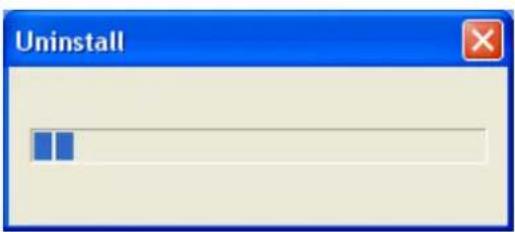
When the uninstall indicator disappears, the un-installation is complete. Do remember to "Reboot and
Restart" your Windows System to activate your setting.
21. Trouble Shooting
The first step in troubleshooting is to read the "Readme" that appears in the USB VoIP Gateway program group. It contains a list of known issues for the current USB VoIP Gateway driver version.
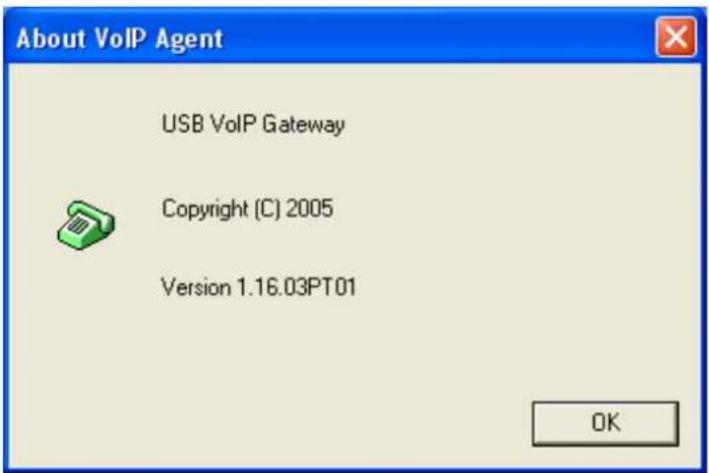
To find out the driver version, right click on the USB VoIP Gateway Agent (Green telephone in the system tray) and select "About".
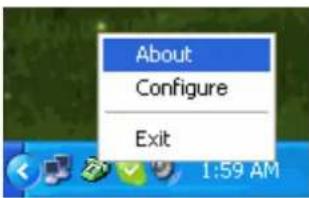
You will see the USB VoIP Gateway Agent About screen below.
Common Fix
If USB VoIP Gateway was working OK and suddenly stops working properly (e.g. stops responding to incoming rings or you cannot get a VoIP dialtone) try the following:
- Quit the USB VoIP Gateway Agent (Right click on the green telephone in the System Tray and select Exit)
- Quit the Skype application
- Unplug the USB VoIP Gateway
- Wait 30 seconds
- Plug in the USB VoIP Gateway
- Start Skype
- Start the USB VoIP Gateway Agent
√ Wrong Device Installed
If you insert the USB VoIP Gateway on a Windows XP SP2 PC "Prior" to installing the software, the USB VoIP Gateway will be incorrectly installed as a Smart Link USB Modem.
Insert the provided CD-ROM into your CD-ROM Drive and click "Driver Install" and this will resolve the issue and install the USB VoIP Gateway properly.
☑ Softphone Version Warning
If you get a Softphone Version Warning from USB VoIP Gateway, then you should upgrade your softphone to the latest version. Otherwise, USB VoIP Gateway may not operate properly.
USB VoIP Gateway does not appear to be responding to incoming calls
There are several reasons why USB VoIP Gateway may not function.
■ USB VoIP Gateway may not work properly with some 4 wire (multi-line) phones.
■ Make sure the USB VoIP Gateway is connected to the PC and USB VoIP Gateway Agent is running (Green phone in the Windows System Tray).
■ Make sure the handset is connected to the Phone jack on the USB VoIP Gateway and not the Line jack.
If the Skype™ application was terminated for any reason while the USB VoIP Gateway Agent was running, you will need to exit the USB VoIP Gateway Agent and then restart it.
■ Some telephone handsets require a battery to be installed in order to ring. If your handset supports a battery, make sure there is a battery installed and that the battery is not depleted.
☑ Cannot hear dial-tone when I pick up the handset connected to the USB VoIP Gateway
Check to make sure that the handset is connected to the correct jack on the USB VoIP Gateway.
☑ Cannot hear the Skype™ call in telephone handset
Check to make sure that Skype is configured to use the USB VoIP Gateway Audio device as it's Audio In and Audio Out Sound Device. This is done as following:
- Select Options from the Skype™ Tools Menu as shown below.
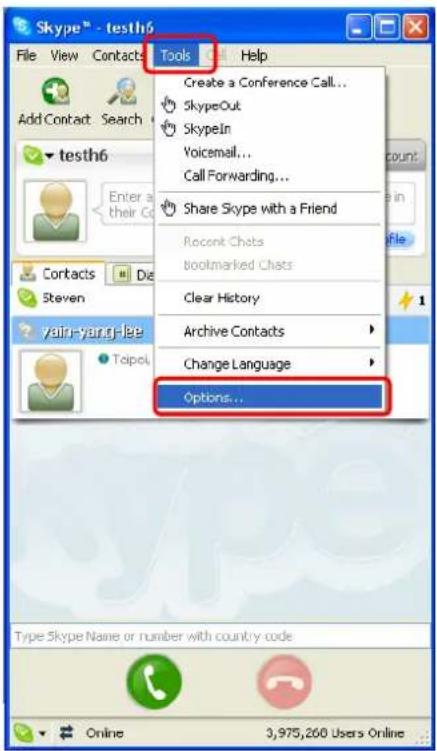
- Select Sound Devices as shown below.
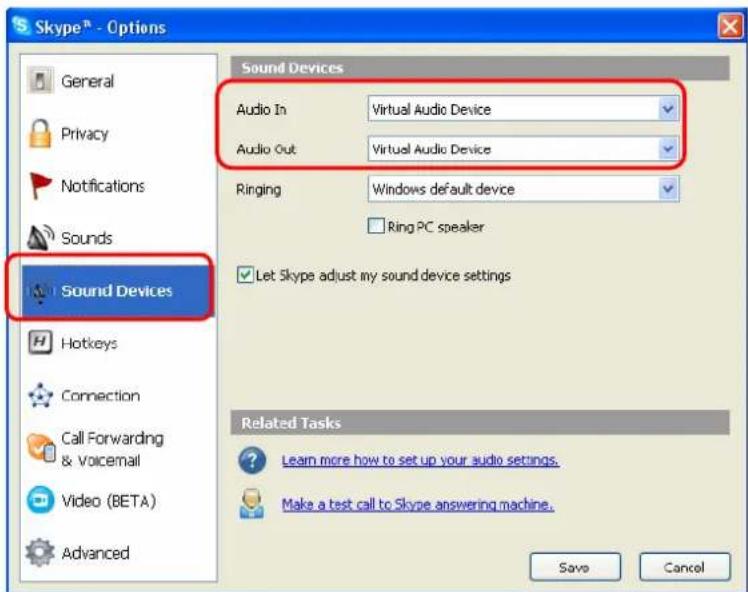
Check the Audio In and Audio Out list boxes and make sure Virtual Audio Device is selected.
☑ Call Forwarding is not working properly
- Make sure that a telephone cable is plugged into the USB VoIP Gateway Line jack and to the wall phone plug.
- Make sure call forwarding is configured properly in the USB VoIP Gateway Agent.
- Try to dial the telephone number as you have entered in the USB VoIP Gateway Call Forwarding dialog box.
- If you are on a PBX, make sure you have entered enough commas after the 9 (For example) to make sure that USB VoIP Gateway waits for the dial-tone before dialing the telephone number.
- Make sure your computer is not going into suspend (Sleep) mode. This will prevent forwarding from working.
☑ Toll bypass is not working properly
- Make sure that a telephone cable is plugged into the USB VoIP Gateway Line jack and to the wall phone plug
- Make sure toll bypass is configured properly in the USB VoIP Gateway Agent.
- Make sure Skype version 1.3.xx or higher is used on both sides.
- Make sure your computer is not going into suspend (Sleep) mode. This will prevent toll bypass from working
- Contents
- Introduction
- Product Overview
- Basic System Requirement
- Package Content
- USB VoIP Gateway – Front Panel
- USB VoIP Gateway – Back Panel
- Hardware Installation
- Driver Installation
- Skype™ - New User
- Skype™ - Existing User
- Enabling USB VoIP Gateway
- USB VoIP Gateway States
- Testing USB VoIP Gateway
- Making & Receiving Calls
- Setting Up Skype™ Speed Dial
- Making Speed Dial Call
- Switching Between VoIP and Regular Calls
- Conference Call Between VoIP and Regular Calls
- 3-Ways Conferencing
- Forwarding Calls
- Telephone Answering Machine
- Interactive Voice Response (IVR)
- Local IVR Access
- Remote IVR Access
- Toll Bypass
- Skype Voicemail
- Call Recorder
- Changing the Default Settings
- Disabling USB VoIP Gateway
- Uninstall The USB VoIP Gateway
- Trouble Shooting
- Common Fix
- √ Wrong Device Installed
- ☑ Softphone Version Warning
- USB VoIP Gateway does not appear to be responding to incoming calls
- ☑ Cannot hear dial-tone when I pick up the handset connected to the USB VoIP Gateway
- ☑ Cannot hear the Skype™ call in telephone handset
- ☑ Call Forwarding is not working properly
- ☑ Toll bypass is not working properly
Brand : AIRLIVE
Model : SKY-211
Category : NAS