
TFD-1905 - Television DENVER - Free user manual and instructions
Find the device manual for free TFD-1905 DENVER in PDF.


| Product Type | 19-inch LCD TV with built-in DVD player |
| Screen Size | 19 inches (48 cm diagonal) |
| Aspect Ratio | 16:10 |
| Resolution | 1440 x 900 pixels |
| Brightness | 300 cd/m² |
| Contrast Ratio | 800:1 |
| Viewing Angle | 160° horizontal and vertical |
| Power Supply | DC 12V, 5A |
| Power Consumption | 60 W |
| Inputs | RF, S-VIDEO, VIDEO, VGA, SCART, AUDIO (L/R), PC Audio |
| TV System | PAL (B/G, I, D/K), SECAM (B/G, D/K) |
| Channel Storage | 200 channels |
| Auto Shut-off | Yes, when no signal |
| Sleep Timer | Yes |
| Teletext | Yes |
| Remote Control Range | 5-8 m, 30° horizontal, 20° vertical |
| Remote Control Batteries | 2 x AA (1.5V) |
| Remote Control Dimensions | 48 x 168 x 24 mm |
| Remote Control Weight | 70 g (without batteries) |
| Accessories Included | Remote control, power adapter, adapter cable, user manual |
| Cleaning Instructions | Clean with a dry cloth only |
| Safety Notes | Keep away from moisture; do not place on unstable surfaces; unplug during storms |
Frequently Asked Questions - TFD-1905 DENVER
User questions about TFD-1905 DENVER
0 question about this device. Answer the ones you know or ask your own.
Ask a new question about this device
Download the instructions for your Television in PDF format for free! Find your manual TFD-1905 - DENVER and take your electronic device back in hand. On this page are published all the documents necessary for the use of your device. TFD-1905 by DENVER.
USER MANUAL TFD-1905 DENVER
Important Safeguards
Before using your TV, please read these instructions completely, and keep this manual for future reference.
Carefully observe and comply all warnings, cautions and instructions placed on the unit or described in the operating instructions or service manual.
| The User Manual uses the following symbols to ensure a safe operation and prevent any damage to operators or properties: | |
 | WARNING----Ignorance or inappropriate use may cause damage to the product. |
 | ATTENTION----Ignorance or inappropriate use may cause injury to the user. |
| Examples: | |
 | |
 | ProhibitionWarning (Attention) symbol (indicating "Electric Shock"). |
 | WARNING |
Never place TV on an unstablecart, stand, or table.The TV may fall, causing serious personal injury, death, or serious damage to the TV 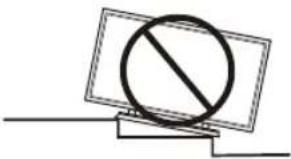 | |
| Keep the product away from moisture:- Do not expose this appliance to rain or moisture- If water penetrates into the product, stop the operation;unplug the connector and contact with your dealer.Continuous use in this case may result in fire or electric shock. | |
Do not use the product if any abnormality occurs:If any smoke or odor becomes apparent, Unplug the connector and contact the manufacturer immediately. Do not try to repair the product by yourself.  | |
Never overload wall outlets and extension cord.Never allow anything to rest on or roll over the power cord, and neve place the TV where the power cord is subject to wear or abuse.  | |
Avoid using dropped or damaged appliances:If the product is dropped and the housing is damaged, the internal components may function abnormally. Unplug the connector immediately and contact the manufacturer for repair. Continuous use of the product may cause fire or electric shock.  | |
Avoid using dropped or damaged appliances:If the product is dropped and the housing is damaged, the internal components may function abnormally. Unplug the connector immediately and contact the manufacturer for repair. Continuous use of the product may cause fire or electric shock.  | |
While it is thundering, do not touch the connecting cable or apparatus.   | |
Hold the power connector when removing the power cable: Pulling the power cable itself may damage the wires inside the cable and cause fire or electric shock.  | |
Do not touch the connector with wet hands:  To avoid risk electric shock To avoid risk electric shock | |
| 1. Read these instructions. Keep these instructions. Follow all instructions.2. Clean only with dry cloth.3. Heed all warning.4. Do not install near any heat sources such as radiators, heat registers, stoves, or other apparatus (including amplifiers) that product heat.5. Protect the power cord from being walked on or pinched particularly at plugs, convenienc receptacles, and the point where they exit from the apparatus.6. Unplug this apparatus during lightning storms or when unused for long periods of time. | |
Contents
1.Product Features----4
2.Accessories----4
3.Front View----5
4.Rear View----6
5.Remote Control----7
6.Quick start----9
7.OSD menu----10
8. DVD operation----15
9.User Help Guide----23
10. Technical Specification----24
1. Product Features
【Attention】Before operating this set, please read this manual carefully to make sure all the operations are correct.
- Input: SCART, VGA, RF, VIDEO, AUDIO, S-VIDEO, PC AUDIO
- Support TV Mode: PAL(B/G,I,D/K),SECAM(B/G,D/K)
- 200 Store channels
- Search TV: auto/manually
- Auto-shut down while no signal input
- Sleep timer
- Program exchange
- Power(DC12V 5A)
2. Accessories
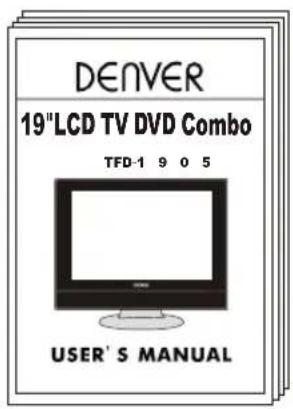
Users' Manual
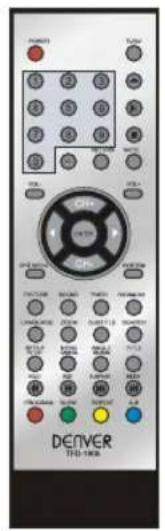
Remote Control
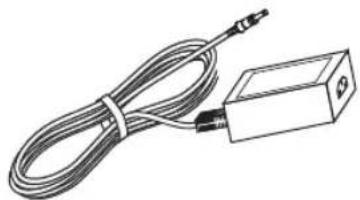
natural_image
Line drawing of a cable and rectangular device with connectors (no text or symbols)Adapter
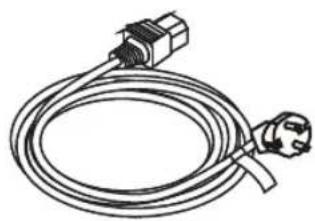
natural_image
Line drawing of a coiled electrical plug with two connectors (no text or symbols)Adapter Cable
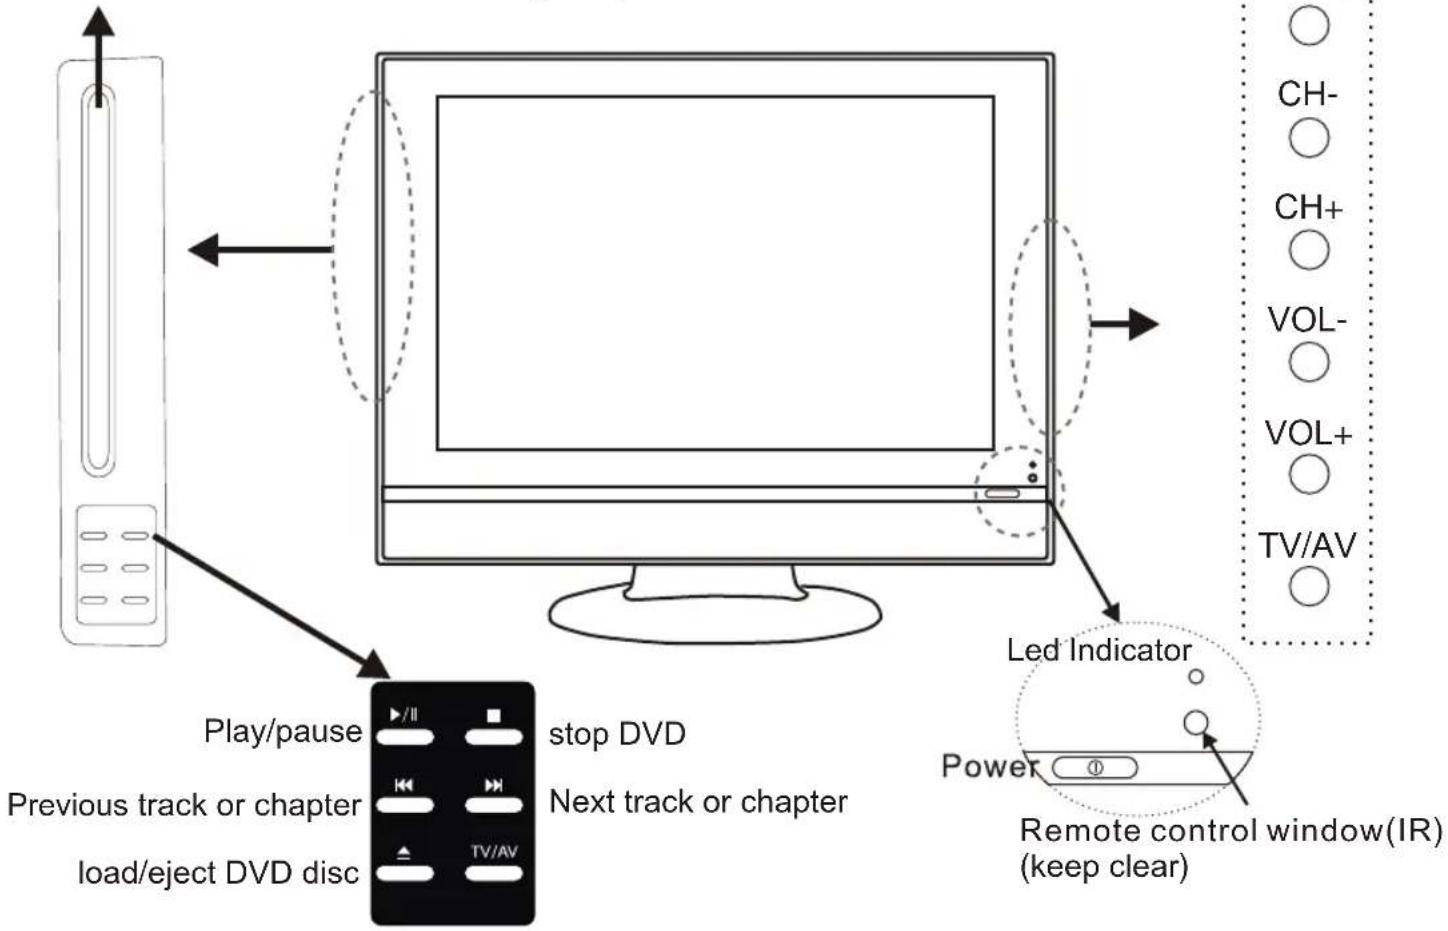
3. Front View
Insert a disc with the label side facing away
flowchart
graph TD
    A["Play/pause"] --> B["Previous track or chapter"]
    B --> C["load/eject DVD disc"]
    C --> D["stop DVD"]
    D --> E["Next track or chapter"]
    E --> F["Computer monitor"]
    G["Power"] --> H["Remote control window(IR) (keep clear)"]
    I["Led Indicator"] --> J["Ch-"]
    I --> K["CH+"]
    I --> L["VOL-"]
    I --> M["VOL+"]
    I --> N["TV/AV"]
1 (IR) Infrared Receiver: Receives IR signals from the remote control.
(Power on/Standby) LED Indicator: Press POWER to turn on and off.
Indicator on (Red)
Standby mode
Indicator on (Green)
Power on mode
The effective receiving scope for the signal is up to 5-8 meters from the front of the remote control window, and 30^ to the left or right side and 20^ above or below the control window.
2 The functions of the buttons are described as below:
MENU: Press to display the OSD menu, Press again to exit the menu.
CH-/CH+: Press to scan through channels. When pressing and holding down either button user can scan channels quickly.
They are also can be used to move down/up in the OSD menu screen.
VOL-/VOL+: Press to adjust the volume.
they are also can be used to move left/right in the OSD menu screen.
VOL+ button can be used to skip forward to next menu.
TV/AV: Press to select the source: TV, AV, SVIDEO, PC, DVD, SCART
Power: Turn on/off the TV set.
4. Rear View
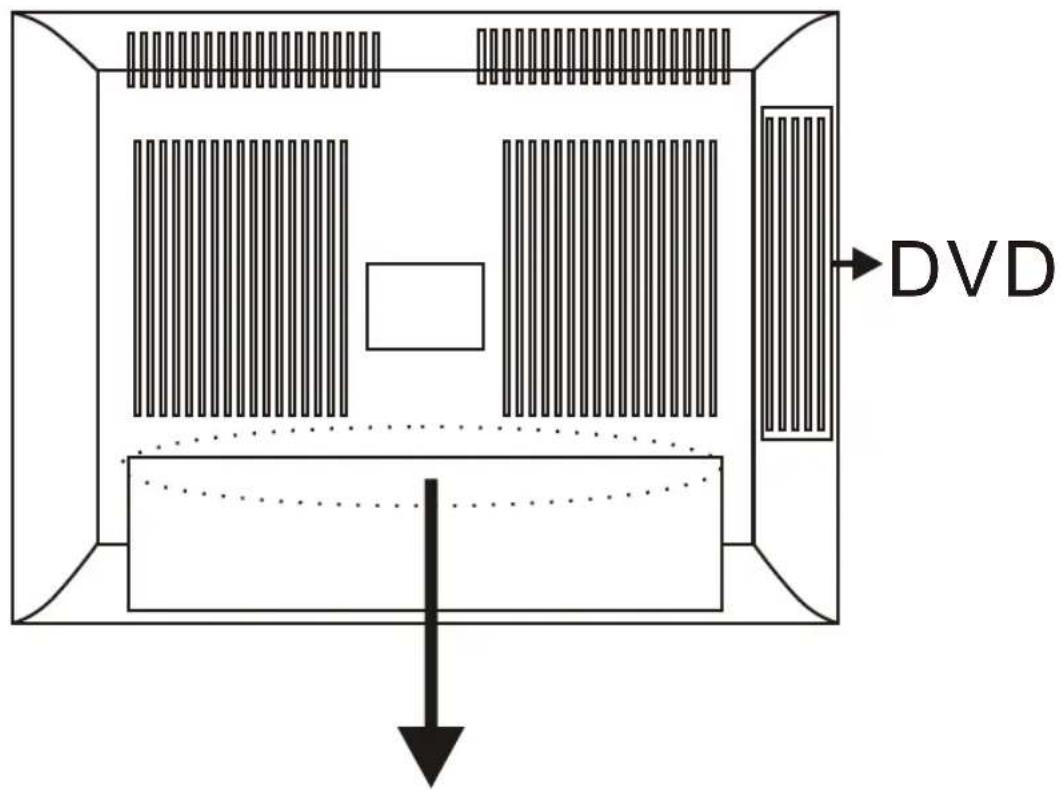

Coax: Connect to Coaxial cable.
Power: Connect it to the adapter.
SCART: Connect it to the composite jack of your DVD, VCR or other SCART program player.
PC audio: Connect it to the audio output jack of your computer.
VGA: For PC display purpose. Connect it to the Mini D-Sub 15 pins analog output jack of the PC.
AV-R AV-L: Connect them to the audio output jacks of your DVD/VCR, and S-Video audio input signals share these terminal.
Video: Connect it to the video output jack that has video output.
S-Video IN: Connect it to the S-Video output jack of your VCR or other video equipment that has S-Video.
RF: Connect antenna or cable 75 Ohm coaxial Aerial to receive TV signal.
5. Remote control
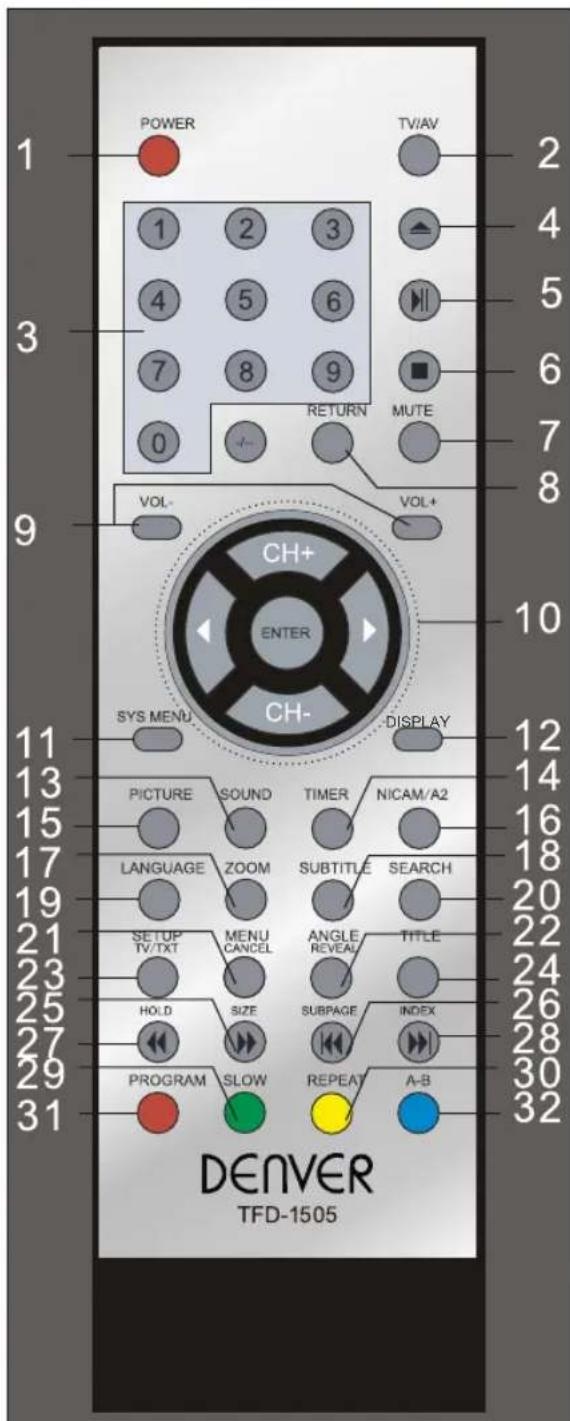
Note:
- Fit two AA batteries, making sure that they are the correct way round, as marked on the case.
- Aim the remote control at the window to keep the right side of the screen, and keep the window clear at all times.
- Do not press the buttons on the remote control too quickly-allow time for the set to respond.
Buttons for TV functions
1 POWER: turn the TV on or turn it standby.
2 TV/AV: select the input source.
3 0-9,-/--:press 0 to 9 for the first ten channel, press -/-- for 10 to 99, and again for 100 to 199.
7 MUTE: press to go into the silence status or cancel.
8 RETURN: go back to play the last channel.
9 VOL+/-: volume up/down.
10 CH+/-: channel up/down, CH+ CH- ◀ ▶ : direction buttons for OSD menu. ENTER: CONFIRM BUTTON for OSD menu.
11 SYS MENU: TV system menu(see page 10)
12 DISPLAY: display the current mode.
13 SOUND: press to select the sound mode: User, Normal, Movie and News.
14 TIMER: press to set a sleep time, the TV will go standby after the time you setting.
15 PICTURE: press to select the picture mode: User, Normal, Soft or Vivid.
16 NICAM/A2: press to select mono or stereo.
Buttons for Teletext
21 CANCEL: turn off the Teletext display.
22 REVEAL: reveal any hidden text, for example-quiz answers.
23 TV/TXT: turn off/on the Teletext display.
25 SIZE: press to see top half of page double size.
press again to see the bottom half of page double size.
Press again for normal size.
26 SUBPAGE: for example, to go directly to subpage 4: press SUBPAGE, then 0, 0, 0, 4; press SUBPAGE again to cancel subpage mode.
27 HOLD: hold or carry on the current subpage.
28 INDEX: direct recall of page 100.
29-32 Colour buttons: short cuts-follow the coloured links in the text.
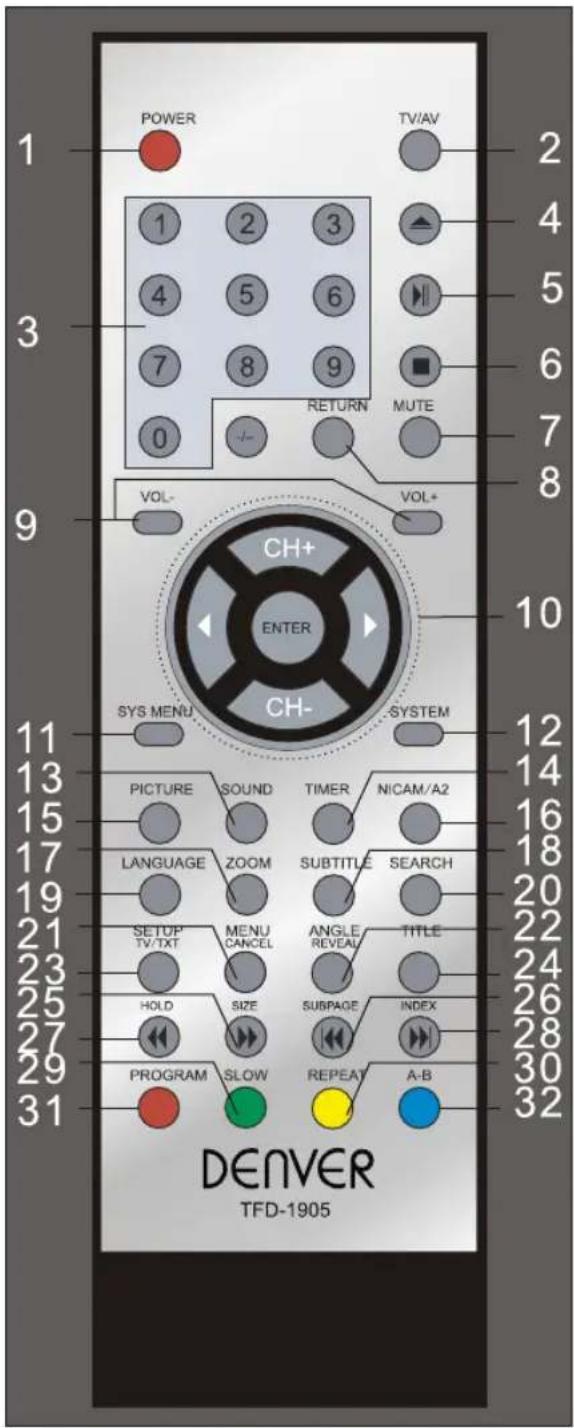
Buttons for DVD functions
-
▲ : load/eject DVD disc.
-
▶ : play/pause DVD program.
-
■ : stop DVD program.
17 ZOOM: adjust picture size in DVD mode.
18 SUBTITLE: turn on/off the DVD subtitle display.
19 LANGUAGE: select DVD disc language.
20 SEARCH: DVD search, Tracks or Chapters.
21 MENU: DVD play list/Disc menu.
22 ANGLE: select DVD picture angle.
23 SETUP: DVD system setup.
24 TITLE: DVD title.
25 : DVD fast forward.
26 : DVD previous chapter.
27 ◀ : DVD fast reverse.
28 : DVD next chapter.
29 SLOW: play DVD programs at slow speed.
30 REPEAT: play the title or chapter once again.
31 PROGRAM: edit the program and play.
32 A-B: select and play the preferable paragraph of DVD program by pressing this key twice at the beginning and end of it.
6. Quick start
TV
- Connect the TV set to the power, and connect the TV signal input with the RF jack.
- Press the POWER button on the TV set to turn on the TV set.
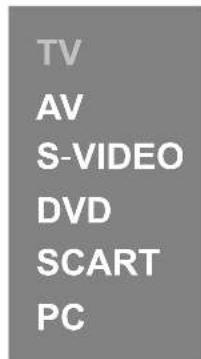
- Press the TV/AV button on the TV set or remote control, the source menu will display on the screen as the right picture, use the CH+/- button to select the source shown, press ▶ button to confirm.
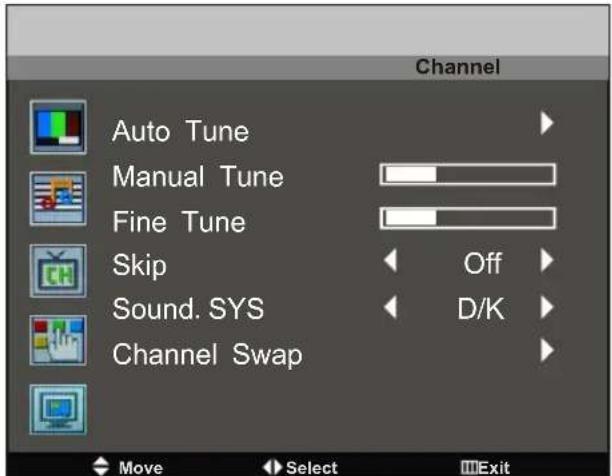
- Press the MENU button on the TV set or the SYS MENU button on the remote control, the screen will display the OSD menu, press the CH+/- button to select the third menu-Channel(see the following picture), press the ▶ button to enter the menu, press CH+/- button to select the item "Auto Tune", press ▶ button, it will start searching channels from the lowest
frequency. When it finds a station it will automatically store it in the first location and move to the next. When Auto Tune is complete, the TV will display the first station found. In most cases the stored stations will be in the random order, therefore you should use the "Channel Swap" function to exchange them into the order you need.
Note: when the Auto Tune starts, you can press SYS MENU button to stop it or it will not stop until all the searching is finished.
DVD
- Press the TV/AV button to display the source menu, use the CH+/- button to select the source DVD, press ▶ button to confirm.
- Insert the disc into the DVD player with the label side face away. Then the disc will play automatically.
PC
- Connect the TV set to the PC with the VGA and PC audio jacks.
- Press the TV/AV button to display the source menu, use the CH+/- button to select the source PC, press ▶ button to confirm. Then the TV set will display the signal from PC.
7. OSD menu
Press the SYS MENU button on the remote control, the screen will display the OSD menu, press the CH+/- button to select the main menu (there are five main menu: Picture, Sound, Channel Function and PC), and press the ▶ button to enter the main menu you select, press CH+/- button to select the item of the main menu, press ◀▶ button to select, adjust or enter a submenu.
Note: The items whose colour are light on the OSD menu could be operated; The items whose colour are gray on the OSD menu could not be operated on current mode.
7.1 Picture menu
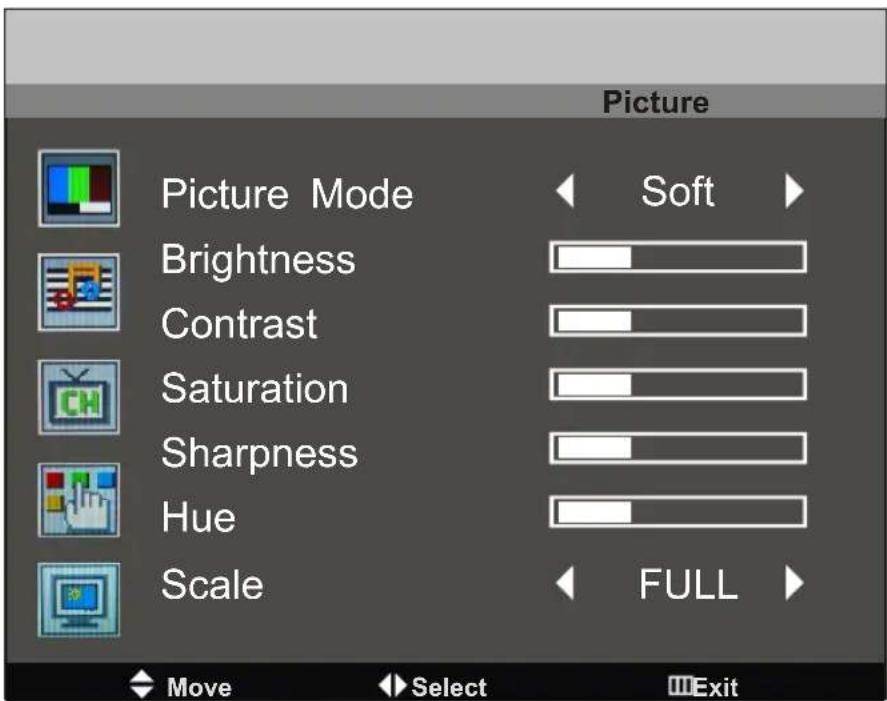
Picture Mode: select the picture display mode----User, Normal, Soft, Vivid. You can also use the PICTURE button on the remote control to select.
Brightness: adjust the brightness of the picture.
Contrast: adjust the contrast of the picture.
Saturation: adjust the saturation of the picture.
Sharpness: adjust the sharpness of the picture.
Hue: adjust the hue of the picture(only used in the mode of NTSC).
Scale: exchange the 16:10 and 4:3 picture mode.
Note: when you are in the mode of PC, you can only adjust the brightness and contrast .
7.2 Sound menu
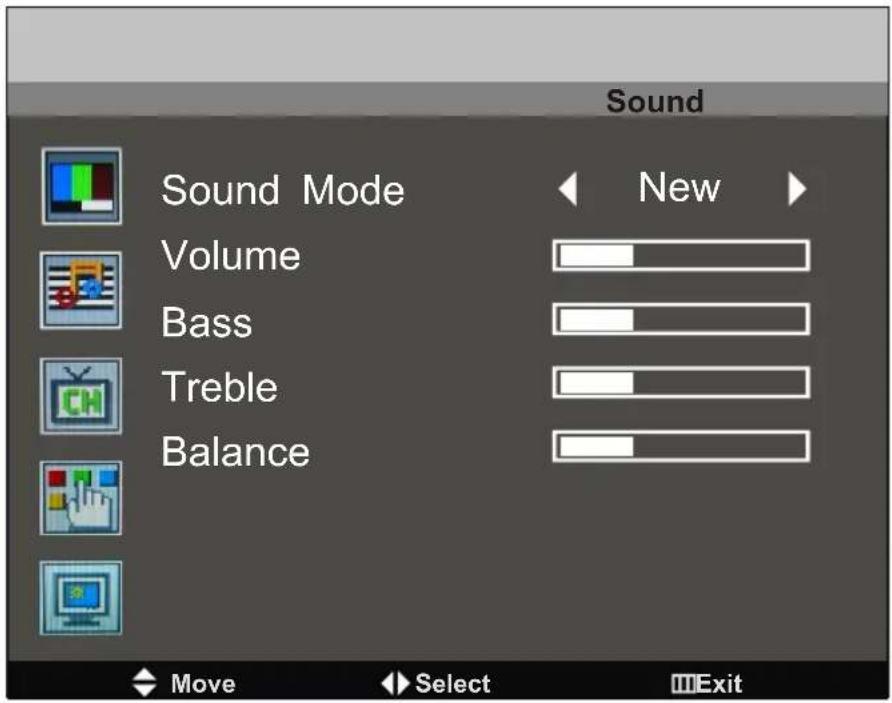
Sound Mode: select the sound mode----User, Normal, Movie, News.
You can also use the SOUND button on the remote control to select.
Volume: adjust the volume of the sound.
You can also use the VOL+/- button on the remote control or TV set to adjust the volume.
Bass: adjust the bass of the sound.
Treble: adjust the treble of the sound.
Balance: adjust the balance of the sound.
7.3 Channel menu(the menu can only be used in the mode of TV)
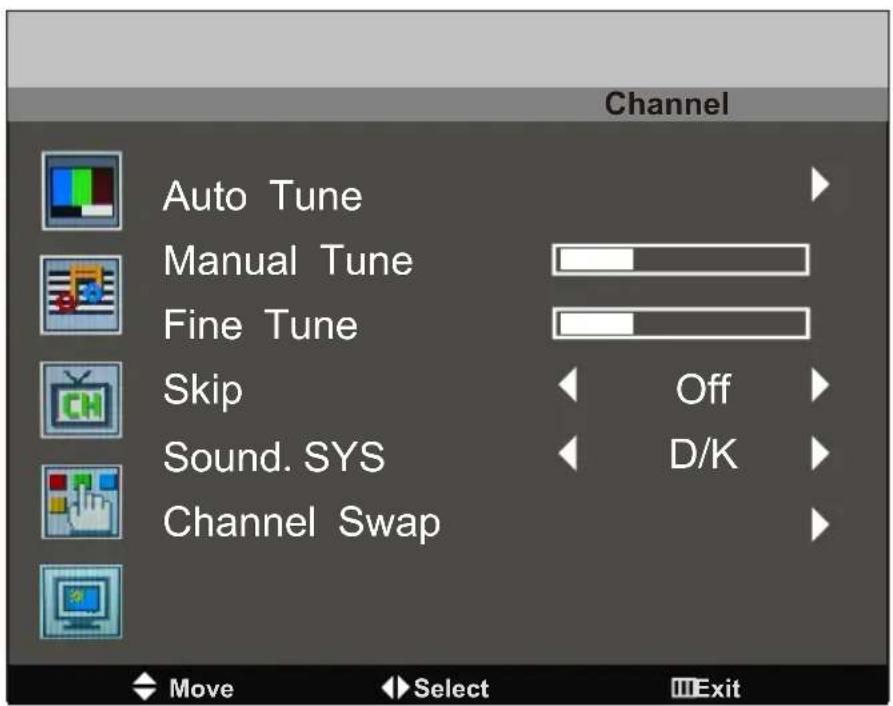
Auto Tune: press ▶ button, it will start searching from the lowest frequency. When it finds a station it will automatically store this in the first location and move to the next. When Auto Tune is complete, the TV will display the first station found. In most cases the stored stations will be in the random order, therefore you should use the "Channel Swap" function to exchange them into the order you need.
Note: when the Auto Tune starts, you can press SYS MENU button to stop it or it will not stop until all the searching is finished.
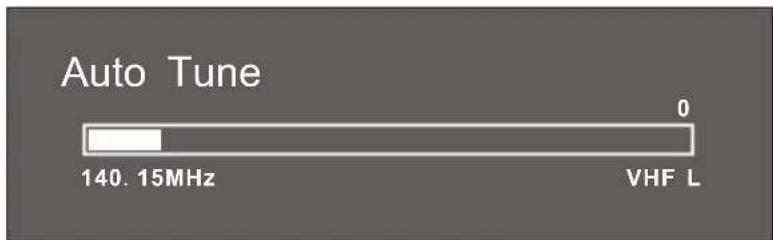
Manual Tune: press ▶ button to search forwards, and press ◀ button to search backwards. When a station found, it will be stored automatically.
Fine Tune: press ▶ button to search forwards, and press ◀ button to search backwards when the signal of the current channel is weak.
Skip: When you turn on the function, the current channel will be skipped when you scan the channels.
Sound.SYS: select the sound system mode.
Channel Swap: press the ▶ button to enter the swap menu as the following picture.
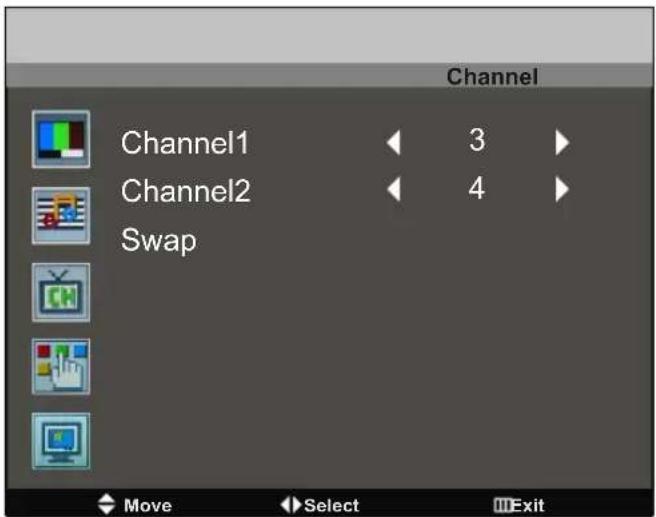
Use the CH+/- button to select "Channel1" or "Channel2", use the ◀ /▶ buttons to select the two channels you want to swap, when you confirm, select "Swap", and press▶ button to swap.
7.4 Function menu
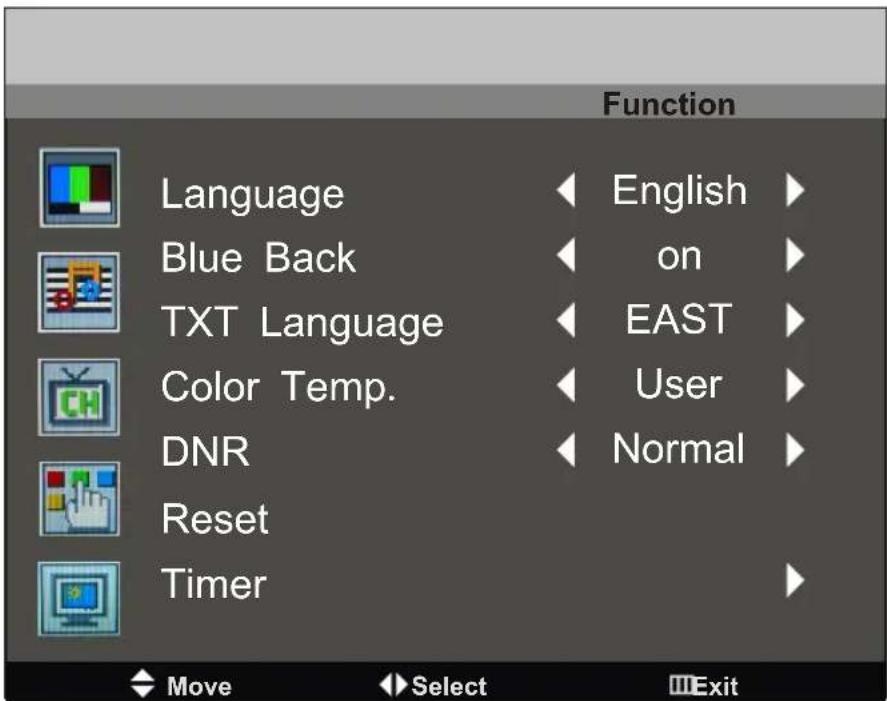
Language: select the OSD's display language.
Blue Back: turn on/off the blue back function(the function can only be used in the mode of TV).
TXT Language: select the area of the Teletext language.
Color Temp.: Adjust the color temperature. You can select Cool, Warm, Normal, or you can select User that you can adjust the red, green and blue color temperature.
DNR: press the ▶ key to choose "Normal" or "Strong" to reduce picture interfere.
Reset: when you press the ▶ button on the item, it will reset all the settings.
Timer: press the ▶ button to enter the timer menu as the following picture.
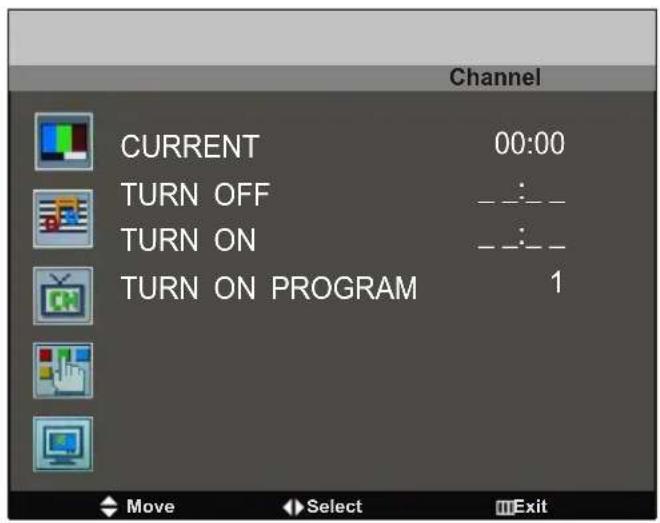
First you should set the current time according to fact, then you can set the time of turn off the TV on the item "TURN OFF", set the time of turn on the TV on the item "TURN ON", and on the item "TURN ON PROGRAM" you can set the program you want to display when it turns on.
7.5 PC menu(the menu can only be used in the mode of PC)
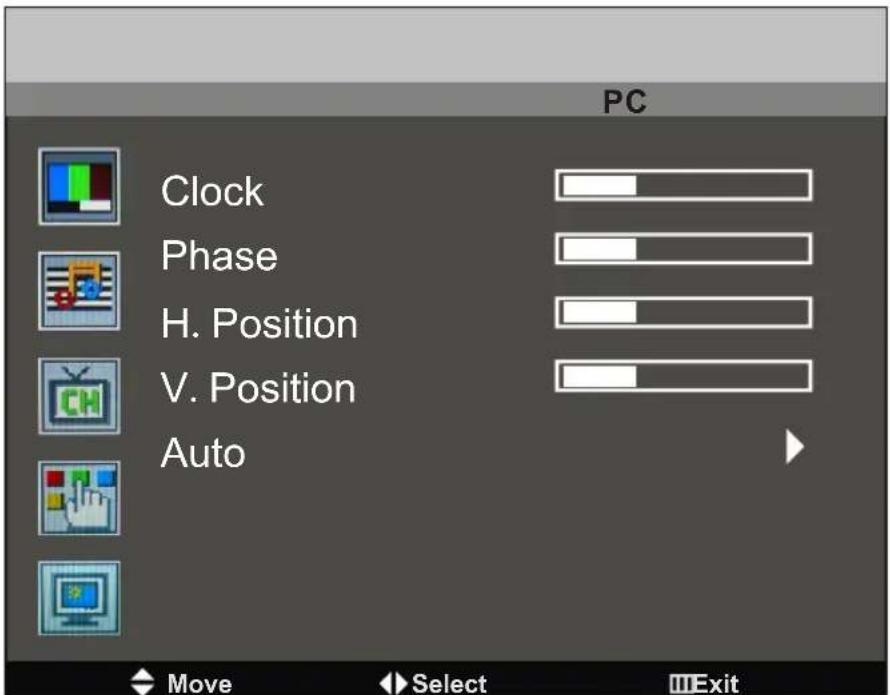
Clock: adjust the pixel clock frequency, until the image size is maximized for the screen. Phase: adjust the phase of the ADC sampling clock relative to the sync signal, until a stable image is obtained. H/V. Position: adjust the transverse/vertical position of the screen. Auto: press the ▶ button to setup the parameter of the screen automatically.
8. DVD operation
Press the Power button on the player or the remote controller, then press TV/AV button to enter DVD mode. At this time “Read” appears on the TV screen. If there is not a disc in the DVD player, after press PLAY/PAUSE button, “No disc” will be displayed on the screen.
Place a disc
Insert a disc with the label side facing away. It will be load automatically. Press EJECT button on set or remote control to eject the disc from DVD loader.
Play
The contents of each disc menu vary according to how the disc was authored and what features are included. The disc menu will be turned on for you to select, when Menu button is pressed. Also play and pause can be switched with the Pause button on the remote. Different play modes are offered, such as menu play, sequence play etc.
Menu Play
- Compatible with DVD, SVCD or VCD2.0.
- If the disc is a DVD, ROOT MENU will appear on the screen. If it is SVCD or VCD2.0, please press MENU button to let the menu out.
- When a DVD disc is loaded, you can press Arrow buttons to highlight the menu item you want to choose; As SVCD or VCD2.0, you can press Numeric buttons to select a track to play. When play SVCD and VCD2.0, press menu key once, there will be a "PBC(ON) or PBC(OFF) at the left and above corner appears on the screen, press menu key again, it will exchange from PBC(ON) to PBC(OFF) or from PCB(OFF) to PBC(ON), when it appreas PCB(ON), the SVCD or VCD2.0 programs will be played circularly.
- Press Enter or Play button, you can begin play when they are highlighted.
- Return when playing: When a DVD disc is playing, press Menu button, and you can return to Root Menu; As SVCD, VCD2.0 and PBC is on, press Menu button or RETURN button, you can return to the menu.
Title Play
- Compatible with DVD discs only.
- During DVD playback, press Title button to display the DVD title content.
- Press the Arrow buttons to highlight the title you want to choose, and press Enter; also you can press numeric buttons to choose.
- The DVD player begins with the chapter 1 of the chosen title.
Sequence Play
- Compatible with DVD, SVCD, VCD, CD, HD-CD, WMA, Digital audio disc/JPEG discs.
- When a SVCD or VCD disc is loaded and PBC is on, once ANGLE button pressed ANGLE switches off. Then the player can play in sequence playback mode; when ANGLE button pressed twice, ANGLE switches on.
- Except for SVCD or VCD discs, in the stop state, when press Play button, the player then enters sequence playback mode. This feature is effective to all the compatible discs.
Program Play
- Compatible with DVD, SVCD, VCD, CD, HD-CD, WMA, Digital audio disc/JPEG discs.
- The Program Playback option allows you to enter the order in which you want chapters or tracks to play, maximum to 16.
- Program Menu:
If PBC is on, this operation will turn PBC off while the chapters / tracks plays in programmed order. - According to the highlight, use the Numeric buttons to enter the chapters / tracks in the order you want them to play. Then press Play or use Arrow buttons to highlight the "PLAY" item and press Enter. The chapters / tracks will play in the programmed order. You can program maximum 16 titles / chapters / tracks.
- According to the Direction Indicator on the menu, you can press Arrow buttons to highlight where you want to enter.
- During Program Playback, if program button is repressed, the program order and the contents will be displayed on the screen, and the Program Playback will be stopped; also you can press Stop and Play to resume normal playback.
- Notes:
To clear the program order, use Arrow buttons to highlight the "CLEAR" item, then press Enter. To modify the program order, use Arrow buttons to highlight the item you are changing and enter the new chapter / track you want to program directly. - The program indicator in the screen, and the playing chapter / track illuminate.
Additional operation
Selecting Tracks
- Compatible with DVD, SVCD, VCD, CD, HD-CD, WMA, Digital audio disc/JPEG discs.
- When playing a DVD disc, press Numeric buttons on the menu or title page to select tracks; During DVD playback, you can input desired title numbers directly.
- During sequence playback of a SVCD or VCD disk, press the numeric buttons to select tracks. (During Program Playback and when the PBC is on, you can only press Prev / Next button to select)
- As for CD, HD-CD, discs, press Numeric buttons directly to select tracks.
- When playing WMA, Digital audio disc / JPEG discs, press Numeric buttons to select different tracks on current track list.
Skipping Tracks
- Compatible with DVD, SVCD, VCD, CD, HD-CD, WMA, Digital audio disc/JPEG discs.
- To skip forward to the beginning of the next title / chapter / track on a disc, press Next on the remote or the right side of the player.
- To skip backward to the beginning of the preceding title / chapter / track on a disc, press Prev on the remote or the right side of the player.
Multispeed Fast/Slow Motion Play
- Compatible with DVD, SVCD, VCD, CD, HD-CD, WMA, Digital audio disc/JPEG discs.
- Press the Multispeed Fast/Slow button on the remote during play to search through a disc. Multispeed Fast/Slow has three speeds: ×2, ×4, ×8, ×20. With each consecutive press of the button, the search speed increases. If you press the button five times, Fast Multispeed Fast/Slow cycles back to normal play.
- During DVD play, when Multispeed Fast/Slow gets to the beginning of the next title / chapter, it resumes normal play; During SVCD or VCD play with PBC on, when Fast Forward Play gets to the beginning of the next track, it resumes normal play.
Multiphase Slow Motion Play
- Compatible with DVD, SVCD, VCD, CD, HD-CD, WMA, Digital audio disc/JPEG discs.
- Multiphase Slow has five speeds: 1/2, 1/3, 1/4, 1/5, 1/6, 1/7 of the normal speed play when press Slow button consecutively in playing discs.
- When press Play button or press the slow button seven times, it goes to normal station.]
Freeze Frame
- Compatible with DVD, SVCD, VCD, CD, HD-CD, WMA, Digital audio disc/JPEG discs.
- During CD, HD-CD, WMA or Digital audio disc / JPEG playback, press Pause once to freeze playback; Press Play button to resume normal playback.
Using the Repeat Feature
- Compatible with DVD, SVCD, VCD, CD, HD-CD, WMA, Digital audio disc/JPEG discs.
- While a disc is playing, press Repeat button once, and the repeat banner appears to show current repeat mode.
a) In SVCD, VCD, CD, HD-CD, WMA, or Digital audio disc / JPEG sequence playback mode. Press Repeat button again to turn on repeat mode. Press the button again on the remote to turn to the next repeat mode. There are three repeat options: Off, Track Repeat, and Disc Repeat. With each consecutive press of the button, the repeat mode switches. If you press the button four times, repeat mode cycles back to Off.
b) In DVD playback, press Repeat button again to turn on repeat mode. There are three repeat options: Off, Chapter Repeat, and Title Repeat. With each consecutive press of the button, the repeat mode switches. If you press the button four times, repeat mode cycles back to Off.
c) In WMA, Digital audio disc / JPEG playback, press Repeat button again to turn on repeat mode. There are four repeat options: Off, Track Repeat, Directory Repeat, and Disc Repeat. With each consecutive press of the button, the repeat mode switches.
If you press the button five times, repeat mode cycles back to Off.
Using the Search Feature
-
Compatible with DVD, SVCD, VCD, CD, HD-CD discs.
-
You can use Search feature to select a title / chapter / track number or go to a specific point in a title. First, press Search button on the remote controller to bring up the search menu and enter the edit state; Secondly, press Arrow buttons to highlight the title / chapter / track number or the time option; Thirdly, use Numeric buttons to enter the title / chapter / track you want to play or the elapsed time you want to go to in that title; At last, press Enter button to start playback. For example, entering 01:23:56 will start playback one hour, twenty-three minutes and fifty-six seconds into the title.
-
Notes
a) This feature does not work in Program Play mode.
b) If PBC is on, it will turn off automatically when Search Playback starts.
c) When playing WMA, Digital audio disc / JPEG discs, Search Feature does not work.
Changing the Soundtrack or Language
- Compatible with DVD SVCD, VCD, CD, HD-CD, WMA, Digital audio disc/JPEG discs.
- Press the LANGUAGE button to display current soundtrack.
A) Press the button to switch soundtracks.
b) Press the button again on the remote to turn to next soundtrack.
-
When playing a SVCD or VCD disc, there are five soundtracks: Stereo (L/R), L/L, R/R, L/L Auto A/D Detect, and R/R Auto A/D Detect. With each consecutive press of the button, the soundtrack switches. If you press the button six times, soundtrack cycles back to Stereo.
-
When playing a CD, HD-CD, WMA, or Digital audio disc, there are three: Stereo (L/R), L/L, and R/R.
-
When playing a DVD or SVCD disc, press LANGUAGE button to display current language, press the button again to turn to next language if the disc has different languages.
Subtitles
- Compatible with DVD, SVCD discs.
- Press the Subtitle button on the remote once, and the subtitle info banner appears.
- When a DVD or SVCD is recorded with subtitles, you can use the Subtitle feature to view the subtitles on-screen. By default, subtitles are off. The info banner will display Subtitle Off.
- To display subtitles, press the Subtitle button again. The default language with its responding serial number will be displayed in the info banner and subtitles will be displayed in that language. With each consecutive press of the Subtitle button, the subtitle switches. For example, "Language Icon: [1 English DTS 6CH] or [Off]" (the availability of the subtitles are disc-dependent). To turn subtitles off, press the Subtitle button until Subtitle Off is displayed.
Mute the Audio Output
- Compatible with DVD, SVCD, VCD, CD, HD-CD, WMA, Digital audio disc/JPEG discs.
- Pressing the Mute button allows you to reduce sound to an inaudible level, and the icon of "MUTE" will be displayed on screen. Press the button again or press the Vol +/- button to return to the normal condition.
- If the player playback disc without sound, please try to press Mute button to resume.
Zoom In the Video Image
- Compatible with DVD, SVCD, VCD, JPEG discs.
- The Zoom Function allows you to enlarge the video image.
- Press Zoom repeatedly to activate the function and choose the required zoom factor: Zoom 1, Zoom 2, Zoom 3, Zoom 1/2, Zoom 1/3, Zoom 1/4, Zoom Off.
Repeat a Specific Segment on the Disc that You Define
- Compatible with DVD, SVCD, VCD, CD, HD-CD, WMA, Digital audio discs.
- During the normal or fast motion playback, press the A-B button once, and "REPEAT A-" will appear on the screen. This indicates the start of the loop to be repeated.
- During the normal of fast motion playback, press A-B again, and "REPEAT A-B" will appear on the screen. It indicates the end of the loop.
- Looping will run from set point A to set point B until you turn off Repeat.
- Press A-B again to cancel A-B loop mode.
- When playing a SVCD, VCD, or CD disc, you can repeat a specific segment only in one track. When the next track begins, A-B Repeat turns off automatically.
- When playing a DVD disc, you can repeat a specific segment only in one title.
Digital audio disc Play
- Compatible with Digital audio disc disc.
- The set will search the directory of the disc automatically, after that, the directory will appear on the screen.
- Then the set will play the MP3 automatically according to the directory listed.
- You can use the direction button to change the directory.
System operation
System operation will define the setting of the set, these definition will be stored until you change them again.
General Steps of Setup Menu
- Press SETUP button of the remote control, the main menu will appear on the screen, and the system will be pause.
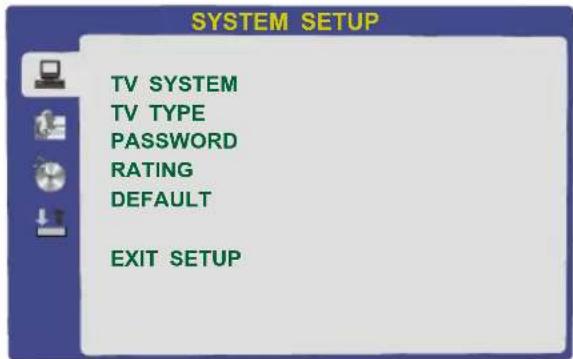
- Press the CH+/- buttons to highlight the icon of the desired page, then press the ◀ button to activate that page; For example, if you want to setup the video page, press to highlight the video icon, the video page will be displayed on the screen.
- Press the CH+ button to highlight the desired option. Press Enter or press ▶ button to select the choices of that option appear on the right.
- Press the Arrow buttons to highlight the Exit Setup option, then press Enter or Setup again to exit Setup Menu.
- When launching the setup routine, the pressing of the following buttons will turn off the setup menu, while the choices that have been changed will be saved: Subtitle, F.F, F.R, Vol +/-, PBC, Title, Return, Play/Pause, Stop, Next, Prev, S.F, S.
R, Zoom, Display, Program, Repeat, A-B, language, Mute, Setup.
Menu specification
1.SYSTEM SETUP
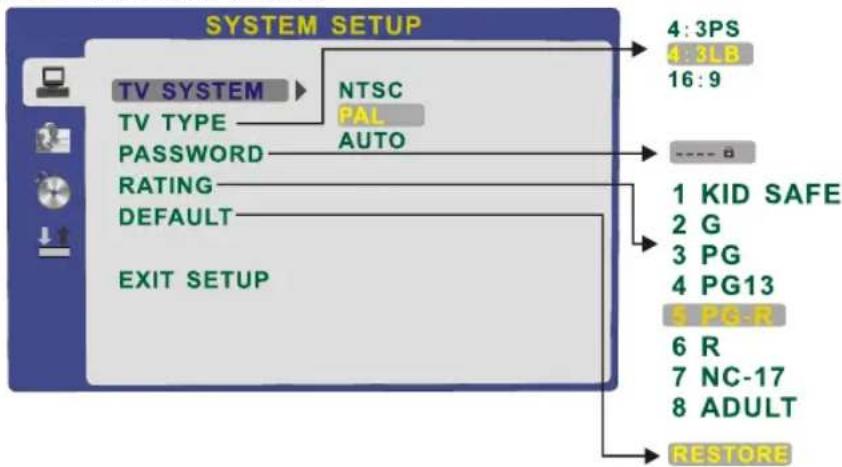
The system setup options are illustrated below:
flowchart
graph TD
    A["TV SYSTEM"] --> B["NTSC"]
    B --> C["PAL"]
    C --> D["AUTO"]
    D --> E["Password"]
    E --> F["RATING"]
    F --> G["DEFAULT"]
    G --> H["EXIT SETUP"]
    I["4:3PS"] --> J["4:3LB"]
    J --> K["16:9"]
    L["----B"] --> M["1 KID SAFE"]
    M --> N["2 G"]
    N --> O["3 PG"]
    O --> P["4 PG13"]
    P --> Q["5 PG-R"]
    Q --> R["6 R"]
    R --> S["7 NC-17"]
    S --> T["8 ADULT"]
    U["RESTORE"] --> V
-TV SYSTEM: According to the Color System of the TV, you can choose the TV System..
-PASSWORD: The password option is initialized as locked, and you cannot set the ratings limit or change the password. In order for the Ratings feature work, the password mode must be turned on. If you want to set the ratings limit, you will need to enter the default password, which is 0000, then press Enter to confirm. To change the password, you will be prompted for the old password, then be prompted for a new. Enter a 4-digit number (this is your password).
-RATING: The Rating feature is a rating limit system, like movie ratings. It works with DVD discs that have been assigned a rating. This helps you control the types of DVDs that your family watches.
There are 8 level of selection, from KID SAFE to ADULT, Adult is the "play all"selection.
2. LANGUAGE SETUP
The language setup options are illustrated below:
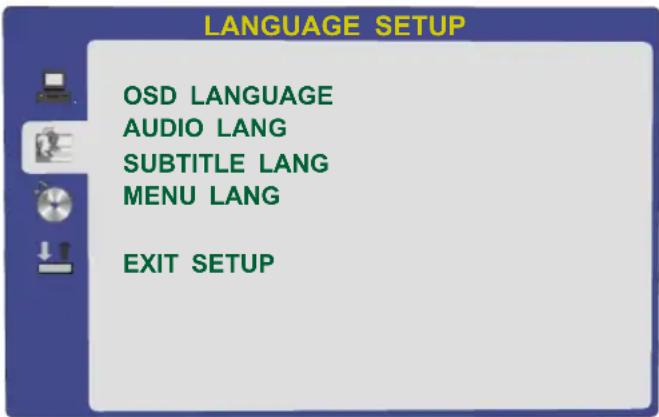
-OSD LANGUAGE: The OSD will display in the language you choose.
-AUDIO LANG: If the disc you are playing has the language you choose, it will output audio in that language.
-SUBTITLE LANG: If the disc you are playing has the language you choose, it will displays subtitles in that language..
-MENU LANG: If the disc you are playing has the language you choose, it will displays menu in that language.
3. AUDIO SETUP
The audio setup options are illustrated below:
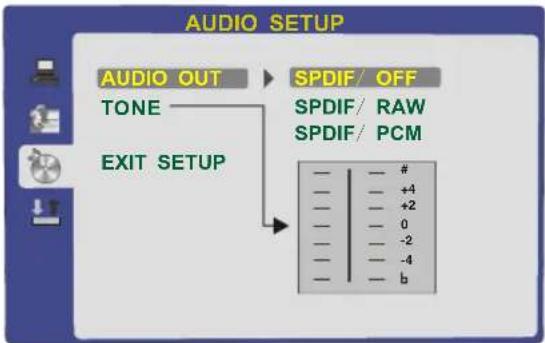
-Highlight the AUDIO OUT option, and press the Arrow buttons to choose the audio output mode you prefer. Press Enter to confirm; There are 3 optional audio output modes: SPDIF /OFF, SPDIF / RAW, and SPDIF/ PCM.
-TONE:Use the Up and Down arrow button to move the scroll and adjust the tone.
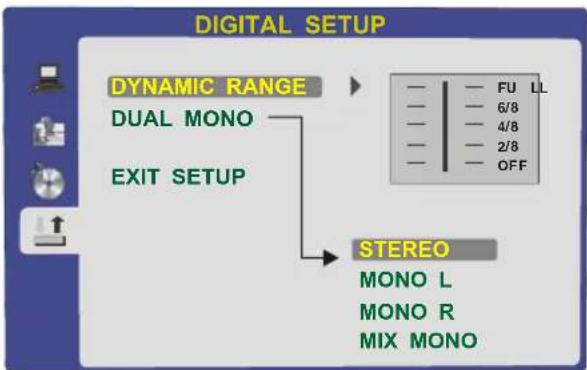
4.DIGITAL SETUP
The video setup options are illustrated below:
-DYNAMIC RANGEO: Use the Up and Down arrow button to move the scroll and adjust the dynamic rangeo.
-DUAL MONO: Choose the mode of the audio output. Three are four modes: STEREO, MONO L, MONO R, MIX MONO.
9. User Help Guide
Should you experience problems. Please consult the guide below before calling the Customer Help line.
| Symptom TV | Possible fault | Remedy |
| Dead. No led lit. | Power not connected | Check the power supply module is connected and turned on. |
| Dead. Led lit red | Set stuck in standby | Press Power button on the remote control or the Power button on the TV. |
| No Picture led Green | Backlight off. | Set faulty. Call Help line |
| TVin PC Mode | Select TVmode or AV mode | |
| No Picture. Blue screen | Set not tuned in | Tune tv to local stations. |
| Aerial not connected | Connect a good aerial signal | |
| Set switched to AV or PC | Select TV mode with handset | |
| Poor picture. Noisy or ghosting | Poorae rial signal | If using an indoor aerial have an outdoor aerial fitted |
| No sound. | Volume turned down or Mute set | Turn up the volume and observe if “Mute” OSD is shown. |
| Teletext missing words or breaking up | Poor aerial signal | Check aerial lead. Have new outdoor aerial fitted |
| DVD Mode | ||
| Not playing discs | Disc inserted incorrectly | Insert disc correctly. Disc must be inserted “Label AWAY” from you. |
| Disc dirty or damaged | Clean disc and check for damage. Try another disc. | |
| Player stops or beaks up. | Laser lens dirty. | Clean laser lens with a “Lens Cleaning disc”. |
| Player will not eject disc. | Player “Latched up” | Fully turn off the TV, wait for 30 seconds and turn back on. |
| Remote Control | ||
| Not working | Batteries low or empty | Change batteries.If handset used frequently,change batteries every 6 months. |
| Object blocking signal to TV | Move objects in Infrared signal path. | |
| Intermittent operation | Batteries LowHigh background light | Change batteries.Darken room to help I/R signal. |
10. Technical Specification
| Screen size | 19"(48cm) |
| Ratio | 16:10 |
| Definition | 1440x900 |
| Angle of view | 160^ × 160^ |
| Brightness( cd/m^2 ) | 300 |
| Contrast | 800:1 |
| Input | RF,S-VIDEO,VIDEO,VGA,SCART,AUDIO |
| Main Power | DC 12V 5A |
| Power consumption | 60W |
| Remote Control | |
| Control distance | 5-8m |
| Control angle | 30^ (horizontal) |
| Batteries | 2x1.5V,size AA |
| Dimensions | 48x168x24mm |
| Weight | 70g(without batteries) |
Note:
The specification shown above may be changed without notice for quality improvement.
ENGLISH
Instructions on environment protection
Do not dispose of this product in the usual household garbage at the end of its lifecycle; hand it over at a collection point for the recycling of electrical and electronic appliances. The symbol on the product, the instructions for use or the packing will inform about the methods for disposal.
The materials are recyclable as mentioned in this marking. By recycling, material recycling or other forms of re-utilization of old appliances, you are making an important contribution to protect our environment.
Please inquire at the community administration for the authorized disposal location.
ALL RIGHTS RESERVED
COPY RIGHT DENVER ELECTRONICS A/S
CE
www.denver-electronics.com
- Important Safeguards
- Contents
- Product Features
- 【Attention】Before operating this set, please read this manual carefully to make sure all the operations are correct.
- Accessories
- Front View
- Rear View
- Remote control
- Note:
- Buttons for TV functions
- Buttons for Teletext
- Buttons for DVD functions
- Quick start
- TV
- DVD
- PC
- OSD menu
- Picture menu
- Sound menu
- Channel menu(the menu can only be used in the mode of TV)
- Function menu
- PC menu(the menu can only be used in the mode of PC)
- DVD operation
- Place a disc
- Play
- Menu Play
- Title Play
- Sequence Play
- Program Play
- Additional operation
- Selecting Tracks
- Skipping Tracks
- Multispeed Fast/Slow Motion Play
- Multiphase Slow Motion Play
- Freeze Frame
- Using the Repeat Feature
- Using the Search Feature
- Changing the Soundtrack or Language
- Subtitles
- Mute the Audio Output
- Zoom In the Video Image
- Repeat a Specific Segment on the Disc that You Define
- Digital audio disc Play
- System operation
- General Steps of Setup Menu
- Menu specification
- 1.SYSTEM SETUP
- LANGUAGE SETUP
- AUDIO SETUP
- +4
- 4.DIGITAL SETUP
- User Help Guide
- Technical Specification
- ENGLISH
- Instructions on environment protection
Brand : DENVER
Model : TFD-1905
Category : Television