
CE27G15 - Television TOSHIBA - Free user manual and instructions
Find the device manual for free CE27G15 TOSHIBA in PDF.

| Product Type | Color Television |
| Brand | Toshiba |
| Model | CE27G15 |
| Screen Size | 27 inches (estimated) |
| Dimensions (W x H x D) | 26-21/32 x 24-5/64 x 21 inches (677 x 612 x 549 mm) |
| Weight | 76.5 lbs (34.7 kg) |
| Power Source | 120V AC, 60Hz |
| Power Consumption | 80W (average) |
| Audio Power Output | 5W + 5W |
| Speaker Type | Two 2-3/8 x 3-1/2 inches (60 x 90 mm) |
| TV System | NTSC standard |
| Channel Coverage | VHF 2-13, UHF 14-69, Cable TV (mid, super, hyper, ultra bands) |
| Video Input | 1V(p-p), 75 ohm, negative sync |
| Audio Input | 150mV(rms), 47k ohm |
| Variable Audio Output | 0-350mV(rms), 4.7k ohm |
| Picture-in-Picture (PIP) | Yes, with swap, freeze, and position adjustment |
| MTS Stereo/SAP | Yes, with surround sound |
| Closed Captioning | C1-C4, T1-T4 |
| Channel Lock | Yes, with 4-digit code |
| Favorite Channels | Up to 12 channels |
| Sleep Timer | Up to 3 hours in 10-minute increments |
| On-Screen Display Languages | English, French, Spanish |
| Remote Control | Programmable for VCR and Cable TV converter |
| Supplied Accessories | Remote Control, 2 AA batteries |
Frequently Asked Questions - CE27G15 TOSHIBA
User questions about CE27G15 TOSHIBA
0 question about this device. Answer the ones you know or ask your own.
Ask a new question about this device
Download the instructions for your Television in PDF format for free! Find your manual CE27G15 - TOSHIBA and take your electronic device back in hand. On this page are published all the documents necessary for the use of your device. CE27G15 by TOSHIBA.
USER MANUAL CE27G15 TOSHIBA
natural_image
Abstract geometric shape with sharp white lines on black background, no text or symbols presentDear Customer
Congratulations! You have purchased one of the finest Color TV's on the market!
This manual will help you use the many exciting and useful features to make your TV viewing more enjoyable than ever before.
Before operating your TV set, please read all these safety and operating instructions completely and then retain for future reference.
Customer's Record
You will find the model number and serial number on the back of your TV set.
Record these numbers in the spaces provided below. Refer to them whenever you call upon your TOSHIBA dealer regarding this product.
Model Number
Serial Number
Safety Precautions
WARNING:
TO REDUCE THE RISK OF FIRE OR ELECTRIC SHOCK, DO NOT EXPOSE THIS APPLIANCE TO RAIN OR MOISTURE.
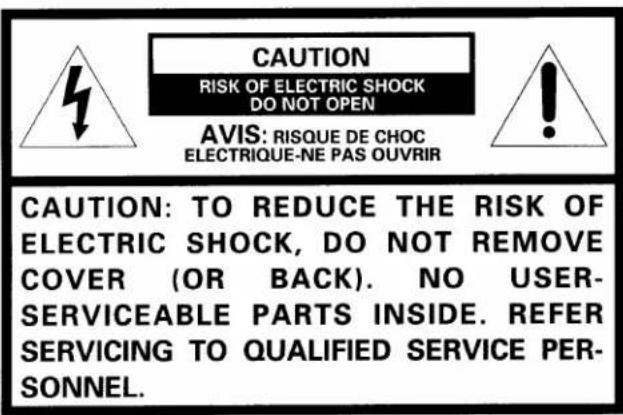
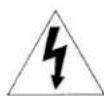
The lightning symbol in the triangle tells you that the voltage inside this product may be strong enough to cause an electric shock. DO NOT TRY TO SERVICE THIS PRODUCT YOURSELF.

The exclamation point in the triangle tells you that important operating and maintenance instructions follow this symbol.
CAUTIONS:
TO PREVENT ELECTRIC SHOCK, DO NOT USE THIS POLARIZED PLUG WITH AN EXTENSION CORD RECEPTACLE OR OTHER OUTLET UNLESS THE PRONGS CAN BE FULLY INSERTED INTO THE OUTLET TO PREVENT ANY EXPOSURE OF THE PRONGS ON THE POLARIZED PLUG.
ATTENTION:
POUR PRÉVENIR LES CHOCS ÉLECTRIQUES, NE PAS UTILISER CETTE FICHE POLARISÉE AVEC UN PROLONGATEUR, UNE PRISE DE COURANT OU UNE AUTRE SORTIE DE COURANT, SAUF SI LES LAMES PEUVENT ÊTRE INSÉRÉS À FOND SANS EN LAISSER AUCUNE PARTIE À DÉCOUVERT.
Avoid displaying stationary images on your TV screen for extended periods of time. Stationary patterns generated by PIP display, computer displays, video games, stock market reports, etc. can become permanently engrained on the picture tube. This damage is not protected by your warranty as it is the result of misuse. Should you wish to use your TOSHIBA Television to display still images, it is always advisable to reduce brightness and contrast settings. Never leave a PIP display, computer display or video game display unattended.
NOTE TO CATV SYSTEM INSTALLER IN THE USA:
This reminder is provided to call the CATV system installer's attention to Article 820-40 of the NEC that provides guidelines for proper grounding and, in particular, specifies that the cable ground shall be connected to the grounding system of the building, as close to the point of cable entry as practical.
Table of Contents
Set Up
Installing Your TV Set .... 3
Antenna/Cable TV Connection .... 4
Preparation
Location of Controls (TV Set) 5
Location of Controls (Remote Control) ...... 6
Before Using the Remote Control....7
Using the Remote with VCR or Cable TV Converter 8
Programming the Remote Control ..... 9
Menu Function (General Instructions)....12
Programming Channel Memory 13
Basic Operation
Watching TV Programs....15
Convenient Remote Functions .... 16
Selecting Stereo/SAP Broadcasts .... 18
Advanced Operation
Adjusting the Picture 20
Adjusting the Sound 21
Watching Picture-in-Picture 22
Operating Closed Captioning Feature ..... 24
Locking Channels 26
Programming Your Favorite Channels......28
Changing On-Screen Display Language ..... 29
Equipment Connections
Connecting a VCR 30
Connecting an Audio Amplifier ....31
Reference Section
Cleaning and Care 32
Specifications 32
Before Calling Service Personnel 33
Limited United States Warranty ....34
Installing Your TV Set
Where to install
Place the TV on the floor or on a sturdy platform. The mounting surface should be flat and steady.
Lighting
Do not place the TV in a room where direct lighting strikes the screen. Use soft and indirect lighting.
Air circulation
Place the TV far enough from the walls to allow proper ventilation. This will prevent the TV from overheating and avoid possible damage to the TV. Avoid dusty places too.
Power supply
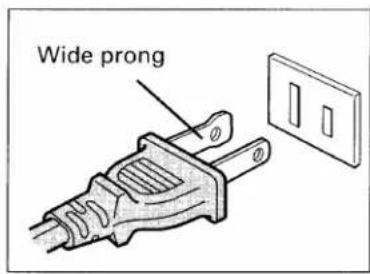
Plug into an electrical outlet with standard household power (120 volt AC, 60Hz). Do not change the plug's safety prong. See the right column.
WARNING : TO AVOID PERSONAL INJURY
- Do not stand or climb on the TV.
- Do not put a VCR or any heavy object on top of the TV.
CAUTION :
As a safety feature, the plug has one prong wider than the other. It will fit only one way into a standard electrical outlet. If the plug will not fit into the outlet, try turning it around. If the plug will not fit either way, the outlet is probably old and non-standard.
You will need to have a new outlet installed by an electrician. DO NOT CHANGE THE SAFETY FEATURE OF THE PLUG.
You can use either an indoor or outdoor antenna to receive VHF and/or UHF channels. Channels 2 - 13 are VHF channels, and channels 14 - 69 are UHF channels. We recommend using an outdoor antenna for better picture quality. You can receive Cable TV by connecting a cable supplied by your local cable company.
To connect an antenna or Cable without a decoder box
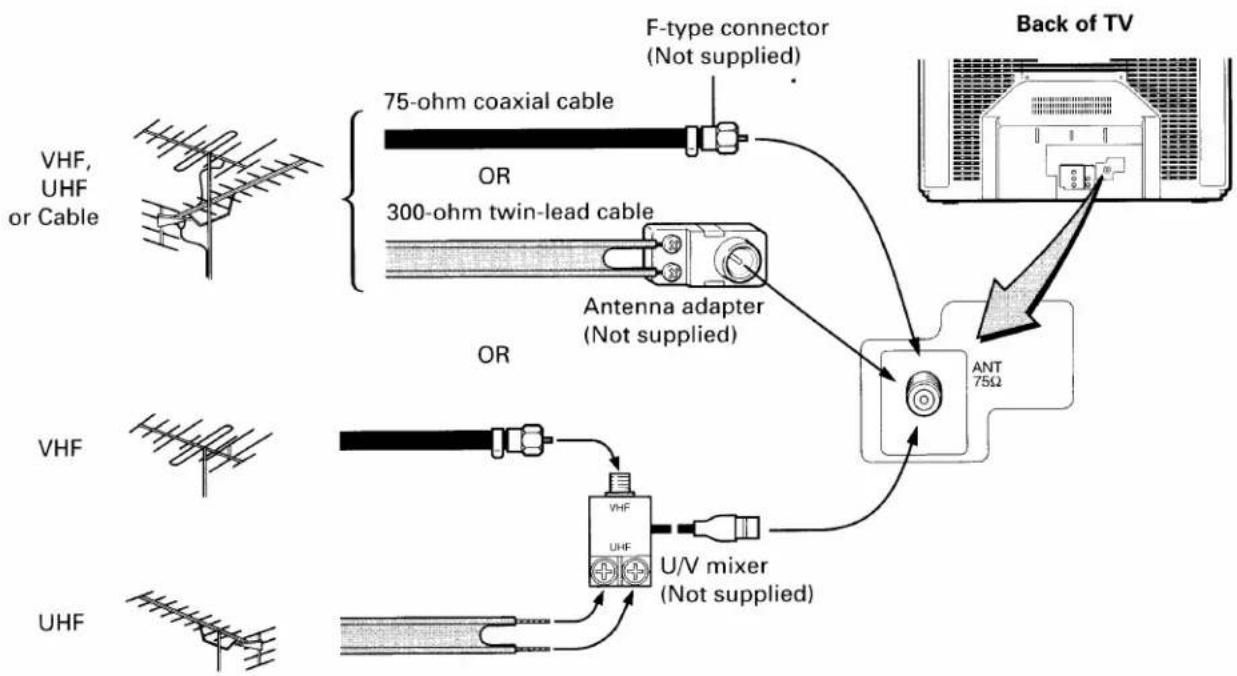
flowchart
graph TD
    A["Back of TV"] --> B["F-type connector (Not supplied)"]
    B --> C["75-ohm coaxial cable"]
    B --> D["300-ohm twin-lead cable"]
    B --> E["Antenna adapter (Not supplied)"]
    E --> F["ANT 75Ω"]
    G["VHF, UHF or Cable"] --> H["OR"]
    I["VHF"] --> J["OR"]
    K["UHF"] --> L["U/V mixer (Not supplied)"]
    M["VHF, UHF"] --> N["VHF"]
    O["Back of TV"] --> P["Back of TV"]
To connect Cable with a decoder box

flowchart
graph TD
    A["Cable TV lead-in"] --> B["2-way signal splitter (Not supplied)"]
    B --> C["A IN B OUT"]
    C --> D["*A/B switch (Not supplied)"]
    D --> E["Cable TV converter/decoder"]
    E --> F["ANT 75Ω"]
    G["Cable TV"] --> H["IN"]
    G --> I["OUT"]
Notes:
* "A" position on the A/B switch allows you to select unscrambled channels using the TV's channel keys.
"B" position allows you to select scrambled channels via the converter/decoder box using the converter's channel keys. Place your TV on channel 3 or 4 to match the converter's output channel.
- If you use a VCR, connect its antenna in/out between the decoder box and A/B switch.
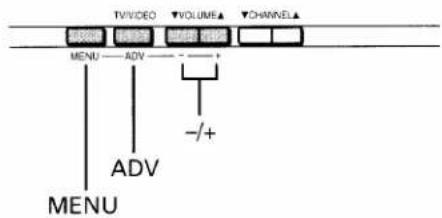
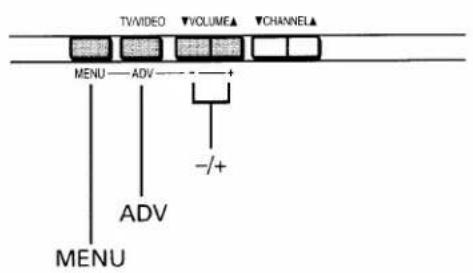
Location of Controls (TV Set)
For specific use of each control, consult the corresponding page numbers in brackets.
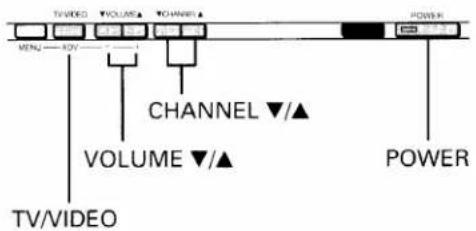
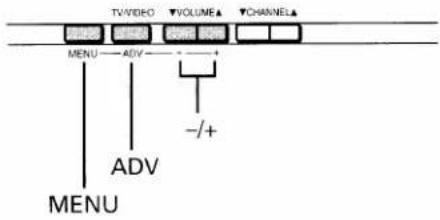
![Front view Remote sensor POWER button [15] MENU button [12] TV/VIDEO button* [30] ADV button [12] POWER indicator CHANNEL ▼/▲ buttons [15] VOLUME ▼/▲ buttons* [15] -/+ buttons [12]](/content/2026/06/1146318/images/f7f3ed440b767a0593a66fec0241e381bd095abd639a55298ca5cbd2077dbf2e.jpg)
![Rear view VIDEO/AUDIO terminals [30-31] Antenna/Cable terminal [4]](/content/2026/06/1146318/images/bb00715b1fa22789961d0091a451f3c5be508e2dec5c78a776d9188b0fdd51e7.jpg)
* Dual function buttons
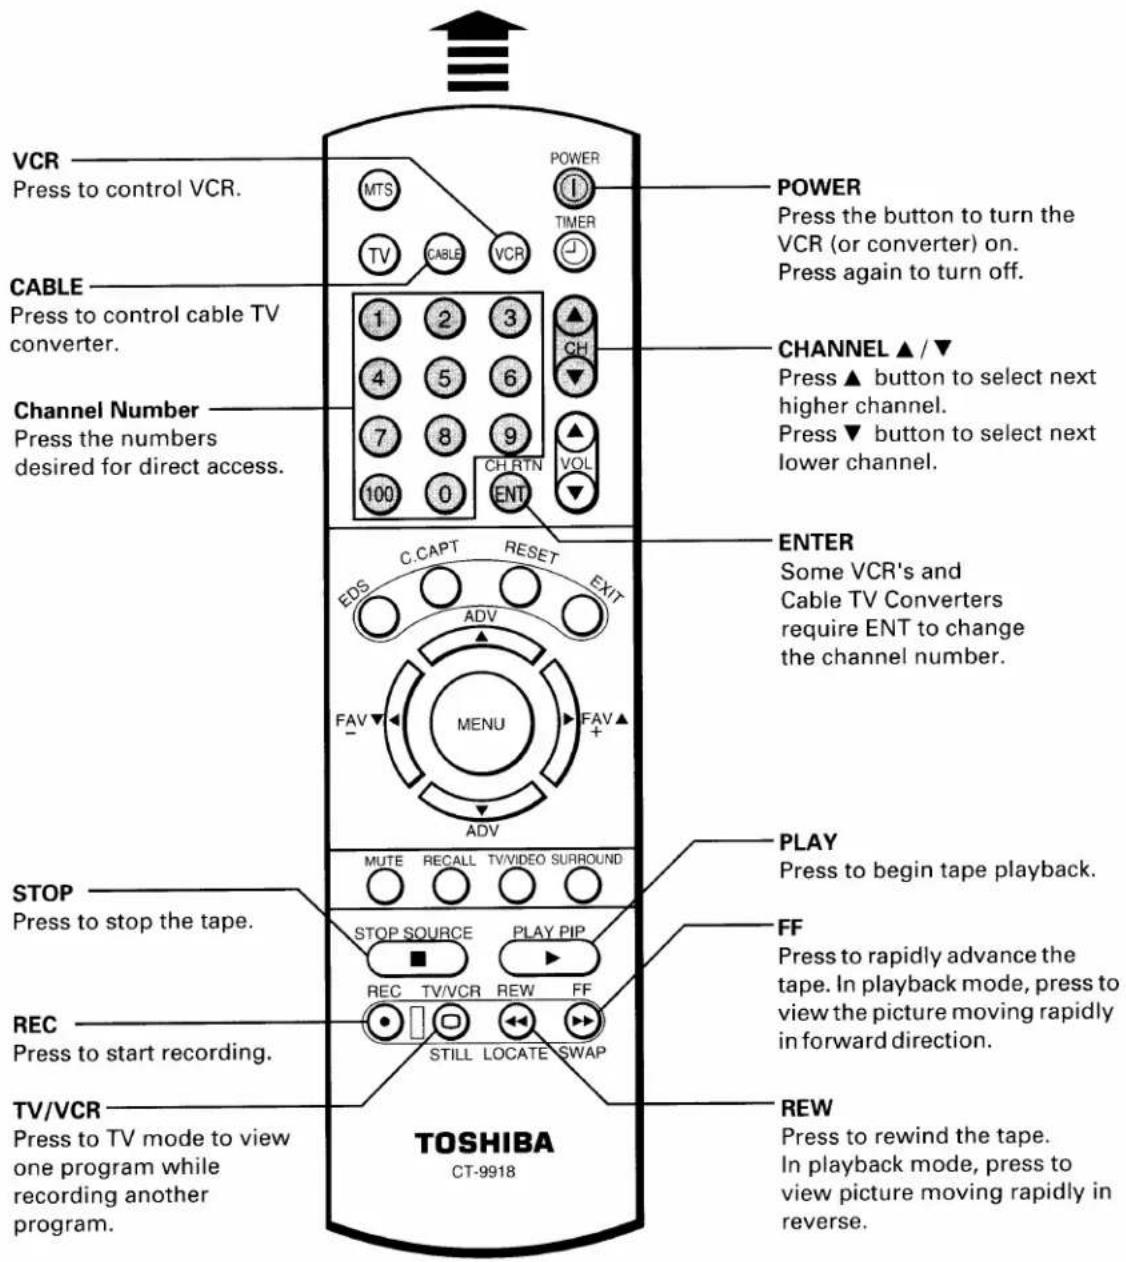
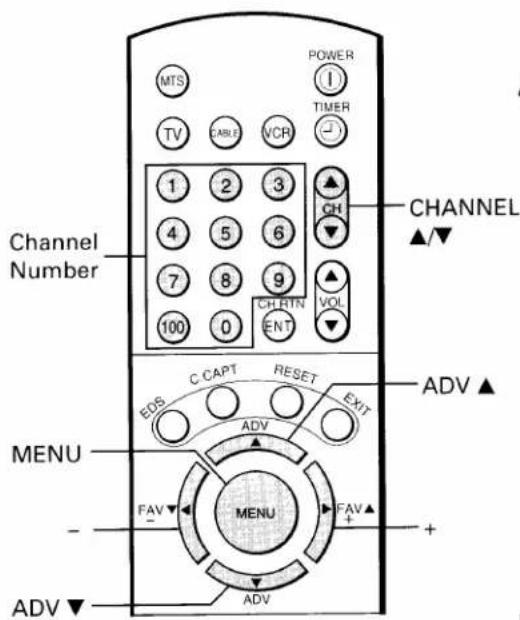
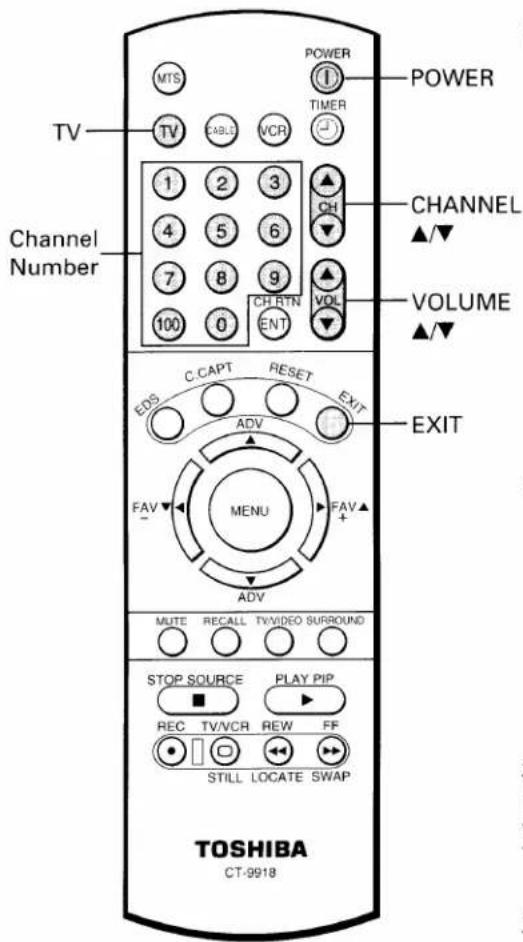
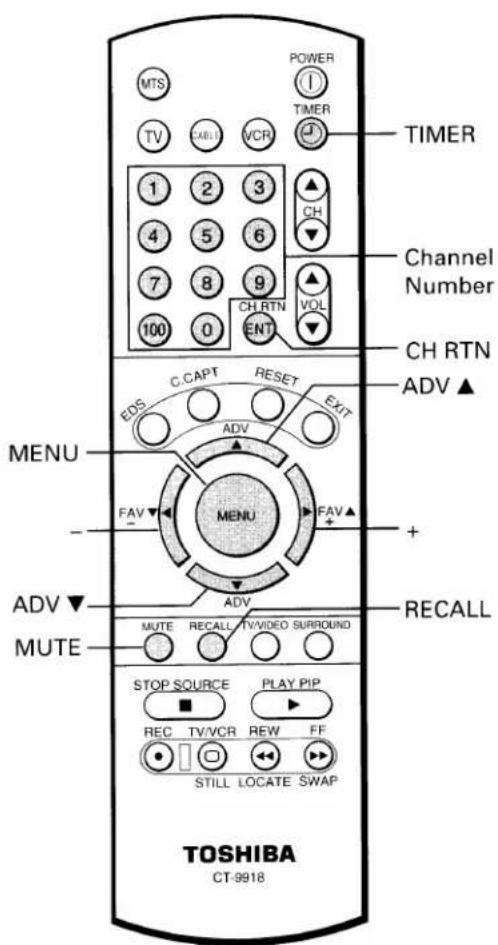
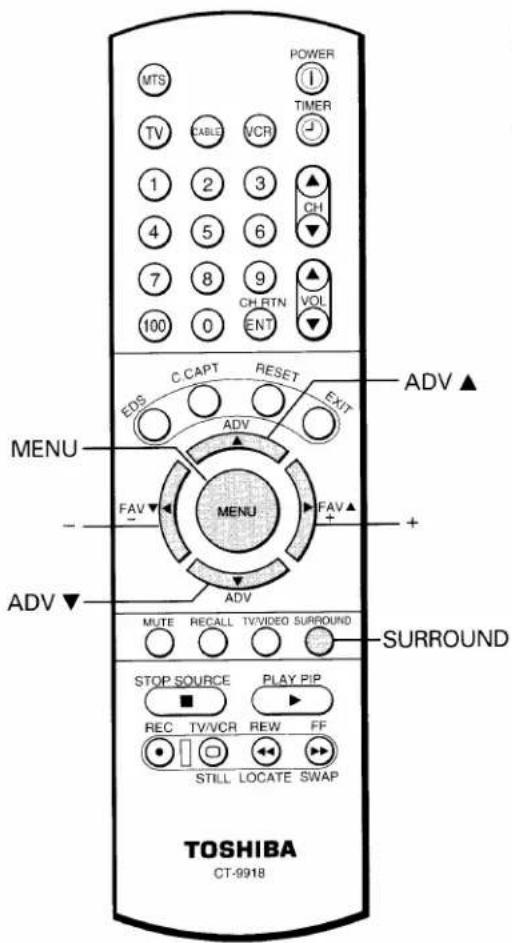
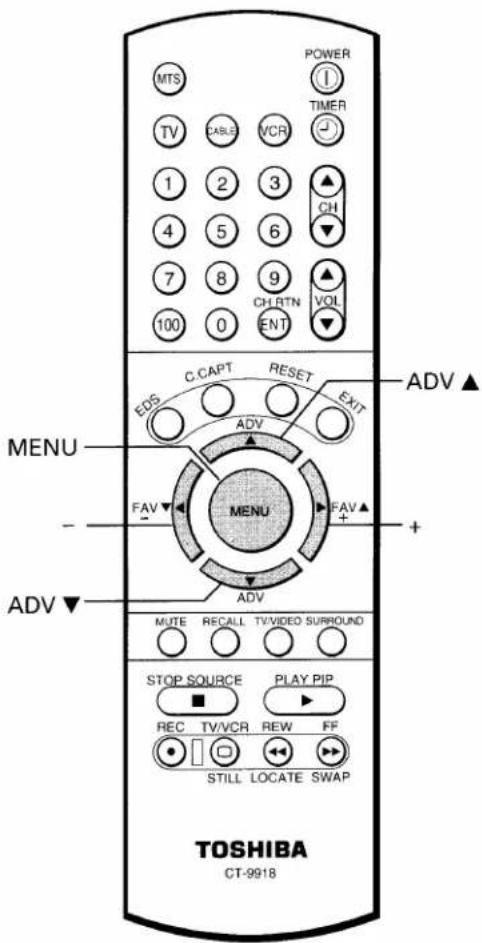
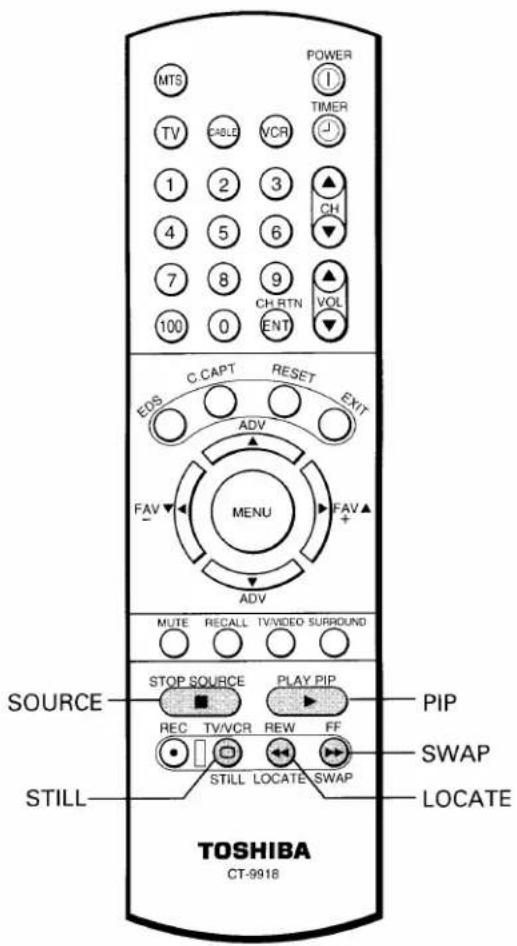
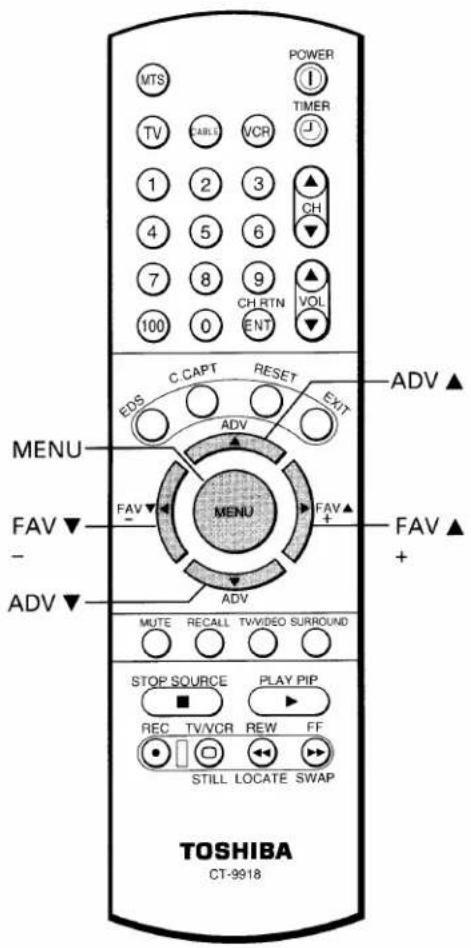
Location of Controls (Remote Control)
Only the buttons that are used to operate the TV set are described here. For details on the use of each control, refer to pages in brackets.
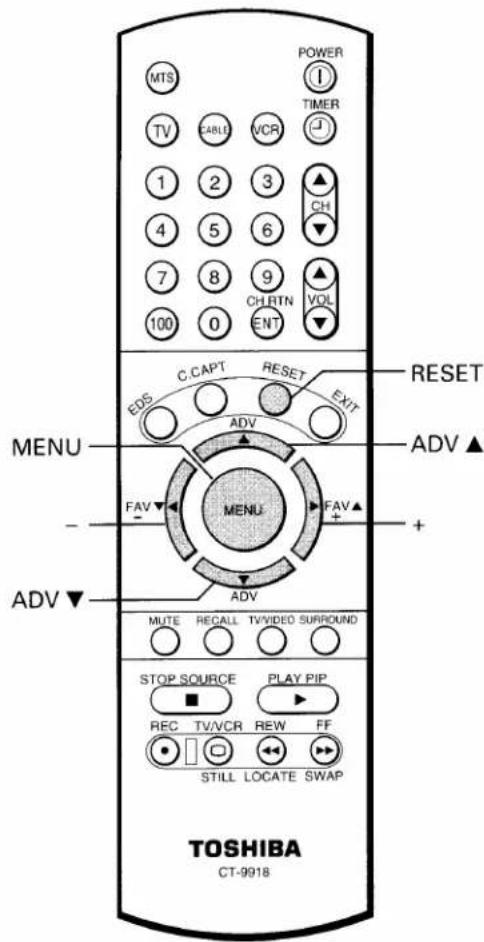
![Aim at the remote sensor on the TV MTS [18] Device buttons* Press "TV" until it blinks to control the TV. Channel Number [15] CH RTN [16] C. CAPT [24] EDS [17] FAV ▼[28] - [12] MENU [12] RECALL [16] MUTE [16] POWER [15] TIMER [17] CHANNEL ▲/▼ [15] VOLUME ▲/▼ [15] RESET [21] EXIT [12] ADV ▲ [12] FAV ▲ [28] + [12] ADV ▼ [12] TV/VIDEO [30] SURROUND [18] STOP SOURCE PLAY PIP REC TV/VCR REW FF STILL LOCATE SWAP PIP functions [22] TOSHIBA CT-9918](/content/2026/06/1146318/images/efc8aa4b77134ff03666b2905abbfca92ba10a76acf47e9cf8642c5ecbd7d1ea.jpg)
* One of the DEVICE buttons will light up when any other button is pushed to indicate which mode you have selected.
Before Using the Remote Control
Introductions
With this Remote Control, you can operate your TV and most models of remote-controlled VCR's and Cable TV converters even if they are different brands. However, this Remote Control must first be programmed to control other brands of VCR's and/or Converters. If you will be using your TV set with a TOSHIBA VCR, your Remote has already been preprogrammed for you.
- Before attempting to operate your Remote Control, install the batteries according to the section "To install batteries" shown below.
- For more detailed instructions, see the section "Programming the Remote Control" on page 9.
Notes:
- After installing new batteries, the Remote Control will set itself to the codes for TOSHIBA's TV and VCR. If you are using the Remote Control to operate equipment that uses different codes, it will have to be reprogrammed for those codes.
- This Remote Control may have functions not available on the original remote controller.
- These functions may or may not operate your VCR or Cable TV Converter. Refer to the owner's manuals supplied with the equipment to see which functions are available.
- The remote controller supplied with your VCR or cable TV converter may have keys not duplicated on this Remote Control. If these functions are desired, the original remote controller will have to be used.
To install batteries
1 Place the Remote Control with the face down. Press down on the ridged area of the battery cover and slide it off.
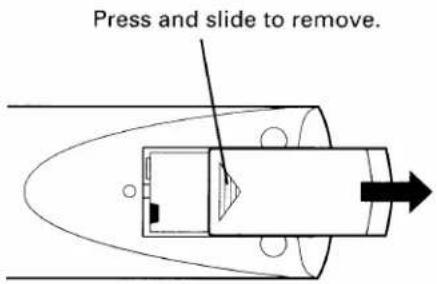
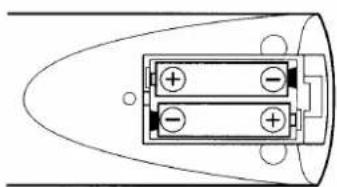
2 Place two "AA" size batteries, matching the + and - signs on each battery to the + and - signs of the battery compartment.
natural_image
Diagram of a cylindrical battery with two cells and positive/negative terminals, no text or symbols present3 Replace the battery cover until the lock snaps.
CAUTION:
- Do not throw your batteries into a fire. Dispose of your batteries in a designated disposal area.
- Do not combine used old batteries with new ones.
- Do not mix battery types.
Tips for Best Operation
- For optimum performance, aim the Remote Control directly at the TV from a distance of no more than 16 ft (5m) and be sure there is no obstruction between the Remote Control and the TV.
- If your Remote Control does not always adjust the TV as you wish, you probably need to replace the batteries.
- Remove dead batteries immediately to prevent battery acid from leaking into the battery compartment.
- If you do not intend to use the Remote Control for a long period, remove the batteries.
Using the Remote with VCR or Cable TV Converter
- To control a TOSHIBA VCR, first press the VCR button. The buttons shown below will then control the VCR. The rest of the buttons operate the TV as usual.
If you have another brand of VCR, you can probably program your Remote to control it.
Details are on page 9. - To control a cable TV converter, this Remote Control must be programmed to recognize the brand of your converter. See page 9. The shaded buttons can be used to control the cable TV converter.
Press the CABLE button whenever you control the cable TV converter.
Aim at the VCR or cable TV converter
Programming the Remote Control
- This Remote Control is preprogrammed to operate TOSHIBA VCR's.
- To use VCR's other than Toshiba models (or cable converter), perform the following procedures before operating.
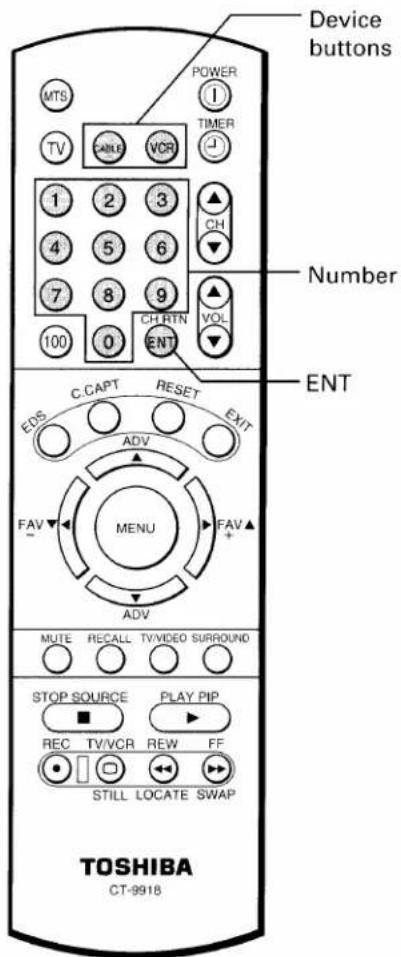
To control other brands of VCR's and cable TV converters
1 Refer to the "VCR code table" (or "Cable TV converter code table") on pages 10 and 11 to find the code number that corresponds to the brand name of your VCR (or converter).
If more than one number is listed, try each one separately until you find the one that works.
2 Turn on the device (VCR or converter) that you wish to control.
3 Press the matching Device button "VCR" (or "CABLE") and ENT at the same time. The device button will light up by the back-light to indicate that it is in the program mode. Perform the following steps while the back-light is on (about 20 seconds).
4 Point the Remote Control toward the VCR (or converter) and press the Number buttons to enter the three digit code number for your brand of VCR (or converter).
- If the right number was entered, the VCR (or the converter) should turn off.
- If the VCR (or the converter) does not respond to the Remote Control, enter another code number until the device turns off. The back-light will blink to confirm that the code has been accepted.
5 Press the Device button to release the program mode.
Notes:
- You have to reprogram the Remote Control when you change its batteries.
- Some newer VCR's are capable of working on either of two remote codes. These VCR's have a switch labeled "VCR1/VCR2".
If your VCR has this kind of switch, and does not respond to all the code numbers for your VCR brand name, set the switch to another position ("VCR1" or "VCR2") and reprogram the Remote Control.
For future reference, write the code you used.
VCR CODE:
CABLE CODE:
Programming the Remote Control (Continued)
- In some rare cases, you may not be able to operate your non-Toshiba equipment with the supplied Remote Control. This is because your equipment may use a code that is not provided with this Remote Control. In this case, please use the equipment's own remote control.
VCR code table
| BRAND NAME | CODE NUMBER | BRAND NAME | CODE NUMBER | BRAND NAME | CODE NUMBER |
| AIWA | 034 | MITSUBISHI | 059,061,046,051, | TOSHIBA | 001,112,131,008, |
| AKAI | 146,043,046,124, | 142,013,020,045 | 047,059,082,013, | ||
| 142,016 | MTC | 034,040 | 017 | ||
| ALBA | 202 | MULTITECH | 024,034 | TOTEVISION | 040,101 |
| AMPRO | 072 | NEC | 012,023,043,048 | UNITECH | 040 |
| ANAM | 031 | NORDMENDE | 043 | VECTORRESEARCH | 012 |
| AUDIO DYNAMICS | 012,023,043 | OPTONICA | 053,054 | VIDEO CONCEPTS | 012,046,034,141 |
| BRANDT | 204 | ORION | 202 | VIDEOSONIC | 040 |
| BROKSONIC | 035,037,129,203 | PANASONIC | 070,140,201,031 | WARDS | 013,024,031,034, |
| CANON | 031 | PENTAX | 013,020,031,063 | 040,053,054,003, | |
| CRAIG | 003,040 | PHILCO | 031,034,067 | 017,131 | |
| CURTIS MATHES | 031,041 | PHILIPS | 031,067,034,101, | YAMAHA | 012,043,034 |
| DAEWOO | 010,110,111,112 | 054 | ZENITH | 072,080,056,048, | |
| 017 | PILOT | 101 | 034,101,058 | ||
| DBX | 012,023,043 | PIONEER | 021,048,013 | ||
| DYNATECH | 034,053 | PULSAR | 072 | ||
| ELECTROHOME | 059 | QUARTZ | 014 | ||
| EMERSON | 006,029,035,025, | QUASAR | 031 | ||
| 034,036,037,046, | RCA | 013,020,034,041, | |||
| 101,129,131,138, | 040,107,109,140, | ||||
| 017,031,202,203 | 144,147,031,205, | ||||
| FISHER | 003,008,009,010 | 206,207,208 | |||
| FUNAI | 034 | REALISTIC | 003,008,010,014, | ||
| GE | 031,072,144,147, | 031,034,040,053, | |||
| 063,107,109,205, | 054,101 | ||||
| 206,207,208 | RICOH | 058 | |||
| GO VIDEO | 132,136 | RUNCO | 072 | ||
| GOLDSTAR | 012,013,020,101, | SALORA | 014 | ||
| 123 | SAMSUNG | 040,107,109,112, | |||
| HARMAN KARDON | 012,045 | 017,205,206 | |||
| HITACHI | 004,026,034,043, | SANSUI | 043,048 | ||
| 063,047,013 | SANYO | 003,010,014 | |||
| INSTANTREPLAY | 031 | SCOTT | 017,037,129,112, | ||
| JCL | 031 | 131 | |||
| JCPENNY | 012,013,040,101, | SEARS | 003,008,010,013, | ||
| 031 | 014,017,101,009, | ||||
| JENSEN | 043 | 031 | |||
| JVC | 048,043,130,152, | SHARP | 031,054,053 | ||
| 055,060,012,031, | SHINTOM | 024 | |||
| 047 | SONY | 056,057,058,003, | |||
| KENWOOD | 014,048,043 | 052,031 | |||
| LLOYD | 034 | SOUNDESIGN | 034 | ||
| LXI | 003,009,017,034, | STS | 013 | ||
| 101,013,014 | SYLVANIA | 031,034,067 | |||
| MAGIN | 040 | SYMPHONIC | 034 | ||
| MAGNAVOX | 067,031,034,041 | TANDY | 010,034 | ||
| MARANTZ | 031,067,012 | TATUNG | 043 | ||
| MARTA | 101 | TEAC | 034,043 | ||
| MATSUI | 202 | TECHNICS | 031,070 | ||
| MEI | 031 | TEKNIKA | 031,019,034,101 | ||
| MEMOREX | 101,003,010,014, | TELEFUNKEN | 204 | ||
| 031,034,053,072 | THOMAS | 034 | |||
| MGA | 045,046,059 | TMK | 006 | ||
| MINOLTA | 013,020 |
Cable TV converter code table
| BRAND NAME | CODE NUMBER | BRAND NAME | CODE NUMBER |
| ABC...... | 001,004,039,046,053,003,042 | SCIENTIFICATLANTA ...... | 003,011,041,042,043,045,046 |
| ANTRONIK...... | 014 | ||
| ARCHER...... | 005,007,014,024 | SHERITECH...... | 022 |
| CABLE STAR...... | 026 | SIGNAL...... | 030 |
| CENTURY...... | 007 | SIGNATURE...... | 001 |
| CITIZEN...... | 007 | SL MARX...... | 030 |
| COLOUR VOICE...... | 065,090 | SPRUCER...... | 047,078 |
| COMBANO...... | 080,081 | STANDARDCOMPONENTS .. | 203 |
| COMTRONICS...... | 019,030,202 | ||
| DIAMOND...... | 023 | STARCOM...... | 002,004,008,009 |
| EAGLE...... | 020,030,040 | STARGATE...... | 008,030 |
| EASTERN...... | 057,062,066 | SYLVANIA...... | 067 |
| ELECTRICORD...... | 032 | TADIRAN...... | 030 |
| GE...... | 072 | TANDY...... | 017 |
| GEMINI...... | 008,022,025,054 | TELECAPATION.... | 021 |
| GI...... | 001,074 | TEXSCAN...... | 029,067 |
| GOLDEN CHANNEL.. | 030 | TOCOM...... | 039,040,056 |
| HAML IN...... | 049,050,055,204,207 | TOSHIBA...... | 052 |
| HITACHI...... | 001,055 | UNIKA...... | 007,014,024 |
| HOSPITALITY...... | 070,077 | UNITED CABLE.... | 004,053 |
| JERROLD...... | 002,003,004,010,001,008,009,069,074,201 | UNIVERSAL...... | 007,024,027,035,005,014,026,032 |
| M-NET...... | 037 | 205 | |
| MACOM...... | 033 | ZENITH...... | 052,060,093 |
| MAGNAVOX...... | 012,079,010,064 | ||
| MEMOREX...... | 052 | ||
| MOVIE TIME...... | 028,032 | ||
| NSC...... | 071,073,015,028,038 | ||
| OAK...... | 016,031,037,053 | ||
| PANASONIC...... | 044,047 | ||
| PARAGON...... | 052 | ||
| PHILIPS...... | 020,065,006,012,013,085,090,202 | ||
| PIONEER...... | 034,051,001,063,076 | ||
| POPULARMECHANICS...... | 206 | ||
| POST NEWSWEEK...... | 016 | ||
| PRUCER...... | 059 | ||
| PTS...... | 011,048,071,072,073,074 | ||
| PULSAR...... | 052 | ||
| RCA...... | 047 | ||
| REGAL...... | 049,050 | ||
| REGENCY...... | 057 | ||
| REMBRANT...... | 025 | ||
| RK...... | 091 | ||
| SAMSUNG...... | 030,068 |
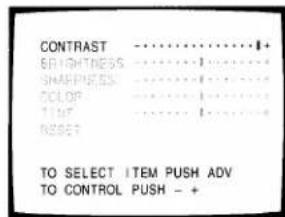
Menu Function (General Instructions)
We suggest you familiarize yourself with the procedure before using the Menu function.
To adjust any TV feature, the use of the Menu function is required. The adjustments that can be made to the TV appear on the screen.
Notes:
● The ADV button on the TV will function as the TV/VIDEO button when no menu display is on the screen.
- The - / + buttons on the TV will function as the VOLUME ▼/▲ buttons when no menu display is on the screen.
- The -/+ buttons on the Remote Control will function as the FAV ▼/▲ buttons when no menu display is on the screen.
MENU button (on TV and on Remote)
Each time you press MENU, the Picture, Audio, Setup or Option menu on-screen display is selected in order, then press ADV.
flowchart
graph TD
    A["Picture menu"] --> B["Option menu"]
    B --> C["Audio menu"]
    C --> D["Setup menu"]

    A -->|CONTRAST: -**********+| E
    A -->|BRIGHTNESS: -**********+| F
    A -->|SHARPNESS: -**********+| G
    A -->|COLOR: -**********+| H
    A -->|TINT: -**********+| I
    A -->|RESET: -**********+| J
    A -->|TO SELECT ITEM PUSH ADV TO CONTROL PUSH - +| K

    C -->|MTS: [STR] SAP MONO | L
    C -->|BASS: -**********+| M
    C -->|TREBLE: -**********+| N
    C -->|BALANCE: -**********+| O
    C -->|SPEAKERS: [ON] OFF | P
    C -->|TO SELECT ITEM PUSH ADV TO CONTROL PUSH - +| Q
    C --> R
    C --> S
    C --> T
    C --> U
    C --> V
    C --> W
    C --> X
    C --> Y
    C --> Z
    C --> AA
    C --> AB
    C --> AC
    C --> AD
    C --> AE
    C --> AF
    C --> AG
    C --> AH
    C --> AI
    C --> AJ
    C --> AK
    C --> AL
    C --> AM
    C --> AN
    C --> AO
    C --> AP
    C --> AQ
    C --> AR
    C --> AS
    C --> AT
    C --> AU
    C --> AV
    C --> AW
    C --> AX
    C --> AY
    C --> AZ
    C --> BA
    C --> BB
    C --> BC
    C --> BD
    C --> BE
    C --> BF
    C --> BG
    C --> BH
    C --> BI
    C --> BJ
    C --> BK
    C --> BL
    C --> BM
    C --> BN
    C --> BO
    C --> BP
    C --> BQ
    C --> BR
    C --> BS
    C --> BT
    C --> BU
    C --> BV
    C --> BW
    C --> BX
    C --> BY
    C --> BZ
ADV button (on TV and on Remote)
Use ADV after you have selected the on-screen menu you want to adjust with the MENU button.
Each time you press ADV, the function to be adjusted will be selected in order.
ADV ▲ button ...... from bottom to top
ADV, ADV ▼ button .... from top to bottom
The selected function will be displayed in Purple.
- /+ buttons (on TV and on Remote)
Use -/+ to adjust the function you have selected with the ADV button.
EXIT button (on Remote)
The above four menu displays will automatically disappear from the screen if no control has been operated for about 15 seconds. If you want to clear the screen of all on-screen displays instantly, press EXIT.
Programming Channel Memory
The channel memory is a list of TV channel numbers your TV will stop on when you press the CHANNEL ▲ or ▼ button. First, use the TV/CABLE and CH PROGRAM functions to preset all active channels in your area.
If necessary, arrange the preset channels with the ADD/ERASE functions so that you can tune into only desired channels.
* This TV receives the following TV signals:
- TV: TV broadcasts signals. (VHF channels 2 through 13 and UHF channels 14 through 69)
- STD CABLE: Standard cable TV signals.
- HRC CABLE: Harmonic Related Carrier cable TV signals.
- IRC CABLE: Incremental Related Carrier cable TV signals.
If you are not sure what CABLE system they are using, consult your local cable company.
TV/CABLE function
1 Press POWER to turn on the TV.
2 Press MENU repeatedly until the Setup menu is displayed on the screen.
3 Press ADV repeatedly until "TV/CABLE" is displayed in purple.
4 Press - or + until the mode that corresponds to your TV signal system is displayed in purple. Each time you press the button, the TV*, STD*, HRC* or IRC* mode will be selected in order.
![TV/CABLE: [TV]STD HRC IRC TO SELECT ITEM PUSH ADV TO CONTROL PUSH - +](/content/2026/06/1146318/images/e27057fc4aeb76d885aa6ae50e6d4050b03a7b6c6e79ad6e8f9e54657b36b906.jpg)
![[TV]STD HRC IRC TO SELECT ITEM PUSH ADV TO CONTROL PUSH - +](/content/2026/06/1146318/images/3888bcc0bdad6902239b24f77c4732f5bdee7b80d500305191f1d89add2e7d2e.jpg)
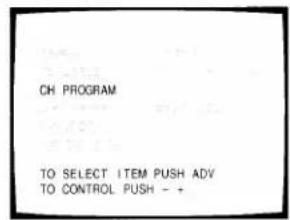
CH PROGRAM function
1 Press MENU repeatedly until the Setup menu is displayed on the screen.
2 Press ADV repeatedly until "CH PROGRAM" is displayed in purple.
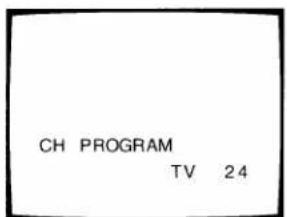
3 Press - or + to start channel programming. The TV will automatically cycle through all the TV or CABLE channels depending on the mode selected, and store active channels in the channel memory.
3 Press - or + to start channel programming.
The TV will automatically cycle through all the TV or CABLE channels depending on the mode selected, and store active channels in the channel memory.
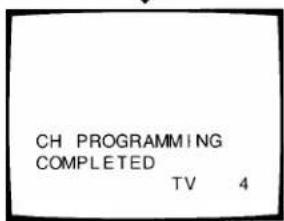
4 When channel programming is complete, you will see the message at the right.
5 Press CHANNEL ▲ or ▼ to make sure the channel programming has been done properly.
Programming Channel Memory (Continued)
ADD/ERASE function
After performing the CH PROGRAM function, you can add or erase specific channels.

1 Select the channel you want to erase using the CHANNEL ▲ or ▼ button, or select the channel you want to add using the Channel Number buttons.
2 Press MENU repeatedly until the Setup menu is displayed on the screen.
3 Press ADV repeatedly until "ADD/ERASE" is displayed in purple.
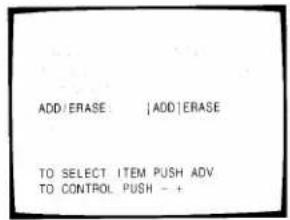
4 Press - or + : To erase the channel Press the button until "ERASE" is displayed in purple indicating that the channel has been erased from the memory.
To add the channel
Press the button until "ADD" is displayed in purple indicating that the channel has been memorized.
![[ERASE] TO SELECT ITEM PUSH ADV TO CONTROL PUSH - +](/content/2026/06/1146318/images/64dc4a95fa55f52a6e536dd80c4d971edb106390712c986fdfd1661f9b6a59a9.jpg)
![[ADD] TO SELECT ITEM PUSH ADV TO CONTROL PUSH - +](/content/2026/06/1146318/images/4dd42c1354df868dc17bcd7654d06effd82aa02590118473ac6af7ed10b4b84f.jpg)
5 Repeat steps 1 to 4 for other channels.
You have now completed the channel programming.
CABLE channel reference chart
| Number on this TV | 1 | 5 | 6 | 14 | 15 | 16········34 | 35 | 36 | 37 | 38········60 | 61 | 62 | 63 | 64 | 65 | 66 | ||||
| Corresponding CABLE channel | A-8 | 5(A-7) | 6(A-6) | A | B | C········U | V | W | AA | BB········XX | YY | ZZ | AAA | BBB | 65 | 66 | ||||
| Number on this TV | 67 | 68 | 69········92 | 93 | 94 | 95 | 96 | 97 | 98 | 99 | 100 | 101 | 102········123 | 124 | 125 | |||||
| Corresponding CABLE channel | 67 | 68 | 69········92 | 93 | 94 | A-5 | A-4 | A-3 | A-2 | A-1 | 100 | 101 | 102········123 | 124 | 125 | |||||
The above chart is typical of many cable system channel allocations. If in doubt, consult your cable company.
- First press the TV button on the Remote Control.
1 Press POWER to turn on the TV. To turn off the TV, press POWER again.
2 Select a channel in one of the following two ways. - To scan the memorized channels in numerical sequence Press CHANNEL ▲ to select the next higher channel. Press CHANNEL ▼ to select the next lower channel. Press the button again to select the next memorized channel.
- To select a channel directly Press the Channel Number buttons (0-9 and 100). To select channel 4, press "4" (or press "0", "4"). To select channel 38, press "3", "8". To select channel 125, press "100", "2", "5" in sequence.
If you cannot select certain channels, either TV (off the air) or CABLE channels Check if the TV/CABLE function is properly set. See page 13.
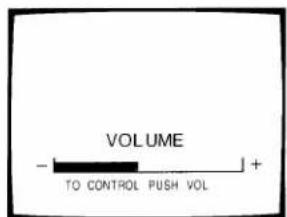
3 Press VOLUME ▲/▼ to adjust the volume. To increase the volume, press ▲. To decrease the volume, press ▼.
Auto-Power-Off
If a vacant channel is tuned or TV broadcast for a day is finished, the TV will automatically turn off after about 15 minutes. This feature does not operate in the VIDEO mode.
Last Mode Memory
If the power is cut off while you are viewing the TV and the power is resupplied, the TV is turned on automatically by the Last Mode Memory feature. If the power is going to be off or when you leave home for a long time, remove the power plug from the wall outlet to prevent the TV from turning on in your absence.
Demonstration Mode
When this function is activated, your TV will automatically display a variety of its on-screen menus and special features, this function is provided for demonstration purpose only. To start demonstration, select "DEMO [START]" in the Option menu. (See page 12.) To stop, press EXIT, POWER, DEMO [STOP] or Recall.
TOSHIBA COLOR TV
- TECHNOLOGY - PERFORMANCE - EXCITEMENT
Watching Video Input
The TV/VIDEO button is used to view the signals coming from other devices like VCR's or Laserdisc players connected to this TV. Details are on page 30.
Note:
The VOLUME ▼/▲ buttons on the TV function as the -/+ buttons while any of the menu displays (Picture, Audio, Setup or Option) are on the screen.
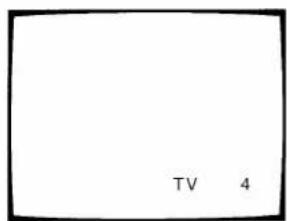
To display on-screen information
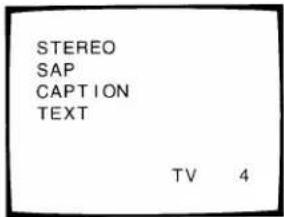
Press RECALL to display the following on-screen information.
- Channel number
- VIDEO mode selected
- Stereo or SAP audio status
- Closed Caption or Text program status
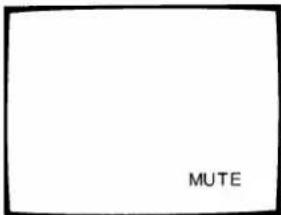
To mute the sound
Press MUTE to mute the sound. The word "MUTE" will be displayed on the screen as shown. This is useful during telephone calls or other interruptions.
To restore the sound, press MUTE again.
Note: When the MUTE button is pressed, the Closed-Captioned feature "C1" is activated. ("MUTE" on-screen display will disappear.) To deactivate, press the MUTE button again. (This feature only functions when the Closed Caption mode is set to "OFF".)
To change quickly between two channels
Press CH RTN to return to the last channel viewed.
This is useful should you want to view two channels. This allows you to view two programs without entering an actual channel number each time.
To operate this function
1 Select the first channel you want to view.
2 Select the other channel with the Channel Number buttons.
3 Press CH RTN.
The previous channel will return.
Each time you press CH RTN, the TV will switch back and forth between the two channels.
flowchart
graph TD
    A["(Viewing channel)\n4"] --> B["(Previous channel)\n6"]
    B --> A
To set the off-timer (sleep timer)
With the off-timer, you can set the TV to turn off automatically after a pre-determined period of time (up to 3 hours, 10 minute units).
1 Press TIMER to select the OFF TIMER mode.
2 Press two Number (0-9) buttons to enter the length of time you want the TV to stay on after each number position starts to blink.
Example: 120 minutes Press 1 and 2.
3 Press TIMER to start the timer. The display color will change from purple to blue, and then the display will disappear.
To cancel the setting
Press POWER twice, once to turn the TV off and once to turn it on again.
You can also set the off-timer using the on-screen menu function.
1 Press MENU repeatedly until the Setup menu is displayed on the screen.
2 Press ADV repeatedly until "TIMER" is displayed in purple.
3 Press + or - to enter the length of time you want the TV to stay on. Each time you press the button, the time display will increase (+) or decrease (-) by 10 minutes.

Note: To display the time remaining, press TIMER. The remaining time will be displayed on the screen. To erase the display, press TIMER again.
To display the EDS information
Press EDS to display the following EDS (Extended Data Service) information for about 10 seconds.
- Network name ①
- Program name ②
- Program type ③
- Time in show ④
- Program length ⑤
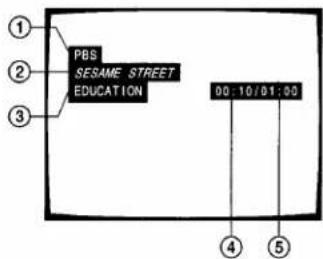
Some of the above information may not be displayed.
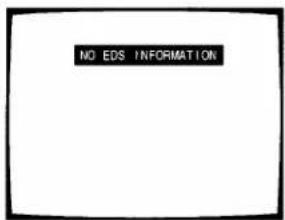
If the TV program you are watching does not include the EDS information
"NO EDS INFORMATION" will be displayed instead for about 10 seconds when you press EDS.
The MTS (Multi-channel TV Sound) feature allows you to improve your TV viewing with high fidelity stereo sound. This TV also allows you to activate or deactivate the stereo surround sound effect.
MTS also provides for an extra channel, SAP (Second Audio Program), used to transmit a second language or other audio information.
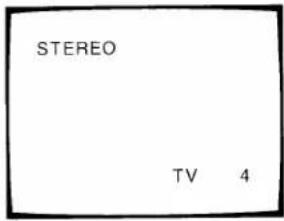
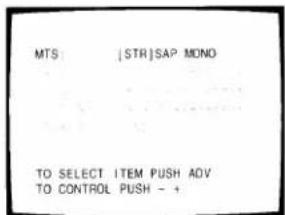
To listen to stereo sound
1 When the TV receives a stereo broadcast, the word "STEREO" is displayed on the screen whenever the TV is turned on, a channel is selected, or the RECALL button is pressed.
2 Press MENU repeatedly until the Audio menu is displayed on the screen.
3 Press ADV repeatedly until "MTS" is displayed in purple. If a stereo broadcast is received, "STR" will be displayed in yellow.
4 Press - or + until "STR" (stereo) is displayed in purple.
Normally this function can be left in "STR" mode. Your TV will then automatically reproduce either stereo or monaural sound, whichever is broadcast.
![MTS [STR]SAP MONO TO SELECT ITEM PUSH ADV TO CONTROL PUSH - +](/content/2026/06/1146318/images/c227870606898c1d84fdd730a2f3279ee291dc9340953bffa91be014a0b14f04.jpg)
![[SAP] TO SELECT ITEM PUSH AOV TO CONTROL PUSH - +](/content/2026/06/1146318/images/87f7f6752c86f085b8bbf6fb5653c889cf410151f62fc8c7a37133b2693f6052.jpg)
If the stereo sound is noisy
Be sure you have selected "STR" mode if broadcast is in stereo. However, if a broadcast signal is not strong enough, and noise-free stereo sound is not available, select "MONO" (monaural) mode.
The noise should be reduced.
To activate surround sound effect
1 Select the STEREO mode as described above.
2 Press SURROUND repeatedly until "SURROUND ON" is displayed in purple.
The surround function has now been activated.
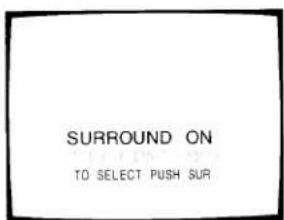
Note: "MTS" function is not available while in the VIDEO mode.
To deactivate the surround effect
Select "SURROUND OFF" in step 2 above.
Note: Normally you can leave the "STR" mode turned on and the surround function activated. The TV will automatically produce either surround stereo or monaural, whatever is broadcast.
Listening to second language
1 When the TV receives a SAP broadcast, the word "SAP" is displayed on the screen.
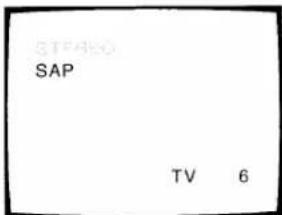
2 Press MENU repeatedly until the Audio menu is displayed on the screen.
3 Press ADV repeatedly until "MTS" is displayed in purple. If a SAP broadcast is received, "SAP" will be displayed in yellow.
4 Press – or + until "SAP" is displayed in purple. You will hear only the second language from the left and right speakers.
![[SAP] TO SELECT ITEM PUSH ADV TO CONTROL PUSH - +](/content/2026/06/1146318/images/1bab10c2943183e68895f8ab361a525c4ba7a6f92305db38f79ca787b79f2a6f.jpg)
You can adjust the picture quality (CONTRAST, BRIGHTNESS, SHARPNESS, COLOR and TINT) to suit your taste.
To adjust the picture quality
1 Press MENU repeatedly until the Picture menu is displayed on the screen.
2 Press ADV repeatedly until the item you want to adjust is displayed in purple.
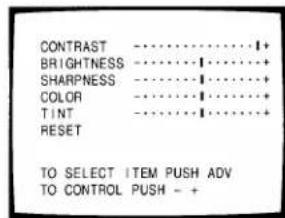
3 Press - or + to adjust the level.
Example: CONTRAST adjustment mode display
| Selection | Pressing | |
| - | + | |
| CONTRAST | lower | higher |
| BRIGHTNESS | darker | lighter |
| SHARPNESS | softer | sharper |
| COLOR | paler | deeper |
| TINT | reddish | greenish |
To reset the Picture and Sound adjustments to the factory-preset level (maximum CONTRAST and all other adjustments centered)
1 Press MENU repeatedly until the Picture menu is displayed on the screen.
2 Press ADV repeatedly until "RESET" is displayed in purple.
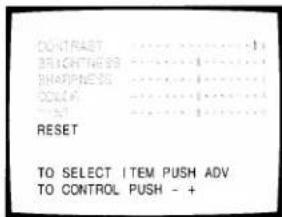
3 Press - or +.

Note: You can also use the RESET button on the Remote Control. (See page 21.)
You can adjust the sound quality (BASS, TREBLE and BALANCE) to suit your taste.
flowchart
graph TD
    A["TVVIDEO"] --> B["MENU"]
    C["VOLUME"] --> D["ADV"]
    E["CHANNEL"] --> F["+/-"]
    G["MENU"] --> H["ADV"]
    I["ADV"] --> J["-/+"]
To adjust the sound quality
1 Press MENU repeatedly until the Audio menu is displayed on the screen.
2 Press ADV repeatedly until the item you want to adjust is displayed in purple.
3 Press - or + to adjust the level.
Example: BASS adjustment mode display
![MTS: [STR]SAP MONO BASS -********+ TREBLE -********+ BALANCE -********+ SPEAKERS: [ON]OFF TO SELECT ITEM PUSH ADV TO CONTROL PUSH - +](/content/2026/06/1146318/images/f01504fe22dcd83df95e977b141fd0c909def779ae48c20cb6173388d9813e8f.jpg)
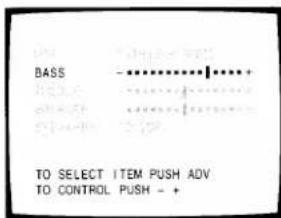
| Selection | Pressing | |
| - | + | |
| BASS | weaker | stronger |
| TREBLE | weaker | stronger |
| BALANCE | decreases the right channel | decreases the left channel |
RESET button (on the Remote Control)
To reset the Picture and Audio adjustments to the factory-preset level (maximum CONTRAST and all other adjustments centered)
Press RESET.
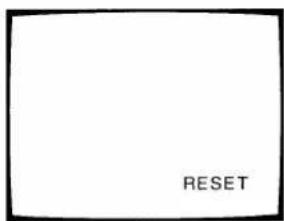
Note: The "SPEAKERS" function is explained on page 31.
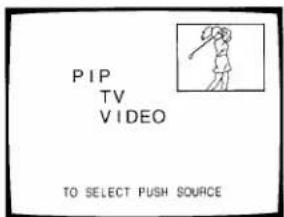
In addition to the main picture, another TV program or video source being received through the VIDEO input jacks can be displayed simultaneously as a small picture. This is called PIP (Picture-in-Picture).
Be sure to connect a VCR with the VIDEO/AUDIO cables.
To connect TV and VCR for PIP
To display a small picture
1 Press PIP once to display a small picture.
The 1/9 size window picture will appear. If you press twice: The 1/16 size wind picture will appear.
2 Press SOURCE to select "VIDEO" input source for the small picture. The selected source will be displayed in purple.
3 Select channels for the PIP using the VCR's channel keys.
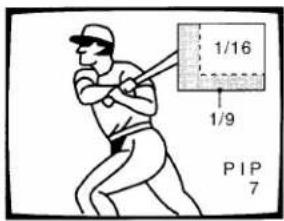
To turn off the small picture, press PIP
- Twice, if you watch the 1/9 size window picture.
- Once, if you watch the 1/16 size window picture.
To use advanced functions
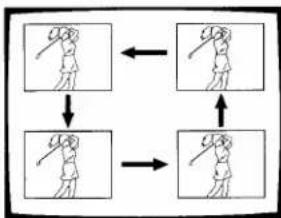
To change the position of the small picture
Press LOCATE repeatedly when a small picture is displayed. The display position of the small picture will change in order.
flowchart
graph TD
    A["Step 1: Two figures in hand"] --> B["Step 2: Two figures in hand"]
    B --> C["Step 3: Two figures in hand"]
    C --> D["Step 4: Two figures in hand"]
    D --> E["Step 5: Two figures in hand"]
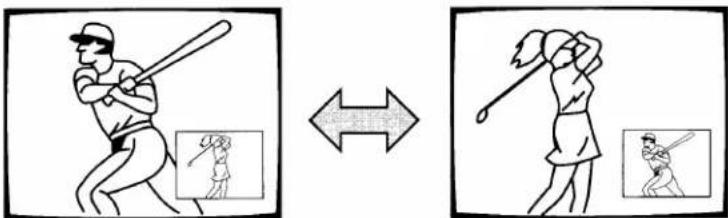
To switch the main and small picture
Press SWAP when a small picture is displayed.
The main and small pictures will switch.
To switch them again, press SWAP again.
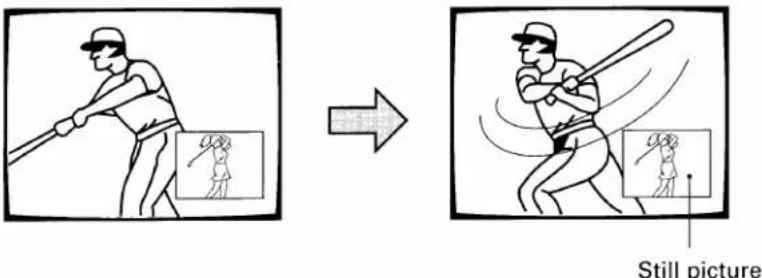
To freeze the small picture
Press STILL when a small picture is displayed.
The small picture will become a still picture.
To return to a moving picture, press STILL again.
Operating Closed Captioning Feature

To view captions
Closed-captioning is a printed version of the dialogue, narration, and/or sound effects of a TV program.
Captions will appear at either the top or bottom of the screen during captioned broadcasts as shown.
Captioning is especially helpful for hearing impaired individuals.
1 Select the desired program.
2 Press RECALL to check if the program is being captioned. If it is, the word "CAPTION" is displayed on the screen.
The captioned programs are usually notated on your local TV listings by its service marks such as "CC".
3 Press C.CAPT on the Remote Control to call up the CLOSED CAPTION menu. Usable selections are displayed in yellow.
Press C.CAPT repeatedly until "C1", "C2", "C3" or "C4" is displayed in purple. ("C1" stands for Caption 1, for example.) Select "C1" for translation of the primary language in your area.
![CLOSED CAPTION [C1]C2 C3 C4 T1 T2 T3 T4 OFF TO SELECT PUSH C.CAPT](/content/2026/06/1146318/images/cd9db5bdf21e7c396514a3edeebd8055a10a56604fb93f7c7232e9dc4a780f86.jpg)
You can also select this feature using the on-screen menu function.
1 Press MENU repeatedly until the Option menu is displayed on the screen.
2 Press ADV repeatedly until "C.CAPT" is displayed in purple.
3 Press - or + to select "C1", "C2", "C3" or "C4".
![C.CAPT: C1 C2 C3 C4 T1 T2 T3 T4[OFF] TO SELECT ITEM PUSH ADV TO CONTROL PUSH - +](/content/2026/06/1146318/images/3d9581341db84c9acd36ce2d39c327e005b8358d44a0f540762a09951c80ca3a.jpg)
![[C1] C2 C3 C4 TO SELECT ITEM PUSH ADV TO CONTROL PUSH - +](/content/2026/06/1146318/images/25acd347d22b6682125b746df0ac23624fde5adaf3cd656519ece37b12a47ca4.jpg)
Note:
A closed-captioned signal may not be decoded in the following situations.
- When a video tape has been dubbed.
- When the signal reception is weak.
- When the signal reception is non-standard.
To deactivate this feature
Select "OFF" in step 3 above.
To view text
Text is information that is presented using from one half to full television screen. It is usually not related to the program.
For example, it could be a listing of the closed-captioned programs, news, weather information or stock market reports.
1 Select the desired program.
2 Press RECALL to check if the program includes text information. If it is, the word "TEXT" is displayed on the screen.
3 Press C.CAPT on the Remote Control to call up the CLOSED CAPTION menu. Usable selections are displayed in yellow.
Press C.CAPT repeatedly until "T1", "T2", "T3" or "T4" is displayed in purple. ("T1" stands for Text 1, for example.)
![CLOSED CAPTION C1 C2 C3 C4 [T1]T2 T3 T4 OFF TO SELECT PUSH C.CAPT](/content/2026/06/1146318/images/250b506b98b343f5f07097b057b49677bb05138a0d7c3469603be5810379b2bc.jpg)
You can also select this feature using the on-screen menu function.
1 Press MENU repeatedly until the Option menu is displayed on the screen.
2 Press ADV repeatedly until "C.CAPT" is displayed in purple.
3 Press - or + to select "T1", "T2", "T3" or "T4".
![C. CAPT: C1 C2 C3 C4 T1 T2 T3 T4 [OFF] TO SELECT ITEM PUSH ADV TO CONTROL PUSH - +](/content/2026/06/1146318/images/f17b451bd3b7ad54dd940d56a890c6918db54f28eb52ae6954689198348fb946.jpg)
![[T1] T2 T3 T4 TO SELECT ITEM PUSH ADV TO CONTROL PUSH - +](/content/2026/06/1146318/images/7aea5c06a4cfd1e30971ee4b25f56057a8e9ab13f60758e6a487ef11b1fe83ea.jpg)
To deactivate this feature
Select "OFF" in step 3 above.
Note: If you select a closed-captioned channel and the Text mode, the text screen always appears.
However, text characters are not displayed when no signal is aired.
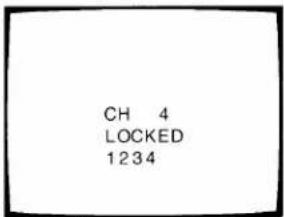
With this function you can lock out specific channels (for example a channel that you do not want your children to watch) by entering your own 4-digit code. The TV will not be able to tune them for the next 24 hours, unless you cancel the locked out channels. There are 4 memory spaces for the TV mode and 4 memory spaces for the CABLE mode.
To lock out channels
1 Select a channel you want to lock out.
Example: channel 4

2 Press MENU repeatedly until the Setup menu is displayed on the screen.
3 Press ADV repeatedly until "CH LOCK" is displayed in purple.
4 Press - or + to call up the channel lock adjustment display shown below. Each time you press the button, you are guided between "SET" and "CLEAR". Select "SET".
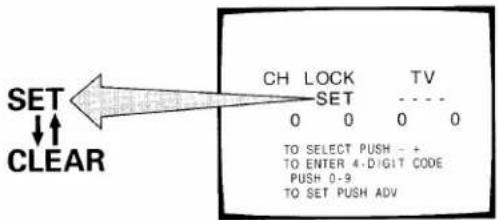
5 Press Number buttons (0 - 9) to enter a 4-digit code. The numbers you enter will replace the dashes in the display. Pick a number that is easy to remember.
Example: To enter "1234" Press 1, 2, 3 and 4 in order.
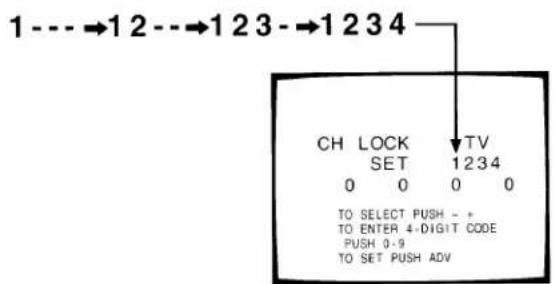
6 Press ADV to lock out the channel. The display at the right will appear on the screen for about 4 seconds.
7 Repeat steps 1 to 6 for other channels.
Note: If a different code number is used whenever you lock out a channel, the last one has priority over the preceding ones.
8 Select another channel before turning off the TV.
To restore channels
1 Select "CLEAR" following steps 2 to 4 on the previous page.
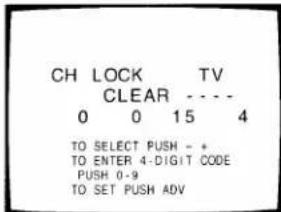
2 Press the 4-digit code used to lock out the channels with the Number buttons.
3 Press ADV. If you have entered the correct code The display shown at the right appears.
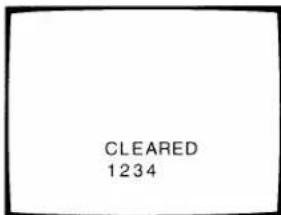
If a wrong code has been entered These messages appear. Try to enter the correct code again.
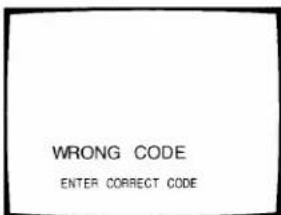
If you want to know the channels you have locked out Call up the channel lock feature using the Setup menu.
Programming Your Favorite Channels
The Favorite Channel Programming feature allows you to program up to 12 of your favorite channels.
Once programmed, you can use the FAV ▼/▲ buttons on the Remote Control to scan through only your favorite channels, skipping other channels you do not normally view.
You can use the CHANNEL ▲/▼ buttons to scan through all the channels you programmed in the TV's memory.
To program your favorite channels
1 Select a channel you want to program.
Example: channel 2
2 Press MENU repeatedly until the Setup menu is displayed on the screen.
3 Press ADV repeatedly until "FAVORITE CH" is displayed in purple.
4 Press - or + to display the FAVORITE CH program menu.
Each time you press – or +, you are guided between "SET" and "CLEAR".
![FAVORITE CH [SET|CLEAR 0 0 0 0 0 0 0 0 0 0 0 0 [TV:CYAN, CABLE:BLUE] TO SELECT PUSH - + TO SET PUSH ADV](/content/2026/06/1146318/images/753bf8c046d896f5cf7a89a103606c89d6068115d71898c385a0cc72dd0a83f5.jpg)
5 To program channels:
Select "SET". Then press ADV until the channel number to be programmed ("2" in this example) replaces "0" on the display.
![FAVORITE CH [SET]CLEAR 2 0 0 0 0 0 0 0 0 0 0 0 [TV:CYAN,CABLE:BLUE] TO SELECT PUSH - + TO SET PUSH ADV](/content/2026/06/1146318/images/e62707e4fc61be66150066bdd105f42389b654d90a40461814cae4c2d8c09b7e.jpg)
To erase channels:
Select "CLEAR". Then press ADV until "0" replaces the channel number to be erased, "2" for example.
6 Repeat steps 1 to 5 for other channels.
To select your favorite channels
To select your favorite channels you have programmed, use the FAV ▼/▲ buttons on the Remote Control instead of using the CHANNEL ▲/▼ buttons.
Note: The FAV ▼/▲ buttons cannot function if you have not programmed your favorite channels.
Changing On-Screen Display Language
You can choose from three different languages (ENGLISH, FRENCH and SPANISH) for the on-screen displays (adjustment menus, and messages).
To select a language
1 Press MENU repeatedly until the Option menu is displayed on the screen.
2 Press ADV repeatedly until "LANGUAGE" is displayed in purple.
3 Press - or + until your desired language is displayed in purple. If you select "FRENCH" for example, the display language changes to French.
![LANGUAGE: [ ENGLISH ] FRENCH SPANISH TO SELECT ITEM PUSH ADV TO CONTROL PUSH - +](/content/2026/06/1146318/images/7bad653625289061790dc38f1ebb8709f7492aeb1cfa701787133165ede1cb3a.jpg)
Example: Picture menu display "ENGLISH"
"FRENCH"
Connect VIDEO/AUDIO IN jacks on the rear of the TV to the video/audio output jacks of a VCR, Laserdisc player, video camera, etc. for playback of video material.

flowchart
graph TD
    A["Antenna/Cable lead-in"] --> B["VCR"]
    C["Antenna input"] --> B
    D["Antenna output"] --> B
    E["Audio outputs"] --> F["Video output"]
    G["Video cable (Not supplied)"] --> F
    H["Audio cable (Not supplied)"] --> F
    I["TV rear"] --> J["IN"]
    I --> K["OUT"]
    J --> L["VIDEO"]
    J --> M["LMONO"]
    J --> N["AUDIO"]
    J --> O["R"]
    K --> P["VAR AUDIO"]
    K --> Q["L"]
    K --> R["R"]
    S["ANT 75Ω"] --> T["Power Supply"]

To select the video input source
To operate your TV and video equipment properly, refer to the instructions furnished with the video equipment.
1 Turn the TV and VCR on.
2 Press TV/VIDEO on the Remote Control or on the TV until "VIDEO" is displayed in purple.
3 Operate your VCR normally.
Note: If you connect a monaural VCR, connect the audio output of the VCR to the L/MONO jack on the TV.
Connecting an Audio Amplifier
Connect the VARIABLE AUDIO OUT jacks to the auxiliary input jacks on the stereo amplifier. You can control the audio level using the Remote Control for this TV.
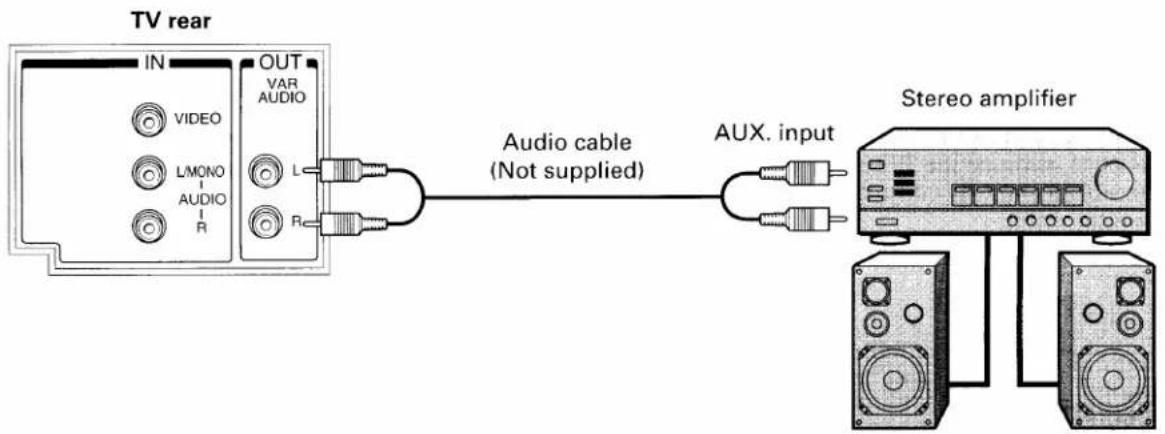
flowchart
graph LR
    A["TV rear"] --> B["IN"]
    A --> C["OUT"]
    B --> D["VIDEO"]
    B --> E["L/MONO"]
    B --> F["AUDIO"]
    B --> G["R"]
    C --> H["VAR AUDIO"]
    C --> I["L"]
    C --> J["R"]
    C --> K["Audio cable (Not supplied)"]
    K --> L["AUX. input"]
    L --> M["Stereo amplifier"]
    M --> N["Speaker 1"]
    M --> O["Speaker 2"]
Preparing for use
1 Turn the TV and the stereo amplifier ON.
2 Adjust the VOLUME buttons on the TV for a moderate listening level.
3 Disconnect the built-in speakers following the instructions at the right.
4 Adjust the volume control on the stereo amplifier for a moderate listening level.
5 Control of the audio can now be done using the VOLUME and MUTE buttons on the Remote Control of the TV, and using the Audio menu items (BASS, TREBLE and BALANCE).
To disconnect the built-in speakers
1 Press MENU repeatedly until the Audio menu is displayed on the screen.
2 Press ADV repeatedly until "SPEAKERS" is displayed in purple.
![SPEAKERS: [ON]OFF TO SELECT ITEM PUSH ADV TO CONTROL PUSH - +](/content/2026/06/1146318/images/1bac8158ab2ce38408487f63f12a05897a9b8a068f679d9874ab3c9b39c90998.jpg)
3 Press - or + until "OFF" is displayed in purple.
The built-in speakers will be disconnected.
![[OFF] TO SELECT ITEM PUSH ADV TO CONTROL PUSH - +](/content/2026/06/1146318/images/413337ebeb918043872001767eafbc95be4950e59eb69f097678d54431ee206d.jpg)
To use the built-in speakers again Select "ON" in step 3 above.
WARNING: TV sets use High Voltage. Do not try to remove the cabinet back. Refer servicing to qualified service personnel.
■ To clean the TV screen:
- First remove the plug from the power outlet to avoid possible shock hazard.
-
Use a clean cellulose sponge or chamois cloth dampened with a solution of mild detergent and warm water to clean TV screen and trim. Do not use too much water on the TV screen. Water spills into the cabinet and may cause damage to the TV. Avoid excess water.
-
Remove any extra moisture with the same cloth or a dry one.
■ To maintain the finish and appearance of the cabinet, polish it from time to time with a quality furniture polish.
Caution: Never use strong solvents such as thinner, benzene or other chemicals on or near cabinet, as they might damage the finish of the cabinet.
Specifications
| TELEVISION SYSTEM | NTSC standard |
| CHANNEL COVERAGE | VHF: 2 through 13UHF: 14 through 69Cable TV: mid band (A-8 through A-1, A through l)super band (J through W)hyper band (AA through ZZ, AAA, BBB)ultra band (65 through 94, 100 through 125) |
| POWER SOURCE | 120V AC, 60Hz |
| POWER CONSUMPTION | 80W (average) |
| AUDIO POWER | 5W + 5W |
| SPEAKER TYPE | Two 2-3/8 x 3-1/2 inches (60 x 90 mm) |
| VIDEO/AUDIO TERMINALS | VIDEO/AUDIO INPUTVIDEO: 1V(p-p), 75 ohm, negative sync.AUDIO: 150mV(rms) (30% modulation equivalent, 47k ohm)VARIABLE AUDIO OUTPUT0 - 350mV(rms) (30% modulation equivalent, 4.7k ohm) |
| DIMENSIONS | Width ...... 26-21/32 inches (677mm)Height ...... 24-5/64 inches (612mm)Depth ...... 21 inches (549mm) |
| MASS | 76.5 lbs. (34.7 kg) |
| SUPPLIED ACCESSORIES | Remote Control with 2 size “AA” batteries |
Design and specifications are subject to change without notice.
Before Calling Service Personnel
Before calling service personnel, please check the following chart for a possible cause of the problem you are experiencing. A minor adjustment on your part may eliminate the problem and restore your TV reception.
| Problem | Checks and Adjustments | Page |
| TV will not turn on | Make sure the power cord is plugged in, then press POWER button.Check battery in the Remote. (Maybe batteries are "dead".) | 157 |
| No picture, no sound | Check antenna/cable connections. | |
| No sound, picture OK | Maybe sound is muted. Try pressing VOLUME ▲ button.Try another channel. (Maybe station trouble.)Check that the SPEAKERS ON/OFF function is properly set. | 1531 |
| Poor sound, picture OK | Try another channel. (Maybe station trouble or local interference from appliance.) | |
| Poor picture, sound OK | Check antenna/cable connections.Try another channel. (Maybe station trouble or local interference.)Adjust Picture menu. | 20 |
| Poor reception of broadcast channels | Try another channel.Check antenna connections.If using VCR, check TV/VCR button. | 8 |
| No UHF, VHF OK | Make sure TV/CABLE function is in "TV" mode. | |
| Unable to select a certain channel | That channel may be locked out with CH LOCK function, or erased with the ADD/ERASE function. | 2614 |
| Multiple images (ghosts) | Try another channel. (Maybe station trouble.)Use a highly directional outdoor antenna. | |
| Poor color or no color | Try another channel. (Maybe station trouble or local interference.)Adjust TINT and/or COLOR in the Picture menu.If you change the direction of the TV while the TV is activated, the picture may suffer from color shading. If so, turn off the TV and allow it to cool for several hours, then turn on the TV again.The picture should improve. | 20 |
| No stereo or SAP sound from a known MTS broadcast | Check if MTS function is properly set. | 18 |
| The Remote Control does not operate | Check if Device buttons are properly set.Maybe something is between the Remote and the remote sensor.Maybe batteries are dead. Try replacing batteries with new ones.Insert them with the correct polarity. | 6, 87 |
Limited United States Warranty
Toshiba America Consumer Products, Inc. ("TACP") and Toshiba Hawaii Inc. ("THI") make the following limited warranties. These limited warranties extend to the original consumer purchaser or any person receiving this set as a gift from the original consumer purchaser and to no other purchaser or transferee.
Limited One (1) Year Warranty
TACP and THI warrant this product and its parts against defects in materials or workmanship for a period of one (1) year after the date of original retail purchase. During this period, TACP and THI will repair a defective product or part, without charge to you. "Authorized TACP/THI service station personnel will come to your home when warranty service is required. Depending on the type of repair required, the service will either be performed in your home or the set will be taken to the authorized TACP/THI service station for repair and returned to your home at no cost to you."
Limited Two (2) Year Warranty of Picture Tube
TACP and THI further warrant the picture tube in this product against defects in materials or workmanship for a period of two (2) years after the date of original retail purchase. During this period, TACP and THI will replace a defective picture tube without charge to you, except that if a defective picture tube is replaced after one (1) year from the date of the original retail purchase, you pay labor charges involved in the replacement.
Rental Units
The warranty for rental units begins with the first rental of thirty (30) days from the date of shipment to the rental firm, whichever comes first.
Commercial Units
Products sold and used for commercial use have a limited ninety (90) day warranty for all parts, labor and picture tube.
Owner's Manual and Demographic Card
You should read this owner's manual thoroughly before operating this product. You should complete and mail the enclosed Demographic card within ten days after you, or the person who has given you this product as a gift, purchased this product. This is one way to enable TACP/THI to provide you with better customer service and improved products. Failure to return the Demographic card will not affect your rights under this warranty.
Your Responsibility
The above warranties are subject to the following conditions:
(1) You must retain your bill of sale or provide other proof of purchase.
(2) All warranty servicing of this product must be made by an Authorized TACP/THI Service Station.
(3) These warranties are effective only if the product is purchased and operated in the U.S.A. or Puerto Rico.
(4) Labor service charges for set installation, set up, adjustment of customer controls and installation or repair of antenna systems are not covered by this warranty. Reception problems caused by inadequate antenna systems are your responsibility.
(5) Warranties extend only to defects in materials or workmanship as limited above and do not extend to any product or parts which have been lost or discarded by you or to damage to products or parts caused by misuse, accident, damage caused by Acts of God, such as lightning or fluctuations in electric power, improper installation, improper maintenance or use in violation of instructions furnished by us; or to units which have had the serial number removed, altered, defaced or rendered illegible.
How to Obtain Warranty Service
If after following all of the operating instructions in this manual and checking the section "BEFORE CALLING SERVICE PERSONNEL", you find that service is needed;
(1) Call the TACP toll free number 1-800-631-3811 after you find a defective product or part to find the nearest TOSHIBA Authorized Service Station.
(2) Please present your bill of sale or other proof to the Authorized Service Station.
"Authorized TACP/THI service station personnel will come to your home when warranty service is required. Depending on the type of repair required, the service will either be performed in your home or the set will be taken to the TACP/THI Authorized service station for repair and returned to your home at no cost to you."
IN THE CONTINENTAL UNITED STATES Should your unit require service, Call:

HAWAII, 327 Kamakee Street, Honolulu, HI 96814 (808) 521-5377
A
All warranties implied by state law, including the implied warranties of merchantability and fitness for a particular purpose, are expressly limited to the duration of the limited warranties set forth above. With the exception of any warranties implied by state law as hereby limited, the foregoing warranty is exclusive and in lieu of all other warranties, guarantees, agreements and similar obligations of manufacturer or seller with respect to the repair or replacement of any parts. In no event shall TACP or THI be liable for consequential or incidental damages.
No person, agent, distributor, dealer or company is authorized to change, modify or extend the terms of these warranties in any manner whatsoever. The time within which action must be commenced to enforce any obligation of TACP or THI arising under this warranty or under any statute, or law of the United States or any state thereof, is hereby limited to 90 days from the date you discover or should have discovered, the defect. This limitation does not apply to implied warranties arising under state law.
This warranty gives you specific legal rights and you may also have other rights which may vary from state to state. Some states do not allow limitation on how long an implied warranty lasts, when an action may be brought, or the exclusion or limitation of incidental or consequential damages, so the above provisions may not apply to you.

ATTENTION CANADIAN CONSUMERS:
Canadian consumers are requested to complete the special Canadian "Warranty Registration Form" enclosed, and forward this completed form with a copy of bill of sale to TOSHIBA OF CANADA to "Register and Validate" their warranty.
Products purchased in the U.S.A. and used in Canada are not covered by these warranties.
Products purchased in Canada and used in the U.S.A. are not covered by these warranties.
TOSHIBA AMERICA CONSUMER PRODUCTS, INC.
HEAD OFFICE/82 TOTOWA ROAD, WAYNE, NEW JERSEY 07470
FACTORY SERVICE CENTERS/NORTHEAST: 82 TOTOWA ROAD, WAYNE, NEW JERSEY 07470
MIDWEST: 1010 JOHNSON DRIVE, BUFFALO GROVE, ILLINOIS 60089-6900
WEST: 5490 E. FRANCIS ST., ONTARIO, CA 91761
SOUTHWEST: 1421 CHAMPION DRIVE, SUITE 304 CARROLLTON, TEXAS 75006
SOUTHEAST: 6115 JIMMY CARTER BLVD., SUITE C2, NORCROSS, GA 30071-4607
TOSHIBA HAWAII, INC.
HEAD OFFICE/327 KAMAKEE STREET, HONOLULU, HAWAII 96814, U.S.A.
- Dear Customer
- Customer's Record
- Safety Precautions
- WARNING:
- CAUTIONS:
- ATTENTION:
- NOTE TO CATV SYSTEM INSTALLER IN THE USA:
- Table of Contents
- Set Up
- Preparation
- Basic Operation
- Advanced Operation
- Equipment Connections
- Reference Section
- Installing Your TV Set
- Where to install
- Lighting
- Air circulation
- Power supply
- WARNING : TO AVOID PERSONAL INJURY
- CAUTION :
- Location of Controls (TV Set)
- Location of Controls (Remote Control)
- Before Using the Remote Control
- Introductions
- Notes:
- To install batteries
- CAUTION:
- Tips for Best Operation
- Using the Remote with VCR or Cable TV Converter
- Programming the Remote Control
- To control other brands of VCR's and cable TV converters
- Programming the Remote Control (Continued)
- Menu Function (General Instructions)
- MENU button (on TV and on Remote)
- ADV button (on TV and on Remote)
- - /+ buttons (on TV and on Remote)
- EXIT button (on Remote)
- Programming Channel Memory
- TV/CABLE function
- CH PROGRAM function
- Programming Channel Memory (Continued)
- ADD/ERASE function
- To add the channel
- Auto-Power-Off
- Last Mode Memory
- Demonstration Mode
- Watching Video Input
- Note:
- To display on-screen information
- To mute the sound
- To change quickly between two channels
- To operate this function
- To set the off-timer (sleep timer)
- To cancel the setting
- To display the EDS information
- To listen to stereo sound
- If the stereo sound is noisy
- To activate surround sound effect
- To deactivate the surround effect
- Listening to second language
- To adjust the picture quality
- To reset the Picture and Sound adjustments to the factory-preset level (maximum CONTRAST and all other adjustments centered)
- To adjust the sound quality
- RESET button (on the Remote Control)
- To display a small picture
- To use advanced functions
- To change the position of the small picture
- To switch the main and small picture
- To freeze the small picture
- Operating Closed Captioning Feature
- To view captions
- To view text
- You can also select this feature using the on-screen menu function.
- To deactivate this feature
- To lock out channels
- To restore channels
- Programming Your Favorite Channels
- To program your favorite channels
- To select your favorite channels
- Changing On-Screen Display Language
- To select a language
- To select the video input source
- Connecting an Audio Amplifier
- Preparing for use
- To disconnect the built-in speakers
- ■ To clean the TV screen:
- Before Calling Service Personnel
- Limited United States Warranty
- Limited One (1) Year Warranty
- Limited Two (2) Year Warranty of Picture Tube
- Rental Units
- Commercial Units
- Owner's Manual and Demographic Card
- Your Responsibility
- How to Obtain Warranty Service
- ATTENTION CANADIAN CONSUMERS:
- TOSHIBA AMERICA CONSUMER PRODUCTS, INC.
- TOSHIBA HAWAII, INC.
Brand : TOSHIBA
Model : CE27G15
Category : Television