HPS-MC3 - Rice cooker SANYO - Free user manual and instructions
Find the device manual for free HPS-MC3 SANYO in PDF.

| Product Type | Rice Cooker |
| Brand | Sanyo |
| Model | HPS-MC3 |
| Capacity | 1.5 Liters (unprepared) |
| Power Consumption | 650 W |
| Voltage | 120 V |
| Frequency | 60 Hz |
| Dimensions (W x D x H) | 10.2 x 10.2 x 9.4 inches (approx) |
| Weight | 3.5 lbs (approx) |
| Cord Length | 3.2 ft |
| Material | Plastic body, aluminum inner pot |
| Inner Pot Coating | Non-stick |
| Functions | Cook, Warm, Keep Warm |
| Keep Warm | Automatic after cooking |
| Auto Shut-off | Yes, when cooking cycle ends |
| Indicator Lights | Power and Warm indicators |
| Non-stick Coating | Yes, on inner pot |
| Dishwasher Safe Parts | Inner pot and lid only |
| Safety Lock | Steam vent lock |
| Cord Storage | Wrap-around base |
| Color | White |
Frequently Asked Questions - HPS-MC3 SANYO
User questions about HPS-MC3 SANYO
0 question about this device. Answer the ones you know or ask your own.
Ask a new question about this device
Download the instructions for your Rice cooker in PDF format for free! Find your manual HPS-MC3 - SANYO and take your electronic device back in hand. On this page are published all the documents necessary for the use of your device. HPS-MC3 by SANYO.
USER MANUAL HPS-MC3 SANYO
natural_image
Black and white photo of a modern cooking pot with lid and control panel (no visible text or symbols)HOUSEHOLD USE ONLY
Table of Contents
| Important Safeguards | 2 |
| Precautions | 3-4 |
| Names and Function of Parts | 5 |
| Operating Instructions for Cooking/Steaming | 6-7 |
| Operation Instructions for Grilling/Griddling | 8-9 |
| Cleaning and Maintenance | 10 |
| Cooking Guide/Troubleshooting | 11 |
| Specifications | 11 |
| Warranty | 12 |
| 中文 | 13-21 |
| 한국어 | 22-30 |
| 日本語 | 31-39 |
Thank you for your purchase of a Sanyo Electric Multi-Cooker. Please read these instructions carefully before use and be sure to keep the manual in a safe place for future reference.
IMPORTANT SAFEGUARDS
When using electrical appliances, follow basic safety precautions to reduce the risk of fire, electrical shock, and/or injury:
- Read all instructions.
- Do not touch hot surfaces. Use handles or knobs.
- To protect against electrical shock, do not immerse cord, plugs, or appliance in water or other liquid.
- Close supervision is necessary when any appliance is used by or near children.
- Unplug unit from outlet when not in use and before cleaning. Allow to cool before putting on or taking off parts, and before cleaning the appliance.
- Do not operate any appliance with a damaged cord or plug or after the appliance malfunctions or has been damaged in any manner. Return appliance to an authorized service facility for examination, repair, or adjustment.
-
Use only power cord provided.
-
The use of accessory attachments not recommended by the appliance manufacture may result in fire, electrical shock or personal injuries.
- Do not use outdoors.
- Do not let cord hang over edge of table or counter, or touch hot surfaces.
- Do not place on or near a hot gas or electric burner, or in a heated oven.
- Extreme caution must be used when moving an appliance containing hot oil or other liquids.
- Always attach plug to appliance first, then plug cord into the wall outlet. To disconnect, turn all controls to the "Off" position and remove plug from wall outlet.
- Do not use appliance for other than intended use. This product is designed for household use only.
SAVE THESE INSTRUCTIONS
Note:
A. A short power-supply cord is provided to reduce risks of becoming entangled in or tripping over a longer cord.
B. Extension cords are available and may be used if care is exercised in their use.
C. If extension cord is used:
A. A short power-supply cord is provided to reduce risks of becoming entangled in or tripping over a longer cord.
B. Extension cords are available and may be used if care is exercised in their use.
C. If extension cord is used:
(1) The marked electrical rating of the extension cord should be at least as great as the electrical rating of the appliance.
(2) The longer cord should be arranged so that it will not drape over the countertop or tabletop where it can be pulled on by children or tripped over.
The appliance has a polarized plug (one blade is wider than the other).
As a safety feature, this plug will fit in a polarized outlet only one way. If the plug does not fit fully in the outlet, reverse the plug. If it still does not fit, contact a qualified electrician. Do not attempt to override this safety feature.
WARNING: Handling the cord on this product or cords associated with accessories sold with this product, will expose you to lead, a chemical known to the State of California to cause cancer, and birth defects or other reproductive harm. Wash hands after handling.
The important precautions described within this section must be followed carefully to prevent the possibility of personal injuries and/or property damage.
• Use only 120 Volt AC electrical current. | • Plug the appliance into a single electrical outlet only. Do not share outlet with other appliances. Do not share outlet with other appliances.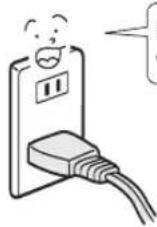 Use only an electrical outlet rated at 15 amperes or more. Make sure that the power plug is firmly inserted all the way into the electrical outlet. Use only an electrical outlet rated at 15 amperes or more. Make sure that the power plug is firmly inserted all the way into the electrical outlet. |
• Do not operate the appliance if the power cord or plug has been damaged. | |
• Always keep the power plug clean. If the power plug blades or plug surfaces become dirty, be sure that they are cleaned thoroughly. If the power plug blades or plug surfaces become dirty, be sure that they are cleaned thoroughly. | • Keep the Magnetic Plug clean and free of debris. 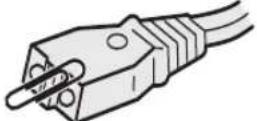 Contact with metal objects may cause electric shock, short circuit or fire. Contact with metal objects may cause electric shock, short circuit or fire. |
• Do not handle the power supply cord in a rough manner. | • Do not attempt to modify the appliance. 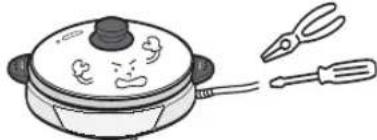 All repairs must be performed by qualified technicians. All repairs must be performed by qualified technicians. |
• Do not use any power cord other than provided. | • Do not attempt to plug in or unplug with wet hands. 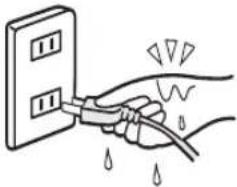 |
• Do not allow children to lick the magnetic plug. This may cause electric shock or injuries. This may cause electric shock or injuries. | • Do not allow children to use this appliance without adult supervision. |
·Unplug the power plug from the outlet when the appliance is not being used.  | ·Do not operate the appliance on an unstable surface or on any surface that is not resistant to heat. 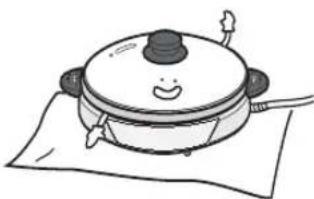 |
·Do not immerse the appliance in water and do not pour water onto it.  | ·Do not touch hot surfaces and avoid contact with steam during or immediately after use.  Use caution when removing the Lid. Use caution when removing the Lid. |
·Do not place the appliance near walls or furniture (within 12" /20cm) 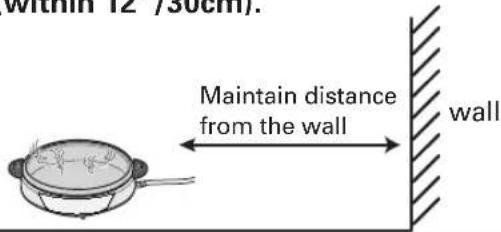 | |
·Do not use this appliance for deep-frying foods.  This action may cause fire. This action may cause fire. | ·Do not use the appliance for heating canned foods or bottles. 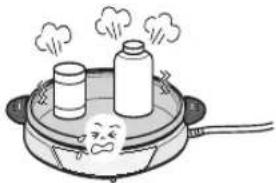 These containers will break and may cause personal injuries These containers will break and may cause personal injuries |
·Do not place food directly on Main Body or Heating Element.  Use only the provided Cooking Pot or Grill Plate to avoid electric shock or malfunction Use only the provided Cooking Pot or Grill Plate to avoid electric shock or malfunction | ·Do not use a metal spatula or other sharp utensil on the Cooking Pot or Grill Plate.  |
·Do not use the Grill Plate with heating sources other than this appliance (grill, gas burner, etc.) 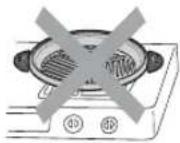 | ·Allow the appliance to cool off prior to cleaning. |
NAMES AND FUNCTION OF PARTS
Lid

text_image
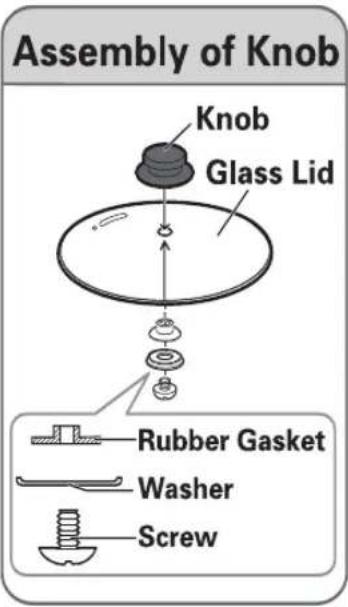
Knob- Lid is made of heat-resistant glass.
- Pay attention to any deformity or damage to glass.
- Damage may cause the lid to shatter when additional force or heat is applied.
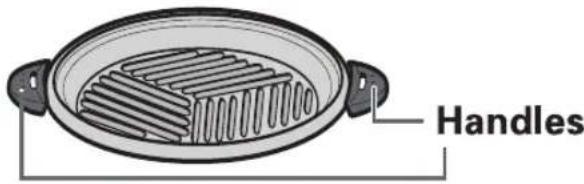
Cooking Pot

text_image
Handles• The Cooking Pot can be used as a griddle.
- The Cooking Pot can be used on a gas burner for warming prior to cooking with Main Body.
text_image
Assembly of Knob Knob Glass Lid Rubber Gasket Washer ScrewGrill Plate
text_image
Handles- Do not use the Grill Plate on heating surfaces other than this appliance.
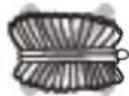
Steaming Plate
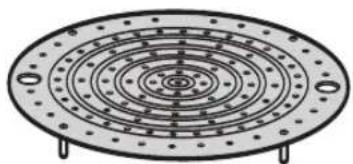
natural_image
Technical line drawing of a circular mechanical component with bolt holes and concentric rings (no text or symbols)Power Cord

text_image
Magnetic Plug A magnetic plug connects to Plug Receptacle. Power Plug- Do not use any Power Cord other than provided.
Main Body
Insulation Housing
Heating Element
Control Panel
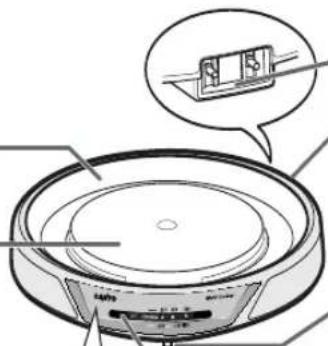
text_image
Diagram of a vacuum cleaner with labeled components and a speech bubble indicating a component.Plug Receptacle
Cautions
Please read.
Temperature Adjustment Slide
Power Indicator Lamp

text_image
SANYO Multi-Cooker Power Indicator Lamp OFF KEEP WARM 250 350 460 LOW HIGHOPERATING INSTRUCTIONS FOR COOKING AND
PREPARATION
1 Place the Cooking Pot onto Main Body.
2 Add water or broth into the Cooking Pot and cover with the Lid.
3 Plug in Power Cord.
① Set the Temperature Adjustment Slide to the "Off" position.
② Insert the Magnetic Plug into the Plug Receptacle.
③ Plug the Power Cord into outlet.

flowchart
graph TD
    A["Cover with lid to boil faster."] --> B["Cooking Pot"]
    B --> C["Add water or broth."]
    C --> D["Cooking Pot and Steaming Plate"]
    D --> E["Add water or broth."]
    E --> F["Cooking Pot"]
    F --> G["Add water or broth."]
    G --> H["Cooking Pot and Steaming Plate"]
    H --> I["Add water or broth."]
    I --> J["Cooking Pot and Steaming Plate"]
    J --> K["Add water or broth."]
    K --> L["Cooking Pot and Steaming Plate"]
HOW TO COOK
1 Set the Temperature Adjustment Slide to the "HIGH" position.
• The Power Indicator Lamp lights when in use.
- It takes approximately 12 minutes to boil water. (1.3 qt./1.2L)
2 Add ingredients.
• Once boiling, add ingredients.
3 Set the Temperature Adjustment Slide to desired cooking temperature.
- The Power Indicator Lamp automatically turns on and off to maintain desired temperature.

flowchart
graph TD
    A["1: Cooked pot"] --> B["2: Stover with dumpling dish"]
    B --> C["3: Steamer with dumpling dish"]
The Cooking Pot can be used on a gas burner for warming prior to cooking with Main Body.
Cautions:
- Do not operate without water or broth in Cooking Pot.
- Do not place the Main Body directly on a gas burner.
- Do not handle Cooking Pot in a rough manner.
- Use cooking mittens to hold the Handles or Knob to avoid injuries.
HOW TO STEAM
1 Place the Cooking Pot onto Main Body.
2 Place the Steaming Plate into Cooking Pot.
3 Add approximately 3 cups (700 ml) of water into the Cooking Pot and cover with the Lid.
4 Plug in Power Cord.
-
Set the Temperature Adjustment Slide to the "Off" position.
-
Insert the Magnetic Plug into the Plug Receptacle.
-
Plug the Power Cord into outlet.
5 Set the Temperature Adjustment Slide to the "HIGH" position.
6 Once boiling, place foods on the Steaming Plate and cover with the Lid.
7 Continue steaming until food is done.
Cooking Pot and Steaming Plate

flowchart
graph TD
    A["Step 5: Steamer with lid"] --> B["Step 6: lid with lid cover"]
    B --> C["Step 7: Steamer with lid and lid cover"]
NOTE:
- Do not operate without water in Cooking Pot.
- While steaming, water evaporates. Add water as needed and do not steam without water.
AFTER USE
1 Unplug the Power Cord.
① Set the Temperature Adjustment Slide to the "Off" position.
② Remove Power Plug from outlet.
③ Remove the Magnetic Plug from Plug Receptacle.
For maintenance of this appliance, refer to page 10.

flowchart
graph TD
    A["① Heat Input"] --> B["③ Circuit Breaker"]
    B --> C["② Power Supply"]
    C --> D["③ Power Connection"]
CAUTIONS
• Make sure the Cooking Pot is sitting properly on the Main Body.
- Remove all foreign objects from the Heating Element and Cooking Pot bottom. Debris in these areas will cause inaccurate temperature control.
- During the first use, the appliance may give off a slight odor or emit smoke. This is due to the newness of the product and will lessen with extended use.
- When using an extension cord, use only those rated at 15 amperes (1500W) or more.
- Wash the Cooking Pot, Grill Plate and Steaming Plate thoroughly before first use or if the appliance was stored for an extended period.
• To avoid boil-over, reduce temperature or remove the Lid.
- If liquids accidentally splash upon the Receptacle, unplug and wipe dry before continuing use.
- Do not damage Main Body, Cooking Pot, Grill Plate, Steaming Plate, or Lid. Disfiguration can cause cooking malfunction.
OPERATING INSTRUCTIONS FOR GRILLING AND
PREPARATION
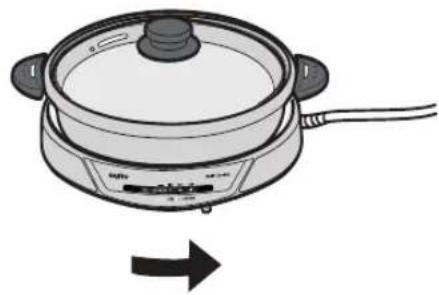
1 Place the Cooking Pot or Grill Plate onto Main Body.
2 Cover with the Lid.
3 Plug in Power Cord.
① Set the Temperature Adjustment Slide to the "Off" position.
② Insert the Magnetic Plug into the Plug Receptacle.
③ Plug the Power Cord into outlet.

flowchart
graph TD
    A["Gridded Plate"] --> B["Select One"]
    B --> C["For Griddling"]
    B --> D["For Grilling"]
    C --> E["Box Box"]
    D --> F["Box Box with Sensor Icon"]
    E --> G["Box Box with Sensor Icon"]
    F --> H["Sensor Icon with Sensor Icon"]
    G --> I["Arrow ①"]
    H --> J["Arrow ②"]
    I --> K["Arrow ③"]
HOW TO GRILL/GRIDDLING
1 Preheat the unit.
- Set the Temperature Adjustment Slide to desired temperature.
• The Power Indicator Lamp lights when in use. - When the desired temperature is reached, the Power Indicator Lamp will turn off. Preheat is completed.
Griddle
natural_image
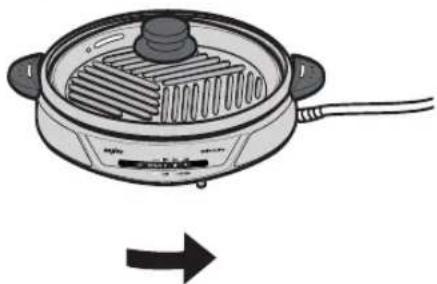
Illustration of a cooking pot with a side panel and a right-pointing arrow indicating rotation (no text or symbols)Grill
natural_image
Illustration of a circular steamer with a side panel and heat sink, showing a rightward arrow (no text or symbols)HOW TO GRILL/GRIDDLING
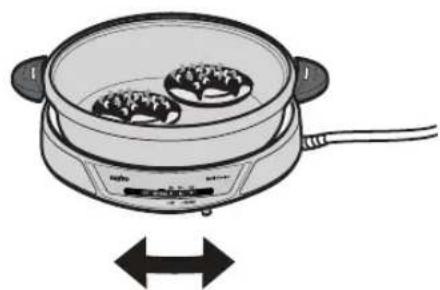
2 Grilling or Griddling.
- Place food directly on Grill Plate or Cooking Pot.
- The Power Indicator Lamp automatically turns on and off to maintain desired temperature.
- Continue grilling or griddling until desired doneness.
AFTER USE
1 Unplug the Power Cord.
① Set the Temperature Adjustment Slide to the "Off" position.
② Remove Power Plug from outlet.
③ Remove the Magnetic Plug from Plug Receptacle.
For maintenance of this appliance, refer to page 10.
Griddle
natural_image
Illustration of a steaming appliance with two food items, shown with bidirectional arrows indicating speed (no text or symbols)Griddle

text_image
Diagram showing heating process with labeled steps: heating pot, electrical plug, and connected electrical outletGrill
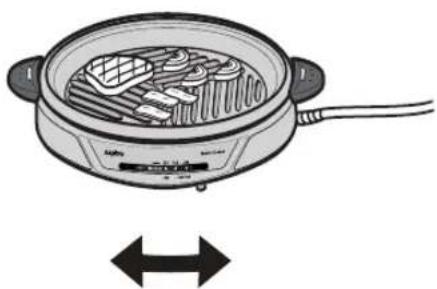
natural_image
Illustration of a hot pot with visible grating and side-mounted dish, no text or symbols present
flowchart
graph TD
    A["Grill"] --> B["①"]
    B --> C["②"]
    C --> D["③"]
    D --> E["Battery with plug"]
    E --> F["③"]
CLEANING AND MAINTENANCE
Always unplug the Power Cord from the electric outlet and allow the entire unit to cool off completely prior to cleaning.
Clean the appliance after each use.
If food or liquid residue is not cleaned, damage may occur to the appliance's surface coatings, resulting in rust.

natural_image
Illustration of a hand washing a cup with another hand visible (no text or symbols)Wash with mild detergent and soft sponge.
When cleaning the unit, do not use cleaning powder, scrub brush, benzene, or thinner.

Lid
The Lid can be submerged and washed in water.
For best results, clean with a sponge and mild detergent.
Wipe dry with a cloth. The lid is made of glass, handle carefully.

natural_image
Illustration of a hand performing a medical procedure on a patient's abdomen (no text or symbols present)Cooking Pot and Grill Plate
The Cooking Pot and Grill Plate can be submerged and washed in water. If necessary, use a sponge and mild detergent to free dried food residue.
Dry thoroughly with a cloth.
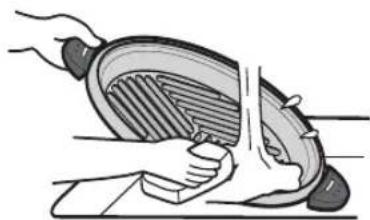
natural_image
Illustration of hands cleaning a large bowl with a griddle (no text or symbols)Steaming Plate
The steaming plate can be submerged in water and is dishwasher-safe. If necessary, use a sponge and mild detergent to free dried food residue.
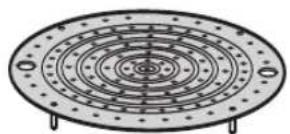
natural_image
Technical diagram of a circular mechanical component with concentric rings and mounting holes (no text or symbols)Main Body
Remove foreign matter from the Main Body. Use a damp cloth or sponge to free stubborn items. If residue remains between Heating Element and Insulation Housing, remove with a soft brush.
Warning!
Do not immerse the Main Body in water and do not pour water directly onto the unit. This may cause electric shock or injury.
natural_image
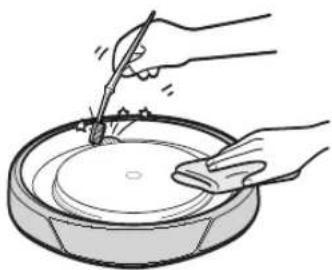
Illustration of hands using a brush to clean or brush the cup of water (no text or symbols)Heating Element
Remove foreign matter from the Heating Element.
If residue is stuck to the Heating Element, gently polish with fine sandpaper (about 320 grit) and then wipe clean with a damp sponge. Not removing foreign matter will result in inaccurate temperature control.
natural_image
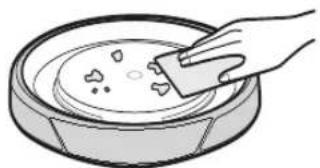
Illustration of a hand using a spatula to clean or remove a bowl with small objects (no text or symbols)COOKING GUIDE
This chart is for your reference only. You may need to adjust the temperature and cooking time according to the type, size, and thickness of food.
| Temperature Setting | Dish | |
| COOKING(using Cooking Pot) | High | Paella, Chige, Yose-Nabe, Sukiyaki, Shabu-Shabu, Nikujyaga (Japanese Beef and Potato Stew), etc. |
| Medium | Bratwurst, Cabbage Rolls, Chili, etc. | |
| Low | Stew, Curry, Soup, Oden, etc. | |
| STEAMING(using Cooking Pot and Steaming Plate) | High | Fish, Steamed Dumplings (Shumai), Steamed Vegetables, Steamed Buns (Cha Siu Bao), Steamed Egg Custard (Chawanmushi), etc. |
| GRILLING(using Grill Plate) | Medium-High | Steak, Chicken, Fish, Korean-Style Barbecue, Teppanyaki, Pork Chops, Bacon, Sausages, etc. |
| GRIDDLING(using Cooking Pot) | 460°F | Stir-fry, Sweet and Sour Pork (Subuta), Fried Rice, Spanish Rice, etc. |
| 390°F | Fried Noodles, Japanese Pancakes (Okonomiyaki), Fish, etc. | |
| 350°F | Hamburgers, Dumplings, Pancakes, etc. | |
| 320°F | Crepes, Fried Eggs, etc. |
TROUBLESHOOTING
If the following symptoms occur, stop using the appliance immediately and contact Sanyo Fisher Service (See warranty, page 12).
- Plug or power cord is damaged, distorted, expanded, or discolored.
• Power cord or plug is warmer than normal.
• Power cord fits loosely or loses power.
• Overheated main body produces burning odor. - Abnormal sound or vibration occurs when power is on.
SPECIFICATIONS
| Model No. | HPS-MC3 | |
| Power Consumption | 1350 Watts | |
| Cooking Capacity | 4.5 Quarts / 4.3 Liters | |
| Unit Dimensions with Lid (W x D x H)" | Cooking Pot | 15^7/16" × 13" × 8^9/16" / 393mm × 330mm × 218mm |
| Grill Plate | 15^1/2" × 13" × 6^1/2" / 393mm × 330mm × 165mm | |
| Weight | 11.7 lbs. / 5.3 kg | |
| Cord Length | Approx. 35^7/16" / 0.9m | |
SANYO COMFORT WARRANTY
WARRANTYAPPLICATION
New, unused SANYO products purchased through a SANYO authorized dealer in Canada are warranted against manufacturing defects in materials and workmanship for ONE YEAR from the date of purchase by the original retail purchaser for non-commercial use. This Warranty only applies in favour of the original retail purchaser of the warranted product.
SANYOCANADAINC.'SRESPONSIBILITY
During the warranty period, SANYO Canada Inc. will repair, or at our option, replace a product which shows evidence of a manufacturing defect in materials or workmanship. Replacement PARTS are warranted for the remaining portion of the warranty period.
WHATISNOTCOVERED
(a) Products purchased outside Canada.
(b) Products purchased in a used condition.
(c) Problems due to product set up and installation.
(d) Adjustments that are outlined in the Operating Manual.
(e) Accessory items including antenna, batteries.
(f) Damage in or due to transportation.
(g) Damage due to improper maintenance, improper wiring, accident, abuse, misuse or negligence.
(h) Damage caused by lightning and power surges.
(i) The cost of removal and reinstallation of a product designed for automobile use.
(j) The rubber seal of the water-proof digital movie camera.
ORIGINALRETAILPURCHASER'S RESPONSIBILITY
You, the original retail purchaser, must present your original, dated bill of sale together with this Warranty to SANYO Canada Inc. or to an authorized SANYO Service Depot when you make a claim under this Warranty.
You, the original retail purchaser, are responsible for any costs of TRANSPORTING the product to and from SANYO Canada Inc. or an authorized SANYO Service Depot. You also are responsible for the cost of any MAINTENANCE necessary in respect of the product.
WARRANTYBECOMESVOID
This Warranty becomes void if the product's serial numbers are altered or removed or if any repair to the product is made other than by SANYO Canada Inc. or by an authorized SANYO Service Depot.
LIMITATIONS
(a) SANYO Canada Inc. reserves the right to change or improve the design of the model of the product warranted hereunder without incurring any obligation to make any modifications to or to install any improvement in or on the product.
(b) In no event shall SANYO Canada Inc. or any of its Authorized Dealers be liable for special or consequential damage arising from the use of this product.
STATUTORYWARRANTIES
The above provisions do not preclude the operation of any applicable provincial statute which in certain circumstances may not allow some of the limitations and exclusions described in this Warranty. Where any terms of this Warranty are prohibited by such a statute, they shall be deemed null and void but the remainder of this Warranty shall remain in effect.
HOWTOOBTAINWARRANTYSERVICE
Please contact SANYO at:
SANYO Canada Inc.
1-300 Applewood Cres.
Concord, Ontario L4K 5C7
1-800-263-2244
www.sanyo.ca