
G755 - Security Camera UNIDEN - Free user manual and instructions
Find the device manual for free G755 UNIDEN in PDF.


| Product Type | Security Camera |
| Brand | Uniden |
| Model | G755 |
| Dimensions (L x W x H) | Approx. 7.5 x 7.5 x 12 cm |
| Weight | Approx. 0.5 kg |
| Power Source | DC 12V, 1A adapter (included) |
| Power Consumption | Max 6W |
| Video Resolution | 1080p Full HD |
| Night Vision | Infrared up to 10m |
| Field of View | 90 degrees |
| Motion Detection | Yes, with alerts |
| Two-Way Audio | Yes, built-in microphone and speaker |
| Connectivity | Wi-Fi 2.4GHz, Ethernet port |
| Storage | MicroSD card (up to 128GB), cloud compatible |
| Water Resistance | IP65 weatherproof |
| Mounting | Wall or ceiling mount included |
| Maintenance | Clean lens with soft, dry cloth |
| Safety | Indoor/outdoor use; keep away from water jets |
| Spare Parts | Power adapter, mounting screws, Ethernet cable |
| Repairability | Contact Uniden support for repairs |
| General Information | Compatible with Uniden App (iOS/Android) |
Frequently Asked Questions - G755 UNIDEN
User questions about G755 UNIDEN
0 question about this device. Answer the ones you know or ask your own.
Ask a new question about this device
Download the instructions for your Security Camera in PDF format for free! Find your manual G755 - UNIDEN and take your electronic device back in hand. On this page are published all the documents necessary for the use of your device. G755 by UNIDEN.
USER MANUAL G755 UNIDEN
Iss. 3, January 2014
Customer Care
At Uniden ^® , we care about you!
If you need assistance, please do NOT return this product to your place of purchase. Our customer care specialists are available to serve you.
Quickly find answers to your questions by:
- Reading your owner's manual, included with this product.
- Visiting our customer support website at www.uniden.com.
- Calling our customer care specialists at 1-800-658-8068.
CONTENTS
CUSTOMER CARE 2
GETTING STARTED 4
USING THIS MANUAL....4
WHAT'S INCLUDED 5
GETTING TO KNOW THE MONITOR AND CAMERAS ....6
What the lights mean 7
SETTING UP THE EQUIPMENT 7
Set Up the Monitor 7
Mount the Camera Stand 7
Attach the camera 9
SETTING UP YOUR SYSTEM 10
Camera Settings 10
System Settings 10
Recording Settings 10
UNIDEN GUARDIAN SOFTWARE OPERATION OVERVIEW .... 11
LIVE SCREEN....11
What the icons Mean 12
Changing How the Live Screen Displays 14
Using the PentaZoom™ Feature 14
Playing Back Recorded Video 15
Deleting Recorded Files 16
Adding New Cameras 16
UNIDEN GUARDIAN SCREEN DESCRIPTIONS .... 18
OVERVIEW....18
UNIDEN GUARDIAN SETTINGS SCREEN 18
CAMERA SETUP SCREEN 20
Pairing 20
Camera On 21
Recorder Setup Screen 22
Network Setup Screen 26
Alarm Setup Screen 30
SYSTEM SETUP SCREEN 32
Storage Management 36
System Upgrade 37
Language 38
QUICK TIPS SCREEN....39
REMOTE ACCESS 40
OVERVIEW 40
System Requirements 40
Connecting to the Internet 40
Connecting to the Intranet (Home network) 41
SETTING UP A PORTAL ACCOUNT 41
Enter The DID Code 43
Enter Security Code 43
Record Video....44
Take A Snapshot 44
USING THE UNIDEN GUARDIAN 2 APP 45
Android ^TM 45
iOS ^* 49
MAINTAINING YOUR SYSTEM 55
UPGRADING YOUR UNIDEN GUARDIAN FIRMWARE 55
TAKING CARE OF YOUR HARDWARE 55
Monitor 55
Cameras 55
MANAGING RECORDED FILES 55
Copying Files from the microSD Card to the Computer ..... 56
SOLVING PROBLEMS 57
ADDITIONAL INFORMATION .... 59
PRODUCT SPECIFICATIONS 59
Lithium-Polymer Battery Warning 60
Recycling and Disposal Information 60
FCC Compliance Information 61
IC Compliance Information 62
CE Compliance Information 62
One-Year Limited Warranty 62
Uniden surveillance products are not manufactured and/or sold with the intent to be used for illegal purposes. Uniden expects consumer's use of these products to be in compliance with all local, state and federal law. For further information on video surveillance and audio recording legal requirements, please consult your local, state and federal law.
© 2014. All rights allowed by law are hereby reserved.
GettInG starteD
usInG this manual
This manual is set up in six main sections:
• Getting Started. This section describes your hardware and how to physically set it up.
- Uniden Guardian™ Software Operations Overview. This section lists basic operations in an abbreviated format. It references screen details in the third section.
- Uniden Guardian Screen Descriptions. Here you will find detailed descriptions of each screen and how it is used.
- Remote Access. This section tells you how to connect your surveillance system to the internet and access it from your PC or other devices.
- Maintaining Your System
- Solving Problems
What's InCLuDeD
You should have the following items:
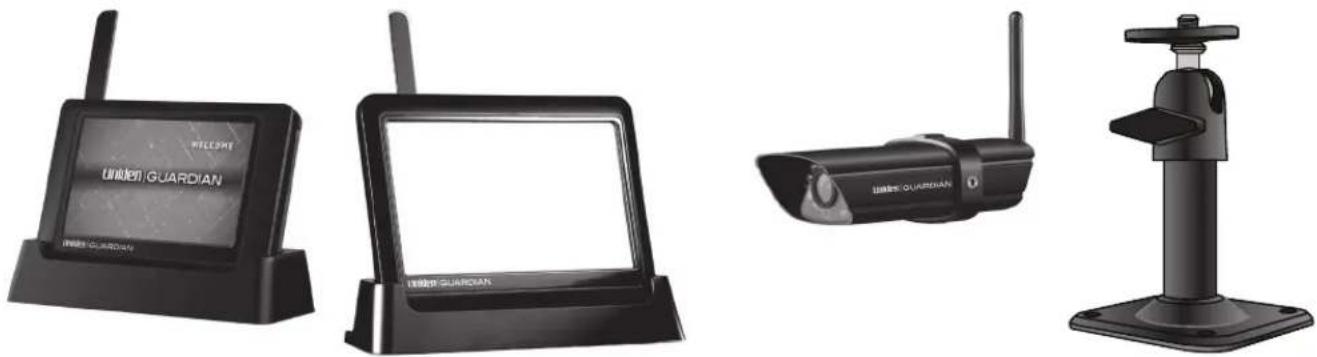
G4 or G7 Monitor and Cradle GC45 Camera (2) Stand (2)
natural_image
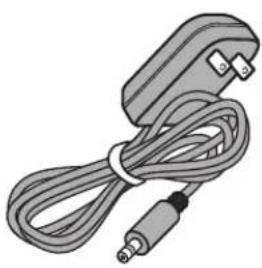
Illustration of a cable and plug device (no text or symbols visible)AC Adapter (3)
natural_image
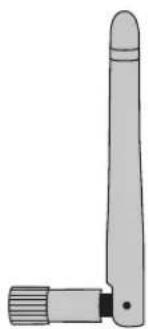
Simple line drawing of a vertical antenna or antenna with a base and side ports (no text or symbols)Antenna (2)
Not Shown: Mounting screws, Ethernet cable, 2 extension cords, and microSD Card.
If any items are missing or damaged, contact our Customer Care Line immediately. Never use damaged products!
GettInG to KnoW the monitor and Cameras
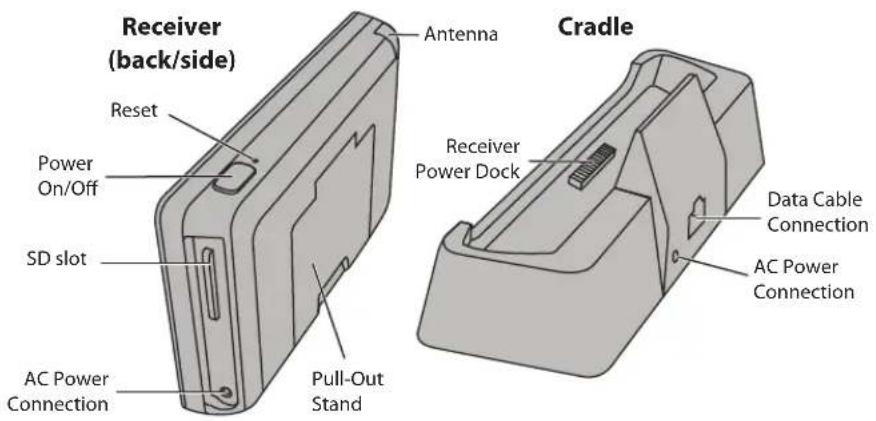
Front view Back view
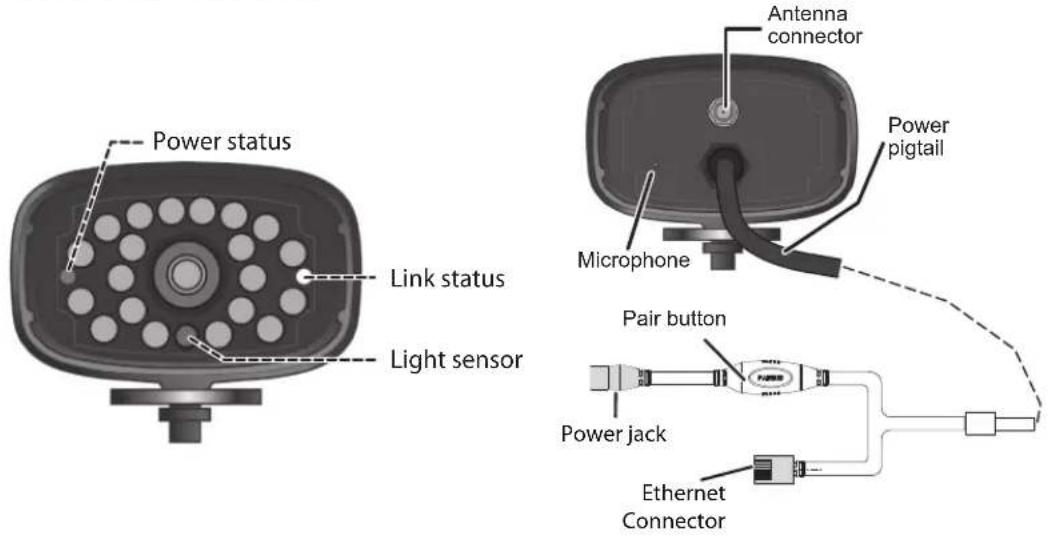
What the LIGhts mean
| Light State What it means | ||
| Power status | On (Red) | The camera is on. |
| Off The | camera is off. | |
| Link status | Flashing The camera is in pairing mode. | |
| On (Green) | The camera is connected to the monitor. | |
| Off The | camera is in standby. | |
settInG uP the equIPment
set uP the monitor
- If you are using the monitor as a stand-alone unit, flip out the stand on the back of the monitor, and extend the antenna. Connect an AC adapter to the power input on the side of the monitor. If you are using the monitor in the cradle, insert the monitor into the cradle and connect an AC adapter to the input on the back of the cradle.
- Connect the other end of the adapter to a 120 volt AC (standard indoor) power outlet.
- Press and hold the Power button on the top of the monitor for 3 - 4 seconds to power it up.
- The monitor displays the Uniden Welcome screen for a few seconds and then transitions to the LIVE view.
The screen remains dark until the cameras are powered up.
mount the Camera stanD
GENERAL GUIDELINES
The Uniden Guardian GC45 cameras included with your monitor are weatherproof and have an IP66 rating. Water can be sprayed on them and they will still work; however, the cameras cannot be submerged.
Although the cameras can be exposed directly to the rain, it is recommended that, if they are used outdoors, they be mounted under some type of cover like a patio overhang or eave. As rainwater drops start to dry on the camera glass, it can create spots that will reflect the light from the infrared LEDs used for night vision, thus causing lower quality video.
Also, as dust, grime, and cobwebs accumulate on the camera glass, they can reflect light from the infrared LED and might lower video quality. Periodically clean the lens glass with a soft cloth.
Placement considerations
Consider the following when placing cameras:
- The clearest line-of-sight between the camera and monitor is best.
— Walls, especially brick and concrete, shorten the transmission distance.
— Placement next to windows allows better transmission. - Optimized motion detection range is 6 - 18 feet for the GC45 camera. The farther away an object is, the less accurate the motion detection.
- Avoid having a direct light source in the view of the camera, including street lights, ceiling or floor lamps, spotlights in the driveway, etc.
- Rainfall, pool water ripples/reflections, tree/shrub leaves blowing in the wind - and the shadows they create - can generate motion detection false alarms.
You can mount the camera with the stand on the bottom (on a wall or table-top) or on the top (on the ceiling). When you are positioning the camera, you might want to bring the monitor along; it's much easier to get the camera into the right position when you have the display handy.
- Hold the base of the camera stand where you want to mount it and mark the location of the screw holes.
- Use the included screws and anchors to attach the base to the wall or ceiling.
- Before attaching the camera, tug gently on the stand to make sure it is securely in place.
attaCh the Camera
natural_image
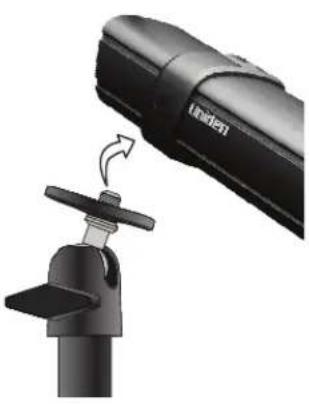
Close-up of a black hair dryer with a scroll wheel, showing the lever mechanism (no text or symbols visible)- For each camera, attach the camera bracket to the mounting screw. You can attach the stand to the top or the bottom of the camera as needed. Tighten it a few turns, then turn the camera to face the direction you want.
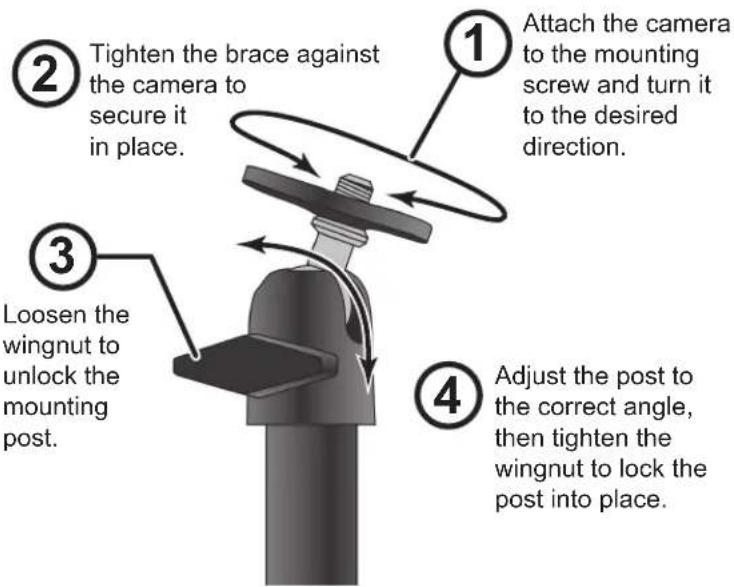
- Tighten the camera brace up against the camera to secure it into place.
- Unlock the mounting post by turning the wingnut to the left a few turns.
- Set the mounting post to the correct angle, then tighten the wingnut until the post is locked into place.
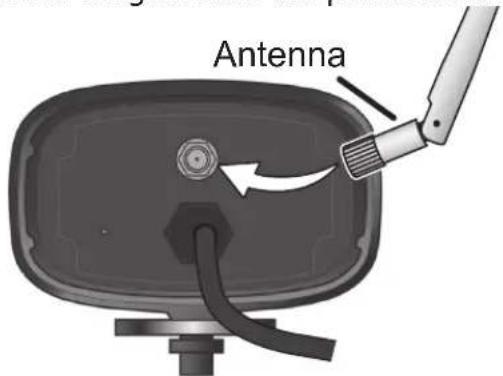
- Attach the antenna to the rear of the camera.
- Connect one end of an AC adapter to the camera's power pigtail and plug the other end into a 120 volt AC (standard indoor) power outlet. (If necessary, connect the extension cord to the camera's pigtail and connect the AC adapter to the extension cord.)
Be sure the power plug and the connector are tightly twisted together to avoid water leaking in.
-
Make sure the Power status light turns on. If it doesn't, try reconnecting the AC adapter, and make sure the power outlet isn't controlled by a wall switch.
-
You should now have video on your Live screen.
settInG uP Your sYstem
You can now set your cameras and system to your preferred settings.
Camera settInGs
- Brightness ("Uniden Guardian Settings Screen" on page 18)
- Motion Detection ("Uniden Guardian Settings Screen" on page 18)
- Schedule Recordings ("Schedule Record" on page 25)
sYstem settInGs
• Power Saving ("Power Saving" on page 32)
- Screen Auto Lock ("Screen Auto Lock" on page 33)
• Time ("Time" on page 34)
• Security code ("Security Code" on page 27)
- Language (default language is English; "Language" on page 38)
reCorDInG settInGs
- Motion Detection ("Motion Detection" on page 22)
- Schedule Recordings ("Schedule Record" on page 25)
unIDen GuarDlan soFtWare oPeratlon oVerVleW
Your monitor's Uniden Guardian software operates through a series of screens that let you choose groups of operations. For example, when you tap on the camera icon in the Pop-up menus, you can set how you want the main viewing screen - called the live screen - to display images from the paired cameras. You can scan between cameras, show all cameras on a single screen (Quad view), or only display a specific camera.
The live screen lets you view the camera transmissions. It also lets you set up your screen display and make adjustments to it. Icons on the screen itself let you monitor power and camera status.
The Uniden Guardian system always defaults to the Live screen in Quad mode after being idle for 2 minutes while in any other system screen. This default ensures that the system is ready to record video even if you forget to return to the Live screen. The system can only start a recording while in Live screen mode.
The operation of the G4 or G7 monitor is identical. The only difference between the two systems is the physical size of the monitor/monitor and how you extend the antenna.
LIVe sCreen
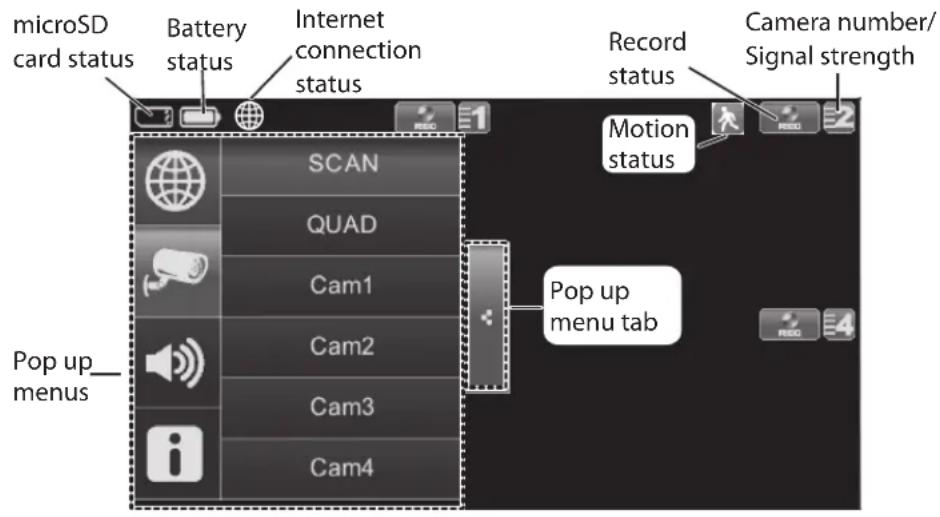
What the ICons mean
| Icon What it does | |
CAMERA MODE | Select how you want the Live screen to display camera input:Scan between cameras (5 seconds)Quad view (all paired cameras display)Full view (1 camera displays on full screen) |
VOLUME | Adjust the volume level. |
UNIDEN GUARDIAN SYSTEM SETTINGS | Access the Uniden Guardian Software Operation screens or view recorded events. |
MICROSD CAPACITY | Indicates memory capacity remaining. |
BATTERY CAPACITY | Displays battery capacity. This graphic shows battery at nearly full. |
INTERNET/INTRANET STATUS | Appears in LIVE view. Indicates connection to the internet/intranet is in progress. |
 | Appears in LIVE view and Pop-Up Menu. Indicates internet connection is established. |
 | Appears in LIVE view. Indicates remote viewing is in progress. |
 | Appears in LIVE view. Indicates system is not connected to the internet. |
 | Appears in LIVE view. Indicates the intranet connection is established. |
CAMERA NUMBER | Displays the camera number and signal strength through the status lines to the left of the number. |
RECORD STATUS | Tap to start or stop recording for that camera• Steady on - Not recording• Flashing - Recording |
MOTION | System indicates motion detection recording in progress. |
SCHEDULED | System indicates scheduled recording in progress. |
POP UP MENU TAB | Opens and closes the pop up menu display. |
NO MICROSD CARD INDICATOR | Displays red when the microSD card is not present or is damaged. |
ChanGlnG hoW the LIVe sCreen DIsPLaYs
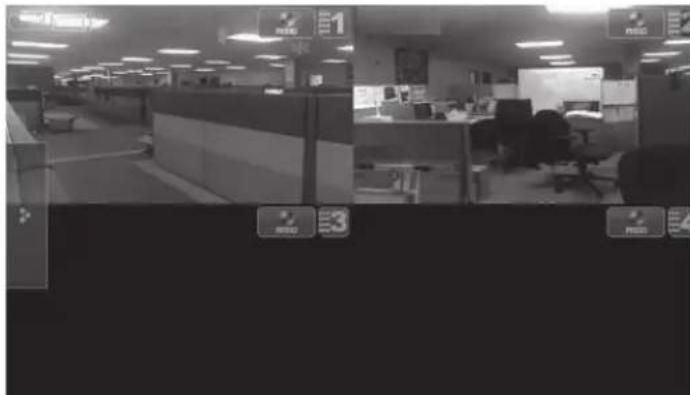
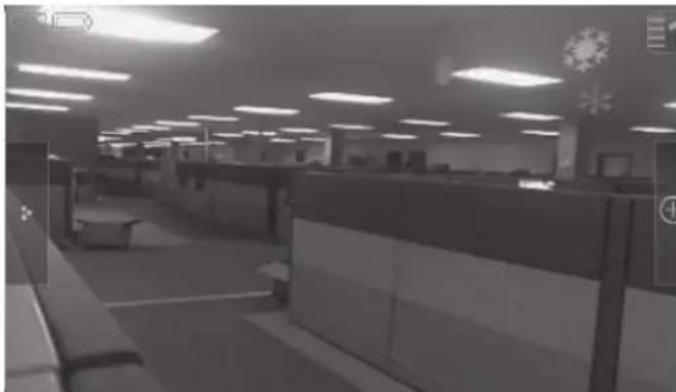
The Live screen displays in 2 views - Quad View or Full View. Quad View divides the screen's image area into 4 quadrants and displays camera video in each quadrant. If less than 4 cameras are on, only those cameras' video will display on the Live screen.
Full view displays a single camera's video on the entire screen. If you are in Quad View, tap on the camera quadrant you want to expand to Full View. Tap on that image to return to Quad View.
natural_image
Interior view of a modern office or service hall with cubicles and ceiling lights (no visible text or signage)usInG the PentaZoom™ Feature
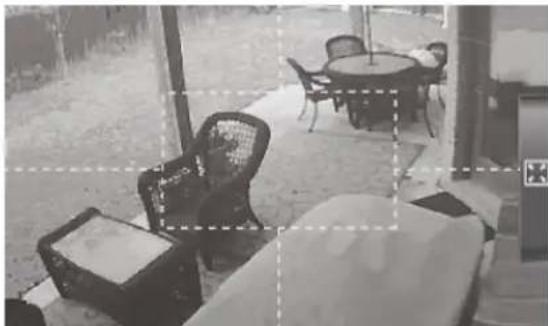
While in any camera's full screen view, selecting the + icon on the right side of the screen enables the PentaZoom feature. PentaZoom lets you select from 5 sections of the video image. Tap on a section and it will digitally zoom to full screen. Tap on the video to return to full screen mode or to go back to the PentaZoom screen, tap 📄.
natural_image
Black-and-white photo of a beachside lounge with chairs, tables, and a person resting on the floor (no visible text or symbols)usInG Your sYstem
reCorDInG LIVe VIDeo
- On the Live screen, tap for the camera to begin recording.
- Tap it again to stop recording.
You can record from all cameras at the same time.
PLaYInG BaCK reCorDeD VIDeo
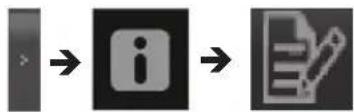
From the pop-up menu, tap the following icons as they appear on the screens:
flowchart
graph LR
    A["Input"] --> B["Process Step"]
    B --> C["Output"]
The Record List screen displays.
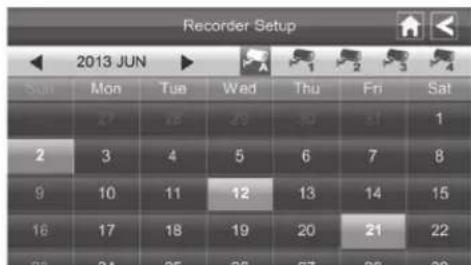
- Tap on the highlighted day containing the recording you want to view or on a specific camera to only view that camera's recordings. The Record List screen displays those recordings listed in a folder.
If you tap on a day that is not highlighted, a folder displays with no recordings listed.
- Tap on the recording you want to view. It displays on the screen.
- Tap on any area of the screen that does not have control icons to bring up the playback progress bar. Tap that area again to close it.
- While playback progress is visible, you can fast forward/rewind by dragging the playback bar forwards or backwards.
On the playback progress bar, tap the double arrow to skip forward or backwards about 10 seconds. Tap the arrow and bar to skip to the next or previous video.
- When playback ends, tap to return to the Record List.
DeLetInG reCorDeD FILes
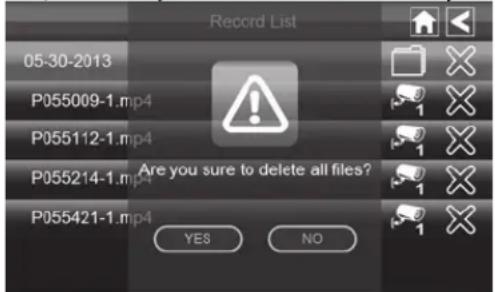
You can delete a single recorded file or a folder containing all recorded files for a specific day.
- On the Record List screen (see previous Record List screen), tap the day with recorded files you
want to delete. The list of recorded files displays.
- Tap the X on the right-hand side of the entry. If you are deleting a folder, a confirmation screen displays. If you are deleting a single recorded file, that file deletes without a confirmation required.
aDDInG neW Cameras
Your monitor supports a total of four active cameras at a
time. When you add a camera, you have to pair it to the monitor (that is, you have to "introduce" the camera and monitor to each other so they can communicate).
SOME THINGS TO KNOW ABOUT PAIRING CAMERAS
- If a camera is already assigned to the selected channel, the monitor overwrites that camera link with the new one.
- Only pair one camera at a time! The monitor links to the first camera it detects. If two or more cameras are in pairing mode, you can't control which camera the monitor will detect first.
PAIR CAMERA
- From the Pairing Camera screen (see "Pairing" on page 20), tap the camera image you want to pair. A processing icon displays for a 60 second countdown.
- During the 60 second countdown, quickly press and release the Pairing button on that camera's power cord (see "Pairing" on page 20).
- The system automatically adjusts the Camera On screen accordingly.
troubleshootinG camera PairinG
Consult the following table for camera pairing troubleshooting suggestions:
| If... Try... | |
| the camera's signal status icon shows no bars | ·making sure the camera is plugged in and the red LED is on.·making sure that the camera's antenna is attached and the monitor's antenna is extended.·making sure the camera is paired to the correct channel.·re-pairing the camera and monitor. |
| the camera's signal status icon shows one or two bars or the video quality is poor | See “General Guidelines” on page 7 for tips on improving video quality. |
| the camera won't pair with the monitor | ·making sure the camera is plugged in and the red LED is on.·pressing and releasing the pairing button quickly.Do not press and hold the pairing button. |
unIDen GuarDlan sCreen DesCrlPtIons
oVerVleW
This section describes the Uniden Guardian screens in detail. It provides a path to the screen being viewed.
unIDen GuarDlan settInGs sCreen
From the pop-up menu, tap the following icons as they appear on the screens:
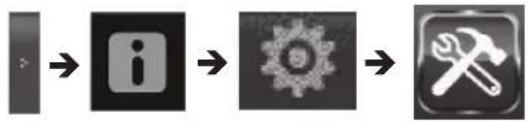
flowchart
graph LR
    A["Input"] --> B["Info Icon"]
    B --> C["Gear Icon"]
    C --> D["Arrow with Cross"]
This screen should display:
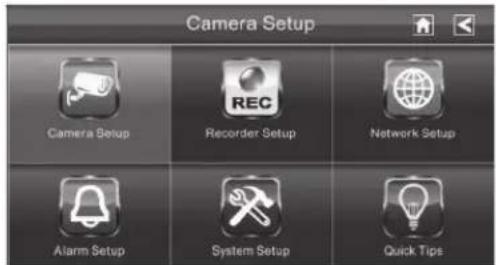
The Uniden Guardian Settings screen highlights the Camera Setup option as the default.
| Main Screen Sub | Screens What it Does | |
| Camera Setup Pa | Pairing Pairs new c | cameras to the monitor. |
| Camera on Makes | es the cameras visible to the monitor. | |
| Brightness Bright | tens or darkens the video of that camera. | |
| Recorder Setup M | Motion Detection | Records when something moves in front of the camera. Continues recording for 2 minutes. Motion detection is on by default. |
| Email Alert Send | s email notification to user's PC and/or mobile device when Motion detection senses motion in front of the camera. | |
| Schedule Record | Set up a schedule for pre-determined recording times and lengths. | |
| Main Screen Sub | Screens What it Does | |
| Network Setup Internet Setup Select the Security Code Set a security code for remote access. | type of internet connection to be used. (DHCP is most common.) | |
| Alarm Setup Period | Set a length of time | for the alarm to sound. |
| Melody Select a melody | to play for the alarm. | |
| System Setup Power | Saving Temporarily | turns off the LCD after the system is idle for 2 minutes to conserve power. |
| Screen Auto Lock Lock | ts the screen from further activity until the screen is unlocked. | |
| Time • Clock Alarm. Set an alarm. | ||
| Storage Management | Formats/erases all the data on the microSD card.Permits new records to overwrite old records when the microSD card is full. | |
| System Upgrade Upgrades the monitor firmware. | ||
| Language Changes default language setting for the monitor (English, French or Spanish). | ||
| Quick Tips NA | Provides a list of 10 common questions. | |
Camera setup sGreen
PalrInG
Your cameras are paired to the monitor at the factory to channels 1 and 2. When you add a new camera to your system, you have to "introduce" the camera and monitor to each other so they can communicate.
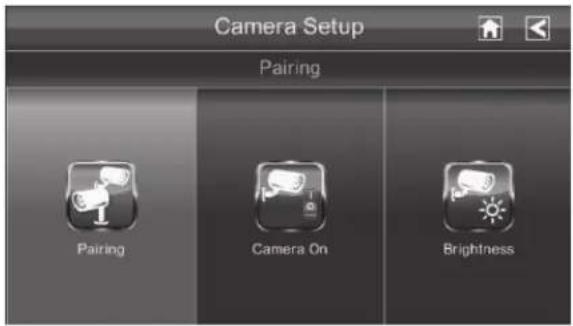
SOME THINGS TO KNOW ABOUT PAIRING CAMERAS:
- If a camera is already assigned to the selected channel, the monitor overwrites that camera link with the new one.
- Only pair one camera at a time! The monitor links to the first camera it detects. If two or more cameras are in pairing mode, you can't control which camera the monitor will detect first.
From the pop-up menu, tap the following icons as they appear on the screens:

flowchart
graph LR
    A["Sensor Input"] --> B["Camera Icon"]
    B --> C["Security Gear Icon"]
    C --> D["Camera Camera"]
    D --> E["Security Camera"]
This screen should display:
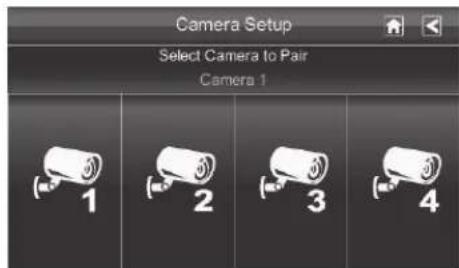
- Tap the camera image you want to pair. A processing icon displays for a 60 second countdown.
- Press and release the Pairing button on that camera's power cord. The 60 second countdown will end when the pairing process is complete.
- The system will automatically adjust the Camera On screen.
Use this procedure to move a camera from one channel to a different channel.
Camera on
When you add a camera to your system, pair up the camera with the monitor and the system will automatically turn it on. An X indicates a camera that is turned off; a check mark indicates the camera is turned on.
From the pop-up menu, tap the following icons as they appear on the screens:

flowchart
graph LR
    A["Input"] --> B["Information Icon"]
    B --> C["Gear Icon"]
    C --> D["Security Camera Icon"]
    D --> E["Monitor Icon"]
This screen should display:
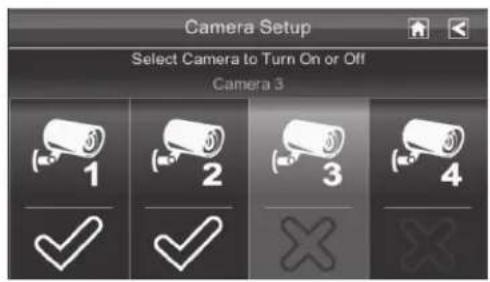
- Tap the camera you want to turn on.
- A check mark replaces the X under the camera.
- To turn a camera off, tap the camera icon. An X replaces the checkmark and indicates the camera is turned off.
Although the camera is turned off, it is still powered. The monitor will not receive video signals from that camera.
BRIGHTNESS
From the pop-up menu, tap the following icons as they appear on the screens:

flowchart
graph LR
    A["Input"] --> B["Information icon"]
    B --> C["Gear icon"]
    C --> D["Security icon"]
    D --> E["Camera icon"]
    E --> F["Weather monitor icon"]
This screen should display:
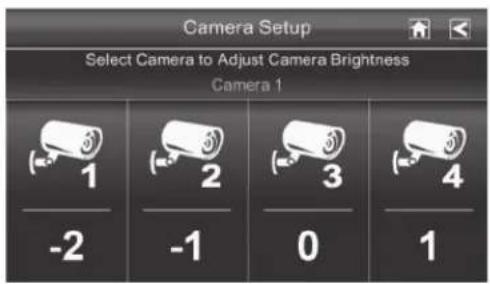
Tap the camera whose brightness level you want to change. The default brightness is 0, and the
range is from -2 through 2. Tap on the camera to cycle through a range of settings.
reCorDer setup sGreen
Use the Recorder Setup screen to select between Motion Detection, Email Alert, or Schedule Record.
Select Motion Detection.
MOTION DETECTION
From the pop-up menu, tap the following icons as they appear on the screens:

flowchart
graph LR
    A["Input"] --> B["Input Icon"]
    B --> C["Gear Icon"]
    C --> D["REC Icon"]
    D --> E["Output"]
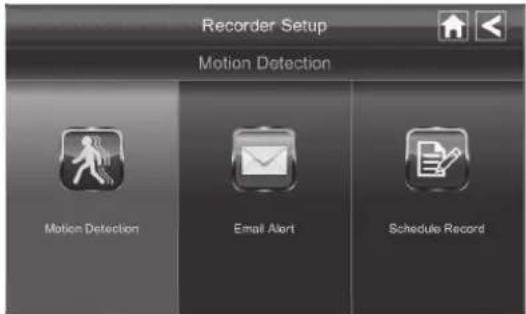
This screen should display:
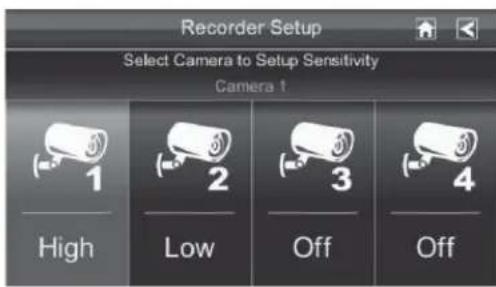
- Each camera's motion detection sensitivity can be set independently. You can set the motion detection level to Off, Low, or High. Tap on the camera to cycle through these choices.
- Tap to return to the main Motion Detection screen.
The Motion Detection default setting for the cameras included in this system is to Low. The system records for 2 minutes when motion is detected.
EMAIL ALERT
The Uniden Guardian system can notify you when it detects motion from any camera by sending you an e-mail alert. The e-mail alert contains information such as the time that motion was detected and by which camera. In order to enable the Uniden Guardian system, you must enter both incoming and outgoing email addresses.
Uniden recommends you use Gmail to set up as the outgoing email server.
The outgoing email server (SMTP server) is responsible for sending out the email notification to tell users when the Uniden Guardian system detects motion from any camera (Motion Detection must be activated).
The incoming mail server (Email To) receives the email notification sent from the SMTP server. The user must be able to receive email on a Windows PC or on mobile devices (such as an iPhone, iPad, or Android smartphone or tablet) to receive e-mail alerts from the Uniden Guardian system.
When you receive an email alert, you can view live video from your Windows PC, an iPhone, iPad, Android smartphone or Andriod tablet through apps. Free apps are available through the Apple App store or the Android Market.
From the pop-up menu, tap the following icons as they appear on the screens:

flowchart
graph LR
    A["Input"] --> B["Input Icon"]
    B --> C["Gear Icon"]
    C --> D["REC Icon"]
    D --> E["Envelope Icon"]
This screen should display:
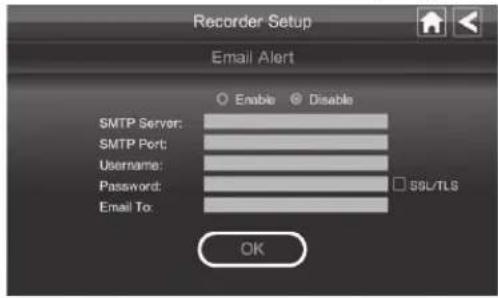
- Tap Enable to activate Email Alert or Disable to deactivate it.
- Tap on the SMTP Server field. A gmail notice displays with the port information; tap OK. A keyboard screen displays.
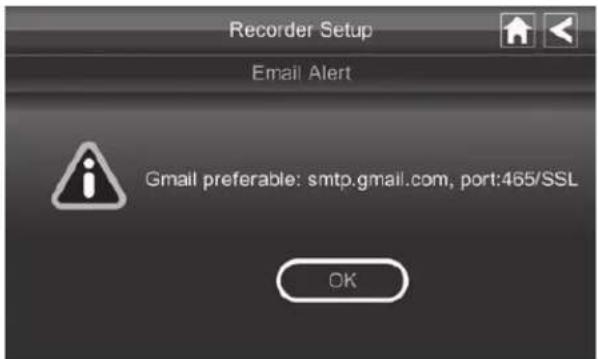
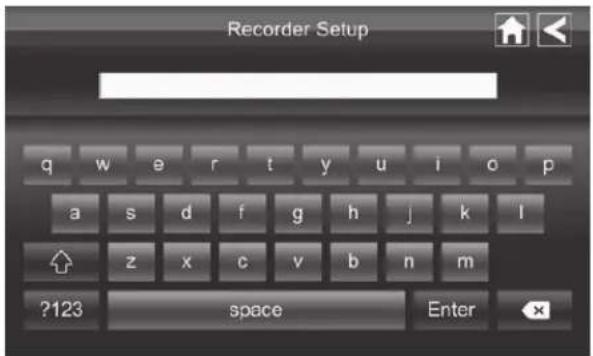
- Enter your outgoing e-mail SMTP server. You can switch the keyboard from alphabetical characters to numbers/symbols and back again by tapping the field to the left of the space bar. Tap Return. The Email Alert screen displays again.
- Repeat the previous step for the Password field. Tap Return.
The password entered here must be the same password as the password for the outgoing email account.
- Repeat Step 3 for the Email To field. Only one incoming email account will be accepted by the Uniden Guardian system. The incoming email account can be different from the outgoing email account.
- Tap OK to save the settings, then tap < to return to the previous screen.
If you are using Gmail as the outgoing SMTP server, check SSL/TLS and use the data in the following table:
| For Gmail | ||
| SMTP Server smtp.gmail.com Enter this. | ||
| SMTP Port 465 Enter this. | ||
| Username XXXX@gmail.com Enter your gmail address in full,including@gmail.com. | ||
| PasswordXXXXXXXXX Enter the password for this | gmail account. | |
| Email to XXXX@gmail.com Enter the email address where | you want the alerts sent. | |
SCHEDULE RECORD
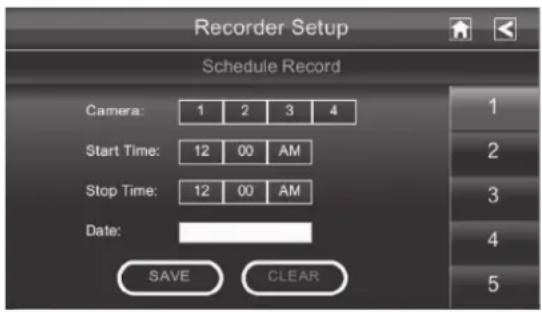
You can schedule up to 5 recording sessions. You are limited to the size of the microSD card for how long a total recording time you have. These recording sessions must begin and end within a single 24-hour period. They cannot cross into the next day.
From the pop-up menu, tap the following icons as they appear on the screens:

flowchart
graph LR
    A["Input"] --> B["Icon"]
    B --> C["Gear Icon"]
    C --> D["REC Icon"]
    D --> E["Document Icon"]
This screen should display:
-
Tap the camera number you want to record (1 - 4). You can select up to all 4 cameras to record.
-
Set the recording start time. Tap the hour and number boxes separately and use the uP and DoWn arrows to scroll through the times.
-
Tap the am/Pm block to toggle between them.
-
Tap on the blank Date box. The Recorder Setup calendar screen displays.
-
Tap on the date you want the recording. The previous screen displays.
-
Set up the recording and then tap saVe. You can select another recording session to schedule, return the previous screen, or return to the Live screen.
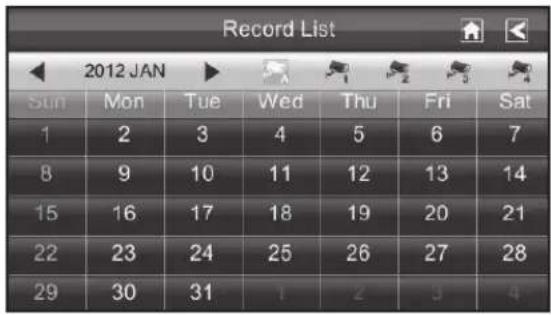
Scheduled recordings are broken up into 15 minute file sizes. For example, if you record a 50 minute event, you will have three 15-minute recordings plus one 5-minute recording.
CLEAR A SCHEDULED RECORDING
- Access the Schedule Record screen.
- Tap recording you want to clear (1-5). The screen displays the settings for that schedule.
- Tap Clear. The screen resets to the default values for that recording slot.
netWork setup sGreen
The Network Setup screen allows you to select your internet connection type and security code. You can also display system default configuration.
From the pop-up menu, tap the following icons as they appear on the screens:
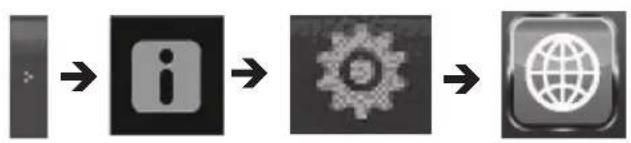
flowchart
graph LR
    A["Sensor Input"] --> B["Information Icon"]
    B --> C["Gear Icon"]
    C --> D["Global Globe Icon"]
This screen should display:
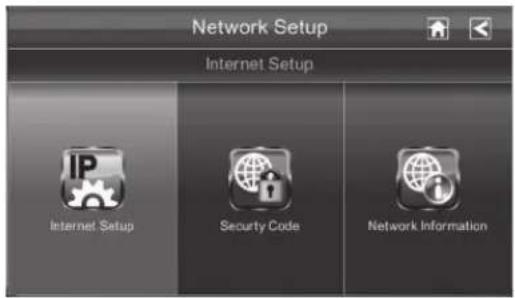
INTERNET SETUP
-
Tap Internet Setup icon to display the Internet Setup screen.
-
Tap on your selection and fill in the fields requested. Tap oK.
| Selection Fields | |
| Static IP • IP Address | Subnet MaskDefault GatewayDNS Server |
| DHCP None |
- Tap oK at the system reboot prompt. The Network Setup screen displays.
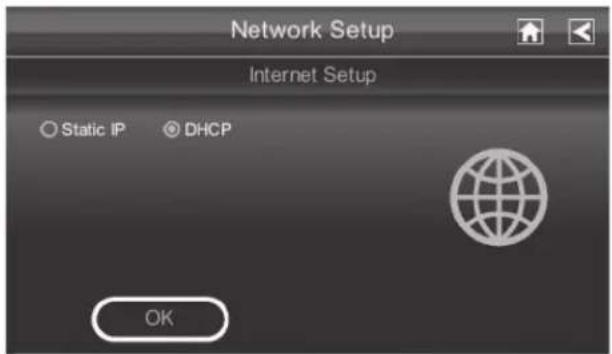
DCHP is the most common connection. Your router will automatically assign an IP address to your Uniden Guardian system. Static IP is for those that have the ability to specify an IP address for the Uniden Guardian system.
SECURITY CODE
Set up your security code to limit who can have access to the system from a remote location.
- Tap Security Code icon to display the Security Code screen.
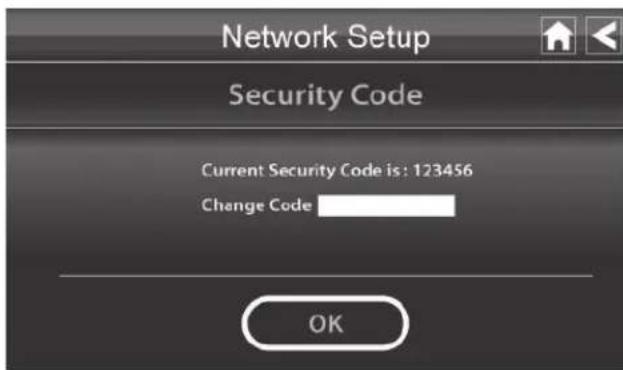
- If you have not entered a security code, you can enter it here. If you have previously entered a security code, your current security code displays.
The default security code is set to 123456. We recommend that you change this code to something you will remember. You will need the code to access your video from a remote device such as a smart phone or PC.
- Tap on the Change Code field. A keyboard screen displays.
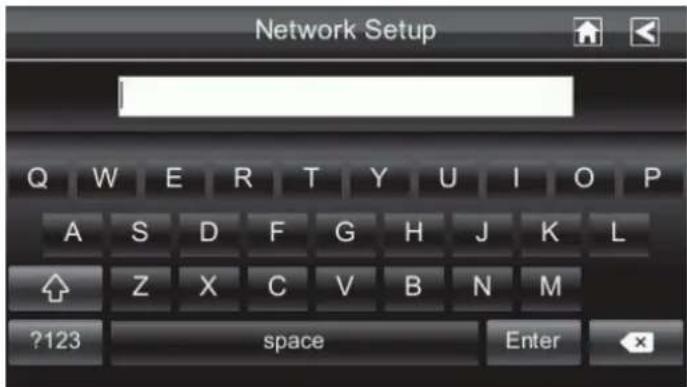
- Enter your security code. You can switch the keyboard from alphabetical characters to numbers/symbols and back by tapping the field to the left of the space bar. Tap enter . The Security Code screen displays again.
You must enter a security code to monitor your video from a PC or other device.
- Tap oK on the system reboot prompt. The Network Setup screen displays.
- Turn your Uniden Guardian monitor off then back on for the security code change to take effect.
NETWORK INFORMATION SCREEN
- Tap the Network Information icon to display the Network Information screen.
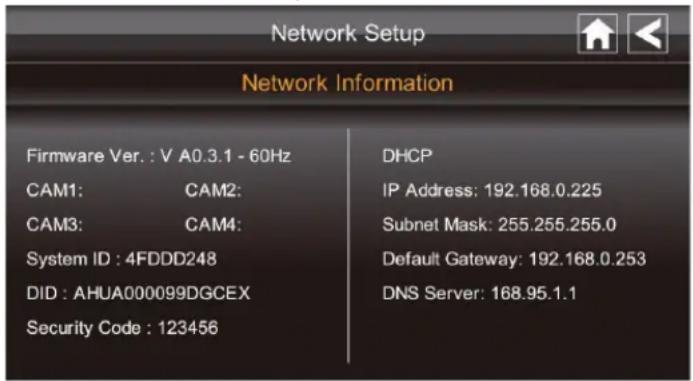
- Tap the arrow to return to the previous screen.
The DID is a unique code specific to your monitor and is required (along with the security code) to gain remote access to your cameras over the internet. The information in the DHCP setting is assigned to your monitor from your home router.
aLarm setup sCreen
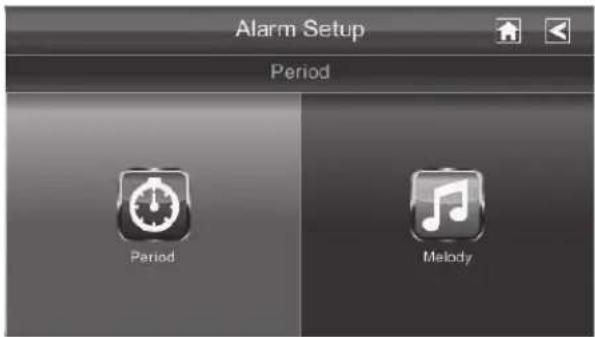
From the Alarm Setup screen, you can:
- Set the length of time the alarm sounds.
- Select a melody for the alarm.
PERIOD SCREEN
This selection allows you to select the length of time the alarm will sound for the alarm clock.
- Tap Period. The Change Siren Duration screen displays.
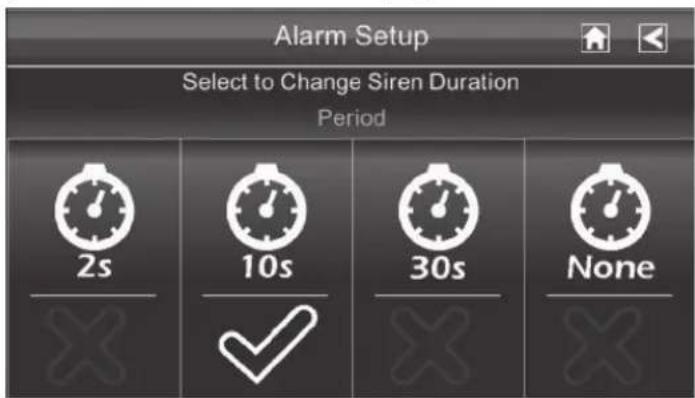
- Tap the duration you want the siren to last (2, 10, or 30 seconds) or tap None to turn sirens off.
- Tap to return to the previous screen.
MELODY
This selection allows you to select a melody for the siren.
- Tap Melody. The Change Siren Melody screen displays.
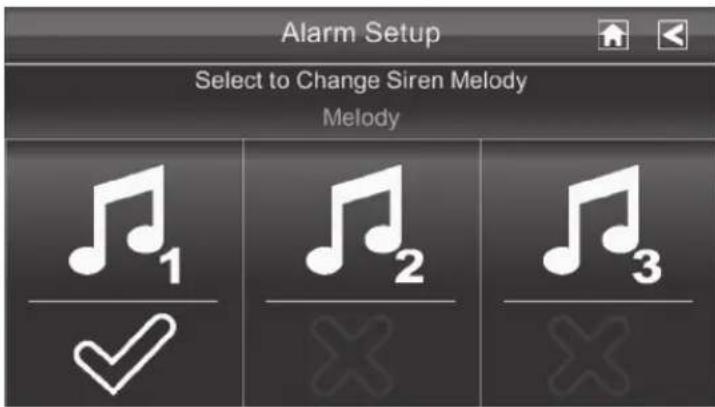
- A check mark appears on the melody you tap and the monitor briefly plays a sample of the selected melody.
- Tap the BACK arrow to return to the previous screen.
sYstem setup sCreen
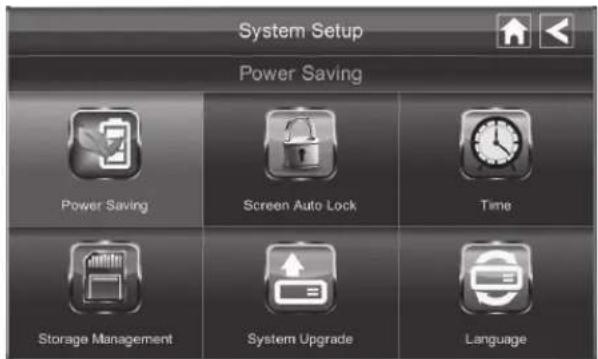
PoWer savinG
When you turn on Power Saving mode, the monitor goes into sleep mode (LCD turns off) after it is idle for 2 minutes. Press the POWER button once to reactivate the monitor (Default = Disable).
If a motion detection event or scheduled recording begins, the LCD turns back on.
- Tap Power Saving icon, then Enable to activate Power Saving mode (Default = Disable).
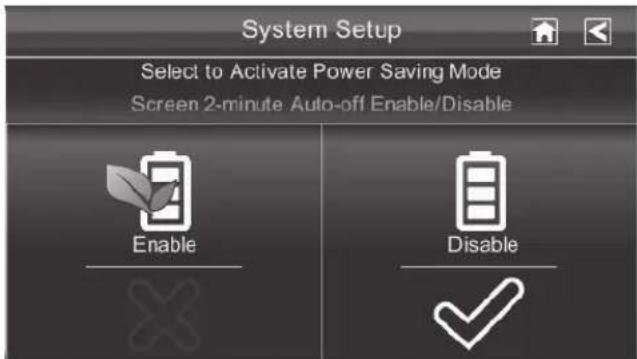
- A check mark appears on your selection.
- Tap to return to the previous screen.
SCREEN AUTO LOCK
When you turn on Auto Lock mode, the monitor will automatically enter screen lock mode after it has been idle for 2 minutes. Auto Lock disables the touchscreen and removes the icons from the display.
When the auto-lock feature has been enabled and your Live screen is locked, just tap the PoWer button once to unlock the screen and return to normal touch screen operation. At any time from the Live screen, you can manually lock the system by tapping the PoWer button, whether or not the auto-lock feature has been enabled.
- Tap Screen Auto Lock. The Activate Touch Screen Operation Auto-lock screen displays.
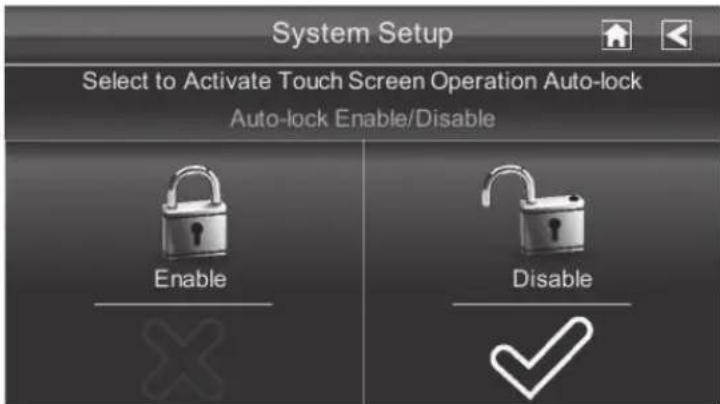
- Tap your selection; a check mark displays.
- Tap the BaCK arrow to return to the previous screen.
TIME
The Time screen lets you set up clock alarms, set the system time, and set your local time zone.
From the pop-up menu, tap the following icons as they appear on the screens:

flowchart
graph LR
    A["Sensor Input"] --> B["Sensor Icon"]
    B --> C["Gear Icon"]
    C --> D["Arrow with wrench"]
    D --> E["Clock Icon"]
The following screen displays:
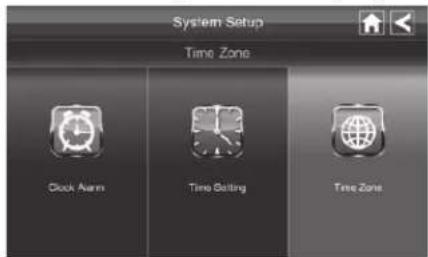
CLOCK ALARM
This feature operates as an independent alarm clock. It does not affect the operation of live video or recording video.
1. Tap

to display the Clock Alarm screen.
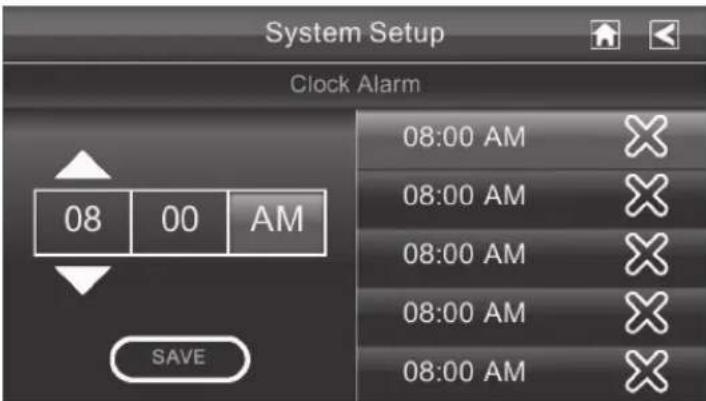
- Tap on an alarm button (total of 5 to select from).
-
Tap on the hour block. The uP/DoWn arrows move to the hour block. Set the hour.
-
Tap on the minute block. The uP/DoWn arrows move to the minute block. Set the minute.
- Tap on am/Pm to toggle between the two.
- Tap saVe when you are finished.
TIME SETTING
This screen contains fields to set the Month, Day, Year, Hour, Minute, and AM/PM.
- Tap

to display the Time Setting screen.
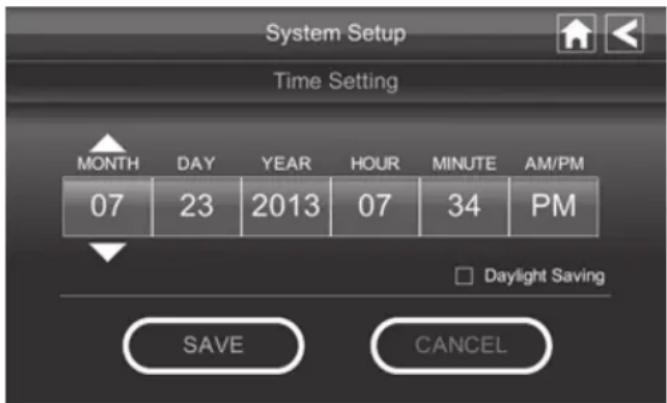
- Tap on each field to set it. The uP/DoWn arrows shift to that field. Use uP/DoWn to set the field.
- Tap on the AM/PM block to switch between the two.
- Tap Daylight Saving to set Daylight Savings time.
- Tap save when you are finished.
It is important to set the correct time to ensure that the recorded video files and the scheduled record times are correct.
TIME ZONE
Time Zone allows you to set the time zone your monitor is in. This is especially useful if you are using the app in another time zone and you want to remotely access your recorded files. You can set a filter for how far back you want to view files (the past hour, past 6 hours, etc - see page 48). Your
system will know that your request refers to the time zone the monitor is in. [Default = (GMT-6:00) Central Time (USA & Canada)]
- Tap

to display the time Zone screen.
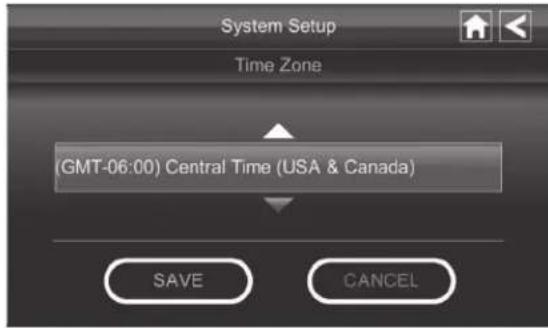
- Scroll through the time zone lists to find your time zone. Tap on that time zone when you find it.
- Tap save when you are finished. The time Zone screen displays.
storaGe manaGement
Storage Management lets you reformat your microSD card (erasing all records) or allow new video records to copy over older records when the microSD card is full. Overwrite erases the oldest record to free space for the new file. More than one record may be erased depending on the new file's size.
The Uniden Guardian System supports up to a 32 GB microSD Card.
From the pop-up menu, tap the following icons as they appear on the screens:

flowchart
graph LR
    A["Input"] --> B["Info Icon"]
    B --> C["Gear Icon"]
    C --> D["Switch Icon"]
    D --> E["Monitor Icon"]
This screen should display:
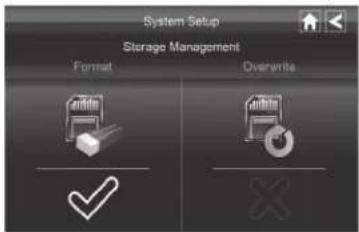
- Tap Storage Management on the System Setup screen. The Storage Management screen displays.
- You can tap either Format or Overwrite from this screen.
FORMAT
Formatting the microSD card erases all data. If there are files you need to keep, transfer those files from the microSD card to your computer.
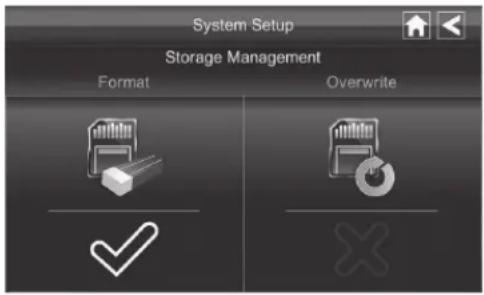
- Tap the Format portion of the Storage Management screen. A confirmation screen displays, asking if you wish to continue.
- Tap oK.
Reformat your microSD card every 4 - 6 weeks for optimum performance.
OVERWRITE
Overwrite lets the system delete the oldest records in order to record new records when the microSD card is full. It might be necessary to delete more than one record to save the new record, depending on size.
- Tap the Overwrite portion of the Storage Management screen.
- A checkmark displays to indicate that the oldest files will be overwritten. If you turn off this feature, an X displays and the system displays an out of space message when you try to record files and the microSD card is full.
sYstem uPGraDe
To upgrade the Uniden Guardian firmware, you will need to download the file from the Uniden Video portal site (www.unidenvideo.com) or from the Uniden website (www.uniden.com) to your computer. This file must then be transferred to the root directory of the microSD card used in your Uniden Guardian system.
From the pop-up menu, tap the following icons as they appear on the screens:

flowchart
graph LR
    A["Input"] --> B["Information Icon"]
    B --> C["Gear Icon"]
    C --> D["Arrow with wrench and pad icon"]
    D --> E["Upload Icon"]
This screen should display:
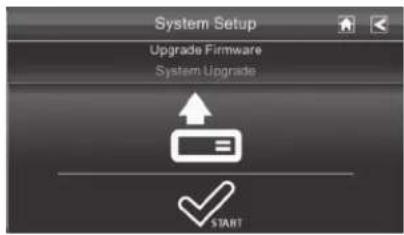
- Remove the microSD card.
- Insert it into your computer. Use the adapter if needed.
- Go to www.unidenvideo.com or www.uniden.com. Locate the download information for your G955 firmware.
- If you need to download an upgrade, navigate to your microSD card and copy the download file to it.
- Remove the microSD card and insert it into your monitor.
- Navigate to System Setup/Update Firmware (see path shown above). Tap on the Update Firmware screen to begin the update.
- The system displays various processing messages, ending with a notice that the system will shut down in 5 seconds. Either let the system shut down on its own or shut it down manually.
- Turn the system back on. The memory card will initialize with the newest firmware.
LanGuaGe
English is the default language. When you change languages, all system settings default to the original factory settings. You will have to reenter any specialized settings.
From the pop up menu, tap the following icons as they appear on the screens:

flowchart
graph LR
    A["Input"] --> B["Info Icon"]
    B --> C["Gear Icon"]
    C --> D["Switch Icon"]
    D --> E["Monitor Icon"]
This screen should display:
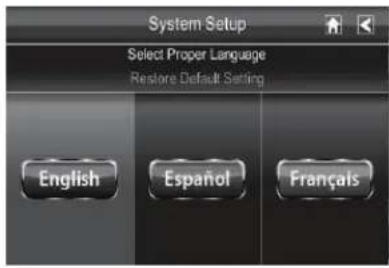
- Select a language to change to that language. The Restore Default Settings screen displays.
- Tap oK to continue with the language reset. The system will reboot in about 5 seconds. If you do not want to reset the language, tap CanCeL and return to the previous screen.
Changing the language will reboot the system and ask you to recalibrate the touch screen. Follow the instructions on the screen.
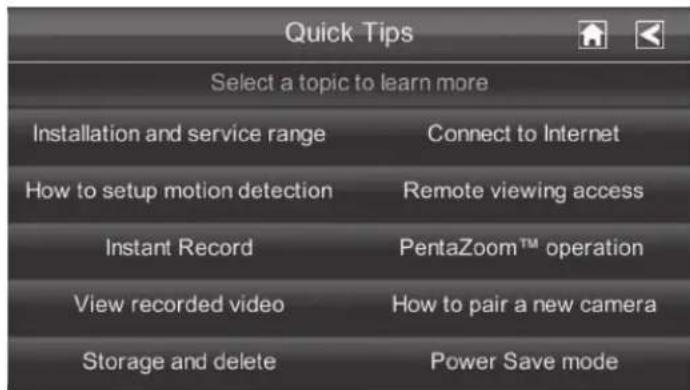
quICK tIPs sCreen
The Quick Tips screen provides more detail into 10 common areas. Tap on a subject to display the information.
remote aCCess
oVerVleW
Uniden Guardian lets you view live video from your Windows ^® PC, an iPhone ^® , iPad ^® , or Android ^TM smartphone or tablet. Free apps are available through the Apple App Store or the Android Market.
This system uses P2P remote access technology and does not require configuring your router, port forwarding or a remote DDNS service.
You must set up a free portal account to remotely view your system. Multiple users can access live video at the same time as long as they have the DID code and security code.
The number of remote viewers is determined by the amount of "available upload bandwidth" on your home network. Each remote viewer requires 350 kbps of bandwidth on the network.
sYstem requirements
- Microsoft® Windows XP, Vista, or Windows 7
- Internet Explorer® 8 or greater
- iPhone® or
- iPad® or
• Android™ smartphone or tablet
ConneCtInG to the Internet
The Uniden Guardian cradle charges your monitor as well as provides an internet connection. When you are connected to the internet, live video will not display on the monitor.
For this procedure, the AC adapter must be connected to the cradle and not to the monitor. Reconnect the AC adapter if necessary.
-
Connect one end of the Ethernet cable into the back of the cradle.
-
Connect the other end into your primary router (typically, the router from your service provider).
- Place cradle maximum distance away from your router.
- Insert the monitor into the cradle. A screen asks if you want to connect to the internet or to only charge the monitor.
- Tap Connect. The Internet Connection Status Indicator appears on the upper left of the LIVE screen indicating that the system is connected to the internet.
While the system is connected to the internet:
The LIVE screen display rate may reduce to 2 - 3 frames per second.
The touch screen's control operation will be limited. To return to full control of the touch screen, disconnect from the internet. Tap on the Pop Up menu and then select Charge Only. - When you connect remotely to the monitor, the Internet Connection Status Indicator shows that remote view is in progress.
ConneCtInG to the Intranet (home netWorK)
When the monitor is placed in the cradle and “charge only” is selected, you can still access your live video from a PC or smart phone as long as those devices are also connected to the same network as the monitor. For example your smart phone is connected to your home network via WiFi. In this case, live video will still be displayed on the monitor as well as on the smart phone.
settInG uP a PortaL aCCount
You need a Uniden portal account to gain remote access to your Uniden Guardian system live video.
Be sure you have set up your security code. By default, the security code is 123456. We highly recommend you change this on the monitor. You will need them for setting up a portal account.
- Go to http://www.unidenvideo.com. Click Register. The Select Region and Language screen displays.
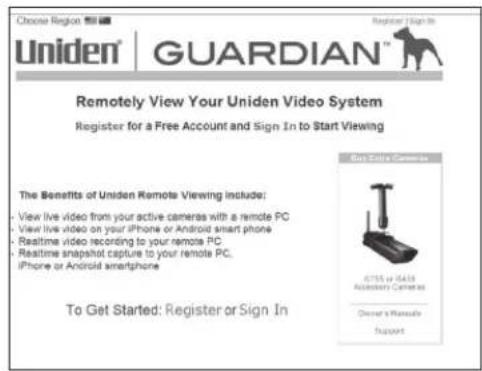
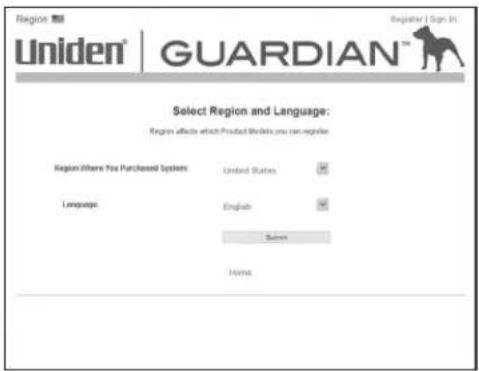
- Fill out this page and click Submit. The Legal Agreement displays.
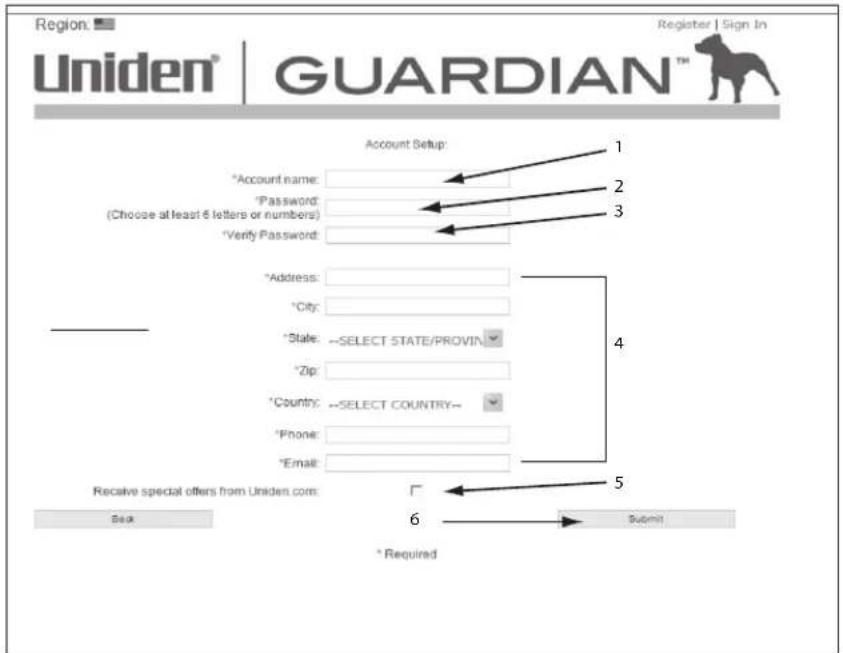
- Read and agree to the Legal Agreement. The Account Setup screen displays
- Enter Account Name (1).
- Enter a Password (2).
- Enter it again to Verify Password (3).
- Complete all required fields (4).
- Click in the check box (5) to receive information on special offers from Uniden.
- Click Submit (6). The New Account Created screen displays.
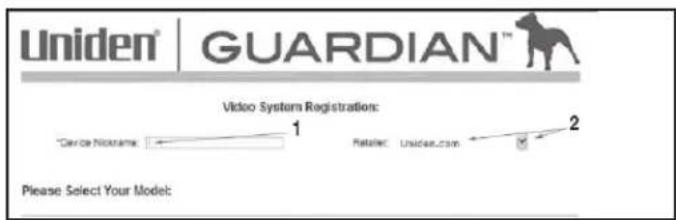
- Click Continue. The Video System Registration screen appears.
- Provide a Device Nickname (1).
- Select your retailer from thelist (2).
enter the DID CoDe
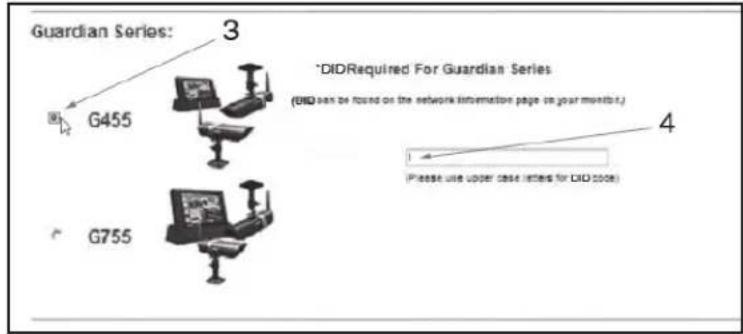
After selecting your Uniden Guardian system, you must enter the DID code. This DID code can be found on the back of your monitor. It is the characters underneath the barcode. You also can find
the DID code on the Network Information screen.
- Click the radio button by your system (3).
- Enter the DID code in all capital letters (4).
- Click Continue (5).
Once your account setup is complete, select the View Now link.
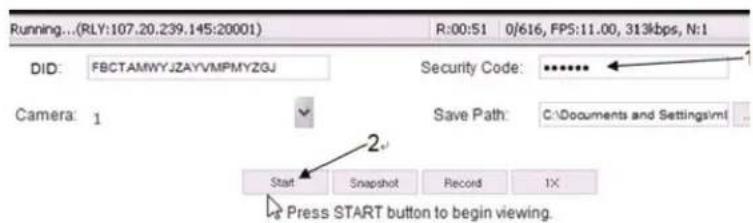
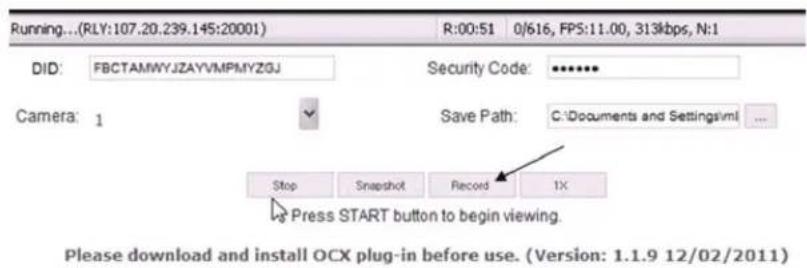
In order to view live video from your PC, you must download and install the OCX plug in. Click on the link near the bottom of the page and it will ask you to Run or Save the file. If you choose to Save, remember where the download location is on your computer. After the download is complete, find that file and click on it to install. After the installation is complete, return to the View Now page on the Portal. On this page, you will see the DID code from your device that you entered during account setup. There is also a space to enter a Security Code.
enter seCurltY CoDe
The Security Code must match the monitor security code that you previously set up (see page 27). By default, the Security Code is set to 123456; we recommend that you change it.
- Enter your own unique security code.
- Click start .
Please download and install OCX plug-in before use. (Version: 1.1.9 12/02/20)
The security code you enter on the Uniden Video Portal and the Apps must match the security code you entered on the device. Anytime you change the security code on the device, you must make the corresponding change on the Portal or Apps.
reCorD VIDeo
The Portal lets you record live video and save it to your PC.
- Click Record to start recording.
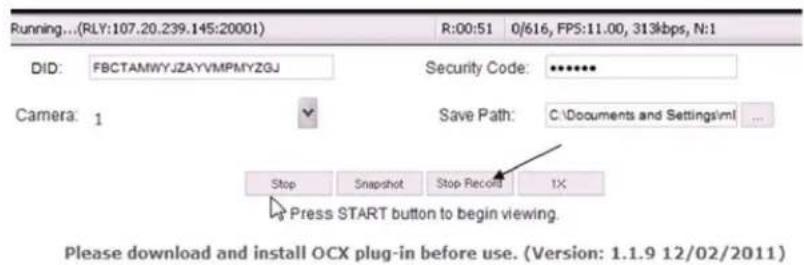
- Click Stop Record to stop recording.
taKe a snaPshot
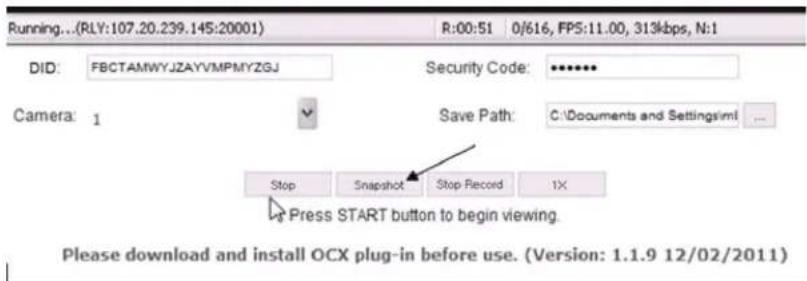
The Portal lets you take snapshots of video and save to your PC.
Click Snapshot.
You specify the save location for all video and snapshots. Select Save and then browse to the location where you want to save them.
usInG the unIDen GuarDlan 2 aPP
anDroID TM
ESTABLISHING YOUR SYSTEM ON THE APP
You can use a Google® Android™ smart phone or tablet with your Uniden Guardian System to remotely connect to and view live camera video. Follow these steps to download, add, and use the app.
-
From your Android™ smart phone or tablet device, search the Android Market for Uniden Guardian 2. Download and install this app to your device.
-
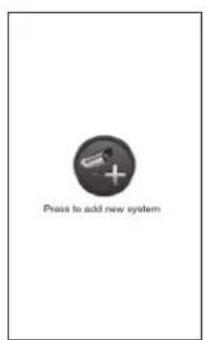
Launch the app; tap Press to aDD Cameras to add your system information to the app. Enter a name for your system in the System Name field
Enter the same DID code from your Uniden Guardian monitor in the DID field.
Enter the security code
Tap the Email Alert box to have the system send you e-mails when motion triggers the camera; tap saVe. A message displays, verifying that you want to save the system you just entered. Tap oK.
-
A message displays, recommending that you change the security code from the default. Tap oK.
-
The Uniden Guardian 2 system Main screen displays. A globe displays for each system you connect to the Uniden Guardian 2 app.
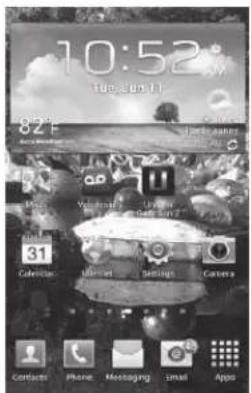
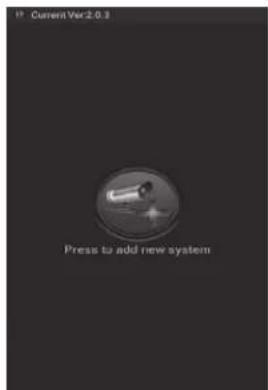
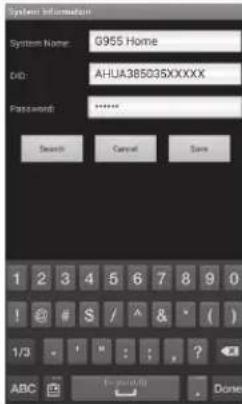
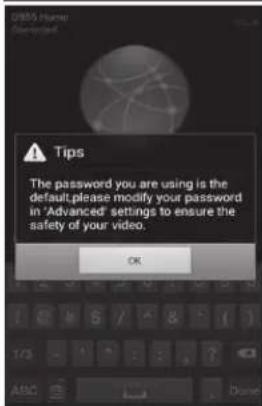
If only one system is connected, the app will display the globe screen momentarily and then display the last image from that system.
- Tap on the globe to view live video from that system.
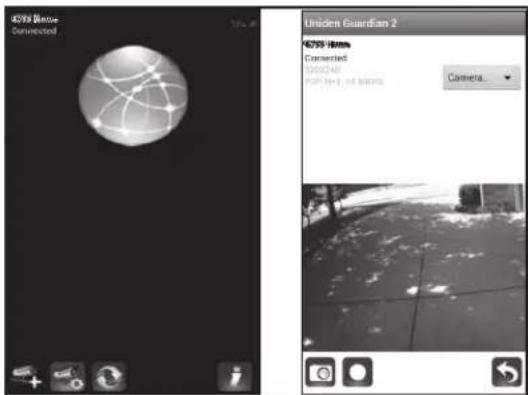
aPP oPeration
When you open the APP on your Android phone, the image displayed on the main screen is the last camera image, captured automatically, from your previously established session.
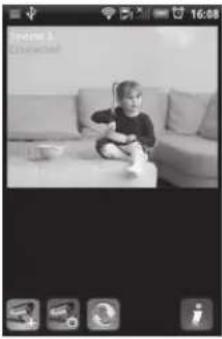 Main screen Main screen |  | Tap to add an additional Uniden Guardian system. |
 | Tap to enter System Setup page. | |
 | Tap to refresh the system. | |
 | Tap to view the APP Information options. There is also an option to enable/disable the PIN lock. |
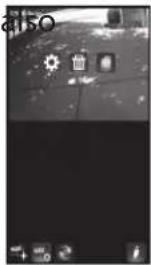
system setup icons
These icons display when you tap the icon from the Main screen.
• Edit System. Tap this icon to change settings and enable email alerts and event notifications.
• : Delete System. Tap this icon to delete the Uniden Guardian system.
• : View Recorded Files. Tap this icon to display a list of recorded file (see page 47).
INFORMATION OPTIONS
These options display when you tap the i icon.
- : Set up PIN Lock. Activating this function prevents others from activating the app and viewing your camera images. Enter a unique 4-digit code and check the "Enable lock when starting" box if desired. Enter this code when you activate the app.
• : About. Tap this icon to display the APP version number and the API version number.
TO ENABLE EVENT NOTIFICATION
You can set your smartphone or device to notify you when there is a new recorded file.
- Tap Settings on your device.
- Tap Notifications. A list of apps displays.
- Tap Uniden Guardian 2.
- The Uniden Guardian 2 setting screen displays. Turn the notification ON or OFF as desired.
TO VIEW RECORDED FILES FROM YOUR MOBILE DEVICE
Before you can view recorded files from your mobile device, you must connect your system to the internet (see page 40).
- Launch the Uniden Guardian 2 app and select your system. The main screen displays.
-
Tap the icon. The Edit System, Delete System, and View Recorded Files icons display.
-
Tap Vl eW reCorDeD FLiEs . A list of recorded files (Event List) displays.You have the following options available:
-
Across the bottom of screen is a camera selection field with a drop-down menu; you can select which camera's Event List you want to view.
- Tap the pencil icon to select recorded files to delete. Tap the box on the right side of the entry to select it for deletion.
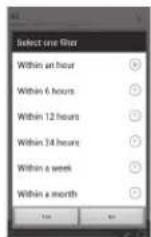
- You can set a filter to display all files recorded within the past hour, past 6 hours, etc. Tap searCh (magnifying glass icon) to display the filter selections. Select a filter and then tap Yes. The Event List displays again, filtered accordingly.
When you set a filter, be sure the Time Zone feature is set accurately in the monitor to reflect the current time zone for the system, not the time zone where you are.
natural_image
Desktop interface with icons and a window, no visible text or symbols on the main screen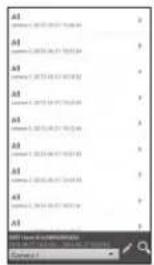
- Tap on a file to play it. Two icons display on the screen below the image:
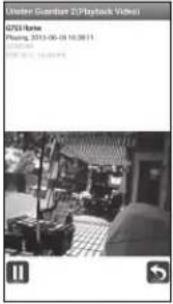 |  | Pause icon. Tap to pause playback. Tap again to resume playback. |
 | Return icon. Tap to return to the previous screen. |
to take snaPshots and record from live vieW:
From the Live view, three icons display on this screen - Snapshot, Record, and Return.
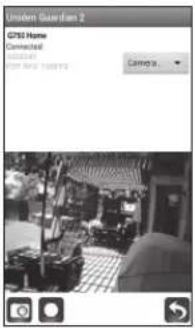 |  | Snapshot icon. Tap to take a picture. Pictures are saved to your phone. |
 | Record icon. Tap to begin recording. A red circle displays in the upper right-hand corner of the screen. The app records for 2 minutes, and stores the recorded file on the monitor's microSD card. | |
 | Return icon. Tap to return to the Main screen. |
los ^
establishing your system on the aPP.
In a similar fashion to the Android smart phone, you can use the Apple® iPhone® smart phone or iPad® tablet with your Uniden Guardian System to remotely connect to and view camera videos. Follow these steps to download the Uniden Guardian iPhone® App and set it up to work with your Uniden Guardian system.
DOWNLOAD
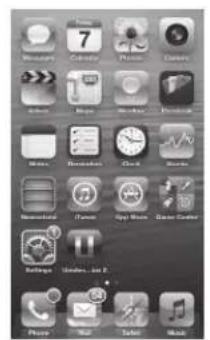
- From your iPhone® or iPad®, go to the Apple App Store and search for Uniden Guardian 2. Download and install this App to your device.
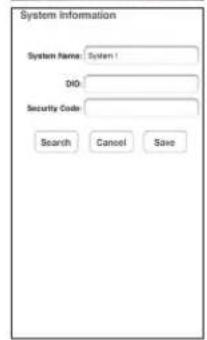
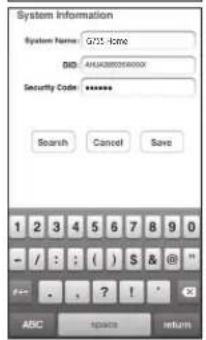
- Launch the app; tap Press to aDD Cameras to add your system information to the app.
Enter a name for your system in the System Name field.
Enter the same DID code from your Uniden Guardian monitor in the DID field.
If your phone is connected via WiFi to the same network as the Uniden Guardian system, tap searCh. The app will look on your network and find your Uniden Guardian system's DID code.
Enter the security code.
Tap save.
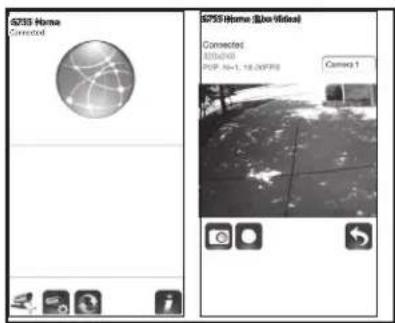
- The Uniden Guardian 2 system Main screen displays. A globe displays for each system you connect to the Uniden Guardian 2 app
If only one system is connected, the app will display the globe screen momentarily and then display the last image of that system.
- If you have more than one system on the app, tap your desired system's globe to view live video from that system.
aPP oPeration
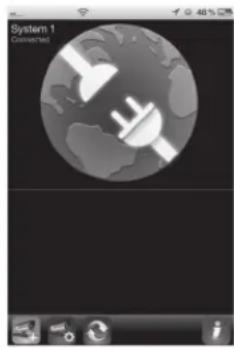
When you open the APP on your iPhone or iPad, several icons display on the bottom task bar.
natural_image
Mobile app interface displaying a globe with plug icons, no visible text or symbols on the globe itself.Main screen


Tap to add an additional Uniden Guardian system.
Tap to enter System Setup page.
Tap to refresh the system.
Tap to enter the APP Information page. There is also an option to enable/disable the PIN lock.
system setuP icons
These icons display when you tap the icon from the Main screen.
- Edit System. Tap this icon to change settings and enable email alerts and event notifications.
• : Delete System. Tap this icon to delete the Uniden Guardian system.
• : View Recorded Files. Tap this icon to display a list of recorded file (see page 52).
information oPtions
These options display when you tap the i icon.
- : Set up PIN Lock. Activating this function prevents others from activating the app and viewing your camera images. Enter a unique 4-digit code and check the "Enable lock when starting" box if desired. Enter this code when you activate the app.
• : About. Tap this icon to display the APP version number and the API version number.
TO ENABLE EVENT NOTIFICATION
You can set your smartphone or device to notify you when there is a new recorded file.
- Tap Settings on your device.
- Tap Notifications. A list of apps displays.
- Tap Uniden Guardian 2.
- The Uniden Guardian 2 setting screen displays. Turn the notification ON or OFF as desired.
TO VIEW RECORDED FILES FROM YOUR MOBILE DEVICE
Before you can view recorded files from your mobile device, you must connect your system to the internet (see page 40). Launch the Uniden Guardian 2 app and select your system. The System Setup screen displays.
- Tap the icon. The Edit System, Delete System, and View Recorded Files icons display.
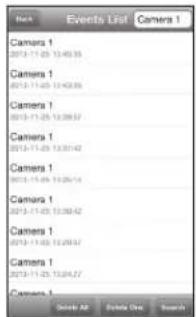
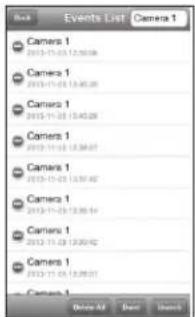
- Tap VleW reCorDeD FILes . A list of recorded files (Event List) displays. You also have the following options available to help you find the files you want:
- Change cameras. In the upper right-hand corner of the screen is a camera selection field. Tap on it and the bottom of the screen displays your camera options. Select the camera whose Event List you want to view.
- Set display filter. You can set a filter to display all files recorded within the past hour, past 6 hours, etc. Tap searCh to display the filter selections. Select a filter and then tap CClose. The Event List displays again, filtered accordingly.
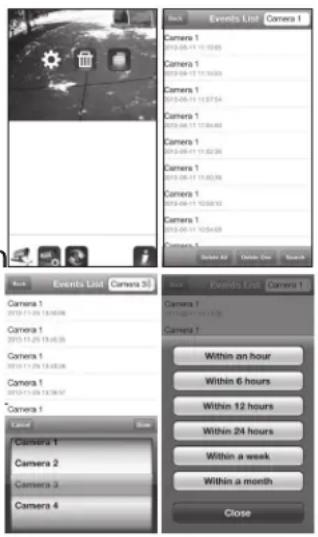
When you set a filter, be sure the Time Zone feature is set accurately in the monitor to reflect the current time zone for the system, not the time zone where you are. See page 35.
- Tap on a file to play it. Two icons display below the image:
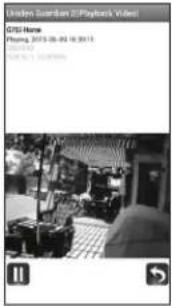 |  | Pause icon. Tap to pause playback. Tap again to resume playback. |
 | Return icon. Tap to return to the previous screen. |
to Delete FILES
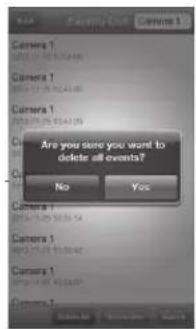
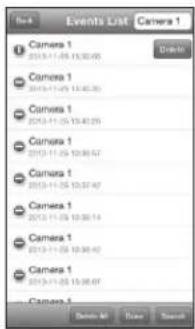
- Tap the DeLete aLL or DeLete one button on the bottom of the list of files.
- If you tap DeLete aLL, a confirmation message display. Tap Yes or no.
If you tap DeLete one, the Event List displays again with red and white circles. Tap the circle on the file you want to delete and then tap DeLete.
to take snaPshots and record from live vieW
From the Live view, three icons display on this screen - Snapshot, Record, and Return.
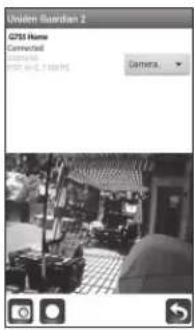 |  | Snapshot icon. Tap to take a picture. Pictures are saved to your phone. |
 | Record icon. Tap to begin recording. A red circle displays in the upper right-hand corner of the screen. The app records for 2 minutes, and stores the recorded file on the monitor's microSD card. | |
 | Return icon. Tap to return to the Main screen. |
maintainInG Your sYstem
uPGraDInG Your unIDen GuarDlan FIRMWare
Check your system firmware version on the Network Information screen.
Go to www.unidenvideo.com to check the current firmware level. Compare it to your system firmware level. If you need to update your Uniden Guardian firmware, download the most current firmware version to your system's microSD card and then upload that firmware to the monitor.
- Eject the microSD card from the monitor.
- Insert the microSD card into your PC (use the included adapter).
- Go to www.unidenvideo.com.
- Copy the current firmware to the microSD card.
- Remove the microSD card, take it out of the adapter, and reinsert it into the monitor.
- Upgrade the firmware (see page 37).
taKInG Care of Your harDWare
monitor
As you use your monitor, keep the screen clean by wiping it with a microfiber cloth to remove fingerprints, dust, etc.
Cameras
When dust and grime builds up on the camera lens and glass, it affects night vision capability. The infrared light reflects off of the dust and grime, limiting the camera's "vision." Use a microfiber cloth to regularly clean the cameras or when night vision video is cloudy or unclear.
manaGlnG reCorDeD FILes
Over time, your microSD card will fill up with recorded files. If there are files you need to keep, transfer them to your computer for storage and remote viewing. Otherwise, reformat your microSD card every 4 to 6 weeks (see page 37).
CoPYInG FILes From the mICrosD CarD to the ComPuter
- Remove the microSD card from the monitor.
- Insert it into your computer's microSD card slot. Use an adapter if necessary.
- Navigate to the microSD card and locate your files.
- Copy them to the computer. These files can now be deleted from the microSD card or the microSD card can be formatted.
soLVInG ProBLems
If you have any trouble with your system, try these simple steps. If you are still having a problem with your camera, check the manual that came with your camera. If you still have a question, call our Customer Care Line; see "Customer Care" on page 2.
| If... Try.. | |
| The motion sensor won’t respond to movement. | Increasing the sensitivity of the motion sensor (see page 20).Checking the settings on the Record screen (see page 18). |
| The motion sensor goes off when there’s nothing there. | Decreasing the sensitivity of the motion sensor (see page 20).Refer to “Placement Considerations” on page 8. |
| I can’t play my video clips in another program. | The video files play with a Quicktime® player. Download this free player from www.apple.com.Video will play in players such as Windows Media® Player if an H.264 CODEC plug-in is installed. |
| I schedule a recording, save the schedule, and the recording does not happen at the scheduled time. | Ensure that the system time is set to the current time.Make sure that the microSD card is inserted into the monitor and there is still memory available on that card. |
| The camera’s signal status icon shows no bars. | making sure the camera is plugged in and the red LED is on.making sure the camera is paired to the correct channel.re-pairing the camera and monitor.moving the camera closer to the monitor; it might be out of range.make sure the camera setting is turned on in Camera Setup (see “Camera On” on page 21). |
| The camera’s signal status icon shows one or two bars or the video quality is poor. | See “General Guidelines” on page 7 for tips on improving video quality. |
| The camera won't pair with the monitor. | ·making sure the camera is plugged in and the red LED is on.·pressing and releasing the pairing button quickly. Do not press and hold the pairing button. |
| When I power up my monitor and cameras for the first time, they seem to be on but there is no picture on the screen. | ·If the Power Saving feature has been turned on, the monitor's LCD screen will power off. Tap the power button to turn the LCD back on. |
| I have my regular Live screen but there are no icons. | ·tapping the Power button on top of the monitor. Screen lock may be on and tapping the Power button will unlock the screen. |
| The monitor picture has frozen. | Using a blunt object like an unbent paper clip to press RESET and reset the monitor. The monitor turns off. Press POWER to turn it back on. |
| I cannot remotely access my recorded files. | ·Verify that the monitor is connected to the internet.·Verify that the time zone is set correctly for the monitor.If you are away from your system, you will need someone to verify these items for you. |
aDDItlonaL InFormation
ProDuCt sPeCIFICatlons
| Radio Frequency Transceiver | |
| RF Frequency 2.4 GHz | |
| Modulation GFSK | |
| Spread spectrum Frequency Hopping | |
| Anti Interference Clean Channel Dynamic Select | |
| Selectable camera channel 4 | |
| Data rate 2 Mbps | |
| Transmitting range 500 feet (152 meters) in an open area (line of sight) | |
| Image Specification | |
| Output Image resolution 4 | 80 X 272, 320 x 240 (QVGA) |
| Image processing H.264 | |
| Exposure Auto | |
| White balance Auto | |
| System Specifications | Camera Monitor | ||
| Weight 13 oz (370 g) G45 | 55: 7 oz (198 g) G755: 1lb 1 oz (468 g) | ||
| Dimension | 5.94 x 2.9 x 1.9" (151 x 74 x 49 mm) | 5 x 3 x 0.9" (132 x 79 x 24 mm) | 7.2 x 5 x 1.1" (184 x 128 x 28 mm) |
| Operating temperature | +14° F (-10°C) to 122°F (+50°C) | ||
| Battery charging temp. | 0°C (32°F) to +45°C (113°F) | ||
| Input voltage 100-240 V | AC @ 60 or 50 Hz | ||
| Operating voltage 5 V DC @ 1 Amp | |||
| Power consumption 650 mA max | |||
| Low light solution | 20 IR LEDs, 1 Low light sensor | ||
| Low light sensitivity 1-8 lux | |||
| Picture sensor | OV7725 1/4”Color CMOS | ||
| Lens F3.6mm H:55 V:44 | |||
Lithium-Polymer Battery Warning
- This equipment contains a rechargeable lithium-polymer battery.
- Do not charge the battery in temperatures below 32^ (0^) or higher than 113^ (45^) .
- Do not open or mutilate the battery.
- The rechargeable batteries contained in this equipment may explode if disposed of in a fire.
- Do not short-circuit the battery.
- Do not charge the rechargeable battery pack used in this equipment with any charger other than the one designed to charge this battery pack as specified in the owner's manual. Using another charger may damage the battery pack or cause the battery pack to explode.
CAUTION! Rechargeable Batteries Must Be Recycled or Disposed of Properly.
Recycling and Disposal Information
- Do not dispose of electronic devices or any of their components (especially batteries and LCD displays) in your municipal trash collection.
- Consult your local waste management authority or a recycling organization like Earth911.com to find an electronics recycling facility in your area.
FCC Compliance Information
Part 15 Compliance Statement
This device complies with Part 15 of the FCC Rules. Operation is subjected to the following two conditions: (1) this device may not cause harmful interference, and (2) this device must accept any interference received, including interference that may cause undesired operation.
This equipment has been tested and found to comply with limits for a Class B digital device, pursuant to Part 15 of the FCC rules and ETSI (EN) 300328. These limits are designed to provide reasonable protection against harmful interference in residential installations. This equipment generates, uses, and can radiate radio frequency energy, and if not installed and used in accordance with the instructions, may cause harmful interference to radio communications.
However, there is no guarantee that interference will not occur in a particular installation. If this equipment does cause interference to radio or television equipment reception, which can be determined by turning the equipment off and on, the user is encouraged to try to correct the interference by one or more of the following measures:
• Reorient or relocate the receiving antenna.
- Move the equipment away from the monitor.
- Plug the equipment into an outlet on a circuit different from that to which the monitor is connected.
- Consult the dealer or an experienced radio/television technician for additional suggestions.
CAUTION! Any changes or modifications to this equipment not expressly approved by the party responsible for compliance could void your authority to operate the equipment.
RF Exposure Information
The antenna used for this transmitter must be installed to provide a separation distance of at least 20 cm (7.9") from all persons and must not be collocated or operating in conjunction with any other antenna or transmitter.
IC Compliance Information
Radio Equipment Notice
The term "IC:" before the radio certification number only signifies that Industry Canada technical specifications were met. Operation is subject to the following two conditions: (1) this device may not cause interference, and (2) this device must accept any interference, including interference that may cause undesired operation of the device. "Privacy of communications may not be ensured when using this device".
CE Compliance Information
Products with CE Marking comply with EMC Directive (2004/108/EC); Low Voltage Directive (73/23/EEC); R&TTE(1999/5/EC) issued by the Commission of the European Community. Compliance with these directives implies conformity to the following European Norms:
• EMC: EN 301 489
• LVD: EN 60950
• Radio: EN 300 328
One-Year Limited Warranty
Important: Evidence of original purchase is required for warranty service.
WARRANTOR: Uniden America Corporation ("Uniden") ELEMENTS OF WARRANTY: Uniden warrants, for one year, to the original retail owner, this Uniden Product to be free from defects in materials & craftsmanship with only the limitations or exclusions set out below.
WARRANTY DURATION: This warranty to the original user shall terminate & be of no further effect 12 months after the date of original retail sale. The warranty is invalid if the Product is (A) damaged or not maintained as reasonable or necessary, (B) modified, altered, or used as part of any conversion kits, subassemblies, or any configurations not sold by Uniden, (C) improperly installed, (D) serviced or repaired by someone other than an authorized Uniden service center for a defect or malfunction covered by this warranty, (E) used in any conjunction with equipment or parts or as part of any system not manufactured by Uniden, or (F) installed or programmed by anyone other than as detailed by the owner's manual for this product.
STATEMENT OF REMEDY: In the event that the product does not conform to this warranty at any time while this warranty is in effect, warrantor will either, at its option, repair or replace the defective unit & return it to you without charge for parts, service, or any other cost (except shipping & handling) incurred by warrantor or its representatives in connection with the performance of this warranty. Warrantor, at its option, may replace the unit with a new or refurbished unit.
THE LIMITED WARRANTY SET FORTH ABOVE IS THE SOLE & ENTIRE WARRANTY PERTAINING TO THE PRODUCT & IS IN LIEU OF & EXCLUDES ALL OTHER WARRANTIES OF ANY NATURE WHATSOEVER, WHETHER EXPRESS, IMPLIED OR ARISING BY OPERATION OF LAW, INCLUDING, BUT NOT LIMITED TO ANY IMPLIED WARRANTIES OF MERCHANTABILITY OR FITNESS FOR A PARTICULAR PURPOSE. THIS WARRANTY DOES NOT COVER OR PROVIDE FOR THE REIMBURSEMENT OR PAYMENT OF INCIDENTAL OR CONSEQUENTIAL
DAMAGES. Some states do not allow this exclusion or limitation of incidental or consequential damages so the above limitation or exclusion may not apply to you.
LEGAL REMEDIES: This warranty gives you specific legal rights, & you may also have other rights which vary from state to state. This warranty is void outside the United States of America & Canada.
PROCEDURE FOR OBTAINING PERFORMANCE OF WARRANTY: If, after following the instructions in the owner's manual you are certain that the Product is defective, pack the Product carefully (preferably in its original packaging). Disconnect the battery from the Product & separately secure the battery in its own separate packaging within the shipping carton. The Product should include all parts & accessories originally packaged with the Product. Include evidence of original purchase & a note describing the defect that has caused you to return it. The Product should be shipped freight prepaid, by traceable means, to warrantor at:
Uniden America Service
743 Henrietta Creek Rd.
Roanoke, TX 76262
(800) 658-8068, 8 a.m. to 5 p.m., Central, Monday through Friday
Uniden®
© 2014 Uniden America
Corporation
All rights reserved
Printed in China
- Customer Care
- CONTENTS
- GETTING STARTED 4
- UNIDEN GUARDIAN SOFTWARE OPERATION OVERVIEW .... 11
- UNIDEN GUARDIAN SCREEN DESCRIPTIONS .... 18
- REMOTE ACCESS 40
- MAINTAINING YOUR SYSTEM 55
- SOLVING PROBLEMS 57
- ADDITIONAL INFORMATION .... 59
- Lithium-Polymer Battery Warning 60
- Recycling and Disposal Information 60
- FCC Compliance Information 61
- IC Compliance Information 62
- CE Compliance Information 62
- One-Year Limited Warranty 62
- GettInG starteD
- usInG this manual
- What's InCLuDeD
- settInG uP the equIPment
- set uP the monitor
- mount the Camera stanD
- GENERAL GUIDELINES
- Placement considerations
- attaCh the Camera
- settInG uP Your sYstem
- Camera settInGs
- sYstem settInGs
- reCorDInG settInGs
- unIDen GuarDlan soFtWare oPeratlon oVerVleW
- ChanGlnG hoW the LIVe sCreen DIsPLaYs
- usInG the PentaZoom™ Feature
- usInG Your sYstem
- reCorDInG LIVe VIDeo
- PLaYInG BaCK reCorDeD VIDeo
- DeLetInG reCorDeD FILes
- aDDInG neW Cameras
- SOME THINGS TO KNOW ABOUT PAIRING CAMERAS
- PAIR CAMERA
- unIDen GuarDlan sCreen DesCrlPtIons
- oVerVleW
- unIDen GuarDlan settInGs sCreen
- Camera setup sGreen
- PalrInG
- Camera on
- BRIGHTNESS
- reCorDer setup sGreen
- MOTION DETECTION
- The Motion Detection default setting for the cameras included in this system is to Low. The system records for 2 minutes when motion is detected.
- EMAIL ALERT
- Uniden recommends you use Gmail to set up as the outgoing email server.
- SCHEDULE RECORD
- CLEAR A SCHEDULED RECORDING
- netWork setup sGreen
- INTERNET SETUP
- SECURITY CODE
- You must enter a security code to monitor your video from a PC or other device.
- NETWORK INFORMATION SCREEN
- aLarm setup sCreen
- PERIOD SCREEN
- MELODY
- sYstem setup sCreen
- PoWer savinG
- If a motion detection event or scheduled recording begins, the LCD turns back on.
- SCREEN AUTO LOCK
- TIME
- CLOCK ALARM
- Tap
- TIME SETTING
- TIME ZONE
- storaGe manaGement
- The Uniden Guardian System supports up to a 32 GB microSD Card.
- FORMAT
- OVERWRITE
- sYstem uPGraDe
- LanGuaGe
- quICK tIPs sCreen
- remote aCCess
- sYstem requirements
- ConneCtInG to the Internet
- ConneCtInG to the Intranet (home netWorK)
- settInG uP a PortaL aCCount
- enter the DID CoDe
- enter seCurltY CoDe
- reCorD VIDeo
- taKe a snaPshot
- usInG the unIDen GuarDlan 2 aPP
- aPP oPeration
- INFORMATION OPTIONS
- TO ENABLE EVENT NOTIFICATION
- TO VIEW RECORDED FILES FROM YOUR MOBILE DEVICE
- los °
- DOWNLOAD
- system setuP icons
- to Delete FILES
- maintainInG Your sYstem
- uPGraDInG Your unIDen GuarDlan FIRMWare
- taKInG Care of Your harDWare
- monitor
- Cameras
- manaGlnG reCorDeD FILes
- CoPYInG FILes From the mICrosD CarD to the ComPuter
- soLVInG ProBLems
- aDDItlonaL InFormation
- Lithium-Polymer Battery Warning
- Recycling and Disposal Information
- FCC Compliance Information
- Part 15 Compliance Statement
- RF Exposure Information
- IC Compliance Information
- Radio Equipment Notice
- CE Compliance Information
- One-Year Limited Warranty
- Uniden®
Brand : UNIDEN
Model : G755
Category : Security Camera