CyberPad 754TPC - Tablet IVIEW - Free user manual and instructions
Find the device manual for free CyberPad 754TPC IVIEW in PDF.

User questions about CyberPad 754TPC IVIEW
0 question about this device. Answer the ones you know or ask your own.
Ask a new question about this device
Download the instructions for your Tablet in PDF format for free! Find your manual CyberPad 754TPC - IVIEW and take your electronic device back in hand. On this page are published all the documents necessary for the use of your device. CyberPad 754TPC by IVIEW.
USER MANUAL CyberPad 754TPC IVIEW
Thank you for purchasing iview products, for more information or to purchase new products, visit us on WWW.IVIEWUS.COM or call: (909) 627-9888.
natural_image
Close-up of a tablet device with blue background and partial circular icons (no readable text)IVIEW-1030TPC (10" 4.3 Tablet PC)

natural_image
Illustration of two figures in a dimly lit room with abstract light patterns (no text or symbols)IVIEW-975TPC (9.7" Tablet with Dual Core)
natural_image
Illustration of a tablet device displaying abstract digital patterns (no readable text or symbols)iVIEW-900TPCII (9" Tablet PC)

natural_image
Digital tablet displaying a night cityscape with moonlight and buildings (no visible text or symbols)iVIEW-795TPC (7" Tablet with Dual Core)

natural_image
Green screen with blurred white line and black border (no text or symbols)IVIEW-792TPC (7" Tablet with Phone)
IVIEW-760TPC (7" Tablet with Leather Case)

natural_image
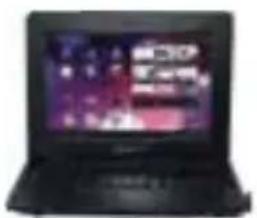
Blurred abstract image with indistinct shapes and colors, no readable text or symbolsiVIEW-754TPC (7 Tablet PC)
natural_image
Black smartphone with extended screen showing time, no visible text or symbols on device bodyVIEW-500TPC (5" Tablet with Phone)
iVIEW®
Enjoy life with Simplicity!
iVIEW-1010 NB (10" Netbook)
natural_image
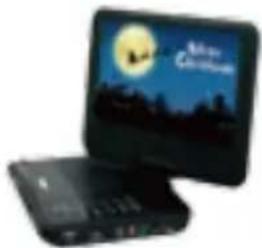
Two black rectangular electronic devices with a full moon and silhouetted landscape in the background (no visible text or symbols)iVIEW-980PDVX (9" Portable DVD)

natural_image
Illustration of a vintage television with a screen displaying a light bulb and antenna (no text or symbols visible)iVIEW-368PTV 3.5" ATSC Portable TV

natural_image
Black rectangular electronic device displaying a group photo of smiling people (no visible text or symbols)iVIEW-700TPC 7" ATSC Portable TV

natural_image
Modern flat-screen TV displaying a red sports car on its side (no visible text or symbols)iVIEW-1900LEDTV 19" LED TV

natural_image
Black rectangular electronic device with no visible text or symbols on its bodyiVIEW-3000STB Converter Box

natural_image
Black cylindrical object with rounded edges, resembling a container or lamp (no visible text or symbols)iVIEW-HFR2-SU3 (eSata 4 Bay Enclosure)
natural_image
Exterior view of a modern office building (no signage)iVIEW-1000KOD Karaoke on Demand
iVIEW's new 7" CyberPad 754 TPC Tablet PC is the next generation of mobile internet device, providing access to the web, customization through Android Apps, and viewing of multimedia content. You are a ble to a c c e s s easily and download thousand d s of Apps from the An droid Play Store and the King Kong Apps Market to tap your need, such as news, weather, or local business info, enjoying your favorite movie clips, watching some YouTube videos, playing games, or just kicking back and listening to some music, working on t h e get-go wi th Office productivity software. With built-in DDR3 of 512MB, 7" CyberPad speed is faster than most of the tablet pc in the market and with memory of 4GB, you may store plenty of pictures, movies, and documents. Expansion storage is available via Card Reader slot, up to 32GB. iVIEW- 754 TPC is your all-in-one tablet that you can't live without.
Notes:
* This is a high-density electronic product; please do not dismantle it by yourself.
* Avoid strong beat and collision.
* Avoid using this product in the following environments: High and low temperature, humidity, dusty, with strong magnetic and long-term exposure to the sun.
* Wipe the product shell by using dry wet cotton cloth gently; the use of other chemical cleaning is prohibited. This product should keep away from water drop and water splash, so cups filled with liquids should not be placed near the product.
* Use the headset long time, high volume may cause permanent damage to hearing.
* Do not use headphones when going across a road, driving a motorcycle or bicycle, in order to avoid traffic accidents.
* Please use permitted battery, charger and accessories only, the use of any other type of product would be a breach of warranty regulations, and may be dangerous.
* Please deal with waste machinery and accessories according to local environmental regulations.
* If you have any questions in the process of using of the product, please contact the local dealer or contact Wiltronics customer service center directly.
* For the smeared memory loss that is caused by product damage, repair or other causes of product damage, repair, the company is not responsible for it, so please follow the user's guide and timely backup.
Content
- Appearance and button....2
2.Start-up and shut-down....4 - Desktop....5
- Buttons....6
5.Main menu operation....7
system settings....7
* Time/Date setting....8
* Brightness....9
* Screen standby....10
* Wireless& network....10
* Install, unload, run the application....12
* Backup & reset....13
* Storage....14
* Language & keyboard....15
* File Manager....15
6 Network....18
7 Music playback 19
8 Video playback....20
9 Photo browse....21
10 Wallpaper 22
11 Record 23
12 Photograph....24
13 E-mail 25
14 External device....28
Features....29
1. Appearance and button
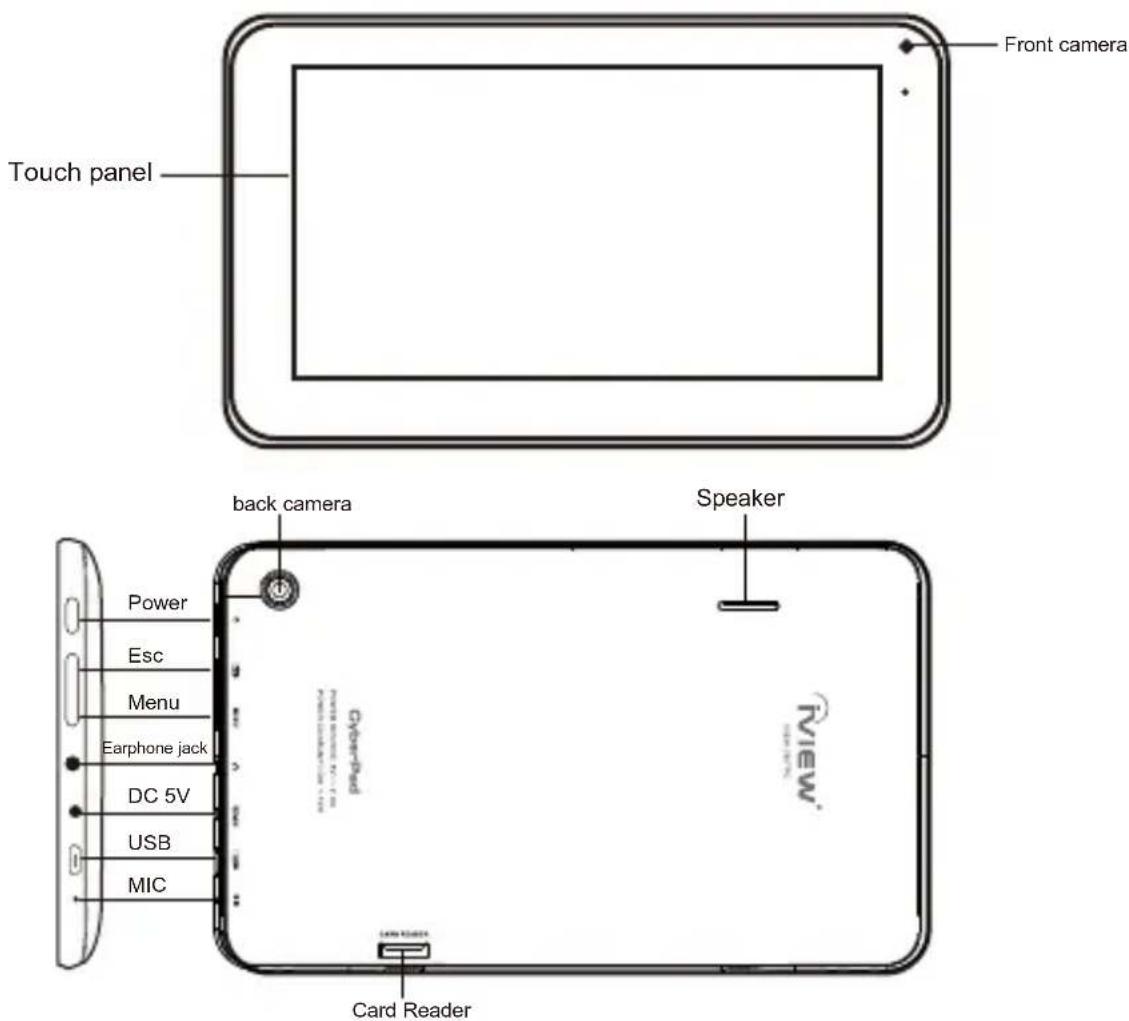
1.1 Touch panel
7"Capacitive touch panel: During the operation, you can click and drag items on the touch panel.
1.2 POWER
To power on: Press and hold the power button, the system will enter the main interface.
To power off: In the main menu interface, press the power button for about 5 seconds to power off, the system will appear "power off" option, click "ok" and you can safely power off.
Lock screen: Press power button to lock screen or unlock screen.
【Remark】: When the power ran out, the system will power off automatically.
1.3 ESC
Short Press ESC button will return to the last interface, long Press ESC button will return to the main interface.
1.4 Volume +, Volume-
The buttons Volume +/Volume located on the side of the tablet which allow to adjust volume.
1.5 Earphone jack
3.5 mm standard earphone jack.
1.6 Card Reader
Video output interface.
1.7 Micro SD Card
Card Reader Slot: External micro SD card.
1.8 USB
USB jack: you can use it to connect the computer for data transmission, charging and external connection USB flash drive.
1.9 Reset
In the case of software breakdown, long press the power button for 5 seconds to reset the tablet sysetm.
NOTE: It is not recommended to use the RESET key of ten since the table system may be damaged.
2. Start-up and shut-down:
Startup: To press the power key and the system will enter the process of Start-up, as shown below:
Startup Logo, in the process of startup

Then the system enters the default home interface.

Shutdown: Press the power key then pop-up options will be on the desktop, choose the option of Power off as shown below.
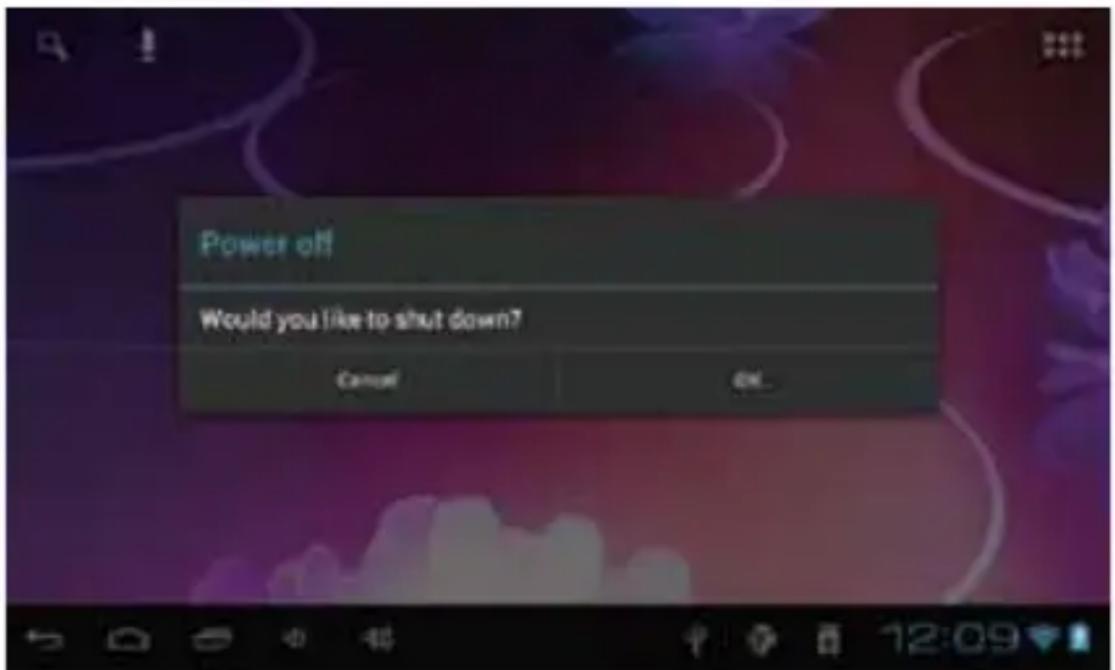
Click OK to shutdown
Sleep: In the normal state operation of the machine, press the power button, enter a state of dormancy, at this time, the screen will be closed. Another short press on the power button will resume to normal mode. When CyberPad is not in use you can start this function to reduce power consumption.
3. Desktop
After the normal startup of the system is completed, you can see the Android 4.0 desktop(below). The default desktop is consisted of quick search bar, status bar, and menu label icon.
The status bar is used to display the network status of current system, battery power, time and other information.
Quick search box is used by the typing keywords to do the Internet search. The main menu tag is in the right middle side of the screen, click it and the default menu bar can be expanded.
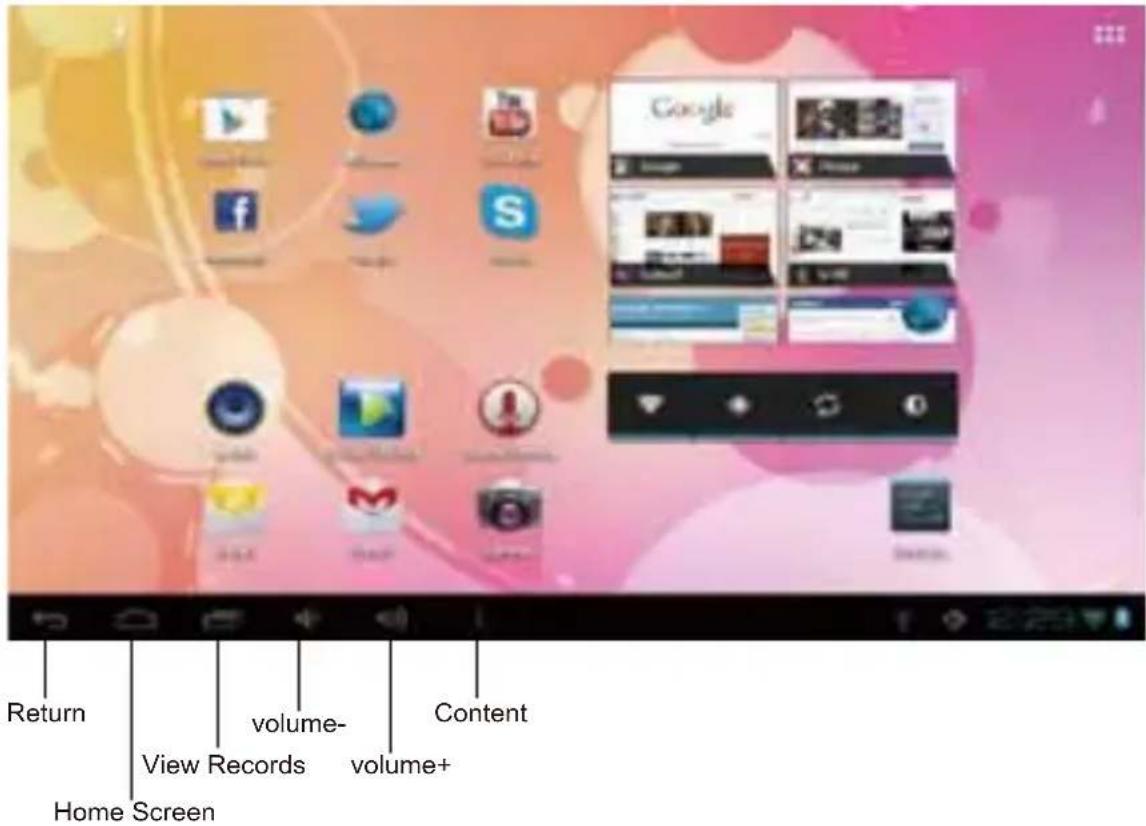
4. Buttons
Keys used in Android systems process:
The volume keys:Volume+,Volume- in the taskbar can be used for Volume change.
The power button: Press long time for switching machine. Press quickly to enter or leave the state of dormancy.
Menu key: Return or select the main interface.
Return key : Return to the last interface .
5.Main menu operation
Press the main menu tag on the main menu, as shown below:
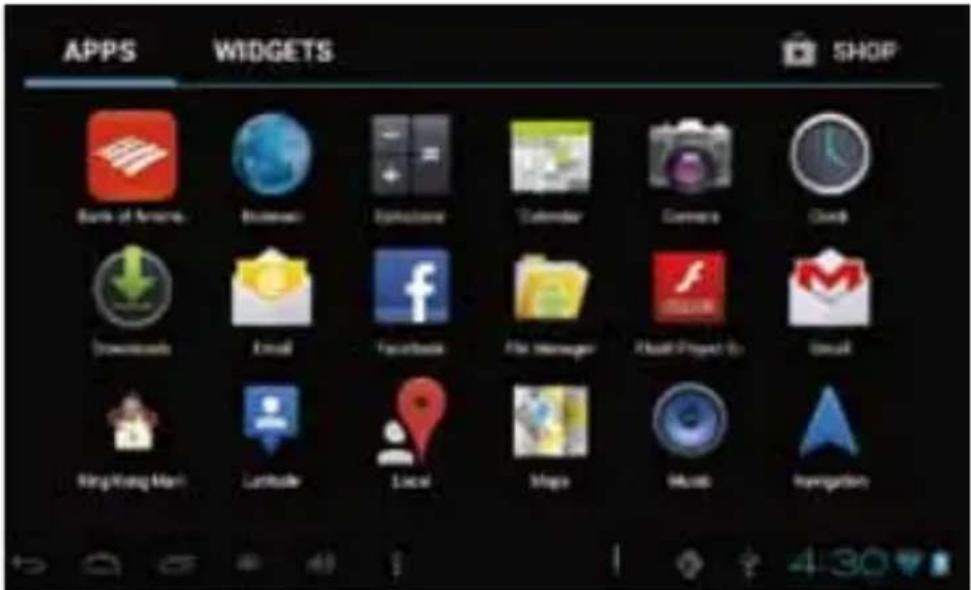
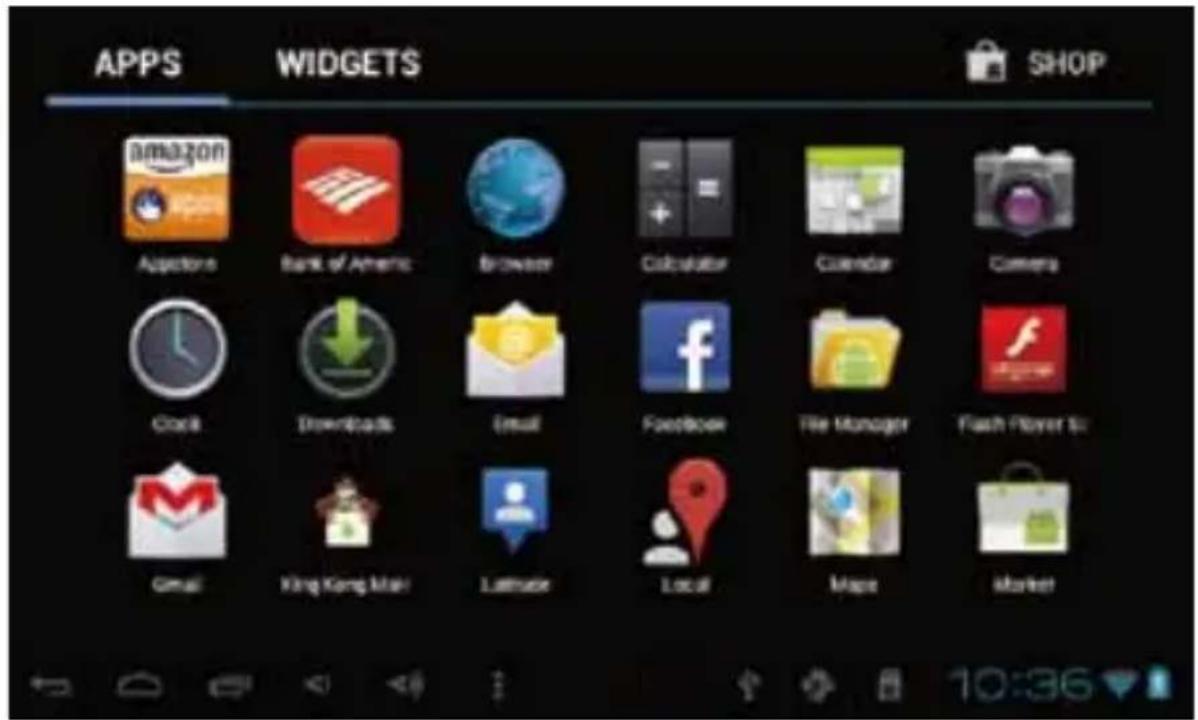
In the main menu, you can set the system, operate the existed application, install a new application, and start touch calibration, play music and video, browse webpage, play game and other operations
system settings
Click on the main menu interface in the "Settings" icon, and then open the system settings interface, as shown below:
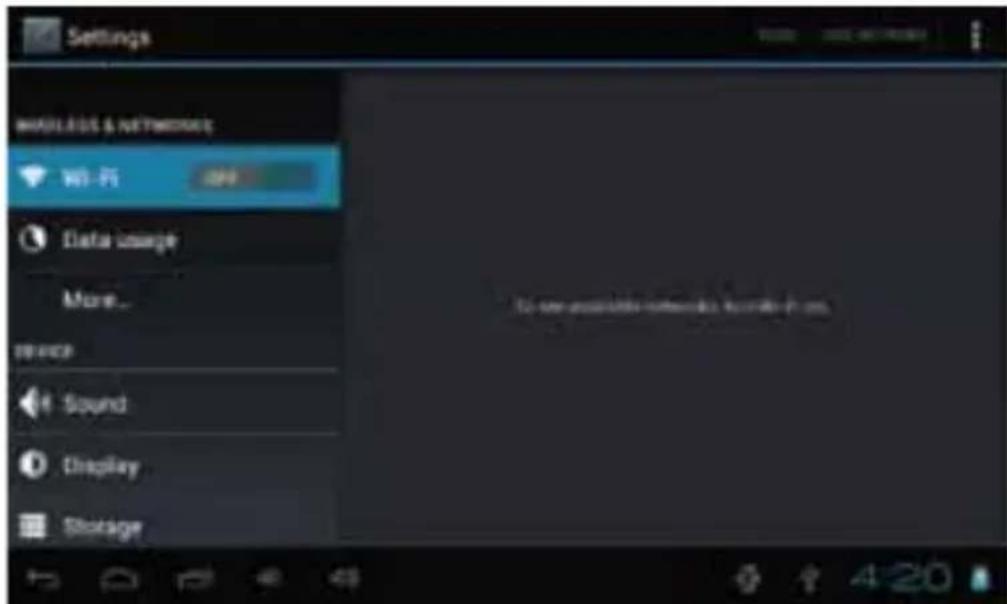
Select the relevant items to do corresponding operation, for example:
* Wireless&network
* Sound&Display
* Date&Time
* The equipment and so on
• Time/Date setting:
In the interface of the setting, select "the time and date settings" to enter the date and time settings interface:
You can choose the automatic mode by using the network time.
You also can choose to set the date, select time zone, set time, select date format, set date and other information
For example, choose the set date, as shown below:
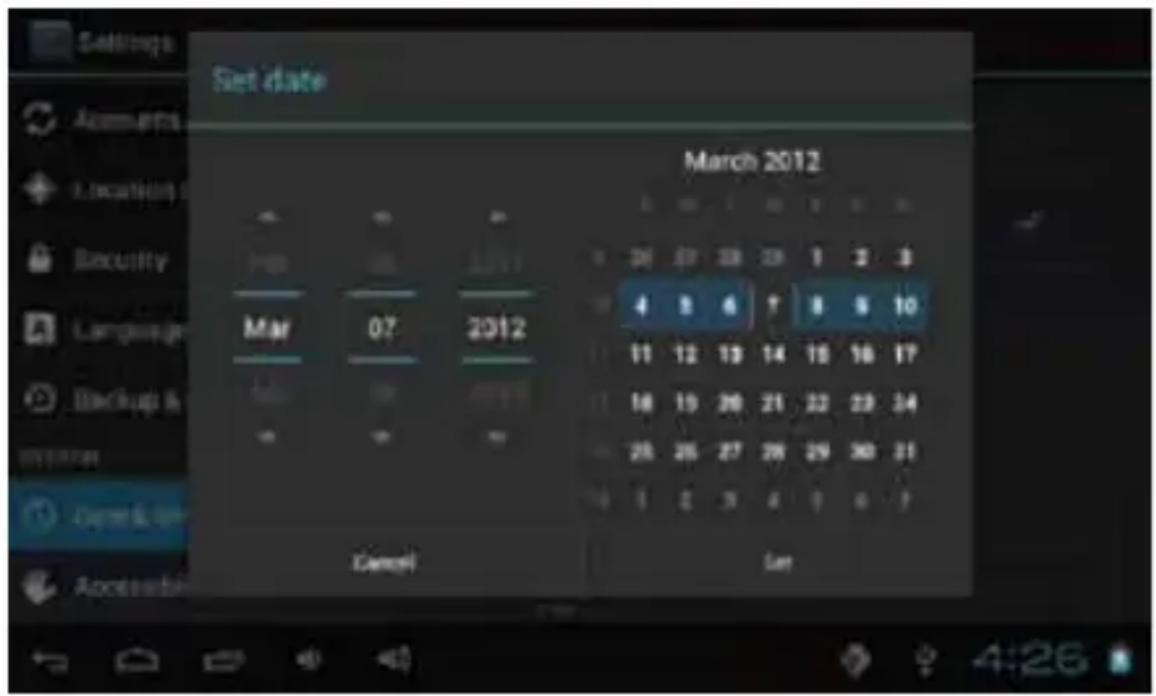
Choose+: It means increase of 1 unit ;
Select-:It means it reduces 1 unit ;
You can also choose the number to enter the input pattern.Directly input the number, and the n select the button done, as shown below:
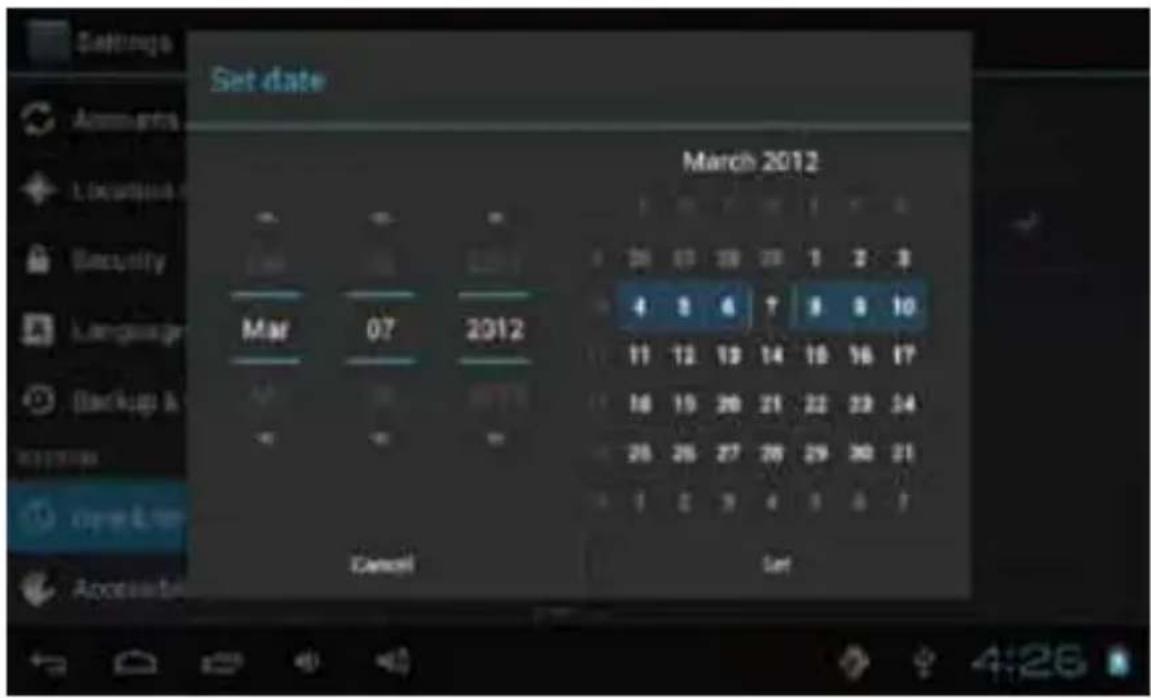
Select"done". if the input number is legitimate, then the operation is successful, and the system will use the new settings.
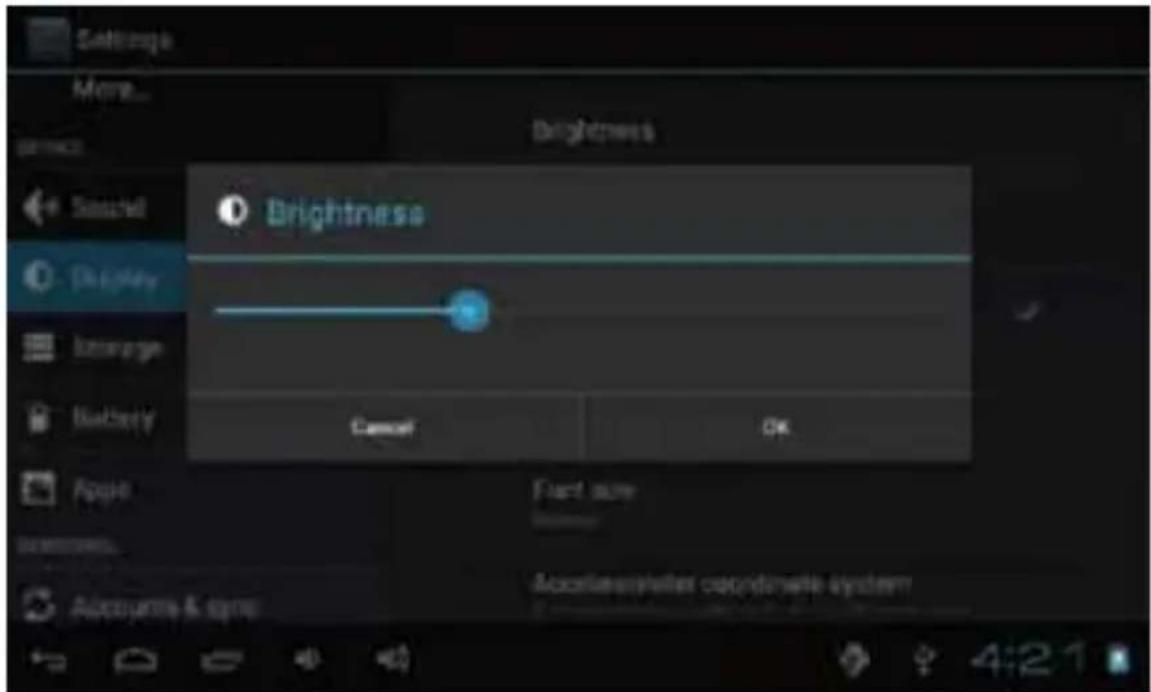
- Brightness:
In the setting of the interface to select "display settings" into the display settings interface, roll drop-down lists to select "Brightness" as appeared in the following dialogue.
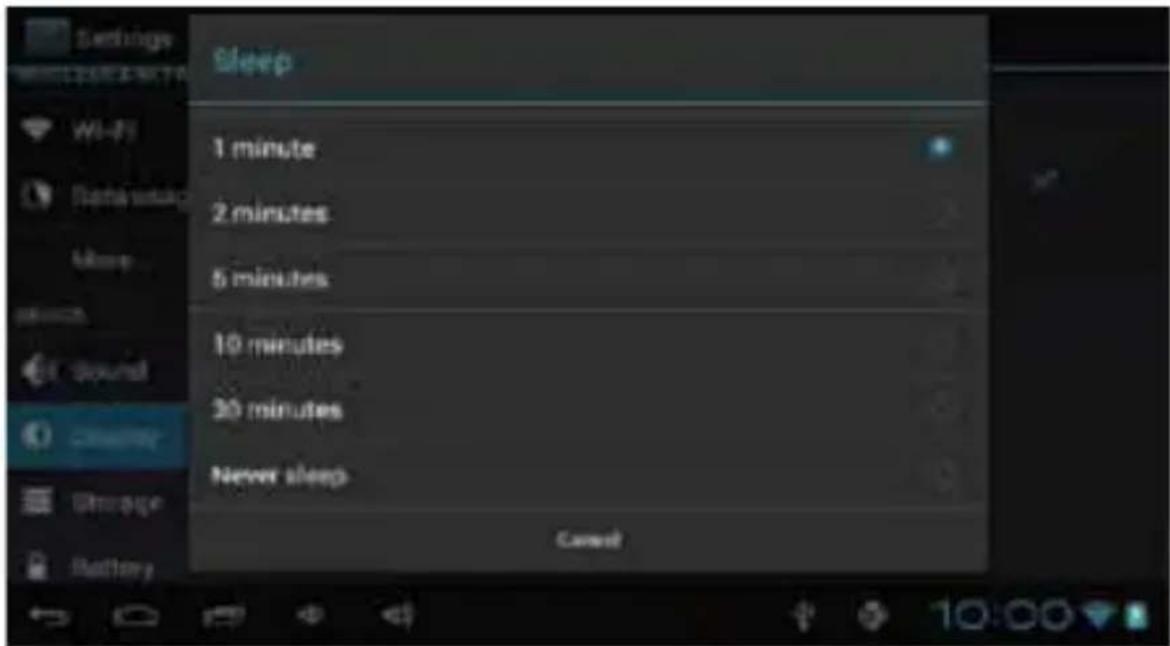
- Screen standby:
Screen standby :You can set the time for the screen standby function to occur. After it starts it will lock the screen the screen saver appears.
In the setting of the interface to select "display settings" into the display settings interface, roll drop-down lists to select "screen standby: as appeared in the following interface.
Note: During video playback, the screen standby function is automatically inhibited.
- Wireless& network:
Click on the "Settings" icon in the main menu, click on the "wireless and network" into the "wireless and network" settings. Click on the "WIFI" column and WIFI function can be started at once. Click "WIFI settings" column can enter "WIFI setting interface", as shown below:
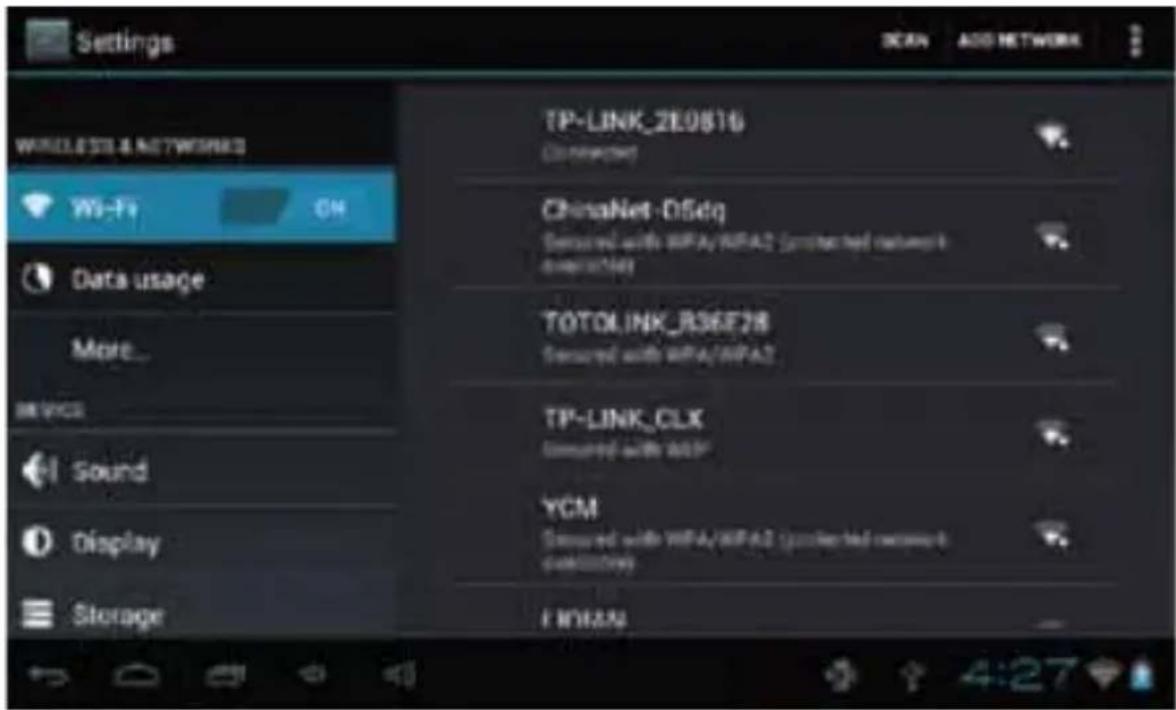
In the WIFI" interface(Pictured above), by click on the WIFI column you can open and close the WIFI function. Click "network notification" to list the wireless router that is searched by Cyberpad .Click the searched wireless router and setup window will pop-up. follow the prompts to complete the WIFI network links.
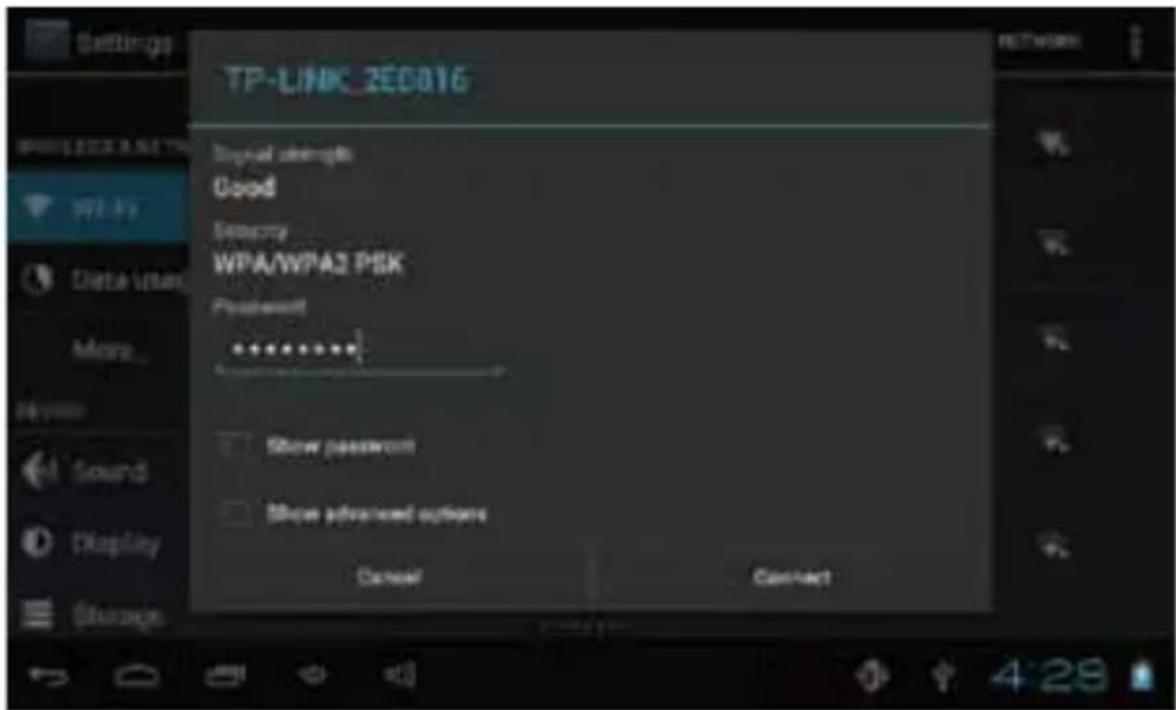
After you connected WI-FI as shown above, the following image will appear:
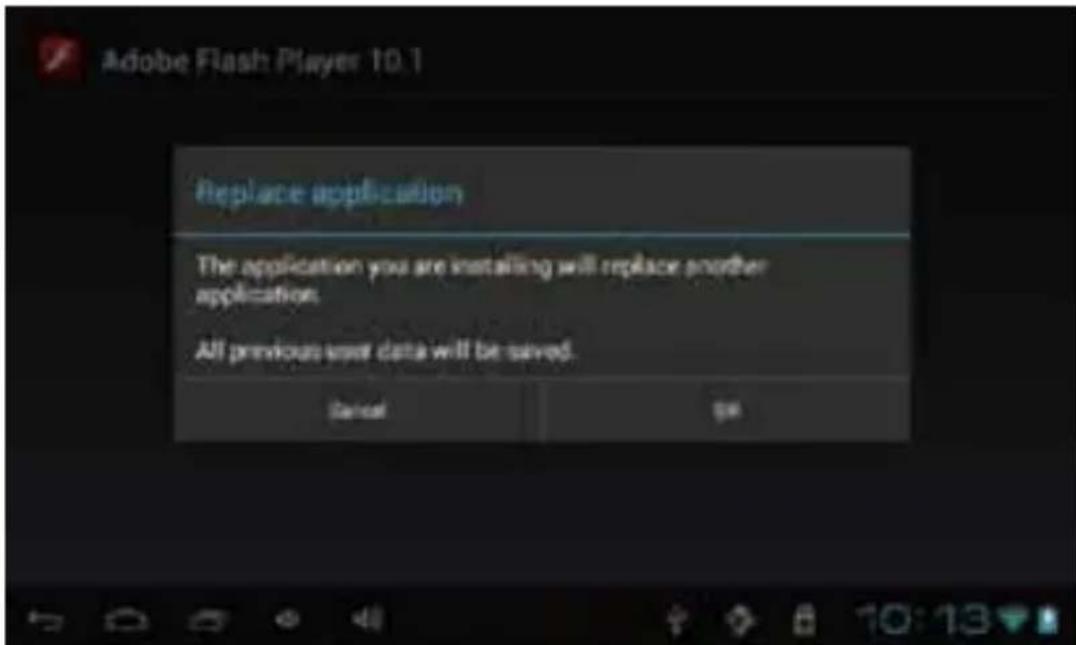
• Install, unload, run the application
*Android installation: There are a variety of ways to install applications, for example, you can click on the Apk file directly and it will automatically be installed. in case that it is the third party programs installation the system may identify it as unsafe and will need the following procedures for installation with the assistance of the Appinstaller.
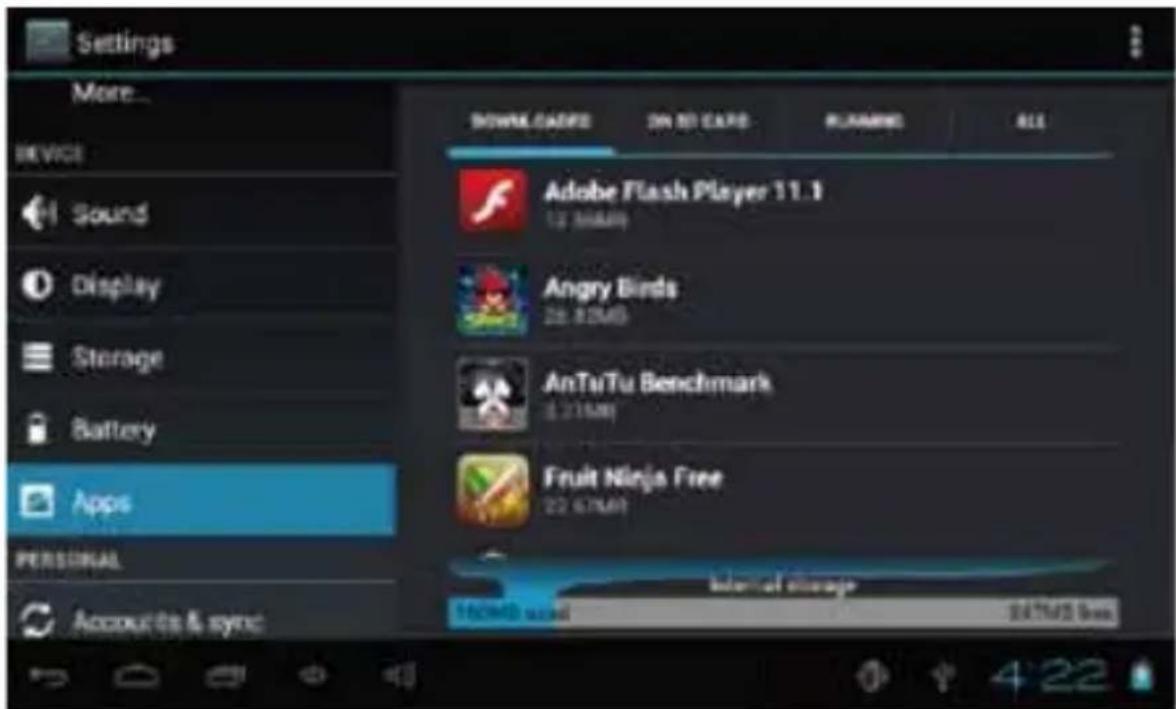
Enter the menu and select Settings-Application
How to uninstall?
-
enter "setting">"Application">"Manage application" And then there will be installed the program list.
-
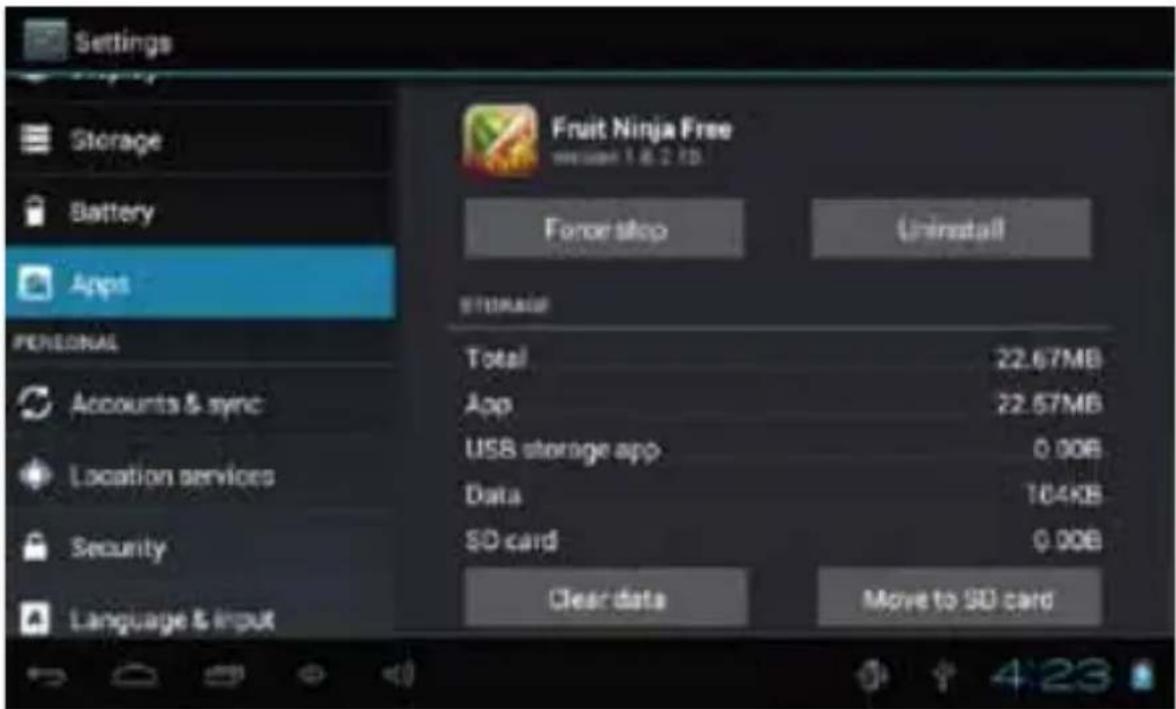
Click you want to uninstall icons, will enter the following interface.
-
Click Uninstall, then you can felete the application.
- Press"Unknown sources" and then "OK" the following image will appear.
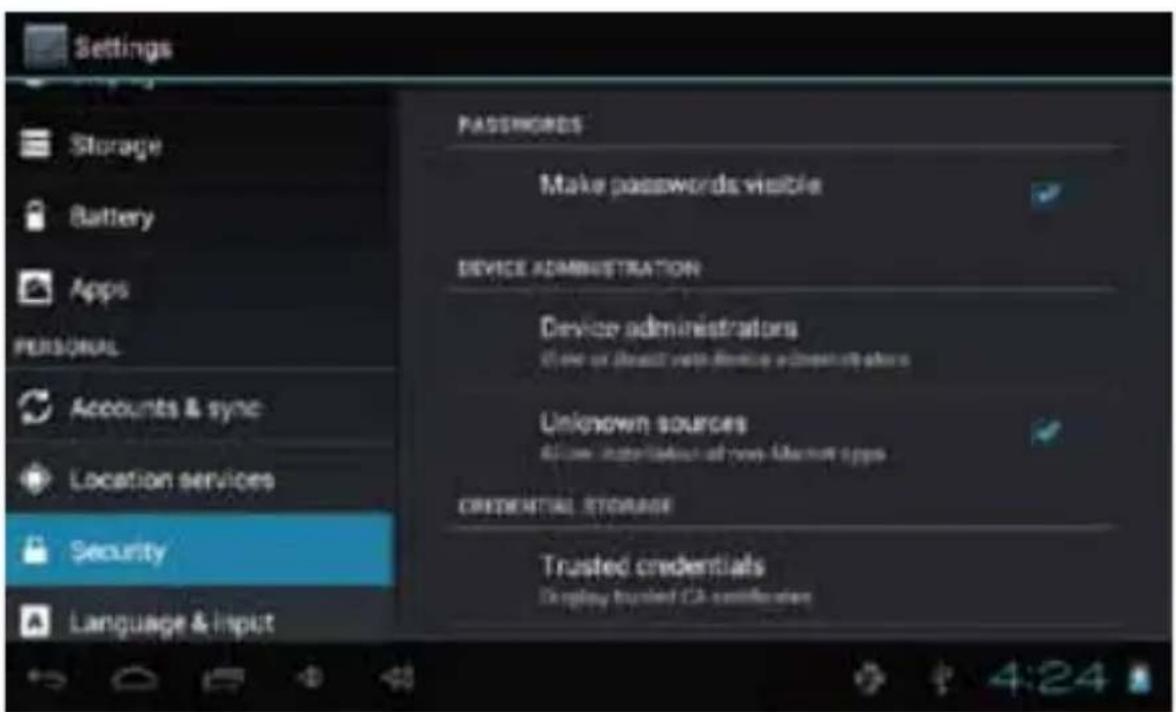
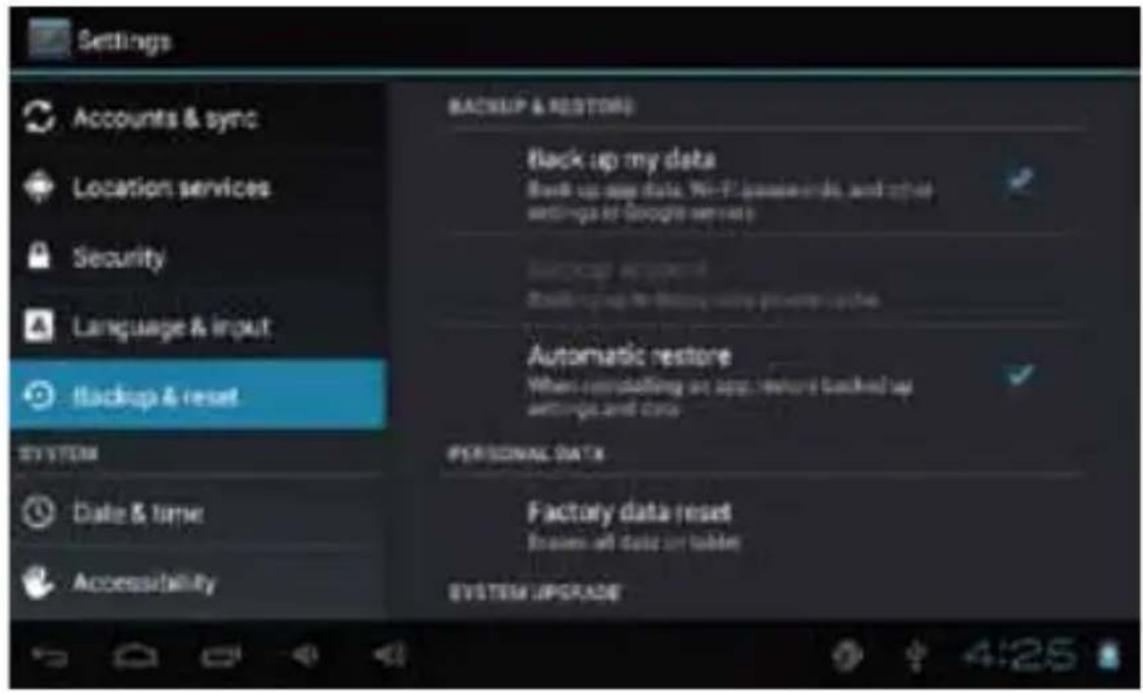
- Backup & reset
Factory data reset
- Storage
Remove TF card, view of the available storage space.
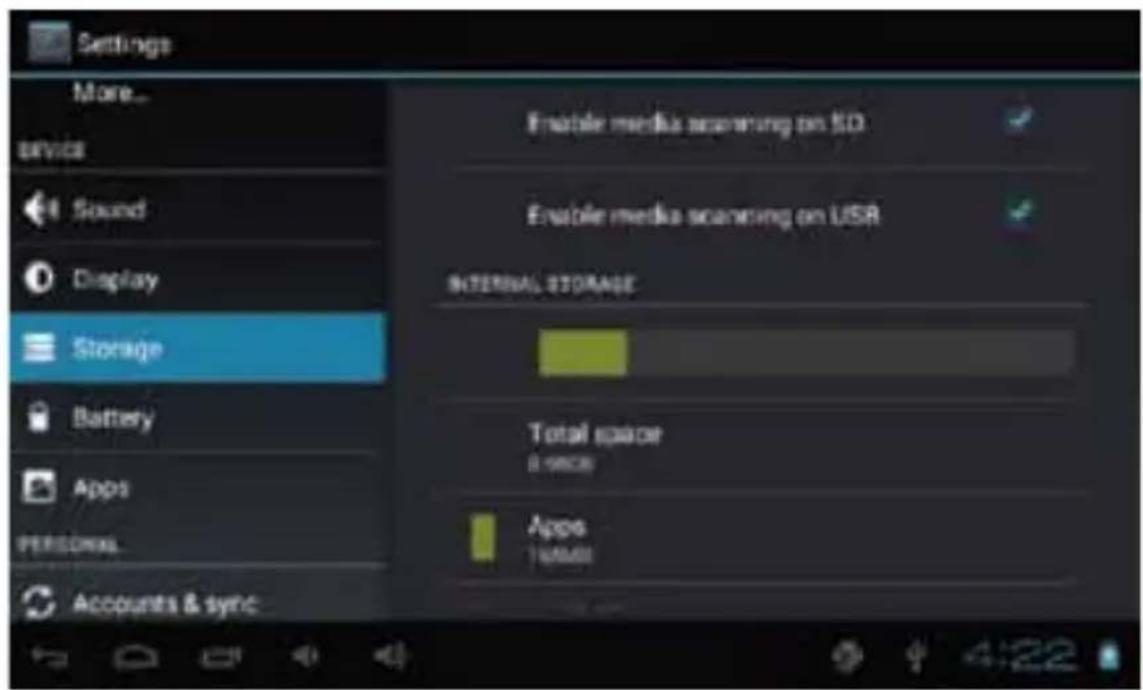
【Remark】: pls touch option"delete SD card", so that can safety to romeve SD card.
• Language & keyboard
Setting: (Language), text input and automatic error correction options;
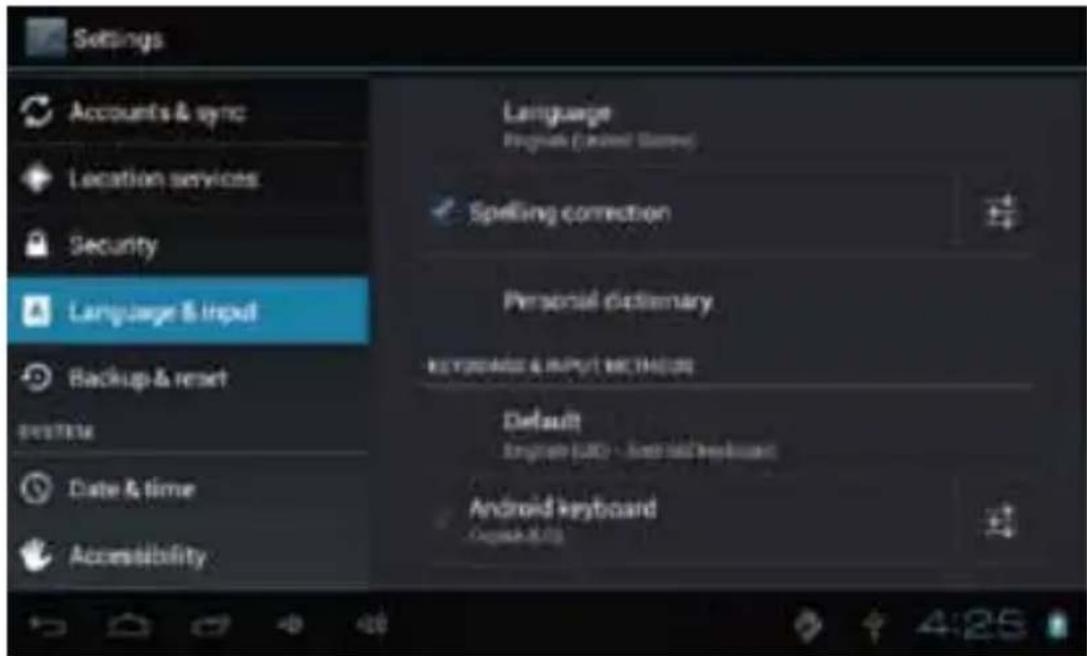
Select Language: 54 kind of national languages are available.
Remark: Android system can support 54 kind of language, now manu interface just suport 14 language.
Android keyboard: Android keyboard setting
Sound on Key-press
Auto-capitalisation
Show suggestions: Display suggested words while typing
Auto-complete: Specebar and punctuation automatically insert highlig.
- File Manager
Copy the APK software program that will be installed to Micro SD card or NAND FLASH. Select" App installer"icon in the main menu.
The first time to enter the program installation, the system defaults NAND Flash as the search directory.
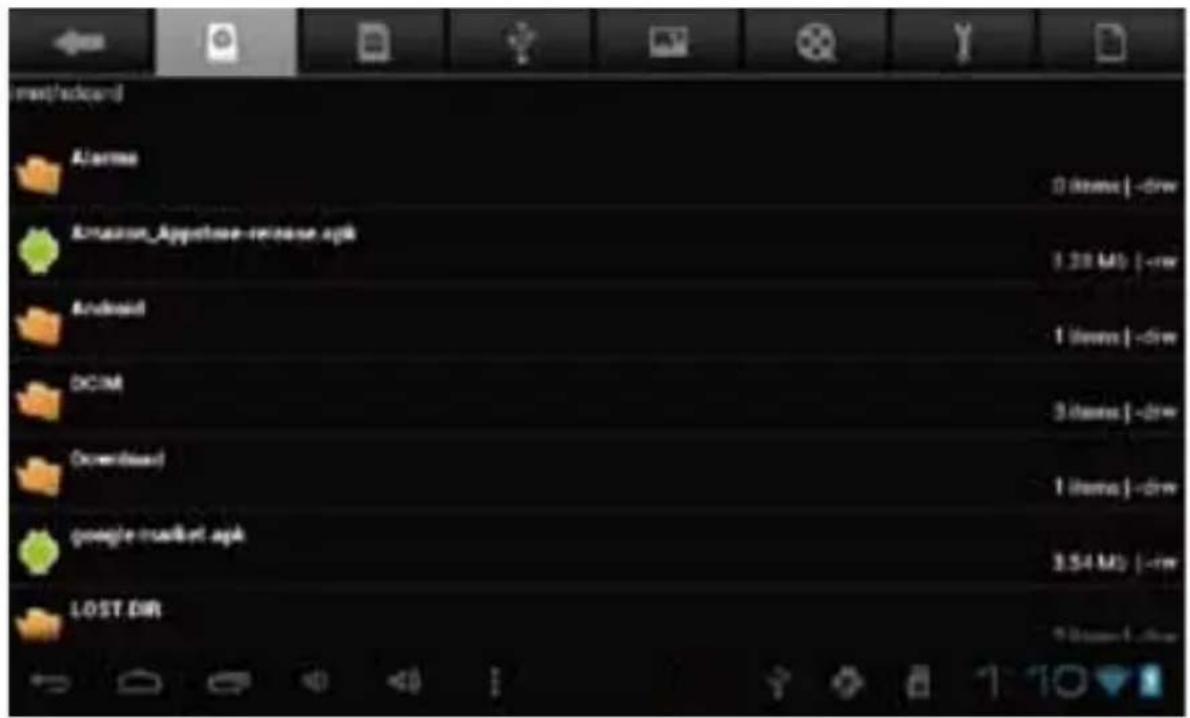
If your APK setup application is on Micro SD card. The system will automatically search the directory from Micro SD Card.
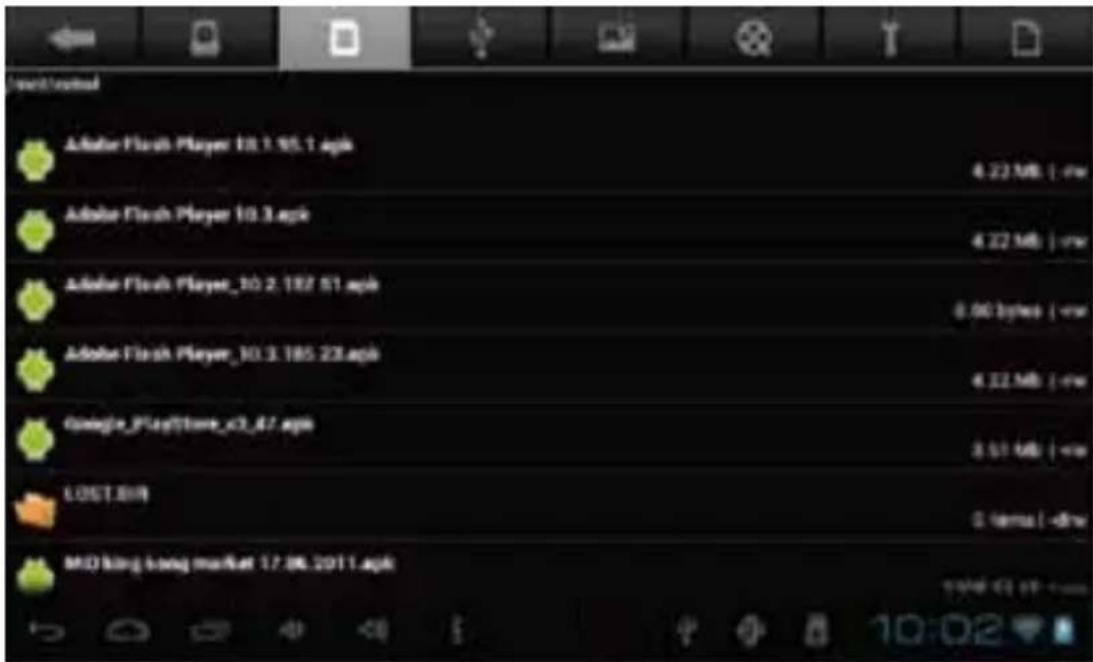
Install the searched application
The user can do on-line installation through "market", or download and install by the computer, or through a built-in browser download and install online.
*Uninstall the application: You can use the third party software management tools or use the built-in Android application management software.
Select"Settings"/"application"/"management application", and select the corresponding installed applications to check the program.
6.Network
Webpage browsing:
When the network is connected, open the webpage browser and enter the URL, you can browse.

Webpage can be free scaled by the scaling controller, as shown below:

Online video:
Users can use the "market" or other ways to download online video player software, online TV player software, online music software, and then install in the machine. To open the installed software, you can watch online video or online TV, and listen to online radio.
Users can also download other third party network application software, including the webpage browsing, video player, website client, instant messaging and other software.
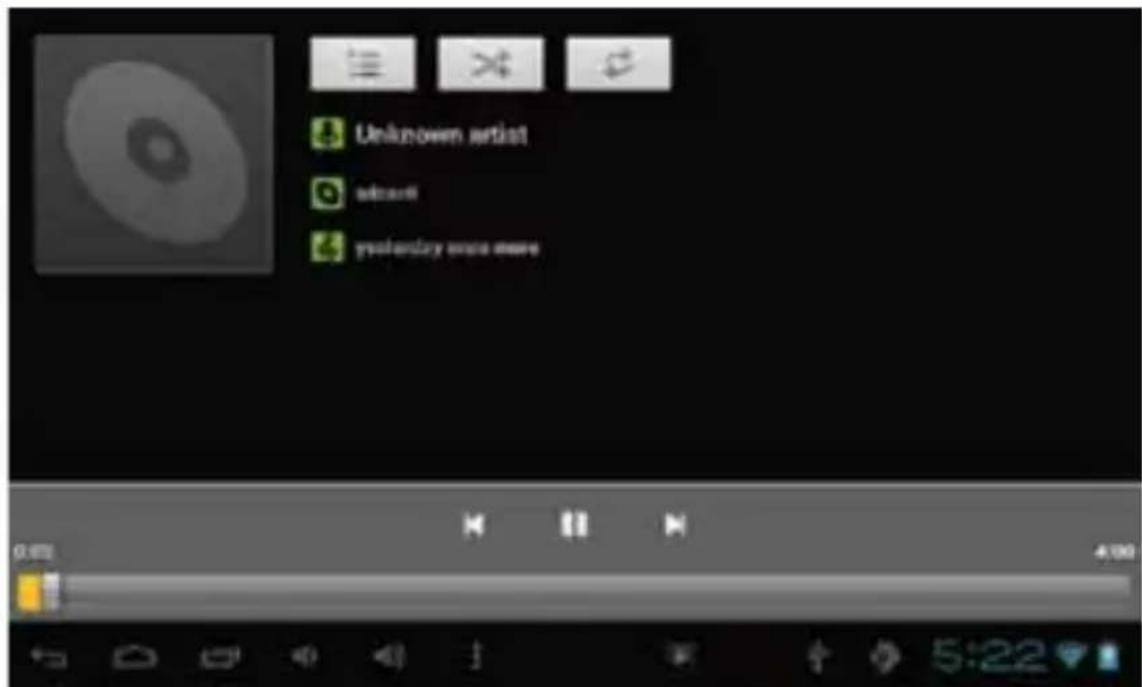
7.Music playback
Click on the "music" icon in the main menu, and then enter the music player interface. The default list system in the user data area for all audio files is shown as below:

You can use synchronous USB to input audio file, or by inserting a Mirco SD card with audio file to input audio files. You can also use the network to download the audio file.
Select the corresponding tag, and check the interface as "artists","album",and "song" and so on to play the song.
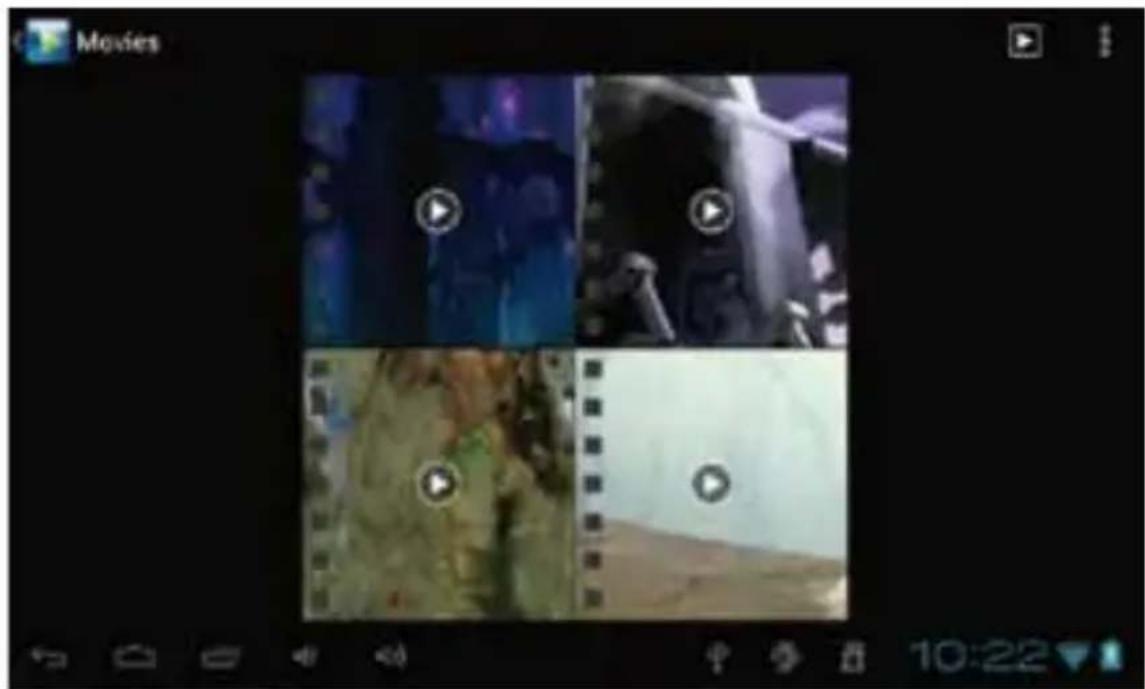
8.Video playback:
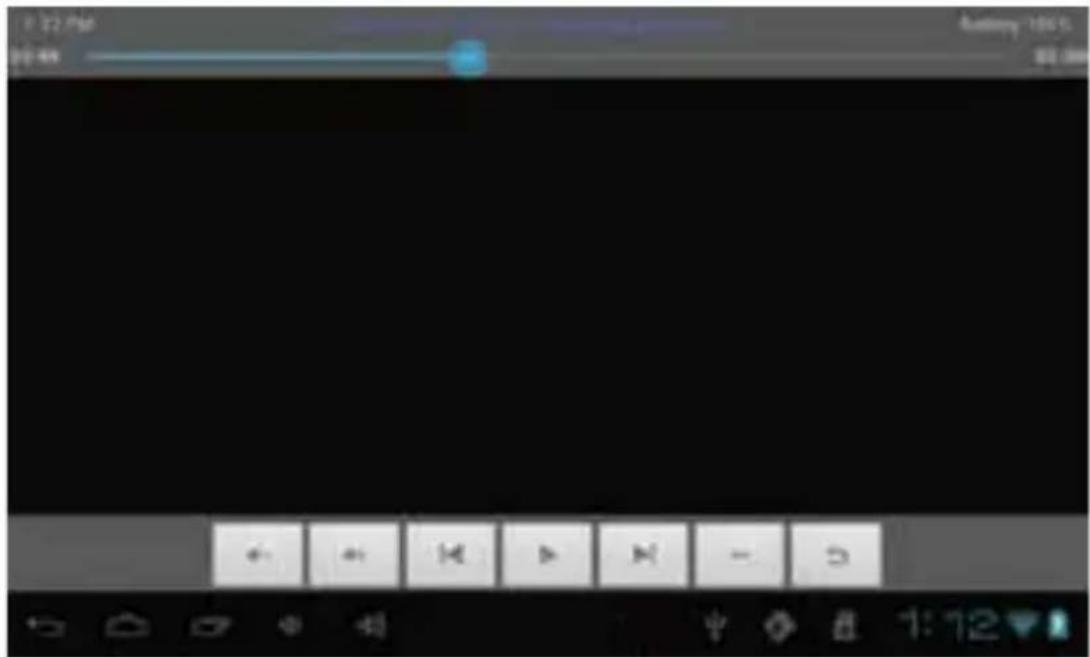
Click on the "Video player" in the main menu, to enter the "Super-HD player" main interface. It lists all video files and image files as shown below:
Select the video file and enter the video playing interface, as shown below. Select "play", "stop", "fast forward", "rewind", "progress" and other control keys to control the payback schedule.
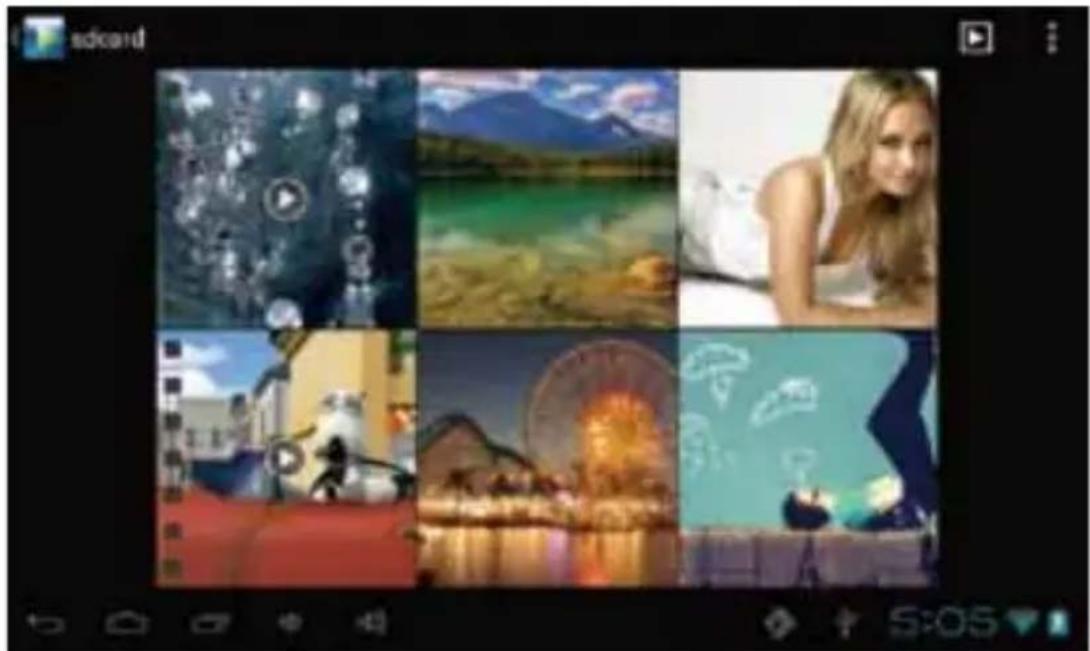
9. Photo browse
Click on the main menu"Super-HD player"to enter the"Super-HD player" interface.It lists all the picture files and video files as shown below:
natural_image
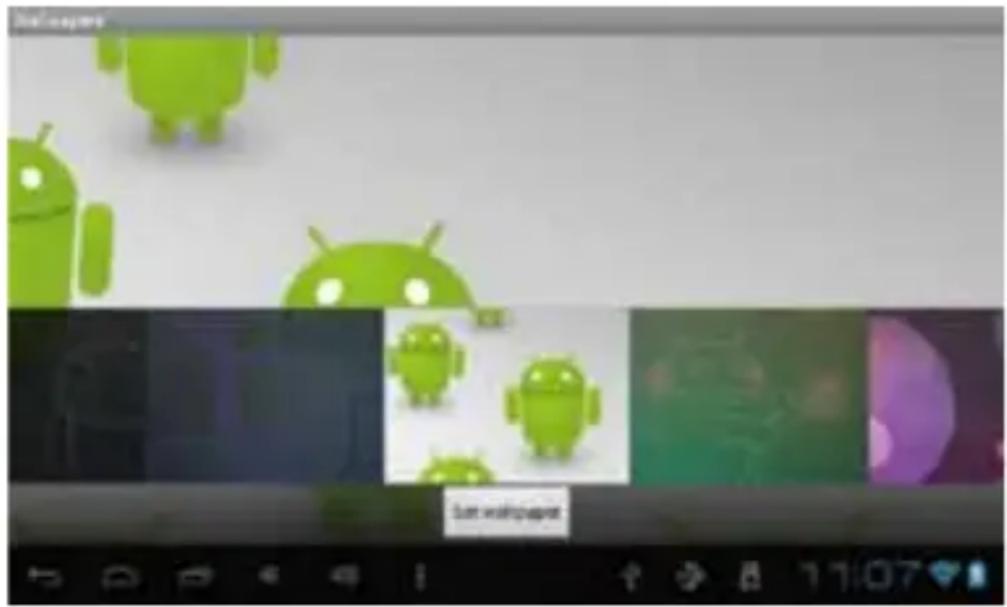
Grid of six video thumbnails showing diverse scenes including mountains, a girl, a robot, a Ferris wheel, and a castle (no text or symbols visible)Select a picture file; enter the picture play interface, as shown below. Select"zoom", "narrow" "set" and "delete" operation.

natural_image
Nighttime cityscape featuring a roller coaster, palm trees, and illuminated Ferris wheel (no visible text or symbols)10. Wallpaper
The system supports static wallpaper, and 3D wallpaper. In the desktop interface, press down the Menu key for pop-up menu options, select "wallpaper" and "choose the wallpaper source" selection box:
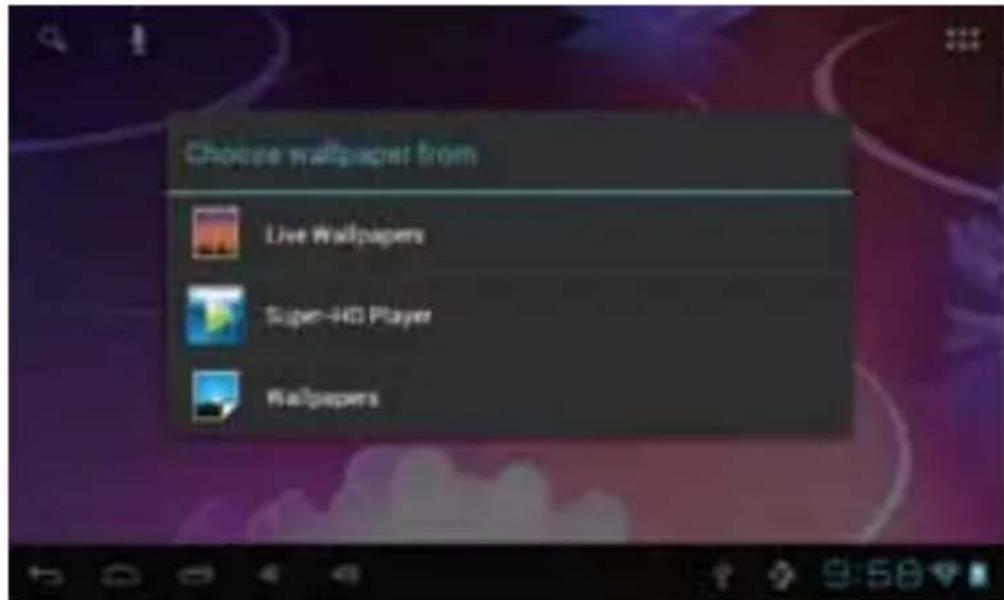
There are the following options: Select "wallpaper" to customize wallpaper.
Select the "dynamic wallpaper" to use the system-supplied 3D wallpaper.
Select the"Gallery"to choose a picture supplied by the system as the static wallpaper.
Or press on the screen and dialog box for the following to pop:
Into the above dialog box, click on the "wallpaper" set;
The following options will display:
Select"wallpaper" to customize wallpaper.
Select the "dynamic wallpaper" to use the system-supplied 3D wallpaper.
Select the "Gallery" to choose a picture supplied by the system as the static wallpaper.
11. Record
Click on the "sound recorder" icon in the main menu and enter the "sound recorder" main interface as shown below:
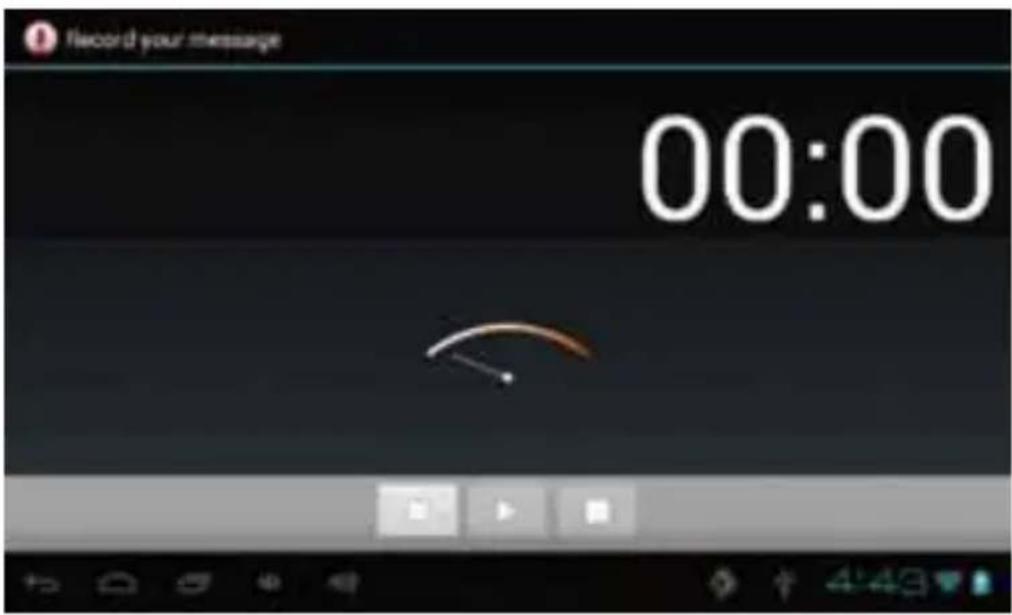
Select the "recording" button to record and after recording is completed press"stop" button. At this time you can select the "play" button to play the recorded sound. Select"Use this recording"button to save the recording, so that you can find the corresponding audio files in "NAND"; if you do not need to save, you can select the "give up" button.
12. Photograph
Click on the "camera" icon in the main menu and enter the "camera" main interface as shown below:
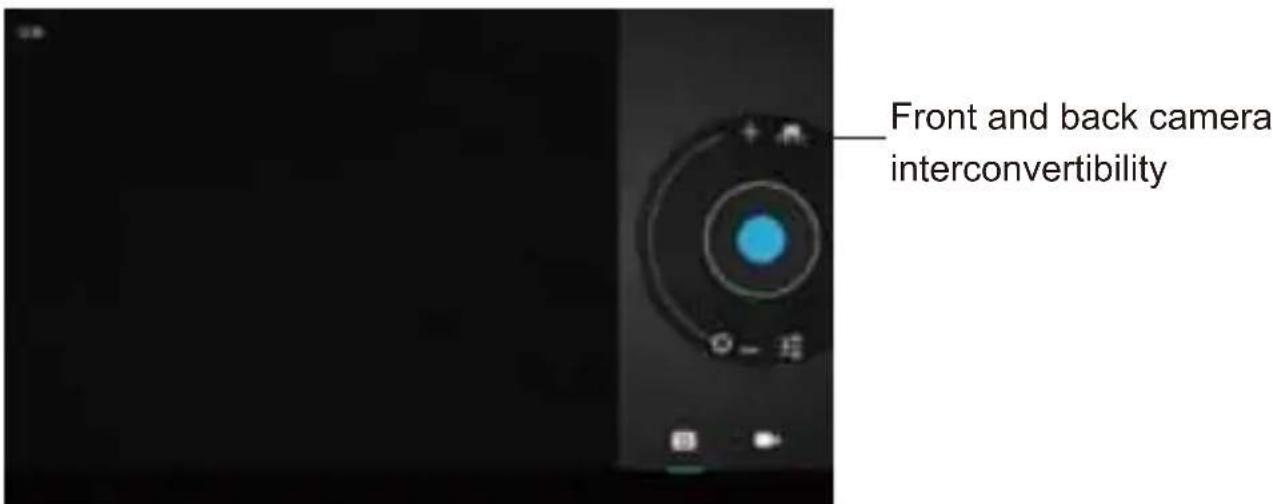
Click on shutter in the camera

natural_image
Close-up of a camera lens with a red center and control buttons (no readable text or symbols)13. E-mail
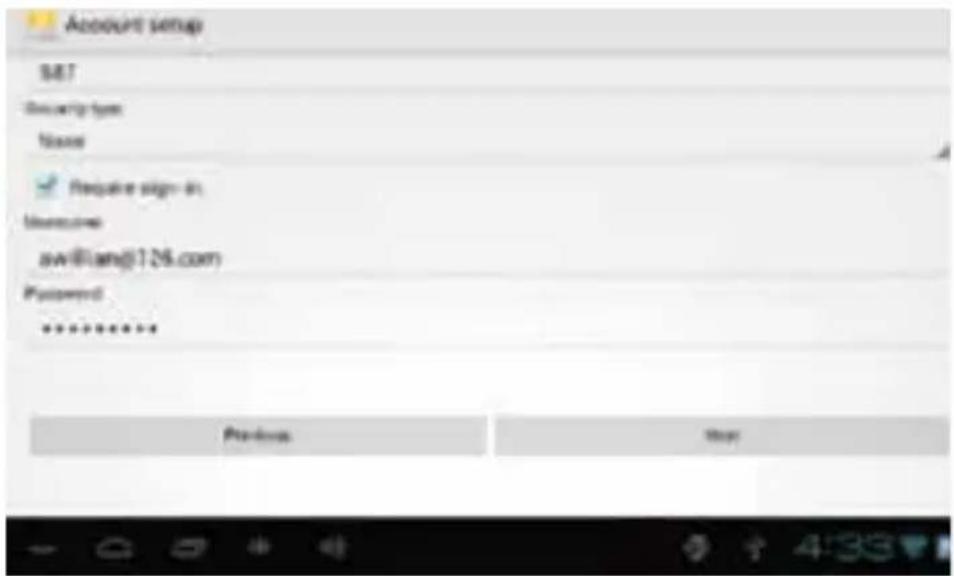
Click on the “e-mail” icon in the main menu to enter email client. Allocation of account information will be required the first time. As shown below:
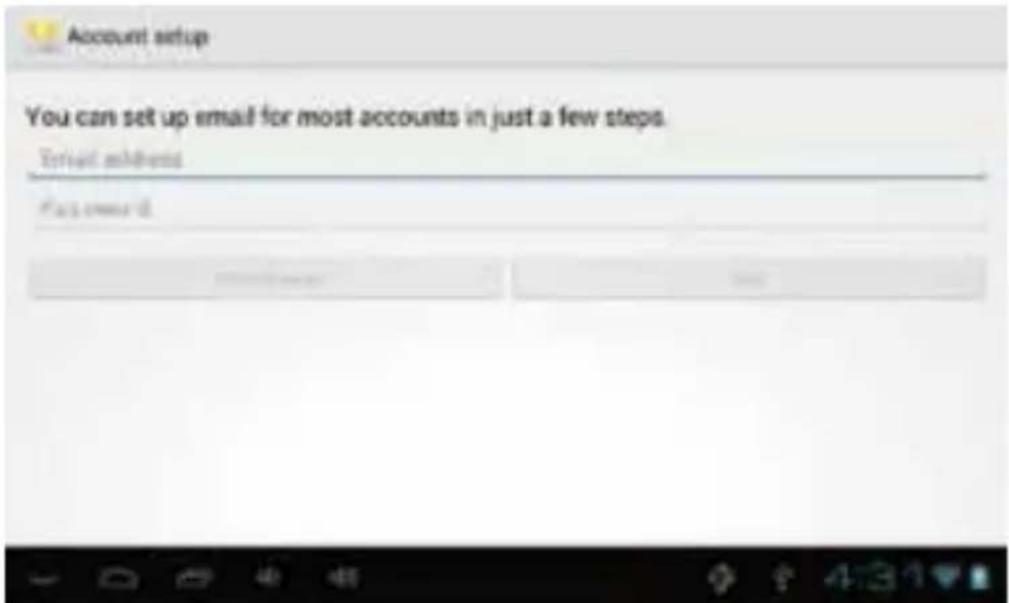
Email requires network support. Make sure that network link is normal. Here we take whhpwjh@126.com as an example:
In the email address bar, enter your valid email address: whhpwjh@126.com In the email address bar, enter your valid password: *****
Then you can choose the "next", account type selection interface will appear as shown below:
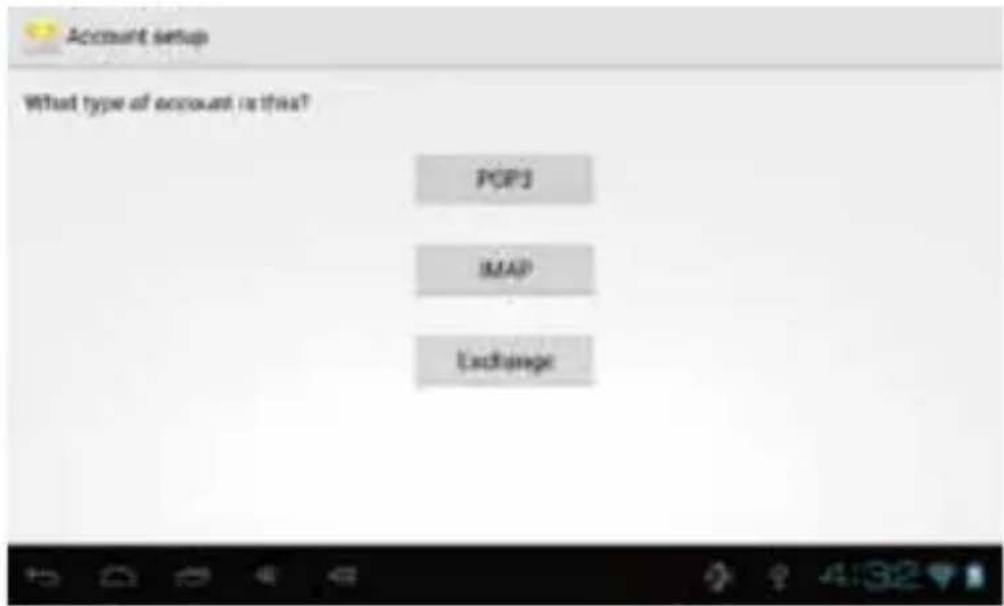
Choose POP3 account .And the receiving service settings will appear as shown below:
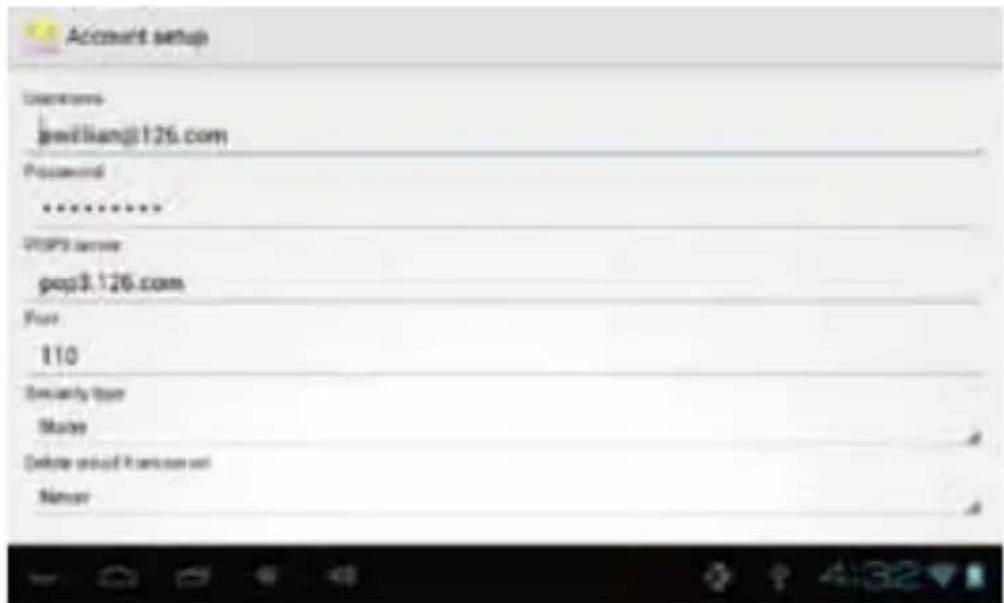
Please according to each email provider's information to set different parameter, such as :
The POP3 server:Default is "126.com", and should be modified as "pop.126.com"
The port number is "110"
Then select the “next”, you will enter the “inspection acceptance server settings”, if set up correctly, there will be a “foreign server settings” interface as follows:
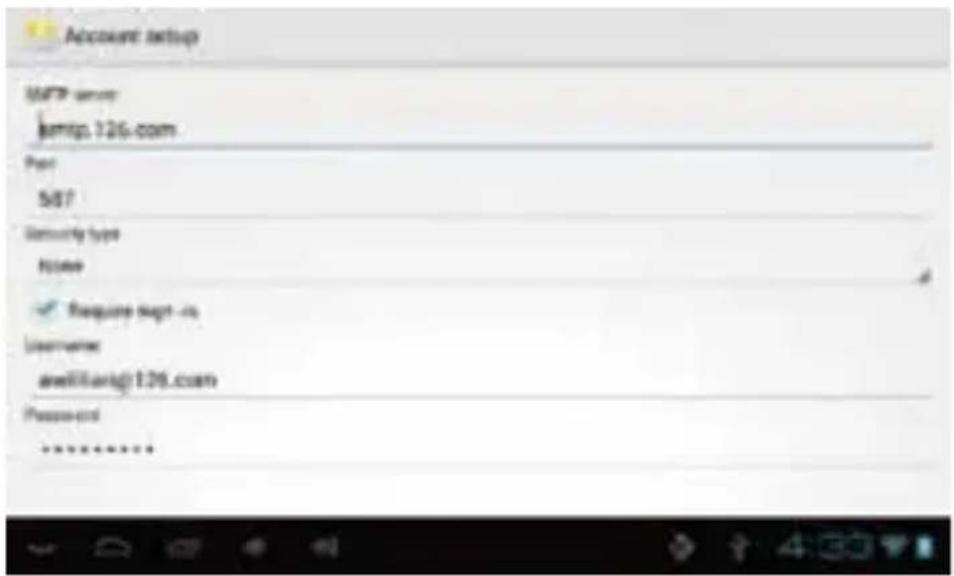
In the column"name", input the name you want to display in the outgoing message, and then click "finish" button, you can enter the mail interface. It will load the mail automatically;
Select one of the column to be viewed in the message. You can do "Reply", "delete", "more reply" and other operations at the view bar.
14. External device
USB connection
Enter "setting">"Developer options">"Choose USB work pattern: OTG/HOST/SLAVE.....
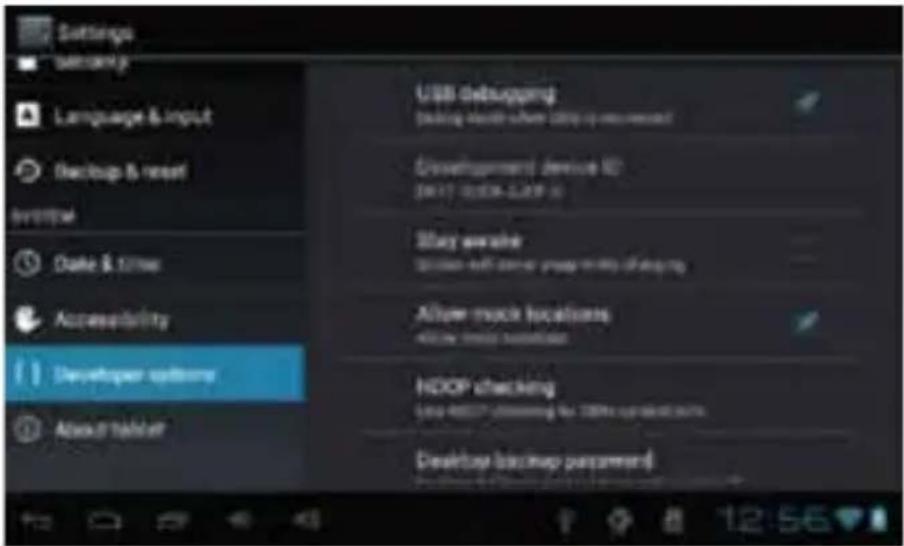
Using USB to connect the Cyberpad and PC, the default connection mode is a synchronous mode.
You can drag the status bar to drop, appeared as the following interface:
Click

into the USB connection hints.
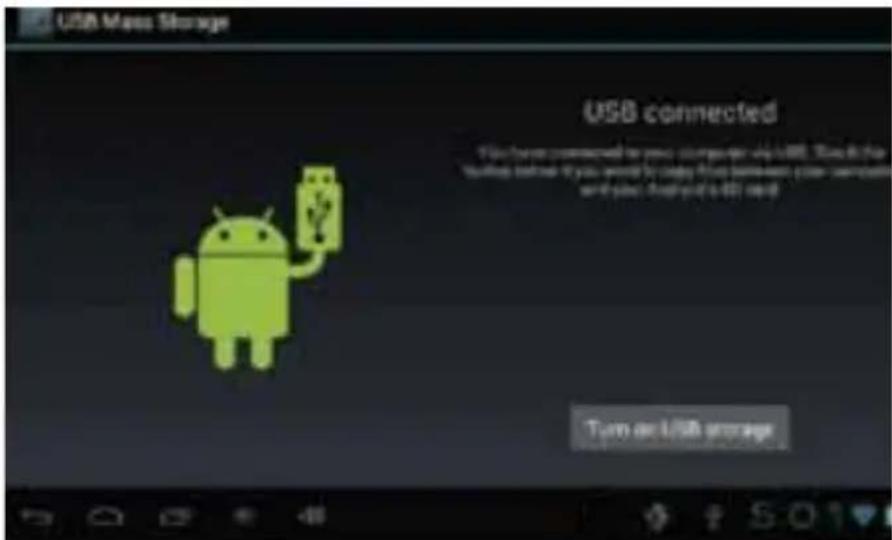
"USB connected": It means that the external memory(SD) loading is completed, and you can see the corresponding letter in the PC terminal.
OTG use
CyberPad supports FAT32 format mobile devices such as U disk and mobile hard disk.
The plug-and-play connection method:
Use the OTG wire to connect the Tablet PC USB OTG and the external equipment.
Keyboard and mouse
CyberPad supports plug and play USB mouse and keyboard device.
Features
* Screen:7" Capacitive Touch Screen
* Processor: 1.2Ghz
* GPU:Mali 400MP
* OS: Android 4.0 Ice Cream Sandwich
* RAM:512MB DDR3
* Memory:4GB
* Support 3G Module USB Dongle
* Support Dual Camera Front 0.3MP, Rear 2.0MP
* Support G-SENSOR
* Support Flash 11.1
* Support Skype Video Call
* I/O port :Mini USB
* Card Slot:Micro SD Card(Max:32GB)
* Audio Output: Stereo Speaker(8Ω1.0w)/3.5MM Stereo Headphone Jack
* King Kong Apps Market, Internet Browser, Office, Calendar, Calculator, E-mail
* Picture Viewing, Music/Video Playback, Games
* Supports Multi Languages
* Battery: Built in 2800mAh/3.7V Li-ion, rechargeable
Basic Warranty Statement
This product is warranted to the original purchaser ONLY, to be free from defects in materials and workmanship under normal use, for ninety (90) DAYS (parts and labor) and one (1) YEAR (parts only) from the date of original purchase. We agree under the warranty period to replace product if it is determined to be defective at "No Charge". This limited warranty does not cover any loss or damages that occur as result of:
• Cosmetic damage.
- Shipping or improper installation or maintenance.
- Misuse.
- Neglect.
- Any cause other than ordinary commercial or industrial application.
- Adjustment by non-authorized source or any of the products firmware or hardware that you or any third party have modified or altered
- Improper environment
- Excessive or inadequate heating or air conditioning or electrical power failures, surges, connection to improper voltage supply or settings or other irregularities.
• Accidents, acts of God.
In the United States and Canada contact Customer Service at (909) 627 - 9888.
* Please note that in order to have your merchandise repaired and replaced by warranty, you must contact our customer service representatives by phone or email, and get RMA number
To obtain factory service, the original purchaser MUST present the following:
- A sales receipt/proof of purchase indicating date of purchase
- Your Name, Place of Purchase, Address, UnitModel, and Description of Problem.
- Send the unit pre-paid to the address below in the original packaging or reasonable substitute to prevent damage. No return will be shipped back to a PO BOX.
- All of the accessories that came with the product package must be sent along with the main unit.
- Please include your check or money order in the amount of \$20.00 to cover handling and return shipping charges. We will not be responsible for delays or unprocessed claims resulting from purchaser's failure to provide any or all of the necessary information.
- There is Additional Shipping Charge for areas outside of United States. For shipping charge please consult with our customer service.

Please review your user guide carefully before using this product.
If you need further assistance please contact us at:
(909) 627 - 9888
Additional troubleshooting information
can also be found on the web at:
www.iviewus.com and click on "Support"
or email us at support@iviewus.com