
PI200S - Simulator Campomatic - Free user manual and instructions
Find the device manual for free PI200S Campomatic in PDF.

| Brand | Campomatic |
| Model | PI200S |
| Product Type | Caller ID Telephone |
| Display | 16-digit LCD with backlight and contrast adjustment (16 levels) |
| Dialing Modes | Pulse (P) / Tone (☐) compatible |
| Caller ID Compatibility | FSK / DTMF with auto-detection |
| Memory | 99 incoming and 18 outgoing call records |
| Ring Tones | 16 selectable melodies |
| Hold Music | 3 options with 4-step volume control |
| Power Supply | 3 x 1.5V AA batteries (alkaline recommended) |
| Handsfree Function | Speakerphone with 3-level volume |
| Alarm Clock | 5 sets (3 daily + 2 one-time) |
| Lock Function | 3-step key lock (green: block 0 calls; yellow: only emergency; red: unrestricted) |
| Telephone Line Compatibility | PABX code setting and parallel phone transfer |
| Dimensions | Approx. 20 x 15 x 8 cm (estimated) |
| Weight | Approx. 500 g (estimated with batteries) |
| Cleaning | Use a soft damp cloth; unplug before cleaning |
| Safety | Unplug during storms; do not overload outlets; no liquid spills |
| Spare Parts | Batteries (AAA 1.5V not included); line cord; coiled handset cord |
| Repairability | Service center recommended for non-user serviceable issues |
Frequently Asked Questions - PI200S Campomatic
User questions about PI200S Campomatic
0 question about this device. Answer the ones you know or ask your own.
Ask a new question about this device
Download the instructions for your Simulator in PDF format for free! Find your manual PI200S - Campomatic and take your electronic device back in hand. On this page are published all the documents necessary for the use of your device. PI200S by Campomatic.
USER MANUAL PI200S Campomatic
Thank you for purchasing our newest Caller ID phone. This manual is designed to familiarize you with this phone. To get the maximum use from your new phone, we suggest that you read this instruction manual carefully before using.
SAFETY INSTRUCTION
When using your telephone equipment, the following basic safety precautions should always be followed to reduce the risk of fire, electric shock and injury to persons:
- Read, understand and follow all warnings and instructions
- Unplug the product from the wall outlet before cleaning. Do not use liquid cleaners or aerosol cleaners. Use a soft damp cloth for cleaning.
- Do not place this product on unstable surfaces. The product may drop, causing serious damage to the product.
- Do not overload wall outlets and extension cords as this can result in fire or electric shock.
- Never push foreign objects of any kind into this product through cabinet slots as they may affect dangerous voltage points or short circuit parts that could result in fire or electric shock. Never spill liquid of any kind on the product.
- Avoid moving or disconnecting this unit during a heavy storm, as there may be a remote risk of electric shock from lightning and thunder.
- Unprofessional person cannot open telephone even meets troubles, please send to service center.
FEATURES
FSK/DTMF compatible with auto-detection.
16-digit LCD display
➢ 99 incoming and 18 outgoing number memories
16 kinds of ringing tone for selection
3 kinds of hold music for selection
Do Not Disturb function
➢ Transfer function between parallel phones (using 2 similar models)
- Secret code function in Do Not Disturb state to avoid missing VIP calls
▶ Pre-dial and edit function
▶ Redial and auto-redial function
➢ 3-step lock function and 5 sets of alarm clock
➢ 16 levels of LCD contrast
Set PABX code
▶ Pulse/Tone dialing mode compatible
3 levels of hands free volume for selection
➢ Ringing volume 8 steps for selection
➢ LCD Backlight function
➢ Thunder-proof and anti-dialing from parallel phones function
▶ Handsfree dialing and speaking function
In use LED indicator
LOCATION DESCRIPTION
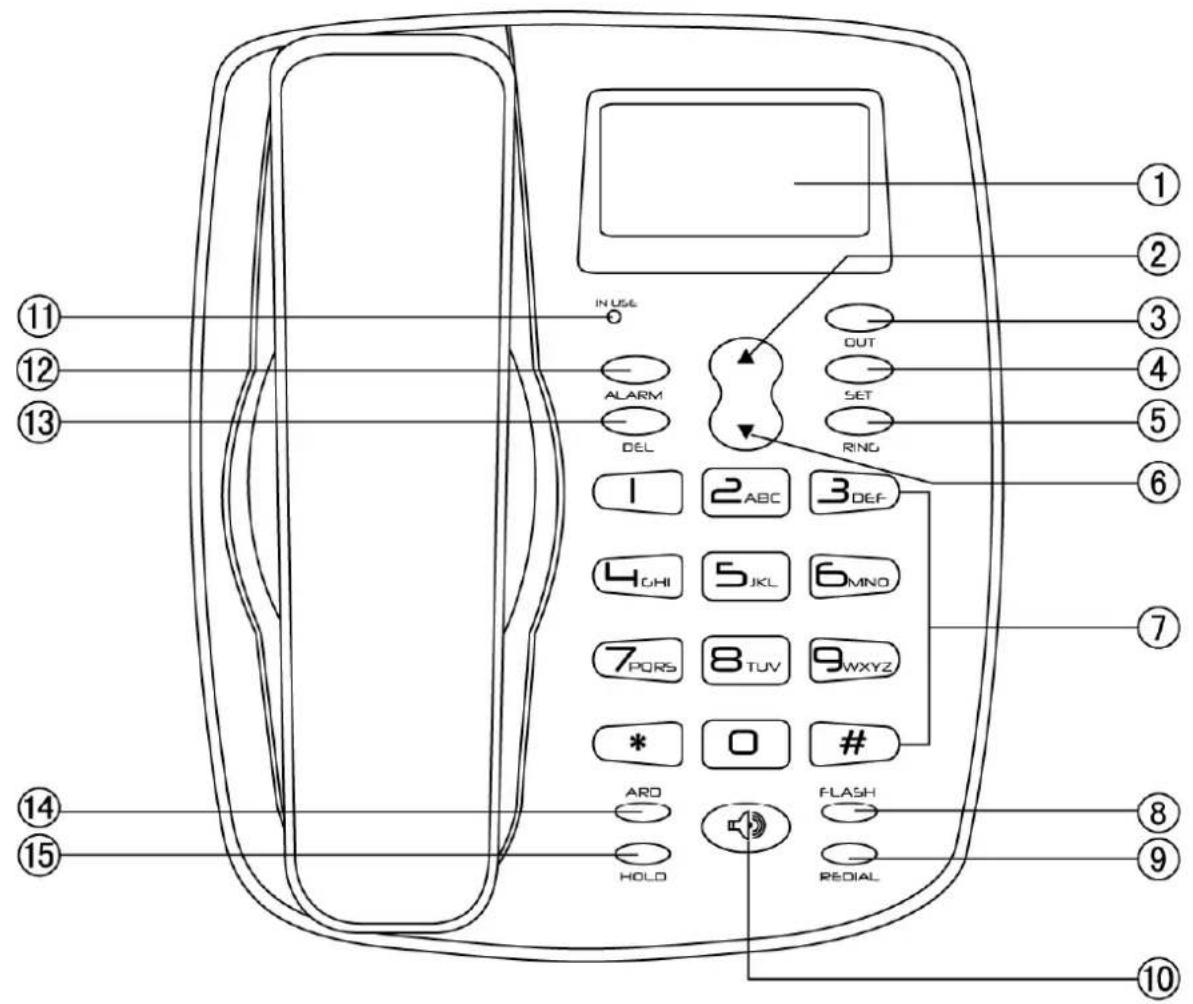
① LCD
② UP
③ OUT
④ SET
⑤ RING
⑥ DOWN
⑦ NUMERICAL KEY
⑧ FLASH
⑨ REDIAL
⑩ H.F
⑪ IN USE
⑫ ALARM
⑬ DEL
⑭ ARD
⑮ HOLD
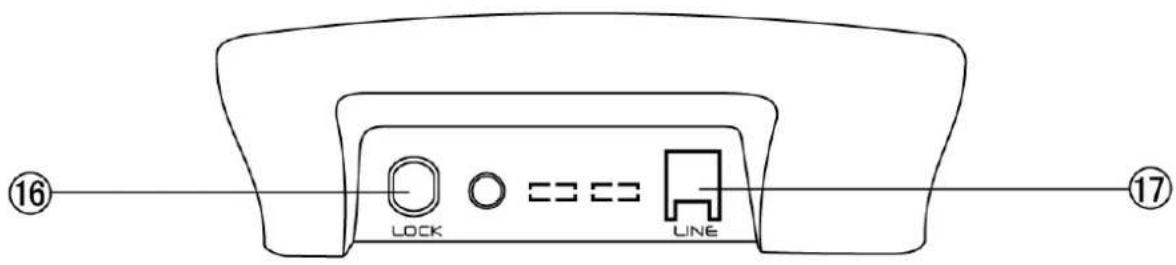
⑯ LOCK
⑰ LINE
GETTING STARTED
- The unit requires 3 × 1.5V AA batteries. Open the battery compartment cover and insert the batteries in the right polarity, then close the cover (Proposal using alkali battery). There should be time display on the liquid crystal screen after the batteries are inserted.
- Insert one end of the line cord to the line jack of the base and the other end to the telephone wall outlet.
- Connect the handset and the unit with coiled line.
- Setting the dialing mode to correct mode according to the directions from your local telecom.
- Apply for the caller ID from your local telecom office.
RECEIVING A CALL
- When a call comes, the telephone rings, and LCD displays the seq. number of the call, the date, time, incoming number and the NEW icon.
- If the same number is received again, and the previous call has not been reviewed, the LCD displays REP icon.
When the incoming memory is full, the latest incoming number replaces the oldest number in the memory
NOTE: For the phone to display incoming number and other information, you must have an active Caller ID subscription with your local telephone exchange company.
From handset
-
Pick up the handset and talk to the other party.
-
When finished, return the handset to the base.
Switching to speakerphone
-
When using the handset, press 🔒 key and return the handset to the base.
-
When finished, press 🔒 key again.
From speakerphone
- When the telephone rings, press 🔔 key and talk to the caller. For the other party to hear your voice clearly, speak into the speaker from a distance of 32cm or less.
- When finished, press 🔒 key again.
NOTE: Generally telecom transmits the incoming message between the first ring and the second ring. So please answer the phone after the second ring.
MAKING A CALL
From handset
- Pick up the handset.
- When you hear the dial tone, dial the desired number.
- The unit will start to time the conversation after 6 seconds.
- When finished, return the handset to the base.
From Speakerphone
- Press key
- When you hear the dial tone, dial the desired number.
- The unit will start to time the conversation after 6 seconds.
- When finished, press 🔒 key again.
Pre-dialing function
- When the handset is on the base, dial the desired number.
- If there are mistakes, use the DEL key to edit.
- Press 🔔 key or pick up the handset and the number will be dialed automatically.
Redial
- Pick up the handset or press 🔒 key,
- Press REDIAL key, the last dialed number will be dialed again
Auto-redial (this function just for your selection)
- Press 🔔 key, dial a number, and you hear an engaged tone.
- Press ARD key and the last dialed number will be redialed automatically at every 9-10 seconds until the line is through.
- The phone will redial the same number automatically for 32 times.
When there is an incoming call while using auto-redial, pick up the handset or press 🔒 key to answer the call. The auto redial function will be terminated.
REVIEWING, CALLING BACK AND DELETING INCOMING NUMBERS
> Reviewing
In on-hook state, press ▲ or ▼ key to scroll and review the numbers.
▶ Deleting
When the desired number is shown, press DEL key, the number is deleted.
Press and hold DEL key for 3 seconds, all the incoming numbers are deleted.
Calling back
- Scroll to the desired number, press 🔔 key or pick up the handset, and the number is dialed out,
- Or press REDIAL key, LCD displays PICK UP, press 🔔 key or pick up the handset, the number is dialed out. Or
- Or press and hold REDIAL key till PICK UP flashing, press 🔒 key or pick up the handset, the number is dialed out. If the long distance code is set, the telephone will add the long distance code ahead the number automatically and then dial back. If the PABX code is set, the telephone will detect and add the code before the number automatically when dialing back the number. It will dial the PABX code first and then after a 2 second pause and then dial the number.
PREVENTING FSK MESSAGE TO AUTO-ADJUST REAL TIME
When a FSK message comes, the unit adjusts real time automatically, you can prevent real time auto adjustment as follows:
- In on-hook state, press and hold ALARM key for 3 seconds, LCD displays: DATE OFF,
- Press ALARM key again, LCD displays DATE ON,
- Press SET key to quit.
NOTE: DATE OFF: Does not allow real time auto adjustment
REVIEWING, CALLING BACK AND DELETING OUTGOING NUMBERS
> Reviewing
In on-hook state, press OUT key, then repeat to press OUT to review outgoing numbers one by one.
> Calling back
-
In on-hook state, press OUT key to review the desired number, then press 🔒 key or pick up the handset, and the number is dialed out,
-
Or press REDIAL key, LCD displays PICK UP, press 🔔 key or pick up the handset, the number is dialed out.
▶ Deleting
- In on-hook state, press OUT key to scroll to the desired number.
- Press DEL key and the number is deleted, or
- Press and hold DEL key for 3 seconds, all numbers will be deleted.
SETTING MENU
Setting date & time
- In on-hook state, press SET key, the value for the year flashes.
- Press ▲ or ▼ key to edit the year.
- Press SET key to confirm and enter the next value month setting.
- Repeat the year setting step to set the month.
- Repeat the above steps for date and time setting.
Setting Local Area Code and Long Distance Code
- After setting up the date and time, press SET key. LCD displays CODE 0---- and the long distance code "0" flashes,
- Press ▲ or ▼ key to edit the flashing code from 0 to 9 or -.
- Press SET key to confirm and enter the next flashing code setting.
- Repeat the above steps for the rest code setting.
Adjusting LCD Contrast
- After setting up the local area code, press SET key, LCD displays LCD 08
-
Press ▲ or ▼ key to adjust the LCD contrast, total 16 levels can be selected.
-
Press SET key to confirm and exit.
At on-hook state, press FLASH key to enter LCD contrast setting directly, then press FLASH key continuously to adjust the LCD contrast.
Setting Alarm Clock
- In on-hook state, press ALARM key once, LCD displays 12-00 AL1;
- Press ▲ or ▼ key to select ON or OFF. LCD displays "ALM" icon when the alarm is set to ON.
- Press SET key, value "12" starts to flash.
- Press ▲ or ▼ key to set the alarm hour and press SET key to confirm and enter alarm minute setting.
- Press ▲ or ▼ key to edit alarm minute and press SET key to confirm and go to next group alarm clock setting.
- Repeat the above steps to set additional alarms.
NOTE: The first 3 groups alarm clock will be repeated periodically every day while the last 2 group alarm clock is effected one time.
SECRET CODE SETTING AND REMOTE MONITOR FUNCTION
Setting
- In on-hook state, press and hold RING key for 3 seconds, LCD displays Pin ----.
- Input a 4-digit of PIN using the numeric keys.
- Press DEL to edit the secret code, press SET to confirm.
- When the last digit of the secret code is #, the telephone will activate remote monitor function.
- Set the ringer to OFF. (Please refer to section "SETTING RINGING TONE").
Usage
-
Secret code: When caller call this telephone, he/she will hear the usual ringing tone (when the line gets through) three times or four times. However, the telephone unit will not ring. The caller will hear a short "di" sound, which means that the caller need to key in the secret code. Once the caller keys in the correct code, the telephone unit will ring. Press 🔔 key or pick up the handset to have the conversation with the caller.
-
Remote monitor: If the last digit of the secret code is #, after the caller keys in the correct secret code, the telephone unit will go into handsfree mode automatically.
-
If the caller keys in the wrong code, he/she will have to call again and key in the correct secret code PIN.
NOTE: This function is useful only when the telephone ringing is set to OFF. The caller must know the secret code in order to dial through the line.
TRANSFER BETWEEN PARALLEL PHONES
Setting paging number
-
In on-hook state, press and hold SET key, LCD displays EL--
-
Key in “*” and the paging number (example “*1” and “*2”), using DEL key to edit
- Press SET key to confirm and exit.
➢ Transferring the line from paralleled phones
When a call comes, use one of paralleled phones to answer. Press “*” and the paging number that was set in another telephone unit, the unit rings, pick up its handset or press 🔔 key to answer the incoming call.
Notice: Please use same series phones to transfer as above operation. Any special services starting with “*” offered by your Telephone company may not function properly. To get the best effect of this function, you should load the batteries before using.
ANTI-DIALING FROM PARALLEL PHONES
- In on-hook state, press and hold # key for 3 seconds, LCD displays SPI ON
- Press 🔔 key twice and then
- Press and hold # key for 3 seconds again, LCD displays SPI OFF
When the anti-steal is set to ON, users who want to dial using an extension via the same line will hear a “di-di, di-di” beep continuously and will not be allowed to make a call.
SETTING RINGING TONE AND ADJUST RINGING VOLUME
There are 16 kinds of ringing tones for selection:
- In on-hook state, press RING key, LCD displays ring 02 db8
- Press RING to select the desired ringing or set ring OFF
- Press ▲ or ▼ key to set ringing volume
- Press SET to confirm and exit.
NOTE: The volume ranges from 1db-8db, with 8db being the loudest. Ring OFF is “Do Not Disturb” mode. If the phone is set to this mode, the telephone will not ring when there is an incoming call.
ADJUST HANDSFREE VOLUME
In handsfree mode, press ▲ or ▼ to adjust the handsfree volume, LCD displays the volume level and there is a total of 3 levels.
SELECTING PULSE OR TONE DIALING MODE
- In on-hook state, press and hold * key for 3 seconds, LCD displays P, then dialing mode is set as Pulse.
- Press 🔔 key twice and hold * key for 3 seconds again, LCD displays ☐, then dialing mode is set as Tone.
SETTING PABX CODE
- In on-hook state, press and hold DEL key 3 seconds to set PABX code, LCD displays
SET PCODE - and the “-” flashes.
- Press ▲ or ▼ key to set PABX code from 0 to 9 or -.
- If choose “-”, it means no PABX code has been set.
- Press SET key to confirm and quit.
HOLD ON MUSIC
Hold music selection
There are 3 kinds of hold music for selection
- At off-hook or hands free state, press HOLD key
- Press OUT key to select the desired hold music. It plays the music at same time.
- Press ▲ or ▼ key to select the 4 steps volume of hold music.
- Press HOLD key to quit.
When talking over handset, press HOLD key to enter the hold mode and the hold music is sent out. In hold mode
-
Press HOLD key to release hold mode and continue to talk over handset, or
-
Hang up handset, it enters hands-free hold mode.
When talking at hands-free mode, press HOLD key to enter the hold mode and the hold music is sent out. In hold mode
- Pick up handset to talk over handset, or
- Press 🔔 key to quit hold mode and talk at hands-free mode.
LOW BATTERY DETECTING
When the voltage is lower than 3.9 v, LCD displays “≡” icon to remind the user to replace the batteries.
LCD BACKLIGHT FUNCTION
The backlight is turned on when receiving an incoming call, dialing, pressing any key or in MUSIC HOLD mode. It will fade off if the telephone is left idle for 10 seconds.
NOTE: If batteries are not loaded, there will be no LCD backlight function.
FLASH FUNCTION
When dialing a number and the line is engaged, press FLASH key and then press REDIAL key to dial it out again.
PAUSE FUNCTION
If dial a number from PABX extension, press PABX number (normally "0" or "9") + ALARM + desired number. When redial, need not dial PABX number and ALARM key, just press REDIAL key.
LOCK
Turn the key to yellow point, all numbers are locked except emergency numbers 119, 120, 122, 110.
Turn the key to green point, all numbers starting with "0" are locked
Turn the key to red point, all numbers are allowed to be dialed out.
NOTES
Please unplug telephone line and power (if any) when installing / replacing batteries.
TROUBLESHOOTING
? No voice
+ Check if the handset is on the phone or if the line has terminated.
? Receive only
+ Check if P/T mode is properly set.
Check if the unit is locked (use the key to unlock it)
? Rusty batteries or leakage
+ Remove the rust or wipe away the leakage.
? Noise
+ Check if the circuit is spoilt. (Change the circuit)
Check if the connector is wet or rusty (Change the connector)
? Ring once then disconnect when receiving a call. Dialing function is still available
+ Check if connector is in a moist environment.
Check if too many extensions are used together or the quality of extension is not good enough (Change the bad extension)
? LCD become dim
- Check if LCD contrast is properly set or if the batteries are weak. (Adjust LCD contrast, if the LCD is still dim, replace the batteries.)
? No ring - Check if the RING is in the OFF state (reset it).
? Most of the functions failed - Check if the batteries are strong enough. (Change the batteries)
If batteries are ok (Remove the battery, unplug the lines and reinstall after 10 minutes)
NOTE: Due to continuous product development, all features and specifications are subject to change without prior notice
- SAFETY INSTRUCTION
- FEATURES
- GETTING STARTED
- RECEIVING A CALL
- From handset
- Switching to speakerphone
- From speakerphone
- MAKING A CALL
- Pre-dialing function
- Redial
- Auto-redial (this function just for your selection)
- REVIEWING, CALLING BACK AND DELETING INCOMING NUMBERS
- > Reviewing
- ▶ Deleting
- Calling back
- PREVENTING FSK MESSAGE TO AUTO-ADJUST REAL TIME
- REVIEWING, CALLING BACK AND DELETING OUTGOING NUMBERS
- > Calling back
- SETTING MENU
- Setting date & time
- Setting Local Area Code and Long Distance Code
- Adjusting LCD Contrast
- Setting Alarm Clock
- SECRET CODE SETTING AND REMOTE MONITOR FUNCTION
- Setting
- Usage
- TRANSFER BETWEEN PARALLEL PHONES
- Setting paging number
- ➢ Transferring the line from paralleled phones
- ANTI-DIALING FROM PARALLEL PHONES
- SETTING RINGING TONE AND ADJUST RINGING VOLUME
- ADJUST HANDSFREE VOLUME
- SELECTING PULSE OR TONE DIALING MODE
- SETTING PABX CODE
- HOLD ON MUSIC
- Hold music selection
- LOW BATTERY DETECTING
- LCD BACKLIGHT FUNCTION
- FLASH FUNCTION
- PAUSE FUNCTION
- LOCK
- NOTES
- TROUBLESHOOTING
Brand : Campomatic
Model : PI200S
Category : Simulator