BOSE459X - Cooker BLANCO - Free user manual and instructions
Find the device manual for free BOSE459X BLANCO in PDF.

| Product Type | Freestanding Cooker |
| Brand | BLANCO |
| Model | BOSE459X |
| Energy Type | Electric |
| Number of Cooking Zones | 4 |
| Hob Type | Ceramic Glass |
| Oven Type | Electric |
| Oven Capacity | 60 L |
| Oven Functions | Conventional, Grill, Fan |
| Dimensions (H x W x D) | 85 cm x 60 cm x 60 cm |
| Weight | Approx. 50 kg |
| Power Supply | 230 V, 50 Hz |
| Color | Stainless Steel / Black |
| Cleaning | Easy-clean enamel interior |
| Safety Features | Child lock, thermal cut-off |
| Warranty | 2 years |
Frequently Asked Questions - BOSE459X BLANCO
User questions about BOSE459X BLANCO
0 question about this device. Answer the ones you know or ask your own.
Ask a new question about this device
Download the instructions for your Cooker in PDF format for free! Find your manual BOSE459X - BLANCO and take your electronic device back in hand. On this page are published all the documents necessary for the use of your device. BOSE459X by BLANCO.
USER MANUAL BOSE459X BLANCO
Instruction Manual for Built In Oven BOSE459X
Dear Customer,
Thank you for buying a BLANCO Oven.
Before we continue telling you about this oven, we cordially invite you to become part of the Blanco family by subscribing online. Please visit our website where you can easily register for product/cooking demonstrations, and request Blanco's gourmet recipes. Go to www.blanco-australia.com and fill in the subscription details in the contact us/showrooms section.
You will find that the clean lines and modern look of your Blanco oven blends in perfectly with your kitchen décor. It is easy to use and performs to a high standard.
Blanco also makes a range of products that will enhance your kitchen such as cooktops, rangehoods, dishwashers, microwaves, sinks and taps. There are models to complement your new Blanco oven.
Of course, we make every effort to ensure that our products meet all your requirements, and our Customer Relations department is at your disposal, to answer all your questions and to listen to all your suggestions.
Please complete the warranty card and keep your receipt as proof of purchase. Retain all documents relating to the purchase of this product.
Blanco is committed to providing increasingly efficient products that are easy to use.
Read these instructions carefully before using your oven and keep them in a safe place.
If you follow the instructions, your oven will provide you with many years of good service.
TABLE OF CONTENTS
SECTION
PAGE NO.
Important Safety Instructions ....
Appliance Details ....
Electrical Connections ....
Transportation ....
Installation ....
Operating Instructions ....
Cleaning
Recommended Cooking Times ....
Cooking Guides ....
DISPOSAL INFORMATION
- Most of the packing materials are recyclable. Please dispose of those materials through your local recycling depot or by placing them in appropriate collection containers.
- If you wish to discard this product, please contact your local authorities and ask for the correct method of disposal.
IMPORTANT: Read the assembly instruction section and safety precautions of this booklet carefully before removing the contents of this carton.
- This appliance is not intended for use by persons (including children) with reduced physical, sensory or mental capabilities, or lack of experience or knowledge, unless they have been given supervision or instruction concerning the use of the appliance by a person responsible for their safety. Children should be supervised to ensure that they do not play with the appliance.
- After removing the packaging, make sure to check if there is any damage to the appliance. If there is any damage (such as cracked glass), never attempt to use the appliance and immediately contact your Authorised Service Centre. As packaging materials can be dangerous to children, they need to be collected immediately and put out of reach.
- In certain circumstances electrical appliances may be a safety hazard. Check the conformity of voltage and power settings, which are specified on the information plate attached to the appliance and/or packaging, with the usage conditions available.
- Do not place heavy objects in or on these appliances, or use for storage, or let children play or swing from the door. These appliances are designed for cooking food only or outdoors and must be fully built in. Do not use the appliances until fully installed.
- This appliance is designed for domestic household use only and for the cooking of domestic food products. Use as a commercial appliance will void the warranty. It should not be used in a marine environment or outdoors.
- This oven is supplied with a set of cables for a single phase connection. This oven is required to be installed by an authorised person.
- If the electrical supply cord is damaged, either when being installed or after installation, it must be replaced by the manufacturer, its service centre or similarly qualified persons in order to prevent a hazard.
- The electrical connection must be accessible after installation. The appliance must be electrically isolated before any maintenance can be performed. WARNING: Ensure the appliance is switched off before replacing the lamp to avoid the possibility of electric shock. If the electrical supply is restricted, means of all-pole disconnection must be accessible and incorporated in the fixed wiring in accordance with the wiring rules.
- The appliance is not intended to be operated by means of an external timer or separate remote control system.
- Electrical connection must be made as per local wiring rules and regulations.
- Always grasp the oven door in the centre of the handle as the areas around the door edges may be hot due to the escape of hot air. Do not lift or move the appliance by pulling the handle.
- Ensure that the kitchen is well ventilated or mechanical ventilation is in use while cooking in this appliance.
- Do not store or use flammable materials or aerosols near the oven. Items made from aluminium, plastic or plastic film should also be kept away from the appliance, as they may fuse to the surface.
- Never line the oven bottom with aluminium foil, as the consequent accumulation of heat could compromise the cooking and even damage the enamel.
- The trays/wire grills can incline when pulled out. Take care that hot liquids do not spill over.
- WARNING – Accessible parts will become hot when in use. Young children should be kept away. Use heat resistant cooking gloves where-ever possible when moving food and cooking utensils in and out of the oven.
- Cleaning may only be commenced on the appliance once it has cooled down (best slightly warm). The appliance should be disconnected from the power outlet or turned off at your isolation switch before commencing any cleaning process. Do not use a steam jet or any other high pressure cleaning equipment to clean the appliance. Follow oven cleaner directions if these are being used.
- Wash all accessories in hot soapy water or in a dishwasher, wipe dry with a paper or cloth towel. If you use your oven for an extended period of time, condensation may form. Dry it using a soft dry cloth.
- When the appliance is not being used, the knobs must be kept in the 'OFF' position.
- Where this appliance is installed in a caravan, it shall NOT be used as a space heater.
- Do not modify this appliance.
- WARNING - Do not use harsh abrasive cleaners or sharp metal scrapers to clean the oven door glass as it can scratch the surface, which may result in the glass shattering. Clean the glass door using warm damp cloth and dry it with a soft cloth.
- All cabinetry and materials used in the installation must be able to withstand a minimum temperature of 85^ C above the ambient temperature of the room it is located in, whilst in use. Certain types of vinyl or laminate kitchen furniture are particularly prone to heat damage or discolouration at temperatures outside the guidelines given above. Any damage caused by the appliance being installed without adhering to the temperature limits set out above will be the liability of the owner. This oven must not be installed behind a decorative door in order to avoid overheating.
- This appliance must be correctly installed by a suitably qualified person, strictly in accordance with the manufacturer's instructions. Please see the specific section of this booklet that refers to installation.
- The appliance must be installed and put in operation by an authorised technician under the conditions provided by the manufacturer in this manual. The manufacturer cannot be held responsible for any damage that might occur due to faulty installation.
- The values indicated on the printed documents found on the product are values obtained in a laboratory environment according to relevant standards. These values may vary according to the usage and environmental conditions of the product.
- This operating manual has been prepared jointly for multiple models. Some of the specifications explained in the manual, may not be included, in your appliance. Pay attention to the explanations with illustrations while reading the manual.
APPLIANCE DETAILS
ELECTRICAL DETAILS:
OVEN:
Rated Voltage: 220 to 240 Vac 50/60 Hz
Max Rated Inputs: BOSE459X-2923W
This information can be found on the rating plate (data label) affixed to the inside of the door jamb.
SIZES:
| Relevant Sizes: | LENGTH (mm) | DEPTH (mm) | HEIGHT (mm) |
| External Oven size | 595 565 455 |
ELECTRICAL CONNECTIONS

Installation is only permitted by a licensed electrician, and carried out according to instructions provided by the manufacturer. Incorrect installation might cause harm and damage which the manufacturer accepts no responsibility.
ELECTRICAL INSTALLATION FOR THE LICENSED ELECTRICIAN
This oven must be connected to a 220-240V 50Hz power supply. It is earthed via the power supply cord. The earthing cable must be connected via the screw with the earthing mark.
Before carrying out the connection to the power supply, the voltage rating of the appliance (stamped on the appliance identification plate) must be checked for correspondence to the available mains supply voltage, and the mains electric wiring should be suitable for the oven's power rating (also indicated on the appliance identification plate).
The switched outlet must be connected to a suitable earth wiring, in conformity to current safety regulations.
The cooking appliance must be connected to a switched outlet. It should not be located above the appliance and no more than 1.25m away from it. The power supply cord must not touch against any hot surfaces and must be placed so that its temperature does not exceed 75^ C at any point along its length.
After having installed the appliance, the switched outlet must always be in an accessible position.
NOTE: For connections to the mains power supply, never use adapters, reductions or multiple power points as these may overheat and catch fire.
The mains terminal block is located on the back of the oven and the terminals are accessible by opening the terminal block cover. Note: The terminal cover should not be opened when the mains power is still connected to the appliance and never by an unauthorized person.
The electrical safety of this appliance can only be guaranteed if the oven is correctly and efficiently earthed. The manufacturer declines all responsibility for damage resulting from an installation which has not been earthed correctly.
NOTE: For connections to the mains power supply, never use adapters, reductions or multiple power points as these may over heat and catch fire. A circuit breaker with a contact opening of at least 3 mm must be installed inside the circuit supply circuit.
OVEN LAMP REPLACEMENT
Ensure oven is switched off and unplugged before commencing bulb change.
Remove the cooking rack rails by lifting the bottom rail arm over the holding pin. Once this is done, the cooking rack rail can be removed as one piece, lifting from the bottom to the top.
Remove the glass cover by gently placing a flat head screw driver behind it and levering the cover off. Doing this will expose the bulb, which is removed by unscrewing the bulb in a clockwise motion.
Once the bulb has been replaced, re assemble in the reverse order to the instructions above.
Type: E 14, Voltage: AC220V-240V, Wattage: 25W, Temperature rating: 300°C
TRANSPORTATION
Keep the original carton of the product and use this packaging if the item needs to be transported. Follow the transport signs on the carton.
Place a paper between the upper cover and cooking panel, cover the upper cover, than tape to the side surfaces of oven.
Tape cardboard or paper onto the inside face of the glass as it will be prone to damage from the trays. Use cardboard covers for the wire grill and trays in your oven. Also tape the oven's covers to the side walls.
If the original carton is unavailable, take measures to protect the external surfaces (glass and painted surfaces) of oven against possible blows, as well as the above.
INSTALLATION

The adjacent furniture must be able to withstand a minimum temperature of 100^ C. The power supply to the appliance must be cut off before any adjustments or maintenance work is done on it.
PREPARATION FOR INSTALLATION AND USE
Manufactured with best quality parts and materials, this modern, functional and practical oven will meet your needs in all respects. Make sure to read the manual to obtain successful results so as not to experience any problems in the future. The information given below contains rules that are necessary for correct positioning and service operations. They should be read without fail, especially by the technician who will position the appliance.
CHOOSING A PLACE FOR THE APPLIANCE
There are several points to pay attention to when choosing a place for your oven. Make sure to take into account our recommendations below in order to prevent any problems and dangerous situations, which might occur later.
When choosing a place for the oven, attention should be paid that there are no flammable or combustible materials in the close vicinity, such as curtains, oil, cloth etc. which quickly catch fire.
Furniture surrounding the oven or cooktop must be made of materials resistant to temperatures at least 100 ^ .
Required changes to wall cabinets and exhaust fans above a built-in cooktop as well as minimum heights from the oven board are shown below. Accordingly, the lowest point of a range hood should be at a minimum height of 65 cm from the cooktop. Refer to the range hood instructions for specific details before installation.
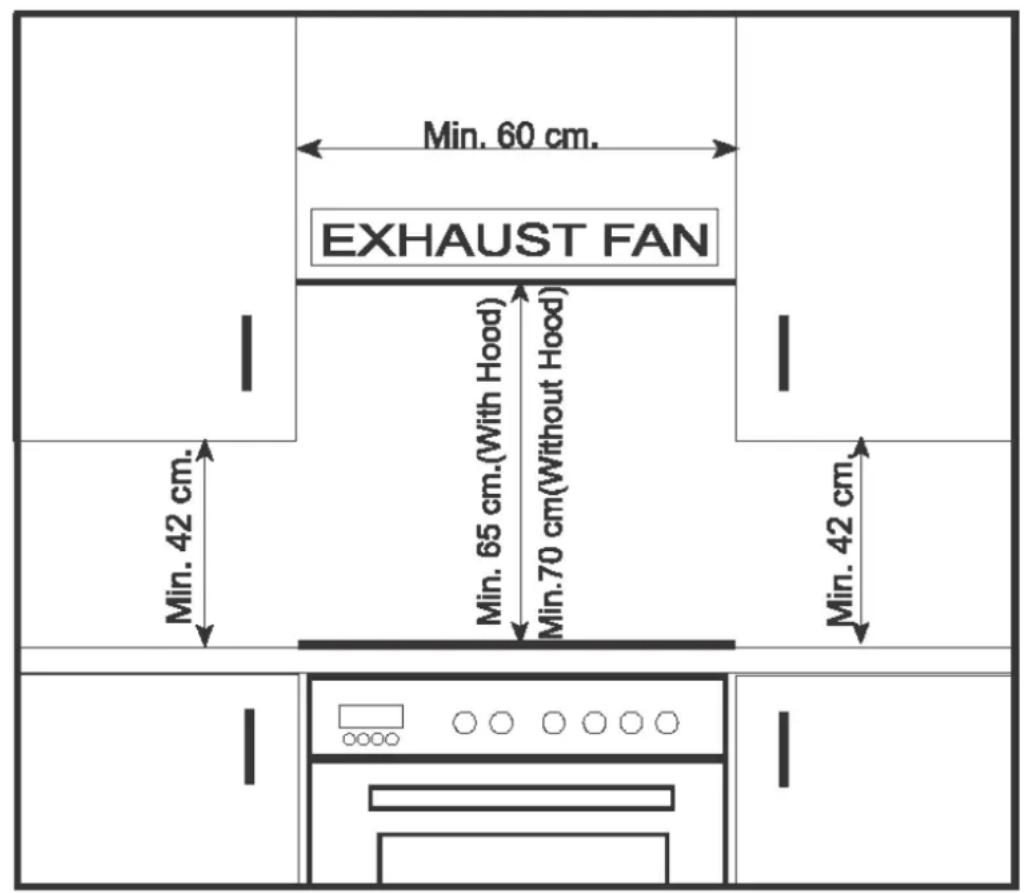
text_image
EXHAUST FAN Min. 60 cm. Min. 42 cm. Min. 65 cm.(With Hood) Min.70 cm(Without Hood) Min. 42 cm.INSTALLATION OF BUILT IN OVEN
Insert the oven into cabinet partly by pushing it forward. Open the oven door and insert 2 screws into the holes on the oven frame. While the product frame touches the wooden surface of the cabinet, tighten the screws.
The dimensions and material of the cabinet in which the oven will be installed must be correct and resistant to increases in temperature. In a correct installation, contact with electrical or insulated parts must be prevented. Insulating parts need to be fitted in a way to ensure that they cannot be removed by using any kind of tool. Installing the appliance in the close vicinity of a refrigerator or a deep-freezer is not recommended as the performance of the above-mentioned appliances will be negatively affected due to emanating heat. After removing your oven from its packaging, be sure that the oven is not damaged. If you suspect any damage to the appliance, do not use it; immediately contact an authorised Service Centre.
REF DIMENSION (mm)
| A | 557.0 |
| B | 363.0 |
| C | 440.0 |
| D | 540.0 |
| E | 595.0 |
| F | 455.0 |
| G | 15.0 |
| H | 138.0 |
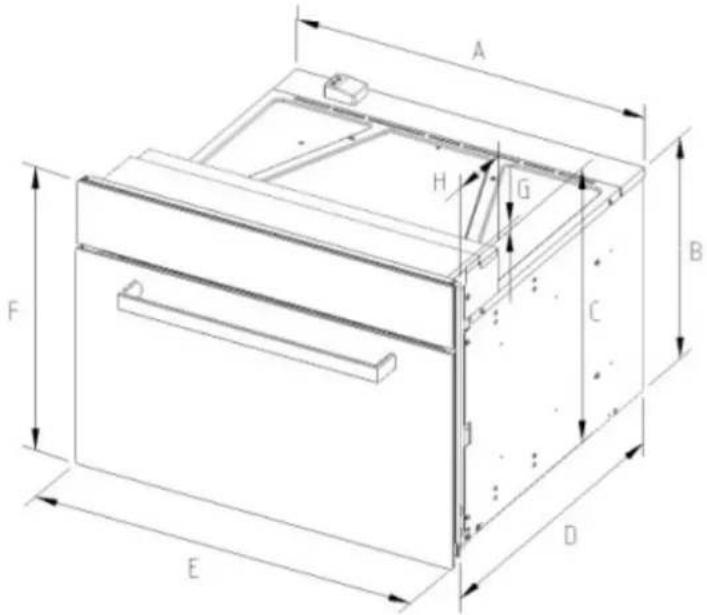
text_image
A H G B C F D EREF DIMENSION (mm)
| H | 460 |
| I | 460 |
| J | 450 |
| K | Min 580 |
| L | 558-568 |
| M | Min 10 |
| N | 90 |
| P | 60-100 |
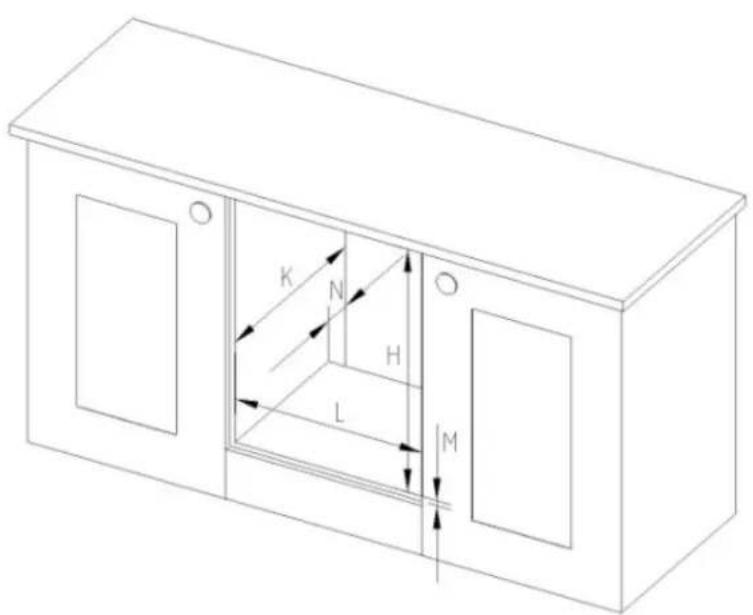
text_image
K N H L M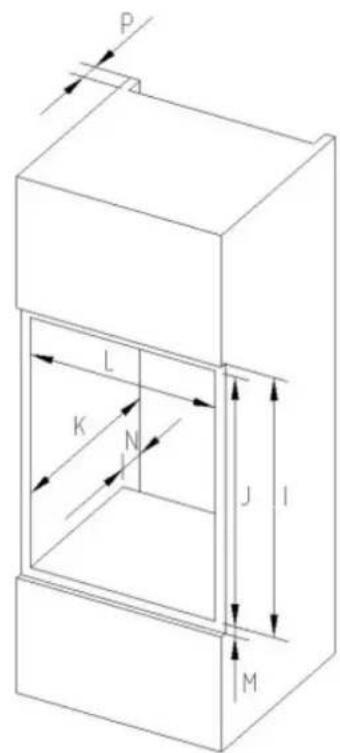
text_image
P L K N J I MOVEN FUNCTION CONTROLS

Defrost Function:
natural_image
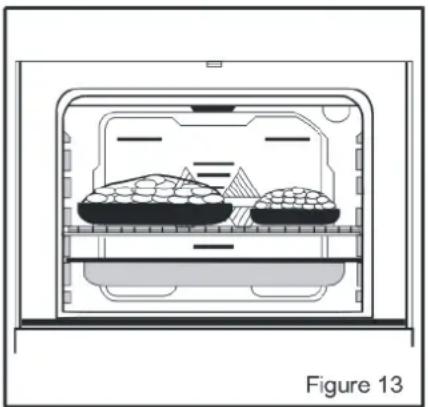
Diagram of a food delivery container with two food items inside, labeled Figure 13 (no text or symbols on the diagram itself)You can start the defrost operation by putting the frozen food into oven and bringing the function control knob to the indicated mark. This function will not cook/bake the food; it only helps to defrost it within a short time.
Put the food to be defrosted on the wire rack that you will place on the third rack support from the bottom (Figure 13). To collect the water that accumulates due to the melting ice, insert an oven tray onto a lower rack. This function is perfect for finishing off the defrost process for frozen food that has been in the refrigerator from the evening before and may not be completely thawed out.

Convection Cooking Function:
This function, Convection, allows heat to radiate evenly from the lower and upper elements into the oven ensuring even cooking of both sides of the food. Adjust the function control so it indicates the Convection Cooking function symbol. Adjust the thermostat control knob of your oven to a temperature recommended on the cooking table for the cooking operation you wish to perform. Preheating of the oven for about 10 minutes is recommended. Place food in a suitable container, then place into oven and cook for the recommended time. This function is preferred for making cakes (cupcakes, other cakes and sponges), biscuits, pastry, baked pasta (e.g. lasagne), casseroles and moist dishes, roasts and oven chips. After cooking, turn off the oven function and temperature control knobs and cancel the timer program if in use. Take the cooked food out of the oven and place it on a safe heatproof surface. As the oven will be hot, work with caution and keep children away from the cooling oven.

Fan Assist Function:
This is the function where the air coming from the lower and upper heating elements is circulated into the oven by the fan motor and blade
Adjust the function control so it indicates the Fan Assist Function symbol and adjust the oven timer to the recommended time for cooking. Adjust the thermostat control to the temperature required on the cooking table for the Fan Assist Function and preheat oven for 10 minutes. Based on the convection function, this combination of features increases the effectiveness of the thermal radiation of the heating elements through forced air circulation of the heat throughout the oven. This helps prevent food from burning on the surface, allowing the heat to penetrate into the food. Food baked on this function such as pastry often brown faster than on convection function alone.
After cooking, turn off the oven function control button and cancel the timer program if in use. Take the cooked food out of the oven and place it on a safe heatproof surface. As the oven will be hot, work with
caution and keep children away from the cooling oven.

Heat Function:
Set the thermostat knob (c) between 50°C and 250°C.
On this function, the lower heating element will come on. This position is recommended for finishing off the cooking of food (in baking dishes or trays) which is already superficially well-cooked and golden on the top but still soft inside. This is an ideal function for delicate cooking such as quiches, cheesecakes and custards where limited top browning of the food is required
After cooking, turn off the oven function control button and cancel the timer program if in use. Take the cooked food out of the oven and place it in a safe heatproof surface. As the oven will be hot, work near with caution and keep children away from the cooling oven.

Fan Assist with Lower Heat Function:
This Fan Assist with Lower Heat function will cook food in a slow, more delicate process and is recommended for finishing off the cooking of food (in baking dishes or trays) which is already superficially well-cooked and golden on the top but still soft inside. This is an ideal function for delicate cooking such as quiches, cheesecakes and custards where limited top browning of the food is required.
After cooking, turn off the oven function and temperature control knobs and cancel the timer program if in use. Take the cooked food out of the oven and place it on a safe heatproof surface. As the oven will be hot, work with caution and keep children away from the cooling oven.

Fan Forced:
Set the thermostat knob (c) between 50^ C and MAX ^ C. Turn the function knob to the fan forced function. On this function the turbo heating element (in the back of the oven) and the fan will operate. On this function the heat remains constant and uniform throughout the oven, whilst the circulating air cooks and browns food uniformly over its entire surface. On this function you can also cook various dishes at the same time on different shelves, as long as their respective cooking temperatures are the same.
This function is ideal for multi-shelf cooking, baked foods, biscuits, and pizza and also good for casseroles and re-heating. Moreover the excellent heat distribution makes it possible to use lower temperatures when cooking some roasts e.g. slow roasted Greek lamb.
After cooking, turn the thermostat and function control knobs to "0" and reset timer to "0" if in use. Take the cooked food out of the oven and place it in a safe heatproof surface. As the oven will be hot, work near with caution and keep children away from the cooling oven.
Lower-Grill Function:
This function is used for grilling. Adjust the function control knob so it indicates the Lower-Grill function symbol and adjust the oven timer to the recommended time for cooking. Set the oven's thermostat control knob to the required temperature. After a preheating period of 10 minutes, put your food into the oven. For grilling, put the food on the grill rack and sit into the deep tray. Place the tray on the highest shelf (5).
Placing the rack within the oven tray provided will ensure that any marinade, fat or oil dropping from the food will be collected. When grilling, the oven door must be closed. On this function, the middle heating elements/coils of the grill operate.
This setting is ideal for toasting bread, cheese melts and melting cheese topped dishes or finishing off a dish to lightly brown on the surface. Also used for herb and garlic bread.
After cooking, turn off the oven function and temperature control knobs and cancel the timer program if in use. Take the cooked food out of the oven and place it on a safe heatproof surface. As the oven will be hot, work with caution and keep children away from the cooling oven.
Grill:
Set the thermostat knob (c) between 50^ C and MAX ^ C. Turn the function knob to the mid-grill function. This function is used for grilling. On this function, the middle heating elements/coils of the grill operate. After a preheating period of 10 minutes, put your food into the oven. For grilling, put the food on the grill rack and sit into the tray. Place the tray on the highest shelf (5). Placing the rack within the oven tray provided will ensure that any marinade, fat or oil dropping from the food will be collected. When grilling for a short time, the oven door should be closed, but for times over 10-15 minutes, the door should be left slightly opened. Take care as food can burn easily if left too long in the oven.
This setting is ideal for toasting bread, cheese melts and melting cheese topped dishes or finishing off a dish to lightly brown on the surface. Also used for herb and garlic bread.
After cooking, turn the thermostat and function control knobs to "0" and reset timer to "0" if in use. Take the cooked food out of the oven and place it on a safe heatproof surface. As the oven will be hot, work with caution and keep children away from the cooling oven.

Maxi-Grill Function:
This function is used for faster grilling and for grills with a lot of food. Adjust the function control knob so it indicates the Maxi-Grill function symbol. Set the oven's thermostat control knob to the required temperature. After a preheating period of 10 minutes, put your food into the oven. For grilling, put the food on the grill rack and sit into the deep tray. Place the tray on the highest shelf (5). Placing the rack within the oven tray provided will ensure that any marinade, fat or oil dropping from the food will be collected. When grilling, the oven door must be closed. On this function, all of the heating elements/coins of the grill operate.
The higher grill temperature and function is ideal for cooking and browning meat (such as lamb or pork chops and cutlets), chicken and seafood (such as fish fillets, cutlets, tuna steaks or Atlantic salmon). This setting is also good for browning fruit crumbles or crumb topped dishes.
After cooking, turn off the oven function and temperature control knobs and cancel the timer program if in use. Take the cooked food out of the oven and place it on a safe heatproof surface. As the oven will be hot, work with caution and keep children away from the cooling oven.
OPERATING INSTRUCTIONS
Using the Oven
The electronic clock features Touch-Control technology. To operate, simply touch the glass control symbols with your finger tip.
The touch control sensitivity continuously adapts to ambient conditions. Make sure the glass surface of the control panel is clean and free of obstacles when plugging in the oven.
If the clock does not respond correctly when you touch the glass, unplug the oven for a few seconds and then plug it in again. Doing this causes the sensors to adjust automatically so that they will react once more to the fingertip control.
((●)): Lights up when the clock timer is selected.
AUTO: Lights up to indicate that the oven is programmed.

: Indicates that the oven is transmitting heat to the food.
+/-: Enable you to select a time.
I→I, (((•)) and →I: Enable you to programme the electronic clock functions.
Setting the Time
When you turn on the oven, you will see the clock flashing 12:00.
Set the clock by touching the + or - sensor.
You will hear 2 beeps confirming that the time has been set.
To change the time, press the + and the - sensors at the same time. The current time will then flash on the screen. Change the time by pressing the + or - sensors. Two beeps will then confirm that the new time has been set.
Note
The clock light has a night mode so the display will dim between 00:00 and 06:00 hours.
Manual Operation
After setting the clock, the oven is ready for use. Select a cooking function and temperature.
During cooking, the symbol for heat being transmitted to food will light up to indicate that heat is being transmitted.
This symbol turns itself off when the selected temperature has been reached.
Set the controls to turn off the oven.
Caution
After cooking, you will notice that the oven cooling system is still on. This is normal and is used to cool the oven down quickly.
Electronic Clock Settings
Timer Alarm: The alarm will go off at the programmed time, even if the oven has finished cooking.
Cooking Time: This function allows you to programme the cooking time, after which the oven will turn off automatically.
Cooking Stop Time: This setting allows you to programme the time for cooking to stop, after which the oven will turn off automatically.
Cooking Time and Cooking Stop Time: This setting allows you to programme the cooking time and cooking stop time. The oven switches on automatically at the set time and operates for the selected cooking time (Cooking Time). It then switches off automatically at the indicated time (Cooking Stop Time).
Child Safety Function: This function locks the electronic clock, preventing small children from playing with it.
Programming the Timer Alarm
- Press + until symbol △ (Bell) Lights up. Press OK.
- Select the time after which you want the alarm to sounds by pressing the + or - sensor.
- You will hear 2 beeps to confirm that the time has been set. The clock will start counting down from the selected time and the illuminated symbol will flash slowly.
- When the time is up, the alarm will go off and the illuminated symbol will flash quickly.
- Touch any sensor to stop the alarm. This will cause the illuminated symbol to switch off.
If you want to change the timer alarm, simply touch the sensor with your finger tip and then press the + or - sensor. You will hear 2 beeps to confirm that the time has been changed. The clock will start counting down from the new time and the clock timer symbol will flash slowly.
Note
You cannot see the current time on the display when the timer alarm is set.
Programming Cooking Time
- Press – or + until symbol lights up. Press OK.
- Select the cooking time by pressing the + or - sensor.
- You will hear 2 beeps, the AUTO symbol will flash slowly and the display will show the time left before the oven switches off automatically.
- Select a cooking function and temperature.
- Once the cooking time is up, the oven will turn off, an alarm will sound and the AUTO symbol will flash quickly.
- Touch any sensor to stop the alarm and to turn off the AUTO symbol. The oven will switch on again.
- Set the controls to ☐ to turn off the oven.
You can change the remaining cooking time at any time by touching sensor with your fingertip until the AUTO symbol starts to flash quickly. Now touch the + or - sensor to change the time.
NOTE
You cannot see the current time on the display when the cooking time is set.
Programming the Cooking Stop Time
- Press – or + until symbol lights up. Press OK.
- Select the cooking stop time by pressing the + or - sensor.
- You will hear 2 beeps, the display will show the current time and the AUTO symbol will flash slowly to indicate that the oven will switch off automatically.
- Select a cooking function and temperature.
- When the cooking time is up, the oven will turn off, an alarm will sound and the AUTO symbol will flash quickly.
- Touch any sensor to stop the alarm and to turn off the AUTO symbol. The oven will switch on again.
- Set the controls to ☐ to turn off the oven.
You can change the stop cooking time at any time by touching sensor with your fingertip until the AUTO symbol starts to flash quickly and you see the stop time on the display.
Now touch the + or - sensor to change the time.
Programming Cooking Time and Cooking Stop Time
- Press – or + until symbol lights up. Press OK.
- Select the cooking time by pressing the + or - sensor.
- You will hear 2 beeps, the display will show the remaining cooking time, and the AUTO symbol will flash slowly.
- Touch sensor until the AUTO symbol starts to flash quickly. The display will show the current time and the programmed cooking time.
- Select the cooking stop time by pressing the + or - sensor.
- You will hear 2 beeps and the display will show the current time.
- Select a cooking function and temperature.
- The oven will remain off and the AUTO light will be on. The oven is now programmed.
- When it is time to start cooking, the oven will turn on and will operate for the programmed cooking time.
- While cooking, the display will show the cooking time remaining and the AUTO symbol will flash slowly.
- When the cooking time is up, the oven will turn off, an alarm will sound, and the AUTO symbol will flash quickly.
- Touch any sensor to stop the alarm and to turn off the AUTO symbol. The oven will switch on again.
- Set the controls to ☐ to turn off the oven.
If you want to change the remaining cooking time while the oven is on, press sensor until the AUTO symbol starts to flash quickly.
Now press the + or - sensor to change the time.
Child Safety Function
This function can be selected at any time while using the oven.
To activate the function, press the + and - sensors at the same time for several seconds. You will hear a beep and the display will show the word SAFE. The clock is locked.
If the oven is off and you activate the child safety function, it will not work even if a cooking function is selected.
If this function is activated while you are cooking, it will only lock the electronic clock settings.
If a clock sensor is touched while the child safety function is on, the word SAFE will appear on the display.
The clock is locked. To disable the function, press the + and - sensors at the same time for several seconds until you hear a beep.
Caution
In the event of a power failure, your electronic clock settings will be erased and 12:00 will flash on the clock display. Reset the clock and program again.
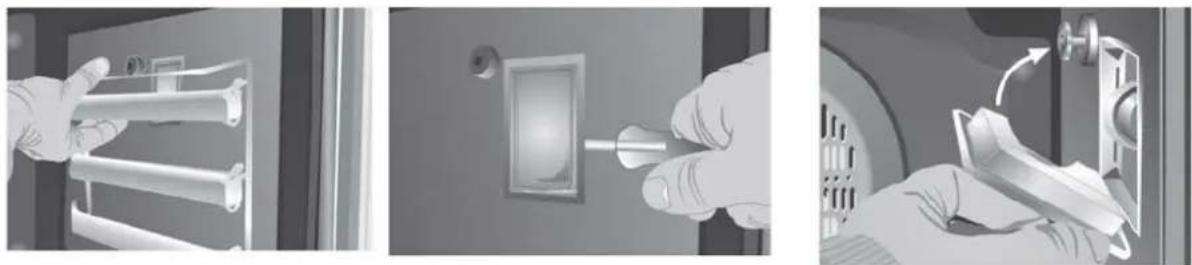
Fold-down Grill Element
To clean the top of the oven,
- Wait until the oven is cold.
- Push the rod of the grill element (A) with both hands until it is released from the upper fastening point.
- Rotate the element and clean the top of the oven.
• Finally, place the grill element back in its original position.
ENERGY SAVING
Choose cookware of an appropriate size.
Using a lid will reduce cooking times.
Minimize the amount of liquid or fat to reduce cooking times.
Oven door should not be opened often during cooking period.
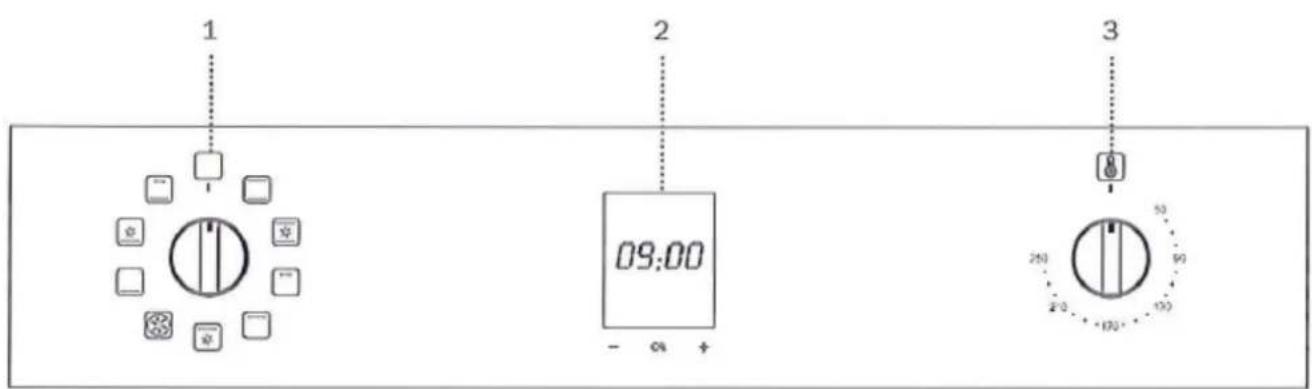
CONTROLS
Control Panel
text_image
1 2 3 09:00 - 04 + 250 2.0 100 50 901 Function selector.
2 Electronic clock.
3 Temperature selector.
ACCESSORIES
It is recommended that you use the containers indicated depending on the food you will cook in your oven. You can also use glass containers, cake pans and special oven trays suitable for use in your oven (available in kitchenware shops). Pay attention to the information given by the supplier for use of this cookware. The information given below should be implemented for enamelled containers.
If the food to be cooked does not completely cover the oven tray, if the food is taken out of the deep-freezer or if the tray is used to collect the dripping juices of the foods during the grill operation, deformation might be observed on the tray over time due to high temperatures forming during the cooking/baking operation. This is a normal, physical state that results during the heat transfer. Do not leave a glass tray or container
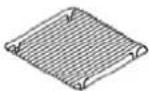
in a cold environment immediately after cooking in them. Do not place them on cold and wet surfaces. Ensure that they slowly cool off by placing them on a dry piece of cloth or wooden board, otherwise, the glass tray or container might break. If you are going to use your oven to grill, we recommend using the grill rack on the tray, supplied together with your product. This way, splattering and dripping oils will not make the oven interior dirty. If you are going to use the large wire oven rack/grill, insert a tray into one of the lower racks to collect fat or oil. To make cleaning easier, add some water into this tray. In a grilling operation, use the shelf in position 4 or 5.
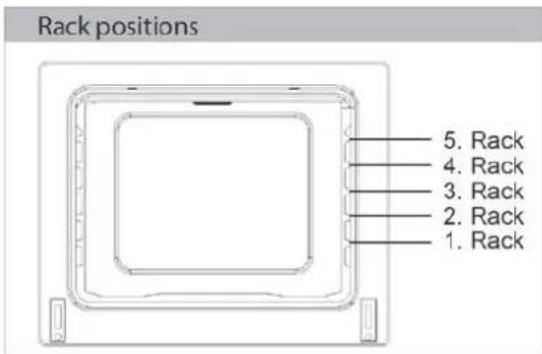
text_image
Rack positions 5. Rack 4. Rack 3. Rack 2. Rack 1. RackIf the interior lighting lamp does not light:
- The lamps are defective. If they are defective, you can change them following the instructions within this manual.
ANTI-TIP SHELVES AND TRAYS
Each anti-tip shelf and tray comes with a built-in safety feature to help minimise them being accidentally pulled fully out. This comes in the way as a "step", positioned part-way in from the rear of the anti-tip shelf or tray.
To fit them into the oven, push the anti-tip shelf or tray part way into the oven until the step "catches", then angle the part over the step & fully insert. To remove, repeat the process in reverse.
WARNING: Accessible parts may become hot when the grill is in use. Children should be kept away.
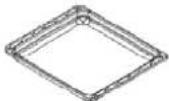
| Anti-tip Shelves | ||
 | Anti-tip shelf is used to grill or to place different cookware on it.WARNING - Fit the anti-tip shelfinto the rack position at anangle, push in and level out.Push to the end of the cavity. | 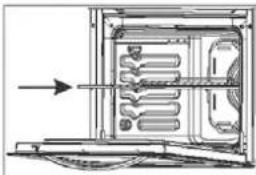 |
| Baking Tray | ||
 | Baking tray is used to cook stews.To locate the tray correctly in the cavity, put it to any rack andpush it up to the end. | |
| Grill Insert for Baking Tray | ||
 | Grill insert must be placed into the baking tray correctlyIt is recommended to use this accessory when grilling steaks,meatballs etc. | |
CLEANING

NOTE: Cleaning and maintenance operations must only be carried out when the oven is cool.
The appliance should be disconnected from the power outlet or turned off at your isolation switch before commencing any cleaning process.
Cleaning the oven exterior:
Before starting to clean your oven, be sure that all control buttons are off and your appliance has cooled off. Unplug the appliance.
Do not use cleaning materials containing particles that might scratch the enamelled and painted parts of your oven. Use cream cleaners or liquid cleaners, which do not contain particles. As these cleaners may damage the surfaces, do not use caustic creams, abrasive cleaning powders, rough wire wool or hard tools. In the event of any excess liquids spilling over your oven surface during cleaning, clean up immediately so as to prevent possible damage to the enamel or metal surface. Do not use steam cleaners for cleaning the oven.
Cleaning the interior of the oven:
Make sure to unplug the oven before starting to clean it. You will obtain best results if you clean the oven interior while the oven is slightly warm (the oven should not be operating). Wipe your oven with a soft piece of cloth (e.g. dish cloth) dampened with warm soapy water after each use, rinse cloth in warm water then wipe oven again and then finish by wiping with a dry cloth. For a complete cleaning process, use dry and powder type oven cleaners, following the oven cleaning product's instructions.
TROUBLESHOOTING
If the oven does not operate:
- The oven may be unplugged from the power source or switched off at the power source.
- The household fuse has blown or household power supply is off.
- The Timer (if available) may not set correctly.
If the oven does not heat:
- The heat may not be set correctly with the oven's temperature setting.
| FOOD (Starters) | ||||||
| Weight (Kg) | Rack pos. | Cooking Mode | Temperature (C°) | Time (Min) | Receptacle | |
| Baked Rice | 1.0 | Lower | Conventional with Fan | 180-200 | 25-30 | Shallow oven Dish |
| Pasty | 1.2 | Intermediate | Conventional with Fan | 160-180 | 30-35 | Tray |
| Vegetable Pastry | 1.0 | Intermediate | Conventional with Fan | 180-200 | 25-30 | Shallow Dish |
| Vegetable Pie | 1.0 | Intermediate | Conventional with Fan | 170-190 | 45-50 | Shallow Dish |
| Baked Potatoes | 1.0 | Lower | Grill and Lower Element | 180-200 | 55-60 | Tray |
| Pizza | 0.6 | Intermediate | Conventional with Fan | 170-190 | 10-15 | Grid |
| Quiche | 0.8 | Intermediate | Grill and Lower Element | 180-200 | 40-45 | Quiche Mould |
| Stuffed Tomatoes | 0.8 | Intermediate | Grill and Lower Element | 170-190 | 10-12 | Tray |
| Lasagne | 1.0 | Intermediate | Grill | 180-200 | 8-10 | Shallow Dish |
| FOOD (Fish) | Weight (Kg) | Rack pos. | Cooking Mode | Temperature (C°) | Time (Min) | Receptacle |
| Red Bream | 1.0 | Intermediate | Grill and Lower Element | 180-200 | 25-30 | Tray |
| Salted Dorado | 1.0 | Intermediate | Conventional with Fan | 190-210 | 25-30 | Tray |
| Sole | 1.0 | Intermediate | Conventional with Fan | 160-180 | 10-15 | Tray |
| Sea-Bass | 1.0 | Intermediate | Grill | 190-210 | 20-25 | Tray |
| Hake | 1.1 | Intermediate | Grill | 190-210 | 25-30 | Tray |
| Fish Pie | 1.1 | Intermediate | Grill | 190-210 | 60-65 | Casserole Dish |
| Salmon in Greased Paper | 1.0 | Intermediate | Conventional with Fan Oven | 170-190 | 15-20 | Tray |
| Trout | 1.1 | Intermediate | Grill | 190-210 | 20-25 | Tray |
| Fillet of Fish | 1.0 | Higher | Grill | 170-190 | 15-20 | Grid |
| Sardines | 1.0 | Higher | Grill | 180-200 | 10-15 | Grid |
| FOOD(Cakes and Desserts) | Weight(Kg) | Rack pos. | Cooking Mode | Temperature(°C) | Time(Min) | Receptacle |
| Sponge Cake | 0.5 | Intermediate | Conventional Fan | 170-190 | 30-35 | Cake Mould |
| FOOD(Meat) | Weight | Rack pos. | Cooking Mode | Temperature | Time | Receptacle |
| Swiss Roll | 0.5(Kg) | Intermediate | Conventional Fan | 160-180 | 10-15(Min) | Tray |
| Buckling Pig | 0.4 | Intermediate | Conventional Fan | 150-190 | 30-35 | Brand Mould |
| Babbits | 1.0 | Intermediate | Conventional | 180-200 | 20-26 | Tray |
| Lamb | 1.0 | Intermediate | Conventional | 170-190 | 45-50 | Tray |
| Vol-Au-Vents | 0.3 | Intermediate | Conventional | 160-180 | 15-20 | Tray |
| Salted Pork Loin | 0.6 | Intermediate | Eairl | 170-190 | 40-45 | Tray |
| Chip Cakes | 0.2 | Intermediate | Conventional Fan | 160-180 | 20-26 | Tray |
| Baked Apples | 0.6 | Intermediate | Conventional Fan | 180-200 | 20-26 | Tray |
| Fillet Steak Pastry | 1.0 | Intermediate | Grill | 180-200 | 35-40 | Tray |
| Brochettes | 0.3 | Higher | Grill | 180-200 | 10-12 | Grid |
| Sausages | 0.6 | Higher | Grill | 190-210 | 10-15 | Grid |
| Meringue | 0.35 | Intermediate | Grill | 100-120 | 70-75 | Tray |
| Baked Bananas | 0.5 | Intermediate | Grill | 180-200 | 20-25 | Casserole Dish |
| Plum Cake | 0.6 | Intermediate | Conventional Fan | 160-180 | 50-55 | Cake Mould |
| Apple Pie | 0.8 | Intermediate | Conventional Fan | 160-180 | 40-45 | Tray |
| Cheesecake | 0.8 | Intermediate | Conventional Fan | 170-190 | 40-45 | Cheesecake Mould |
| Yoghurt | 1 litre | (1) | Grill | 50 | 8 hours | Yoghurt Pots |
Cooking (if lower-upper part does not cook equally):
- Control the shelf locations, cooking period and heat values according to the manual.
Unit smoking when first used:
- This is a result of protective oils being removed and is to be expected with a first use.
Clock Flashing on Display
• Power failure or interruption
If you have any further problems with your product, please call your Authorised Service Centre.
We appreciate your feedback. Please review our products on www.blanco-australia.com
BLANCO
AUSTRALIAN & NEW ZEALAND PRODUCT WARRANTY STATEMENT OF STANDARD WARRANTY CONDITIONS
AUSTRALIAN CUSTOMERS
Our goods come with guarantees that cannot be excluded under the Australian Consumer Law. You are entitled to a replacement or refund for a major failure and for compensation for any other reasonably foreseeable loss or damage. You are also entitled to have the goods repaired or replaced if the goods fail to be of acceptable quality and the failure does not amount to a major failure.
NEW ZEALAND CUSTOMERS
Nothing herein contained shall be construed in any way as excluding or limiting your rights under the Consumer Guarantee Act 1993.
OUR WARRANTY
This product is also covered by the manufacturer's warranty set out in this document (Our Warranty).
Our Warranty is for a period of twenty four (24) months from the date of purchase and for dishwasher & refrigeration appliances will have an additional thirty six (36) months after the first twenty four (24) months on the wash motor for dishwashers & on the Sealed System (PARTS only Compressor & condenser etc) for refrigeration appliances. The labour cost to replace these parts is the responsibility of the customer.
This is in addition to (and does not exclude, restrict or modify) any rights or remedies to which you may already be entitled under the Australian consumer Law or the New Zealand Consumer Guarantee Act 1993 relating to this product.
Our Warranty (which is subject to the conditions below) covers rectification free of charge of any fault arising from defective materials or components, or faulty workmanship. The product will be repaired or replaced at the option of Blanco, and all costs of installation, removal, cartage, freight travelling expenses and insurance are to be paid by the customer.
Our Warranty is subject to the following conditions:
- That the purchaser contact Blanco prior to any product repair.
- That the purchaser carefully follows all instructions provided with the product and complies with all relevant electrical & plumbing regulations in their State when installing the product.
- That the purchaser carefully follows the instructions provided in the owner's handbook relating to the proper use and care of the product and does not use the product for any purpose other than the DOMESTIC use for which it has been designed. If the appliance is used in commercial applications or for rental purposes, Our Warranty is limited to a warranty of Twelve (12) months covering all parts with Three (3) months on any labour cost of service or repair.
SERVICE AREA
The provision of service under Our Warranty is limited by the boundary / territory area of the nearest service centre. Travelling cost incurred for service outside this area is not covered by Our Warranty and service will incur commercial cost to be paid by the customer regulated by the number of kilometres travelled beyond the service area. These costs will be disclosed to you for acceptance by you prior to your claim being processed.
Microwave ovens must be returned to your nearest Authorised Service Centre for repair as they are a carry in serviceable appliance.
WHAT IS COVERED: By Our Warranty
During the warranty period, Blanco or its authorised Service Centre will at no extra charge, if your appliance is readily accessible without the need of special equipment and subject to the terms and conditions of this warranty, repair or replace any parts which it considers defective.
WHAT IS NOT COVERED: By Our Warranty
- Products installed damaged or incomplete or not in compliance with the relevant electrical & plumbing regulations in their State.
- Normal wear and tear e.g. cleaning, light globes, filters etc.
- Failure resulting from power surges and electrical storms.
- Insect or vermin infestation.
- Unauthorised repairs or use of non genuine Blanco parts.
- Any failure caused by the product not being used in accordance with the instruction and the installation manual provided with the product.
- Misuse or abuse, including failure to properly maintain or service.
- The clearing of blockages in pumps and hoses.
- Damage which occurs during delivery or installation.
- Claims to product surface coating due to liquid or solid spill-overs, accidental damage or damage caused from cleaning products not recommended by Blanco.
HOW TO CLAIM OUR WARRANTY
You will need to contact Blanco in Australia or New Zealand by using the contact details below.
IN AUSTRALIA
Blanco is distributed by Shriro Australia Pty Ltd
Locked Bag 5002, Kingsgrove, NSW, 2208
Phone: 1300 795 572 Fax: 1800 686 413
Email: customercare@shriro.com.au
Web: http://www.blanco-australia.com/
IN NEW ZEALAND
Blanco is distributed by Monaco Corporation
(Member of Shriro Australia Pty Ltd)
PO Box 4399, Shortland St, Auckland, 1140
Phone: 09 415 6000 Fax: 09 415 7060
Email: service@shriro.com.au
Web: http://www.blanco-australia.com/
Note: Please complete the following details when you have unpacked the product and staple this card with the purchase invoice or sales docket.
Model No.
Date of Purchase....
Serial No.
Retailer....