
PalmPro 7763P - Video projector ACER - Free user manual and instructions
Find the device manual for free PalmPro 7763P ACER in PDF.


| Product Type | Video projector |
| Brand | Acer |
| Model | PalmPro 7763P |
| Display Technology | DLP |
| Resolution | 1920 x 1080 (Full HD) |
| Brightness | 3000 ANSI lumens |
| Contrast Ratio | 10,000:1 |
| Keystone Correction | Vertical ±30° |
| Lamp Life (Normal/Eco) | Up to 5000 / 10000 hours |
| Connectivity | HDMI, VGA, USB, Composite, Audio In/Out |
| Built-in Speaker | 2W mono |
| Dimensions (W x D x H) | 280 x 210 x 90 mm |
| Weight | 2.5 kg |
| Power Consumption | 240W max |
| Input Voltage | 100-240V AC, 50/60Hz |
| Cleaning Instructions | Wipe exterior with soft dry cloth; clean air filter every 500 hours |
| Lamp Replacement | User-replaceable after cooling |
| Operating Temperature | 0°C to 40°C |
| Safety Features | Auto power-off, overheat protection, Kensington lock |
| Included Accessories | Power cord, VGA cable, remote control, user manual |
| Warranty | 2 years limited |
Frequently Asked Questions - PalmPro 7763P ACER
User questions about PalmPro 7763P ACER
0 question about this device. Answer the ones you know or ask your own.
Ask a new question about this device
Download the instructions for your Video projector in PDF format for free! Find your manual PalmPro 7763P - ACER and take your electronic device back in hand. On this page are published all the documents necessary for the use of your device. PalmPro 7763P by ACER.
USER MANUAL PalmPro 7763P ACER
Thank you very much for purchasing this Acer DLP™ Technology Projector.
Please read this operating guide to ensure correct use of the device. After reading this manual, keep it for future reference.
Outline
This DLP™ Technology Projector can display various computer signals and NTSC/PAL/SECAM video signals.
Features

natural_image
Line drawing of a projector with ventilation grilles and a circular lens (no text or symbols)(1) High brightness
(2) High resolution
(3) Compact size, light weight for portability
(4) RGB output terminal
(5) RS232 Communication
(6) Mouse emulation
(7) Complies with VESA DDC1/2B specifications
Copyright
Copyright © 2000 by this company. All rights reserved. No part of this publication may be reproduced, transmitted, transcribed, stored in a retrieval system or translated into any language or computer language, in any form or by any means, electronic, mechanical, magnetic, optical, chemical, manual or otherwise, without the prior written permission of this company.
Disclaimer
This company makes no representations or warranties, either expressed or implied, with respect to the contents hereof and specifically disclaims any warranties, merchantability or fitness for any particular purpose. Further, this company reserves the right to revise this publication and to make changes from time to time in the contents hereof without obligation of this company to notify any person of such revision or changes.
Fill this in!!
For the convenience of service, record the following information in the space below. The serial number is on the back of the product.
Monitor Information
Product 7763P/65PE Name: Serial Number: Date of Purchase:
Dealer Information
Dealer: Telephone Number: Address:
Caution
TO PREVENT SHOCK, DO NOT OPEN THE CABINET. NO USER -SERVICEABLE PARTS INSIDE. REFER SERVICING TO QUALIFIED PLUS SERVICE PERSONNEL. AND PLEASE READ ALL OF THESE INSTRUCTIONS BEFORE YOU OPERATE YOUR PROJECTOR. SAVE THESE INSTRUCTIONS FOR FUTURE REFERENCE.
Safety Instructions
- Read all of these instructions before you operate your projector and save for future reference.
- The lamp becomes extremely hot during operation. Allow the projector to cool for approximately 45 minutes prior to removing the lamp assembly for replacement. Do not operate lamps beyond the rated lamp life. Excessive operation of lamps beyond rated life could cause them to explode in rare occasions.
- Power is still available when the projector is in the standby mode. Never replace lamp assembly or any electronic components unless the projector is unplugged.
-
Do not attempt to service this product yourself, as opening or removing covers may damage the components inside and will void your warranty.
-
Do not place this product on an unstable cart, stand, or table. The product may fall, causing serious damage to the product.
- The Standard Remote Control contains a low-power laser that acts as a pointing device during presentations. The light beam may cause injury if pointed directly into a person's eyes.
- This product is capable of displaying inverted images for ceiling mount configurations. Please use suitable equipment for mounting the unit and make sure it is securely installed.
- Openings in front or at two sides are for ventilation. They must not be blocked or covered.
- For ventilation reasons, the fan continues to operate for about 2 minutes after the projector has been powered off. Please do not unplug the power cord until the fan stops.
- Do not look straight at the projector lens during operation. The intense light beam may injure your eyes.
Table of Contents
| Introduction | 1 |
| Projector Features | 1 |
| Description | 2 |
| A FRONT (figure) | 2 |
| B REAR (figure) | 2 |
| C BOTTOM (figure) | 3 |
| Installation | 3 |
| A. Positioning | 3 |
| B. Adjustable Feet | 4 |
| Moving the Projector | 4 |
| Accessories | 5 |
| Connection | 7 |
| A Connecting the Projector to Computer/Notebook 7 | |
| B Connecting the Projector to Macintosh/Power Book 8 | |
| Operation | 9 |
| Turn On/Off Procedure | 9 |
| A Power on | 9 |
| B Standby | 9 |
| External Control | 9 |
| A Control Pad | 9 |
| B Remote Control | 11 |
| Usage and Replacement of Lamp | 12 |
| A Lamp/temperature Status LED Indicator | 13 |
| B Replacing the Lamp | 14 |
| OSD | 17 |
| Main OSD Menu | 17 |
| A Display Page | 18 |
| B Image Page | 19 |
| C Control Page | 20 |
| D Source Page | 21 |
| Other Correspondent Remote Functions and Messages 22 | |
| Maintenance and Troubleshooting | 24 |
| A Lamp Replacement | 24 |
| B Cleaning the Lens | 24 |
| C Troubleshooting | 24 |
| Specifications | 26 |
| A Optical | 26 |
| B Electrical | 26 |
| C Mechanical | 26 |
| D Preset Display Resolution Table | 27 |
| Appendix | 28 |
| AV Connection Port | 28 |
| AV Control Pad | 28 |
| A Connecting the Box | 29 |
Introduction
Projector Features
A Image Resolution
Fully compatible with true SVGA(63P)/XGA(65PE), and supports SXGA using advanced intelligent compression technology. The advanced intelligent compression technology enables it to present clear compression SVGA/XGA images without line omission.
B Brightness
Provides superior brightness of 700 ANSI lumens using TI's Digital Micromirror Device (DMD) and our own optical design, with a geometric effect that increases light usage efficiency. By increasing the light usage efficiency we can better reproduce the three basic colors (RGB) required for color reproduction on a single DMD.
C Portability
This projector has a sophisticated shape, like that of an attaché case, with a retractable carrying handle that is extremely compact and lightweight. It helps you make powerful presentations wherever you go with its 5-pound weight and B5 size.
D Keystone
The projection position is already set to the height of the line of vision; there is no keystone effect. Even when projecting above or under the height of the line of vision, image distortion (if any) can be adjusted using the keystone correction function.
E Multilanguage
The OSD (On Screen Display: information screens and menus) in 7 languages (English, Deutsch, Français, Italiano, Español, Swedish and Dutch) provides you with additional information to help you make corrections with OSD operation in your native languages.
F Auto Detect System
This projector can detect display signals from PCs with frequently used timing and do the optimization simultaneously. It does not require complicated adjustments in order to project picture images from PCs.
G Ceiling Mount and Rear Screen Projection
The projector is equipped with a full mirror scan conversion function (vertical/horizontal mirror), which allows the image to be reversed for ceiling mounting as well as for rear projection applications.
H AV box
An AV box is optional, and users can attach one or two to the projector. Additionally, our AV box video standard is compatible with NTSC U.S. and Canada standard
PAL Western Europe standard
SECAM France and Eastern Europe standard
NTSC4.43 Middle East standard
If users want to watch CATV, AV box will serve the need.
Description
A FRONT (figure)
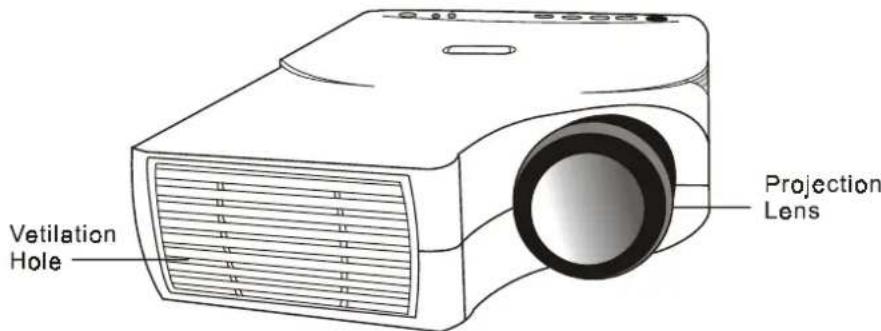
Figure 1 Front view of 7763P/ 65PE
B REAR (figure)

Figure 2 Rear view of 7763P/65PE
C BOTTOM (figure)

Figure 3 Bottom view of 7763P/65PE
Installation
A. Positioning
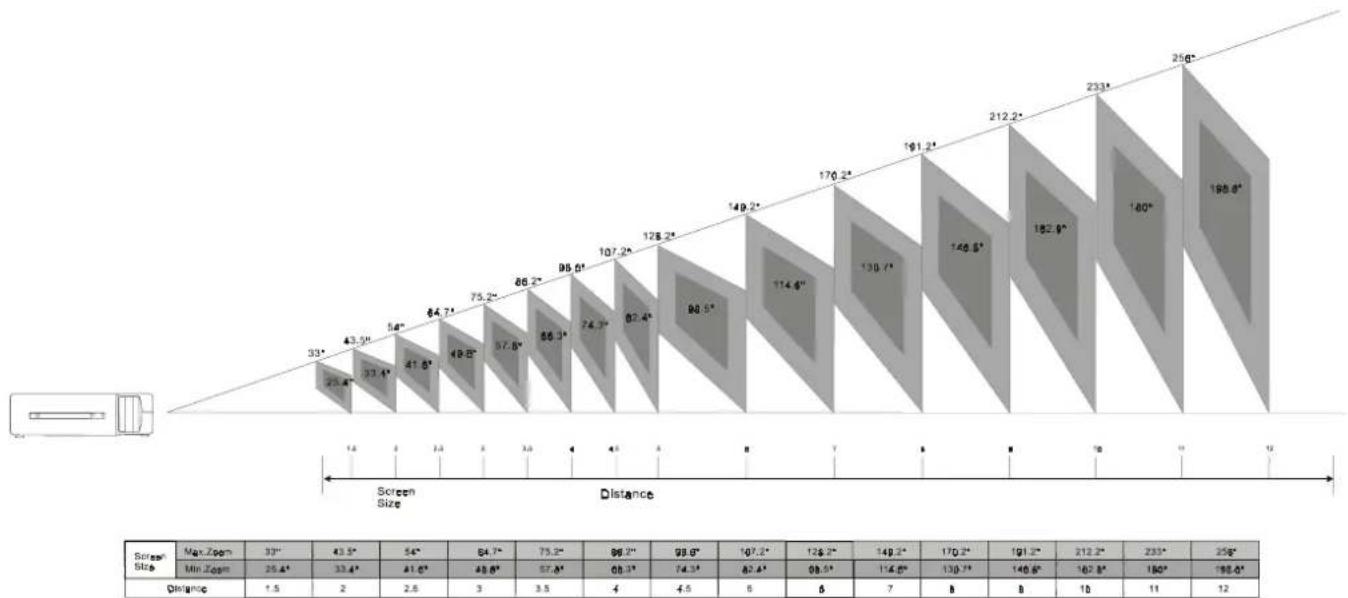
- This projector is basically designed to project on a flat projection surface.
- This projector can be focused from 1.5m-14m.
• Refer to the figure below to adjust the screen size.
bar
| Screen Size | Max Zoom | Min Zoom | Distance | |---|---|---|---| | 1.5 | 33* | 25.4* | 33.4* | | 2 | 43.9* | 33.4* | 41.6* | | 3 | 54* | 41.6* | 48.6* | | 4 | 64.7* | 49.8* | 57.6* | | 5 | 75.2* | 57.6* | 66.2* | | 6 | 86.2* | 66.3* | 74.3* | | 7 | 96.6* | 74.3* | 82.4* | | 8 | 107.2* | 82.4* | 90.5* | | 9 | 128.2* | 90.5* | 107.2* | | 10 | 149.2* | 107.2* | 126.2* | | 11 | 170.2* | 126.2* | 149.2* | | 12 | 170.2* | 149.2* | 170.2* | | 13 | 191.2* | 149.6* | 191.2* | | 14 | 212.2* | 160.6* | 212.2* | | 15 | 233* | 160* | 233* | | 16 | 180* | 180* | 180* | | 17 | 256* | 198.6* | 256* | Distance: Range from (1.5, 33) to (198.6*, 256).Figure 4 Positioning of 7763P/65PE
B. Adjustable Feet
Picture tilt and projection angle can be adjusted by twisting Adjustable Feet. Projection angle can be adjusted 2^ to 8.5^ degrees by rotating Adjustable Feet.
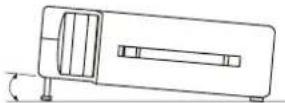
Figure 5 Adjustable feet
Moving the Projector
Use the carrying handle when moving the projector.
Replace the lens cover and rotate the feet fully clockwise (to shorten the feet) when moving the projector to prevent damage to the projector.
Caution
The carry bag (supplied) is intended to protect the projector from dust and scratches on the surface of the cabinet. It is not designed to protect the projector from external shock.
Do not transport the projector in an unsuitable transport case by using a courier or transport service. This may cause damage to the projector.

natural_image
Line drawing of a hand pressing down on a device component (no text or symbols)Figure 6 Moving the projector
Accessories
Please check and make sure your box contains everything listed below. If any pieces are missing, contact your dealer.
Please save the original box and packing materials in case you ever need to ship the unit.

Figure 7 Accessories of 7763P/65PE
Connection
2
A Connecting the Projector to Computer/Notebook
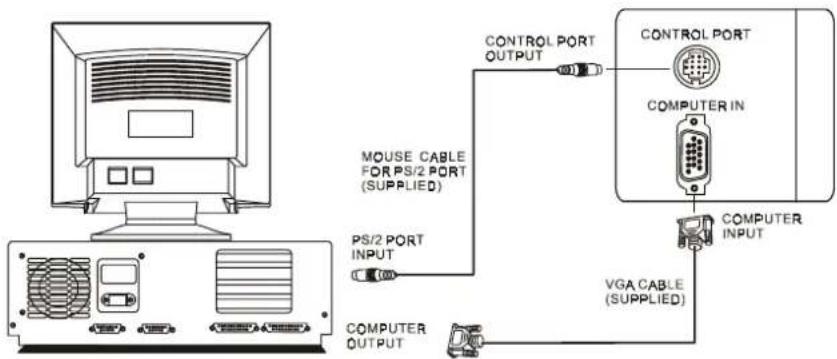
Figure 8 Connection to PC

Figure 9 Connection to notebook
B Connecting the Projector to Macintosh/Power Book

flowchart
graph TD
    A["Computer"] --> B["ADB PORT INPUT"]
    B --> C["MOUSE CABLE FOR ADB PORT (SUPPLIED)"]
    C --> D["CONTROL PORT OUTPUT"]
    D --> E["COMPUTER IN"]
    E --> F["COMPUTER INPUT"]
    F --> G["VGA/CABLE (SUPPLIED)"]
    G --> H["VGA/MAC ADAPTER (SUPPLIED)"]
Figure 10 Connection to Macintosh
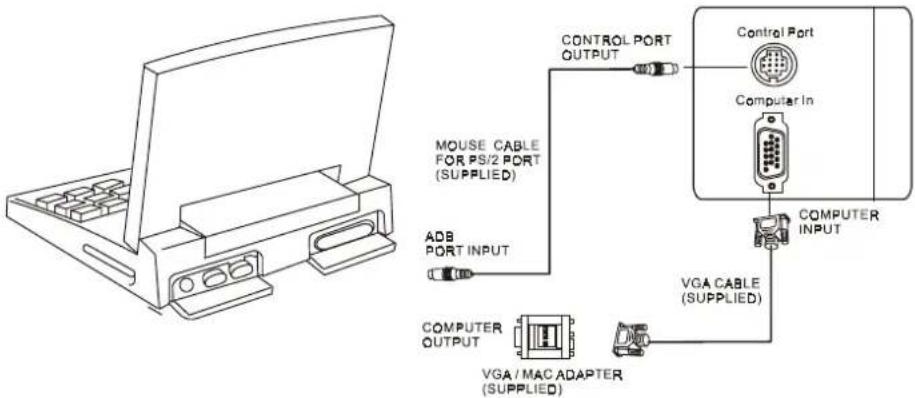
Figure 11 Connection to Power Book
Turn On/Off Procedure
A Power on
Press the Standby/On key to turn on the lamp. The LED will blink green during warm up and then light solid green.
"INPUT SIGNAL DETECTED, ACTIVATING AUTO IMAGE" will be displayed on the screen after the projector has identified the input signal;
"SEARCHING" message will be displayed on the screen if there is no signal input;
"SYNC IS OUT OF RANGE" message will be displayed on the screen if the horizontal frequency of the input signal exceeds the range of the projector.
B Standby
Press the Standby/On key for more than one second to turn off the lamp. The LED will then blink orange and the lamp will shut down, but the fan will continue to run for about 1 minute to cool the lamp. After the fan stops, the LED will turn to a light solid orange.
*Lamp Protection Procedure: If you try to turn on the lamp again while the LED is blinking, the projector will ignore the command until it has cooled down for one minutes.
External Control
A Control Pad

Figure 12 External control pad
| MAIN UNIT FUNCTION | |
| Menu | To call the OSD menu.To enter sub pages.To select items. |
| ▸ | To navigate through sub pages or to increase the scale bar number. |
| ◄ | To navigate through sub pages or to decrease the scale bar number. |
| Exit | To exit from the current page or OSD menu, and save setting changes.To show lamp hour message |
| Standby/On | To turn the projection lamp on and off. |
| Standby/On indicator | Functions as an indicator showing the standby status. |
| Lamp status indicator | Lights or blinks when the lamp does not light. |

B Remote Control
Figure 13 Remote control
The remote control allows you to operate the function keys on the projector and to emulate mouse function when the projector is connected to a computer.
| Main Unit Function | |
| Standby/On | To turn the projection lamp on and off. |
| Freeze | Pressing this button displays a still (frozen) picture. |
| Magnify | Pressing this button partially magnifies a displayed picture.(Move the picture with the Disk Pad after pressing the Magnify button.) |
| Disk Pad | When the OSD menu is active, Disk Pad acts as ▲▼selecting device. When the on-screen menus are not active, it works as mouse pad. When the magnify function is active, use disk pad to move through the picture. |
| Menu | Call the OSD Menu.To enter sub pages.To select items. |
| Blank | The blank screen is displayed by pressing Blank. And the blank screen will be revealed partially from top to bottom by pressing Blank again. |
| Source | Selects the input source. |
| Mute | Mutes the sound. |
| Volume | Adjusts volume. The sound gets louder or quieter by pressing the "+" or "-" button. |
| Laser | Laser pointer on button. Use as a stick (for indication). |
| Mouse Left-Click | When operating in mouse emulation mode, it registers a left mouse click. (bottom button) |
| Mouse Right-Click | When operating in mouse emulation mode, it registers a right mouse click. |
| Exit | To leave current OSD Pages. |
| ◄►Drag | To move Left/Right among OSD items. |
Inserting Batteries in the Remote Control
Be sure to follow instructions in placing batteries into the remote control units.
- Push and slide the lid in the direction of the arrow.
• Install two 'AAA' batteries as indicated inside the battery compartment. - Replace the lid and snap into place.

Caution
- Avoid excessive heat and humidity.
- Do not mix new and old or different types of batteries.

natural_image
Three-step diagram showing battery installation process: first with two batteries, second with a battery inside a housing, and third with a housing inside (no text or symbols)Figure 14 Battery replacement process
Remote Control Range
The remote sensors are located on the back of the unit. It can function in a range 50 degrees horizontal and 30 degrees vertical relative to a line that is a right angle to the remote sensor. The distance between the remote control and remote sensor must be shorter than four meters (13 feet).

Figure 15 Range
Usage and Replacement of Lamp
The light source lamp has a limited service life.
The picture will become dark or the color will fade after the lamp has been used for a long time. In such cases, continued use of the lamp could cause a malfunction. Replace the lamp with a new one.
A Lamp/temperature Status LED Indicator
1. Lamp in excess of service hours
When the LED light is a continuous red, it means the lamp has exceeded (*1500) service hours. After this light appears, it is advisable to replace the projection lamp as soon as possible.
i. "CHANGE THE LAMP, AND RESET THE LAMP TIMER" will be displayed on the screen if the lamp has been operated for 1200 hours (see figure 16).
ii. "CHANGE THE LAMP, THE POWER WILL TURN OFF AFTER 20 HOURS" will be displayed on the screen if the lamp has been operated for 1479 hours. The "20" will count down (see figure 17).
iii. "CHANGE THE LAMP!" will blink on the screen together with a red LED if the lamp has been operated for more than (*1500) hours (see figure 18). The power will turn off automatically after 10 minutes. All three of the above messages will not display for more than 3 minutes, but each message will be displayed whenever you turn on the lamp.

Figure 16 Lamp replacement warning signal


2. Lamp is not well attached
If the LED blinks rapidly, it indicates that the lamp is not attached properly.
3. Temperature is too high
If the projector's internal temperature is too hot to operate safely, the LED will blink slowly for one minute and then the lamp will turn off automatically.
4. Normal status
If the LED light is off, it means the lamp and temperature inside the projector are normal.

Caution:
The lamp indicator will light when the lamp becomes too hot. Turn off the power and let the projector cool for 45 minutes, then turn it on again. If the indicator is still shining, contact your dealer.
B Replacing the Lamp
Replacing the lamp
When replacing the lamp, turn off the projector and unplug the AC cord. Wait 45 minutes so that the lamp can cool. High-pressure lamp when hit, may explode if improperly handled.

Caution:
- Dispose of used lamps in accordance with local authorities.
• As the lamp is made of glass, do not apply shocks to it or scratch it. - Also, do not use an old lamp, as this could cause the lamp to explode.
- If it seems that the lamp has exploded (for example, an explosive sound is heard), disconnect the power cord from the outlet and ask your dealer to replace the lamp. The lamp is covered by a front glass panel and an air-tight structure, but, in rare cases, the reflector and the inside of the projector may be damaged by scattered, broken pieces of glass, which could cause injury while being handled.
i. Turn the main power switch off and disconnect the power cord from the outlet.
ii. Remove the lamp cover.
- If hot, the lamp could cause burns. Wait for about 45 minutes until lamp has cooled down.
- Loosen a screw and remove the cover.
iii. Loosen the screw and pull the handle to remove the lamp.
- If the screw is not loosened completely, you could hurt your fingers.
- Do not insert your hand into the box after the lamp has been removed. (There are optical parts inside that, if touched, could result in color unevenness, etc.)
iv. Replace the lamp with a new one and fix it using the same screw.
- Firmly tighten the lamp screw. Loose screws could result in a poor connection, which could cause the unit to malfunction.
v. Install the lamp cover and fix it using a screw.
• To prevent burns, install the lamp cover and secure it using the screw.
- Do not turn on power with lamp cover removed.
- Whenever the lamp is replaced, reset the total operation time of the lamp. Do not reset if the lamp has not been replaced.
- Do not reset the timer without changing the lamp, as this can cause the lamp to break.
Lamp Replacement Procedure

Figure 19 Lamp replacement: Step 1, Step 2, Step 3
Resetting Lamp Timer
If replacing the lamp after 1500 hours of operation, please carry out the following operation within 10 minutes of powering on.
| OSD | FUNCTION |
| Lamp -1234 Hr.- | Press the Exit button on the projector for 3 seconds or the Exit button on the remote control for 3 seconds and display the total lamp usage time. |
 | Press the Menu button on the projector or the remote control while the lamp usage time is being displayed, and the lamp hour display will be active and adjustable. |
 | Select the "Reset" item on the screen using the <▶ buttons or on control pad or remote.Lamp Hours Used/Reset |
OSD
Main OSD Menu
Press the "Menu" key and the main OSD menu structure will appear as shown at right (Fig. 23). Whenever AV box is attached, 4 subpages appear in the menu: Display page, Image page, Control page, and Source page. However if input is from PC and no AV box is attached, Source will disappear in the menu.
Press the "Menu" key again to enter Display page items, or press "◀" or "▶" to select sub-pages. (The main OSD menu will automatically disappear if a key is not pressed within 10 seconds).

Press the "Exit" button to leave the current sub-page, and press the button again to leave the main OSD menu
(at the same time the settings are saved).
Figure 20 Main OSD menu
Input PC input without AV box PC input with AV box Video input with AV box status
| Subpage | Display | Display | Display |
| Image | Image | Image | |
| Control | Control | Control | |
| Source | Source |
A Display Page
When a PC is the input source, there will be only four items on this page: Keystone, Brightness, Contrast, and Color Balance (Fig. 21). On the other hand, when the input source are video, S-video, TV or CATV, there will be other 4 items on this page: Keystone, Brightness, Contrast, and Sharpness (Fig.22).
Press the "Menu" button again to scroll through the items; press "◀" or "▶" to adjust the item scale, or press the "Exit" button to go back to the main OSD page.
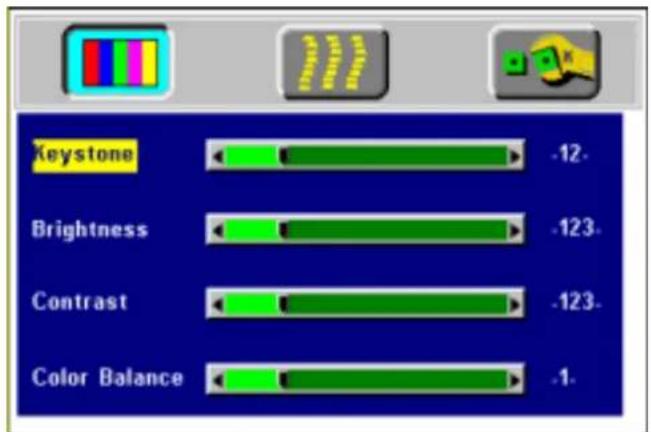
Fig.21 Display sub-page when the input source is PC(with/without AV box)

Figure 22 Display sub-page when the input source is video, s-video, TV or CATV

flowchart
graph LR
    A["Keystone (Decrease)"] --> B["(Increase)"]
    B --> C["Source is PC"]
    D["Brightness (Dark)"] --> E["(Bright)"]
    E --> F
    G["Contrast (Lower)"] --> H["(Higher)"]
    H --> I
    J["Color Balance (Red)"] --> K
Sharpness (Soft) (Sharp) Source is Videos
B Image Page
Select the Image sub-page and the first item, "Auto Resize" will be highlighted. There are five items on this page: Auto Resize, H. Phase, H. Size, H. Position, and V. Position (Fig. 23).
If AV box is attached and the input is from Video other instead of PC, another different IMAGE sub-page including Image Ratio, System, Color and Tint will come out as figure 24.

Figure 23 Image sub-page... Only available when the input signal is PC
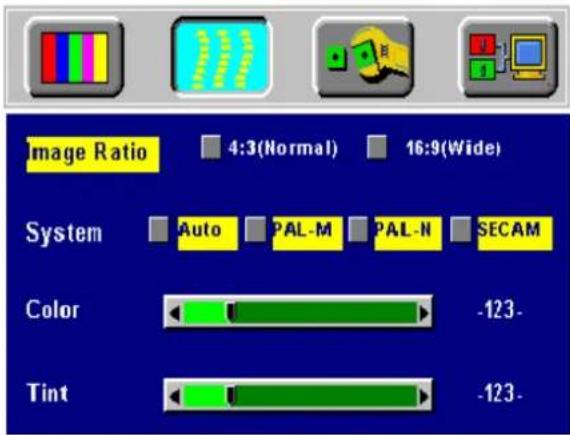
Figure 24 Image sub-page - Only available when the input signal is from video, S-video, TV or CATV
Setting effects
Auto When Auto Resize is on, the projector determines the Resize best fit of the image to the screen.
H. If flicker occurs on a projected image, users may try to adjust the H. Phase manually.
H. Size If the projected image is too wide or too narrow for the screen, users may turn Auto Image off and adjust the H. Size manually to fit the screen size.
| H. Posit ion | (move the image left) (move the image right) |
| The Auto Image should be turned off to activate the H. Position item. Position adjustments are saved when the projector is power off. | |
| V. Positio n | (move the image down) (move the image up) |
| Position adjustments are saved when the projector is power off. |
| Image Ratio 4:3 (Normal) 16:9 (Wide) | |
| System | To select the input video system standard. When an AV box or turner box is attached, the projector will automatically detect the video system. Users also can select desired video systems. When selecting system, the projector will detect the selected system simultaneously, and the OSD will still exit on the screen. The default setting of System is "Auto" (See Figure 29). |
| Color | (Less) (More) |
| Tint | (Red) (Green) Source is Video or S-Video |
*Tint may not be adjusted with PAL/SECAM video signal input.
C Control Page
When users go into the Control sub-page, the first item, "Language," will be highlighted. There are five items on this page: Language, Mirror, Blank, Auto Off, and Reset (Fig. 25).

Figure 25 Control sub-page
Setting effects
Language To select the OSD menu language. Eight languages are supported: English, French, German, Italian, Spanish, Swedish and Dutch. (See Figure 25).
| Mirror | To select Normal projection, H-Invert projection, V-Invert projection, or H/V Invert projection. |
| Blank | To select the background color when the image/sound is blanked. |
| Auto Off | To set the time to turn the power off after the start up screen is displayed and no signal is detected or sync is out of range. To select, use “◀” or “▶” to set the time. 0 means Auto Off function inactive.*Default setting is 0 (stop). |
| Reset | To reset display, image and control settings to factory settings. |
Source Page D
This Sub-page will only show up whenever AV box is attached.
There are five items on this page: Source, Volume, Treble, Bass, and Mute.

Figure 26 Source sub-page (AV box attached)
| Items | Description |
| Source | 3 input sources are available in the items when AV box is connected to the projector: PC, Video, S-video |
| Volume | To set the volume level of speaker built in the AV box. |
| Treble | To set the treble level of speaker built in the AV box. |
| Bass | To set the bass level of speaker built in the AV box. |
| Mute | To turn on/off the mute function. |
*The priority of input signal detection: a. PC b. S-Video c. Video *When selecting input sources, the projector will detect the selected input simultaneously, and the OSD menu will still exist on the screen.
Other Correspondent Remote Functions and Messages
| OSD | FUNCTION |
 Source Source | The selected source will be displayed at the bottom right of the screen for 3 seconds after selecting the source. (PC, VIDEO, S-VIDEO). |
 Freeze Freeze | The image will be frozen when the "Freeze" button is pressed. A " || " mark appears at the lower right of the screen for 3 seconds during the freeze function. Furthermore, a "▶" mark appears at the lower right of the screen for 3 seconds when freeze is released. "Freeze" is released when the source button or the "Freeze" button is pressed again. |
 Mute Mute | Press the "Mute" button and the sound will be muted. There will be an OSD message as shown below:Press Mute again or the volume +/- buttons to turn off the mute. |
 Volume Volume | Press volume + or - buttons to adjust the volume. The OSD message below will appear: (The message will disappear automatically 3 seconds after the volume is adjusted.)By pressing the magnify "+" button, the center of the picture can be magnified. Press the button again, and the image will be further magnified (to a maximum of 4X). Press the magnify "-" button, and the size of the magnified image will be reduced by 50 percent. To return to the normal display mode, press the "Return" button. |
 Magnify Magnify | |
| Laser | Press this button to generate the laser beam. |
| Disk Pad | If users connect the PS2 (ADB) mouse cable on the projector with the PC/Notebook (Macintosh/ Powerbook) mouse port, the disk pad will be able to function as a PC/Notebook(Macintosh/ Powerbook) mouse. When an image has been magnified, press the "Disk Pad" button to move around the display area (the mouse function is not available when magnify function is on). |
| Drag | This button is a toggle switch to turn on/off the drag function of the remote mouse. |
| Blank | Press this button to activate or release the blank function. |
Maintenance and Troubleshooting
4
A Lamp Replacement
Refer to Page 11
B Cleaning the Lens
Follow these steps to clean the projection lens:
- Apply a non-abrasive camera lens cleaner to a soft, dry cleaning cloth (abrasive cleaners, solvents or other harsh chemicals might scratch the lens).
- Avoid using an excessive amount of cleaner.
- Lightly wipe the clean cloth over the lens.
- Affix the lens cover whenever the projector is not in use.
C Troubleshooting
| PROBLEMS TRY THESE SOLUTIONS | |
| NO POWER | ✓ Plug the power cord into the AC Inlet. ✓ Plug the power cord into the power Inlet. ✓ Wait two minutes after the projector has been turned off before turning the projector back on. |
| NO PICTURE | ✓ Check that you have selected the proper input source. ✓ Ensure all cables are connected properly. ✓ Adjust the brightness and contrast. ✓ Remove the lens cap. ✓ Is the POWER indicator flashing? ✓ Is the STATUS Indicator flashing? |
| IMAGE ISN'T SQUARE ON THE SCREEN | ✓ Reposition the unit to improve its angle on the screen. ✓ Is the vertical offset properly corrected using the keystone function? |
| POOR COLOR | ✓ Select the correct video system. ✓ Adjust brightness, contrast, or saturation. |
| IMAGE IS BLURRED | ✓ Adjust the focus. ✓ Reposition the unit to improve its screen angle. ✓ Ensure the distance between the unit and screen is within the adjustment range of the lens. |
| REMOTE CONTROL DOESN'T WORK | ✓ Replace the batteries with new ones. ✓ Make sure there is no obstacle between the remote control and the unit. |
| √ Stand within 4 meters (13 feet) of the unit.√ Make sure nothing is blocking the receiver on the control pad. | |
| NO SOUND | √ Check audio cable connection from audio input source.√ Adjust audio source.√ Press "Volume" (+) button.√ Press "Mute" button. |
Specifications
A Optical
DMD ^TM 1-chip 0.7" DMD ^TM (Digital Micromirror Device) Lens Manual zoom, manual focus (F=2.8 to 3.1 f=31 to 40) Lamp mercury lamp 150W Image size 25" to 300" Projection Distance 1.5 to 14 M Light Output 800 ANSI lumens Contrast Ratio 450:1
B Electrical
Inputs RGB(H:31.47 to 68.70 kHz V:56.25 to 85.00 Hz)
Video (NTSC/PAL/SECAM/NTSC 4.43)
Color Reproduction Full color, 16.7 million colors simultaneously.
Power Requirement 100 to 240 VAC, 50 to 60 Hz
C Mechanical
Dimensions 24.3 cm (L) × 6.2 cm (H) × 19.8 cm (W)
Net Weight 2.3 kg/5.0 lb.
Operational Temperature projector: 10 to 40°C
Remote control
D Preset Display Resolution Table
| Resolution H Sync (kHz) V Sync (kHz) Remark | ||||
| 640x350 | 31.5 | 70.1 | ||
| 640x400 37.9 85.1 VESA | ||||
| 720x400 | 31.5 | 70.0 | ||
| 720x400 37.9 85.1 VESA | ||||
| 640x480 | 31.5 | 60.0 | ||
| 640x480 37.9 72.8 VESA | ||||
| 640x480 | 35 | 66.7 | ||
| 640x480 43.3 85.0 VESA | ||||
| 800x600 | 35.2 | 56.3 | ||
| 800x600 37.9 60.3 VESA | ||||
| 800x600 46.9 75.0 VESA | ||||
| 800x600 48.1 72.2 VESA | ||||
| 800x600 | 53.7 | 85.1 | ||
| 832x624 49.7 74.5 Macintosh | ||||
| 1024x768 | 48.4 | 60.0 | ||
| 1024x768 56.5 70.1 VESA | ||||
| 1024x768 | 60.0 | 75.0 | ||
| 1024x768 68.7 85.0 VESA | ||||
| 1280x1024 | 64.0 | 60.0 | ||
Appendix
Guideline to Acer 7763P/65PE AV box
1. Features and Connection
AV Connection Port
This box is compatible with RCA input, S-Video input, audio output.
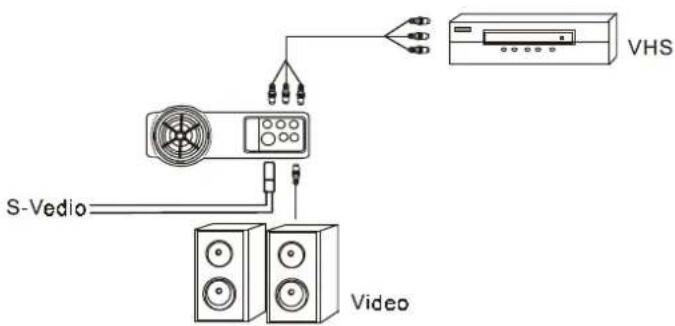
Figure 27 Connection of AV box
| Speaker | |
| RCA Jack | For Video and Audio Input from VHS or V8 |
| S Video Port | For S-Video Input |
| Phone Jack | For Video input/Output |
*AV box is sold separately and is not included in the standard configuration of accessories in the unit. Please contact the dealer nearest you need the box or visit the Acer Peripherals, Inc. Web site for more information.
AV Control Pad
| Source | Select the source |
| Volume up | Turn the volume upward |
| Volume down | Turn the volume downward |
Connecting the Box
Please follow the instruction here to place the AV box:

natural_image
Technical line drawing of a mechanical device with internal components and mounting holes (no text or symbols)Figure 28 Bottom View of AV box

natural_image
Line drawing of a device with a button and arrow pointing to a component (no text or symbols)Figure 29 Side View of AV box
To attach the AV box to the unit:

natural_image
Line drawing of hands holding a device with buttons and a tray (no text or symbols)A/V function.
-
Precisely place the two chocks at the lower surface of the AV box into the lower slots in the correspondent position in the projector.
-
Slowly push the box to fit the unit and, meanwhile, insert the box plug into the A/V connector closely.
-
Plug in the correct cord into the correspondent jack or port to perform
-
Select inputs by pressing "Source" key, and select channel by the channel up or down keys.

natural_image
Line drawings of two hands holding a device, one open and one closed, both showing mechanical components (no text or symbols)Figure30 Connecting the Box
- Outline
- Features
- Copyright
- Disclaimer
- Fill this in!!
- Monitor Information
- Dealer Information
- Caution
- TO PREVENT SHOCK, DO NOT OPEN THE CABINET. NO USER -SERVICEABLE PARTS INSIDE. REFER SERVICING TO QUALIFIED PLUS SERVICE PERSONNEL. AND PLEASE READ ALL OF THESE INSTRUCTIONS BEFORE YOU OPERATE YOUR PROJECTOR. SAVE THESE INSTRUCTIONS FOR FUTURE REFERENCE.
- Safety Instructions
- Introduction
- Projector Features
- A Image Resolution
- B Brightness
- C Portability
- D Keystone
- E Multilanguage
- F Auto Detect System
- G Ceiling Mount and Rear Screen Projection
- H AV box
- Description
- C BOTTOM (figure)
- Installation
- Positioning
- Adjustable Feet
- Moving the Projector
- Accessories
- Connection
- 2
- A Connecting the Projector to Computer/Notebook
- B Connecting the Projector to Macintosh/Power Book
- Turn On/Off Procedure
- A Power on
- B Standby
- External Control
- A Control Pad
- B Remote Control
- Figure 13 Remote control
- Remote Control Range
- Usage and Replacement of Lamp
- A Lamp/temperature Status LED Indicator
- Lamp in excess of service hours
- Lamp is not well attached
- Temperature is too high
- Normal status
- Caution:
- B Replacing the Lamp
- Replacing the lamp
- Lamp Replacement Procedure
- Resetting Lamp Timer
- OSD
- Main OSD Menu
- A Display Page
- B Image Page
- Setting effects
- C Control Page
- Source Page D
- Other Correspondent Remote Functions and Messages
- Maintenance and Troubleshooting
- 4
- A Lamp Replacement
- B Cleaning the Lens
- C Troubleshooting
- Specifications
- A Optical
- B Electrical
- C Mechanical
- Appendix
- Features and Connection
- AV Connection Port
- Connecting the Box
Brand : ACER
Model : PalmPro 7763P
Category : Video projector