CBLR-USB - Electronic accessory Crestron - Free user manual and instructions
Find the device manual for free CBLR-USB Crestron in PDF.


| Product Type | Cable Retractor for FlipTops |
| Brand | Crestron |
| Model | CBLR-USB |
| Category | Electronic Accessory |
| Cable Length | Up to 3 ft (0.9 m) |
| Maximum Retractors per FlipTop | Up to 4 |
| Orientation | Horizontal or Vertical (reconfigurable) |
| Retraction Speed | Adjustable |
| Retraction Mechanism | Patent-pending dampened retraction |
| Installation | Requires modification of FlipTop assembly |
| Compatible FlipTop Models | FT-PWR-D, C2N-FTR-TPS4, FTI-PWR-D, QM-FTCC, and others |
| Included Accessories | Mounting bracket, screws, clevis pins, hairpin cotter pins, spacers |
| Optional Accessories | Blank inserts (CBLRA-INSERT-BLANK), 2-wire inserts (CBLRA-INSERT-2WIRE), extra mounting brackets |
| Power | None (passive mechanical device) |
| Materials | Plastic, metal |
| Maintenance | Wipe clean with a dry cloth |
| Safety | Ensure mounting screws are not longer than table thickness to prevent damage |
| Spare Parts Available | Blank inserts, 2-wire inserts, mounting brackets (CBLRA series) |
| Regulatory Compliance | Refer to Doc. 7475 |
| Manufacturer | Crestron Electronics, Inc. |
Frequently Asked Questions - CBLR-USB Crestron
User questions about CBLR-USB Crestron
0 question about this device. Answer the ones you know or ask your own.
Ask a new question about this device
Download the instructions for your Electronic accessory in PDF format for free! Find your manual CBLR-USB - Crestron and take your electronic device back in hand. On this page are published all the documents necessary for the use of your device. CBLR-USB by Crestron.
USER MANUAL CBLR-USB Crestron
Cable Retractors for FlipTops™
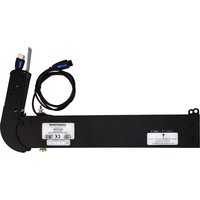
Crestron® cable retractors provide a convenient cable management solution for use with most Crestron FlipTops™. This solution allows a user to simply reach into the FlipTop™ compartment and pull out any cable to the desired length. Each cable can be pulled out up to 3 feet (0.9 meter). A simple press of the easy-access lever retracts the cable back into the compartment.

natural_image
Exterior view of a black electronic device with a metallic clip and label (no readable text or symbols)Each Cressron cable refractor features a patent-pending mechanism that dampens the rate of refraction to prevent the cable from whipping as it is pulled back into the FlipTop storage compartment. The refraction speed is installer adjustable to ensure full and effortless refraction without excessive force. Up to three or four cable retractors can be installed depending on the FlipTop model. Blank inserts (CBLRA-INSERT-BLANK ^® ) are required to fill any unused positions. As an alternative to a blank insert, a 2-wire insert (CBLRA-INSERT-2WIRE ^® or FTA-CBLRA-INSERT-2WIRE-102 ^® ) is also offered to accommodate additional non-retracting cables if needed.

Preparation
Preparation consists of:
- Modifying the FlipTop assembly to accommodate the cable retractors. - Determining the desired mounting orientation. (Retractors are shipped configured for horizontal orientation, but are easily reconfigured for vertical orientation.)
NOTE. For preparation of FlipTop 600 Series models, refer to "Modify the FlipTop (FlipTop 600 Series)" in the third column on this page.
Modify the FlipTop (Non-FlipTop 600 Series) Removing Cable Guide and Lower Bar Assembly
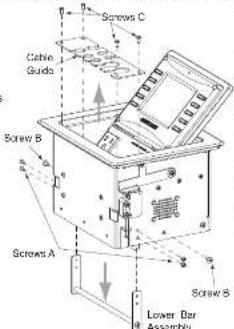
- Remove four screws A to detach the lower bar assembly. Also remove two screws B. Retain screws A and B to attach the FlipTop mounting bracket assembly. Refer to the FlipTop mounting brackets table provided in section ① to ensure that the mounting bracket received is appropriate for the FlipTop being modified.
- Remove four screws C to remove the cable guide. Retain the screws to attach the two side filler plates ^4 .
- Move the mounting bracket assembly up into position and secure using four screws A and two screws B.
- Place the side filler plates in position and secure using four screws C.
* Item(s) and supersby
Attachment of Mounting Bracket Assembly and Side Filler Plates

Mounting Bracket Assembly Installed

Side Filler Plates Installed

Modify the FlipTop (FlipTop 600 Series)
Retractors can be installed in both the left and right sides of the FlipTop 600 Series models.
- Remove the screw holding the cable guide in place, then remove the cable guide.
- Remove the screws holding the cable pass-through bracket in place, then remove the cable
pass-through bracket - Remove the shoulder screws from the front of the unit. Save these as they are used in retractor installation.

Reconfigure Retractors for Vertical Operation
To reconfigure the retractors for vertical orientation, refer to the illustration below and do the following:
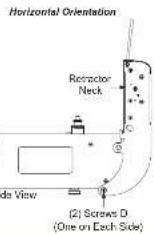
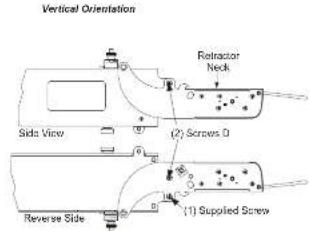
1. Remove the two screws D, one from each side of the retractor, attaching the neck in the horizontal orientation.
2. Reposition the neck as shown in the vertical orientation view and attach using the two screws D plus a third screw E (1/4 in, 6-32, flathead, supplied) to secure the neck in that position.
For regulatory compliance information, refer to Doc. 7475.
QUICKSTART DOC. 7245C (2032356, Sheet 1 of 2) 02.14
www.crestron.com
888.273.7876201.767.3400
Open and close was bound to change without red to.

CRESTRON
CBLR Series
Cable Retractors for FlipTops™

Adjustments
Once the retractor arm configuration is set, refer to the following illustration and adjust retractor arm tension and cable retraction speed as follows:
- Adjust retractor tension by loosening the top thumb screw enough to enable pulling or pushing the adjacent cable end to align the red screw with the label arrow.
- Adjust cable retraction speed by first pulling the knob outward and moving it to the VERT or HORZ position to match the configuration of the retractor arms.
a. Pull the cable (plug end) out so it is fully extended.
b. Press the retraction lever and observe the speed of the cable retraction. If it is too slow or too fast, reposition the knob to an intermediate position and recheck.
Adjusting Retractor Tension and Retraction Speed


Assembly
Assembly consists of:
- Attaching the cable retractors to the FlipTop box
- Attaching the horizontal mounting bracket and connecting the retractor arms for horizontal orientation
During the following procedures, refer to the accompanying illustrations.
NOTE: For assembly of FlipTop 600 Series models, refer to "Attach Cable Retractors to the FlipTop (FlipTop 600 Series)" in the third column on this page.
Attach Cable Retractors to the FlipTop (Non-FlipTop 600 Series)
- Insert the necks of the refractors and any included spacers up and into the mounting bracket assembly until they engage the frame of the assembly.
2 Carefully slide the clevis pin through the hole in the side of the mounting bracket assembly and through each item being mounted until it protrudes through the opposite side of the assembly. - Insert the supplied hairpin cotter pin into the hole in the clevis pin to secure it.
- Tighten the screws in the neck assemblies so they are just snug against the clevis pin. (Shown in "Attach the Horizontal Mounting Bracket" on page 3.)
Typical Assembly (Horizontal Orientation)

Typical Assembly (Vertical Orientation)

Attach Cable Retractors to the FlipTop (FlipTop 600 Series)
- Insert the necks of the retractors into the FlipTop until they engage
the frame of the assembly. - Insert the shoulder screws in the front of the FlipTop.
- Tighten each individual set screw on the reflectors.
Attach the Cable Retractors (FlipTop 600 Series)

For regulatory compliance information, refer to Doc. 7475.
QUICKSTART DOC. 7245C (2032356, Sheet 1 of 2) 02.14
www.crestron.com
888.273.7876201.767.3400
Open and close was bound to change without red to.

CRESTRON
CBLR Series
Cable Retractors for FlipTops™
Attach the Horizontal Mounting Bracket
- Rotate the retractor arms up to the underside of the table, and position the horizontal mounting bracket so the slots are aligned with the attachment holes in the retractor arms. Carefully use the horizontal mounting bracket as a template to mark the position of the two screw holes.
- Drill starter holes for the screws, and use the two screws provided to attach the mounting bracket to the table.
NOTE: Make certain the provided screws are not longer than the thickness of the table top. If necessary, use shorter screws
- Rotate the retractor arms into position and insert the supplied clevis pin through the horizontal mounting bracket and the holes in the retractor arms. Insert the supplied hairpin cotter pin into the hole in the clevis pin to secure it
Attach the Horizontal Mounting Bracket (Non-FlipTop 600 Series)
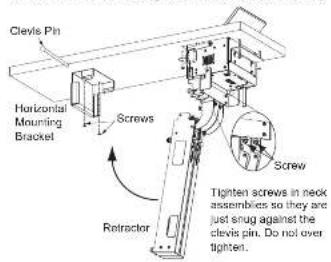
Attach the Horizontal Mounting Bracket (FlipTop 600 Series)


Available Accessories (For Non-FlipTop 600 Series)
FlipTop Mounting Brackets
INTERNATIONAL
MODEL
(4-POSITION)
| Mounting Bracket Assemblies | CBLRA-BRKT-3-FT 6506161 | CBLRA-BRKT-4-FT 6506162 | CBLRA-BRKT-4-FT 6506188 | |
| Applicable FilipTop Models | FT-PWR-D | C2N-FTR-TPS4 | FTI-PWR-D | |
| QM-FTCC | FT-PWR-D-LG | QMI-FTCC | ||
| QM-FTCC-NB | C2N-FTR-TPS4-U | QMI-FTDC | ||
| QM-FTDC | QM-FTCC-TPS4 | QMI-FTMC | ||
| QM-FTDC-NB | QMI-FTCSC | |||
| QM-FTMC | ||||
Horizontal Mounting Brackets (Used to support retractor arms in horizontal orientation)
CBLRA-BRKT-3H, Part No. 6506159
CBLRA-BRKT-4H, Part No. 6508160
Spacer Inserts (Used to fill unpopulated retractor slots)
CBLRA-INSERT-BLANK, Part No. 6506163
CBLRA-INSERT-2 WIRE, Part No. 6508164
The special patents that cover Croshum products are listed at parents, crexton, mm
Crestron, the Crestron logo, FlipTop, and FlipTops are other trademarks or registered trademarks of Crestron Electronics, Inc. in the United States and/or other countries. Other trademarks, registered trademarks and trade names may be used in this document to refer to either the entities claiming the marks and names or their products. Crestron disclaims
proprietary interests in the marks and names of others. Creation is not repressable for errors in typography or photography.
This document was written by the Technical Publications department at Crestron, ©2016 Cresson Electronics, Inc.
For regulatory compliance information, refer to Doc. 7475.
QUICKSTART DOC. 7245C (2032356, Sheet 2 of 2) 02.14
www.crestron.com
888.273.7876201.767.3400
Open and close around to change without end to.

CRESTRON


Brand : Crestron
Model : CBLR-USB
Category : Electronic accessory