P 6121-L2 - Wi-Fi Network Card Pentagram - Free user manual and instructions
Find the device manual for free P 6121-L2 Pentagram in PDF.


| Product Type | Wi-Fi Network Card |
| Model | P 6121-L2 |
| Brand | Pentagram |
| Interface | PCI Express |
| Wireless Standard | 802.11ac |
| Frequency Band | 2.4 GHz / 5 GHz |
| Maximum Speed | Up to 867 Mbps on 5 GHz |
| Security | WPA2, WPA3 |
| Antenna | 2 x External Antennas |
| Dimensions | 120 x 80 x 20 mm |
| Weight | 50 g |
| Power Supply | Via PCIe slot |
| Operating Temperature | 0°C to 40°C |
| Storage Temperature | -20°C to 70°C |
| Operating Humidity | 10% to 90% (non-condensing) |
| Compatible Operating Systems | Windows 10, 11; Linux |
| LED Indicators | Power, Link/Activity |
| Package Contents | Network card, antennas, driver CD, manual |
| Certifications | CE, FCC |
Frequently Asked Questions - P 6121-L2 Pentagram
User questions about P 6121-L2 Pentagram
0 question about this device. Answer the ones you know or ask your own.
Ask a new question about this device
Download the instructions for your Wi-Fi Network Card in PDF format for free! Find your manual P 6121-L2 - Pentagram and take your electronic device back in hand. On this page are published all the documents necessary for the use of your device. P 6121-L2 by Pentagram.
USER MANUAL P 6121-L2 Pentagram
Installation and User's Manual
PENTAGRAM horNET Wi-Fi PCI 11g (P6121-L2) Wi-Fi USB 11g (P6122-09) Wi-Fi PCMCIA 11g (P6123-09)

PENTAGRAM
THE PERFECT SIMPLICITY
The latest versions of manual, drivers and applications are available on www.pentagram.eu
NOTE! Any information and technical data are subject to change without prior notification and/or indication in this manual.
INDEX
INTRODUCTION 5
PACKAGE CONTENTS....5
BEFORE YOU BEGIN....5
DESIGNING YOUR WIRELESS NETWORK.... 6
CARDBUS ADAPTER 6
PCI ADAPTER 6
USB ADAPTER....7
INSTALL WIRELESS ADAPTER....7
INSTALL DRIVER AND UTILITY 7
INSTALL ADAPTER....9
CONFIGURATION YOUR WIRELESS ADAPTER.... 11
USING THE WIRELESS CLIENT CONFIGURATION UTILITY 12
NETWORK STATUS....12
SITE SURVEY 13
ADMIN....14
PROFILE MANAGER 15
TROUBLESHOOTING 18
SPECIFICATIONS....19
Introduction
The Wireless Network Adapter is a powerful 32-bit Cardbus/PCI/USB Adapter that installs quickly and easily into PCs. The Adapter can be used in Ad-Hoc mode to connect directly with other cards for peer-to-peer file sharing or in Infrastructure mode to connect with a wireless access point or router for access to the Internet in your office or home network.
The Wireless Cardbus/PCI/USB Adapter connects you with 802.11g networks at up to an incredible 54Mbps! And for added versatility, it can also interoperate with all the up to 11Mbps 802.11b products found in homes, businesses, and public wireless hotspots around the country. And in either mode, your wireless communications are protected by industrial-strength WPA, so your data stays secure.
This User Manual contains information on how to install and configure your Wireless Adapter to get your network started accessing the Internet. It will guide you through the correct configuration steps to get your device up and running.
Package Contents
- Wireless network Cardbus/PCI/USB adapter
- Manual, Drivers and Utility on CD
- Quick Installation Guide
If any of the above items are missing, please contact your reseller.
Before you begin
You must have at least the following:
- A laptop computer/desktop PC with an available 32-bit Cardbus/PCI slot
- At least a 300MHz processor and 32MB of memory
• Windows 98SE, ME, 2000, XP
- A CD-ROM Drive
- Cardbus/PCI/USB controller properly installed and working in the laptop computer
- A 802.11g or 802.11b Access Point (for infrastructure Mode) or another 802.11g or 802.11b wireless adapter (for Ad-Hoc; Peer-to-Peer networking mode.)
Designing Your Wireless Network
The wireless Cardbus/PCI/USB Adapter supports up to 54 Mbps connections. This card is fully compliant with the specifications defined in IEEE802.11g standard. It is designed to complement PCI Local Bus computers and supports Windows 98SE/Me/2000/XP.
Cardbus adapter
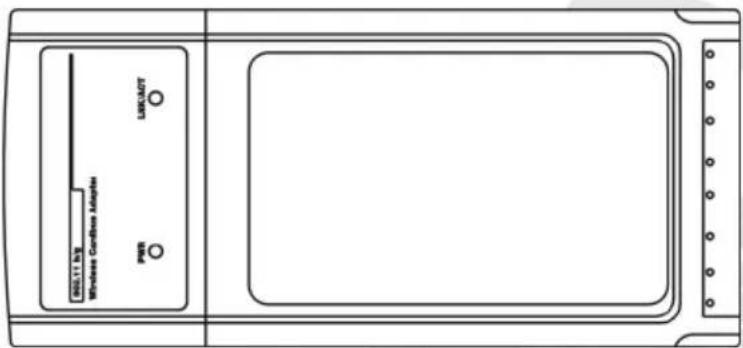
The two status LED indicators of the Cardbus wireless adapter are described in the following.
- PWR ON (Green): Indicates the Adapter is ready
- LNK/ACT ON (Green): Indicates a valid connection
- LNK/ACT Flashing: Indicates the Adapter is transmitting or receiving data.
PCI adapter
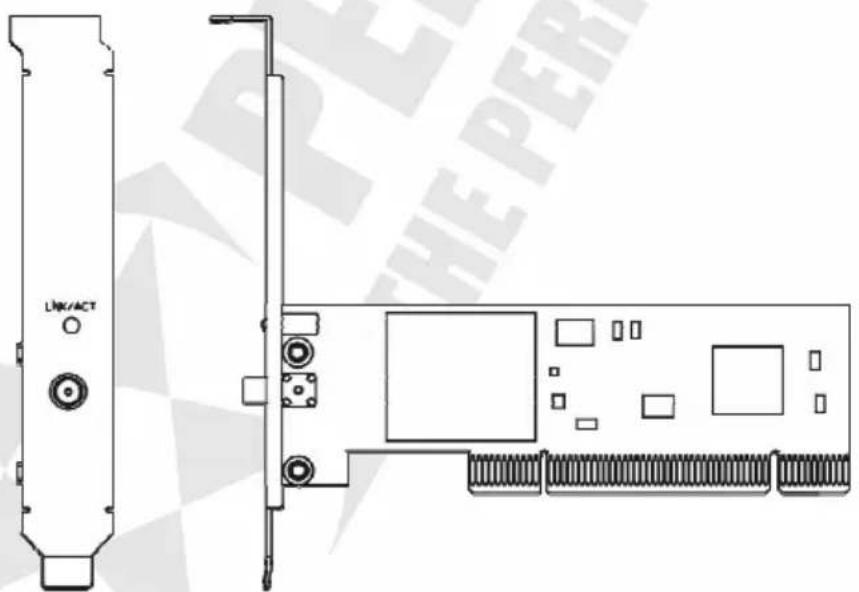
The status LED indicators of the PCI wireless adapter are described in the following.
- LNK/ACT ON (Green): Indicates a valid connection
- LNK/ACT Flashing: Indicates the Adapter is transmitting or receiving data.
USB adapter
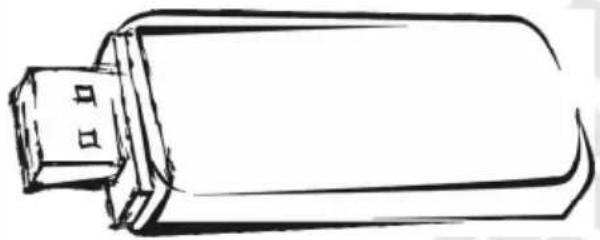
The status LED indicators of the USB wireless adapter are described in the following.
- LNK/ACT ON (Green): Indicates a valid connection
- LNK/ACT Flashing: Indicates the Adapter is transmitting or receiving data.
natural_image
Line drawing of a cylindrical electronic device with a USB port, no text or symbols presentInstall Wireless Adapter
Install Driver and Utility
- Insert the Driver and Utility CD-ROM into the CD-ROM driver.
- The Wizard should run automatically, and Figure 2-1 should appear. If it does not, click the Start button and choose Run. In the field that appears, enter D:\autorun.exe (if "D" is the letter of your CD-ROM drive).
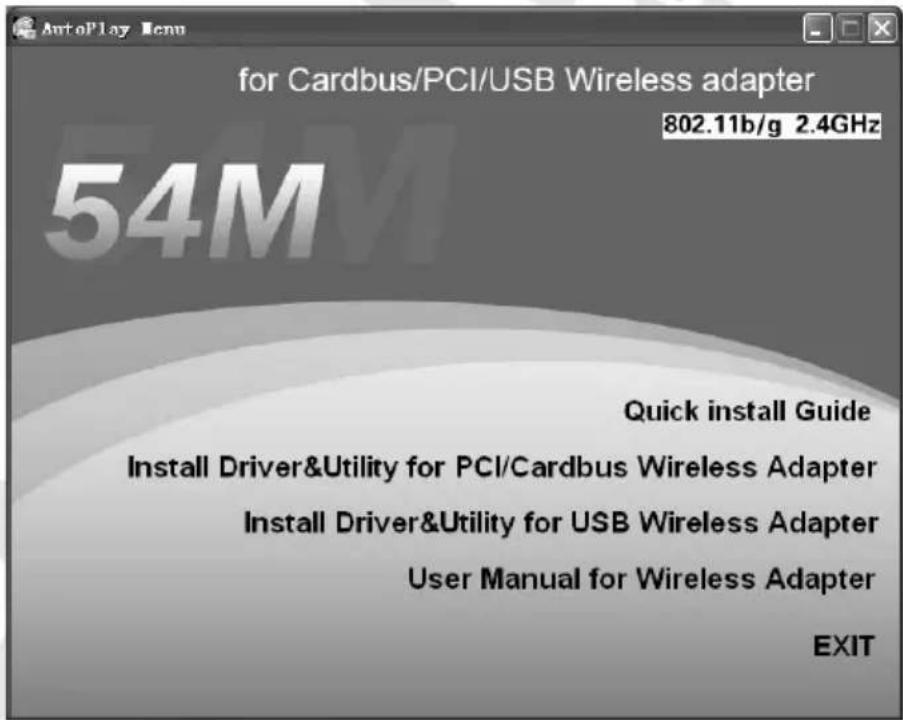
- Click Install Driver & Utility on the Wireless Client Configuration Utility screen.
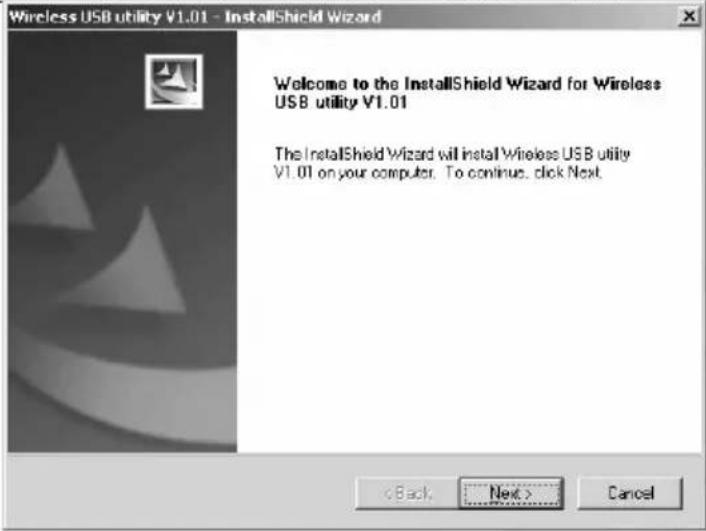
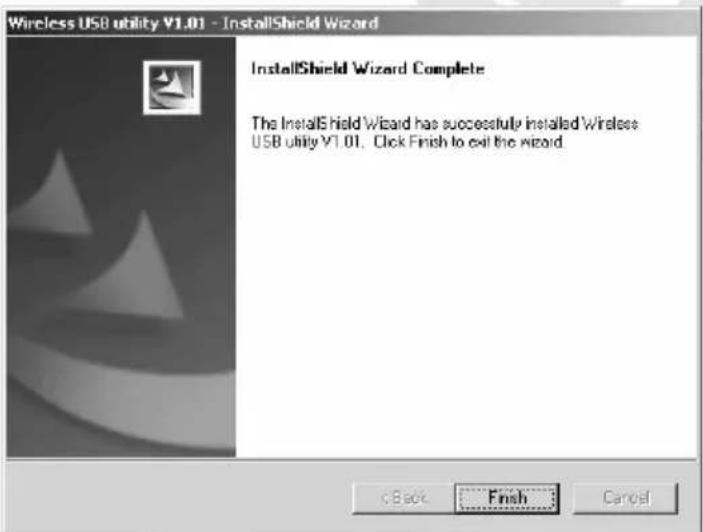
- Follow the Install Shield Wizard steps, and click Finish when done.
- Now turn off your PC or notebook
Install Adapter
Cardbus Adapter
- Power on your PC, let the operating system boot up completely, and log in as needed.
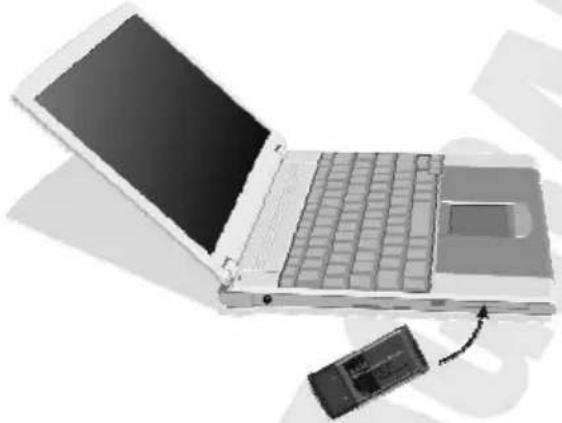
- Hold the adapter with the LOGO facing up and insert it into a Cardbus slot.
natural_image
Laptop with keyboard and mouse, showing front panel and rear panel (no text or symbols visible)- If the Found New Hardware Wizard displays, choose Install the software automatically (Recommended), and click Next button. The driver will be installed automatically.
![Found New Hardware Wizard Welcome to the Found New Hardware Wizard This wizard helps you install software for 802.11g/b Wireless LAN Client Adapter - USB If your hardware came with an installation CD or floppy disk, insert it now. What do you want the wizard to do? ● Install the software automatically [Recommended] ○ Install from a list or specific location [Advanced] Click Next to continue. < Back Next > Cancel](/content/2026/05/1143681/images/b7686ccec4d205195a14b6ce2128929782e4879773d1fdb88a799c9ac3ff1fcf.jpg)
PCI Adapter
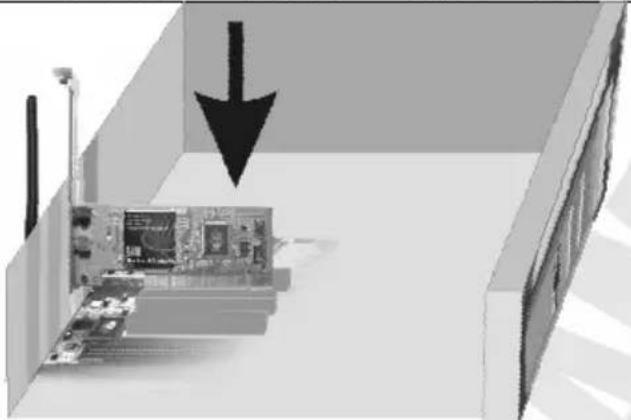
- Open your PC case and locate an available PCI on the motherboard.
- Slide the PCI Adapter into the PCI slot. Make sure that all of its pins are touching the slot's contacts. You may have to apply a bit of pressure to slide the adapter all the way in. after the adapter is firmly in place, secure its fastening tab to your PC's chassis with a mounting screw. Then close your PC.
- Attach the external antenna to the adapter's antenna port.
- Power on the PC.
natural_image
3D illustration of a computer monitor with an arrow pointing downward, no text or symbols presentIf the Found New Hardware Wizard displays, choose Install the software automatically (Recommended), and click Next button. The driver will be installed automatically.
USB Adapter
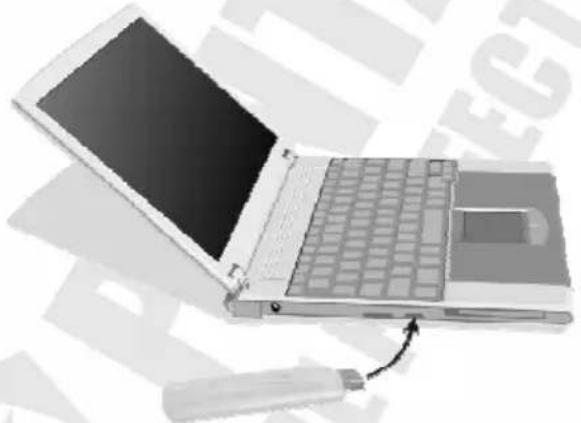
- Power on your PC, let the operating system boot up completely, and log in as needed.
- Hold the adapter and insert it into a USB slot.
- If the Found New Hardware Wizard displays, choose install the software automatically (Recommended), and click Next button. The driver will be installed automatically.
natural_image
Illustration of a laptop with a keyboard and an attached USB drive, no text or symbols presentConfiguration your wireless adapter
- The Wireless Client Configuration Utility screen will appear automatically.
![Wireless Client Configuration Utility Advanced Auto Link Admin About Network Status-Profile Manager Site Survey Statistics Select Profile Signal Strength Link Information Internet Protocol (TCP/IP) Status: No Connection Network SSID: Network Type: Network BSSII: Security: Link Speed: Channel Performance Current Tx Rate: Current Rx Rate: 6.3 Ebps 9.9 Kbps 3.2 Kbps 5.0 Kbps 0 bps 0 bps Radio Off [Alt+F2] OK Cancel](/content/2026/05/1143681/images/24703387d966d4d2939784fbac4589fecc1b8534c3c0e16742eb4a5bb37dd4d6.jpg)
- Click the Site Survey tab then click the Refresh button to search for available wireless networks.
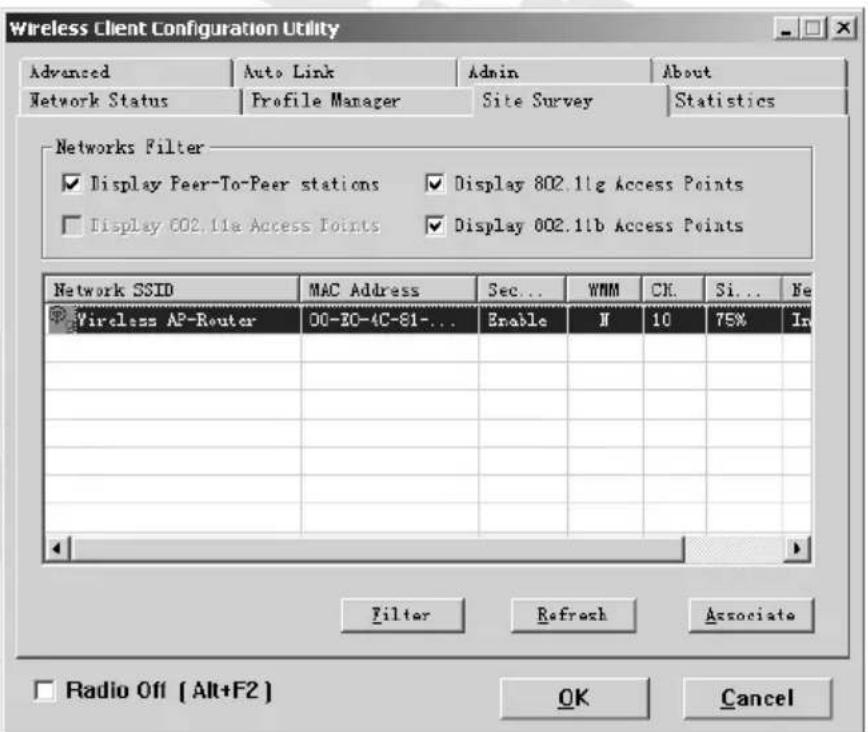
- To connect to one of the networks on the list, select the wireless network, and click Associate button.
Using the Wireless Client Configuration Utility
Use the Wireless Client Configuration Utility to check the link information, search for available wireless networks, or create profiles that hold different configuration settings. You can double-click the icon on your system desktop start it. Another way to start the Configuration Utility is to click on Start>Programs>Wireless Client Configuration Utility>WirelessCfg.
If you are using Windows XP, you can use either the Zero Configuration Utility or the Wireless Client Configuration
Network Status
The Network Status tab displays signal strength and link information, Internet Protocol (TCP/IP).
![Wireless Client Configuration Utility Advanced Auto Link Admin About Network Status-Profile Manager Site Survey Statistics Select Profile Wireless AP-Router Signal Strength 88 % Link Information Status: Connected Network SSID: Wireless AP-Router Network Type: Infrastructure Network BSSII: CO E0 4C 81 86 D1 Security: WEP Link Speed: 54 Mbps Internet Protocol (TCP/IP) DHCP Option: Disable IF Address: 192.168.1.22 Subnet Mask: 255.255.255.0 Default Gateway: 192.168.2.10 Channel 10 (2.457 GHz) Current Tx Rate: 0 bps Current Rx Rate: 0 bps 9.3 Kbps 7.4 Kbps 4.7 Kbps 3.7 Kbps 0 bps 0 bps Radio Off [Alt+F2] OK Cancel](/content/2026/05/1143681/images/a4e600b3143edaa377823877d6a57c80a61d1814763b0fa2a783046bd7f25a42.jpg)
Link Information:
Status – The status of the wireless network connection.
Network SSID – The unique name of the wireless network.
Network Type – The mode of the wireless network currently in use.
Network BSSID – The MAC address of the wireless network's access point.
Security – The status of the encryption security feature.
Link Speed – The data transfer rate of the current connection.
Channel – The channel to which the wireless network devices are set.
Internet Protocol (TCP/IP):
DHCP Option – The status of the DHCP client.
IP Address – The IP Address of the Adapter.
Subnet Mask – The Subnet Mask of the Adapter.
Default Gateway – The Default Gateway address of the Adapter.
Site Survey
The Site Survey tab, displays a list of infrastructure and ad-hoc networks available for connection.
![Wireless Client Configuration Utility Advanced Auto Link Admin About Network Status-Profile Manager Site Survey Statistics Networks Filter ✓ Display Peer-To-Peer stations ✓ Display 802.11g Access Points □ Display 802.11a Access Points ✓ Display 802.11b Access Points Network SSID MAC Address Sec... WMM CH Si... Wireless AP-Router 00-E0-4C-81-86-D1 Enable # 10 80% N P C R T /U D E F G H N N N N N N N N N N N N N N N N N N N N N N N N N N N N N N N N N N N N N N N N N N N N N N N N N N ,N N N N N N N N N N N N N N N N N N N N N N N N N N N N N N N N N N N N N N N N N N N N N N N N N N :N Pilter Reshn Associatie Radio Off [ Alt+F2 ] OK Cancel](/content/2026/05/1143681/images/88bdafaf4783f81e8fe88fc8b03bc8980ac3e884b04156e632de673e307379de.jpg)
The section of the window displays the Available Networks. Highlight the network to which you wish to connect. Click on the Associate button.
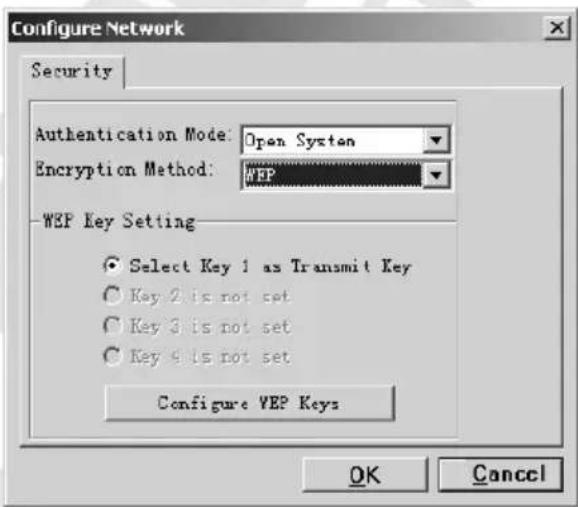
Choose the Authorization Mode and Encryption Method in the drop-down box. If the wireless network uses a Passphrase, enter the Passphrase in the Passphrase field. If the wireless network uses a WEP key, enter the WEP key in the Key field.
Click the OK button to complete the network connection and return to the Site Survey screen, or click the Cancel button the cancel the network connection and return to the Site Survey screen.
Admin
The Admin tab screen lets you import or export profiles.
![Wireless Client Configuration Utility Network Status | Profile Manager | Site Survey | Statistics Advanced | Auto Link | Admin | About Click button and select the file from which you want to import the profile. Import Profiles Click button and select the file where you want to save the profiles. All profiles shown in page will be saved to the selected source. Export Profiles Radio Off [ Alt+F2 ] OK Cancel](/content/2026/05/1143681/images/053bdde8ff7bca01fb1afaa167c056e3ab3e7936958d3a9a3e3dfbfae3ff6a44.jpg)
To save the profile(s) in a different location, click the Export Profile button. On the screen that appears, direct Windows to the appropriate folder and click the OK button.
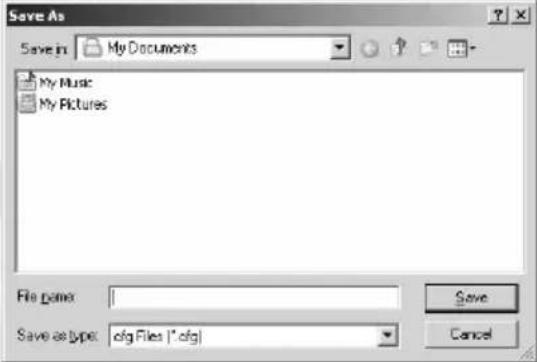
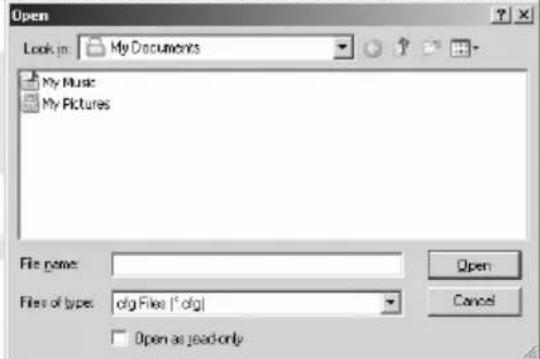
Click the Import Profile button to import a profile that has been saved in another location. From the screen that appears, select the appropriate file, and click the Open button.
Profile Manager
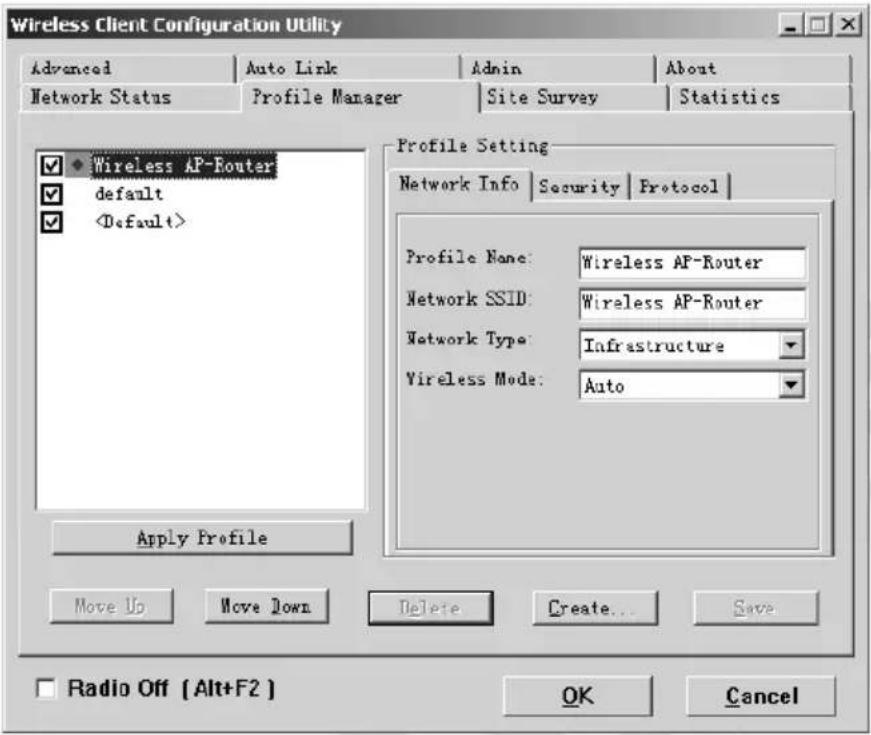
On the Profile Manager tab, click the Create button to create a new profile.
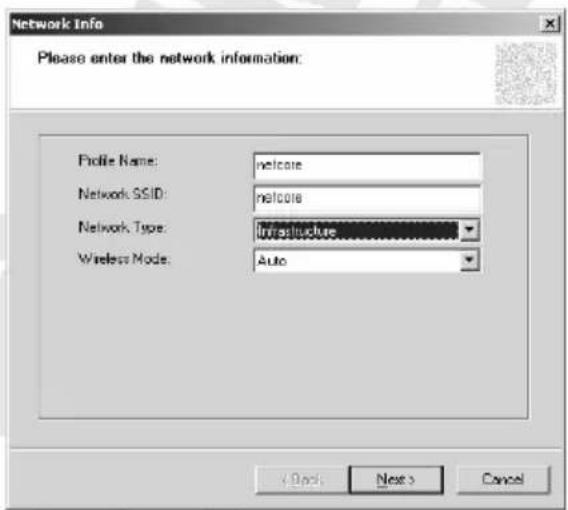
When the Network Info screen appears, enter a Name for the new profile. Enter the Network SSID. Choose the Infrastructure Mode in the Network Type drop-down box if you want your wireless computers to communicate with computers on your wired network via a wireless access point. Choose the Ad-Hoc Mode in the Network Type drop-down box if you want multiple wireless computers to communicate directly with each other. Click the Next button to continue or the Back button to return to the previous screen.
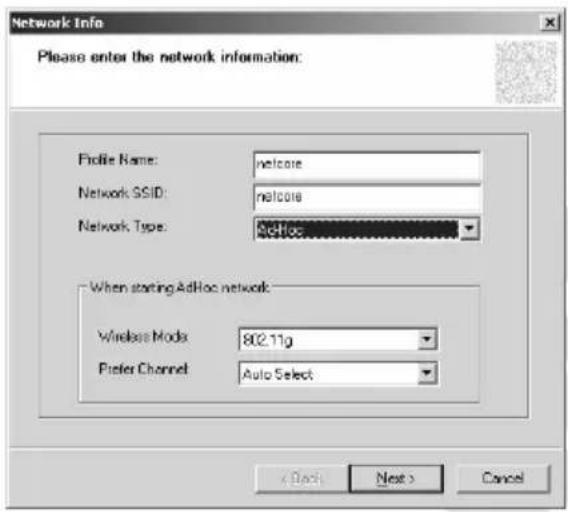
If you choose Ad-Hoc Mode, select the Wireless Mode from the drop-down menu. Then, select the correct operating channel for your network form the Prefer Channel drop-down menu. Click the Next button.
If you choose Infrastructure Mode, click the Next button.
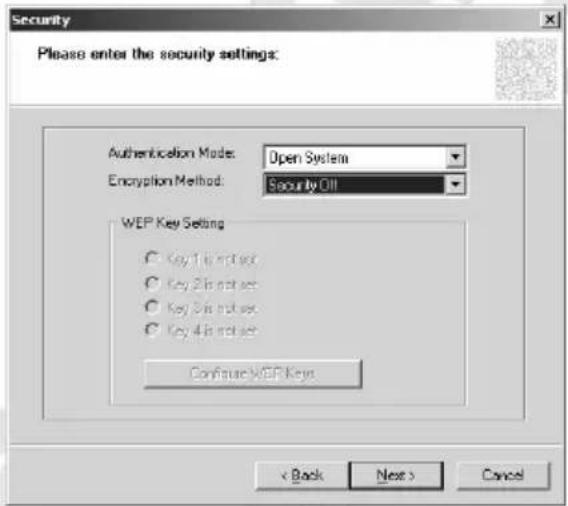
The Security screen will appear. Choose the Authentication Mode and Encryption Method from the drop-down menu. To use WEP encryption (recommended to increase network security), select 64 bits or 128 bits WEP from the drop-down menu, and enter either a Passphrase or WEP key. Then click Next button.
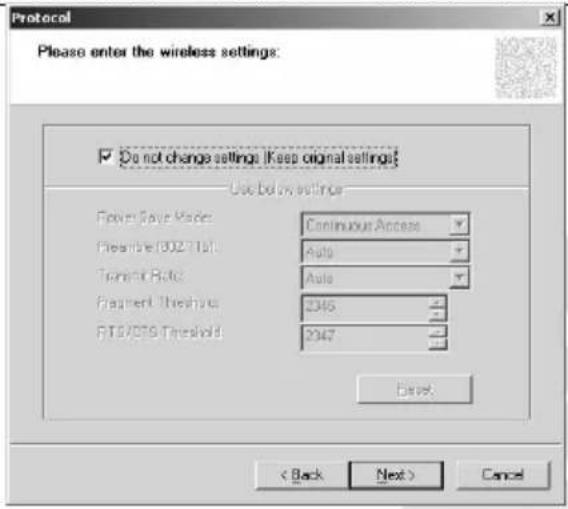
The Protocol screen will appear. Select Do not change settings, then, click Next button.
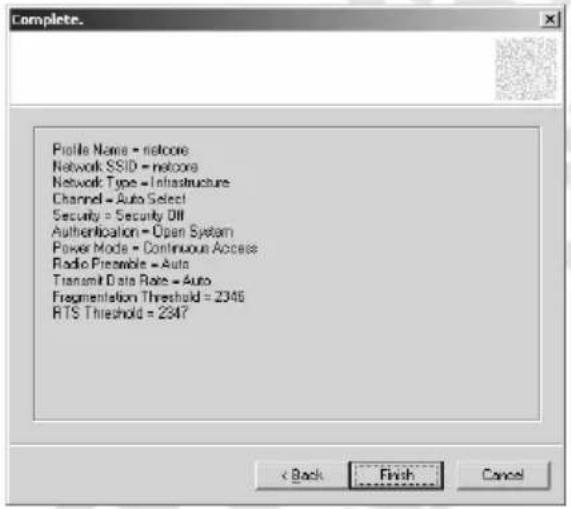
The Complete Screen will appear. Click Finish button.
You have successfully created a connection profile.
Troubleshooting
This chapter provides solutions to problems that may occur during the installation and operation of the Wireless Cardbus/PCI/USB Adapter. Read the descriptions below to solve your problems.
1. The Wireless Cardbus/PCI/USB Adapter does not work properly.
- Reinsert the Wireless Cardbus/PCI/USB Adapter into your PC's PCI slot/Cardbus slot/USB slot.
- Right click on My Computer and select Properties. Select the device manager and click on the Network Adapter. You will find the Adapter if it is installed successfully. If you see the yellow exclamation mark, the resources are conflicting. You will see the status of the Adapter. If there is a yellow question mark, please check the following:
- Make sure that your PC has a free IRQ (Interrupt ReQuest, a hardware interrupt on a PC.)
- Make sure that you have inserted the right adapter and installed the proper driver. If the Adapter does not function after attempting the above steps, remove the adapter and do the following:
- Uninstall the driver software from your PC.
- Restart your PC and repeat the hardware and software installation as specified in this User Guide.
2. I cannot communicate with the other computers linked via Ethernet in the Infrastructure configuration.
- Make sure that the PC to which the Adapter is associated is powered on.
- Make sure that your Adapter is configured on the same channel and with the same security options as with the other computers in the Infrastructure configuration.
3. What should I do when the computer with the Adapter installed is unable to connect to the wireless network and/or the Internet?
- Check that the LED indicators for the broadband modem are indicating normal activity. If not, there may be a problem with the broadband connection.
- Check that the LED indicators on the wireless router are functioning properly. If not, check that the AC power and Ethernet cables are firmly connected.
- Check that the IP address, subnet mask, gateway, and DNS settings are correctly entered for the network.
- In Infrastructure mode, make sure the same Service Set Identifier (SSID) is specified on the settings for the wireless clients and access points.
- In Ad-Hoc mode, both wireless clients will need to have the same SSID. Please note that it might be necessary to set up one client to establish a BSS (Basic Service Set) and wait briefly before setting up other clients. This prevents several clients from trying to establish a BSS at the same time, which can result in multiple singular BSSs being established, rather than a single BSS with multiple clients associated to it.
- Check that the Network Connection for the wireless client is configured properly.
- If Security is enabled, make sure that the correct encryption keys are entered on both the Adapter and the access point.
Specifications
Standards: IEEE 802.11g, IEEE 802.11b
Modulation:
802.11b: CCK (11 Mbps),
DQPSK (2 Mbps),
DBPSK (1 Mbps);
802.11g: OFDM
Channels:
11 Channels (USA)
13 Channels (Europe)
14 Channels (Japan)
Network Protocol: TCP/IP, IPX, NDIS 4, NDIS 5, NDIS 5.1, NetBEUI
Interface: Cardbus/PCI/USB
Transmit Power: 15 dBm
Sensitivity: -80 dBm
LED: PWR, LNK/ACT
WEP Key Bits: 64-Bit and 128-Bit
Dimensions:
Cardbus: 118.3×5×54.5mm
PCI: 120×40mm (Non-Bracket)
USB: 85.5×28×10mm
Unit Weight:
Cardbus: 55g
PCI: 50g
USB: 15g
Power:
Cardbus: 3.3V
PCI: 5V
USB: 5V
Certifications: FCC CE
Operating Temp.: 0°C to 40°C
Storage Temp.: -20°C to 70°C
Operating Humidity: 10% to 85%, Non-Condensing
Storage Humidity: 5% to 90%, Non-Condensing
NOTES
- Installation and User's Manual
- PENTAGRAM horNET Wi-Fi PCI 11g (P6121-L2) Wi-Fi USB 11g (P6122-09) Wi-Fi PCMCIA 11g (P6123-09)
- INDEX
- Introduction
- Package Contents
- Before you begin
- Designing Your Wireless Network
- Cardbus adapter
- PCI adapter
- USB adapter
- Install Wireless Adapter
- Install Driver and Utility
- Install Adapter
- Configuration your wireless adapter
- Using the Wireless Client Configuration Utility
- Network Status
- Link Information:
- Internet Protocol (TCP/IP):
- Site Survey
- Admin
- Profile Manager
- Troubleshooting
- The Wireless Cardbus/PCI/USB Adapter does not work properly.
- I cannot communicate with the other computers linked via Ethernet in the Infrastructure configuration.
- What should I do when the computer with the Adapter installed is unable to connect to the wireless network and/or the Internet?
- Specifications
- Modulation:
- Channels:
- Dimensions:
- Unit Weight:
- Power:
- NOTES
Brand : Pentagram
Model : P 6121-L2
Category : Wi-Fi Network Card