
CE252 - KVM Extender ATEN - Free user manual and instructions
Find the device manual for free CE252 ATEN in PDF.


| Product Type | KVM Extender |
| Brand | ATEN |
| Model | CE252 |
| Dimensions (approx.) | 200 x 80 x 30 mm |
| Weight (approx.) | 500 g |
| Power Supply | External power adapter (DC 5V) |
| Maximum Transmission Distance | Up to 150 m via Cat5e/6 cable |
| Supported Resolution | Up to 1920 x 1200 @ 60 Hz |
| Video Interface | VGA (HD-15) female |
| Keyboard/Mouse Interface | USB Type-A female |
| Connection Type | Point-to-point |
| LED Indicators | Power, Link, Video |
| Operating Temperature | 0°C to 50°C |
| Storage Temperature | -20°C to 60°C |
| Humidity | 0-80% RH, non-condensing |
| Maintenance | Clean with a soft, dry cloth. Avoid liquids. |
| Safety Precautions | Use only the provided power adapter; do not expose to moisture. |
| Spare Parts | Not available; non-serviceable unit. |
| Repairability | No user-serviceable parts; contact ATEN support. |
| General Information | Supports hot-plugging; compatible with most operating systems. |
Frequently Asked Questions - CE252 ATEN
User questions about CE252 ATEN
0 question about this device. Answer the ones you know or ask your own.
Ask a new question about this device
Download the instructions for your KVM Extender in PDF format for free! Find your manual CE252 - ATEN and take your electronic device back in hand. On this page are published all the documents necessary for the use of your device. CE252 by ATEN.
USER MANUAL CE252 ATEN
natural_image
Two blue ATEN portable electronic devices with visible ports and connectors (no readable text or symbols)FCC Information
This is an FCC Class A product. In a domestic environment this product may cause radio interference in which case the user may be required to take adequate measures.
This equipment has been tested and found to comply with the limits for a Class A digital device, pursuant to Part 15 of the FCC Rules. These limits are designed to provide reasonable protection against harmful interference when the equipment is operated in a commercial environment. This equipment generates, uses and can radiate radio frequency energy and, if not installed and used in accordance with the instruction manual, may cause harmful interference to radio communications. Operation of this equipment in a residential area is likely to cause harmful interference in which case the user will be required to correct the interference at his own expense.
RoHS
This product is RoHS compliant.
SJ/T 11364-2006
The following contains information that relates to China.
Be sure to register your product at our online support center:
| International http://support.aten.com |
| North America http://www.aten-usa.com/product_registration |
Telephone Support
For telephone support, call this number:
| International 886-2-86 | 92-6959 |
| China 86-10-5255-011 | 0 |
| Japan 81-3-5615-5811 | |
| Korea 82-2-467-6789 | |
| North America 1-888-999-ATEN ext 4988 | |
| United Kingdom 44-8-4481-58923 | |
User Notice
All information, documentation, and specifications contained in this manual are subject to change without prior notification by the manufacturer. The manufacturer makes no representations or warranties, either expressed or implied, with respect to the contents hereof and specifically disclaims any warranties as to merchantability or fitness for any particular purpose. Any of the manufacturer's software described in this manual is sold or licensed as is. Should the programs prove defective following their purchase, the buyer (and not the manufacturer, its distributor, or its dealer), assumes the entire cost of all necessary servicing, repair and any incidental or consequential damages resulting from any defect in the software.
The manufacturer of this system is not responsible for any radio and/or TV interference caused by unauthorized modifications to this device. It is the responsibility of the user to correct such interference.
The manufacturer is not responsible for any damage incurred in the operation of this system if the correct operational voltage setting was not selected prior to operation. PLEASE VERIFY THAT THE VOLTAGE SETTING IS CORRECT BEFORE USE.
Package Contents
The CE252 KVM Extender package consists of:
◆ 1 CE252L KVM Extender (Local Unit)
◆ 1 CE252R KVM Extender (Remote Unit)
◆ 2 Custom KVM Cables
◆ 1 Power Adapter
◆ 2 Mounting Kits
◆ 1 User Instructions*
Check to make sure that all the components are present and that nothing got damaged in shipping. If you encounter a problem, contact your dealer.
Read this manual thoroughly and follow the installation and operation procedures carefully to prevent any damage to the unit, and/or any of the devices connected to it.
* Features may have been added to the CE252 since this manual was printed. Please visit our website to download the most up-to-date version of the manual.
© Copyright 2012 ATEN® International Co., Ltd.
Manual Part No. PAPE-0277-200G
Manual Date: 2012-02-29
ATEN and the ATEN logo are registered trademarks of ATEN International Co., Ltd. All rights reserved.
All other brand names and trademarks are the registered property of their respective owners.
Contents
FCC Information .... ii
RoHS....ii
SJ/T 11364-2006....ii
User Information ....iii
Online Registration .....iii
Telephone Support .....iii
User Notice ....iii
Package Contents.... iv
About this Manual....vii
Conventions......viii
Product Information......viii
1. Introduction
Overview....1
Features 2
Requirements....3
Console 3
Computers....3
Cables 3
Components .... 4
CE252L Front View 4
CE252R Front View....5
CE252L / CE252R Rear View ....6
2. Hardware Setup
Rack Mounting 7
Installation....9
Grounding 9
Setting Up 11
Installation Diagram....12
3. Operation
Access Methods....13
Hotkey Operation 13
Auto Scan Mode (ASM)....14
[Left Shift] [Right Shift]. 14
Changing the Scan Interval .....14
[Left shift] [Right shift] [n] 14
Using Gain Controls ....15
Accessing Local Computers 15
LED Display 16
CE252L (Local Unit) 16
CE252R (Remote Unit) 16
Appendix
Safety Instructions 17
General 17
Rack Mounting 19
Technical Support....20
International 20
North America. 20
Specifications 21
VGA Pin Assignments 22
TP Wiring Diagram 22
TP Pin Assignments 22
Troubleshooting 23
About SPHD Connectors 24
Limited Warranty....24
About this Manual
This User Manual is provided to help you get the most from your c/c system. It covers all aspects of installation, configuration and operation. An overview of the information found in the manual is provided below.
Chapter 1, Introduction, introduces you to the CE252 system. Its purpose, features and benefits are presented, and its front and back panel components are described.
Chapter 2, Hardware Setup, describes how to set up your installation. The necessary steps – from a basic single stage hookup to a complete 32 switch daisy chained operation are provided.
Chapter 3, Operation, explains the fundamental concepts involved in operating the CE252.
An Appendix, provides specifications and other technical information regarding the CE252.
Conventions
This manual uses the following conventions:
Monospaced Indicates text that you should key in.
[ ] Indicates keys you should press. For example, [Enter] means to press the Enter key. If keys need to be chorded, they appear together in the same bracket with a plus sign between them: [Ctrl+Alt].
- Numbered lists represent procedures with sequential steps.
◆ Bullet lists provide information, but do not involve sequential steps.
→ Indicates selecting the option (on a menu or dialog box, for example), that comes next. For example, Start → Run means to open the Start menu, and then select Run. Indicates critical information.
Product Information
For information about all ATEN products and how they can help you connect without limits, visit ATEN on the Web or contact an ATEN Authorized Reseller. Visit ATEN on the Web for a list of locations and telephone numbers:
| International http://www.aten.com |
| North America http://www.aten-usa.com |
Chapter 1
Introduction
Overview
The CE252 offers local and remote access to your KVM installation. Both (local and remote) KVM extenders support PS/2 consoles and can be located up to 300 m (1000 feet) apart.
You can reliably manage a large number of computers via a KVM switch. Additional computers can also be connected to the remote KVM extender.
The CE252 also features Automatic Gain Control, which compensates signal strength as the distance between the local and remote KVM extenders varies (over Cat 5 cables). This translates into high resolution video at a lower cost.
The CE252 uses a custom ASIC to ensure the utmost reliability and compatibility. This technology comprises automatic distance sensing and signal strength (gain) adjustment.
Setup is easy – simply connect the computer system box (or KVM switch) and Local Console to the CE252 Local Unit; run a Cat. 5 cable to the CE252 Remote Unit (up to 300 meters away); finally plug the Remote Console into the Remote Unit.
Features
- Local and Remote units connect at distances up to 300m using Cat. 5 cable
- Dual Console Operation – control the system from both the local and remote consoles
◆ Remote unit allows additional PC connection
◆ Built-in ASIC for greater reliability and compatibility
◆ PS/2 and Microsoft Intellmouse supported - Pushbutton selection – sequential selection between local and auto mode
- Hotkey operation – switching between PCs
◆ High resolution video – up to 1600 x 1200 @ 60Hz
♦ VGA, SVGA, and multisync monitor support
◆ Local monitor supports DDC2B - Two gain control modes provided to compensate for distance for the sharpest video quality:
- Adjustable gain control – manually adjusts signal strength
- Automatic gain control – automatically adjusts signal strength
◆ Built-in 8KV ESD protection and 2KV surge protection - Local unit takes its power from the computer – external power is only required when the power from the local computer/computers in the KVM installation is insufficient*
- Easy to install – no software required – connecting cables to the devices is all it takes
Note: If you choose to purchase a power adapter for use with the CE252L, be sure to get one with the same specifications as the one provided in this package for the CE252R
Requirements
Console
- A VGA, SVGA, or Multisync monitor capable of the highest resolution that you will be using on any computer in the installation.
◆ A PS/2 type keyboard
◆ A PS/2 type mouse
Note: If you connect a DDC type monitor to the Local Unit, the monitor that connects to the Remote Unit must be able to support the highest video resolution that the DDC monitor can provide.
Computers
The following equipment must be installed on each computer that is to be connected to the system:
♦ A VGA, SVGA, or Multisync card
◆ A 6-pin mini-DIN mouse port
◆ A 6-pin mini-DIN keyboard port
Cables
Although it is possible to use standard KVM cables to link the computers with PS/2 type keyboard and mouse ports to the CE252, for optimal signal integrity ATEN recommends using the KVM cables provided with this package.
- For best performance, use Category 5 (or higher) cables to connect the CE252 Local and Remote Units.
Components
CE252L Front View
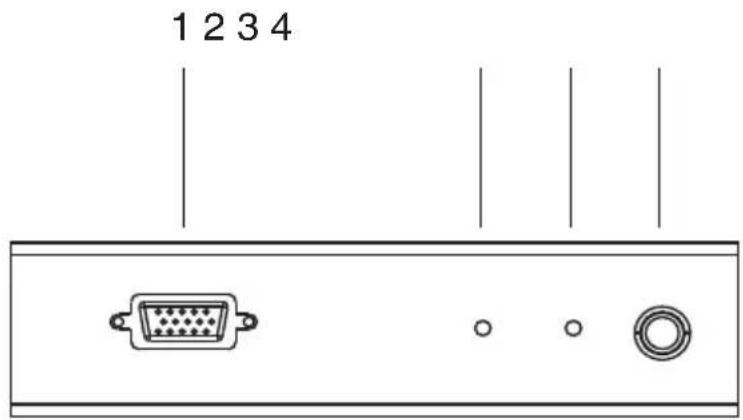
| No. | Description Function | |
| 1 | KVM Port The KVM cable | that links the CE252L to the local computer plugs in here. |
| 2 | Local LED The Local Unit | has two LEDs to indicate the operating status of the Local and Remote Units. SeeLED Display, page 16, for operating status details. |
| 3 | Remote LED | |
| 4 | Local /Auto Pushbutton | Pressing this button toggles between the Local and Remote operating modes.Local: Only the local console controls the system.Auto: Both consoles control the system:SeeAccessing Local Computers, page 15, for operating mode details. |
CE252R Front View

| No. | Description Function | |
| 1 | KVM Port The KVM cable | that links the CE252R to the remote computer plugs in here. |
| 2 | Manual Gain Control Use a | flathead screwdriver or another similar object to manually adjust the signal gain. |
| 3 | Auto/Manual Gain Selection Switch | This allows you to toggle between Auto and Manual Gain:When the switch is set to Auto, The unit automatically adjusts the signal gainWhen the switch is set to Manual, signal gain is set using the Manual Gain Control |
| 4 | Hotkey Selection Switch | This allows you to change the KVM focus between the Local and Remote Units. Select CTRL + CTRL or SCOLL LOCK + SCROLL LOCK as the hotkey. (When changing the hotkey settings, you must disconnect and then reconnect the Remote Unit's power adapter cable for the new settings to take effect.)See Hotkey Operation, page 13, for details on how to switch between the Local and Remote Units from the Remote Console. |
| 5 | Local LED The Remote Unit | has two LEDs to indicate the operating status of the Local and Remote Units. See LED Display, page 16, for operating status details. |
| 6 | Remote LED |
CE252L / CE252R Rear View
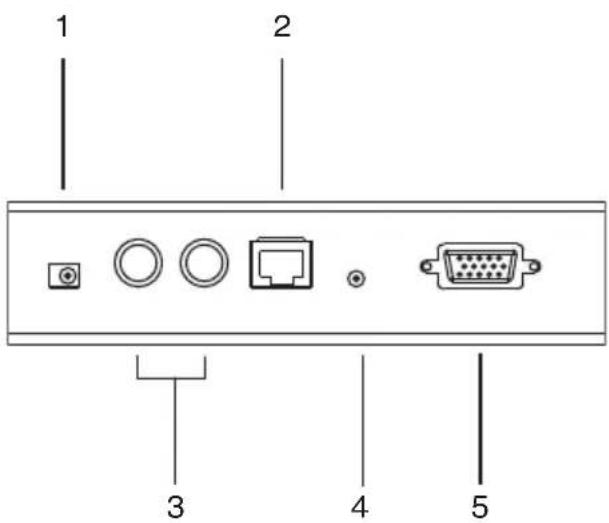
| No. | Description Function | |
| 1 | Power Jack The cable from | the AC Power Adapter connects here.* |
| 2 | Keyboard / Mouse Ports | These PS/2 ports are for the Console's keyboard (purple) and mouse (green). |
| 3 | Remote I/O The Category | 5 cable that connects the Remote and Local Units plugs in here. |
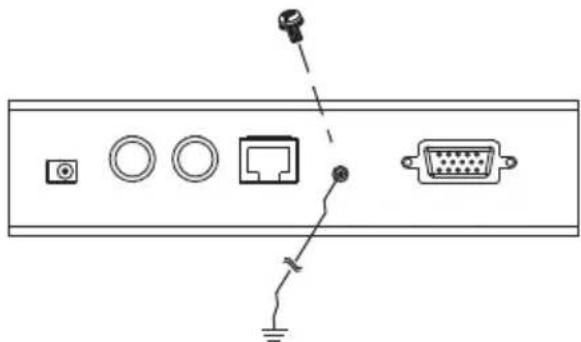
| 4 | Grounding Terminal The grounding wire (used to ground the unit) attaches here. | |
| 5 | Monitor Port The Console monitor connects to this port. | |
Note: The Local Unit (CE252L) can get its power from the computer – external power is only required when power from the local computer/computers in the KVM installation is insufficient. If you choose to purchase a power adapter for use with the CE252L, be sure to get one with the same specifications as the one provided in this package for the CE252R.
Chapter 2
Hardware Setup

-
Important safety information regarding the placement of this device is provided on page 17. Please review it before proceeding.
-
Make sure that all the devices you will be connecting are properly grounded.
Rack Mounting
For convenience and flexibility, the CE252L and CE252R can be mounted on system racks. To rack mount a unit do the following:
- Unscrew either the two front screws or two rear screws from the bottom panel.

natural_image
Line drawing of a rectangular electronic device with mounting holes and a central connector (no text or symbols)- Use the screws you just removed to attach the mounting bracket that came with your package to the unit:

natural_image
Technical line drawing of a rectangular electronic device with mounting holes and internal components (no text or symbols)- Screw the bracket into any convenient location on the rack.

natural_image
Isometric line drawing of a vertical panel with square holes, no text or symbols present
natural_image
Line drawing of a wall-mounted electronic device with mounting holes and a separate panel (no text or symbols)Installation
Grounding
To prevent damage to your installation it is important that all devices are properly grounded.
- Use two grounding wires to ground both units by connecting one end of the wire to the grounding terminal, and the other end of the wire to a suitable grounded object.
natural_image
Diagram of a device panel with labeled ports and connectors (no text or symbols)- Make sure that the computer that the CE252L connects to and the monitor that the CE252R connects to are properly grounded.

-
See the Grounding Information card that came with this package for proper grounding details.
-
For increased grounding protection, use STP (shielded twisted pair) cable to connect the local and remote units. There are two methods that can be used:
a) In addition to the eight paired wires, STP cable also contains a grounding wire. Solder this wire to the RJ-45 connector as shown in the diagram below:

natural_image
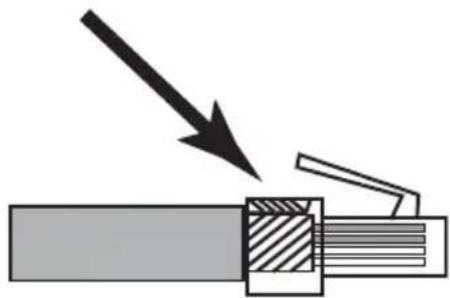
Illustration of a cable being inserted into a terminal block with an arrow indicating direction (no text or symbols)b) The second method is to use the STP cable shielding for grounding. In this case, make sure that the shielding makes tight contact with the top inside of the RJ-45 connector as shown in the diagram below:
natural_image
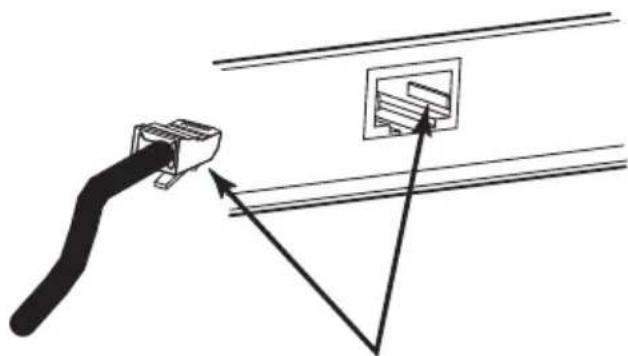
Diagram of a mechanical assembly with an arrow indicating direction, showing a shaft and clamping mechanism (no text or symbols)In either case, make sure that the sides of the RJ-45 connector make tight contact with the grounding contacts on the sides of the RJ-45 socket as shown in the diagram below:
natural_image
Diagram showing a cable connector inserted into a wall-mounted device, with arrows indicating direction (no text or symbols present)Setting Up
Setting up the CE252 is simply a matter of plugging in the cables. Refer to the installation diagram on the following page (the numbers in the diagram correspond to the numbered steps) and do the following:
- Connect the local console devices (mouse, keyboard and monitor) to the ports on the rear of the Local Unit (CE252L).
-
Plug the provided KVM cable into the appropriate connector on the front of the CE252L, then plug the connectors on the other end of the KVM cable into the appropriate ports on the computer system (or Console section of the KVM switch - if you are using one).
Each connector is marked with an identifying icon. -
Connect one end of a Category 5 twisted pair cable to the Remote I/O port on the CE252L, then plug the other end of the Category 5 twisted pair cable into the Remote I/O port on the CE252R.
-
Connect the remote console devices (mouse, keyboard and monitor) to the ports on the rear of the Remote Unit (CE252R).
-
Plug the provided KVM cable into the appropriate connector on the front of the CE252R, then plug the connectors on the other end of the KVM cable into the appropriate ports on the computer system (or Console section of the KVM switch - if you are using one). Each connector is marked with an identifying icon.
-
Connect the other provided power adapter into an AC source, then connect the adapter's power cable to the Power Jack on the CE252R.
-
If you choose to use a power adapter with the CE252L, plus the power adapter into an AC source and plug the adapter's power cable into the CE252L's Power Jack.
Note: Use of a power adapter with the CE252L is optional. Please refer to the note regarding the Power Jack on page 6 for further details.
Installation Diagram

Access Methods
By default, the Remote Console allows you to access computers connected to the Local Unit (via the KVM switch). Moreover, the Remote Console offers access to computers connected to the Remote Unit. For example, an additional computer or KVM switch connected to the Remote Unit.
The CE252R/L KVM Extender features the following two flexible computer access methods: Hotkey Operation and Auto Scan Mode.
Note: Before using the Remote Console, verify the Hardware installation is complete. See Setting Up, page 11. Hotkey operation and Auto Scan mode are only available to Remote Console (Remote Unit) users.
Hotkey Operation
Hotkeys offer convenient switching between the Local and Remote Units from the Remote Console.
To change the KVM focus between the Local and Remote Units do the following:
- From the Remote Unit, select CTRL + CTRL or SCROLL LOCK + SCROLL LOCK (Hotkey selection slide switch, see CE252R Front View, page 5). This will set the desired hotkey.
Note: When connecting an additional KVM switch to the Remote Unit, make sure the selected hotkey is different from the one being used to control the KVM.
- At the Remote Unit console, press the selected hotkey twice. This will change the KVM focus between the local and remote PCs.
Auto Scan Mode (ASM)
The Auto Scan feature automatically toggles the KVM focus between the Local and Remote Units at regular intervals. As a result, any computers connected to each can be monitored without user intervention. The default time interval is 5 seconds.
To invoke Auto Scan Mode do the following:
Press and release the Left Shift key; then press and release the Right Shift key:
[Left Shift] [Right Shift]
Once scanning begins, it continues until you press the [Spacebar] to exit Auto Scan Mode. The port that was currently active at the time scanning stopped remains active.
Note: While Auto Scan Mode is in effect, ordinary keyboard and mouse functions are suspended. You must exit Auto Scan Mode by pressing the [Spacebar] in order to regain normal control of their use.
Changing the Scan Interval
If you wish, before you invoke Auto Scanning you can change the amount of time Auto Scan stops at each port. To do so, use the following Hotkey combination (press and release the keys one at a time):
[Left shift] [Right shift] [n]
Where n represents a number from 1 to 4 that specifies the desired scan interval time, as shown in the table below:
| n Scan Interval | |
| 1 3 secs | |
| 2 5 secs | |
| 3 10 secs | |
| 4 20 secs | |
Using Gain Controls
After installing the CE252R/L, you can adjust the strength of the video signal (Gain).
There are two available Gain controls: Automatic and Manual.
Select the Automatic Gain slide switch on the Remote Unit to let CE252R/L adjust the video signal strength. Otherwise, to adjust the gain manually, select the Manual Gain slide switch, then turn the Video Gain Control knob left or right.
Accessing Local Computers
The Local/Auto pushbutton located on the Local Unit allows users to restrict the access to the KVM switch connected to it.
Pushing the Local button will block access from the remote console to the local computers (only the Local Console has access). Selecting Auto will allow access from both consoles (Local and Remote Consoles).
LED Display
The CE252 Local and Remote Units have front panel LEDs to indicate their operating status, as shown in the tables, below:
CE252L (Local Unit)
| LED Auto | |
| Local 1. Lights | when the local console is active (the Remote LED is out).2. Turns off when the remote console is active (the Remote LED turns on).3. Flashes on and off alternately with the Remote LED when neither console is active. |
| Remote 1. Lights | when the remote console is active (the Local LED is out).2. Turns off when the local console is active (the Local LED turns on).3. Flashes on and off alternately with the Local LED when neither console is active. |
CE252R (Remote Unit)
| LED Indication | |
| Local 1. Lights | steadily to indicate that the remote console is accessing/able to access the local PC.2. Turns off when the remote console is not accessing the local PC.3. Flashes when the connection to the local PC fails. |
| Remote 1. Lights | when the remote console is active.2. Turns off when remote console is not active. |
Safety Instructions
General
- Read all of these instructions. Save them for future reference.
- Follow all warnings and instructions marked on the device.
- Do not place the device on any unstable surface (cart, stand, table, etc.). If the device falls, serious damage will result.
♦ Do not use the device near water. - Do not place the device near, or over, radiators or heat registers.
- The device cabinet is provided with slots and openings to allow for adequate ventilation. To ensure reliable operation, and to protect against overheating, these openings must never be blocked or covered.
- The device should never be placed on a soft surface (bed, sofa, rug, etc.) as this will block its ventilation openings. Likewise, the device should not be placed in a built-in enclosure unless adequate ventilation has been provided.
- Never spill liquid of any kind on the device.
- Unplug the device from the wall outlet before cleaning. Do not use liquid or aerosol cleaners. Use a damp cloth for cleaning.
- The device should be operated from the type of power source indicated on the marking label. If you are not sure of the type of power available, consult your dealer or local power company.
- The device is designed for IT power distribution systems with 230V phase-to-phase voltage.
- To prevent damage to your installation, it is important that all devices are properly grounded.
- The device is equipped with a 3-wire grounding type plug. This is a safety feature. If you are unable to insert the plug into the outlet, contact your electrician to replace your obsolete outlet. Do not attempt to defeat the purpose of the grounding-type plug. Always follow your local/national wiring codes.
- Do not allow anything to rest on the power cord or cables. Route the power cord and cables so that they cannot be stepped on or tripped over.
If an extension cord is used with this device make sure that the total of the ampere ratings of all products used on this cord does not exceed the extension cord ampere rating. Make sure that the total of all products plugged into the wall outlet does not exceed 15 amperes.
- To help protect your system from sudden, transient increases and decreases in electrical power, use a surge suppressor, line conditioner, or un-interruptible power supply (UPS).
- Position system cables and power cables carefully; Be sure that nothing rests on any cables.
- Never push objects of any kind into or through cabinet slots. They may touch dangerous voltage points or short out parts resulting in a risk of fire or electrical shock.
- Do not attempt to service the device yourself. Refer all servicing to qualified service personnel.
- If the following conditions occur, unplug the device from the wall outlet and bring it to qualified service personnel for repair.
- The power cord or plug has become damaged or frayed.
♦ Liquid has been spilled into the device. - The device has been exposed to rain or water.
- The device has been dropped, or the cabinet has been damaged.
- The device exhibits a distinct change in performance, indicating a need for service.
- The device does not operate normally when the operating instructions are followed.
- Only adjust those controls that are covered in the operating instructions. Improper adjustment of other controls may result in damage that will require extensive work by a qualified technician to repair.
- Do not connect the RJ-11 connector marked “UPGRADE” to a public telecommunication network.
Rack Mounting
Before working on the rack, make sure that the stabilizers are secured to the rack, extended to the floor, and that the full weight of the rack rests on the floor. Install front and side stabilizers on a single rack or front stabilizers for joined multiple racks before working on the rack.
- Always load the rack from the bottom up, and load the heaviest item in the rack first.
- Make sure that the rack is level and stable before extending a device from the rack.
- Use caution when pressing the device rail release latches and sliding a device into or out of a rack; the slide rails can pinch your fingers.
- After a device is inserted into the rack, carefully extend the rail into a locking position, and then slide the device into the rack.
- Do not overload the AC supply branch circuit that provides power to the rack. The total rack load should not exceed 80 percent of the branch circuit rating.
- Ensure that proper airflow is provided to devices in the rack.
- Do not step on or stand on any device when servicing other devices in a rack.
Technical Support
International
- For online technical support – including troubleshooting, documentation, and software updates: http://support.aten.com
- For telephone support, see Telephone Support, page iii
North America
| Email Support support@aten-usa.com | ||
| Online Technical Support | Troubleshooting Documentation Software Updates | http://www.aten-usa.com/support |
| Telephone Support 1-888-999-ATEN | ext 4988 | |
When you contact us, please have the following information ready beforehand:
Product model number, serial number, and date of purchase.
- Your computer configuration, including operating system, revision level, expansion cards, and software.
◆ Any error messages displayed at the time the error occurred.
◆ The sequence of operations that led up to the error.
◆ Any other information you feel may be of help.
Specifications
| Function CE252L CE252R | |||
| Connectors | Console Port | Keyboard 1 x 6-pin Mini-DIN Female (Purple) | |
| Video 1 x H DB-15 Female (Blue) | |||
| Mouse 1 x 6-pin Mini-DIN Female (Green) | |||
| KVM Port 1 x SPHD-15 Female (Yellow) | |||
| Link 1 x RJ-45 Female | |||
| Power adapter 1 x DC Jack | |||
| LEDs Local 1 | (Green) | ||
| Remote 1 (Green) | |||
| Switches Selection Mode 1 x Pushbutton N/A | |||
| Manual Gain Control N/A 1 x Knob | |||
| Auto / Manual Gain Selection N/A 1 x Slide | |||
| Hotkey Selection N/A 1 x Slide | |||
| Emulation | Keyboard / Mouse PS/2 | ||
| Video | 1600x1200 @ 150 m, 1024x768 @ 300 m | ||
| Power Consumption | DC 5.3V, 2.6W | ||
| Environment | Operating Temp. | 0–50°C | |
| Storage Temp. | -20–60°C | ||
| Humidity | 0–80% RH, Non-condensing | ||
| Physical Properties | Housing | Metal | |
| Weight | 0.35kg | ||
| Dimensions (L x W x H) | 13.90 x 8.80 x 3.80 cm | ||
VGA Pin Assignments
| Pin Signal Pin Signal Pin Signal | |||||
| 1 Red Video 6 Analog | Ground | 11 ID0 | |||
| 2 Green Video 7 Analog | Ground | 12 ID1 | |||
| 3 Blue Video 8 Analog | Ground | 13 Horizontal Sync | |||
| 4 ID2 9 NC 14 Vertical Sync | |||||
| 5 Ground 10 Ground 15 ID3 | |||||
TP Wiring Diagram

TP Pin Assignments
| Pin | Assignment |
| 1 | V OUT B |
| 2 | /V OUT B |
| 3 | V OUT G |
| 4 | V OUT R |
| 5 | /V OUT R |
| 6 | /V OUT G |
| 7 | /DO |
| 8 | DO |
Troubleshooting
| Problem Solution | |
| No video Make sure that all cables are securely plugged into their sockets. | |
| Poor video quality The video quality can be improved by reducing the refresh rate. | |
| Trails and smearing on the screen. | Unplug the Cat 5 cable from the remote unit, then replug it. |
| Local Unit not working The power from the local computer/computers in the KVM installation may be insufficient. You may need to purchase a power adapter for use with the CE252L. Be sure to get one with the same specifications as the one provided in this package for the CE252R | |
| Remote Unit not working Make sure that the power adapter that came with this package is properly plugged into the remote unit's power jack. | |
| Poor video quality with replacement units. | Previous models of the CE252 should not be used with newer models. Both the Local Unit and the Remote Unit should be replaced at the same time to ensure optimum video quality. |
About SPHD Connectors

This product uses SPHD connectors for its KVM and/or Console ports. We have specifically modified the shape of these connectors so that only KVM cables that we have designed to work with this product can be connected.
Limited Warranty
IN NO EVENT SHALL THE DIRECT VENDOR'S LIABILITY EXCEED THE PRICE PAID FOR THE PRODUCT FROM DIRECT, INDIRECT, SPECIAL, INCIDENTAL, OR CONSEQUENTIAL DAMAGES RESULTING FROM THE USE OF THE PRODUCT, DISK, OR ITS DOCUMENTATION.
The direct vendor makes no warranty or representation, expressed, implied, or statutory with respect to the contents or use of this documentation, and especially disclaims its quality, performance, merchantability, or fitness for any particular purpose.
The direct vendor also reserves the right to revise or update the device or documentation without obligation to notify any individual or entity of such revisions, or update. For further inquiries, please contact your direct vendor.


- FCC Information
- RoHS
- SJ/T 11364-2006
- Telephone Support
- User Notice
- Package Contents
- Contents
- Introduction
- Hardware Setup
- Operation
- Appendix
- About this Manual
- Conventions
- Product Information
- Chapter 1
- Introduction
- Overview
- Features
- Requirements
- Console
- Computers
- Cables
- Components
- CE252L Front View
- CE252R Front View
- CE252L / CE252R Rear View
- Chapter 2
- Hardware Setup
- Rack Mounting
- Installation
- Grounding
- Setting Up
- Installation Diagram
- Access Methods
- Hotkey Operation
- Auto Scan Mode (ASM)
- [Left Shift] [Right Shift]
- Changing the Scan Interval
- [Left shift] [Right shift] [n]
- Using Gain Controls
- Accessing Local Computers
- LED Display
- Safety Instructions
- General
- Technical Support
- International
- North America
- Specifications
- VGA Pin Assignments
- TP Wiring Diagram
- TP Pin Assignments
- About SPHD Connectors
- Limited Warranty
Brand : ATEN
Model : CE252
Category : KVM Extender