Runaid 10 - Sports Watch Alatech - Free user manual and instructions
Find the device manual for free Runaid 10 Alatech in PDF.

User questions about Runaid 10 Alatech
0 question about this device. Answer the ones you know or ask your own.
Ask a new question about this device
Download the instructions for your Sports Watch in PDF format for free! Find your manual Runaid 10 - Alatech and take your electronic device back in hand. On this page are published all the documents necessary for the use of your device. Runaid 10 by Alatech.
USER MANUAL Runaid 10 Alatech
Thank you for purchasing Alatech Bluetooth Running Watch (BRW)!
Your BRW employs low power Bluetooth 4.0 technology for you to exercise together with mobile devices or sensor accessories. It helps a lot in your daily exercise training program.
About this manual
- Please read this manual carefully before using this product for its correct and effective use.
- Icons you may find in this manual:
| BRW BRW is an abbreviation of Bluetooth Running Watch. | |
| Notes. | |
| Tips and remarks. | |
| Appendix | For other information and battery replacement, please refer to appendix. |
- Please download and view the latest release of this manual at www.alatech.com.
Items included with your product
• Runaid 10, Bluetooth 4.0 Running Watch (BRW)
- Quick Start Guide
• Warranty Card
Trademark
- Bluetooth ^® is the registered trademark of Bluetooth SIG, Inc.
• Apple, Mac OS, iPhone, iPad, Multi-Touch are trademarks of Apple Inc. - "HTC ONE" is a registered trademark of HTC Corporation.
• Android is a trademark of Google Inc.
1 Getting to Know Your Runaid 10 4
| 1-1 Applications | 4 |
| 1-2 Keys | 6 |
| 1-3 Main screen | 7 |
| 1-4 Switch the function mode | 8 |
| Function modes | 9 |
2 Pairing with Sensor 10
| 2-1 Pair with your HRM | 10 |
| 2-2 Pair with your Foot Pod | 11 |
| 3 Basic Setup | 12 |
| 3-1 Date/time setup | 12 |
| 3-2 User setup | 13 |
| 3-3 Sensor setup | 14 |
| 3-4 Hot Key setup | 15 |
| 3-5 Exercise page setup | 16 |
| Exercise page cross reference table | 17 |
4 Exercise Mode 18
| 4-1 Setup training target | 18 |
| Training program cross reference table | 19 |
| 4-2 Training with sensors | 20 |
| Cross reference table of results of current exercise session | 21 |
5 Log Function 22
| 5-1 Browse, upload, and delete file | 22 |
| 5-2 View exercise statistics | 24 |
| 6 Calibrating with Your Foot Pod | 25 |
| 7 Timing Function (stopwatch, countdown timer) | 26 |
| 8 Daily Alarm Setup | 27 |
| 9 Connect to Smartphone or Mobile Device | 28 |
| 9-1 Install App and enable the Bluetooth function | 28 |
| 9-2 Pair your BRW with mobile device | 29 |
| 9-3 Synchronize with smartphone | 30 |
| 9-4 Smartphone exercise sync. | 32 |
S Specifications 33
| A Appendix | 34 |

Getting to Know Your Runaid 10
1-1 Applications
Getting to Know Your Runaid 10
1-1 Applications

Please refer to the following application and operation index to know more about using your Runaid 10 BRW.
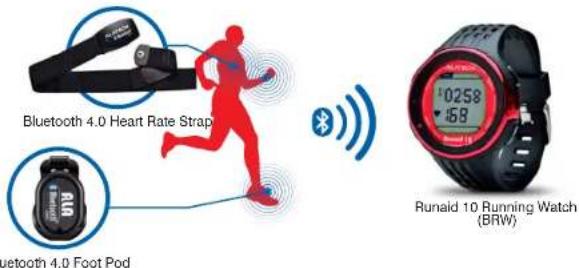
Use with sensor alone:
Your BRW may connect to two sensors with low power Bluetooth 4.0 technology ^Note:1 at the same time.
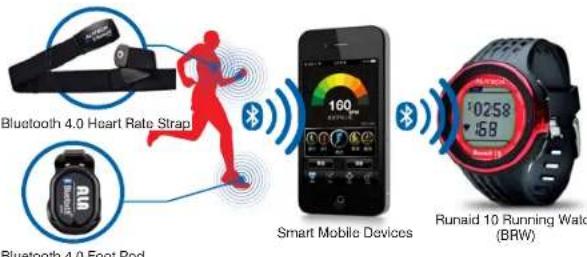
Exercise together with your smartphone:
Exercise together with your smartphone or mobile devices connected with low power Bluetooth 4.0 technology ^Note 2 .

• Note 1: Compatible with ALATECH Heart Rate Strap (model CS009/CS010/CS011/CS012) ALATECH Foot Pod (model GS002BLE)
- Note 2: Compatible with any device running iOS 5.0 or Android 4.3 or later and featuring Bluetooth 4.0 (require installation of App: ALA COACH+).
- For more information on compatible mobile devices and supported accessories, please refer to page 2B or browse web site at www.alatech.com.
■ Application cross reference table:
| Application | Exercise readings Recording method | |||||||||
| Heartbeat | Calories | Distance | Speed | Pace | Cadence | Track | Diagram | Summary | ||
| Exercise together with your smartphone | ● | ● | Mobile phone GPS | Mobile phone GPS | Mobile phone GPS | ● | ||||
| ● | ● | ● | ● | ● | Mobile phone GPS | ● | ||||
| ● | ● | ● | ● | ● | ● | ● | Mobile phone GPS | ● | ||
| Use with sensor alone | ● | ● | ●BRW | |||||||
| ● | ● | ● | ● | ●BRW | ||||||
| ● | ● | ● | ● | ● | ● | ●BRW | ||||
Operation index:
Use with sensors
| Setup Hot Key | Setup sensor | Pair with sensor | Basic setup | Select training program | Start exercising | Browse records |
| Page 15 Page 14 Page 10-11 Page 12-17 Page 18-19 Page 20-21 | Page 22-24 | |||||
Exercise together with your smartphone
| Install App | SetupHot Key | Pair withmobile device | Pair withsensor | Sync setup | Startexercising |
| Page 28 Page 15 Page 29 Please refer to operation | page 30-31 Page 32 | ||||
| manual included withyour sensors | |||||

- Please pair the optional sensor device with your BRW before its first use.
- Please complete the following pairing before using it together with smartphone for the first time:
- Pair this watch with your smartphone or mobile device.
- Pair the optional sensor with your smartphone or mobile device.

Getting to Know Your Runaid 10 Getting to Know Your Runaid 10
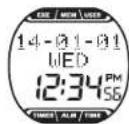
1-2 Keys 1-3 Main Screen

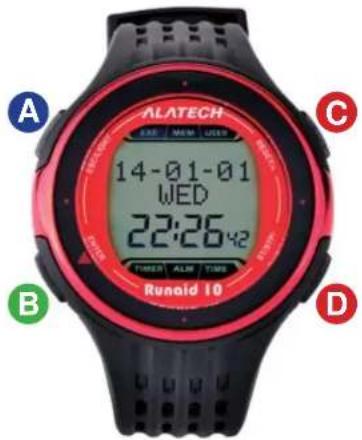
| Key Name Function | ||
| ESC/LIGHT | •Press to exit•Press and holdto turn on the backlight•End exercising in Exercise (EXE) mode | |
| ENTER/▼ | •Press to enter and confirm•In the main scree, this may be theExercise Hot Key orSmartphone Hot Key•Start exercising in Exercise (EXE) mode | |
| RESET/+ | •Scroll pages•Setup (increase) values•Reset Stopwatch or Countdown Timer | |
| ST/STP/- | •Scroll pages•Press to decrease setup values•Press to start/stop the Stopwatch orCountdown Timer in TIMER mode | |

• The back light may be too dim to be noticed under direct sun light.
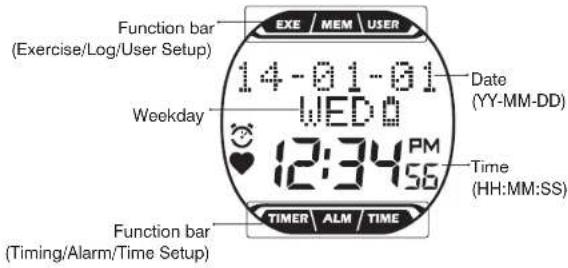
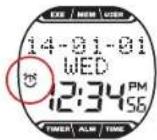
| Symbol Name | Symbol Name | ||
| Alarm | EXE | Exercise Mode | |
| Heartbeat | MEM | Log Function | |
| PM | AM | USER | User Setup |
| PM | PM | TIMER | Timer Function |
| Battery Low Indicator | ALM | Daily Alarm Setup | |
| Target Achievement Trophy | TIME | Date/Time Setup |

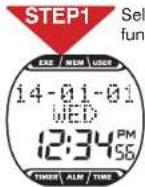
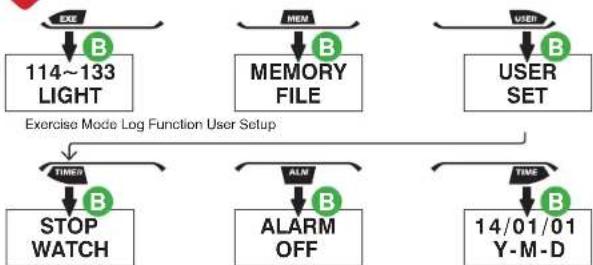
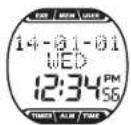
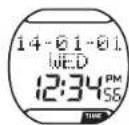
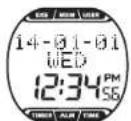
- The main screen display full function bar at top and bottom of screen along with current date and time. - The screen displays symbol of currently active mode or the one you are about to enter into.

Getting to Know Your Runaid 10 Getting to Know Your Runaid 10
1-4 Switch the Function Mode 1-4 Switch the Function Mode

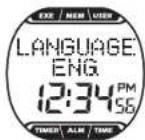
When using your product for the first time, press any key to turn on Runaid 10 BRW and use Key C or D to select to LANGUAGE: ENG. (English), DEU. (Deutsch), FRAN. (Français), Español, ITA. (Italiano), PORT. (Portugues) ^Note , press Key B to confirm and complete LANGUAGE SETTINGS. After completing the language selected at the first time, please refer to below instructions for use this product.
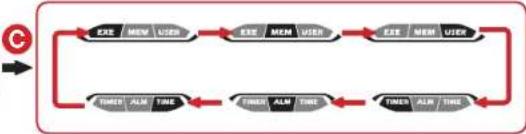
act function indicator: Press Key C or D to select desired mode in ion bar.
flowchart
graph TD
    A["EXE"] --> B["B"]
    B --> C["114~133 LIGHT"]
    C --> D["TIMER"]
    D --> E["B"]
    E --> F["STOP WATCH"]
flowchart
graph LR
    A["Start"] --> B["EXE / MEM / USER"]
    B --> C["EXE / MEM / USER"]
    C --> D["EXE / MEM / USER"]
    D --> E["TIMER / ALM / TIME"]
    E --> F["TIMER / ALM / TIME"]
    F --> G["TIMER / ALM / TIME"]
    G --> H["TIMER / ALM / TIME"]
    H --> I["End"]
flowchart
graph TD
    A["EXC"] --> B["114~133 LIGHT"]
    C["MEM"] --> D["MEMORY FILE"]
    E["USER"] --> F["USER SET"]
    G["TIMES"] --> H["STOP WATCH"]
    I["ALM"] --> J["ALARM OFF"]
    K["TIME"] --> L["14/01/01 Y-M-D"]
    M["Exercise Mode Log Function User Setup"] --> N["TIME"]
    style A fill:#f9f,stroke:#333
    style C fill:#f9f,stroke:#333
    style E fill:#f9f,stroke:#333
    style G fill:#ccf,stroke:#333
    style I fill:#ccf,stroke:#333
    style K fill:#ccf,stroke:#333
Date:Time SetupDaily Alarm SetupTimer

st settings: Press Key C or D to change settings, → press Key B.

Press Key A Note 2 2\~3 times in any window to exit to the main

- Note 1: If you have already setup the Language Settings once, you can change it by going to USER SET > LANGUAGE. (Page 13) - Note 2: Press and hold key A to turn on backlight. Press, instead of press and hold, it to exit or the backlight would be turned on.

Function modes:
 | Symbol name Description | |
| EXERCISE(Exercise Mode) | 1.Your BRW comes with low, moderate, and high exercise intensity and customizable training programs including: target heart rate zone and target time, distance, steps, and calories. (Page 18-19)2.Execute training program and view instant exercise information. (Page 20-21) | |
 | MEMORY(Log Function) | 1.You can keep up to 18 records.2.Browse, upload, and delete file. (Page 22-23)3.View total exercise amount including accumulated exercise time, distance, steps and energy total burnt. (Page 24) |
 | USER SET(User Setup) | 1.Setup personal data and change language settings. (Page 13)2.Sensor setup. (Page 14)3.Pairing. (Page 10-11)4.Calibrating with your Foot Pod. (Page 25)5.Switch Hot Key. (Page 15)6.Exercise setup page. (Page 16-17)7.Sync. with smartphone. (Page 30-31) |
 | ||
| TIMER(Timer Function) | 1.Timing with stopwatch. (Page 26)2.Enter the countdown timer screen. (Page 26) | |
 | ALARM SETDaily Alarm Setup | Open and Setup alarm. (Page 27) |
| TIME SET(Date/Time Setup) | Setup date and time. (Page 12) | |

Pairing with Sensor
Pairing with Sensor

2-1 Pair with Your HRM 2-2 Pair with Your Foot Pod
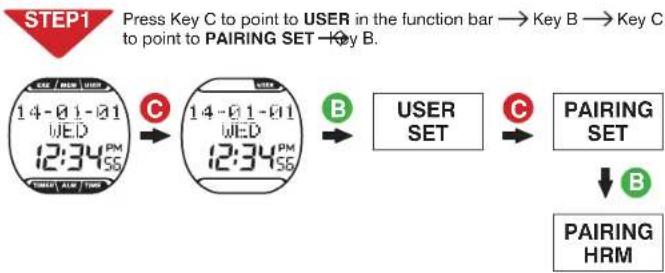
flowchart
graph LR
    A["STEP1 Press Key C to point to USER in the function bar"] --> B["Key B"]
    B --> C["Key C to point to PAIRING SET"]
    C --> D["Key B"]
    D --> E["USER SET"]
    E --> F["PAIRING SET"]
    F --> G["PAIRING HRM"]
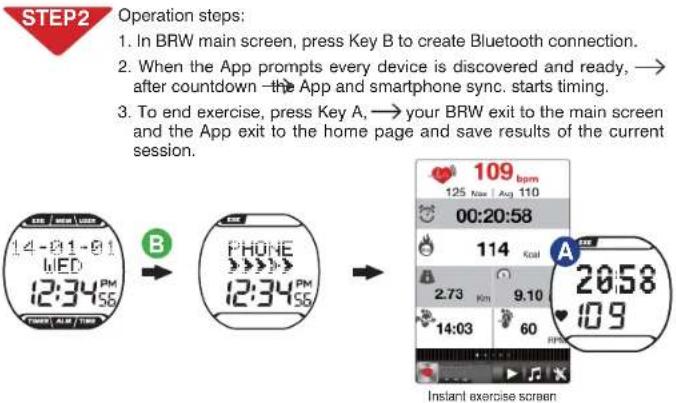
STEP2 Pairing steps:
1. PAIRING HRM window → press Key B to create Bluetooth connection and start pairing.
2. Paired successfully, message OK prompts, → press Key A to exit. Pairing failed, message NO DEV prompts, – press Key A to exit to PAIRING HRM – starts from STEP 2 again.
3. Pairing completed, press Key A to return to the main screen.
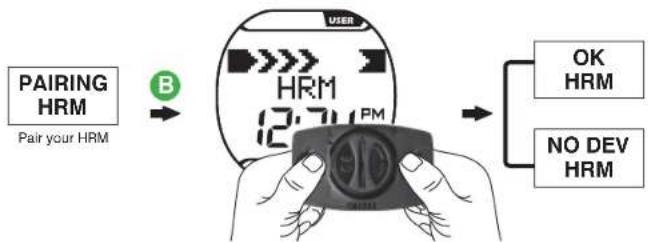
flowchart
graph TD
    A["PAIRING HRM\nPair your HRM"] -->|B| B["User Device with 12.74 PM"]
    B --> C{OK HRM}
    B --> D{NO DEV HRM}
Please refer to the heart rate strap manual on wearing it properly, or press and hold the metal button at the back of the heart rate sensor (HRM) with both hands until the 'OK' message prompts in your BRW.

- Make sure HRM is set to 'ON' in the Sensor Setup window. (Page 14)
- Keep your heartbeat sensor and BRW within 10cm from each other. Keep both away from other Bluetooth devices to prevent incorrect pairing.
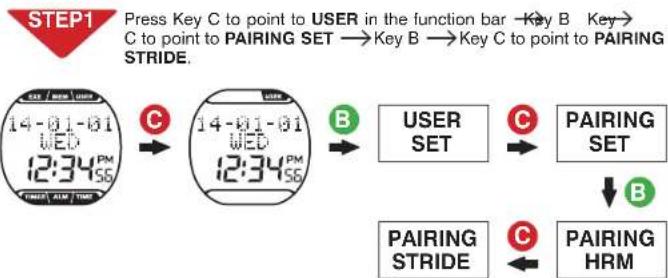
flowchart
graph TD
    A["14-01-01 WED 12:34 PM"] -->|C| B["14-01-01 WED 12:34 PM"]
    B -->|B| C["USER SET"]
    C -->|C| D["PAIRING SET"]
    D -->|B| E["PAIRING HRM"]
    E -->|C| F["PAIRING STRIDE"]
    F --> G["User Setup"]
    style A fill:#f9f,stroke:#333
    style B fill:#f9f,stroke:#333
    style C fill:#ccf,stroke:#333
    style D fill:#ccf,stroke:#333
    style E fill:#ccf,stroke:#333
    style F fill:#ccf,stroke:#333
    style G fill:#ccf,stroke:#333
STEP2 Pairing steps:
1. PAIRING STRIDE window → press Key B to create Bluetooth connection and start pairing.
2. Paired successfully, message OK prompts, → press Key A to exit. Pairing failed, message NO DEV prompts, - press Key A to exit to PAIRING STRIDE starts from STEP 2 again.
3. Pairing completed, press Key A to return to the main screen.
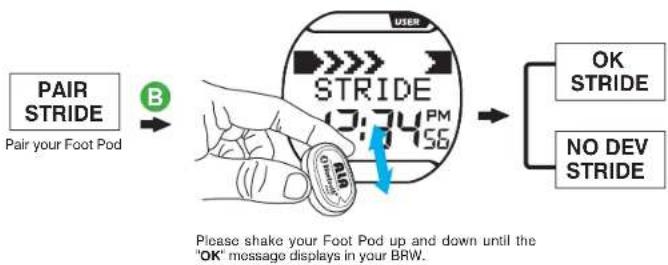

• Make sure STRIDE is set to 'ON' in the Sensor Setup window. (Page 14)
- Activate your Foot Pod before pairing (shake it or run or walk for some 20 steps). Your Foot Pod remains awake for one minute. It goes back to sleep mode again if no Bluetooth connection is enabled.
- Keep your Foot Pod and BRW within 10cm from each other. Keep both away from other Bluetooth devices to prevent incorrect pairing.

Baisc Setup
3-1 Date/Time Setup
Baisc Setup
3-2 User Setup

Please Setup your basic data before using your BRW.
You may Setup your basic data with the ALA COAH+ App on your mobile phone or devices and synchronized it to your BRW. See Page 30-31 for its operation.

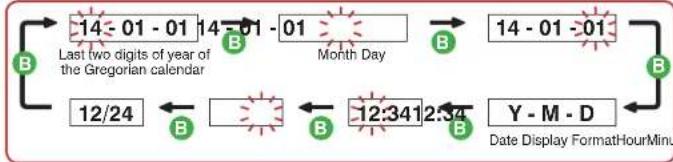
Press Key D to point to TIME in the function bar press Key B.


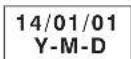
14/01/01 Y-M-D

Setup steps:
- Press Key B to point to the flashing item.
- Press Key C or D to select desired settings.
- Setup is completed, press Key A to return to the main screen.
Date/Time Setup

flowchart
graph TD
    A["12/24"] --> B["-14 - 01 - 01"]
    B --> C["14 - 01 - 01"]
    C --> D["Month Day"]
    D --> E["-12:34 12:34"]
    E --> F["Y - M - D"]
    F --> G["Date Display FormatHourMinu"]
    style A fill:#f9f,stroke:#333
    style B fill:#ccf,stroke:#333
    style C fill:#cfc,stroke:#333
    style D fill:#fcc,stroke:#333
    style E fill:#cff,stroke:#333
    style F fill:#ffc,stroke:#333
    style G fill:#fcc,stroke:#333


- Date display format settings:
Y-M-D:Year-month-day
M - D - Y: Month-day-year
D - M - Y: Day-month-year

Press Key C to point to USER in the function bar press Key B.


Setup steps:
- Press B key to change setup page.
- Press Key C or D to select desired settings.
- Setup is completed, press Key A to return to the main screen.

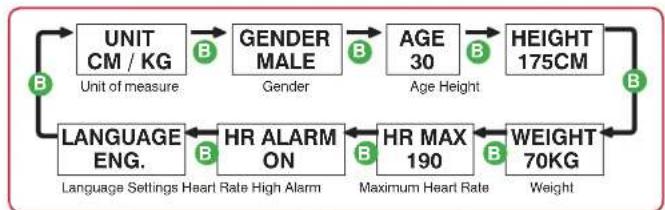
User Setup


- Please enter your age, gender, height, and weight accurately as these may determine the accuracy in calculating your target training heartbeat and burnt calories range.
*The maximum heart rate is derived from the "Age formula: 220 - Age" formal automatically. It is highly recommended to change these settings only with more accurate values arrived with physicians and professional lab monitoring.
flowchart
graph LR
    A["UNIT CM / KG\nUnit of measure"] --> B["GENDER MALE\nGender"]
    B --> C["AGE 30\nAge Height"]
    C --> D["HEIGHT 175CM\nWeight"]
    D --> E["WEIGHT 70KG\nWeight"]
    E --> F["HR MAX 190\nMaximum Heart Rate"]
    F --> G["HR ALARM ON\nLanguage Settings Heart Rate High Alarm"]
    G --> H["LANGUAGE ENG.\nLanguage Settings Heart Rate High Alarm"]
    H --> I["B"]
    I --> A


- UOM option: metric CM / KG or Imperial FT / LB - Gender: MALE or FEMALE
• Age: 10-99 year-old
• Height: 120-230 cm (3' 11' - 7' 5')
• Weight: 30-150KG (67-330LB)
• Maximum Heart Rate: 130-220bpm
• Heart Rate High Alarm: ON or OFF

Baisc Setup
3-3 Sensor Setup
Baisc Setup
3-4 Hot Key Setup

STEP1 Press Key C to point to USER in the function bar → Key B → Key C to point to SENSOR SET.

flowchart
graph LR
    A["14-01-01 WED 12:34 PM 156"] --> B["14-01-01 WED 12:34 PM 156"]
    B --> C["USER SET"]
    C --> D["SENSOR SET"]
STEP2 Setup steps: 1. Press Key B to switch between HRM or STRIDE setup window. 2. Press Key C to select ON (connect) or OFF (disconnect). 3. Setup is completed, Press Key A to return to the main screen.

flowchart
graph LR
    A["SENSOR SET\nSensor Setup"] --> B["HRM OFF"]
    B --> C["HRM ON"]
    C --> D["STRIDE OFF"]
    D --> E["STRIDE ON"]
    E --> F["Digital Clock Display 14:01:01\nWED 12:34 PM\nFIREY ALM TIME"]
Setup heart rate strap Setup foot pod
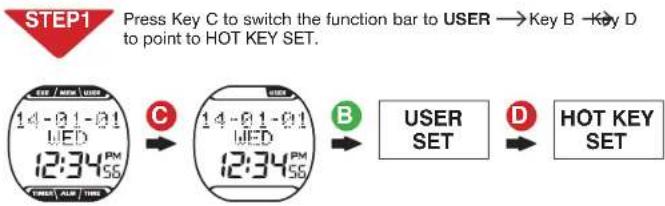
flowchart
graph LR
    A["STEP1 Press Key C to switch the function bar to USER"] --> B["→ Key B - Key D to point to HOT KEY SET."]
    C["14-01-01 UED 12:34 PM"] --> D["→"]
    E["14-01-01 UED 12:34 PM"] --> F["→"]
    G["USER SET"] --> H["→"]
    I["HOT KEY SET"] --> J["→"]
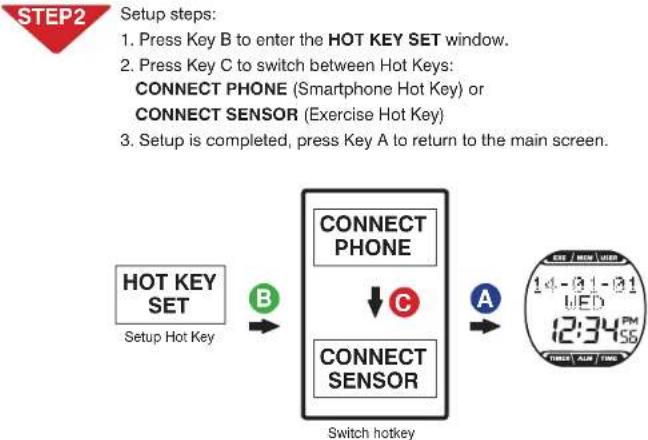
flowchart
graph LR
    A["SET: HOT KEY SET"] --> B["Connect Phone"]
    B --> C["Connect Sensor"]
    C --> D["Switch hotkey"]
    style A fill:#f9f,stroke:#333
    style B fill:#ccf,stroke:#333
    style C fill:#cfc,stroke:#333
    style D fill:#fcc,stroke:#333

- Your BRW can connect to two Bluetooth 4.0 sensors (heart rate strap and foot pod) at one time. - Please only connect sensors required by specific exercises to save time in search for Bluetooth connections..

- After CONNECT PHONE is set to the HOT KEY press Key B in the main screen to enter the smartphone exercise sync. screen. (See Page 32 Smartphone Exercise Sync. for detail.) - After CONNECT SENSOR is set to the HOT KEY press Key B in the main screen to enter the Training with sensors. (See page 20-21 for sensor tutorial.)

Baisc Setup Baisc Setup
3-5 Exercise Page Setup 3-5 Exercise Page Setup


flowchart
graph LR
    A["14-01-01\nMED\n12:34PM\n15S"] --> B["14-01-01\nMED\n12:34PM\n15S"]
    B --> C["USER SET"]
    C --> D["EXE PAGE SET"]

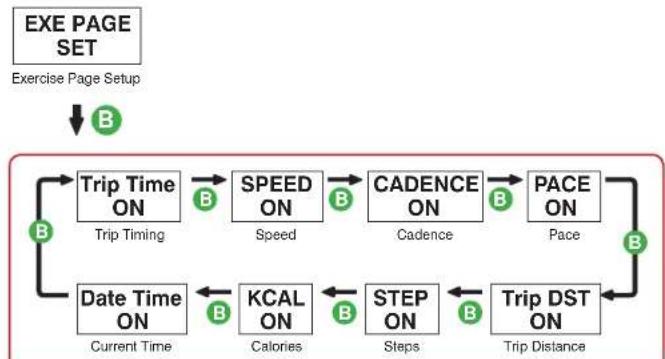
flowchart
graph TD
    A["EXE PAGE SET"] --> B["Exercise Page Setup"]
    B --> C["Trip Time ON"]
    C --> D["Trip Timing"]
    D --> E["SPEED ON"]
    E --> F["Speed"]
    F --> G["CADENCE ON"]
    G --> H["Cadence"]
    H --> I["PACE ON"]
    I --> J["Pace"]
    J --> K["Trip DST ON"]
    K --> L["Trip Distance"]
    L --> M["Step ON"]
    M --> N["Steps"]
    N --> O["KCAL ON"]
    O --> P["Calories"]
    P --> Q["Date Time ON"]
    Q --> R["Current Time"]
    R --> S["B"]
    S --> C
Exercise page:
| Exercise page Name Description | ||
| Trip Time | Trip Timing | •Display format: HH:MM:SS |
| SPEED* | Speed * | •Kilometers (Miles) run per hour•Display in metric unit: KPH (KM per Hour)•Display in Imperial unit: MPH (Mile per Hour) |
| CADENCE* | Cadence* | •Steps per minute•In unit of stride (one step by left and right feet together)•Display unit: SPM (Stride per Minute) |
| PACE* | Pace* | •Minutes it takes to run one kilometer (mile)•Display in metric unit: min / KM•Display in Imperial unit: min / ML |
| Trip DST* | Trip Distance* | •The minimum metric display unit: 0.1 KM•The minimum Imperial display unit: 0.1 ML |
| STEP* | Steps* | •Every step, either by left or right foot, is one step |
| ♥** | Heartbeat** | •Heartbeat per minute•Display unit: BPM (Heartbeat per Minute) |
| KCAL** | Calories** | •Display in unit of Kcal (Cal.) |
| Date Time | Current Time | •Display current time and date |

* Display together with foot pod.
** Display together with heart rate strap.

Exercise Mode
Exercise Mode

4-1 Setup Training Target
4-1 Setup Training Target
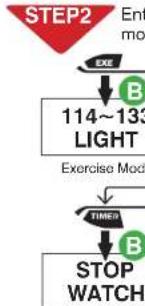
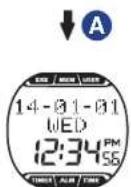
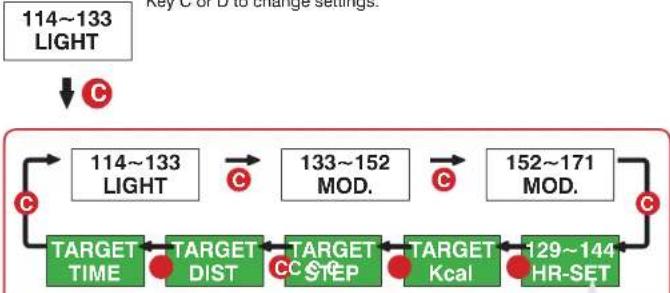
STEP1 Press Key C to point to EXE in the function bar → press Key B.
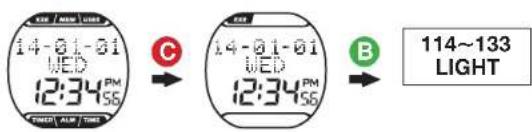
STEP2 Setup steps: 1. Press Key C to change the training program page. 2. After pointing to customizable training targets (e.g. green labeled area), → press Key B to enter and select flashing items, → press Key C or D to change settings.
flowchart
graph LR
    A["114~133 LIGHT"] --> B["114~133 LIGHT"]
    B --> C["133~152 MOD."]
    C --> D["152~171 MOD."]
    D --> E["129~144 HR-SET"]
    E --> F["TARGET TIME"]
    E --> G["TARGET DIST"]
    E --> H["TARGET STEP"]
    E --> I["TARGET Kcal"]
    style A fill:#f9f,stroke:#333
    style B fill:#ccf,stroke:#333
    style C fill:#cfc,stroke:#333
    style D fill:#fcc,stroke:#333
    style E fill:#cff,stroke:#333
    style F fill:#ffc,stroke:#333
    style G fill:#ffc,stroke:#333
    style H fill:#ffc,stroke:#333
    style I fill:#ffc,stroke:#333
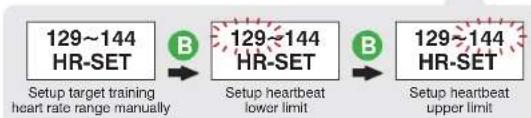
flowchart
graph LR
    A["129~144 HR-SET"] -->|B| B["129~144 HR-SET"]
    B -->|B| C["129~144 HR-SET"]
    D["Setup target training\nheart rate range manually"] --> A
    E["Setup heartbeat\nlower limit"] --> B
    F["Setup heartbeat\nupper limit"] --> C
STEP3 Setup completed: Press Key A to exit to the main screen. Or press Key B → to start exercising.(See page 20-21 for sensor tutorial.)
Training program:
| Training program Name Description | ||
| 114~133*LIGHT | Light* | •Intensity: 60~70% of the maximum heart rate.•Application: health upkeep and weight control. |
| 133~152*MOD. | Medium* | •Intensity: 70~80% of the maximum heart rate.•Application: aerobic exercise and advanced fitness training. |
| 152~171*HARD | Strong* | •Intensity: 80~90% of the maximum heart rate.•Application: sports games and athletic training. |
| 129~144HR-SET | Setup Target Heart Rate Zone Limits Manually | •Setup range:129~144129~144lower limitupper limit70-144 bpm144-220 bpm |
| TARGET Kcal | Target Burning Calorie | •Setup range: 50-10,000 Kcal. |
| TARGET STEP | Target Steps | •Setup range: 500-99,500 steps. |
| TARGET DIST | Target Distance | •Setup range in metric unit: 0.5-999.9 kilometer.•Setup range in Imperial unit: 0.5-619.5 miles. |
| TARGET TIME | Target Training Time | •Setup range:0:300:300-99 hours 5-55 minutes |
Training targets that can be setup manually

- Training program marked with * symbol is calculated by your BRW system according to your age setup. You may customize the target heart rate range with the HR-SET program.
• The upper and lower limit of heartbeat varies with your age. Please choose and set a proper training target on the basis of your physical fitness before every exercise session.
• After a custom training target is achieved, a champion trophy ≈ displays along with the results, press C Key to page through the results. Press A Key to exit and choose to save the record.

Exercise Mode
4-2 Training with Sensor
Exercise Mode
4-2 Training with Sensor

flowchart
graph TD
A["114~133 LIGHT"] --> B["HRSSENOSER"]
B --> C["Searching heart rate strap"]
C --> D["GSSENOSER"]
D --> E["Searching foot pod"]
E --> F["HR----GS DONE"]
F --> G["Sensor ready"]
G --> H["00:01 ♥96"]
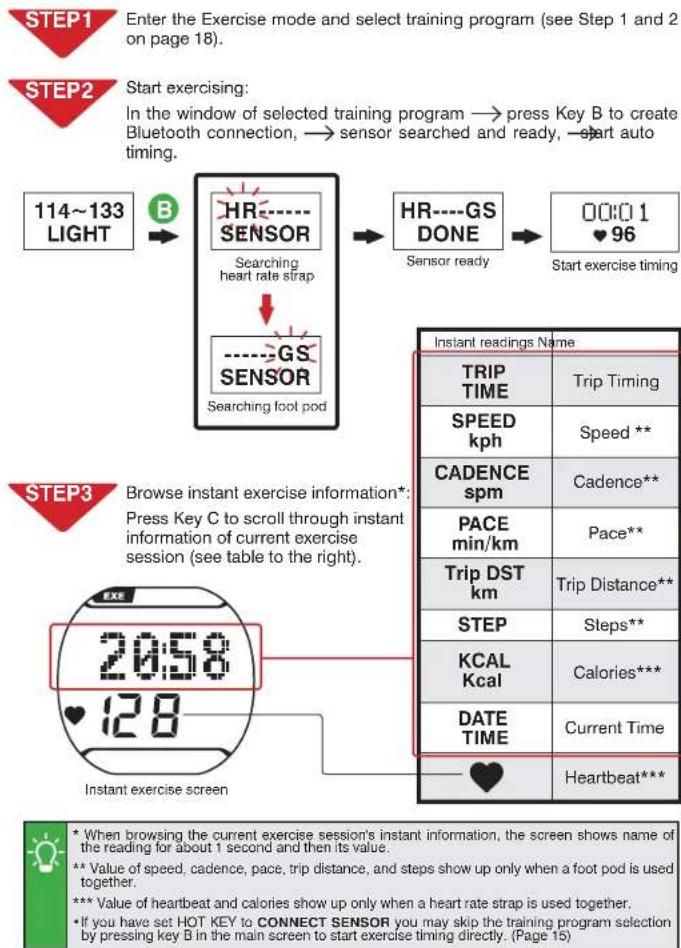
I["20:58 ♥128"] --> J["Instant exercise screen"]
K["Start exercising: In the window of selected training program → press Key B to create Bluetooth connection, → sensor searched and ready, → start auto timing."] --> L["STEP1 Enter the Exercise mode and select training program (see Step 1 and 2 on page 18)."]
M["STEP3 Browse instant exercise information*: Press Key C to scroll through instant information of current exercise session (see table to the right)."] --> N["Step3 Instant readings Name"]
N --> O["TRIP TIME"]
N --> P["SPEED kph"]
N --> Q["CADENCE spm"]
N --> R["PACE min/km"]
N --> S["Trip DST km"]
N --> T["STEP"]
N --> U["KCAL Kcal"]
N --> V["DATE TIME"]
N --> W["Heartbeat***"]
flowchart
graph TD
    A["114~133 LIGHT"] --> B["HRSSENOSER"]
    B --> C["Searching heart rate strap"]
    C --> D["GSSENOSER"]
    D --> E["Searching foot pod"]
    E --> F["HR----GS DONE"]
    F --> G["Sensor ready"]
    G --> H["00:01 ♥96"]
    I["20:58 ♥128"] --> J["Instant exercise screen"]
    K["Start exercising: In the window of selected training program → press Key B to create Bluetooth connection, → sensor searched and ready, → start auto timing."] --> L["STEP1 Enter the Exercise mode and select training program (see Step 1 and 2 on page 18)."]
    M["STEP3 Browse instant exercise information*: Press Key C to scroll through instant information of current exercise session (see table to the right)."] --> N["Step3 Instant readings Name"]
    N --> O["TRIP TIME"]
    N --> P["SPEED kph"]
    N --> Q["CADENCE spm"]
    N --> R["PACE min/km"]
    N --> S["Trip DST km"]
    N --> T["STEP"]
    N --> U["KCAL Kcal"]
    N --> V["DATE TIME"]
    N --> W["Heartbeat***"]
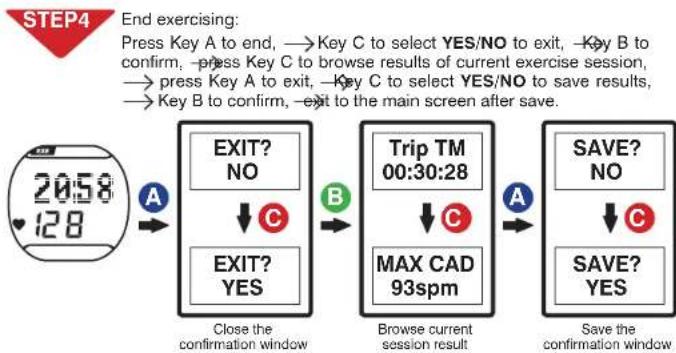
flowchart
graph LR
    A["20:58 128"] --> B["EXIT? NO"]
    B --> C["EXIT? YES"]
    C --> D["Close the confirmation window"]
    D --> E["Trip TM 00:30:28"]
    E --> F["MAX CAD 93spm"]
    F --> G["Browse current session result"]
    G --> H["SAVE? NO"]
    H --> I["SAVE? YES"]
    I --> J["Save the confirmation window"]
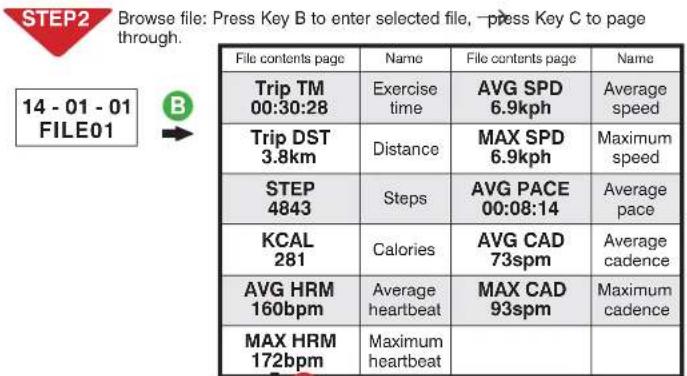
■ Results of current exercise session:
| Current session result page | Name | Current session result page | Name |
| Trip TM00:30:28 | Exercise time | AVG SPD6.9kph | Average speed |
| Trip DST3.8km | Distance | MAX SPD6.9kph | Maximum speed |
| STEP4843 | Steps | AVG PACE08:14 | Average pace |
| KCAL281 | Calories | MAX PACE06:14 | Maximum pace |
| AVG HRM160bpm | Average heartbeat | AVG CAD73spm | Average cadence |
| MAX HRM172bpm | Maximum heartbeat | MAX CAD93spm | Maximum cadence |
• Precautions before exercising:
-
Make sure the optional sensor has been paired with your BRW. (Page 10-11)
-
Set the BRW Hot Key to CONNECT SENSOR. (Page 15)
-
Please only connect sensors required by specific exercises to save time in search for Bluetooth connections. (Page 14)
-
Activate your foot pod before using it (shake it or run or walk 20 steps). Your foot pod remains awake for one minute. It goes back to sleep mode again if no Bluetooth connection is enabled.
-
In case your BRW lost connection with the sensor during exercise, the message 'LINK HR or LINK GS' prompts, press Key C to select option YES or NO, press Key B to confirm your choice. If you choose option YES, your BRW starts searching for the sensor again, searched successfully, continue timing. If you choose option NO, your BRW continues the timing without searching for the sensor.

Log Function
5-1 Browse, Upload, and Delete File
Log Function

flowchart
graph LR
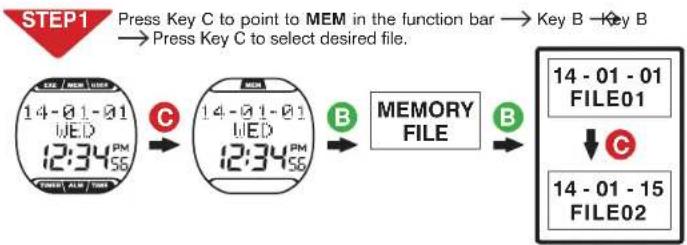
A["STEP1 Press Key C to point to MEM in the function bar"] --> B["Key B"]
B --> C["Press Key C to select desired file."]
subgraph Step1
D["14-01-01 WED 12:34 PM SE"] --> E["14-01-01 WED 12:34 PM SE"]
E --> F["MEMORY FILE"]
F --> G["14-01-01 FILE01"]
G --> H["14-01-15 FILE02"]
end
D -->|C| E
E -->|B| F
F -->|B| G
| File contents page | Description |
| VIEW LAPS | Select to view single lap data (See STEP 3.) |
| UPLOAD FILE | Upload file (See STEP 4.) |
| DELETE FILE | Delete file (See STEP 5.) |
| •Maximum number of laps: 42.•lap equivalence: metric: one kilometer per lap. Imperial; one mile per lap. |
STEP3 Single lap data: In the VIEW LAP window, → press Key B to enter, → press Key C to view single lap data.
LAP01 Single lap number 6.9kph Average speed 128 Average heartbeat
Runaid 10, Bluetooth Running Watch (BRW)
5-1 Browse, Upload, and Delete File

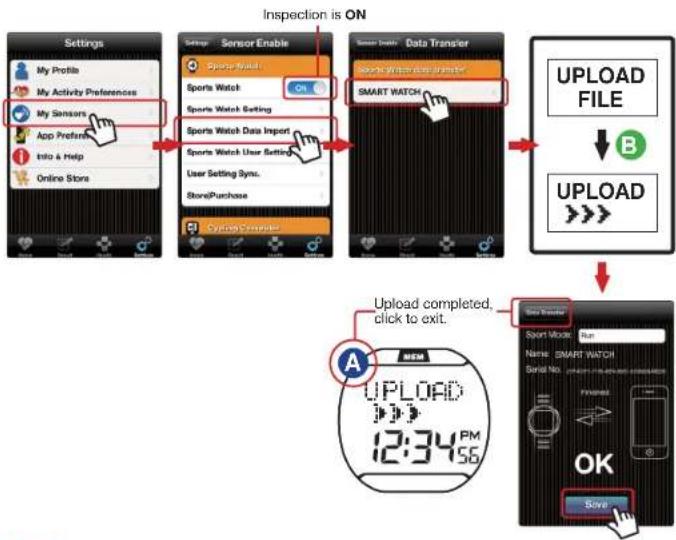
Uploading file:
- Open ALA COACH+ App>Settings>My Sensors>Sports Watch>Sports Watch Data Import > SMART WATCH.
- In the BRW UPLOAD FILE window, press Key B to create Bluetooth connection, → connected, press App Start button.
- After the uploading is completed, the App prompts OK, → press the Save button, press the button at upper left corner to exit, press Key A at your BRW to exit.
flowchart
graph TD
    A["Settings"] --> B["Sensor Enable"]
    B --> C["Data Transfer"]
    C --> D["Upload FILE"]
    D --> E["Upload completed, click to exit."]
    E --> F["Save Transfer"]

• Precautions on file uploading:
- Make sure the mobile device has paired with your BRW. (Page 29)
- Check the mobile device > Setup > Bluetooth* system and ALA COACH+ App > Settings > My Sensors > Sports Watch is ON.
STEP5
Deleting file:
In the DELETE FILE window, press Key B to enter, → press Key C to select NO/YES, press Key B to confirm.
STEP6
Completed, press key A to return to the main screen.
User Manual

Log Function
5-3 View Exercise Statistics
Calibrating with Your Foot Pod

flowchart
graph TD
A["STEP1: Press Key C to point to MEM in the function bar"] --> B["14-01-01 WED 12:34 PM 56"]
B --> C["14-01-01 WED 12:34 PM 56"]
C --> D["MEMORY FILE"]
D --> E["MEMORY STAT."]
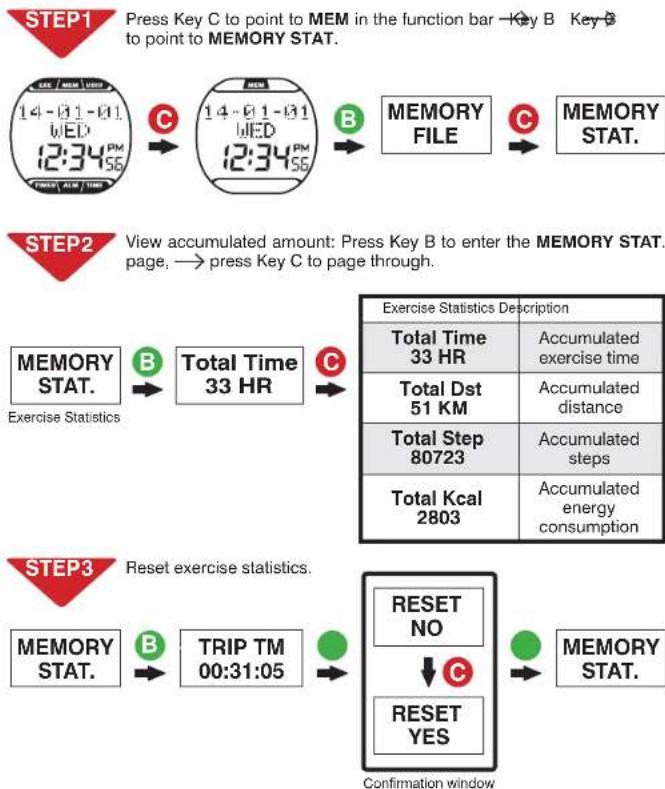
F["STEP2: View accumulated amount: Press Key B to enter the MEMORY STAT. page, → press Key C to page through."] --> G["MEMORY STAT."]
G --> H["Exercise Statistics"]
H --> I["Total Time 33 HR"]
I --> J["Exercise Statistics Description"]
J --> K["Total Time 33 HR"]
K --> L["Accumulated exercise time"]
J --> M["Total Dst 51 KM"]
M --> N["Accumulated distance"]
J --> O["Total Step 80723"]
O --> P["Accumulated steps"]
J --> Q["Total Kcal 2803"]
Q --> R["Accumulated energy consumption"]
S["STEP3: Reset exercise statistics."] --> T["MEMORY STAT."]
T --> U["TRIP TM 00:31:05"]
U --> V["RESET NO"]
V --> W["RESET YES"]
W --> X["MEMORY STAT."]
style A fill:#f9f,stroke:#333
style F fill:#f9f,stroke:#333
style S fill:#f9f,stroke:#333


- Press RESET to clear total exercise amount data.
- The RESET function does not erase the exercise file. To delete it, go to MEMORY FILE and select individual file for deletion.
flowchart
graph TD
    A["14-01-01 WED 12:34PM"] --> B["14-01-01 WED 12:34PM"]
    B --> C["USER SET"]
    C --> D["STRIDE SET"]
    E["STRIDE SET"] --> F["WALKING CAL. Walking"]
    F --> G["RUNNING CAL. Running"]
    G --> H["Calibration distance"]
    H --> I["400M CAL. 800M 1000M"]
    I --> J["WAKE SENSOR"]
    J --> K["GO!"]
    K --> L["COMPLETE CAL. FAIL CAL."]
    L --> M["WALKING 815 Calibrating"]

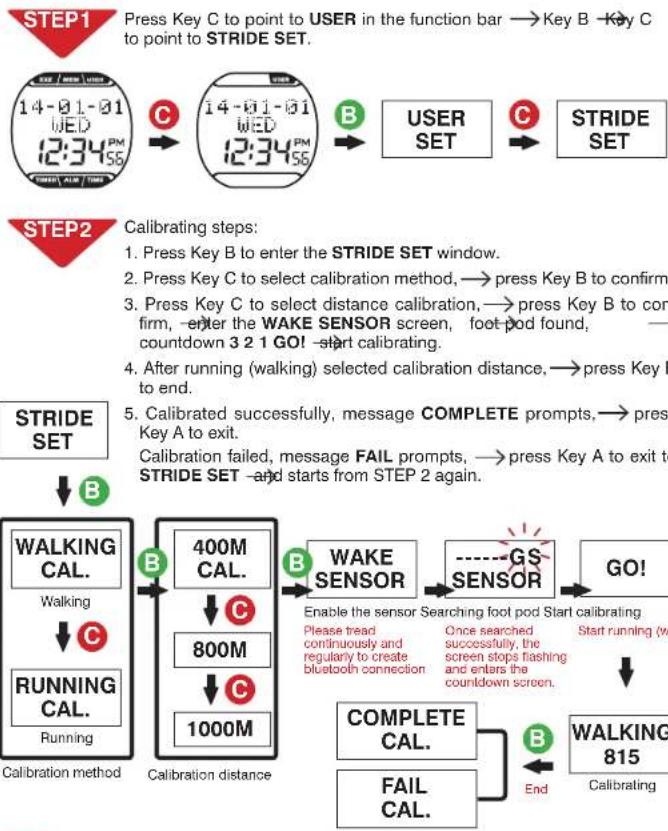
- Please calibrate at sports field with standard 400m runway. Run or walk in the inner most runway in steady speed and the same pace. Press key B to end once you have run through the selected calibration distance, and your BRW save the calibrated distance automatically.
- Please calibrate at distance 800m or more to get better calibration result.
- Accuracy of measured distance may vary with step size, road surface quality, and inclination even after calibration.

Timer Function
Daily Alarm Setup

Timing with Stopwatch
1.Enter the stopwatch mode:
In the main screen, press Key D to point to TIMER in the function bar → Key B → press Key B to enter the STOPWATCH function.
2.Measure elapse time:


3.Measure split time:

Start


- Measure elapse time of two contestants:

Start


- Measurement completed, press Key A to return to the main screen.
Countdown Timer
1.Enter the countdown timer screen:
Press Key D to point to TIMER in the function bar → Key B —Key C to point to COUNTDOWN TIMER → press Key B.
2. Setup countdown time:
Press Key B to point to flashing setup item, → press Key C or D to setup desired value and press Key B to confirm.
3. Use the countdown timer:
Press Key D to start countdown, → press Key D again to pause/resume count-down.
To stop timing, press Key D Key C to reset the countdown time to its initial value.
4. After countdown to zero, your BRW buzzes, → press any Key to stop, and the countdown time resumes to its initial value.
5. Measurement completed, press Key A to return to the main screen.

Hour SecMin
- Enter the alarm setup window:
In the main screen, press Key D to point to ALM in the function bar → press Key B. - Setup steps: Press Key C to ON/OFF alarm,→ press Key B to move to flashing setup item,→ press Key C or D to setup desired value.
- Setup is completed, Press Key A to return to the main screen.
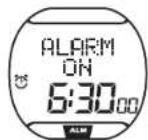


• The alarm icons displays to the left of the screen. Once the set alarm time is reached, your BRW alarms, press any Key to stop alarming.

-Stopwatch timing unit: 1/100 second. Timing limit: 23:59:59.99.
•The stopwatch would continue timing to its limit and start timing again from zero if it is not stopped manually.
• Countdown timer timing unit: 1 second.
- Countdown time range: 1 minute to 24 hours. (You can Setup countdown time in unit of minute or hour.)
• To Setup countdown time of 24 hours, please do the following: 00:00:00


Connect to Smartphone or Mobile Device Connect to Smartphone or Mobile Device
9-2 Pair Your BRW with Mobile Device9

Please install the ALA COACH+ App on your mobile device before connecting to it and open your mobile device's Bluetooth® function for functions including pairing, synchronizing exercises, and file uploading.

Search and install: ALA COACH+

Please scan to download immediately
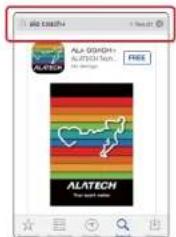

Supported OS: Apple iOS 5.0 or later, Android 4.3 or later

Compatible mobile devices:
- iPhone 4S or later
• iPod Touch 5 or later - iPad 3 or later
- iPad mini or later
- HTC One Max
• HTC One (M8)

- Please visit us at www.alatech.com to learn more about the latest information on compatible mobile devices and supported accessories.

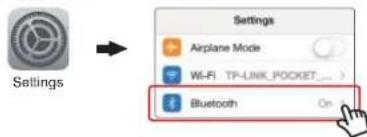
Please make sure you have turned on your mobile device>setup>Bluetooth® system in advance.

Please pair your optional sensor with the mobile device. (See user manual included with the sensor for the pairing procedure.)
STEP1
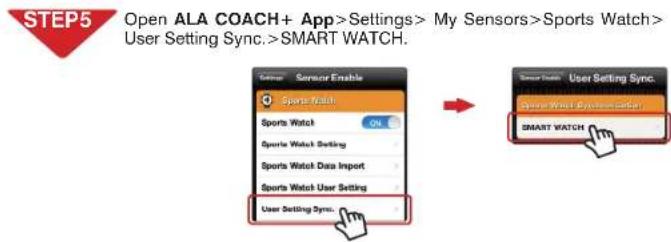
Check your mobile device>Setup>Bluetooth ^® system is open. (see page 28)
STEP2
Set BRW Hot Key to CONNECT PHONE. (see page 15)
STEP3
Open ALA COACH+ App>Settings>My Sensors>Sports Watch>Sports Watch Settings>Add New Sensor.
STEP4
Pairing steps:
- In BRW main screen, → press Key B to create Bluetooth connection.
- Once your BRW is discovered by the App, → press to start pairing.
- Once pairing is completed, the App prompts OK, → press the upper left button to exit the mobile device, and Key A to exit your BRW.
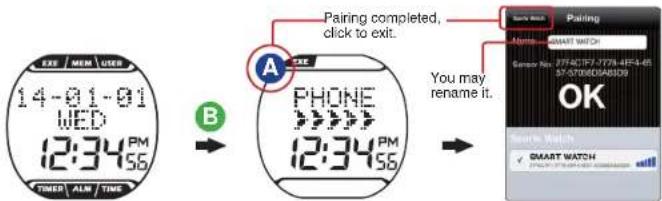

- Keep your mobile device and BRW within 10cm from each other and keep both away from other Bluetooth devices to prevent incorrect pairing.

Connect to Smartphone or Mobile Device
Connect to Smartphone or Mobile Device

9-3 Synchronize with Smartphone
9-3 Synchronize with Smartphone
flowchart
graph TD
    A["Start"] --> B{User Setup}
    B -->|Yes| C["Target Mode: HR Zone/User set"]
    B -->|No| D["Heart Rate Zone Max: 144 bpm"]
    B -->|Yes| E["Heart Rate Zone Mix: 129 bpm"]
    B -->|No| F["Distance: 3.0 bpm"]
    B -->|Yes| G["Duration: 06:30"]
    B -->|No| H["Calories: 580 kcal"]
    B -->|Yes| I["Step 1: Check your mobile device>Settings>Bluetooth® sytem is open.<br>(see page 28)"]
    A --> J["Step2: Make sure your smartphone or mobile device has been paired with your BRW otherwise, please pair the two in advance.<br>(see page 29)"]
    A --> K["Step3: Open ALA COACH+ App>Settings>My Sensors>Sports Watch>Sports Watch User Setting"]
    A --> L["Step4: Setup in sequence"]
    L --> M["User Setting"]
    M --> N["Unit: Unit"]
    M --> O["Gender: Gender"]
    M --> P["Age: Age"]
    M --> Q["Height: Height"]
    M --> R["Weight: Weight"]
    M --> S["Max Heart Rate: Max Heart Rate"]
    M --> T["Heart Rate Alarm: Heart Rate Alarm"]
    M --> U["Heart Rate Sensor: Heart Rate Sensor"]
    M --> V["Foot Pod Sensor: Foot Pod Sensor"]
    M --> W["Synchronize to the user settings USER SET"]
    W --> X["Synchronize to the sensor settings SENSOR SET"]

    A --> Y["Settings"]
    Y --> Z["My Profile: My Profile"]
    Y --> AA["My Activity Preferences: My Activity Preferences"]
    Y --> AB["My Sensors: My Sensors"]
    Y --> AC["App Preference: App Preference"]
    Y --> AD["Info & Help: Info & Help"]
    Y --> AE["Online Store: Online Store"]

    A --> AF["Sensor Enable"]
    AF --> AG["Sensor Watch: Sports Watch ON"]
    AF --> AH["Sports Watch Setting: Sports Watch Data Import"]
    AF --> AI["User Setting Syn. Store/Purchase"]
    AF --> AJ["System/Consumer"]

    A --> AK["Time Setting"]
    AK --> AL["Time Synchronization OFF"]
    AK --> AM["Time Display Mode NE NEW OFF"]
    AK --> AN["Time System NE NEW OFF"]
    AK --> AO["Heart Rate Alarm OFF"]
    AK --> AP["Alarm Setting 00:00"]

    A --> AQ["Synchronize to the date and time settings alarm settings TIME SET ALARM SET"]
    AQ --> AR["Synchronize to the exercise page settings EXE PAGE SET"]
flowchart
graph TD
    A["14-01-01 WED 12:34 PM SE"] --> B["14-01-01 WED 12:34 PM SE"]
    B --> C["USER SET"]
    C --> D["PHONE SYNC"]
    D --> E["User Setting System"]
    E --> F["Sync completed, click to exit."]
    F --> G["Once Sync is completed, the App prompts OK, press the upper left button to exit the mobile device, and Key A to exit your BRW."]


Connect to Smartphone or Mobile Device
9-4 Smartphone Exercise Sync.
Specifications

flowchart
graph LR
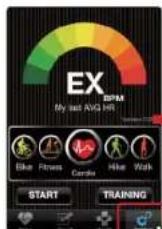
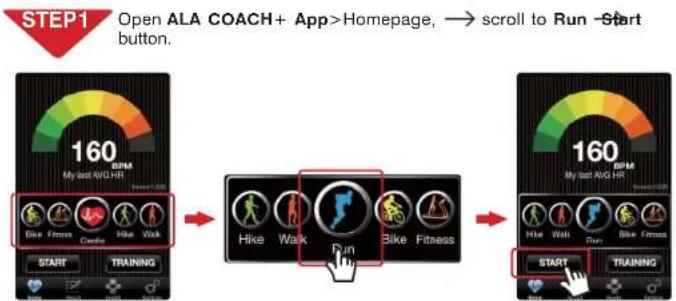
A["STEP1 Open ALA COACH+ App>Homepage, → scroll to Run Start button."] --> B["160 BPM My start AVG HR"]
B --> C["Hike Walk Run Bike Fitness"]
C --> D["160 BPM My start AVG HR"]

- Precautions on connecting smartphone for exercise data sync.:
- Make sure your mobile device has been paired with your BRW. (Page 29)
- Make sure your mobile device has been paired with your optional sensors. (See user manual included with the sensor for the pairing procedure.)
- Make sure the BRW Hot Key is set to CONNECT PHONE. (Page 15)
- Check the mobile device>Setup>Bluetooth® system and ALA COACH+ App>Settings>My Sensors>Sports Watch is ON.
- Please keep your mobile device and BRW within 10 meters direct sight distance from each other during exercise sync.
- The exercise result data would be saved in ALA COACH+ App>FILE instead of your BRW after the exercise is ended.
•Product: Runaid 10 Bluetooth Running Watch
• Model: FB006
• Operation temperature: -5°C to 50°C (23°F to 122°F)
- Timing accuracy: (At 25°C/77°F operation environment) ±1 second/day
• Water proof grade: 5 ATM
- Battery type: CR2032
- Battery life: Around one year on average
(on the basis of exercise seven days per week and one hour per day)
- Battery low indicator
-Backlight: EL
• Transmission technology: Bluetooth 4.0 (Bluetooth® Smart)
- Receiving transmission distance: around 10 meters (line of sight)
- Compatible accessories:
ALATECH Bluetooth 4.0 Heart Rate Strap (Optional)
ALATECH Bluetooth 4.0 Foot Pod (Optional)
- Compatible devices:
iOS 5.0 or later system version (iPhone 4S or later)
Android 4.3 or later system version and featuring Bluetooth 4.0
• Dimension: L45.5×W46.2×D13.6mm
• Weight: 51g
• Material employed: ABS case and PU band

Appendix
Appendix

■ Precautions for use with Runaid 10
- Due to we cannot guarantee compatibility with other manufacturer's sensors, we sincerely recommend you use ALATECH Bluetooth sensors with your Runaid 10 BRW for activity tracking. Recommend compatible sensors as below:
ALATECH Heart Rate Strap (model CS009/CS010/CS011/CS012)
ALATECH Bluetooth 4.0 Foot Pod (model GS002BLE)
• To ensure sufficient transmission range from your heart rate strap to your smartphone, keep your smartphone in front of you. We recommend you do not put it in a back pocket or backpack during smartphone exercise sync.
Fail to Connect to Bluetooth Devices
• In case your Runaid 10 BRW failed to connect to a Bluetooth device, please do the following:
1. Check battery power in your BRW and the mobile device.
2. Make sure the BRW HOT KEY is set to CONNECT PHONE. (Page 15)
3. Check whether your BRW is enabled, ALA COACH+ App>Settings>My Sensors>Sports Watch.
4. Keep the mobile device and your BRW within 10 meters direct sight distance from each other.
5. If the Bluetooth indicator on the device status bar turn from white to semi-transparent App. 100%, restart the mobile device, Bluetooth® system and ALA COACH+
6. Restart the mobile device, Bluetooth ^® system and ALA COACH+ App.
7. If the problem persists, please try pairing the mobile device with other Bluetooth device to find out the cause is caused by any of your BRW, the mobile device, or the Bluetooth ^® system.
- If the Runaid 10 BRW failed to connect with sensors through Bluetooth, please do the following:
1. Check battery power in your BRW and the sensor.
2. Make sure the BRW HOT KEY is set to CONNECT SENSOR. (Page 15)
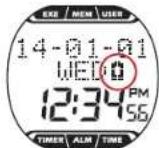
Battery Low Indicator
The battery low indicator prompts once the battery power is down to a certain level; the following functions may be affected or limited:
- Bluetooth connection lost and link with sensor or mobile device failed.
• Light failed to turn on. - Buzzer failed to sound.
In case the power low indicator persists displaying, get the battery replaced immediately.
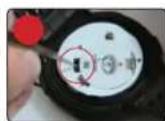
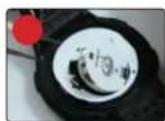
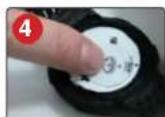
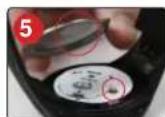
Replace Battery
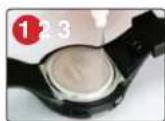
- Remove the four screws from your BRW's backcover with a Phillips screwdriver.
- Release the bolt hook of the metal cover of the battery with tweezers.
- Insert a new CR2032 battery with the positive pole facing upward.
- Recap the metal battery cover.
- Close the back cover and tighten the four screws.
(Note: Align the round flap at the back cover to the spring.)

- Do the basic setups described in page 12-17 after every battery replacement. If you have done the BRW user setup with the ALA COACH+ App, you may re-sync settings to your BRW as described in 'Phone sync.' on page 30-31.

Appendix
Appendix

■ Health Warnings (including allergy)
- DO NOT over tighten your BRW band. This may lead to sweat and poor air circulation which, in turn, may lead to skin inflammation. Keep a finger space between your wrist and BRW band.
- Wearing BRW with sensitive skin or poor health may lead to skin inflammation. In case of skin inflammation, please keep the wand clean. Remove it and consult with your doctor immediately if there is skin inflammation or rash symptom.
- Consult your doctor before starting or changing your exercise program.
■ Precautions on the Use of Battery
Button battery in your BRW may suffer shortened life cycle or cause damage to the core, fire, chemical burns, electrolyte leakage, and/or personal injury.
- DO NOT expose your device to a heat source or high temperatures.
- DO NOT burn or drill your device or its battery.
- Please store your device in environment with a temperature range from -5^ to 50^ (23°F to 122°F) if it is not to be used for long time.
- DO NOT use your device in environment with temperatures exceeding -5^ to 50^ (23°F to 122°F).
- Please check local regulations for disposal of your device / battery or contact local waste disposal agencies.
Warnings on replaceable batteries:
- DO NOT remove batteries with pointed object.
- Keep batteries out of children's reach.
- DO NOT disassemble, drill, or damage batteries.
- Please replace batteries with correct ones. Fail to do so may lead to fire or explosion.
- Replaced button battery may contain perchlorate substance and require special disposal. Warnings on non-replacement battery: DO NOT try to remove non-replacement battery.

CAUTION

RISK OF EXPLOSION IF BATTERY IS REPLACED BY AN INCORRECT TYPE. DISPOSE OF USED BATTERIES ACCORDING TO THE INSTRUCTIONS.

Please check local waste disposal regulations to dispose your wasted battery.

ALATECH
www.alatech.com.tw

© 2014 ALATECH Technology Limited. All rights reserved.
2PF182128100001 (10/2014. Rev. C)