
ROBOT MULTIFONCTIONS SKM2501ST - Multifunction robot SINGER - Free user manual and instructions
Find the device manual for free ROBOT MULTIFONCTIONS SKM2501ST SINGER in PDF.

| Product type | 4-in-1 multi-function robot |
| Brand | SINGER |
| Model | SKM2501ST |
| Power supply | 120V/60Hz, 600W or 230V/50Hz, 600W |
| Kneading bowl capacity | Up to 1.75 kg (cake), 1.2 kg flour, 8 egg whites |
| Blender container capacity | 1.3 L max., 600 ml hot liquid max. |
| Chopper capacity | 500 g max. |
| Included accessories | Dough hook A, dough hook B, whisk for meringue, kneading bowl, spatula, blender container with lid, peanut grinder, chopper with cutting discs (fine, medium, blades), food pusher accessory, accessory holder |
| Main functions | Mixing, kneading, whisking, blending, chopping, mincing, grinding, crushing ice |
| Speeds | 9 speed levels + pulse function (P) |
| Max. operating time | Mixer: 10 min; Blender: 1 min; Grinder: 3 min; Chopper: 5 min |
| Materials | Stainless steel kneading bowl (estimated), glass blender container, stainless steel blades |
| Power cord | With integrated storage |
| Safety | Lid locking device; automatic shutdown in case of overload; whisk release button |
| Maintenance | Clean accessories with soapy water, wipe body with a damp cloth, do not immerse motor unit |
| Use | Indoor household use only |
Frequently Asked Questions - ROBOT MULTIFONCTIONS SKM2501ST SINGER
User questions about ROBOT MULTIFONCTIONS SKM2501ST SINGER
0 question about this device. Answer the ones you know or ask your own.
Ask a new question about this device
Download the instructions for your Multifunction robot in PDF format for free! Find your manual ROBOT MULTIFONCTIONS SKM2501ST - SINGER and take your electronic device back in hand. On this page are published all the documents necessary for the use of your device. ROBOT MULTIFONCTIONS SKM2501ST by SINGER.
USER MANUAL ROBOT MULTIFONCTIONS SKM2501ST SINGER
natural_image
Two kitchen appliances: a blender and a digital blender with black handle (no text or symbols visible)MODEL : SKM2501ST FRANÇAIS/ ENGLISH/ EΛΛΗΝΙΚΑ
FRANÇAIS
Composition 4: Hachoir :
natural_image
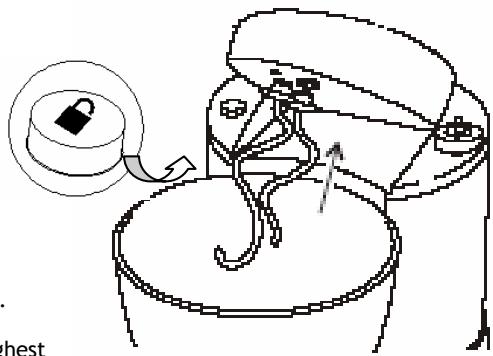
Line drawing of a kitchen mixer with an open lid and rotating button (no text or symbols)
natural_image
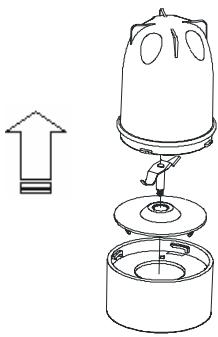
Line drawing of a mechanical device with internal components and a rotation arrow (no text or symbols)3. Mode d'emploi
Hacher :
natural_image
Technical line drawing of a mechanical device with a cylindrical component and an arrow indicating downward motion (no text or symbols)
natural_image
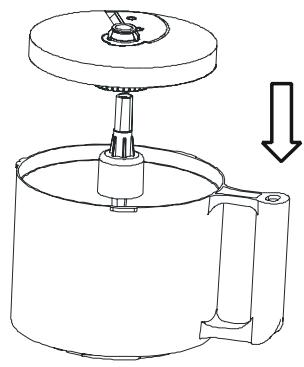
Line drawing of a mechanical device with a downward arrow indicating compression or disassembly (no text or symbols present)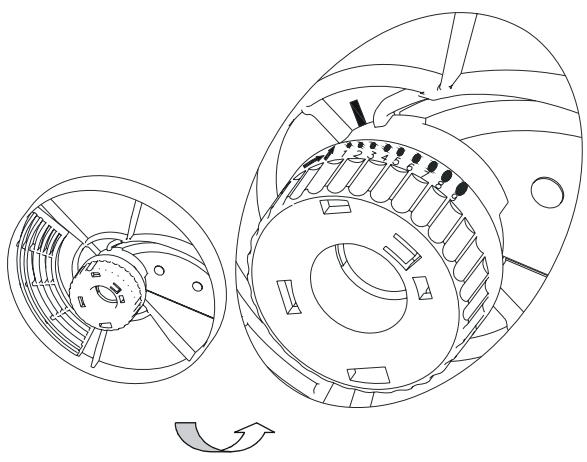
natural_image
Technical line drawing of a mechanical assembly showing internal components and a rotating arrow (no text or symbols)natural_image
Line drawing of a mechanical device with rotating components and directional arrows (no text or symbols)natural_image
Line drawing of a kitchen utensil with a downward arrow indicating a drop or reduction (no text or symbols)I. Functions and Characteristics:
This product is a 4-in-1 multi-functional kitchen appliance, conforming to the requirements for relevant technical recognition and safety recognition on electrical appliance. This product is a specialized kitchen appliance with rich functions. With the speed control system, different speeds can be selected according to different functions to achieve the best effect that you want. It’s mainly applicable for household indoor use
Specifications: 120V/60Hz, 600W; 230V/50Hz, 600W
The four working units of the product and their functions are as follows
- Mixing:
Can be used for blending of dough, egg, cheese, cake, crumble dim sum, seasoning soup, sauce, drink, etc.
- Blender Cup:
Can be used for juice extraction, milk blending, and ice blending, etc.
- Peanut Paste Cup:
Can be used to comminute peanuts to make delicious peanut paste and to mince onions, etc.
- Bowl Body:
Can be used to slice, sliver or mince fruit or meat, etc.
II. Basic Safety Precautions for Electric Appliance Use
-
Before using the product, please carefully read the specification of the product first and pay attention to relevant safety precautions for electric appliance use
-
Read all instructions carefully.
-
To protect against electrical shock, do not immerse cord, plug or unit in water or other liquid
-
The product is only for use and maintenance by adults.
-
Close supervision is necessary when any appliance is used by or near children.
-
Do not use this appliance for other than intended use.
-
Do not operate any appliance with a damaged cord or plug after the appliance malfunctions, or has been damaged in any manner. Return appliance to the nearest authorized service facility for examination, repair or adjustment. (Refer to warranty card for the most convenient customer service center)
-
If the power cord is damaged, please contact the manufacturer or authorized consumer service center nearby or professional servicing place to replace the power cord.
-
Do not let cord hang over edge of table or counter, or touch hot surface, including the stove.
-
Do not place on or near a hot gas or electric burner, or a heated oven
-
To disconnect, switch off the power and then remove plug from wall outlet.
-
Do not clean the unit with scouring powders, steel wool pads, or other abrasive materials.
-
The use of accessory attachments not recommended by manufacture may cause hazards.
-
Unplug from outlet when not in use and before cleaning. Allow to cool before cleaning the appliance.
-
During use, please prevent hand, hair, clothes and other articles from being winded into the blender accessories or its working parts. Use the cleaner blade only after the blender stops working to avoid any hurt.
-
Switch off the appliance before changing accessories or approaching parts which move in use. Use the cleaner blade only after the blender stops working.
-
Be careful when cleaning the blades after using the appliance to prevent being hunt by the blades.
-
After using the appliance, please clean the blending parts and dry them in a cool place, keep the appliance clean and hygeian, place it properly and avoid to be played with by children
-
When there is a failure or damage to the appliance, or it fell before or there is any other man-made damage, do not use it again.
-
Do not use outdoors.
- This appliance is not intended for use by children or other persons without assistance or supervision if their physical, sensory or mental capabilities prevent them from using it safely. Children should be supervised to ensure that they do not play with the appliance.
III. Preparations before Use:
- Remove all packages
- Before using, please clean all accessories with soap water and air-dry them.
- Please wind the spare power cord on the cord storage holder at the back of the appliance.
IV. Basic Operations:
- Please select proper power supply for the appliance.
- Sequential speed control: select proper speed with the electronic speed switch, from grade 1, the lowest speed, to grade 9, the highest speed.
- Pulse speed control: turn the electronic speed switch to "P" for better pulse operation. When released, the switch will return to "O" automatically to stop the working of the appliance.
- Stop: turn the electronic speed switch to "O" and the appliance will stop working.
Warning: If the blender cover or blender cup is not tightly locked, the appliance cannot be operated.
Warning: Operation of empty blender cup and peanut paste cup is not allowed. They can be operated only after being properly installed and
turned to a appointed position.
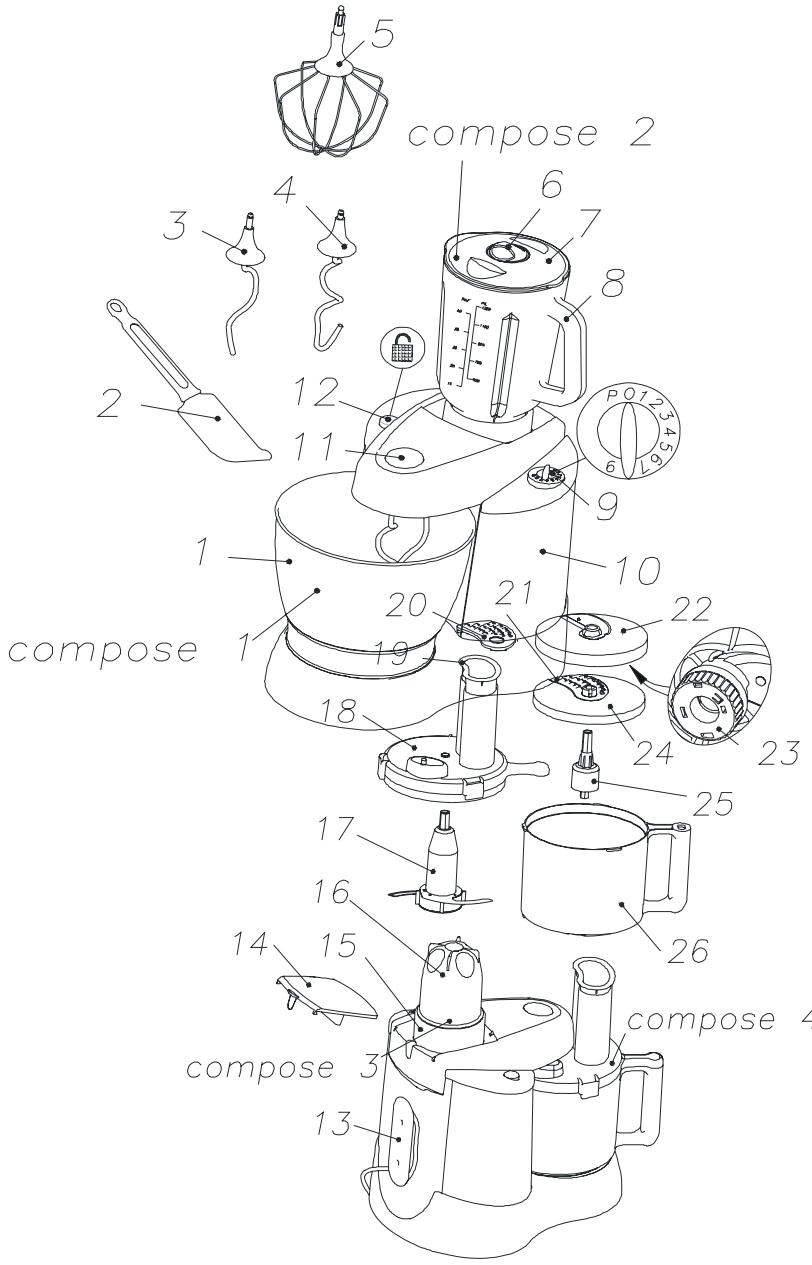
V. Name of Each Part of the Appliance
Compose 1: Mixing:
- Mixing 2. Cleaner blade
-
Dough Hook (B) 4. Dough Hook (A)
-
Whisk Beater
Compose 2: Blender Cup:
- Small Lid 7. Cup Lid 8. Cup Main Body:
- Speed Switch 10. Main Body 11. Ejector Button
- Release Lock Switch 13. Cord Storage Holder
Compose 3: Peanut Paste Bowl:
- Base Of Cup 16. Clear Cup
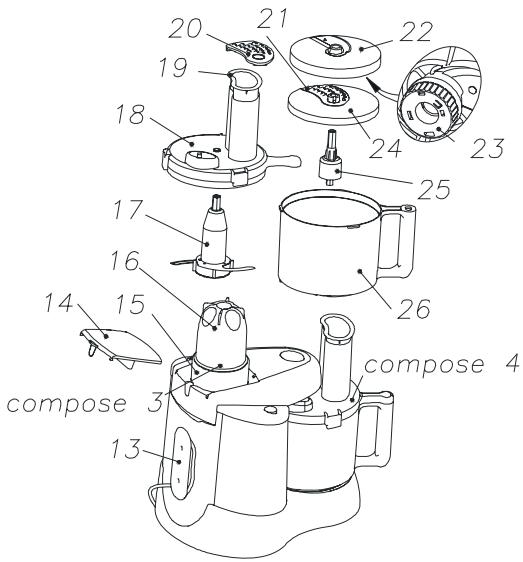
Compose 4: Meat Mincing Bowl:
- Meat Mincing Blade 18. Bowl Cover
- Food Pusher 20. Thin Shredding Blade
- Thick Shredding Blade 22. Slicing Blade Tray
- Blade Button 24. Shredding Blade Tray
- Main Shaft 26. Bowl Body
VI. Operation of Each Part of the Appliance:
Usage and Precautions of Mixing
1. Functions of blender part:
- Dough hook B (3) and Dough hook A (4): suitable for dough blending or blending fruit into cake materials.
- Whisk beater (5): suitable for blending of egg white, cheese, pudding, cake, butter and sugar.
2. Precautions
1) Only after the blender door (14) is closed, can the appliance be started.
2) The mixing part cannot be operated for over 10 successive minutes.
3) Do not use the whisk beater to blend anything too ropy, or the device would be damaged.
4) The dough hook A (4) and dough hook B (3) shall be used together, while the whisk beater shall be used alone. Different blender parts and their corresponding jacks have different colors, please plug the blender parts into the jacks with matching colors.
5) After cleaning, please put Mixing (1) back to its original position to protect the device.
6) Before removing the mixing (1), please remove the blender parts first.
3. Use:
natural_image
Line drawing of a kitchen mixer with an open lid and handle, showing internal components (no text or symbols)1) Blend flour of 850g and water of 486g with a rate of 7:4. Pour the water into the Mixing (1), then the flour.
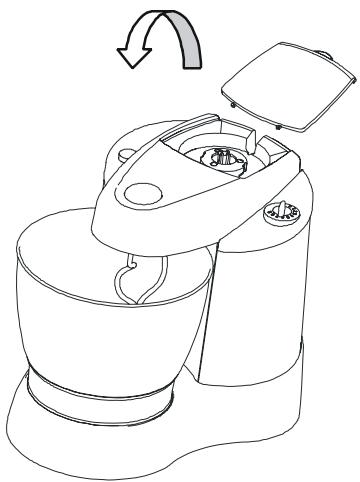
2) Press down the release lock switch (12) to open the device cover.
3) Put the materials into the mixing (1) and put the mixing (1) onto the base of main body (10). If necessary, turn it slightly to make it in a proper position.
4) Plug dough hook A (4) and dough hook B (3) into the jacks with corresponding colors.
5) Press down and lock the device cover, or the device cannot be started.
6) Select a speed of grade 1 to grade 5 to start the blender. (Note: the highest speed for mixing shall be grade 5)
7) After 10 minutes, the blending of dough shall be finished. Turn the speed switch (9) to "O" to stop the blender.
4. Remove blender parts
1) Turn the speed switch (9) to 'O' to stop the device first.
2) Press down the release lock switch (12) to open the blender cover.
3) Press down the ejector button (11) to remove blender parts.
** Generally, remove the blender parts before removing the mixing (1).
Note: Before the device comes to a full stop, the blender cover cannot be opened and the blender parts cannot be removed
5. Speed adjustment
If the materials being blended may spill out (such as, cream or flour), please select grade 1-2 at the beginning, then increase the speed if necessary.
Note: when blending, the speed shall not be over grade 5
1) Blend into thin paste: select a speed of grade 4-5 and the time shall be no longer than 1 minute.
2) Blend: select a speed of grade 5 to blend for 8-10 minutes.
3) Make pastry or blend flour and fruits into cake material: select a speed of grade 1-5 and blend for 5-10 minutes.
Blend common flour: select a speed of grade 1-2 to blend for 1 minute at the beginning, then increase to the speed to grade 4-5 and the time shall be no more than 10 minutes.
6. Maximum capacity:
Following data is only for reference, you can adjust according to your needs:
1) Egg white: 8;
2) Fruit cake: totally 1.75kg;
3) Common flour: 1.20kg (with minimum 864ml of water).
7. Cleaning
1) Pull the plug out of the socket before cleaning
2) Keep the main body, power cord and plug dry
3) Clean the blender parts with soap water and then air-dry them
4) When cleaning the main body, wipe with wet cloth first, then with dry cloth
Usage and Precautions of Blender Cup
1. Function of blender cup:
1) Juice extraction;
2) Milk blending;
3) Ice blending.
2. Precautions
1) Do not remove blender cup (8) or cup lid (7) before the blender blade fully stops rotating;
2) Do not use the blender cup for 1 successive minute for the blending of all foods can be finished within one minute;
3) Do not blend seasoning, such as clove, dill and cumin for they will damage the blade and rubber parts;
4) The blender is not suitable for food storage;
5) Do not put anything more than 1300ML, the maximum capacity, into the blender cup;
6) Do not put any hot liquid more than 600ML into the blender cup;
7) When the blender cup is in its position, do not push the release lock switch to open the unit cover;
3. Use of blender (the maximum capacity of the blender cup is 1.3L)
1) Blender Mixer Juice: apple, banana, Chinese chestnut and water125g each,
a. Remove the blender door (14);
b. Prepare fruits and put them into the blender cup (8);
c. Lock cup lid (7) and small cup lid (6) tightly;
d. Lock the blender cup to the blender cover tightly;
e. Select a high speed of grade8-9 to run the device (for a better effect, you can select grade "P" to run the device) for 1 minute.
f. After blending, turn the speed switch (9) to "O" to stop the device and unplug the power cord.
g. When the appliance comes to a full stop, remove the blender sup and close the blender door (14).
2) Milk blending:
The operation methods are the same as above. 6°C cold milk 750ml, blending at a speed of grade 9 for one minute can make the milk perfect for drinking.
3) Ice blending
The operation methods are the same as above. 2 cups of ice cubes, each having a bulk of about 20X25X40m m ^3 , select pulse operation to blend for 30 seconds, stop for 1 minute and then blend for 30 seconds with pulse operation again. After blending, you will find all ice cubes have been smashed.

4. Cleaning
When cleaning the blender cup, pour some warm water into it first, cover the cup lid and small cup lid, turn the switch to high speed to run the device for about 20-30 seconds, pour the water out, clean with fresh water and then air-dry it.
Usage and Precautions of Peanut Paste Cup
1. Function of the peanut paste cup:
Crush the peanuts and blend them into paste.
2. Precautions:
1) Do not remove base of cup (15) or clear cup (16) before the crushing blade fully stops rotating;
2) Do not use the device for 3 successive minutes;
3) The peanuts prepared for blending of peanut paste shall be baked and crisp.
3. Blending of peanut paste:
Baked and peeled peanuts; ;
1) Peanuts shall not be more than 2/3 of the cup;
2) Screw the clear cup (16) in the base of cup (15); (as shown in the right figure)
3) Screw the peanut paste bowl into the base of main body; (as shown in following figure)
4) Blend with pulse operation for four times when starting the device, then slowly increase the speed to grade 9, the highest speed, and after 2-3 minutes' blending, the peanuts can be blended into paste;
5) Turn the speed switch (9) to 'O' to stop the device and unplug the power cord;
6) Hold the base of cup (15) with hand and screw the base of cup (15) and the clear cup (16) out of the main body;
7) Hold the base of cup (15) with one hand and the clear cup (16)
with the other and screw the clear cup (16) out of the base of cup (15), then pour the peanuts into another container.
4. Cleaning:
When cleaning, can remove the blade rack, blade and clear cup (16) respectively, clean with cloth and soap water and then air-dry them. Be careful not to hurt the hand with the crushing blade.
Usage and Precautions of Meat Mincing Bowl
1. Functions of meat mincing bowl:
Slicing up: for apple, cucumber, carrot, onion, etc.
1) Shredding: for apple, radish, potato, etc.
2) Shredding of pea, onion and nut, etc.
3) Meat mincing
2. Precautions
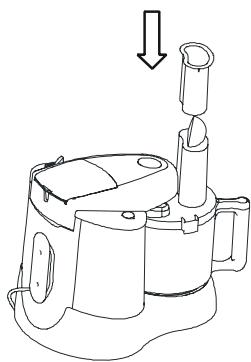
1) When using this part, close the blender door (14) before starting the appliance; (as shown in the right figure)
2) It can not be run for over 5 successive minutes;
3) Before installing the meat mincing bowl onto the main body (10), install the main shaft


natural_image
Diagram of a portable air conditioner unit with an upward arrow indicating motion (no text or symbols)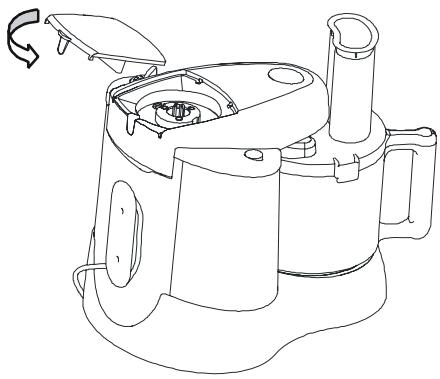
natural_image
Line drawing of a mechanical device with internal components and a handle (no text or symbols)(25), blade and bowl cover first;
4) When using, lock the bowl cover (18) tightly;
5) When using, do not foist the finger or other article into the hole on bowl cover (18), lest the occurrence of any accident.
6) Before the blender blade comes to a full stop, do not open the meat mincing bowl cover (18) or remove the meat mincing bowl (26) or conduct any other operation on the meat mincing bowl;
7) After mincing the food, the meat mincing bowl shall be removed from the main body before the meat mincing bowl cover (18) is opened and the food is taken out;
8) After using, the meat mincing bowl shall be cleaned and air-dried and the blades shall be put in a safe place for proper keeping
3. Operation methods
Slicing up:
2) Put the main shaft (25) and slicing blade tray (22) into the meat mincing bowl; (as showing in the right figure)
3) Press the blender cover tightly to its appointed position, locked the meat mincing bowl cover (18) and install the meat mincing bowl onto the main body (10), (as shown in following figure)

natural_image
Technical line drawing of a mechanical device with a cylindrical top and handle, showing internal components and a downward arrow (no text or symbols)4) Turn the speed switch (9) to start the appliance and adjust the speed to grade 3-4; foist fruit from the hole in meat mincing bowl cover (18) and push down the fruits with the food pusher (19); (as shown in the right figure)
5) Turn the speed switch (9) to 'O' to stop the device and unplug the power cord.
6) When the appliance comes to a full stop, screw out and remove the meat mincing bowl, open the bowl cover (18) and take the slicing blade tray (22) out, then pour the sliced fruits out onto a dish for your enjoyment;
natural_image
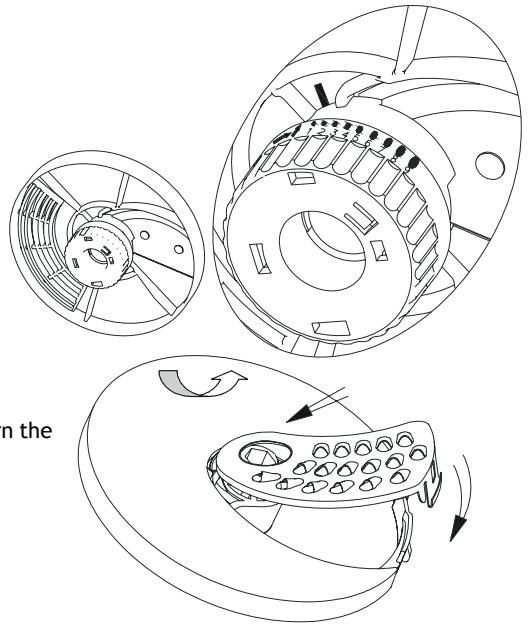
Technical line drawing of a mechanical component with an arrow indicating downward motion (no text or symbols)* The thickness of the fruit slice is adjustable: when you need to adjust the thickness, turn the blade button (23) at the back of
slicing blade tray (22) to choose the thickness of fruit slice freely. You can turn the blade button (23) 1-9 grades along the direction as shown by the arrow in the figure. With the increase of every one grade, the thickness will increase by about 0.7mm and the maximum slice thickness is 6.4mm.
Shredding of fruit:
The shredding methods are same with those of slicing; what's different is that there are thin shredding blade (20) and thick shredding blade (21) as options; please refer to the right figure for blade changing; the speed can be grade 3-4; after shredding, turn the speed switch (9) to 'O' to stop the device and unplug the power cord.
natural_image
Technical line drawing of a mechanical assembly with three views: top view, side view, and bottom view (no text or symbols)Shredding of pea and nut, etc.
With the meat mincing blade (17), the device can blend and
shred apple, banana and Chinese chestnut, etc. The using methods are as follows:
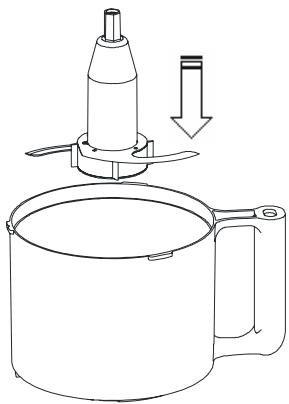
4) Install the meat mincing blade(17) into the meat mincing bowl (26); (as shown in the right figure)
5) Prepare the fruits with the proportion you want and pour them into the meat mincing bowl (26), then screw the meat mincing bowl cover into the meat mincing bowl and lock up;
6) The fruits for blending once shall not be more than 500g;
7) Install the meat mincing bowl onto the main body and install the food pusher (19);
8) Press down the blender cover lock to lock up, or the device cannot be started;
10) Turn the speed switch (9) to 'O' to stop the device and unplug the power cord.
9) Turn the speed switch(12) to start the device, turn the speed switch to grade 4 and after the device runs for 4 minutes, the foods can be fully shredded;
natural_image
Line drawing of a kitchen mixer with a downward arrow indicating compression (no text or symbols)Shredding of beef:
1) Install the meat mincing blade (17) into the meat mincing bowl (26);
2) Cut the beef for shredding into cubes and pour them into the meat mincing bowl (26), then screw the meat mincing bowl cover into the meat mincing bowl (18) and lock up; the beef for shredding once shall not be more than 500g;
3) Install the meat mincing bowl onto the main body and install the food pusher (19);
4) Turn the speed switch (9) to start the device, blend with pulse operation for four times, then slowly increase the speed to grade 9 and 1-minute-blending will achieve the effect (when the device is just started, it may vibrate and you can hold the device with hand to keep it balanced);
5) Turn the speed switch (9) to "O" to stop the device and then unplug the power cord.
4. Cleaning
1) When cleaning the blades, be careful not to be hurt by the blades;
2) When cleaning, can remove the meat mincing bowl (26), bowl cover (18) and blade respectively and clean with soap water;
3) After cleaning, air-dry and put the blade in a safe place for proper keeping.
4)
VII Recipe
White bread (loaf or cylinder shape)
Materials: Wheat flour 500g
Salt 5ML
Lard 15g
Fresh yeast 15g or dry yeast 10ML+ seasoning sugar 5ML
warm water 300ml Do not exceed the maximum capacity
Instructions:
1) Dry yeast: pour water into the bowl, then yeast and sugar, and water for 5 minutes till foam appears; Fresh yeast: crush directly and then add into the flour;
2) Pour water into Mixing (1), then flour, fresh yeast (if necessary), salt and lard;
3) Put the Mixing (1) into the base of main body (10), turn slightly to move it into the proper position;
4) Plug in the blender parts according to corresponding colors;
5) Press down blender cover and ensure the cover is locked tightly;
6) Turn the speed switch (9) to increase the speed slowly, staying with grade 1-2 within first 1-2 minutes, then increasing the speed to grade 4-5 till all materials are well blended. The working time shall not be over 10 minutes;
7) Put the dough into a bowl, add some wine and cover with wet cloth, then put it in a warm place for it to ferment. Its bulk will double;
8) Knead the dough into loaf or cylinder shape, then put it on a bake tray with some wine on it;
Bake under a temperature of 230C, 20-25 minutes for loaf and 15 minutes for cylinder-shaped dough.
Cake
-
cake flour 120g
-
baking powder 2/3 teaspoon
-
egg yolk 5 pcs
-
sugar 60g
-
oil or butter 80g (if butter please
-
water 80g
melt)
-
egg white 6 pcs
-
sugar 60g
1) beat egg yolk 5pcs with sugar 60g until creamy
2) add oil/butter and water into 1
5) slowly put egg white mixture into 3 and mix them well
6) preheat oven 350F and bake 50-60 mins until done
7) up side down the cake mould until the cake totally cool down
8) carefully cut out the cake from the mould
9) now ready to serve
3) add cake flour and baking powder into the mixture 2 and mix them until smooth.(no lump in the mixture)
4) put egg white 6 pcs and sugar 60g into another bowl and use the beater to beat until very firm
ΕΛΛΗΝΙΚΑ
natural_image
Line drawing of a kitchen mixer with an open lid and handle, showing internal components (no text or symbols)- Χρήση:
natural_image
Diagram of a portable air conditioner unit with an upward arrow indicating motion (no text or symbols)natural_image
Line drawing of a kitchen appliance with handle and side panel (no text or symbols)natural_image
Line drawing of a mechanical device with no visible text or symbolsnatural_image
Technical line drawing of a mechanical component with an arrow indicating downward motion (no text or symbols)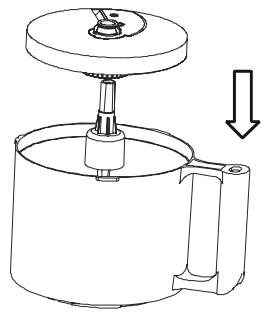
natural_image
Technical line drawing of a mechanical device with a cylindrical top and internal components, showing a downward arrow indicating motion (no text or symbols present)natural_image
Technical line drawing of a mechanical fan assembly with internal components and a rotation arrow (no text or symbols)
natural_image
Line drawing of a mechanical device with rotating components and directional arrows (no text or symbols)natural_image
Line drawing of a kitchen utensil with a cup and lid, showing a downward arrow indicating motion (no text or symbols)natural_image
Simple line drawing of a trash bin with crossed lines indicating no waste or plastic (no text or symbols)Disposal of Old Electrical & Electronic Equipment (Applicable in the European Union and other European countries with separate collection systems)
This symbol on the product or on its packaging indicates that this product shall not be treated as household waste. Instead it shall be handed over to the applicable collection point for the recycling of electrical and electronic equipment. By ensuring this product is disposed of correctly, you will help prevent potential negative consequences for the environment and human health, which could otherwise be caused by inappropriate waste
handling of this product. The recycling of materials will help to conserve natural resources. For more detailed information about recycling of this product, please contact your local city office, your household waste disposal service or the shop where you purchased the product.
Français

natural_image
Simple line drawing of a trash bin with crossed lines indicating no waste or plastic (no text or symbols)natural_image
Simple line drawing of a trash bin with crossed lines indicating no waste or plastic (no text or symbols)- FRANÇAIS
- Mode d'emploi
- Hacher :
- Functions and Characteristics:
- Basic Safety Precautions for Electric Appliance Use
- Preparations before Use:
- Basic Operations:
- Name of Each Part of the Appliance
- Operation of Each Part of the Appliance:
- Usage and Precautions of Mixing
- Functions of blender part:
- Precautions
- Use:
- Remove blender parts
- Speed adjustment
- Maximum capacity:
- Cleaning
- Function of blender cup:
- Use of blender (the maximum capacity of the blender cup is 1.3L)
- Cleaning
- Usage and Precautions of Peanut Paste Cup
- Function of the peanut paste cup:
- Precautions:
- Blending of peanut paste:
- Cleaning:
- Usage and Precautions of Meat Mincing Bowl
- Functions of meat mincing bowl:
- Operation methods
- Shredding of fruit:
- Shredding of beef:
- VII Recipe
- White bread (loaf or cylinder shape)
- Cake
- ΕΛΛΗΝΙΚΑ
Brand : SINGER
Model : ROBOT MULTIFONCTIONS SKM2501ST
Category : Multifunction robot