MY721X - Cellphone SAGEM - Free user manual and instructions
Find the device manual for free MY721X SAGEM in PDF.

User questions about MY721X SAGEM
0 question about this device. Answer the ones you know or ask your own.
Ask a new question about this device
Download the instructions for your Cellphone in PDF format for free! Find your manual MY721X - SAGEM and take your electronic device back in hand. On this page are published all the documents necessary for the use of your device. MY721X by SAGEM.
USER MANUAL MY721X SAGEM


254034103_my721X_en.book Page 4 Juedi, 10. avril 2008 10:49 10


Contents
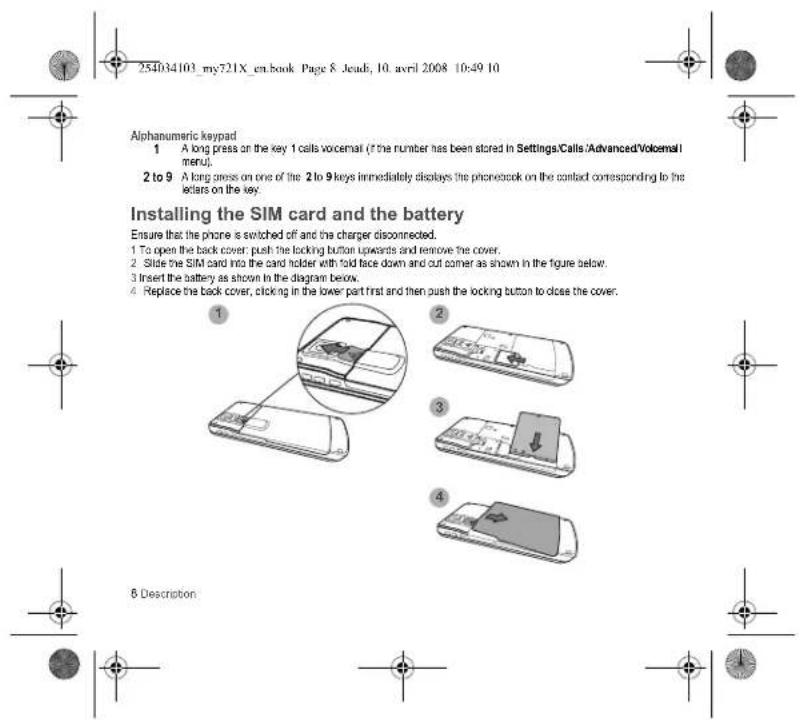
Description 6
installing the SIM card and the battery ..... 8
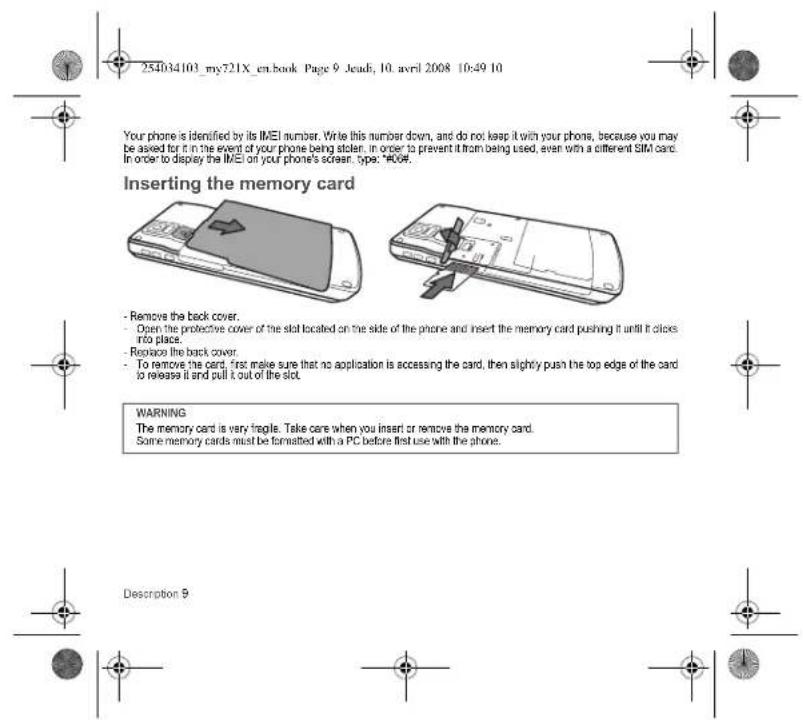
Inserting the memory card 5
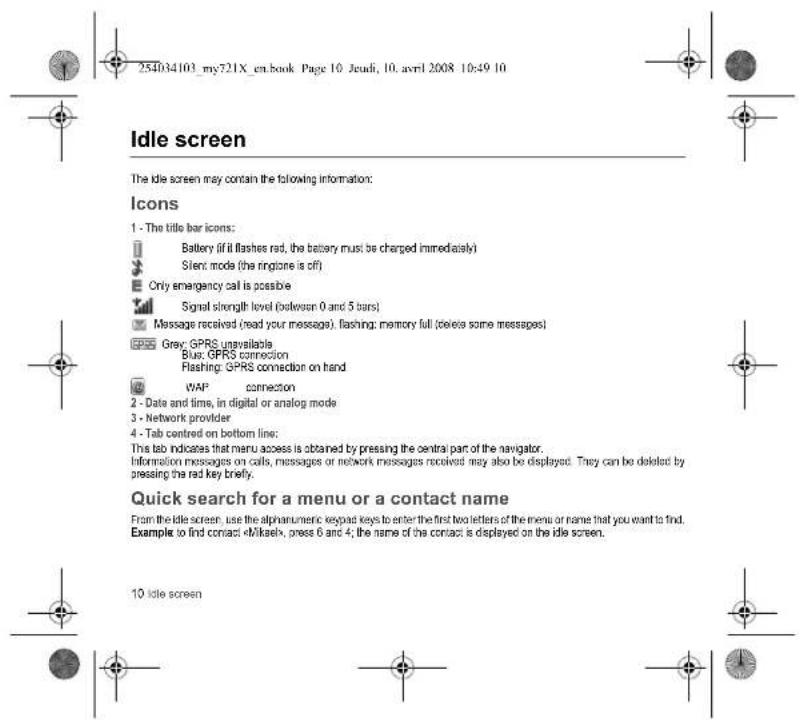
Idle screen 10
Icons 10
Quick search for a menu of a contact name. To
Quick Start
Information on the SIM card ....11 Getting started ....11
Switching ON/OFF 12
Network 12
First call 12
Receiving a call....13
Using your phone....14
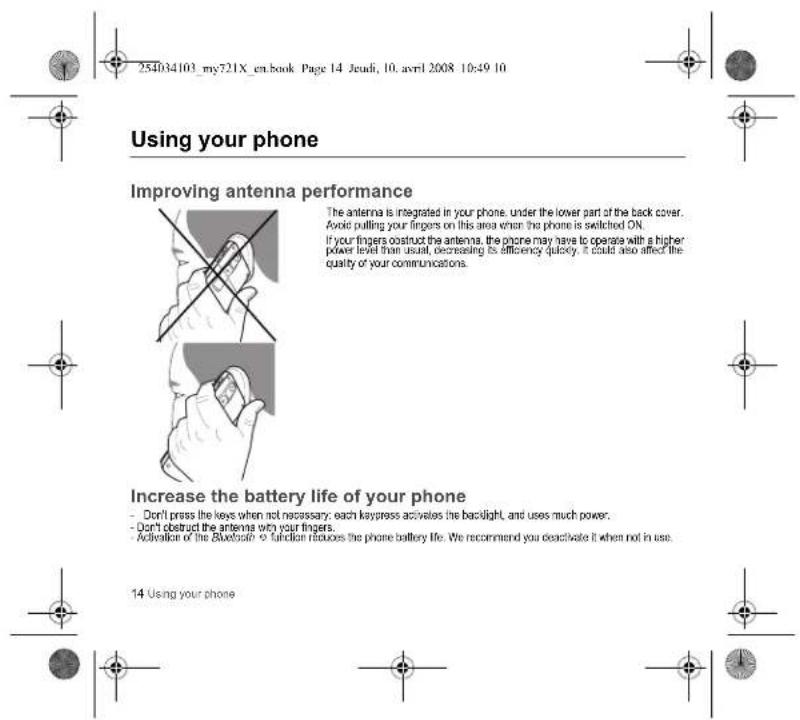
Improving antenna performance....14
Increase the battery life of your phone .....14
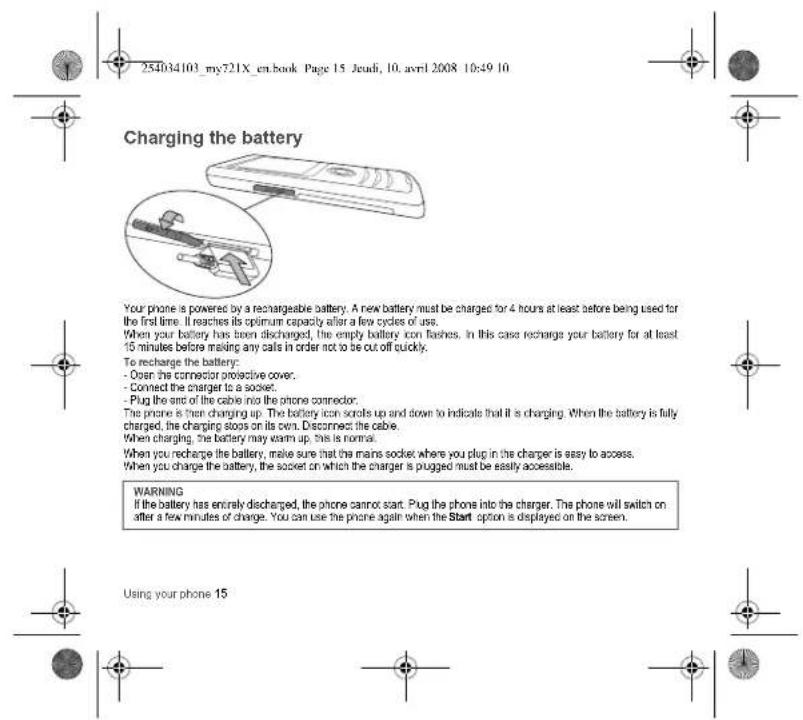
Charging the battery 15
Phonebook....17
Using the phonebook....17
Storing a new contact .... 17 Colling a contract .... 17
Contact options 18
Mailing lists 20
Messages 2
Creating a text message 21
Saving the message 22
Sending the message....22
Receiving messages 22
Messages menu
Camera 25
Taking and saving a photo 25
Taking a video 26
Multimedia....27
music 28
Music player 28
FM Radio 29
WAP 31
The WAP Menu 31
WAP Logging on.... 31
Downloading objects 32 INPR loading off 29
WAP Logging Oil.... 32 GARS.... 33
Organiser and Tools 33
Services....33
Games 33
Calculator 33
Unit Converfor 34 Applications 34
Applications 54
Time Manager 35
Alarm 35
Timer 35 Organizer 35


4 Contents


Information on the SIM card
To use your phone, you need a card called a SIM card. It contains personal information that you can modify. - Secret codes (PIM(s); Personal Identification Numbers), these codes allow you to protect access to your SIM card and phone - Phonebook - Messages - How special services work


WARNING
This card must be handled and stored with care to avoid being damaged. If you should lose your SIM card, contact your network provider immediately. Please keep your SIM card out of reach of young children.

Getting started
When you switch on your phone for the first time, follow the instructions displayed on the screen. If access to the SIM card is protected, the device prompts you to enter the PIN: Enter the code you received when your SIM card was issued. The digits do not appear on the screen for security reasons.
Warning
If a wrong PIN is entered three times in succession, your SIM card is blocked. You must then:
- Enter the POK (Personal)
- Enter your PIN and validate. - Enter your PIN again and validate.
After 5 or 10 failed attempts (depending on the type of SIM card), the SIM card is permanently locked. You must then contact your operator to obtain a new card.

Quick star 11


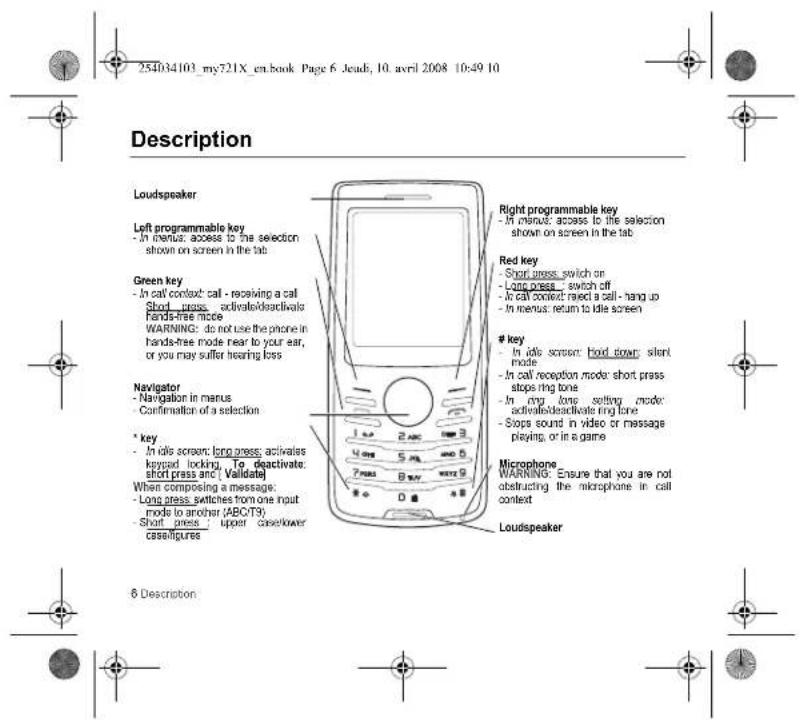
![254034103_my721X_en.book Page 13 Jeudi, 10. avril 2008 10:49 10 Receiving a call When you receive a call, the number of your caller is displayed when it is presented by the network. Press the green key to answer, and speak To refuse the call, press the red key. To stop the ring tone, without refusing the call. press ▲ Hands-free mode During a call: - short press on the green key and confirm or - press [ Options ] and select Loudspeaker ON than confirm. WARNING: in this mode do not position the phone near your ear. All the numbers corresponding to incoming and outgoing calls are logged in the list of recent calls. When in a call, pressing [Options ] allows you to have access to different functions. Pressing [Mute ON] allows you to switch off the microphone temporarily when you wish to mute your audio. Quick start: 13](/content/2026/05/1142748/images/8bb005b8d4f6c50026ef9895f4becdf4a10031eb8fd5e3829aea4636b470a153.jpg)
![254034103_my721X_en.book Page 17 Jeudi, 10. avril 2008 10:49 10 Phonebook Using the phonebook Enter the Phonebook menu, the contacts list is displayed if you already get some (otherwise, go to Storing a new contact). When a contact is selected, an icon is displayed in the title bar. contact stored in the SIM card contact stored in the phone contact stored in the Fixed Dialing. See Settings:Advanced Security,PIN2 and Settings:Advanced/Security:Advanced/Fixed dialling menus for more details about this activation. You can search for a contact quickly by typing the first letters (up to three). You can display it by pressing the navigator. Storing a new contact There are two options to store a contact : 1) select [Options], then select Add phone contact or Add SIM contact or 2) enter in Add contact pressing the navigator, then select Telephone, SIM card orFixed directory. - Enter the last name and press the navigator. - Enter the number and press the navigator. Note: you can fill in other fields if you store the contact in the phone memory (email, address, ringtone, photo, etc.). - Press [ Save] to store it. Calling a contact Several ways: - Select a contact. Press - the green key to start the call. - Select a contact, press the navigator, their number is displayed, press [ Options ] Call to start the call. - Direct call from the idle screen (only for the contacts stored in the SIM card memory): type the number with which the contact was saved @eampro .2 ! calling number , the number is displayed, confirm. Phonebook 17](/content/2026/05/1142748/images/301a3386cb583e14e4d5e834e31c9f841b9b1c56c66981df826e6d79066a73e9.jpg)
![254034103_my721X_en.book Page 18 Jeudi, 10. avril 2008 10:49 10 Contact options To display the various options, select a contact and press [Options]. Modify contact Modify what you want and validate then select. Save once this modifications are completed. Send message To send an SMS or an MMS to a contact (see chapter Messages). Send by message To send a contact details by message (see chapters Messages). Send by Bluetooth To send the details of one, several or all the contacts by Bluetooth. Copy to SIM / Copy to mobile This allows you to copy your phonebook contacts from one memory to the other. Only the name and the first phone number will be copied. Export This allows you to copy one or several contact details to the Multimedia/My Contacts/directory. Several options: - current: the details of the contact selected are copied, - multiple: the details of the contacts you select are copied, - all the details of all the contacts are copied. My numbers This option allows you to save your personal numbers and store them in the memory. 18 Phonebook](/content/2026/05/1142748/images/6cb3e74874aa171b3089db04e53aadf44c3a312374cc915fe0ed4d8c2295f938.jpg)
![254034103_my721X_en.book Page 19 Jeudi, 10. avril 2008 10:49 10 Memory Select SIM or Phone and validate. - Phone the screen displays the amount of memory used. The memory capacity is shared between the phonebook and various other features. If you are short on memory, check if you can free some space. - SIM: available memory only for contacts. Delete It allows you to delete the contact(s) selected or all the contacts. Set as my card/Business card The details of a contact stored in the phone memory can be saved in a business card. - Select a contact and press [ Options]. - Select Set as my card and [OK]. The details are saved as Business card. Then you can read it, modify it or send it by message or Bluetooth®. Copy SIM -> phone/Copy phone -> SIM This allows you to copy your phonebook contacts from one memory to the other. Only the name and the first phone number will be copied. - Copying a contact stored in the phone to the SIM card: select the current contact and modify the name and number if necessary. - Copying a SIM contact to the phone: select the current contact, several contacts or all the SIM contacts. Synchronize You can synchronize your phonebook with your archives stored in your operator's network depending on the options offered by your operator with a GSM or GPRS connection from your phone. You can also synchronize your phonebook with your archives stored in your computer. You just need to activate bluetooth® or configure your USS connection in your phone (see chapter Connectivity). Add to mailing list This allows you to add a contact to a mailing list. Phonebook 19](/content/2026/05/1142748/images/7e8d023837b22686f33e3929244d451fe06de8d794e05659dd6f385baa3b7e3b.jpg)
![254034103_my721X_en.book Page 20 Jeudi, 10. avril 2008 10:49 10 Settings - List choice: This menu allows you to select the default phonebook (SIM, Phone, SIM and Phone) displayed when the phone switches on. - Sorting: This menu allows you to select the way to sort contacts in the phonebook (by name or first name); - New Number: After an incoming or outgoing call with a number not stored in the phonebook, this option allows you to activate or deactivate a request to store the number in the phonebook. Mailing lists A mailing list allows you to group contacts: this list can be used to send messages easily to all the list contacts (only contacts stored in the phone memory). - In the phonebook, select the Mailing Lists tab pressing the navigator rightwards. - Press [ Options ] - Select Add mailing list. - Enter a name and press the navigator. - The phone prompts you to add the contacts either immediately in this case, select the contacts you want to add by pressing the navigation, or enter (on a list, press [Options]. Select Add contact each time you want to add a contact in the list). 20 Phonebook](/content/2026/05/1142748/images/8db591ce71dbeac6e315b73b19c746c7d7e28e7a9b935c365e960f87a965bc3d.jpg)
![254034103_my721X_en.book Page 22 Jeudi, 10. avril 2008 10:49 10 Accented characters Accented characters are generated automatically in T9 mode. In ABC mode accented characters are available by pressing the key supporting the non-accented character repeatedly. Saving the message - Select Save if you do not want to send the message immediately or if you want to send it several times. It is saved in the Drafts menu. - - Select Save as template to use it again as a template. It is saved in the Templates menu. Sending the message - Once the text entered, press the navigator or press [ Options] and select Add recipient. - Enter the receiver's number or take it in your phonebook pressing [ Options] then selecting Contacts. You also can select a contacts list in your phonebook. Receiving messages When you receive a message, the phone plays the ring tone that you selected, and a message icon is displayed on the screen of your phone. If you do not read the messages, this icon remains displayed on the screen. When it flashes, the memory is full. Receiving icons, backgrounds or tunes can take several seconds. An icon is flashing when the download of your message is in progress. Note that you have two different possibilities for receiving MMS: automatically or manually; if "manual mode" is activated, then you will just receive a notification in your Inbox, meaning that a MMS is available on the MMS Server; select Retrieve in the options when you want to retrieve the MMS from the network. For more details about automatic and retrieval modes, see "Options" on page 24. Messages menu Inbox Messages are listed in chronological order, the latest message being displayed first. The quantity of Not Road and Not Retrieved messages is shown. Not Retrieved and Not Road messages are shown in bold. 22 Messages](/content/2026/05/1142748/images/824dd714c322a781b12f399d9ca3151a56e61dd8ba5d8130cbb240c26ab24ace.jpg)
![Drafts When you store a composed message, it is stored with the drafts. Select a message and press [Options]. The options are: Read, Details, Delete, Modify, Send. If you select a message and press the navigator, you can modify it. Sentbox The Sentbox menu is used to store all your sent messages if you activated the Store sent messages option in the Advanced/Options menu (see page 24). Too many messages saved will quickly fill up the available memory and no further messages will be received. For each message, its characteristics (shown with an icon) and the time (or date) of sending are displayed on the screen. Select a message and press the navigator. Select one of the options shown. Outbox This menu displays the messages that have not been sent. You can therefore send them again. Templates When composing a message, if you selected the Save as template option, the template is saved in this menu. The same options are available for the templates as for the drafts. Local info. This menu is used to activate reception of information broadcast by the network. You can choose whether you want to receive this information or not (please contact your network provider). Advanced Memory You can see how much memory space is available for saving messages. Choose one of the options given: SMS or MMS. The SMS screen displays the memory available on the SIM card and on the phone. The MMS screen displays how much memory is used by the MMS. Messages 23](/content/2026/05/1142748/images/4a4eb74508639401e976ce506de873d6dea133f1570d3b084221c70a7cda6757.jpg)
![254034103_my721X_en.book Page 24 Jeudi, 10. avril 2008 10:49 10 Options 1. SMS The SMS sending options are: store sent messages, acknowledgment, period of validity (during that period, the network provider will try to send the message), message format, message centre number. 2. MMS The MMS options are: - Store sent messages: it is highly recommended that you keep this function deactivated, to avoid saturating the memory. - Retrieval mode: if you are in a poor coverage area, it may be more convenient to choose the manual retrieval mode which gives you the retrieve star option. - Priority: selection of a priority to send a message. - Request delivery report: request a delivery report when sending a message. - Period of validity: during that period, the network provider will try to send the message. Advanced settings: - Send delivery report: sending a delivery report when receiving a message. - MMS Ignore: if you want to deactivate the reception of an MMS in your phone. - MMS server: to select another MMS provider, or set the parameters of a new MMS provider. - Display Bcc: if you want to activate/deactivate this display. - Sender visibility: you choose to display or not your phone number on the receiver's phone screen, with that message. - Maximum size: if you want to activate/deactivate the option of maximum size supported for the MMS. 3. Voicemail The function is used to record your voicemail access number. This number depends on the operator: Mailing list This menu displays the mailing lists created in the phonebook. To display the different options, press [Options]. - Add mailing list: allows you to create a new mailing list. - Modify name: allows you to modify the mailing list name. - Add contact: allows you to add a contact to the mailing list. - Properties: allows you to see the type of mailing list and the number of contacts. - Delete: allows you to delete the mailing list. 24 Messages](/content/2026/05/1142748/images/796947dca115c41eca780e44515334296c28b052840d391e8052a5e857ad9390.jpg)


This menu allows you to take photos and videos and use them for different purposes. For instance, you can send them to another phone or an internet address, store them, use them as wallpapers or screen savers.
Taking and saving a photo
Select the Cameramenu. The camera is now on. Look into your phone display and position your subject. Move your phone to position your photo.
The text lines on the left of the screen indicate:
- the current format selected ( Photo format option below).
- the current quality selected ( Photo quality option below).
Settings before taking a photo
Zoom:

To activate zoom, use the navigator upwards or downwards.
Note: If the zoom selected does not match the storage format, the photo is automatically saved in an appropriate format. Other settings (press Options):
- Activate timer, to take a photo with a 5, 10 or 15 second lime delay.
- Activate anti-shake: this is used to activate/deactivate the stabilizer function.
- Preview mode to select the photo layout (portrait or landscape). To use your photos as wallpaper, we advise you to select the portrait mode.
- Effects: In select an offer
- Exposure: to select luminesby
- Save new pictures: used to select the location where the photo will be saved (phone or memory card).
- Click sound to select the sound you will hear when taking a photo.
- Photo quality: to select the photo quality
- Photo format: to select the resolution in which your photo will be saved. Warning: the 3.2 MPixels resolution is only available in landscape plot
- Go to video in lake a vireg


Camera 25


![254034103_my721X_en.book Page 26 Jeudi, 10. avril 2008 10:49 10 Taking a photo - Press the navigator, the photo is taken and stays on the phone display. Warning: if you press [Back], you call go back to the previous session and lose the photo you have just taken. Press the navigator if you want to send the photo immediately by MMS. - Press Save to save your photo, a progress bar pops up and then different options are displayed: - Send by: allows you to send the photo by MMS. - Send by Bluetooth: allows you to send the photo by Bluetooth? - New... allows you to take a new photo. - name: allows you to modify the name of a photo. - Add to contact: allows you to assign a photo to a contact saved in the phonebook. - Use as: allows you to select the photo as a wallpaper or screensaver. Note: using the camera during a call may affect the call quality. Taking a video - Select the Cameramenu and press the navigator rightwards to switch to video mode. - If necessary, send the following settings by pressing [ Options]: - Video sound: allows you to select whether or not the sound is recorded with a video. - Size restriction: allows you to choose a video size. - Save new videos to... allows you to select where the video is saved (phone or memory card). - Go to Camera: to take a photo. - Press the navigator to record then press [ Stop] when you want to stop recording. Note: the phone automatically stops recording when the maximum size available is reached. - Press [ Options ] to display the options: - Record a video: allows you to record a new video. - Playbacic allows you to play the video. - Send by MMS: allows you to send the video by MMS. - Send by Bluetooth: allows you to send the video by Bluetooth? - Rename: allows you to modify the name of a video. - Delete: allows you to delete a video. Note: the videos are saved in the phone in .3gp format. 26 Camera](/content/2026/05/1142748/images/799bdce6b7ebe9f9cd88be131aecbbb73f30cfc4be281f0328cd590234b9a469.jpg)
![254034103_my721X_en.book Page 27 Jeudi, 10. avril 2008 10:49 10 Multimedia The Multimedia menu contains the directories of all the multimedia objects recorded in your phone and the downloaded objects (photos, videos, ringtones, etc.). There are two tabs that you can select by pressing the navigator rightwards or leftwards: - Phone tab (phone memory) - microSD™ tab (available if you have inserted a memory card in your phone). You can copy the multimedia objects from the card to your phone. To display the various options of each directory, press [Options]. - Browse displays the list of the objects. - Rename modifies the directory name. - Delete deletes the directory (only the directories created by the user). - New... folder create a new directory. - New allows you to leave a new photo or video or to record a sound. - Format: this option deletes all the internal memory of the phone. Warning: all the multimedia objects saved in this memory will be deleted. - Memory displays the memory used and available for the multimedia objects. For each object a list of options is available (new, send, delete, etc.). The My Contacts directory appears if you have exported contact details from your phonetbook (see chapter Phonebook). The My Calendar directory appears if you have exported a ToDo (see chapter Time Manager). Multimedia 27](/content/2026/05/1142748/images/9dcd0066990743c6d831d367d5e2c9792d0733fddd9d0dce60004c8ffe4ad1aa.jpg)
![254034103_my721X_en.book Page 28 Jeudi, 10. avril 2008 10:49 10 Music Music player This menu allows you to listen to music in the same way as on a portable music player. If you do not have any music stored in the memory, use WAP to download some or connect your phone to a PC - Short press: Set the volume From the idle screen: - Short press: play/pause listening to your music - Long press: access to Music player and start playing From the Music player menu: - Short press: play/pause music Creating a playlist - Select [ Options] Library - Select [ Options] Create playlist - Type a name for your playlist and press the navigator. The Multimediameru in which there are the multimedia directories is displayed. - Select in My Sounds directory or in the memory card the music tracks you want in your playlist. - [ Options] View content then on a music [ Options] Add to playlist adds the music selected or all the music tracks. When pressing [ Options] on a playlist, you can display or play the contents, add musics, create a new playlist; delete one or modify its name. 28 Music](/content/2026/05/1142748/images/30050c173f2ab17dfd84f14963ea4cbf8f3c8278819d0ec066f88d84d43109f4.jpg)
- Library. allows you to display the playlist. - Play: to play music tracks in the playlist.
- Remove from list allows you to remove the music selected or all the music from the list.
- Play options: to play the music tracks one by one, in a continuous way or in a random way
- Repeat options: to choose whether or not to replay a list.
- Save list save the current playlist as a new playlist. - Send by Bluetooth to send the music by message or Bluetooth ^®
Rename: to rename the music.
- Display used to display the music tracks in list form or album cover form.
- Memory: allows you to display the memory used for music tracks and the available memory for the multimedia objects.
- Details: properties of the music selected.
FM Radio
Important: you must connect the hands-free kit to operate the FM radio. The radio antenna is contained in the hands-free kit
WBS.
Note: frequency range available: 87.5 MHz to 108 MHz (in steps of 100 kHz).
Once you have connected the hands-free kit, select the Music player menu then Radio FM.
[Options] is used to access the different radio functions:
Select a frequency
- Save several stations in a list (3 lists of 10 stations)
- Mond of stereo mode - Stand step
- DisplacCh
- RDS
- Activation of the amplified mode.
When you listen to the radio, the station number is displayed on the idle screen.
The side key functions are identical to those used to listen to music.
Music 29
![254034103_my721X_en.book Page 30 Jeudi, 10. avril 2008 10:49 10 Operation of the keys while listening to FM radio: 1 - nextbusl station (short press) 2 - change in steps of 0.1 MHz (short press) - find stations (long press) 3 - playbause [Back]: used to exit the menu while continuing to listen to the radio. 30 Music](/content/2026/05/1142748/images/babf993037f7912cd8bd7b44a79db38470cb0bdf18a9c79dd3640734d6951644.jpg)


Set of services dependent on your operator.
Games


Your phone contains one or several games, either a complete or demo version according to the model. You can download more. You are the owner of a SAGEM mobile phone with which you can download applications and games to be executed on your phone thanks to the built-in Java™ engine.
However, receiving applications from anywhere implies some basic knowledge of the possible effects of such downloading.
We recommend you download certified games or applications from your operator sites or from www.pianclsagem.com.
By default, the connection URL of your operator or of PlanetSagem is configured in your phone. If no connection URL is configured, selecting the More Games menu, will display the WAP function to configure new profiles which allow you to download games or applications.
When you select a game or an application, the Settings/Connection menu (displayed with [Select key] allows you to configure a profile which is only used by the game or application to connect to the network (to exchange scores for example) but is not used to download new games or applications.

Calculator
This menu allows you to use your phone as a calculator.
Use the following keys to make calculations:
- Upwards: Add, downwards Subtract, rightwards Divide. Leftwards: Multiply
The following keys are used for
- Left programmable key: Equals or convert
- Right programmable key: Delete
- : Decimal point
-:minus sign
If no calculations are being run, pressing [Convert] allows you to use the value in the converter directly.
Organiser and Tools 33


![254034103_my721X_en.book Page 34 Jeudi, 10. avril 2008 10:49 10 Converter This option allows you to convert one currency to another. Enter a value and press the navigator upwards to convert; from one currency to another, or downwards to convert back. Pressing [Options] allows you to use the following options: Rapid exchange If you select Activate, the converter will work in the idle screen by entering the desired numbers and pressing the navigator upwards or downwards to convert. Exchange rate Enter the exchange rate corresponding to the chosen currency. Currency Enter the two types of currency to be converted. Goto Calculator This option allows you to use immediately the value converted in the calculator. Unit Converter This menu allows you to convert all types of measurement units. Applications This menu contains your downloaded applications. 34 Organiser and Tools](/content/2026/05/1142748/images/0b0e9d349dccb0c5be2efab4834efbf6fa23e9363acfd7d9268b6c43234f6c86.jpg)
![254034103_my721X_en.book Page 35 Jeudi, 10. avril 2008 10:49 10 Time Manager Alarm This menu allows you to set and activate the alarm. The alarm works even when the phone is switched off. Timer This menu is used to set and activate the timer. The alarm icon appears on the idle screen. Organizer The Assistant menu is an organizer where you can record events. The current month is displayed: press the navigator to see the current week and any events you have recorded. Press the navigator again to access the options: - Add Written Event/Add Vocal Event: allows you to add text or voice type events. Fill in the different items. Save the event. Once you have added the event, you can modify it, delete it, send it by message or Bluetooth® or export it. ToDo This menu allows you to add ToDos, access category-based Todo management and delete all the ToDos. If there are not ToDos, you access the options below directly. If there is a ToDo, press [Options] to display the options. - Add written ToDo Add vocal Todo allows you to add a ToDo of the text or voice type. Fill in the different items. Save the ToDo. - Categories: allows you to see the different ToDo categories, assign a specific ring tone to each individual ToDo, know the number of ToDos in each category and see them. - Delete all: allows you to delete all the ToDos from your ToDo. - Memory: allows you to display the memory used by the different functions of your phone and in particular the ToDo. Time Manager 35](/content/2026/05/1142748/images/541520feccb05149f36a077540eeeef3346a9fe394c0e93588601975a2a632a9.jpg)
![254034103_my721X_en.book Page 36 Jeudi, 10. avril 2008 10:49 10 - Synchronize: you can synchronize a task with your archives stored in your operator's network depending on the options offered by your operator with a GSM or GPRS connection from your phone. You can also synchronize a task with your archives stored in your computer. You just need to activate Bluetooth or configure your USB connection in your phone (see chapter Connectivity). ToDo actions menu This menu allows you to do at the actions possible on any ToDo. To display a ToDo, select it in the list and press the navigator. To display the different options, press [Options]. - Modify ToDo: allows you to modify the ToDo properties. - Delete: allows you to delete the ToDo. - Send by MMS: allows you to send the ToDo by MMS. - Send by Bluetooth: allows you to send the ToDo by Bluetooth. - Export: allows you to copy the event to the Multimedia/My Calendar directory. Autonomy This menu displays information about battery life. Chronometer This menu allows you to use the chronometer and the timer functions. 36 Time Manager](/content/2026/05/1142748/images/6d713dc863eadc578dadccb8ca6a975f1bbe710a4c80811b1702ef76b701a6d8.jpg)


For Multimedia and Preloaded choices, on the name of a picture.
- press [ Select] to validate your wallpaper selection, or - press the navigator, the picture is displayed. Press [ Select] to select it as your phone wallpaper or crass the navigator
upwards or downwards to display others
Skins
This menu allows you to select the background picture when displaying menus.
Screensaver
This menu allows you, when the phone is in standby mode, to display an animation from the following choices.
- Normal screen
Slide show: several screensavers are displayed in a random way. Download more WAR cooperation link to download pictures.
- Multimedia: pictures to select in the My Pictures directory
- Default: phone default screensavers.
For Multimedia and Preloaded choices, on the name of a picture:
- press [ Select] to validate your screensaver selection.
- press the navigator, the picture is displayed. Press [ Select] to select it as your phone screensaver or press the navigator upwards or downwards to display others.
Energy saving
Economic mode
You can select one of the following eco modes:
- On & double lock: this mode provides maximum efficiency for battery life. The screen is off and the keypad is locked.
To call this notice and to check the keypath, please the navigation, please add a red copy of this growth key, add a press - add a brief key (if Validate).
- On & single lock: the screen is off and the keypad is locked.
To exit this mode: press the red key. To just turn on the backlight and display time only, press the navigator
- On & unlocked: this mode decreases the battery life. The screen is off and the keypad is always active
To exit this mode: press any key to light up the screen.
Backlight
screen only. Only the screen is up. Full backlight both the covers and it
- Full backlight both the screen and the keypad are in up.
Note: In any case, after a certain time of inactivity, the backlight will be automatically turned off to save battery the
Operator logo
This menu allows you to display your operator's logo on the idle screen (depending on model).


38 Settings


![254034103_my721X_en.book Page 39 Jeudi, 10. avril 2008 10:49 10 Date / Time Set Date/Time This menu allows you to set the date and time of your phone. Automatic update This menu allows you to choose manual or automatic updating of date and time (after switching off your phone or when going abroad for instance). Please select Automatic, Manual or On demand and press [Select]. WARNING: this service depends on your operator and on the information broadcast on its network. Please contact them to know how this operates. Display This menu allows you to select the date and time display. In the list that appears, select the desired display type and validate. Time zone This menu allows you to change time in relation to the GMT. Choose the time of the country desired by calculating the time from GMT. Daylight savings This menu allows you to set your phone to summer/winter time Select 1h, 2 h Summer time or Winter time depending on the season, and validate. Languages This menu allows you to choose your phone's display language. Select your language and validate. If you select Automatic, the language used will be the one relative to your SIM card. Shortcuts This menu allows you to customize the settings of your phone to make it as convenient as possible for you to use. (Function available depending on model) This menu allows you to allocate functions to the right and will programmable keys. Select the key that you wish to modify and validate. Choose the function that you want to allocate to this key and validate. Settings 39](/content/2026/05/1142748/images/4606b9081659626ec35f35cb260d823b11d170e745d29fab4ad9c863e0378744.jpg)


This menu allows you to select the way to sort contacts in the phonebook (by name or first name) and the filler applied on the contacts list display (SIM contacts, phone memory or both).
Reset
This menu allows you to reset the phone settings.
Connectivity
You can exchange various data with other devices (PC, mobile phones, personal assistants, printers, etc.): pictures, sounds, photos, videos, To Do tasks, organiser events, contacts, etc.
Data exchange can be done through:
- a USB cable
- a bouslach - correction.

Bluetooth®
Bluetooth ^2 is a technology used to establish a wireless connection with other Bluetooth ^3 equipped devices, for example, with a pedestrian kit or a car kit to phone or with a PC to swap data. The range is about 10 m.
The Bluetooth® menu contains the following entries:
Paired devices
This menu lets you draw up the list of devices with which the Bluetooth ^® connection is secure (by authentication and encryption).
A device must be added to this list before it can be used in Bluetooth® with your phone except for exchanging objects. When you select send by Bluetooth® (photo, Todo task, contact details, etc.) the phone displays the list of devices. You do not need to select a device from this list at this time, you can start a one-off search for a device when you initiate sending.
See below for the pairing procedure.
Mode
With this menu you can, on the one hand, activate and deactivate the Bluetooth® function and, on the other, when the Bluetooth® function is activated, select whether you want other Bivelong® devices to be able to retail your device.
- On & hidden: your phone is not visible. It cannot be detected by other Bluetooth ^® devices. In this mode, a device can only connect to your phone using Bluetooth ^® if you have already paired it. This mode lets you detect other devices and pair with them from your phone.


40 Settings


- On & visible: your phone is visible for a period of 3 minutes. During this period, it can be detected by the other Bluetooth®
devices. Select this mode when a pairing with your phone has been initiated from another Bluetooth device. Off: the Bluetooth function is not available
On & always your phone is visible and can be detected by the other Bluetooth® devices as long as this mode is selected.
IMPORTANT:
- The Off option ensures the best battery life for your phone.
- Blustooth ^3 security is better guarded because your phone remains invisible to the other devices.
My Bluetooth® name
This is the name used to identify your phone when it is detected by another Bluetooth device.
Pairing procedure
Select Paired devices/New Device
If the Bluetooth ^® function is not active, the phone prompts you to activate it using one of the 3 modes described above.
The phone searches for visible Bluetooth devices and displays the list. Select the device concerned and validate your
choice. Your phone then prompts you to enter a code which must be the same as the code entered on the remote device. Enter and validate this order. Your phone is newly joined with the remote device.
Enter and validate this code. Your phone is now paired with the remote device.
A corrected device is shown in both in the 1st
[Options] on the name of a device lets you access the following options:
- Delete this is used to delete the device. WARNING: using this function needs starting the pairing over again.
- Rename this is used to modify the name of the device.
- Before all, this is used to delete all your devices. WARNING, using this function needs starting the pairing over again.
- Activate: this is used to activate the connection with the device.
- Properties: this is used to display the list of the device's Bluetooth® services.
Notes:
- Refer to the user manual of the device with which you are pairing to find out how to set this device to the mode allowing
this operation.
- The code of the remote device may be predefined by the device manufacturer. In this case, refer to the user manual of this
device to find out this code.
USB Mode
This menu allows you to select a mode to connect the phone to a PC with a USB cable available as an accessory.
At plugging-in
If you select this option, when connecting a USB cable, the phone asks you to select the mode you want.

Settings 41


This mode is a communication mode between the phone and a PC. It allows you to exchange data (visit cards, contacts) between the phone and a PC.
After connection of the USB cable between the phone and the PC, you must use the MPAS software (My Pictures And Sounds available on www.planetsagam.com) or the Walphone software (available on www.wellphone.com).
This mode allows you to connect the phone to a printer (printing photos) without using a PC.
USB key
This mode allows you to exchange data between a PC and the phone memory (the one containing the pictures, sounds and videos files) or the memory card.
After connection of the USB cable between the phone and the PC, the phone memory and the memory card are displayed as additional memories in the Windows explorer files directory.
Note: If a call comes in during an exchange of data with your PC, the link will be interrupted and will have to be manually re-started.
Notes when the phone is connected to a personal computer in USB key mode;
- The memory card is not detected by the phone. Consequently, if you have configured your phone with a Wallpaper of a ring tone stored in the memory card, these will not be used during the connections.
- Camera is not available, neither in photo mode, nor in video mode.


SyncML
You can synchronize your phonebook, your organiser or your TcDos with your archives stored in your computer. Use the Wellphone software and configure your USB connection in your phone or activate Bluetooth ^8 .
Car kit/Headset
This menu allows you to activate or deactivate the Automatic response option when the phone is connected to a pedestrian kit or a car kit.

Flight mode
This mode allows you to use only certain phone functions; these functions are ones that do not require the use of the network (for example: music player, store contacts in the directory, organiser, etc.).

42 Settings


On outgoing calls: status of the Display numbers function.
On incoming calls: status of the Display numbers function when you have forwarded the incoming calls to another number.
Caller's Number
On outgoing calls, status of the Display numbers function when your call is forwarded to another number.
On incoming calls: status of the caller's Display numbers function.
Call waiting
(Operator-dependent service). During a call, you may be informed that a caller is trying to reach you; you hear a special tone.
The caller's identity is displayed on the screen (name or number).
You can activate, deactivate, or status of the call waiting service in order to check if it is active or not.
During a call, if a second cater tries to contact you, the screen displays the call warning.

Auto redial
This menu allows you to call back a caller you have not managed to reach.
You can set the redial function to inactive, On request or Systematic.
If you choose On request, your phone will offer to radial your caller automatically if their number is busy.
Advanced
Counters
This menu allows you to consult the duration of the last calls.
It can also be used to check the volume of data exchanged in GPRS.
Call barring
This menu allows you to block the sending or receiving of certain calls.
Before you can use this service, a password will be provided by your operator when you take out your subscription.
Access to this service depends on your subscription type
To activate call barring
- Select incoming or outgoing calls.
- Select the call type on which you want to activate call barring.
Seed
• either A
- or if roaming, if you are away from your home country and if roaming is available, only incoming calls will be blocked.
- Sales, Activation and enter passcards.

44 Settings


![254034103_my721X_en.book Page 45 Jeudi, 10. avril 2008 10:49 10 Call divert Depending on your subscription. this service allows you to forward incoming calls to a different number or to the voice mailbox. Choose the type of forwarding you want from the options available. Blacklist The blacklist is used to limit failures on automatic calls (calls generated by the automatic redial function or by applications: data, fax for example). When several automatic calls have failed with a number (number busy or unknown), this number is put in the blacklist and no further automatic call will be made with this number until you create it from the blacklist. Note: this function does not apply to the calls performed manually. Voicemail This function is used to record your voicemail access number. New number After an incoming or outgoing call with a number not stored in the phonebook, this option allows you to activate or deactivate a request to store the number in the phonebook. Messaging This menu allows you to select various options for sending and receiving messages (see page 24). Advanced Security This menu allows you to configure your phone's security settings. PIN This menu allows you to activate and modify your phone's PIN. To modify the PIN, select Modify PIN and [Select]. Enter one PIN and validate. Enter new PIN twice and validate. To activate or deactivate the PIN, select the Control PIN menu and [Select]. Enter PIN and validate. Select Activate or Deactivate and validate. Settings 45](/content/2026/05/1142748/images/f2cc811c850dd0a4ad84c98a5de7b979cc1bc13dae31a3bc48a239606d8d81c7.jpg)
![254034103_my721X_en.book Page 46 Jeudi, 10. avril 2008 10:49 10 PIN2 You have a second PIN number to allow you to access certain functions (*). Proceed as above in order to modify PIN number 2 of your phone. Phone code The Phone code menu allows you to activate the phone code so that it is requested and checked whenever the phone is switched on if a different SIM card is used. This code is automatically linked to the SIM card installed when the phone is activated, for example to protect the phone if slider. Select Check and [Select]. Enter 0000 (the default factory code) and validate. Select Activate or Deactivateand validate. To modify the phone code, select Modify and validate. Enter old phone code and validate. Enter new phone code and validate. Enter phone code again to confirm it and validate. Operator This menu allows you to modify the call barring. Access to this service depends on your type of subscriptron. Advanced Confidentiality This menu allows the activation or deactivation of automatic deletion, after power off/on, of outgoing calls, messages stored or organiser events. Select Activate or Deactivateand validate. Fixed dialling This menu allows you to restrict the ougoing calls. The availability of this menu depends on your SIM Enter PIN2 number and validate. Select Activate or Deactivateand validate. Proceed as for any other phonebook. When activating this function, only the numbers stored in the phonebook can be called. This phonebook is linked to the SIM card, and its size depends on the card's capacity. (*) These functions may or may not be available depending on your SIM card. 46 Settings](/content/2026/05/1142748/images/63ca4d63d40819658f8ebf91ea4871df0574a5c3084f00820ecb848d572c36fd.jpg)


Size: 112.5×40.5×9.8 mm
Battery life (")
- Standby, up to 220 h - Calls: up to 3 h
- Music mode. 4 h 30
Multimedia objects supported:
- Audio formats: Mid, WAV (PCM, ADPCM), AMR NB, MP3, AAC, Melody 1.2
- Image narratives. Drip, Wamp, Jpeg, Ping, Gi, Immilated gri Wise frames: 20P
- Video format: 3G
Size of memory available for messages: 100 messages
Size of memory available for messages, the phonebook and the multimedia objects: up to 10 MB
Memory card maximum size: 4 GB
MAXIMUM SIZE OF EACH
- MMS: the phone supports MMS sizes up to 300 kB both for outcine and incoming messages (depending on the phone
configuration and on the operator reservations
Operating temperature: from -10 °C to +55 °C


(*) These values are theoretical ones and given for information only.
48 Technical features


Do not use your phone when driving. In order to give your full attention to driving, stop and park safely before making a call. You must comply with any current legislation.
Distance of operation
This phone model has been tested and meets radiofrequency exposure guidelines when used as follows:
- against the ear, make or receive a phone call and hold the phone as you would a wireline telephone, - body worn when transmitting, place the phone in a carry accessory that contains no metal and positions the phone a minimum of 1.5 cm from your body. Use of other accessories may not ensure compliance with radiofrequency exposure guidelines, if you do not use a body worn accessory and are not holding the phone at the ear, position the phone a minimum of 1.5 cm from your body.
- data operation: when using a data feature, position the phone a minimum of 1.5 cm from your body for the whole duration of the data transmission.
Accessories
We recommend you use SAGEM brand accessories for optimal operation of your phone and accessories.
Using the music player
This product has been designed to comply with prevailing legislation regarding the limitation of maximum audio volume levels.
Environment
Packaging
To facilitate the recycling of packaging materials, please comply with the selective waste sorting rules instituted locally for this type of waste.
Batteries
Spent batteries must be deposited at the designated collection points.
The product
The crossed-out waste bin mark affixed to the product (including its accessories) means that it belongs to the family of electrical and electronic equipment. To promote the recycling and recovery of waste electrical and electronic equipment (WEEE) and at the same time safeguard the environment. European regulations require you to comply with the sorting rules instituted locally for this type of waste.
52 Care and safety information


- Prolonged listening at high volume with a headset or earphones can damage your hearing.
- If you experience during in your ears, reduce the volume or stop using the product.
- Only use the headset or earphones supplied with the product or else use compatible accessories. The list of compatible accessories can be consulted on our Web site: http://www.sagem.com.
This product has been designed to comply with prevailing legislation regarding the limitation of maximum audio volume levels. - Prolonged listening at high volume with a headset or earphones can damage your hearing.
- If you experience ringing in your ears, reduce the volume or stop using the product.
- Only use the headset or earphones supplied with the product or else use compatible accessories. The list of compatible accessories can be consulted on our Web site: http://www.sagem.com.


The crossed-out waste on track alive to the product, including its accessories, means that it belongs to the fairly electrical and electronic equipment. To promote the recycling and recovery of waste electrical and electronic equipment (WEEE) and at the same time safeguard the environment. European regulations require you to comply with the sorting rules instituted locally for its type of waste.


When running a Java™ application, you may be prompted to grant access to protected features. These features are protected because using them could incur a cost, or involve your personal data. In case of doubt, don't hesitate to refuse access by selecting the "No" button!
The security configuration menu is an expert feature! You must know exactly what you are doing before attempting to change the security parameters of a MIDet. Misunderstanding changes may render MIDet non functional and/or lead to higher risks for your private data or impact your airline consumption. Any changes in the security configuration are done under your responsibility, In no case shall Sagam Mobiles and/or your network provider be listed for any damages deriving from or arising out of such changes in the security configuration.
You must be aware that applications downloaded to your phone could cause the phone to perform actions for which you will be billed, such as making calls and sending SMS. Depending on your operator's billing policy, you may also be charged to download the application because of airline consumption.
Security considerations
Java™ MDP technology is an efficient way to provide powerful applications in mobile phones.
All these MIDP 2.0 features cannot be displayed on MIDlet installed in the handset: an advanced access control system is implemented in the device to protect your private data and airtime consumption.
Access controls are collected in 9 security groups:
- Network access
- Auto invocation
Phone call Local comp
- Local traffic/only - Messaging receipt
- Messaging receiving
- Read User data
- Write User data
- Multimedia recording
Each of these security groups has one of 5 possible authorizations levels (listed from the more restrictive to the more permissive):
- Never: The security group completely prevents access to the protected features
- Per use: Each time MIDlet tries to use protected feature, user is prompted to grant access.
- Per session: First time a MIDet, uses a protected function, user is prompted to grant access like in "Per use" authorization but access is granted until the MIDet terminates.


Java™ 57


- Single confirmation: The first time in the whole MIDlet life a MIDlet uses a projected feature, user is prompted to grant access, it remains valid until the MIDlet is removed from the handset. - Always: The security group unconditionally grants access to projected features.
A. MIPod has a security status which is either "uncertified", or also "certified".
An "uncertified" status means that the source of the MIDlet could not be verified by the mobile phone at installation time. As far as the phone knows, the MIDlet could have been written by anyone.
A "certified" status means that the MIDlet was digitally signed by a known party, whose name is displayed by the mobile phone.
Security permissions are different for "uncertified" or "certified" MIDlats. Security configuration menu
When a MIDlet is installed in the mobile phone, default security authorizations are applied
This default security configuration may be altered through the "Settings/Security" menu of an installed MIDcel
Once in the Security menu, the security status of the KMLlet is displayed.
If you do not want to enter the security menu, simply select the "Back" button. You can proceed by selecting "OK" button. The menu displayed allows you to increase or decrease the permissions currently applied to the current MIDlat for each of the security groups.
When you set a more permissive authorization to a security group than the current value, the mobile phone asks you to confirm your increased risk exposure.
The maximum risk exposure increase is limited by the security status.
What is Java™?
Business applications and games are easily downloadable by the end-user on a Java™ featured handset. Your mobile phone is a MIDP 2.0 compliant Java™ platform which implements WMA (SMS support) and MIMAPI (Multimedia support) options, providing an exciting environment to run highly graphical, networked and intuitive MIDP applications. What is a MIDlet?
A Java™ application or a game designed to run in a mobile phone is named a MIDlet (MIDP applet).
A MIDlet is usually made up of 2 flies;
- The JAD the
JAD file stands for Java™ Application Descriptor. It is a small file describing the content of a JAR file
JAR file stands for Java™Archive. It refers to the application data themselves (program, images, sound). A JAR file can have a size of up to 200 KB.
Note: In rare circumstances, MIClet vendors may provide no JAD file and the MIClet is just the JAR file. In such a case it is your sole responsibility to assess the risk of downloading the JAR file without any possibility of consulting the JAD file.


58 Java™


The phone won't start and/or won't take a charge
The battery has completely lost its charge. Connect the phone to the charger for between 5 and 30 minutes. The phone will only switch on after it has been charging for a few minutes.
You may use the phone again when the Start option is displayed on the screen.
If the phone still won't start after 30 minutes charging, contact customer service.
SIM not present
Check if the SIM card is present and properly positioned / inserted.
Check the condition of the SIM card. If damaged, please go back to the operator's shop for advice. Contact your after-sales papers if the message persists.
Service is this needed. In contrast, PIN needs
Incorrect PIN code An incorrect PIN code has been enlared. Be careful. Three incorrect PIN codes will block the SIM Card.
SIM BLOCKED
SIM BLOCKED If a wrong PIN is entered three times in succession, your SIM card is blocked. You must then:
- Enter the PUK (Personal Unlocking Key) code provided by your operator, and validate.
- Enter your PIN and validate.
- Enter your PIN again and validates.
After 5 or 10 failed attempts (depending on the type of SIM card), the SIM card is permanently locked. You must then contact
your operator to obtain a new card
SIM LOCKED
In certain cases, the handset can only be used with some types of SIM cards. This message means that the SIM card you
are using does not match the phone. Take the SIM card out, and switch the phone on again. If the message SIM not present
appears on the screen, you will need to check its compatibility with the phone vendor. If not, please contact your after-sales
Service. No cell connection
No call connection Check that the number you have dialed is correct
If the letter R is displayed on the top right corner of the screen, without any network name displayed, only emergency services
can be called.
Check the status of your credit
Check that the SIM Card you are using offers the service you are requesting check if its validity has not expired.
Check and deactivate the outgoing calls restriction when necessary.


Troubleshooting 63


The network could be saturated. Try later.
If the problem persists, please contact your Technical Helpdesk.
No incoming calls received
Try to make a call in order to check that the phone and the network are operational.
Check and deactivate the permanent call forwarding (permanent call forwarding icon displayed on the screen).
check and deactivate the incoming calls restriction when necessary.
In the problem persists, please contact your Technical Helpdesk.
Poor reception quality when calling Avoid placing your fingers on the bottom of the phone, where the serial is integrated; the phone will have to use full strength
to establish a quality transmission.
Cannot read message
Check that the message centre number is correctly entered.
To do so, please select the menu Messages, select Advanced Options/SMS, select MSG centre n* and check the number
entered. Please contact your network provider to get this number.
No volcemall
Check that your subscription does offer this service.
Program the call to be forwarded to voicemail using the information provided by the operator.
Try to make a call to check that phone and network are operational.
Check if the voicemail number is properly configured. To do so, go to the Settings :Calls menu, select Voicemail and check
the number. Otherwise, enter your operator's volume/number.
Operator name does not appear on screen
Go into the Settings menu, select Networks then Selection Manual Wait until the operator appears, select it and validate.
In the Operator logo is present (depending on model), activate the display (SettingsDisplay Operator logo).
Poor screen legibility
To ensure optimal screen legibility, follow the recommendations below:
- check that you have removed the plastic protective film
- clean the screen of you telephone with a soft dry cloth to remove any finger marks or dust,
- make sure the background brightness is not too strong.
The automatic updating of date and time does not operate correctly
This service depends on your operator and on the information broadcast on its network. It may broadcast them continuously,
occasionally or may not offer this service.
For instance, some networks require a GPRS connection for the automatic updating of data and time. This GPRS connection is identified by a black GPRS icon deployed on the screen.
Please contact your operator, that will confirm you can access this service and will give you all the installation information.
64 Troubleshooting