
CAFETIERE SCM2125ST - Coffee maker SINGER - Free user manual and instructions
Find the device manual for free CAFETIERE SCM2125ST SINGER in PDF.


| Product Type | Programmable Filter Coffee Maker |
| Brand | SINGER |
| Model | SCM2125ST |
| Capacity | 10 cups (approx. 1.25 L) |
| Color | Black and stainless steel |
| Materials | Plastic, glass (thermal carafe), stainless steel |
| Power | Approx. 800-1000 W (estimated) |
| Power supply | 120 V, 60 Hz (or 230 V depending on region) |
| Display | Digital display with clock and AM/PM indicators |
| Functions | Delayed programming, automatic shut-off, anti-drip system, keep warm |
| Carafe type | Insulated thermal carafe with flip-lid |
| Filter | Removable filter holder for 8-12 cup paper filters (permanent filter not included) |
| Water level indicator | Yes, markings on the water tank |
| Timer | Programmable up to 24 hours in advance |
| Automatic shut-off | Yes, after the brewing cycle ends |
| Cleaning | Clean the water tank with clean water, carafe and filter holder are hand-washable |
| Descaling | Recommended 4 times a year with diluted white vinegar |
| Cord length | Short (approx. 0.7 m) for safety |
| Dimensions (approx.) | 30 x 20 x 35 cm (estimated) |
| Weight (approx.) | 2.5 kg (estimated) |
| Included accessories | Thermal carafe, filter holder, instruction manual |
| Warranty | Depends on retailer (typically 1-2 years) |
Frequently Asked Questions - CAFETIERE SCM2125ST SINGER
User questions about CAFETIERE SCM2125ST SINGER
0 question about this device. Answer the ones you know or ask your own.
Ask a new question about this device
Download the instructions for your Coffee maker in PDF format for free! Find your manual CAFETIERE SCM2125ST - SINGER and take your electronic device back in hand. On this page are published all the documents necessary for the use of your device. CAFETIERE SCM2125ST by SINGER.
USER MANUAL CAFETIERE SCM2125ST SINGER
natural_image
Singer coffee maker with digital display and black lid (no visible text or symbols on device body)MODEL : SCM2125ST FRANÇAIS/ ENGLISH/ EΛΛΗΝΙΚΑ
FRANCAIS
MESURES DE SECURITE
natural_image
Technical diagram of a mechanical component with concentric circles and radial features, labeled 'Fig. 3' (no text or symbols beyond label)SYSTEME ANTI GOUTTE
IMPORTANT SAFETY INSTRUCTIONS
When using electrical appliances, basic safety precautions should always be
followed to reduce the risk of fire, electrical shock and personal injury.
- Read all instructions carefully.
- Do not touch hot surfaces. Use handle.
- To prevent electrical shock; do not immerse cord, plug or unit in water or other liquids.
- Close supervision is necessary when any appliance is used by or near children.
- Unplug from outlet when not in use and before cleaning. Allow to cool before putting on or taking off parts and before cleaning the appliance.
- If the supply cord is damaged, it must be replaced by an authorized service agent in order to avoid a hazard.
- The use of accessory attachments not recommended by your agent may cause hazards.
- Do not use outdoors.
- Do not let cord hang over edge of table or counter, or touch hot surfaces such as stove).
- Do not place on or near a hot gas or electric burner, or in a heated oven.
- To disconnect, turn power select switch to "O" (OFF), then remove plug from wall outlet.
- Never use warm or hot water to fill the water reservoir. Use cold water only.
- Scalding may occur if the cover is lifted or removed during the brewing cycle.
- Snap the lid securely to the carafe before serving.
- Never use the carafe on a range top or in a conventional or microwave oven.
- Do not set a hot carafe on a wet or cold surface.
- Do not use a cracked carafe, or a carafe that has a loose or weakened handle.
- Do not clean the coffee maker with scouring powders, steel wool pads, or other abrasive materials.
- Do not use this appliance for other than intended use.
- This appliance is not intended for use by children. Children should be supervised to ensure that they do not play with the appliance.
SAVE THESE INSTRUCTIONS
SPECIAL POWER CORD INSTRUCTIONS
A short power-supply cord is provided to reduce the hazards resulting from entanglement or tripping over a longer cord. An extension cord may be used with care; however, be sure the marked electrical rating is compatible with the rating of this appliance. The extension cord should be positioned so that it does not drape over the counter or tabletop or where it can be pulled on by children or someone trips over. The electrical rating of this appliance is listed on the bottom panel of the unit.
WARNING: To reduce the risk of fire or electric shock, do not open or remove bottom
cover of coffee maker. There are no user serviceable parts inside. Repairs should be done by an Authorized Service Center only.
BEFORE FIRST USE
Carefully unpack the coffee maker and remove all packaging materials. You may wipe the heating stand with a clean, damp cloth. Do not immerse the heating stand in water or other liquid. To remove any dust that may have accumulated on the removable parts during packaging, wash the thermal flask, lid, and filter basket with warm, soapy water. Rinse and dry. Do not use harsh or abrasive cleansers.
NOTE: We recommend that prior to brewing your first pot of coffee; you "brew" cold water only, without ground coffee or a paper filter. This will remove any dust that may have settled inside the coffee maker.
IMPORTANT: Use only cold water. The automatic brewing system has been designed to work only with cold water.
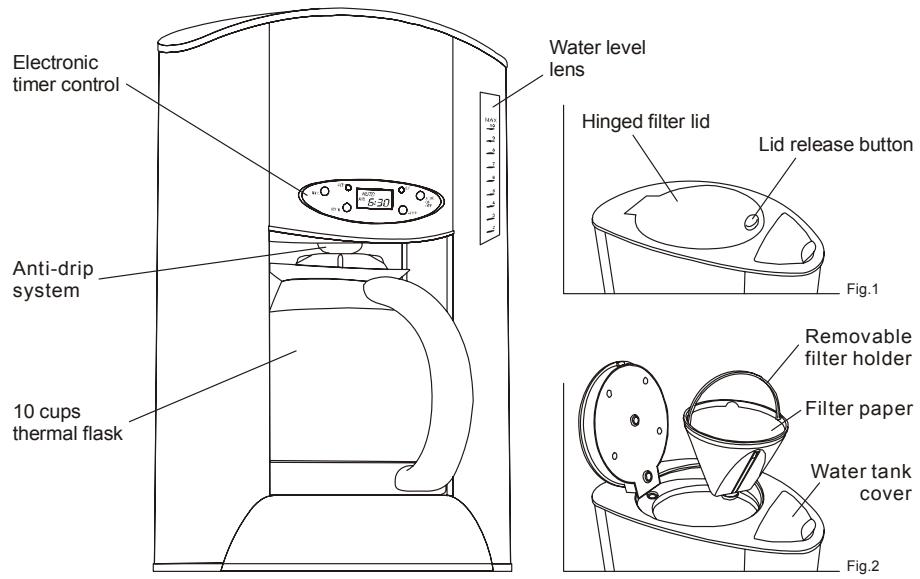
- Place your drip coffee maker on a flat, level surface, such as a counter top. Plug the unit into an AC-only outlet that fits the electrical rating of the appliance.
- Open the filter lid by pushing the lid release button (Fig.1), insert a paper filter (8-12 cup size) or permanent filter (not included) into the filter holder (Fig.2). Place the desired amount of ground coffee into the paper filter.
Note: We recommend using the coffee ground specifically for automatic drip coffee makers. After using your drip coffee maker a few times you may adjust the amount to suit your own taste.
- Open the water tank cover located on top of the water reservoir (Fig. 2). Fill the water reservoir with water up to the marked level of water level lens for the desired amount of coffee.
IMPORTANT: Use only cold water - the automatic brewing system has been designed to work with cold water only.
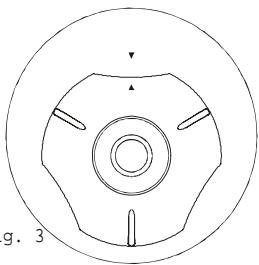
- Place the thermal flask in place with the lid open so that the arrows point towards each other (Fig. 3). Press the power select button twice.
The "ON" light will now light up, indicating that your coffee maker has begun the brewing cycle.
-
Hot water will be dispersed gently and evenly through the coffee grounds. When all the water has been pumped out of the reservoir, the heater will switch off automatically.
-
If you wish to use the timer to preset the coffee maker, see the section on «Using the Timer».
NOTE: For optimal thermal retention, preheat the thermal flask by rinsing with hot water prior to placing in the coffee maker.
-
When brewing is completed, remove the thermal flask and place where convenient. Close the lid by turning it in clockwise position until it locked. It stays hot for few hours.
-
To pour, turn the lid open so that the arrows point towards each other (anti-clockwise position) (Fig. 3).
- Remember to close the lid by turning it in clockwise position to seal the thermal flask.
- To open, turn the lid to anti-clockwise position until it release from the thermal flask.
AUTO-PAUSE DRIP STOP
Your coffee maker has been designed with an auto-pause drip stop feature. If you wish, at any time during the brewing cycle, you may temporarily remove the thermal flask from the unit and pour a cup of hot coffee. No coffee will drip from the filter holder. Simply replace the thermal flask in place will restart the brewing process (remember to stay the lid open so that the arrows point towards each other).
CAUTION: Do not remove the thermal flask for longer than 30 seconds.
natural_image
Technical diagram of a mechanical component with concentric circles and radial features (no text or symbols)DECALCIFYING
Calcium buildup frequently occurs in drip coffee makers. This buildup is quite normal and is caused by minerals commonly found in drinking water. Periodically, your drip coffee maker will need cleaning to remove any calcium or mineral deposits that may form. You will know when your coffee maker requires decalcifying when you notice an obvious slow down in brewing time.
We recommend decalcifying your drip coffee maker with a solution of white vinegar and cold water. A solution of two tablespoons white vinegar in one thermal flask of cold water works best.
Pour the solution into the water reservoir, then close the hinged lid and put the empty thermal flask and filter basket into place. Switch the coffee maker on, and allow the coffee maker to "brew" the vinegar solution.
When the vinegar solution has finished brewing, empty the thermal flask and rinse it out with clean water. Refill the water reservoir with cold water only, and run another "brew" cycle. This will rinse out any remaining vinegar solution. If necessary, a second "brew" of water only can be performed.
We recommend decalcifying your drip coffee maker four times a year or at any time the brewing time slows down.
CARE AND CLEANING
CAUTION: Be sure to unplug this appliance before cleaning. To protect against electrical shock, do not immerse cord, plug or unit in water or other liquid.
The thermal flask and lid may be washed with warm, soapy water. Simply open the lid by turning it in anti-clockwise position and close the lid by turning it in clockwise position. Never use harsh or abrasive cleaners on any part or parts to your coffee maker.
The filter holder may be removed from the main body and washed in warm, soapy water.
The heating stand may be wiped with a clean, damp cloth when necessary.
IMPORTANT: Never immerse the heating stand in water or other liquid.
Do not try to clean the inside of the water chamber with a cloth because this will
leave a residue of lint and may clog your drip coffee maker. Just rinse with cold
water periodically
ELECTRONIC TIMER CONTROL
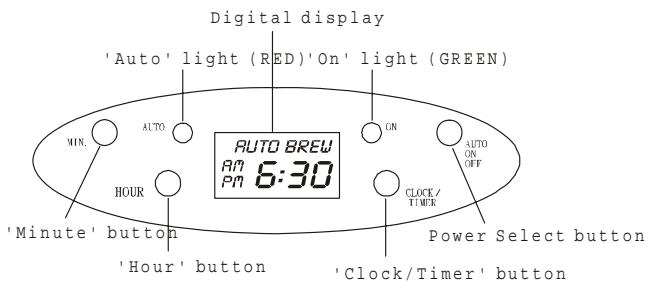
- Digital display - Clock with AM/PM indicator.
- Hour button - This button advances the hour display of the clock and timer. See the section "Setting the Clock" for proper use.
-
Minute button - This button advances the minute display for the clock timer. See the section on "Setting the Clock" for proper use.
-
Clock/Timer button - This button allows you to preset the brewing cycle to begin at a selected time. See the section on "Using the Timer" for proper use.
-
On light - Indicates that the coffee maker is in normal operating mode.
-
Auto light - Indicates that the coffee maker is in timer mode, waiting preset brew time.
-
Power Select button - Select from three power modes:
Auto/On/Off. Press the start button once and the Auto light comes on. Press the start button again and the "ON" light comes on. The "OFF" position (last position) does not have a light.
USING THE TIMER
Your coffee maker has a multifunction timer built into the face of the unit.
The following sections describe the proper use of this timer.
SETTING THE CLOCK
To set the clock, simply press and hold the "CLOCK/TIMER" button and press the "HOUR" button until the desired hour has been reached. There is an "AM" and "PM" indicator on the left side of the digital readout. Press the "MIN" button until the desired minutes have been reached. Your clock has now been set, and will continue to keep the correct time.
NOTE: Unplugging the unit will reset the clock to 12:00.
PRESETTING THE BREWING CYCLE
To preset your coffee maker to begin brewing at a later time, first follow step1 to 3 in the section "Using Your Coffee maker". Check to make sure that the clock is set to the correct time. If it is not, set the clock to the correct time. Press the "CLOCK/TIMER" button once, the "BREW" indicator will display on top of digital readout. Press the "HOUR" and "MIN" buttons until the desired brew time is reached. The "AM" and "PM" indicators are on the left side of the digital readout. Press the "POWER SELECT" button once. The red "AUTO" light will light up, indicating that your coffee maker is now waiting for the preset brew time to be reached before it will begin the brewing cycle.
AUTO SHUT-OFF
As an added convenience, your coffee maker has been designed with an auto shut off feature. When the brewing cycle complete, the coffee maker will automatically shut itself off.
ΕΛΛΗΝΙΚΑ
natural_image
Simple line drawing of a trash bin with crossed lines indicating no waste or plastic (no text or symbols)Disposal of Old Electrical & Electronic Equipment (Applicable in the European Union and other European countries with separate collection systems)
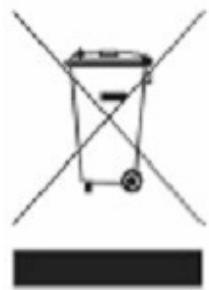
This symbol on the product or on its packaging indicates that this product shall not be treated as household waste. Instead it shall be handed over to the applicable collection point for the recycling of electrical and electronic equipment. By ensuring this product is disposed of correctly, you will help prevent potential negative consequences for the environment and human health, which could otherwise be caused by inappropriate waste handling of this product. The recycling of materials will help to conserve natural resources. For more detailed information about recycling of this product, please contact your local city office,
your household waste disposal service or the shop where you purchased the product.
Français
natural_image
Simple line drawing of a trash bin with crossed lines indicating no waste or plastic (no text or symbols)natural_image
Simple line drawing of a trash bin with two crossed lines indicating no waste or restriction (no text or symbols)- FRANCAIS
- MESURES DE SECURITE
- SYSTEME ANTI GOUTTE
- IMPORTANT SAFETY INSTRUCTIONS
- SAVE THESE INSTRUCTIONS
- SPECIAL POWER CORD INSTRUCTIONS
- BEFORE FIRST USE
- AUTO-PAUSE DRIP STOP
- DECALCIFYING
- CARE AND CLEANING
- ELECTRONIC TIMER CONTROL
- USING THE TIMER
- SETTING THE CLOCK
- PRESETTING THE BREWING CYCLE
- AUTO SHUT-OFF
- ΕΛΛΗΝΙΚΑ
- Français
Brand : SINGER
Model : CAFETIERE SCM2125ST
Category : Coffee maker