VST038 - Coffee maker BREVILLE - Free user manual and instructions
Find the device manual for free VST038 BREVILLE in PDF.

| Brand | Breville |
| Model | VST038 |
| Product Type | Drip Coffee Maker |
| Capacity | 12 cups (60 oz) |
| Dimensions (W x D x H) | 9.5 x 7.8 x 13.4 inches |
| Weight | 6.5 lbs |
| Power Rating | 1100 W |
| Voltage | 120 V |
| Main Functions | Programmable timer, brew strength selector (Mild, Regular, Strong), keep warm (up to 2 hours), brew pause, auto shut-off (after 2 hours), water filter indicator |
| Filtration | Charcoal water filter included |
| Carafe | Thermal stainless steel carafe with drip-free pouring spout |
| Filter Basket | Removable, cone-shaped for #4 paper filters |
| Water Tank | Removable, 60 oz capacity with water level markings |
| Cleaning | Descaling alert; removable parts dishwasher-safe (carafe, filter basket, water tank) |
| Safety Features | Auto shut-off, boil-dry protection, non-slip feet |
| Repairability | User-replaceable water filter; other parts serviceable by authorized technicians |
| Color | Stainless steel and black |
| Warranty | 1-year limited |
Frequently Asked Questions - VST038 BREVILLE
User questions about VST038 BREVILLE
0 question about this device. Answer the ones you know or ask your own.
Ask a new question about this device
Download the instructions for your Coffee maker in PDF format for free! Find your manual VST038 - BREVILLE and take your electronic device back in hand. On this page are published all the documents necessary for the use of your device. VST038 by BREVILLE.
USER MANUAL VST038 BREVILLE
natural_image
Close-up of a black and white portable kitchen appliance with a 'Breville' logo on the side (no additional text or symbols visible)2 slice sandwich toaster
instruction booklet
selection of recipes included

natural_image
Close-up of a black and white curved object with a handle, possibly a lamp or scanner (no text or symbols visible)PLEASE READ THESE INSTRUCTIONS AND RETAIN THEM FOR FUTURE USE.
This product can be used by children aged 8 years and above, and persons who require supervision, provided:
• they are familiar with the hazards associated with the product, and,
• they receive instruction by a competent person on how to safely use the product.
Children must not play with the product. Cleaning and user maintenance must not be done by children unless they are aged 8 or older and are supervised.
Keep the appliance and its cord out of reach of children less than 8 years old.
Bread can burn therefore do not use the appliance near or below combustible materials such as curtains. Never use the appliance below wall cupboards or shelves.
Never operate the appliance by means of an external timer or separate remote-control system.
Do not touch the metal parts of the appliance during use as they may become very hot.
If the supply cord is damaged, it must be replaced by the manufacturer, its service agent or similarly qualified persons in order to avoid a hazard.
⚠️ Never use this appliance for anything other than its intended use. This appliance is for household use only. Do not use this appliance outdoors.
⚠️ Always ensure that hands are dry before handling the plug or switching on the appliance.
⚠️ Always use the appliance on a stable, secure, dry and level surface.
⚠ Do not touch the external surfaces of the appliance during use as they may become very hot.
⚠️ Care is required when using the appliance on surfaces that may be damaged by heat. The use of an insulated pad is recommended.
This appliance must not be placed on or near any potentially hot surfaces (such as a gas or electric hob).
⚠️ Never let the power cord hang over the edge of a worktop, touch hot surfaces or become knotted, trapped or pinched.
⚠ Do not use the appliance if it has been dropped or if there are any visible signs of damage.
⚠ Ensure the appliance is switched off and unplugged from the supply socket after use and before cleaning.
⚠️Always allow the appliance to cool before cleaning or storing.
⚠️ Never immerse any part of the appliance or power cord and plug in water or any other liquid.
⚠️Never leave the appliance unattended when in use.
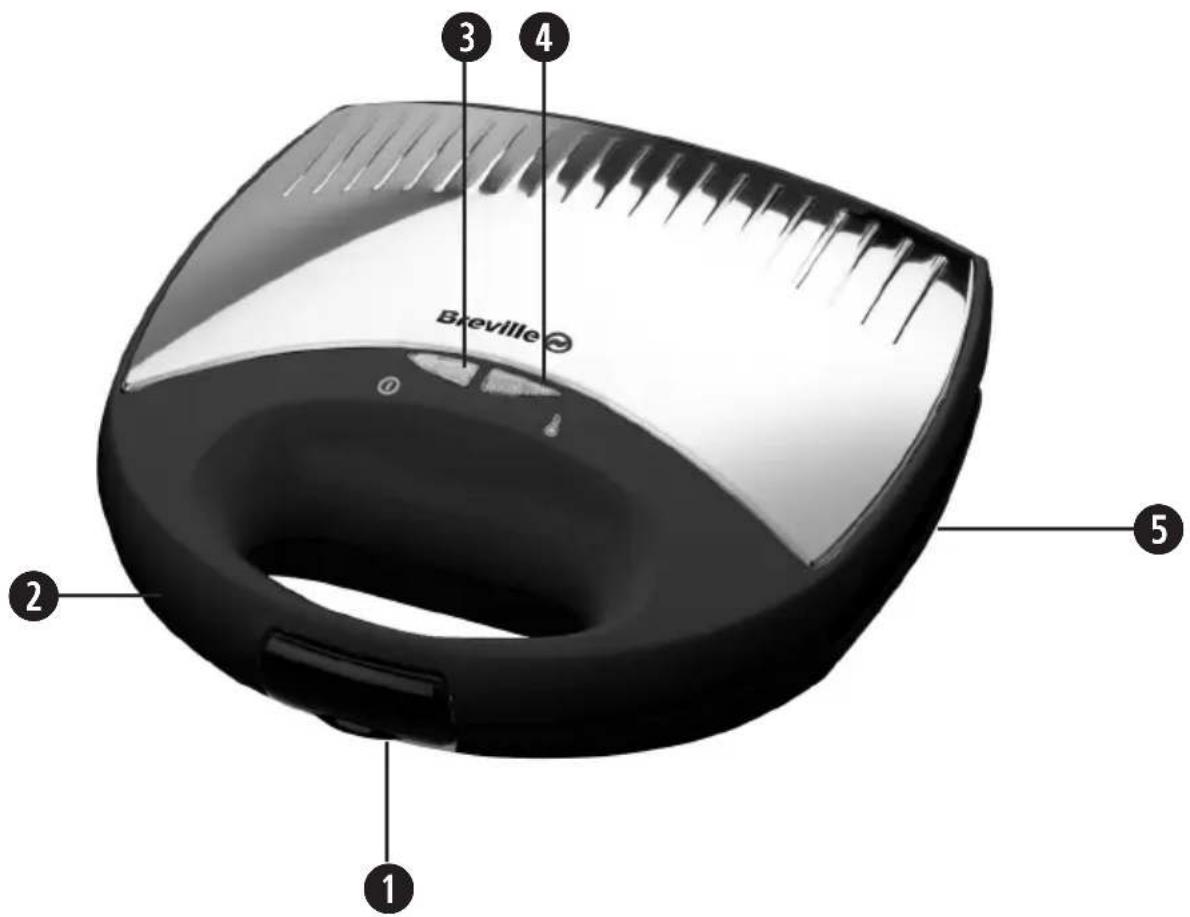
1 Latch - holds the lid firmly closed during cooking
2 Carrying handle
3 Red power on light
4 Green ready-to-cook light
5 Non-stick cooking plates with the original Breville cut-and-seal action. Suitable for large or small slices of bread.
Due to our policy of continuous improvement, the actual product may differ slightly from the one illustrated in these instructions.
Before first use
Note that the first time you use your sandwich toaster, you may notice a slight burning smell and a little smoke. This is completely normal and will soon disappear.
- Unpack your sandwich toaster. You may wish to keep the packaging for future use.
- Wipe the cooking plates with absorbent paper or a soft damp cloth.
- Clean the outside of your sandwich toaster with a soft damp cloth which has been wrung almost dry in warm soapy water. The cover can be polished with a soft dry cloth.
Using your sandwich toaster
- Plug your toaster in to the mains supply socket and switch the socket on if required. The red 'power on' light will light up and your sandwich toaster will start heating up. Pre-heating will take about 6 minutes.
- When your sandwich toaster is fully heated the green ready-to-cook light will light up. This light will go on and off as your sandwich toaster maintains the right temperature.
- Lightly brush the cooking plates with sunflower oil or spread the OUTSIDE of the bread with butter or a spread suitable for cooking. Don't use a low fat spread or one which has a high water content.
- Place the lower slice of bread onto the bottom plate ‘buttered’ side down. Form a hollow with the back of a spoon and add 1-2 tbsp of the prepared filling. Don’t overfill the sandwich or the filling will leak out. Add the top slice of bread buttered side up and close the lid gently and latch it. Take care because your sandwich toaster will be hot!
- Allow the sandwich to toast for approximately 4-5 minutes. Leave the sandwich in the toaster for more or less time according to taste.
- Open the lid. Watch out for escaping steam—use a tea towel or wear oven gloves. Remove the cooked sandwich with a non-metallic spatula. Don't use a metal blade as this will damage the non-stick surface of the plates.
- Once cooked, take care when eating, as fillings, especially fruit or tomato, can be very hot.
Making toasties is easy and fun, they can be as creative or as simple as you like and make great snacks whether eaten at home or on the go.
Using basic ingredients delicious sweet of savoury meals can be made in minutes, perfect for any time of the day.
Here are some classic toasted sandwich recipes that you may wish to try.
- Cheese and tomato
- Cheese, beans and ham
• Turkey, stuffing and cranberry - Ham, brie, mushrooms and rocket
- Steak and mushrooms
- BLT – bacon, lettuce and tomato
- Bacon and cheese
• Chicken, red pepper and Brie - Sweet chilli chicken
• Sausage and scrambled eggs
• Camembert and cranberry
• Chocolate and banana - Banana and plum
- Toffee and apple
- Tuna Melt – tuna, onion, mayonnaise and cheese
Pizza Toastie
(makes 2 toasted sandwiches)
- 4 Slices of bread
- Sundried tomato paste
- Mozzarella
-
Basil leaves
-
Switch on your sandwich toaster. When the correct temperature is reached, brush the plates with oil, or butter each slice of bread on one side.
- Place one piece of bread on each of the bottom plates (butter side down).
- Spread some of the sundried tomato paste onto the bread leaving a small distance from the crust.
- Sprinkle the mozzarella and basil leaves onto the paste and place another slice of bread on top to form a sandwich (butter side up).
- Close the lid and let the sandwich cook until brown.
Experiment with different Pizza toppings such as, pineapple, cooked ham, peppers and olives.
Croque Monsieur
(makes 2 toasted sandwiches)
- 4 slices of bread
- 2 eggs
- Milk
- Ham
- Cheese
-
Salt and Pepper
-
Thickly butter the sandwich toaster plates and then switch it on to heat up.
- Whilst your sandwich toaster is heating, whisk the eggs in a bowl and mix in the milk, salt and pepper.
- Dip the bread in the egg mixture and turn it around so that it is completely coated.
- Once the sandwich toaster maker has reached temperature, open the lid and then place a piece of soaked bread onto each plate.
- Place a layer of ham onto the bread and then a layer of cheese.
- Add another piece of bread to each side to form a sandwich and then close the lid. (This recipe may take slightly longer to brown than other toastie recipes).
Smoked Salmon, Cream Cheese and Chives Toastie
(makes 2 toasted sandwiches)
- 4 Slices of bread
- Smoked salmon
- Cream cheese
-
Chives
-
Switch on your sandwich toaster. When the correct temperature is reached, brush the plates with oil, or butter each slice of bread on one side.
- Place one piece of bread on each of the bottom plates (butter side down).
- Spread the cream cheese onto the bread and sprinkle the chives. Add the smoked salmon and place another slice of bread on top to form a sandwich (butter side up).
- Close the lid and let the sandwich cook until brown.
Breakfast Toastie
(makes 2 toasted sandwiches)
- 4 Slices of bread
• Sausage, cooked and sliced - Baked beans
-
Mushrooms, cooked and sliced
-
Switch on your sandwich toaster. When the correct temperature is reached, brush the plates with oil, or butter each slice of bread on one side.
- Place one piece of bread on each of the bottom plates (butter side down).
- Add the sausage, mushrooms and beans making sure you do not over fill the toastie. Place another slice of bread on top to form a sandwich (butter side up).
- Close the lid and let the sandwich cook until heated thoroughly and golden brown.
Blueberry Bread and Butter Pudding Toastie
(makes 2 toasted sandwiches)
• 4 slices of white bread
- 1 medium egg
- 1 egg white
• 100 ml of whole milk
- 75ml of double cream
- 12 teaspoon of vanilla extract
• 14 teaspoon of mixed spice
- 50g of butter
• 2 tablespoons of golden syrup
• 1 large tablespoon of castor sugar
- 50g of dried blueberries
- Thickly butter your sandwich toaster plates and then switch it on to heat up.
- Whilst your sandwich toaster is heating whisk the egg and the egg white in a bowl until it is foamy. Then mix in the milk, cream, vanilla extract and mixed spice.
- Dip the bread in the egg mixture and turn it around so that it is completely coated.
- Once your sandwich toaster has reached temperature, open the lid and then place a piece of soaked bread onto each plate.
- Sprinkle the blueberries onto each piece of bread and then drizzle with golden syrup.
- Add another piece of bread to each side to form a sandwich and then close the lid. (This recipe may take slightly longer to brown than other toastie recipes).
Banoffee Toastie
(makes 2 toasted sandwiches)
- 4 slices of bread
- Banana – sliced
- Toffee pieces – small
- Switch on your sandwich toaster. When the correct temperature is reached, brush the plates with oil, or butter each slice of bread on one side.
- Place one piece of bread on each of the bottom plates (butter side down).
- Add the toffee pieces and banana slices and arrange evenly across the bread. Place another slice of bread on top to form a sandwich (butter side up).
- Close the lid and let the sandwich cook until heated thoroughly and golden brown.
⚠️ Unplug and switch off your sandwich toaster and allow it to fully cool down before cleaning it. Do not immerse the main body, cord set or plug in water or liquid of any kind.
Never use steel wool, scouring pads, abrasive cleaners or metallic utensils to clean your sandwich toaster.
- Before cleaning your sandwich toaster, switch it off and unplug it from the mains supply. Allow it to cool down fully.
- Wipe the cooking plates with absorbent paper or a soft damp cloth.
- Clean the outside of your sandwich toaster with a soft damp cloth which has been wrung almost dry in warm soapy water. The cover can be polished with a soft dry cloth.
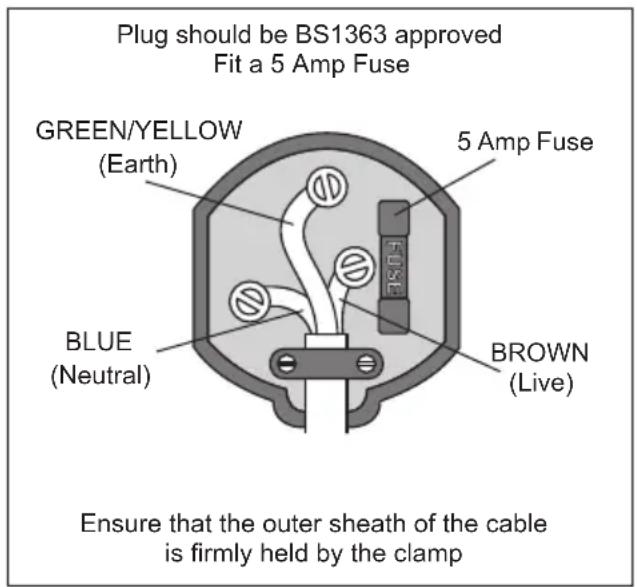
This appliance must be earthed.
This appliance is fitted with either a moulded or rewirable BS1363, 13 amp plug. The fuse should be rated at 5 amps and be ASTA approved to BS1362.
If the fuse in a moulded plug needs to be changed, the fuse cover must be refitted. The appliance must not be used without the fuse cover fitted.
If the plug is unsuitable, it should be dismantled and removed from the supply cord and an appropriate plug fitted as detailed below. If you remove the plug it must not be connected to a 13 amp socket and the plug must be disposed of immediately.
The wires of the mains lead are coloured in accordance with the following code:
$$ \text { GREEN / YELLOW } = \text { EARTH } $$
$$ \mathrm{BLUE} = \text { N E U T R A L } $$
$$ B R O W N = L I V E $$
The wire which is coloured GREEN/YELLOW must be connected to the terminal in your plug which is marked with an E or by the earth symbol ( 12 or coloured GREEN or GREEN/YELLOW.
The wire which is coloured BLUE must be connected to the terminal in your plug which is marked with the letter N or coloured BLACK.
The wire which is coloured BROWN must be connected to the terminal in your plug which is marked with the letter L or coloured RED.
If any other plug is used, a 5 amp fuse must be fitted either in the plug or adaptor or at the distributor board.
These appliances are built to the very highest of standards. There are no user serviceable parts. Follow these steps if the unit fails to operate:
- Check the instructions have been followed correctly.
- Check that the fuse has not blown.
- Check that the mains supply is functional.
If the appliance will still not operate, return the appliance to the place it was purchased for a replacement. To return the appliance to the Customer Service Department, follow the steps below:
- Pack it carefully (preferably in the original carton). Ensure the unit is clean.
- Enclose your name and address and quote the model number on all correspondence.
- Give the reason why you are returning it.
- If within the guarantee period, state when and where it was purchased and include proof of purchase (e.g. till receipt).
- Send it to our Customer Service Department at the address below:
Customer Service Department
Jarden Consumer Solutions (Europe) Limited
Middleton Road
Royton
Oldham
OL2 5LN, UK.
Telephone: 0161 621 6900 Fax: 0161 626 0391
e-mail: info@pulse-uk.co.uk
Please keep your receipt as this will be required for any claims under this guarantee.
This appliance is guaranteed for 1 year after your purchase as described in this document.
During this guaranteed period, if in the unlikely event the appliance no longer functions due to a design or manufacturing fault, please take it back to the place of purchase, with your till receipt and a copy of this guarantee.
The rights and benefits under this guarantee are additional to your statutory rights, which are not affected by this guarantee. Only Jarden Consumer Solutions (Europe) Limited. ("JCS (Europe)") has the right to change these terms.
JCS (Europe) undertakes within the guarantee period to repair or replace the appliance, or any part of appliance found to be not working properly free of charge provided that:
- you promptly notify the place of purchase or JCS (Europe) of the problem; and
- the appliance has not been altered in any way or subjected to damage, misuse, abuse, repair or alteration by a person other than a person authorised by JCS (Europe).
Faults that occur through, improper use, damage, abuse, use with incorrect voltage, acts of nature, events beyond the control of JCS (Europe), repair or alteration by a person other than a person authorised by JCS (Europe) or failure to follow instructions for use are not covered by this guarantee. Additionally, normal wear and tear, including, but not limited to, minor discoloration and scratches are not covered by this guarantee.
The rights under this guarantee shall only apply to the original purchaser and shall not extend to commercial or communal use.
If your appliance includes a country-specific guarantee or warranty insert please refer to the terms and conditions of such guarantee or warranty in place of this guarantee or contact your local authorized dealer for more information.
Waste electrical products should not be disposed of with Household waste. Please recycle where facilities exist. E-mail us at enquiries info@pulse-uk.co.uk for further recycling and WEEE information.
Jarden Consumer Solutions (Europe) Limited.
Middleton Road
Royton
Oldham
OL2 5LN
UK

natural_image
Symbol of a trash bin crossed with diagonal lines, no text or labels presentBreville

©2013 Jarden Consumer Solutions (Europe) Limited
All rights reserved. Imported and distributed by Jarden Consumer Solutions (Europe) Limited, Royton, Oldham OL2 5LN, United Kingdom.
The product you buy may differ from the one shown due to continuing product development. One (1) Year Limited Warranty—see inside for details. Jarden Consumer Solutions (Europe) Limited is a subsidiary of Jarden Corporation (NYSE:JAH). Made in PRC
www.breville.co.uk