
HP-6002K - Power adapter Edimax - Free user manual and instructions
Find the device manual for free HP-6002K Edimax in PDF.


| Product Type | Powerline Adapter (HomePlug AV Standard) |
| Model | HP-6002K |
| Brand | Edimax |
| Data Transfer Rate | Up to 600 Mbps |
| Range | Up to 300 meters over electrical wiring |
| Port | 1x Gigabit Ethernet Port (10/100/1000 Mbps) |
| LED Indicators | LAN (link/activity), PLC (powerline link/data), PWR (power) |
| Button | Group button (less than 3s: create/join network; 8-12s: leave network or reset to factory defaults) |
| Compatibility | HomePlug AV (AV600, AV500, AV200 devices); not compatible with HomePlug 1.0/1.1 |
| QoS | Built-in Quality of Service for bandwidth-sensitive applications (voice, video, gaming) |
| IGMP | Supports IGMP managed multicast for optimized IPTV streaming |
| Encryption | 128-bit AES encryption (via Group button pairing) |
| Energy Saving | Intelligent energy-saving mode reduces power consumption when idle |
| Operating Systems (Utility) | Windows XP/Vista/7/8 |
| System Requirements | Intel Pentium III 1.0 GHz, 256 MB RAM, 100 MB disk space, Ethernet port |
| Management | Utility software for network management, diagnostics, and configuration |
| Safety Compliance | FCC Part 15 Class B, R&TTE Directive 1999/5/EC, WEEE |
| Applications | HD video streaming, online gaming, IPTV, VoIP, broadband sharing |
| Installation | Plug and play; utility software optional for advanced features |
Frequently Asked Questions - HP-6002K Edimax
User questions about HP-6002K Edimax
0 question about this device. Answer the ones you know or ask your own.
Ask a new question about this device
Download the instructions for your Power adapter in PDF format for free! Find your manual HP-6002K - Edimax and take your electronic device back in hand. On this page are published all the documents necessary for the use of your device. HP-6002K by Edimax.
USER MANUAL HP-6002K Edimax
No.3, Wu-Chuan 3rd Road, Wu-Gu, New Taipei City 24891, Taiwan
Email: support@edimax.com.tw
Edimax Technology Europe B.V.
Copyright © Edimax Technology Co., Ltd. all rights reserved. No part of this publicaon may be reproduced, transmied, transcribed, stored in a retrieval system, or translated into any language or computer language, in any form or by any means, electronic, mechanical, magnec, opcal, chemical, manual or otherwise, without the prior written permission from Edimax Technology Co., Ltd.
Edimax Technology Co., Ltd. makes no representaons or warranes, either expressed or implied, with respect to the contents hereof and specifically disclaims any warranes, merchantability, or tness for any parcular purpose. Any soware described in this manual is sold or licensed as is. Should the programs prove defecve following their purchase, the buyer (and not this company, its distributor, or its dealer) assumes the enre cost of all necessary servicing, repair, and any incidental or consequential damages resulting from any defect in the soware. Edimax Technology Co., Ltd. reserves the right to revise this publicaon and to make changes from me to me in the contents hereof without the obligaon to nofy any person of such revision or changes.
The product you have purchased and the setup screen may appear slightly dierent from those shown in this QIG. For more informaon about this product, please refer to the user manual on the CD-ROM. The soware and specicaons are subject to change without noce. Please visit our website www.edimax.com for updates. All brand and product names menoned in this manual are trademarks and/or registered trademarks of their respective holders.
Edimax Technology Co., Ltd.
Add: No. 3, Wu-Chuan 3rd Rd., Wu-Ku Industrial Park, New Taipei City, Taiwan Tel: +886-2-77396888
Chapter 1: Introducon ....3
1.1 Product Features....3
1.2 Applicaon ....3
1.3 Compatibility....4
1.4 System Requirements .... 4
Chapter 2: Interfaces ....5
2.1 LEDs....5
2.2 Buon 6
2.3 Gigabit Ethernet Port 6
Chapter 3:Ulity Soware Installaon....7
3.1 Win 8....7
3.2 Win XP/Vista / 7....14
Chapter 4: Using the Utility Soware....20
4.1 Main Tab 20
4.2 Diagnoscs Tab 21
4.3 About Tab....22
Chapter 5: Group Buon ....23
5.1 Forming a HomePlug AV Logical Network....23
5.2 Joining a Network 24
5.3 Leaving a Network & Joining another Network....25
Chapter 6: Troubleshoong....26
Chapter 1: Introduction
1.1 Product Features
- High-speed data transfer rate of up to 600Mbps, ideal for bandwidth-intensive HD video or 3D video streaming and online gaming
- Features energy saving mode to reduce power consumption
- Up to 300-meter range over a home's electrical circuit for better performance through walls or across oors
- Built-in QoS assures the quality of bandwidth sensitive applicaons such as voice, video and online games
• Supports IGMP managed mulcast IP transmission, optimizing IPTV streaming
• Compatible with all AV500 & AV200 Powerline adapters (HomePlug AV)
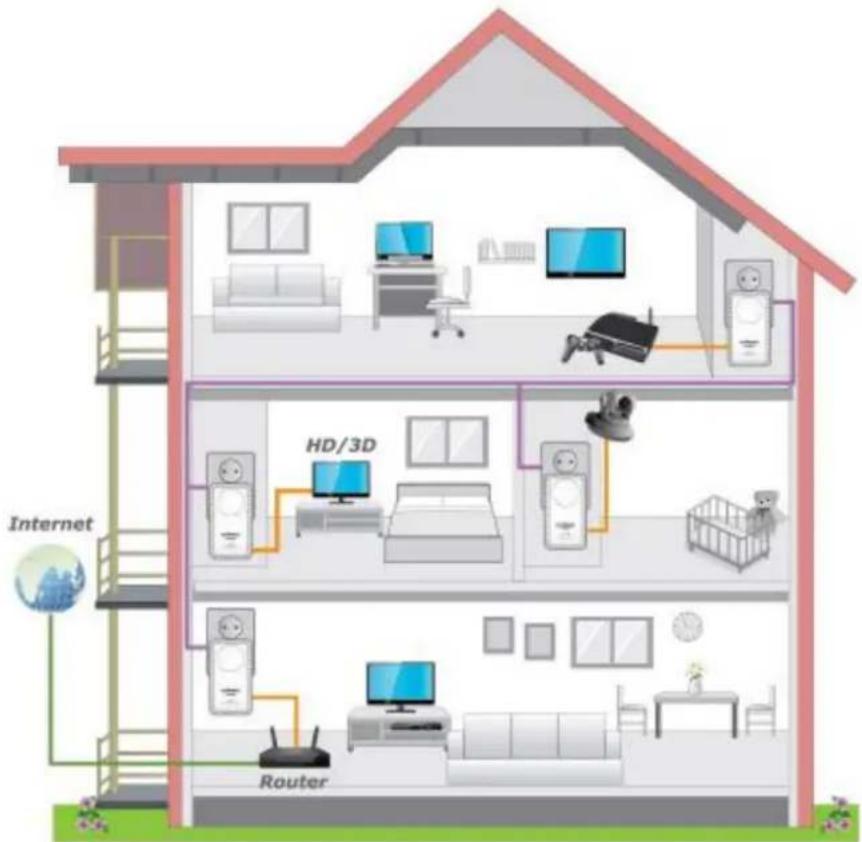
1.2 Application
● High-denion (HD) and standard-denion (SD) video distribuon
● Broadband Internet sharing
- Internet Protocol Television (IPTV) and Voice over Internet Protocol (VoIP) applicaons
1.3 Compatibility
AV600 powerline devices (HomePlug AV standard) are incompatible and cannot be used with 14Mbps and 85Mbps powerline devices (HomePlug 1.0 and 1.1 standards).
1.4 System Requirements
| Operang System | Ulity supports Windows XP/Vista/7/8 |
| CPU | Intel Penum III 1.0GHz (or above) |
| RAM | 256MB (or above) |
| Free Disk Space | 100MB (or above) |
| Network Interface | Ethernet port (100Mbps or above) and an Ethernet cable |
Chapter 2: Interfaces

2.1 LEDs
| LED | Status | Descripon |
| [70YY]LAN | Green | LAN port connected |
| Blinking | LAN acvity (transferring data) | |
| O | LAN port not connected | |
| [2WDW]PLC | Green | The green indicator turns on and the green indicator turns blinks slowly when the device is detectcng a powerline link.The green indicator turns on and the green indicator turns blinks quickly to indicate data is being transferred over the powerline link. |
| O | No other PLC device detected | |
 PWR PWR | Green | Powered on |
| O | Powered o |
2.2 Button
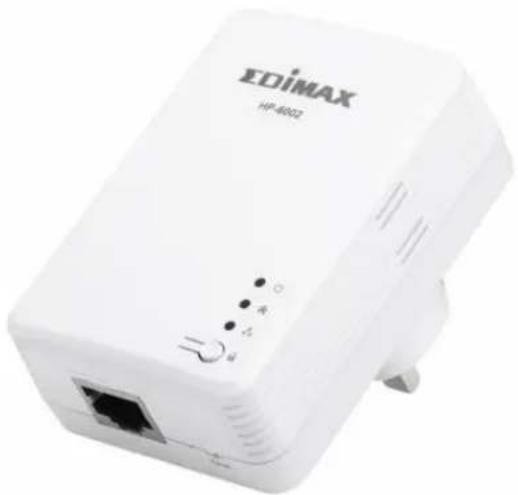
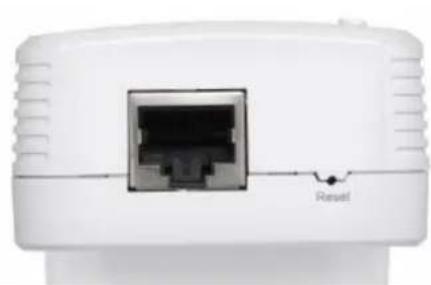
| Interface | Descripon |
| Ethernet Port | This is a Gigabit Ethernet port for connecng to a computer or other devices with a network port. |
| Group | Creates an encrypted powerline network group automacally (press the buon for less than 3 seconds). |
| Leaves an encrypted powerline network group (press the buon for 8~12 seconds). | |
| Reset | Restores the powerline adapter to factory defaults (press the buon for 8~12 seconds). |
2.3 Gigabit Ethernet Port
You can connect the powerline adapter to a router, a computer, or any network device via this Gigabit Ethernet port.
Chapter 3: Utility Software Installation
3.1 Win 8
Step 1 Before installing the ulity soware, make sure that no other powerline ulity is installed on your computer. If any other ulity soware is installed, uninstall it and reboot the computer.
Step 2 Insert the CD into your CD-ROM drive. When the following EZmax Wizard appears, select your model.

Step 3 Then click "Setup Ulity".

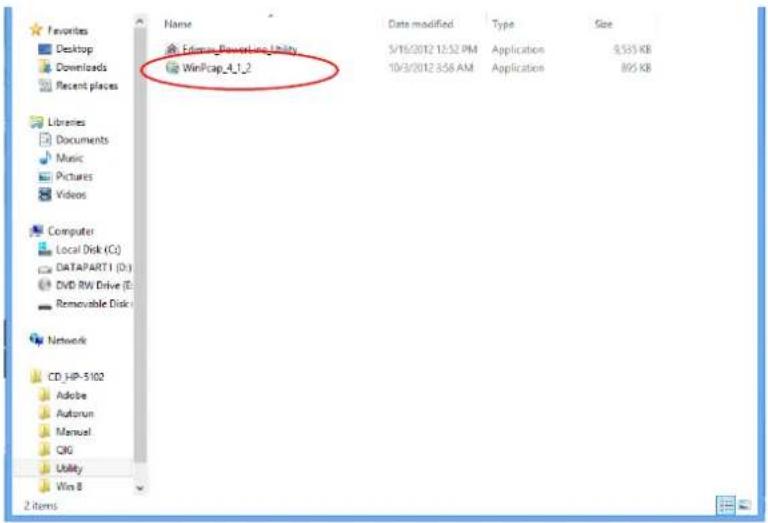
Step 4 Click right buon on WinPCap4.1.2 then click "Properes".

Step 5 Click Compatibility tab and check "Run this program in compatibility mode for:", then select Windows 7, then click "Apply".

Step 6 Then click "WinPcap_4_1_2". The wizard will guide you through the setup process.
Step 7 When the following WinPcap Compatibility Assistant appears, select Run the program without geng help.
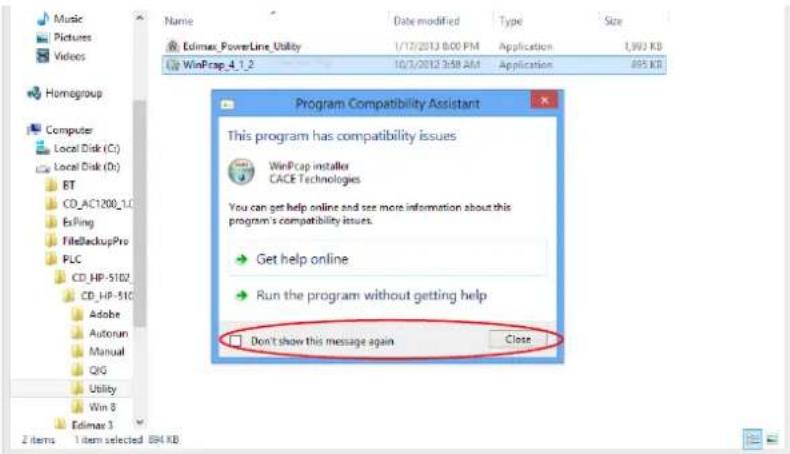
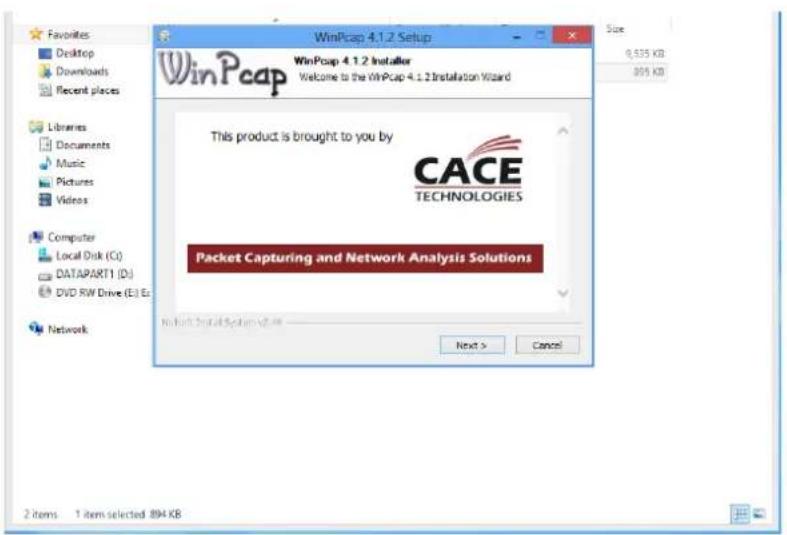
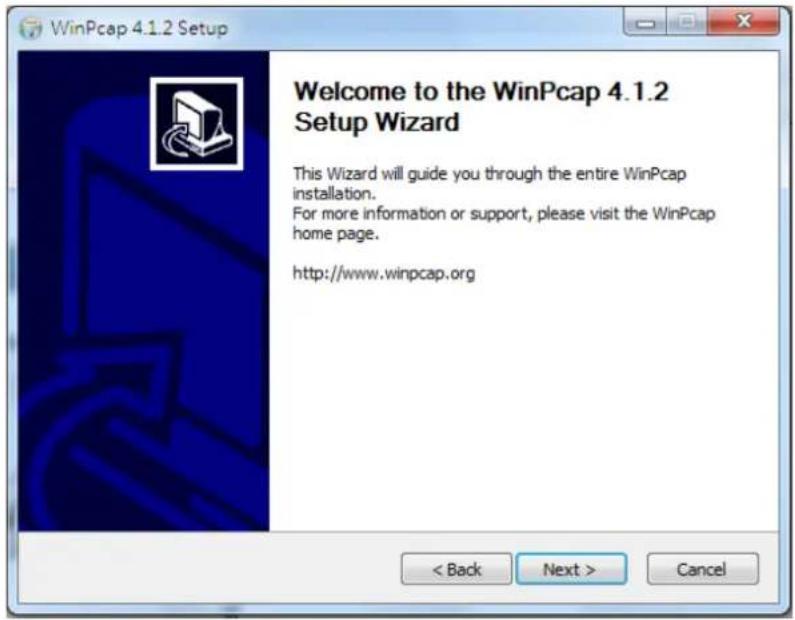
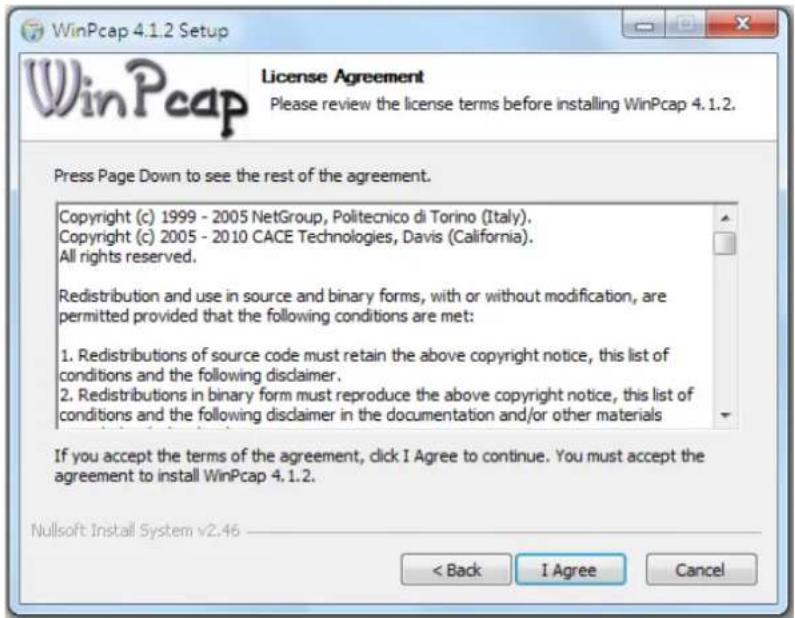
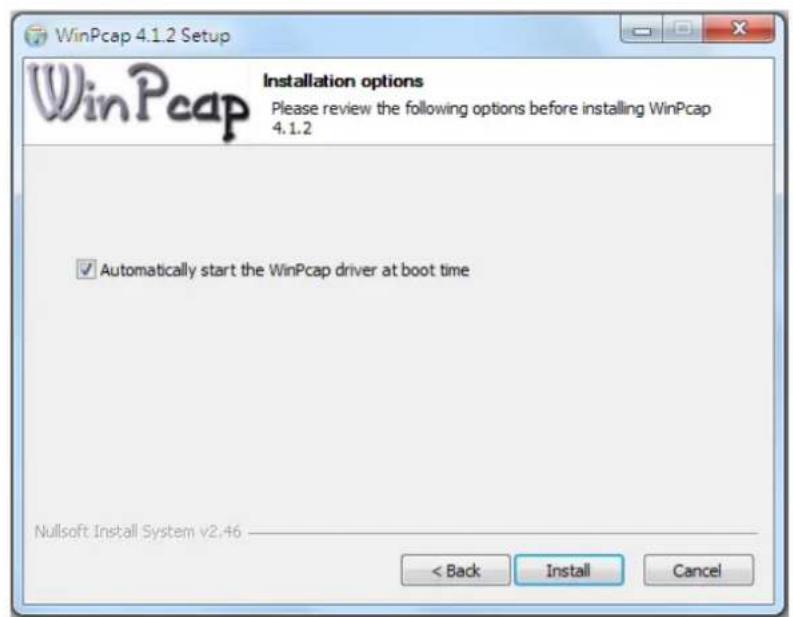
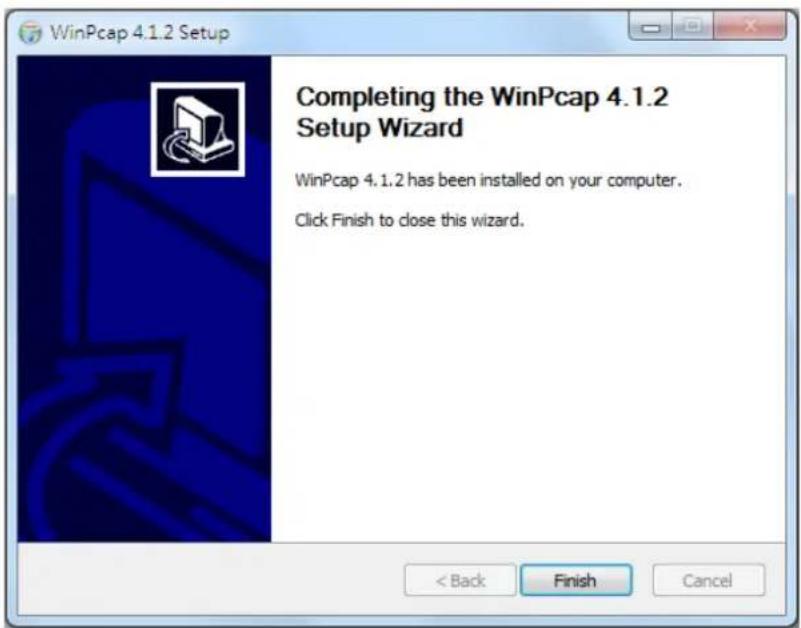
Step 8 Aer the installaon is complete, click "Finish".
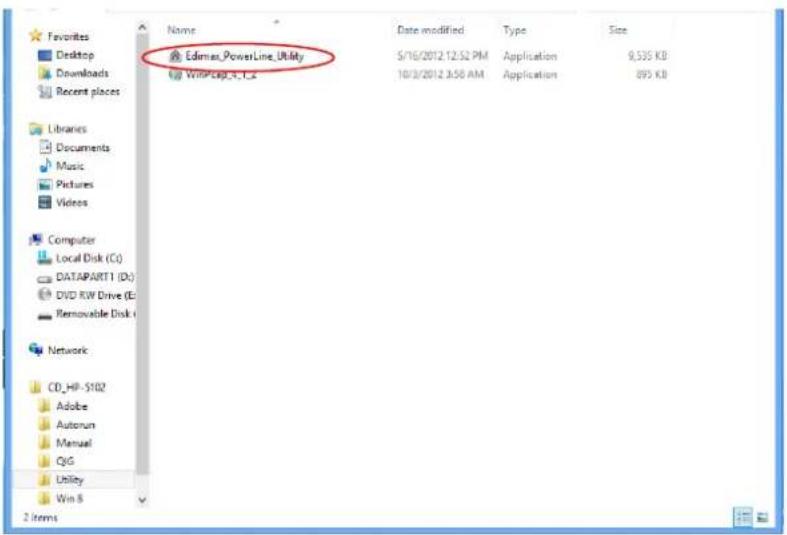
Step 9 Click the "Edimax PowerLine Ulity", the "PLC AV600 Ulity" appears, click "Next" to connue.
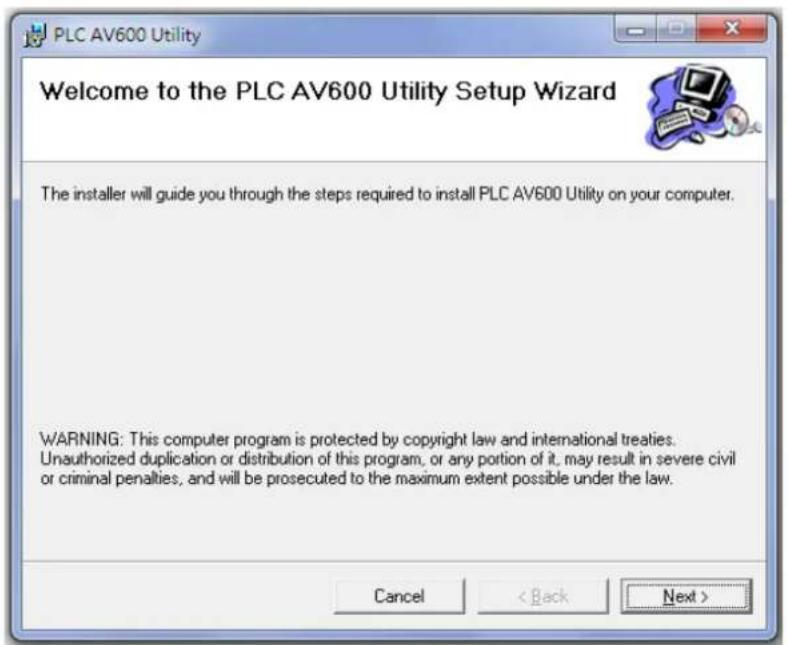
Step 10 Select where you want to install the ulity soware, and then click "Next".

Step 11 Aer the installaon is complete, click "Close".
Step 12 An icon will appear on your desktop. Click the icon to open the ulity soware.

Note: You can manage all the connected powerline adapters with the ulity soware. However, installing the ulity soware is oponal.
3.2 Win XP/Vista / 7
Step 1 Before installing the ulity soware, make sure that no other powerline ulity is installed on your computer. If any other ulity soware is installed, uninstall it and reboot the computer.
Step 2 Insert the CD into your CD-ROM drive. When the following EZmax Wizard appears, select your model.

Step 3 Then click "Setup Ulity".
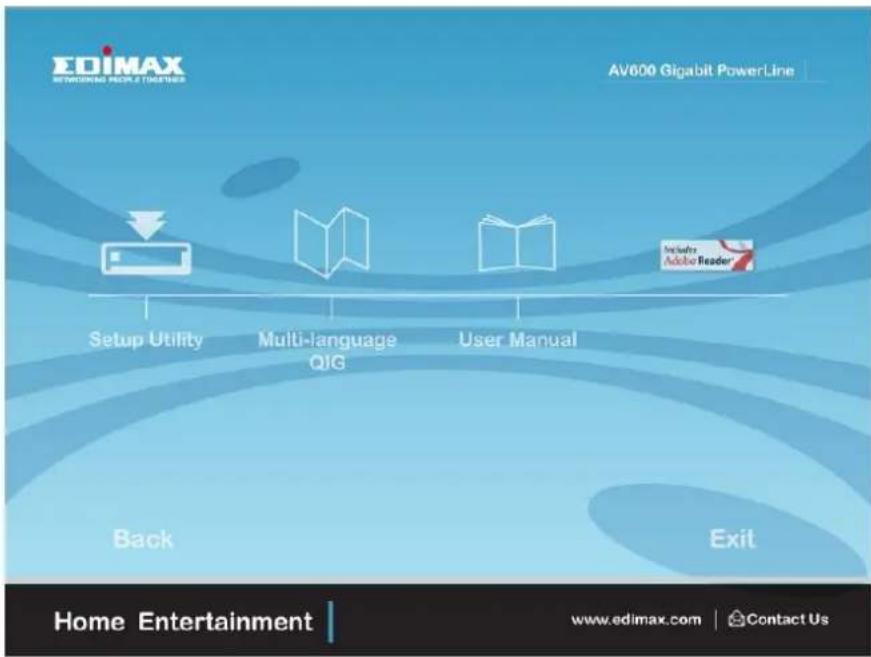
Step 4 If you have not installed WinPcap version 4.1.2 (or higher) on your computer before. The wizard will guide you through the setup process.


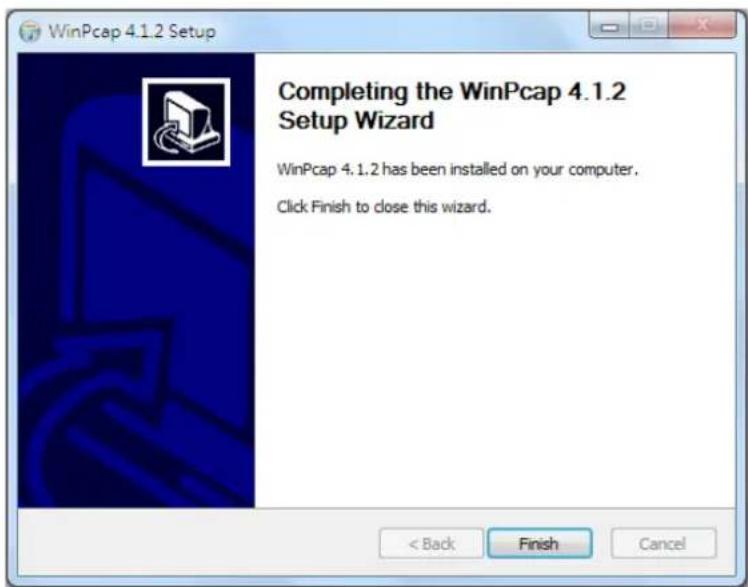
Step 5 When the "Edimax PowerLine Ulity" setup wizard appears, click "Next" to connue.

Step 6 In the "License Agreement" screen, please select "I Agree" and then click "Next" to connue.

Step 7 Select where you want to install the ulity soware, and then click "Next".

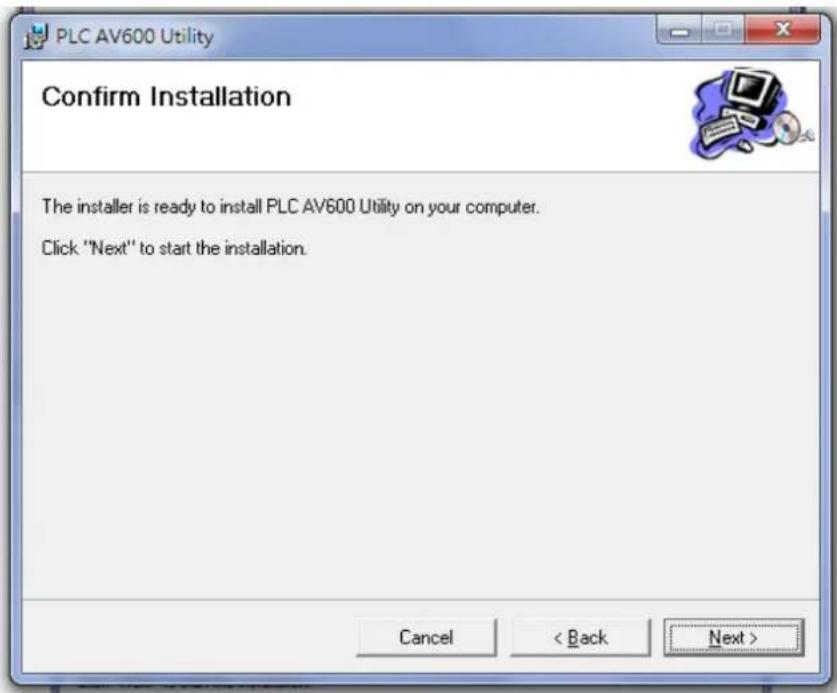
Step 8 If you conrm to install the ulity, click "Next".

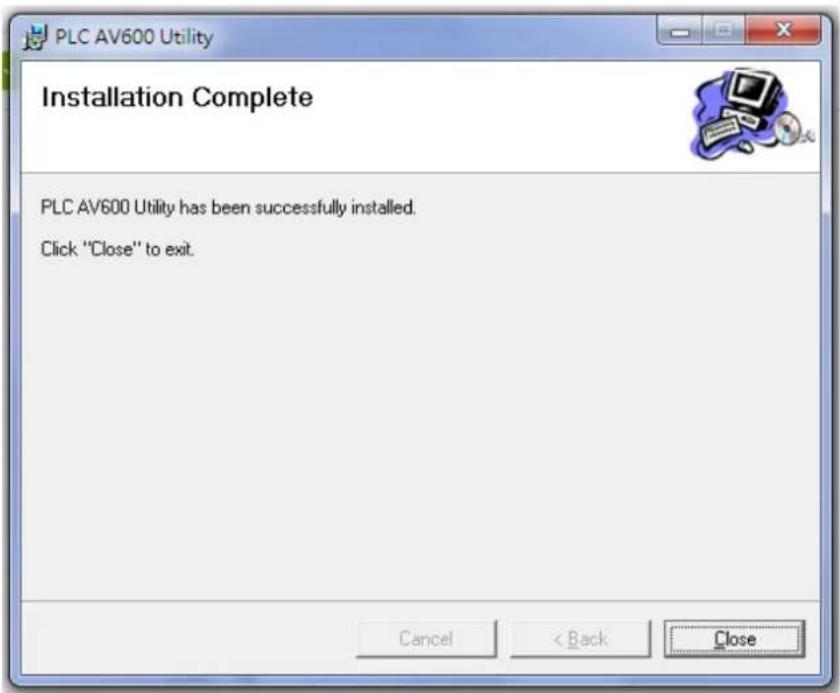
Step 9 Aer the installaon is complete, click "Close".

Step 10 An icon will appear on your desktop. Click the icon to open the ulity soware.

Note: You can manage all the connected powerline adapters with the utility soware. However, installing the utility soware is oponal.
Chapter 4: Using the Utility Software
4.1 Main Tab
The “Main” tab provides a list of powerline adapters connected to the network. The upper panel displays local powerline adapters. The lower panel displays remote powerline adapters in the network.

| Set Name | Select a device and click “Set Name” to rename the device. |
| Enter Password | By default, this column is blank. Select a device and click “Enter Password” to set up a password for the device. |
| Scan | Click “Scan” and the ulity soware will perform an immediate scan of other remote powerline adapters. By default, the ulity automacally scans every few seconds. |
4.2 Diagnostics Tab

The "Diagnoscs" tab displays the system informaon and history of all remote devices.
The upper panel displays technical data concerning the soware and hardware on the host computer and the lower panel displays the history of all remote devices.
4.3 About Tab
The “About” tab contains some basic informaon about the soware. You can also enable or disable the autoscan funcon under “Preferences”.

Chapter 5: Group Button
This secon demonstrates how to add or remove devices from a HomePlug AV network with the "Group" buon.
5.1 Forming a HomePlug AV Logical Network
When two devices with dierent group keys are connected to the same powerline and you want them to form a logical network, follow the following procedures:
Step 1 Press and hold the “Group” buon on adapter A for less than 3 seconds. The Power LED will start to blink.
Step 2 Within 120 seconds aer the Power LED starts blinking on adapter A, press the “Group” buon on adapter B for less than 3 seconds.
Step 3 Wait for the conneccon to be established.
![graph LR A["Computer"] --> B["Adapter A"] B --> C["Adapter B"] C --> D["Laptop"] A -->|Data Flow| B B -->|Data Flow| C C -->|Data Flow| D](/content/2026/05/1141969/images/caa38a07948e4fb1e3431dbb7f5228ac387f5ffcf582b4332a17f4643aa67be5.jpg)
5.2 Joining a Network
If you want to add a new powerline device to an existing network, follow the following procedures:
Step 1 Press the “Group” buon on an adapter in the exisng network (adapter A or B) for less than 3 seconds. The Power LED will start to blink.
Step 2 Within 120 seconds aer the Power LED starts blinking on adapter A or B, press the “Group” buon on the new adapter (adapter C) for at least 3 seconds.
Step 3 Wait for the conneccon to be established.
![graph TD subgraph Network ABC A["Computer"] -->|Data Bus| A1["Adapter A"] A1 -->|Data Bus| A2["Adapter A"] A2 -->|Data Bus| A3["Adapter A"] A3 -->|Data Bus| A4["Adapter A"] A4 -->|Data Bus| A5["Adapter A"] A5 -->|Data Bus| A6["Adapter A"] A6 -->|Data Bus| A7["Adapter A"] A7 -->|Data Bus| A8["Adapter…](/content/2026/05/1141969/images/c09eb74be2fec330e65c04ad5ff876a558fcdae46474c55dc099fe320d3ea6fc.jpg)
5.3 Leaving a Network & Joining another Network
If you want to remove a powerline device from an existing network and add it to another network, follow the following procedures:
Step 1 Press the "Group" buon on the adapter to be removed (adapter B) for at least 10 seconds.
Step 2 Wait for adapter B to be disconnected with adapter A & C.
Step 3 Press the “Group” buon on an adapter in another network (adapter D) for less than 3 seconds. The Power LED will start to blink.
Step 4 Within 120 seconds aer the Power LED starts blinking on adapter D, press the "Group" buon on adapter B for at least 3 seconds.
Step 5 Wait for the conneccon to be established.
![graph TD subgraph "Remove Adapter B form Network ABC" A["Computer"] --> B["Adapter A"] B --> C["Adapter C"] C --> D["Laptop"] D --> E["Adapter E"] E --> F["Computer"] end subgraph "Join Adapter B to Network DE" G["Adapter B"] --> H["Adapter D"] H --> I["Adapter E"] I --> J["Computer"] end style A fi…](/content/2026/05/1141969/images/7dc77bdebe23784a4ab7f8bc2e2a4f81af1b13d65333a0b2a7c16d7e83b6fcfe.jpg)
Chapter 6: Troubleshooting
If your powerline adapters have diculty communicang with each other, try the following procedures:
- Try power cycling the unit by unplugging it from the electric outlet for 10 seconds and plugging it in again.
- Use a pin to hold the reset buon down for 2 seconds on each unit you are trying to connect. The units will reset and aempt to establish a conncon using factory default sengs.
- Try plugging the powerline adapter into an adjacent electric outlet.
- Powerline adapters work better when plugged directly into an electric outlet. Using a power strip or surge protector may degrade network performance or completely block network signals.
- This powerline adapter should not be used on GFI protected electric outlets, as some outlets will iter out the powerline signal.
- This powerline adapter should not be used in areas with excessive heat.
- Certain orescent or incandescent lights are noise sources that can degrade performance.
- If your building has more than one circuit breaker box, your powerline adapters may not be able to establish a conncon across dierent circuit breaker boxes. In such cases, try establishing a conncon across dierent circuit breaker boxes by linking two powerline adapters together with an Ethernet cable.
Federal Communicaon Commission Interference Statement
This equipment has been tested and found to comply with the limits for a Class B digital device, pursuant to Part 15 of FCC Rules. These limits are designed to provide reasonable protecon against harmful interference in a residential installaon. This equipment generates, uses, and can radiate radio frequency energy and, if not installed and used in accordance with the instrucons, may cause harmful interference to radio communicaons. However, there is no guarantee that interference will not occur in a particular installaon. If this equipment does cause harmful interference to radio or television recepon, which can be determined by turning the equipment o and on, the user is encouraged to try to correct the interference by one or more of the following measures:
- Reorient or relocate the receiving antenna.
- Increase the separaon between the equipment and receiver.
- Connect the equipment into an outlet on a circuit dierent from that to which the receiver is connected.
- Consult the dealer or an experienced radio technician for help.
FCC Cauon
This device and its antenna must not be co-located or operang in conjuncon with any other antenna or transmier. This device complies with Part 15 of the FCC Rules. Operaon is subject to the following two conditions: (1) this device may not cause harmful interference, and (2) this device must accept any interference received, including interference that may cause undesired operaon. Any changes or modicaons not expressly approved by the party responsible for compliance could void the authority to operate equipment.
Federal Communicaons Commission (FCC) Radiaon Exposure Statement
This equipment complies with FCC radiaon exposure set forth for an uncontrolled environment. In order to avoid the possibility of exceeding the FCC radio frequency exposure limits, human proximity to the antenna shall not be less than 2.5cm (1 inch) during normal operaon.
Federal Communicaons Commission (FCC) RF Exposure Requirements
SAR compliance has been established in the laptop computer(s) conguraons with PCMCIA slot on the side near the center, as tested in the applicaon for cercaon, and can be used in laptop computer(s) with substanally similar physical dimensions, construcon, and electrical and RF characteristics. Use in other devices such as PDAs or lap pads is not authorized. This transmier is restricted for use with the specic antenna tested in the applicaon for cercaon. The antenna(s) used for this transmier must not be co-located or operang in conjuncon with any other antenna or transmier.
R&TTE Compliance Statement
This equipment complies with all the requirements of DIRECTIVE 1999/5/EC OF THE EUROPEAN PARLIAMENT AND THE COUNCIL of March 9, 1999 on radio equipment and telecommunicaon terminal equipment and the mutual recognition of their conformity (R&TTE). The R&TTE Directive repeals and replaces in the directive 98/13/EEC (Telecommunicaons Terminal Equipment and Satellite Earth Staon Equipment) As of April 8, 2000.
Safety
This equipment is designed with the utmost care for the safety of those who install and use it. However, special aenon must be paid to the dangers of electric shock and stac electricity when working with electrical equipment. All guidelines of this and of the computer manufacture must therefore be allowed at all mes to ensure the safe use of the equipment.
EU Countries Intended for Use
The ETSI version of this device is intended for home and oce use in Austria, Belgium, Bulgaria, Cyprus, Czech, Denmark, Estonia, Finland, France, Germany, Greece, Hungary, Ireland, Italy, Latvia, Lithuania, Luxembourg, Malta, Netherlands, Poland, Portugal, Romania, Slovakia, Slovenia, Spain, Sweden, Turkey, and United Kingdom. The ETSI version of this device is also authorized for use in EFTA member states: Iceland, Liechtenstein, Norway, and Switzerland.
EU Countries Not Intended for Use
None
EU Declaraon of Conformity
| English: | This equipment is in compliance with the essenal requirements and other relevant provisions of Direcve 2004/108/EC, 2009/125/EC. |
| Français: | Cet équipement est conforme aux exigences essenelles et autres disposions de la direcve 2004/108/EC, 2009/125/EC |
| Češna: | Toto zařízení je v souladu se základními požadavky a ostatními příslušnými ustanoveními směrnic 2004/108/EC, 2009/125/EC. |
| Polski: | Urządzenie jest zgodne z ogólnymi wymaganiami oraz szczególnymi warunkami określonymi Dyrektywą UE 2004/108/EC, 2009/125/EC. |
| Română: | Acest echipament este în conformitate cu cerințele esențiale și alte prevederi relevante ale Direcvei 2004/108/EC, 2009/125/EC. |
| Русский: | Это оборудование соответствует основным требованиям и положениям Директивы 2004/108/EC, 2009/125/EC. |
| Magyar: | Ez a berendezés megfelel az alapvető követelményeknek és más vonatkozó irányelveknek (2004/108/EC, 2009/125/EC) |
| Türkçe: | Bu cihaz 2004/108/EC, 2009/125/EC direktieri zorunlu istekler ve diğer hükümlerle ile uyumludur. |
| Українська: | Обладнання відповідає вимогам і умовам директиви 2004/108/EC, 2009/125/EC. |
| Slovenčina: | Toto zariadenie spĺňa základné požiadavky a d’alšie príslušné ustanovenia smerníc 2004/108/EC, 2009/125/EC. |
| Deutsch: | Dieses Gerät erfüllt die Voraussetzungen gemäß den Richtlinien 2004/108/EC, 2009/125/EC. |
| Español: | El presente equipo cumple los requisitos esenciales de la Direcva 2004/108/EC, 2009/125/EC. |
| Italiano: | Questo apparecchio è conforme ai requisi essenziali e alle altre disposizioni applicabili della Direva 2004/108/EC, 2009/125/EC. |
| Nederlands: | Dit apparaat voldoet aan de essenële eisen en andere van toepassing zijnde bepalingen van richtlijn 2004/108/EC, 2009/125/EC. |
| Português: | Este equipamento cumpre os requesitos essênciais da Direcva 2004/108/EC, 2009/125/EC. |
| Norsk: | Dee utstyret er i samsvar med de viktigste kravene og andre relevante regler i Direkv 2004/108/EC, 2009/125/EC. |
| Svenska: | Denna utrustning är i överensstämmelse med de väsentliga kraven och övriga relevanta bestämmelser i direkv 2004/108/EC, 2009/125/EC. |
| Dansk: | Dee udstyr er i overensstemmelse med de væ sentligste krav og andre relevante forordninger i direkv 2004/108/EC, 2009/125/EC. |
| Suomi: | Tämä laite täyää direkivien 2004/108/EC, 2009/125/EC oleelliset ja muut asiaankuuluvat määräykset. |
FOR USE IN











WEEE Directive & Product Disposal

At the end of its serviceable life, this product should not be treated as household or general waste. It should be handed over to the applicable collecon point for the recycling of electrical and electronic equipment, or returned to the supplier for disposal.
ΣDIMAX
NETWORKING PEOPLE TOGETHER

- EDIMAX TECHNOLOGY EUROPE B.V
- EDIMAX TECHNOLOGY CO., LTD
- CHAPTER 1: INTRODUCON ....3
- CHAPTER 2: INTERFACES ....5
- CHAPTER 3:ULITY SOWARE INSTALLAON....7
- CHAPTER 4: USING THE UTILITY SOWARE....20
- CHAPTER 5: GROUP BUON ....23
- CHAPTER 6: TROUBLESHOONG....26
- CHAPTER 1: INTRODUCTION
- 1.1 PRODUCT FEATURES
- 1.2 APPLICATION
- 1.3 COMPATIBILITY
- 1.4 SYSTEM REQUIREMENTS
- 2.2 BUTTON
- 2.3 GIGABIT ETHERNET PORT
- CHAPTER 3: UTILITY SOFTWARE INSTALLATION
- 3.1 WIN 8
- STEP 4 CLICK RIGHT BUON ON WINPCAP4.1.2 THEN CLICK "PROPERES
- STEP 5 CLICK COMPATIBILITY TAB AND CHECK "RUN THIS PROGRAM IN COMPATIBILITY MODE FOR:", THEN SELECT WINDOWS 7, THEN CLICK "APPLY
- STEP 6 THEN CLICK "WINPCAP_4_1_2". THE WIZARD WILL GUIDE YOU THROUGH THE SETUP PROCESS
- 3.2 WIN XP/VISTA / 7
- STEP 9 AER THE INSTALLAON IS COMPLETE, CLICK "CLOSE
- STEP 10 AN ICON WILL APPEAR ON YOUR DESKTOP. CLICK THE ICON TO OPEN THE ULITY SOWARE
- CHAPTER 4: USING THE UTILITY SOFTWARE
- 4.1 MAIN TAB
- 4.2 DIAGNOSTICS TAB
- 4.3 ABOUT TAB
- CHAPTER 5: GROUP BUTTON
- 5.1 FORMING A HOMEPLUG AV LOGICAL NETWORK
- 5.2 JOINING A NETWORK
- 5.3 LEAVING A NETWORK & JOINING ANOTHER NETWORK
- CHAPTER 6: TROUBLESHOOTING
- FEDERAL COMMUNICAON COMMISSION INTERFERENCE STATEMENT
- FCC CAUON
- FEDERAL COMMUNICAONS COMMISSION (FCC) RADIAON EXPOSURE STATEMENT
- FEDERAL COMMUNICAONS COMMISSION (FCC) RF EXPOSURE REQUIREMENTS
- R&TTE COMPLIANCE STATEMENT
- SAFETY
- EU COUNTRIES INTENDED FOR USE
- EU COUNTRIES NOT INTENDED FOR USE
- EU DECLARAON OF CONFORMITY
- WEEE DIRECTIVE & PRODUCT DISPOSAL
- ΣDIMAX
Brand : Edimax
Model : HP-6002K
Category : Power adapter