
Clearmountain’s Spaces - Audio software Apogee - Free user manual and instructions
Find the device manual for free Clearmountain’s Spaces Apogee in PDF.

| Product Type | Audio Software Plugin |
| Brand | Apogee |
| Model | Clearmountain’s Spaces |
| Category | Convolution Reverb |
| Platform Compatibility | macOS and Windows (64-bit) |
| Supported Plugin Formats | AAX, AU, VST3 |
| System Requirements (macOS) | macOS 10.12 or later, Intel or Apple Silicon |
| System Requirements (Windows) | Windows 7 or later, 64-bit |
| License Type | Single-user license (iLok account required) |
| Activation Method | iLok or machine authorization |
| Main Function | Convolution reverb using spaces captured by Bob Clearmountain |
| Adjustable Parameters | Decay, Predelay, Filter, Mix, and more |
| Installation | Download installer from Apogee website and run |
| Updates | Free updates within same major version |
| Support Resources | Online manual, FAQ, and customer support |
Frequently Asked Questions - Clearmountain’s Spaces Apogee
User questions about Clearmountain’s Spaces Apogee
0 question about this device. Answer the ones you know or ask your own.
Ask a new question about this device
Download the instructions for your Audio software in PDF format for free! Find your manual Clearmountain’s Spaces - Apogee and take your electronic device back in hand. On this page are published all the documents necessary for the use of your device. Clearmountain’s Spaces by Apogee.
USER MANUAL Clearmountain’s Spaces Apogee
Clearmountain's SPACES™
User's Guide


Lead vox

APOGEE
Contents
Contents 2
Overview 3
Introduction 3
About Bob Clearmountain 3
Highlights 3
System Requirements 3
Getting Started 4
Plugin Tour 6
Primary View 6
Presets 10
Getting Started in Your DAW 12
Logic Pro 12
Ableton Live 10 12
Additional Information 12
Overview
Introduction
One of the most unique sonic building blocks from the Apogee Clearmountain's Domain plugin is now available as a separate plugin at a breakthrough price!
The Apogee Clearmountain's Spaces plugin reproduces Bob Clearmountain's personalized workflow for creating the distinctive, rich spaces where his mixes live. With the very same echo chamber profiles and processing he's used on countless hit records, Clearmountain's Spaces lets you envelope your tracks in unique and cohesive atmospheres that set your mixes apart.
About Bob Clearmountain
For decades, engineers, producers, and musicians have marveled at Bob Clearmountain's mixes. Recordings by iconic artists like David Bowie, Chic, Roxy Music, The Rolling Stones, Bruce Springsteen, Bryan Adams, INXS, and so many more are prime examples of how Bob's work elevated the role of "the mixer" to that of an essential creative partner in the process of making records. Bob's ability to build a soundscape and atmosphere, where voices and instruments effortlessly live in an intimate space but seamlessly blend together, set new standards for mixing. His passion to reveal the true character of the song, highlighting the emotion of the music, gets to the heart of what inspired the song to begin with.
Highlights
- Clearmountain's Custom Personalized Spaces:
- Apogee Studios - A short and warm ambience from Apogee's in-house recording studio and development lab!
Mix This! Chamber - A medium length, bright reverb from the physical echo chambers at Clearmountain's Mix This! studio in Los Angeles. -
Roscoe Chamber 1 - An extra long and rich reverb from a legendary studio's physical echo chamber, captured with AEA ribbon mics for a warm and rich sound.
-
Input De-esser, EQ and Pre-Delay
• Real Time Audio Visualizer - Flexible Plugin Window Resizing
- Clearmountain Expert Presets
System Requirements
• MacOS 10.12.6 or Windows 10 1709 or higher
- 8 GB RAM
- PACE iLok Account
• AAX Native, AU, VST or VST 3 Compatible Host Application
Getting Started
To authorize the Clearmountain's Spaces plugin, you need a Pace iLok account and the Pace Activation Code that comes with the purchase of the plugin. The Activation Code deposits an iLok license into your choice of three valid license locations - a physical iLok 2 or greater, your computer's hard drive or the iLok Cloud.
To get started, double-click on the ClearmoutainsSpaces Installer file and follow the installation instructions. Once completed, open your DAW. When the “Activation is required” dialog appears, follow on-screen directions as shown below.
At the “Activation is required” page, click Activate if you have an Activation Code. If you don’t have a code, click Try to activate with a 15-day Trial license.
If you clicked Activate, enter the Activation Code on this page:
Sign into (or create) your iLok account on this page:

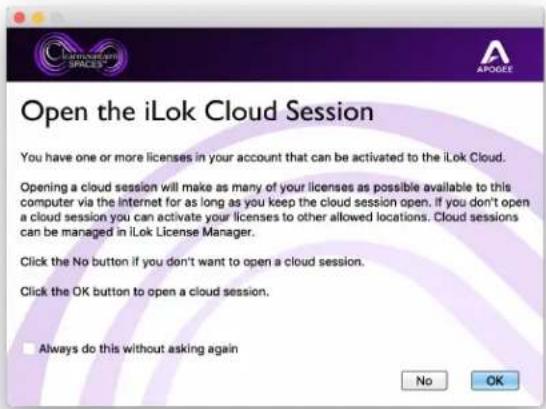
Clearmountain's Spaces supports activation to the iLok Cloud. If this is your preference, you can open an iLok Cloud Session from this page.
When activating to the iLok Cloud, you don't need a physical iLok but your computer will need a consistent connection to the internet.
Click NO unless you're sure you want to open an iCloud Session.
If you haven't opened a Cloud session, choose a valid license location on this page. If you want to activate to your iLok 2 (or greater), connect it now:
It's also possible to activate your license from the iLok License Manager app - open the app and choose Licenses > Redeem Activation Code.

Plugin Tour
Primary View
The Clearmountain's Spaces plugin offers high quality, flexible reverb plus Input EQ, De-essing and Pre-delay in an easy-to-use interface.
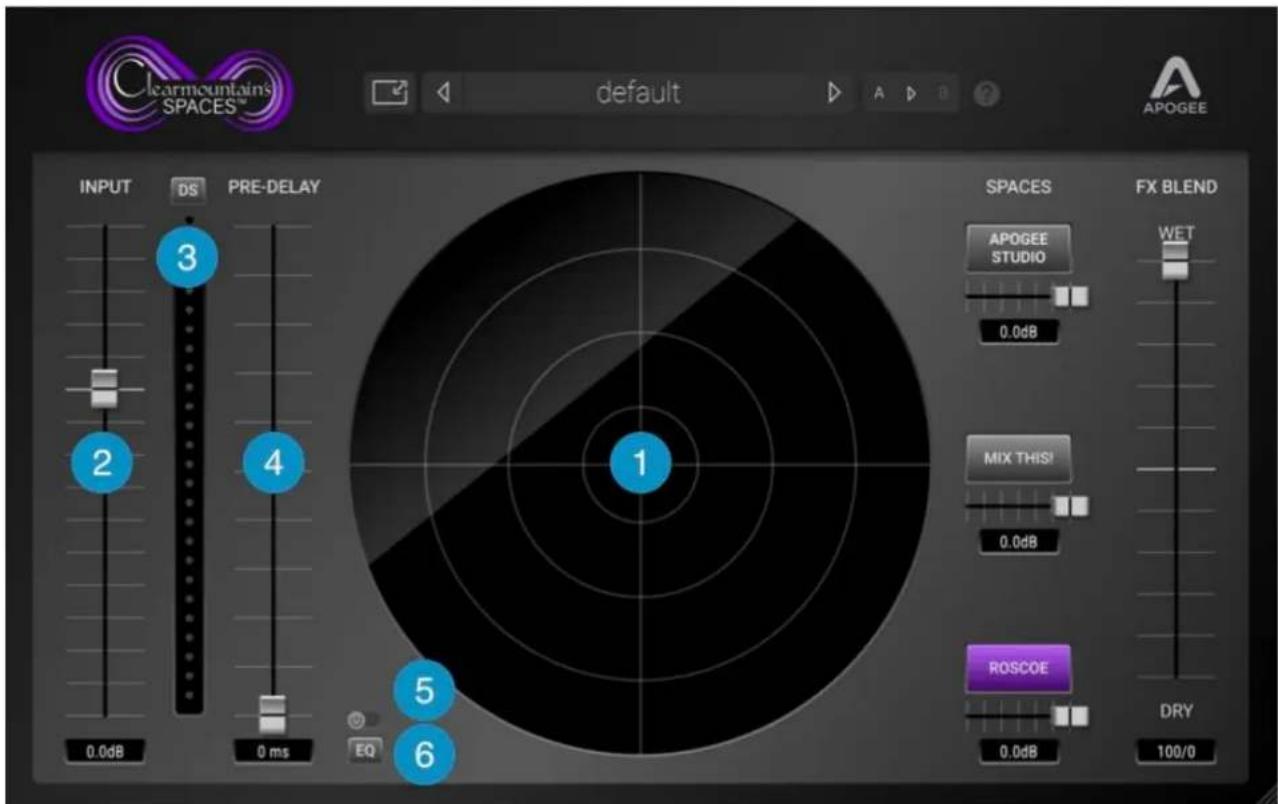
1 FX Visualizer - At the center of the Clearmountain's Spaces plugin is the FX Visualizer, a multi-component vectorscope that displays the stereo sound field of the plugin's Input and Reverb signals.
2 Input - Trim the plugin input from +10 to -20 dB.
3 DS - De-ess the Input signal before Reverb processing is applied.
De-essing is the process of reducing sibilance sounds (the "s" sounds in human speech) that can become overbearing when recording with modern techniques (close mic'ing, EQ, compression).
When adding reverb to vocals, you may want to de-ess the reverb send even more than the direct channel so the "s" sounds aren't too prominent in the reverb. The de-esser helps to "melt" the delay/reverb into the mix. This technique can also be applied to drums with too-prominent cymbals or acoustic guitars with too-prominent picking noise.
4 Pre-Delay - Add up to 200 milliseconds of pre-delay to the Input signal before Reverb processing is applied.
Adding a pre-delay before the reverb can help to separate the original sound from the processed sound, for a resulting ambience that remains up-front in the mix but surrounded by the space of the reverb. Add about 60-100 ms of pre-delay with the Apogee Studios space for that 50's slapback-in-a-room sound.
5 EQ In/Out - Engage the 3-band EQ before Reverb processing is applied.
6 EQ Show/Hide - Show the 3-band EQ waveform display and settings.
To create space in your mix, it can be helpful to EQ the reverb send more radically than the direct channel. For example, roll off the send's low end to avoid reverb "boom". Try boosting the delay send's mid-highs while filtering the high end for a sound that's present but not grating.

7 Low Filter (High Pass) - The Low filter is an 18dB/octave high pass filter with adjustable cutoff frequency. To adjust the frequency 1) click on the Low filter handle and drag it horizontally 2) hover the cursor over the handle, click on the Low Frequency value and type in a frequency value.
8
Mid Peak - The Mid Peak filter is a parametric peak filter with adjustable frequency, gain and Q (Bandwidth). To adjust the frequency, click on the Mid handle and drag it horizontally; to adjust the gain, click the handle and drag it vertically; to adjust the Q(Bandwidth), command-click on the handle and drag vertically. Like the Low and High Filters, settings may be entered by hovering your cursor over the Mid Peak handle, then typing values in the parameter display.
9
High Filter (Low Pass) -- The High filter is a 12dB/octave low pass filter with adjustable cutoff frequency. To adjust the frequency 1) click on the High filter handle and drag it horizontally 2) hover the cursor over the handle, click on the Low Frequency value and type in a frequency value.
10
Window Size - Set the plugin Window Size from 50% to 150%. Window Size may also be freely adjusted by clicking the lower right hand corner of the plugin window and dragging.
11
Preset Manager - Factory and User presets may be opened, saved and managed from the top toolbar. To open Factory and User presets, click the preset title, then select the desired preset from the drop down menu. To audition presets quickly, click the Previous or Next chevron.
Factory Presets, described on page 10, are installed with the plugin. Note that Factory Presets can't be overwritten - use Save As to store your Factory Preset customizations as your own User Presets.
To create your own User presets, first find a Factory preset that's close to your desired effect, or start from scratch with the Default Factory preset. To save your changes, click the preset title then choose Save As at the bottom of the drop down menu.
To save changes to your User presets, choose either Save or Save As.
User presets are stored by default in the following folders:
- Mac: Users > Yourhome > Library > Audio > Presets > Apogee > Clearmountain's Spaces.
- Windows: This PC > Documents > Apogee > Clearmountain's Spaces > Patches.
To store User presets in another location (for example, your DAW session folder), choose Save As and navigate to the desired folder. To open User presets from another folder, choose Open and navigate to the preset file, then click Open.
Note that User presets that aren't stored in the default location won't appear permanently in the plugin's preset drop down menu. When opened from another location, they appear temporarily until the DAW session is closed. To ensure that a User preset always appears in the preset drop down menu, re-save it to the default folder.
12
A > B - Two settings registers, A and B, offer the ability to compare settings options with the click of the mouse. Click A to make it the active register, then set parameters to your first option. Copy A to B by clicking the register arrow, then set parameters to your second option. Toggle between A and B to quickly compare the two settings options.
13 Help - Click this icon to see the following information:
- Toggle Tooltips on and off. To see Tooltips (short descriptions of plugin controls), hold the cursor over a control for 2-3 seconds.1
- Show Clearmountain's Spaces User's Guide
14 Spaces - Engage Spaces by clicking the desired Spaces button. Using the associated faders, create Composite Spaces by mixing and layering Spaces of different timbral characteristics and decay times for a result that's utterly personalized.
The convolution reverbs are driven by custom impulse responses - digital files that capture the acoustic signature of a physical space - captured by Clearmountain himself in the actual studio spaces he's employed for decades
- Apogee Studios - A short and warm ambience from Apogee's in-house recording studio and development lab!
- Mix This! Chamber - A medium length, bright reverb from the physical echo chambers at Clearmountain's Mix This! studio in Los Angeles.
- Roscoe Chamber - An extra long and rich reverb from a legendary studio's physical echo chamber, captured with AEA ribbon mics for a warmer, low mid-rich sound.
15 The MixThis! Chamber has an additional Input Config parameter when Spaces is instantiated as a stereo in > stereo out plugin.
- Stereo - stereo input is routed to the true stereo impulse response.
- Sum to Mono - stereo input is summed to mono, then routed to the stereo impulse response. Functionally equivalent to instantiating the plugin in mono in > stereo out.
- Reversed Stereo - stereo input is reversed, then routed to the stereo impulse response.
16 FX Blend - Set the blend between the FX mix and the plugin input.
- When using the plugin as an insert on the source material channel, start with the FX Blend around 40/60 and adjust to taste.
- When using the plugin on an Aux return (and using an Aux send on the source material channel), set FX Blend to 100/0, then use the Aux return fader to adjust the mix between the direct source material and the plugin effects.
Presets
The Clearmountain's Spaces Factory Presets were created by Bob himself, based on his decades of mixing experience.
Note that each Factory Preset is listed twice:
- Presets with the (c) suffix (channel) are used when Clearmountain's Spaces has been instantiated on the same channel as the source audio to be processed.
- Presets with the (s) suffix (send) are used when when Clearmountain's Spaces has been instantiated on a separate aux return, with a corresponding send on the source audio channel.
Big Bottom - Start here to add ambience to your drums. This is what you wish the room mics sounded like!
Hyde Park Concert - Inspired by the live Springsteen mix “London Calling - Live in Hyde Park, where the ambience is surprisingly dry (being an outdoor concert) but the PA mix ricochets off the surrounding buildings. Great for adding a live ambience to a track without making it too washy.
Monastery Vocals - This is the sound of distant chanters, just visible through the golden glow of candlelight. Note how the radical EQ creates a unique and evocative atmosphere.
Motown - This preset highlights the custom-designed physical echo chambers in Mix This! Studios in Los Angeles, inspired by the short and bright echo heard on classic Motown tracks. There's just enough pre-delay to separate the source from the effect to maintain presence.
Pop Ballad Vocal - a great example of a Composite Space, with a longer pre-delay and two Spaces layered for added richness and personality. The De-esser ensures that even sibilant vocals have a smooth, even reverb.
Sax in a Bathroom - Short and bright ambience with an accent on the high-mids.
Springsteen Piano Verb - a Composite Space created from all three Spaces blended together, plus a long pre-delay.
Start Me Up Gtr - A great example of the early use of actual spaces in a classic mix. In this case, the entire atmosphere of the track “Start Me Up” by the Rolling Stones is created by sending tracks to a speaker in the Ladies Bathroom of a legendary New York Studio, then recording the reverb with mics.
Getting Started in Your DAW
In most cases, instantiating the plugin is as simple as installing it, opening your DAW, and clicking on a plugin dropdown menu. Find below specific information for using Spaces in the most popular DAWs.
Logic Pro
If the plugin doesn't appear in the Channel Strip Audio FX menu after installation, it may be necessary to re-scan the plugin:
- Open Logic Preferences > Plugin Manager
- Find Clearmountain's Spaces, then verify that under Compatibility, the entry reads "Successfully Validated" and that the Use checkbox is checked.
- If the Entry reads "Failed Validation, click Reset and Rescan, then click "Done".
Ableton Live 10
In Ableton Live, it's necessary to set Ableton Preferences to use 3rd-party AU and VST2 plugins.
- Choose Live > Preferences to open the Preferences window, then click Plug-Ins.
- Click "Use Audio Units" and "Use VST2 Plug-in System Folders buttons "On".
Additional Information
For more information
• Apogee KnowledgeBase and FAQs
• Informational Videos
• Apogee Product Registration
• How to contact Apogee Technical Support
Please visit:
www.apogeedigital.com/support

- Clearmountain's SPACES™
- User's Guide
- Contents
- Contents 2
- Overview 3
- Getting Started 4
- Plugin Tour 6
- Getting Started in Your DAW 12
- Additional Information 12
- Overview
- Introduction
- About Bob Clearmountain
- Highlights
- System Requirements
- Getting Started
- Plugin Tour
- Primary View
- 8
- 9
- 10
- 11
- 12
- Presets
- Getting Started in Your DAW
- Logic Pro
- Ableton Live 10
- Additional Information
- For more information
Brand : Apogee
Model : Clearmountain’s Spaces
Category : Audio software