
IVFSM643X - Microwaves ILVE - Free user manual and instructions
Find the device manual for free IVFSM643X ILVE in PDF.


| Product Type | Built-in Microwave Oven |
| Brand | Ilve |
| Model | IVFSM643X |
| Capacity | 25 Liters |
| Dimensions (W x H x D) | 595 x 455 x 560 mm |
| Net Weight | 25 kg |
| Power Supply | 230 V ~ 50 Hz, 16 A |
| Microwave Power | 900 W |
| Grill Power | 1000 W |
| Convection Power | 1350 W |
| Functions | Microwave, Grill, Convection, Combination, Defrost, Auto Menus |
| Control Type | Electronic with Digital Display |
| Interior Light | Yes, LED |
| Door Opening | Drop-down (Pull-down) |
| Turntable | Glass turntable, diameter 315 mm |
| Child Lock | Yes |
| Cleaning | Stainless steel interior, easy-clean enamel |
| Safety Features | Overheat protection, door interlock, child lock |
| Spare Parts Availability | Glass turntable, roller ring, oven lamp, filter |
| Repairability Index | 8.0 / 10 |
| Energy Efficiency Class | A+ |
| Noise Level | 60 dB |
| Color / Finish | Stainless Steel |
| Warranty | 2 years manufacturer warranty |
Frequently Asked Questions - IVFSM643X ILVE
User questions about IVFSM643X ILVE
0 question about this device. Answer the ones you know or ask your own.
Ask a new question about this device
Download the instructions for your Microwaves in PDF format for free! Find your manual IVFSM643X - ILVE and take your electronic device back in hand. On this page are published all the documents necessary for the use of your device. IVFSM643X by ILVE.
USER MANUAL IVFSM643X ILVE
natural_image
Line drawing of a microwave oven with front panel and side door (no text or symbols)To avoid exposure to dangerous high voltage, DO NOT REMOVE THE SPLATTER SHIELD inside the oven cavity.
Before operating this oven, please read these instructions completely.
PRECAUTIONS TO AVOID POSSIBLE EXPOSURE TO EXCESSIVE MICROWAVE ENERGY
(a) Do not attempt to operate this oven with the door open since open-door operation can result in harmful exposure to microwave energy. It is important not to defeat or tamper with the safety interlocks.
(b) Do not place any object between the oven front face and the door or allow soil or cleaner residue to accumulate on sealing surfaces.
(c) WARNING : If the door or door seals are damaged, the oven must not be operated until it has been repaired by a competent person : (1) door (bent), (2) hinges and latches(broken or loosened), (3) door seals and sealing surfaces.
(d) WARNING : It is hazardous for anyone other than a competent person to carry out any service or repair operation that involves the removal of a cover which gives protection against exposure to microwave energy.
(e) WARNING : Liquids and other foods must not be heated in sealed containers since they are liable to explode.
(f) WARNING : This appliance can be used by children aged from 8 years and above and persons with reduced physical, sensory or mental capabilities or lack of experience and knowledge if they have been given supervision or instruction concerning use of the appliance in a safe way and understand the hazards involved. Children shall not play with the appliance. Cleaning and user maintenance shall not be made by children unless they are aged from 8 years and above and supervised.
TABLE OF CONTENTS
PRECAUTIONS TO AVOID POSSIBLE EXPOSURE TO EXCESSIVE MICROWAVE ENERGY 1
IMPORTANT SAFETY INSTRUCTIONS ....3
EARTHING INSTRUCTIONS ....5
INSTALLATION 5
SPECIFICATIONS 6
IMPORTANT 6
FEATURES DIAGRAM 7,8
COOKING IN TWO STAGE 12
KITCHEN TIMER MODE ....13
SPEEDY COOKING 14
CARE AND CLEANING....18
QUESTIONS AND ANSWERS 19
UTENSIL TEST 20
COOKING UTENSILS 20
USE YOUR MICROWAE OVEN SAFELY 21
MICROWAVING PRINCIPLES 22
HOW MICROWAVES COOK FOOD ....22
CONVERSION CHARTS 22
COOKING TECHNIQUES 23
DEFROSTING GUIDE 24
DEFROSTING CHART 24
COOKING & REHEATING CHART 25
VEGETABLE CHART 26
RECIPE 27
IMPORTANT SAFETY INSTRUCTIONS
READ CAREFULLY AND KEEP FOR FUTURE REFERENCE.
WARNING : To prevent fire, burns, electric shock and other warnings:
Listed below are, as with all appliances, certain rules to follow and safeguards to assure high performance from this oven:
- Do not use the oven for any reason other than food preparation, such as for drying clothes, paper, or any other nonfood items or for sterilizing purposes.
- Do not use the oven when empty, this could damage the oven.
- Do not use the oven cavity for any type of storage, such as papers, cookbook, cookware, etc.
- Do not operate the oven without the tray in place. Be sure it is properly sitting on the rotating base.
- Make sure you remove caps or lids prior to cooking when you cook food sealed in bottles.
- Do not put foreign material between the oven surface and door. It could result in excessive leakage of microwave energy.
- Do not use recycled paper products for cooking. They may contain impurities which could cause sparks and/or fires when used during cooking.
- Do not pop popcorn unless popped in a microwave approved popcorn popper or
unless it's commercially packaged and recommended especially for microwave ovens. Microwave popped corn produces a lower yield than conventional popping; there will be a number of unpopped kernels. Do not use oil unless specified by the manufacturer.
-
Do not cook any food surrounded by a membrane, such as egg yolks, potatoes, chicken livers, etc., without first piercing them several times with a fork.
-
Do not pop popcorn longer than the manufacturer's directions. (popping time is generally below 3 minutes). Longer cooking does not yield more popped corn, it can cause scorchings and fire. Also, the cooking tray can become too hot to handle or may break.
-
If smoke is emitted, switch off or unplug the appliance and keep the door closed in order to stifle any flames.
-
When heating food in plastic or paper containers, keep an eye on the oven due to the possibility of ignition.
-
The contents of feeding bottles and baby food jars shall be stirred or shaken and the temperature checked before consumption, in order to avoid burns.
- Always test the temperature of food or drink which has been heated in a microwave oven before you give it to somebody, especially to children or elderly people. This is important because things which have been heated in a microwave oven carry on getting hotter even though the microwave oven cooking has stopped.
- Eggs in their shell and whole hard-boiled eggs should not be heated in microwave ovens since they may explode, even after microwave heating has ended;
- Keep the waveguide cover clean at all times. Wipe the oven interior with a soft damp cloth after each use. If you leave grease or fat anywhere in the cavity it may overheat, smoke or even catch fire when next using the oven.
- Never heat oil or fat for deep frying as you cannot control the temperature and doing so may lead to overheating and fire.
- Liquids, such as water, coffee, or tea are able to be overheated beyond the boiling point without appearing to be boiling due to surface tension of the liquid. Visible bubbling or boiling when the container is removed from the microwave oven is not always present.
THIS COULD RESULT IN VERY HOT LIQUIDS SUDDENLY BOILING OVER WHEN A SPOON OR OTHER UTENSIL IS INSERTED INTO THE LIQUID.
To reduce the risk of injury to persons:
a) Do not overheat the liquid.
b) Stir the liquid both before and halfway through heating it
c) Do not use straight-sided containers with narrow necks.
d) After heating, allow the container to stand in the microwave oven for a short time before removing the container.
e) Use extreme care when inserting a spoon or other utensil into the container.
- This appliance is not intended for use by persons(including children) with reduced physical, sensory or mental capabilities, or lack of experience and knowledge, unless they have been given supervision or instruction concerning use of the appliance by a person responsible for their safety.
- Children should be supervised to ensure that they do not play with the appliance.
- Only use utensils that are suitable for use in microwave ovens.
- Microwave heating of beverages can result in delayed eruptive boiling, therefore care must be taken when handling the container.
SAVE THESE INSTRUCTIONS
EARTHING INSTRUCTIONS
This appliance must be earthed. In the event of an electrical short circuit, earthing reduces the risk of electric shock by providing an escape wire for the electric current. This appliance is equipped with a cord having a earthing wire with a earthing plug. The plug must be plugged into an outlet that is properly installed and earthed.
WARNING:
Improper use of the earthing plug can result in a risk of electric shock. Consult a qualified electrician or serviceman if the earthing instructions are not completely understood, or if doubt exists as to whether the appliance is properly earthed. If it is necessary to use an extension cord, use only a 3-wire extension cord that has a 3-blade earthing plug, and a 3-slot receptacle that will accept the plug on the appliance. The marked rating of the extension cord should be equal to or greater than the electrical rating of the appliance.
INSTALLATION
1. Ventilation
Do not block air vents. If they are blocked during operation, the oven may overheat and eventually cause a failure. For proper ventilation, allow above 3 inches of space between oven sides, rear and the minimum height of free space necessary above the top surface of the oven is 100mm.
2. Steady, flat location
This oven should be set on a steady, flat surface. For correct operation, the oven must have sufficient airflow. Do not block air vents as this may cause overheating. In a freestanding situation allow adequate ventilation around the microwave from any overhead, rear and side wall constructions. If combining the microwave with a trim kit for a 'built-in' situation, (where more than one side of the appliance is closed in) the specification and installation requirements are as per the trim kit instruction manual.
Note: Cabinet materials must be suitable to withstand temperatures up to 90°C.
3. Leave space behind and side
All air vents should be kept a clearance. If all vents are covered during operation, the oven may overheat and, eventually, oven failure.
4. Away from radio and TV sets
Poor television reception and radio interference may result if the oven is located close to a TV, Radio antenna, feeder and so on. Position the oven as far from them as possible.
5. Away from heating appliance and water taps
Keep the oven away from hot air, steam or Splash when choosing a place to position it, or the insulation might be adversely affected and breakdowns occur.
6. Power supply
- Check your locla power source. This oven requires a current of approximately 10 amperes, 240V 50Hz.
- Power supply cord is about 0.8 meters long.
- The voltage used must be the same as specified on this oven. Using a higher voltage may result in a fire or other accident causing oven damage. Using low voltage will cause slow cooking. We are not responsible for damage resulting from use of this oven with a voltage of ampere fuse other than those specified.
- If the supply cord is damaged, it must be replaced by the manufacturer, its service agent or a similarly qualified persons in order to avoid a hazard.
7. Examine the oven after unpacking for any damage such as:
A misaligned door, Broken door, A dent in cavity. If any of the above are visible, DO NOT INSTALL, and notify dealer immediately.
8. Do not operate the oven if it is colder than room temperature.
(This may occur during delivery in cold weather.) Allow the oven to become room temperature before operating.
SPECIFICATIONS
| POWER SUPPLY 240V~ / 50Hz, SINGLE PHASE WITH EARTHING | ||
| MICROWAVE OUT | POWER CONSUMPTION 1500 W | |
| OUTPUT POWER 1000 W | ||
| FREQUENCY 2450 MHz | ||
| OUTSIDE DIMENSIONS (W X H X D) 560 X 344 X 435 mm | ||
| CAVITY DIMENSIONS (W X H X D) 369 X 240 X 390 mm | ||
| NET WEIGHT APPROX. 18 KG | ||
| TIMER 99 min. 90sec. | ||
| POWER LEVELS 10 LEVELS | ||
* Specifications are subject to change without notice.
IMPORTANT
The wires in this mains lead fitted to this appliance are coloured in accordance with the following code.
Green-and-yellow : Earth
Blue : Neutral
Brown : Live
As the colours of the wires in the mains lead of this appliance may not correspond with the coloured markings identifying the terminals in your plug, proceed as follows: the wire which is coloured green-and-yellow must be connected to the terminal in the plug which is marked with the letter 'E', the earth symbol or coloured green-and-yellow. The wire which is coloured blue must be connected to the terminal which is marked with the letter 'N' or coloured black.
The wire which is coloured brown must be connected to the terminal which is marked with the letter 'L' or coloured red.
WARNING: This appliance must be earthed.
FEATURES DIAGRAM
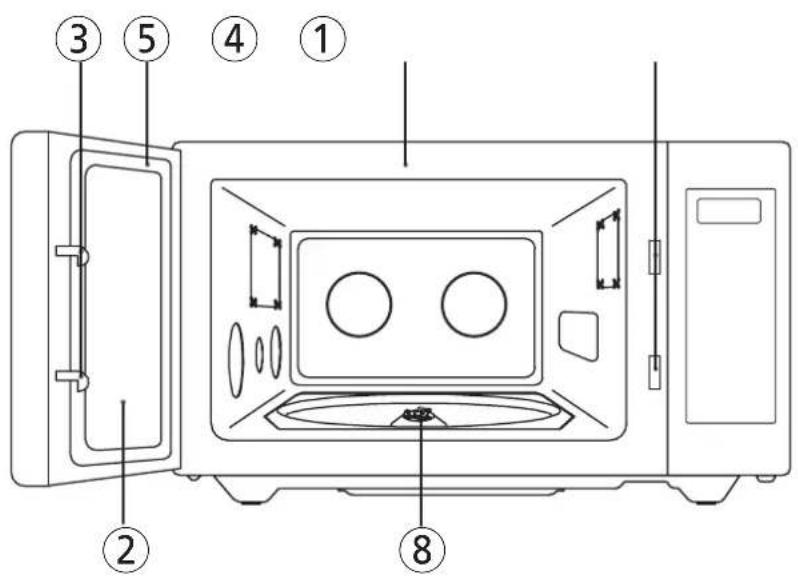
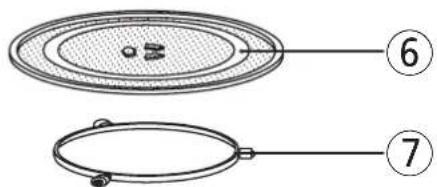
①Safety interlock system-Prevents the oven from operating while the door is opened. The oven will only operate with the door fully closed. When the door is open, the oven turns off and will only start again after the door is closed.
② Door screen-Allows viewing of food. The screen is transparent to light, but prevents microwaves escaping.
③Door latch-When the door is closed it will automatically shut off. If the door is opened while the oven is operating, the magnetron will automatically shut off.
④Oven cavity
⑤Door seal-The door seal surfaces prevent microwaves escaping from the oven cavity.
⑥Glass cooking tray-Made of special heat resistant glass. The tray can be easily removed for cleaning. Make sure it is correctly positioned (indentation) before operating. Place food in a suitable container (dish) on the tray.
⑦Roller guide-Supports the glass cooking tray.
⑧Coupler-This fits over the shaft in the center of the oven's cavity floor. This is to remain in the oven for all cooking.
FEATURES DIAGRAM (continued)
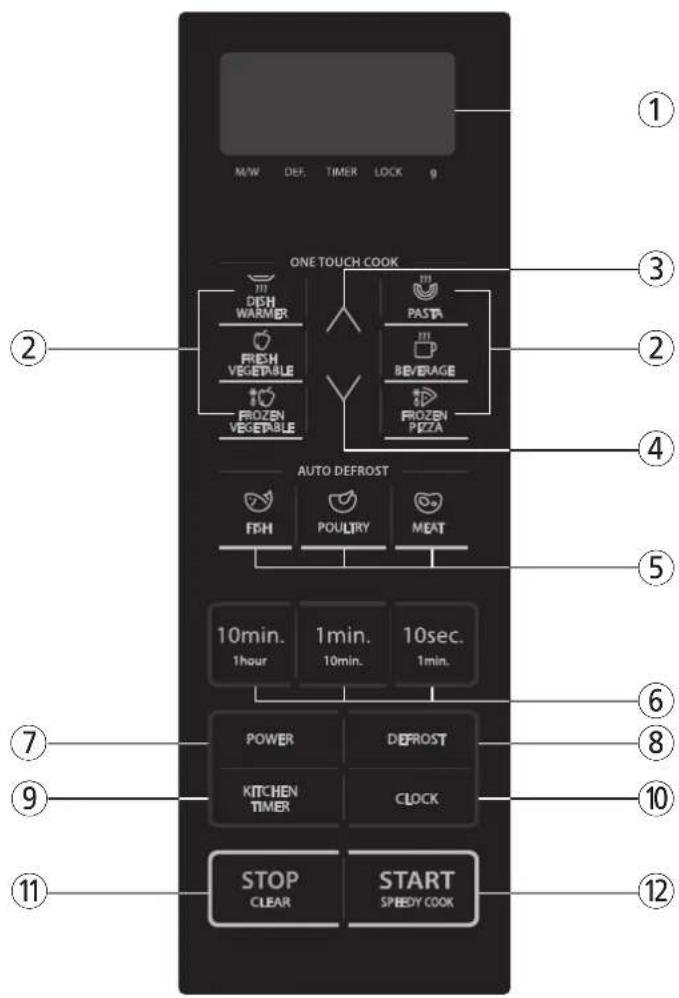
① Display - Cooking time, power level, indicators and present time are displayed.
② One Touch - Used to cook or reheat specific quantities of food.
③ MORE - Used to add time to cooking.
④ LESS - Used to remove time from cooking.
⑤ Auto Defrost - Used to defrost foods. (for weight)
⑥ Time Set pad - Used to set the cooking time and the present time.
⑦ Power - Used to set power level.
⑧ Defrost - Used to defrost foods. (for time)
⑨ Kitchen Timer - Used as a minute timer, to delay the start of cooking, or to set a holding time after cooking.
⑩Clock - Used to set clock.
⑪ Stop/Clear - Used to stop the oven operation or to delete the cooking data.
⑫ Start/Speedy Cook - Used to start the oven and also used to set a reheat time.
OPERATION PROCEDURE
This section includes useful information about oven operation.
- Plug power supply cord into a 240V 50Hz power outlet.
-
After placing the food in a suitable container, open the oven door and put it on the glass tray. The glass tray and roller guide must always be in place during cooking.
-
Shut the door. Make sure that it is firmly closed.
1 The oven light is on only when the microwave oven is operating.
2 The oven will automatically shut off at any time by opening the oven door.
3 Each time a button is pressed, a BEEP will sound to acknowledge the touch.
4 The oven automatically cooks on full power unless set to a lower power level.
5 The display will show “: 0” when the oven is plugged in.
6 Time clock returns to the present time when the cooking time ends.
6 When the Stop/Clear button is pressed during the oven operation, the oven stops cooking and all information retained. To erase all information (except the present time), press the Stop/Clear button once more. If the oven door is opened during the oven operation, all information is retained.
7 If the Start button is pressed and the oven does not operate, check the area between the door and door seal for obstructions and make sure the door is closed securely. The oven will not start cooking until the door is completely closed or the program has been reset.
Make sure the oven is properly installed and plugged into the electrical outlet.
WATTAGE OUTPUT CHART
- The power-level is set by pressing the Power button. The chart shows the display, the power level and the percentage of power.
| Press Power button Power level (Display) Approximate Percentage of Power | |
| once P-HI 100% | |
| twice P-90 90% | |
| 3 times P-80 80% | |
| 4 times P-70 70% | |
| 5 times P-60 60% | |
| 6 times P-50 50% | |
| 7 times P-40 40% | |
| 8 times P-30 30% | |
| 9 times P-20 20% | |
| 10 times P-10 10% | |
| 11 times P-00 0% | |
CONTROLS
SETTING THE CLOCK
When the oven is first plugged in, the display will flash “:0” and a tone will sound. If the AC power ever turns off, the display shows “:0” when the power comes back on.
CLOCK
-
Touch CLOCK pad. This is a 12 hour clock system.
-
Touch CLOCK pad once more. This is a 24hour clock system.
NOTE: This oven has multiple clock system. If you want 12 hour clock system, omit this step.
-
Enter the correct time of day by touching the numbers in sequence.
-
Touch CLOCK pad.
CLOCK
The display stops blinking, and the colon start blinking. If you selected 12 hour clock system, this digital clock allows you to set from 1:00 to 12:59. If you selected 24 hour clock system, this digital clock allows you to set from 0:00 to 23:59.
- Touch STOP/CLEAR pad.
NOTE: If you attempt to enter an incorrect time, the time will not be set and a error signal tone will sound. Touch the CLOCK pad and re-enter the time.
TIME DEFROSTING
When TIME DEFROST is selected, the automatic cycle divides the defrosting time into periods of alternating defrost and stand times by cycling on and off.
DEFROST
- Touch DEFROST pad.
The DEFROST indicator lights and " : 0" is displayed.
- Touch number pads for the desired defrosting time.
The display will show the numbers you pressed in the order you touched.
- Touch START pad.
NOTE: Your oven can be programmed for 99 minutes 90 seconds.(99:90)
When you touch START pad, the DEFROST indicator starts blinking to show the oven is in the DEFROST mode. The display counts down the time to show you how much defrosting time is left in the DEFROST mode. The oven beeps during the defrosting cycle to signal that the food needs to be turned or rearranged. When the defrosting time ends, you will hear 3 beeps.
WEIGHT DEFROSTING
WEIGHT DEFROSTING lets you easily defrost food by eliminating guesswork in determining defrosting time. Follow the steps below for easy defrosting.
| MEAT | 1. Touch MEAT pad. | The DEFROST & g indicator light and "500" is displayed. |
| 2. Select desired defrosting weight. | The display will show what you touched. | |
| 3. Touch START pad. | MEAT DEFROSTING begins. | |
| POULTRY | 1. Touch POULTRY pad. | The DEFROST & g indicator light and "800" is displayed. |
| 2. Select desired defrosting weight. | The display will show what you touched. | |
| 3. Touch START pad. | POULTRY DEFROSTING begins. | |
| FISH | 1. Touch FISH pad. | The DEFROST & g indicator light and "300" is displayed. |
| 2. Select desired defrosting weight. | The display will show what you touched. | |
| 3. Touch START pad. | FISH DEFROSTING begins. | |
* WEIGHT DEFROST CHART
| Touch pad MEAT POULTRY FISH | ||
| once 500 g 800 g 300 g | ||
| twice 800 g 1000 g 500 g | ||
| 3 times 1000 g 1200 g 800 g | ||
| 4 times 1200 g 1500 g 1000 g |
The defrosting time is automatically determined by the weight selected.
The g indicator goes off and the DEFROST indicator blinks and the defrosting time counts down in the display window. The oven beeps during the defrosting cycle to signal that the food needs to be turned or rearranged. When the defrosting time ends, you will hear 3 beeps.
COOKING IN ONE STAGE
| POWER | 1. Touch POWER pad. (Select desired power level.) | The M/W indicator lights. The display will show what you touched. |
| NOTE: If steps 1nd 2 are omitted, the oven will cook at full power. | ||
| 2. Touch the number pads for the cooking time. | This example shows power level 5. The display will show the numbers you pressed in the order you touched. | |
| NOTE: Your oven can be programmed for 99 minutes 90 seconds. (99:90) | ||
| 3. Touch START pad. | ||
When you touch START pad, the M/W indicator starts blinking to show the oven is cooking. The display counts down the time to show how much cooking time is left. When the cooking time ends, you will hear 3 beeps.
NOTE: Using lower power levels increases the cooking time which is recommended for foods such as cheese, milk and slow cooking of meats.
COOKING IN TWO STAGES
| All recipes require frozen foods to be defrosted fully before cooking.This oven can be programmed to automatically defrost foods before cooking. | ||
| DEFROST | 1. Touch DEFROST pad. | The DEFROST indicator lights and “:0” is displayed and the lb indicator starts blinking. |
| 2. Touch number pads for the defrosting time you want. | The display will show the numbers you pressed in the order you touched. | |
| POWER x6 | 3. Touch POWER pad. (Select desired power level.) | The M/W indicator lights and “P-HI” is The display will show what you touched.This example shows power level 5. |
| 4. Touch number pads for desired cooking time. | The display will show the number you pressed in the order you touched. | |
| 5. Touch START pad. | ||
| When you touch START pad, the DEFROST and M/W indicators come on to confirm the power levels selected. The DEFROST indicator starts blinking to show you that the oven is in DEFROST mode.The display counts down the time remaining in DEFROST mode.When the oven beeps, turn over, break apart and/or redistribute the food. At the end of DEFROST mode, the oven will beep and start M/W cook. The DEFROST indicator goes off and the M/W indicator starts blinking.The display counts down the time remaining in M/W cook. When M/W cook ends, you will hear 3 beeps. | ||
KITCHEN TIMER MODE
Timer operates as a minute timer, can be set to delay cooking and used as a hold setting after cooking. However delay cooking can not be programmed for defrost. Timer operates without microwave energy.
HOW TO USE AS A MINUTE TIMER
KITCHEN TIMER
- Touch KITCHEN TIMER pad.
The KITCHEN TIMER indicator lights and “: 0” is displayed.
- Press the amount of time you want to count down.
The display will show the numbers you pressed in the order you touched.
- Touch START pad.
The display counts down the time remaining in KITCHEN TIMER mode. When KITCHEN TIMER mode ends, you will hear 3 beeps.
HOW TO USE TO DELAY THE START OF COOKING
KITCHEN TIMER
- Touch KITCHEN TIMER pad.
The KITCHEN TIMER indicator lights and " : 0 " is displayed.
- Press the amount of time you want to delay time.
The display will show the numbers you pressed in the order you touched.
- Program the desired power level and cooking time for food to be cooked.
The kitchen timer will begin counting down to zero and cooking will then begin.
- Touch START pad.
HOW TO USE TO SET A HOLDING TIME
KITCHEN TIMER
- Program the desired defrosting time.
The KITCHEN TIMER indicator lights and " : 0 " is displayed.
- Touch KITCHEN TIMER pad.
The display will show the numbers you pressed in the order you touched.
- Press the amount of time you want the oven to hold.
Defrosting will start. After defrosting, stand time will count down.
NOTE: Your oven can be programmed for 99 minutes 90 seconds. (99:90)
- Touch START pad.
SPEEDY COOK
SPEEDY COOK allows you to reheat for 30 seconds at 100% (full power) by simply touching the SPEEDY COOK pad.
By repeatedly touching the SPEEDY COOK pad, you can also extend reheating time to 5 minutes by 30 second increments.
SPEEDY COOK
- Touch SPEEDY COOK pad.
When you touch SPEEDY COOK, ":30" is displayed.
After 1.5 seconds, the oven starts reheating.
ONE TOUCH COOKING
One touch cook allows you to cook or reheat many of your favorite foods by touching just one pad. To increase quantity, touch chosen pad until number in display is same as desired quantity to cook.
PASTA
- Touch PASTA pad once for 1 serving or twice for 2 serving.
When you touch PASTA pad once, "1" is displayed.
After the 1.5 seconds, the display is changed into cooking time and the oven starts cooking.
WARNING - PLEASE NOTE
As ONE TOUCH cooking functions preset times are approximate, cooking times may vary due to such factors as cup/container size, food/beverage quantity and food/beverage type. Always pay close attention when using this function to prevent overcooking.
\* PASTA \*
• 1 serving : Touch PASTA once.
• 2 serving : Touch PASTA twice within 1.5 seconds.
NOTE: 1. Place pasta into a deep casserole and double quantity of water.
- Cover with lid or plastic wrap. After cooking, stir.
- If possible, let stand 3 to 5 minutes or until liquid has been absorbed.
ONE TOUCH COOKING (CONTINUED)
FROZEN PIZZA
- Follow package directions for preparation model.
- Touch FROZEN PIZZA pad once for 200g pizza or twice for 400g pizza.
When you touch FROZEN PIZZA pad once, "200g" is displayed.
After 1.5 seconds, the display shows the cooking time and the oven starts cooking.
\* FROZEN PIZZA \*
• 200 g : Touch FROZEN PIZZA once.
- 400 g : Touch FROZEN PIZZA twice within 1.5 seconds.
NOTE: 1. Use only frozen pizza at a time.
- Use only frozen pizza made for microwave ovens.
- If the cheese of frozen pizza does not melt sufficiently, cook a few seconds longer.
- Some brands of frozen pizza may required more or less cooking time.
BEVERAGE
- Pour beverage in microwave mug. Place it on the turntable. Do not cover. Stir before serving.
- Touch BEVERAGE pad once for 1 cup, twice for 2 cups or three times for 3 cups.
When you touch BEVERAGE pad once, "1" is displayed.
After 1.5 seconds, the display changes into cooking time of quantity and the oven starts cooking.
\* BEVERAGE \* (200ml/cup)
- 1 cup(mug) : Touch BEVERAGE once.
- 2 cups(mugs) : Touch BEVERAGE twice within 1.5 seconds.
- 3 cups(mugs) : Touch BEVERAGE three times within 1.5 seconds.
DISH WARMER
- Touch DISH WARMER pad once for 350g or twice for 450g.
When you touch DISH WARMER pad once, "350" is displayed.
After 1.5 seconds, the display is changed into cooking time and the oven starts cooking.
\* DISH WARMER \*
• 350 g : Touch DISH WARMER once.
• 450 g : Touch DISH WARMER twice within 1.5 seconds.
NOTE: 1. Put food on microwave plate.
2. Cover with vented plastic wrap.
LESS, MORE
To alter one touch cooking or cooking time whilst oven is in operation, use LESS or MORE.(except for defrosting) Press LESS/MORE to decrease/increase the one touch cooking time in multiples of 10 seconds.
The overall one touch cooking time can be increased to a maximum of 99 minutes 50 seconds.
Press LESS/MORE to decrease/increase the cooking time in multiples of 1 minute.
The overall cooking time can be increased to a maximum of 99 minutes.
CHILD SAFETY LOCK
The safety lock prevents unwanted oven operation such as by small children.
To set, press and hold STOP/CLEAR for 3 seconds, LOCK indicator lights.
To cancel, press and hold STOP/CLEAR for 3 seconds, LOCK indicator goes off.
-
Press STOP/CLEAR pad.
-
You can restart the oven by touching START pad.
- Touch STOP/CLEAR once more to erase all instructions.
-
You must enter in new instructions.
-
Open the door.
- You can restart the oven by closing the door and touching START.
NOTE: Oven stops operating when door is opened.
- Turn the oven off before cleaning.
- Keep the inside of the oven clean.
When food spatters or spilled liquids adhere to oven walls, wipe with a damp cloth.
Mild detergent may be used if the oven gets very dirty. The use of harsh detergent or abrasives is not recommended.
- The outside oven surface should be cleaned with soap and water, rinsed and dried with a soft cloth.
To prevent damage to the operating parts inside the oven, water should not be allowed to seep into the ventilation openings.
- If the Control Panel becomes wet, clean with a soft, dry cloth. Do not use harsh detergents or abrasives on Control Panel.
-
If steam accumulates inside or around the outside of the oven door, wipe with a soft cloth. This may occur when the microwave oven is operated under high humidity conditions and in no way indicates malfunction of the unit.
-
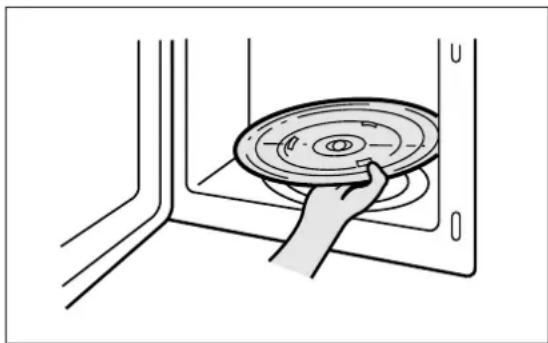
It is occasionally necessary to remove the glass tray for cleaning. Wash the tray in warm sudsy water or in a dishwasher.
natural_image
Illustration of a hand inserting a circular component into a wall-mounted fan (no text or symbols)- The roller guide and oven cavity floor should be cleaned regularly to avoid excessive noise.
Simply wipe the bottom surface of the oven with mild detergent water or window cleaner and dry. The roller guide may be washed in mild sudsy water.
ROLLER GUIDE
- The ROLLER GUIDE and oven floor should be cleaned frequently to prevent excessive noise.
- The ROLLER GUIDE MUST ALWAYS be used for cooking together with the Glass Tray.
GLAsS TRAY
- DO NOT operate the oven without the Glass Tray in place.
- DO NOT use any other Glass Tray with this oven.
- If Glass Tray is hot, ALLOW TO COOL before cleaning or placing it in water.
- DO NOT cook directly on the Glass Tray.
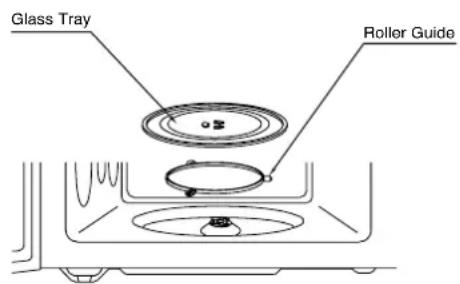
The oven should be cleaned regularly and any food deposits removed. Failure to maintain the oven in a clean condition could lead to deterioration of the surface that could adversely affect the life of the appliance and possibly result in a hazardous situation.
BEFORE YOU CALL FOR SERVICE
Refer to the following checklist, you may prevent an unnecessary service call.
* The oven doesn't work;
- Check that the power cord is securely plugged in.
- Check that the door is firmly closed.
- Check that the cooking time is set.
- Check for a blown circuit fuse or tripped main circuit breaker in your house.
* Sparking in the cavity;
- Check utensils. Metal containers or dishes with metal trim should not be used.
- Check that metal skewers or foil does not touch the interior walls.
If there is still a problem, contact the service agent.
A list of these agents is included in the oven.
CARE AND CLEANING
Although your oven is provided with safety features, it is important to observe the following:
- It is important not to defeat or tamper with safety interlocks.
- Do not place any object between the oven front face and the door or allow residue to accumulate on sealing surfaces. Wipe the sealing area frequently with a mild detergent, rinse and dry. Never use abrasive powders or pads.
- When opened, the door must not be subjected to strain, for example, a child hanging on an opened door or any load could cause the oven to fall forward to cause injury and also damage to the door. Do not operate the oven if it is damaged, until it has been repaired by a competent service technician. It is particularly important that the oven closes properly and that there is no damage to the:
i) Door(bent)
ii) Hinges and Hookes(broken or loosened)
iii) Door seals and sealing surfaces.
-
The oven should not be adjusted or repaired by anyone except a properly competent service technician.
-
The oven should be cleaned regularly and any food deposits removed;
-
Failure to maintain the oven in a clean condition could lead to deterioration of the surface that could adversely affect the life of the appliance and possibly result in a hazardous situation;
QUESTIONS AND ANSWERS
* Q : Why do eggs sometimes pop?
A : When baking or poaching eggs, the yolk may pop due to steam build-up inside the yolk membrane. To prevent this, simply pierce the yolk with a toothpick before cooking. Never cook eggs without piercing their shells.
* Q : Why this standing time recommended after the cooking operation has been completed?
A : Standing time is very important.
With microwave cooking, the heat is in the food, not in the oven. Many foods build up enough internal heat to allow the cooking process to continue, even after the food is removed from the oven. Standing time for joints of meat, large vegetables and cakes is to allow the inside to cook completely, without overcooking the outside.
* Q : Will the microwave oven be damaged if it operates while empty?
A: Yes. Never run it empty.
* Q : Why does my oven not always cook as fast as the microwave cooking guide says?
A : Check your cooking guide again, to make sure you've followed directions exactly ; and to see what might cause variations in cooking time. Cooking guide times and heat settings are suggestions, to help prevent over-cooking... the most common problem in getting used to a microwave oven. Variations in the size, shape and weights and dimensions could require longer cooking time. Use your own judgement along with the cooking guide suggestions to check whether the food has been properly cooked just as you would do with a conventional cooker.
* Q : Can I operate my microwave oven without the turntable or turn the turntable over to hold a large dish?
A : No. If you remove or turn over the turntable, you will get poor cooking results. Dishes used in your oven must fit on the turntable.
* Q : Is it normal for the turntable to turn in either direction?
A : Yes. The turntable rotates clockwise or counterclockwise, depending on the rotation of the motor when the cooking cycle begins.
* Q : Can I pop popcorn in my microwave oven? How do I get the best results?
A: Yes. Pop packaged microwave popcorn following manufacture's guidelines or use the preset POPCORN pad. Do not use regular paper bags. Use the "listening test" by stopping the oven as soon as the popping slows to a "pop" every 1 or 2 seconds. Do not repop unpopped kernels. Do not pop popcorn in glass cookware.
* Q : I accidentally ran my microwave oven without any food in it. Is it damaged?
A : Running the oven empty for a short time will not damage the oven. However, it is not recommended.
* Q : Can the oven be used with the glass tray or roller guide removed?
A : No. Both the glass tray and roller guide must always be used in the oven before cooking.
* Q : Can I open the door when the oven is operating?
A : The door can be opened anytime during the cooking operation. Then microwave energy will be instantly switched off and the time setting will maintain until the door is closed and START is touched.
* Q : Why do I have moisture in my microwave oven after cooking?
A : The moisture on the side of your microwave oven is normal. It is caused by steam from cooking food heating the cool oven surface.
* Q : Dose microwave energy pass through the viewing screen in the door?
A : No. The metal screen bounces back the energy to the oven cavity. The holes are made to allow light to pass through. They do not let microwave energy pass through.
Utensil Guide
Only use utensils that are suitable for use in microwave ovens.
To cook food in the microwave oven, the microwaves must be able to penetrate the food, without being reflected or absorbed by the dish used. Care must therefore be taken choosing the utensil. If the utensil is marked microwave-safe, you do not need to worry. The following lists various utensils and indicates whether and how they should be used in a microwave oven.
COOKING UTENSILS
Recommended Use
•Glass and glass-ceramic bowls and Dishes - Use for heating or cooking.
- Microwave browning dish - Use to brown the exterior of small items such as steaks, chops, or pancakes. Follow the directions provided with you browning dish.
- Microwaveable plastic wrap - Use to retain steam. Leave a small opening for some steam to escape and avoid placing it directly on the food.
- Wax paper - Use as a cover to prevent spattering.
- Paper towels, paper plates, napkins and cups - Use for short term heating and covering; they absorb excess moisture and prevent spattering. Always attend the oven closely. Only use to absorb fat and moisture when warming food. Pay special attention as over-heating may cause a fire in your oven. Do not use re-cycled paper products, e.g. kitchen roll unless they say they are specifically designed for use in a microwave oven. These products contain impurities which may cause sparks and/or fires when used.
- Thermometers - Use only those labeled "Microwave Safe" and follow all directions. Check the food in several places. Conventional thermometers may be used once the food has been removed from the oven.
- Microwave cling film, microwave roasting bags - Microwave cling film and bags must be vented for steam to escape, pierce in 4\~5 places. Do not use plastic or metal ties as they may melt or catch fire due to electrical ‘arcing’.
Limited Use
- Aluminum foil - Use narrow strips of foil to prevent overcooking of exposed areas. Using too much toil can damage your oven, so be careful.
- Ceramic, porcelain, and stoneware - Use these if they are labeled "Microwave Safe." If they are not labeled, test them to make sure they can be used safely. Never use dishes with metallic trim.
- Plastic - Use only if labeled "Microwave Safe." Other plastics can melt.
- Thin plastic, paper, straw and wooden containers - Always attend the oven closely. Look at the oven from time to time when cooking or reheating food in disposable containers of plastic, paper or other combustible material. Only use for warming food. Pay special attention as over-heating may cause a fire in your oven.
Not Recommended
- Glass jars and bottles - Regular glass is too thin to be used in a microwave, and can shatter.
- Paper bags - These are a fire hazard, except for popcorn bags that are designed for microwave use.
- Styrofoam plates and cups - These can melt and leave an unhealthy residue on food.
- Plastic storage and food containers - Containers such as margarine tubs can melt in the microwave.
- Metal utensils - These can damage your oven. Remove all metal before cooking.
Do not attempt to defeat or tamper with safety interlocks.
Do not place any object between the oven front frame and the door or allow residue to build up on sealing surfaces. Wipe with a mild detergent, rinse and dry. Never use abrasive powders or pads.
Do not subject the oven door to strain or weight such as a child hanging on an open door.
This could cause the oven to fall forward resulting in injury to you and damage to the oven.
Do not operate the oven if door seals or sealing surfaces are damaged; or if door is bent; or if hinges are loose or broken.
Do not operate the oven empty. This will damage the oven.
Do not attempt to dry clothes, newspapers or other materials in the oven. They may catch on fire.
Do not use recycled paper products as they may contain impurities which may cause sparks or fires.
Do not hit or strike the control panel with hard objects. This can damage the oven.
Food
Never use your microwave oven for home canning. The oven is not designed for proper home canning. Improperly canned food may spoil and be dangerous to consume.
Always use the minimum recipe cooking time. It is better to undercook rather than overcook foods.
Undercooked foods can be returned to the oven for more cooking. If food is overcooked, nothing can be done.
Heat small quantities of food or foods with low moisture carefully. These can quickly dry out, burn or catch on fire.
Do not heat eggs in the shell. Pressure may build up and eggs can explode.
Potatoes, apples, egg yolks and sausages are examples of food with non-porous skins.
These must be pierced before cooking to prevent bursting.
Do not attempt to deep fat fry in your microwave oven.
Always stir liquids before heating. Heated liquids can erupt, if not mixed with air.
Do not leave the oven unattended while popping corn.
Do not pop corn in a paper bag unless it is the commercially prepared Microwave Popcorn product. The kernels can overheat and ignite a brown paper bag.
Do not put packaged Microwave Popcorn bags directly on the oven tray. Place the package on a microwave safe glass or ceramic plate to avoid overheating and cracking the oven tray.
Do not exceed the Microwave Popcorn manufacturers' suggested popping time. Longer popping does not yield more popcorn but it can result in scorch, burn of fire. Remember, the Popcorn bag and tray can be too hot to handle. Remove with caution and use pot holders.
ARCING
If you see arcing, open the door and correct the problem.
Arcing is the microwave term for sparks in the oven.
Arcing is caused by:
- Metal or foil touching the side of the oven.
- Foil not molded to food (upturned edges act like antennas).
- Metal, such as twist-ties, poultry pins, or gold rimmed dishes, in the microwave.
• Recycled paper towels containing small metal pieces being used in the microwave.
MICROWAVING PRINCIPLES
Microwave energy has been used in this country to cook and reheat food since early experiments with RADAR in World War II. Microwaves are present in the atmosphere all the time, both naturally and manmade sources. Manmade sources include radar, radio, television, telecommunication links and car phones.
HOW MICROWAVES COOK FOOD
Microwave oven is a Group 2 ISM equipment in which radiofrequency energy is intentionally generated and used in the form of electromagnetic radiation for the treatment of material. This oven is a Class B equipment suitable for use in domestic establishments and in establishments directly connected to a low voltage power supply network which supplies buildings used for domestic purposes.
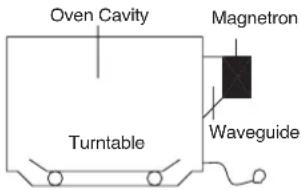
In a microwave oven, electricity is converted into microwave by the MAGNETRON.
TRANSMISSION
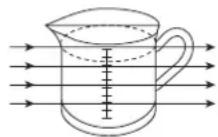
Then they pass through the cooking containers to be absorbed by the water molecules in the food, all foods contain water to a more or lesser extent.
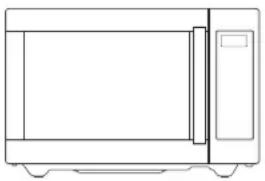
▶ REFLECTION
natural_image
Line drawing of a microwave oven with front panel and side door (no text or symbols)The microwaves bounce off the metal walls and the metal door screen.
▶ ABSORPTION
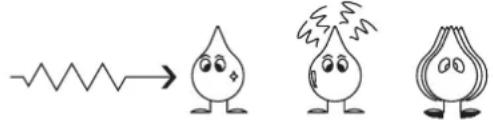
Microwave Water Molecule Absorption Vibration
The microwaves cause the water molecules to vibrate which causes FRICTION, i.e. HEAT. This heat then cooks the food. Microwaves are also attracted to fat and sugar particles, and foods high in these will cook more quickly. Microwaves can only penetrate to a depth of 1^1/2 -2 inches(4-5cm) and as heat spreads through the food by conduction, just as in a traditional oven, the food cooks from the outside inwards.
CONVERSION CHARTS
| WEIGHT MEASURES | |
| 15 g | 12 oz. |
| 25 g 1 oz. | |
| 50 g 2 oz. | |
| 100 g 4 oz. | |
| 175 g 6 oz. | |
| 225 g 8 oz. | |
| 450 g 1 lb. | |
| VOLUME MEASURES |
| 30 ml 1 fl.oz. |
| 100 ml 3 fl.oz. |
| 150 ml 5 fl.oz. ( 14 pt) |
| 300 ml 10 fl.oz. ( 12 pt) |
| 600 ml 20 fl.oz. (1pt) |
| SPOON MEASURES | |
| 1.25 ml | 14 tsp |
| 2.5 ml | 12 tsp |
| 5 ml 1 tsp | |
| 15 ml 1 tbsp | |
| FLUID MEASUREMENTS | ||
| 1 Cup | = 8 fl.oz. | = 240 ml |
| 1 Pint | = 16 fl.oz. (UK 20 fl.oz.) | = 480 ml (UK 560 ml) |
| 1 Quart | = 32 fl.oz. (UK 40 fl.oz.) | = 960 ml (UK 1120 ml) |
| 1 Gallon | = 128 fl.oz. (UK 160 fl.oz.) | = 3840 ml (UK 4500 ml) |
COOKING TECHNIQUES
STANDING TIME
Dense foods e.g. meat, jacket potatoes and cakes, require standing time (inside or outside of the oven) after cooking, to allow heat to finish conducting to cook the center completely. Wrap meat joints and jacket potatoes in aluminium foil while standing. Meat joints need approx. 10-15 minutes, jacket potatoes 5 minutes. Other foods such as plated meal, vegetables, fish etc require 2-5 minutes standing. After defrosting food, standing time should also be allowed. If food is not cooked after standing time, return to the oven and cook for additional time.
MOISTURE CONTENT
Many fresh foods e.g. vegetables and fruit, vary in their moisture content throughout the season, particularly jacket potatoes. For this reason cooking times may have to be adjusted. Dry ingredients e.g. rice, pasta, can dry out during storage so cooking times may differ.
DENSITY
Porous airy foods heat more quickly than dense heavy foods.
CLING FILM
Cling film helps keep the food moist and the trapped steam assists in speeding up cooking times. Pierce before cooking to allow excess steam to escape. Always take care when removing cling film from a dish as the build-up of steam will be very hot.
SHAPE
Even shapes cook evenly. Food cooks better by microwave when in a round container rather than square.
SPACING
Foods cook more quickly and evenly if spaced apart. NEVER pile foods on top of each other.
STARTING TEMPERATURE
The colder the food, the longer it takes to heat up. Food from a fridge takes longer to reheat than food at room temperature.
LIQUIDS
All liquids must be stirred before and during heating. Water especially must be stirred before and during heating, to avoid eruption. Do not heat liquids that have previously been boiled. DO NOT OVERHEAT.
TURNING & STIRRING
Some foods require stirring during cooking. Meat and poultry should be turned after half the cooking time.
ARRANGING
Individual foods e.g. chicken portions or chops, should be placed on a dish so that the thicker parts are towards the outside.
QUANTITY
Small quantities cook faster than large quantities, also small meals will reheat more quickly than large portions.
PIERCING
The skin or membrane on some foods will cause steam to build up during cooking. These foods must be pierced or a strip of skin should be peeled off before cooking to allow the steam to escape. Eggs, potatoes, apples, sausages etc, will all need to be pierced before cooking. DO NOT ATTEMPT TO BOIL EGGS IN THEIR SHELLS.
COVERING
Cover foods with microwave cling film or a lid. Cover fish, vegetables, casseroles, soups. Do not cover cakes, sauces, jacket potatoes or pastry items.
DEFROSTING GUIDE
▶ Do not defrost covered meat. Covering might allow cooking to take place. Always remove outer wrap and tray. Use only containers that are microwave-safe.
▶ Begin defrosting whole poultry breast-side-down. Begin defrosting roasts fat-side-down.
The shape of the package alters the defrosting time. Shallow rectangular shapes defrost more quickly than a deep block.
▶ After/3 of the defrost time has elapsed, check the food. Toy may wish to turn over, break apart, rearrange or remove thawed portions of the food.
During defrost, the oven will prompt you to turn the over. At this point, open oven door and check the food. Follow the techniques listed below for optimum defrost results.
Then, close oven door, touch the START pad to complete defrosting.
When defrosted, food should be cool, but softened in all areas. If still slightly icy, return to microwave oven very briefly, or let stand a few minutes. After defrosting, allow food to stand 5-60 minutes if there are any icy areas.
Poultry and fish may be placed under running cool water until defrosted
Turn over : Roast, ribs, whole poultry, turkey breasts, hot dogs, sausages, steaks, or chops.
Rearrange : Break apart or separate steaks, chops, hamburger patties, ground meat, chicken or seafood pieces, chunks of meat such as stew beef.
Shield : Use small strips of aluminum foil to protect thin areas or edges of unevenly shaped foods such as chicken wings. To prevent arching, do not allow foil to come within 1-inch of oven walls or door.
Remove: To prevent cooking, thawed portions should be removed from the oven at this point. This may shorten defrost time for food weighing less than 3 lbs.(1350g).
DEFROSTING CHART (by Time Defrost)
| Item & Weight Defrosting Time Standing Time Special Techniques | |||
| BEEFMinced beef 1 lb./450g | 8-10 min. | 15-20 min. | Break apart and remove thawed portions with fork. |
| Stew Meat 1^1/2 lbs./675g | 7-9 min. | 25-30 min. | Separate and rearrange once. |
| Loin Roast2 lbs./900g | 12-15 min. | 45-60 min. | Turn over after half the time.Shield as needed. |
| Patties 4 (4 oz./110g ) | 6-7 min. | 15-20 min. | Turn over after half the time. |
| PORKLoin Roast 2 lbs./900g | 12-15 min. | 45-60 min. | Turn over after half the time.Shield as needed. |
| Spareribs 1 lb. 450g | 6-7 min. | 25-30 min. | Separate and rearrange once. |
| Chops 4 (5 oz./125g) | 7-8 min. | 25-30 min. | Separate and turn over once. |
| Minced pork1lb./450g | 7-9 min. | 15-20 min. | Break apart and remove thawed portions with fork. |
| POULTRYWhole Chicken 2^1/2 lbs./1125g | 15-17 min. | 45-90 min. | Break side down. Turn over after half the time. Shield as needed. |
| Chicken Breasts1lb./450g | 7-9 min. | 15-30 min. | Separate and rearrange once. |
| Fryer Chicken(cut up)2lbs./900g | 10-12 min. | 25-30 min. | Separate and rearrange once. |
| Chicken Thighs 1^1/2 lbs./675g | 10-12 min. | 15-30 min. | Separate and rearrange once. |
| FISH & SEAFOODWhole Fish 1lb./450g | 5-6 min. | 15-20 min. | Turn over after half the time.Shield as needed. |
| Fish Fillets 1^1/2 lb./675g | 6-7 min. | 15-20 min. | Separate and turn over once. |
| Shrimp 1/2 lb./225g | 3-4 min. | 10-15 min. | Separate and rearrange once. |
* The times are approximate because freezer temperatures vary.
COOKING & REHEATING CHART
| Item | Power Level | Cooking Time Per lb./g | ||||
| MEAT | ||||||
| Beef | ||||||
| Standing / rolled Rib - Rare P-80 9-11 min.- Medium P-80 10-12 min.- well done P-80 12-14 min.Ground Beef (to brown for casserole) P-HI 5-7 min.Hamburgers, Fresh or defrosted(4oz. Each/100g) 2 patties P-HI 3-5 min.4 patties P-HI 4-6 min. | ||||||
| PorkLoin, Leg P-80 13-16 min.Bacon 4 slices P-HI 2-3 min.6 slices P-HI 3-4 min. | ||||||
| NOTE: The above times should be regarded only as a guide. Allow for difference in individual lasts and preferences. The times may vary due to the shape, cut, and composition of the meat. | ||||||
| POULTRY | ||||||
| ChickenWholeBreast(boned)portions | P-HIP-80P-80 | 8-10 min.6-8 min.7-9 min. | ||||
| TurkeyWhole | P-HI | 10-12 min. | ||||
| NOTE: The above times should be regarded only as a guide. Allow for difference in individual tastes and preferences. The times may vary due to the shape, cut, and composition of the food. | ||||||
| FRESH FISH | ||||||
| Item | PowerLevel | Cooking TimePer lb./g | Method | StandingTime | ||
| Fish Fillets | P-HI | 4-6 min. | Add 15-30 ml(1-2 Tbsp) | 2-3 min. | ||
| Whole Mackerel,Cleaned and Prepared | P-HI | 4-6 min. | - | 3-4 min. | ||
| Whole Trout, Cleanedand Prepared | P-HI | 5-7 min. | - | 3-4 min. | ||
| Salmon Steaks | P-HI | 5-7 min. | Add 15-30 ml(1-2 Tbsp) | 3-4 min. | ||
| ITEM | POWER LEVEL | Cooking Time | Standing Time | |||
| Lasagna1 serving( 1012 oz./300g) | P-HI | 5-7 min. | Place lasagna on microwaveable plate.Cover with plastic wrap and vent. | |||
| Casserole1 cup4 cups | P-HIP-HI | 1 12 -3 min.5-7 min. | Cook covered in microwaveable casserole.Stir once halfway through cooking. | |||
| Mashed potatoes1 cup4 cups | P-HIP-HI | 2-3 min.6-8 min. | Cook covered in microwaveable casserole.Stir once halfway through cooking. | |||
| Baked beans1 cup | P-HI | 2-3 min. | Cook covered in microwaveable casserole.Stir once halfway through cooking. | |||
| Ravioli or pasta in sauce1 cup4 cups | P-HIP-HI | 3-4 min.8-11 min. | Cook covered in microwaveable casserole.Stir once halfway through cooking. | |||
| Sandwich roll or bun1 roll | P-HI | 20-30 seg. | Wrap in paper tower and place on glassmicrowaveable rack* Note : Do not use recycled paper towels. | |||
VEGETABLE CHART
* Note : Use power level High (P-HI) unless otherwise noted.
| VEGETABLES AMOUNT TIME SPECIAL INSTRUCTIONS | |||
| AsparagusFresh spears 1 lb./450g 5-8 min. In medium casserole, placeFrozen spears 10 oz./280g package 4-7 min. In medium casserole. | 1/4 cup water. | ||
| BeansFresh green 1 lb./450g cut in half 10-15 min. In medium casserole, placeFrozen green 10 oz./280g package 5-8 min. In medium casserole, place 2 tbsp water.Frozen lima 10 oz./280g package 4-7 min. In medium casserole, place | 1/2 cup water. 1/4 cup. Water. | ||
| BeetsFresh, whole 1 bunch( 1 14 - 1 12 lbs.) 16-22 min. In medium casserole, place 1/2 cup water. | |||
| BroccoliFresh cut 1 bunch( 1 14 - 1 12 lbs.) /560-680gFresh spears 1 bunch( 1 14 - 1 12 lbs.) /560-680gFrozen, chopped 10 oz./280g package 4-7 min. In medium casserole.Frozen spears 10 oz./280g package 4-7 min. In medium casserole, place 3 tbsp water. | |||
| CabbageFreshWedges | 1 medium head (about 2 lbs./900g) | 6-10 min. 5-9 min. In large casserole, place 1/4 cup water. | In large casserole, place 1/4 cup water. |
| Carrotsfresh, sliced frozen | 1 lb./450g 4-8 min. In large casserole, place 1/4 cup water.10 oz./280g package 4-7 min. In medium casserole, place 2 tbsp water. | ||
| Cauliflowerflowerets 1 medium head (about 2 lbs./900g) fresh, whole frozen | 7-11 min. 1 medium head (about 2 lbs./900g)10 oz./280g package 3-7 min. In medium casserole, place 2 tbsp water. | ||
| Cornfrozen kernel | 10 oz./280g package 2-6 min. In medium casserole, place 2 tbsp water. | ||
| Corn on the cob fresh frozen | 1-5 ears1 ear2-6 ears | (per ear) 114 - 4 min.3-6 min.2-3 min. | In large glass baking dish, place corn. If corn is in husk, use no water;if corn has been husked, add 14 cup water. Rearrange after half of time.Place in large oblong glass baking dish. Cover with vented plastic wrap. Rearrange after half of time. |
| Mixed vegetable frozen | 10 oz./280g package 2-6 min. In medium casserole, place 3 tbsp water. | ||
| Peasfresh, shelled frozen | 2 lbs.(450g) unshelled 10 oz.(280g) package 2-6 min. In medium casserole, place 2 tbsp water. | ||
| Potatoesfresh, cubed, white fresh, whole, sweet or white | 4 potatoes (6-8 oz./160-220g each)1 (6-8 oz./160-220g) | 9-12 min.2-4 min. | Peel and cut into 1-inch cubes. Place in large casserole with 12 cup water. Stir after half of time.Pierce with cooking fork. Place in the oven, 1-inch apart, in circular arrangement. Let stand 5 minutes. |
| Spinachfresh frozen, chopped, and leaf | 10-16 oz./280-450g10 oz./280g package 3-6 min. In medium casserole, place 3 tbsp water. | ||
| Squashfresh, summer, and yellow winter, acorn, 1-2 squash or butternut | 1 lb./450g sliced.ash (about 1 lb./450g each) | 3-5 min. In large glass break lunch, place squash cut-side-down. Turn cut-side-up after 4 minutes. | In large casserole, place 1/4 cup water.Cut in half and remove fibrous membranes.baking dish, place squash cut-side-down. Turn cut-side-up after 4 minutes. |
RECIPE
TOMATO & ORANGE SOUP
1 oz.(25g) butter
1 medium onion, chopped
1 large carrot & 1 large potato, chopped
13/4lb(800g) canned, chopped tomatoes juice and grated rind of 1 small orange
1 ^1/2 pints(900ml) hot vegetable stock salt and pepper to taste
FRENCH ONION SOUP
1 large onions, sliced
1 tbsp (15ml) corn oil
2 oz.(50g) plain flour
2 pints(1.2 liters) hot meat or vegetable stock salt and pepper to taste
2 tbsp (30ml) parsley, chopped
4 thick slices French bread
2 oz.(50g) cheese, grated
STIR FRIED VEGETABLES
1 tbsp(15ml) sunflower oil
1"(2.5cm) root ginger, peeled and finely grated
2 medium carrots, cut into fine strips
4 oz.(100g) button mushrooms, chopped
2 oz.(50g) beansprouts
4 oz.(100g) mange-tout
1 red pepper, seeded and thinly sliced
4 spring onions, chopped
4 oz.(100g) canned water chestnuts, sliced
^1/_4 head of chinese leaves, thinly sliced
HONEYED CHICKEN
4 boneless chicken breasts
2 tbsp(30ml) clear honey
1 tbsp(15ml) whole grain mustard
1/2 tsp(2.5ml) dried tarragon
1 tbsp(15ml) tomato puree
1/4 pint(150ml) chicken stock
- Melt the in a large bowl on P-HI for 1 minute.
- Add the onion, carrot and potato and cook on P-HI for 6 minutes. stir halfway through cooking.
- Add the tomatoes, orange juice, orange rind and stock. Mix thoroughly. Season with salt and pepper to taste. Cover the bowl and cook on P-HI for 18 minutes. stir 2-3 times during cooking, until the vegetables are tender.
-
Blend and serve immediately.
-
Place the onion and oil a bowl, mix well and cook on P-HI for 2 minutes.
- Stir in the flour to make a paste and gradually add stack. Season and add the parsley.
- Cover the bowl and cook on P-80 for 20 minutes.
- Pour the soup into serving bowls, submerge bread and sprinkle generously with cheese.
-
Cook on P-80 for 2 minutes, until the cheese has melted.
-
Place the oil, soy sauce, sherry, ginger, garlic and carrots in a large bowl, mix thoroughly
- Cover and cook on P-HI for 5-6 minutes, stirring once.
- Add the button mushrooms, beansprouts, mange-tout, red pepper, spring onions, water chestnuts and chinese leaves. Mix thoroughly.
- Cook on P-HI for 6-7 minutes, until the vegetables are tender. Stir 2-3 times during cooking.
Stir fried vegetables are ideally served with meat or fish.
- Place the chicken breasts in a casserole dish.
- Mix all remaining ingredients together and pour over the chicken. Salt and pepper to taste.
- Cook on P-HI for 13-14 minutes. Rearrange and coat the chicken with the sauce twice during cooking.
BLUE CHEESE & CHIVE JACKETS
2 baking potatoes,
(approx.9 oz.(250g) each)
2 oz.(50g) butter
4 oz.(100g) blue cheese, chopped
1 tbsp(15ml) fresh chives, chopped
2 oz.(50g) mushrooms, sliced salt and pepper to taste
WHITE SAUCE
1 oz.(25g) butter
1 oz.(25g) plain flour
1/2 pint(300ml) milk
salt and pepper to taste
STRAWBERRY JAM
1^1/2 lb.(675g) strawberries, hulled
3 tbsp(45ml) lemon juice
1^1/2 lb.(675g) caster sugar
4 oz.(100g) margarine
4 oz.(100g) sugar
1 eggs
4 oz.(100g) self raising flour, sifted
2-3 tbsp(30-45ml) milk
OMELETTS
^1/_2 oz.(15g) butter
4 eggs
6 tbsp(90ml) milk
salt & pepper
- Prick each potato in several places. Cook on P-HI for 12-13 minutes. Halve and scoop the flesh into a bowl, add the butter, cheese, chives, mushrooms, salt and pepper, mix thoroughly.
- Pile mixture into the potato skins and place in a flan dish, on the rack.
-
Cook on P-60 for 10 minutes.
-
Place the butter in a bowl and cook on P-HI for 1 minute, until melted.
-
Stir in the flour and whisk in the milk. Cook on P-HI for 4-5 minutes, stirring every 2 minutes until thick and smooth. Season with salt and pepper to taste.
-
Place strawberries and lemon juice in a very large bowl, heat on P-HI for 5 minutes, or until the fruit has softened. Add sugar, mix well.
- Cook on P-80 for 30-35 minutes, until setting point*is reached, stir every 4-5 minutes.
- Pour into hot, clean jars. Cover, seal and label.
* setting point : To determine setting point, place 1 tsp(5ml)jam onto chilled saucer. Allow to stand for 1 minute. Move surface of jam gently with your finger, if the surface wrinkles setting point has been reached.
- line the base of 8" (20.4cm) cake dish with grease-proof paper.
- Cream the margarine and sugar together until light and fluffy. Beat in the eggs and fold in the sifted flour alternately with the milk.
- Pour into prepared container. Cook on P-HI for 4-5 minutes, until a skewer comes out cleanly.
-
Leave the cake to stand for 5 minutes before turning out.
-
Whisk together eggs and milk. Season.
- Place butter in 10"(26cm) flan dish. Cook on P-HI for 1 minute, until melted. Coat the dish with the melted butter.
- Pour omelette mixture into flan dish. Cook on P-HI for 2 minutes. whisk mixture and cook again on P-HI for 1 minutes.
SCRAMBLED EGG
^1/_2 oz.(15g) butter
2 eggs
2 tbsp(30ml) milk
salt & pepper
SAVORY MINCE
1 small onion, diced
1 clove garlic, crushed
1 tsp(5ml) oil
7 oz.(200g) can chopped tomatoes
1 tbsp(15ml) tomato puree
1 tsp(5ml) mixed herbs
8 oz.(225g) minced beef
salt and pepper
- Melt the butter in a bowl on P-HI for 1 minutes.
- Add the eggs, milk and seasoning and mix well.
-
Cook on P-HI for 3 minutes, stirring every 30 seconds.
-
Place onion, garlic and oil in casserole, and cook on P-HI for 2 minutes or until soft.
- Place all other ingredients in casserole. Stir well.
- Cover and cook on P-HI for 5 minutes then P-60 for 10-15 minutes or until the meat is cooked.
WARRANTY CARD
ILVE.COM.AU
Eurolinx Pty Limited A.B.N. 50 001 473 347 trading as ILVE ("ILVE")
Office:
48-50 Moore Street, Leichhardt N.S.W 2040 Post:
Locked Bag 3000, Annandale, N.S.W 2038 P: 1300 856 411
WARRANTY REGISTRATION
Your ongoing satisfaction with your ILVE product is important to us. We ask that you complete the enclosed Warranty Registration Card and return it to us so that we have a record of the ILVE product purchased by you, Alternitivley, you can now register your warranty online at http://support.eurolinx.com.au/
PRIVACY
ILVE respects your privacy and is committed to handling your personal information in accordance with the National Privacy Principles and the Privacy Act 1988 (Cth). A copy of the ILVE Privacy Policy is available at www.ilve.com.au. ILVE will not disclose any personal information set out in the Warranty Registration Card (“Personal Information”) without your consent unless required by:
-
law;
-
any ILVE related company;
-
any service provider which provide services to ILVE or assist ILVE in providing services (including repair and warranty services) to customers. Our purpose in collecting the Personal Information is to keep a record of the ILVE product purchased by you, in order to provide a better warranty service to you in the unlikely event that there is a problem with your ILVE product. ILVE may contact you at any one or more of the addresses, email addresses or telephone numbers set out in the Warranty Registration Card. Please contact ILVE on 1300 694 583 should you not wish to be contacted by ILVE.
WARRANTY
- Warranty
ILVE warrants that each ILVE product will remain, for a period of twenty four (24) months computed from the date of purchase of the ILVE product, free from defects arising in the manufacture of the ILVE product (“Warranty”). Except for consumer guarantees set
out in the Competition and Consumer Act 2010 (Cth) ("Act"), ILVE does not make any further warranties or representations in relation to ILVE products.
- What is not Covered by the Warranty.
The Warranty does not apply if an ILVE product is defective by a factor other than a defect arising in the manufacture of the ILVE product, including but not limited to:
(a) damage through misuse (including failure to maintain, service or use with proper care), neglect, accident or ordinary wear and tear (including deterioration of parts and accessories and glass breakage);
(b) use for purpose for which the ILVE product was not sold or designed;
(c) use or installation which is not in accordance with any specified instructions for use or installation;
(d) use or operation after a defect has occurred or been discovered;
(e) damage through freight, transportation or handling in transit (other than when ILVE is responsible);
(f) damage through exposure to chemicals, dusts, residues, excessive voltage, heat, atmospheric conditions or other forces or environmental factors outside the control or ILVE;
(g) repair, modification or tampering by the purchaser or any person other than ILVE, an employee of ILVE or an authorised ILVE service contractor ^* ;
(h) use of parts, components or accessories which have not been supplied or specifically approved by ILVE.
(i) damage to surface coatings caused by cleaning or maintenance using products not recommended in the ILVE product handbook provided to the purchaser upon purchase of the ILVE product;
(j) damage to the base of an electric oven due to items having been placed on the base of the oven cavity or covering the base, such as aluminium foil (this impedes the transfer of heat from the element to the oven cavity and can result in irreparable damage); or
(k) damages, dents or other cosmetic imperfections not affecting the performance of the ILVE in respect of an ILVE product purchased as a "factory second" or from display
The Warranty does not extend to light globes used in ILVE products.
- Domestic Use
Each ILVE product is made for domestic use. This Warranty may not extend to ILVE products used for commercial purposes.
- Time for Claim under the Warranty
You must make any claim under this Warranty within twenty eight (28) days after the occurrence of an event which gives rise to a claim pursuant to the Warranty, by booking a service call on the telephone number below.
Continued over...
WARRANTY CARD CONTINUED
ILVE.COM.AU
5. Proof of Purchase
Customers must retain proof of purchase in order to be eligible to make a warranty claim in respect of an ILVE product.
6. Claiming under the Warranty
Customers will bear the cost of claiming under this Warranty unless ILVE determines the expenses are reasonable, in which case the customer must claim those expenses by providing written evidence of each expense to ILVE at the address on the Warranty Registration Card.
7. Statutory Rights
(a) These terms and conditions do not affect your statutory rights.
(b) The limitations on the Warranty set out in this document do not exclude or limit the application of the consumer guarantees set out in the Act or any other equivalent or corresponding legislation in the relevant jurisdiction where to do so would:
(i) contravene the law of the relevant jurisdiction; or
(ii) cause any part of the Warranty to be void.
(c) ILVE excludes indirect or consequential loss of any kind (including, without limitation, loss of use of the ILVE product) and (other than expressly provided for in these terms and conditions) subject to all terms,
conditions and warranties implied by custom, the general law, the Act or other statute.
(d) The liability of ILVE to you for a breach of any express or non-excludable implied term, condition or warranty is limited at the option of ILVE to:
(i) replacing or repairing the defective part of the ILVE product;
(ii) paying the cost of replacing or repairing the defective part of the ILVE product;
(iii) replacing the ILVE product; or
(iv) paying the cost of replacing the ILVE product.
(e) Our goods come with guarantees that cannot be excluded under the Australian Consumer Law. You are entitled to a replacement or refund for a major failure and for compensation for any other reasonably foreseeable loss or damage.
You are also entitled to have the goods repaired or replaced if the goods fail to be of acceptable quality and the failure does not amount to a major failure.
8. Defects
Any part of an ILVE product deemed to be defective and replaced by ILVE is the property of ILVE. ILVE reserves the right to inspect and test ILVE products in order to determine the extent of any defect and the validity of a claim under the Warranty.
*For your closest ILVE authorised service agent please contact ILVE on 1300 856 411 or
Email: customercare@eurolinx.com.au
All warranty service calls must be booked via the customer care department. The team can be contacted on 1 300 85 64 11 option 1 or customercare@eurolinx.com.au
01052015
PLEASE NOTE: IF YOU HAVE PURCHASED AN ILVE GAS OVEN, YOU CAN DOWNLOAD A SPECIFIC GAS OVEN MANUAL FROM WWW.ILVE.COM.AU/DOWNLOADS
*NB: THIS MANUAL DOES STILL CONTAIN COMPREHENSIVE GAS OVEN INFORMATION
iWarranty
REGISTER YOUR WARRANTY ONLINE NOW
GO TO: http://support.eurolinx.com.au/
WARRANTY REGISTRATION CARD
01062014
Please complete and send to ILVE at: REPLY PAID 83617
LEICHHARDT NSW 2040
| Last Name: | First Name: | |
| Address: | ||
| State: | Postcode: | Email: |
| Home Phone: | Mobile: | |
| Purchase Date: / / (Please attach proof of purchase to validate warranty) | ||
| MODEL NUMBER | SERIAL NUMBER(if you cannot locate the serial number please call ILVE on 1300 85 64 11) |
| 1 | |
| 2 | |
| 3 | |
| 4 |
01052015

natural_image
Black hexagonal icon with an 'i' symbol inside, representing information (no text or numbers present)LIVE WITH
ILVE
Australia National Telephone Number 1300 MYILVE (694 583)
ILVE showrooms are open daily from 9am-5pm and Saturdays 10am-4pm
NSW & ACT (Head Office)
48-50 Moore Street Leichhardt
VIC & SA
1211 Toorak Road Camberwell
QLD
1/42 Cavendish Road Coorparoo
WA & NT
Unit 10/55 Howe Street Osborne Park
TAS (Crisp Ikin)
3 Pear Avenue Derwent Park, 7009 P 03 6272 7386
New Zealand Telephone Number 0508 458 369
New Zealand
PO Box 11.160 Sockburn Christchurch F 03 344 5906
ilve.com.au
- PRECAUTIONS TO AVOID POSSIBLE EXPOSURE TO EXCESSIVE MICROWAVE ENERGY
- TABLE OF CONTENTS
- IMPORTANT SAFETY INSTRUCTIONS
- READ CAREFULLY AND KEEP FOR FUTURE REFERENCE.
- To reduce the risk of injury to persons:
- SAVE THESE INSTRUCTIONS
- EARTHING INSTRUCTIONS
- WARNING:
- INSTALLATION
- Ventilation
- Steady, flat location
- Leave space behind and side
- Away from radio and TV sets
- Away from heating appliance and water taps
- Power supply
- Examine the oven after unpacking for any damage such as:
- Do not operate the oven if it is colder than room temperature.
- SPECIFICATIONS
- IMPORTANT
- FEATURES DIAGRAM
- OPERATION PROCEDURE
- WATTAGE OUTPUT CHART
- CONTROLS
- SETTING THE CLOCK
- CLOCK
- TIME DEFROSTING
- DEFROST
- KITCHEN TIMER MODE
- HOW TO USE AS A MINUTE TIMER
- KITCHEN TIMER
- HOW TO USE TO DELAY THE START OF COOKING
- HOW TO USE TO SET A HOLDING TIME
- SPEEDY COOK
- ONE TOUCH COOKING
- WARNING - PLEASE NOTE
- \* PASTA \*
- ONE TOUCH COOKING (CONTINUED)
- FROZEN PIZZA
- \* FROZEN PIZZA \*
- NOTE: 1. Use only frozen pizza at a time.
- BEVERAGE
- When you touch BEVERAGE pad once, "1" is displayed.
- \* BEVERAGE \* (200ml/cup)
- DISH WARMER
- When you touch DISH WARMER pad once, "350" is displayed.
- \* DISH WARMER \*
- LESS, MORE
- CHILD SAFETY LOCK
- ROLLER GUIDE
- GLAsS TRAY
- BEFORE YOU CALL FOR SERVICE
- CARE AND CLEANING
- QUESTIONS AND ANSWERS
- Utensil Guide
- COOKING UTENSILS
- Recommended Use
- Limited Use
- Not Recommended
- Food
- ARCING
- If you see arcing, open the door and correct the problem.
- MICROWAVING PRINCIPLES
- HOW MICROWAVES COOK FOOD
- CONVERSION CHARTS
- COOKING TECHNIQUES
- STANDING TIME
- MOISTURE CONTENT
- DENSITY
- CLING FILM
- SHAPE
- SPACING
- STARTING TEMPERATURE
- LIQUIDS
- TURNING & STIRRING
- ARRANGING
- QUANTITY
- PIERCING
- COVERING
- DEFROSTING GUIDE
- VEGETABLE CHART
- RECIPE
- TOMATO & ORANGE SOUP
- FRENCH ONION SOUP
- STIR FRIED VEGETABLES
- HONEYED CHICKEN
- BLUE CHEESE & CHIVE JACKETS
- WHITE SAUCE
- STRAWBERRY JAM
- OMELETTS
- SCRAMBLED EGG
- SAVORY MINCE
- WARRANTY CARD
- ILVE.COM.AU
- WARRANTY REGISTRATION
- PRIVACY
- WARRANTY
- WARRANTY CARD CONTINUED
- Proof of Purchase
- Claiming under the Warranty
- Statutory Rights
- Defects
- iWarranty
- LIVE WITH
- ILVE
Brand : ILVE
Model : IVFSM643X
Category : Microwaves