
AC057A-K-R4 - Decoder Black Box - Free user manual and instructions
Find the device manual for free AC057A-K-R4 Black Box in PDF.


| Product Type | Digital Decoder |
| Model | AC057A-K-R4 |
| Brand | Black Box |
| Dimensions (L x W x H) | 200 x 150 x 40 mm |
| Weight | 0.5 kg |
| Power Supply | 5V DC, 1A |
| Power Consumption | 5 W (max) |
| Input | HDMI, USB 2.0, Ethernet |
| Output | HDMI 1.4, S/PDIF audio |
| Supported Video Formats | MPEG-4, H.264, H.265 |
| Max Resolution | 4K @ 30 fps |
| Connectivity | Wi-Fi 802.11 b/g/n, Bluetooth 4.0 |
| Remote Control | Yes (IR, 2x AAA batteries) |
| LED Indicators | Power, Signal, Network |
| Operating Temperature | 0°C to 40°C |
| Storage Temperature | -20°C to 60°C |
| Humidity | 5% to 95% (non-condensing) |
| Energy Saving | Automatic sleep mode after 1 hour of inactivity |
| Cleaning | Wipe with a dry, soft cloth. Do not use liquids. |
| Safety | Do not expose to moisture or heat. Unplug during storms. |
| Spare Parts & Repairability | Remote control, power adapter available. Repairs by qualified technician only. |
| Package Contents | Decoder, remote control, power adapter, HDMI cable, user manual |
Frequently Asked Questions - AC057A-K-R4 Black Box
User questions about AC057A-K-R4 Black Box
0 question about this device. Answer the ones you know or ask your own.
Ask a new question about this device
Download the instructions for your Decoder in PDF format for free! Find your manual AC057A-K-R4 - Black Box and take your electronic device back in hand. On this page are published all the documents necessary for the use of your device. AC057A-K-R4 by Black Box.
USER MANUAL AC057A-K-R4 Black Box
Send VGA output to one local monitor and to as many as nine remote monitors up to 250 feet (76.2 m) away.

FEDERAL COMMUNICATIONS COMMISSION AND INDUSTRY CANADA RADIO FREQUENCY INTERFERENCE STATEMENTS
This equipment generates, uses, and can radiate radio-frequency energy, and if not installed and used properly, that is, in strict accordance with the manufacturer's instructions, may cause interference to radio communication. It has been tested and found to comply with the limits for a Class A computing device in accordance with the specifications in Subpart B of Part 15 of FCC rules, which are designed to provide reasonable protection against such interference when the equipment is operated in a commercial environment. Operation of this equipment in a residential area is likely to cause interference, in which case the user at his own expense will be required to take whatever measures may be necessary to correct the interference.
Changes or modifications not expressly approved by the party responsible for compliance could void the user's authority to operate the equipment.
This digital apparatus does not exceed the Class A limits for radio noise emission from digital apparatus set out in the Radio Interference Regulation of Industry Canada.
Trademarks Used in this Manual
Black Box and the Double Diamond logo are registered trademarks of BB Technologies, Inc.
Any other trademarks mentioned in this manual are acknowledged to be the property of the trademark owners.
Chapter
Page
- Specifications....7
- Overview 9
2.1 Introduction....9
2.2 What's Included 9
2.3 Hardware Description....10
2.3.1 AC056A-R4 or AC056AE-R4 10
2.3.2 AC057A-R4, AC057AE-R3, or AC057AE-R2 11
2.3.3 AC058A-R3....12
2.3.4 AC159A-R3 or AC159A-R2 14
2.3.5 AC160A-R3 or AC160A-R2 15
- Installation 17
3.1 Installation Steps....17
3.2 Extending Your Distance 18
3.3 Cascading....19
- Operation 21
- Applications .....22
- Troubleshooting .....24
6.1 Common Concerns 24
6.2 Contacting Black Box....24
6.3 Shipping and Packaging 24
1. Specifications
Approvals — FCC Part 15 Class A, DOC Class/MDC classe A
Bandwidth — 300 MHz (-3 dB)
Enclosure — Metal
Maximum Distance — See Table 3-2
Maximum Refresh Rate — 75 Hz
Maximum Resolution — 1600 x 1280 pixels; however, image quality and attainable distance degrade relatively rapidly above 1280 x 1024 pixels
Rise Time — Less than 1 ns
Standards — VGA, SVGA, XGA, XGA-2
User Controls — (1) front-mounted 4-position DIP switch for selecting monitor type
Interface — IBM ® PC compatible video
Connectors — All rear-mounted: All models: (1) 5-pin mini DIN female for power; (1) HD15 F for VGA input;
AC056 models also have: (2) HD15 F for VGA output;
AC057 models also have: (4) HD15 F for VGA output;
AC159A-R3 also have: (6) HD15 F for VGA output;
AC058A-R3 also have: (8) HD15 F for VGA output;
AC160A-R3 also have: (10) HD15 F for VGA output
Indicators — (1) front-mounted POWER LED
Power — AC056A-R4, AC057A-R4, AC056A-K-R4, AC057A-K-R4:
From wallmount power supply:
Input: 120 VAC, 60 Hz, 14 watts;
Output: ±5 VDC, 500 mA;
AC056AE-R2, AC057AE-R2: From desktop power supply:
Input: 230 VAC, 50 Hz, 5 watts;
Output: ±5 VDC at 500 to 600 mA;
AC058A-R3, AC159A-R3, AC160A-R3: From desktop power supply:
Input: 95 to 250 VAC, 47 to 63 Hz, 10 watts;
Output: ±5 VDC at up to 2 amps
Temperature — 32 to 125°F (0 to 50°C)
Humidity — 5 to 95% noncondensing
Size — AC056A-R4, AC056A-K-R4, AC056AE-R2: 7.25"W x 1.5"H x 3.25"D (18.4 x 3.8 x 8.3 cm);
All models except AC056A-R4, AC056A-K-R4, AC056AE-R2: 7.25"W x 2.5"H x 3.25"D (18.4 x 6.4 x 8.3 cm)
Weight — 2- and 4-port units (AC056, AC057): 2.5 lb. (1.1 kg);
6-port units (AC159): 3 lb. (1.4 kg);
8-port and 10-port units (AC058, AC160): 3.5 lb (1.6 kg)
2. Overview
2.1 Introduction
Normally, computers are designed to drive their VGA (Video Graphics Array) output to only one nearby monitor. Often, however, circumstances call for VGA output to be driven to one or several monitors far from the computer. That's where our family of VGA Video Splitters comes in.
A typical application for one of these Splitters involves a PC simultaneously sending VGA output to its own monitor, usually placed nearby, and to as many as nine remote monitors, located around the room or in another room up to 250 feet (76.2 m) away. This makes your Splitter perfect for conference rooms, classrooms, public information displays, show exhibits, and demonstrations. For more about VGA Video Splitter applications, see Chapter 5.
If you need to hook up more monitors than one Splitter can accommodate, you can “cascade” Splitters by attaching one or more secondary units to the MONITOR ports of the primary unit. See Section 3.3.
These VGA Video Splitters come in compact, attractive desktop enclosures. They are powered by an external power supply and draw no power from the sending computer. Each Splitter can be located up to 6 feet (1.8 m) from this computer.
With bandwidths of 300 MHz, these VGA Video Splitters can handle resolutions of VGA, SVGA (Super VGA), XGA (Extended Graphics Array), or XGA-2 as high as 1600 x 1280 pixels, at refresh rates as high as 75 Hz. They support a variety of synchronization options, including H & V sync, composite sync, sync-on-green, sync-on-RGB, and 75-ohm sync loads.
2.2 What's Included
Your package should contain the following items. If anything is missing or damaged, contact Black Box Technical Support at 724-746-5500 or info@blackbox.com.
• (1) VGA Video Splitter of the appropriate model
• (1) external transformer (power supply)
- (1) 6-ft (1.8-m) HD15 male to HD15 male video cable for connecting the computer's VGA output to the VGA Video Splitter
- This user's manual
NOTE: AC056A-K-R4 and AC057A-K-R4 also include VGA M/F output cables.
If anything is missing or damaged, contact Black Box Technical Support at 724-746-5500 or info@blackbox.com.
2.3 Hardware Description
2.3.1 AC056A-R4 or AC056AE-R4

Figure 2-1. Front panel.

Figure 2-2. Back panel.
Table 2-1. AC056A-R4 or AC056AE-R4 components.
| Number Component Description |
| 1 4-position DIP switch Selects monitor type |
| 2 Power LED ON when power to the unit is on |
| 3 5-pin DIN connector Links to power |
| 4 VGA in Connects to VGA |
| 5 Monitor 2 Links to Monitor 2 |
| 6 Monitor 1 Links to Monitor 1 |
2.3.2 AC057A-R4, AC057AE-R3, or AC057AE-R2

Figure 2-3. Front panel.

Figure 2-4. Back panel.
Table 2-2. AC057A-R4, AC057AE-R3, or AC057AE-R2 components.
| Number Component Description |
| 1 4-position DIP switch Selects monitor type |
| 2 Power LED ON when power to the unit is on |
| 3 5-pin DIN connector Links to power |
| 4 VGA in Connects to VGA |
| 5 Monitor 2 Links to Monitor 2 |
| 6 Monitor 1 Links to Monitor 1 |
| 7 Monitor 4 Links to Monitor 4 |
| 8 Monitor 3 Links to Monitor 3 |
2.3.3 AC058A-R3
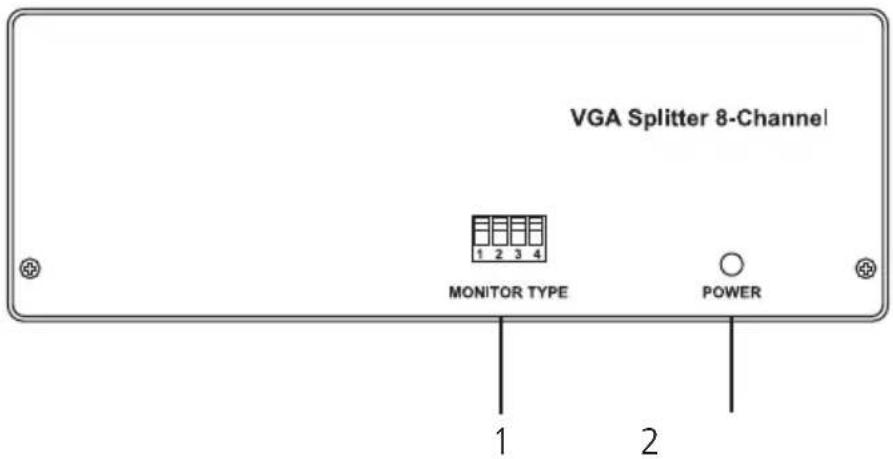
Figure 2-5. Front panel.

Figure 2-6. Back panel.
Table 2-3. AC058A-R3 components.
| Number Component Description | ||
| 1 4-position DIP switch Selects monitor type | ||
| 2 Power LED ON when power to the unit is on | ||
| 3 5-pin DIN connector | Links to power | |
| 4 VGA in | Connects to VGA | |
| 5 Monitor 2 | Links to Monitor 2 | |
| 6 Monitor 1 | Links to Monitor 1 | |
| 7 Monitor 6 | Links to Monitor 6 | |
| 8 Monitor 5 | Links to Monitor 5 | |
| 9 Monitor 8 | Links to Monitor 8 | |
| 10 | Monitor 7 | Links to Monitor 7 |
| 11 | Monitor 4 | Links to Monitor 4 |
| 12 | Monitor 3 | Links to Monitor 3 |
2.3.4 AC159A-R3 or AC159A-R2
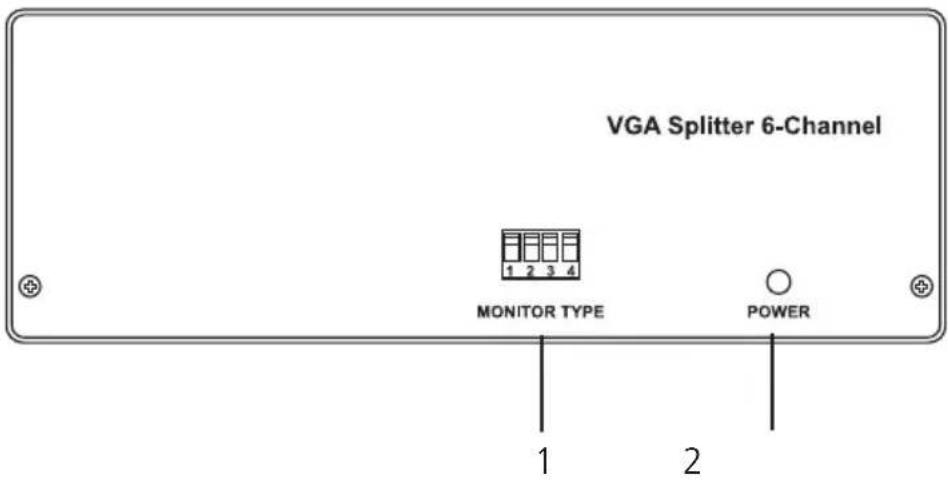
Figure 2-7. Front panel.
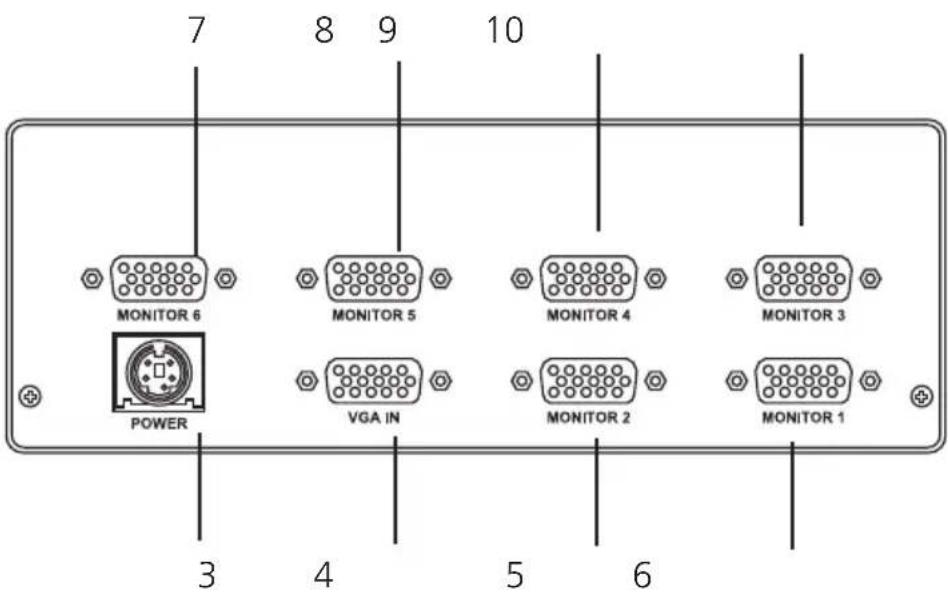
Figure 2-8. Back panel.
Table 2-4. AC159-R3 or AC159A-R2 components.
| Number Component Description |
| 1 4-position DIP switch Selects monitor type |
| 2 Power LED ON when power to the unit is on |
| 3 5-pin DIN connector Links to power |
| 4 VGA in Connects to VGA |
| 5 Monitor 2 Links to Monitor 2 |
| 6 Monitor 1 Links to Monitor 1 |
| 7 Monitor 6 Links to Monitor 6 |
| 8 Monitor 5 Links to Monitor 5 |
| 9 Monitor 4 Links to Monitor 4 |
| 10 Monitor 3 Links to Monitor 3 |
2.3.5 AC160A-R3 or AC160A-R2

Figure 2-9. Front panel.
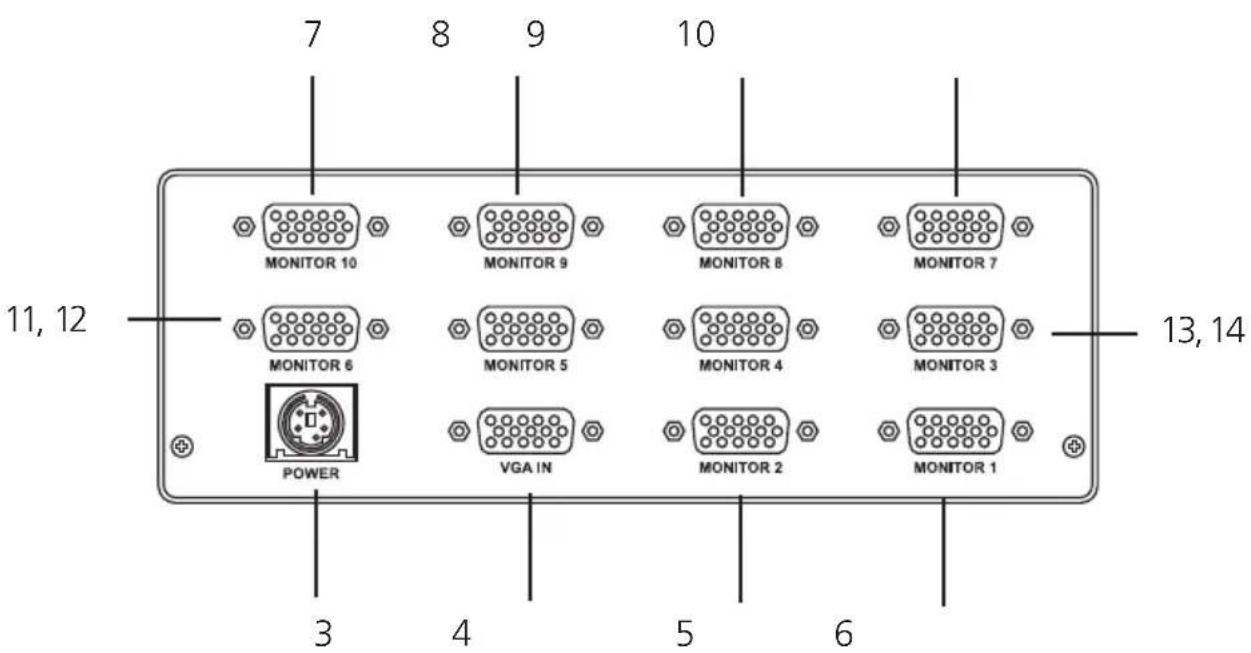
Figure 2-10. Back panel.
Table 2-5. AC160A-R3 or AC160A-R2 components.
| Number Component Description | ||
| 1 4-position DIP switch | Selects monitor type | |
| 2 Power LED | ON when power to the unit is on | |
| 3 5-pin DIN connector | Links to power | |
| 4 VGA in | Connects to VGA | |
| 5 Monitor 2 | Links to Monitor 2 | |
| 6 Monitor 1 | Links to Monitor 1 | |
| 7 Monitor 10 | Links to Monitor 10 | |
| 8 Monitor 9 | Links to Monitor 9 | |
| 9 Monitor 8 | Links to Monitor 8 | |
| 10 | Monitor 7 | Links to Monitor 7 |
| 11 | Monitor 6 | Links to Monitor 6 |
| 12 | Monitor 5 | Links to Monitor 5 |
| 13 | Monitor 4 | Links to Monitor 4 |
| 14 | Monitor 3 | Links to Monitor 3 |
3. Installation
3.1 Installation Steps
Follow these steps to install the VGA Video Splitter:
- Place the VGA Video Splitter within 6 feet (1.8 m) of the computer.
- Run the included video cable from the computer's VGA output to the connector marked VGA IN on the rear of the splitter.
- Connect your primary monitor (the one that was previously attached directly to the computer) to the connector marked MONITOR 1 on the rear of the splitter.
- Connect the additional monitor(s) to the remaining MONITOR connector(s) on the rear of the splitter. You can use VGA extension cables to extend the distance you can run to as much as 250 feet (76.2 m); see Section 3.3.
- Plug the output cord of the included power supply into the jack marked POWER on the rear of the Splitter.
- Plug the power supply into an AC wall outlet. The Splitter's front-panel LED should glow red to show that the unit is properly powered.
- The four-position DIP switch marked MONITOR TYPE on the front panel of the VGA Video Splitter tells the VGA adapter in your computer what type of monitors you have connected when the computer boots up.
For a standard application in which your remote monitor(s) are pretty much interchangeable with your primary monitor (the one on MONITOR 1), move all four switch positions to the "UP" setting; this will cause the Splitter to pass the "ID bits" from the primary monitor through to the VGA adapter. Moving all the positions to UP will not work for applications in which:
- there is no monitor on MONITOR 1;
- the primary monitor is connected to MONITOR 1 with a VGA extension cable that doesn't carry the ID-bit leads;
- the primary monitor uses higher-grade video than one or more of the remote monitors (for example, color VGA vs. monochrome VGA or high-resolution XGA-2 vs. low-resolution VGA).
In these situations, set the MONITOR TYPE switch this way:
Table 3-1. DIP switch settings for monitor types.
| Monitor Type | DIP Switch #1 | DIP Switch #2 | DIP Switch #3 | DIP Switch #4 |
| Color VGA and XGA monitors DOWN UP DOWN UP | ||||
| Monochrome VGA DOWN DOWN UP UP | ||||
| 8514/A UP UP DOWN UP | ||||
| *Monitor type not listed here UP UP UP UP | ||||
*NOTE: If your monitors don't belong to any of these three types, you must set all four MONITOR TYPE switch positions UP and connect a representative monitor to MONITOR 1 with cable that carries the monitor's ID-bit leads. If you don't have such a cable, contact Black Box Technical Support at 724-746-5500 or info@blackbox.com to order a cable that carries all ID-bit leads.
- Turn on the computer and the monitors. The monitors should now display the computer's output.
This completes the VGA Video Splitter installation. Once installed, the splitter shouldn't require any adjustments; you can keep it out of sight. It should now be ready for continuous operation.
3.2 Extending Your Distance
The maximum distance to which a VGA Video Splitter can drive signals to a VGA monitor depends primarily on the quality of the cable being used and the pixel resolution and refresh rate of the VGA image coming from the computer. Never use twisted-pair cable as video-extension cable, because this will cause “ghosting” of the on-screen images. Table 3-2 is a guide for maximum distance at various resolutions with high-quality VGA extension cable.
Table 3-2. Maximum Distances.
| Pixel Resolution and Refresh Rate Maximum Cable Length in feet (meters) | |
| 640 x 480 at 60 Hz 250 ft. (76.2 m) | |
| 640 x 480 at 75 Hz 175 ft. (53.3 m) | |
| 800 x 600 at 60 Hz 200 ft. (61 m) | |
| 800 x 600 at 75 Hz 175 ft. (53.3 m) | |
| 1024 x 768 at 60 Hz 150 ft. (45.7 m) | |
| 1024 x 768 at 75 Hz 125 ft. (38.1 m) | |
| 1280 x 1024 at 75 Hz 100 ft. (30.5 m) | |
To run the cable the full distance, you must not route it near motors, generators, air compressors, or other sources of electromagnetic noise. If you would like to order VGA extension cable, contact Black Box Technical Support at 724-746-5500 or info@blackbox.com.
3.3 Cascading
If you need to display your computer's VGA output on more monitors than a single VGA Video Splitter can handle, you can always "cascade" splitters:
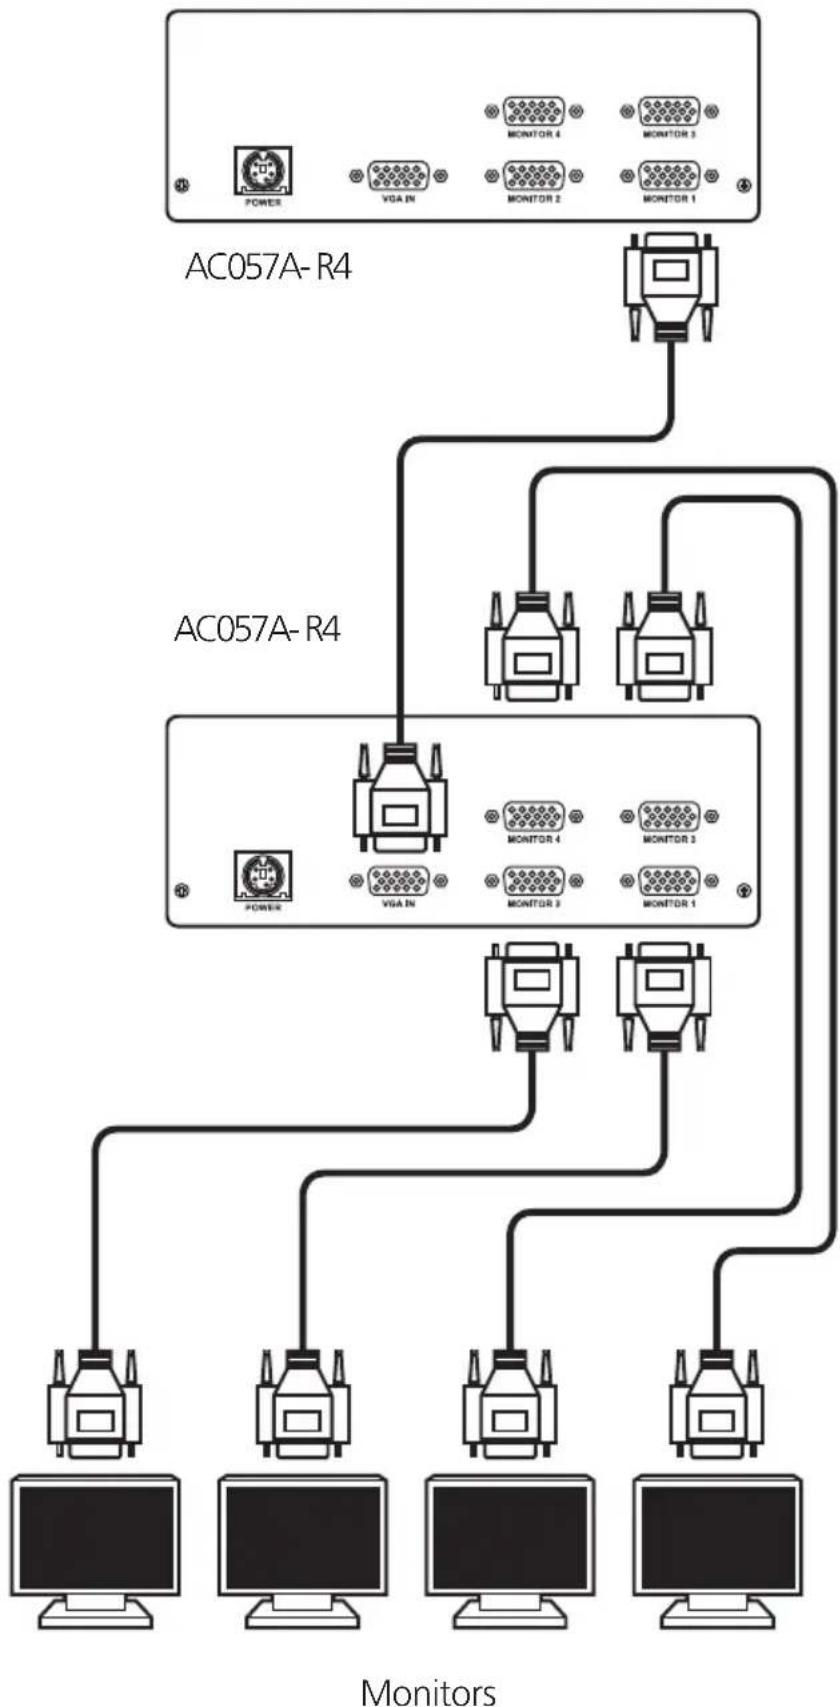
You can connect secondary splitters to the MONITOR ports on the primary splitter with short HD15 male to HD15 male cables. (If you need any of these cables, contact Black Box Technical Support at 724-746-5500 or info@blackbox.com.) Then you can plug as many as a hundred monitors into the MONITOR ports on the secondary splitters.
If you'll be cascading splitters, we have several suggestions for maintaining image quality and reducing the complexity of your system:
- Begin connecting secondary splitters to the highest-numbered port on the primary splitter and work backwards from there. For example, attach the first secondary splitter to MONITOR 8, the second to MONITOR 7, etc.
- Avoid connecting secondary splitters to primary splitters with fewer ports. For example, rather than attaching a ten-port secondary to a four-port primary, use the ten-port unit as the primary and retire the four-port until you need to use it as a secondary.
- In general, use as few splitters and as short runs of cable as possible to reach all your monitors.
- You can cascade to more than two “layers” of VGA Video Splitters; that is, you can begin plugging tertiary Splitters into the MONITOR ports of secondary Splitters when you run out of MONITOR ports on the primary splitter. However, the more VGA splitters that come between your computer and your monitors, the more signal degradation you will get. Try not to go to a third layer of splitters unless you absolutely have to—if you have to send VGA output to more than a hundred monitors, for example.
4. Operation
VGA Video Splitters provide a reliable means of getting your VGA images to widespread arrays of monitors: They use equalized amplification to compensate for the normal signal losses that occur when you run cable to VGA monitors at longer distances. With this technique, the signals that reach the monitors closely match the signal that left the VGA adapter, and you get the truest representation of your VGA images in terms of detail and color fidelity.
Each monitor output is independently buffered. This ensures isolation and proper signal levels regardless of the number of monitors used. The Splitter's external transformer will feel warm after the unit has been on for a period of time. This is normal because the unit draws a significant amount of current.
If, during operation, you find that you need to send your images to more monitors than a single splitter can support, you can “cascade” splitters (use two or more in combination).
5. Applications
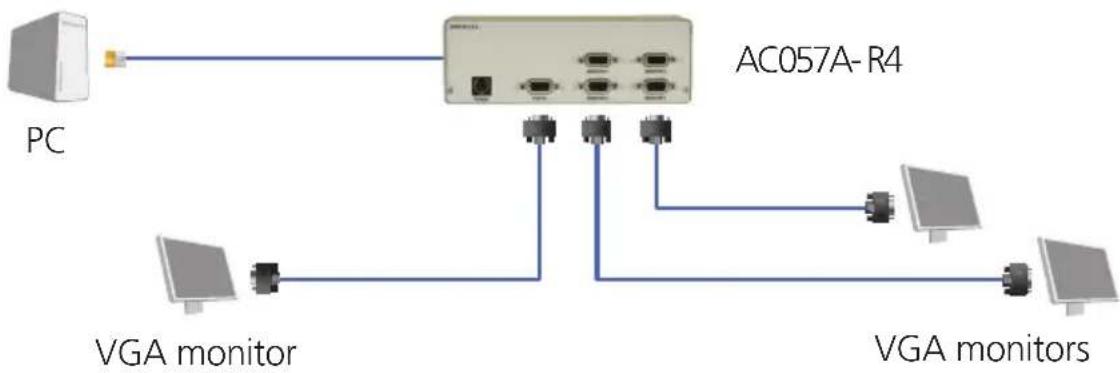
Use VGA Video Splitters where a number of monitors need to be connected to one computer. Typical applications include classrooms, business meetings, and trade shows. Figure 5-1 shows a typical application using an AC057A-R4 unit.
flowchart
graph TD
    PC["PC"] -->|USB| A["AC057A-R4"]
    A --> B["VGA monitor"]
    A --> C["VGA monitors"]
    B --> D["Computer"]
    C --> E["Computer"]
Figure 5-1. Typical application using the AC057A-R4.
In a conference room or demonstration room, for example, the VGA Video Splitter can feed images to the PC's own VGA monitor plus others located around the room or on the demonstration table. This eliminates the need for people to crowd around the PC for a look at the display.
In a classroom, instructional material on your computer can be easily viewed by all the students at their desks.
Also, you can give presentations by creating an “electronic slide show” on your computer and using the VGA Video Splitter to drive the “slides” to the computer’s own monitor plus a large-screen projection monitor that has a VGA input.
Figure 5-2 shows a cascaded application using an AC057A-R4 unit.
flowchart
graph TD
    A["AC057A-R4"] --> B["MONITOR 1"]
    A --> C["MONITOR 2"]
    A --> D["MONITOR 3"]
    A --> E["MONITOR 4"]
    A --> F["POWER"]
    A --> G["VGA IN"]
    A --> H["MONITOR 1"]
    A --> I["MONITOR 2"]
    A --> J["MONITOR 3"]
    A --> K["MONITOR 4"]
    A --> L["MONITOR 5"]
    M["MONITOR 1"] --> N["MONITOR 2"]
    O["MONITOR 3"] --> P["MONITOR 4"]
    Q["MONITOR 4"] --> R["MONITOR 5"]
    S["MONITOR 5"] --> T["MONITOR 6"]
Figure 5-2. Cascaded application using an AC057A-R4 units.
6. Troubleshooting
6.1 Common Concerns
If the display colors on all the monitors seem to be “reversed,” this might be caused by improperly setting the MONITOR TYPE DIP switch on the front panel. Recheck the switch setting (see Section 3.1, Step 7).
If one or two colors are missing on one of the VGA monitors, make sure all connections to the VGA Video Splitter are secure. Make sure the monitor connector's jackscrews are tightened.
If problems persist, contact Black Box Technical Support.
6.2 Contacting Black Box
If you determine that your VGA Video Splitter is malfunctioning, do not attempt to alter or repair the unit. It contains no user-serviceable parts.
Contact Black Box Technical Support at 724-746-5500 or info@blackbox.com. The problem may be solvable over the phone.
Before you do, make a record of the history of the problem. We will be able to provide more efficient and accurate assistance if you have a complete description, including:
- the nature and duration of the problem.
- when the problem occurs.
- the components involved in the problem.
- any particular application that, when used, appears to create the problem or make it worse.
6.3 Shipping and Packaging
If you need to transport or ship your VGA Video Splitter:
- Package it carefully. We recommend that you use the original container.
- If you are shipping the splitter for repair, include its power supply. If you are returning the splitter, make sure you include everything you received with the unit. Before you ship, contact Black Box to get a Return Materials Authorization (RMA) number.
Black Box Tech Support: FREE! Live. 24/7.
Tech support the way it should be.

natural_image
Black-and-white portrait of a smiling woman wearing a headset (no text or symbols visible)Great tech support is just 30 seconds away at 724-746-5500 or blackbox.com.

BLACK BOX®
NETWORK SERVICES
About Black Box
Black Box provides an extensive range of networking and infrastructure products. You'll find everything from cabinets and racks and power and surge protection products to media converters and Ethernet switches all supported by free, live 24/7 Tech support available in 30 seconds or less.
© Copyright 2011. Black Box Corporation. All rights reserved. Black Box ® and the Double Diamond logo are registered trademarks of BB Technologies, Inc. Any third-party trademarks appearing in this manual are acknowledged to be the property of their respective owners.
AC056A-R4, version 1
- Send VGA output to one local monitor and to as many as nine remote monitors up to 250 feet (76.2 m) away.
- FEDERAL COMMUNICATIONS COMMISSION AND INDUSTRY CANADA RADIO FREQUENCY INTERFERENCE STATEMENTS
- Chapter
- Page
- Specifications
- Overview
- Introduction
- What's Included
- AC057A-R4, AC057AE-R3, or AC057AE-R2
- AC159A-R3 or AC159A-R2
- AC160A-R3 or AC160A-R2
- Installation
- Installation Steps
- Cascading
- Operation
- Applications
- Troubleshooting
- Common Concerns
- Contacting Black Box
- Shipping and Packaging
- About Black Box
Brand : Black Box
Model : AC057A-K-R4
Category : Decoder