Time Machine - NAS NETGEAR - Free user manual and instructions
Find the device manual for free Time Machine NETGEAR in PDF.

User questions about Time Machine NETGEAR
0 question about this device. Answer the ones you know or ask your own.
Ask a new question about this device
Download the instructions for your NAS in PDF format for free! Find your manual Time Machine - NETGEAR and take your electronic device back in hand. On this page are published all the documents necessary for the use of your device. Time Machine by NETGEAR.
USER MANUAL Time Machine NETGEAR
Time Machine Setup for Routers
User Manual
August 2015
202-11590-02
350 East Plumeria Drive
San Jose, CA 95134
USA

natural_image
Abstract geometric composition with overlapping colored triangles (no text or symbols)Time Machine Setup for Routers
Support
Thank you for selecting NETGEAR products.
After installing your device, locate the serial number on the label of your product and use it to register your product at https://my.netgear.com. You must register your product before you can use NETGEAR telephone support. NETGEAR recommends registering your product through the NETGEAR website.
For product updates and web support, visit http://support.netgear.com.
Phone (US & Canada only): 1-888-NETGEAR.
Phone (Other Countries): Check the list of phone numbers at http://support.netgear.com/general/contact/default.aspx.
Trademarks
© NETGEAR, Inc., NETGEAR and the NETGEAR Logo are trademarks of NETGEAR, Inc. Any non-NETGEAR trademarks are used for reference purposes only.
Compliance
For regulatory compliance information, visit http://www.netgear.com/about/regulatory/.
See the regulatory compliance document before connecting the power supply.
Contents
Chapter 1 Prepare Your USB HDD and Mac Computer
Supported Mac Operating Systems 5
Supported NETGEAR Routers 5
Supported USB Hard Disk Drives 5
Set Up a USB Hard Drive on a Mac 5
Prepare Your Mac to Back Up a Large Amount of Data. 8
Chapter 2 Back Up With Time Machine
Use Time Machine to Back Up Onto a USB Hard Drive 13
Prepare Your USB HDD and Mac Computer
1
You can use Time Machine to back up your Mac computer onto a USB hard disk drive (HDD) that is connected to one of the router's USB ports. Before you back up using Time Machine, read this chapter to prepare your USB HDD and Mac computer.
This chapter contains the following sections:
• Supported Mac Operating Systems
• Supported NETGEAR Routers
• Supported USB Hard Disk Drives
- Set Up a USB Hard Drive on a Mac
• Prepare Your Mac to Back Up a Large Amount of Data
For more information about the topics covered in this manual, visit the support website at http://support.netgear.com.
Supported Mac Operating Systems
To determine if your Mac computer supports Time Machine, see the Apple support site or see the documentation that came with your Mac.
Note: The images used in this user manual were taken on a MacBook Air running OS X Yosemite.
Supported NETGEAR Routers
To determine if your NETGEAR router supports Time Machine, see your router's user manual, which is available at http://downloadcenter.netgear.com.
Supported USB Hard Disk Drives
For the most up-to-date list of USB HDDs that your router supports, visit http://kbserver.netgear.com/readyshare.
Set Up a USB Hard Drive on a Mac
NETGEAR recommends that you use a new USB HDD or format your old USB disk to do the Time Machine backup for the first time. Use a blank partition to prevent some issues during backup using Time Machine. The router supports GUID or MBR partitions.
To format your USB hard disk drive and specify partitions:
- Connect a USB HDD to a USB port on your Mac computer.
-
On your Mac, go to the Spotlight (or the magnifying glass), which is at the top right of your computer's menu bar, and search for Disk Utility.
-
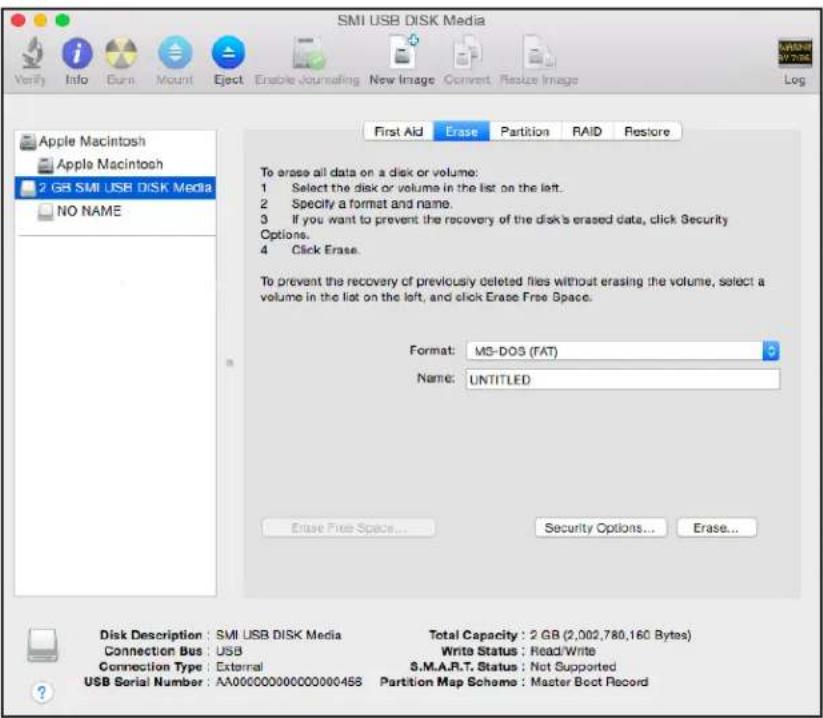
Open the Disk Utility, select your hard disk drive, click the Erase tab, and click the Erase button.
text_image
SMI USB DISK Media Verify Info Burn Mount Eject Enable Journaling New Image Convert Realize Image Log Apple Macintosh Apple Macintosh 2 GB SMI USB DISK Media NO NAME First Aid Erase Partition RAID Restore To erase all data on a disk or volume: 1 Select the disk or volume in the list on the left. 2 Specify a format and name. 3 If you want to prevent the recovery of the disk's erased data, click Security Options. 4 Click Erase. To prevent the recovery of previously deleted files without erasing the volume, select a volume in the list on the left, and click Erase Free Space. Format: MS-DOS (FAT) Name: UNTITLED Erase Free Space... Security Options... Erase... Disk Description: SMI USB DISK Media Total Capacity: 2 GB (2,002,780,160 Bytes) Connection Bus: USB Write Status: Read/Write Connection Type: External S.M.A.R.T. Status: Not Supported USB Serial Number: AA000000000000000458 Partition Map Scheme: Master Boot Record- Click the Partition tab.
text_image
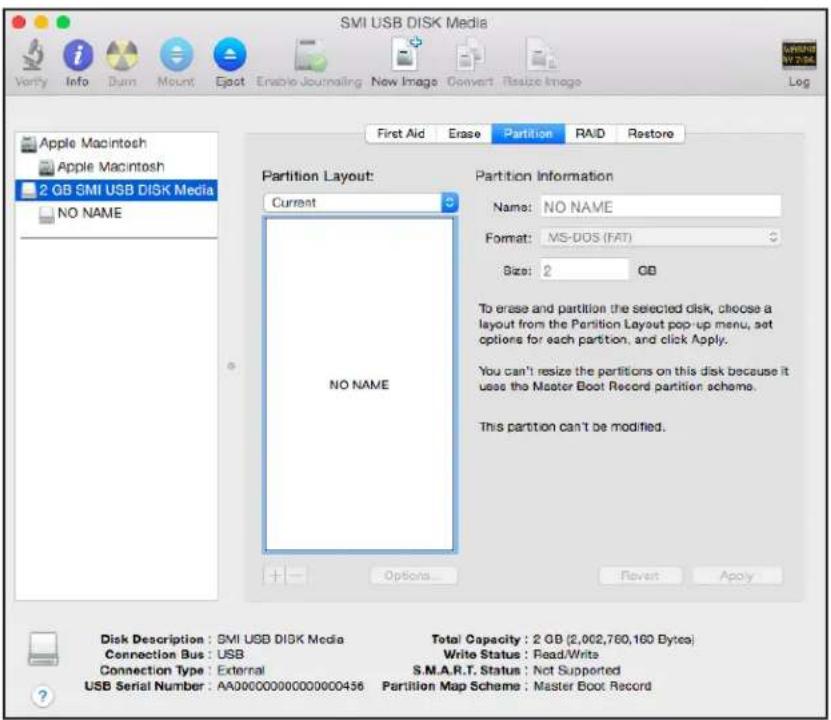
SMI USB DISK Media Verify Info Dum Mount Eject Enable Journaling New Image Convert Resize Image Log First Aid Erase Partition RAID Restore Apple Macintosh Apple Macintosh 2 GB SMI USB DISK Media NO NAME Partition Layout: Current No NAME Partition Information Name: NO NAME Format: MS-DOS (FAT) Size: 2 GB To erase and partition the selected disk, choose a layout from the Partition Layout pop-up menu, set options for each partition, and click Apply. You can't resize the partitions on this disk because it uses the Master Boot Record partition scheme. This partition can't be modified. Options... Revort Apply Disk Description: SMI USB DISK Media Connection Bus: USB Connection Type: External USB Serial Number: AA00000000000000456 Total Capacity: 2 GB (2,002,760,160 Bytes) Write Status: Read/Write S.M.A.R.T. Status: Not Supported Partition Map Scheme: Master Boot Record- In the Partition Layout menu, set the number of partitions that you want to use.
text_image
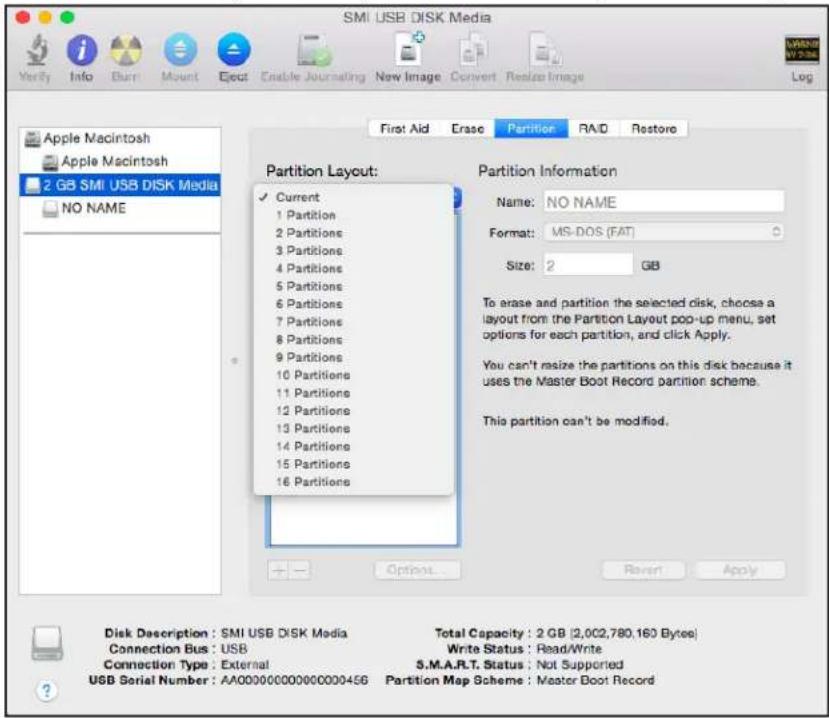
SMI USB DISK Media Verify Info Burn Mount Eject Enable Journaling New Image Convert Realize Image Log First Aid Erase Partition RAID Restore Apple Macintosh Apple Macintosh 2 GB SMI USB DISK Media NO NAME Partition Layout: ✓ Current 1 Partition 2 Partitions 3 Partitions 4 Partitions 5 Partitions 6 Partitions 7 Partitions 8 Partitions 9 Partitions 10 Partitions 11 Partitions 12 Partitions 13 Partitions 14 Partitions 15 Partitions 16 Partitions Partition Information Name: NO NAME Format: MS-DOS (FAT) Size: 2 GB To erase and partition the selected disk, choose a layout from the Partition Layout pop-up menu, set options for each partition, and click Apply. You can't resize the partitions on this disk because it uses the Master Boot Record partition scheme. This partition can't be modified. Disk Description: SMI USB DISK Media Total Capacity: 2 GB (2,002,780,160 Bytes) Connection Bus: USB Write Status: Read/Write Connection Type: External S.M.A.R.T. Status: Not Supported USB Serial Number: AA00000000000000456 Partition Map Scheme: Master Boot RecordThe Options button displays at the bottom of the page.
- Click the Options button.
text_image
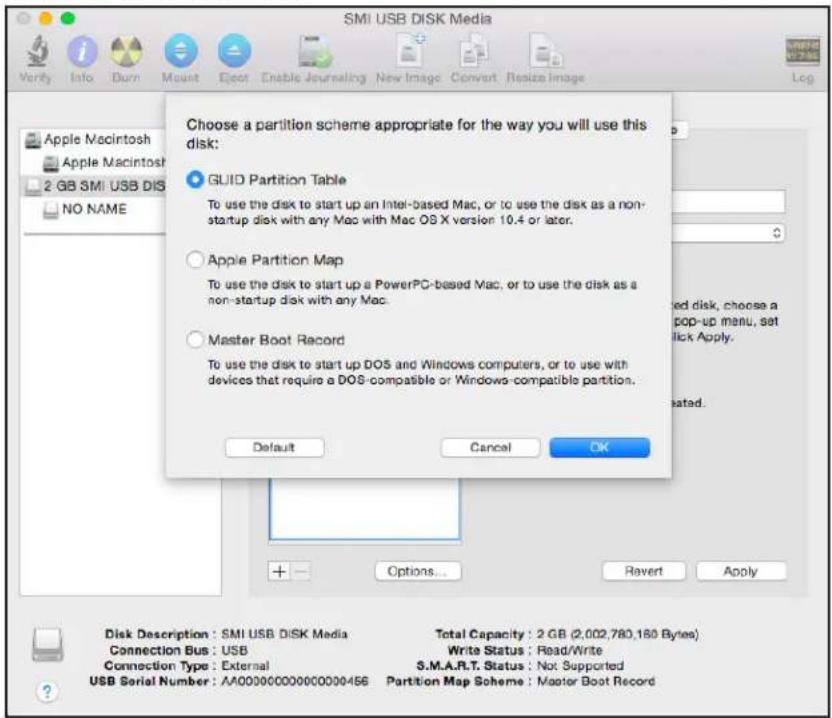
SMI USB DISK Media Choose a partition scheme appropriate for the way you will use this disk: GUID Partition Table To use the disk to start up an Intel-based Mac, or to use the disk as a non-startup disk with any Mac with Mac OS X version 10.4 or later. Apple Partition Map To use the disk to start up a PowerPC-based Mac, or to use the disk as a non-startup disk with any Mac. Master Boot Record To use the disk to start up DOS and Windows computers, or to use with devices that require a DOS-compatible or Windows-compatible partition. Default Cancel OK Disk Description: SMI USB DISK Media Connection Bus: USB Connection Type: External USB Serial Number: AA000000000000000456 Total Capacity: 2 GB (2,002,780,160 Bytes) Write Status: Read/Write S.M.A.R.T. Status: Not Supported Partition Map Scheme: Master Boot Record-
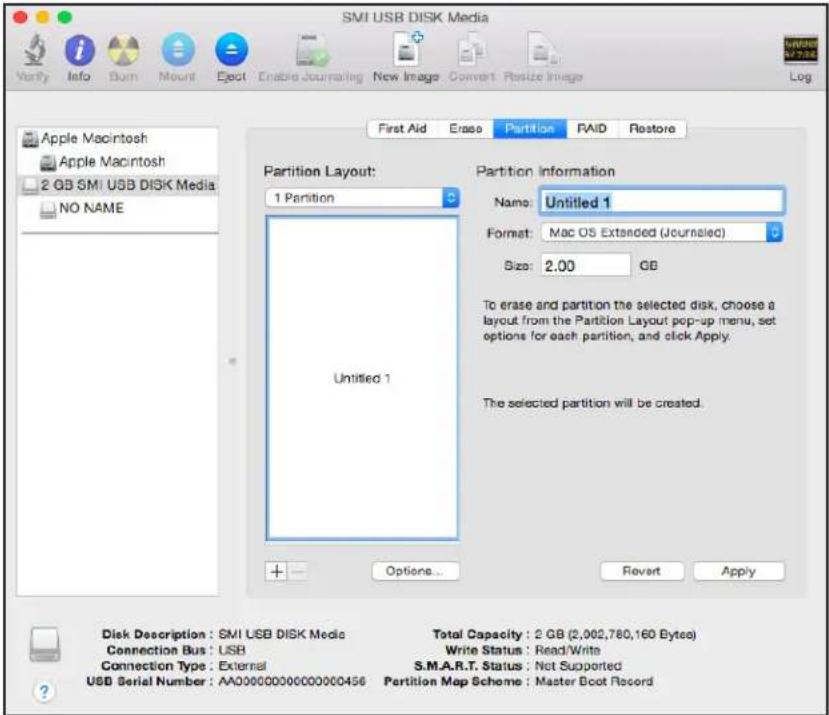
Select the GUID Partition Table or Master Boot Record radio button and click the OK button.
-
In the Format menu, select Mac OS Extended (Journaled).
text_image
SMI USB DISK Media Vorify Info Burn Mount Eject Enable Journaling New Image Convert Realize Image Log First Aid Erase Partition RAID Restore Apple Macintosh Apple Macintosh 2 GB SMI USB DISK Media NO NAME Partition Layout: 1 Partition Untitled 1 Partition Information Name: Untitled 1 Format: Mac OS Extended (Journalled) Size: 2.00 GB To erase and partition the selected disk, choose a layout from the Partition Layout pop-up menu, set options for each partition, and click Apply. The selected partition will be created. Options... Revart Apply Disk Description : SMI USB DISK Media Total Capacity : 2 GB (2,002,780,160 Bytes) Connection Bus : USB Write Status : Read/Write Connection Type : External S.M.A.R.T. Status : Net Supported USB Serial Number : AA00000000000000456 Partition Map Scheme : Master Boot Record- Click the Apply button.
Your settings are saved.
Prepare Your Mac to Back Up a Large Amount of Data
Before you back up a large amount of data with Time Machine, NETGEAR recommends that you follow this procedure to prepare your Mac.
To prepare to back up a large amount of data:
- Upgrade the operating system of the Mac computer.
- Verify and repair the backup disk and the local disk.
- Verify and repair the permissions on the local disk.
- Set Energy Saver:
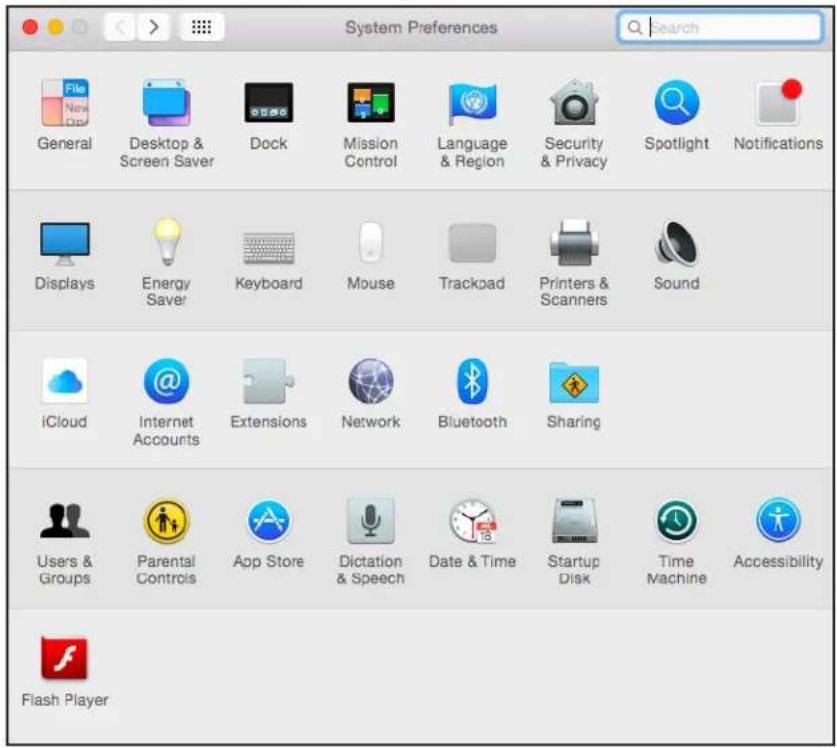
a. From the Apple menu, select System Preferences.
text_image
System Preferences General Desktop & Screen Saver Dock Mission Control Language & Region Security & Privacy Spotlight Notifications Displays Energy Saver Keyboard Mouse Trackpad Printers & Scanners Sound iCloud Internet Accounts Extensions Network Bluetooth Sharing Users & Groups Parental Controls App Store Dictation & Speech Date & Time Startup Disk Time Machine Accessibility Flash Playerb. Select Energy Saver.
text_image
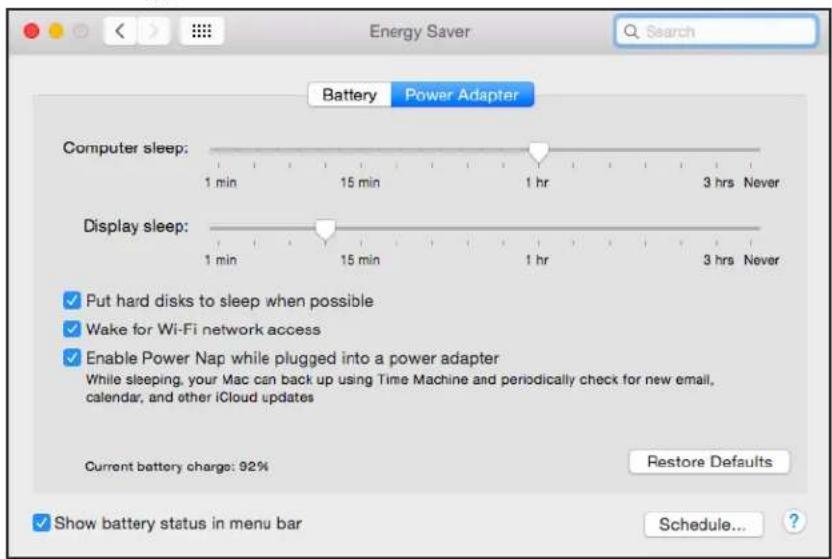
Battery Power Adapter Computer sleep: 1 min 15 min 1 hr 3 hrs Never Display sleep: 1 min 15 min 1 hr 3 hrs Never ✓ Put hard disks to sleep when possible ✓ Wake for Wi-Fi network access ✓ Enable Power Nap while plugged into a power adapter While sleeping, your Mac can back up using Time Machine and periodically check for new email, calendar, and other iCloud updates Current battery charge: 92% Restore Defaults ✓ Show battery status in menu bar Schedule... ?c. Click the Power Adapter tab.
d. Select the Wake for Wi-Fi network access check box.
e. Click the back arrow to save the changes and exit the page.
- Modify your security settings:
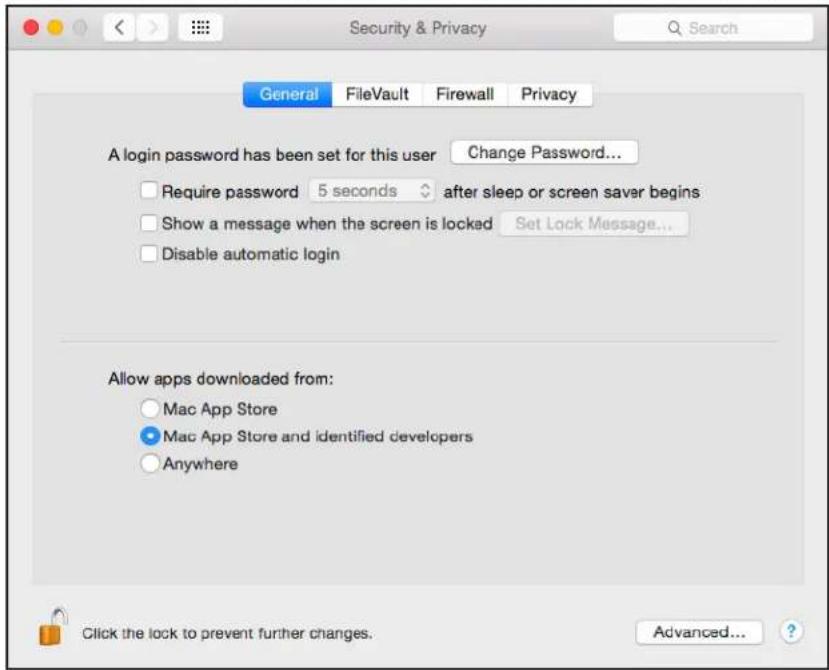
a. From the System Preferences window, select Security & Privacy.
text_image
Security & Privacy General FileVault Firewall Privacy A login password has been set for this user Change Password... Require password 5 seconds after sleep or screen saver begins Show a message when the screen is locked Set Lock Message... Disable automatic login Allow apps downloaded from: Mac App Store Mac App Store and identified developers Anywhere Click the lock to prevent further changes. Advanced... ?b. Click the Advanced button at the bottom of the page.
If the Advanced button is grayed out, click the lock icon so that you can change the settings.
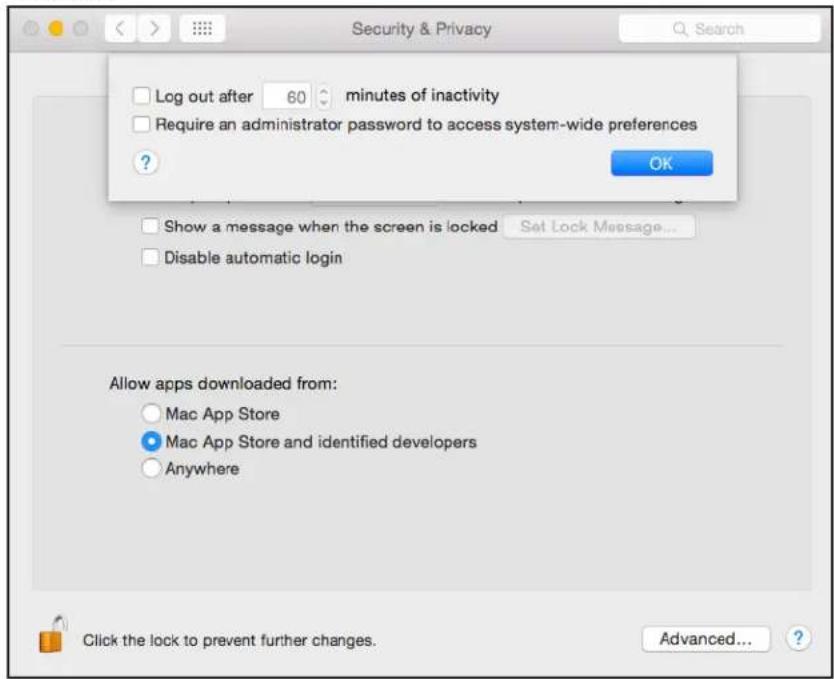
text_image
Security & Privacy Log out after 60 minutes of inactivity Require an administrator password to access system-wide preferences ? OK Show a message when the screen is locked Set Lock Message... Disable automatic login Allow apps downloaded from: Mac App Store Mac App Store and identified developers Anywhere Click the lock to prevent further changes. Advanced... ?c. Clear the Log out after minutes of inactivity check box.
Time Machine Setup for Routers
d. Click the OK button.
Your changes are saved.
Back Up With Time Machine
2
You must follow the instructions in Chapter 1 to prepare your USB HDD and Mac computer before you can back up your Mac computer using Time Machine.
Use Time Machine to Back Up Onto a USB Hard Drive
You can use Time Machine to back up your Mac computers onto a USB HDD that is connected to one of the router's USB ports.
To back up your Mac onto a USB hard drive:
- If you are already using Time Machine with a USB HDD, skip Steps 2 and 3 and go to Step 4.
-
Prepare your USB HDD with a compatible format and partitions.
For more information, see Set Up a USB Hard Drive on a Mac on page 5. -
Prepare your Mac if you plan to back up a large amount of data.
For more information, see Prepare Your Mac to Back Up a Large Amount of Data on page 8.
- Connect your USB HDD to a USB port on your router.
If your USB HDD uses a power supply, you must use it when you connect the USB HDD to the router.
When you connect the USB HDD to the router's USB port, it might take up to two minutes before it is ready for sharing. By default, the USB HDD is available to all computers on your local area network (LAN).
-
Connect your Mac computer to the router's network using a WiFi connection or a wired Ethernet connection.
-
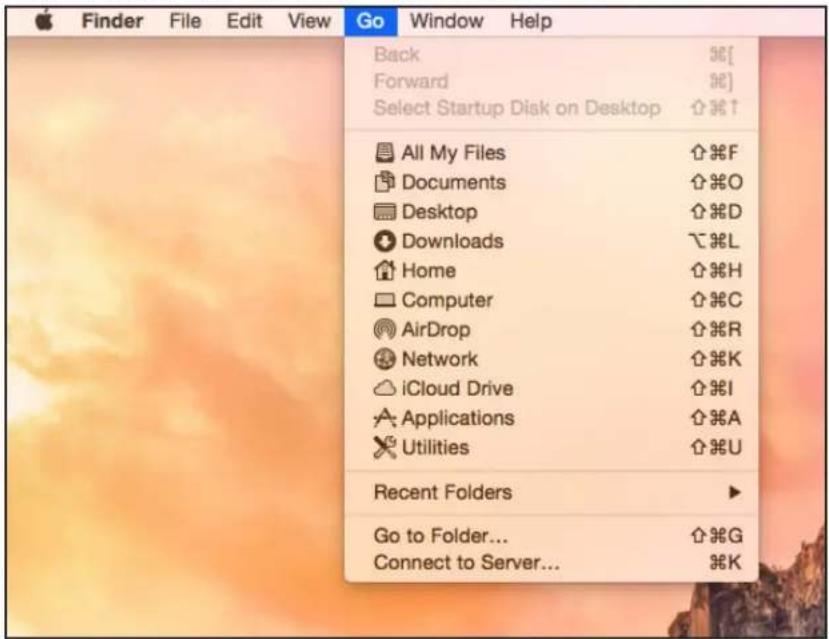
Launch Finder and select Go > Connect to Server.
text_image
Finder File Edit View Go Window Help Back Forward Select Startup Disk on Desktop All My Files Documents Desktop Downloads Home Computer AirDrop Network iCloud Drive Applications Utilities Recent Folders Go to Folder... Connect to Server...The Connect to Server window displays.
- In the Server Address field, type smb://routerlogin.net and click the Connect button.
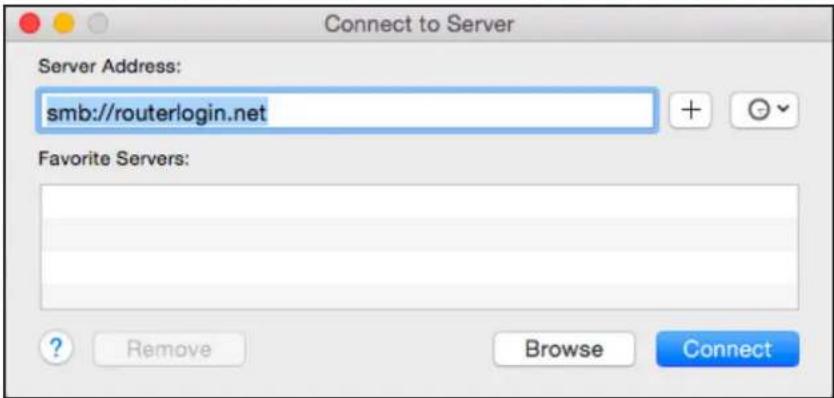
text_image
Connect to Server Server Address: smb://routerlogin.net Favorite Servers: ? Remove Browse Connect- When prompted, select the Registered User radio button.
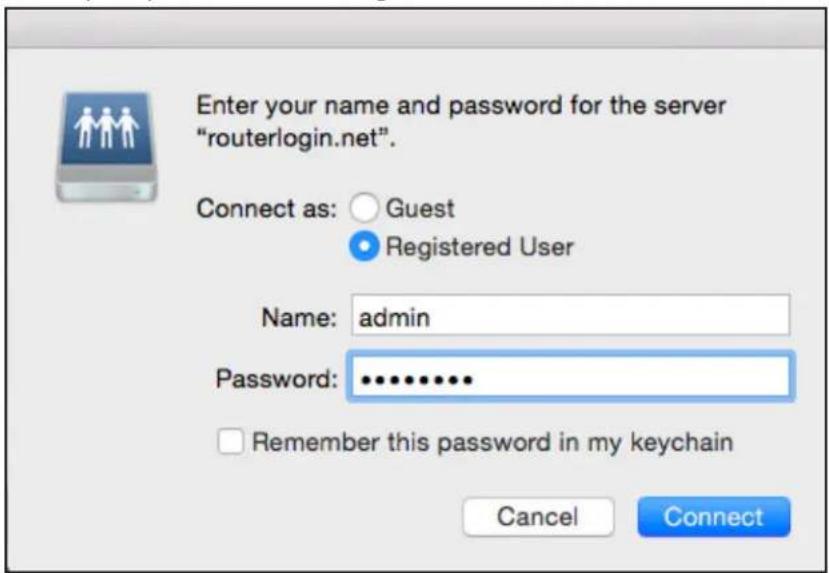
text_image
Enter your name and password for the server "routerlogin.net". Connect as: Guest Registered User Name: admin Password: ............. Remember this password in my keychain Cancel Connect- Enter admin for the name and password for the password and click the Connect button.
A list of USB devices connected to your router displays.
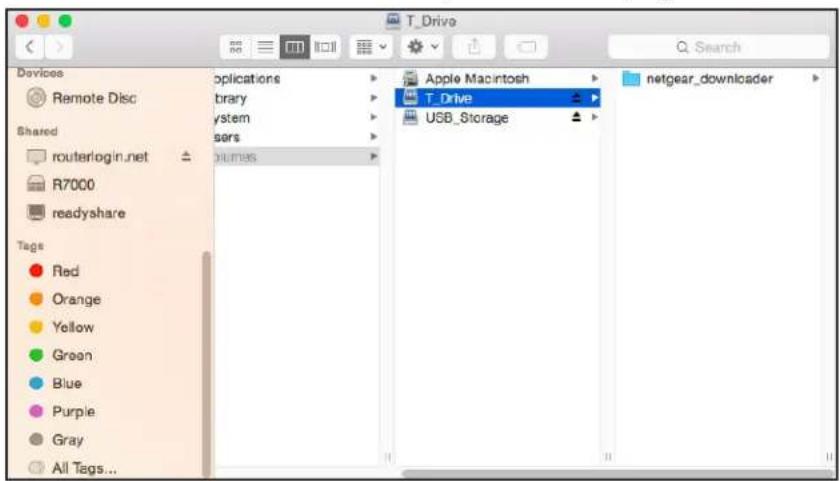
text_image
T_Drive Applications Binary ystem users runmes Apple Macintosh T_Drive USB_Storage netgear_downloader Red Orange Yellow Green Blue Purple Gray All Tags...- From the Apple menu, select System Preferences.
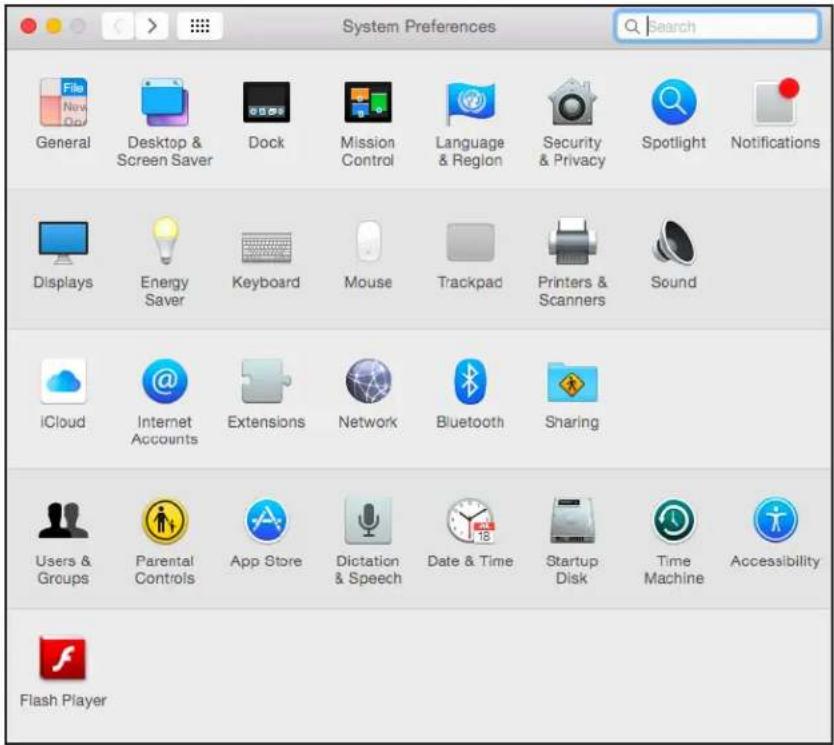
text_image
System Preferences Search General Desktop & Screen Saver Dock Mission Control Language & Region Security & Privacy Spotlight Notifications Displays Energy Saver Keyboard Mouse Trackpad Printers & Scanners Sound iCloud Internet Accounts Extensions Network Bluetooth Sharing Users & Groups Parental Controls App Store Dictation & Speech Date & Time Startup Disk Time Machine Accessibility Flash Player11. Select Time Machine.
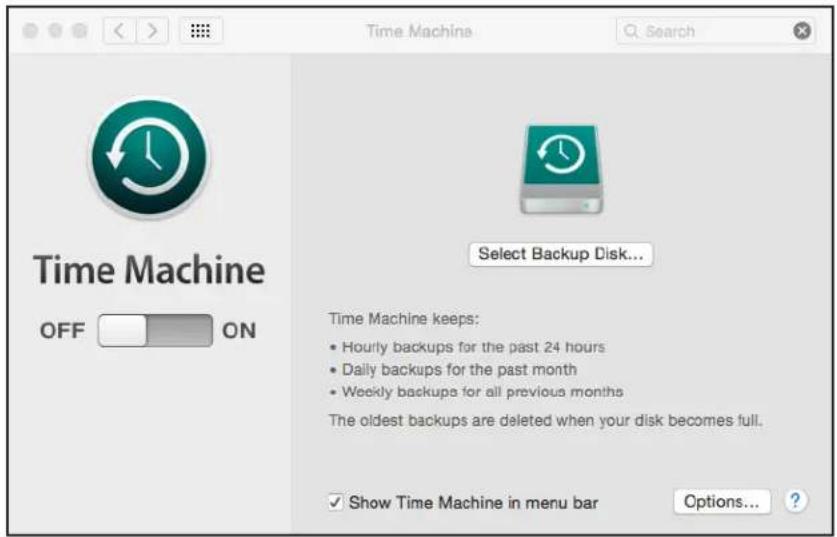
text_image
Time Machine OFF ON Select Backup Disk... Time Machine keeps: • Hourly backups for the past 24 hours • Daily backups for the past month • Weekly backups for all previous months The oldest backups are deleted when your disk becomes full. ✓ Show Time Machine in menu bar Options... ?12. Click the Select Backup Disk button and select your USB device from the list.
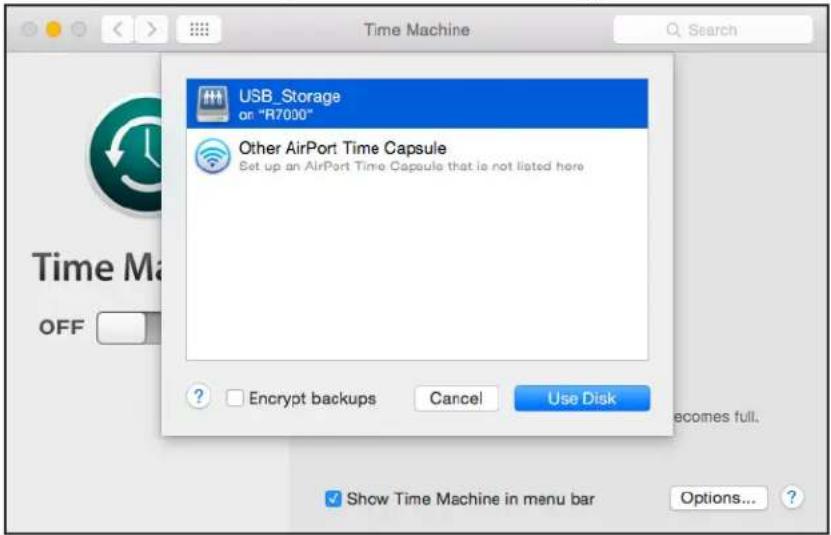
text_image
USB_Storage or "R7000" Other AirPort Time Capsule Set up an AirPort Time Capsule that is not listed here ? Encrypt backups Cancel Use Disk Time Ma OFF becomes full. Show Time Machine in menu bar Options... ?13. Click the Use Disk button.
Note: If you do not see the USB partition that you want in the Time Machine disk list, go to Mac Finder and click that USB partition. It displays in the Time Machine list.
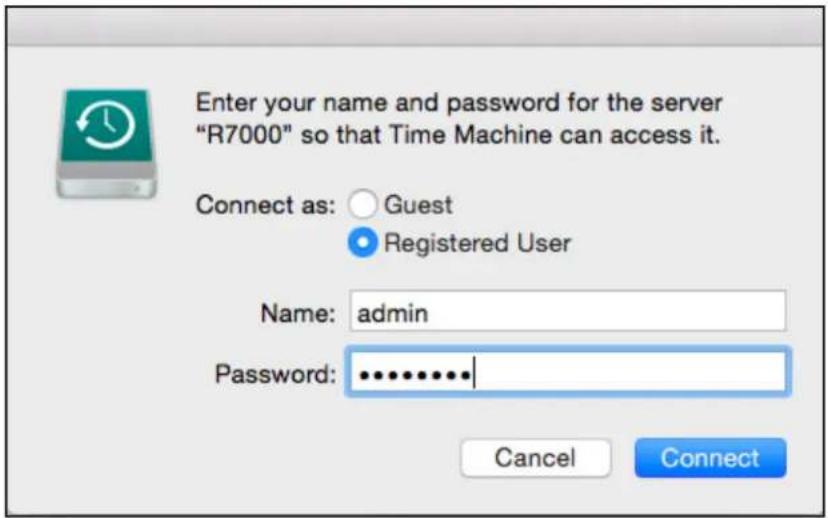
- When prompted, select the Registered User radio button.
text_image
Enter your name and password for the server "R7000" so that Time Machine can access it. Connect as: Guest Registered User Name: admin Password: ******** Cancel Connect- Enter admin for the name and password for the password and click the Connect button.
The setup is complete.
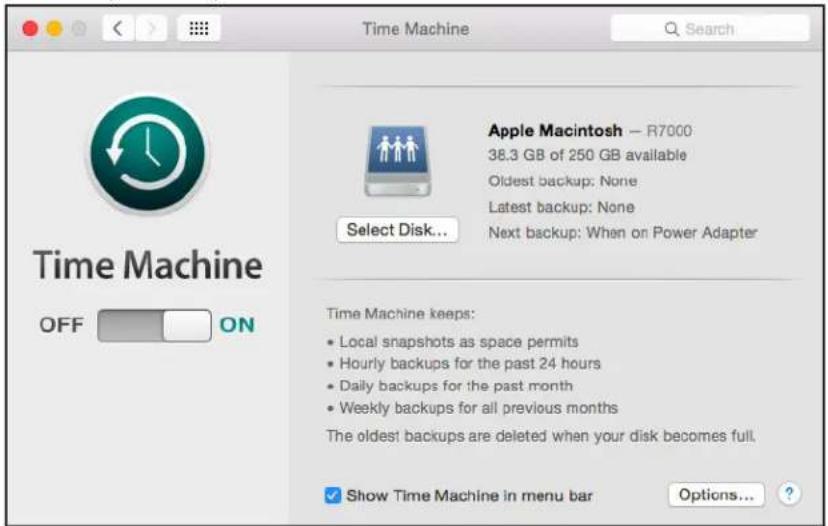
text_image
Time Machine Search Apple Macintosh — R7000 38.3 GB of 250 GB available Oldest backup: None Latest backup: None Next backup: When on Power Adapter Select Disk... Time Machine keeps: • Local snapshots as space permits • Hourly backups for the past 24 hours • Daily backups for the past month • Weekly backups for all previous months The oldest backups are deleted when your disk becomes full. Show Time Machine in menu bar Options...Your Mac automatically schedules a full backup. You can back up immediately if you want.