FreeWave Viewer VL - Remote control Vello - Free user manual and instructions
Find the device manual for free FreeWave Viewer VL Vello in PDF.


| Brand | Vello |
| Model | FreeWave Viewer VL |
| Product Type | Wireless Presenter Remote |
| Connectivity | RF 2.4 GHz |
| Range | Up to 30 meters (100 feet) |
| Power Source | 2 x AAA batteries (not included) |
| Battery Life | Approximately 12 months of typical use |
| Laser Pointer | Class 2, <1 mW output |
| Functions | Page up/down, full screen, black screen, hyperlink navigation, volume control |
| Compatibility | Windows, macOS, Linux |
| Dimensions | 10.5 x 3.2 x 1.8 cm (4.1 x 1.3 x 0.7 in) |
| Weight | 50 g (1.8 oz) with batteries |
| Material | Plastic with rubberized grip |
| Color | Black |
| Receiver | USB nano receiver, stored inside remote |
| Cleaning | Wipe with a soft, dry cloth; do not use liquids |
| Safety | Avoid direct eye exposure to laser; keep away from children |
| Spare Parts | Batteries and USB receiver can be replaced; contact Vello support |
| Warranty | 1 year limited warranty |
| Manual Languages | English, French, German, Spanish, Italian, Dutch |
Frequently Asked Questions - FreeWave Viewer VL Vello
User questions about FreeWave Viewer VL Vello
0 question about this device. Answer the ones you know or ask your own.
Ask a new question about this device
Download the instructions for your Remote control in PDF format for free! Find your manual FreeWave Viewer VL - Vello and take your electronic device back in hand. On this page are published all the documents necessary for the use of your device. FreeWave Viewer VL by Vello.
USER MANUAL FreeWave Viewer VL Vello
FREEWAVE VIEWER VL
WIRELESS LIVE-VIEW
REMOTE

VELLO
INTRODUCTION
Thank you for selecting the Vello FreeWave Viewer VL Wireless Live-View Remote. The bright 3.5" color viewer displays the live view from select DSLR cameras and can trigger the shutter and control video recording from up to 328 feet (100 meters) away in an open area.
The two-component system consists of the Transmitter/Mini-Cam that fits on the shoe mount of your camera and the Receiver/Viewer that you can hold like any mobile device or mount on a tripod.
You'll be able to take still photographs, start and stop video recording and more all from a safe distance or hidden from your subject. Using a 2.4 Gigahertz (GHz) radio frequency (RF) that passes through and around people, furniture, walls, floors and windows, the VL components do not require line-of-sight positioning.
The VL features two remote viewing modes. The Live View (LV) mode provides the same camera lens view as if you were standing directly behind your camera looking at its view screen. The Closed Circuit Television-type camera (the Mini-Cam) mode bypasses your camera's lens and uses the fixed lens built into the VL's transmitter to see the general area at which your camera is pointed. The output feed from either viewing mode can be used for big-screen monitoring on your TV using the included single-pin to composite video adapter.
For a more elaborate setup, you can use additional FreeWave VL Transmitter/Mini-Cams and a single Receiver/Viewer to monitor and control up to four cameras. Each camera can be matched to its own wireless channel, and each can be placed in a different nearby location. For example, you can shoot the same subject from various angles.
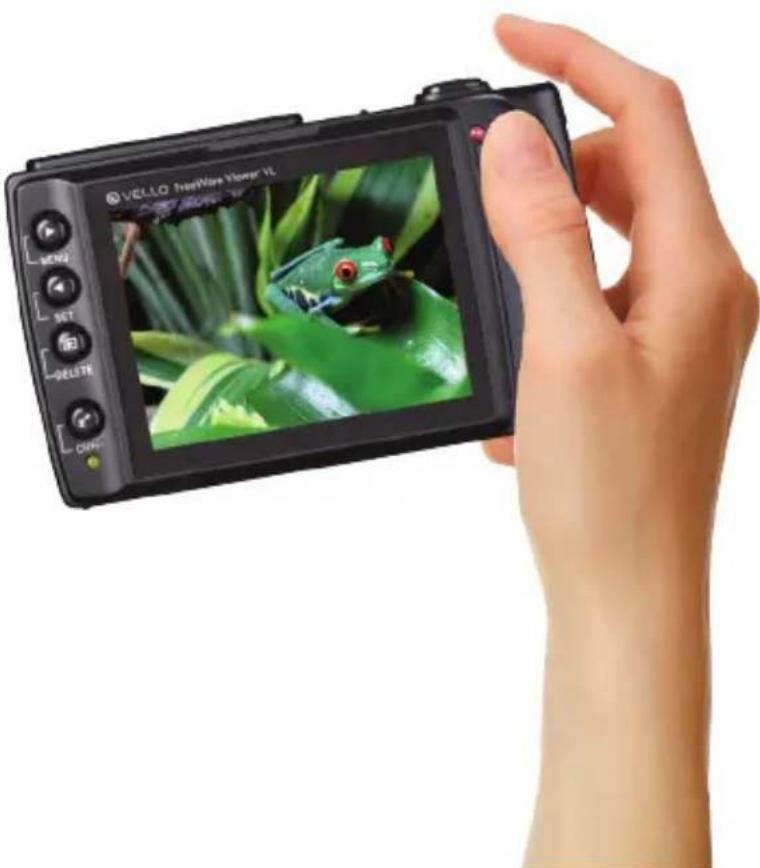
natural_image
Hand holding a black VELLO FruitWire Viper VL digital camera with a green frog on a leaf (no text or symbols visible on the device screen)CONTENTS
In The Box
• Transmitter/Mini-Cam with swivel antenna and shoe-mount locking collar
- Receiver/Viewer with embedded antenna and pop-up sun shade
- USB Type A to Type B Mini USB cable to connect to your computer or charger
- 2-NP-60 batteries
- USB wall charger
- Composite video-output cable
• Wrist strap for Receiver/Viewer
- User manual
Required Accessories
- Data and IR cables for use with specific DSLR camera models (See separate compatibility insert)
Recommended Accessories
• NP-60 Lithium-Ion Battery Pack
- Compact AC/DC Charger for NP-60 Battery
- Vello Cold Shoe Mount with 1/4" Thread (CS-20) for mounting the Transmitter/Mini-Cam to a bracket or tripod
- Vello Straight Flash Bracket (CB-600) for mounting the Transmitter/Mini-Cam next to your camera while keeping its hot shoe free
KEY FEATURES
• Live-view wireless display and remote control
• Built-in camera to support cameras without live-view
• Video start and stop control for Canon models that support infrared mode
- Up to 328' (100 m) operating distance
• Built-in color 3.5" TFT LCD with pop-up sun shade
• Built-in memory for storing photos in viewer
• Each component is powered by a removable rechargeable lithium battery
• Video output to a TV, monitor, or video recorder
- Option to monitor and control up to four cameras at once
SUGGESTED USES FOR YOUR LIVE-VIEW REMOTE SYSTEM
- Shooting wildlife, pets or other elusive or dangerous subjects from a distance
- Photographing children and other shy subjects that behave differently when in close proximity to a photographer
- Maintaining a view from a camera placed in a nearby but hard-to-access location like the foot of a stage or edge of a sporting event
• Taking wireless self-portraits - Adding live-view functionality to cameras that don't innately offer the feature by using the built-in Mini-Cam
- Conserving power on your camera by turning off its own LCD
PRECAUTIONS
- To prevent damage to your equipment or injury to yourself or others, read all of the following safety instructions before using this equipment. Keep these instructions for future reference.
- This equipment contains small parts which may pose a choking hazard. Consult a physician immediately if a child swallows any part of this device.
-
Keep out of reach of children.
-
Dispose of batteries in accordance with local environmental regulations.
- Should the product break open as the result of a fall or other accident, remove the batteries. Failure to observe this precaution could result in electric shock or a product malfunction.
-
Do not disassemble or modify the product.
-
Keep away from water and flammable gas.
- Do not expose to high temperature.
- When using the FreeWave Viewer VL, there may be static and latency if you are moving or if objects including vehicles or people move between the transmitter and receiver. This is inherent in wireless technology. It's not the fault of the FreeWave Viewer VL.
- Only use batteries listed in this manual. Do not short or disassemble them. Do not attempt to insert batteries upside down or backwards. Batteries are prone to leakage when fully discharged. To avoid damage to the product, be sure to remove the batteries when leaving the product unattended for prolonged periods or when no charge remains. In case liquid from the batteries comes into contact with skin or clothing, rinse immediately with water.
- Do not leave this equipment in a closed vehicle under the sun or in other areas subject to extremely high temperatures. Failure to observe this precaution could result in fire or damage to the casing or internal parts.
- Do not handle with wet hands or immerse the product or expose it to water or rain. Do not use in the presence of flammable gas. Failure to observe these precautions could result in explosion or fire.
- All images are for illustrative purposes only.
OVERVIEW OF TRANSMITTER/MINI-CAM
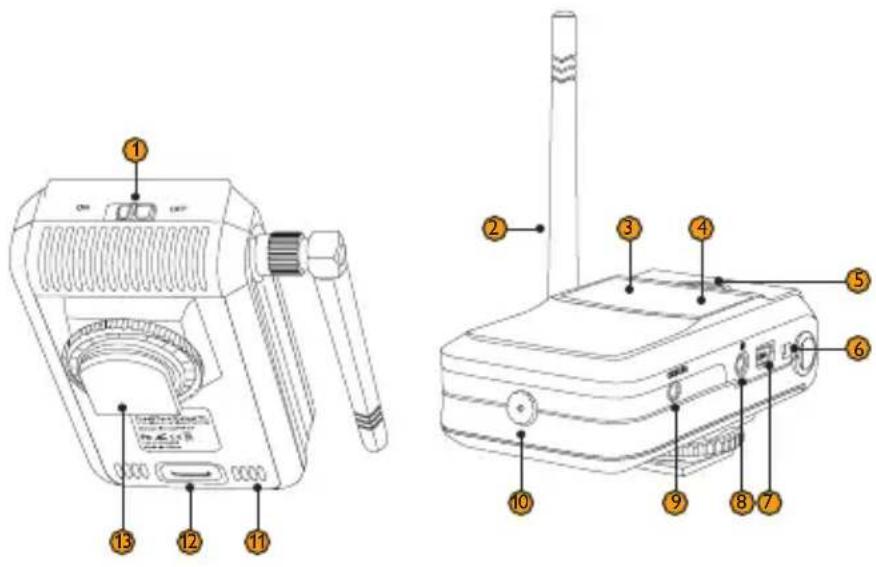
- Power switch
- Antenna
- Signal LED
- Power LED
- Match button
- Charger LED
- USB port
- IR port
- Camera socket
- Mini-cam lens
- Heat vent
- Battery cover release
- Shoe-mount locking collar
OVERVIEW OF RECEIVER/VIEWER
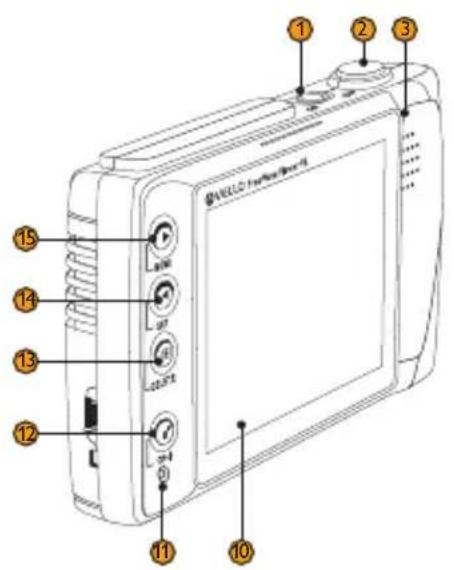
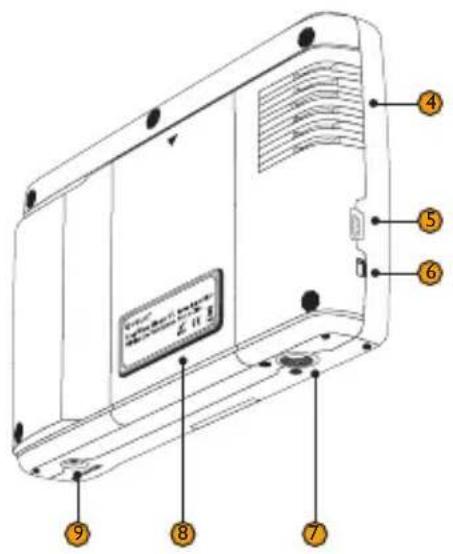
- Power switch
- Shutter button
- Shutter indicator LED
- Heat vent
- USB port
- Charger LED
- Tripod mounting socket
- Battery cover
- Composite video output
- View screen
- Sleep indicator LED
- Sleep | CH+/- button
- Playback | Delete button
- Set button
- Menu button
BATTERY SETUP AND CHARGING
The Transmitter/Mini-Cam and Receiver/Viewer each use one of the two included NP-60 lithium-ion batteries.
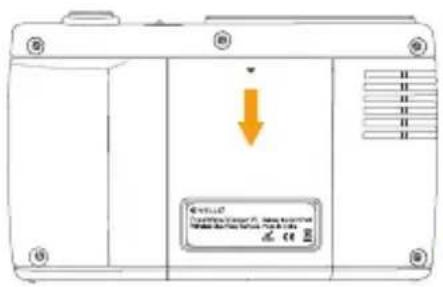
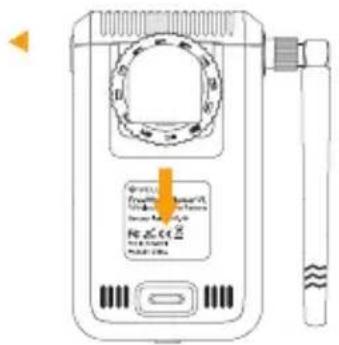
- Press the cover release button on the back of the Transmitter/ Mini-Cam and remove the battery compartment door. Then, insert the battery with the contact points aligned according to the +/- icons. Reattach the cover.
-
The Receiver/Viewer doesn't have a cover release button. On the top portion of the battery door, by the arrow, use your thumb to slide the cover down and remove it to insert the battery. By aligning the +/- icons. Slide and snap the cover back into place.
-
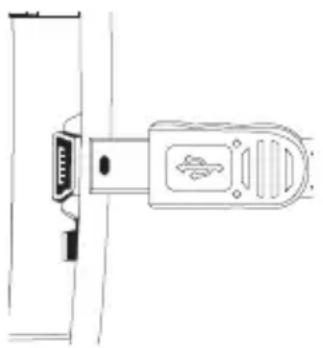
To charge each battery, make sure the power switch on both the transmitter and receiver are set to off. Attach the smaller end of the USB cable to the transmitter and the larger end to the USB wall charger. Plug the USB wall charger into a wall outlet or power strip. A depleted battery takes about 2.5 hours to fully charge. While charging, an LED on the
transmitter will glow red. When fully charged, the LED indicator light will dim. Repeat the process to charge the Receiver/Viewer. (Optional chargers are available if you'd like to charge a transmitter and receiver at the same time.)
Note: the Receiver/Viewer will not operate while charging.
natural_image
Technical line drawing of a connector with a USB port and connector slot (no text or symbols)USING THE POP-UP SHADE
The pop-up shade is pre-installed on the Receiver/Viewer. To open it, place your thumb under the narrower tab and lift the cover. The side panels will pop open. To close the shade, push in both side panels and snap down the cover.
To remove the shade, lift the bottom-most (wider) tab off the device. The entire shade will come off.
To attach the shade, align the tab at the top of the shade with the slot above the screen. Then press down on the bottom of the shade until the unit snaps into the slot below the screen.
SCREEN ADJUSTMENTS
Brightness
Though the pop-up sun shade will help you see the screen in bright daylight, you can set the brightness to one of five levels. Toggle through the Menu [▶] button and select Brightness. Press the Set [◀] button to adjust the brightness. A slider bar appears. Each level increases the brightness by 20%.
Contrast
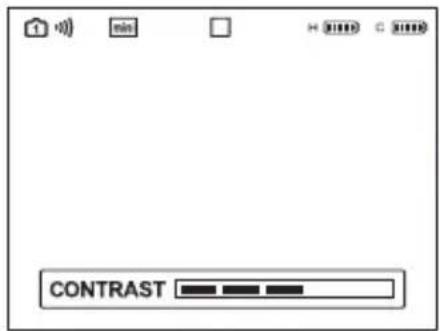
Toggle through the Menu button until Contrast is selected. A slider bar appears. Press the Set button to adjust the contrast. Each level increases contrast by 20%.
CANON CAMERA COMPATIBILITY
Certain Canon DSLRs cannot auto-focus when you half press the Receiver/Viewer's shutter button in LV mode. They include the Canon Rebel XS (1000D), Rebel T1i (500D), and Rebel XSi (450D). These cameras can auto focus by pressing the camera's own * button.
The Canon 5D Mark II, 50D, 40D, 1D Mark IV, and 1Ds Mark III cameras can auto focus by pressing the AF-ON button.
FUNCTIONS AND OPERATION SETUP
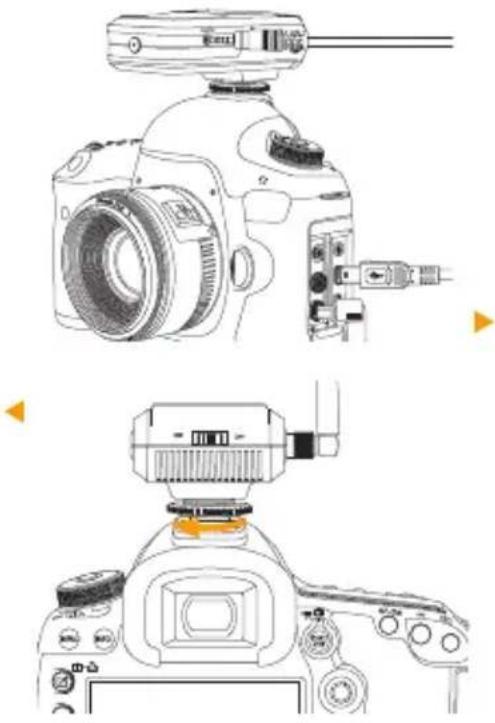
- Attach the Transmitter/ Mini-Cam to your DSLR by turning the knob underneath counterclockwise, sliding the transmitter into your camera's shoe mount. Then, turn the knob clockwise to tighten the locking collar in place.
Note: the shoe is used solely for physical support.
natural_image
Technical line drawings of a DSLR camera with attached components and control panel (no text or symbols)- Attach the appropriate data cable (not included) to the camera socket on the transmitter and the twin ends (where applicable) to your camera's AV output and remote shutter socket. (See included sheet listing compatible cameras and their cables.)
CHANNEL MATCHING
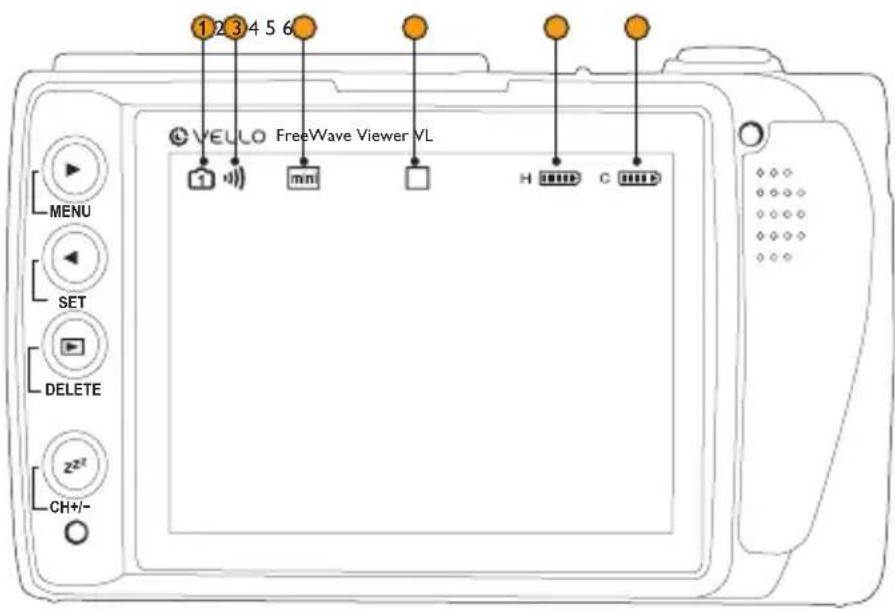
Once the transmitter and receiver are charged, switch on the power for both devices. You can choose from four viewing channels. Since the default is Channel 1, you should be able to see a picture from the Mini-Cam in the transmitter on the receiver's screen. A tiny "1" inside a camera icon appears at the top left of the screen. If no signal is being received on that channel, a red X appears to the right of the channel number.
-
Channel Indicator
-
Viewing mode
-
Receiver Battery Level
-
Signal Strength
-
Shooting Mode
-
Transmitter Battery Level
Here's how to match channels:
- Press the Menu [▶] button four times to display the Match menu at the bottom of the screen.
- Press the Set [Button to cycle through the channels.
-
To select the highlighted channel, fully press the Shutter button on the Receiver/Viewer. The shutter indicator light will flicker, then stop after a few seconds.
-
Press the Match button on the Transmitter/Mini-Cam while the Receiver/Viewer's shutter indicator light is flickering.
-
The signal light of the Transmitter/Mini-Cam will start to flicker. When it stops, it should have successfully matched with the Receiver/Viewer.
-
To verify that channel matching is successful, check that the Receiver/Viewer's channel number is followed by a series of curved lines rather than an X. A maximum of four lines indicates the strength of the channel signal.
You will only need to change and match channels if there's interference with other devices or you add up to three other Transmitter/Mini-Cams for control from your Receiver/Viewer.
You can operate the system through one of two views: Mini-Cam or Live View (LV). The picture from the transmitter's embedded camera is the Mini-Cam view. It delivers a VGA-quality picture from the fixed lens on the transmitter. The lens offers an approximately 35mm field of view.
Keep in mind that when you choose to display the Mini-Cam view on the receiver's LCD, the image will not be exactly framed as the picture you capture through your DSLR's own lens. If your DSLR lens is set to 35mm, the frame will be generally comparable.
To see exactly what your DSLR captures, you should switch to the LV mode since its image passes through your DSLR's lens. The same channel number that carries the picture from the Mini-Cam also delivers the LV view. To
switch to LV mode, press the Set button. To toggle back to the Mini-Cam view, press it again.
DRIVE MODES
Single Shots
- Set your camera to Single shot mode.
- Press the Menu button on the Receiver/Viewer followed by the Set button to navigate to the single shot icon [☐].
- Half press the shutter button on the Receiver/Viewer to activate focusing. A green LED will light up near the upper right corner of the LCD.
- Fully press the shutter button
to take the shot. The shutter LED will turn red.
Continuous Shots
- Set your camera to Continuous drive mode.
- Press the Menu [▶] button on the Receiver/Viewer to get to Drive mode.
-
Press the Set Button to highlight the continuous shooting mode icon [☐] as seen on the Receiver/Viewer screen.
-
Half press the shutter button on the Receiver/Viewer to activate focusing. A green LED will light up near the upper right corner of the LCD.
- Fully press the shutter button. The shutter LED will turn red.
Note: with some cameras you'll have to first manually focus the camera and then use the receiver to remotely trigger the shutter.
Self-Timer Mode
- Set your camera to Single Shot drive mode.
- Press the Menu [▶] button on the Receiver/Viewer and go to Drive mode. Use the Set [▶] button to navigate to the clock icon [☐].
- Half press the shutter button on the Receiver/Viewer to focus the camera. Full press to release the shutter. The camera's shutter will be triggered 5 seconds later, giving you time to get into the picture, for instance.
Note: You can set your camera to Self-Timer mode while leaving the Receiver/Viewer in single shot mode.
Bulb (Long Exposure) Mode
- Set your camera to Bulb drive mode.
- Press the Menu [▶] button on the Receiver/Viewer and go to Drive mode.
-
Using the Set Button, navigate to Bulb shooting mode [1].
-
Half press the shutter on the Receiver/Viewer to focus the subject.
-
To start the exposure, fully press the shutter button on the Receiver/Viewer. Both the shutter LED on the receiver and the shutter LED on the transmitter will stay red. To end the exposure, half press the shutter button again. Both LEDs will turn off.
VIDEO RECORDING
Transmitter Setup
This function requires the optional FW-IRC infrared emitter that attaches to the VL's transmitter.
- Set your camera to infrared remote shooting mode and video mode.
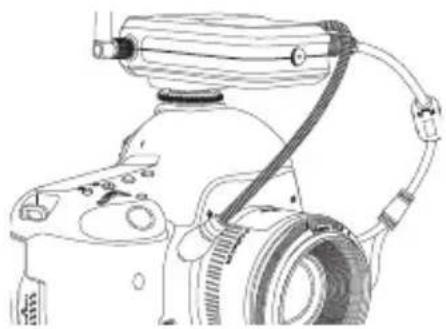
- Connect the VL transmitter to your camera with the appropriate data cable (not included) by attaching the single end of the data cable to the transmitter's camera socket and the A\V end to your camera's A\V socket.
natural_image
Line drawing of a DSLR camera with attached cable and head (no text or symbols)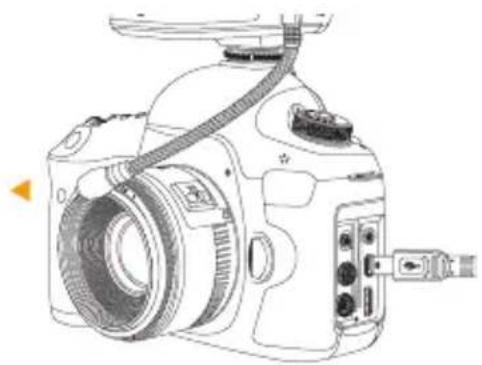
natural_image
Line drawing of a DSLR camera with attached cable and ports (no text or symbols)- Connect the IR cable to the transmitter. Rest the cable over the data cable so that it does not obstruct the lens.
- Pre-focus the lens to your subject before initiating video recording. The Viewer VL does not control auto-focus in video mode. Switching the lens to manual focus will lock the focus.
Note: IR video recording will be disabled if the data cable is connected to your camera's remote shutter socket. Ensure the remote shutter socket is not connected before attempting to record video in IR mode.
Receiver Setup
Press the Menu [▶] button on the Receiver/Viewer and go to Drive mode. Press the Set [M] button and choose video mode [].
Video Shooting
When the Receiver/Viewer is set to LV mode, it can display what the lens on your DSLR sees. Fully press the shutter button on the receiver to begin video recording. The shutter LEDs glow red on both the transmitter and receiver. Press the Receiver/Viewer's shutter button again to stop video recording.
MULTIPLE CAMERA CONTROL
If you want to capture the same subject from different angles or different subjects within range of one Receiver/Viewer, you can operate up to four cameras from one Receiver/Viewer. Multiple camera control is compatible with stills or video as long as you switch drive modes on the FreeWave Viewer VL.
Follow these steps to set each Transmitter/Mini-Cam to one of the four channels.
-
Press the Menu Button four times to display the Channel menu at the bottom the screen.
-
Using the Set Button, cycle through the four channels for each of the Transmitter/Mini-Cams you'll be using.
-
To select the highlighted channel, fully press the Shutter button at the top of the Receiver/Viewer. The shutter indicator light will flicker. Quickly press the match button on the Transmitter/Mini-Cam
while the indicator light is flickering on the Receiver/Viewer.
-
The signal light of the Transmitter/Mini-Cam will start to flicker. When it stops, it should have successfully matched with the Receiver/Viewer.
-
Repeat this procedure for up to three additional Transmitter/Mini-Cams, choosing a different channel for each.
SLEEP MODE
On the Receiver/Viewer press the Sleep button for 2 seconds. Both it and the transmitter on the current channel will go to sleep. An LED on the receiver will glow orange; the power indicator on the transmitter, red. To wake up the receiver and transmitter, press the Sleep button for three seconds. Sleep mode does not support multiple transmitters.
natural_image
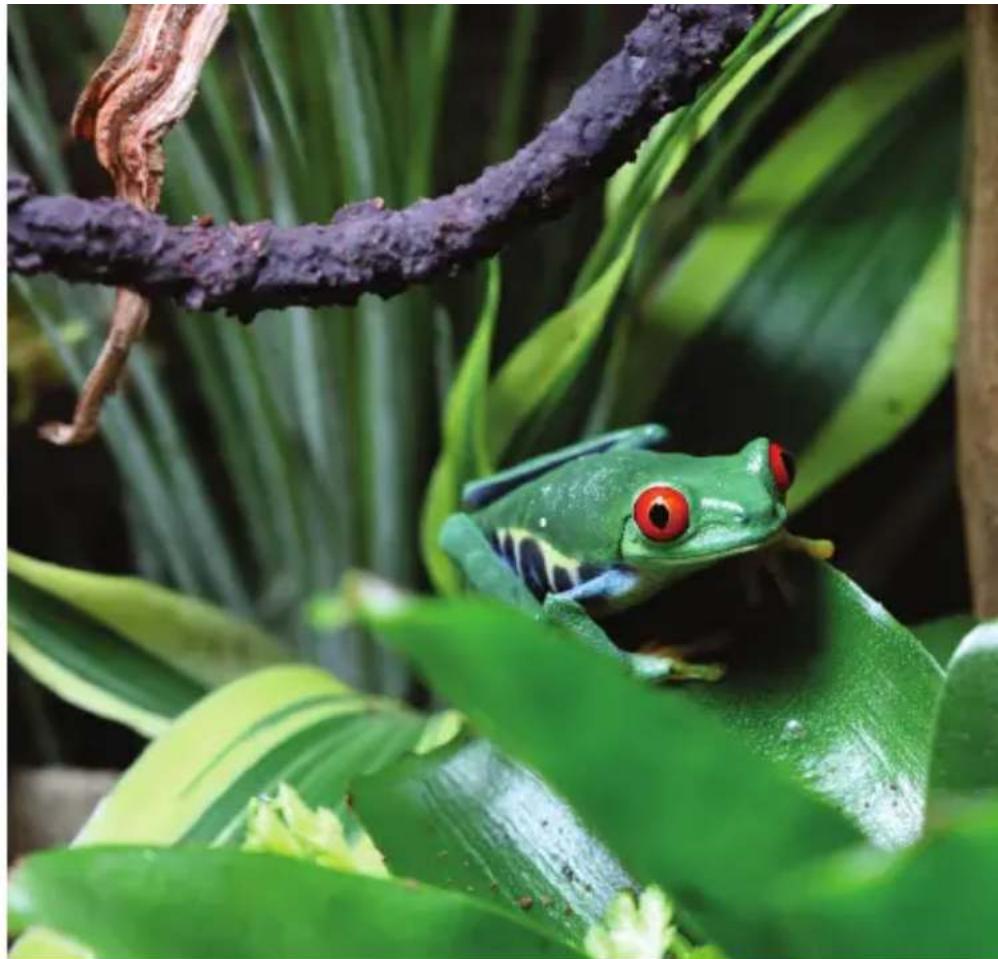
Green frog perched on a branch surrounded by green foliage (no text or symbols visible)MINI-CAM IMAGE PLAYBACK
Whenever you take a picture while in Mini-Cam mode, the Receiver/Viewer will store the image in its internal memory.
Note: There is no way to disable this feature.
Only still images shot from the Mini-Cam can be saved in the internal memory of the Receiver/Viewer. There is no storage or playback on the Receiver/Viewer from shooting in Live View mode.
Note: Images captured in Live View mode will be saved to your camera's memory card.
Browsing / Managing Pictures
Press the Receiver/Viewer's Playback [REDACTED] button to enter playback mode. You'll see the latest saved pictures by default. Press the Right arrow [REDACTED] button to navigate back through the images and the Left arrow [REDACTED] button to go forward. Press the Playback [REDACTED] button to exit playback mode.
One-hundred images can be stored in the viewer. You won't be able to store additional images in the viewer once its memory fills up. A message will appear on the screen that there's no space in the Receiver/Viewer's internal memory. Even so, your camera will continue to be able to take pictures.
To delete individual images, enter playback mode. When you see an image to erase, press the Delete button for 2 seconds. If you want to delete all the pictures while in Live View or Mini-Cam mode, press the Menu button and select Delete All Images option. Then press the Set button.
Note: Images stored in the Receiver/Viewer cannot be transferred to a computer via the USB cable. The USB port is used only for charging the battery.
Plug the smaller pin end of the included video cable into the Video output port, located on the bottom of the Receiver/Viewer and the larger plug into a composite video port on your TV. (You may want to add your own composite video cable to create a longer cable.) Set your TV to the appropriate video input. You'll be able to watch the live Mini mode on your TV from one or more Transmitter/Mini-Cam units in other rooms. By manually advancing the images stored in the Receiver/Viewer's internal memory, you'll be able to share the pictures on a larger screen or copy them in sequence to your video recorder. (See “Browsing / Managing Pictures” on page 26.)
For image archiving or keeping a recording of your session, you can insert a video recorder (such as a DVR or VCR) between the Receiver/Viewer and your TV.
Note: The FreeWave Viewer VL does not support audio.
TROUBLESHOOTING
Why is my camera unable to shoot?
- Ensure batteries are installed correctly, and power is switched on.
- Check that the FreeWave Viewer VL's transmitter and receiver are on the same channel.
- Be sure that cables are connected correctly.
- Manually focus the lens of your camera if your camera's shutter does not support Live View during auto focus.
Why is my camera unable to control video?
- Make sure you're using a compatible Canon-branded DSLR. Other brands will not work.
- Check that your camera and the FreeWave Viewer VL are in IR mode.
- Ensure the Receiver/Viewer is set to video mode.
-
Be sure the IR cable is connected correctly and aimed at the camera's IR sensor.
-
Check that nothing is plugged into your camera's remote shutter socket.
- Make sure the Transmitter/Mini-Cam and Receiver/Viewer are matched to the same channel.
Why is my camera unable to control multiple camera shutters?
- Be sure each transmitter has been matched successfully with the receiver.
- Be sure the receiver channel has been switched to the appropriate transmitter.
- Be sure the receiver and each transmitter are not low on power.
- Be sure the cable is connected correctly.
What can I do about signal disturbance or shooting interference?
- Try another channel.
- Be sure the channel is the same on the transmitter and receiver.
- Move the receiver or camera to a non-interfering position until the signal connects.
- Adjust the antenna.
- Be sure you are not moving, and that there are no moving objects between the transmitter and receiver.
SPECIFICATIONS
| Transmitter/Camera | Receiver/Viewer | |
| Dimensions | mm) 5 × 3.1 × 1.2" (127 × 79 × 30 mm) | |
| Weight (with battery) | oz. (204 g) | |
| Frequency | ||
| Range | ||
| Signal technology | frequency switching | |
| Number of channels | ||
| Battery | Lithium-ion | |
| Battery life (per battery) | ||
| Built-in camera resolution | ||
| View screen | colors) | |
| Screen resolution | ||
| Viewing angle | 120° (H) / 105° (V) | |
| Storage | 100 pictures from transmitter's built-in camera only | |
FCC COMPLIANCE
This equipment generates, uses, and can radiate radio frequency energy. If not installed and used in accordance with the instructions, the FreeWave Viewer VL may cause harmful interference to radio communications. This equipment has been tested and found to comply with the limits for a Class B digital device pursuant to Part 15 of the FCC Rules. These limits are designated to provide reasonable protection against harmful interference in a residential installation.
There is no guarantee that interference will not occur
in a particular installation.
If this equipment does cause harmful interference to radio or television reception, which can be determined by turning the equipment ON or OFF, the user is encouraged to try to correct the interference by one or more of the following measures:
- Reorient or relocate the receiving antenna;
- Increase the distance between the equipment and the receiver.
This device complies with Part
15, Subpart B, Class B of the FCC Rules. Operation is subject to the following two conditions:
- This device may not cause harmful interference.
- This device must accept any interference received, including interference that may cause undesired operation.
Any changes or modifications (including the antenna) made to this device that are not expressly approved by the manufacturer may void the user's authority to operate the equipment.
One-Year Limited Warranty
This VELLO product is warranted to the original purchaser to be free from defects in materials and workmanship under normal consumer use for a period of one (1) year from the original purchase date or thirty (30) days after replacement, whichever occurs later. The warranty provider's responsibility with respect to this limited warranty shall be limited solely to repair or replacement, at the provider's discretion, of any product that fails during normal use of this product in its intended manner and in its intended environment. Inoperability of the product or part(s) shall be determined by the warranty provider. If the product has been discontinued, the warranty provider reserves the right to replace it with a model of equivalent quality and function.
This warranty does not cover damage or defect caused by misuse, neglect, accident, alteration, abuse, improper installation or maintenance. EXCEPT AS PROVIDED HEREIN, THE WARRANTY PROVIDER MAKES NEITHER ANY EXPRESS WARRANTIES NOR ANY IMPLIED WARRANTIES, INCLUDING BUT NOT LIMITED TO ANY IMPLIED WARRANTY OF MERCHANTABILITY OR FITNESS FOR A PARTICULAR PURPOSE. This warranty provides you with specific legal rights, and you may also have additional rights that vary from state to state.
To obtain warranty coverage, contact the Vello Customer Service Department to obtain a return merchandise authorization (“RMA”) number, and return the defective product to Vello along with the RMA number and proof of purchase. Shipment of the defective product is at the purchaser’s own risk and expense.
For more information or to arrange service, visit www.vellogear.com or call Customer Service at 212-594-2353.
Product warranty provided by the Gradus Group.
www.gradusgroup.com
VELLO is a registered trademark of the Gradus Group.
© 2014 Gradus Group LLC. All Rights Reserved.

VELLO™
A Gradus Group Brand
www.vellogear.com
All other trademarks are the property of their respective owners
GG2
- FREEWAVE VIEWER VL
- INTRODUCTION
- CONTENTS
- In The Box
- Required Accessories
- Recommended Accessories
- KEY FEATURES
- SUGGESTED USES FOR YOUR LIVE-VIEW REMOTE SYSTEM
- PRECAUTIONS
- OVERVIEW OF TRANSMITTER/MINI-CAM
- OVERVIEW OF RECEIVER/VIEWER
- BATTERY SETUP AND CHARGING
- USING THE POP-UP SHADE
- SCREEN ADJUSTMENTS
- Brightness
- Contrast
- CANON CAMERA COMPATIBILITY
- FUNCTIONS AND OPERATION SETUP
- CHANNEL MATCHING
- DRIVE MODES
- Single Shots
- Continuous Shots
- Self-Timer Mode
- Bulb (Long Exposure) Mode
- VIDEO RECORDING
- Transmitter Setup
- Receiver Setup
- Video Shooting
- MULTIPLE CAMERA CONTROL
- SLEEP MODE
- MINI-CAM IMAGE PLAYBACK
- Browsing / Managing Pictures
- TROUBLESHOOTING
- Why is my camera unable to shoot?
- Why is my camera unable to control video?
- Why is my camera unable to control multiple camera shutters?
- What can I do about signal disturbance or shooting interference?
- FCC COMPLIANCE
- One-Year Limited Warranty
Brand : Vello
Model : FreeWave Viewer VL
Category : Remote control