
RC-S2P - Remote control Vello - Free user manual and instructions
Find the device manual for free RC-S2P Vello in PDF.


| Product Type | Remote Control |
| Brand | Vello |
| Model | RC-S2P |
| Compatible Devices | Vello compatible devices, universal use |
| Transmission Type | Infrared (IR) |
| Operating Range | Up to 10 meters (33 feet) |
| Battery Type | 2 x AAA (LR03) Alkaline batteries |
| Battery Life | Approximately 12 months under normal use |
| Dimensions (L x W x H) | 200 x 50 x 25 mm (7.9 x 2.0 x 1.0 in) |
| Weight (with batteries) | 120 g (4.2 oz) |
| Material | ABS plastic with soft-touch coating |
| Color | Black |
| Number of Buttons | 40 |
| Backlit Buttons | No |
| Power On/Off | Yes |
| Volume Control | Yes |
| Channel Control | Yes |
| Menu Navigation | Yes (directional pad and OK button) |
| Programmable Buttons | No |
| Operating Temperature | 0°C to 40°C (32°F to 104°F) |
| Storage Temperature | -20°C to 60°C (-4°F to 140°F) |
| Humidity | Up to 90% non-condensing |
| Warranty | 2 years |
| Cleaning | Wipe with a soft, dry cloth; avoid liquids |
| Replacement Parts | Batteries (AAA) only; remote not disassemble-friendly |
Frequently Asked Questions - RC-S2P Vello
User questions about RC-S2P Vello
0 question about this device. Answer the ones you know or ask your own.
Ask a new question about this device
Download the instructions for your Remote control in PDF format for free! Find your manual RC-S2P - Vello and take your electronic device back in hand. On this page are published all the documents necessary for the use of your device. RC-S2P by Vello.
USER MANUAL RC-S2P Vello
THANK YOU FOR CHOOSING VELLO
The Vello ShutterBoss Pro features direct-button access and control of advanced timer functionality for shooting time-lapse photos and astrophotography. Program delayed shutter-release times, lengthy exposure times, or timed intervals between a sequence of shots from 0 to 99 hours, 59 minutes, and 59 seconds. Use the intervalometer to capture long-exposure images for nighttime star trails or shoot a time-lapse series of a blooming flower.
PRECAUTIONS
- Please read and follow all the instructions in this manual.
- Turn off the camera's power before inserting or removing the remote cord.
- Do not disassemble or perform any unauthorized modifications. Use only with the compatible devices specified in this manual.
-
Keep this device away from water and extreme humidity, and store it in a cool and dry place.
-
Do not operate in conditions with extreme heat or cold.
- Do not operate in the presence of flammable gases or vapors.
- Avoid operating this device in the presence of magnetic fields. A strong static charge or electromagnetic field generated by devices such as a radio transmitter can interfere with this device.
-
Use only the batteries listed in this manual, and make certain to align the batteries with the correct polarity.
-
Batteries are prone to leakage when fully discharged. Remove the batteries when leaving the product unattended for prolonged periods or when no charge remains.
- Keep out of reach of children. This device contains small parts which may pose a choking hazard.
- Dispose of used batteries, packaging, and old devices in accordance with the appropriate local environmental regulations.
- All images are for illustrative purposes only.
OVERVIEW
Remote
- 2.5 mm threaded socket
- Wrist strap eyelet
- Power switch
- Battery compartment
- Control lock
- Light
- Reset/Sound
- Confirmation LED
- Delay
- Long
- Interval
- Decrease value
- Timer Start/Stop
- Shutter hold
- Shutter release
- Increase value
- Set Frame no.


LCD
- Delay time
- Long time
- Interval time
- Hours
- Minutes
- Seconds
- Lock indicator
- Battery status
- Sound indicator
- Start/stop indicator
- Frame number
Also Includes
- Shutter release cable
- Wrist strap

INSTALLING THE BATTERIES
- Press down on the latch and open the battery door.
- Insert two AAA batteries (not included) as shown, following the diagrams in the battery compartment, then close the battery door.
The battery status indicator on the LCD shows the remaining battery power.


natural_image
Close-up of two black batteries labeled 'WATSON MX' with a triangular indicator, mounted on a black base (no additional text or symbols visible)POWERING ON/OFF
CONNECTING THE REMOTE
Slide the On/Off switch to On. Insert the shutter release

cable's threaded 2.5 mm end into the remote's threaded socket, and rotate the remote clockwise to secure. Connect the other end of the shutter release cable to your camera's remote port. See your camera's manual to identify this port.
Note: The ShutterBoss Pro comes in a variety of models that are compatible with many different cameras. The only difference is the connector end of the cable.

CONTROLS
Lock Button
The control lock button 🔊/🔒 locks all controls. Press the lock button until the lock icon 🔔 appears on the display. To unlock, press and hold the button for about 2 seconds, until the 🔔 indicator disappears.
Backlight
Press the to activate the display panel's backlight. It will remain lit for about 1 minute.
Audio Confirmation
The ShutterBoss Pro will emit a tone when you press a button on the remote and when using the timer. To toggle audio confirmation, press the 🎧 button until the 🌐 indicator appears on the display.
Timer Start/Stop
The Timer Start/Stop button starts and stops the timer functions and sequence of shots. P.AV appear on the display when a sequence starts, and disappear when the sequence stops.
Increase/Decrease
Use the +buttons to increase or decrease the time increments and number of frames.
Shutter Release Button
Press halfway to focus, and press fully to release the shutter. You can also hold this button for longer exposures when using your camera in bulb mode.
Reset
Hold the Reset button for about 2 seconds to reset all values.
CONFIRMATION LED
A confirmation LED offers a visual aid to the activity on the remote.
The LED will glow blue during the focus phase and turn red for the exposure.
The LED will glow blue when you press the shutter release halfway, and glow red when you press it fully.


MANUAL RELEASE
The simplest way of using the ShutterBoss Pro is as a manual shutter release.
-
Adjust your camera settings, such as exposure mode, shutter speed, and focus and shooting modes.
-
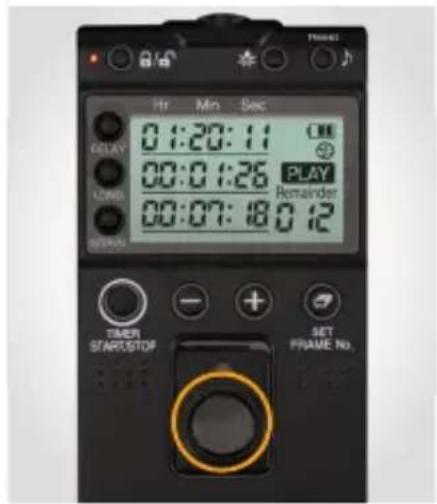
Press the remote's shutter release button halfway to focus your camera.
Note: Autofocus is not compatible with back-button focusing on some camera models.
- Press the shutter release button fully to take a photo.
USING THE TIMER
The ShutterBoss Pro's internal timer functions are ideal for taking long-exposure and timelapse photography.
Note: Every camera handles remote switches differently. See your camera's manual to make sure it's set up properly. Do not attempt to change any timer settings during operation.
Timed Delay
DELAY allows you to set a timed delay before triggering a single or sequence of exposures.
-
Press the DELAY button to set the delay timer's seconds, minutes, and hours. The numbers will blink to indicate which value you are changing.
-
Use the +buttons to increase or decrease the values.
If you don't make any changes, the value will blink for about 5 seconds.
Exposure Time
LONG sets the exposure time for each shot. This can be much longer than the camera's available shutter speeds.
Note: For exposures 1 second and longer, set your camera to Bulb mode, and then set the exposure time on the ShutterBoss Pro. Use the camera to control exposure times faster than 1 second.
-
Set your camera's exposure mode to Bulb.
-
Press the LONG button to set the long timer's seconds, minutes, and hours. The numbers will blink to indicate which value you are changing.
- Use the +buttons to increase or decrease the values.
If you don't make any changes, the value will blink for about 5 seconds.
Interval Time
INTERVAL is the time between exposures in a sequence.
Note: If you are using a flash, be sure to set an interval that is longer than your flash recycle time.
- Press the INTERVAL button to set the interval timer's seconds, minutes, and hours. The numbers will blink to indicate which value you are changing.
- Use the +buttons to increase or decrease the values.
If you don't make any changes, the value will blink for about 5 seconds.
Shot Count
FRAME No. is the number of exposures selected for the sequence. You can trigger the camera's shutter from 1 to 999 times, or infinite (---). By default, there is a 1-second interval between exposures until you set the interval manually.
- Use the +buttons to increase or decrease the values. Press the □ to confirm.
If you don't make any changes, the numbers will blink for about 5 seconds.
- Press the SET FRAME No.
button to set the number of shots. The numbers will blink to indicate they are being changed.
BULB MODE
Capture an exposure with full control over the length of the exposure. Make sure your camera is set to Bulb mode.
- Press the remote's shutter release button halfway to focus.
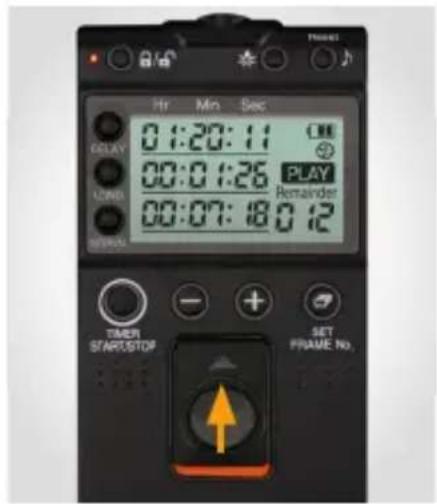
- Press the remote's shutter release button fully to start the exposure, and slide the button to the lock position, you will see the orange indicator under the button.
- Slide the button back to the original position to end the exposure
SPECIFICATIONS
| Supported Cameras | vellogear.com for a list of supported cameras |
| Self-Timer Delay | r. 59 min. 59 sec. |
| Long Time | in. 59 sec. |
| Interval Time | 9 min. 59 sec. |
| Number of Shots | white |
| Cable length | |
| Power Source | es (not included) |
| Operating Temperature | to 113°F (-10°C to 45°C) |
| Storage Temperature | 140°F (-10°C to 60°C) |
| Dimensions (H × W × D) | 2.2 × 0.5 in. (122 × 55.6 × 13.9 mm) |
| Weight | atteries |
ONE-YEAR LIMITED WARRANTY
This VELLO product is warranted to the original purchaser to be free from defects in materials and workmanship under normal consumer use for a period of one (1) year from the original purchase date or thirty (30) days after replacement, whichever occurs later. The warranty provider's responsibility with respect to this limited warranty shall be limited solely to repair or replacement, at the provider's discretion, of any product that fails during normal use of this product in its intended manner and in its intended environment. Inoperability of the product or part(s) shall be determined by the warranty provider. If the product has been discontinued, the warranty provider reserves the right to replace it with a model of equivalent quality and function.
This warranty does not cover damage or defect caused by misuse, neglect, accident, alteration, abuse, improper installation or maintenance. EXCEPT AS PROVIDED HEREIN, THE WARRANTY PROVIDER MAKES NEITHER ANY EXPRESS WARRANTIES NOR ANY IMPLIED WARRANTIES, INCLUDING BUT NOT LIMITED TO ANY IMPLIED WARRANTY OF MERCHANTABILITY OR FITNESS FOR A PARTICULAR PURPOSE. This warranty provides you with specific legal rights, and you may also have additional rights that vary from state to state.
To obtain warranty coverage, contact the Vello Customer Service Department to obtain a return merchandise authorization (“RMA”) number, and return the defective product to Vello along with the RMA number and proof of purchase. Shipment of the defective product is at the purchaser’s own risk and expense.
For more information or to arrange service, visit www.vellogear.com or call Customer Service at 212-594-2353.
Product warranty provided by the Gradus Group.
www.gradusgroup.com
VELLO is a registered trademark of the Gradus Group.
© 2024 Gradus Group LLC. All Rights Reserved.

VELLO® A Gradus Group Brand
www.vellogear.com GG1


- THANK YOU FOR CHOOSING VELLO
- PRECAUTIONS
- OVERVIEW
- Remote
- LCD
- Also Includes
- INSTALLING THE BATTERIES
- POWERING ON/OFF
- CONNECTING THE REMOTE
- CONTROLS
- Lock Button
- Backlight
- Audio Confirmation
- Timer Start/Stop
- Increase/Decrease
- Shutter Release Button
- Reset
- CONFIRMATION LED
- MANUAL RELEASE
- USING THE TIMER
- Timed Delay
- Exposure Time
- Interval Time
- Shot Count
- BULB MODE
- ONE-YEAR LIMITED WARRANTY
Brand : Vello
Model : RC-S2P
Category : Remote control