
RHC 60 IX - Range hood Ariston Thermo - Free user manual and instructions
Find the device manual for free RHC 60 IX Ariston Thermo in PDF.


| Product Type | Wall canopy range hood |
| Model | RHC 60 IX |
| Brand | Ariston Thermo |
| Width | 600 mm |
| Height (minimum from hob) | 600 mm (electric), 650 mm (gas) |
| Power Supply | 240V, 50Hz, 1.15A max |
| Total Power Rating | 280 W max |
| Fan Speeds | 3 speeds |
| Lighting | Halogen bulb 12V 20W (replaceable) |
| Filter Type | Aluminum grease filters (washable); optional charcoal filters for recirculation |
| Ducting | 150 mm round outlet; ducted or recirculation mode |
| Chimney Depth | 172 mm |
| Fixing Plate Distance | 323 mm from bottom of hood |
| Safety Features | Safety screws to prevent accidental dislodgement; earthing required |
| Cleaning | Mild detergent and warm water; monthly filter cleaning |
| Approvals | AS/NZS 60335.2.31:2004, CISPR14:2001, IEC61591 |
Frequently Asked Questions - RHC 60 IX Ariston Thermo
User questions about RHC 60 IX Ariston Thermo
0 question about this device. Answer the ones you know or ask your own.
Ask a new question about this device
Download the instructions for your Range hood in PDF format for free! Find your manual RHC 60 IX - Ariston Thermo and take your electronic device back in hand. On this page are published all the documents necessary for the use of your device. RHC 60 IX by Ariston Thermo.
USER MANUAL RHC 60 IX Ariston Thermo
Description: ARISTON WALL CANOPY
Model Numbers: RHC60IX, RHC90IX
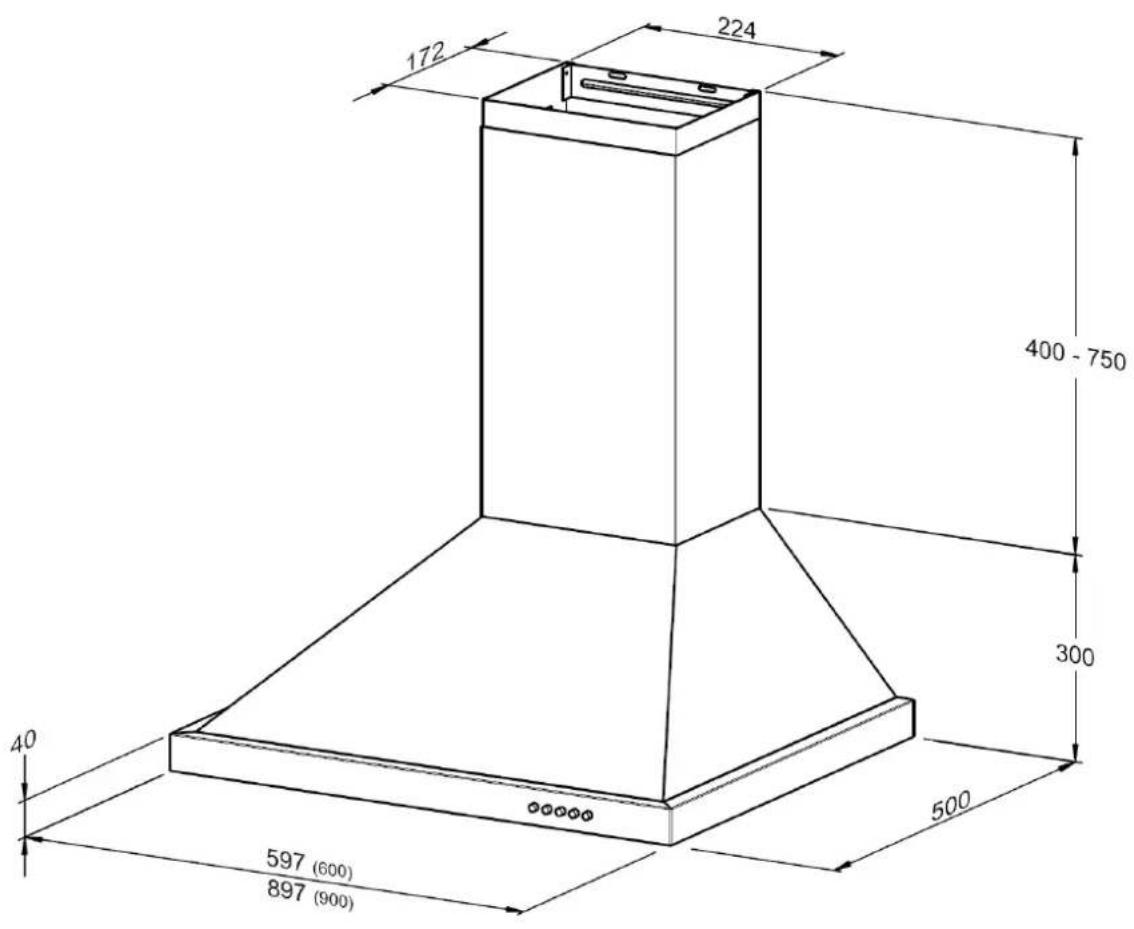
Overview

Pre-installation
Thank you for purchasing a quality Ariston rangehood. Ariston has a high standard of quality control and every rangehood is tested and approved before it leaves the factory.
Important:
- Please read the entire instructions before installing the rangehood.
- Always switch power off prior to installation.
- Stainless steel is very easily damaged during installation if abraded or knocked by tools. Protect the rangehood with the cardboard box or plastic bag during installation.
- All electrical work must be done in accordance with local and national electrical codes as applicable.
- For safety, this product must be earthed.
○ A power outlet should be within 1500mm of the power cord exit from the rangehood.
The power socket must be accessible and enable the end user to isolate the rangehood from the power for the purpose of internal cleaning or maintenance. - 150mm round ducting adapter is supplied. All other ducting accessories are not supplied. All ducting must comply with local requirements and building codes.
- If re-circulating, ensure that the side outlet grilles are not obstructed. Even a partial obstruction will restrict the efficiency of the rangehood.
- See Ducting options next page.
Contents of packaging:
1 x rangehood
1 x 150mm ducting adaptor
1 x packet of fasteners and wall plugs
2 x chimney pieces (upper and lower)
2 x chimney bracket
1 x fixing plate
Typical equipment required:
- electric drill
- screwdriver
- tape measure
- spirit level
- duct tape (if ducting)
- jig saw (if ducting)
○ ladder (if ducting)
Pre-Installation - continued
Ducting Options
The method of ducting should be carefully considered before installing the rangehood. The guide below recommends the ducting components to use for all common ducting configurations - through the top of the home (for the roof and soffit) and through the rear of the home. 150mm round ducting should be used in conjunction with this model rangehood. Alternatively this rangehood can be operated in recirculation mode (see Recirculation mode pg 6).
The highlighted area in the table below gives the recommended Uniduct item numbers for different mounting and outlet options.
| Duct mounting option | |||
| Rear | Top (roof) | Top (soffit/eave) | |
| Uniduct item numbers | |||
| 150mm diameter round outlet | 1688 | 1634 and 1635 | 1634 and 1688 |
Figure 2.
Extra lengths and/or bends may be required, depending on the length required and whether there is any structural material in the run e.g. rafters.
Please note that this chart is designed as a guide.
Pre-Installation - continued
Installation position
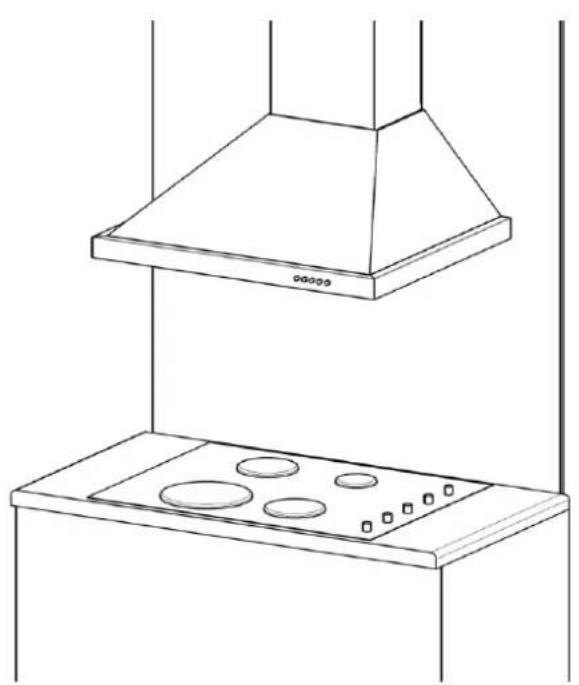
natural_image
Line drawing of a kitchen range hood and stove with circular vented outlets (no text or symbols)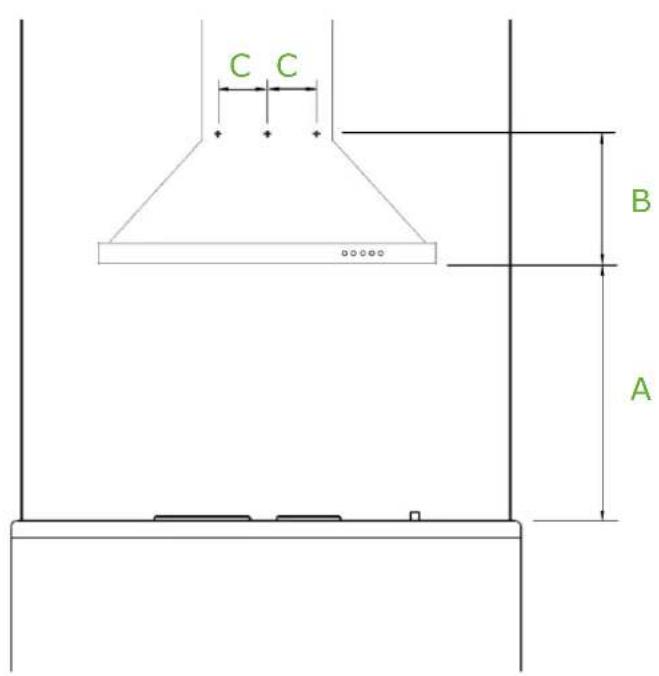
A Minimum height from the hob surface to the underside face of the rangehood
600mm electric hob
650mm gas hob
Notes: If the instructions for the gas hob specify a greater distance, this has to be taken into account. Any installation above 750mm will compromise performance.
B Vertical height from bottom of Rangehood to Fixing Plate mounting screws 323mm.
C Distance between mounting screw holes on Fixing Plate 100mm.
Installation
Mounting to a stud is recommended. However, if fitted to other wall linings (plasterboard, concrete etc) suitable fixings will be required. Before drilling any holes check that the wall and ceiling are clear of any electrical cables, pipes etc.
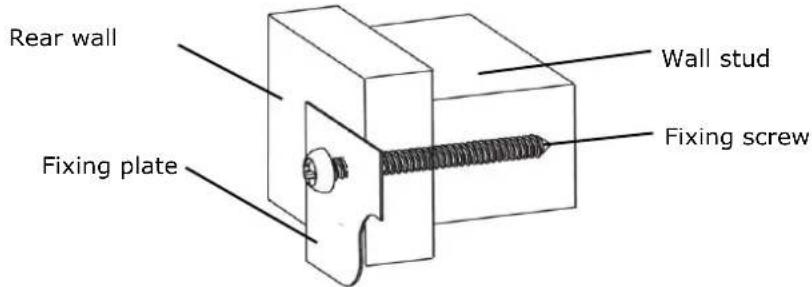
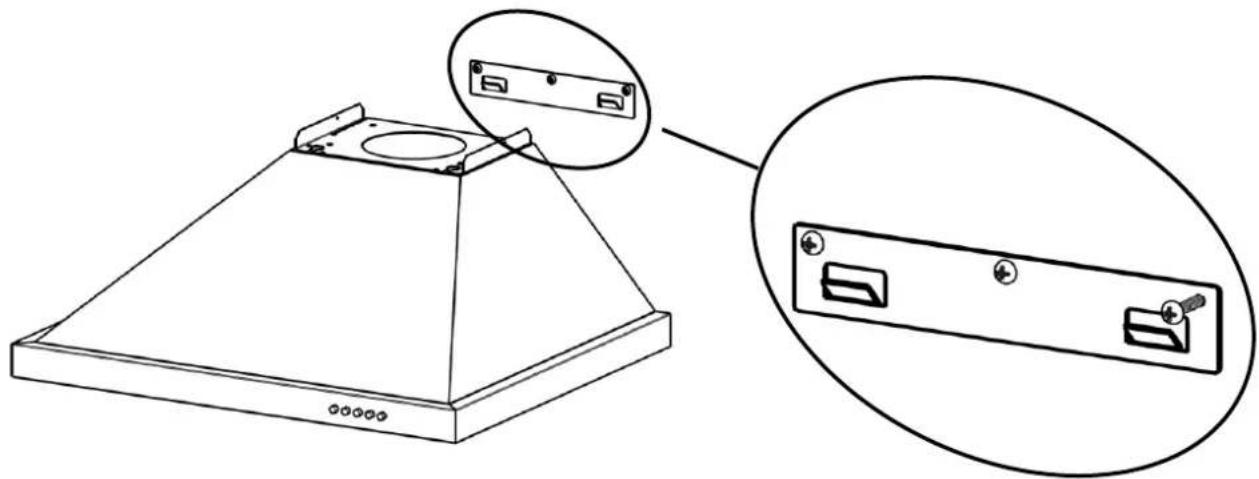
- Pre drill pilot holes in the positions given (pg 4 - Installation position). Fix the fixing plate using the screws supplied or appropriate wall fixings, check with a spirit level to ensure bracket is level. Tighten screws.
natural_image
Technical line drawing of a kitchen top with an inset showing a close-up of the component (no text or symbols present)- Mark the position of the decorative chimney at the ceiling and wall. Cut the cornice moulding away if required, to enable the chimney to sit flush against the wall and ceiling.
- Only if ducting - Mark and cut out the hole in the ceiling / wall to fit the ducting (160mm dia max). Warning: Chimney depth is 172mm. Ensure no part of the hole is greater than 170mm from the wall.
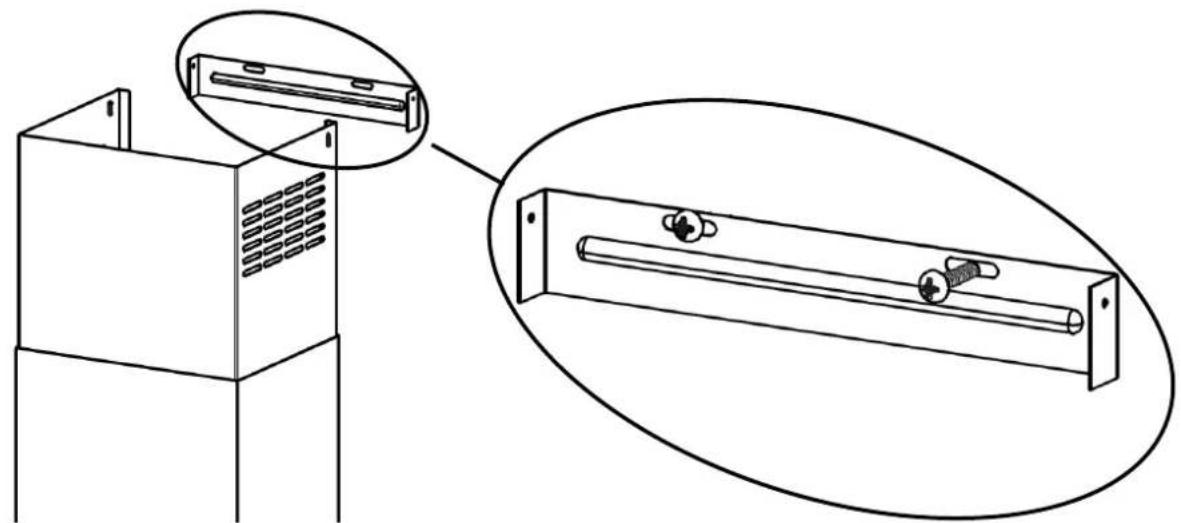
- Use the upper chimney bracket as a template to mark the fixing screw positions. Using the screws supplied, fix the chimney bracket to the wall, checking that it is central about the canopy.
natural_image
Technical line drawing of a cabinet with an inset showing a bracket and a separate view of a cylindrical component (no text or symbols present)Installation - continued
- Connect and secure the ducting (use duct tape if required).
- Remove the protective plastic covering from all parts including the filters. Fit the canopy hood on the fixing bracket. Mark and drill the two holes required for the safety screws. Secure the canopy in place with the safety screws provided. The safety screws stop the canopy from accidentally being knocked off the fixing plate.
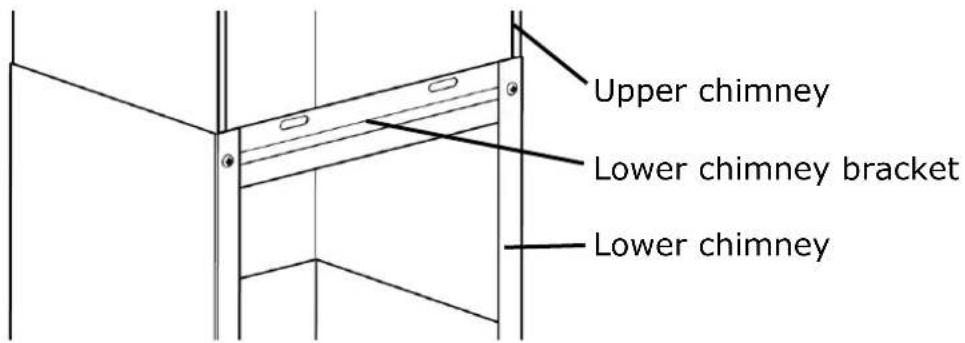
- Insert the upper chimney piece into the lower chimney piece. Assemble the lower chimney bracket onto the lower chimney using screws provided and ensure the bracket holds both chimney pieces. Do not fully tighten the screws as some adjustment is required in step 9.
- Connect to the power supply and switch on the power to the canopy hood. Check the function of the canopy hood. Connect and secure the ducting (use duct tape if required).
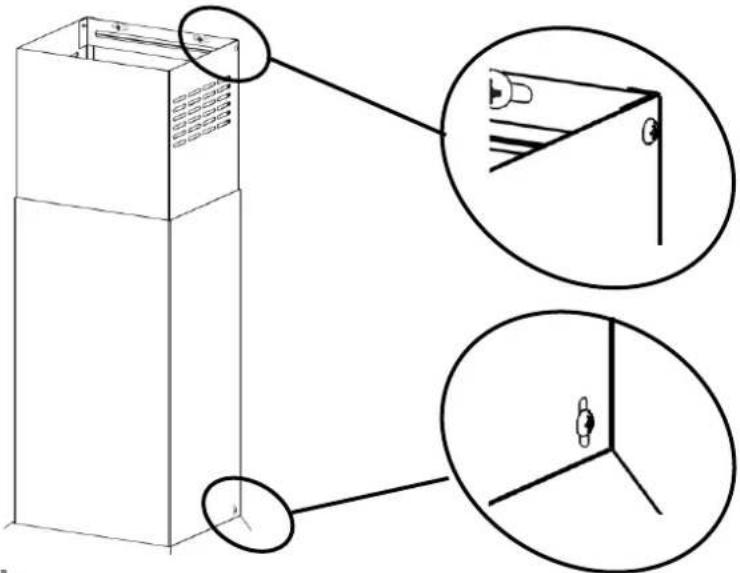
- Place the two chimney pieces onto the canopy top and secure the lower part to the canopy sides. Extend the upper chimney to the ceiling and secure in place with two screws supplied.
Recirculation mode
- This unit can be installed to operate in recirculation mode where ducting is not a chosen/desired or practical option. There are recirculation grilles fitted on each side of the upper chimney which allow the cleansed air to return to the kitchen. Ensure that the side outlet grilles are not obstructed. Even a partial obstruction will restrict the efficiency of the rangehood.
- Replace aluminium filters with charcoal filters (see pg 7 for part numbers).
Operating instructions
Controls
Power On/Off
Speed 1
Speed 2
Speed 3
Lights On/Off
Light
The light can be operated independently from the fan and is controlled in accordance with the graphics printed above.
Fan
The fan is operated by turning the power switch on. It can be run at three different speeds (Speed 1 / Speed 2 / Speed 3) depending on the cooking requirements and is controlled in accordance with the graphics printed above.
Cleaning and maintenance
General Maintenance
Switch off the canopy before cleaning or maintenance. To prevent surface damage never use abrasive or oil based liquid cleaners. To clean the surfaces of the appliance, use mild detergent and warm water. In areas of high humidity and coastal environments cleaning should be carried out frequently.
Warning: a build up of oil may occur if the wall canopy is not cleaned regularly.
Filter Maintenance
To maintain efficiency, the filters should be removed regularly (approximately monthly), and washed using hot soapy water or the dishwasher. Note - some discolouration of the frame may occur if washed in the dishwasher.
Rangehoods fitted with charcoal filters are designed to remove grease and odours from cooking vapours prior to the cleansed air re-entering the kitchen (when the rangehood is in recirculation mode). Charcoal filters should be replaced every two to four months depending on use.
Note: Fully saturated charcoal filters can become a barrier to air movement therefore limiting rangehood performance. In the event of fire, grease laden filters could be flammable and therefore regular replacement is recommended. In ducted installations, conventional aluminium filters are recommended.
Replacement of Halogen Lamps
To replace a lamp, first disconnect the rangehood from the power supply. Use a small blade screwdriver to prise off the lamp cover. Care must be taken to avoid the lamp lens falling on to the hob top. The halogen bulb is a push fit into the lamp body. Insert the replacement lamp into the lamp holder and replace the lens and lamp cover.
Replacement parts
- Charcoal filter
Light bulb 12V 20W - Chimney extensions
2536 (2 pack - 600 Model)
2537 (3 pack - 900 Model)
104467
10 ft: 2188 Stainless Steel, 2180 White
12 ft: 2189 Stainless Steel, 2181 White
Product approvals and ratings
| Product approval number | V071158 |
| Product rating | 280W (1.15A) Max at 240V 50Hz |
| Electric approval AS/NZS | 60335.2.31:2004 |
| EMC AS/NZS | CISPR14:2001 |
| Performance tested | IEC61591 |
Important safety information
- This appliance is not intended for use by persons (including children) with reduced physical, sensory or mental capabilities, or lack of experience and knowledge, unless they have been given supervision or instruction concerning use of the appliance by a person responsible for their safety.
• Young children should be supervised to ensure that they do not play with the appliance. - There shall be adequate ventilation of the room when the rangehood is used at the same time as appliances burning gas or other fuels.
• You must read the details concerning the method and frequency of cleaning.
• There is a fire risk if cleaning is not carried out in accordance with the instructions. - Do not flambé under the rangehood.
- Exhaust air must not be discharged into an existing flue which is used for exhausting fumes from appliances burning gas or other fuels.
- The minimum distance between the hob surface and the lowest part of the rangehood is 600mm. This distance shall be at least 650mm, if the rangehood is installed over a gas hob. If the instructions for the gas hob specify a greater distance, this has to be taken into account.
- Attention should be given to ensure that any applicable regulations concerning the discharge of exhaust air is fulfilled.
- If the supply cord of this equipment is damaged, it must only be replaced by the manufacturer or its service agent or a similarly qualified person in order to avoid a hazard.
Notes:
- Please remember to fill out the details on the warranty certificate (do not post).
- Remove any plastic coating from the product.
- Ensure safety screws are fitted.

- Overview
- Pre-installation
- Important:
- Contents of packaging:
- Typical equipment required:
- Pre-Installation - continued
- Ducting Options
- Installation position
- Installation
- Installation - continued
- Recirculation mode
- Operating instructions
- Light
- Fan
- Cleaning and maintenance
- General Maintenance
- Filter Maintenance
- Replacement of Halogen Lamps
- Replacement parts
- Product approvals and ratings
- Important safety information
- Notes:
Brand : Ariston Thermo
Model : RHC 60 IX
Category : Range hood