IS-COMP4-SERV - Software AMX - Free user manual and instructions
Find the device manual for free IS-COMP4-SERV AMX in PDF.


| Product Type | Software |
| Model | IS-COMP4-SERV |
| Brand | AMX |
| Compatible Operating Systems | Windows 10/11, macOS 10.14+ |
| Minimum RAM | 4 GB |
| Minimum Storage | 500 MB |
| Processor Requirement | Intel Core i3 or better |
| Software Category | Control System Programming |
| Primary Function | Configuration and management of AMX control systems |
| Supported File Formats | .axs, .kpd, .tp4 |
| User Interface | Graphical user interface with drag-and-drop |
| Connectivity | Ethernet, USB, serial (via adapter) |
| Multi-Language Support | English, French, German, Spanish |
| Automatic Updates | Yes, via internet |
| Technical Support | Online knowledge base, email, phone |
| License Type | Perpetual license per device |
| Installation Type | Download and install from AMX website |
| Security Features | Password protection, encrypted communication |
| Maintenance and Cleaning | Not applicable (software) |
| Spare Parts and Repairability | Not applicable (software) |
Frequently Asked Questions - IS-COMP4-SERV AMX
User questions about IS-COMP4-SERV AMX
0 question about this device. Answer the ones you know or ask your own.
Ask a new question about this device
Download the instructions for your Software in PDF format for free! Find your manual IS-COMP4-SERV - AMX and take your electronic device back in hand. On this page are published all the documents necessary for the use of your device. IS-COMP4-SERV by AMX.
USER MANUAL IS-COMP4-SERV AMX
The IS-PLAYER-200 (FG1230-08) is a self-contained solution for Inspired Signage software that delivers content to each display (FIG. 1). The IS-PLAYER-200 ("Player") runs the Babel and Player applications.

FIG. 1 IS-PLAYER-200 - Front Panel
Features
• High-definition video output at 1080p 60HZ
- 2.13 GHz Intel® Core™2 Duo processor with 2MB cache
- 1 GB RAM (2 x 512MB)
• Performance graphics card - DirectX 9c compliant
• SATA 3.0Gb/s Hard Drive 80 GB
Additional Documentation
For more detailed instructions on configuring the IS-PLAYER-200, refer to the IS-PLAYER-200/LM Installation/Reference Guide (available at www.amx.com).
Important Safety Markings
Note: Power supply cords shall have conductors with cross-sectional areas sufficient for the rated current of the equipment. Conductors shall be sized based on the requirements in the National Electrical Code, ANSI/NFPA 70, and the Canadian Electrical Code, Part I, CSA C22.1. The length of a power supply cord shall not exceed 4.5 m.
Product Specifications
| IS-PLAYER-200 - Product Specifications | |
| Dimensions (HWD) | • 2.8" x 16.25" x 12" (7.11 cm x 41.27 cm x 30.48 cm)• 2 RUs |
| Weight 13.75 lbs | (6.24 kg) |
| Environment | • Operating Temperature: 0°C to 40°C (32°F to 104°F)• Storage Temperature: -10°C to 70°C (14°F to 158°F)• Operating Relative Humidity: 5% - 85% non-condensing |
| Power • 100-240V | AC, 5-3A, 50/60Hz• Internal: 270W FLEX ATX Power Supply |
| AC Current Draw | • Input Current: Max 5A @115Vac, 3A @230Vac• Max output - 270 (50°C) (+3.3V & .5V=130W)• DC output - +3.3V |
| Enclosure Metal with black matte finish | |
| OS WEPOS | |
| Front Panel Components | |
| Status • Green LED indicates power• Yellow LED indicates disc activity | |
| Rear Panel Components | |
| Power Switch Turns power on/off.Note: This is a "soft switch": flipping the switch while the Player is running issues a shutdown request. | |
| Power connector | EC connector for AC power cable (included)• Connect only to AC power supplied according to appropriate national requirements. Contact your AC power Provider for National Requirements.• Isolate IT Power System Connection. |
| USB Ports | 6 Type-B USB Ports for connecting USB mouse and keyboard.Note: The Player is designed to be used without a keyboard and mouse; they are not required for normal operation. |
| Ethernet Port | RJ-45 Ethernet port provides Gigabit Ethernet communication between the Player and the Controller PC (which runs the Inspired Composer application).Connect the Ethernet port to the LAN |
| Audio Out Provides stereo audio output to the display, via a mini-stereo-to-RCA cable (not included).Note: The Audio in (blue) and Microphone (red) connectors are not used. | |
| DVI Video Out (1 & 2) | Provides HD resolution DVI out via DVI cable.Note: There are 2 DVI video outputs provided, but only one is used. Either DVI output port can be used to deliver video to the display. |
| IS-PLAYER-200 - Product Specifications (Cont.) | |
| Certifications | • FCC Class B• cTÜVus• CE Mark• CB Report• RoHS compliant |
| Included Accessories | • One set Rack Mount Ears• One power cable• DVI to VGA adapter• Component adapter for Graphics Card• IS-PLAYER-200/LM Rack Mounting Installation Guide• IS-PLAYER-200 Installation Guide (this document) |
Rack Mounting the IS-PLAYER-200
The Player is designed to be installed in an equipment rack, using the supplied Rack Mount Ears. The Player requires 2 rack-units in a standard 19" equipment rack.
IMPORTANT NOTES
- The Player requires adequate ventilation. Before rack-mounting the Player, please read the IS-PLAYER-200/LM Rack Mounting Installation Guide (included with the Player).
-
Before installing the Player in the rack, write down the MAC address which is indicated on a label on the rear of the unit (FIG. 3). You'll need this information later, and once the PC is rack-mounted it may be difficult to view the label.
-
Use the supplied mounting screws to attach the Rack Mount Ears to both sides of the Player chassis (FIG. 2).
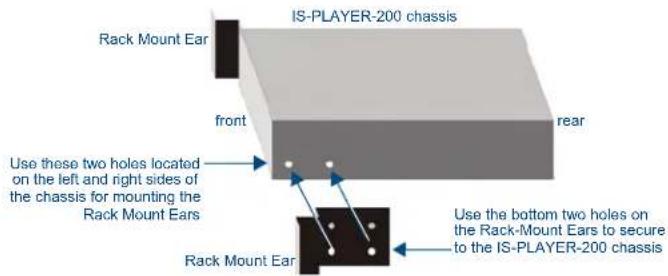
FIG. 2 Installing the Rack Mount Ears to the Player Chassis
- Secure the Player to the mounting rails in the rack.
Connections and Wiring
FIG. 3 describes the rear panel connectors:
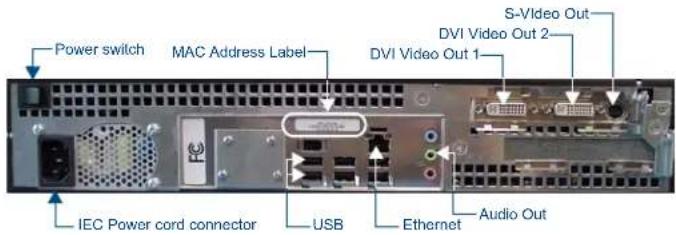
FIG. 3 IS-PLAYER-200 - Rear panel
Once the Player has been installed, and all cabling connections are complete, turn it on and wait for content to appear on the screen before continuing to the next step. This may take several seconds.
Network Configuration
To ensure connectivity between the Inspired Composer application and the Player, it is important that the IP address of the Player does not change.
The Player is configured to obtain its address automatically, from a DHCP server. Therefore, we recommend that you use a DHCP server that can preserve the binding between the Player's MAC address and IP address. If this is not possible, the Player can be allocated a static IP address as described in the following section.
Please consult your network administrator for advice on the best approach for your network scenario.
- If you know your Player's IP address (example: http://10.0.0.1:25001), you can direct your web browser to port 25001 on the Player.
- If you do not configure your DHCP server to allocate a predefined IP address to the Player, you will not know which IP address your Player has been allocated. In this case, you can use Apple's Bonjour Client software.
Bonjour (Zero-Configuration) Client
You can use a zero-configuration client to determine the IP address of the Player. There are many zero-configuration clients available. However, for the purposes of this document, we will refer to Bonjour for Windows. It is free and widely available for download. If you don't already have it installed on your PC, download and install Bonjour for Windows before you begin.
Connecting In a Network With a DHCP Server
Using the Bonjour for Windows plug-in utility, the Player can be installed and configured on the network without the need to pre-configure each device before installation. You will match the MAC Address (provided on a decal placed on the rear panel of the Player enclosure - see FIG. 3) to the MAC Address that is displayed in the Bonjour browser pane.
- Launch Internet Explorer with the Bonjour plug-in.
- Once power is applied to the device, the Bonjour plugin displays the Player as shown in FIG. 4:
Config.Player-00-1C-C0-36-EB-B6
FIG. 4 Bonjour device listing for the IS-PLAYER-200
Notice that the MAC Address is appended to the name of the service.
- Double-click on the Player to access the main configuration page (FIG. 5).

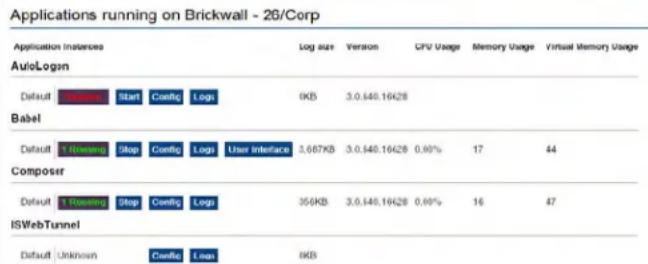
FIG. 5 IS-PLAYER-200 - Main Configuration page
- This requires valid login information - the browser will prompt you for User ID and Password before displaying the configuration pages for the selected device.
- Default Username = admin
- Default Password = admin
At this point, the Player can be configured (changing IP settings, User settings, etc) via the configuration pages.
Player Configuration
Specify Time Zone and Date/Time Settings
Use the options in the MachineManager configuration page to access the Time Zone and current Time settings for the Player:
- In the main configuration page, click the Config button under Machine Manager to open the Inspired Signage MachineManager [Default] Configuration page.
- Click on Date Time Configuration at the top of the page to access the Date Time Configuration page.
- Select the appropriate time zone from the Time zone drop-down menu, and click Set Time Zone.
- Use the Time drop-down menus to select the current Hour, Minute and Second.
- Use the Date drop-down menus to select the current Year, Month and Date.
- Set Date and Time (to set the Date only, click on Set Date only).
Note: Although the directions on this page indicate that all changes require a Player Application restart, in this case you do not have to restart the Player, as you will restart the Player later. Note however, that changing the time will cause the screen to go black.
Specify Screen Resolution, Aspect Ratio and Rotation
Use the options in the Player configuration page to access the Screen Resolution settings for the Player:
- To return to the main configuration page, click the Applications button at the top of the page (FIG. 6).

FIG. 6 Applications button
- In the main configuration page, click the Config button under Player. This opens the Inspired Signage Player [Default] Configuration page:
- Click on the Player Configuration button at the top of the page. This invokes the Player Configuration page.
- Select an output resolution from the standard resolution options provided in the Output Resolution drop-down menu. The default setting is 1024 x 768. To specify a custom output resolution, select Custom from the menu. With Custom selected, the Custom Width and Custom Height fields are enabled. Enter the desired resolution (width and height in pixels).
- Select an output aspect ratio from the standard aspect ratio options provided in the Aspect Ratio drop-down menu. The default setting is 16 x 9. To specify a custom aspect ratio, select Custom from the menu. With Custom selected, the Custom X and Custom Y fields are enabled. Enter the desired aspect ratio.
-
To rotate the output display, select the desired degree of counter-clockwise rotation from the Rotation (Counterclockwise) drop-down menu. The default setting is zero (no rotation). To specify a custom rotation, select Custom from the menu. With Custom selected, the Custom Rotation field is enabled. Enter the desired rotation (degrees, in counter-clockwise direction).
-
Click Apply Settings to save your changes.
Restart The Player
After having set the Time Zone, Date/Time and Resolution settings, it is necessary to restart the Player:
- To return to the main configuration page, click the Applications button at the top of the page.
- In the main configuration page, click on the Stop button in the Player options.
- The program will prompt you to verify this action - click OK to proceed.
- Click on the Start button in the Player options.
Specify a Device Name and TCP/IP Settings for the IS-PLAYER-200
Use the options in the MachineManager configuration page to access the Device Name and TCP/IP settings for the Player:
- In the main configuration page, click the Config button under Machine Manager. This opens the Inspired Signage MachineManager [Default] Configuration page:
- Click on TCP/IP And Name Configuration at the top of the page. This invokes the TCP/IP And Name Configuration page.
- Enter a name for this Player in the Device Name field. The Device Name is returned to Bonjour, to make it easy to identify Players when using Bonjour.
- By default, DHCP is enabled for the IS-PLAYER-200, in which case all of the TCP/IP fields are disabled. To manually configure these settings, de-select DHCP and enter the desired Machine IP, SubnetMask, DefaultGateway and Primary/Secondary DNS values in the respective fields.
- If the static IP address of the Player is changed, then the web browser must be closed and re-opened to re-discover the devices.
Networking
To be fully operational, the Player requires the following permanent network connections:
- To the PC on which the Inspired Composer application is installed, for content updates
• To the Internet, for News & Weather updates (optional)
- To a PC on the network, for automated creation of Image Slideshows (optional)
The location of the IS-PLAYER-200 in the network topology and the choice of a PC to install Composer should be determined accordingly.
- Features
- Additional Documentation
- Important Safety Markings
- Rack Mounting the IS-PLAYER-200
- IMPORTANT NOTES
- Connections and Wiring
- Network Configuration
- Bonjour (Zero-Configuration) Client
- Connecting In a Network With a DHCP Server
- Config.Player-00-1C-C0-36-EB-B6
- Player Configuration
- Specify Time Zone and Date/Time Settings
- Specify Screen Resolution, Aspect Ratio and Rotation
- Restart The Player
- Networking
Brand : AMX
Model : IS-COMP4-SERV
Category : Software