Aero RhythmTrak - Synthesizer ZOOM - Free user manual and instructions
Find the device manual for free Aero RhythmTrak ZOOM in PDF.

| Product Type | Rhythm Synthesizer / Drum Machine |
| Model | Aero RhythmTrak |
| Brand | Zoom |
| Dimensions (W x D x H) | Approx. 300 x 200 x 60 mm |
| Weight | Approx. 1.2 kg |
| Power Supply | AC adapter (DC 9V, 500mA) or 6 AA batteries |
| Sounds | Over 200 built-in drum and percussion sounds |
| Patterns | Up to 100 user patterns, 50 preset patterns |
| Sequencer | 16-step sequencer with real-time and step recording |
| Effects | Reverb, delay, distortion, filter, and more |
| Connectivity | MIDI In/Out, USB, stereo audio out, headphone out |
| Sampling | Built-in microphone for sampling, up to 8 seconds per sample |
| Display | Backlit LCD screen |
| Storage | Internal memory for patterns and samples |
| Maintenance | Clean with a soft, dry cloth. Avoid liquids. |
| Safety | Keep away from moisture, heat, and magnetic fields. |
| Spare Parts | Contact Zoom support for replacement parts. |
| Warranty | 1 year limited warranty |
Frequently Asked Questions - Aero RhythmTrak ZOOM
User questions about Aero RhythmTrak ZOOM
0 question about this device. Answer the ones you know or ask your own.
Ask a new question about this device
Download the instructions for your Synthesizer in PDF format for free! Find your manual Aero RhythmTrak - ZOOM and take your electronic device back in hand. On this page are published all the documents necessary for the use of your device. Aero RhythmTrak by ZOOM.
USER MANUAL Aero RhythmTrak ZOOM
Version 2.0 Operation Manual
Contents
Usage and Safety Precautions....3
Introduction......6
Explanation of terms ....7
Overview
Names of parts....8
Using the AR-96 11
Ring Controller overview....12
Connecting other devices....14
Switching modes ....15
Instrument overview....16
Preparations
Turning the power on and off....18
Loading SD cards ....20
Character input screen use....21
INST (instrument) mode
INST mode overview....22
Operation summary ......25
Real-time pattern input 28
Arpeggiator 32
Clearing patterns....34
Other settings....35
STEP mode
STEP mode overview....36
Operation summary ......39
Pattern step input ....40
Motion sequences....44
Clearing patterns....46
Pattern settings....47
Managing patterns....50
SONG mode
SONG mode overview ....52
Operation summary ....54
Song creation....55
Song settings....58
Managing song sequences....60
Capturing audio (recording)
Capture overview 61
Operation summary 63
Capturing audio 64
Capture settings....69
LOOPER mode
LOOPER mode overview ....71
Operation summary ......73
Creating looper sequences....75
Looper settings....77
Managing looper sequences....80
Kits (sound sets)
Kit overview....81
Using kits 82
Managing kits....83
Editing sounds (EDIT)
Editing overview......85
Editing sounds 87
SONG mode EDIT screen 94
LOOPER mode EDIT screen 95
Effects
Effects overview....98
Using effects....99
Mixer
Mixer overview 100
Using the mixer 101
System settings
Changing various settings....104
MIDI message settings....106
Backing up data and managing audio files 110
SD card management 114
Ring Controller settings....118
Updating the firmware....124
MIDI controller
Using the Ring Controller for MIDI control. 125
MIDI controller layouts....127
Other functions ......128
Troubleshooting....129
Product specifications ....130
Appendix
EDIT menu parameter lists....133
Effects list....141
Arpeggiator parameter list ....143
Ring Controller MIDI messages .....145
MIDI implementation chart....155
Usage and Safety Precautions
Safety Precautions
In this manual, symbols are used to highlight warnings and cautions that you must read to prevent accidents. The meanings of these symbols are as follows.

Warning
Something that could cause serious injury or death

Caution
Something that could cause injury or damage to the equipment
Other symbols used

An action that is mandatory

An action that is prohibited

Warning
Operation using an AC adapter
Never use any AC adapter other than a ZOOM AD-14.
Do not do anything that could exceed the ratings of outlets and other electrical wiring equipment
Connect the AC adapter only to an AC outlet that supplies the rated voltage required by the adapter.
Operation using the rechargeable battery
Always use a ZOOM BT-04 rechargeable battery.
Carefully study warning indications on batteries before use.
Always keep the battery cover closed during use.
Alterations
Do not open the case or modify the product.

Caution
Product handling
Do not drop, bump or apply excessive force to the unit.
! Be careful not to allow foreign objects or liquids to enter the unit.
Operating environment
Do not use in extremely high or low temperatures.
Do not use near heaters, stoves and other heat sources.
Do not use in very high humidity or where it could be splashed by water.
Do not use in places with frequent vibrations.
Do not use in places with much dust or sand.
AC adapter handling
When disconnecting the power plug from an outlet, always pull on the plug itself.
Disconnect the power plug from the outlet when the unit will not be used for a long time and whenever there is lightning.
Connection cables and input/output jacks
Always turn the power OFF for all equipment before connecting any cables.
Always disconnect all connection cables and the AC adapter before moving the unit.
Volume
Do not use at a loud volume for a long time.
Usage Precautions
Interference with other electrical equipment
In consideration of safety, the AR-96 has been designed to minimize its emission of electromagnetic waves and to suppress interference from external electromagnetic waves. However, equipment that is very susceptible to interference or that emits powerful electromagnetic waves could result in interference if placed nearby. If this occurs, place the AR-96 and the other device farther apart.
With any type of electronic device that uses digital control, including the AR-96, electromagnetic interference could cause malfunction, corrupt or destroy data and result in other unexpected trouble. Always use caution.
Cleaning
Use a soft cloth to clean the exterior of the unit if it becomes dirty. If necessary, use a damp cloth that has been wrung out well to wipe it.
If the Ring Controller surface becomes dirty, wipe it with a soft damp cloth that does not shed fibers.
Never use abrasive cleansers, wax or solvents such as alcohol, benzene or paint thinner.
Breakdown and malfunction
If the unit becomes broken or malfunctions, immediately disconnect the AC adapter, turn the power off and disconnect other cables. Contact the store where you bought the unit or ZOOM service with the following information: product model, serial number and specific symptoms of breakdown or malfunction, along with your name, address and telephone number.
Usage and Safety Precautions (continued)
Copyrights
- Windows ^® , Windows ^® 10, Windows ^® 8 and Windows ^® 7 are trademarks or registered trademarks of Microsoft ^® Corporation.
• Mac, Mac OS, iPad and iOS are trademarks or registered trademarks of Apple Inc. - Intel and Intel Core are trademarks or registered trademarks of Intel Corporation or its subsidiaries in the US and other countries.
• The SD, SDHC and SDXC logos are trademarks. - Bluetooth and the Bluetooth logo are registered trademarks of Bluetooth SIG, Inc. and are used under license by ZOOM CORPORATION.
- MIDI is a registered trademark of the Association of Musical Electronics Industry (AMEI).
- Ableton and Ableton Live are trademarks of Ableton AG.
- Other product names, registered trademarks and company names in this document are the property of their respective companies.
Note: All trademarks and registered trademarks in this document are for identification purposes only and are not intended to infringe on the copyrights of their respective owners.
Recording from copyrighted sources, including CDs, records, tapes, live performances, video works and broadcasts, without permission of the copyright holder for any purpose other than personal use is prohibited by law.
ZOOM CORPORATION will not assume any responsibility related to infringements of copyrights.
For optimal performance
The AR-96 uses Bluetooth LE wireless communication for communication between the Ring Controller and the Base Station. Communication at up to 10 meters is possible in an unobstructed indoor space. If interference from electromagnetic waves or other causes prevent good communication, try the following.
- Bring the Ring Controller and the Base Station closer together.
- Move any obstacles between the Ring Controller and the Base Station.
-
Stop unnecessary 2.4GHz transmissions or move interfering devices (including the following) further away.
-
WiFi access points
- Smartphones and other devices that use WiFi
- Microwave ovens
- Audio monitors, lighting controllers and other devices that communicate at 2.4GHz
Warnings and requests regarding safe battery use
Carefully read the following warnings in order to avoid serious injuries, burns, fires and other problems caused by leaking, heat generation, combustion, rupture or accidental swallowing.

DANGER
Do not charge the lithium-ion battery (BT-04) in any way other than using the AR-96 and an AD-14.
Danger of explosion if battery is incorrectly replaced. Replace only with the same or equivalent type.
Do not disassemble the battery, put it in fire, or heat it in a microwave or conventional oven.
Do not leave the battery near a fire, in strong sunlight, inside a vehicle that has become hot or in similar conditions. Do not recharge in conditions like these.
Do not carry or store the battery with coins, hairpins or other metal objects.
Do not allow the battery to be wet by any liquid, including water, seawater, milk, soft drinks or soapy water. Do not charge or use a battery that is wet.

Warning
Do not hit the battery with a hammer or other object. Do not step on it or drop it. Do not otherwise impact or apply force to the battery.
Do not use the battery if it becomes deformed or damaged.
Do not remove or damage the outer seal. Never use a battery that has had all or part of its outer seal removed or a battery that has been torn.
Recycling request
Please recycle batteries to help conserve resources. When discarding used batteries, always cover their terminals and follow all laws and regulations that are applicable to the location.

LI-Hon 00
Usage and Safety Precautions (continued)
FCC regulation warning (for U.S.A.)
This equipment has been tested and found to comply with the limits for a Class B digital device, pursuant to Part 15 of the FCC Rules. These limits are designed to provide reasonable protection against harmful interference in a residential installation. This equipment generates, uses, and can radiate radio frequency energy and, if not installed and used in accordance with the instructions, may cause harmful interference to radio communications. However, there is no guarantee that interference will not occur in a particular installation. If this equipment does cause harmful interference to radio or television reception, which can be determined by turning the equipment off and on, the user is encouraged to try to correct the interference by one or more of the following measures:
- Reorient or relocate the receiving antenna.
- Increase the separation between the equipment and receiver.
- Connect the equipment into an outlet on a circuit different from that to which the receiver is connected.
- Consult the dealer or an experienced radio/TV technician for help.
For EU Countries

Declaration of Conformity
Disposal of Old Electrical & Electronic Equipment (Applicable in European countries with separate collection systems)
natural_image
Simple line drawing of a trash bin with two crossed lines and a solid black bar below (no text or symbols)Products and batteries that have been marked with the symbol of a crossed-out wheeled waste bin must not be disposed of with household waste.
Old electrical/electronic equipment and batteries should be recycled at facilities that are able to process them and their byproducts.
Contact the local government for information about nearby recycling facilities. Conducting recycling and waste disposal properly helps conserve re-
sources and prevents harmful impacts on human health and the environment.
For U.S.A. and CANADA
This device complies with part 15 of the FCC Rules and Industry Canada license-exempt RSS standard(s). Operation is subject to the following two conditions:
(1) This device may not cause harmful interference, and (2) this device must accept any interference received, including interference that may cause undesired operation.
This equipment complies with FCC/IC radiation exposure limits set forth for an uncontrolled environment and meets the FCC radio frequency (RF) Exposure Guidelines and RSS-102 of the IC radio frequency (RF) Exposure rules. This equipment has very low levels of RF energy that are deemed to comply without testing of specific absorption ratio (SAR).
For CANADA
Label is located at the bottom of the unit.
The contents of this document and the specifications of the product could be changed without notice.
Introduction
Thank you very much for purchasing a ZOOM Aero RhythmTrak AR-96. The AR-96 has the following features.
- Loop-shaped controller
The loop shaped Ring Controller makes inputting loop sequences intuitive.
- Ring Controller with 3 rows of 32 pads and 5 rows of 32 LEDs
During step input, you can use the 3 rows of pads to input 3 instruments at the same time. In addition, the multicolor LEDs allow you to see the input status of up to five instruments at a glance.
Furthermore, each pad row can be used separately for real-time input, allowing diverse performance options.
- Ring Controller can be removed from Base Station
The Ring Controller can be removed from the Base Station to perform with it in hand. You can now realize entertaining performances in ways that are not possible with conventional rhythm machines.
- Accelerometer built into the Ring Controller
You can control effect parameters by tilting the Ring Controller. Enjoy a new feeling of controlling sound with your body.
• Automatic detection of the grip area
The grip area setting function can prevent misoperation when holding the Ring Controller during performances.
The position can be set easily when holding it in the most comfortable position.
- The Ring Controller and Base Station connect with Bluetooth LE
The Ring Controller and Base Station connect wirelessly using Bluetooth LE. Power consumption is low, so use for long periods of time is possible.
In addition, the Ring Controller can be independently connected to Mac computers and iOS devices to be used as a multifunction MIDI controller.
• Built-in sound sources can be edited in various ways
The sounds included in the AR-96 have a variety of adjustable parameters that increase their expressive ranges.
Each of the sound parameters can be set easily on an icon-based editor screen.
In addition, each kit can use the sounds of up to 33 instruments (16 simultaneous voices), allowing the creation of rich musical pieces.
- More than 400 PCM sound sources and 70 synthesizer oscillator types built-in
From the rich selection of sound sources, you will be able to find sounds that fit your image of the music you want to make.
The sounds are organized by categories so you can find them quickly.
- Various creation modes
Create music using different modes for different purposes. Build patterns one step at a time in STEP mode. Perform patterns in INST mode. Arrange patterns you have made into complete pieces of music in SONG mode. Assign captured audio to pads and perform with them in LOOPER mode.
- Use up to five effects simultaneously
You can use an insert effect on individual instruments, as well as global filter, delay, reverb and master effects at the same time. This vastly increases sound design possibilities.
- Inputs for electronic instruments and audio devices
You can perform while listening to the input from a connected device and capture input sounds to use as loops and sound sources.
- Loading of audio files possible
You can use a computer to save WAV files on an SD card and load them for use as loops and sound sources. (An SD card (not included) is required.)
• Headphone output independent from other outputs
The second stereo output allows you to output a metronome just to the headphones, for example.
Explanation of terms
Pattern
This is a short musical part of several bars. Patterns are made of sequences (performance information) and kits (sound sets). You can also save parameters controlled by the Ring Controller, quantization and other settings for each pattern separately.
The AR-96 has preset patterns that cover a variety of musical genres.
Song
This is a combination of multiple patterns that form a single musical piece.
Step
A step is the length of the shortest notes that can be input to a sequence.
Steps are usually one 16th of a measure, so you can set sounds to occur in 16th note intervals.
This length can be changed in the settings.
Sequence
A sequence is performance data that records the timing when various sounds are played.
The AR-96 has a STEP mode that allows you to record sequences one step at a time and an INST mode that allows you to record playing the pads in real time.
Instrument
These are the smallest elements of sounds. A variety of sound sources, including drum sets, percussion instruments, basses and synthesizers, are already prepared for use.
You can also use WAV files saved on an SD card by a computer as instruments.
In addition to selecting sounds, various settings are available in each instrument. These include envelopes with attack and sustain times, filters and effects.
Kit
One pattern can use up to 33 instruments. This collection of instruments is called a "kit".
A kit created in one pattern can be copied to another pattern.
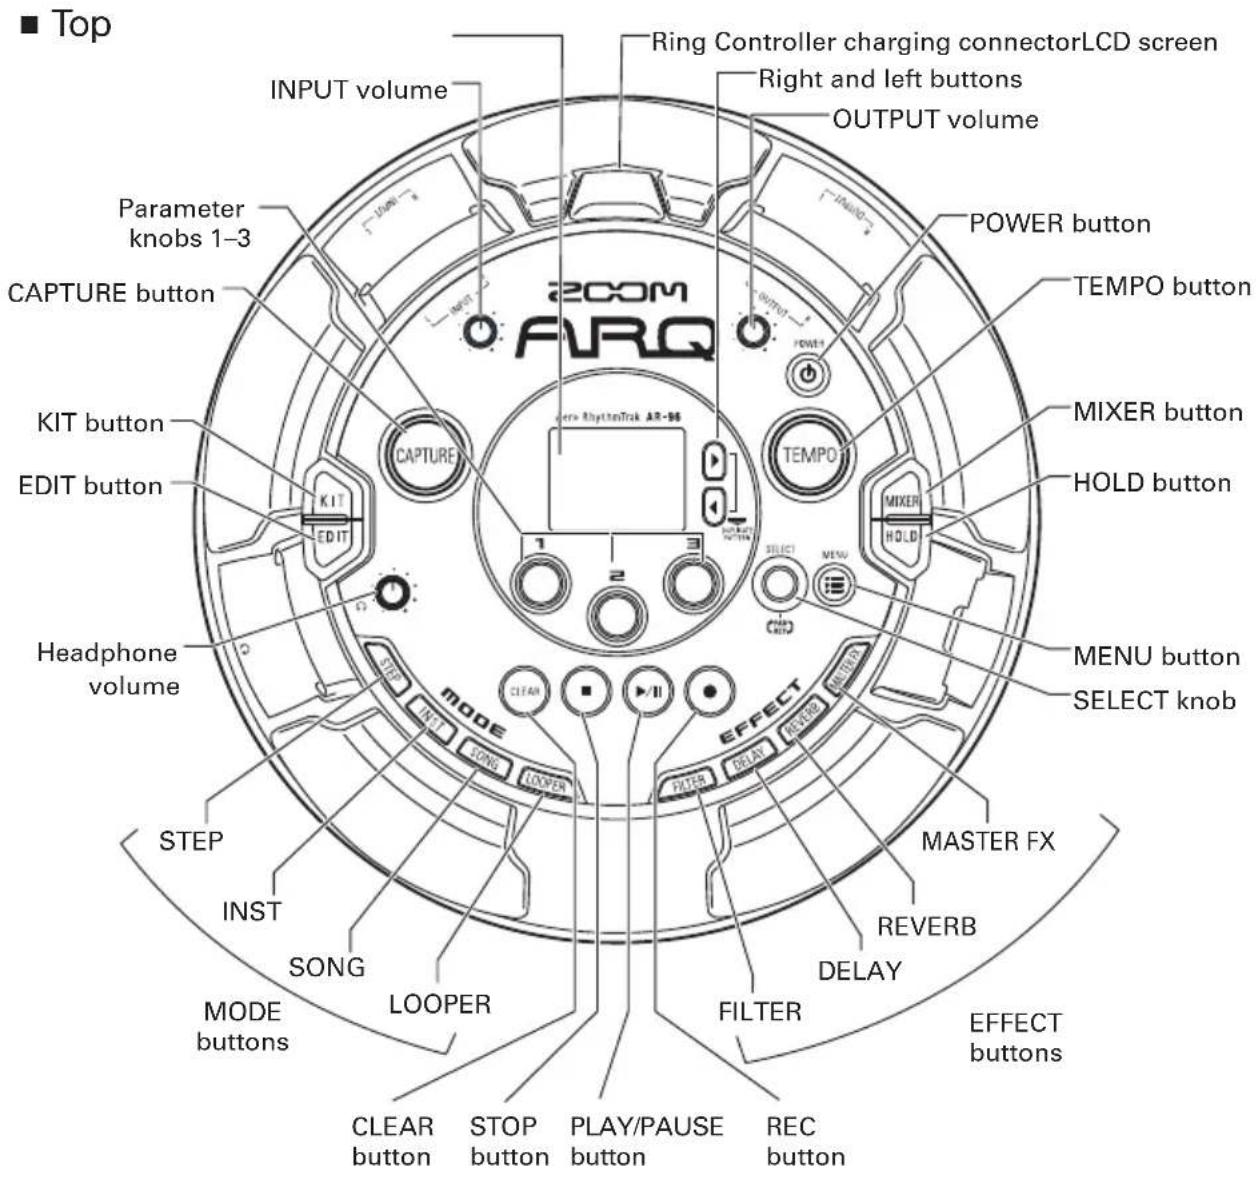
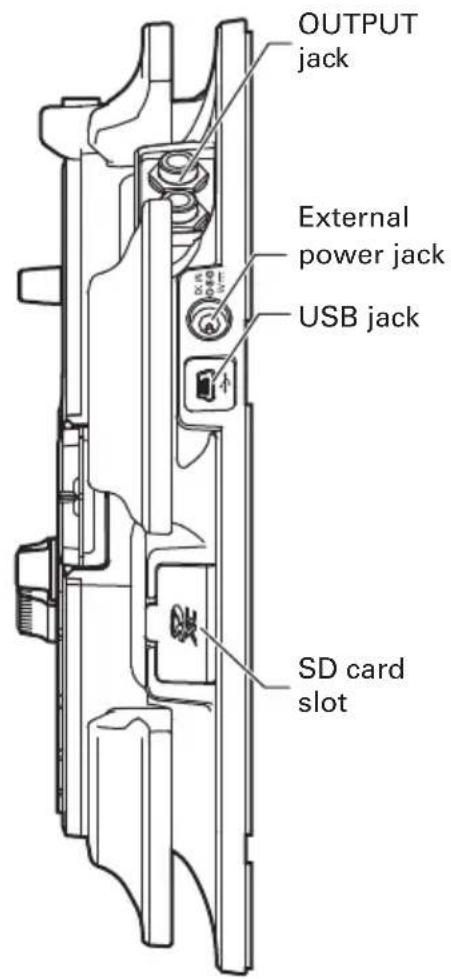
Names of parts
Base Station
■ Left side
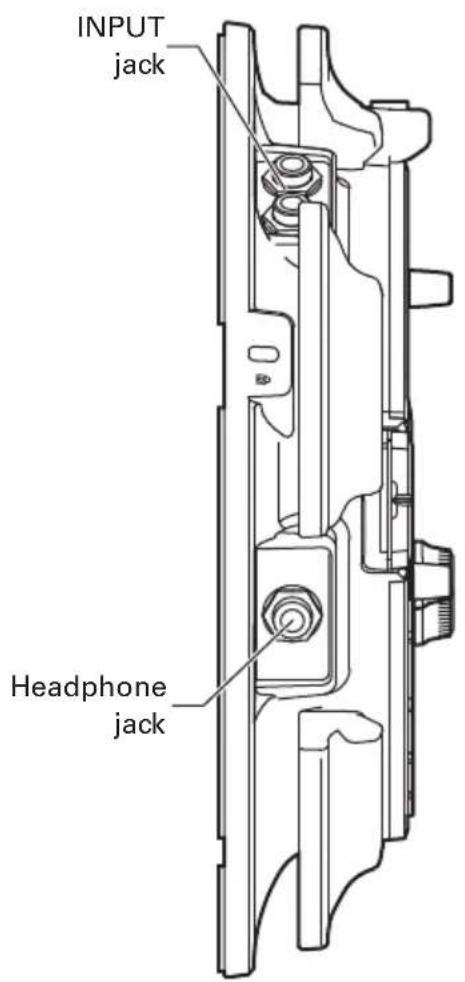
■ Right side
Ring Controller
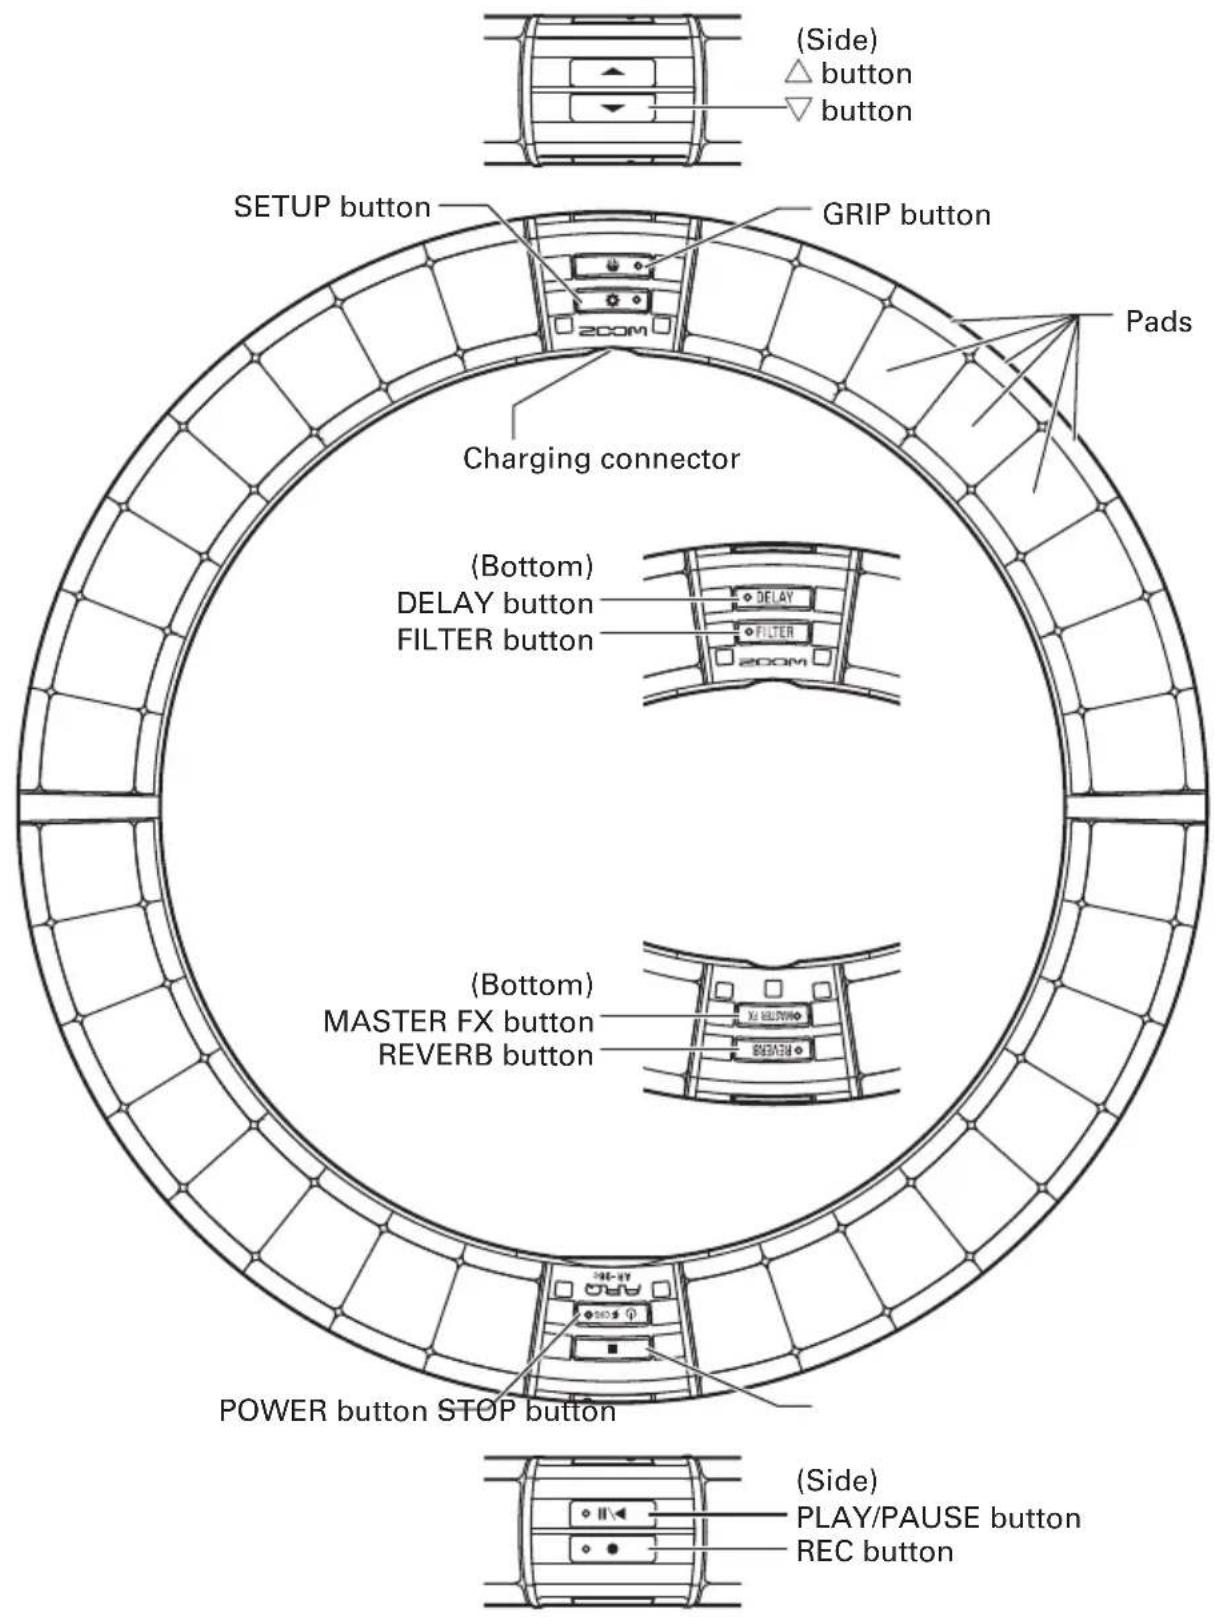
HINT
- You can use the Ring Controller buttons for the same operations as the Base Station buttons.
- The Ring Controller ⇧ corresponds to the Base Station ⬇.
- Press ⏻ ⚡CHGO on the Ring Controller to show the remaining battery charge on the Base Station screen.
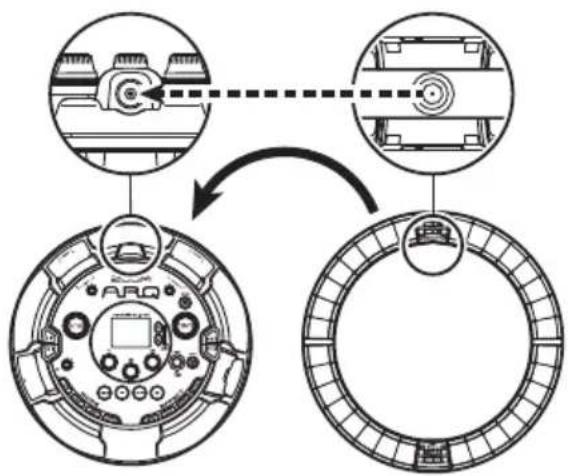
Using the AR-96
The AR-96 consists of a Base Station and a Ring Controller.
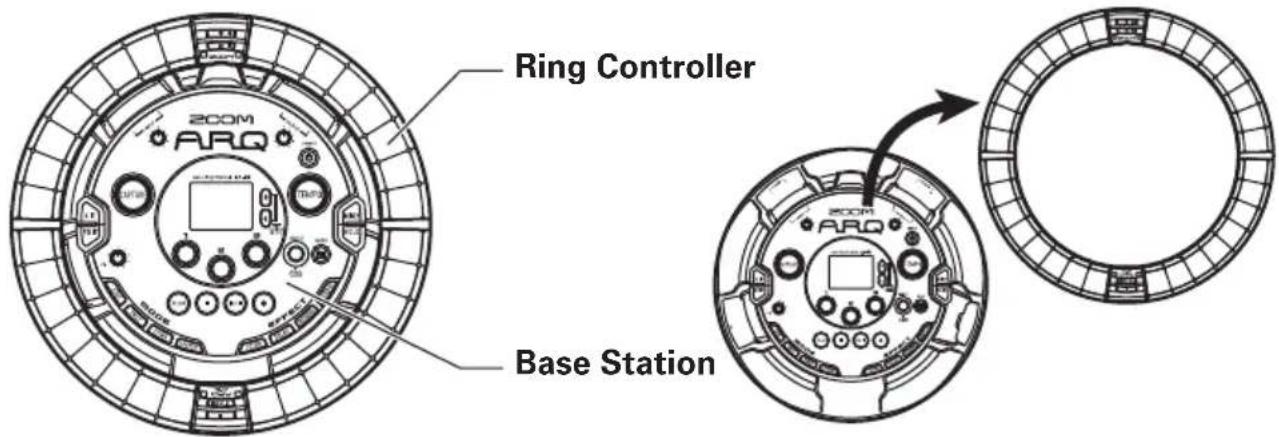
With the Base Station, you can edit tones, create songs and save them, for example. Use the Ring Controller for input when creating songs.
Since the Ring Controller can be detached from the Base Station, you can hold it in your hand and play it like an instrument. You can also connect it wirelessly to a Mac computer or iOS device and use it as a MIDI controller ( P. 108).
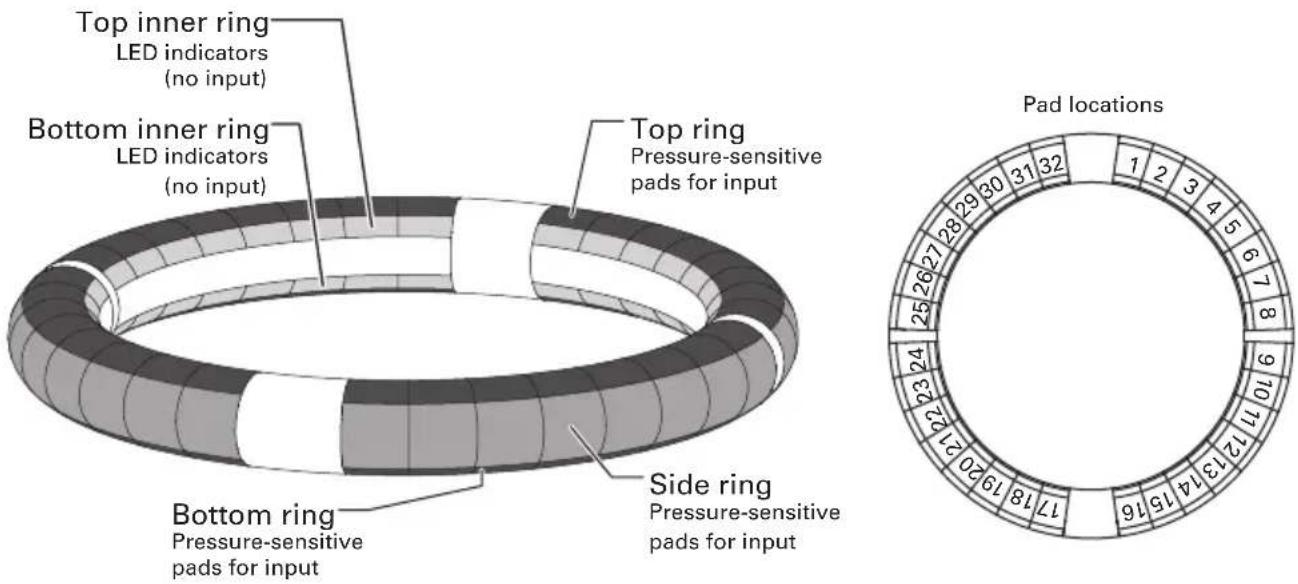
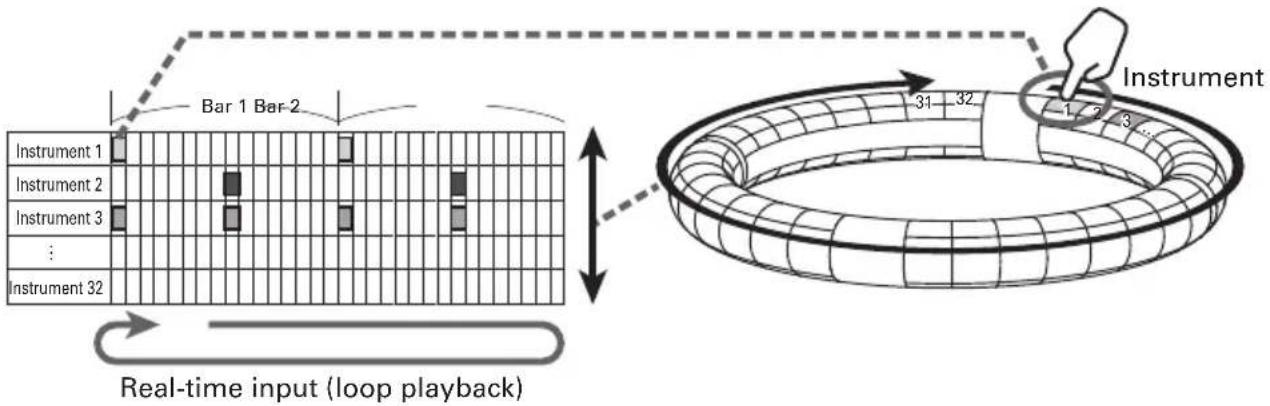
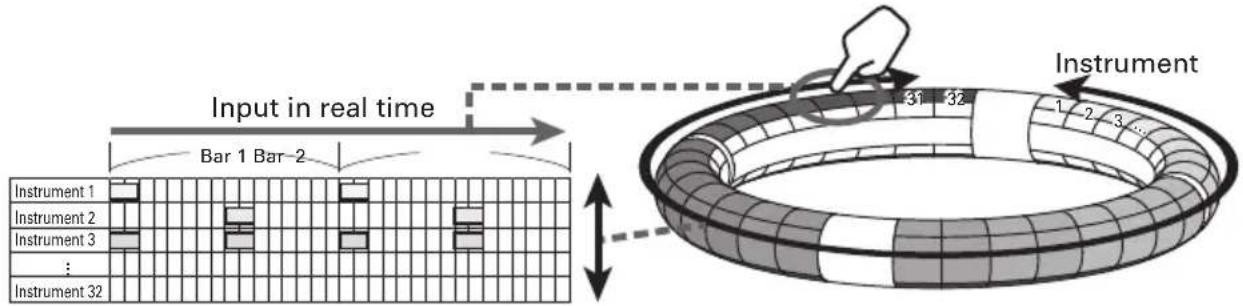
The Ring Controller includes an LED matrix with 5 rows of 32 blocks (3 rows with pads and 2 rows for display only). Placing a two-dimensional matrix on the surface of a three-dimensional hoop enables confirmation and operation of all steps in a compact form.

flowchart
graph TD
    A["Grid with color gradient from top-left to bottom-right"] --> B["Transformation from top-left to bottom-right"]
    B --> C["Ring structure with labeled points: A-E, B-C-D, C-D, etc."]
    style A fill:#f9f,stroke:#333
    style B fill:#ccf,stroke:#333
    style C fill:#cfc,stroke:#333
    style D fill:#fcc,stroke:#333
    note1["1 2 3 ...  ... 30 31 32"] -.-> B
    note2["... 31 32"] -.-> C
    note3["1 2 3 ..."]
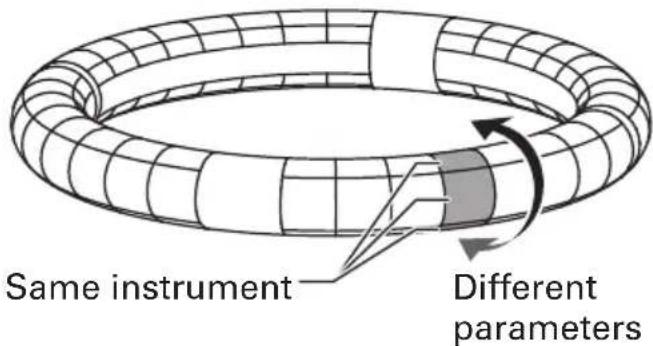
Ring Controller overview
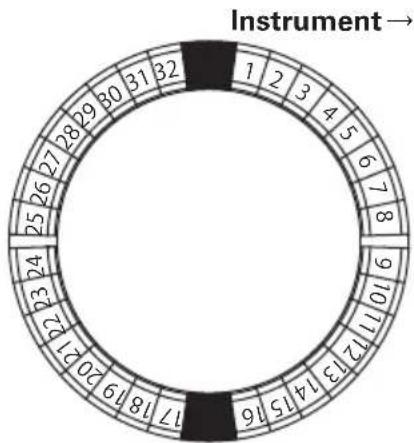
The AR-96 Controller surface has 5 ring-shaped areas. The top, side and bottom rings each have 32 pressure-sensitive pads. Using these pads, you can input and edit songs and perform in real-time, for example.
Assignment of functions
Various functions are assigned to the Ring Controller rings and pads according to the operation status and mode.
Example: In STEP mode PAD layout, the rings display 5 different instrument sequences (3 when set to Guideline display), and each pad and indicator corresponds to a step between 1 and 32.
Example: In INST mode PAD layout, each pad controls 1 of 32 instruments with each ring assigned to a different parameter setting.
HINT
Since input procedures differ for each mode, see the explanation pages for each operation for details.
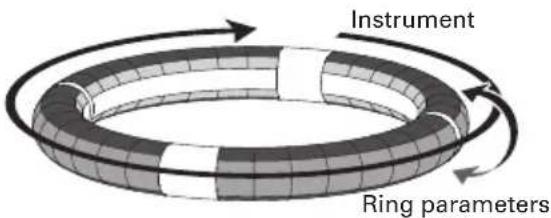
Ring Controller overview (continued)
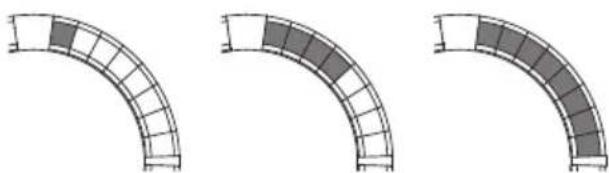
Guideline
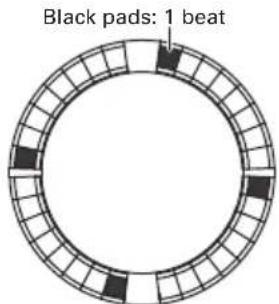
In STEP mode, the LEDs of the top and bottom inner rings can light for each beat to assist in step recording.
See "Setting inner ring display" ( P. 96) for setting instructions.
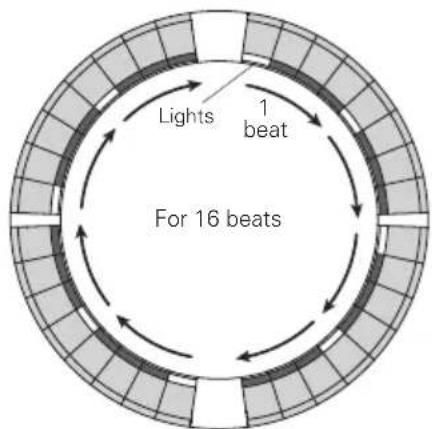
Playback position
When Guideline mode is active, the LEDs of the top and bottom inner rings light green at the step currently playing during playback of patterns and songs, for example.
In addition, in INST mode and during other real-time input, the LEDs light red.
natural_image
Diagram of a toroidal structure with internal flow arrows, no text or symbols presentGrip area
You can set a grip area that does not respond to touch in order to prevent pads from being pressed unintentionally when using the Ring Controller separately from the Base Station. You can set the grip area range as you like.
For details about how to set this, see "Grip area setting" ( P. 103).
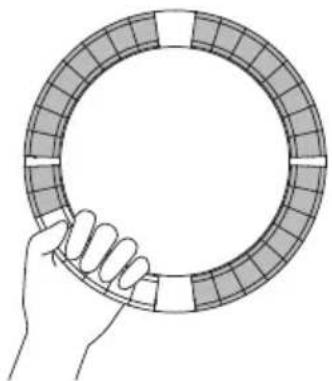
natural_image
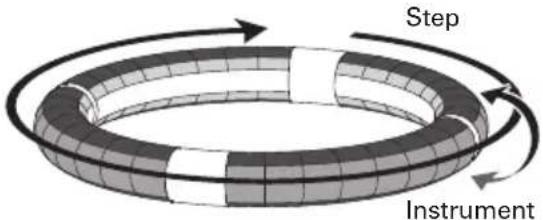
Hand holding a circular mechanical component with segmented outer ring (no text or symbols visible)Turning the Ring Controller over
If you turn the ring controller over and place it so that the side with the power key and the side with the effect keys are reversed, the functions assigned to the rings and the display of LEDs will be reversed top to bottom. Moreover, the direction of movement will also be switched. As a result, when the Ring Controller is viewed from above, movement will always be clockwise and the top ring will always be on top when you use it.

Use the same way even when turned over
NOTE
If the grip area has been set, turning the ring controller over will not reverse assignments or the direction.
Connecting other devices
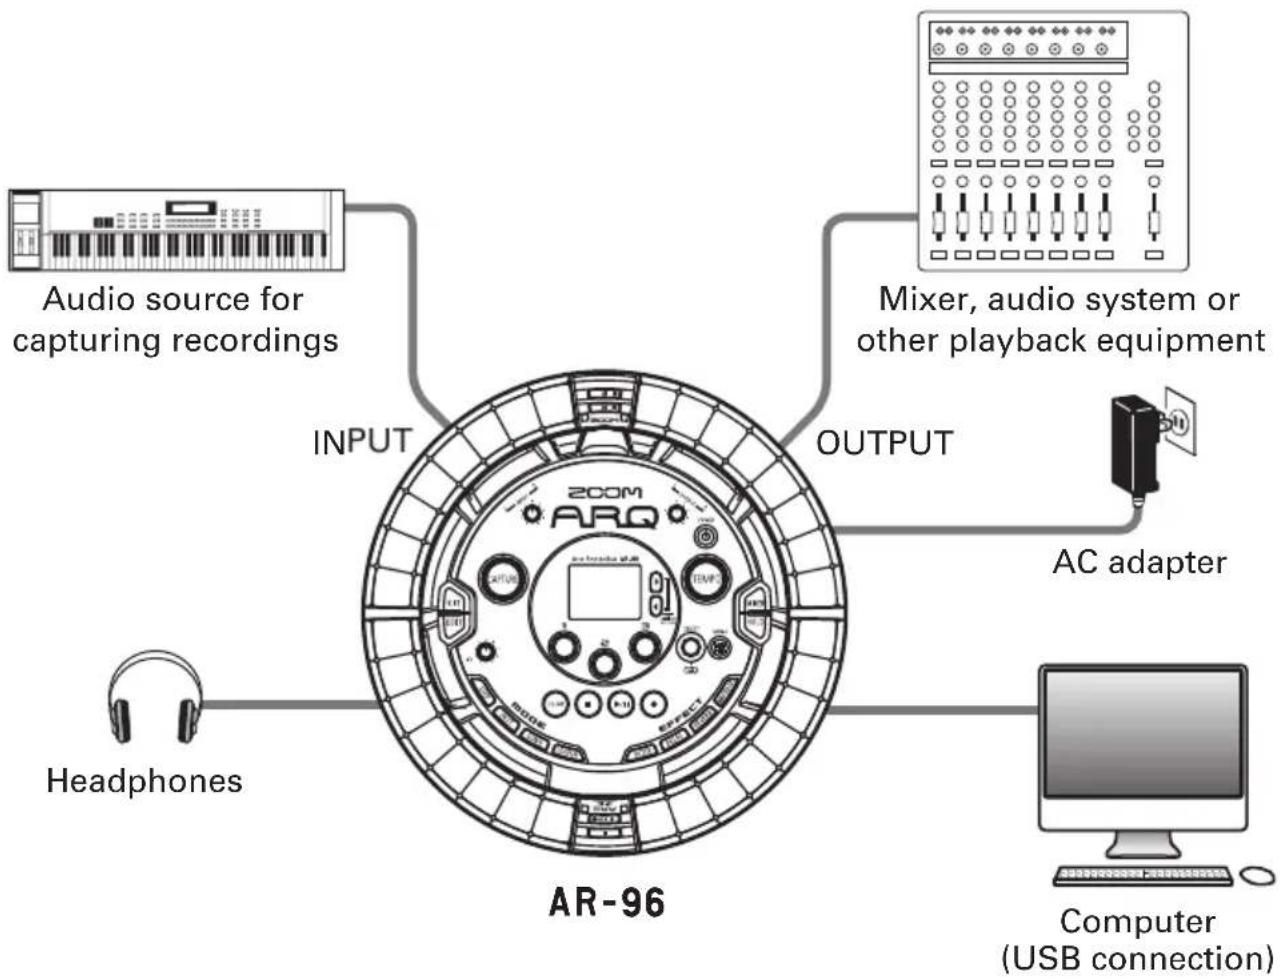
flowchart
graph TD
    A["Audio source for capturing recordings"] --> B["INPUT"]
    B --> C["200M ARQ"]
    C --> D["OUTPUT"]
    D --> E["AC adapter"]
    E --> F["Computer (USB connection)"]
    G["Headphones"] --> H["AR-96"]
    I["Mixer, audio system or other playback equipment"] --> D
Switching modes
With the AR-96, you can create patterns and combine multiple patterns to create songs.
Editing with the AR-96 mainly uses the following four modes. By switching between these modes, you can alternate between creating patterns and creating songs.

The two modes for creating patterns are STEP and INST.
- In STEP mode, you can record instrument sounds one step at a time to create patterns.
- In INST mode, and you can record a performance as a pattern by playing the pads in real-time.
Use SONG and LOOPER modes to create songs.
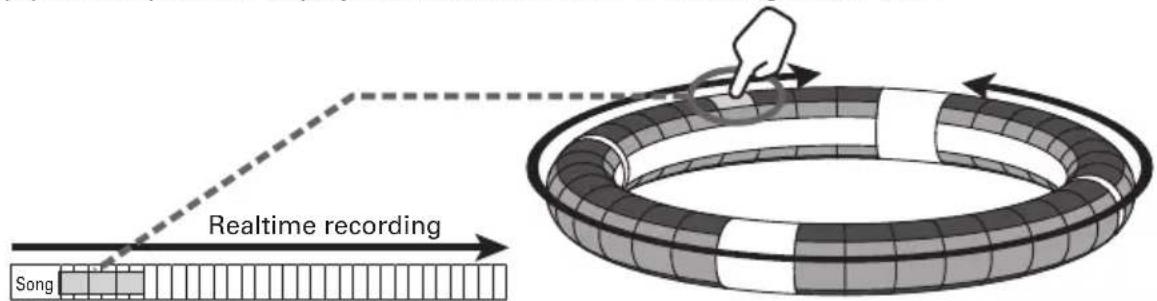
- In SONG mode, create songs by playing and changing patterns in real-time and recording the results.
- In LOOPER mode, use audio data captured from the input of devices connected to the INPUT jacks, patterns and songs, as well as WAV files loaded from SD cards, for example, as materials to build looper sequences and create songs.
Pattern creation
Create and save patterns
STEP mode
Create patterns by inputting one step at a time
INST mode
Record patterns by playing in real time
SONG mode
Combine patterns that have already been made to create songs
LOOPER mode
Create songs using loops from other songs, captured external input and PCM audio files
Song creation
Combine patterns and other sources to create songs
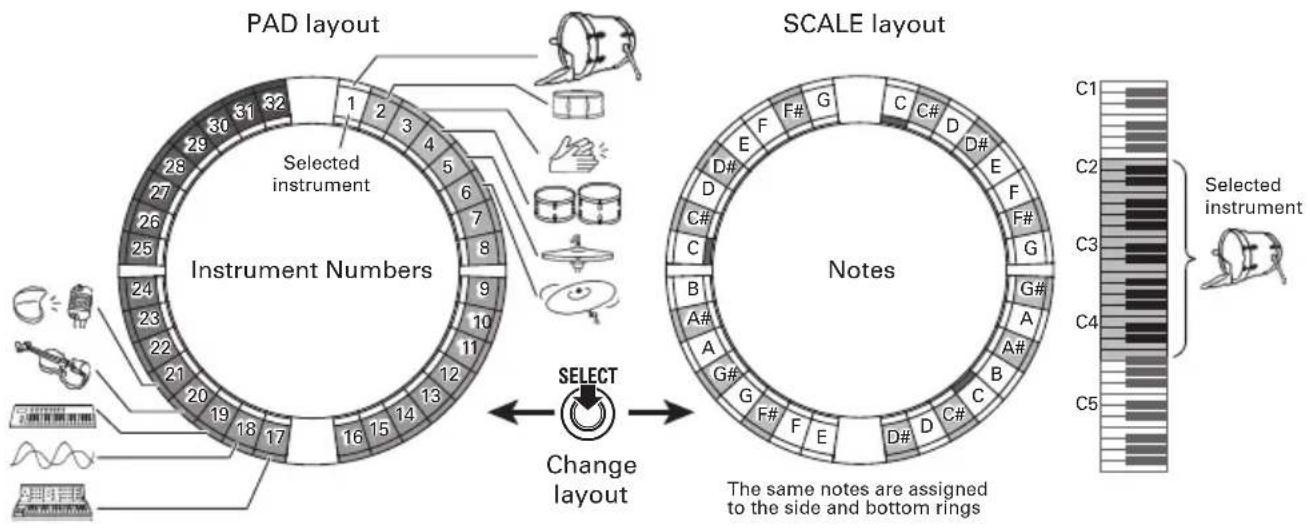
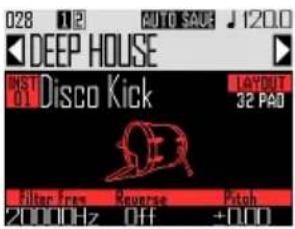
Instrument overview
The AR-96 can use up to 33 sound sources in a single kit. Each of these is called an instrument and produces sound from waveform data, such as a drum hit, from a WAV file loaded from an SD card, or from the built-in synthesizer. In addition to its sound (oscillator), each instrument has various settings. These include envelopes with attack and sustain times, filters, effects and pad colors.
Instruments are assigned numbers from 1 to 33. In EDIT and STEP modes, you can edit the sound and sequence for the instrument selected by number.
HINT
Instrument number 33 is the one used in KEY layout in AR-96 Version 1.00. It can only be edited in STEP mode.
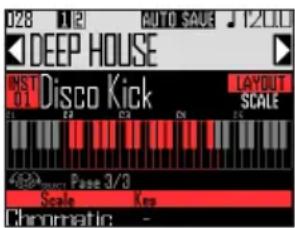
The AR-96 Ring Controller has the two following layouts. In STEP or INST mode, press 📋 to switch between them. Up to 16 sounds can be generated simultaneously in either layout.
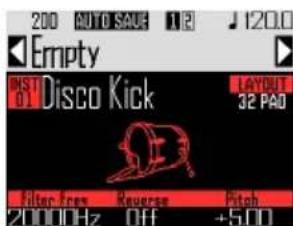
| PAD layout | In this performance mode, you can assign different instruments to each of the 32 pads. Instruments 1–32 assigned individually to pads 1–32.The selected instrument is shown on the display and the corresponding pad lights white. | 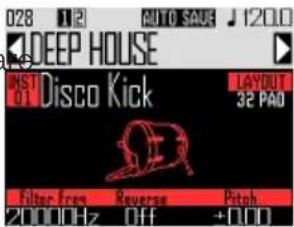 |
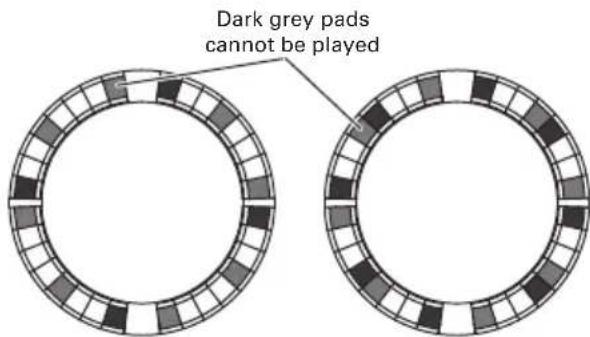
| SCALE layout | This performance mode allows you to use a musical scale to play the instrument selected in PAD layout. The pads become like a keyboard in a musical scale order.The Ring Controller LEDs light with a pale color for white keyboard keys and a dark color for black keyboard keys.The scale can also be set to major or minor, for example.Unlike in AR-96 Version 1.00, any of the 1–32 instruments can be switched to SCALE layout.The note (pitch) that sounds when a pad is played in PAD layout is C4. |  |
Instrument overview (continued)
Assignments of instruments to the Ring Controller are different for STEP and INST modes as well as for PAD and SCALE layouts.
| INST modeSTEP mode | ||
| PAD layoutKEY layout | Instrument No.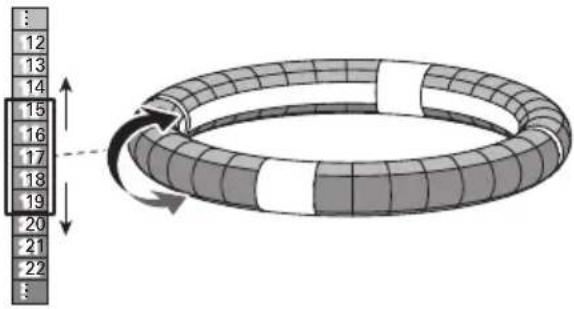 | Instrument No.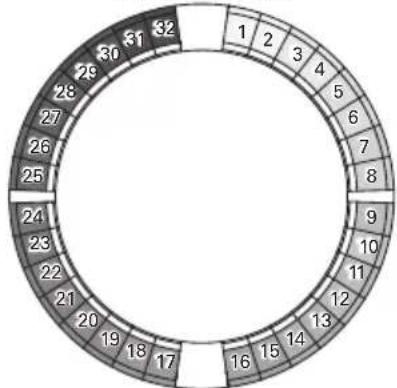 |
Note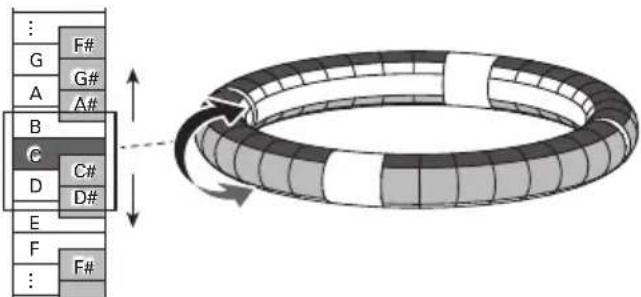 (Using chromatic scale) (Using chromatic scale) | 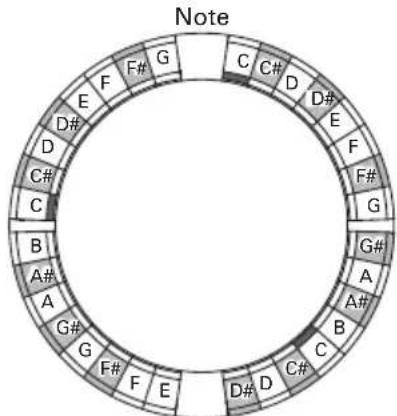 (Same notes assigned to side and bottom rings) (Same notes assigned to side and bottom rings) |
Preparations
Turning the power on and off
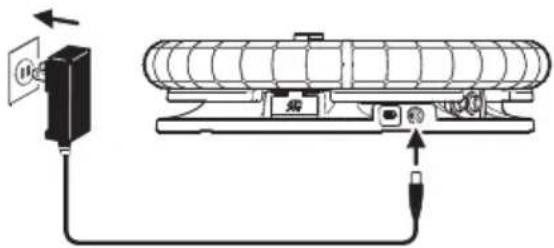
Base Station power
- Connect the included AC adapter to the Base Station.
natural_image
Diagram of a mechanical device with a cable and connector, showing internal components and wiring (no text or symbols)-
Press and hold ⏻ on the Base Station.
-
Press and hold ⏻ to turn the power OFF.
HINT
When the Ring Controller is asleep and connected to the Base Station, turning the Base Station power ON/OFF will also turn the Ring Controller ON/OFF.
NOTE
Use the AC adapter to power the AR-96 even when it is connected to a computer or other device by USB.
Ring Controller power
■ Charging the Ring Controller
- Place the Ring Controller on the Base Station.
flowchart
graph TD
    A["Top View"] --> B["Side View"]
    B --> C["Back View"]
Align their charging connectors before placement.
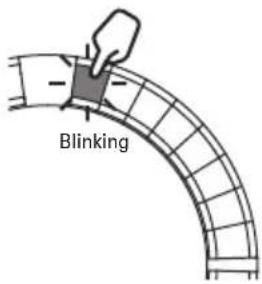
Charging will start and the Ring Controller ⏻ ⚡️ CHG O LED will light.
| Charging(Power off or asleep) | Red |
| Charging during use Orange | |
| Using battery(Remaining battery charge at least 12%) | Green |
| Using battery(Remaining battery charge less than 12%) | Blinking green |
Turning the power on and off (continued)
HINT
Even when the Base Station is OFF, if it is connected to a power supply, it can recharge the Ring Controller.
■ Putting the Ring Controller to sleep
When the Ring Controller is charging, the power will not turn OFF. Instead, it will go to sleep.
1.

CONTROLLER
Press and
hold ⏻ CHG O.
2.

CONTROLLER
Press and hold
to wake it from sleep.
HINT
When asleep, the Ring Controller ⏻ ⚡CHEO LED will light red (charging) or blink red (not charging).
■ Turning the Ring Controller OFF
To turn the Ring Controller OFF, follow these steps when it is not charging.
1.

CONTROLLER
Press and hold
CHG
for at least 7 seconds
when not charging.
2.

CONTROLLER
Press and hold
CHG
to turn the power on.
NOTE
- When the power is OFF, the ⏻ 5CHGO LED becomes unlit.
- When the Ring Controller's power is OFF, if you place it on a Base Station that is connected to power, recharging will start automatically and the Ring Controller will do the following.
- Turn ON (if Base Station is ON)
- Sleep (if Base Station is OFF)
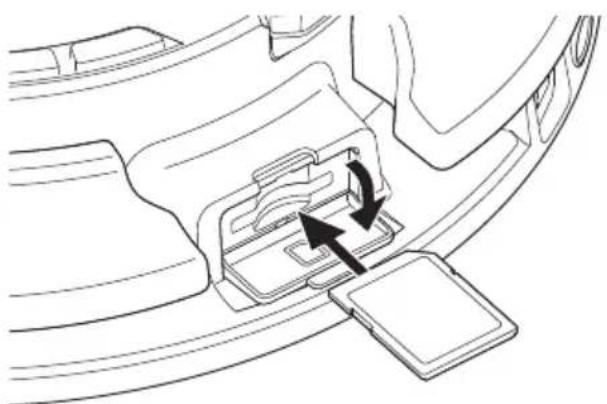
Loading SD cards
■ Loading and removing SD cards
1. Turn the power off.
2. Open the SD card slot cover on the Base Station.
3. Insert the SD card into the slot.
To eject an SD card:
Push the card further into the slot and then pull it out.
natural_image
Line drawing of a car interior showing a plastic component with two arrows indicating movement or assembly (no text or symbols)NOTE
- If no SD card is loaded in the AR-96, captured data cannot be saved and patterns and songs that are created cannot be backed up.
- When inserting an SD card, be sure to insert the correct end with the top side up as shown.
- Before using SD cards that have just been purchased or that have been formatted on a computer, they must be formatted by the AR-96.
- SD card formatting instructions (→ P. 114)
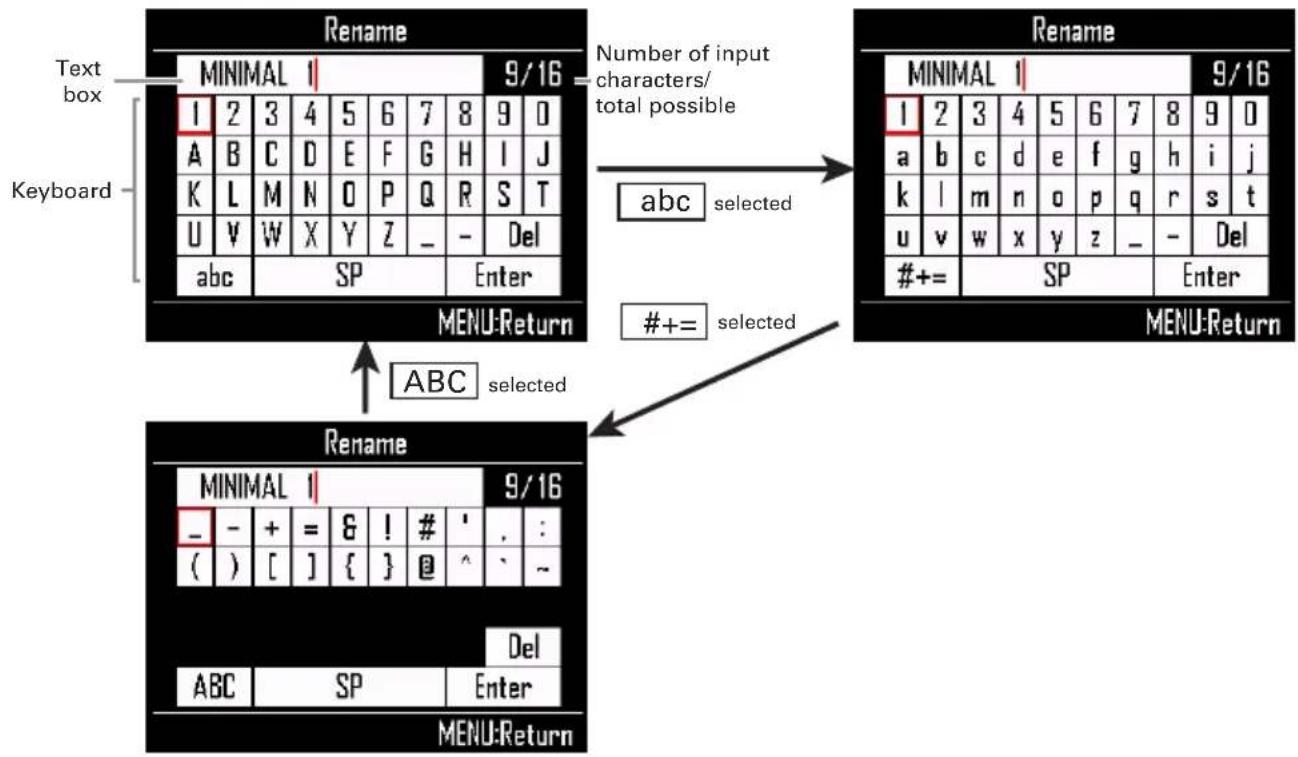
Character input screen use
flowchart
graph TD
    A["Text box"] --> B["Keyboard"]
    B --> C["Rename"]
    C --> D["Menu:Return"]
    D --> E["ABC selected"]
    E --> F["Rename"]
    F --> G["Menu:Return"]

    subgraph Text_box
        H["MINIMAL 1"] --> I["I 2 3 4 5 6 7 8 9 0"]
        J["A B C D E F G H I J"]
        K["K L M N O P Q R S T"]
        L["U V W X Y Z _ - Del"]
        M["abc SP Enter"]
    end

    subgraph Keyboard
        N["ABC"] --> O["Menu:Return"]
    end

    style A fill:#f9f,stroke:#333
    style F fill:#f9f,stroke:#333
    style C fill:#ccf,stroke:#333
    style D fill:#cfc,stroke:#333
    style E fill:#fcc,stroke:#333
    style F fill:#cff,stroke:#333
■ Editing operations
Move cursor in text
box:

Select character: Turn

Confirm character: Press

Complete editing:
Move cursor to "Enter"
and press

Cancel editing: Press

HINT
• The following characters can be used.
(space) ! # & ' () + , - 0 1 2 3 4 5 6 7 8 9 ; =
@ABCDEFGHIJKLMNOPQRSTUVWXYZ
UVWXYZ[]^_^`abcdefghijklmnopqrstuvwxyz[1]
opqrstuvwxyz {} \~
• Some characters might not be usable
depending on the item being input.
INST (instrument) mode
INST mode overview
You can tap pads to perform as you like. You can also record performances in real-time to create patterns.
In this mode, each pad around the Ring Controller corresponds to a single instrument (PAD layout) or note (SCALE layout).
HINT
In PAD layout, the note (pitch) C4 is output when a pad is played.
Different parameter settings are assigned to the side and bottom rings, so they can be used for different tones ( P. 93).
INST mode overview (continued)
Pattern creation in PAD layout
After starting real-time input, tap pads for an instrument to input it.
The pattern will start loop playback, and you can overdub as many times as you like.
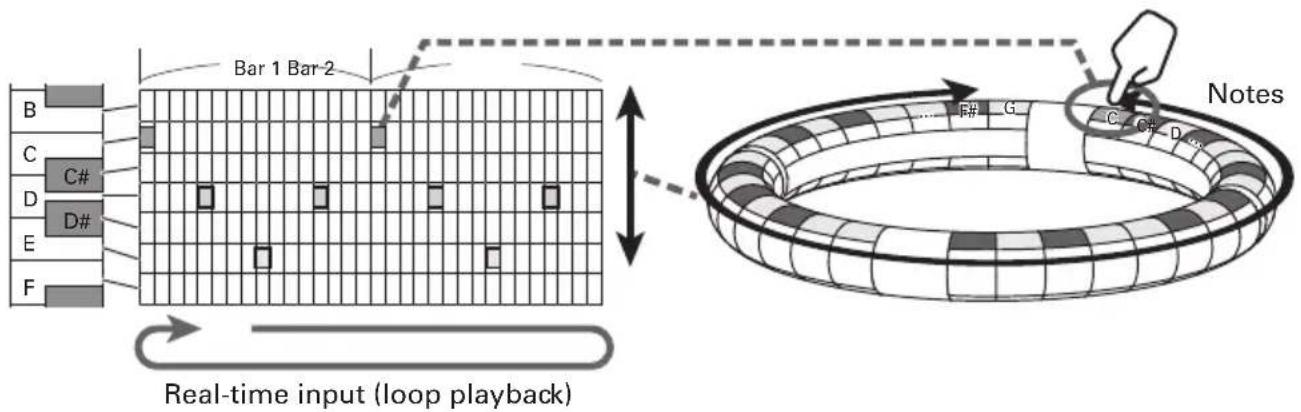
Pattern creation in SCALE layout
After starting real-time input, tap pads for notes to input them.
Scales can be used to input every instrument numbered 1–32.
INST mode overview (continued)
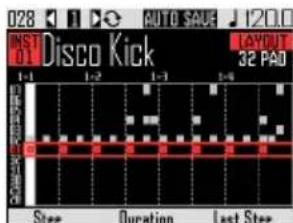
Screen overview
■ PAD layout
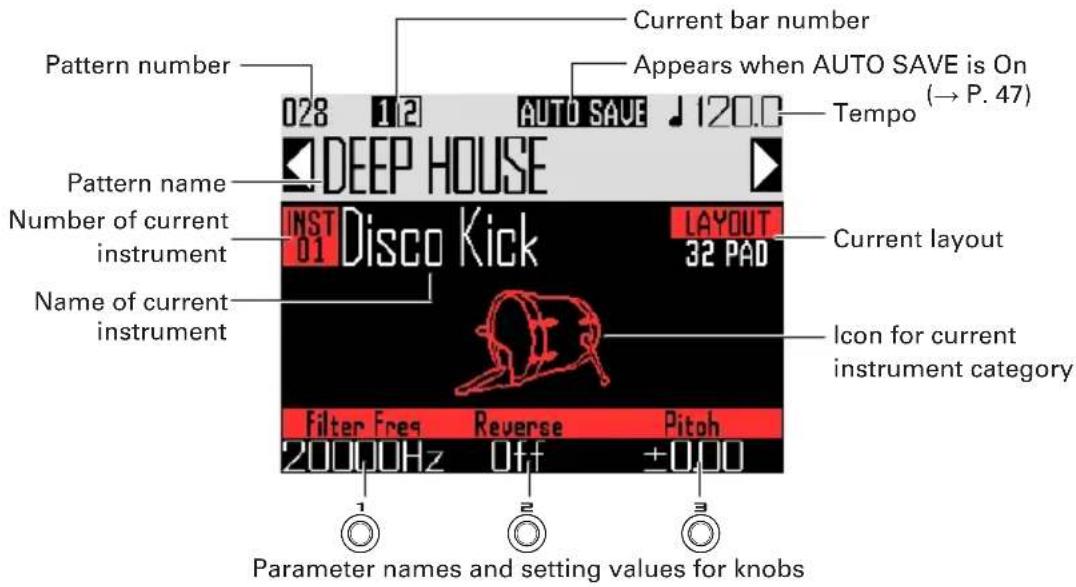
HINT
- By pressing INST as you tap a pad, you can select its instrument without playing its sound.
- The parameters assigned to Ⓞ, Ⓞ and Ⓞ can be selected using the Quick Access function (→ P. 92).
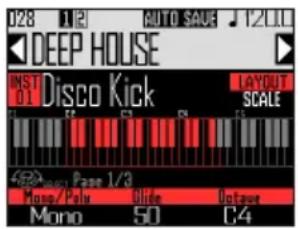
■ SCALE layout
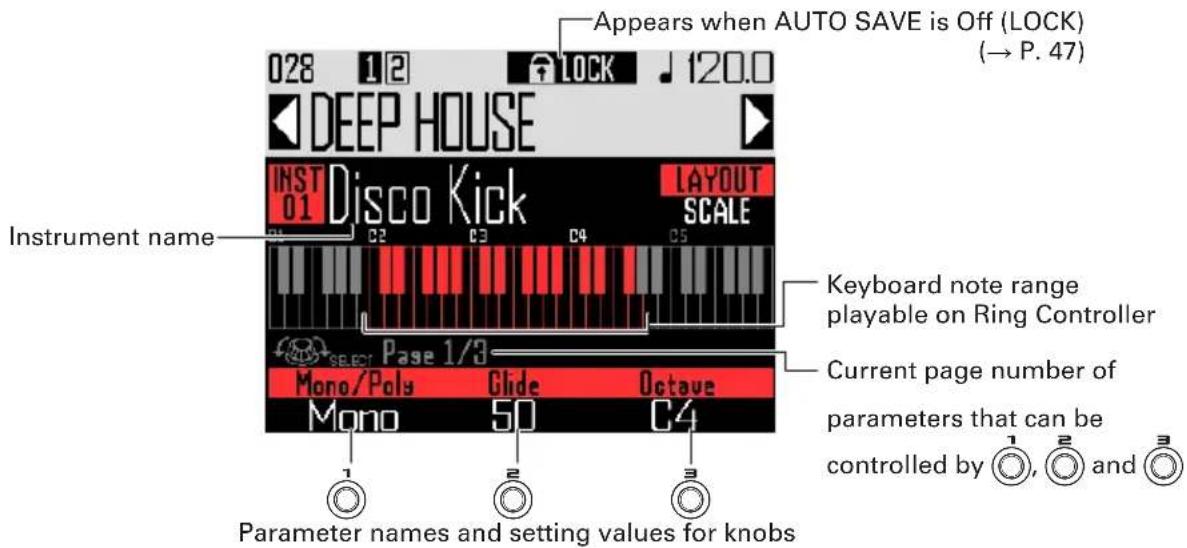
HINT
The parameters assigned to 1, 2 and 3 can be set to the following options using
Page 1: Mono/Poly, Glide, Octave
Page 2: PAD layout Quick Access functions 1–3
Page 3: Scale, Key

Operation summary
Enter INST mode
Press INST to enter INST mode.

Select a pattern
Use 🔒 to select a pattern number.
Check the instruments
Play the pads to hear the sounds of the input instruments.
When a pad is tapped, it becomes "selected" and lights white. The name and parameters of the instrument are shown on the display.
To select an instrument without making a sound press and hold INST while tapping the pad.
To use SCALE layout to input the selected instrument, press SELECT to change the layout.
You can also use Ⓞ to check the instruments.
Start input
Press ⬙ to enter standby, and press ▶ ^II to start real-time input.

natural_image
3D illustration of a toroidal ring with grid pattern (no text or symbols)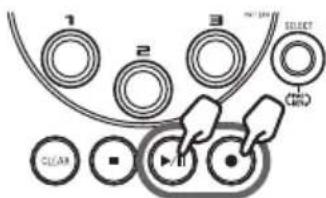
Operation summary (continued)
Start real-time input
In PAD layout
Tap instrument pads to input them in time with the looping pattern that is playing back.
In SCALE layout
Tap the pads of notes to input them in time with the looping pattern that is playing back.
Realtime input (loop playback)
End input
Press Ⓞ to end real-time input.
Operation summary (continued)
Preparations
■ Enter the mode
- Press INST.
■ Selecting patterns
Select a pattern to use for input.
- Use ▶ to select a pattern.
The name of the selected pattern appears on the display.
HINT
If a pattern is in the middle of playing back, the pattern will change after the current one completes. The name of the pattern will blink until it changes.
■ Select sounds
Switch between layouts and check instruments as necessary.
Example using Ⓞ to change the pitch
HINT
You can also edit the sounds ( P. 85).
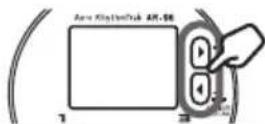
■ Set the tempo
- Press TEMPO.
The tempo setting appears on the display.
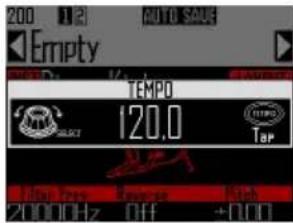
- Use SELECT to set the tempo.
The tempo can be set from 40.0–250.0 BPM in 0.1BPM increments.
HINT
You can also press (TEMPO) repeatedly at the desired tempo to set it (in quarter notes).
Real-time pattern input
Inputting patterns
■ Input a pattern
1.
Press

● lights, showing that recording standby has started.
2.
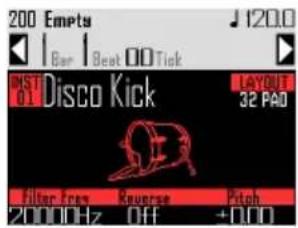
Press

This starts the precount.
After the precount completes, you can input instruments. The bar, beat and tick (smallest recordable time unit) values shown on the display also start to change.
HINT
- Changing the type of precount ( P.35)
- You can press Ⓞ during pattern playback to start input. In this case, there will be no precount.
3.

CONTROLLER
Tap the pad for the
instrument to be input.
Play along with the metronome.
other
| Segment | Value | |---|---| | 1 | 1 | | 2 | 2 | | 3 | 3 | | 4 | 4 | | 5 | 5 | | 6 | 6 | | 7 | 7 | | 8 | 8 | | 9 | 9 | | 10 | 10 | | 11 | 11 | | 12 | 12 | | 13 | 13 | | 14 | 14 | | 15 | 15 | | 16 | 16 | | 17 | 17 | | 18 | 18 | | 19 | 19 | | 20 | 20 | | 21 | 21 | | 22 | 22 | | 23 | 23 | | 24 | 24 | | 25 | 25 | | 26 | 26 | | 27 | 27 | | 28 | 28 | | 29 | 29 | | 30 | 30 | | 31 | 31 | | 32 | 32 |HINT
- By setting quantization, input can automatically be corrected if it varies from the rhythm ( P.47) .
- Changing the metronome settings ( P.35)
4.
Press

to end input.
This ends recording.
HINT
Press ▶ to pause recording.
Press ⬙ to stop recording but continue play-back. You can tap pads at this point to check the sounds.
■ Inputting patterns by tapping pads one step at a time
You can also input patterns by manually moving through them one step at a time and playing pads at the desired steps (step-by-step input).
1.
Press

● lights, showing that recording standby has started.

2.
Press

The pattern will move one step by the set step value ( P. 43).
During movement, the display will change showing the current step position.
Real-time pattern input (continued)
You can also use ⏻ to change the step unit.
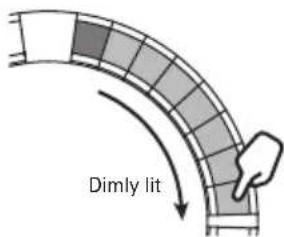
HINT
If an instrument has been input at the current step position, that pad will light brightly. Pads that have not been input will be lit dimly.
3. CONTROLLER Tap the pad for the
instrument to be input.
The tapped pad will light brightly. Tap a brightly lit pad to cancel its input. The pad light will dim.
HINT
- Press ☐ while pressing a pad to move between steps and release the pad to sustain the input sound to that step (note length).
- During step-by-step input, press ▶ ^Ⅲ to switch to real-time input.
4. Press Ⓞ to end input.
This ends recording.
■ Playing the pattern
1. Press ▶\II.
Playback starts and ▶ lights.
2. Press ▶ again to pause.
Playback pauses and ◀\blinks.
3. Press ☐ to stop playback.
▶Ⅱ becomes unlit when playback stops.
■ Clearing part of a pattern
1. Press ▶II.
The pattern plays back.
2. Press CLEAR.
CLEAR will blink.
-
CONTROLLER While the part you want to clear is playing back, press the pad for the instrument to clear. The sequence (performance data) will be deleted while the pad is being pressed.
-
CONTROLLER Stop pressing the pad when playback of the part you want to clear has stopped.
-
Press CLEAR to stop clearing.
Real-time pattern input (continued)
Quickly copying patterns
This function copies the contents of the pattern you are editing to a different pattern and switches to editing that pattern. This allows you to easily create pattern variations.
- Press both ▶ at the same time. This opens the COPY screen.
- Use ⬆ to select the copy destination pattern, and press ⬆. If the copy destination pattern is not empty, a confirmation screen will open.
- Use ⬆ to select Yes, and press ⬆.
This copies the pattern and switches to editing that pattern.
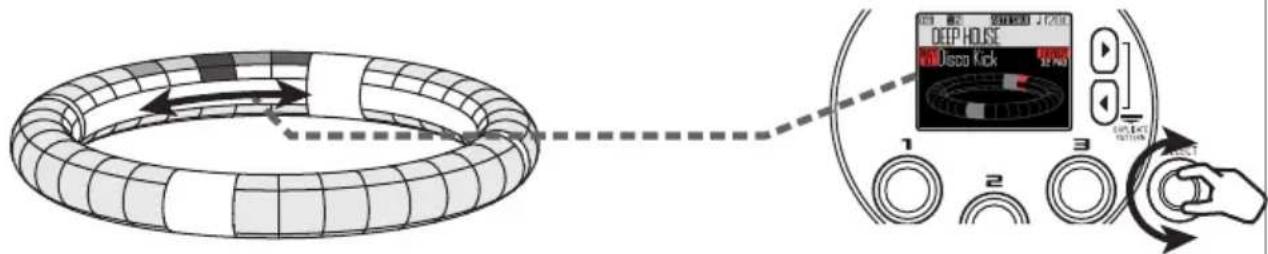
Making SCALE layout settings
You can set, for example, the octave, scale and whether only a single sound (monophonic) or multiple sounds (polyphonic) can be output when the Ring Controller is in SCALE layout.
■ Polyphony setting (Mono/Poly)
This sets whether only a single sound (monophonic) or multiple sounds (polyphonic) are output when multiple pads are pressed at the same time.
- When in SCALE layout, use Ⓞ to open page 1 at the bottom of the display.
- Use Ⓞ to select the polyphony mode. Select Mono or Poly.
■ Setting the glide (Glide)
When a different note is triggered, the pitch can change instantly or gradually over time according to this setting.
- When in SCALE layout, use Ⓞ to open page 1 at the bottom of the display.
HINT
Glide is only enabled when the polyphony mode is Mono.
Real-time pattern input (continued)
2. Use Ⓞ to set the glide value.
This can be set from 0 to 100.
The higher this value is set, the more gradual the change will be.
■ Octave setting (Octave)
You can change the note range that can be played on the Ring Controller.
- When in SCALE layout, use Ⓞ to open page 1 at the bottom of the display.
2. Use Ⓞ to change the octave.
The octave shown will start on pad 1.
■ Changing the scale (Scale)
The layout of notes on the Ring Controller changes according to the scale set.
This allows you to assign only notes from the desired scale to the Ring Controller.
- When in SCALE layout, use Ⓞ to open page 3 at the bottom of the display.
2. Use 1 to select the scale.
You can select from the following.
Chromatic, Major (Ionian), Harmonic Minor, Melodic Minor, Dorian, Phrygian, Lydian, Mixolydian, Aeolian, Locrian, Super Locrian, Major Blues, Minor Blues, Diminished, Com Dim, Major Pentatonic, Minor Pentatonic, Raga1 (Bhairav), Raga2, Raga3, Arabic, Spanish, Gypsy, Minor Gypsy (Hungarian Minor), Egyptian, Hawaiian, Pelog, Hirojoshi, In-Sen, Iwato, Kumoi, Miyakobushi, Ryukyu, Chinese, Whole Tone, Whole Half, 5th Interval
■ Changing the key (Key)
You can change the key when the scale is set to anything other than Chromatic.
-
When in SCALE layout, use Ⓞ to open page 3 at the bottom of the display.
-
Use ☐ to change the key.
You can select from C, C#, D, D#, E, F, F#, G, G#, A, A# and B.
NOTE
The Ring Controller layout also changes according to the key setting.
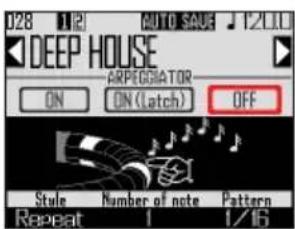
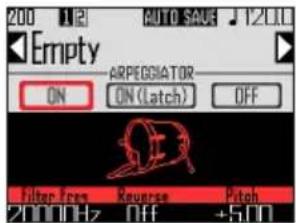
Arpeggiator
This function can be used to make an instrument play automatically when triggered by a pad. Pressing multiple pads will trigger multiple instruments in order.
By pressing chord tones in SCALE layout, the notes in the chord can be played back one at a time.
1.
Press

This opens the arpeggiator setting screen.
2.
Use SELECT to select any setting other than OFF.
When ON is selected, sound will be output automatically while pads are being pressed.
When ON (Latch) is selected, sounds will automatically start output when pads are pressed and stop when their pads are pressed again.
HINT
Automatic output in ON (Latch) mode can also be stopped by pressing ☐.
3.
Turn Ⓞ to change the arpeggiator style.
The style can be set to Repeat, Sequence, Up, Down, Up & Down, or Random.
The selected Style changes the arpeggiator type and the functions of ☐ and ☐ as shown in the table on the following page.
4.
Press HOLD to end arpeggiator setting.
When the arpeggiator is enabled, the display changes when you tap a pad.
At this time, you can use Ⓞ to turn the arpeggiator OFF.
Arpeggiator (continued)
Arpeggiator parameter list
| Style Effect | Parameter 2(use Ⓞ to set) | Parameter 3(use Ⓞ to set) | |
| Repeat | Pressed pads will sound repeatedly.If multiple pads are pressed, they will all sound at the same time repeatedly. | Number of noteIn addition to the note of the pad, a number of intervals can also be set to sound.When set to 1, only the pad sounds. Higher numbers add fifths and octaves above. If the number is set to 2 or higher, you can select Up, Down, Up-Down or Random as the order they make sound.(Arpeggiator parameter list → P. 143) | PatternThis sets the timing of the arpeggiator.In addition to simply repeating the sounds at fixed intervals (1/32, 1/16Tri, 1/16, 1/8Tri, 1/8, 1/4, 1/2 or 1/1), you can also select preset sequences (Seq 1–32).(Arpeggiator parameter list → P. 144) |
| Sequence | If the pressed pad has a recorded sequence, the instrument will play with that sequence.If the pad does not have a recorded sequence, it will sound just once without repeating. If multiple pads are pressed at the same time, they will sound at the same time repeatedly. | ||
| Up | If multiple pads are pressed at the same time, they will sound in order from the lowest instrument number. | OctaveThis can be set from 1 to 4.If Octave is set to 1, only the pads pressed will sound.If it is set to 2, notes one octave above will sound in addition to the pads.In the same manner, if sets to 3 or 4, notes 2–3 octaves above will also sound. | PatternThis sets the timing of the arpeggiator.In addition to simply repeating the sounds at fixed intervals (1/32, 1/16Tri, 1/16, 1/8Tri, 1/8, 1/4, 1/2 or 1/1), you can also select preset sequences (Seq 1–32).(Arpeggiator parameter list → P. 144) |
| Down | If multiple pads are pressed at the same time, they will sound in order from the highest instrument number. | ||
| Up & Down | If multiple pads are pressed at the same time, they will sound in order from the lowest to the highest instrument number. Then, they will sound from the highest to the lowest. | ||
| Random | If multiple pads are pressed at the same time, they will sound in random order. | ||
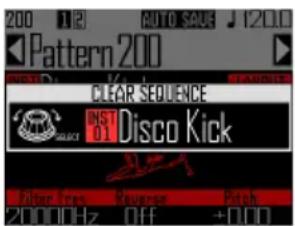
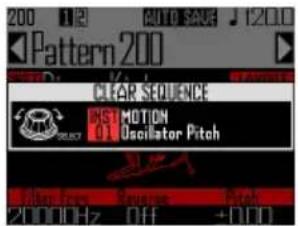
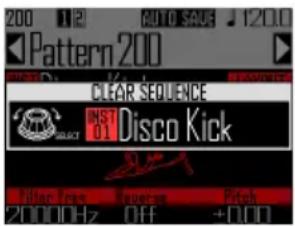
Clearing patterns
Completely clearing instruments
-
Use ⬤ to select the instrument to clear.
-
When playback is stopped, press CLEAR.
This opens the CLEAR screen. Press CLEAR again to cancel.
HINT
- You can also turn 📋 on the CLEAR screen to select the instrument to clear. Select "All Instruments" to clear the entire sequence.
- In SCALE layout, notes will be cleared. Select "All Notes" to clear the entire SCALE layout sequence.
-
If an instrument is cleared in PAD layout notes input in SCALE layout will also all be cleared.
-
Press SELECT
A confirmation message appears.
- Use SELECT to select Yes, and press SELECT.
This clears all programmed sequences for the selected instrument.
Other settings
Metronome settings
Make settings related to the metronome that plays back as a guide during recording.
1.
Press

2.
Use ⬆ to select Settings, and press ⬆.
This opens the Settings screen.
3.
Use ⬆ to select METRONOME, and press ⬆.
This opens the METRONOME settings screen.
4.
Use SELECT to select menu items and SELECT to confirm them.
Press ⏻ to move up one level in the menu.
■ Setting the precount (Precount)
- Use Ⓞ to select the precount.
Select Off, 1–8 or Special
HINT
When Special is selected, the count will sound as follows.

■ Setting the sound (Sound)
- Use Ⓞ to select the metronome sound.
The sounds that can be selected are Bell, Stick, Click, Cowbell and Hi-Q.
■ Setting the pattern (Guide Click) - Use SELECT to select the metronome pattern.
Set the frequency that the metronome sounds in note intervals. The interval can be set to 1/16, 1/8, 1/4 or 1/2.
■ Setting the volume (Volume) - Use Ⓞ to set the metronome volume.
The volume can be set from 0–10.
■ Select the output used (Output Routing) - Use ⬆ to select the metronome output destination. Select PHONES, OUTPUT or PHONES+OUTPUT.
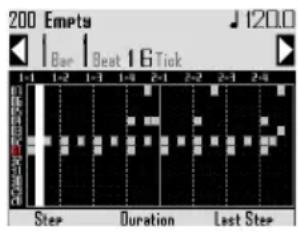
STEP mode overview
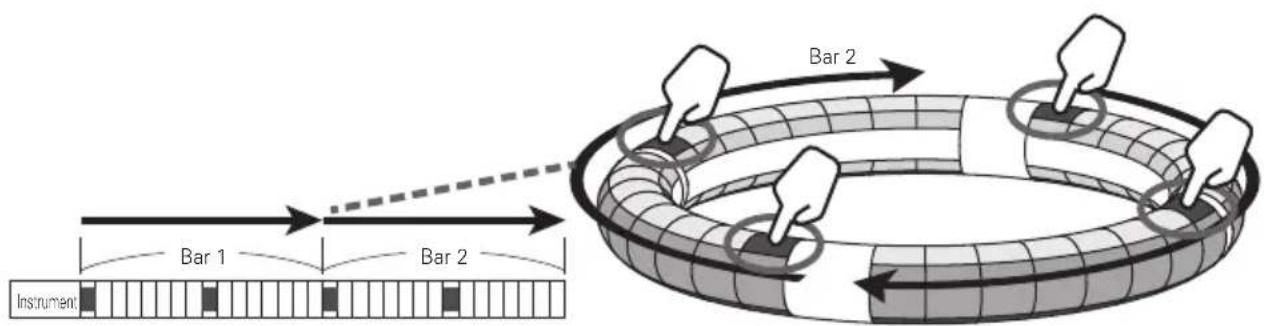
In STEP mode, you can create patterns by inputting them one step at a time.
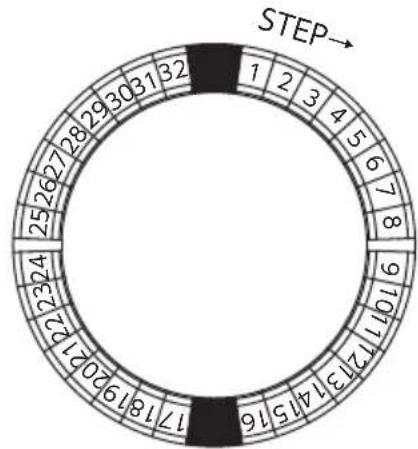
In this mode, each pad around the Ring Controller corresponds to a single sequential step.
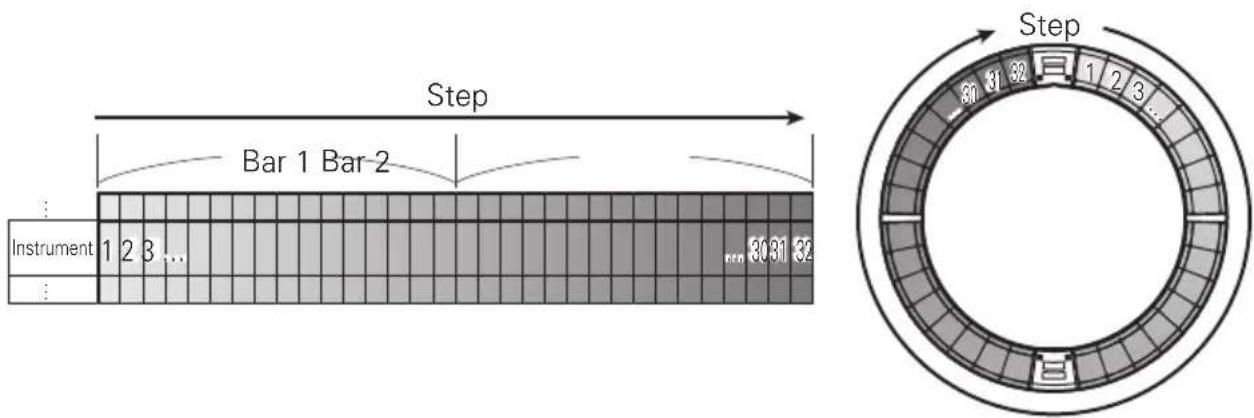
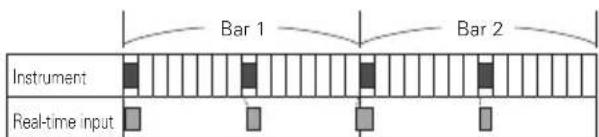
Since the Ring Controller rings are divided into 32 steps, you can input up to two musical bars (①) at a time (when the smallest step is a 16th note).
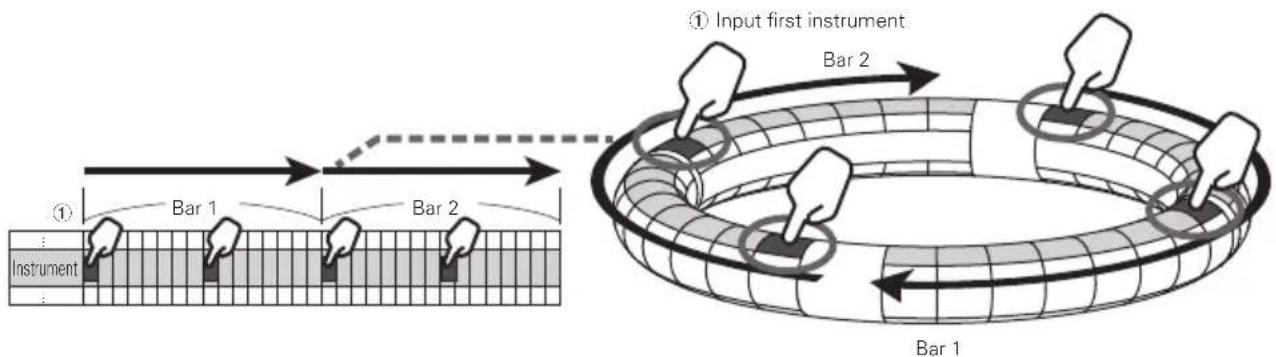
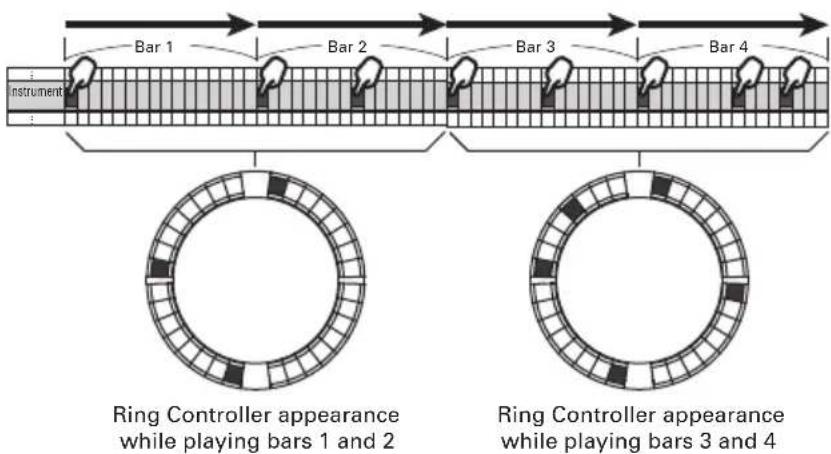
If the pattern is longer than two bars, the Ring Controller display will switch every two bars (in cases when the smallest step is a 16th note).
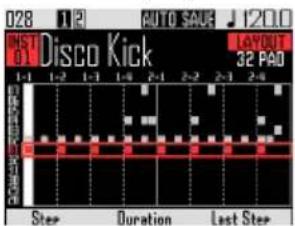
STEP mode overview (continued)
In PAD layout
The 5 rings (3 when set to Guideline display) on the Ring Controller each show a different instrument. You can use SELECT to change which instruments are shown by which rings.
Since multiple instruments can be shown by the Ring Controller, you can check instruments that have already been input as you input the next instrument.
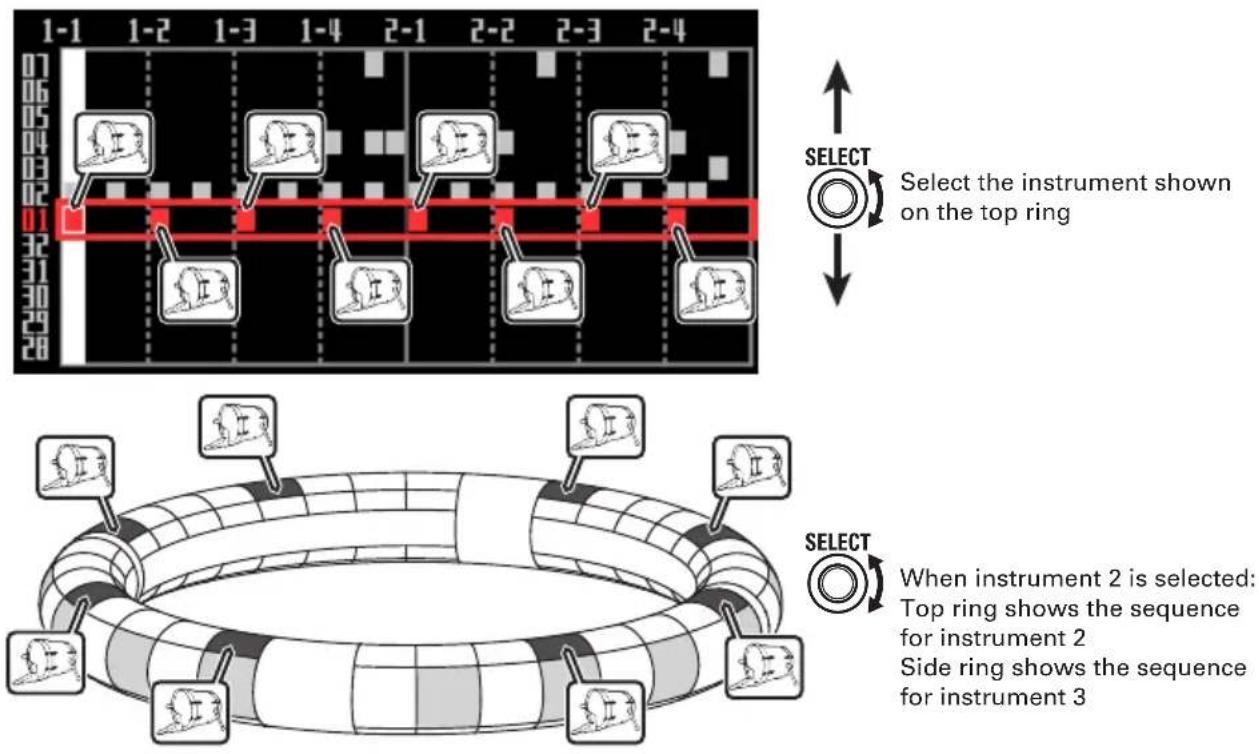
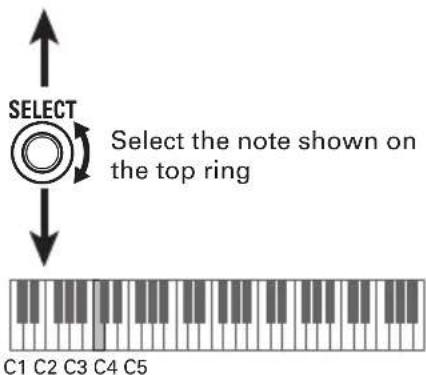
Select the instrument shown on the top ring
When instrument 2 is selected: Top ring shows the sequence for instrument 2 Side ring shows the sequence for instrument 3
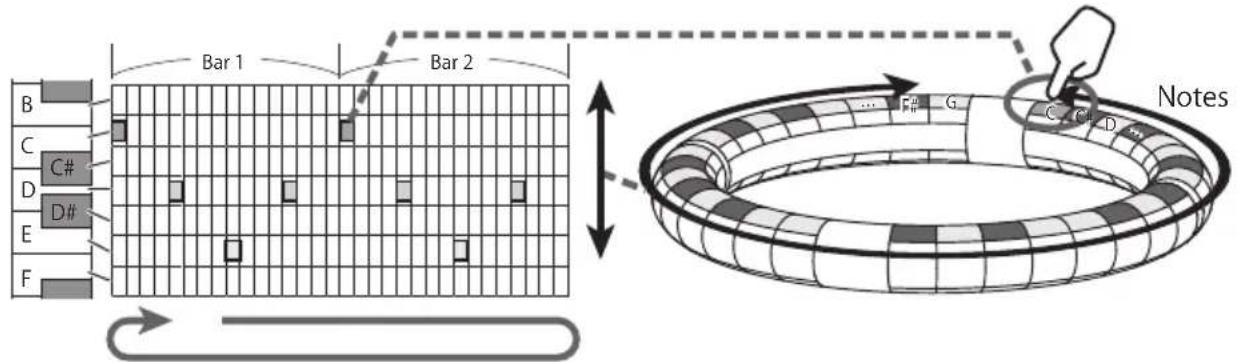
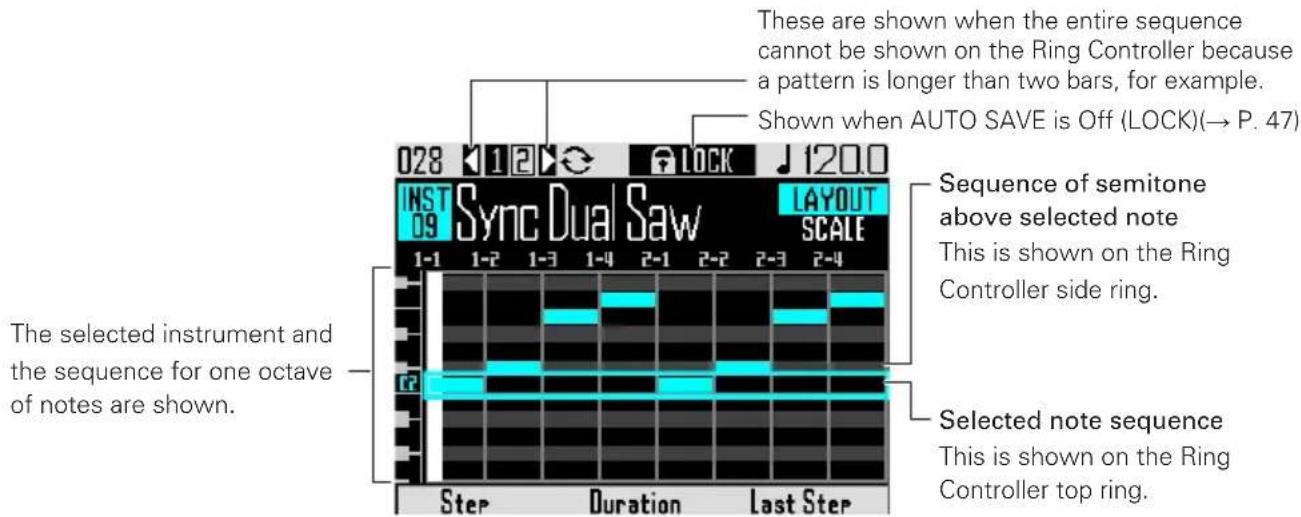
In SCALE layout
You can use Ⓞ to select the note input.


natural_image
Diagram of a toroidal ring with segmented pattern (no text or symbols)
When C#2 is selected: Top ring shows C#2 sequence Side ring shows D2 sequence
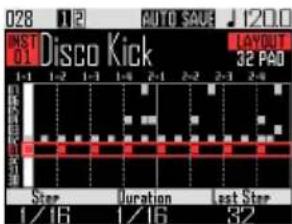
Screen overview
■ PAD layout
HINT
The settings for Ⓞ, Ⓞ and Ⓞ are only shown when their knobs are being turned.
■ SCALE layout
Operation summary
Select a pattern
Use ⏻ to select a pattern number.
Enter STEP mode
Press STEP to enter STEP mode.

Select the instrument to input
Use SELECT to select the instrument to use for input from the 32 instruments. That instrument moves to the top ring of the Ring Controller.
flowchart
graph TD
    A["Circle Ring"] --> B["Playoff"]
    B --> C["Music Kick"]
    C --> D["Playoff Indicator 1"]
    C --> E["Playoff Indicator 2"]
    C --> F["Playoff Indicator 3"]
① Use SELECT to select the input instrument
② The instrument color shown on the ring moves
To use SCALE layout for input, press SELECT to change the mode.
After finishing, switch to a different instrument
Step input
Tap pads to input the sound at those points.
Bar 1
Pattern step input
Preparations
■ Select a pattern
Select a pattern to use for input.
1. Use ▶ to select a pattern.
The name of the selected pattern appears on the display.
■ Enter the mode
1. Press STEP.
Inputting patterns
■ Select an instrument
1. Use ⬆ to select the instrument to input.
The instrument to be input appears in the middle of the display.
CONTROLLER The input instrument is shown by the top ring of the Ring Controller.
■ Input a pattern
1. CONTROLLER Tap the pad for the step to be input.
The LED for the tapped pad will light in the instrument color.
other
| Step | Value | |---|---| | 1 | 2 | | 2 | 3 | | 3 | 4 | | 4 | 5 | | 5 | 6 | | 6 | 7 | | 7 | 8 | | 8 | 9 | | 9 | 10 | | 10 | 11 | | 11 | 12 | | 12 | 13 | | 13 | 14 | | 14 | 15 | | 15 | 16 | | 16 | 17 | | 17 | 18 | | 18 | 19 | | 19 | 20 | | 20 | 21 | | 21 | 22 | | 22 | 23 | | 23 | 24 | | 24 | 25 | | 25 | 26 | | 26 | 27 | | 27 | 28 | | 28 | 29 | | 29 | 30 | | 30 | 31 | | 31 | 32 | STEP→HINT
You can set the pads to be velocity sensitive and respond to how hard they are tapped ( P. 121).
2. CONTROLLER To clear an input step, tap the pad again.
The step will be cleared and the LED will become unlit.
■ Play the pattern
1. Press ▶II.
Playback starts and ▶ lights.
2. Press ▶\ again to pause. Playback pauses and ▶\ blinks.
3. Press ☐ to stop playback. ▶▶ becomes unlit when playback stops.
Pattern step input (continued)
Selecting notes
In SCALE layout, you can select notes to input.
- Turn SELECT when SCALE layout is active.
The note to be input appears in the middle of the display.
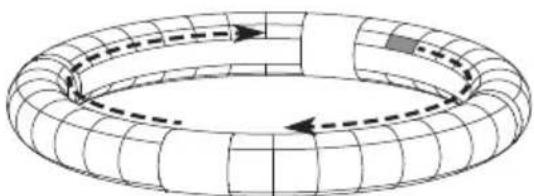
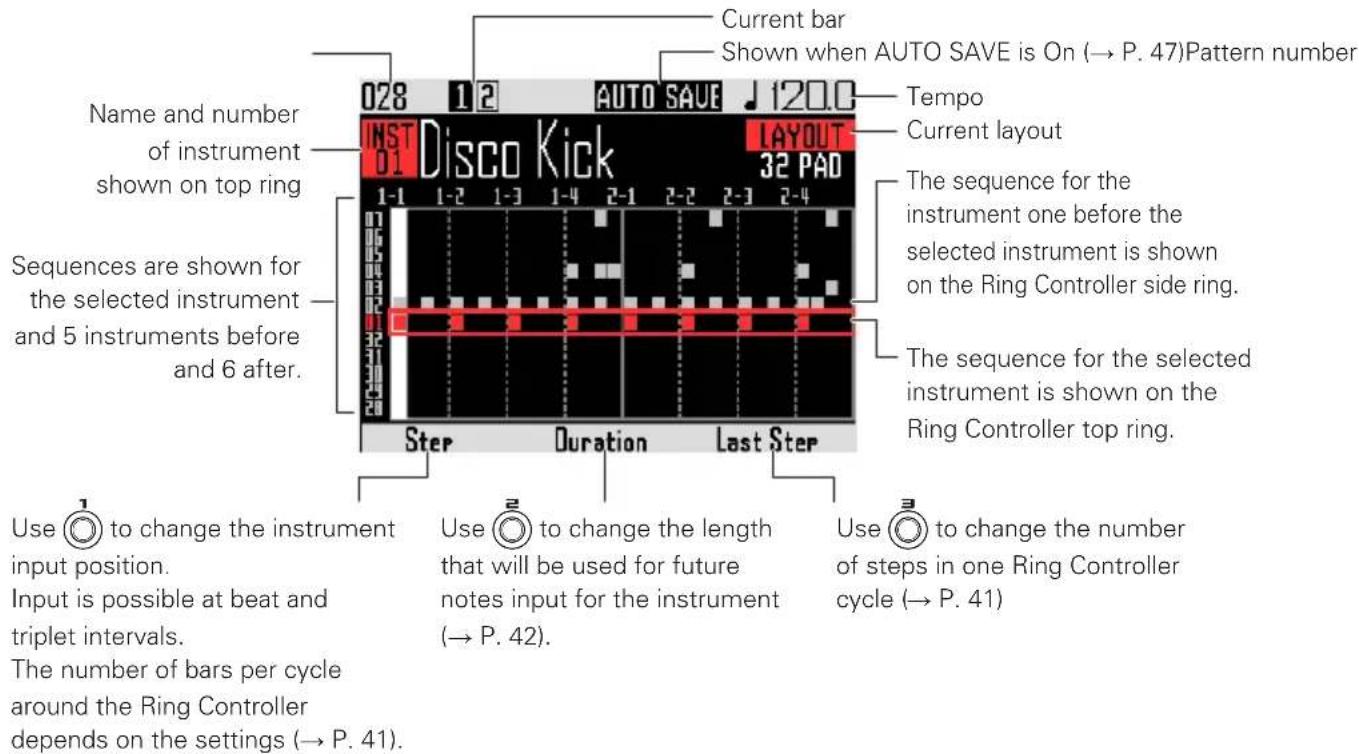
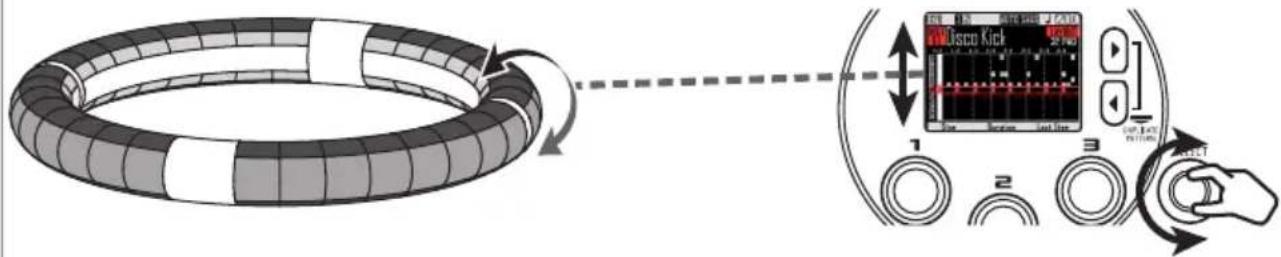
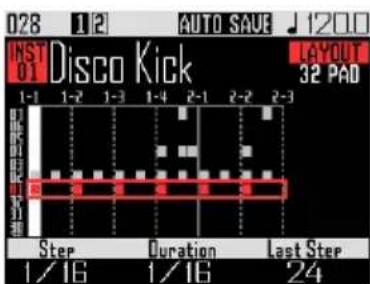
Changing the last step position on the Ring Controller
You can change the last step in the cycle on the Ring Controller
By setting the cycle to 24 steps, you can create patterns in triple time, for example.
- Turn ☐ to show the Last Step
value.
This shows the number of the last step on the Ring Controller.
This can be set between 1 and 32.
NOTE
- If the Last Step is less than 32, sequence data up to that step will not be cleared.
- If the Step setting is 1/32 or 1/16Tri, one step will be 1/32nd of a bar. If the Step setting is 1/16 or 1/8Tri, one step will be 1/32nd of 2 bars. So, the timing change when setting the Last Step will be different.
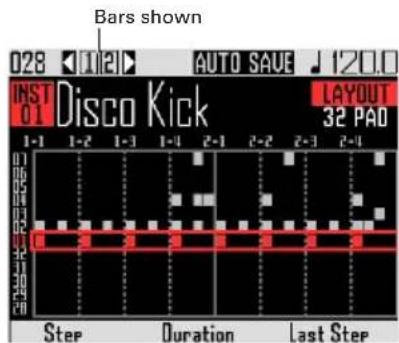
Inputting steps for patterns that are longer than one Ring Controller cycle
If the Step setting is 1/16 and the pattern exceeds 2 bars or the Step setting is 1/32 and the pattern exceeds 1 bar, the entire sequence cannot be shown on the Ring Controller, so the part of the sequence shown depends on the playback position.
This icon appears when screen display is changing with playback position
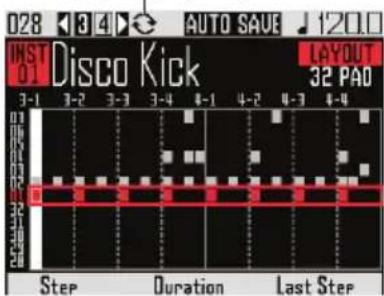
Screen during playback of bar 3
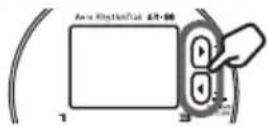
- Press ☑ to show the bar used for step input.
The display will not change even when a different bar is playing.
Pattern step input (continued)
Changing note lengths
The lengths of input sounds (notes) can be set in two ways.
■ Setting the note length before input
1. Use ☐ to show the Duration
value.
This shows the length that will be used for future notes input for the instrument.

2. CONTROLLER After setting the
Duration, tap the pad for the step to be input.
The sound will be input for the set Duration.
natural_image
Three identical curved structural diagrams with grid patterns, no text or symbols presentDuration 1/16 Duration 1/4 Duration 1/2
NOTE
The Duration setting will have no effect if the LOOP item is × in the Oscillator list (→ P. 133).
■ Setting when a sound starts and stops
- CONTROLLER Press and hold the pad for the step to be input. The pressed pad will blink.
- CONTROLLER Tap the pad where you want the note to stop playing. This changes the note length.
HINT
The steps included in the length of the changed note light dimly.
NOTE
The note length cannot be changed if the LOOP item is × in the Oscillator list (→ P. 133).
Pattern step input (continued)
■ Changing where a sound is input
You can change where a sound can be input. Sounds can be input on the beat or in triplet units.
1. Use Ⓞ to show the Step value.
You can change the positions of following input notes.
Step can be set to unit lengths of 1/32 (32nd note), 1/16Tri (16th note triplet), 1/16 (16th note) or 1/8Tri (8th note triplet).
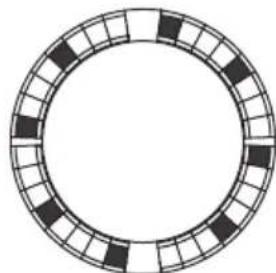
The Step setting determines the number of bars per cycle around the Ring Controller.
This setting also changes the length of the sequence shown on the display.
Step setting: 1/32 Ring controller cycle: 1 bar
natural_image
Circular diagram with alternating black and white squares arranged in a ring (no text or symbols)Step setting: 1/16 Ring controller cycle: 2 bars
Step setting: 1/16Tri
Ring controller cycle: 1 bar
Step setting: 1/8Tri
Ring controller cycle: 2 bars
Display when Step set to 1/32 or 1/16Tri
Motion sequences
Setting changes for effect parameters and parameters controlled by , and in INST mode (Quick Access functions→P.92) can be recorded as sequences.
You can record changes in real time while a pattern is playing as well as record parameter setting values step-by-step.
These recorded changes will be saved as a part of the pattern and re-created during playback.
Recording motion sequences in real time
- Select the pattern for which you want to record a motion sequence.

- Press ⊙.
-
Press ▶Ⅱ. ▶Ⅱ lights and pattern playback starts after the precount.
-
Use effect buttons and change
Quick Access function parameters, for example.
These changes will be recorded as a motion sequence.
- Setting effects ( P. 98)
- Setting Quick Access functions ( P. 92)
HINT
- Recording starts from the moment that a parameter is operated, and recorded parameter values are shown in red.
-
If a parameter that has already been recorded is recorded again, the new data will overwrite the old.
-
Press Ⓞ or Ⓚ when done recording.
Motion sequences (continued)
Recording motion sequences step by step
- Select the pattern for which you want to record a motion sequence.
- Press ⊙.
- Use ☑ to move to the step where you will change a parameter.
- Use effect buttons and change Quick Access function parameters, for example.
Changes are recorded, and recorded parameter values are shown in red.

- Press ♛ or ⏻ when done recording.
Clearing motion sequences
-
Select the pattern for which you want to clear the motion sequence.
-
Use SELECT to select an instrument that has a motion sequence recorded.
HINT
This step is not necessary when clearing effect parameter motion sequences.
- Press CLEAR.
This opens a screen where you can clear sequences for the selected instrument.
- Use ⬆ to select the motion sequence you want to clear.
Effect parameter motion sequences are next to "All Instruments" and "All Notes".
- Press SELECT to confirm
This opens a confirmation screen.
- Use ⏻ to select Yes, and press ⏻.
This clears the sequence for the selected parameter.
Clearing patterns
Completely clearing an instrument
-
Use ⬤ to select the instrument to clear.
-
Press CLEAR.
This opens the CLEAR screen.
Press CLEAR again to cancel.
HINT
- You can also turn 📄 on the CLEAR screen to select the instrument to clear. Select "All Instruments" to clear the entire sequence.
- In SCALE layout, notes will be cleared. Select "All Notes" to clear the entire SCALE layout sequence.
-
If an instrument is cleared in PAD layout notes input in SCALE layout will also all be cleared.
-
Press SELECT
A confirmation message appears.
- Use ⬆ to select Yes, and press ⬆.
This clears all programmed sequences for the selected instrument.
Pattern settings
Pattern settings include Auto Save, Quantize, Bar length, and Swing, as well as Ring Controller Accelerometer parameters.
These settings are saved separately for each pattern.
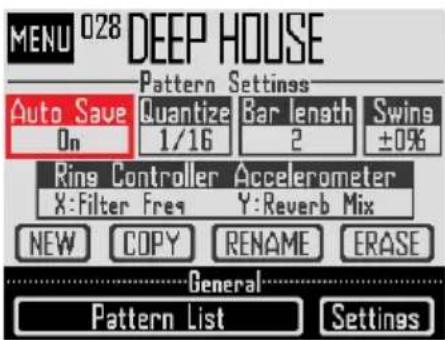
Auto Save setting
You can set whether or not the results of changes to sounds and effects are saved to the pattern.
When Auto Save is set to Off (LOCK), the results of changes to sounds and effects will not be saved to the pattern. Changes made will be discarded when you switch to song or looper mode or select a different pattern. Moreover, you will not be able to save sequences.
This setting is useful when you want to change sounds during a live performance, for example, but do not want to save the results or change pattern settings.
-
Press MENU
-
Use ⏻ to select Auto Save, and press ⏻.
-
Use SELECT to make the Auto Save setting, and press SELECT to confirm.
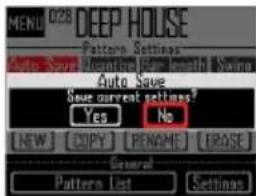
NOTE
When you switch the Auto Save setting from Off (LOCK) to On, a screen will appear to confirm whether you want to save the current settings. If you select "No", the current settings will not be saved, but future changes will be saved.
Quantization setting
This sets the shortest note length that can be input into the sequence.
This setting is the value that will be used to correct (quantize) real-time input.
When using the capture function and "Capture with metronome" is enabled, capturing will start using the quantization time set here.
Example with 1/16 quantization
Sequence is aligned to 16th notes even if played timing is off
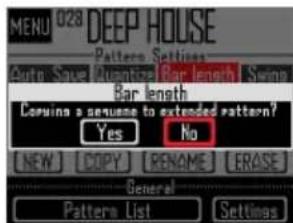
Pattern length setting
You can change the pattern length and set it between 2 and 8 bars.
When making a pattern longer, you can also copy the sequence you have already input to the lengthened part.
When a pattern is shortened, the already input sequence will not be cleared.
Pattern settings (continued)
Swing setting
The amount of swing (rhythmic groove) can be set. The swing range is ±50% .
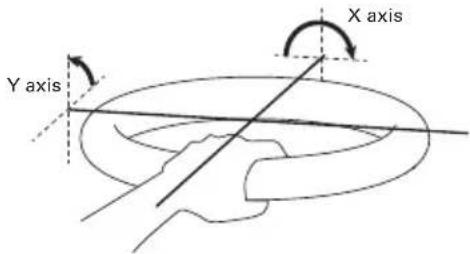
Ring Controller accelerometer settings
The Ring Controller accelerometer can be used to control the effect parameters and parameters controlled by 1, 2 and 3 in INST mode (Quick Access functions→P.92), as well as arpeggiator notes and repetition speed. Parameters can be changed by tilting the Ring Controller.
NOTE
- This can be used when the Ring Controller grip area has been set (→ P. 119).
- The directions of the X and Y axes are automatically set based on the grip area position.
- Do not hit the Ring Controller with excessive force.
■ Assigning parameters
1. Select Ring Controller
Accelerometer.
This opens the X-axis parameter assignment screen.
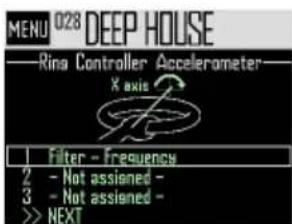
-
Use ⬆ to select parameter 1, 2 or 3 to be assigned to the X axis, and press ⬆.
-
Use ⬆ to select the parameter to assign, and press ⬆.
-
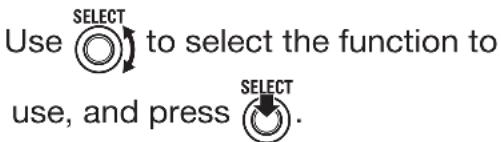
After assigning the parameter, select NEXT, and press SELECT. This opens the Y axis parameter assignment screen.
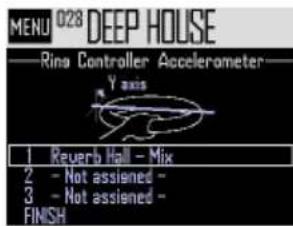
- Assign parameters to the Y axis in the same way as the X axis, select FINISH, and press SELECT.
This completes the setting of parameters controlled by the Ring Controller.
NOTE
The lowest-numbered assigned parameters are shown on the Pattern Settings screen. If multiple parameters have been assigned, "+" will appear next to that parameter name to show that others have also been assigned.
Pattern settings (continued)
■ Using the Ring Controller to control effects
-
Remove the Ring Controller from the Base Station.
-
Set the Ring Controller grip area. Setting the grip area ( P. 119)
-
Use the Ring Controller to control assigned parameters.
If an effect parameter has been assigned, press the button for that effect to turn it on.
If an arpeggiator parameter has been assigned, press HOLD to turn the arpeggiator on. The parameter values will change according to the tilt and direction.
List of parameters that can be assigned to the Ring Controller
| Filter - Frequency |
| Filter - Resonance |
| Filter - Level |
| Mono Delay - Time |
| Mono Delay - Feedback |
| Mono Delay - Mix |
| Stereo Delay - Time |
| Stereo Delay - Feedback |
| Stereo Delay - Mix |
| Reverse Delay - Time |
| Reverse Delay - Feedback |
| Reverse Delay - Mix |
| Reverb Hall - Decay |
| Reverb Hall - Tone |
| Reverb Hall - Mix |
| Reverb Room - Decay |
| Reverb Room - Tone |
| Reverb Room - Mix |
| Reverb Plate - Decay |
| Reverb Plate - Tone |
| Reverb Plate - Mix |
| nn Quick Access 1* |
| nn Quick Access 2* |
| nn Quick Access 3* |
| Arpeggiator - Note Shift |
| Arpeggiator - Repeat Rate |
HINT
- The “nn” is replaced by the instrument number (1–32).
- When Arpeggiator - Note Shift is assigned, the notes output by the arpeggiator will change in response to the tilt of the Ring Controller. The notes will change according to the scales set in the SCALE layout of each instrument (→ P. 31).
- When Arpeggiator - Repeat Rate is assigned, the speed of the arpeggiator output will change in response to the tilt of the Ring Controller. When the arpeggiator Style is not "Sequence", this is enabled only if "Pattern" is set to 1/1–1/32.
Managing patterns
You can create new patterns, and copy or erase the selected pattern, for example.
Pattern management
1.
Press

2.
You can select NEW, COPY, RENAME or ERASE.
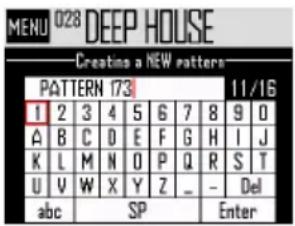
■ Creating new patterns (NEW)
- Use ⬆ to select NEW, and press ⬆. This opens the character input screen.
HINT
Character input screen use ( P. 21)
- After editing the pattern name, select Enter, and press SELECT.
A new pattern will be created with that name. After creation, the new pattern will be selected.
NOTE
The new pattern will be created with the lowest empty pattern number.
A new pattern cannot be created if there are no empty patterns.
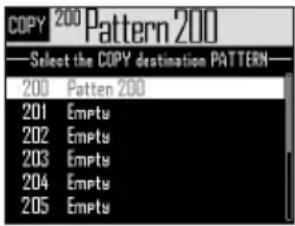
■ Copying patterns (COPY)
- Use ⬆ to select COPY, and press ⬆. This opens a screen for selecting the copy destination pattern.
- Use ⬆ to select the copy destination pattern, and press ⬆. This opens a confirmation screen.
- Use ⬆ to select Yes, and press ⬆. This copies the contents of the pattern selected previously over the destination pattern that was just selected. After copying, the copied pattern will be selected.
■ Changing pattern names (RENAME)
- Use ⬆ to select RENAME, and press ⬆. This opens the character input screen.
HINT
Character input screen use ( P. 21)
- After editing the pattern name, select Enter, and press SELECT. This changes the pattern name.
Managing patterns (continued)
■ Erasing patterns (ERASE)
- Use ⬆ to select ERASE, and press ⬆. This opens a confirmation screen.
- Use ⏻ to select Yes, and press ⏻. This erases the pattern.
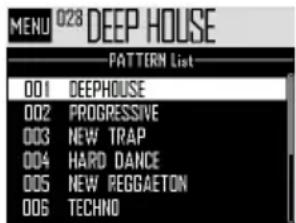
■ Loading patterns from the pattern list
- Press MENU
- Use ⬆ to select Pattern List, and press ⬆.
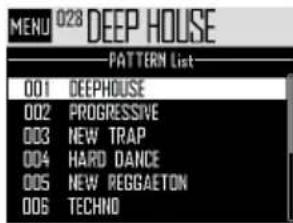
- Use ⬆ to select the pattern you want to load, and press ⬆.
This loads the selected pattern.
HINT
If a pattern is in the middle of playing back, the pattern will change after the current one completes.
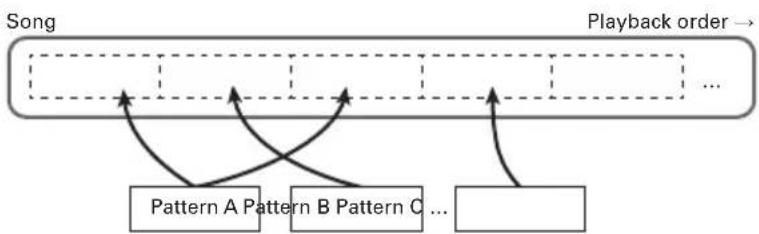
SONG mode overview
In SONG mode, you can combine multiple patterns that you have created into one complete song.
flowchart
graph TD
    A["Song"] --> B["Playback order"]
    B --> C1["Pattern A Pattern B Pattern C ..."]
    C1 --> D1["..."]
    D1 --> E1["..."]
    E1 --> F1["..."]
    F1 --> G1["..."]
    G1 --> H1["..."]
    H1 --> I1["..."]
    I1 --> J1["..."]
    J1 --> K1["..."]
    K1 --> L1["..."]
    L1 --> M1["..."]
    M1 --> N1["..."]
    N1 --> O1["..."]
    O1 --> P1["..."]
    P1 --> Q1["..."]
    Q1 --> R1["..."]
    R1 --> S1["..."]
    S1 --> T1["..."]
    T1 --> U1["..."]
    U1 --> V1["..."]
    V1 --> W1["..."]
    W1 --> X1["..."]
    X1 --> Y1["..."]
    Y1 --> Z1["..."]
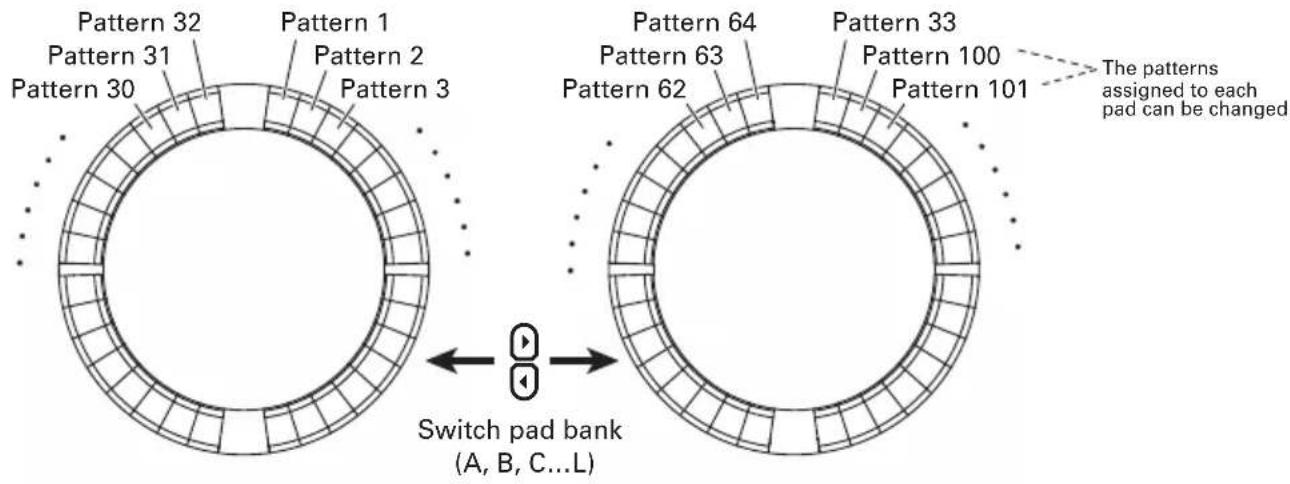
The pads on the Ring Controller are assigned 32 patterns.
The same patterns are assigned to the top, side and bottom rings.
You can change the patterns assigned to each pad.
SONG mode also has A-L pad banks.
By changing banks, you can assign 32 different patterns to the Ring Controller.
After completing preparation, start real-time input and tap pads to play their patterns.
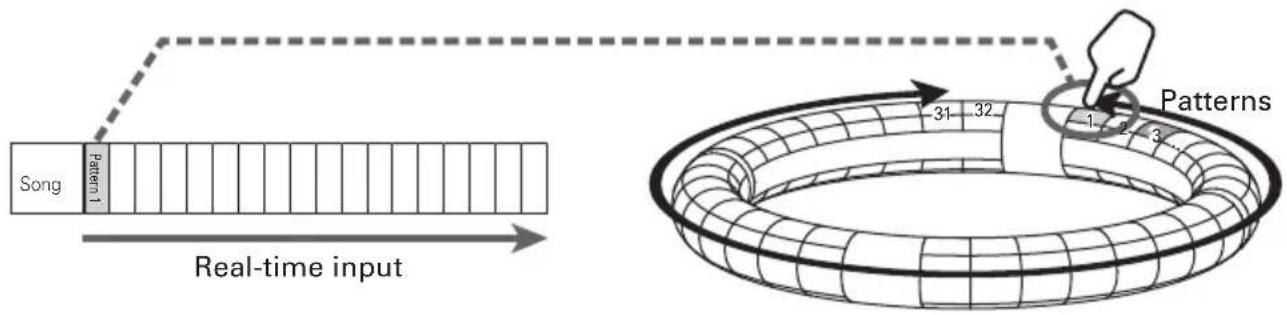
flowchart
graph LR
    A["Song"] --> B["Pattern 1"]
    B --> C["Real-time input"]
    C --> D["Patterns"]
    D --> E["31 32"]
    E --> F["1 2 3"]
SONG mode overview (continued)
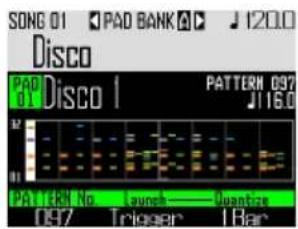
Screen overview
Operation summary
Enter SONG mode
Press SONG to enter SONG mode.

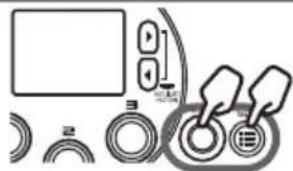
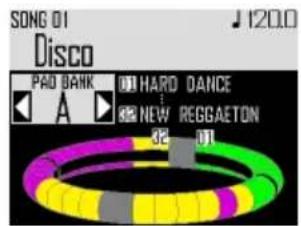
Select a song
Press ⏰ and use ⏱ to open the Song Sequence List. Then, use ⏻ and ⏽ to select a song sequence.
natural_image
Pure electrical circuit lines without any symbolsSelect a pattern to play
Use Ⓑ to change the pad bank as necessary.

natural_image
Illustration of a toroidal object with grid pattern and a hand pointing downward (no text or symbols)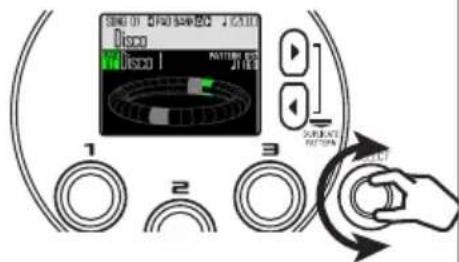
Start input
Press ⬙ to start real-time input.

natural_image
3D illustration of a toroidal ring with grid pattern (no text or symbols)
Create a song
Tap pads for patterns to play them and add them to the song in real time.
End input
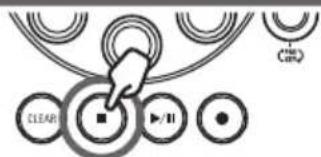
Press ☐ to end song input.
Song creation
Assigning patterns to pads
- Tap a pad, or use ⏻ to select a pad.
The pattern assigned to the selected pad is shown on the display and starts playing back.
HINT
- By tapping the Ring Controller pads, you can select patterns and listen to them at the same time.
- Tap a pad while pressing SONG to select a pad without playing the pattern.
-
Press EDIT when a pad is selected to open the setting screen for that pattern (→ P. 47).
-
Use SELECT to select a pattern
number.
This assigns the pattern of that number to the pad.
Switching pad banks
By switching banks, you can change the 32 different patterns assigned to the pads.
- Press 🔒.
This switches the pad bank and assigns the 32 patterns in that bank to the Ring Controller.
Song creation (continued)
Real-time input
1.
Press

This starts the count.
2.

CONTROLLER
Tap a pad to select
a pattern to play.
The tapped pad will light according to the pattern animation type setting ( P. 59).
HINT
- If no animation has been set, the tapped pad will light brightly.
- If even a single animation has been set, the tapped pad will show the animation, and it will light with the pattern color.
- What happens after a pattern completes playing depends on the Ⓞ pattern playback method setting (→ P. 59).
3.

CONTROLLER
Play other pads to
switch patterns.
Until the pattern switches, the display will appear as follows.
HINT
- The timing of pattern changes depends on the pattern quantize and pattern playback method settings (→ P. 59).
• The maximum number of measures in a song is 999. Song creation will stop when this number is reached.
4.
Press Ⓞ when done playing all patterns.
This ends song creation.
Song creation (continued)
Playing back songs
1.
Press ▶.
This starts song playback.
HINT
- During song playback, you can use the Ring Controller to perform with the instruments assigned to the playing patterns.
- Press ⬇ to switch between PAD and SCALE layouts.
2.
Press ▶/II to pause.
will blink.
Press ▶ again to resume playback.
3.
Press Ⓞ to stop playback.
Playback stops, and the playback position returns to the beginning.
NOTE
Sound parameters changed during playback are not recorded to patterns.
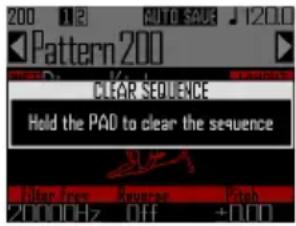
Clearing a song sequence
1.
Press CLEAR.
A confirmation message appears on the display and CLEAR lights.
2.
Use SELECT to select Yes.
This clears the song sequence.
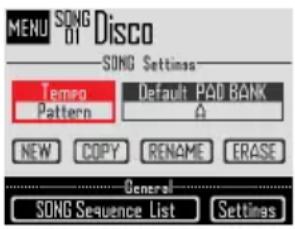
Song settings
Setting tempo synchronization
Set whether each pattern uses its own tempo setting or all patterns use the same tempo when playing a song.
-
Press MENU
-
Use ⏻ to select Tempo, and press ⏻.
- Use SELECT to select the synchronization type, and press SELECT.
Song: Use the same tempo for everything.
Pattern: Use each pattern's tempo.
Setting the default pad bank selected
You can set the pad bank that is selected whenever song mode is activated or a song sequence is loaded.
-
Press Ⓥ.
-
Use SELECT to select Default PAD BANK, and press SELECT.
-
Use SELECT to select a pad bank, and press SELECT. You can select from A-L.
Mixing
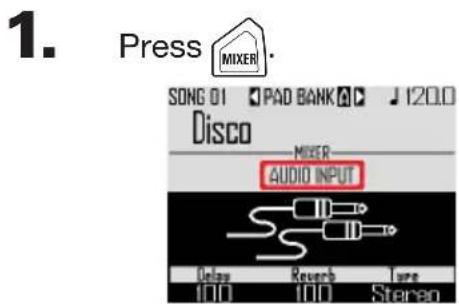
This opens the Mixer Screen. You can set send effects and STEREO/MONO for audio input through the INPUT jacks.
HINT Mixer (→ P. 100)
Song settings (continued)
Making pattern settings
■ Setting the pattern playback method
You can set what happens after a pattern plays back.
-
CONTROLLER Select a pad.
-
Use Ⓞ to change the playback method.
One Shot: The pattern plays once and stops.
Trigger: The same pattern will loop continuously until you select the next pattern or press the STOP button.
Toggle: Tapping the pad alternately starts and stops pattern playback. When a pattern is stopped, silence will continue to be recorded.
■ Setting quantization when changing patterns
-
CONTROLLER Select a pad.
-
Use ⚙ to change the quantization.
HINT
Quantization is applied in the following situations.
- When the pattern is switched (the quantization of the latter pattern is used)
- Toggle is stopped
■ Setting pad colors
Set on the EDIT screen ( P. 95).
■ Setting the LED animation type.
Set on the EDIT screen ( P. 95).
■ Setting the LED animation timing
Set on the EDIT screen ( P. 95).
Managing song sequences
Managing song sequences
1.

2.
Use SELECT to select the function to use, and press SELECT. You can select NEW, COPY, RENAME or ERASE.
■ Creating new song sequences (NEW)
- Use ⬆ to select NEW, and press ⬆. This opens the character input screen.
HINT
Character input screen use ( P. 21)
- After editing the sequence name, select Enter, and press SELECT.
A new song sequence will be created with that name. After creation, the new song sequence will be selected.
NOTE
The new song sequence will be created with the lowest empty song sequence number. A new song sequence cannot be created if there are no empty ones.
■ Copying song sequences (COPY)
- Use ⬆ to select COPY, and press ⬆. This opens a screen for selecting the copy destination song sequence.
- Use ⬆ to select the copy destination song sequence, and press ⬆. This opens a confirmation screen.
- Use ⬆ to select Yes, and press ⬆. This copies the contents of the song sequence selected previously over the destination song sequence that was just selected. After copying, the copy destination song sequence is selected.
■ Changing song sequence names (RENAME)
- Use ⏻ to select RENAME, and press ⏻. This opens the character input screen.
HINT
Character input screen use ( P. 21)
- After editing the song sequence name, select Enter, and press SELECT. This changes the song sequence name.
■ Erasing song sequences (ERASE)
- Use ⬆ to select ERASE, and press ⬆. This opens a confirmation screen.
- Use ⏻ to select Yes, and press ⏻. This erases the song sequence.
Capturing audio (recording)
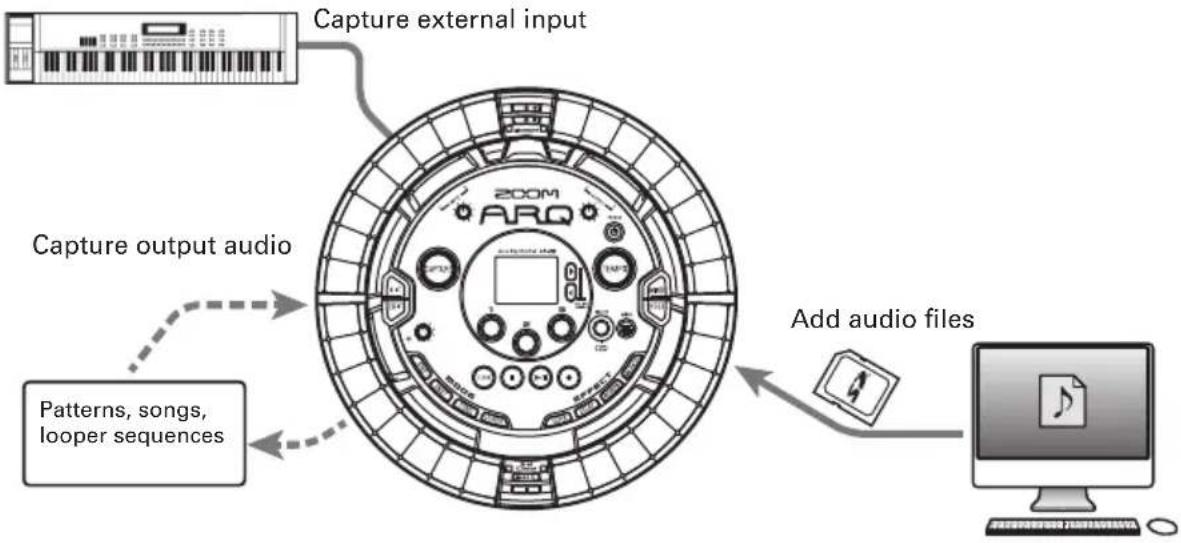
Capture overview
The AR-96 can capture (record) audio it is playing back and audio input through its INPUT jacks in every mode.
You can use captured audio as instruments and in LOOPER mode.
WAV files saved on SD cards can also be used in the same way as captured audio.
flowchart
graph TD
    A["Capture external input"] --> B["Capture output audio"]
    B --> C["Add audio files"]
    C --> D["Computer"]
HINT
- In LOOPER mode, up to 96 captured recordings can be assigned to pads and used to perform.
- The total time of captured audio that can be used for instruments is 6 minutes (or 12 minutes if mono).
NOTE
Captured audio data is saved on the SD card. Be aware that you will not be able to use the captured recordings if you remove the SD card or replace it with a different SD card.
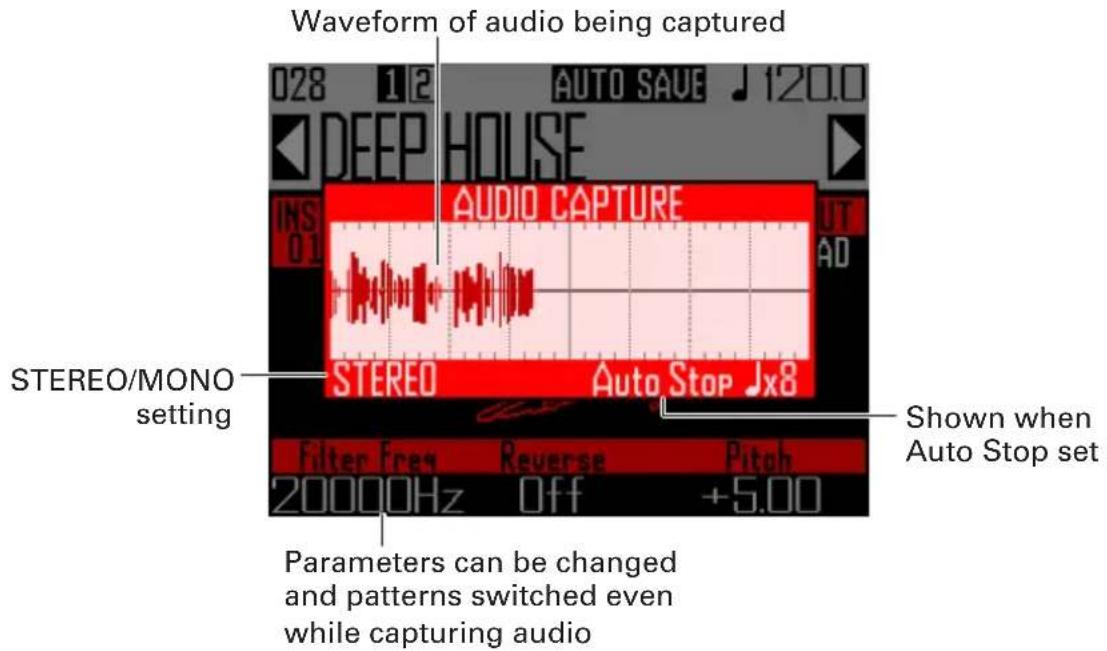
Capture overview (continued)
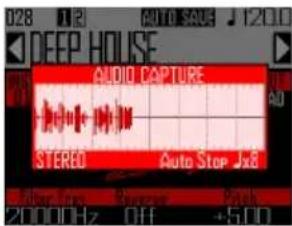
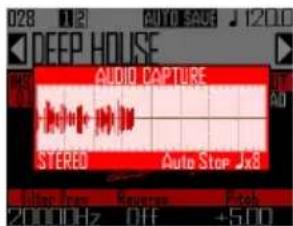
Screen overview
Operation summary
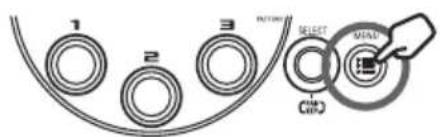
Make capture settings
- Set to stereo or mono
... Switching between stereo and mono ( P. 69) - Stop recording captured audio after a number of beats set in advance
... Setting the auto stop function ( P. 69) - Listen to a pre count or guide click when capturing audio
... Using the metronome while capturing audio ( P. 70)
Play the material to capture
- Play a pattern or song, for example, that you want to use as a captured recording.
- Input from the sound source connected to the INPUT jacks.
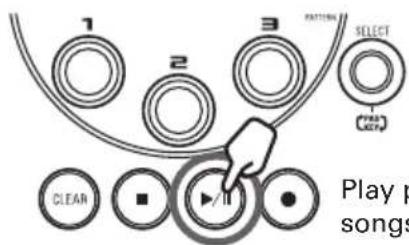
Start capturing
Press CAPTURE to start capturing.

Stop capturing
Press CAPTURE again to stop capturing.
On the setting screen that appears after capturing stops, you can assign it to pads and set the range that is sounded, for example.
Save
You can select and save captured audio to use as an instrument or in LOOPER mode.
Captured audio can also be saved to an SD card without changing its name or using it as an instrument or in LOOPER mode.
Capturing audio
Capturing internal sound sources
- Play a pattern or song, for example, that you want to capture.
HINT
By inputting audio through the INPUT jacks at the same time, you can capture a mixed recording of both sound sources.
2.
Press

The capture screen opens, and capturing starts.
Press CLEAR to cancel.
HINT
- Up to 6 minutes stereo or 12 minutes mono can be captured.
- If "Capture with METRONOME" is set, the timing of capture start will automatically be adjusted to the beat, for example (→ P. 70).
- Turning effects ON/OFF, changing parameters, playing pads, and changing patterns, for example, will be recorded while capturing.
3.
After the audio has been captured,
press

You can adjust the captured recording and save it on the Capture Setting screen that opens ( P. 65).
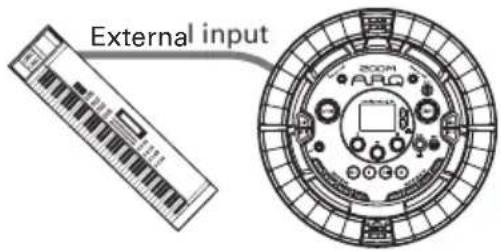
Capturing external input
- Connect the instrument or other audio device that you want to use to capture recordings to the Base Station INPUT jacks.
HINT
If the external input is a mono audio source, check the external input Stereo/Mono setting ( P. 103).
2. Start playing the connected equipment.
Use the INPUT volume to adjust the input level.
NOTE
If the input level is too high, CAPTURE will flash rapidly.
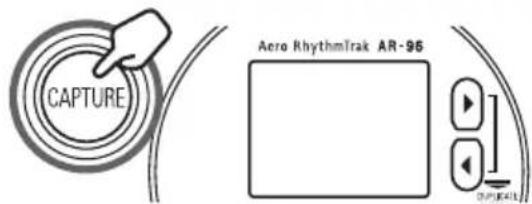
3. Press CAPTURE.
The capture screen opens, and capturing starts.
HINT
You can use "Capture with METRONOME" to set a precount and a guide click ( P. 70).
4. After the audio has been captured, press CAPTURE.
You can adjust the captured recording and save it on the Capture Setting screen that opens.
Capturing audio (continued)
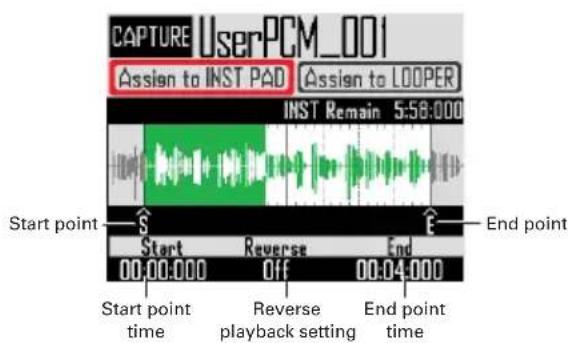
Adjusting and saving captured audio
After capturing audio completes, the CAPTURE settings screen opens, and the captured recording begins loop playback.
The captured audio can be edited on the screen.
HINT
- Press ▶II to pause and resume playback.
- Press (■) to stop playback and reset the playback position to the beginning of the loop.
- One Ring Controller cycle corresponds to the time between start and end points. Press ▶, and tap a pad to start playback of the loop from that position. Tap a pad when stopped to play only the interval assigned to that pad.
- The playback position lights according to the position of the captured audio during playback.
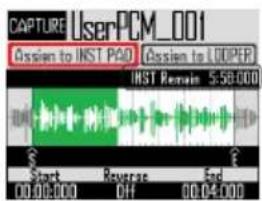
■ Editing captured audio to use as instruments assigned to pads
Make the following settings to use captured audio in INST mode, for example.
-
Use SELECT to select "Assign to INST PAD".
-
Use 1 and 3 to set the range of the captured audio to assign to the pad.
1: Start point
Change the starting point of the captured audio.
: End point
Change the ending point of the captured audio.
NOTE
The "INST remain" time shown on the display is the remaining amount of time that can be assigned to pads (maximum of 6 minutes stereo or 12 minutes mono). Captured audio that exceeds this length cannot be assigned to the pads.
To make more time available, remove captured audio from other pads or shorten intervals between start and end points.
When setting start and end points, the waveforms around those points are shown magnified.
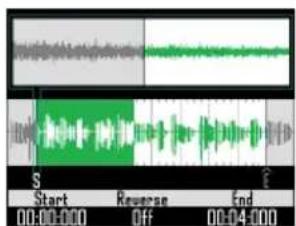
HINT
- Pressing any MODE button, Ⓔ or CLEAR will cancel editing of the captured recording and reopen the original screen.
- Start and end points can be set after the first 500 ms and before the last 500 ms of the captured recording.
Capturing audio (continued)
- Use Ⓞ to set the playback direction of the captured audio.
When this is On, playback will be reversed.
- Use SELECT to select "Assign to INST PAD", and press SELECT.
The screen where you can assign captured audio to pads opens.
Press MENU or CLEAR to return to the previous screen.

- To change the name of the cap-
tured audio, use ⏻ to select RENAME, and press ⏻.
You can edit the name of the captured recording.
- Use 🔒 to select the pattern to
which to assign the captured recording.
The pattern name changes at the bottom of the screen.
- Tap pads to select ones for assignment.
Tap pads to listen to the instruments currently assigned to them.
- To save the captured audio to the
SD card without assigning it to a pad, use SELECT to select "Save only", and press SELECT.
This will save the captured audio as a WAV file to the SD card.
You can use it as an instrument and in LOOPER mode later ( P. 71).
- To assign it to a pad,
use SELECT to select Assign, and press SELECT.
This assigns the captured audio to the selected pads.
This also saves the captured audio as a WAV file to the SD card.
HINT
- The captured audio will be saved inside the "Capture" subfolder in the "AR-96" folder on the SD card.
- The capture name will be used unchanged as the file name.
- captured audio that has been assigned to a pad can have envelopes, filters and other parameters set in the same way as the built-in instruments.
Capturing audio (continued)
■ Editing captured audio to use in LOOPER mode
Make the following settings to use captured audio in LOOPER mode.
-
Use SELECT to select "Assign to LOOPER".
-
Use and to set the range of the captured audio to assign to the pad.
1: Start point
Change the starting point of the captured audio.
: End point
Change the ending point of the captured audio.
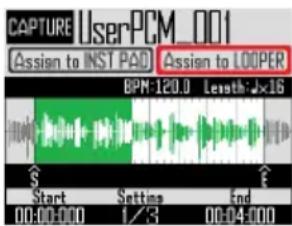
When setting start and end points, the waveforms around those points are shown magnified.
- Use ⏻ to show the following settings.
The following settings can be made.
BPM: Use Ⓞ on Setting screen 2 to set the tempo of the captured audio.
Length: Use 📋 on Setting screen 2 to set the length of the captured audio.
Reverse: Use ⏻ on Setting screen 3 to reverse the playback direction of the captured audio.
NOTE
The LOOPER mode tempo sync function ( P. 95) cannot be used if BPM and Length are not set. You can also set these later.
- Use SELECT to select "Assign to LOOPER", and press SELECT.
The screen where you can assign captured audio to pads opens. Press ⏻ or Ⓤlear to return to the previous screen.

- To change the name of the captured audio, use SELECT to select RENAME, and press SELECT.
You can edit the name of the captured recording.
- Use ▶ to select the pad bank (→ P. 71) to which to assign the captured audio.
The pad bank name changes at the bottom of the screen.
Capturing audio (continued)
7. Tap pads to select ones for
assignment.
Pads that already have captured audio assigned will light with their set colors.
Unlit pads can be selected. Selected pads will light white.
8. To save the captured audio to the
SD card without assigning it to a
pad, use SELECT to select "Save
only", and press SELECT
This will save the captured audio as a WAV file to the SD card.
You can use it as an instrument and in LOOPER mode later ( P. 71).
9. To assign it to a pad,
use SELECT to select Assign,
and press SELECT
This assigns the captured audio to the selected pads.
This also saves the captured audio as a WAV file to the SD card.
NOTE
Assign cannot be selected if no pads have been selected.
Capture settings
Setting the auto stop function
You can set capture to automatically stop a set time after starting.
-
Press MENU
-
Use ⏻ to select Settings, and press ⏻.
- Use ⬆ to select CAPTURE, and press ⬆.
- Use SELECT to select Auto Stop, and press SELECT.
- Use ⬆ to select the timing, and press ⬆. Select Off or 1–32 quarter notes.
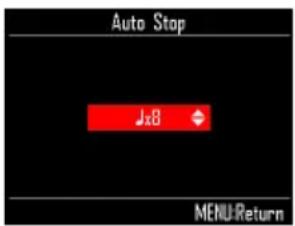
Switching between stereo and mono
Captured audio can be saved as stereo or mono.
Audio capture is possible for up to 6 minutes in stereo or 12 minutes in mono.
- Press MENU
- Use ⬆ to select Settings, and press ⬆.
- Use ⬆ to select CAPTURE, and press ⬆.
- Use SELECT to select Stereo/Mono, and press SELECT.
- Use ⏻ to change the setting, and press ⏻. Select Stereo or Mono.
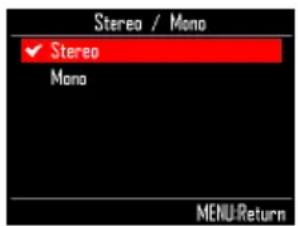
Capture settings (continued)
Using the metronome while capturing audio
You can use a precount and listen to a guide click when capturing audio.
This is convenient when capturing patterns that are playing, for example, and synchronizing the timing of pattern starts and the beginning of capturing.
- Press MENU
- Use SELECT to select Settings, and press SELECT.
- Use SELECT to select CAPTURE, and press SELECT.
- Use SELECT to select "Capture with METRONOME", and press SELECT.
- Use ⏻ to select On, and press ⏻.
The metronome will function while capturing audio (metronome settings → P. 35).
When this function is on, after pressing the CAPTURE button, the actual start of capturing will be synchronized with the pattern's quantize setting ( P. 47).
LOOPER mode overview
In LOOPER mode, you can combine patterns and songs that have already been created, input from the INPUT jacks, WAV files and other captured audio into a single song as a looper sequence.
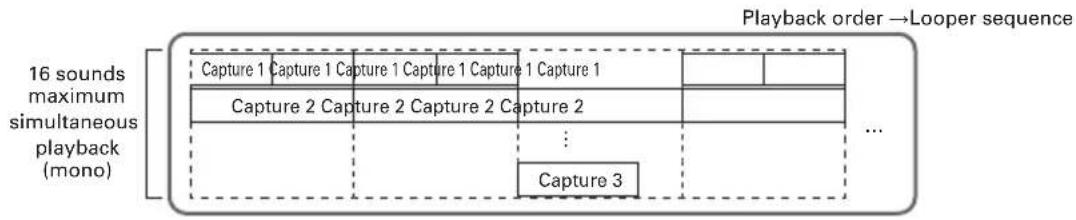
flowchart
graph TD
    A["16 sounds maximum simultaneous playback (mono)"] --> B["Capture 1 Capture 1 Capture 1 Capture 1 Capture 1"]
    B --> C["Capture 2 Capture 2 Capture 2 Capture 2"]
    C --> D["..."]
    D --> E["..."]
    F["Playback order → Looper sequence"] --> G["Capture 3"]
32 captured recordings are assigned to the Ring Controller pads.
The captured recordings assigned to the pads can be changed. The same captured recordings are assigned to the top, side and bottom rings.
LOOPER mode has A, B and C pad banks. By changing banks, you can assign 32 different captured recordings to the Ring Controller.
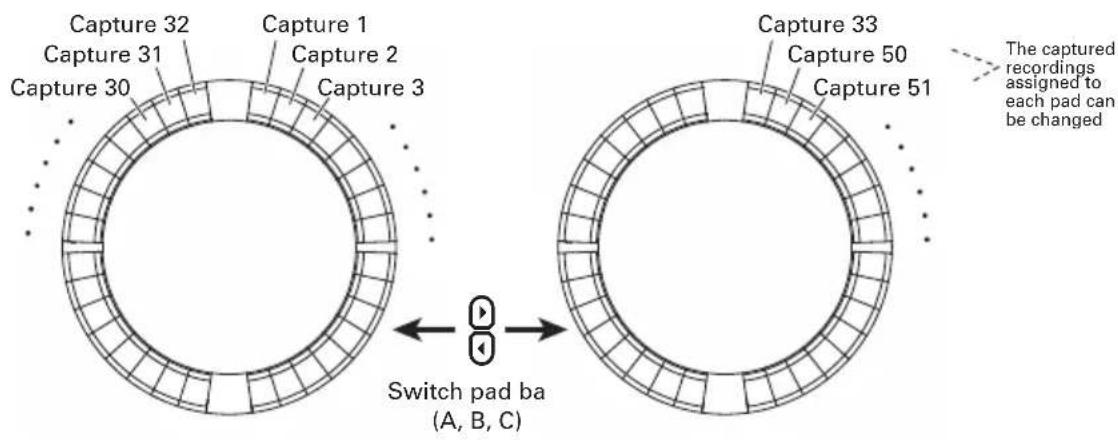
After completing preparation, start real-time input and tap pads to play their captured recordings. Up to 16 captured mono recordings can be played back at the same time.
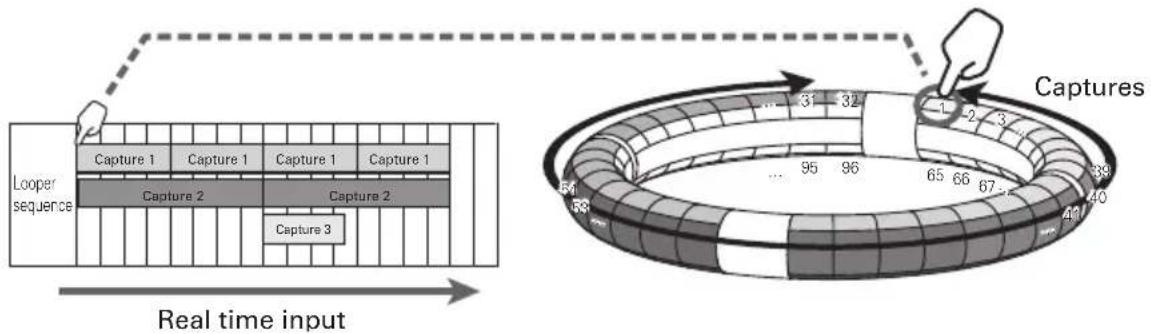
flowchart
graph TD
    A["Real time input"] --> B["Capture 1"]
    A --> C["Capture 2"]
    A --> D["Capture 3"]
    A --> E["Capture 40"]
    F["Looper sequence"] --> G["Capture 1"]
    F --> H["Capture 2"]
    F --> I["Capture 3"]
    G --> J["95"]
    H --> K["96"]
    I --> L["97"]
    J --> M["31"]
    K --> N["32"]
    L --> O["33"]
    M --> P["34"]
    N --> Q["35"]
    O --> R["36"]
    P --> S["37"]
    Q --> T["38"]
    R --> U["39"]
    S --> V["40"]
HINT
See "Captured recordings" ( P. 61) for how to create captured recordings.
LOOPER mode overview (continued)
Screen overview
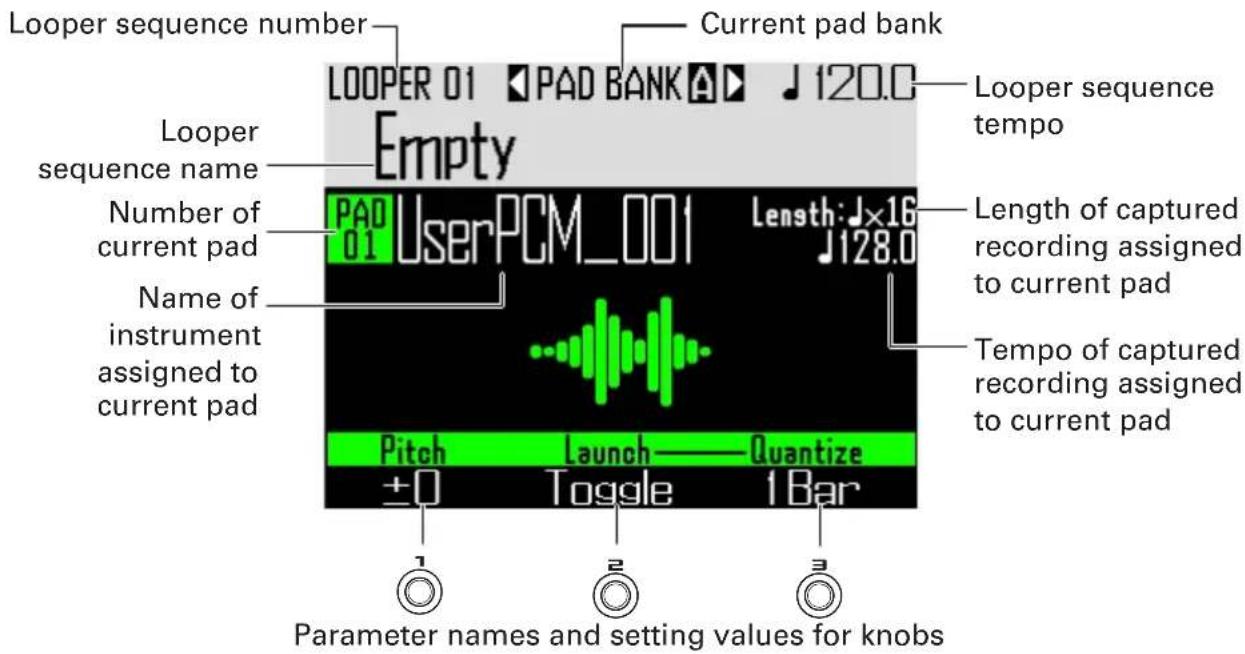
Operation summary
Enter LOOPER mode
Press LOOPER to enter LOOPER mode.

Select the looper sequence
Press ⏰ and use ⏱ to open the Looper Sequence List.
Use SELECT and SELECT to select a loop sequence from the list.

natural_image
Pure electrical circuit lines without any symbolsSelect captured audio for playback
Tap a pad or use ⏻ to change the pad bank as necessary.
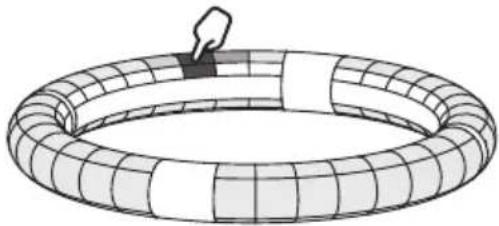
natural_image
Diagram of a toroidal structure with grid pattern and a small hand icon (no text or symbols)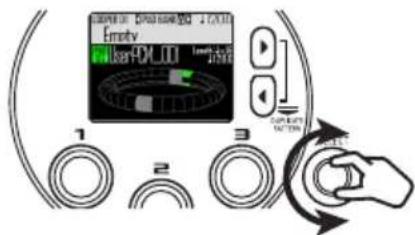
Start input
Press ⬙ to start real-time input.

natural_image
3D illustration of a toroidal ring structure with grid pattern (no text or symbols)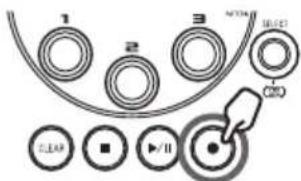
Create a looper sequence
Tap pads for captured recordings to play them and add them to the sequence in real time.
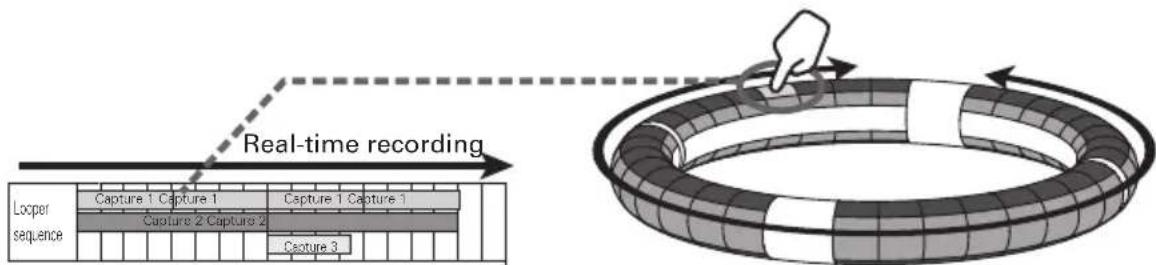
flowchart
graph TD
    A["Loop sequence"] --> B["Capture 1 Capture 1"]
    B --> C["Capture 2 Capture 2"]
    C --> D["Castry 3"]
    D --> E["Output Ring"]
    style A fill:#f9f,stroke:#333
    style E fill:#ccf,stroke:#333
End input
Press Ⓞ to end looper sequence input.
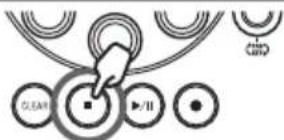
Operation summary (continued)
Assigning WAV files as captured recordings
WAV files saved on an SD card can be assigned to pads.
- Save WAV files to assign in the "Capture" subfolder in the "AR-96" folder on the SD card.
HINT
Files that meet the following conditions can be added as captured audio.
- WAV format files with 44.1kHz sampling frequency and 16/24-bit resolution
- Playback time is 6 minutes (12 minutes mono) or less
- File name uses only English letters and numbers
If the WAV file contains Logic format tempo information, that information can be read.
-
Load the SD card into the Base Station, and turn the power ON.
-
Press LOOPER.
-
Tap a pad, or use Ⓞ to select an unlit pad.
NOTE
Pads that do not have captured audio assigned to them are unlit. Pads that already have captured audio assigned to them will light with their set colors.
The selected pad will light white and the following screen will open.
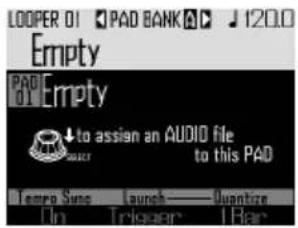
- Press SELECT
WAV files saved in the "Capture" subfolder in the "AR-96" folder on the SD card will be shown.
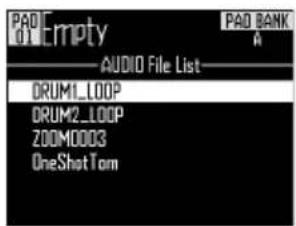
- Use ⬆ to select the file to assign, and press ⬆.
This assigns the WAV file to the pad.
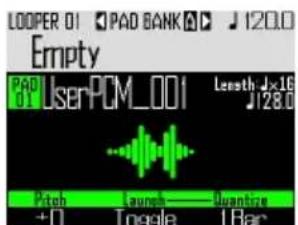
Creating looper sequences
Recording the playback of captured audio as looper sequences in real-time
■ Switching pad banks
32 different captured recordings can be assigned to each of the pad banks.
1. Press 🔊.
This switches the pad bank and assigns the 32 captured recordings in that bank to the Ring Controller.
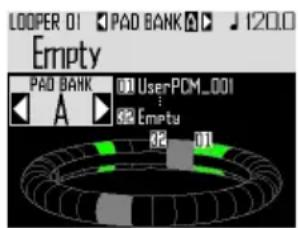
2. Tap a lit pad or use Ⓞ to select a captured recording.
The selected captured recording starts playing and its name appears on the display.
If a pad does not have a captured recording assigned to it, assign one to it ( P. 61).
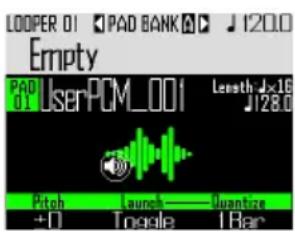
HINT
- By tapping the Ring Controller pads, you can select and listen to them at the same time.
- Tap a pad while pressing LOOPER to select it without playing the captured audio.
- Press EDIT when a pad is selected to open the setting screen for the captured audio (→ P. 65).
3. Press ⊙.
This starts the precount. After the precount, looper sequence recording will start.
4. CONTROLLER Tap a pad that has a captured recording assigned to it.
The tapped pad will light according to the capture animation type setting ( P. 77).
HINT
- If no animation has been set, the tapped pad will light brightly.
- If even a single animation has been set, the tapped pad will show the animation, and it will light with the capture color.
- Up to 16 captured mono recordings can be played back at the same time.
- What happens after captured recording playback completes depends on the capture playback mode setting ( P.77) .
5. CONTROLLER Tap other pads to play their captured recordings.
HINT
The timing of when captured recordings start playback depends on the quantize setting ( P. 77).
6. Press ☐ when all captured recordings are done playing.
This ends looper sequence recording.
Creating looper sequences (continued)
Playing back looper sequences
1. Press ▶\II.
This starts looper sequence playback. Pads will light during playback according to the pattern animation type setting ( P. 77).
HINT
- If no animation has been set, pads will light brightly during playback.
- If even a single animation has been set, playing pads will show the animation or light with the capture color.
2. Press ▶II to pause.
will blink. Press again to resume playback.
3. Press ☐ to stop playback.
Playback stops, and the playback position returns to the beginning.
Clearing looper sequences
1. Press CLEAR.
A confirmation message appears on the display and CLEAR lights.
2. Use ⏻ to select Yes, and press ⏻.
This clears the looper sequence.
Looper settings
Making capture settings
■ Setting the capture playback method
You can set what happens after a captured recording plays back.
- Select a captured recording.
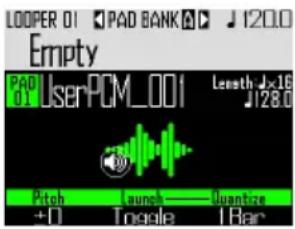
- Use Ⓞ to change the playback method.
One Shot: The captured recording plays once and stops.
Toggle: Tapping the pad alternately starts and stops playback of the captured audio.
Gate: The captured audio plays back in a loop while the pad is being pressed. Playback stops when it is released.
■ Setting the pitch of the captured recording
-
Select a captured recording.
-
Use Ⓞ to change the pitch.
■ Setting capture quantization
You can set the timing of captured audio playback.
-
Select a captured recording.
-
Use Ⓞ to change the quantization.
HINT
Quantization is applied in the following situations.
- When playback of captured audio starts
- When Gate or Toggle stops
Looper settings (continued)
Making additional capture settings
Make additional capture settings on the EDIT screen.
■ Setting the capture synchronization
Set on the EDIT screen ( P. 95).
■ Set the capture tempo, which is necessary for synchronization.
Set on the EDIT screen ( P. 95).
■ Set the capture length, which is necessary for synchronization.
Set on the EDIT screen ( P. 95).
■ Setting the capture level
Set on the EDIT screen ( P. 96).
■ Setting the send effects
Set on the EDIT screen ( P. 96).
■ Setting the capture pad color
Set on the EDIT screen ( P. 95).
■ Setting the LED animation type.
Set on the EDIT screen ( P. 95).
■ Setting the LED animation timing
Set on the EDIT screen ( P. 95).
■ Changing captured recordings assigned to pads
Set on the EDIT screen ( P. 97).
Ring Controller accelerometer settings
You can use the Ring Controller's accelerometer to control effect parameters. Parameters can be changed by tilting the Ring Controller.
■ Assigning parameters
1.
Press

Settings for the selected looper sequence are shown.
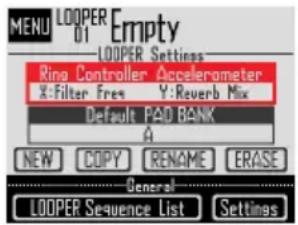
2.
Use SELECT to select Ring Controller
Accelerometer, and press SELECT
This opens the X-axis parameter assignment screen.
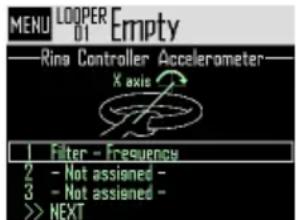
3.
Use ⬆ to select parameter 1, 2 or 3 to be assigned to the X axis, and press ⬆.
4.
Use ⬆ to select the parameter to assign, and press ⬆.
Looper settings (continued)
-
Set the parameter to assign to the X axis.
-
Select NEXT, and press SELECT
This opens the Y axis parameter assignment screen.
- Assign parameters to the Y axis in the same way as the X axis, select FINISH, and press SELECT.
This completes the setting of parameters controlled by the Ring Controller.
Selecting the default pad bank
You can set the pad bank that starts selected when looper mode is activated or a looper sequence is loaded.
-
Press MENU
-
Use SELECT to select Default PAD BANK, and press SELECT.
-
Use SELECT to select a pad bank, and press SELECT.
You can select A, B or C.
HINT
The Ring Controller accelerometer and default pad bank settings are saved as settings for the selected looper sequence.
Mixing
- Press MIXER.
This opens the Mixer Screen. You can set send effects and STEREO/MONO for audio input through the INPUT jacks.
HINT
Mixer ( P. 100)
Managing looper sequences
Managing looper sequences
1.

2.
Use SELECT to select the function to use, and press SELECT. You can select NEW, COPY, RENAME or ERASE.
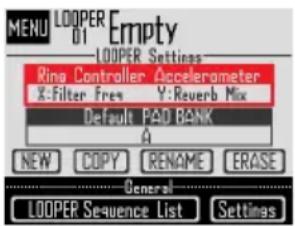
■ Creating new looper sequences (NEW)
- Use ⬆ to select NEW, and press ⬆. This opens the character input screen.
HINT
Character input screen use ( P. 21)
- After editing the sequence name, select Enter, and press SELECT.
A new looper sequence will be created with that name.
After creation, the new looper sequence will be selected.
NOTE
The new looper sequence will be created with the lowest empty looper sequence number.
A new looper sequence cannot be created if there are no empty ones.
■ Copying looper sequences (COPY)
- Use ⬆ to select COPY, and press ⬆. This opens a screen for selecting the copy destination looper sequence.
- Use Ⓞ to select the copy destination looper sequence, and press Ⓞ. This opens a confirmation screen.
- Use SELECT to select Yes, and press SELECT. This copies the contents of the looper sequence selected previously over the destination looper sequence that was just selected. After copying, the copied looper sequence will be selected.
■ Changing looper sequence names (RENAME)
- Use ⬆ to select RENAME, and press ⬆. This opens the character input screen.
HINT
Character input screen use ( P. 21)
- After editing the looper sequence name, select Enter, and press SELECT. This changes the looper sequence name.
■ Erasing looper sequences (ERASE)
- Use ⬆ to select ERASE, and press ⬆. This opens a confirmation screen.
- Use ⏻ to select Yes, and press ⏻. This erases the looper sequence.
Kits (sound sets)
Kit overview
One pattern can use up to 33 instruments. This collection of instruments is called a "kit". A kit created in one pattern can be copied to another pattern.
Screen overview
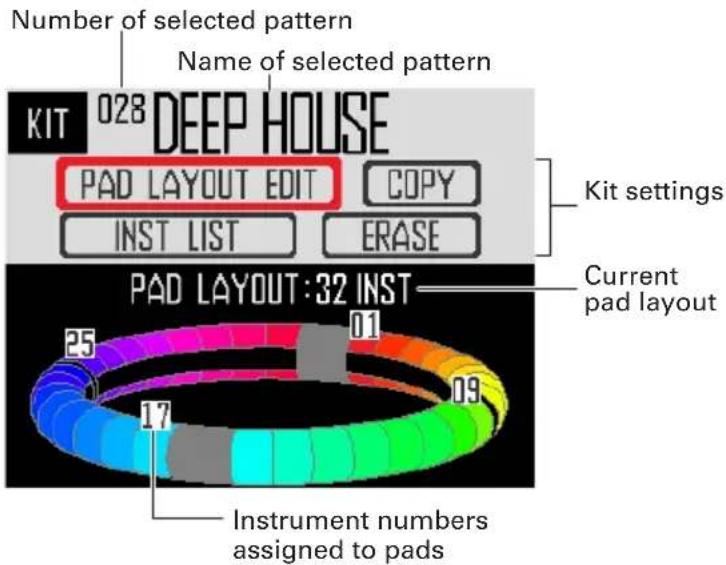
Using kits
Setting the PAD layout
When pad layout is selected, you can change the number of instruments assigned to the Ring Controller.
By default, you can play 32 instruments with the Ring Controller. You can, however, also reduce the number of instruments and play it like a handheld tambourine.
1.
Press

This opens the KIT screen.
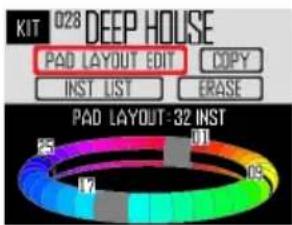
2.
Use

to select PAD LAYOUT
EDIT, and press

This opens a screen where you can set the number of instruments assigned to the Ring Controller.
Press ⏚ to return to the previous screen.
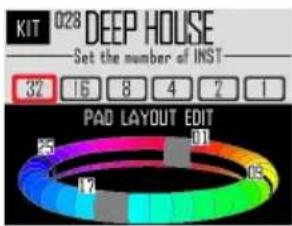
3.
Use SELECT to select the number of assigned instruments.
This can be set to 32, 16, 8, 4, 2 or 1.
HINT
When set to any value other than 32, that number of instruments will be assigned to pads in order starting with instrument number 1.
For example, when set to 4, instruments numbered 1–4 will be assigned to pads.
If you want to change the instruments assigned to pads, use the SWAP function to switch them ( P. 83).
Managing kits
Instrument management
Instruments can be copied, and their positions can be swapped.
1.
Press

This opens the KIT screen.
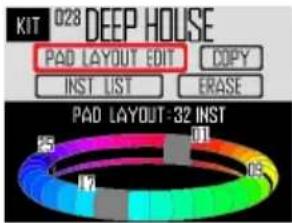
2.
Use SELECT to select INST LIST, and press SELECT.
This opens a list of the instruments used in the selected pattern.
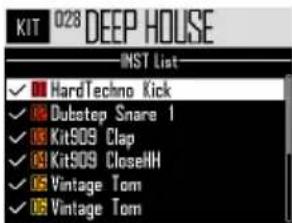
HINT
If PAD layout is set to a value other than 32, the instruments assigned to the Ring Controller are shown with checks.
3.
Use ☑ to select the instrument to manage, and press ⏻. Press ⏱ to return to the instrument list.
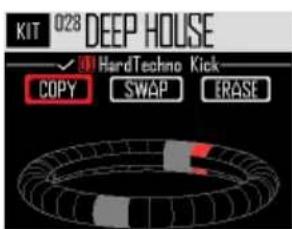
■ Copying instruments (COPY)
Instruments can be copied to different pads. This is convenient for using the same sound with a different pitch or parameter settings.
- Use ⬆ to select COPY, and press ⬆. This opens a screen for selecting the copy destination instrument.

- Use ☑ to select the copy destination instrument, and press SELECT. This opens a confirmation screen.
- Use ⬆ to select Yes, and press ⬆. This copies the instrument selected previously over the destination instrument that was just selected. This does not change the number of the copied instrument.
■ Swapping instruments (SWAP)
The pad positions of two instruments can be switched.
- Use ⏻ to select SWAP, and press ⏻. This opens a screen where you can select the instrument to swap.
- Use ☑ to select the instrument to swap, and press ⏻.
This opens a confirmation screen.
- Use ⬆ to select Yes, and press ⬆. This swaps the instrument selected previously with the instrument that was just selected.
NOTE
This does not change the numbers of the swapped instruments.
Managing kits (continued)
■ Erasing an instrument (ERASE)
- Use SELECT to select ERASE, and press SELECT.
This opens a confirmation screen.
- Use ⬆ to select Yes, and press ⬆. This will set the instrument oscillator to OFF and all other parameters to default values.
Managing kits
A kit created in one pattern can be copied to another pattern. The instruments in a kit can also be removed.
1.
Press

This opens the KIT screen.

2. Use SELECT to select the function to
use, and press SELECT
You can select COPY or ERASE.
■ Copying kits (COPY)
This copies the contents of the current kit to a different pattern.
- Use SELECT to select COPY, and press SELECT.
This opens a screen for selecting the copy destination pattern.
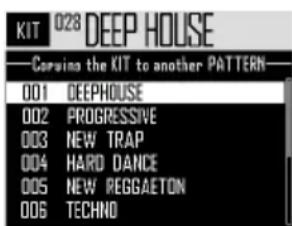
- Use ⬆ to select the copy destination pattern, and press ⬆.
This opens a confirmation screen.
- Use SELECT to select Yes, and press SELECT.
This copies the current kit to the selected pattern.
■ Erasing kits (ERASE)
This removes all the instruments from the current kit.
- Use Ⓞ to select ERASE, and press Ⓞ. This opens a confirmation screen.
- Use SELECT to select Yes, and press SELECT.
This will set the oscillator to OFF and all other parameters to default values for every instrument.
Editing sounds (EDIT)
Editing overview
Use the EDIT screen to edit sounds.
Edit sounds when STEP mode or INST mode is active.
HINT
- The EDIT screens in SONG and LOOPER modes have different settings (→ P. 94).
• To edit the sound of instrument number 33, select it in STEP mode and press EDIT.
Screen overview
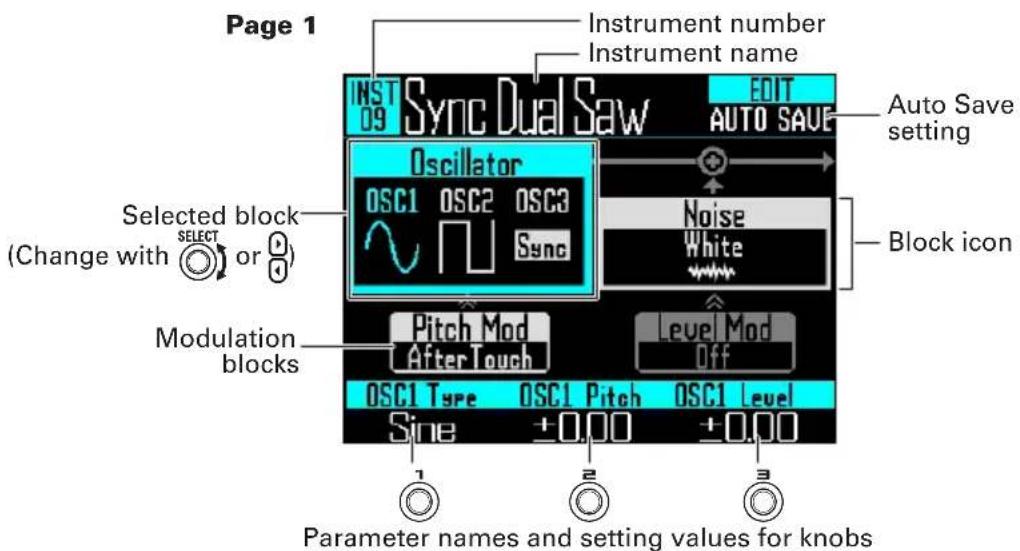
Page 2
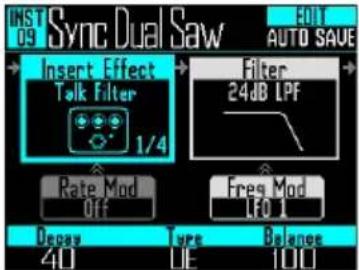
Page 3 Page 4
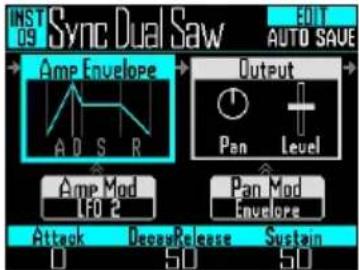
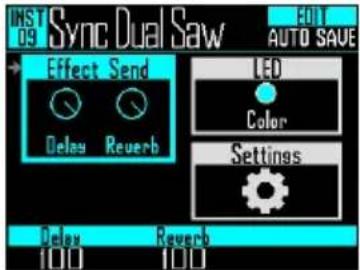
Block structure
The EDIT screen uses the following block structure to edit sounds.
Oscillator Noise Insert effects Filter
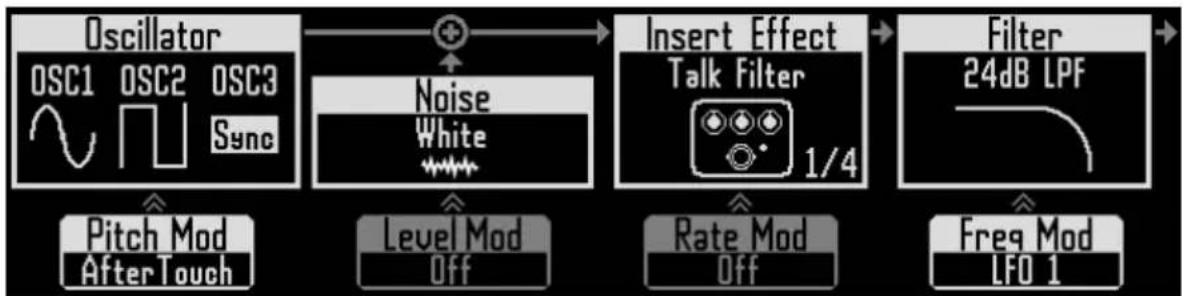
flowchart
graph LR
    A["Oscillator"] --> B["Noise"]
    B --> C["Insert Effect"]
    C --> D["Filter"]
    subgraph Inputs
        E["Pitch Mod After Touch"] --> F["After Touch"]
        G["Level Mod Off"] --> H["Off"]
        I["Rate Mod Off"] --> J["Off"]
        K["Freq Mod LFO 1"] --> L["Freq Mod LFO 1"]
    end
This sets the basic instrument sound. You can select from built-in sound sources, captured recordings and WAV files loaded from the SD card.
For information about these sound parameters, see the Oscillator list ( P. 133).
Noise can be added to the sound.
Sounds can be altered with effects. Up to four effects can be used in a kit.
Sounds can be altered with filters.
(Lower) Oscillator pitch modulation
The oscillator pitch can be altered with an envelope or LFO.
(Lower) Noise level modulation
The noise level can be can be altered with an envelope or LFO.
(Lower) Insert effect modulation
Insert effect parameters can be can be altered with an envelope or LFO. This cannot be used with some effects.
(Lower) Filter frequency modulation
The filter frequency can be altered with an envelope or LFO.
Amp envelope Output Effect sends
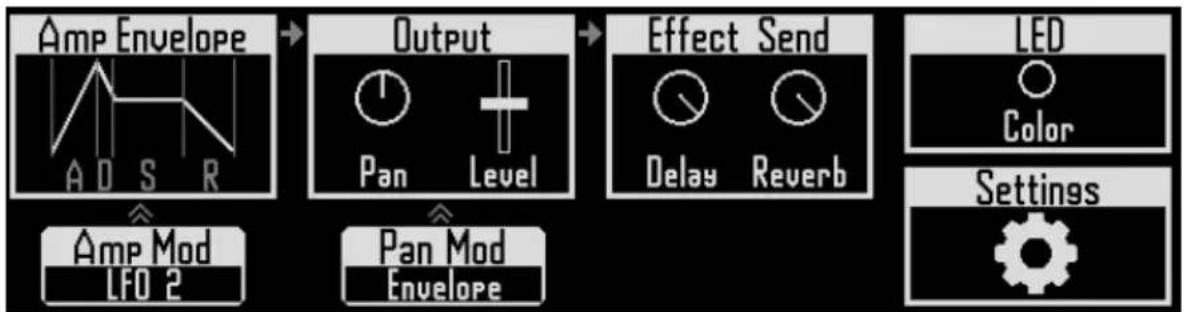
flowchart
graph LR
    A["Amp Envelope"] --> B["Output"]
    B --> C["Effect Send"]
    C --> D["LED"]
    D --> E["Settings"]

    subgraph Amp_Envelope
        A1["Amplifier Line Chart"]
        A2["Amplifier Line Chart"]
        A3["Amplifier Line Chart"]
        A4["Amplifier Line Chart"]
        A5["Amplifier Line Chart"]
        A6["Amplifier Line Chart"]
        A7["Amplifier Line Chart"]
        A8["Amplifier Line Chart"]
        A9["Amplifier Line Chart"]
        A10["Amplifier Line Chart"]
    end

    subgraph Output
        B1["Pan Level"]
        B2["Pan Level"]
        B3["Level"]
    end

    subgraph Effect_Send
        C1["Delay Reverb"]
        C2["Delay Reverb"]
        C3["Delay Reverb"]
    end

    subgraph LED
        D1["Color"]
    end
This sets how quickly sound starts when a pad is tapped, the sound level while it is being pressed, and how quickly it becomes silent after the pad is released.
This sets the panning (stereo position) and level.
These set the amounts sent to the delay and reverb effects.
LED
This sets the pad color and lighting style.
Settings
Use this to set the MIDI channel and Quick Access functions.
(Lower) Amp modulation
The volume can be can be altered with an envelope or LFO.
(Lower) Pan modulation
The panning can be can be altered with an envelope or LFO.
Editing sounds
Starting editing
- Use ▶ to select a pattern, use ⏻ to select the instrument to edit, and press Ⓗ. This opens the EDIT screen.
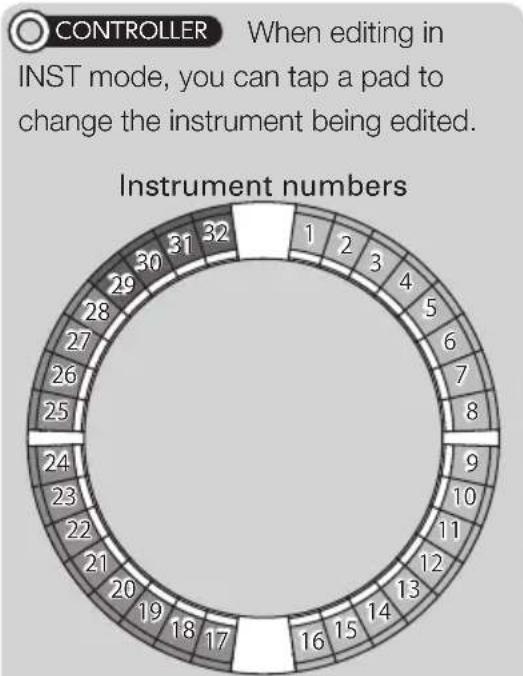
polar_bar
| Instrument | Count | | ---------- | ----- | | 1 | 32 | | 2 | 31 | | 3 | 30 | | 4 | 29 | | 5 | 28 | | 6 | 27 | | 7 | 26 | | 8 | 25 | | 9 | 24 | | 10 | 23 | | 11 | 22 | | 12 | 21 | | 13 | 20 | | 14 | 19 | | 15 | 18 | | 16 | 17 | | 17 | 16 |HINT
Tap a pad while pressing INST to change the instrument without outputting sound.
Common operations for each block
■ Changing setting items and parameters
- Use SELECT or to select the block to change.
The names and values of the parameters at the bottom of the screen will change. Use 1, 2 and 3 to change values that can be adjusted.
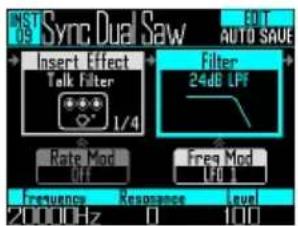
- Use 1, 2 and 3 to select and change parameters.
Press ⏻ to show submenus for blocks that have them, including filter and noise. Use ⏻ to select and change setting values, and press ⏻ to confirm.
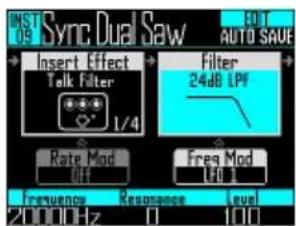
HINT
See "EDIT menu parameter list" for block menu details ( P. 133).
Editing sounds (continued)
Oscillator block settings
This sets the basic instrument sound.
■ Selecting internal sound sources
Internal sound sources, which include drum sets, percussion instruments, and synthesizers,- can be selected.
1.
Press

2.
Use ⬆ to select the oscillator block, and press ⬆.
This opens the oscillator list.
Press Ⓤ to move up one category level.
Press Ⓗ at the top level to return to the EDIT screen.

HINT
- The check shows the currently selected oscillator.
- You can also use the ⏻ buttons to change categories.
3.
Use ⬆ to select the oscillator, and press ⬆.
This selects the oscillator.
■ Selecting captured audio files and WAV files
WAV files saved in the "Capture" subfolder in the "AR-96" folder on the SD card can be selected.
1.
Press EDIT.
2.
Use ⏻ to select the oscillator block, and press ⏻.
3.
Press ⏻ repeatedly to open the top category level, and use ⏻to select Audio File.
Selectable WAV files will be shown.
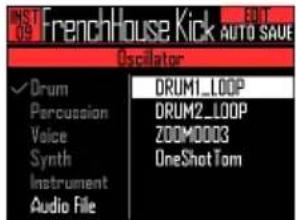
4.
Use ⏻ to select a file, and press ⏻.
This selects the file as an oscillator.
NOTE
When an audio file is selected as an oscillator, the filter and other parameters will be reset to default values.
Editing sounds (continued)
■ Playing audio files
The total possible playback time of audio files used as oscillators is 6 minutes if stereo or 12 minutes if mono.
Files that meet the following conditions can be used as oscillators.
- WAV format files with 44.1kHz sampling frequency and 16/24-bit resolution
- Playback time is 6 minutes (12 minutes if mono) or less
- File name uses only English letters and numbers
The playback of audio files can be set as in looper mode.
One Shot: The captured recording plays once and stops.
Toggle: Tapping the pad alternately starts and stops playback of the captured audio.
Gate: The captured audio plays back in a loop while the pad is being pressed. Playback stops when it is released.
When an audio file is set to Toggle and is playing back, a screen like the following appears with a mark that shows it is playing back.
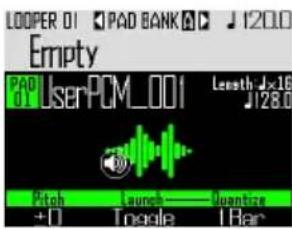
Tap the pad again to stop playback. You can also press ☐ to stop playback.
When the playback method is set to Toggle, press SELECT to open WAVE layout for the Ring Controller as shown in the following illustration. One Ring Controller cycle corresponds to the time between start and end points.
Start pointEnd point
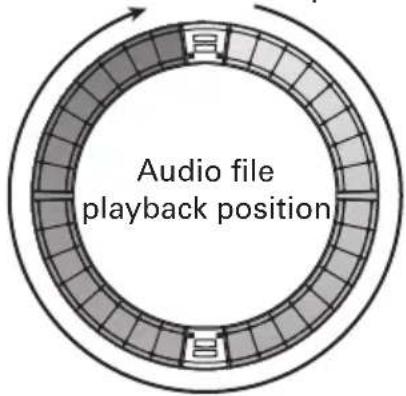
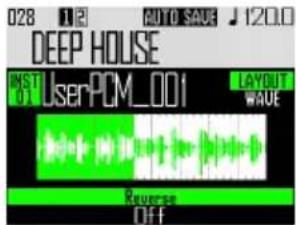
- Press ▶ to start audio file loop playback.
- Tap a pad to start playback of the loop from that position.
- Tap a pad when stopped to play only the interval assigned to that pad.
NOTE
WAVE layout cannot be changed during play-back. Moreover, playback and recording are not possible when in WAVE layout.
Editing sounds (continued)
Insert effect block settings
You can use up to 4 insert effects at the same time.
-
Press EDIT.
-
Use SELECT to select the insert effect block, and press SELECT.
This selects the inside of the block.
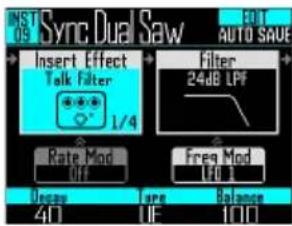
- Use ⬆ to select the effect type, and press ⬆.
This selects the outside of the block.
HINT
See the "Effect list" appendix for details about insert effects ( P. 141).
NOTE
The number of insert effects being used is shown at the bottom right of the effect icon. If 4 insert effects are already being used, more effects cannot be selected.
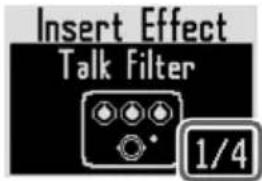
In this case, a message will appear showing which instruments are using effects. You can turn off unneeded effects and try again.

Modulation blocks settings
In modulation blocks, you can use envelopes and LFOs to alter parameters for blocks, including the oscillator and filter.
-
Press EDIT.
-
Use ⏻ to select a modulation block, and press ⏻.
This selects the inside of the block.
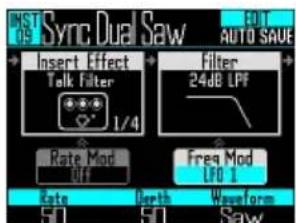
- Use Ⓞ to select the modulation type.
Select Off, Envelope, LFO 1, LFO 2, or Aftertouch.
Editing sounds (continued)
4. Use 1, 2 and 3 to set
parameters.
Parameters can be set according to the modulation type.
5. Press SELECT when you are done
making settings.
This selects the outside of the block.
NOTE
When the following settings are made, additional settings will be shown.
· If the LFO Waveform is set to Pulse
The following screen will open, and you can set the pulse width to 1–99%.
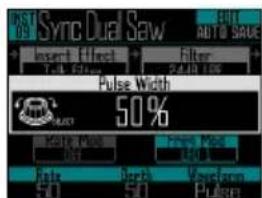
- If Envelope is selected
The following screen will open, and you can set the envelope depth in a range between -100% and +100%.
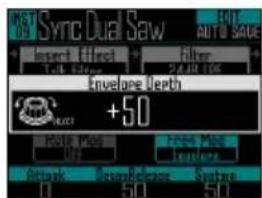
LED block settings
You can set the color used on the display and by the Ring Controller LEDs, as well as how pads light when a pad is tapped.
1. Press EDIT
2. Use SELECT to select the LED block.
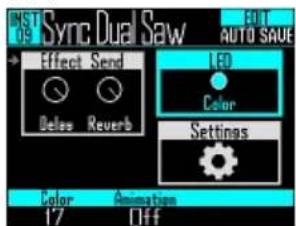
3. Use Ⓞ to change the color.
You can select from 32 colors. When set to OFF, LEDs will not light.
HINT
When you change oscillators, the LED color will automatically change according to the oscillator type.
4. Use Ⓞ to select the animation to
use.
The animation can be set to Off, Moire, Firework, Cross, Circulation or Rainbow.
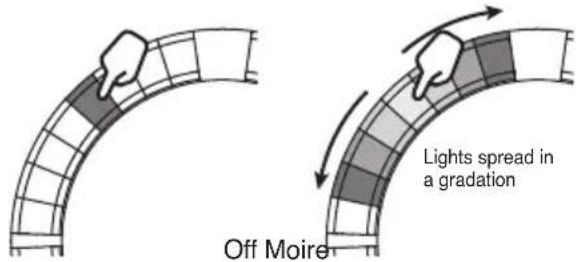
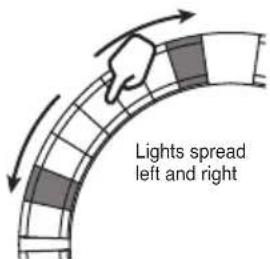

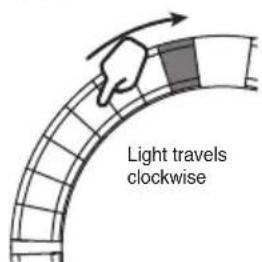
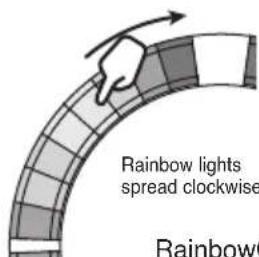
Editing sounds (continued)
Settings block settings
Use this to make Quick Access and MIDI settings.
1.
Press EDIT.
2.
Use SELECT to select the Settings block, and press SELECT.
This opens the settings menu. Use SELECT to select a setting item.
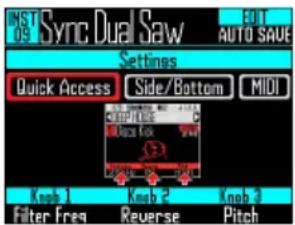
■ Quick Access function settings (Quick Access)
- Use Ⓞ to select Quick Access. The functions assigned to Ⓞ, Ⓞ and Ⓝ in INST mode are shown.
- Set the functions assigned to ⏻, ⏱ and ⏲. The set functions can be used to make changes in INST mode.
Editing sounds (continued)
■ Using tonal variations on the Ring Controller side and bottom rings (Side/Bottom)
Parameter variations can be set for the side and bottom rings of the Ring Controller in INST mode so playing them is different from the top ring. By changing where you tap, you can add variation when playing.
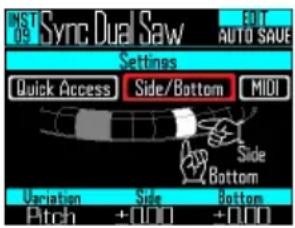
- Set the parameter and change the values with 1, 2 and 3.
○ selects the parameter, and ○ and ○ set its value changes when the side and bottom rings are tapped.
■ Setting the MIDI channel for the selected pad
The MIDI channel can be set for the selected pad.
If the unit receives a MIDI message on this channel by USB, the instrument assigned to the pad will play at the pitch that corresponds to the note number.
In addition, if a sequence is recorded for the selected pad, note numbers will be output on the set MIDI channel during pattern playback.
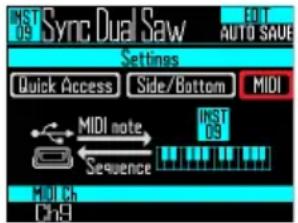
- Use Ⓞ to set the MIDI channel.
This can be set to OFF or from 1 to 16.
The AR-96 can output sounds for note numbers 0–108.
NOTE
The AR-96 cannot record MIDI messages received by USB as a sequence.
SONG mode EDIT screen
The following settings can be made with the SONG mode EDIT screen.
LED settings
You can set the color used on the display and by the Ring Controller LEDs, as well as how pads light when a pad is tapped.
■ Setting pattern pad colors
- Select a pattern.
- Press EDIT
This opens the LED settings for the selected pattern.
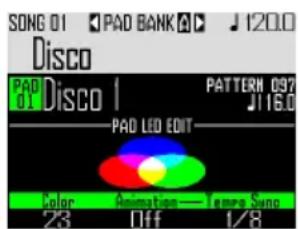
-
Use Ⓞ to change the color.
■ Setting the LED animation type. -
Select a pattern.
- Press EDIT
- Use Ⓞ to change the animation type.
The animation can be set to Off, Moire, Firework, Cross, Circulation or Rainbow ( P. 92).
■ Setting the LED animation timing
- Select a pattern.
- Press EDIT.
- Use ⚙ to change the animation playback timing.
This sets the repetition timing of the animation based on the playback tempo. The interval can be set to 1/8, 1/4, 1/2, 1 or 2.
LOOPER mode EDIT screen
The following settings can be made with the LOOPER mode EDIT screen.
LED settings
You can set the color used on the display and by the Ring Controller LEDs, as well as how pads light when a pad is tapped.
-
Select a captured recording.
-
Press EDIT.
The EDIT screen for the captured audio of the selected pattern opens.
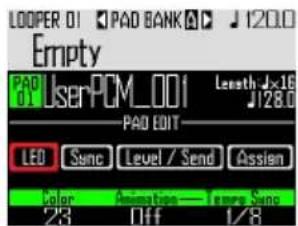
-
Use SELECT to select LED.
-
Use Ⓞ to select a color.
-
Use Ⓞ to select an animation type.
The animation can be set to Off, Moire, Firework, Cross, Circulation or Rainbow ( P. 92).
- Use ⚙ to change the animation playback timing.
This sets the repetition timing of the animation based on the playback tempo. The interval can be set to 1/8, 1/4, 1/2, 1 or 2.
Setting the synchronization of the captured audio (Sync)
The playback of the captured audio can be synchronized with the looper sequence tempo.
-
Select a captured recording.
-
Press EDIT.
The EDIT screen for the captured audio of the selected pattern opens.
- Use ▶ to select Sync.
Settings related to synchronization are shown.
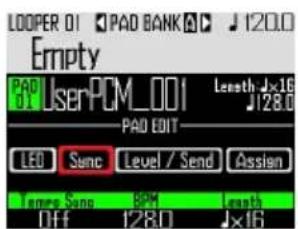
- Use Ⓞ to turn synchronization on or off (Tempo Sync).
When on, the captured audio will play back synchronized with the looper sequence tempo. In addition, loop play-back will also be synchronized with the tempo.
NOTE
To turn Tempo Sync On, the BPM and Length parameters must also be set. If they are not set, it cannot be turned on.
LOOPER mode EDIT screen (continued)
- Use Ⓞ to set the tempo of the captured recording (BPM).
Set the original tempo of the captured recording.
This can be set from 40.0 to 250.0.
- Use Ⓞ to select the length of the captured recording (Length).
The length of the captured audio can be set in units of quarter notes or bars.
NOTE
BPM and Length values must be set correctly to synchronize accurately.
When Tempo Sync is Off, the captured recording is played back at its original speed. During loop playback, the file will loop between its start and end points without synchronizing to the tempo.
Level and send settings (Level/Send)
The playback level of captured audio and the amounts sent to the delay and reverb effects can be set.
-
Select a captured recording.
-
Press EDIT.
The EDIT screen for the captured audio of the selected pattern opens.
-
Use SELECT to select Level/Send.
-
Use Ⓞ to set the playback level of the captured audio.
This can be set from 0 to 100.
- Use Ⓞ to set the amount sent to the delay effect.
This can be set from 0 to 100.
- Use Ⓞ to set the amount sent to the reverb effect.
This can be set from 0 to 100.
LOOPER mode EDIT screen (continued)
Changing assigned captured recordings (Assign)
The captured audio assigned to the selected pad can be changed.
- Select a captured recording.
- Press EDIT
The EDIT screen for the captured audio of the selected pattern opens.
- Use SELECT to select Assign.

- Press SELECT
Assignable files saved in the "Capture" subfolder in the "AR-96" folder on the SD card will be shown.
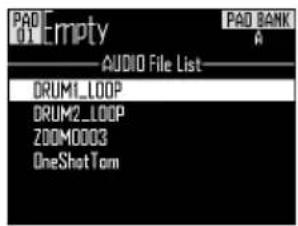
- Use ⬆ to select a file, and press ⬆.
This assigns the selected file to the pad.
Effects overview
Global filter, delay, reverb and master effects can be applied to the playback of patterns, songs and looper sequences.
Screen overview
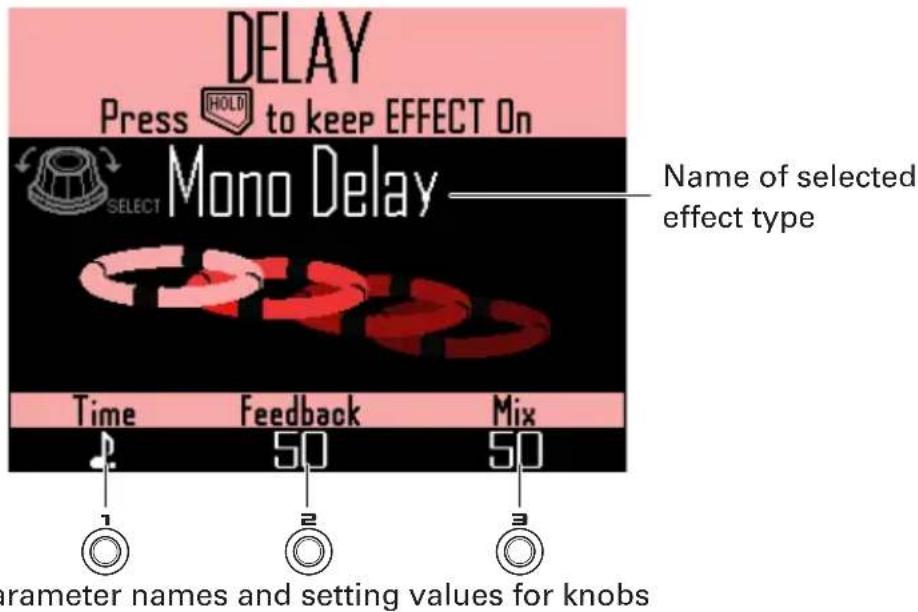
Effect types
FILTER
This enables the global filter.
DELAY
This enables the delay.
REVERB
This enables the reverb.
MASTER FX
You can select one of a variety of effects as the master effect that is applied to all output.
The parameters that can be set depend on the type of effect.
HINT
See the "Effect list" appendix for details about effect parameters ( P. 141).
Using effects
Turning effects ON/OFF
- During pattern, song and looper sequence playback, press and hold FILTER, DELAY, REVERB or MASTER FX for the effect you want to use.
The effect is turned on only while the button is being pressed.

CONTROLLER
Press the button
for the effect you want to use. When using the Ring Controller, just pressing the button will hold the effect.
HINT
- Multiple effects can be turned on at the same time In this case, information about the effect turned on last appears on the display.
-
When an effect is on, its Ring Controller effect button LED lights.
-
To hold an effect, press FILTER, DELAY, REVERB or MASTER FX while pressing HOLD.
The effect will stay on even after its button is released.
HINT
Multiple effects can be held at the same time
- To stop holding an effect, press

while pressing its button

DELAY

or MASTER FX).

CONTROLLER
Press the button for
the effect you want to stop holding.
Changing effect types
- During song playback, press FILTER, DELAY, REVERB or MASTER FX for the effect type you want to change. The type of the selected effect appears on the display.
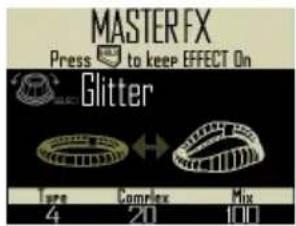
- Use SELECT to change the effect type.
Changing parameters
- Press FILTER, DELAY, REVERB or MASTER FX for the effect you want to change.
The parameters of the selected effect appear on the display.
HINT
When multiple effects are being held, press the button of the effect you want to change.
- Turn 1, 2 and 3 to change the parameters you want.
Mixer overview
The audio from the external inputs can be adjusted. In INST and STEP modes, the levels of each instrument in the mix can also be adjusted.
Screen overview
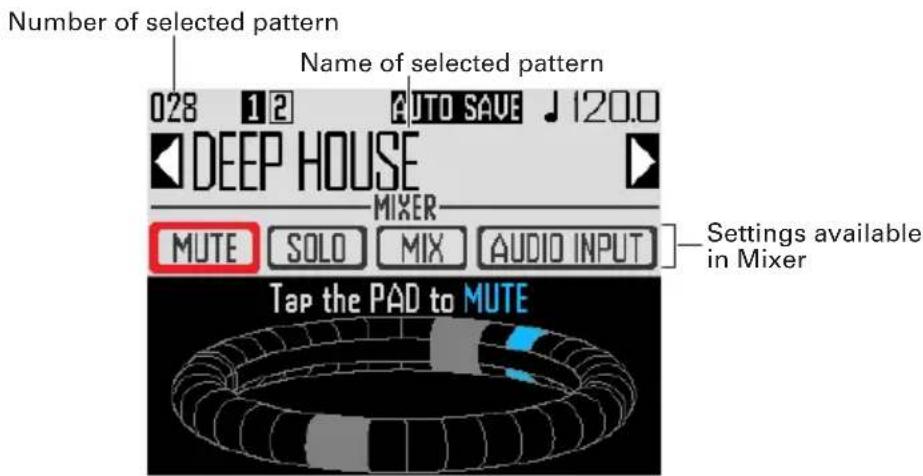
Using the Ring Controller
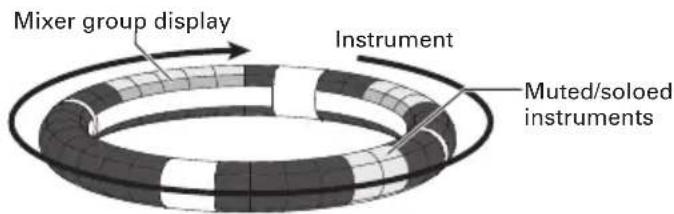

In SCALE layout, tapping any pad has the same effect
The pads on the rings correspond to 32 instruments. After selecting mute or solo on the display, you can turn muting or soloing ON/OFF by tapping the pads.
Starting mixing
1.
Press MIXER when the pattern to mix
is selected or playing back.
This opens the MIXER screen.
HINT
In SONG and LOOPER modes, you can set send effects and levels, as well as stereo/mono, for audio input through the INPUT jacks.
Using the mixer
Muting
You can mute just the selected instrument.
- Use 🔒 to select MUTE.

- CONTROLLER Tap the pad for the instrument to be muted.
The instrument for the tapped pad will be muted.
HINT
The pads of muted instruments become unlit.
- CONTROLLER To end muting, tap the muted pad again.
The instrument for the tapped pad will be unmuted.
Soloing
You can solo the playback of just the selected instrument.
- Use 🔒 to select SOLO.
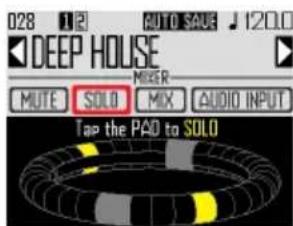
- CONTROLLER Tap the pad for the instrument to be soloed.
Only the instrument for the tapped pad will be played back.
HINT
When an instrument is soloed, only the pad for the solo playback is lit.
- CONTROLLER To end soloing, tap the soloed pad again.
Solo playback of the instrument for the tapped pad will end.
Using the mixer (continued)
Group mixer
You can group multiple instruments and adjust their levels together.
■ Setting the group mixer
1. Use ▶ to select MIX.
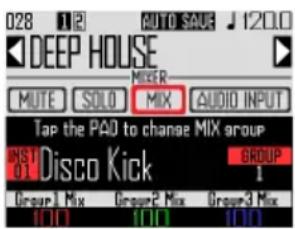
HINT
The top ring of the Ring Controller lights with the group colors of each instrument.
Group 1: red
Group 2: green
Group 3: blue
No group: unlit
Pad shown on the display: blinking (blinking white if no group)
2. CONTROLLER Tap the pad for an
instrument to change its mixer
Group setting.
The name and group number of the instrument for the tapped pad will be shown on the display. Tap the same pad repeatedly to set its group.
3. Turn 1, 2 and 3 to adjust the volumes of the mixer groups.
This adjusts the volume of the mixer groups.
HINT
- The maximum volume values of the mixer group will be the volumes set for each instrument.
- The volumes of instruments not set to groups will not be adjusted.
Using the mixer (continued)
Using INPUT send effects
- Use SELECT to select AUDIO INPUT.
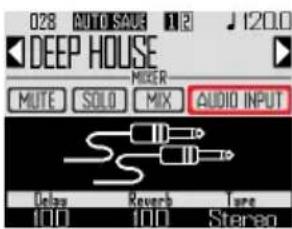
- Use 1 and 2 to adjust the amount of each effect send.
These can be set from 0 to 100.
Setting the external input to stereo or mono.
Make the following settings if an audio source with mono output is connected to the external input.
-
Connect a mono cable to the left INPUT jack.
-
Press MIXER.
-
Use SELECT to select AUDIO INPUT.
-
Use ⚙ to select the type of external input.
Stereo: Receive the left and right channel inputs as a stereo audio signal Mono (Lch): Receive the left channel input as a mono audio signal
Changing various settings
Settings related to unit operation and other features can be made.
1.
Press MENU
2.
Use SELECT to select SETTING, and press SELECT.
This opens the setting screen.
3.
Use SELECT to select menu items and SELECT to confirm them.
Press ⏱ to move up one level in the menu.
■ Setting the quantization (Quantize)
- Use Ⓞ to select the quantization value. Set the input adjustment timing as a fraction of a musical measure. This can be set to OFF, 1/32, 1/16Tri, 1/16, 1/8Tri, 1/8, 1/4, 1/2 or 1.
HINT
This affects motion sequences and real-time input in INST mode, for example.
■ Setting inner ring display (Inner Ring LED)
- Use SELECT to select what the inner ring of the Ring Controller shows. Select Instruments (instrument display) or Guideline (guideline display).
■ Setting the clock mode (Clock Mode)
Set whether the internal clock or an external clock is used when connected to other MIDI devices by USB.
- Use SELECT to select the clock mode. Select Internal or External USB.
NOTE
When External USB is selected, songs and looper sequences cannot be recorded.
■ Setting the display brightness (LCD Backlight)
- Use ⬆ to set the brightness of the Base Station display. Select Low, Mid or High.
■ Show the software versions (Software Version)
- Use SELECT to show the software versions.
Changing various settings (continued)
■ Restoring default settings
(Factory Reset)
- Press SELECT to restore the AR-96 Base Station to its default settings.
A confirmation message appears on the display, and then the settings are restored to their factory defaults.
NOTE
Restoring settings to their defaults will erase everything you have created including patterns and songs. Save them to an SD card in advance if you do not want to lose them.
Backing up data ( P. 98)
MIDI message settings
Outputting MIDI messages from the Base Station (USB MIDI Output)
When the Ring Controller pads and Base Station knobs and buttons are used, the Base Station can send MIDI messages from the USB port. You can set the MIDI messages output. The
AR-96 will output the set MIDI messages without change regardless of the mode it is in.
These messages can be used to control DAW software, for example.
1.
Press

2.
Use SELECT to select Settings, and press SELECT.
This opens the Settings screen.
3.
Use SELECT to select SETTING, and press SELECT.
This opens the setting screen.
4.
Use ⬆ to select USB MIDI Output, and press ⬆.
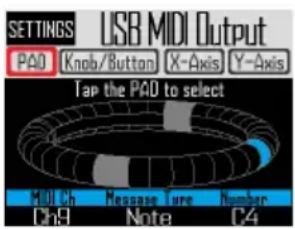
■ MIDI messages output when Ring Controller pads are tapped
The 32 pads on the Ring Controller can each be assigned different MIDI messages.
- Use SELECT to select PAD.
- Tap the pad you want to set.
The tapped pad lights blue and settings are shown at the bottom of the display.
- Use 1, 2 and 3 to edit the MIDI message.
You can set each value as follows.
| MIDI Ch | Message Type Number | |
| 1-16 | Off | - |
| Note 0-127 | ||
| CC (control change) 0-127 | ||
| Prg Chg (program change) 0-127 | ||
| Ch Press (output same aftertouch value on entire MIDI channel) | - | |
| PolyPress (output after-touch only on each pad) | 0-127 (Note Number) |
HINT
If the Message Type is set to CC, the CC number set by "Number" is sent with the strength (velocity) that the pad is tapped. "0" is sent when the pad is released
NOTE
Sequences recorded on the AR-96 are output independently of the MIDI messages sent when pads are pressed ( P. 93).
MIDI message settings (continued)
■ MIDI messages output when the Ring Controller is moved
The MIDI messages sent when the Ring Controller is moved in the X and Y directions can be edited.
- Use SELECT to select X-Axis or Y-Axis

- Use 1, 2 and 3 to edit the MIDI message.
You can set each value as follows.
| MIDI Ch | CC Number Min Value | |
| 1-16 | OFF - | |
| 0-127 0-127 |
HINT
Sent values will be in a range from the Min Value set by Ⓞ to 127.
■ MIDI messages output when Base Station knobs and buttons are used
The MIDI messages sent when controls, including 1, 2, 3, SELECT, ●, TEMPO and MIXEN, are used can be edited
- Use ⏻ to select Knob/Button, and press ⏻.
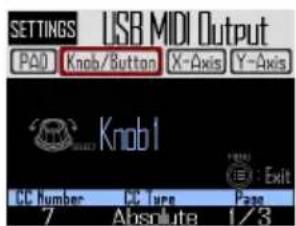
- Use SELECT to select the knob or button to edit.
The settings for the selected knob or button will appear on the display with the setting values at the bottom.
- Use 1, 2 and 3 to edit the MIDI message.
You can set the values as detailed on the next page.
MIDI message settings (continued)


| Page 1 Page 2 Page 3 | ||||
| CC Number | Type Minimum/Dec Number | Maximum/Inc Number MIDI Ch | ||
| 0-127 | Off -- | 1-16 | ||
| Absolute (send the knob rotation position as an absolute value) | 0-127 (Minimum) 0-127 (Maximum) | |||
| Relative (when the knob is turned, send the difference in values between counterclockwise (Dec) and clockwise (Inc)) | 0-127 (Dec Number) 0-127 (Inc Number) | |||
HINT
- When Type is set to Absolute, the value of the current knob rotation position is output if is within the range between Minimum and Maximum. If turned counterclockwise from the Minimum value or turned clockwise from the Maximum value, no message will be output. Beware that even though this can be used with many DAW applications, differences could occur with the values sent by the AR-96 if the controlled parameters are changed in the DAW.
- When Type is set to Relative, the value set by Dec Number is sent when the knob is turned counterclockwise, and the value set by Inc Number is sent when the knob is turned clockwise. Even if parameters have been changed in the DAW, values can be increased or decreased relatively. However, correctly setting the Dec Number and Inc Number might be necessary depending on the DAW.


| MIDI Ch Message Type Number | ||
| 1-16 | Off | - |
| Note | 0-127 | |
| CC (control change) | 0-127 | |
| Prg Chg (program change) | 0-127 | |
HINT
When Message Type is set to Note, pressing a button will send the note set by "Number" at a velocity of 127. Releasing the button will send it at a velocity of 0.
When Message Type is set to CC, pressing a button will send the CC number set by "Number" at a value of 127. Releasing the button will send it at a value of 0.
MIDI message settings (continued)
System real-time messages
When the system settings Clock Mode is set to Internal, MIDI clock is output from the USB port on the AR-96.
Moreover, with this setting, the AR-96 will send a start message when playback starts and a stop message when it stops.
In addition, it will send a continue message when playback resumes from a paused state.
Start, stop and continue messages will not be output, however, when the AR-96 does not play back because, for example, it does not have song or looper sequences.
Backing up data and managing audio files
Data utilities
You can manage audio files on SD cards and back up the data for patterns, song sequences and looper sequences that you created to an SD card all at once.
When restoring data, you can load all the data at once or choose only some data to load.
Moreover, you can specify single patterns to be backed up and restored.
1.
Press

2.
This opens the Settings screen.
3.

This opens the DATA UTILITY screen.
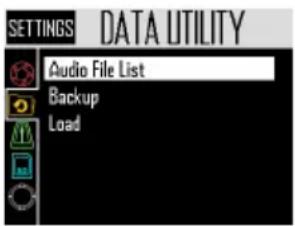
4.
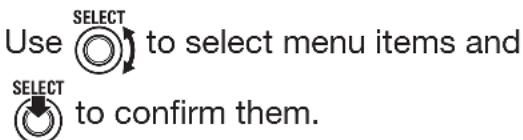
Press ⏰ to move up one level in the menu.
■ Backing up all data (Backup All Data)
This function backs up all pattern data, song sequences and loop sequences.
- Use ⬆ to select Backup, and press ⬆. This opens the backup extent selection screen.
All Data: This backs up all data.
Pattern & Kit: This backs up a single pattern.
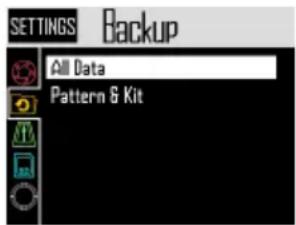
- Use ⬆ to select All Data, and press ⬆. This opens the backup file name input screen.
HINT
Character input screen use ( P. 21)
- After inputting the data name, select Enter, and press SELECT.
This backs up all data.
NOTE
WAV format audio files used for captured recordings are not backed up.
HINT
- The default backup file name is "DATAxxxx.ARD" ("xxxx" is a 4-digit number).
- The backup data will be saved inside the "Data" subfolder in the "AR-96" folder on the SD card.
Backing up data and managing audio files (continued)
■ Backing up selected patterns (Backup Pattern & Kit)
This backs up only the selected pattern.
This backs up the sequence and kit data contained in the pattern.
- Use ⬆ to select Backup, and press ⬆.
This opens the backup extent selection screen. - Use ⏻ to select "Pattern & Kit", and press ⏻.
This opens the pattern list.
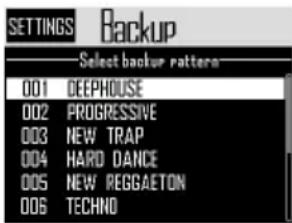
- Use ⏻ to select a pattern to back up, and press ⏻.
This opens the backup file name input screen.
HINT
Character input screen use ( P. 21)
- After inputting the data name, select Enter, and press SELECT.
This backs up the selected pattern.
HINT
The default backup file name is "[pattern name].PAT".
■ Loading all data (Load All Data)
This function loads all pattern data, song sequences and loop sequences.
- Use ⏻ to select Load, and press ⏻. This opens the load range selection screen.
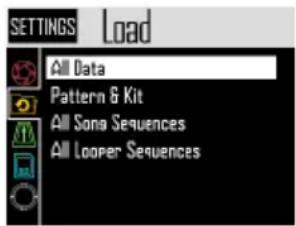
- Use ⬆ to select All Data, and press ⬆. This opens a list with the backup data on the SD card.
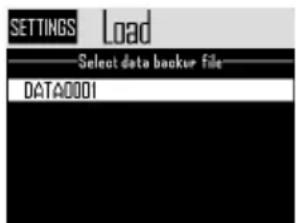
- Use ⬆ to select the backup data, and press ⬆. This opens a confirmation screen.
- Use ⏻ to select Yes, and press ⏻. The data will be loaded from the SD card.
NOTE
When you load data, the contents on the AR-96 are overwritten.
Backing up data and managing audio files (continued)
■ Loadingpatterns
(Load Pattern & Kit)
This function loads only selected pattern data.
- Use SELECT to select Load, and press SELECT.
This opens the load range selection screen.
- Use ⏻ to select "Pattern & Kit", and press ⏻.
This opens a list with the backup data on the SD card.
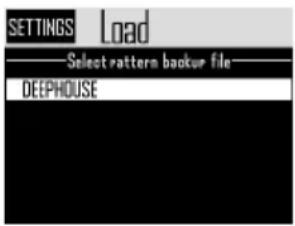
- Use ⬆ to select the backup data, and press ⬆.
This opens the pattern list.
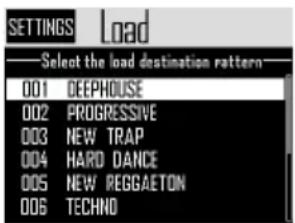
- Use SELECT to select the load destination pattern, and press SELECT. This opens a confirmation screen.
- Use SELECT to select Yes, and press SELECT. The data will be loaded from the SD ca
NOTE
If the loaded pattern uses audio files as instrument oscillators, those audio files must be saved in the "Capture" subfolder in the "AR-96" folder on the SD card.
■ Loading song and looper sequences
(Load All Song/Looper Sequences)
These functions load song sequences and looper sequences.
In order to load these data sets, a backup of all data must have already been made.
- Use SELECT to select Load, and press SELECT.
This opens the load range selection screen.
- Use ⬆ to select "All Song Sequences" or "All Looper Sequences", and press ⬆.
This opens a list with the backup data on the SD card.
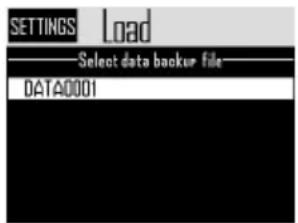
- Use ⬆ SELECT to select the backup data, and press ⬆.
This opens a confirmation screen.
- Use SELECT to select Yes, and press SELECT.
The data will be loaded from the SD card.
NOTE
- Pattern data used by a song sequence will not be loaded. If the current pattern data is different from the data at the time of backup, also load the pattern data used by the sequence.
- Audio files used by the looper sequence must be saved in the "Capture" subfolder in the "AR-96" folder on the SD card.
Backing up data and managing audio files (continued)
■ Audio file list
Audio files used as instrument oscillators and in looper mode can be managed.
- Use SELECT to select Audio File List, and press SELECT.
This opens the list of audio files on the SD card.
Audio files with checks are used as instrument oscillators or in looper mode.
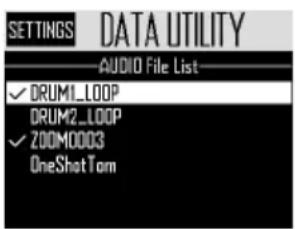
- To delete a file, use ⬆ to select it, and press ⬆.
This opens a confirmation screen.
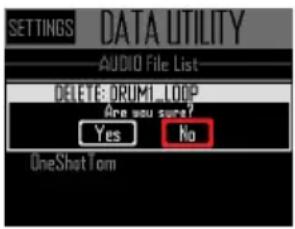
- Use ⬆ to select Yes, and press ⬆. This deletes the audio file.
NOTE
Be aware that if audio files used as instrument oscillators and in looper mode are deleted, the pads they are assigned to will no longer play back.
SD card management
Checking SD card open space
1.
Press

2.
Use ⬆ to select Settings, and press ⬆. This opens the Settings screen.
3.
Use SELECT to select SD CARD, and press SELECT.
4.
Use ⬆ to select SD Card Remain, and press ⬆. This shows the amounts of space used and open on the SD card.

Formatting SD cards
1.

2.
Use ⬆ to select Settings, and press ⬆. This opens the Settings screen.
3.
Use SELECT to select SD CARD, and press SELECT.
4.
Use ⏻ to select Format, and press ⏻. A confirmation message appears.

5.
Use SELECT to select Yes, and press SELECT. This formats the SD card.
NOTE
- Before using SD cards that have just been purchased or that have been formatted on a computer, they must be formatted by the AR-96.
- Be aware that all data previously saved on the SD card will be deleted when it is formatted.
SD card management (continued)
Testing SD card performance
You can test whether an SD card can be used with the AR-96. A basic test can be done quickly, while a full test examines the entire SD card.
■ Quick testing
-
Press MENU
-
Use SELECT to select Settings, and press SELECT.
This opens the Settings screen.
-
Use SELECT to select SD CARD, and press SELECT.
-
Use ⬆ to select Performance Test, and press ⬆.
-
Use ⏻ to select Quick Test, and press ⏻.
This will start the quick SD card test.
6. The test completes.
The result of the evaluation will be shown.

■ Full testing
- Press MENU
- Use SELECT to select Settings, and press SELECT. This opens the Settings screen.
- Use SELECT to select SD CARD, and press SELECT.
- Use ⬆ to select Performance Test, and press ⬆.
- Use ⏻ to select Full Test, and press ⏻.
The amount of time required and a confirmation message appears.
- Use ⬆ to select Yes, and press ⬆.
This will start the full SD card test.
- The test completes. The result of the test will be shown.

NOTE
Even if a performance test result is "OK", there is no guarantee that writing errors will not occur. This information is just to provide guidance.
SD card management (continued)
Exchanging data with a computer (SD Card Reader)
By connecting the AR-96 with a computer, you can check and copy data on the SD card loaded in it.
■ Connecting
- Press MENU
- Use SELECT to select Settings, and press SELECT.
- Use SELECT to select SD CARD, and press SELECT.
- Use SELECT to select SD Card Reader, and press SELECT.
- Use a USB cable to connect the AR-96 and the computer.

NOTE
- The supported operating systems are as follows.
Windows: Windows 7 or later
Mac: OS X (10.8) or later - The AR-96 cannot operate on USB bus power. Use the AC adapter to supply power.
■ Disconnecting
1. Disconnect on the computer.
Windows: Select AR-96 from "Safely Remove Hardware".
Mac OS: Drag the AR-96 icon to the Trash and drop it.
NOTE
Always conduct computer disconnection procedures before removing the USB cable.
2. Disconnect the USB cable from the computer and the AR-96, and

SD card management (continued)
SD card folder structure
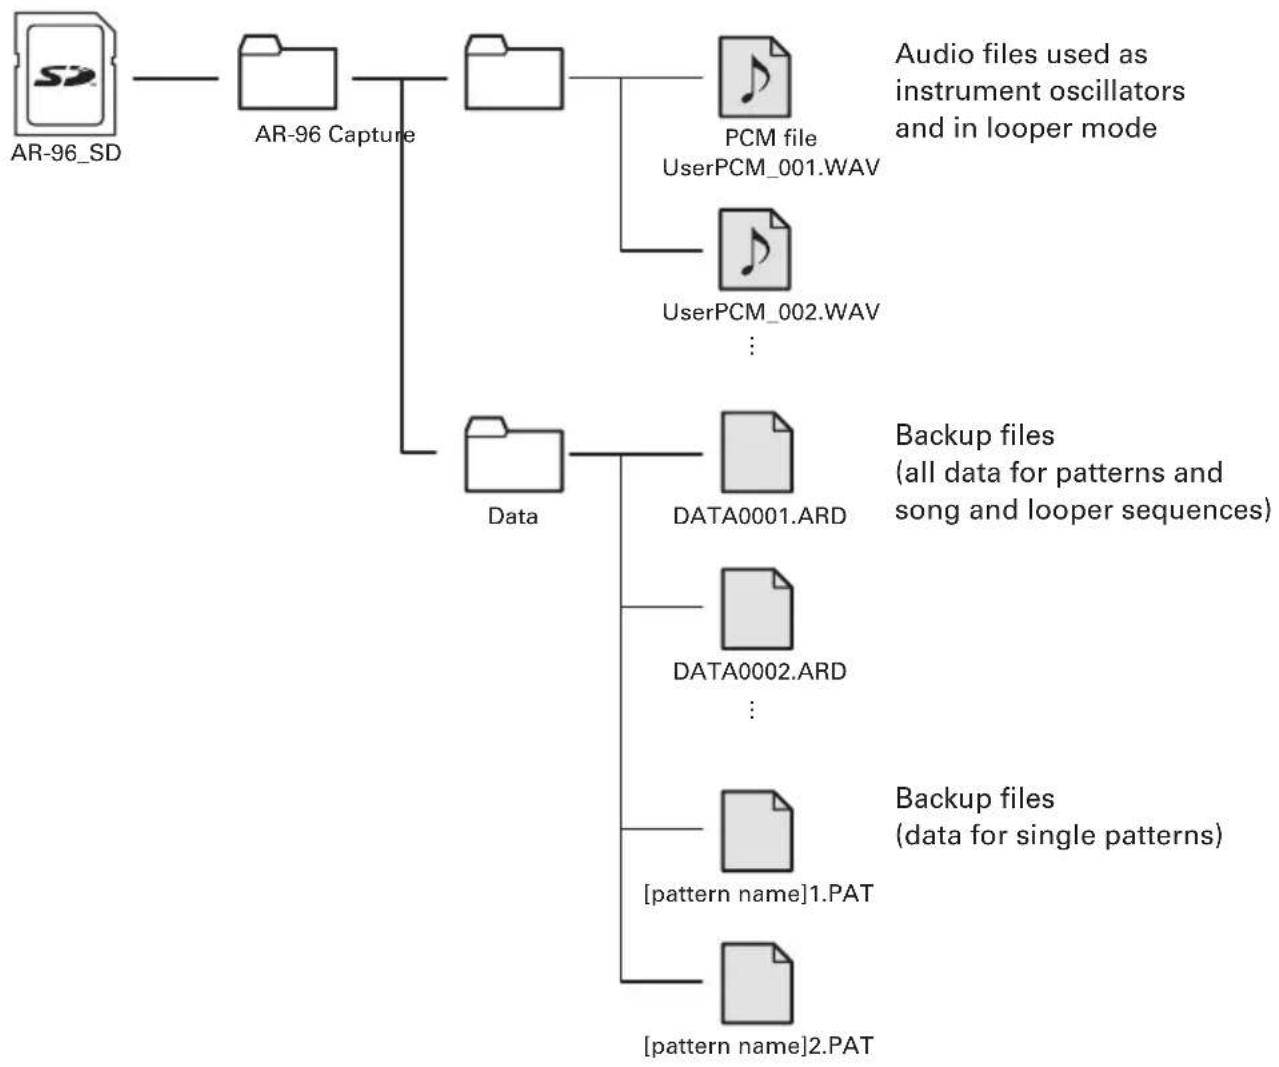
flowchart
graph TD
    A["AR-96_SD"] --> B["AR-96 Capture"]
    B --> C["Data"]
    C --> D["DATA0001.ARD"]
    C --> E["DATA0002.ARD"]
    C --> F["[pattern name"]1.PAT]
    C --> G["[pattern name"]2.PAT]
    H["PCM file\nUserPCM_001.WAV"] --> I["Audio files used as instrument oscillators and in looper mode"]
    J["UserPCM_002.WAV"] --> K["Backup files (all data for patterns and song and looper sequences)"]
    L["Backup files (data for single patterns)"] --> M["Backup files (data for single patterns)"]
Ring Controller settings
Ring Controller and Base Station connection and disconnection
The Ring Controller and Base Station connect through wireless communication using Bluetooth LE.
Making setting connections is necessary when, for example, connecting a Ring Controller and Base Station that were not originally in the same set.
■ Connecting
- Press MENU
- Use ⬆ to select CONTROLLER, and press ⬆.
- Use ⬆ to select Device List, and press ⬆.
A list of Ring Controllers that can be connected will appear.
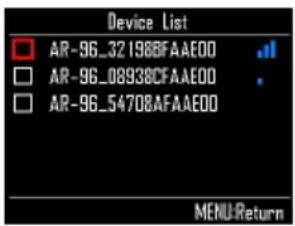
HINT
The number of bars in the antenna icon shows the strength of the connection.
- Use SELECT to select the Ring Controller to connect, and press SELECT. The selected Ring Controller will be connected and all its lights will flash blue.
■ Disconnecting
- Press MENU
- Use ⬆ to select CONTROLLER, and press ⬇.
- Use Ⓞ to select Device List, and press ⏻.
The list of Ring Controllers will appear. A white square will appear next to the connected Ring Controller.
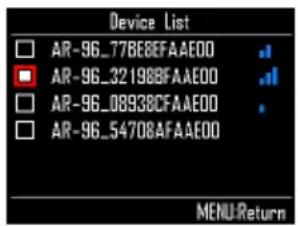
- Use SELECT to select a connected Ring Controller, and press SELECT
The Ring Controller will be disconnected and all its lights will flash red.
Ring Controller settings (continued)
Setting the grip area
1.

Press
All the Ring Controller LEDs will light blue.
HINT
When automatic grip setting ( P. 120) is ON, lifting the Ring Controller will automatically put it in this same state.
2.

Grasp the area to
set as the grip area.
The pads in the grasped range blink white.
The pads at the same positions on the top and bottom rings are also affected.
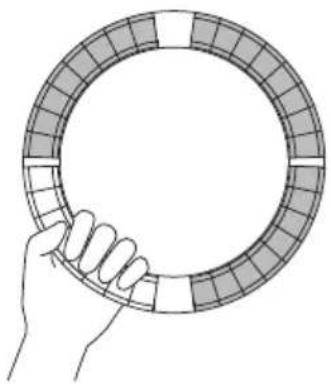
natural_image
Hand holding a circular object with segmented pattern (no text or symbols)HINT
If a grip is not detected for 30 seconds, detection will automatically cancel.
3.

Press
The LED lighting of the Ring Controller returns to its previous state, except the LEDs in the grip area become unlit showing that they will not respond to use.
HINT
- If a grip is detected and 1 second passes, it will be set automatically.
- When the grip area is set, the LED will light.
Operations when grip area set
When STEP mode or INST mode is active abd the grip area is set, the display will change and show settings related to the Ring Controller, as well as the current X and Y axis values.
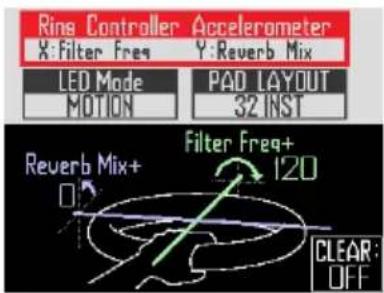
■ Setting parameters to change using the Ring Controller accelerometer
- Use SELECT to select Ring Controller Accelerometer.
Select the parameter to change ( P. 78).
■ Setting how the Ring Controller lights
- Use Ⓞ to select LED Mode. Select NORMAL (ordinary lighting), MOTION (light in response to accelerometer) or PAD 1 (light when pad 1 makes sound). Even when MOTION or PAD 1 is selected, tapping pads will output sound as usual.
Ring Controller settings (continued)
■ Changing the PAD layout
You can change the number of instruments that can be played when pad layout is selected ( P. 82).
NOTE
Press ⏻ to reopen the regular screen. Disabling the grip area setting will also reopen the regular screen. On this screen, press CLEAR to stop parameter control with the Ring Controller. Press CLEAR again to resume parameter control with the Ring Controller.
■ Disabling the grip area setting
- CONTROLLER Press
All the Ring Controller LEDs will light blue.
-
Place the Ring Controller on the Base Station.
-
CONTROLLER Press
This disables the grip area setting, making all pads usable again.
HINT
If automatic grip cancellation ( P. 120) is ON, the grip area will automatically be canceled when the Ring Controller is placed on the Base Station.
Ring Controller function settings
In this section, we explain setting items that can be used when connected to the Base Station.
HINT
Using the Ring Controller for MIDI control ( P. 125)
-
Press MENU
-
Use SELECT to select CONTROLLER, and press SELECT.
-
Use SELECT to select Setting, and press SELECT.
This opens the Ring Controller Setting screen.
- Use SELECT to select menu items and SELECT to confirm them.
Press ⏻ to move up one level in the menu.
■ Setting the LED brightness (LED Brightness)
- Use ⬆ to select LED brightness. Select Low or High.
■ Automatic grip setting (Auto Grip)
You can set automatic grip to ON or OFF.
- Use SELECT to set the automatic grip setting. Select Off or On.
Ring Controller settings (continued)
■ Velocity
(For AR-96 > Velocity Curve)
This sets the pad sensitivity.
- Use SELECT to set the pad sensitivity.
Low: Low sensitivity (playing strength affects velocity little)
Mid: Standard
High: High sensitivity (playing strength greatly affects velocity)
Max: Velocity is always maximum regardless of playing strength
■ Aftertouch
(For AR-96 > After Touch)
You can turn aftertouch ON or OFF.
- Use SELECT to set the aftertouch.
Select Off or On.
■ Aftertouch threshold (For AR-96 > After Touch Threshold)
Set how easily aftertouch is activated.
- Use SELECT to set the aftertouch threshold.
Low: Aftertouch activates easily
Mid: Standard
High: Aftertouch does not activate easily
■ Accelerometer sensitivity (For AR-96 > Accelerometer Sensitivity)
This sets the accelerometer sensitivity.
- Use SELECT to set the accelerometer sensitivity.
Low: Low sensitivity (less response to tilting) Mid: Standard
High: High sensitivity (responds even to slight tilting)
Ring Controller settings (continued)
■ Setting functions with the Ring Controller
You can also use the Ring Controller pads to set its functions.

The Ring Controller enters setting mode and the pads function as setting keys.
HINT
- BLE mode: To use the Ring Controller for MIDI control, select Mac/iOS.
- BLE mode cannot be activated while connected to the Base Station. Turn the Base Station power OFF or disconnect from it ( P.118) .
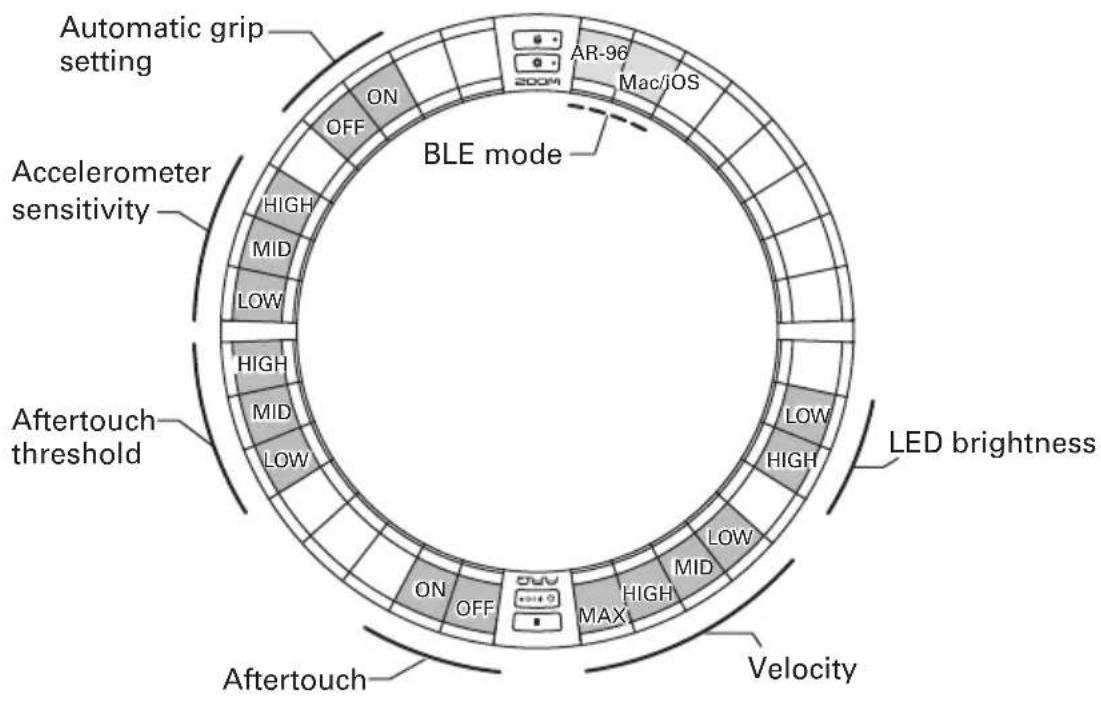
Ring Controller settings (continued)
Changing the Ring Controller battery
Change the battery if it begins to run out of power quickly or cannot be charged.
NOTE
Always use a ZOOM BT-04 rechargeable battery.
■ Checking the remaining battery charge
- Press ⏻ CHGO on the Ring Controller.
The remaining battery charge of the Ring Controller will be shown on the display.
■ Removing the battery
- Remove the cap from the back of the Ring.
The cap is below ◦ MASTERFX.
Ring Controller bottom
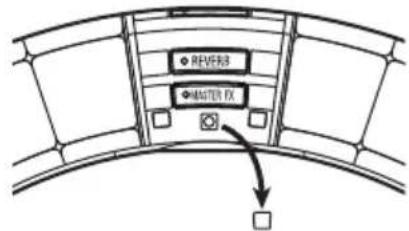
- Remove the screw under the cap.
Use a Phillips head screwdriver to remove the screw.

- Pull the battery holder out.
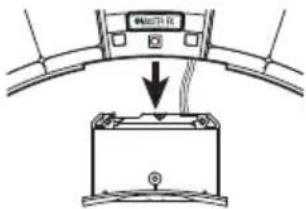
- Disconnect the cable connector that connects the battery and the battery holder.
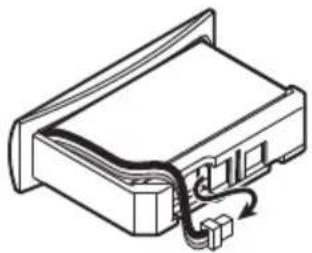
natural_image
Isometric line drawing of a mechanical or electronic component with no visible text or symbols- Remove the battery from the battery holder.
■ Installing a battery
-
Put the battery into the battery holder.
-
Connect the battery and battery holder with the cable.
-
Install the battery holder in the Ring Controller.
-
Tighten the screw and replace the cap.
Updating the firmware
The product firmware can be updated to the latest version.
An update file for the latest version can be downloaded from the ZOOM website (www.zoom.co.jp).
Updating the Base Station
- Copy the file for updating to the root directory on an SD card.
- Insert the SD card into the card slot. Then, while pressing ⏰, press and hold POWER ⏻.
This opens an update confirmation screen.
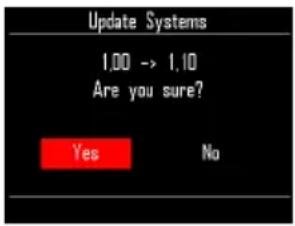
- Use SELECT to select Yes, and press SELECT.
NOTE
Do not turn the power off or remove the SD card during the update. Doing so could cause the AR-96 to become unstartable.
- After the update completes, press and hold POWER to turn the power off.

Updating the Ring Controller
If you connect a Ring Controller that is using old firmware to a Base Station, an update alert will appear on its display.
If this occurs, follow the procedures below to update the Ring Controller.
- CONTROLLER While pressing and holding ▶\II○, press ⏻CHG○.
The Ring Controller will start in update mode, and an update screen will appear on the Base Station.
NOTE
Confirm that the pad next to ⏻ ⚡CHGO is lit blue. If it lights purple, connect the Ring Controller and the Base Station (→ P. 102).
- Use SELECT to select Yes, and press SELECT. The update progress screen opens on the Base Station.
- CONTROLLER After the update completes, press and hold ⏻ CH60 to turn the power off.
NOTE
Confirm the update result with the color of the pad next to ⏻ CH6○.
- Update completed successfully: Green
- Update failed: Red
If the update failed, try again from step 1.
Using the Ring Controller for MIDI control
The AR-96 Ring Controller can be connected independently to a Mac/iOS device and used as a MIDI controller.
MIDI controller settings
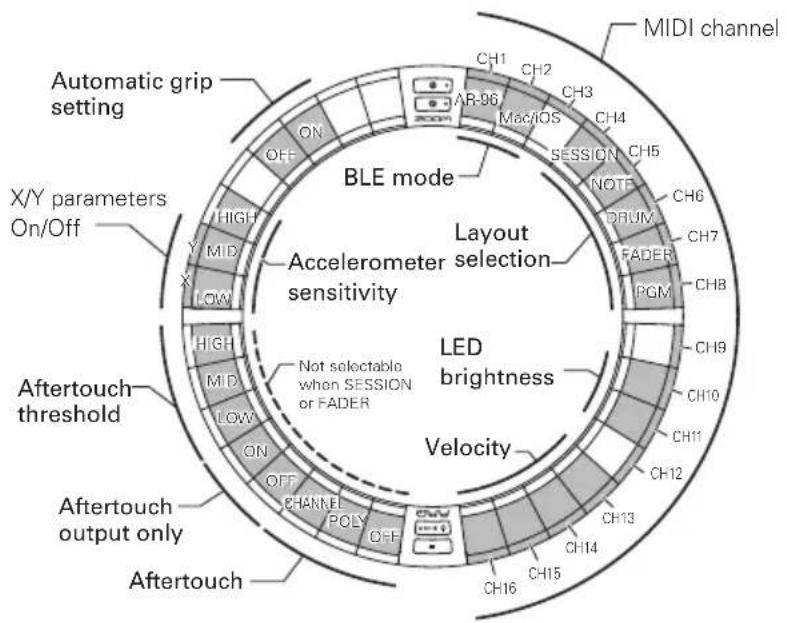
■ BLE mode
Select the device to be connected to the Ring Controller.
AR-96: This is the normal mode. It connects to an AR-96 Base Station ( P. 118).
Mac/iOS: This allows you to connect the Ring Controller directly to a Mac or iOS device and use it as a MIDI controller.
■ Layout selection
Set the MIDI message layout of the Ring Controller.
For details about each layout, see "MIDI controller layouts" ( P. 127).
■ MIDI channels
Set the combination of MIDI channels for the
Ring Controller to use.
CH 1–11 (12–16 are fixed for session layout)
■ X/Y parameter On/Off
Set whether or not the accelerometer values of the X and Y axes are output.
■ Aftertouch
Set the aftertouch type.
OFF: No aftertouch
POLY: When multiple pads are pressed simultaneously, they are each treated independently
CHANNEL: The same value is output for the entire MIDI channel
■ Aftertouch only output
Only aftertouch MIDI messages are output.
Using the Ring Controller for MIDI control (continued)
HINT
- These settings can also be made by pressing Ⓗ on the Base Station and using the CONTROLLER > Setting > For Mac/iOS item.
- For velocity and other setting items in common with the AR-96, refer to "Ring Controller settings" (→ P. 118).
Connecting with Mac/iOS devices
Using Bluetooth LE, you can connect the Ring Controller directly to a Mac or iOS device, and use it as a MIDI controller.
NOTE
To use this function, turn the Base Station power OFF or disconnect from it ( P. 118).
■ Switching the Ring Controller mode
1.

This puts the Ring Controller into setup mode.
2.

Mac/iOS BLE mode.
This puts the Ring Controller into Mac/iOS mode.
■ Connecting with a Mac
-
Open the Audio MIDI Setup application on the Mac
-
Select Window in the menu bar, and then Show MIDI Window. This opens the MIDI Studio window.
3. Double-click the Bluetooth icon.
This opens the Bluetooth Configuration screen.
4. Click "Connect" for the Ring
Controller shown in the list.
When connection succeeds, all of the LEDs will blink blue on the Ring Controller.
NOTE
If connection fails, open the System Preferences and click the × next to the Ring Controller in the list of Bluetooth devices before trying again.
■ Connecting with iOS devices
-
Launch an app that supports MIDI over BLE on the iOS device.
-
On the app Settings screen, conduct Bluetooth connection.
When connection succeeds, all of the LEDs will blink blue on the Ring Controller.
HINT
For app setting procedures, see the manual for that app.
MIDI controller layouts
When using the Ring Controller for MIDI control, you can select from five types of pad layouts.
Layout types
■ SESSION layout
This layout is designed for use with the Session View of Ableton Live. You can use it to play clips and scenes and use it to control volume, panning and send effects, for example.
■ NOTE layout
This layout distributes notes on the pads like piano keys.
Use □ to change the octave.
■ DRUM layout
This layout is designed for use with drum racks in DAW software.
The pads on 1/4 of each ring correspond to one drum rack section.
Use □ to raise or lower groups of note numbers.
■ FADER layout
This lets you use the Ring Controller as faders.
The pads on half of each ring function as a single fader.
■ PROGRAMMER mode
This mode allows you to program each pad and its LED lighting as you like.
HINT
For details about MIDI messages sent and received in each mode, see "Ring Controller MIDI messages" ( P. 145).
Selecting layouts
- CONTROLLER Press
This puts the Ring Controller into setup mode.
- CONTROLLER Tap the pad for one of the modes.
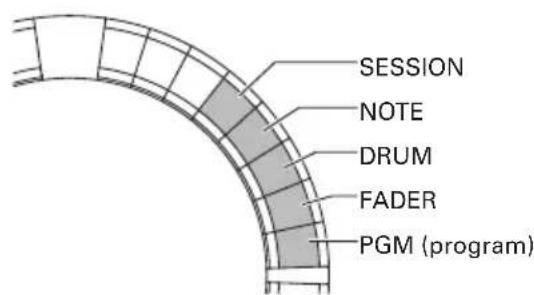
This changes the Ring Controller layout.
- CONTROLLER Press
This ends setting mode.
Other functions
Accelerometer
You can use the Ring Controller accelerometer to send MIDI messages.
NOTE
- This can be used when the Ring Controller grip area has been set ( P. 119).
- The grip area determines the directions of the X and Y axes.

MIDI messages sent
X axis: Control Change 85, 0–127
Change occurs in a range from level (0°) to upside down (180°).
Y axis: Control Change 86, 0–127
Change occurs in a range from level (0°) to vertical (90°).
■ Turning the accelerometer ON/OFF
1.
CONTROLLER
Press ○MASTERFX.
The ◦ MASTER FX LED lights, and the accelerometer turns ON.
2.
CONTROLLER
Press ○ MASTER FX again
to turn the accelerometer OFF.
The ◦ MASTER FX LED becomes unlit, and the accelerometer turns OFF.
Restoring default settings
1.

CONTROLLER
While pressing

turn the Ring Controller on.
This enables factory reset mode.
2.

CONTROLLER
Tap the pad with a
blinking LED.
This restores the Ring Controller to its default settings, and turns the Ring Controller off automatically
■ R
estoring default settings from the ase Station
You can use the Base Station to restore the Ring Controller to its factory default settings.
1.
Press

2.

to select CONTROLLER, SELECT SS
and press

3.

to select Setting, SS SELECT.
and press

4.

to select Factory Reset, SS SELECT.
and press

This opens a confirmation screen.
5.

to select Yes,
and press

This restores the Ring Controller to its factory default settings.
Troubleshooting
If you think that the AR-96 is operating strangely, check the following items first.
■ There is no sound or it is very quiet
- Confirm that the power is ON.
- Check the connections
- Adjust the levels of the instruments
- Adjust mixer group levels.
- Confirm that it is not muted.
- Check the headphone and OUTPUT volume levels.
■ There is a lot of noise
- Confirm that nothing is wrong with the shielded cable.
- Use a genuine ZOOM AC adapter.
■ Effects are not working
- Confirm that the effect is properly assigned to an instrument.
- Effects are only enabled when their individual keys are being pressed. Use HOLD to keep an effect enabled even after releasing its key.
■ The Ring Controller does not work well
- Confirm that the power is ON.
- Confirm its connection with the Base Station.
- Adjust the pad sensitivity.
- Confirm the grip setting.
- If using it as a MIDI controller, check the Mac or iOS device settings.
Product specifications
Base Station
| Inputs INPUT L/R | Connector type Standard mono phone jacks (unbalanced) | ||
| Input gain +10 to -65 dB | |||
| Input impedance 50 kΩ | |||
| Outputs | OUTPUT L/R | Connector type Standard mono phone jacks (unbalanced) | |
| Output impedance 200 Ω | |||
| PHONES | Connector type | Standard stereo phone jacks20mW × 2 (into 32Ω load) | |
| Output impedance 10 Ω | |||
| Dynamic range | ANALOG IN (AD): 92 dB typ (IHF-A)PHONE OUT (DA): 102 dB typ (IHF-A)MAIN OUT (DA): 106 dB typ (IHF-A) | ||
| Recording media | 16MB-2GB SD cards, 4GB-32GB SDHC cards, 64GB-128GB SDXC cards | ||
| MIDI IN/OUT USB MIDI or MIDI over Bluetooth LE | |||
| Power 5V 1A AC adapter | |||
| Power consumption | Base Station: 1.25 W maximumWhen powering Ring Controller: 4.5 W maximum(including charging current) | ||
| External dimensions 260.0 mm (D) × 260.0 mm (W) × 64.0 mm (H) | |||
| Weight (main unit only) 990 g | |||
| Display LCD 2.0" full-color LCD (320×240) | |||
| Interface | USB 2.0(standard USB MIDI) | Supported operating sys-tems | Windows 7 (SP1 or later), Windows 8 (including 8.1) or later, Windows 10Mac OS X 10.8 or later |
| Minimum specifications | Chipset that includes USB 2.0 as standard,Intel Core i3 or faster CPU | ||
| MIDI overBluetooth LE | Transmission speed 31.25 kbps (±1%) maximum | ||
| Latency(with Ring Controller) | 5-12.5 ms | ||
Ring Controller
| MIDI IN/OUT MIDI over Bluetooth LE | |||
| Sensors PAD pressure sensors, 3-axis accelerometer | |||
| Power | Lithium polymer rechargeable battery (DC4.2V maximum voltage, 3.7V nominal voltage, 450mAh 3.7V capacity), direct supply from Base Station | ||
| Power consumption When using battery: 2 W maximum | |||
| Recharging time About 2.5 hours | |||
| Battery operation time | About 4.5 hours when LED brightness is LowAbout 2.5 hours when LED brightness is High(differs according to use conditions) | ||
| External dimensions 280.5 mm (D) × 280.5 mm (W) × 33.5 mm (H) | |||
| Weight (main unit only) 540 g | |||
| Trigger pads | Number of pads 96 | ||
| Velocity curves | 4 types | ||
| Interface | MIDI overBluetooth LE | Supported iOS devices | iPad devices running iOS 8.0 or later |
| Supported Macs | Mac OS X 10.10.5 Yosemite or laterMacBook, iMac and Mac pro series computers that support BLE transmission | ||
| Transmission speed 31.25 kbps (±1%) maximum | |||
| Latency(with Base Station) | 5-12.5 ms | ||
| Latency (iOS and Mac OS) | 16.25-20 ms | ||
Appendix
EDIT menu parameter lists
■ Oscillator block
Oscillator list
| Category Instrument name | LOOP | |
aKickInstrument color: 1 | 2Step Kick O | |
| BigBeat Kick O | ||
| Blubber Kick O | ||
| BreakBeat Kick × | ||
| Breaks Kick × | ||
| Classic Kick O | ||
| Cyber Kick O | ||
| DeepDark Kick × | ||
| DeepHouse Kick O | ||
| Disco Kick × | ||
| D&B Kick × | ||
| Dubstep Kick × | ||
| EDM Kick O | ||
| Electro Kick O | ||
| EuroBeat Kick O | ||
| EuroDance Kick O | ||
| EuroTrance Kick | O | |
| FrenchHouse Kick | O | |
| Funk Kick | × | |
| Hardcore Kick | × | |
| HardHouse Kick | O | |
| HardTechno Kick | × | |
| HipHop Kick 1 | O | |
| HipHop Kick 2 | O | |
| Oldschool Kick | O | |
| HR&HM Kick × | ||
| Jazz Kick × | ||
| Jungle Kick | × | |
| Kicker Kick | O | |
| Berlin Kick | O | |
| D Kick | O | |
| Muted Kick | O | |
| Lounge Kick | × | |
| MainRoom Kick | × | |
| Minimal Kick O | ||
| NuDisco Kick × | ||
| ProgHouse Kick | O | |
| R&B Kick | O | |
| Reggae Kick O | ||
| Reggaeton Kick | × | |
| Rock Kick | × | |
| Sub Kick | O | |
| Synth Kick | O | |
| Techno Kick O | ||
| TechHouse Kick | O | |
| Kit707 Kick | × | |
| Kit808 Kick | O | |
| Kit909 Kick | O | |
| Trap Kick O | ||
| TrapMe Kick | O | |
| TribalHouse Kick | O | |
SnareInstrument color: 31 | 2Step RS | × |
| 2Step Snare | ||
| BigBeat RS | ||
| BigBeat Snare | ||
| Breaks RS | ||
| Breaks Snare | ||
| Chicago Snare | ||
| DeepHouse Snare | ||
| DeepHouse RS | ||
| D&B RS | ||
| D&B Snare | ||
| Dubstep RS | ||
| Dubstep Snare 1 | ||
| Dubstep Snare 2 |
| Category Instrument name | LOOP | |
SnareInstrument color: 31 | EDM Snare | × |
| EDM RS | ||
| Electro RS | ||
| Electro Snare | ||
| EuroBeat RS | ||
| EuroBeat Snare | ||
| EuroDance RS | ||
| EuroDance Snare | ||
| EuroTrance RS | ||
| EuroTranceSnare | ||
| FlashBulb Snare | ||
| Future Snare | ||
| Garage Snare | ||
| Hardcore RS | ||
| Hardcore Snare | ||
| HardHouse RS | ||
| HardHouse Snare | ||
| HardTechnoRS | ||
| HardTechnoSnare | ||
| HH Snare | ||
| HipHop RS | ||
| HipHop Snare | ||
| HR&HM RS | ||
| HR&HM Snare | ||
| Jazz RS | ||
| Jazz Snare | ||
| Jazz Brush | ||
| Jungle RS | ||
| Jungle Snare | ||
| MainRoom Snare | ||
| Minimal RS | ||
| Minimal Snare | ||
| NuDisco RS | ||
| NuDisco Snare | ||
| ProgHouse RS | ||
| ProgHouse Snare | ||
| R&B RS | ||
| R&B Snare | ||
| Reggae RS | ||
| Reggae Snare | ||
| Reggaeton RS | ||
| Reggaeton Snare | ||
| Rock RS | ||
| Rock Snare | ||
| Gangsta Snare | ||
| South Snare | ||
| TechHouse RS | ||
| TechHouse Snare | ||
| Kit707 Snare | ||
| Kit808 Snare | ||
| Kit808 RS | ||
| Kit909 Snare | ||
| Kit909 RS | ||
| Trap RS | ||
| Trap Snare | ||
| TribalHouse RS | ||
| TribalHouseSnare | ||
| UK Snare | ||
| Vintage Snare | ||
ClapInstrument color: 31 | Building Clap | × |
| ClasRave Clap | ||
| Dance Clap | ||
| Disco Clap | ||
| D&B Clap | ||
| Breaks Clap | ||
| Electro Clap | ||
| Techno Clap 1 | ||
| HipHop Clap | ||
| House Clap 1 | ||
| Minimal Clap | ||
| House Clap 2 | ||
| NY Clap | ||
| Reggae Clap | ||
| Short Clap | ||
| SlapVerb Clap | ||
| Step Clap | ||
| Techno Clap 2 | ||
| Thug Clap | ||
| Kit707 Clap | ||
| Kit808 Clap | ||
| Kit909 Clap | ||
| Trance Clap | ||
| Trap Clap | ||
| HiHatInstrument color: 30 | Berlin CloseHH | × |
| Berlin OpenHH | ||
| Chicago Hi-Hat | ||
| ComputerNoise | ||
| DeadLeaser Hat | ||
| Disco CloseHH | ||
| Disco OpenHH | ||
| Dance CloseHH | ||
| Dance OpenHH | ||
| D&B CloseHH | ||
| D&B OpenHH | ||
| Breaks CloseHH | ||
| Breaks OpenHH | ||
| Electro CloseHH | ||
| Electro OpenHH | ||
| Techno CloseHH | ||
| Techno OpenHH | ||
| Feedback Hat | ||
| Garage Hat | ||
| GlitchTick Hat | ||
| HardHouse Hat | ||
| Standard OpenHH | ||
| HipHop CloseHH | ||
| HipHop OpenHH | ||
| House CloseHH | ||
| House OpenHH | ||
| Minimal CloseHH | ||
| Minimal OpenHH | ||
| HR&HM CloseHH | ||
| HR&HM OpenHH | ||
| Jazz CloseHH | ||
| Jazz OpenHH | ||
| London Hat | ||
| Milano Hat | ||
| NY Hat | ||
| Paris Hat | ||
| R&B CloseHH | ||
| R&B OpenHH | ||
| Reggae CloseHH | ||
| Reggae OpenHH | ||
| Rock CloseHH | ||
| Rock OpenHH |
| Category Instrument name | LOOP | |
HiHatInstrument color: 30 | Short Hi-Hat | × |
| Kit707 CloseHH | ||
| Kit707 OpenHH | ||
| Kit808 CloseHH | ||
| Kit808 OpenHH | ||
| Kit909 CloseHH | ||
| Kit909 OpenHH | ||
| Trance CloseHH 1 | ||
| Trance OpenHH 1 | ||
| Trance CloseHH 2 | ||
| Trance OpenHH 2 | ||
CymbalInstrument color: 30 | Short Crash | × |
| Long Crash | ||
| Splash Cymbal | ||
| Disco Crash | ||
| Disco Ride | ||
| Dance Crash | ||
| Dance Ride | ||
| D&B Crash | ||
| D&B Ride | ||
| Breaks Crash | ||
| Breaks Ride | ||
| Electro Crash | ||
| Electro Ride | ||
| Techno Crash | ||
| Techno Ride | ||
| HipHop Crash | ||
| HipHop Ride | ||
| House Crash | ||
| House Ride | ||
| Minimal Crash | ||
| Minimal Ride | ||
| HR&HM Crash | ||
| HR&HM Ride | ||
| Jazz Crash | ||
| Jazz Ride | ||
| R&B Crash | ||
| R&B Ride | ||
| Reggae Crash | ||
| Reggae Ride | ||
| Standard Ride | ||
| Rock Crash | ||
| Rock Ride | ||
| Kit707 Crash | ||
| Kit707 Ride | ||
| Kit808 Crash | ||
| Kit909 Crash | ||
| Kit909 Ride | ||
| Trance Crash | ||
| Trance Ride | ||
TomInstrument color: 2 | 80's Tom × | |
| Acoustic Tom 1 × | ||
| Acoustic Tom 2 × | ||
| DoubleElectroTom O | ||
| FrenchHouseTom × | ||
| Ind. Tribe Tom × | ||
| Industry Tom × | ||
| Long Tom × | ||
| NewWave Tom × | ||
| Noise Tom × | ||
| Synth Tom O | ||
| Kit707 Tom × | ||
| Kit808 Tom × | ||
| Kit909 Tom × | ||
| Vintage Tom × | ||
PercussionInstrument color: 2 | BellTree × | |
| Bottle × | ||
| BrightData × | ||
| Cabasa Hit × | ||
| Cabasa Shake × | ||
| Castanets × | ||
| CementClick × | ||
| Clave × | ||
| Conga Open × | ||
| Conga Close × | ||
| Conga Slap × | ||
| Cowbell × | ||
| Darbuka × | ||
| Davul Chember × | ||
| Davul Dum × | ||
| Davul Kasnak | × | |
| Davul Tek | × | |
| Djembe | × | |
| Droplet | × | |
| GlitchClave | × | |
| Hi-Bongo | × | |
| Hi-Timbales | × | |
| Hi-Agogo | × | |
| IDM Prec. | × | |
| Lo-Bongo × | ||
| Lo-Timbales | × | |
| LongGuiro | × | |
| LongWhistle | O | |
| Lo-Agogo × | ||
| Maracas × | ||
| MouthPop | × | |
| MuteCuica | × | |
| MuteSurdo × | ||
| MuteTriangle | × | |
| OpenCuica | × | |
| OpenSurdo | × | |
| OpenTriangle | × | |
| OrganicPrec. | × | |
| Lo-Pop | O | |
| PlasticLid | × | |
| Hi-Pop | × | |
| Quijada | × | |
| Quijada Hit × | ||
| RimPercussion | × | |
| Riq Doum × | ||
| Riq Pa | × | |
| Riq Tak | × | |
| Shaker 1 | × | |
| Shaker 2 | × | |
| Shaker Hit | × | |
| ShortData × | ||
| ShortGuiro | × | |
| ShortPercussion | × | |
| ShortWhistle | × | |
| Snap | × | |
| SquishyZap | × | |
| Sticks | × | |
| SynthPercussion | O | |
| Tabla Ge | × | |
| Tabla Ke | × | |
| Tabla Na | × | |
| Tabla Te | × | |
| Jingle × | ||
| Tambourine × | ||
| Timpani × | ||
| Kit808 Cowbell | O | |
| Vibraslap | O | |
| WindChime | × | |
| WoodBlock × |
| Category Instrument name | LOOP | |
VoiceInstrument color: 14 | Ai-Low House | × |
| Hey Trap | ||
| Female Oh | ||
| Male Oh | ||
| Oh Garage | ||
| Technologic Vox | ||
| U DeepHouse | ||
| VocalStab | ||
| Yah Dubstep | ||
| Male Ahaa | ||
| Male Ahaaw | ||
| AncientWisdom | ||
| Male Baaa | ||
| Male Che | ||
| Male ComeOn | ||
| Male Doh | ||
| Male Doo | ||
| Female Aan | ||
| Female Ah | ||
| Female Am | ||
| Female Haa | ||
| Female Ho | ||
| Female On | ||
| Female So | ||
| Female Yo | ||
| Female Your | ||
| Ghostly | ||
| Male Haa | ||
| Male Hey 1 | ||
| Male Hey 2 | ||
| Male Nahh | ||
| Male Ohooo | ||
| Male Paa | ||
| Male Wao | ||
| Male Whoo | ||
Synth BasicInstrument color: 14 | Saw | u |
| Square | ||
| Pulse | ||
| Sine | ||
| Triangle | ||
| Saw + Square | ||
| Saw + Pulse | ||
| Saw + Sine | ||
| Saw + Triangle | ||
| Sine + Triangle | ||
| Saw Harmony | ||
| Square Harmony | ||
| Pulse Harmony | ||
| Sine Harmony | ||
| Tri Harmony | ||
| Dual Saw | ||
| Dual Square | ||
| Dual Pulse | ||
| Dual Sine | ||
| Dual Triangle | ||
| Triple Saw | ||
| Triple Square | ||
| Triple Pulse | ||
| Triple Sine | ||
| Triple Triangle | ||
| Oct Saw | ||
| Oct Square | ||
| Oct Pulse | ||
| Oct Sine | ||
| Oct Triangle | ||
| Ring Saw | ||
| Ring Square | ||
| Ring Pulse | ||
| Ring Sine | ||
| Ring Triangle | ||
| Synth BasicInstrument color: 14 | Ring Dual Saw | |
| Ring Dual Square | ||
| Ring Dual Pulse | ||
| Ring Dual Sine | ||
| Ring Dual Tri | ||
| Ring Oct Saw | ||
| Ring Oct Square | ||
| Ring Oct Pulse | ||
| Ring Oct Sine | ||
| Ring Oct Tri | ||
| FM Saw | ||
| FM Square | ||
| FM Pulse | ||
| FM Sine | ||
| FM Triangle | ||
| FM Dual Saw | ||
| FM Dual Square | ||
| FM Dual Pulse | ||
| FM Dual Sine | ||
| FM Dual Triangle | ||
| FM Oct Saw | ||
| FM Oct Square | ||
| FM Oct Pulse | ||
| FM Oct Sine | ||
| FM Oct Triangle | ||
| Sync Saw | ||
| Sync Square | ||
| Sync Pulse | ||
| Sync Sine | ||
| Sync Triangle | ||
| Sync Dual Saw | ||
| Sync Dual Square | ||
| Sync Dual Pulse | ||
| Sync Dual Sine | ||
| Sync Dual Tri | ||
| Synth BassInstrument color: 14 | AngerBass O | |
| DeepBass O | ||
| DubstepDirtBass × | ||
| FlatRicBass × | ||
| GarageFatBass × | ||
| ParisBass O | ||
| PulseButtonBass × | ||
| SubspenseBass O | ||
| VoiceBass × | ||
| WarmSawBass O | ||
| Synth FxInstrument color: 14 | AirCloud O | |
| Alarm O | ||
| AlienWarning × | ||
| Arpness × | ||
| BeatBang | × | |
| BlackStar | × | |
| BottleVox | × | |
| Closer | × | |
| CompBlip O | ||
| DangerZone | × | |
| ElectricSwipe | × | |
| EpicAir | × | |
| ForcedAir | × | |
| Lazer 1 | × | |
| Lazer 2 | × | |
| Lazer 3 | × | |
| LazerGun | × | |
| MarsInvaders | × | |
| MazG × | ||
| NoiseFloor | × | |
| Revange × |
| Category Instrument name | LOOP | |
Synth FxInstrument color: 14 | SawDown × | |
| Shreakback | × | |
| SirenFX | × | |
| Spacer | O | |
| StarGate | × | |
| TrapBounce | × | |
| TunyPluck × | ||
| Twister | × | |
| U Tone | O | |
| WideFive | O | |
| X Scape | × | |
Synth HitInstrument color: 14 | 1980sAnalog5ths | O |
| ClubChord | × | |
| DecadeChord | × | |
| DubstepStab | × | |
| EdgeOfSlab | O | |
| EDM MinorChord | × | |
| EDM Stab × | ||
| FadeChord | × | |
| FatMash O | ||
| FatPad | × | |
| FluteSpaceLead | × | |
| FutureSax × | ||
| LeadChord | × | |
| LeadChordRave | × | |
| LeadDirt | × | |
| LeadDrop | × | |
| LegacyChord | × | |
| LowTech | O | |
| MetalicPad | O | |
| PartyChord | × | |
| PlasticTube | O | |
| PumpChord | × | |
| RaggaTone | O | |
| RaveLead O | ||
| RaveStabLead | × | |
| SimpleChord × | ||
| StringBreath | × | |
| SubyChord | × | |
| SyncLift | × | |
| TechChord | × | |
| TightAnalog5ths O | ||
Instrument BasicInstrument color: 14 | AltoSax | O |
| AcousticBass | O | |
| AcousticGuitar | O | |
| Bell | × | |
| BrassEnsemble × | ||
| Clav | O | |
| ElectricPiano O | ||
| E.Bass Finger | O | |
| E.Bass Pick | O | |
| E.Bass Slap | O | |
| ElectricGuitar | O | |
| DistGuitar O | ||
| GuitarFeedback | × | |
| Kalimba | × | |
| MajorPartials × | ||
| MetalBell | × | |
| MinorPartials O | ||
| MutedStab × | ||
| OldMovieMinor | × | |
| Organ 1 | O | |
| Organ 2 | O | |
| Piano | O | |
| StringsEnsemble | × | |
| TenorSax | O |
EDIT menu parameter lists (continued)
| Category Instrument name | LOOP | |
Instrument HitInstrument color: 14 | Brass Hit 1 | × |
| Brass Hit 2 | ||
| Cluster | ||
| E.Guitar 1 | ||
| E.Guitar 2 | ||
| Hammond | ||
| Orchestra Hit | ||
| Piano Hit | ||
| PianoJazz Hit | ||
| Pulse | ||
| SlideOrgan | ||
| Strings Hit |
| Category Instrument name | LOOP | |
Audio FileInstrument color: 23 | Audio file name(first 16 characters) | × |
Parameters
■ Oscillator types other than Synth Basic and Audio File
| Parameter 1 Parameter 2 Parameter 3 | |
| Pitch* Reverse –-24.00–+24.00 Off, On – |
■ Synth Basic
OSC1
| Parameter 1 Parameter 2 Parameter 3 | |
| OSC1 Type OSC1 Pitch* OSC1 Level | |
| Saw, Square, Pulse,Sine, Triangle | -24.00–+24.00 0–100 |
OSC2
| Parameter 1 Parameter 2 Parameter 3 | |
| OSC2 Type OSC2 Pitch* OSC2 Level | |
| Saw, Square, Pulse,Sine, Triangle | -24.00–+24.00 0–100 |
OSC3
| Parameter 1 Parameter 2 Parameter 3 | ||
| OSC3 Type OSC3 Pitch* OSC3 Level | ||
| Saw, Square, Pulse,Sine, Triangle,Ring Src, FM Src, Sync Src | -24.00–+24.00 0–100 | |
*When Ring Src, FM Src, or Sync Src is selected, OSC3 functions as a source to modulate OSC1 and OSC2.
■ Pulse Width
| Pulse Width |
| 1-99 |
Note: This can be set when the selected OSC Type is Pulse.
■ Audio File
| Parameter 1 Parameter 2 Parameter 3 | |
| Pitch* Reverse Launch | |
| -24.00 – +24.00 Off, On One Shot, Toggle, Gate |
*This parameter can be controlled by the Pitch Mod block.
EDIT menu parameter lists (continued)
■ Mod blocks (same for all Mod blocks)

Selection type
| Selection knob selection |
| Off, LFO 1, LFO 2, Envelope, AfterTouch |
Parameters
■ LFO 1, LFO 2
| Parameter 1 Parameter 2 Parameter 3 | ||
| Rate Depth Waveform | ||
| 1-100, ♣ (Type 1) -100 - +100 | Saw, Square, Pulse, Sin,Tri, Random |
Note: See Tempo sync parameters for details about ♪ setting values (→ P. 142).
■ Envelope
| Parameter 1 Parameter 2 Parameter 3 | ||
| Attack Decay/Release Sustain | ||
| 0-100 0-100 0-100 |
Depth
| Envelope Depth |
| -100 - +100 |
■ AfterTouch
| Parameter 1 Parameter 2 Parameter 3 | ||
| Depth -- | ||
| -100 - +100 -- |
■ Noise block
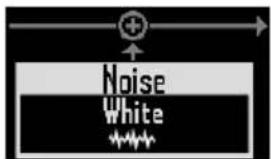
Selection type
| Selection knob selection |
| Off, White, Pink |
Parameters
| Parameter 1 Parameter 2 Parameter 3 | ||
| Level* -- | ||
| 0-100 -- |
*This parameter can be controlled by the Level Mod block.
EDIT menu parameter lists (continued)
■ Insert effect block
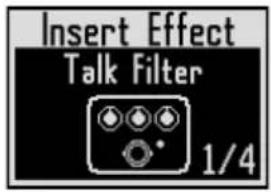
Effects list
| Type name Parameter 1 Parameter 2 Parameter 3 | |||
| BitCrush | Bit SMPL* Balance4-16 0-50 0-100 | ||
| Distortion | Gain* Tone Level0-100 0-100 0-100 | ||
| Chorus | Depth Rate* Mix0-100 1-50 0-100 | ||
| Phaser | Rate* Color Mix1-50, ♪ (Type 1) 4STG, 8STG, inv 4, inv 8 0-100 | ||
| Flanger | Depth Rate* Mix0-100 0-50, ♪ (Type 1) 0-100 | ||
| Ring Modulator | Frequency* Tone Balance1-50 0-10 0-100 | ||
| 3Band EQ | Low Mid Hi-12 - +12 -12 - +12 -12 - +12 | ||
| Talk Filter | Decay*0-100 iA, UE, UA, oA | Type0-100 | Balance |
| Sub Bass | Frequency Mix30-250 | -0-100 - | |
| Pumper | Depth Rate0-100 | - ♪ (Type 3) | - |
| Compressor | Sense Attack Tone0-10 Slow, Fast 0-10 | ||
*These parameters can be controlled by the Effect Mod block.
■ Filter block
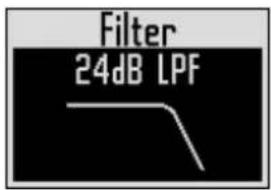
Selection type
| Selection knob selection |
| LPF [-12dB], LPF [-24dB], BPF [-12dB], BPF [-24dB], HPF [-12dB], HPF [-24dB], Peaking Filter, Off |
Parameters
| Parameter 1 | Parameter 2 | Parameter 3 |
| Frequency* | Resonance | Level |
| 20 Hz – 20000 Hz | 0–100 | 0–100 |
*This parameter can be controlled by the Freq Mod block.
EDIT menu parameter lists (continued)
■ Amp envelope block

Parameters
| Parameter 1 Parameter 2 Parameter 3 | ||
| Attack Decay/Release Sustain | ||
| 0-100 0-100 0-100 |
Note: The level can be controlled by the Amp Mod block.
■ Output block
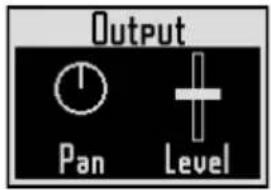
Parameters
| Parameter 1 Parameter 2 Parameter 3 | ||
| Pan* Level – | ||
| L100 – Center – R100 0–100 – |
*This parameter can be controlled by the Pan Mod block.
■ Send effect block
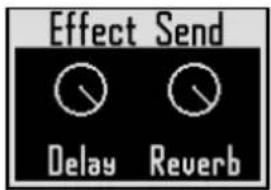
Parameters
| Parameter 1 Parameter 2 Parameter 3 | ||
| Delay Reverb – | ||
| 0–100 0–100 – |
Effects lists
■ Delay
| Type name | Parameter 1 Parameter 2 Parameter 3 | ||
| Parameter name/setting value Parame | er name/setting value Parameter name/setting value | ||
| Mono Delay | Time Feedback Mix | ||
| 1-2000, J (Type 2) 0-100 0-100 | |||
| Stereo Delay | Time Feedback Mix | ||
| 1-2000, J (Type 2) 0-100 0-100 | |||
| Reverse Delay | Time Feedback Mix | ||
| 10-2000, J (Type 2) 0-100 0-100 | |||
■ Reverb
| Type name | Parameter 1 Parameter 2 Parameter 3 | ||
| Parameter name/setting value Parameter name/setting value Parameter name/setting value | |||
| Hall, Room, Plate | Decay Tone Mix | ||
| 1-30 -12 - +6 0-100 | |||
Note: See Tempo sync parameters for details about ⌘ setting values (→ P. 142).
Effects lists (continued)
■ Master effects
| Category Type name | Parameter 1 Parameter 2 Parameter 3 | |||
| Parameter name/setting value Parame | er name/setting value Parameter name | setting value | ||
| Distortion | BitCrush | Bit SMPL Balance4-16 0-50 0-100 | ||
| Distortion | Gain Tone Level0-100 0-100 0-100 | |||
| Modulation | Chorus | Depth Rate Mix0-100 1-50 0-100 | ||
| Phaser | Rate Color Mix1-50, (Type 1) 4STG, 8STG, inv 4, inv 8 0-100 | |||
| Flanger | Depth Rate Mix0-100 0-50. | (Type 1) 0-100 | ||
| Ring Modulator | Frequency Tone Balance1-50 0-10 0-100 | |||
| Wah | Frequency --1-50 -- | |||
| AutoPan | Rate Width0-50, (Type 1) 0-10 0-10 | Clip | ||
| Filter | Isolator | Low0-100 0-100 0-100 | Mid | Hi |
| 3Band EQ | Low-12 - +12 -12 - +12 | Mid-12 - +12 | Hi | |
| Delay | Reverse Delay | Time Feedback10-2000, (Type 2) | Hi Damp0-100 0-10 | |
| Dynamics | Limiter | Threshold0 --24 | Ratio Release1-54,∞ | 0-10 |
| Compressor | Threshold0 --24 | Ratio Attack1-26 0-10 | ||
| Time manipulation | Glitter | Type Complex1-8 | Mix0-100 0-100 |
- Only one master effect can be used at a time.
· See Tempo sync parameters for details about ♪ setting values.
■ Tempo sync parameters
When ♪ appears for a parameter or effect, it is a value that can be synchronized to the tempo.
| Type 1 | Type 2 | Type 3 |
| 32nd note | 16th note | 32nd note |
| 16th note | Quarter note triplet | 16th note |
| Quarter note triplet | Dotted 16th note | Quarter note triplet |
| Dotted 16th note | 8th note | Dotted 16th note |
| 8th note | Half note triplet | 8th note |
| Half note triplet | Dotted 8th note | Half note triplet |
| Dotted 8th note | Quarter note | Dotted 8th note |
| Quarter note | Dotted quarter note Quarter note | |
| Dotted quarter note Half note | Dotted quarter note | |
| Half note | 3 quarter notes | Half note |
| 3 quarter notes | 4 quarter notes | 3 quarter notes |
| 4 quarter notes | ... | 4 quarter notes |
| ... | 8 quarter notes | |
| 19 quarter notes | ||
| 20 quarter notes | ||
Arpeggiator parameter lists
■ Number of note
| Number of note | Pad note | +5th | +1 Oct | +1 Oct +5th | +2 Oct | +2 Oct +5th | +3 Oct | +3 Oct +5th |
| 1 • | ||||||||
| 2 Up | ||||||||
| 2 Down | • | • | ||||||
| 2UpDown | ||||||||
| 2 Random | ||||||||
| 3 Up | ||||||||
| 3 Down | ||||||||
| 3UpDown | • • • | |||||||
| 3 Random | ||||||||
| 4 Up | ||||||||
| 4 Down | ||||||||
| 4UpDown | • • • • | |||||||
| 4 Random | ||||||||
| 5 Up | ||||||||
| 5 Down | ||||||||
| 5UpDown | • • • • • | |||||||
| 5 Random | ||||||||
| 6 Up | ||||||||
| 6 Down | ||||||||
| 6UpDown | • • • • • • | |||||||
| 6 Random | ||||||||
| 7 Up | ||||||||
| 7 Down | ||||||||
| 7UpDown | • • • • • • • | |||||||
| 7 Random | ||||||||
| 8 Up | ||||||||
| 8 Down | ||||||||
| 8UpDown | • • • • • • • • | |||||||
| 8 Random |
Arpeggiator parameter lists (continued)
■ Pattern
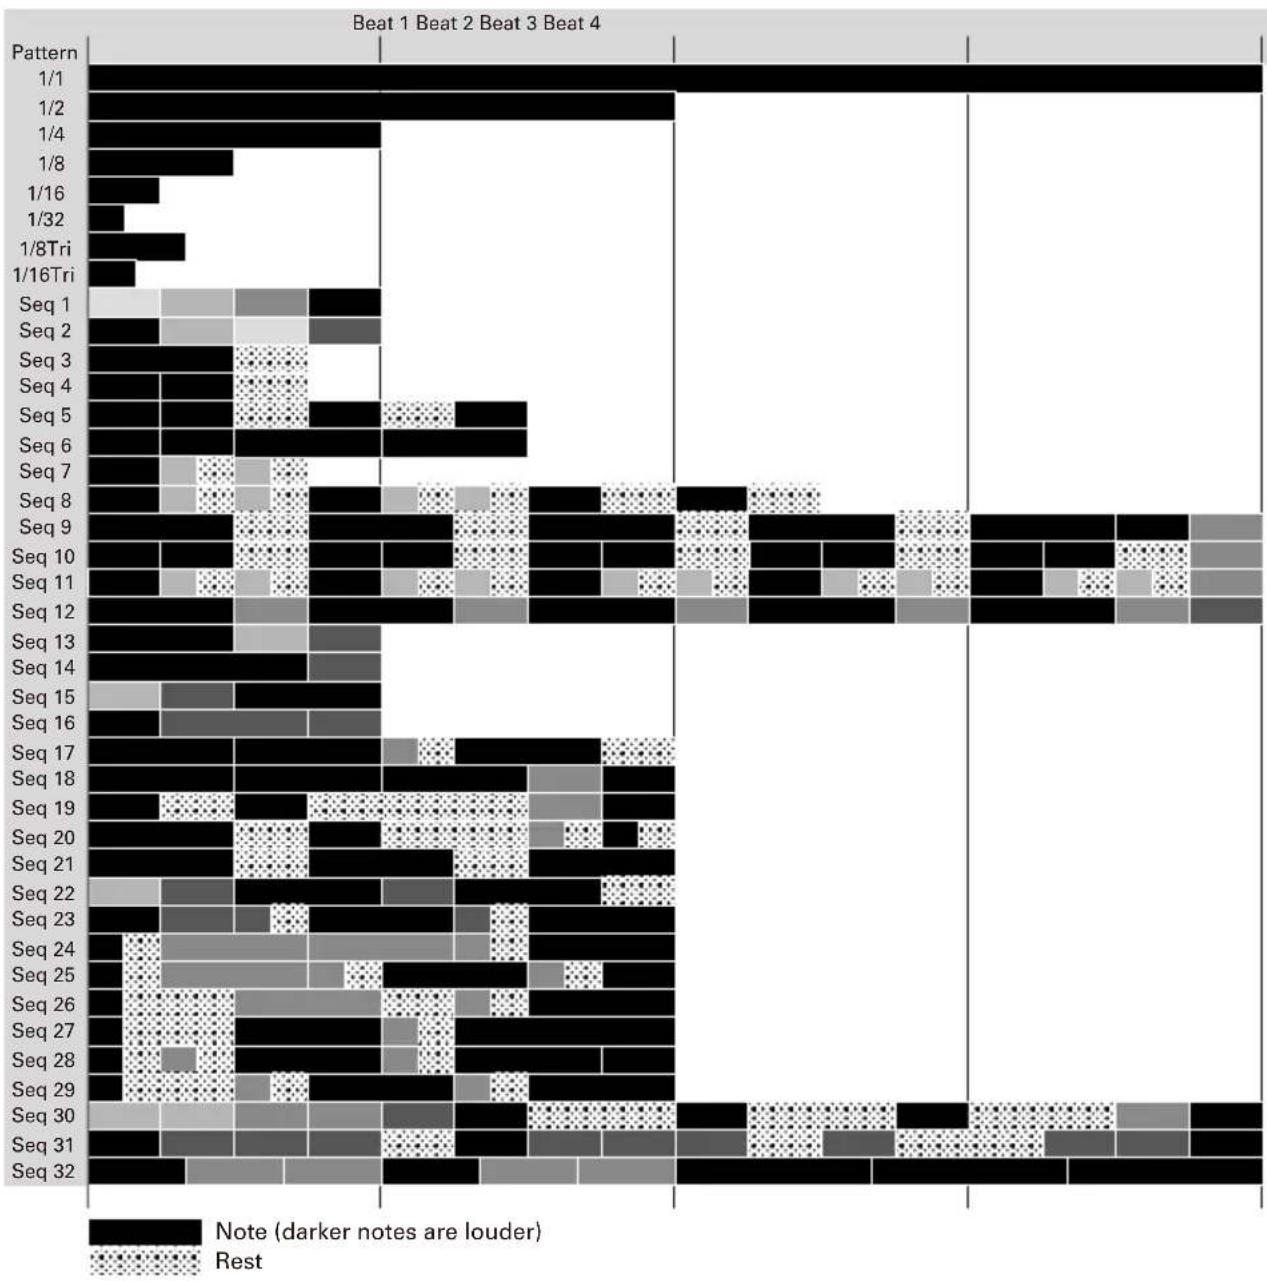
bar_stacked
| Pattern | Note (darker notes are louder) | Rest | | ------- | ------------------------------ | ---- | | 1/1 | 100 | 0 | | 1/2 | 95 | 0 | | 1/4 | 85 | 0 | | 1/8 | 70 | 0 | | 1/16 | 40 | 0 | | 1/32 | 20 | 0 | | 1/8Tri | 50 | 0 | | 1/16Tri | 30 | 0 | | Seq 1 | 60 | 0 | | Seq 2 | 55 | 0 | | Seq 3 | 50 | 0 | | Seq 4 | 45 | 0 | | Seq 5 | 40 | 0 | | Seq 6 | 35 | 0 | | Seq 7 | 30 | 0 | | Seq 8 | 25 | 0 | | Seq 9 | 20 | 0 | | Seq 10 | 15 | 0 | | Seq 11 | 10 | 0 | | Seq 12 | 5 | 0 | | Seq 13 | 0 | 0 | | Seq 14 | 0 | 0 | | Seq 15 | 0 | 0 | | Seq 16 | 0 | 0 | | Seq 17 | 0 | 0 | | Seq 18 | 0 | 0 | | Seq 19 | 0 | 0 | | Seq 20 | 0 | 0 | | Seq 21 | 0 | 0 | | Seq 22 | 0 | 0 | | Seq 23 | 0 | 0 | | Seq 24 | 0 | 0 | | Seq 25 | 0 | 0 | | Seq 26 | 0 | 0 | | Seq 27 | 0 | 0 | | Seq 28 | 0 | 0 | | Seq 29 | 0 | 0 | | Seq 30 | 0 | 0 | | Seq 31 | 0 | 0 | | Seq 32 | 0 | 0 |Ring Controller MIDI messages
■ Ring Controller key numbers
The pads on the Ring Controller are assigned different key numbers. These key numbers are expressed as a combination of Column and Row.
Ring direction (column)
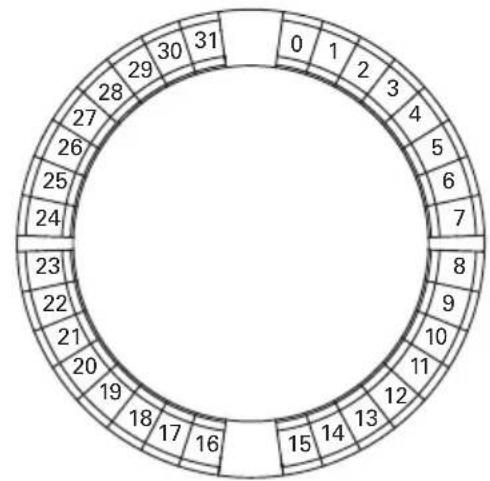
radar
| Segment | Value | |---|---| | 0 | 1 | | 1 | 2 | | 2 | 3 | | 3 | 4 | | 4 | 5 | | 5 | 6 | | 6 | 7 | | 7 | 8 | | 8 | 9 | | 9 | 10 | | 10 | 11 | | 11 | 12 | | 12 | 13 | | 13 | 14 | | 14 | 15 | | 15 | 16 | | 16 | 17 | | 17 | 18 | | 18 | 19 | | 19 | 20 | | 20 | 21 | | 21 | 22 | | 22 | 23 | | 23 | 24 | | 24 | 25 | | 25 | 26 | | 26 | 27 | | 27 | 28 | | 28 | 29 | | 29 | 30 | | 30 | 31 | The chart displays a circular layout with each segment labeled by its corresponding numeric value. The values are arranged in a ring format around the circle.When viewed from top (side with ARQ logo)
Circumference direction (row)

Example: 12x2
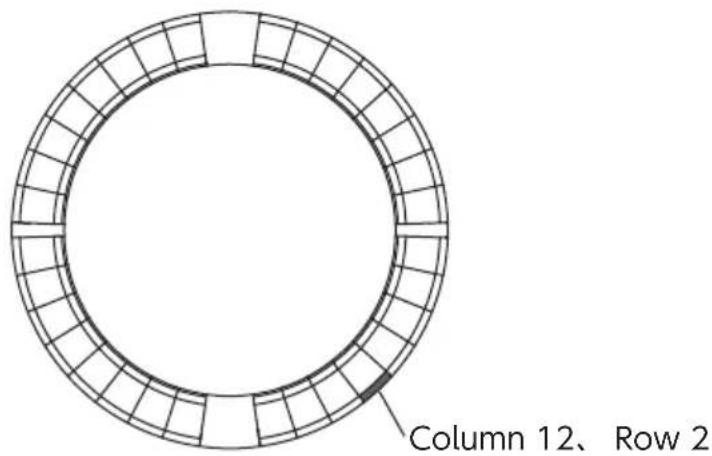
Ring Controller MIDI messages (continued)
■ Session layout
This layout is designed for use with the Session View of Ableton Live.
You can use the Ring Controller to play clips and scenes and to control volume, panning and send effects, for example.
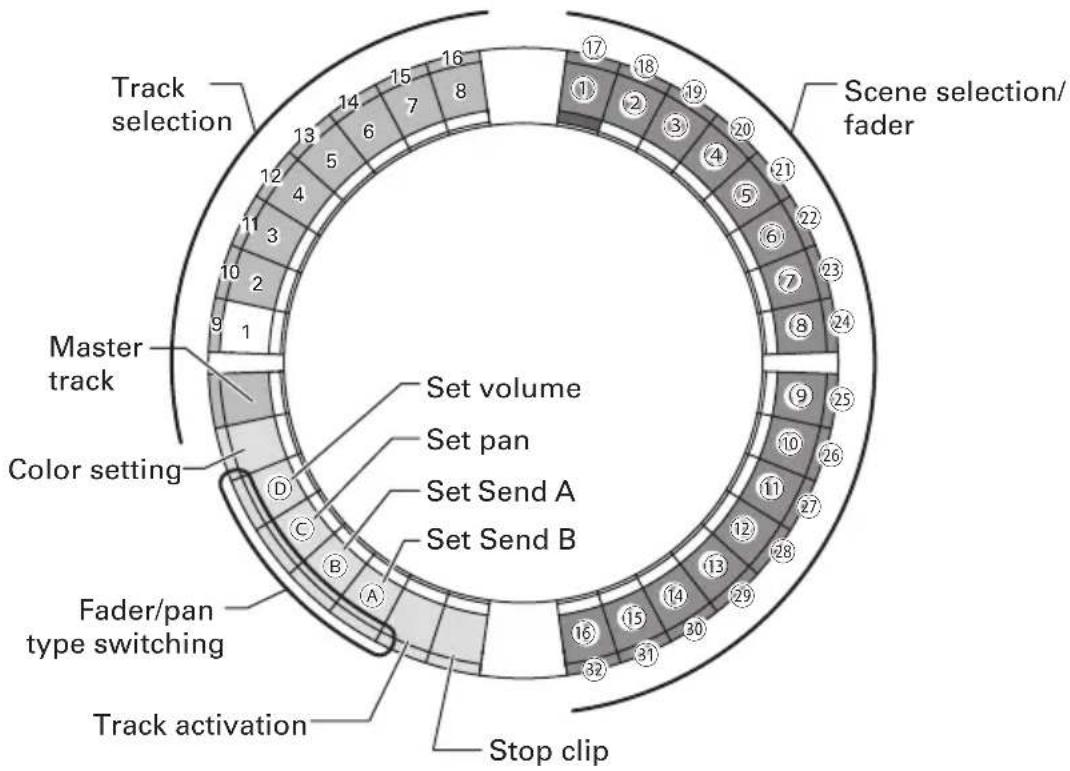
flowchart
graph TD
    A["Track selection"] --> B["Scene selection/fader"]
    B --> C["Master track"]
    C --> D["Color setting"]
    D --> E["Fader/pan type switching"]
    E --> F["Stop clip"]
    style A fill:#f9f,stroke:#333
    style B fill:#ccf,stroke:#333
    style C fill:#cfc,stroke:#333
    style D fill:#fcc,stroke:#333
    style E fill:#cff,stroke:#333
    style F fill:#ffc,stroke:#333
Track selection
You can select tracks 1–16 and the master track. Selected tracks light white.
Setting colors
You can set the Ring Controller LED colors.
-
Press a side ring pad to change the top ring LED color.
-
While pressing a top ring pad, press a pad for a track, a scene or volume, for example, to change its color.
Setting volume, pan and sends A and B.
You can set the volume, panning and send effects for the selected track. (A–D in the illustration.)
Switching between fader and pan types
Operation of the right side of the Ring Controller can be set independently to fader type or pan type for setting volume, pan and sends A and B.
Fader type lights green and pan type lights orange.
Track activation setting
You can switch the selected track between being active and muted. When active, the LED is bright. When muted, the LED is dim.
Stoppingclips
You can stop playback of the clip on the selected track.
Scene selection and fader/pan
While pressing a pad to set volume, pan or send A or B, these pads function together as a fader or pan control. At all other times, they select scene numbers. (1-32 in the illustration.)
HINT
The functions above are a setting example.
Ring Controller MIDI messages (continued)
| Track Select/Stop/Active Clip Launch Fader/Pan Control | ||||||
| Track Number | MIDI Channel | Note Number (Select, Stop, Active) | MIDI Channel | Note Number (1-32) | MIDI Channel | Control Change Number (A, B, C, D) |
| 1 12 0, | 17, 18 16 0-31 | 16 3, 9, 14, 15 | ||||
| 2 12 1, | 19, 20 16 32-63 | 16 20, 27, 28, 29 | ||||
| 3 12 2, | 21, 22 16 64-95 | 16 30, 31, 35, 41 | ||||
| 4 12 3, | 23, 24 16 96-1 | 27 16 46, 47, 52, 53 | ||||
| 5 12 4, | 25, 26 15 0-31 | 15 3, 9, 14, 15 | ||||
| 6 12 5, | 27, 28 15 32-63 | 15 20, 27, 28, 29 | ||||
| 7 12 6, | 29, 30 15 64-95 | 15 30, 31, 35, 41 | ||||
| 8 12 7, | 31, 32 15 96-1 | 27 15 46, 47, 52, 53 | ||||
| 9 12 8, | 33, 34 14 0-31 | 14 3, 9, 14, 15 | ||||
| 10 12 9, | 35, 36 14 32-63 | 14 20, 27, 28, 29 | ||||
| 11 12 10, | 37, 38 14 64-95 | 14 30, 31, 35, 41 | ||||
| 12 12 11, | 39, 40 14 96-127 | 14 46, 47, 52, 53 | ||||
| 13 12 12, | 41, 42 13 0-31 | 13 3, 9, 14, 15 | ||||
| 14 12 13, | 43, 44 13 32-63 | 13 20, 27, 28, 29 | ||||
| 15 12 14, | 45, 46 13 64-95 | 13 30, 31, 35, 41 | ||||
| 16 12 15, | 47, 48 | 13 96-127 | 13 46, 47, 52, 53 | |||
| master 12 | 16, 49, 50 12 96-127 | 12 3, 9, 14, 15 | ||||
Ring Controller MIDI messages (continued)
■ NOTE layout
This layout arranges notes on the pads like piano keys.
You can use □ to change the octave.
| Row | |||||||||
| 0 | 1/2/3 (common) | 4 | |||||||
| ×2 | ×1 | At startup | ×1 | ×2 | ×3 | ||||
| Column | 0 | 20 | 32 | 44 | 56 | 68 | 80 | ||
| 1 | 21 | 33 | 45 | 57 | 69 | 81 | |||
| 2 | 22 | 34 | 46 | 58 | 70 | 82 | |||
| 3 | 23 | 35 | 47 | 59 | 71 | 83 | |||
| 4 | 24 | 36 | 48 | 60 | 72 | 84 | |||
| 5 | 25 | 37 | 49 | 61 | 73 | 85 | |||
| 6 | 26 | 38 | 50 | 62 | 74 | 86 | |||
| 7 | 27 | 39 | 51 | 63 | 75 | 87 | |||
| 8 | 28 | 40 | 52 | 64 | 76 | 88 | |||
| 9 | 29 | 41 | 53 | 65 | 77 | 89 | |||
| 10 | 30 | 42 | 54 | 66 | 78 | 90 | |||
| 11 | 31 | 43 | 55 | 67 | 79 | 91 | |||
| 12 | 32 | 44 | 56 | 68 | 80 | 92 | |||
| 13 | 33 | 45 | 57 | 69 | 81 | 93 | |||
| 14 | 34 | 46 | 58 | 70 | 82 | 94 | |||
| 15 | 35 | 47 | 59 | 71 | 83 | 95 | |||
| 16 | 36 | 48 | 60 | 72 | 84 | 96 | |||
| 17 | 37 | 49 | 61 | 73 | 85 | 97 | |||
| 18 | 38 | 50 | 62 | 74 | 86 | 98 | |||
| 19 | 39 | 51 | 63 | 75 | 87 | 99 | |||
| 20 | 40 | 52 | 64 | 76 | 88 | 100 | |||
| 21 | 41 | 53 | 65 | 77 | 89 | 101 | |||
| 22 | 42 | 54 | 66 | 78 | 90 | 102 | |||
| 23 | 43 | 55 | 67 | 79 | 91 | 103 | |||
| 24 | 44 | 56 | 68 | 80 | 92 | 104 | |||
| 25 | 45 | 57 | 69 | 81 | 93 | 105 | |||
| 26 | 46 | 58 | 70 | 82 | 94 | 106 | |||
| 27 | 47 | 59 | 71 | 83 | 95 | 107 | |||
| 28 | 48 | 60 | 72 | 84 | 96 | 108 | |||
| 29 | 49 | 61 | 73 | 85 | 97 | 109 | |||
| 30 | 50 | 62 | 74 | 86 | 98 | 110 | |||
| 31 | 51 | 63 | 75 | 87 | 99 | 111 | |||
Example: Pad at Column 12, Row 2 (when MIDI channel 1 selected)
The note number is 56 (38h) and the MIDI channel is 1 (00h).
- When this pad is tapped, "90h" (Note on/MIDI ch), "38h" (Note Number) and the velocity are transmitted. The pad also lights yellow when it is tapped.
- This pad will also light yellow if "90h" (Note on/ MIDI ch), "38h" (Note Number) and a velocity are transmitted to the Ring Controller.

Ring Controller MIDI messages (continued)
■ DRUM layout
This layout is designed for use with drum racks in DAW software. The pads on 1/4 of each ring correspond to one drum rack section.
You can use ▲ to move groups of note numbers in the column direction.
| Row | |||||||||||
| 0 | 1/3 (common) | 2 | 1/3 (common) | 2 | 1/3 (common) | 2 | 1/3 (common) | 2 | 4 | ||
| × 2 × 1 | At startup | × 1 | |||||||||
| Column | 0 | 52 | 56 | 36 | 40 | 20 | 24 | 48 | |||
| 1 | 53 | 57 | 37 | 41 | 21 | 25 | 59 | ||||
| 2 | 54 | 58 | 38 | 42 | 22 | 26 | 610 | ||||
| 3 | 55 | 59 | 39 | 43 | 23 | 27 | 711 | ||||
| 4 | 60 | 64 | 44 | 48 | 28 | 32 | 1216 | ||||
| 5 | 61 | 65 | 45 | 49 | 29 | 33 | 1317 | ||||
| 6 | 62 | 66 | 46 | 50 | 30 | 34 | 1418 | ||||
| 7 | 63 | 67 | 47 | 51 | 31 | 35 | 1519 | ||||
| 8 | 68 | 72 | 52 | 56 | 36 | 40 | 2024 | ||||
| 9 | 69 | 73 | 53 | 57 | 37 | 41 | 2125 | ||||
| 10 | 70 | 74 | 54 | 58 | 38 | 42 | 2226 | ||||
| 11 | 71 | 75 | 55 | 59 | 39 | 43 | 2327 | ||||
| 12 | 76 | 80 | 60 | 64 | 44 | 48 | 28 | ||||
| 13 | 77 | 81 | 61 | 65 | 45 | 49 | 2933 | ||||
| 14 | 78 | 82 | 62 | 66 | 46 | 50 | 3034 | ||||
| 15 | 79 | 83 | 63 | 67 | 47 | 51 | 3135 | ||||
| 16 | 84 | 88 | 68 | 72 | 52 | 56 | 3640 | ||||
| 17 | 85 | 89 | 69 | 73 | 53 | 57 | 3741 | ||||
| 18 | 86 | 90 | 70 | 74 | 54 | 58 | 3842 | ||||
| 19 | 87 | 91 | 71 | 75 | 55 | 59 | 3943 | ||||
| 20 | 92 | 96 | 76 | 80 | 60 | 64 | 4448 | ||||
| 21 | 93 | 97 | 77 | 81 | 61 | 65 | 4549 | ||||
| 22 | 94 | 98 | 78 | 82 | 62 | 66 | 4650 | ||||
| 23 | 95 | 99 | 79 | 83 | 63 | 67 | 4751 | ||||
| 24 | 100 | 104 | 84 | 88 | 68 | 72 | 5256 | ||||
| 25 | 101 | 105 | 85 | 89 | 69 | 73 | 5357 | ||||
| 26 | 102 | 106 | 86 | 90 | 70 | 74 | 5458 | ||||
| 27 | 103 | 107 | 87 | 91 | 71 | 75 | |||||
| 28 | 108 | 112 | 92 | 96 | 76 | 80 | 6064 | ||||
| 29 | 109 | 113 | 93 | 97 | 77 | 81 | 6165 | ||||
| 30 | 110 | 114 | 94 | 98 | 78 | 82 | 6266 | ||||
| 31 | 111 | 115 | 95 | 99 | 79 | 83 | 6367 | ||||
Example: Pad at Column 12, Row 2 (when MIDI channel 1 selected)
The note number is 64 (40h) and the MIDI channel is 1 (00h).
- When this pad is tapped, "90h" (Note on/MIDI ch), "40h" (Note Number) and the velocity are transmitted. The pad also lights yellow when it is tapped.
- This pad will also light yellow if "90h" (Note on/ MIDI ch), "40h" (Note Number) and a velocity are transmitted to the Ring Controller.
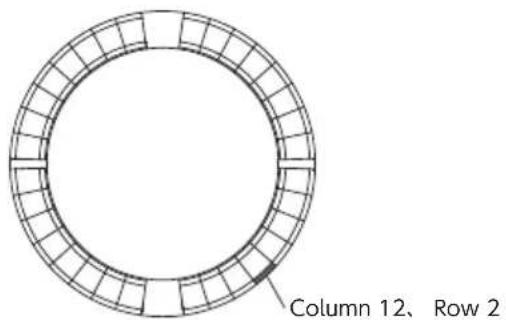
Ring Controller MIDI messages (continued)
■ FADER layout
This lets you use the Ring Controller as faders. The pads on half of each ring comprise a single fader. The transmitted MIDI messages are Control Change (number and specified value). You can change the amount of time until the specified value is reached according to the velocity when pressing the pads.
Control Change number
| Row | ||||||
| 0 1 | 2 3 4 | |||||
| Column | 0 | 24 25 26 | ||||
| 1 | ||||||
| 2 | ||||||
| 3 | ||||||
| 4 | ||||||
| 5 | ||||||
| 6 | ||||||
| 7 | ||||||
| 8 | ||||||
| 9 | ||||||
| 10 | ||||||
| 11 | ||||||
| 12 | ||||||
| 13 | ||||||
| 14 | ||||||
| 15 | ||||||
| 16 | 23 22 21 | |||||
| 17 | ||||||
| 18 | ||||||
| 19 | ||||||
| 20 | ||||||
| 21 | ||||||
| 22 | ||||||
| 23 | ||||||
| 24 | ||||||
| 25 | ||||||
| 26 | ||||||
| 27 | ||||||
| 28 | ||||||
| 29 | ||||||
| 30 | ||||||
| 31 | ||||||
Value
| Row | ||||
| 0 1-3 | (common) 4 | |||
| Column | 0 127 | |||
| 1 123 | ||||
| 2 114 | ||||
| 3 105 | ||||
| 4 96 | ||||
| 5 | 87 | |||
| 6 78 | ||||
| 7 69 | ||||
| 8 59 | ||||
| 9 50 | ||||
| 10 41 | ||||
| 11 32 | ||||
| 12 23 | ||||
| 13 14 | ||||
| 14 | 5 | |||
| 15 0 | ||||
| 16 | 0 | |||
| 17 | 5 | |||
| 18 14 | ||||
| 19 23 | ||||
| 20 32 | ||||
| 21 41 | ||||
| 22 50 | ||||
| 23 59 | ||||
| 24 69 | ||||
| 25 78 | ||||
| 26 87 | ||||
| 27 96 | ||||
| 28 105 | ||||
| 29 114 | ||||
| 30 123 | ||||
| 31 127 | ||||
HINT
- When the velocity is 127, it takes 20 milliseconds for the specified value to be reached.
- When the velocity is 1, it takes 2 seconds for the specified value to be reached.
Example: Pad at Column 12, Row 2 (when MIDI channels 1 and 2 are selected)
The Control Change number is 25 (19h) and the MIDI channel is 1 (00h).
- When this pad is tapped (gently) with a velocity of "b0h" (Control Change/MIDI ch), "19h" (Control Change Number) and the "value" start to be transmitted. For two seconds, this message will be continuously transmitted as the value changes. Transmission will stop when the value reaches 23. The pads at Row 2,
Column 12–15 will also light pink.
- The Row 2, Column 12–15 pads will also light pink if "b0h" (Control Change/MIDI ch), "19h" (Control Change Number) and "17h" are transmitted to the Ring Controller.
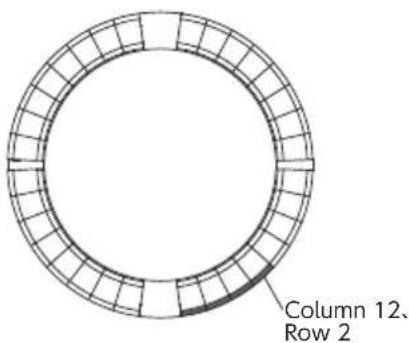
Ring Controller MIDI messages (continued)
■ PROGRAMMER mode
This mode allows you to program the LED lighting of each pad as you like.
| Row | ||||||
| 01234 | ||||||
| Column | 0003264 | 32 | ||||
| 1113365 | 33 | |||||
| 2223466 | 34 | |||||
| 3333567 | 35 | |||||
| 4443668 | 36 | |||||
| 5553769 | 37 | |||||
| 6663870 | 38 | |||||
| 7773971 | 39 | |||||
| 8884072 | 40 | |||||
| 9994173 | 41 | |||||
| 10101042 | 7442 | |||||
| 11111143 | 7543 | |||||
| 12121244 | 7644 | |||||
| 13131345 | 7745 | |||||
| 14141446 | 7846 | |||||
| 15151547 | 7947 | |||||
| 16161648 | 8048 | |||||
| 17171749 | 8149 | |||||
| 18181850 | 8250 | |||||
| 19191951 | 8351 | |||||
| 20202052 | 8452 | |||||
| 21 | 21215385 | 53 | ||||
| 22222254 | 8654 | |||||
| 23232355 | 8755 | |||||
| 24242456 | 8856 | |||||
| 25252557 | 8957 | |||||
| 26262658 | 9058 | |||||
| 27272759 | 9159 | |||||
| 28282860 | 9260 | |||||
| 29292961 | 9361 | |||||
| 30303062 | 9462 | |||||
| 31313163 | 9563 | |||||
| 21112 | ||||||
| MIDI Channel | ||||||
Example: Pad at Column 12, Row 2 (when MIDI channels 1 and 2 are selected)
The note number is 44 (2ch) and the MIDI channel is 1 (00h).
- When this pad is tapped, "90h" (Note on/MIDI ch), "2ch" (Note Number) and the velocity are transmitted.
- This pad's LED will also light in the color corresponding to the velocity if "90h" (Note on/MIDI ch), "2ch" (Note Number) and a velocity are transmitted to the Ring Controller.
The LEDs of the top and bottom inner rings respond to MIDI channel 2.
- The LED of the pad at Column 0, Row 0 will
also light in the color corresponding to the velocity if "91h" (Note on/MIDI ch), "00h" (Note Number) and a velocity are transmitted to the Ring Controller.
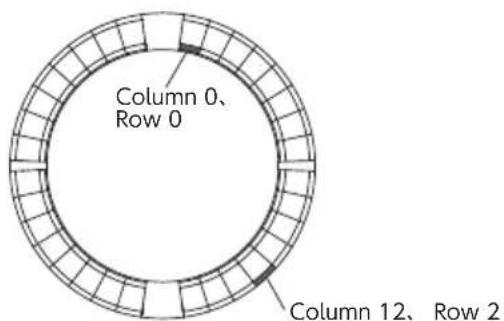
Ring Controller MIDI messages (continued)
■ LED color designation
The pad LED colors can be changed according to transmitted velocity values.
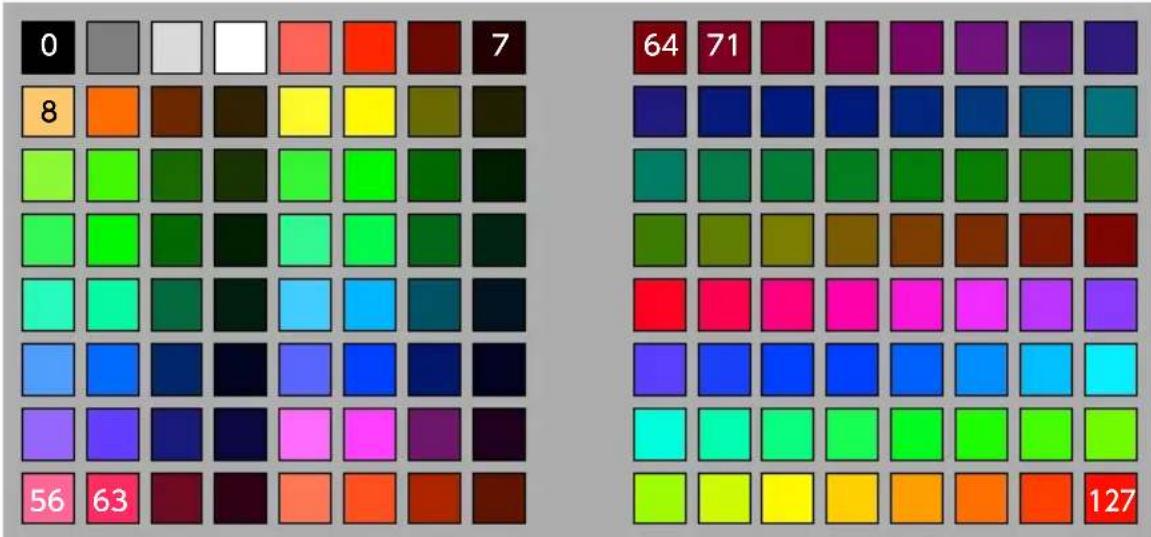
heatmap
| Color | Value | |---|---| | 0 | 64 | | 7 | 71 | | 8 | | | 56 | 127 | | 63 | |Example: In PROGRAMMER mode if you send "90h" (note on/MIDI channel), "2ch" (note number) and "88"(velocity) to the Ring Controller, the LED shown in the illustration will light green (color number 88).
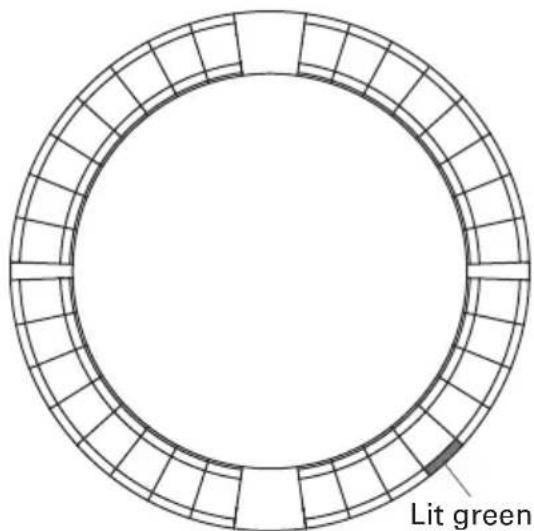
Ring Controller MIDI messages (continued)
■ LED control
MIDI messages can be used to control the Ring Controller LEDs.
- Palette mode: Select colors from the color palette.
- RGB mode: Select colors by specifying R (Red 0–127), G (Green 0–127) and B (Blue 0–127) values.
- To turn an LED off, send a velocity of 0 or a note off message.
Lighting an LED at a specific position (key number designation, pallet mode)
Sys-Ex - F0h 52h <n> 6Fh 62h 0Ah <row>
<column> <color> F7h
n: Sys-Ex MIDI channel
row: Row number (0-4)
column: Column number (0-31)
color: Color palette number (0-127)
Lighting an LED at a specific position (key number designation, RGB mode)
Sys-Ex - F0h 52h <n> 6Fh 62h 0Bh <row>
<column> <Red> <Green> <Blue> F7h
n: Sys-Ex MIDI channel
row: Row number (0-4)
column: Column number (0-31)
Red, Green, Blue: 0-127
Lighting pads at the same position on each ring (pallet mode)
Sys-Ex - F0h 52h <n> 6Fh 62h 0Ch <column>
<color> F7h
n: Sys-Ex MIDI channel
column: Column number (0-31)
color: Color palette number (0-127)
Lighting all LEDs on one ring (pallet mode)
Sys-Ex - F0h 52h <n> 6Fh 62h 0Dh <row>
<color> F7h
n: Sys-Ex MIDI channel
row: Row number (0-4)
color: Color palette number (0-127)
Lighting all LEDs (pallet mode)
Sys-Ex – F0h 52h <n> 6Fh 62h 0Eh <color> F7h
n: Sys-Ex MIDI channel
color: Color palette number (0-127)
Ring Controller MIDI messages (continued)
■ Function buttons
Control changes are assigned to the function buttons.
| Button Number | |
| UP 68h | |
| DOWN 69h | |
| DELAY 6ah | |
| FILTER 6bh | |
| STOP 6dh | |
| PLAY 6eh | |
| REC 6fh | |
| REVERB 70h | |
| MASTER FX 71h |
- The DELAY, FILTER, STOP, PLAY, REC and REVERB buttons on the Ring Controller do not have special functions assigned to them. You can use these buttons to control DAW software.
- If a control change message is received from DAW software, the LED of the corresponding button will light.
MIDI implementation charts
■ Base Station
[Aero RhythmTrak]
Model: AR-96 Base Station Date: 28 March 2017
MIDI Implementation Chart Version: 2.00
| Function... | Transmitted Recognized Remarks | ||
| Basic Default Channel Changed | 1 - 16 *1 *21 - 16 *1 *2 | 1, 161, 16 | |
| Mode Default Messages Altered | xx********** | xx | |
| Note Number True voice | 0 - 127 *1 *2********** | 0, 1080, 108 | |
| Velocity Note ON Note OFF | o *1 *2o *1 *2 | oo | |
| After Key's Touch Ch's | o *2o *2 | ox | |
| Pitch Bend x x | |||
| Control Change 0 - 127 o | *2 x | ||
| Prog Change True# | o *20, 127 | x | |
| System Exclusive x x | |||
| System Song Pos Common Song Sel Tune | xxx | xx | |
| System Clock Realtime Command | o *3o *3 | o *4o *4 | |
| Aux Local ON/OFF Messages All Notes OFF Active Sense Reset | o *2o *2xx | xxx | |
| Notes | *1 Transmitted by Internal Note.*2 Numbers via USB MIDI Output route can be changed in "USB MIDI Output Setting".*3 Enabled when Clock Mode is "Internal".*4 Enabled when Clock Mode is "External". | ||
Mode 1: OMNI ON, POLY
Mode 3: OMNI OFF, POLY
Mode 2: OMNI ON, MONO
Mode 4: OMNI OFF, MONO
o: Yes
x: No
MIDI implementation charts (continued)
■ Ring Controller
[Aero RhythmTrak] Date: 9 June 2016
Model: AR-96 Ring Controller MIDI Implementation Chart Version:1.00
| Function... | Transmitted Recognized Remarks | |||
| Basic Channel | Default Changed | 1, 21-16 | 1, 21-16 | |
| Mode | Default Messages Altered | xx********** | xxx | |
| Note Number | True voice | 0-127********** | 0-127********** | |
| Velocity Note ON Note OFF | o 9n, V=1-127o 8n, V=0 | o 9n, V=1-127o 8n, V=0 | ||
| After Touch | Key's Ch's | o an, V=1-127o dn, V=1-127 | xx | |
| Pitch Bend x x | ||||
| Control Change | o85, 86102, 113 | ox102, 113 | Accelerometer Key LED | |
| Prog Change True # | x********** | xx | ||
| System Exclusive o o | ||||
| System Song Pos Common Song Sel Tune | xxx | xx | ||
| System Real Time Commands | xx | xx | ||
| Aux Local ON/OFFMessages All Notes OFF Active Sense Reset | xxxx | xxxx | ||
| Notes | ||||
Mode 1: OMNI ON, POLY
Mode 3: OMNI OFF, POLY
Mode 2: OMNI ON, MONO
Mode 4: OMNI OFF, MONO
o: Yes
x: No