CFR200 - Freezer Manta - Free user manual and instructions
Find the device manual for free CFR200 Manta in PDF.


| Product type | Chest freezer |
| Model | CFR200 |
| Brand | Manta |
| Total capacity | 200 L |
| Dimensions (HxWxD) | 85 x 55 x 60 cm |
| Weight | 35 kg |
| Power supply | 220-240 V ~ 50 Hz |
| Energy consumption | 250 kWh/year |
| Energy class | F |
| Temperature range | -18 °C |
| Defrost type | Manual |
| Climate class | SN-N-ST |
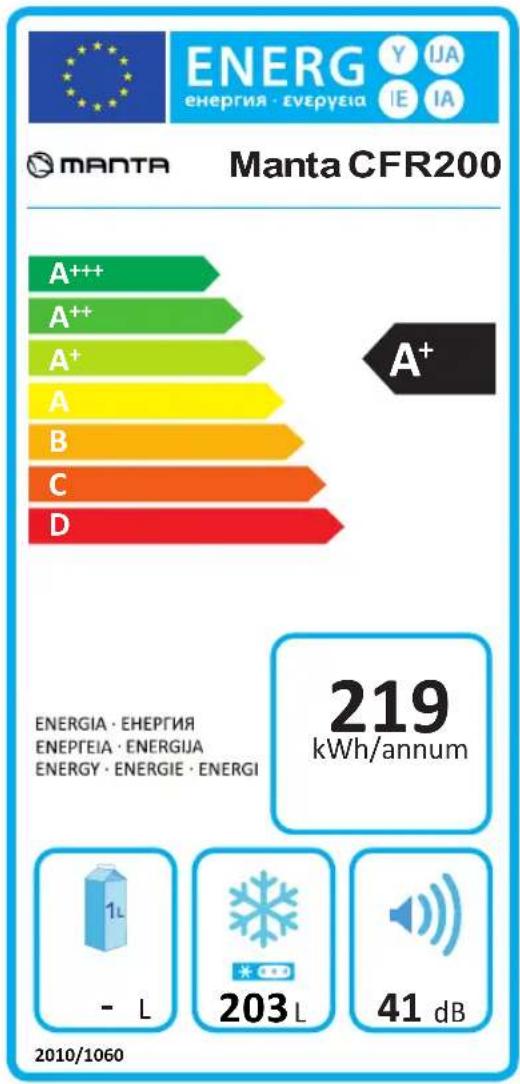
| Noise level | 41 dB |
| Adjustable thermostat | Yes |
| Interior light | Yes |
| Door lock | Yes (with key) |
| Drain plug | Yes |
| Storage baskets | 2 wire baskets |
| Refrigerant | R600a |
| Maintenance | Defrost when ice exceeds 5 mm; clean interior with mild detergent |
| Safety | Do not store flammable materials; keep ventilation openings clear |
| Repairability index | 5.0 / 10 |
Frequently Asked Questions - CFR200 Manta
User questions about CFR200 Manta
0 question about this device. Answer the ones you know or ask your own.
Ask a new question about this device
Download the instructions for your Freezer in PDF format for free! Find your manual CFR200 - Manta and take your electronic device back in hand. On this page are published all the documents necessary for the use of your device. CFR200 by Manta.
USER MANUAL CFR200 Manta
natural_image
Abstract black-and-white circular logo with interlocking curved shapes (no text or symbols)MANTA
Chest Freezer
CFR200
Instrukcja obsługi
User's Manual
CLEANING AND CARE....10
DO'S AND DONT'S 10
DIAGRAM....11
OPERATIONS 11
SPECIFICATION....14
INSTRUKCJE TRANSPORTOWE
natural_image
Simple geometric diagram of a triangular shape with a central circle and a labeled line (no text or symbols)flowchart
graph LR
    A["Step ①: Rotation of bearing"] --> B["Step ②: Rotation of bearing"]
    B --> C["Step ③: Rotation of bearing"]
    C --> D["Step ④: Rotation of bearing"]
● The appliance should be transported only in an upright position. The packing as supplied must be intact during transportation
- If during the course of transport the appliance has to be transported horizontally, it must only be laid on its left hand side when standing in the front of the appliance. After bringing it to upright position, it must not be operated for at least 4 hours to allow the system to settle
● The appliance must be protected against rain, moisture and other atmospheric influences.
● Care must be taken while cleaning or carrying the appliance not to touch the bottom of the condenser metal wires at the back of the appliance, as this could cause injury to fingers and hands or damage the appliance
- Do not position the appliance on top of another. Do not attempt to sit or stand on top of the appliance as it is not designed for such use. You could injure yourself or damage the appliance.
● Make sure that the mains cable is not caught under the appliance during and after moving, as this could damage the cable
- When positioning your appliance take care not to damage your flooring, pipes, wall coverings etc.
- Do not move the appliance by pulling by the lid, door or handle.
- Do not allow children to play with the appliance or tamper with the controls.
● Failure to comply with the above instructions could result in damage to the appliance. The manufacturer declines to accept any liability should the transportation instructions not be followed.
INSTALLATION INSTRUCTIONS
- If possible, avoid placing the appliance near cookers, radiators or in direct sunlight as this will cause your appliance to work harder. If installed next to a source of heat or freezer, maintain the following minimum side clearances:
| From cookers 100 mm (4") | |
| From radiators 300 mm (12") | |
| From refrigerators 100 mm (4") |
● Make sure that sufficient room is provided around the appliance to ensure free air circulation. Ideally, no less than 10 cm should be left around the sides and at the back, make sure clearances are maintained as shown the diagram below.

● The appliance should be placed on a flat, firm surface.
● The appliance must not be used outdoors.
- Protect the appliance from moisture. Do not place the appliance in damp rooms in order to protect metal parts from corrosion. Do not spray water into the appliance, since it will cause insulation deterioration and ground fault
● Refer to cleaning and care section to prepare your appliance for use
- If the appliance is placed in an unheated room (e.g. in the garage), in old weather water droplets may form on external surfaces. This is quite normal and does not indicate a malfunction. Wipe the condensed water vapor with a dry cloth.
- Place the appliance in the designated location and do not connect it to the mains for a minimum of 1h.
CLEANING AND CARE
- We recommend that you switch off the appliance at the socket outlet and pull out the mains plug before cleaning
● Never use any sharp instruments or abrasive substances, soap, household cleaner, detergent or wax polish for cleaning - Use lukewarm water to clean the compartment of the appliance and wipe it dry.
- Clean the interior using a damp cloth with a solution of bicarbonate of soda to one pint of water. Wring it out, clean the interior and wipe it dry.
- Remove excessive ice formation regularly using a plastic scraper available in hardware stores. A large amount of accumulated ice will cause the freezer to operate less efficiently.
- If the appliance is not going to be used for a long period of time, switch it off, remove all food, clean it and leave the door ajar
- Check door seals regularly to ensure they are clean and free from food particles.
- Never wash the compressor with water – just wipe it thoroughly with a dry cloth after cleaning the freezer to prevent the formation of rust
● This appliance is intended for domestic household use only. Warranty does not cover commercial use. - If the mains lead is damaged, you must have it replaced by the manufacturer, an authorized service centre or similarly qualified persons in order to avoid a hazard
DO'S AND DON'TS
- Defrost food from the freezer thoroughly in a fridge or in a microwave oven following defrosting and cooking instructions. Ensure that the freezer lid/door is completely closed after each use
● Frozen food must be completely thawed before cooking - Close the lid/door gently
-
Check contents of the freezer at regular intervals
-
Clean and defrost your appliance regularly (See "Defrosting").
- Keep food for as short a time as possible and adhere to "Best Before" and "Use by" etc. dates
- Store commercially frozen food in accordance with the instructions given on the packets.
● Always choose high quality fresh food and be sure it is thoroughly clean before you freeze it
● Prepare fresh food for freezing in small portions to ensure rapid freezing - Wrap all foods in aluminum foil or freezer quality plastic bags and make sure any air pockets are pressed outi usuwaj ze środka powietrze
● Wrap frozen food immediately after purchasing and put it in to the freezer as soon as possible - Remove ice cream from the freezer 10-20 minutes before serving.
- Don't leave the door open for long periods, as this will make the appliance more costly to run and cause excessive ice formation
- Don't use sharp edged objects such as knives or forks to remove excess ice
- Don't put hot food into the appliance. Let it cool down first
- Don't put liquid-filled bottles or sealed cans containing carbonated liquids into the freezer, as they may burst.
- Don't store poisonous or any dangerous substances in your appliance. It has been designed for the storage of edible foodstuffs only
- Don't eat ice-cream and ice cubes directly after taking them out from the freezer. The low temperature may cause, freezer burns' on lips.
- Don't freeze fizzy drinks
- Don't try to keep frozen food which has thawed; it should be eaten within 24 hours or cooked and refrozen.
- Don't remove items from the freezer with wet hands.
- Don't close the lid/door with force. You may damage the appliance.
- This appliance is not intended for use by persons (including children) with reduced physical, sensory or mental capabilities, or lack of experience and knowledge, unless they have been given supervision or instruction concerning use of the appliance by a person responsible for their safety. Children should be supervised to ensure that they do not play with the appliance.
- Don't store explosive substances in the appliance, e.g., spray cans that contain inflammable propellant gas, etc.
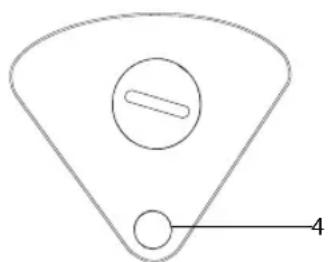
DIAGRAM

natural_image
Simple line drawing of a triangular shape with a central circle and a small circle, labeled with the number 4 (no text or symbols beyond the label)- Key lock
- Drain outlet
- Control panel
- (Power) Indicates a connection to a power source
OPERATION
Start-up and temperature control
- Place the appliance in its designated location and allow to stand for a minimum of 1 hour before it is switched on
- Turn the thermostat knob to your position. Food can be placed in the compartment only after freezer thermostat has operated in your position for 4 hours
- The achieved temperatures may vary according to certain conditions of use such as: placement of the freezer, ambient temperature, frequency of lid being opened with food. Depending on these factors, the temperature knob position will vary. Typically, with the ambient temperature of approximately 22°C, the temperature knob should be set to the middle setting
Your freezer has one control for regulating the temperature.
The temperature control is located on the lower right hand corner.
● The range of the temperature control is from position "MIN, MAX, and OFF" temperature control to the setting that best suits your needs.
● To turn the freezer off, turn the temperature control to "OFF". NOTE:
● Turning the temperature control to "OFF" position stops the c off the power to the freezer.
- If the unit is unplugged, lost power, or turned off; you must w the unit. If you attempt to restart before this time delay, the freezer will not start.
● Large amounts of food will lower the cooling efficiency of the a
- If you choose to change the thermostat setting, adjust thermos increment at a time. Allow several hours for temperature to stabilize between adjustments.
CHEST FREEZER ♦ CFR200
Defrosting
- Defrost twice a year or when a frost layer of approximately 7 mm (1/4") has formed
● Alternatively you may switch off the freezer at the socket outlet and pull out the mains plug - 6 hours before the defrosting, please set the thermostat knob at „MAX" position to make sure the food is at the lowest temperature when you get it out. All food should be wrapped in several layers of newspaper and stored in a cool place (e.g. fridge or larder).
- Remove the freezer basket and leave the lid open. Containers of warm water may be placed in the freezer to speed up the defrosting.
● Never use hairdryers, electrical heaters or other such electrical appliances for defrosting
- When defrosting has finished drain the water in the bottom of the freezer as illustrated below, then wipe dry thoroughly. Switch fast freeze on, (Fast Freeze – the orange switch) and leave the appliance for approximately 4 hours.
- Don't use sharp edged objects such as knives or forks to remove the ice

flowchart
graph LR
    A["Step ①: Rotation arrow"] --> B["Step ②: Rotation arrow"]
    B --> C["Step ③: Rotation arrow"]
    C --> D["Step ④: Rotation arrow"]
- Extract the rubber cover from the water conduit inside the freezer (1) (NOTE: PLEASE KEEP THE RUBBER COVER SAFE DURING THE DEFROSTING AND PUT IT BACK AFTER THE DEFROSTING IS COMPLETE)
● Extract the water conduit outside the freezer and put in a water container. Extract the water conduit by 20-25mm until the water hole can be seen.
● Twist the water conduit until the arrow points downward
● After defrosting is done, make sure there is no more water coming out before replacing the cap and position the arrow points upward.
CHEST FREEZER ♦ CFR200
MOST COMMON PROBLEMS
| Phenomenon | Problem Cause | Insp.Content | Remedy | |
| Red light not functioning | No Electricity | Fuse Broken | Check fuse | Replace fuse |
| Loose plug and socket | Check for loose contact | Replace or service socket | ||
| With Electricity | Loose red bulb | Check for loose contact | Tighten the bulb | |
| Broken red bulb | Remove red bulb | Replace red bulb | ||
| Green light not functioning | Compressor working well | Loose green bulb | Check for loose contact | Tighten the bulb |
| Broken green bulb | Remove green bulb | Replace the bulb | ||
| Loose thermostat | Check thermostat | Tighten the thermostat | ||
| Compressor not working | Loose thermostat | Check for loose contact | Tighten the thermostat | |
| Thermostat damage | Check for short circuit Check thickness <=5mm | Replace thermostat | ||
| Non-stop running of machine | Does not refrigerate well | Thick frost on surface | Defrost time | |
| Door open frequently | Avoid open | |||
| Too much food stored R600a/R12 Leaked | Lessen the quantity. | |||
| Refrigerate well | Call Service | |||
| Set temp.<ambient temp | Check temp level "5-6" | Adjust level to "2-4" | ||
| Thermostat not working | Replace thermostat | |||
| Too noisy | Refrigerator installed on an uneven ground | Check universal wheels | Put on a level and even ground | |
| Loose screws at condenser or compressor | Check for loose screws. | Tighten the loose screws | ||
| Compressor not working but red and green light working. | Loose of starting relay or heat preventing socket | Check damaged contact | Tighten the connection Repair/Service Compressor | |
| Compressor damaged | ||||
| Voltage less than 187V | Check the voltage level | Use a power regulator | ||
SPECIFICATIONS - PRODUCT DATA SHEET
Note!
Product design and Technical parameters may be change without notice. This mainly concerns parameters technical, software and user manual present. User's Manual is a general orientation on service product. Manufacturer and distributor do not assume any responsibility as compensation for any inaccuracies errors in the descriptions appearing in this user manual.
| Appliance type 4-star chest freezer | |
| Model: Manta CFR200 | |
| Total effective volume | 203L |
| Climate class N SN ST T | / / / |
| Overvoltage protection class | 1 |
| Voltage 220V-240V | |
| Frequency 50Hz | |
| Input power 90W | |
| Refrigerant/ weight R600a / | 56g |
| Net weight 33kg | |
| Dimensions of the product | 945*523*850mm |
| Freezing capacity | 9kg/24h |
| Ability to keep food after voltage cut off | 2h |
| Energy consumption | 0.60kW·h/24H |
bar
Manta CFR200 | Grade | Energy Consumption (kWh/annum) | |---|---| | A+++ | 185 | | A++ | 195 | | A+ | 205 | | A | 210 | | B | 220 | | C | 230 | | D | 240 | Energy Category: ENERGIA · EHEPTNIA, ENEPTEIA · ENERGIJA, ENERGY · ENERGIE · ENERGI 219 kWh/annum - L | 203 L | 41 dB 2010/1060
INFORMACJAOPRAWIDŁOWYMPOSTĘPOWANIUWPRZYPADKU UTYLIZACJIURZĄDZEŃELEKTRONICZNYCHIELEKTRYCZNYCH
natural_image
Abstract black-and-white circular logo with interlocking curved shapes (no text or symbols)MANTA
- MANTA
- Chest Freezer
- CFR200
- INSTRUKCJE TRANSPORTOWE
- INSTALLATION INSTRUCTIONS
- CLEANING AND CARE
- DO'S AND DON'TS
- DIAGRAM
- OPERATION
- Start-up and temperature control
- Your freezer has one control for regulating the temperature.
- CHEST FREEZER ♦ CFR200
- Defrosting
- SPECIFICATIONS - PRODUCT DATA SHEET
- Note!
- INFORMACJAOPRAWIDŁOWYMPOSTĘPOWANIUWPRZYPADKU UTYLIZACJIURZĄDZEŃELEKTRONICZNYCHIELEKTRYCZNYCH
Brand : Manta
Model : CFR200
Category : Freezer