SD-250ESTE - DVD player TOSHIBA - Free user manual and instructions
Find the device manual for free SD-250ESTE TOSHIBA in PDF.

| Product Type | DVD Player with support for DVD, VCD, CD, CD-R, CD-RW, MP3, JPEG, MPEG, DivX |
| Dimensions (W x H x D) | 420 mm x 49 mm x 265 mm |
| Power Supply | 220-240 V ~ 50 Hz |
| Power Consumption (On) | 11 W |
| Power Consumption (Standby) | 4 W |
| Video Output | Composite (CVBS), RGB via SCART; PAL/NTSC |
| Audio Output | Analog stereo (RCA), Digital coaxial (for Dolby Digital/DTS) |
| Audio Formats Supported | Dolby Digital, DTS, LPCM, MPEG multichannel |
| Playback Features | Multi-angle (up to 9), multi-subtitle (up to 32), multi-audio (up to 8), zoom, repeat (chapter/title/A-B), program, slow motion, time search |
| Disc Types Supported | DVD-5, DVD-9, DVD-10, DVD-18, VCD, CD-DA, CD-R, CD-RW, MP3 CD, JPEG CD, MPEG CD, DivX |
| Regional Code | Region code must match disc (not specified, but common for Europe) |
| Remote Control | IR remote with R03/AAA batteries (2 supplied) |
| Display | Vacuum Fluorescent Display (VFD) |
| Parental Control | 8 levels with password protection |
| OSD Languages | Multilingual (selectable, specific list not exhaustive) |
| Safety Class | Class 1 Laser product |
| Supplied Accessories | Remote control, 2x AAA batteries, Owner's Manual |
| Cleaning Instructions | Clean disc from center outward; do not use benzene, thinner, or anti-static spray |
| Repairability | Do not open cover; refer to qualified technician |
| Manual Pages | 35 pages (English) |
Frequently Asked Questions - SD-250ESTE TOSHIBA
User questions about SD-250ESTE TOSHIBA
0 question about this device. Answer the ones you know or ask your own.
Ask a new question about this device
Download the instructions for your DVD player in PDF format for free! Find your manual SD-250ESTE - TOSHIBA and take your electronic device back in hand. On this page are published all the documents necessary for the use of your device. SD-250ESTE by TOSHIBA.
USER MANUAL SD-250ESTE TOSHIBA
SAFETY INFORMATION 2
WARNING 2
SAFETY PRECAUTIONS 3
SAFETY PRECAUTIONS 4
NOTES ON CD-R AND CD-RW DISCS 5
NOTES ON DISCS 5
SUPPLIED ACCESSORIES 6
DISC TYPES COMPATIBLE WITH THIS UNIT 7
GENERAL PROPERTIES 8
FRONT PANEL FUNCTIONS 9
FRONT PANEL DISPLAY 10
REAR PANEL PARTS 11
CONNECTION OF YOUR DVD PLAYER WITH TV 12
CONNECTION OF YOUR DVD PLAYER WITH AV AMPLIFIER 13
FITTING BATTERIES IN YOUR REMOTE CONTROL .... 14
REMOTE CONTROL FUNCTIONS 14
DVD PLAYBACK 16
DIRECT SELECTION OF SCENES 17
REPEAT PLAY 18
CONVENIENT FUNCTIONS 1
Instructions in this manual describe the controls on the player. You can also use the controls on the remote if they have the same or similar names as those on the player.
Dear Customers
We would like to thank you for purchasing this DVD/VCD/CD/CD-R/CD-RW/MP3/JPEG/MPEG/DivX player.
We strongly recommend that you carefully study the operating instructions before attempting to operate the unit and that you note the listed safety precautions.
SAFETY INFORMATION
CAUTION
CLASS 1 LASER PRODUCT
DVD Player is a class 1 laser product. However this product uses a visible laser beam which could cause hazardous radiation exposure. Be sure to operate the player correctly as instructed.
While this player is plugged to the wall outlet, do not place your eyes close to the opening of the disc tray or any other openings in the case of the product. For your own safety do not attempt to look inside this product.
Use of controls for adjustments or performance of procedures other than those specified may result in hazardous radiation exposure. Do not open covers and do not attempt to repair any damaged parts. Refer product to a service technician or qualified professional for any necessary repair.
WARNING
To reduce the risk of fire or electric shock, do not expose this equipment to rain or moisture.
To reduce the risk of fire or electric shock, and any interference, use the recommended accessories only.

WARNING
RISK OF ELECTRIC SHOCK


The lightning flash with arrowhead symbol, within an equilateral triangle, is intended to alert the user to the presence of uninsulated "dangerous voltage" within the product's enclosure that may be of sufficient magnitude to constitute a risk of electric shock of persons.

The exclamation point within an equilateral triangle is intended to alert the user to the presence of important operating and maintenance (servicing) instructions in the literature accompanying the appliance.
SAFETY PRECAUTIONS
Power Source
The unit should be operated only from a 220-240V\~50 Hz outlet. Please do not open the cover by yourself. There is high voltage in the set, which will endanger your life. Please contact local service agent for help and advice. Repairs to be carried out by a qualified technician only.
- The apparatus is not disconnected from the AC power source (mains) as long as it is connected to the wall outlet, even if the apparatus itself has been turned off.
- If you are not going to use the apparatus for a long time, be sure to disconnect the apparatus from the wall outlet.
Power Cord
Do not place the unit, a piece of furniture, or any object on the power cord (mains lead). Do not cut or pinch the power cord. Handle the power cord by the plug. Do not pull out the plug by tugging the cord and never touch the power cord when your hands are wet as this could cause a short circuit or electric shock. Never make a knot in the cord or tie it with other cords. The power cords should be routed in such a way that they are not likely to be stepped on. A damaged power cord can cause fire or give you an electrical shock. Check the power cord once in a while. If you find it damaged, ask closest service agent for help. When the AC power cord needs to be changed, it should be done at a qualified service shop only.
SOME DOS AND DON'TS ON THE SAFE USE OF EQUIPMENT
This equipment has been designed and manufactured to meet international safety standards but, like any electrical equipment, care must be taken if you are to obtain the best results and safety is to be assured. So, please read the points below for your own safety. They are of a general nature, intended to help you with all your electronic consumer products and some points may not apply to the goods you have just purchased.
DO read the operating instructions before you attempt to use the equipment.
DO ensure that all electrical connections (including the mains plug, extension leads and inter-connections between the pieces of equipment) are properly made and in accordance with the manufacturer's instructions. Switch off and withdraw the mains plug before making or changing connections.
DO consult your dealer if you are ever in doubt about the installation, operation or safety of your equipment.
DO be careful with glass panels or doors on equipment
DON'T remove any fixed cover as this may expose dangerous voltages.
DON'T obstruct the ventilation openings of the equipment with items such as newspapers, tablecloths, curtains, etc. Overheating will cause damage and shorten the life of the equipment.
DON'T allow electrical equipment to be exposed to dripping or splashing, or objects filled with liquids, such as vases, to be placed on the equipment.
DON'T place hot objects or naked flame sources such as lighted candles or nightlights on, or close to equipment. High temperatures can melt plastic and lead to fires.
DON'T use makeshift stands and NEVER fix legs with wood screws - to ensure complete safety always fit the manufacturer's approved stand or legs with the fixings provided according to the instructions.
DON'T use equipment such as personal stereos or radios so that you are distracted from the requirements of traffic safety. It is illegal to watch television whilst driving.
DON'T listen to headphones at high volume, as such use can permanently damage your hearing.
DON'T leave equipment switched on when it is unattended unless it is specifically stated that it is designed for unattended operation or has a stand-by mode. Switch off using the switch on the equipment and make sure that your family know how to do this. Special arrangements may need to be made for infirm or handicapped people.
DON'T continue to operate the equipment if you are in any doubt about it working normally, or if it is damaged in any way -switch off, withdraw the mains plug and consult your dealer.
ABOVE ALL
— NEVER let anyone especially children push anything into holes, slots or any other opening in the case - this could result in a fatal electrical shock;
— NEVER guess or take chances with electrical equipment of any kind
— it is better to be safe than sorry!
SAFETY PRECAUTIONS
Notes on copyrights:
It is forbidden by law to copy, broadcast, show, broadcast via cable, play in public, or rent copyright material without permission.
This product is equipped with copy protection measures developed by Macrovision. Copy protection signals are recorded on some discs. When recording these discs on a VCR, picture noise will appear during playback.
This product incorporates copyright protection technology that is protected by certain U.S. patent claims and other intellectual property rights owned by Macrovision Corporation and other rights owners. Use of this copyright protection technology must be authorized by Macrovision Corporation, and is intended for home and other limited viewing uses only unless otherwise authorized by Macrovision Corporation. Reverse engineering or disassembly is prohibited.
The following information applies only to the model for U.K.
WIRING : This unit is supplied with a BSI 1363 approved 13 amp mains plug, fused at 5 amp. When replacing the fuse always use a 5 amp BS 1362, BSI or ASTA approved type. Never use this plug with the fuse cover omitted. To obtain a replacement fuse cover contact your dealer. If the type of plug supplied is not suitable for the mains sockets in your home, then the plug should be removed and a suitable type fitted. Please refer to the wiring instructions below:
WARNING: A mains plug removed from the mains lead of this DVD player must be destroyed. A mains plug with bared wires is hazardous if inserted in a mains socket.
Do not connect either wire to the earth pin, marked with the letter E or with the earth symbol or coloured green or green and yellow.
If any any other plug is fitted, use a 5 amp fuse, either in the plug, or at the distribution board.
IMPORTANT: The wires in this mains lead are coloured in accordance with the following codes:
- BLUE: NEUTRAL, BROWN: LIVE - As the colours of the wires in the mains lead of this DVD player may not correspond with the coloured marking identifying the terminals in your plug, proceed as follows: The wire which is coloured blue must be connected to the terminal which is marked with the letter N or coloured black. The wire which is coloured brown must be connected to the terminal which is marked with the letter L or coloured red.
NOTES ON CD-R AND CD-RW DISCS
- CD-R (Recordable) and CD-RW (Rewritable) discs, recorded by the users, may only be used after finalization process.
-
CD-R and CD-RW discs may not be usable, depending on the disc features, recording conditions and damage or dirt on disc. The disc configuration and features are determined by the tool and device used for recording. Therefore, users may face with the following undesired consequences:
-
Some discs may not be read at all.
- Some discs may cause system crash after playing for a while.
- Some parts of the disc may be skipped or worked abnormally.
- Compare with the original discs, the time passed for reading a CD-R and CD-RW discs may be longer.
NOTES ON DISCS
On handling discs
- To keep the disc clean, handle the disc by its edge. Do not touch the surface.
- Do not stick paper or tape on the disc.
- If the disc is contaminated with any substance like glue remove before using it.

- Do not expose the disc to direct sunlight or heat sources such as hot air ducts, or leave it in a car parked in direct sunlight as the temperature can rise quickly and damage the disc.
• After playing, store the disc in its case.
On cleaning
- Before playing, clean the disc with a cleaning cloth. Wipe the disc from the center out.
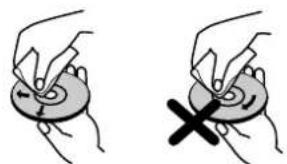
natural_image
Two hand-drawn diagrams showing a circular object being held by fingers, with one holding a cross symbol (no text or labels)- Do not use solvents such as benzene, thinner, commercially available cleaners or anti-static spray intended for vinyl LPs.
Discs that should not be used
Only the discs including the marks shown on page 7 can be played.
Note, however, that discs with special shapes (heart-shaped discs, hexagonal discs, etc.) cannot be played. Do not attempt to play such discs, as they may damage the player.

NOTE:
- Do not use record spray or antistatic. Also do not use volatile chemicals such as benzene or thinner.

SUPPLIED ACCESSORIES
In the packaging material you will find the following:
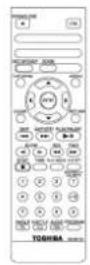
a
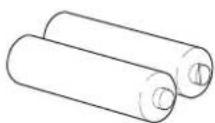
b
C
(a) Remote control
(b) Two R03 (AAA) batteries for remote control.
(c) Owner's Manual
DISC TYPES COMPATIBLE WITH THIS UNIT
This player can play the following discs.
| Disc Types (Logos) | Recording Types | Disc Size | Max. Playing Time | Characteristics |
DVD VIDEO VIDEO | Audio+Video | 12 cm | Single-sided; 240 min.Double-sided; 480 min. | DVD contains excellent sound and video due to Dolby Digital and MPEG-2 System.Various screen and audio functions can be easily selected through the on screen menu. |
| 8 cm | Single-sided; 80 min.Double-sided; 160 min. | |||
VIDEO-CD DIGITAL VIDEO DIGITAL VIDEO | Audio+Video | 12 cm | 74 min. | Video with CD sound, VHS quality & MPEG-1 compression technology. |
| 8 cm | 20 min. | |||
AUDIO-CD DIGITAL AUDIO DIGITAL AUDIO | Audio | 12 cm | 74 min. | An LP is recorded as an analog signal with more distortion. CD is recorded as a Digital Signal with better audio quality, less distortion and less deterioration of audio quality over time. |
| 8 cm | 20 min. | |||
MP3-CD READABLE READABLE | Audio(xxxx.mp3) | 12 cm | It depends on MP3 quality. | MP3 is recorded as a Digital Signal with better audio quality, less distortion and less deterioration of audio quality over time. |
| 8 cm | ||||
PICTURE-CD READABLE READABLE | Video(still picture) | 12 cm | It depends on JPEG quality. | JPEG is recorded as a Digital Signal with better picture quality over time. |
| 8 cm | ||||
DivX | Audio+Video | 12 cm | It depends on DivX quality | Video & Audio with MPEG-4 Compression technology. |
| 8 cm |
GENERAL PROPERTIES
1) DVD/VCD/CD/CD-R/CD-RW/MP3/JPEG/MPEG/DivX playback
2) NTSC/PAL playback (according to disc content)
3) User-friendly multilanguage OSD menu control
4) Vacuum Fluorescent Display (VFD)
5) Dolby Digital, DTS, LPCM audio via coaxial connection
6) Multiple Aspect Ratio support (16:9 Widescreen, 4:3 Letterbox, 4:3 PAN & SCAN)
7) Multi-Audio (up to 8) support
8) Multi-Subtitle (up to 32) support
9) Multi-Angle (up to 9) support
10) 8 parental levels
11) Fast forward and rewind at different speeds.
12) Smooth and seamless playback at 2x speed.
13) Slow motion playback in different speeds.
14) Frame by frame forward playback
15) Time Search
16) Repeat
17) A - B repeat
18) Different play modes for Audio CD, MP3, JPEG and MPEG (Normal/Shuffle/Intro)
19) Program function for Audio CD, MP3 and JPEG
20) Scart Socket
21) Analog Audio Output
FRONT PANEL FUNCTIONS

- Disc Tray
Place a disc on the tray.
Indicates the playing time, title, chapter/track, etc.
- OPEN/CLOSE (▲button
Opens or closes the disc tray.
- STOP button
Stops playing disc.
- PLAY/PAUSE button
Plays/pauses the disc. For any DVD title that has a root menu with still picture, this button functions as "button select" (selects highlighted item) in the root menu. Otherwise this functioning of "play/pause" button on the root menu will be prohibited by the disc, and "▼" will appear.
- SKIP buttons
Press to go back to the preceding chapter/track or go to the next chapter/track.
-
ON/SATND BY Indicator
-
ON/STANDBY button
Turns the unit on or switches the unit to standby mode.
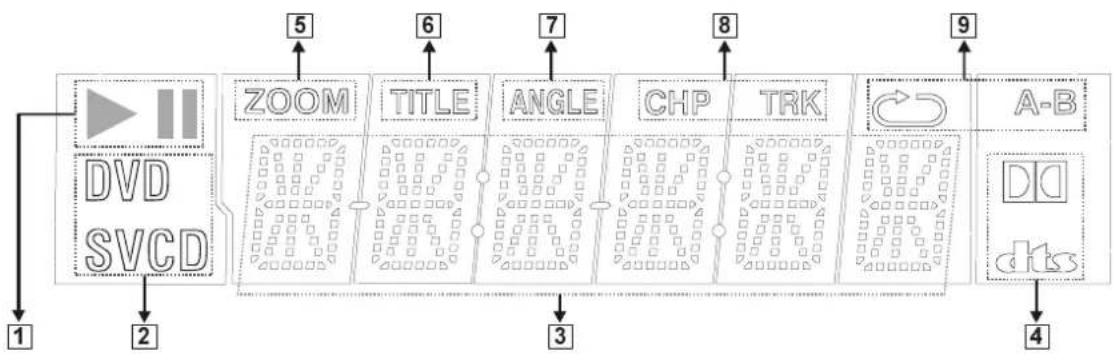
FRONT PANEL DISPLAY
flowchart
graph LR
    A["1"] --> B["2"]
    B --> C["3"]
    C --> D["4"]
    D --> E["5"]
    E --> F["6"]
    F --> G["7"]
    G --> H["8"]
    H --> I["9"]
    I --> J["A-B"]
    J --> K["DD"]
    K --> L["dt.s"]
    style A fill:#f9f,stroke:#333
    style L fill:#bbf,stroke:#333
- Play/Pause
- Current Disc
- Time or Title / Chapter / Track number
- Dolby Digital / DTS
- Zoom
- Title Number
- Angle
- Chapter / Track Number
- Repeat
REAR PANEL PARTS

1. DIGITAL AUDIO OUT connector
COAXIAL :
Connects to an audio component using the coaxial digital connection cord.
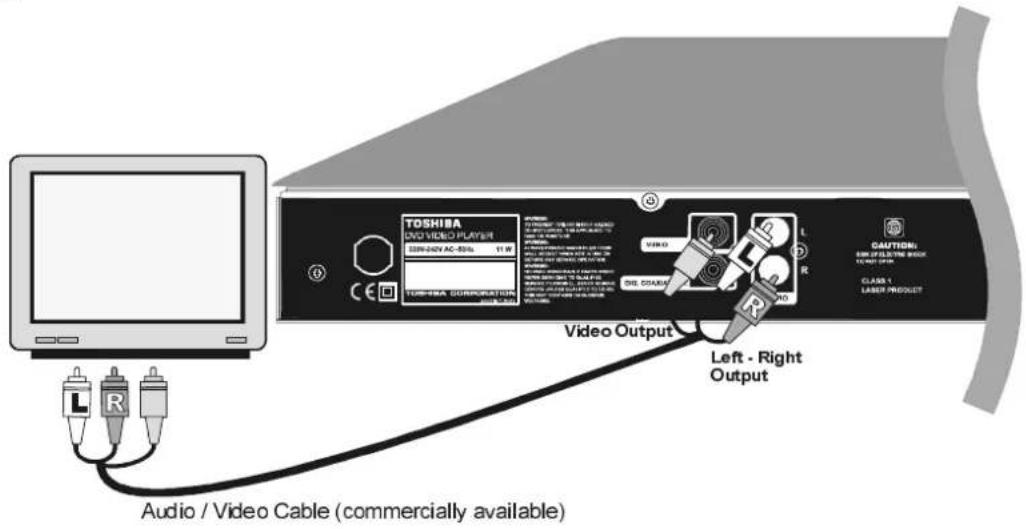
2. AUDIO connectors
Connects to the AV amplifier or audio input connector on the TV by using 2 cords (Left, Right).
3. VIDEO OUT connector
VIDEO:
Connects to the video input connector on the TV.
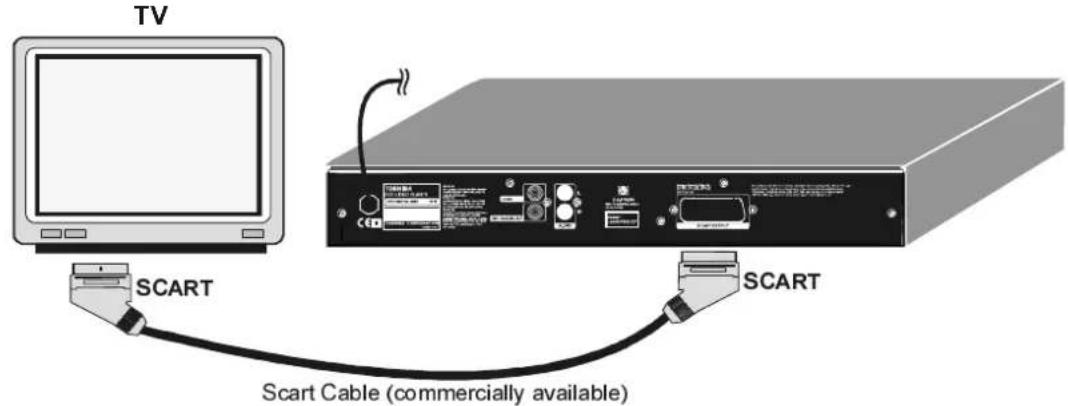
4. SCART connector
Connects to the scart-input connector on the TV.
CONNECTION OF YOUR DVD PLAYER WITH TV
Be sure to turn off the power of each component before making the connections.
Scart socket:
RGB signal via scart cable gives you the best picture performance. If your DVD player will not be connected to a hi-fi set or A/V amplifier to hear better sound, scart is enough for both audio & video connections.
Video & Audio Output RCA Jacks:
Video (yellow) & audio (Red: right, White: left) output jacks can be used to connect the DVD player to your TV set via cables. To make this connection, your TV set must have Video & audio input connectors. This type of connection is alternative to scart connection. Picture quality is not as good as SCART RGB connection but audio performance is the same.
CONNECTION OF YOUR DVD PLAYER WITH AV AMPLIFIER
Be sure to turn off the power of each component before making the connections.
Analog Audio Output Jacks:
To get better sound quality, the unit can be connected to an amplifier via analog audio left/right outputs.

Digital Audio Output Connectors:
For the best sound, the unit can be from the coaxial digital audio output to an AV amplifier with a built-in Dolby Digital or DTS decoder. By using 6 speakers, user can enjoy the 5.1 channel surrounding sound.
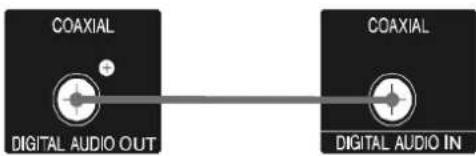
NOTE:
- When this unit is connected to a separate Decoder Box or Amplifier through the DIGITAL AUDIO OUT connector, you may sometimes hear a short noise when selecting the sound system in the DVD Menu. This is not a malfunction.
FITTING BATTERIES IN YOUR REMOTE CONTROL
First open the battery cover on the underside of the remote control. Fit both batteries 1.5Volt (R03/AAA) referring to the imprinted symbols (+/-) in the battery case and put on the battery cover again.
While using the remote control, direct it towards the front of the DVD player. If the remote control does not work or the chosen function could not be made, the batteries are most probably exhausted and they should be replaced as soon as possible. Please use only leak proof batteries. If you will not be using your remote control for a long time, it is recommended to take out the batteries from your remote control.
REMOTE CONTROL FUNCTIONS

1. TIME button
Changes the playing time display mode of the disc, title, track, on the OSD and front panel display.
2. OPEN/CLOSE (▲button
Opens or closes the disc tray.
3. Number buttons
Press to enter track/chapter/title/time numbers directly.
4. SEARCH MODE button
Press to select the unit for search (title, chapter, track, time)
5. TOP MENU button
Displays the title menu on the TV screen or activates the digest menu in Picture CD(JPEG).
6. MENU button
Displays the DVD root menu on screen. During VCD playback, shows the VCD menu if it exists. Press again to resume playback.
7. SLOW BUTTONS
Use these buttons for forward and reverse slow playback
8. PLAY/PAUSE button
Plays/pauses the disc. For any DVD title that has a root menu with still picture, this button functions as "button select" (selects highlighted item) in the root menu. Otherwise this functioning of "Play/Pause" button on the root menu will be prohibited by the disc, and "💡" will appear.
9. SEARCH/REV-FWD
Press to adjust the forward and reverse playback at different speeds during playback (fast forward/reverse) or during pause mode (slow motion).
10. SKIP ◀ button
Press once midway through a chapter or track to go back to the beginning of the current chapter or track during playback. When pressed twice in quick succession, playback will start from the preceding chapter or track.
11. STOP button
Stops playing disc.
12. SETUP/DISP
Displays the current playing status or set-up menu on the TV screen.
13. Arrow buttons
Move to the items or settings.
14. ENTER button
Executes the items or settings.
15. ON/STANDBY button
Turns the unit on or switches the unit to standby mode
16. AUDIO button
Changes the language of the sound while playing a DVD.
17. SUBTITLE button
Changes the language of the subtitle while playing a DVD.
18. ANGLE button
Changes the angle when playing a DVD disc recorded with multiple angles.
19. A - B RPT button
Press to execute the A - B repeat play.
20. +10 button
For the track numbers which are greater than "9" use +10 button. Each press increases the number by 10. Then type the second digit of track number..
21. PLAY MODE button
Press to execute disc/title/chapter repeat.
22. RETURN button
Returns to the preceding selection screen.
23. PROGRAM button
Press to enter the program menu in stop mode for audio CD, MP3 CD and JPEG CD.
24. ZOOM button
Zooms the picture.
Press to go to the next chapter or track during playback and next frame during pause.
26. CLEAR button
Using this button you can delete the mistyped entries or you can cancel some functions.
DVD PLAYBACK
Preparations
Turn on your audio system if the player has been connected to an audio system and turn on your TV.
Basic Play
- Press on the ON/STANDBY button
- Press OPEN/CLOSE (▲) to open the disc tray.
- Place a disc onto the tray
Hold the disc without touching either of its surfaces, position it with the printed title side facing up, align it with the guides, and place it in its proper position. - Press OPEN/CLOSE (▲).
The disc tray closes and play commences if the disc does not have any menus recorded on it.
A menu may appear on the TV screen after a few moments or the film may start immediately after the introduction of the Film Company. This behaviour depends on the disc content and may change.
NOTE:
- Step 5 and 6 are available only when a menu is recorded on the disc.
-
Press ◀/▶/▼/▲ or the number button(s) to select the preferred title.
-
Press ENTER.
Playback of the selected item now starts. The played item may be a motion picture, a still picture or another submenu depending on the disc.
NOTE:
- When using menus, the disc controls the behaviour of the player.
- For stopping play and returning to the menu screen (when a menu is available on the disc), press MENU or TOP MENU button depending on the disc. Play is suspended, and the Disc menu screen is displayed.
After operation
When the unit is not in use, remove the disc and press ON/STANDBY to turn off the unit.
NOTE:
- The disc continues to rotate while the menu is displayed even after the player has finished playing a particular item. When no further selections are to be played, be sure to press the STOP (■) button to clear the menu display.
- If the disc is placed in upside down ( and it is a single sided disc), the VFD display on the player will indicate bAd dl.
For your reference:
If an action corresponding to a button is prohibited, the "↓" symbol appears.
Bookmark
During playback of DVD, VCD (with PBC off, see page 20) or CD DA you can mark three positions and start playback from those positions later.
Saving the position
- Press PROGRAM button during playback of a DVD, VCD or CDDA.
- Bookmark screen is displayed.
- Select the bookmark in which you want to save the current position by using the arrow keys.
- Press ENTER to save the current playback position.
The time is saved to the bookmark selected and is displayed in the list.
Playback of bookmarks
- Press PROGRAM button to open the bookmark screen.
- Bookmark screen is displayed.
- Highlight one of the bookmarks that you saved before.
- Press ENTER.
The playback will resume from that position.
Clearing bookmarks
- Press PROGRAM button to open the bookmark screen.
- Bookmark screen is displayed.
- Select the bookmark you want to clear.
- Press CLEAR
The content of the bookmark is cleared.
To close bookmark screen press PROGRAM again.
NOTE:
Bookmarks are cleared when you eject the disc or when you turn off your player.
Stopping Play
To stop the play permanently, press STOP (■) twice. When the STOP (■) button is pressed for the first time, a message "PRESS PLAY KEY TO CONTINUE" will appear on the screen to remind you if you want to continue the play. To stop the play press the STOP (■) button again or you can press PLAY/ PAUSE to continue playback.
Fast Forward / Reverse
Press FWD ▶ or REV ◀ on the remote control during playback.
The speed of forward or reverse changes for every press of the FWD ▶ or REV ◀ button.
Normal play is resumed when the PLAY/PAUSE button is pressed.
Skip Forward / Backward
A chapter is skipped forward or backward each time the button is pressed.
When the SKIP is pressed once midway through a chapter, play returns to the start of that chapter. When it is pressed again in quick succession, a previous chapter is skipped each time the button is pressed.
Pause
Press PLAY/PAUSE once during playback.
The picture will go to pause mode.
To return to normal play:
Press PLAY/PAUSE again.
Step Forward
Press PLAY/PAUSE once during playback.
Press SKIP/STEP▶.
The next frame of the movie is displayed.
NOTE:
- Reverse stepping is not available.
Slow motion Play Forward / Backward
Press PLAY/PAUSE once during playback.
Press SLOW (◀ Slow Backward or Slow Forward ▶) to increase or decrease the speed of the slow motion play.
The speed of slow motion play is displayed on the screen each time you change it.
To return to normal play:
Press PLAY/PAUSE.
Direct Selection of Scenes
Selecting Scenes by Chapter Number
Press SEARCH on the remote control once during playback.
The chapter/title search box is displayed on the screen. You can see the total number of chapters as -/xx.
Enter the number of the chapter using number buttons.
The selected chapter is played just after you enter all the chapter number digits or when you press ENTER after entering some digits.
You can clear the field by pressing the CLEAR button if you enter wrong number.
You can press RETURN key to cancel chapter search.
NOTE:
- If you attempt to enter a number greater than the total number of chapters on the current title, it clears the numbers entered and waits for you to enter again.
- If you wait ten seconds without pressing any key for selecting scenes by chapter number operation is cancelled.
Selecting Scenes by Title Number
Press SEARCH on the remote control once during playback.
The chapter/title search box is displayed on the screen.
Press ◀ (Left) button on the remote control to select the title field in the search box to change the title.
You can see the currently playing title and total number of titles as -/xx.
Enter the number of the title using number buttons.
The selected title is played just after you enter all the title number digits or when you press ENTER after entering some digits.
You can clear the field by pressing the CLEAR button if you enter wrong number.
You can press RETURN key to cancel title search.
NOTE:
- If you attempt to enter a number greater than the total number of titles, it clears the numbers entered and waits for you to enter again.
- If you wait ten seconds without pressing any key for selecting scenes by title number, the operation is cancelled.
Selecting Scenes by Time
You can view the DVD starting from any time point you want.
Press SEARCH on the remote control "twice" during playback.
The time search box is displayed on the screen. You can see the total runtime of the title as --:--:--/xx:xx:xx
Enter the time using number buttons.
The title is played beginning from the desired time just after you enter the time, if not prohibited by the DVD.
You can clear the fields by pressing the CLEAR button if you enter wrong numbers.
You can press RETURN key to cancel time search.
NOTE:
- If you attempt to enter a number greater than the total time of the current title, it clears the numbers entered and waits for you to enter again.
- If you wait ten seconds without pressing any key for entering time, selecting scenes by time operation is cancelled.
Repeat Play
Repeat Viewing
Press PLAYMODE during playback.
Each time this button is pressed, a different repeat box is displayed on the screen.
If "CHAPTER REPEAT" is displayed, the current chapter will be played again.
If "TITLE REPEAT" is displayed, the current title will be played again.
If "REPEAT OFF" is displayed, the repeat mode is disabled.
NOTE:
- Repeat play may be prohibited by some DVD titles.
Repeating sections between two specific points.
(A - B repeat)
Press A-B RPT during playback at the point where repeat play is to commence (A).
"A TO B SET A" is displayed.
Press A-B RPT again at the point where repeat play is to be concluded (B).
"A TO B SET B" is displayed and the repeat play of the selection between points A and B starts, if not prohibited by the DVD.
To return to normal play:
Press A-B RPT again. "A TO B CANCELLED" is displayed and the A-B Repeat is disabled.
Convenient Functions
Displaying the time information
Press SETUP/DISP during playback.
During playback, when this button is pressed, some information is displayed on TV screen to indicate the current status of the disc. In the display screen you can find the following information lines:
Line 1: Title & Chapter Numbers
Line 2: Audio Format, Number of Output Channels & Audio Language
Line 3: Subtitle Language Number & Subtitle Language
Line 4: Time Counter Mode & Time Counter
Pressing SETUP/DISP button once more closes this information screen.
You can also reach time information screen by pressing TIME key.
Time counter modes can be selected by pressing TIME key consecutively.
First hit to TIME key: TITLE ELAPSED Mode
Second hit to TIME key: TITLE REMAIN Mode
Third hit to TIME key: CHAPTER ELAPSED Mode
Fourth hit to TIME key: CHAPTER REMAIN Mode
If "TITLE ELAPSED" is displayed, the elapsed time for the title is being displayed on the VFD display.
If "TITLE REMAIN" is displayed the remaining time for the title is being displayed on the VFD display.
If "CHAPTER ELAPSED" is displayed, the elapsed time for the chapter is being displayed on the VFD display.
If "CHAPTER REMAIN" is displayed, the remaining time for the chapter is being displayed on the VFD display.
Displaying a scene with a larger and closer view
ZOOM function enables you to take a closer look at the scene you are viewing. This is especially useful when you are watching science fiction or an adventure film.
NOTE: Pressing ZOOM key consecutively will change the zoom ratios. You can move in the picture i.e change the zoomed location by using the ◀ / ▶ / ▼ / ▲ arrow keys.
To return to normal play:
Press ZOOM again. "ZOOM OFF" is displayed on the screen and the picture is now in its normal size.
Displaying / Changing Subtitle Language
It is possible to change the subtitle language from the one selected at the initial settings to a different language, if available.
(This operation works only with discs on which multiple subtitle languages are recorded, if not prohibited by the disc.)
Press SUBTITLE during playback.
When no subtitles are recorded "↓" will be displayed instead of the selected language.
Press SUBTITLE a number of times until the preferred language is selected.
When this button is pressed once, the first subtitle recorded on the disc will be displayed. The subtitles recorded will be displayed in sequence for every press of the SUBTITLE button cyclically.
To turn off the subtitles, press subtitle a number of times until "SUBTITLE OFF" appears on the screen.
NOTE:
- When the preferred language is not selected even after pressing the button several times, it means that the language is not available on the disc.
- When the player is restarted or the disc is changed, the subtitle selection is automatically changed back to the initial settings.
Changing Audio Soundtrack Language
It is possible to change the audio language from the one selected at the initial settings to a different language, if available.
(This operation works only with discs on which multiple audio soundtrack languages are recorded, if not prohibited by the DVD.)
Press AUDIO during playback.
Press AUDIO a number of times until the preferred language is selected.
NOTE:
- When the preferred language is not selected even after pressing the button several times, it means that the language is not available on the disc.
- When the standby is turned on or the disc is removed, the language heard is the one selected at the initial settings. If this language is not recorded on the disc, only the available language on the disc will be heard.
Viewing From Another Angle
Some DVD discs may contain scenes, which have been shot simultaneously from a number of different angles. For these discs, the same scenes can be viewed from each of these different angles using the ANGLE button.
The number of recorded angles differs depending on the disc used.
("y/x") is displayed briefly on the screen during playback. This indicates that the multi-angle scene has just started. Also on unit's display (VFD) 'ANGLE' message appears. From that moment on, the y^th angle of total x angles is played and you can change the viewing angle until the end of the multi-angle scene.
In SETUP menu, an 'ANGLE MARK' option exists, which, if enabled, will display a continuous angle mark on the screen as long as multi-angle scene is available.
Press ANGLE during playback.
The current angle is changed
Press ANGLE a number of times until the preferred viewing angle is selected.
NOTE:
- This function will only work on discs where different angles have been recorded.
- The viewing angles are shown on the screen. You can select one from them for viewing.
- If you press ANGLE outside of a multi-angle scene on a multi-angle title, “▼” is displayed. It means that only one angle is currently available.
Using a DVD Menu
Some DVD discs have unique menu structures called DVD menus. For example, DVDs programmed with complex content provide guide menus, and those recorded with various languages provide menus for audio and subtitle language. Although the DVD menus' content and operation differ from disc to disc, the following explains basic operation when this feature is used.
Press TOP MENU or MENU during playback.
The DVD menu available on the disc is now displayed.
NOTE:
- If you press MENU, the root menu of DVD is displayed.
- If you press TOP MENU, the menu of the current title is displayed.
Press ◀ / ▶ / ▼ / ▲ to select the preferred item.
Press ENTER
The selected item is now executed.
You can play any track you want, just by pressing the corresponding number button.
For the track numbers which are greater than "9" use +10 button. Each press increases the number by 10. Then type the second digit of track number.
If you attempt to enter a number greater than the total number of tracks on disc, "↓" symbol is displayed on screen.
NOTE:
- Some DVDs may not contain root and/or title menus.
VIDEO CD PLAYBACK
Preparations
Press on the standby button of your audio system if the player has been connected to an audio system.
Basic Play
- Press on the standby button
- Press OPEN/CLOSE (▲) to open the disc tray.
- Place a disc onto the tray
Hold the disc without touching either of its surfaces, position it with the printed title side facing up, align it with the guides, and place it in its proper position.
- Press OPEN/CLOSE
The disc tray is closed.
For Video CDs without playback control:
Play commences immediately.
For Video CDs provided with playback control:
If disc contains a menu, it will appear on the screen after a few moments.
Bookmark
Please see page 16 for bookmark operation.
Menu Play
This function works only with video CDs with playback control (version 2.0)
The details differ depending on the disc concerned. Also refer to the instructions accompanying the disc.
After steps 1 to 4 above the menus are displayed on the TV screen
- Press the number button(s) to select the preferred item.
The player now starts to play the selected item.
NOTE:
- Use +10 button to enter two-digit-numbers.
- ◀ / ▶ / ▼ / ▲ arrow buttons are not used for selecting items for video CDs.
What is playback control (PBC)?
If a video CD has " playback control " written on the jacket of disc, it means that particular scenes or information can be selected for viewing interactively with TV screen using the menu screen.
NOTE:
- TOP MENU button is dedicated to PBC " playback control" during VCD playback. You can change PBC mode to ON or OFF using this button.
When switching from PBC off to PBC on mode, playback will start from the beginning of the disc.
- PBC on is default. Whenever you insert a disc, it will be on
After operation
When the unit is not in use, remove the disc and press
ON/STANDBY to turn off the unit.
NOTE:
- The disc continues to rotate while the menu is displayed even after the player has finished playing a particular item. When no further selections are to be played, be sure to press the STOP (■) button to clear the menu display.
- If the disc is placed in upside down (and it is a single sided disc), the VFD display on the player will indicate BAD DISC.
For your reference:
When "▼" symbol appears while a button is pressed on up-left corner of OSD (On - Screen - Display), it means that the player, or the disc prohibits the corresponding operation.
Stopping Play
To stop the play permanently, press STOP (■) twice. When the STOP (■) button is pressed for the first time, a message "PRESS PLAY KEY TO CONTINUE" will appear on the screen to remind you if you want to continue the play. To stop the play press the STOP (■) button again or you can press PLAY/ PAUSE to continue playback.
Fast Forward / Reverse
Press REV ◀ or FWD ▶ during playback.
Normal play is resumed when the PLAY/PAUSE button is pressed.
The speed of advance or reverse changes for every press of the FWD or REV button.
Skip Forward / Backward
Press SKIP ◀ or SKIP/STEP▶ during playback.
A track is skipped forward or backward each time the button is pressed.
When the SKIP button is pressed once midway through a track, play returns to the start of that track. When it is pressed again in quick succession, a previous track is skipped each time the button is pressed.
Pause
Press PLAY/PAUSE once during playback.
The screen suspends.
To return to normal play:
Press PLAY/PAUSE again.
Step Forward
Press PLAY/PAUSE once during playback.
The screen suspends.
Press SKIP/STEP ▶▶.
The next frame of the movie is displayed.
NOTE:
- Reverse stepping is not available.
Slow motion Play Forward / Backward
Press PLAY/PAUSE once during playback.
The screen suspends.
Press SLOW (Slow Backward ◀ or Slow Forward ▶) to increase or decrease the speed of the slow motion play.
The speed of slow motion play is displayed on the screen each time you change it.
To return normal play:
Press PLAY/PAUSE.
Direct Selection of Scenes
Selecting Scenes by Time (only for version 2.0
VCDs)
You can view the video CD, starting from any time point you want.
Press SEARCH on the remote control once during playback.
The time search box is displayed on the screen as TRACK TIME __ : __ : __ / xx : xx : xx
Enter the time using number buttons.
Player goes to entered time of the current track.
Press SEARCH on the remote control two times during playback.
The time search box is displayed on the screen as DISC TIME __ : __ : __ / xx : xx : xx
Enter the time using number buttons.
Player goes to entered time of the disc.
If you give up entering the time simply press RETURN, and the operation is cancelled.
NOTE:
- PBC will be turned off automatically when disc search is activated.
-
Disc search is available only when PBC is off. (See Page 20).
-
If you attempt to enter a number greater than the total time of the disc or current title, it clears the numbers entered and waits for you to enter again.
- If you wait ten seconds without pressing any key for selecting scenes, the operation is cancelled.
Accessing tracks using number buttons:
You can play any track you want, just by pressing the corresponding number button.
For the track numbers which are greater than "9" use +10 button. Each press increases the number by 10. Then type the second digit of track number.
If you attempt to enter a number greater than the total number of tracks on disc, “↓” symbol appears on up-left corner of screen.
NOTE:
- This operation is available only when PBC is off.(See Page 20).
Repeat Play
Press PLAY MODE during playback.
Each time this button is pressed, a different repeat box is displayed on the screen.
If "REPEAT TRACK" is displayed, the current track will be played again.
If "REPEAT ALL" is displayed, the whole disc will be played again.
If "REPEAT OFF" is displayed, the repeat mode is disabled.
NOTE:
Repeat Modes are available only when PBC is off.(See Page 20)
Repeating sections between two specific points.(A
- B repeat)
Press A-B RPT during playback at the point where repeat play is to commence (A).
"A TO B SET A" is displayed on screen.
Press A-B RPT again at the point where repeat play is to be concluded (B).
"A TO B SET B" is displayed and the repeat-play of the selection between points A and B starts.
To return to normal play:
Press A-B RPT again. "A TO B CANCELLED" is displayed and the A-B Repeat is disabled.
NOTE:
- If you give up entering the point B after entering A simply press RETURN, and the operation is cancelled.
Convenient Functions
Displaying the time information
Press TIME during playback.
Each time this button is pressed, a different time information box is displayed on the screen.
If "SINGLE ELAPSED" is displayed, the VFD display on the unit shows the elapsed time for the track which is being played
If "SINGLE REMAIN" is displayed, the VFD display on the unit shows the remaining time for the track which is being played
If "TOTAL ELAPSED" is displayed, the VFD display on the unit shows the elapsed time for the disc which is being played
If "TOTAL REMAIN" is displayed, the VFD display on the unit shows the remaining time for the disc which is being played
Displaying a scene with a larger and closer view
This zoom in function enables you to take a closer look at the scene you are viewing.
This is especially a useful function when you are watching science fiction or an adventure film.
Press ZOOM during playback.
You can change the zooming ratio by pressing ZOOM button more than once.
NOTE:
- You can move in the picture i.e change the zoomed location by using the ◀ / ▶ / ▼ / ▲ arrow keys.
To return to normal play:
After the biggest zoom ratio, press ZOOM again. "Zoom Off" is displayed on the screen and the picture is now in its normal size.
Intro - Digest menu
Press STOP button if it is in play mode.
Press MENU button in order to see the menu. This menu contains:
- Intro
- Disc
- Track
- Exit
Intro
Intro menu is used for introducing the content of the disc.
When you select INTRO option, it plays only first 10 seconds of each track and then passes to the next track.
After the last track it stops playing.
Disc
When you select DISC option, unit goes into digest mode and 9 pictures each of which shows the first scene of the tracks are displayed on the screen.
Using the arrow keys, a picture can be selected. When it is focused, the picture starts playing within the frame.
Press ENTER button to start full-screen playback of the selected scene.
Press SKIP/STEP ▶ or SKIP ◀ button in order to display next or previous 9 scenes in digest mode.
Track
When you select TRACK option, unit goes into digest mode and 9 pictures which show different scenes from the first track, are displayed on the screen.
Using the arrow keys, a picture can be selected. When it is focused, the picture starts playing within the frame.
Press ENTER button to start playing of the selected scene.
Press SKIP/STEP ▶ or SKIP ◀ button in order to display 9 scenes of next or previous track.
Exit
Use this option to quit the menu.
AUDIO CD PLAYBACK
Preparations
Turn on your audio system if the player has been connected to an audio system.
Basic Play
- Press the ON/STANDBY button
- Press OPEN/CLOSE (▲) to open the disc tray.
- Place a disc onto the tray
- Press OPEN/CLOSE (▲)
Play is commenced.
After operation
When the unit is not in use, remove the disc and press
ON/STANDBY to turn off the unit.

NOTE:
- If the disc is placed in upside down ( and it is a single sided disc), the VFD display on the player will indicate "bAd dl".
For your reference:
When “↓” appears while a button is being operated, it means that the corresponding operation is prohibited by the player.
Bookmark
Please see page 16 for bookmark operation.
Stopping Play
To stop the play permanently, press STOP (■) twice. When the STOP (■) button is pressed for the first time, a message "PRESS PLAY KEY TO CONTINUE" will appear on the screen to remind you if you want to continue the play. To stop the play press the STOP (■) button again or you can press PLAY/ PAUSE to continue playback.
Fast Forward / Reverse
Press ▶ FWD or REV ◀ during playback.
The speed of advance or reverse changes for every press of the FWD or REV button.
Normal play is resumed when PLAY/PAUSE button is pressed.

NOTE:
No sound will be heard during rapid advance or rapid reverse.
Skip Forward / Backward
Press SKIP or SKIP/STEP during playback.
A track is skipped forward or backward each time the button is pressed.
When the SKIP button is pressed once midway through a track, play returns to the start of that track. When it is pressed again in quick succession, a previous track is skipped each time the button is pressed.
Pause
Press PLAY/PAUSE once during playback.
The play suspends.
To return to normal play:
Press PLAY/PAUSE again.
Direct Selection of Tracks
Selecting by Time
You can play the audio CD starting from any time point you want.
Press SEARCH on the remote control during playback.
The time search box is displayed on the screen as TRACK TIME __ : __ : __ / xx : xx : xx
Enter the time using number buttons.
Player goes to the entered time of the current track.
Press SEARCH on the remote control two times during playback.
The time search box is displayed on the screen as DISC TIME __ : __ : __ / xx : xx : xx
Enter the time using number buttons.
Player goes to the entered time of the disc.
NOTE:
If you give up entering the time simply press RETURN, and the operation is cancelled.
- If you wait ten seconds without pressing any key for selecting tracks, the operation is cancelled.
Accessing tracks using number buttons
You can play any track you want, just by pressing the corresponding number button.
For the track numbers which are greater than "9" use +10 button. Each press increases the number by 10. Then type the second digit of track number.
If you attempt to enter a number greater than the total number of tracks on disc, "↓" symbol is displayed on screen.
Repeat Play
Press PLAY MODE during playback.
Each time this button is pressed, a different repeat box is displayed on the screen.
If "REPEAT TRACK" is displayed, the current track will be played again.
If "REPEAT ALL" is displayed, the whole disc will be played again.
If "REPEAT OFF" is displayed, the repeat mode is disabled.
NOTE:
If the play list is active, the playlist is repeated instead of the whole disc in "Repeat All" case.
Repeating sections between two specific points.
(A - B repeat)
Press A-B RPT during playback at the point where repeat play is to commence (A).
"A TO B SET A" is displayed.
Press A-B RPT again at the point where repeat play is to be concluded (B).
"A TO B SET B" is displayed and the repeat-play of the selection between points A and B starts.
To return to normal play:
Press A-B RPT again. "A TO B CANCELLED" is displayed and the A-B Repeat is disabled.
NOTE:
If you give up entering the point B after entering A simply press RETURN, and the operation is cancelled.
Convenient Functions
Displaying the time information
Press TIME during playback.
Each time this button is pressed, an information box is displayed on TV screen to indicate the status of the time displayed on the VFD display.
If "SINGLE ELAPSED" is displayed, the VFD display on the unit shows the elapsed time for the track that is being played.
If "SINGLE REMAIN" is displayed, the VFD display on the unit shows the remaining time for the track which is being played.
If "TOTAL ELAPSED" is displayed, the VFD display on the unit shows the elapsed time for the disc which is being played
If "TOTAL REMAIN" is displayed, the VFD display on the unit shows the remaining time for the disc which is being played.
Program Function
Press STOP button if it's playing.
Press PROGRAM button to select program mode.
Enter track numbers that you want to add to program list.
For the track numbers which are greater than "9" use +10 button. Each press increases the number by 10. Then type the second digit of track number.
Press PLAY/PAUSE button to finish the program entry.
Screen is cleared and it will start playing the program list.
NOTE:
- If you attempt to enter a number greater than the total number of tracks on disc, it clears the numbers entered and waits for you to enter again.
You can remove the last track of the play list by pressing the CLEAR button.
The program is cancelled when:
- The disc tray is opened or closed.
- The power is turned off.
Intro Menu
Press STOP button if it is playing.
Press MENU button in order to see the menu. This menu contains:
-
Intro
-
Shuffle On/Off
-
Program
-
Exit
Intro
Intro menu is used for introducing the content of the disc.
When you select INTRO option, it plays only first 10 seconds of each track and then passes to the next track.
After the last track it stops playing.
Shuffle
When you set SHUFFLE on, it plays the tracks once in a random order.
Program
When you select PROGRAM option, it activates the program mode.
Exit
Use this option to quit menu.
CD MENU
To see the directory structure (menu) of JPEG/MP3/MPEG CDs, you should set CD MENU option to WITH MENU in setup page. (See Page 30.)
If CD MENU option is set to NO MENU, the content is automatically played without displaying menu.
Basic Play
- Press the ON/STANDBY button
- Press OPEN/CLOSE to open the disc tray
- Place a CD-R / CD-RW disc onto the tray
- Press OPEN/CLOSE to close the disc tray
DISC LOADING message appears on screen. Please wait for a moment.
CD MENU is displayed. Directories are on the left part and files in the selected directory are on the right part.
- Press UP/DOWN to select file to be played.
In the stop mode you can navigate in all directories. If an MP3 track is playing, only the current directory can be used for navigation.
- Press ENTER, ◀, to switch between directories & files
On the right part:
On the right part press RETURN to go to parent directory.
Press ◀to switch to directories.
On the left part :
Press ▶ or ENTER to switch to files. Selected directory content is displayed on the right after reading directory. First item is highlighted initially.
- Press ENTER on a file to play
Alternatively, you can press corresponding number keys to select a file in current directory.
MP3/MPEG File :
Selected MP3/MPEG starts to play.
Elapsed or Remaining Time is displayed according to Time Mode.
JPEG File :
Selected JPEG is displayed in full screen.
Slide Show starts automatically.
Pause
Press PLAY/PAUSE once during playback.
The play suspends. PAUSE message appears on screen.
To return to normal play:
Press PLAY/PAUSE again.
Stopping Play
To stop the play permanently, press STOP (■) twice. When the STOP (■) button is pressed for the first time, a message "PRESS PLAY KEY TO CONTINUE" will appear on the screen to remind you if you want to continue the play. To stop the play press the STOP (■) button again or you can press PLAY/ PAUSE to continue playback.
Fast Forward / Reverse
For MP3/MPEG:
Press REV ◀ / FWD ▶ during playback to decrease/increase play speed.
NOTE:
- No sound will be heard during fast forward or reverse.
Skip Forward / Backward
For JPEG :
Press SKIP or SKIP / STEP during playback.
Previous or next file in the current directory will be played.
Image transformation
Only for JPEG :
Press PLAY to start slide show.
There are three modes of transformation:
- Invert
- Left
- Right
These operations are allowed only when a picture is being displayed normally, and will be cancelled automatically when a new picture is displayed. The arrow keys are used to select the different transformation modes.
Press ▲ to invert/normal
Press ◀ to turn left
Press ▶ to turn right
Zoom
Only for JPEG:
Press PLAY to start slide show.
For JPEG pictures ZOOM IN / OUT and ZOOM PAN functions are available.
Press ZOOM to turn on/off this function
When this mode is on, any picture will be displayed at the last ratio selected by the user.
A message will indicate the current ratio on screen.
If zoom mode is on,
Press REV ◀ / FWD ▶ to control the ratio of zoom in/out.
NOTE:
- During ZOOM function, image transformation is disabled.
Digest Mode:
Only for JPEG:
Press PLAY button to start slide show.
Press TOP MENU button during JPEG slide show. Unit goes into digest mode and "9" pictures are displayed on screen.
Using the arrow keys, a picture can be selected.
Press ENTER button to display the selected picture.
Press SKIP/STEP▶or SKIP◀◀ buttons in order to display next or previous "9" pictures in digest mode.
PressTOP MENU button to cancel the digest mode to start playing.
Repeat Modes
Press PLAY MODE to change current repeat mode.
Repeat mode is displayed for a while in slide show mode.
In CD MENU it is displayed at the bottom.
Displaying The Time Information
Press TIME to change displayed time mode.(Only for MP3)
Play Modes
Press STOP button.
Press RIGHT to go to Play Modes menu.
Press ENTER to change play mode.
The options available are:
FOLDER NORMAL
When this play mode is selected, the current folder will be played once.
FOLDER REPEAT
When this play mode is selected, the current folder will be repeated continuously.
DISC SCAN
When this play mode is selected, the first 10 seconds of all tracks will be played.
DISC NORMAL
When this play mode is selected, the disc will be played once.
DISC REPEAT
When this play mode is selected, the disc will be repeated continuously.
SHUFFLE
When this play mode is selected, the tracks in the current folder will be played once in a random order.
SINGLE TRACK
If this option is chosen, the selected track will be played only once.
REPEAT TRACK
If this option is chosen, the selected track will be repeated continuously.
Press ◀ to go to the file list of the current folder and press PLAY/PAUSE to activate the selected playback mode.
For "SINGLE TRACK" and "REPEAT TRACK" modes, press ▲ / ▼ and ENTER to play the selected track.
Program Function
Press PROGRAM to select program mode in stop mode.
Program message is displayed.
Press NUMBER keys to select files in the current directory.
Alternatively, you can use UP / DOWN keys and then press ENTER to add selected file into the program list.
Press STOP to finish program.
PROGRAM MODE will appear at the bottom of CD MENU.
Press PLAY to start program.
Files in the Program list are played sequentially.
NOTE:
- You can use trick mode keys, skip prev/next files, and so on.
- You can remove the last track of the playlist by pressing the CLEAR button during program setup.
• The program remains even after the Program Play ends
If you want to quit program mode:
Press STOP key if a track is being played.
Press PROGRAM key.
Press STOP key again.
The program is cancelled when:
- The disc tray is opened or closed
- The player is turned off
- In each directory change
SMARTNAVI
To see the directory structure (menu) of JPEG/MP3/MPEG/MPEG4/DivX CDs, you should set SMARTNAVI option to WITH MENU in setup page.
If SMARTNAVI option is set to NO MENU, the content is automatically played without displaying menu.
Basic Play
- Press I / (ON / STANDBY) to turn on the power.
- Press OPEN/CLOSE to open the disc tray
- Place a CD-R / CD-RW disc onto the tray
Hold the disc without touching either of its surfaces, position it with the printed title side facing up, align it with the guides, and place it in its proper position.
- Press OPEN/CLOSE to close the disc tray
DISC LOADING message appears on screen. Please wait for a moment.
SMARTNAVI appeared. Directories are on the left part and files in the selected directory are on the right part.
- Press UP/DOWN to select file to be played.
In the stop mode you can navigate in all directories. If an MP3 track is playing, only the current directory can be used for navigation.
- Press ENTER on a file to play
If a file is focused on the left part, the preview of the item is displayed. If a folder is focused on the left part, the total number of files in that directory is displayed.
MP3/MPEG/MPEG4/DivX File :
Selected MP3/MPEG/MPEG4/DivX starts to play.
Elapsed or Remaining Time is displayed according to Time Mode.
JPEG File :
Selected JPEG is displayed in full screen.
Slide Show starts automatically.
Pause
Press PLAY/PAUSE once during playback.
The play suspends. PAUSE message appears on screen.
To return to normal play:
Press PLAY/PAUSE again.
Stopping Play
Press stop (■) twice.
The play is stopped. STOP message appeared on screen for a while.
Fast Forward / Reverse
For MP3/MPEG/MPEG4/DivX :
Press FWD ▶ or REV ◀ during playback to decrease/increase play speed.
NOTE:
- No sound will be heard during fast forward or reverse.
Skip Forward / Backward
Press SKIP / STEP ▶ or SKIP ◀ during playback.
Next or previous file in the current directory will be played.
Image transformation
Only for JPEG :
Press PLAY / PAUSE to start slide show.
There are three modes of transformation:
- Invert
- Mirror
- Left
- Right
These operations are allowed only when a picture is being displayed normally, and will be cancelled automatically when a new picture is displayed. The arrow keys are used to select the different transformation modes.
Press ▲ to invert/normal
Press ▼ to mirror
Press ◀ to turn left
Press ▶ to turn right
Zoom
Only for JPEG:
Press PLAY / PAUSE to start slide show.
It is provided both ZOOM in/out and Zoom pan functions for JPEG pictures.
Press ZOOM to turn on/off this function
When this mode is on, any picture will be displayed at the last ratio selected by the user.
A message will indicate the current ratio on screen.
If zoom mode is on,
Press REV ◀/ FWD ▶ to control the ratio of zoom in/out.
NOTE:
- During ZOOM function, image transformation is disabled.
Repeat Modes
Press PLAY MODE to change current repeat mode.
Repeat mode is displayed for a while in slide show mode.
In SMARTNAVI it is displayed at the bottom.
Displaying The Time Information
Press TIME to change displayed time mode.
Program Function
Press PROGRAM to select program mode in stop mode.
PROGRAM Message appears.
Press NUMBER keys to select files in the current directory.
Alternatively, you can use ▲ / ▼ keys and then press ENTER to add selected file into the program list.
PROGRAM Message appeared with the current file index and the total files in the list.
Press STOP to finish program.
PROGRAM Message is appeared at the bottom of SMARTNAVI.
Press PLAY/PAUSE to start program.
PLAY Message appears.
Files in the program list are played sequentially.
NOTE:
- You can use trick mode keys, skip prev/next files, and so on.
- You can remove the last track of the playlist by pressing the CLEAR button.
- The program remains even after the Program Play ends
If you want to quit program mode:
Press STOP key if a track is being played.
Press PROGRAM key twice.
The program is cancelled when:
- The disk tray is opened or closed
- The player is turned off
- In each directory change
USING SETUP MENU
Press SETUP/DISP key on the remote control when the player is not in playback mode.
The setup menu-main page appears. This is the menu, where you can change the device's settings.
USING MAIN PAGE
Select items using ▼ /▲ up/down arrow buttons.
When selected, the item will be highlighted.
Press ENTER to choose the highlighted item.
The submenu for the selected item appears on the screen.
SETUP menu will only be available when the player is not playing a disc.
In RESUME (Pre-Stop) mode, some pages and some items can not be accessed. On the MAIN page, you can not access VIDEO SETUP and PARENTAL SETUP pages in RESUME mode.
NOTE:
- To close the setup menu, select EXIT SETUP and press ENTER, or press SETUP/DISP.
USING SUB MENUS
Use ◀ / ▶ left/right arrow buttons to switch between left and right menus.
Once you enter any submenu,
Use ▼/▲ up/down arrow buttons to move the highlighted position up and down.
Press ENTER to choose the highlighted option on the right menu.
To close the setup menu, press SETUP/DISP.
NOTE:
- In any submenu, to return to main page, select MAIN PAGE and press ENTER button.
- To close the setup menu, select EXIT SETUP and press ENTER, or press SETUP/DISP.
MENU ITEMS
VIDEO SETUP
- VIDEO SETUP page will not be available if the player is in RESUME (Pre-Stop) mode.
TV DISPLAY:
The aspect ratio of the picture provided by the DVD player can be varied in line with the features available on the TV in use.
The options available are:
NORMAL / PS (4:3 Pan & Scan):
Allows you to see the movie fill the entire screen of your TV, but not the right and left edges. This type of picture can only be viewed, if it is contained on the disc.

NORMAL / LB (4:3 Letterbox):
Allows you to see movies in their original aspect ratio. You will see the entire frame of the movie, but it will occupy a smaller portion of the screen.

WIDE (Wide screen 16:9):
Choose this setting if your DVD player is connected to a wide-screen TV.

NOTE:
- Depending on the format of the DVD disc. (eg. 2.35:1) the picture may still have black lines above and below this picture.
TV TYPE:
The video standard of the DVD player output can be selected from 'MULTI', 'NTSC' or 'PAL'.
If 'MULTI' is selected, the output standard will be either NTSC or PAL depending on the DVD being played.
If 'PAL' is selected, the video output will be converted to PAL standard irrespective of disc standard.
If NTSC is selected, the video output will be converted to NTSC standard irrespective of disc standard.
AUDIO SETUP
It is not possible to connect speakers directly to this DVD player; an AV amplifier must be used.
DOWNMIX MODE:
This mode allows the DVD player analog audio outputs to be matched to the features available on the TV in use. Analog audio outputs can be selected as
STEREO: Two channels stereo.
Use this option if you have a stereo TV or a stereo HI-FI system.
SURROUND:
Do not use this option if your DVD player is not connected to a multichannel TV or multichannel AV receiver. It is particularly important not to enable speakers, which are not present. Otherwise serious sound quality problems will be experienced.
DYNAMIC (Dynamic Range Compression):
Boosts frequency response. This item can be selected between "OFF" and "FULL".
LPCM OUTPUT:
This item can be selected as "LPCM 96K" or "LPCM 48K".
DTS OUTPUT:
DTS Output can be selected as "ANALOG" or "DIGITAL".
ANALOG : Use this setting if your player is connected to your TV or to your audio system through analog audio output or your digitally connected audio system doesn't support DTS decoding feature.
DIGITAL : Use this setting if your player is connected to DTS decoding audio system via digital audio output.
LANGUAGE SETUP
Audio, disc menu and subtitle items will not be available if the player is in RESUME (Pre-Stop) mode.
OSD LANG:
You can select the default OSD language of the player menus
AUDIO:
You can select the default audio language if supported by that DVD disc.
DISC MENU:
You can select the DVD's disc menu language among these languages. Disc menu appears in the selected language, if supported by that DVD disc.
SUBTITLE:
You can select the default subtitle language if supported by that DVD disc.
PARENTAL SETUP
PARENTAL SETUP page will not be available if the player is in RESUME (Pre-Stop) mode.
Playing some DVDs can be limited depending on the age of users. The "Parental Control" function allows playback limitation level to be set by the parent.
PARENTAL SETUP (Parental Level):
Parental Level can be adjusted to one of the eight levels or "NO PARENTAL". "NO PARENTAL" or level "8 ADULT" adjustments let you watch all of the DVD titles ignoring the DVD disc's parental level. You can watch the DVD discs, which have the same or lower parental level than the player's selected level only.
PASSWORD:
Password to change the parental level can be set by using this option.
You have to set a 4-digit password when you select a parental level for the first time. You have to enter your password every time you want to change the parental level. If you forget your password please contact technical service.
Change Password:
Using this item you can change the current password.
To change the password you will be prompted to enter your old password. After you have entered your old password, you can now enter the new 4-digit password.
You can use CLEAR key to delete the incorrect entry.
Press OPEN/CLOSE to activate parental setup setting
PREFERENCES
ANGLE MARK, CD MENU and DEFAULTS items will not be available if the player is in RESUME (Pre-Stop) mode
ANGLE MARK:
This option allows you to turn on /off the angle mark on the screen, which is displayed to indicate that a multi angle scene has started. It also shows which angle you are currently watching.
STANDBY TIME:
Standby activation time can be adjusted or standby can be disabled using this option. If one of the time options is selected, standby is activated, whenever no key is pressed for the selected time duration in stop mode.
CD MENU:
This option allows you to enable or disable the CD MENU, which is used for playing MP3, MPEG or JPEG CDs.
TRANSPARENCY:
Using this option one of the transparency levels can be selected for on screen display.
DEFAULTS:
If you choose RESET and press ENTER button, the factory-presets are loaded. Parental level and parental password do not change.
DIVX(R) Registration :
There is a registration code in this page. This code is utilized to register this player with the DivX(R) Video On Demand service. This will allow you to rent and purchase video using the DivX(R) Video On Demand format.
DivX DRM User Steps:
- The User will open the DivX Registration page by entering the SETUP menu of the Player.
- You will get the DivX VOD registration code via the internet. The address for the DivX VOD website is: www.divx.com/vod
- After entering the address above on the Internet, go to the section where registration is to be made for DivX DRM membership.
- Use the DivX DRM Registration code you receive from the Player to register and set a username and a password for yourself.
- Once the registration process in over, you will download the DivX DRM activation file from the Internet and write it onto a disc.
- After inserting this disc into the player and playing the activation file, you will have a new player DivX DRM Registration code activated for the player DivX DRM.
- When you want to download and watch movies, you will enter the address www.divx.com/vod and will be able to download movies with your pre-designated username and password by paying a certain charge. Upon writing this film on the disc and inserting it into the Player, you can watch these the number of times that you are entitled to watch.
TROUBLESHOOTING
The picture quality is poor (DVD)
- Make sure the DVD disc surface is not damaged. (Scratch, fingerprint etc.)
- Clean the DVD disc and try again.
- Ensure that the DVD disc is in the tray with the label uppermost.
- A damp DVD disc or condensation may affect the equipment. Wait for 1 to 2 hours in Stand-by to dry the equipment.
Disc does not play
- No disc in the machine.
-Place a disc onto the tray.
• Disc incorrectly loaded.
-Ensure that the DVD disc is in the correct guide on the disc tray with the label side up. - Wrong type of disc. The machine cannot play CD-ROMS etc.
-Use disc in supported formats described on page 7. - The region code of the DVD must match the one of the player.
Wrong OSD language
- Select the language in the set-up menu.
The language for the sound or subtitles on a DVD cannot be changed.
- Multilingual sound and/or subtitles not recorded on the DVD.
- Try to change the sound or subtitles using DVD's title menu. Some DVD's do
not allow the user to change these settings without using the disc's menu
Some functions (Angle, Zoom etc) do not work
• These functions are not available on the DVD.
Abnormal or no picture
- Check that the player is connected to TV properly and that all connections between the DVD player and other attached equipment are secure.
- Have you pressed the correct buttons on the remote control? Try once more.
- Make sure the TV TYPE and VIDEO OUTPUT are set correctly in VIDEO SETUP menu.
No sound
- Check the volume is set to an audible level.
- Make sure you have not switched the sound off accidentally.
- Check the connections of the audio connectors, see pages 12 and 13.
Distorted sound
- Check that the appropriate listening mode setting is correct.
No response from remote control
- Make sure the remote control is in the correct mode.
- Check batteries are fitted correctly.
- Change the batteries.
- Operate the remote control within 30^ angle on either side of the remote control sensor, up to a distance of approximately 6 metres.
- Operate the remote control on a straight path of the remote control sensor, up to a distance of approximately 7 metres.
If nothing works
If you have tried the above solutions and none seems to work, try switching your DVD off and on again. If this does not work, contact your supplier or DVD repair technician. Never attempt to repair a defective DVD yourself.
DVD/VCD/CD/CD-R/CD-RW/MP3/MPEG/JPEG/DivX player,
| Power Requirements | 220 - 240V ~ 50 Hz Auto Adjustable Standby mode: 4W 78mA Power ON mode: 11W 109mA |
| Types of Discs Supported | DVD : SS/SL 4.7" (DVD-5) SS/DL 4.7" (DVD-9) DS/SL 4.7" (DVD-10) DS/DL 4.7" (DVD-18) VCD CD-DA CD-R CD-RW MP3 MPEG JPEG Div X |
| Video Type | MPEG-2 Digital Video Standard Decoding (MPEG-1 supported) Full-screen video display of 720 x 576 (PAL) & 720 x 480 (NTSC) pixels 50 and 60 Hz frame refresh rates (PAL & NTSC) Digital bit-stream processing rate up to 2x10,08Mbits/sec for DVD, 8x1.411Mbits/sec for CD. Line resolution: more than 500 lines. |
| Video Output | Analog Video: (With using 4 x 10-bits / 54MHz video DACs) CVBS : PAL / NTSC (Negative synchronised ), 1Vpp @ 75Ω (loaded) RGB+CVBS : Through Full Euroscart Output (Pin-8 Control) |
| Audio Type | Dolby Digital Decoding DTS Digital Output MPEG Multichannel Decoding LPCM |
| Audio Output | Analog Outputs: 24 Bit/ 96 kHz down-sampling DAC 2 RCA jack outputs (Left / Right) Left / Right audio outputs of Full Euroscart Output / Channel: 2 Vrms (0 dB fs, 1kHz) |
| Dimension | 420 mm(W) x 49 mm(H) x 265 mm(D) |
. Design and specifications are subject to change without notice.
DEFINITION OF TERMS
Angle
Recorded onto some DVD discs are scenes, which have been simultaneously shot from a number different angles (the same scene is shot from the front, from the left side, from the right side, etc.). With such discs, the ANGLE button can be used to view the scene from different angles.
Chapter Number
These numbers are recorded on DVD discs. A title is subdivided into many sections, each of which are numbered, and specific parts of video presentations can be searched quickly using these numbers.
DVD
This refers to a high-density optical disc on which high-quality pictures and sound have been recorded by means of digital signals. Incorporating a video compression technology (MPEG II) and high-density recording technology. DVD enables esthetically pleasing full-motion video to be recorded over long periods of time (for instance, a whole movie can be recorded).
DVD has a structure consisting of two 0.6 mm thin discs, which are adhered to each other. Since the thinner the disc, the higher the density at which the information can be recorded, a DVD disc has a greater capacity than a single 1.2 mm thick disc.
Playback Control
This is recorded on a Video CD (Version 2.0). The scenes or information to be viewed (or listened to) can be selected interactively with the TV monitor by looking at the menu shown on the TV monitor.
Subtitles
These are printed lines appearing at the bottom of the screen, which translate or transcribe the dialogue. They are recorded on the DVD discs.
Time Number
This indicates the playtime, which has elapsed from the start of a disc or a title. It can be used to find a specific scene quickly. (Not all discs permit the time search feature to be used. Availability is determined by the disc's manufacturer.)
Title Number
These numbers are recorded on DVD discs. When a disc contains two or more movies, these movies are numbered as title 1, title 2, etc.
Track Number
These numbers are assigned to the tracks which are recorded on Audio CDs. They enable specific tracks to be located quickly.
Video CD
This contains recordings of pictures and sound whose quality is on a par with that of video tape. This player also supports Video CDs with playback control (Version 2.0).
Dolby Digital
Many movie theaters are equipped with 5.1 channel surround systems. This same type of technology is available to you in your home. To enjoy full 5.1 channel surround, your DVD player must be connected to an external Dolby Digital decoder via the digital outputs.
Dolby Pro Logic
This is Dolby Laboratories' technology to decode Dolby Surround encoded programs actively. Dolby Surround programs have four channels of audio (Left, Center, Right and Surround) encoded into a standard 2-channel stereo signal. The rear channel is monaural.
PCM
PCM stands for Pulse Code Modulation and is digital audio.
MPEG
Short for Moving Picture Experts Group. This is an international standard for compression of moving images. On some DVDs digital audio has been compressed and recorded in this format.
DivX
DivX is a digital video compression technology based on MPEG-4 and developed by DivX Networks Inc.

NOTE:
- This DVD player may not support some MP3 recordings due to differences in recording formats or disc type.
- Please read the owner's manual about MP3 playback
- CD-R/CD-RW discs recorded by CD-DA method can be played. Some CD-R/CD-RW discs my be incompatible due to laser pick-up and disc design.
- Some VCD discs may be incompatible.
- DVD-R discs recorded by DVD-Video method can be played. Some DVD-R discs may be incompatible due to laser pick-up and disc design.
- Some discs may be incompatible with JPEG Viewer function due to different recording format or condition of the discs.