
AT-HDVS-210U-TX-WP - Hi-Fi System Atlona - Free user manual and instructions
Find the device manual for free AT-HDVS-210U-TX-WP Atlona in PDF.


| Product Type | 2x1 Switcher and HDBaseT Transmitter |
| Brand | Atlona |
| Model | AT-HDVS-210U-TX-WP |
| Inputs | 1 x HDMI, 1 x USB-C |
| Output | 1 x HDBaseT (RJ-45) |
| Max Video Resolution | 4K/UHD @ 60 Hz with 4:2:0 chroma subsampling |
| HDCP Compliance | HDCP 2.2 |
| Power Supply | PoE (Power over Ethernet) from compatible HDBaseT receiver |
| Form Factor | US one-gang Decora-style wallplate |
| Dimensions (W x H x D) | Standard 1-gang wallplate (approx. 4.5 x 2.75 x 1.5 in) |
| Weight | 0.4 lbs (0.18 kg) |
| Control Methods | RS-232, TCP/IP, Web GUI, Telnet |
| Auto-Switching | Yes, based on hot plug detect and video detection |
| EDID Management | 19 preprogrammed EDIDs, plus downstream EDID saving |
| Cable Distance (4K) | Up to 130 ft (40 m) with CAT6a/7; up to 115 ft (35 m) with CAT5e/6 |
| Cable Distance (1080p) | Up to 330 ft (100 m) with CAT6a/7; up to 200 ft (60 m) with CAT5e/6 |
| LED Indicators | Power, Link, USB-C, HDMI |
| Firmware Update | Via Web GUI or USB port |
| Warranty | 10 years limited |
| Package Contents | Transmitter, white & black faceplates, white & black wallplates, installation guide |
Frequently Asked Questions - AT-HDVS-210U-TX-WP Atlona
User questions about AT-HDVS-210U-TX-WP Atlona
0 question about this device. Answer the ones you know or ask your own.
Ask a new question about this device
Download the instructions for your Hi-Fi System in PDF format for free! Find your manual AT-HDVS-210U-TX-WP - Atlona and take your electronic device back in hand. On this page are published all the documents necessary for the use of your device. AT-HDVS-210U-TX-WP by Atlona.
USER MANUAL AT-HDVS-210U-TX-WP Atlona
Two-Input Wallplate Switcher for HDMI and USB-C with HDBaseT™ Output


AT-HDVS-210U-TX-WP
Atlona Manuals
Switchers
Version Information
| Version Release Date Notes | ||
| 1 12/17 Initial release | ||
| 2 02/18 f/w 1.0.10; added InputStatus and InputBroadcast commands | ||
| 3 04/18 Commands moved to separate API document | ||
Welcome to Atlona!
Thank you for purchasing this Atlona product. We hope you enjoy it and will take an extra few moments to register your new purchase.
Registration only takes a few minutes and protects this product against theft or loss. In addition, you will receive notifications of product updates and firmware. Atlona product registration is voluntary and failure to register will not affect the product warranty.
To register your product, go to http://www.atlona.com/registration
Sales, Marketing, and Customer Support
Main Office
Atlona Incorporated
70 Daggett Drive
San Jose, CA 95134
United States
Office: +1.877.536.3976 (US Toll-free)
Office: +1.408.962.0515 (US/International)
Sales and Customer Service Hours
Monday - Friday: 6:00 a.m. - 4:30 p.m. (PST)
http://www.atlona.com/
International Headquarters
Atlona International AG
Ringstrasse 15a
8600 Dübendorf
Switzerland
Office: +41 43 508 4321
Sales and Customer Service Hours
Monday - Friday: 09:00 - 17:00 (UTC +1)
Operating Notes

IMPORTANT: Visit http://www.atlona.com/product/AT-HDVS-210U-TX-WP for the latest firmware updates and User Manual.
Atlona, Inc. ("Atlona") Limited Product Warranty
Coverage
Atlona warrants its products will substantially perform to their published specifications and will be free from defects in materials and workmanship under normal use, conditions and service.
Under its Limited Product Warranty, Atlona, at its sole discretion, will either:
- repair or facilitate the repair of defective products within a reasonable period of time, restore products to their proper operating condition and return defective products free of any charge for necessary parts, labor and shipping.
OR
- replace and return, free of charge, any defective products with direct replacement or with similar products deemed by Atlona to perform substantially the same function as the original products.
OR
- refund the pro-rated value based on the remaining term of the warranty period, not to exceed MSRP, in cases where products are beyond repair and/or no direct or substantially similar replacement products exist.
Repair, replacement or refund of Atlona products is the purchaser's exclusive remedy and Atlona liability does not extend to any other damages, incidental, consequential or otherwise.
This Limited Product Warranty extends to the original end-user purchaser of Atlona products and is non-transferrable to any subsequent purchaser(s) or owner(s) of these products.
Coverage Periods
Atlona Limited Product Warranty Period begins on the date of purchase by the end-purchaser. The date contained on the end-purchaser 's sales or delivery receipt is the proof purchase date.
Limited Product Warranty Terms – New Products
• 10 years from proof of purchase date for hardware/electronics products purchased on or after June 1, 2013.
• 3 years from proof of purchase date for hardware/electronics products purchased before June 1, 2013.
• Lifetime Limited Product Warranty for all cable products.
Limited Product Warranty Terms - Refurbished (B-Stock) Products
- 3 years from proof of purchase date for all Refurbished (B-Stock) hardware and electronic products purchased on or after June 1, 2013.
Remedy
Atlona recommends that end-purchasers contact their authorized Atlona dealer or reseller from whom they purchased their products. Atlona can also be contacted directly. Visit www.atlona.com for Atlona's contact information and hours of operation. Atlona requires that a dated sales or delivery receipt from an authorized dealer, reseller or end-purchaser is provided before Atlona extends its warranty services. Additionally, a return merchandise authorization (RMA) and/or case number, is required to be obtained from Atlona in advance of returns.
Atlona requires that products returned are properly packed, preferably in the original carton, for shipping. Cartons not bearing a return authorization or case number will be refused. Atlona, at its sole discretion, reserves the right to reject any products received without advanced authorization. Authorizations can be requested by calling 1-877-536-3976 (US toll free) or 1-408-962-0515 (US/international) or via Atlona's website at www.atlona.com.
Exclusions
This Limited Product Warranty excludes:
- Damage, deterioration or malfunction caused by any alteration, modification, improper use, neglect, improper packaging or shipping (such claims must be presented to the carrier), lightning, power surges, or other acts of nature.
Atlona, Inc. ("Atlona") Limited Product Warranty
- Damage, deterioration or malfunction resulting from the installation or removal of this product from any installation, any unauthorized tampering with this product, any repairs attempted by anyone unauthorized by Atlona to make such repairs, or any other cause which does not relate directly to a defect in materials and/or workmanship of this product.
- Equipment enclosures, cables, power supplies, batteries, LCD displays, and any accessories used in conjunction with the product(s).
- Products purchased from unauthorized distributors, dealers, resellers, auction websites and similar unauthorized channels of distribution.
Disclaimers
This Limited Product Warranty does not imply that the electronic components contained within Atlona's products will not become obsolete nor does it imply Atlona products or their electronic components will remain compatible with any other current product, technology or any future products or technologies in which Atlona's products may be used in conjunction with. Atlona, at its sole discretion, reserves the right not to extend its warranty offering in instances arising outside its normal course of business including, but not limited to, damage inflicted to its products from acts of god.
Limitation on Liability
The maximum liability of Atlona under this limited product warranty shall not exceed the original Atlona MSRP for its products. To the maximum extent permitted by law, Atlona is not responsible for the direct, special, incidental or consequential damages resulting from any breach of warranty or condition, or under any other legal theory. Some countries, districts or states do not allow the exclusion or limitation of relief, special, incidental, consequential or indirect damages, or the limitation of liability to specified amounts, so the above limitations or exclusions may not apply to you.
Exclusive Remedy
To the maximum extent permitted by law, this limited product warranty and the remedies set forth above are exclusive and in lieu of all other warranties, remedies and conditions, whether oral or written, express or implied. To the maximum extent permitted by law, Atlona specifically disclaims all implied warranties, including, without limitation, warranties of merchantability and fitness for a particular purpose. If Atlona cannot lawfully disclaim or exclude implied warranties under applicable law, then all implied warranties covering its products including warranties of merchantability and fitness for a particular purpose, shall provide to its products under applicable law. If any product to which this limited warranty applies is a “Consumer Product” under the Magnuson-Moss Warranty Act (15 U.S.C.A. §2301, ET SEQ.) or other applicable law, the foregoing disclaimer of implied warranties shall not apply, and all implied warranties on its products, including warranties of merchantability and fitness for the particular purpose, shall apply as provided under applicable law.
Other Conditions
Atlona's Limited Product Warranty offering gives legal rights, and other rights may apply and vary from country to country or state to state. This limited warranty is void if (i) the label bearing the serial number of products have been removed or defaced, (ii) products are not purchased from an authorized Atlona dealer or reseller. A comprehensive list of Atlona's authorized distributors, dealers and resellers can be found at www.atlona.com.
Important Safety Information
CAUTION
RISK OF ELECTRIC SHOCK
DO NOT OPEN
CAUTION: TO REDUCT THE RISK OF
ELECTRIC SHOCK
DO NOT OPEN ENCLOSURE OR EXPOSE
TO RAIN OR MOISTURE.
NO USER-SERVICEABLE PARTS
INSIDE REFER SERVICING TO
QUALIFIED SERVICE PERSONNEL.

The exclamation point within an equilateral triangle is intended to alert the user to the presence of important operating and maintenance instructions in the literature accompanying the product.

The information bubble is intended to alert the user to helpful or optional operational instructions in the literature accompanying the product.
- Read these instructions.
- Keep these instructions.
- Heed all warnings.
- Follow all instructions.
- Do not use this product near water.
- Clean only with a dry cloth.
- Do not block any ventilation openings. Install in accordance with the manufacturer's instructions.
-
Do not install or place this product near any heat sources such as radiators, heat registers, stoves, or other apparatus (including amplifiers) that produce heat.
-
Do not defeat the safety purpose of a polarized or grounding-type plug. A polarized plug has two blades with one wider than the other. A grounding type plug has two blades and a third grounding prong. The wide blade or the third prong are provided for your safety. If the provided plug does not fit into your outlet, consult an electrician for replacement of the obsolete outlet.
- Protect the power cord from being walked on or pinched particularly at plugs, convenience receptacles, and the point where they exit from the product.
- Only use attachments/accessories specified by Atlona.
- To reduce the risk of electric shock and/or damage to this product, never handle or touch this unit or power cord if your hands are wet or damp. Do not expose this product to rain or moisture.
- Unplug this product during lightning storms or when unused for long periods of time.
- Refer all servicing to qualified service personnel. Servicing is required when the product has been damaged in any way, such as power-supply cord or plug is damaged, liquid has been spilled or objects have fallen into the product, the product has been exposed to rain or moisture, does not operate normally, or has been dropped.


FCC Statement

FCC Compliance and Advisory Statement: This hardware device complies with Part 15 of the FCC rules. Operation is subject to the following two conditions: 1) this device may not cause harmful interference, and 2) this device must accept any interference received including interference that may cause undesired operation. This equipment has been tested and found to comply with the limits for a Class A digital device, pursuant to Part 15 of the FCC Rules. These limits are designed to provide reasonable protection against harmful interference in a commercial installation. This equipment generates, uses, and can radiate radio frequency energy and, if not installed or used in accordance with the instructions, may cause harmful interference
to radio communications. However there is no guarantee that interference will not occur in a particular installation. If this equipment does cause harmful interference to radio or television reception, which can be determined by turning the equipment off and on, the user is encouraged to try to correct the interference by one or more of the following measures: 1) reorient or relocate the receiving antenna; 2) increase the separation between the equipment and the receiver; 3) connect the equipment to an outlet on a circuit different from that to which the receiver is connected; 4) consult the dealer or an experienced radio/TV technician for help. Any changes or modifications not expressly approved by the party responsible for compliance could void the user's authority to operate the equipment. Where shielded interface cables have been provided with the product or specified additional components or accessories elsewhere defined to be used with the installation of the product, they must be used in order to ensure compliance with FCC regulations.
Table of Contents
Introduction 8
Features 8
Package Contents 8
Panel Description 9
Installation 10
RS-232 Connector 10
Connection Instructions 11
Connection Diagram 12
Faceplate Removal and Assembly 13
IP Configuration 14
Setting the IP Mode 14
Setting the IP Address Using Commands 15
Setting the IP Address using the Web GUI 15
Resetting to Factory-Default Settings 16
The Web GUI 17
Accessing the Web GUI 17
Menu Bar 19
Toggles 19
Buttons 20
Info page 21
A/V Settings page 22
Display page 23
CEC 23
System Settings 24
TCP/IP Settings of Controlled Devices 25
RS-232 / IP Commands 26
RS-232 page 27
EDID page 29
Config page 30
System page 31
HDBT page 33
Appendix 34
Internal EDID Data 34
Updating the Firmware 57
Using the Web GUI 57
Using USB 58
Default Settings 60
Specifications 61
Index 62
Introduction
The Atlona AT-HDVS-210U-TX-WP is a 2×1 switcher and HDBaseT transmitter with HDMI and USB-C inputs. It features a US one-gang, Decora-style wallplate form factor, and includes interchangeable black and white wallplates and faceplates. The USB-C input is ideal for AV interfacing with newer Mac®, Chromebook™, and Windows® PCs, as well as smartphones and tablets. Video signals up to 4K/UHD @ 60 Hz with 4:2:0 chroma subsampling, plus embedded audio and control can be transmitted up to 330 feet (100 meters). The HDVS-210U-TX-WP is HDCP 2.2 compliant. It is designed for use with the AT-UHD-EX-100CE-RX-PSE receiver, but can also be used with the AT-HDVS-200-RX receiver and HD scaler, as well as Atlona switchers and matrix switchers with HDBaseT inputs. This transmitter can serve as an integral component of a fully automated AV system, with the convenience of automatic input selection and display control. It is remotely powered by the UHD-EX-100CE-RX-PSE or other Atlona HDBaseT-equipped devices through Power over Ethernet (PoE).
Features
• US one-gang enclosure for Decora-style wallplate openings – interchangeable as black or white
- 2×1 HDBaseT switcher with HDMI and USB-C inputs
- HDBaseT transmitter for AV, power, and control up to 330 feet (100 meters)
- HDCP 2.2 compliant
• 4K/UHD capability @ 60 Hz with 4:2:0 chroma subsampling
- Remotely powered via PoE (Power over Ethernet)
• Automatic display control
• Automatic input selection using hot plug detect and video detection technology
• TCP/IP and RS-232 control of switcher
• EDID management
- HDCP management
- Configured and managed by AMS (Atlona Management System)
• Field-updatable firmware
- Front-panel power and signal status LED indicators
- Award-winning 10 year limited product warranty
Package Contents
1 x AT-HDVS-210U-TX-WP
1 x White faceplate with RS-232 cover
1 x White wallplate
1 x Black faceplate with RS-232 cover
1 x Black wallplate
1 x Installation Guide
Panel Description

Front

Rear
Wallplate with white trim is shown
1 RS-232
Remove this cover to expose the RS-232 port. Connect an RS-232 cable, with a 3-pin captive screw connector, from this port to a control system. Refer to RS-232 Connector (page 10) for more information.
2 PWR
This LED indicator glows solid green when the unit is powered.
3 LINK
This LED indicator glows solid green to indicate the presence of a stable A/V signal.
4 USB-C
This LED indicator glows solid green when the USB-C port is the currently selected port.
5 HDMI
This LED indicator glows solid green when the HDMI port is the currently selected port.
6 HDMI
Connect an HDMI cable from this port to a UHD/HD source.
7 USB-C
Connect an USB cable from this port to a UHD/HD source.
8 HDBaseT OUT
Connect an Ethernet cable from this port to a locally-powered HDBaseT receiver such as the AT-HDVS-200-RX, AT-HDVS-150-RX, or AT-UHD-EX-100CE-RX-PSE.
Installation
RS-232 Connector
The AT-HDVS-210U-TX-WP provides RS-232 control between an automation system and an RS-232 device. This step is optional.
- Remove the small plate covering the RS-232 port on the faceplate.

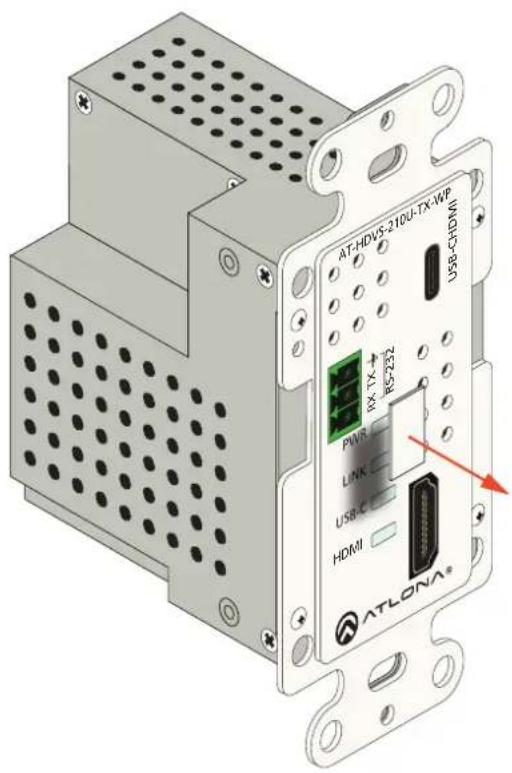
- Use wire strippers to remove a portion of the cable jacket.
- Remove at least 3/16" (5 mm) from the insulation of the RX, TX, and GND wires.
- Insert the TX, RX, and GND wires into correct terminal using the included 3-pin captive screw connector.


Connection Instructions
- Determine the proper faceplate to be used for installation. If using the black faceplate, then refer to Faceplate Removal and Assembly (page 13) for information on changing the faceplate.
- Connect an Ethernet cable, from the HDBaseT OUT port, on the rear of the unit, to one of the following devices. Ethernet cables should use EIA/TIA-568B termination:
a. PoE-compatible receiver (not included), such as the AT-HDVS-200-RX. Refer to Figure 1 on the next page.
b. Atlona Power Over Ethernet Mid-Span Power Supply (AT-PS-POE). Use this option if the system endpoint is not capable of supplying power to the AT-HDVS-210U-TX. Refer to Figure 2 on the next page.
Refer to the tables below for recommended cabling when using Altona products with HDBaseT technology. The green bars indicate the signal quality when using each type of cable. Higher-quality signals are represented by more bars. These table are for guidance, only. Performance may vary, based on environmental factors.
| Core | Shielding | CAT5e | CAT6 | CAT6a | CAT7 |
| Solid UTP (unshielded) N/A | |||||
| STP (sheilded) | |||||
| Performance Rating (MHz) 350 500 | 600 800 | ||||
| Cable Max. Distance @ 4K Max. Distance @ 1080p | ||
| CAT5e / CAT6 115 feet (35 meters) | 200 feet (60 meters) | |
| CAT6a / CAT7 130 feet (40 meters) | 230 feet (70 meters) | |

IMPORTANT: Stranded or patch cable is not recommended due to performance issues. Sheiled cables are strongly recommended to minimize signal noise and interference.
- Complete the installation of the AT-HDVS-210U-TX-WP into the electrical box or mudring. Refer to the Connection Diagram (page 12) if necessary.
- Connect a USB-C cable from the USB-C port to a UHD/HD source.
- Connect an HDMI cable from the HDMI port to a UHD/HD source.
- OPTIONAL: Connect an RS-232 control system to the RS-232 port on the switcher. This port is used to control functions of the AT-HDVS-210U-TX-WP, such as volume up/down, display on/off, etc.
No power supply is required for the AT-HDVS-210U-TX-WP. This unit will be powered over the Ethernet cable, from a compatible HDBaseT receiver.
Connection Diagram
Figure 1
![graph TD A["AT-HDVS-200-RX"] -->|HDMI| B["UHD/HD Display"] A -->|Control| B B --> C["1-gang electrical box or mud ring"] C --> D["AT-HDVS-210U-TX-WP"] D --> E["White Decors®-style wallplate (included)"] D --> F["Wall cross-section"] D --> G["USB-C"] D --> H["Laptop"] D --> I["Laptop"]](/content/2026/05/1127875/images/498c99becbea5c01b8831bfd8adcb47947a6dd466d7cb2beb8a6ac18c831f1eb.jpg)
Figure 2
![graph TD A["AT-PS-POE"] -->|HDBaseT| B["Projector"] B --> C["AT-HDVS-210U-TX-WP"] C --> D["Laptop"] C --> E["USB-C"] C --> F["HDMI"] C --> G["White Decora®-style wallplate (included)"] C --> H["1-gang electrical box or mud ring"] C --> I["Wall cross-section"]](/content/2026/05/1127875/images/c5d6a9b3da227b4d9289a284bf39086a59103b4989cc3a1a6fcab2fd4a723932.jpg)
Faceplate Removal and Assembly
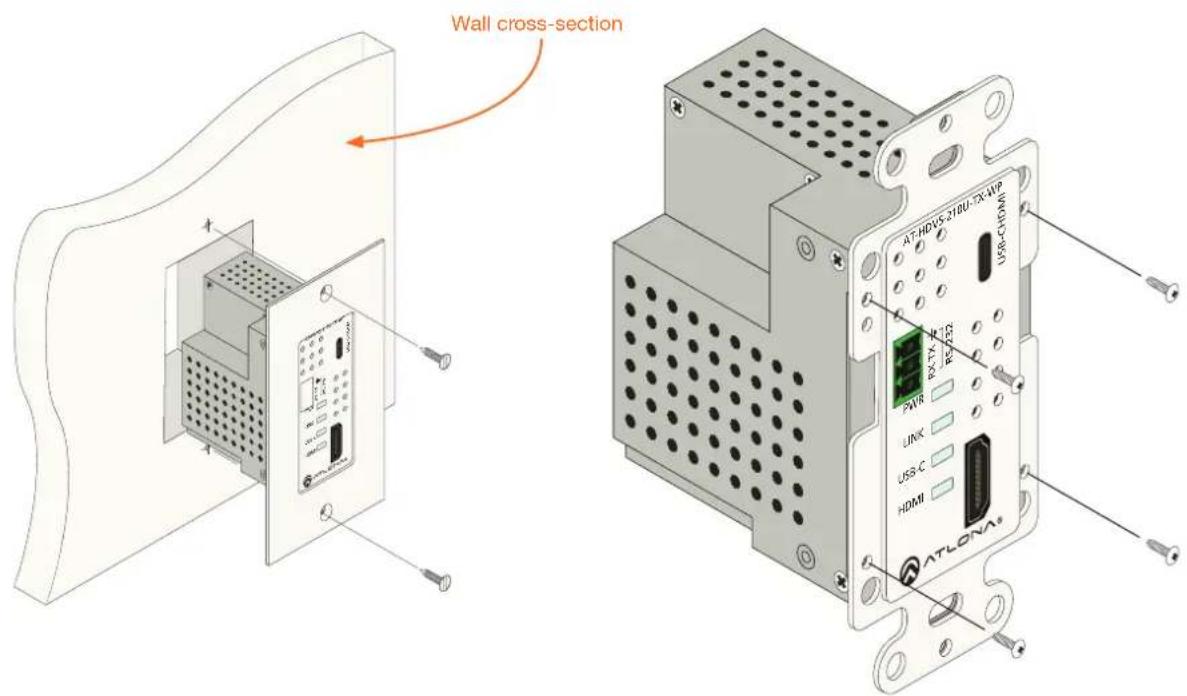
The AT-HDVS-210U-TX-WP includes an optional black faceplate and wallplate. Removal of the faceplate requires that the AT-HDVS-210U-TX-WP be disassembled from the electrical box or mud ring.
- Remove the wall plate from the electrical box and slide out the AT-HDVS-210U-TX-WP assembly, as shown. It is recommended that the Ethernet cable, connected to the HDBaseT OUT port, be disconnected from the unit, to allow for easy installation of the faceplate.
-
Remove the four screws, holding the faceplate to the assembly, using a Phillips screwdriver. Once the screws are removed, gently remove the faceplate by pulling it toward you.
-
Attach the new faceplate and secure it using the four Phillips-head screws.
-
Install the AT-HDVS-210U-TX-WP into the electrical box or mud ring. Make sure to reconnect the Ethernet cable to the HDBaseT OUT port, on the back of the assembly, before reinstalling the unit into the electrical box.
-
Reattach the wallplate to secure the entire assembly in place.
IP Configuration
The AT-HDVS-210U-TX-WP is shipped with DHCP enabled. Once connected to a network, the DHCP server (if available), will automatically assign an IP address to the unit. Use an IP scanner, along with the MAC address on the back of the unit, to identify both the unit and its IP address on the network. If a static IP address is desired, the unit can be switched to static IP mode. Use one of the following procedures to switch between DHCP and static IP mode. The default static IP address of the AT-HDVS-210U-TX-WP is 192.168.1.254.
If the AT-HDVS-210U-TX-WP is unable to detect a DHCP server within 15 seconds, then the unit will set all IP settings to zero.
Setting the IP Mode
- Make sure the AT-HDVS-210U-TX-WP is powered, by connecting an Ethernet cable between a PoE-compatible receiver, such as the AT-HDVS-200-RX, and the HDBaseT OUT port on the unit. Power is supplied by the receiver over HDBaseT.
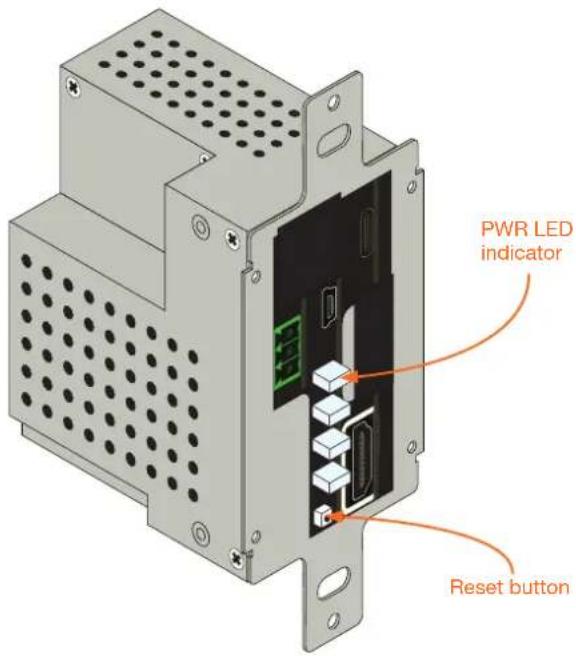
- Remove the faceplate. Refer to Faceplate Removal and Assembly (page 13) for more information.


- Press and hold the Reset button for approximately 5 seconds. Release the Reset button once the PWR LED indicator begins to flash. The number of flashes will indicate the currently selected IP mode.
| PWR LED flashes Description | |
| Two Static IP mode | |
| Four DHCP mode | |
Setting the IP Address Using Commands
Use the IPStatic and IPDHCP commands to switch between DHCP and IP mode through RS-232 or Telnet. Refer to API document for more information. All commands and their arguments are case-sensitive.
- Setting static IP mode
- Connect to the AT-HDVS-210U-TX-WP using RS-232 or Telnet.
- At the command line, execute the IPDHCP command using the off argument, as shown.
IPDHCP off
- Execute the IPStatic command. This command requires three arguments: the desired IP address of the AT-HDVS-210U-TX-WP, the subnet mask, and the gateway address. All arguments must be entered in dot-decimal notation. The following is an example:
IPStatic 192.168.1.112 255.255.255.0 192.168.1.1 IP address Subnet mask Gateway
- Setting DHCP mode
- Connect to the AT-HDVS-210U-TX-WP using RS-232 or Telnet.
- At the command line, execute the IPDHCP command using the on argument, as shown. All characters are case-sensitive.
IPDHCP on
Once DHCP is enabled, the unit will be assigned an IP address by the DHCP server (if present).
Setting the IP Address using the Web GUI
The System page (page 31), in the web GUI, allows the AT-HDVS-210U-TX-WP to use either DHCP or static IP mode. In order to access the web GUI, the IP address of the AT-HDVS-210U-TX-WP must be known. Refer to Setting the IP Mode (page 14) for more information.
- Open the desired web browser and enter the IP address of the AT-HDVS-210U-TX-WP.
- Log in, using the required credentials. The factory-default username and password are listed below:
Username: root Password: Atlona
- Click the System tab.

- Click the IP Mode toggle to switch between the DHCP and STATIC IP setting. When set to STATIC IP, the IP, Netmask, and Gateway fields can be modified.
- Click the Save button to save the changes.
Resetting to Factory-Default Settings
Resetting the AT-HDVS-210U-TX-WP requires that the front faceplate be removed. Refer to Faceplate Removal and Assembly (page 13) for more information.
- Remove the faceplate from the AT-HDVS-210U-TX-WP.
- Press and hold the Reset button for 15 seconds.
- Release the Reset button.
During the reboot process, the PWR LED indicator will glow red. The unit will be operational when the PWR LED indicator glows blue.
- Reassemble the faceplate to the front of the AT-HDVS-210U-TX-WP and reinstall into the electrical box or mud ring.
The Web GUI
Accessing the Web GUI
The AT-HDVS-210U-TX-WP includes a built-in web GUI. Atlona recommends that the web GUI be used to set up the AT-HDVS-210U-TX-WP, as it provides intuitive management of all features.
The AT-HDVS-210U-TX-WP is shipped with DHCP enabled. Once connected to a network, the DHCP server will automatically assign an IP address to the unit. Use an IP scanner to determine the IP address of the AT-HDVS-210U-TX-WP. If a static IP address is desired, refer to IP Configuration (page 14). The default static IP address of the AT-HDVS-210U-TX-WP is 192.168.1.254.

NOTE: The web GUI can only be accessed if the AT-HDVS-210U-TX-WP is connected to a compatible PoE receiver unit, such as the AT-HDVS-200-RX, using the HDBaseT port. The receiver must be connected to the network.
- Launch a web browser.
- Use one of the following methods to access the IP address of the AT-HDVS-210U-TX-WP:
a. Login to the web GUI of the receiver unit that is connected to the AT-HDVS-210U-TX-WP. Once logged in, click the link for the AT-HDVS-210U-TX-WP, as shown:

b. Use an IP scanner to locate the IP address of the AT-HDVS-210U-TX-WP on the network. The MAC address, on the back of the unit, can be used to identify the unit with the IP address.
The Address Resolution Protocol, executed from the command line, can also be used, as shown in the example below. This command will provide a listing of all devices that are connected to the network, along with their MAC address.
| C:\Windows\System32>arp -a | ||
| Internet Address | Physical Address | Type |
| 192.168.1.1 | 08-bd-43-af-25-13 | dynamic |
| 192.168.1.255 | ff-ff-ff-ff-ff-ff | static |
| 224.0.0.22 | 01-00-5e-00-00-16 | static |
| 224.0.0.251 | 01-00-5e-00-00-fb | static |
| 224.0.0.252 | 01-00-5e-00-00-fc | static |
| 239.255.255.250 | 01-00-5e-7f-ff-fa | static |
| 255.255.255.255 | ff-ff-ff-ff-ff-ff | static |
| ... | ||
| ... | ||
- The Login page for the receiver will be displayed.
- Type root, using lower-case characters, in the Username field.
- Type Atlona in the Password field. This is the default password. The password field is case-sensitive. When the password is entered, it will be masked. The password can be changed, if desired. Refer to the Config page (page 30) for more information.
- Click the Submit button or press the ENTER key on the keyboard.

- The Info page will be displayed.

- Click Logout, on the far-right side of the menu bar, to log out of the web GUI and return to the Login page.

Menu Bar
The dark-colored bar, near the top of the screen, is the menu bar. When the mouse is moved over each menu element, it will be highlighted in light orange. Once the desired menu element is highlighted, click the left mouse button to access the settings within the menu.
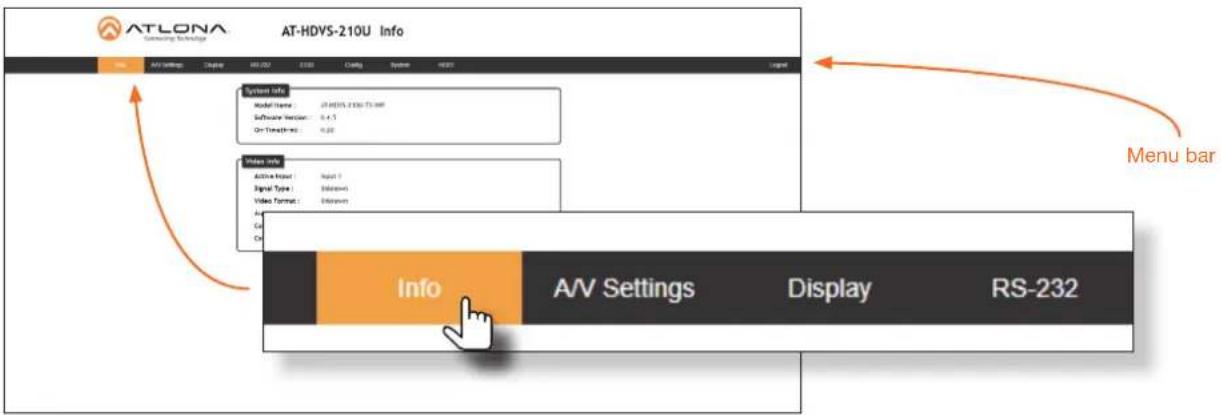
In this example, clicking A/V Settings, in the menu bar, will display the A/V Settings page.

Toggles
Several settings within the Web GUI use toggles, which enable, disable, or assign one of two settings. Generally, when the toggle is blue, it means that the feature is enabled or ON. If a feature is disabled, then the toggle will appear gray and be labeled as OFF. Toggle buttons may also indicate its current setting and, when enabled or set to a particular state, may also provide access to another set of controls or text fields within the Web GUI, as shown with the IP Mode toggle.

Buttons
Buttons are used to execute an action or setting. Several pages within the Web GUI include a Save button. Clicking the Save button will apply and save all settings in the current page. Other buttons, such as the Factory Default button, under the System page, reset the AT-HDVS-210U-TX-WP to factory-default settings
Info page

ATLONA Connecting Technology
AT-HDVS-210U Info

AV Settings


System Info
| Model Name : | AT-HDVS-210U-TX-WP |
| Software Version : | 0.4.5 |
| On-Time(h-m) : | 0:20 |
Video Info
| Active Input : | Input 1 |
| Signal Type : | Unknown |
| Video Format : | Unknown |
| Aspect : | -- |
| Color Space : | -- |
| Color Depth : | -- |
Model Name
The model SKU of this product.
Software Version
The version of firmware that the AT-HDVS-210U-TX-WP is running. Always make sure to check the AT-HDVS-210U-TX-WP product page, on the Atlona web site, for the latest version of firmware.
On-Time (h-m)
The time elapsed since the unit was last powered-on. Turning the unit "off", using the PWOFF command, will not reset this field.
Active Input
The currently selected input. Refer to the A/V Settings page (page 22) for information on changing the input.
Signal Type
Displays the input resolution of the source device.
Video Format
Displays the video format.
Aspect
Displays the aspect ratio of the input video source.
Color Space
Displays the color space of the input video source.
Color Depth
Displays the color depth of the input video source.
A/V Settings page

Input Selection
Click the drop-down list to select the desired input.
| Setting Description | |
| Input 1 USB-C | |
| Input 2 HDMI | |
Auto Switch
Set the Auto Switch mode toggle to ON to enable auto-switching. When auto-switching is enabled, the switcher will automatically switch to the opposite input if a signal loss is detected on the current input. The default setting is ON.
HDCP Settings
Sets the HDCP reporting mode of the input port. Input 1 = USB-C; Input 2 = HDMI. Some devices, such as Mac computers will transmit HDCP content if an HDCP-compliant display/sink is detected. Setting this value to OFF, will instruct the source to send non-HDCP content (if possible) to non-HDCP display and/or sink devices. Note that setting this value to OFF will not decrypt HDCP content.
| Setting Description | |
| ON HDCP content is always transmitted by the source | |
| OFF Instructs the source to send non-HDCP content, if possible |
Output
Mutes or un-mutes the audio output. Set the Output toggle to OFF to disable audio on the output. The default setting is ON.
Display page

CEC
CEC Command
Click the ON or OFF button to turn the display on or off using CEC.
System Settings
Display Auto Power On
Set this value to ENABLE to send the command to power-on the display when an A/V signal is detected. Otherwise, set to DISABLE to turn this feature off.
Display Auto Power Off
Set this value to ENABLE to send the command to power-off the display when an A/V signal is no longer present. Otherwise, set to DISABLE to turn this feature off.
Lamp cool down timer (Sec.)
Sets the cool-down interval, in seconds, before the projector can be powered-off. During this time interval, the projector will not accept any "power on" or "power off" commands until the last "power off" command has been processed and the projector lamp has completed the cool-down cycle. Range: 0 to 300.
Auto power off timer
Sets the time interval, in seconds, between when the loss of A/V signal is detected and when the "Display Off" command is sent. Range: 5 seconds to 1 hour.
Power on delay timer (Sec.)
Sets the time interval, in seconds, between when the system is powered-on, and when system can re-enter the Auto Power Off state. All display-on commands are triggered immediately after an A/V source is connected. Range: 0 to 300.
Control Type
Sets the control method for sending commands. The following options are available: RS-232, IP, CEC.
| Setting Description | |
| RS-232 RS-232 is used to send commands. | |
| IP Commands are sent over IP. | |
| CEC Uses CEC to send commands. |
Feedback Verify
Sets the feedback verification state. Click the toggle to enable or disable this feature. The following options are available.
| Setting Description | |
| On This is the default setting. | The AT-HDVS-210-TX-WP will make four attempts to send the command, if the feedback string is not acknowledged. After the fourth attempt, the process will fail. |
| Off Sends the command and ignores the feedback string. | |
Display Mode
Click this drop-down list to select the behavior of the display when a source is connected.
| Setting Description | |
| DispSW AVon Display switches | on/off, source audio/video signal is always on. |
| DispSW AVSW Display switches | on/off, source audio/video signal switches on/off. |
| AV SW | Display is always on, source audio/video signal switches on/off; Lamp cool down timer (Sec.) and Power on delay timer (Sec.) are ignored. |
TCP/IP Settings of Controlled Devices
IP Mode
Click this drop-down list to select the login mode.
| Setting Description | |
| Non-login Does not require a username and password when using TCP/IP to control the display. | |
| RS-232 Requires a username and password to control the display through TCP/IP. |
IP Address
Enter the IP address of the device in this field.
Port
Enter the listening port of the device in this field.
Username
Enter the username for login. If the IP Mode is set to Non-Login, then this information will not be required.
Password
Enter the password for login. If the IP Mode is set to Non-Login, then this information will not be required.
Save
Click this button to save all changes in this window group.
RS-232 / IP Commands
Send Mode
Sets the display format for the commands in the web GUI. In Hex mode, non-valid characters are not accepted.
Options: ASCII, Hex.
On/Off/Volume+/Volume-/Mute
- Set command
Enter the command in this field.
- Feedback
Enter the feedback string in this field.
- CR-LF
Click this drop-down list to select the desired end-of-line characters to be sent.
- Test
Click this button to test the command line and/or feedback.
| Setting Description | |
| None No end-of-line characters included | |
| CR Carriage return | |
| LF Line feed | |
| CR-LF Carriage return + Line feed | |
| Space Space character | |
| STX Start-of-text character | |
| ETX End-of-text character | |
| Null Null character (binary zero) | |
Save
Click this button to save all changes in this window group.
RS-232 page

ATLONA Connecting Technology
AT-HDVS-210U RS-232

Zone
When the AT-HDVS-210U-TX-WP is connected to the AT-HDVS-200-RX, the drop-down list boxes will be disabled and the HDBaseT baud rate will be locked at 115200.
If the AT-HDVS-210U-TX-WP is connected to another HDBaseT device, such as the AT-UHD-CLSO-824, each of these drop-down list boxes can be set to the baud rate of the HDBaseT RS-232 settings on the corresponding device. Click the Save button to accept the settings.
TX RS-232
When the AT-HDVS-210U-TX-WP is connected to the AT-HDVS-200-RX, the drop-down list boxes will be disabled and the HDBaseT baud rate will be locked at 115200.
If the AT-HDVS-210-TX-WP is connected to another HDBaseT device, such as the AT-UHD-CLSO-824, each of these drop-down list boxes can be set to the baud rate of the HDBaseT RS-232 settings on the corresponding device. Click the Save button to accept the settings.
| Setting Description | |
| Baud rate Sets the baud rate. The following options are available: 2400, 9600, 19200, 38400, 56000, 57600, 115200. | |
| Data bit Sets the number of data bits used to represent each character of data. The following options are available: 7 or 8. | |
| Parity Sets the parity bit, which can be included with each character to detect errors during the transmission of data. The following options are available: None, Odd, or Even. | |
| Stop bit Sets the stop bit. Stop bits are sent at the end of each character, allowing the client to detect the end of a character stream. The following options are available: 1 or 2. |
RX RS-232 Zone 1
Each of these drop-down lists refer to the setting for the RS-232 1 port on the receiver. Click the Save button to accept the settings.
| Setting Description | |
| Baud rate Sets the baud rate. The following options are available: 2400, 9600, 19200, 38400, 56000, 57600, 115200. | |
| Data bit Sets the number of data bits used to represent each character of data. The following options are available: 7 or 8. | |
| Parity Sets the parity bit, which can be included with each character to detect errors during the transmission of data. The following options are available: None, Odd, or Even. | |
| Stop bit Sets the stop bit. Stop bits are sent at the end of each character, allowing the client to detect the end of a character stream. The following options are available: 1 or 2. |
EDID page
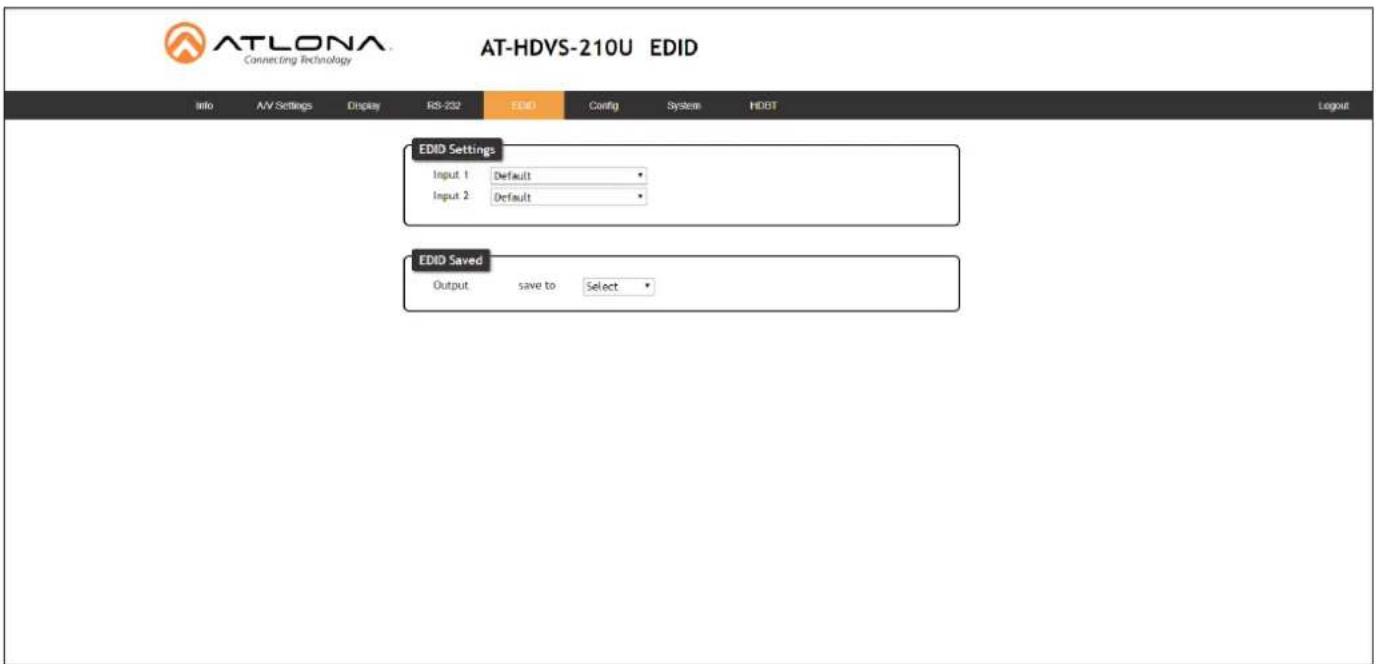
EDID Settings
Click these drop-down lists to select the desired EDID to be used for each input. Input 1 = USB-C, Input 2 = HDMI. The source device will use the information in the EDID, before sending A/V data to the sink device. For a summary of timings and audio capabilities of each EDID, refer to Internal EDID Data (page 34).
| Available EDID Selections | |||
| Default 1080p 3D MCH 1366x768 2CH 3840x2160@60 4:2:0 | MCH | ||
| 1080p 2CH 1080p 3D DD 1080p DVI 3840x2160@30 4:4:4 | 2CH | ||
| 1080p MCH 720p 2CH 1280x800 DVI 3840x2160@60 4:4:4 | MCH | ||
| 1080p DD 720p DD 1920x1200 2CH 4096x2160@60 4:2:0 | 2CH | ||
| 1080p 3D 2CH 1280x800 2CH 3840x2160@60 4:2:0 | 2CH | 4096x2160@60 4:2:0MCH | |
EDID Saved
Click this drop-down list to select the memory location to save the downstream EDID. Eight memory locations are available. Once an EDID is saved to a memory location, it can be access from the EDID Settings drop-down lists.
Config page

ATLONA Connecting Technology
AT-HDVS-210U Config
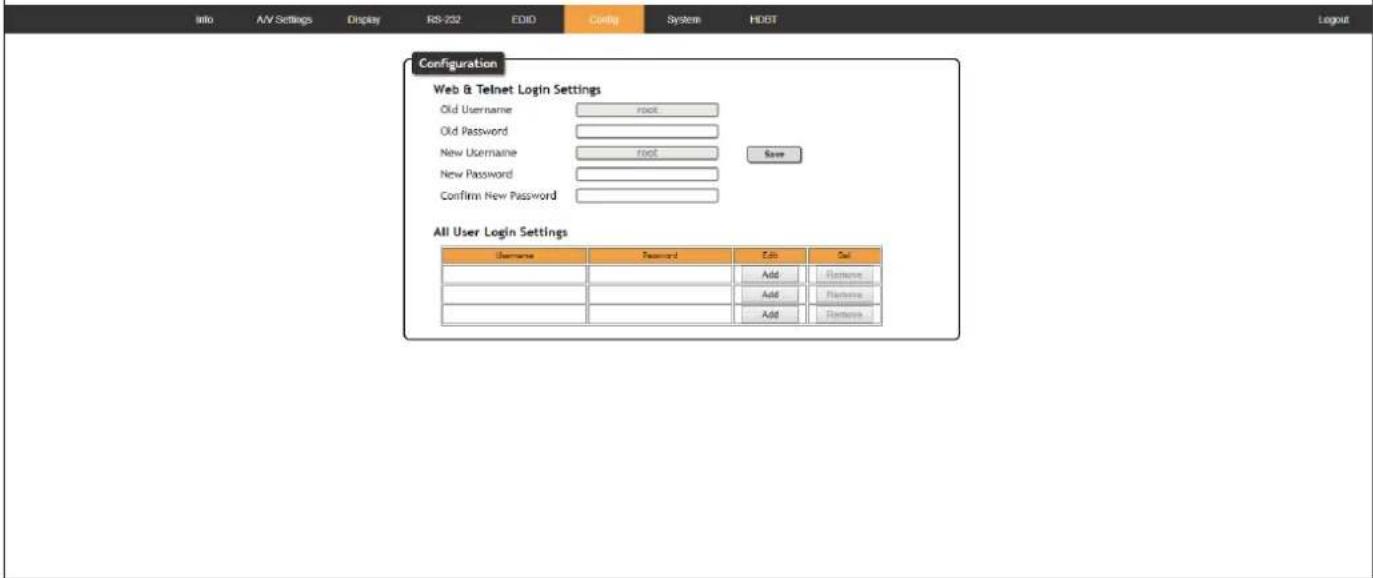
Old Username
This field cannot be changed. "root" is the administrator user.
Old Password
Enter the current password for the "root" username in this field. The default password is "Atlona".
New Username
This field cannot be changed.
Save
Click this button to save all changes.
New Password
Enter the new password fro the "root" username in this field.
Confirm New Password
Verify the new password by retyping it in this field.
All User Login Settings
- Username
Displays the username.
- Password
Displays the password for the associated username.
- Edit
Click the Add button, in this column, to edit the username and password in the row.
• Del
Click the Remove button to delete the user in the row. This button will only be available if both a username and password have been created.
System page

ATLONA Connecting Technology
AT-HDVS-210U System

IP Mode
Click this toggle to set the IP mode of the AT-HDVS-210U-TX-WP. The default setting is DHCP. Available settings: STATIC IP, DHCP.
IP
Enter the IP address of the AT-HDVS-210U-TX-WP in this field. This field will only be available if IP Mode is set to STATIC IP. The default IP address is 192.168.1.254.
Netmask
Enter the subnet mask in this field. This field will only be available if IP Mode is set to STATIC IP.
Gateway
Enter the gateway (router) address in this field. This field will only be available if IP Mode is set to STATIC IP.
Telnet Port
Enter the Telnet listening port in this field.
Telnet Login Mode
Click this toggle to set the login mode to either ON or OFF. If this feature is set to ON, then the AT-HDVS-210U-TX-WP will prompt for both the username and password at the start of a Telnet session. Use the same credentials as the web GUI.
Telnet Timeout
Click this drop-down list to select the timeout interval, in seconds, before the Telnet connection is automatically closed after no activity. Range: 1 to 3600 (seconds).
Broadcast
By default, broadcast mode is set to ON. When set to ON, any system changes will be broadcasted to the web GUI will also be affected on the control system (if connected), via TCP/IP. To separate control between the web GUI and Telnet, set this feature to OFF. Command queries such as IPCFG and Type will only return information to the requester.
Power
Under normal operation conditions, this toggle is set to ON. Click this toggle to OFF, to turn the AT-HDVS-210U-TX-WP "off". When "off", the PWR LED indicator will turn red. The PWOFF and PWON commands can also be used to control the power state.
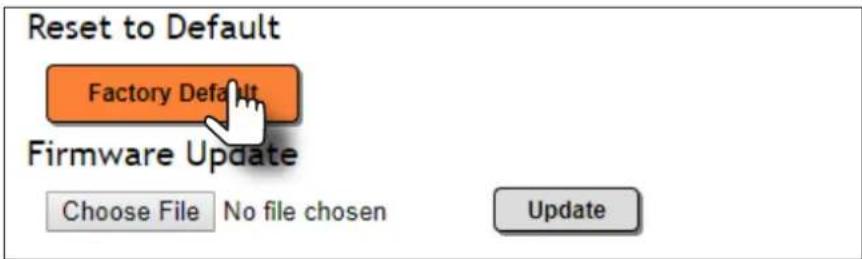
Reset to Default
Click the Factory Default button to set the AT-HDVS-210U-TX-WP to factory-default settings.
Firmware Update
Click the Choose File button to select the firmware file, when upgrading the firmware on the AT-HDVS-210U-TX-WP. Once the firmware file is selected, click the Update button. Refer to Updating the Firmware (page 57) for more information.
HDBT page

ATLONA Connecting Technology
AT-HDVS-210U HDBT
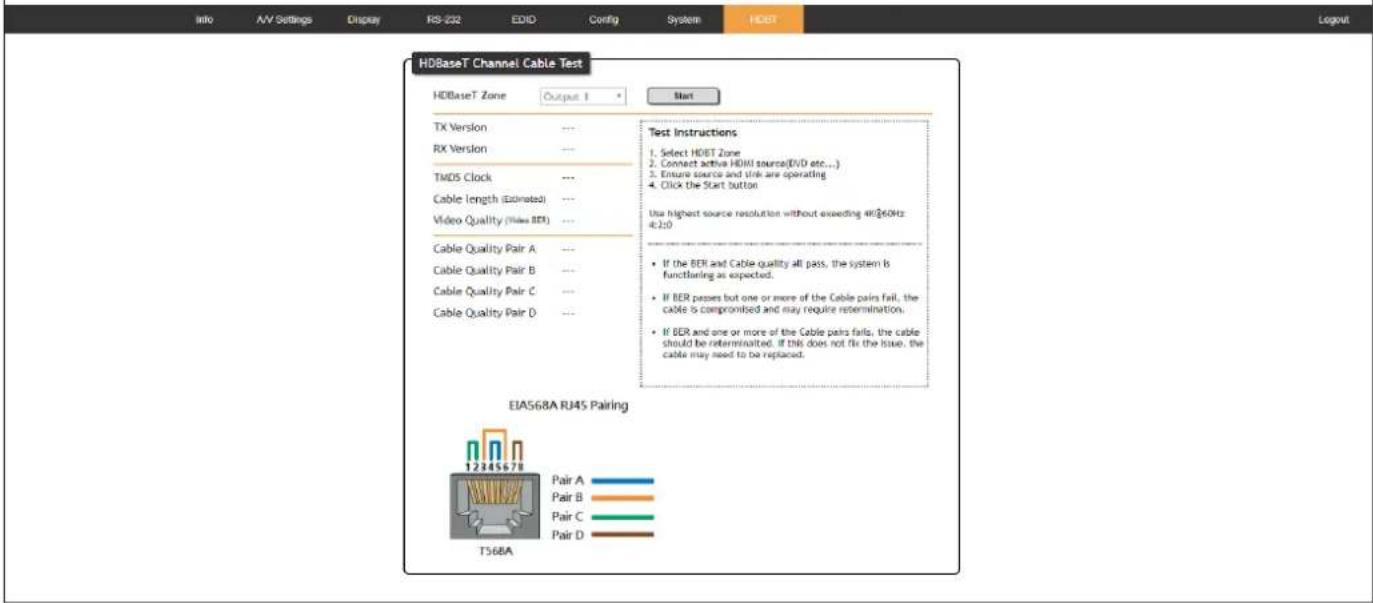
HDBaseT Zone
The AT-HDVS-210U-TX-WP has only a single HDBaseT output. Therefore, this drop-down list is disabled.
Start
Click the Start button to being the HDBaseT testing. During testing, the button text will change to "Stop". Click the Stop button to halt the HDBaseT testing process.
TX Version
The version of the Valens chip on the transmitter.
RX Version
The version of the Valens chip on the receiver.
TMDS Clock
Displays the pixel clock speed. If no source is connected, then this field will display as "None".
Cable length (Estimated)
This field indicates the approximate length of the Ethernet cable connected between the HDBaseT ports on the transmitter and the receiver. If the cable length is less than 15 feet, then this value will be displayed as 0 (zero).
Video Quality (Video BER)
The Bit Error Rate (BER). This field displays either PASS or FAIL during a test.
Cable Quality Pair (A, B, C, D)
Each of these fields will display either PASS or FAIL during a test.
Appendix
Internal EDID Data
The AT-HDVS-210U-TX-WP comes with 19 preprogrammed EDID selections. The timing and audio summary (if applicable) for each EDID, is listed below. Raw data is also provided and can be used to view the full EDID structure.
EDID Description
Default Pass-through (downstream EDID)
EDID Description
1080P 2CH
Native/preferred timing
1920x1080p at 60Hz (16:9)
Standard timings supported
| 720 x | 400p at | 70Hz - IBM VGA |
| 640 x | 480p at | 60Hz - IBM VGA |
| 800 x | 600p at | 60Hz - VESA |
| 1024 x | 768p at | 60Hz - VESA |
| 1280 x | 1024p at | 60Hz - VESA STD |
| 1024 x | 768p at | 60Hz - VESA STD |
| 800 x | 600p at | 60Hz - VESA STD |
| 640 x | 480p at | 60Hz - VESA STD |
CE video identifiers (VICs) - timing/formats supported
| 1920 x 1080p at | 60Hz - HDTV (16:9, 1:1) |
| 1920 x 1080p at | 30Hz - HDTV (16:9, 1:1) |
| 1920 x 1080p at | 24Hz - HDTV (16:9, 1:1) |
| 1920 x 1080i at | 60Hz - HDTV (16:9, 1:1) |
| 1280 x 720p at | 60Hz - HDTV (16:9, 1:1) [Native] |
| 720 x 480p at | 60Hz - EDTV (16:9, 32:27) |
| 720 x 480p at | 60Hz - EDTV (4:3, 8:9) |
CE audio data (formats supported)
LPCM 2-channel, 16/20/24 bit depths at 32/44/48 kHz
Raw data
| 00 | FF | FF | FF | FF | FF | FF | 00 | 06 | 8C | 11 | 20 | 00 | 00 | 00 | 00 | 01 | 15 | 01 | 03 | 80 | 10 | 09 | 78 |
| 0A | EE | 91 | A3 | 54 | 4C | 99 | 26 | 0F | 50 | 54 | A1 | 08 | 00 | 81 | 80 | 61 | 40 | 45 | 40 | 31 | 40 | 01 | 01 |
| 01 | 01 | 01 | 01 | 01 | 01 | 02 | 3A | 80 | 18 | 71 | 38 | 2D | 40 | 58 | 2C | 45 | 00 | A0 | 5A | 00 | 00 | 00 | 1E |
| 01 | 1D | 00 | 72 | 51 | D0 | 1E | 20 | 6E | 28 | 55 | 00 | A0 | 5A | 00 | 00 | 00 | 1E | 00 | 00 | 00 | FD | 00 | 39 |
| 3F | 1F | 52 | 10 | 00 | 0A | 20 | 20 | 20 | 20 | 20 | 20 | 00 | 00 | 00 | FC | 00 | 41 | 54 | 4C | 20 | 31 | 30 | 38 |
| 30 | 50 | 20 | 32 | 43 | 48 | 01 | 20 | 02 | 03 | 1C | F1 | 47 | 10 | 22 | 20 | 05 | 84 | 03 | 02 | 23 | 09 | 07 | 07 |
| 67 | 03 | 0C | 00 | 10 | 00 | B8 | 2D | E3 | 05 | 03 | 01 | 02 | 3A | 80 | 18 | 71 | 38 | 2D | 40 | 58 | 2C | 45 | 00 |
| A0 | 5A | 00 | 00 | 00 | 1E | 01 | 1D | 80 | 18 | 71 | 1C | 16 | 20 | 58 | 2C | 25 | 00 | A0 | 5A | 00 | 00 | 00 | 9E |
| 01 | 1D | 00 | 72 | 51 | D0 | 1E | 20 | 6E | 28 | 55 | 00 | A0 | 5A | 00 | 00 | 00 | 1E | 8C | 0A | D0 | 8A | 20 | E0 |
| 2D | 10 | 10 | 3E | 96 | 00 | A0 | 5A | 00 | 00 | 00 | 18 | 26 | 36 | 80 | A0 | 70 | 38 | 1F | 40 | 30 | 20 | 25 | 00 |
| A0 | 5A | 00 | 00 | 00 | 1A | 00 | 00 | 00 | 00 | 00 | 00 | 00 | 00 | 00 | 90 |
EDID Description
1080P MCH
Native/preferred timing
1920x1080p at 60Hz (16:9)
Standard timings supported
640 x 480p at 60Hz - IBM VGA
CE video identifiers (VICs) - timing/formats supported
| 1920 x 1080p at | 60Hz - HDTV (16:9, 1:1) |
| 1920 x 1080p at | 30Hz - HDTV (16:9, 1:1) |
| 1920 x 1080p at | 24Hz - HDTV (16:9, 1:1) |
| 1920 x 1080i at | 60Hz - HDTV (16:9, 1:1) |
| 1280 x 720p at | 60Hz - HDTV (16:9, 1:1) [Native] |
| 720 x 480p at | 60Hz - EDTV (16:9, 32:27) |
| 720 x 480p at | 60Hz - EDTV (4:3, 8:9) |
CE audio data (formats supported)
| LPCM | 2-channel, 16/20/24 bit depths at 32/44/48/88/96/176/192 kHz |
| LPCM | 6-channel, 16/20/24 bit depths at 32/44/48/88/96/176/192 kHz |
| LPCM | 8-channel, 16/20/24 bit depths at 32/44/48/88/96/176/192 kHz |
| AC-3 | 6-channel, 680k max. bit rate at 32/44/48 kHz |
| DTS | 6-channel, 1536k max. bit rate at 32/44/48/88/96 kHz |
| DD+ | 8-channel at 32/44/48 kHz |
| DVD-A | 8-channel at 48/96/192 kHz |
| DTS-HD | 8-channel, 16-bit at 44/48/88/96/176/192 kHz |
CE speaker allocation data
FL/FR, FLFE, FC, RL/RR, RC, RLC/RRC
Raw data
| 00 | FF | FF | FF | FF | FF | FF | 00 | 06 | 8C | 11 | 20 | 00 | 00 | 00 | 01 | 01 | 15 | 01 | 03 | 80 | 10 | 09 | 78 |
| 0A | EE | 91 | A3 | 54 | 4C | 99 | 26 | 0F | 50 | 54 | 20 | 00 | 00 | 01 | 01 | 01 | 01 | 01 | 01 | 01 | 01 | 01 | 01 |
| 01 | 01 | 01 | 01 | 01 | 01 | 02 | 3A | 80 | 18 | 71 | 38 | 2D | 40 | 58 | 2C | 45 | 00 | A0 | 5A | 00 | 00 | 00 | 1E |
| 01 | 1D | 00 | 72 | 51 | D0 | 1E | 20 | 6E | 28 | 55 | 00 | A0 | 5A | 00 | 00 | 00 | 1E | 00 | 00 | 00 | FC | 00 | 41 |
| 54 | 4C | 20 | 31 | 30 | 38 | 30 | 50 | 20 | 4D | 43 | 48 | 00 | 00 | 00 | FD | 00 | 39 | 3F | 1F | 52 | 10 | 00 | 0A |
| 20 | 20 | 20 | 20 | 20 | 20 | 01 | 1D | 02 | 03 | 35 | F6 | 47 | 10 | 22 | 20 | 05 | 84 | 03 | 02 | 38 | 09 | 7F | 07 |
| 0D | 7F | 07 | 0F | 7F | 07 | 15 | 07 | 55 | 3D | 1F | C0 | 57 | 07 | 00 | 67 | 54 | 00 | 5F | 7E | 01 | 83 | 5F | 00 |
| 00 | 67 | 03 | 0C | 00 | 10 | 00 | B8 | 2D | E3 | 05 | 03 | 01 | 02 | 3A | 80 | 18 | 71 | 38 | 2D | 40 | 58 | 2C | 45 |
| 00 | A0 | 5A | 00 | 00 | 00 | 1E | 01 | 1D | 80 | 18 | 71 | 1C | 16 | 20 | 58 | 2C | 25 | 00 | A0 | 5A | 00 | 00 | 00 |
| 9E | 01 | 1D | 00 | 72 | 51 | D0 | 1E | 20 | 6E | 28 | 55 | 00 | A0 | 5A | 00 | 00 | 00 | 1E | 8C | 0A | D0 | 8A | 20 |
| E0 | 2D | 10 | 10 | 3E | 96 | 00 | A0 | 5A | 00 | 00 | 00 | 18 | 00 | 00 | 63 |
EDID Description
| 1080P DD | Native/preferred timing1920x1080p at 60Hz (16:9) |
| Standard timings supported720 x 400p at 70Hz - IBM VGA640 x 480p at 60Hz - IBM VGA800 x 600p at 60Hz - VESA1024 x 768p at 60Hz - VESA1280 x 1024p at 60Hz - VESA STD1024 x 768p at 60Hz - VESA STD800 x 600p at 60Hz - VESA STD640 x 480p at 60Hz - VESA STD | |
| CE video identifiers (VICs) - timing/formats supported1920 x 1080p at 60Hz - HDTV (16:9, 1:1)1920 x 1080p at 30Hz - HDTV (16:9, 1:1)1920 x 1080p at 24Hz - HDTV (16:9, 1:1)1920 x 1080i at 60Hz - HDTV (16:9, 1:1)1280 x 720p at 60Hz - HDTV (16:9, 1:1) [Native]720 x 480p at 60Hz - EDTV (16:9, 32:27)720 x 480p at 60Hz - EDTV (4:3, 8:9) | |
| CE audio data (formats supported)AC-3 6-channel, 680k max. bit rate at 32/44/48 kHzDTS 6-channel, 1536k max. bit rate at 32/44/48/88/96 kHz | |
| CE speaker allocation dataFL/FR, FLFE, FC, RL/RR | |
| 00 FF FF FF FF FF FF 00 06 8C 11 20 00 00 00 00 01 15 01 03 80 10 09 780A EE 91 A3 54 4C 99 26 0F 50 54 A1 08 00 81 80 61 40 45 40 31 40 01 0101 01 01 01 01 01 02 3A 80 18 71 38 2D 40 58 2C 45 00 A0 5A 00 00 00 1E01 1D 00 72 51 D0 1E 20 6E 28 55 00 A0 5A 00 00 00 1E 00 00 00 FD 00 393F 1F 52 10 00 0A 20 20 20 20 20 20 00 00 00 FC 00 41 54 4C 20 31 30 3830 50 20 44 44 0A 01 4B 02 03 23 F1 47 10 22 20 05 84 03 02 26 15 07 553D 1F C0 67 03 0C 00 10 00 B8 2D E3 05 03 01 83 0F 00 00 02 3A 80 18 7138 2D 40 58 2C 45 00 A0 5A 00 00 00 1E 01 1D 00 72 51 D0 1E 20 6E 28 55 00 A0 5A 00 00 001E 8C 0A D0 8A 20 E0 2D 10 10 3E 96 00 A0 5A 00 00 00 18 26 36 80 A0 7038 1F 40 30 20 25 00 A0 5A 00 00 00 1A 00 00 7E |
EDID Description
| 1080P 3D2CH | Native/preferred timing1920x1080p at 60Hz (16:9) |
| Standard timings supported720 x 400p at 70Hz - IBM VGA640 x 480p at 60Hz - IBM VGA640 x 480p at 67Hz - Apple Mac II640 x 480p at 72Hz - VESA640 x 480p at 75Hz - VESA800 x 600p at 60Hz - VESA800 x 600p at 72Hz - VESA800 x 600p at 75Hz - VESA832 x 624p at 75Hz - Apple Mac II1024 x 768p at 60Hz - VESA1024 x 768p at 70Hz - VESA1024 x 768p at 75Hz - VESA1280 x 1024p at 75Hz - VESA1152 x 870p at 75Hz - Apple Mac II1152 x 864p at 75Hz - VESA STD1280 x 720p at 60Hz - VESA STD1280 x 800p at 60Hz - VESA STD1280 x 1024p at 60Hz - VESA STD1440 x 900p at 60Hz - VESA STD1600 x 900p at 60Hz - VESA STD1680 x 1050p at 60Hz - VESA STD | |
| CE video identifiers (VICs) - timing/formats supported1920 x 1080p at 60Hz - HDTV (16:9, 1:1) [Native]1280 x 720p at 60Hz - HDTV (16:9, 1:1)1920 x 1080i at 60Hz - HDTV (16:9, 1:1)720 x 480p at 60Hz - EDTV (16:9, 32:27)1920 x 1080p at 24Hz - HDTV (16:9, 1:1)1920 x 1080p at 30Hz - HDTV (16:9, 1:1)720 x 480i at 60Hz - Doublescan (16:9, 32:27) | |
| CE audio data (formats supported)LPCM 2-channel, 16/20/24 bit depths at 32/44/48 kHz | |
| CE speaker allocation dataFL/FR | |
| CE vendor specific data (VSDB)3D structures supported.. Top-and-bottom, Side-by-side w. horizontal sub-sampling3D formats supported.... Mandatory formats plus some primary VICs1920 x 1080p at 60Hz - HDTV (16:9, 1:1) [Native]1280 x 720p at 60Hz - HDTV (16:9, 1:1)1920 x 1080i at 60Hz - HDTV (16:9, 1:1)1920 x 1080p at 24Hz - HDTV (16:9, 1:1)1920 x 1080p at 30Hz - HDTV (16:9, 1:1) |
EDID Description
| 1080P 3D2CH | Raw data | |||||||||||||||||||||||
| 00 | FF | FF | FF | FF | FF | FF | 00 | 06 | 8C | 11 | 20 | 00 | 00 | 00 | 02 | 01 | 15 | 01 | 03 | 80 | 59 | 32 | 78 | |
| 0A | EE | 91 | A3 | 54 | 4C | 99 | 26 | 0F | 50 | 54 | BD | EF | 80 | 71 | 4F | 81 | C0 | 81 | 00 | 81 | 80 | 95 | 00 | |
| A9 | C0 | B3 | 00 | 01 | 01 | 02 | 3A | 80 | 18 | 71 | 38 | 2D | 40 | 58 | 2C | 45 | 00 | A0 | 5A | 00 | 00 | 00 | 1E | |
| 66 | 21 | 56 | AA | 51 | D0 | 1E | 30 | 46 | 8F | 33 | 00 | A0 | 5A | 00 | 00 | 00 | 1E | 00 | 00 | 00 | FD | 00 | 18 | |
| 4B | 0F | 51 | 17 | 00 | 0A | 20 | 20 | 20 | 20 | 20 | 20 | 00 | 00 | 00 | FC | 00 | 41 | 54 | 4C | 20 | 33 | 44 | 20 | |
| 32 | 43 | 48 | 0A | 20 | 20 | 01 | E6 | 02 | 03 | 2C | F1 | 47 | 90 | 04 | 05 | 03 | 20 | 22 | 07 | 23 | 09 | 07 | 07 | |
| 83 | 01 | 00 | 00 | E2 | 00 | 0F | E3 | 05 | 03 | 01 | 70 | 03 | 0C | 00 | 10 | 00 | B8 | 2D | 21 | D0 | 06 | 01 | 40 | |
| 00 | 37 | 20 | 50 | 01 | 1D | 80 | 18 | 71 | 1C | 16 | 20 | 58 | 2C | 25 | 00 | A0 | 5A | 00 | 00 | 00 | 9E | 01 | 1D | |
| 00 | 72 | 51 | D0 | 1E | 20 | 6E | 28 | 55 | 00 | A0 | 5A | 00 | 00 | 00 | 1E | 8C | 0A | D0 | 8A | 20 | E0 | 2D | 10 | |
| 10 | 3E | 96 | 00 | A0 | 5A | 00 | 00 | 00 | 18 | 00 | 00 | 00 | 00 | 00 | 00 | 00 | 00 | 00 | 00 | 00 | 00 | 00 | 00 | |
| 00 | 00 | 00 | 00 | 00 | 00 | 00 | 00 | 00 | 00 | 00 | 00 | 00 | 00 | 00 | F5 | |||||||||
EDID Description
| 1080P 3DMCH | Native/preferred timing1920x1080p at 60Hz (16:9) |
| Standard timings supported640 x 480p at 60Hz - IBM VGA | |
| CE video identifiers (VICs) - timing/formats supported1920 x 1080p at 60Hz - HDTV (16:9, 1:1) [Native]1280 x 720p at 60Hz - HDTV (16:9, 1:1)1920 x 1080i at 60Hz - HDTV (16:9, 1:1)720 x 480p at 60Hz - EDTV (16:9, 32:27)1920 x 1080p at 24Hz - HDTV (16:9, 1:1)1920 x 1080p at 30Hz - HDTV (16:9, 1:1) | |
| CE audio data (Formats supported)LPCM 2-channel, 16/20/24 bit depths at 32/44/48/88/96/176/192 kHzLPCM 6-channel, 16/20/24 bit depths at 32/44/48/88/96/176/192 kHzLPCM 8-channel, 16/20/24 bit depths at 32/44/48/88/96/176/192 kHzAC-3 6-channel, 680k max. bit rate at 32/44/48 kHzDTS 6-channel, 1536k max. bit rate at 32/44/48/88/96 kHzDD+ 8-channel at 32/44/48 kHzDVD-A 8-channel at 48/96/192 kHzDTS-HD 8-channel, 16-bit at 44/48/88/96/176/192 kHz | |
| CE speaker allocation dataFL/FR, FLFE, FC, RL/RR, RC, RLC/RRC | |
| CE vendor specific data (VSDB)3D structures supported.. Top-and-bottom, Side-by-side w. horizontal sub-sampling3D formats supported.... Mandatory formats plus some primary VICs1920 x 1080p at 60Hz - HDTV (16:9, 1:1) [Native]1280 x 720p at 60Hz - HDTV (16:9, 1:1)1920 x 1080i at 60Hz - HDTV (16:9, 1:1)1920 x 1080p at 24Hz - HDTV (16:9, 1:1)1920 x 1080p at 30Hz - HDTV (16:9, 1:1) |
EDID Description
| 1080P 3DMCH | Raw data | |||||||||||||||||||||||
| 00 | FF | FF | FF | FF | FF | FF | 00 | 06 | 8C | 11 | 20 | 00 | 00 | 00 | 03 | 01 | 15 | 01 | 03 | 80 | 59 | 32 | 78 | |
| 0A | EE | 91 | A3 | 54 | 4C | 99 | 26 | 0F | 50 | 54 | 20 | 00 | 00 | 01 | 01 | 01 | 01 | 01 | 01 | 01 | 01 | 01 | 01 | |
| 01 | 01 | 01 | 01 | 01 | 01 | 02 | 3A | 80 | 18 | 71 | 38 | 2D | 40 | 58 | 2C | 45 | 00 | A0 | 5A | 00 | 00 | 00 | 1E | |
| 00 | 00 | 00 | FE | 00 | 0A | 20 | 20 | 20 | 20 | 20 | 20 | 20 | 20 | 20 | 20 | 20 | 20 | 00 | 00 | 00 | FC | 00 | 41 | |
| 54 | 4C | 20 | 33 | 44 | 20 | 4D | 43 | 48 | 0A | 20 | 20 | 00 | 00 | 00 | FD | 00 | 18 | 4B | 0F | 51 | 17 | 00 | 0A | |
| 20 | 20 | 20 | 20 | 20 | 20 | 01 | 8A | 02 | 03 | 40 | F4 | 46 | 90 | 04 | 05 | 03 | 20 | 22 | 38 | 09 | 7F | 07 | 0D | |
| 7F | 07 | 0F | 7F | 07 | 15 | 07 | 55 | 3D | 1F | C0 | 57 | 07 | 00 | 67 | 54 | 00 | 5F | 7E | 01 | 83 | 5F | 00 | 00 | |
| 70 | 03 | 0C | 00 | 10 | 00 | B8 | 2D | 21 | D0 | 06 | 01 | 40 | 00 | 37 | 20 | 50 | E2 | 00 | 0F | E3 | 05 | 03 | 01 | |
| 01 | 1D | 80 | 18 | 71 | 1C | 16 | 20 | 58 | 2C | 25 | 00 | A0 | 5A | 00 | 00 | 00 | 9E | 01 | 1D | 00 | 72 | 51 | D0 | |
| 1E | 20 | 6E | 28 | 55 | 00 | A0 | 5A | 00 | 00 | 00 | 1E | 8C | 0A | D0 | 8A | 20 | E0 | 2D | 10 | 10 | 3E | 96 | 00 | |
| A0 | 5A | 00 | 00 | 00 | 18 | 00 | 00 | 00 | 00 | 00 | 00 | 00 | 00 | 00 | 4F | |||||||||
EDID Description
| 1080P 3D DD | Native/preferred timing1920x1080p at 60Hz (16:9) |
| Standard timings supported640 x 480p at 60Hz - IBM VGA | |
| CE video identifiers (VICs) - timing/formats supported1920 x 1080p at 60Hz - HDTV (16:9, 1:1) [Native]1280 x 720p at 60Hz - HDTV (16:9, 1:1)1920 x 1080i at 60Hz - HDTV (16:9, 1:1)720 x 480p at 60Hz - EDTV (16:9, 32:27)1920 x 1080p at 24Hz - HDTV (16:9, 1:1)1920 x 1080p at 30Hz - HDTV (16:9, 1:1) | |
| CE audio data (Formats supported)AC-3 6-channel, 680k max. bit rate at 32/44/48 kHzDTS 6-channel, 1536k max. bit rate at 32/44/48/88/96 kHz | |
| CE speaker allocation dataFL/FR, FLFE, FC, RL/RR | |
| CE vendor specific data (VSDB)3D structures supported.. Top-and-bottom, Side-by-side w. horizontal sub-sampling3D formats supported.... Mandatory formats plus some primary VICs1920 x 1080p at 60Hz - HDTV (16:9, 1:1) [Native]1280 x 720p at 60Hz - HDTV (16:9, 1:1)1920 x 1080i at 60Hz - HDTV (16:9, 1:1)1920 x 1080p at 24Hz - HDTV (16:9, 1:1)1920 x 1080p at 30Hz - HDTV (16:9, 1:1) | |
| EDID Description | |
| 1080P 3D DD | Raw data |
| 00 FF FF FF FF FF FF 00 06 8C 11 20 00 00 00 04 01 15 01 03 80 59 32 780A EE 91 A3 54 4C 99 26 0F 50 54 20 00 00 01 01 01 01 01 01 01 0101 01 01 01 01 01 02 3A 80 18 71 38 2D 40 58 2C 45 00 A0 5A 00 00 00 1E00 00 00 FE 00 0A 20 20 20 20 20 20 20 20 20 20 20 20 20 20 20 20 20 20 20 20 20 20 20 20 20 20 20 20 20 20 20 20 20 20 | |
| 54 4C 20 33 44 20 44 44 0A 20 20 20 20 00 00 00 FD 00 18 4B 0F 51 17 00 0A20 20 20 20 20 20 01 B9 02 03 2E F4 46 90 04 05 03 20 22 26 15 07 55 3D1F C0 70 03 0C 00 10 00 B8 2D 21 D0 06 01 40 00 37 20 50 83 0F 00 00 E200 0F E3 05 03 01 01 1D 80 18 71 1C 16 20 58 2C 25 00 A0 5A 00 00 00 9E01 1D 00 72 51 D0 1E 20 6E 28 55 00 A0 5A 00 00 00 1E 8C 0A D0 8A 20 E02D 10 10 3E 96 00 A0 5A 00 00 00 18 00 00 00 00 00 00 00 00 00 00 00 00 00 | |
| 00 00 00 00 00 00 00 00 00 00 00 00 00 00 00 00 71 | |
| EDID Description | |
| 720P 2CH | Native/preferred timing1280x720p at 60Hz (16:9)Standard timings supported640 x 480p at 60Hz - IBM VGACE video identifiers (VICs) - timing/formats supported1280 x 720p at 60Hz - HDTV (16:9, 1:1) [Native]1280 x 720p at 50Hz - HDTV (16:9, 1:1)1920 x 1080i at 60Hz - HDTV (16:9, 1:1)1920 x 1080i at 50Hz - HDTV (16:9, 1:1)720 x 480p at 60Hz - EDTV (16:9, 32:27)720 x 480i at 60Hz - Doublescan (16:9, 32:27)CE audio data (Formats supported)LPCM 2-channel, 16/20/24 bit depths at 32/44/48/88/96/176/192 kHzCE speaker allocation dataFL/FRRaw data00 FF FF FF FF FF FF 00 06 8C 11 20 00 00 00 05 01 15 01 03 80 34 21 78EE EE 91 A3 54 4C 99 26 0F 50 54 00 00 00 01 01 01 01 01 01 01 01 0101 01 01 01 01 01 01 01 01 01 01 01 01 01 01 01 01 01 01 01 01 01 01 01 01 01 01 01 01 01 01 01 01 01 65 1D 00 BC 52 D0 1E 20 B8 28 55 40 C4 8E 21 00 00 1E 00 00 00 FC 00 4154 4C 20 37 32 30 50 32 43 48 0A 20 00 00 00 FD 00 38 4C 1E 53 11 01 0A20 20 20 20 20 01 FA 02 03 1B 71 46 84 13 05 14 03 07 23 09 7F 07 8301 00 00 67 03 0C 00 10 00 00 11 01 1D 00 72 51 D0 1E 20 6E 28 55 00 C48E 21 00 00 1E 01 1D 00 BC 52 D0 1E 20 B8 28 55 40 C4 8E 21 00 00 1E 8C0A D0 8A 20 E0 2D 10 10 3E 96 00 C4 8E 21 00 00 18 00 00 00 00 00 00 00 00 00 00 00 00 00 00 00 00 00 00 00 00 00 00 00 00 00 00 00 00 00 00 00 00 00 0000 00 00 00 00 00 00 00 00 00 00 00 00 00 00 00 00 00 00 00 00 00 00 00 00 00 00 00 00 00 00 00 00 5B |
EDID Description
| 720P DD | Native/preferred timing1280x720p at 60Hz (16:9) |
| Standard timings supported640 x 480p at 60Hz - IBM VGA | |
| CE video identifiers (VICs) - timing/formats supported1280 x 720p at 60Hz - HDTV (16:9, 1:1) [Native]1280 x 720p at 50Hz - HDTV (16:9, 1:1)1920 x 1080i at 60Hz - HDTV (16:9, 1:1)1920 x 1080i at 50Hz - HDTV (16:9, 1:1)720 x 480p at 60Hz - EDTV (16:9, 32:27)720 x 480i at 60Hz - Doublescan (16:9, 32:27) | |
| CE audio data (formats supported)AC-3 6-channel, 680k max. bit rate at 32/44/48 kHzDTS 6-channel, 1536k max. bit rate at 32/44/48/88/96 kHz | |
| CE speaker allocation dataFL/FR, FLFE, FC, RL/RR | |
| Raw data00 FF FF FF FF FF FF 00 06 8C 11 20 00 00 00 05 01 15 01 03 80 34 21 78EE EE 91 A3 54 4C 99 26 0F 50 54 00 00 00 01 01 01 01 01 01 01 01 0101 01 01 01 01 01 01 01 01 01 01 01 01 01 01 01 01 01 01 01 01 01 01 01 01 01 01 01 01 01 01 01 01 01 65 1D 00 BC 52 D0 1E 20 B8 28 55 40 C4 8E 21 00 00 1E 00 00 00 FC 00 4154 4C 20 37 32 30 50 20 44 44 0A 20 00 00 00 FD 00 38 4C 1E 53 11 01 0A20 20 20 20 20 20 01 0F 02 03 1E 71 46 84 13 05 14 03 07 26 15 07 55 3D1F C0 83 0F 00 00 67 03 0C 00 10 00 00 11 01 1D 00 72 51 D0 1E 20 6E 2855 00 C4 8E 21 00 00 1E 00 00 1E 00 00 1E 00 00 1E 00 00 1E 00 00 1E 00 00 1E 00 00 1E 00 00 1E 00 00 1E 00 00 1E 00 00 1E |
EDID Description
| 1280x8002CH | Native/preferred timing1280x800p at 60Hz |
| Standard timings supported720 x 400p at 70Hz - IBM VGA640 x 480p at 60Hz - IBM VGA640 x 480p at 67Hz - Apple Mac II640 x 480p at 72Hz - VESA640 x 480p at 75Hz - VESA800 x 600p at 56Hz - VESA800 x 600p at 60Hz - VESA800 x 600p at 72Hz - VESA800 x 600p at 75Hz - VESA832 x 624p at 75Hz - Apple Mac II1024 x 768p at 60Hz - VESA1024 x 768p at 70Hz - VESA1024 x 768p at 75Hz - VESA1280 x 1024p at 75Hz - VESA1152 x 870p at 75Hz - Apple Mac II1600 x 1200p at 60Hz - VESA STD1440 x 900p at 60Hz - VESA STD1400 x 1050p at 60Hz - VESA STD1280 x 1024p at 60Hz - VESA STD1280 x 800p at 60Hz - VESA STD1280 x 720p at 120Hz - VESA STD1024 x 768p at 120Hz - VESA STD800 x 600p at 120Hz - VESA STD | |
| CE video identifiers (VICs) - timing/formats supported720 x 480p at 60Hz - EDTV (16:9, 32:27)1280 x 720p at 60Hz - HDTV (16:9, 1:1) [Native]1920 x 1080i at 60Hz - HDTV (16:9, 1:1)720 x 480p at 60Hz - EDTV (4:3, 8:9)720 x 480i at 60Hz - Doublescan (4:3, 8:9)720 x 480i at 60Hz - Doublescan (16:9, 32:27)1440 x 480p at 60Hz - DVD (4:3, 4:9)1440 x 480p at 60Hz - DVD (16:9, 16:27)720 x 576p at 50Hz - EDTV (16:9, 64:45)720 x 576p at 50Hz - EDTV (4:3, 16:15)1280 x 720p at 50Hz - HDTV (16:9, 1:1)1920 x 1080i at 50Hz - HDTV (16:9, 1:1)720 x 576i at 50Hz - Doublescan (4:3, 16:15)720 x 576i at 50Hz - Doublescan (16:9, 64:45)1920 x 1080p at 25Hz - HDTV (16:9, 1:1)1920 x 1080p at 30Hz - HDTV (16:9, 1:1)640 x 480p at 60Hz - Default (4:3, 1:1) | |
| CE audio data (formats supported)LPCM 2-channel, 16/20/24 bit depths at 32/44/48 kHz | |
| CE speaker allocation dataFL/FR |
Appendix
| EDID Description | |
| 1280x8002CH | Raw data |
| 00 FF FF FF FF FF FF 00 06 8C 25 27 01 01 01 01 27 14 01 03 80 00 00 780A A5 DF A2 59 5C 8F 23 DC 50 5E BF EF 80 A9 40 95 00 90 40 81 80 81 0081 FC 61 7C 45 7C 9E 20 00 90 51 20 1F 30 48 80 36 00 00 00 00 00 00 1E00 00 00 FF 00 52 53 34 31 30 33 39 30 36 35 35 37 0A 00 00 00 FD 00 3278 1F 64 11 00 0A 20 20 20 20 20 20 00 00 00 FC 00 41 54 4C 20 50 43 5758 47 41 32 43 48 01 49 02 03 24 C1 83 01 00 00 65 03 0C 00 10 00 51 0384 05 02 06 07 0E 0F 12 11 13 14 15 16 21 22 01 23 09 07 07 8C 0A D0 8A20 E0 2D 10 10 3E 96 00 00 00 00 00 00 18 01 1D 00 72 51 D0 1E 20 6E 2855 00 00 00 00 00 00 1E 01 1D 80 18 71 1C 16 20 58 2C 25 00 00 00 00 0000 9E 8C 0A D0 90 20 40 31 20 0C 40 55 00 00 00 00 00 00 18 01 1D 00 BC52 D0 1E 20 B8 28 55 40 00 00 00 00 00 1E 00 04 | |
EDID Description
| 1366x7682CH | Native/preferred timing1366x768p at 60Hz |
| Standard timings supported720 x 400p at 70Hz - IBM VGA640 x 480p at 60Hz - IBM VGA640 x 480p at 67Hz - Apple Mac II640 x 480p at 72Hz - VESA640 x 480p at 75Hz - VESA800 x 600p at 56Hz - VESA800 x 600p at 60Hz - VESA800 x 600p at 72Hz - VESA800 x 600p at 75Hz - VESA832 x 624p at 75Hz - Apple Mac II1024 x 768p at 60Hz - VESA1024 x 768p at 70Hz - VESA1024 x 768p at 75Hz - VESA1280 x 1024p at 75Hz - VESA1152 x 870p at 75Hz - Apple Mac II1600 x 1200p at 60Hz - VESA STD1440 x 900p at 60Hz - VESA STD1400 x 1050p at 60Hz - VESA STD1280 x 1024p at 60Hz - VESA STD1280 x 800p at 60Hz - VESA STD1280 x 720p at 120Hz - VESA STD1024 x 768p at 120Hz - VESA STD800 x 600p at 120Hz - VESA STD | |
| CE video identifiers (VICs) - timing/formats supported720 x 480p at 60Hz - EDTV (16:9, 32:27)1280 x 720p at 60Hz - HDTV (16:9, 1:1) [Native]1920 x 1080i at 60Hz - HDTV (16:9, 1:1)720 x 480p at 60Hz - EDTV (4:3, 8:9)720 x 480i at 60Hz - Doublescan (4:3, 8:9)720 x 480i at 60Hz - Doublescan (16:9, 32:27)1440 x 480p at 60Hz - DVD (4:3, 4:9)1440 x 480p at 60Hz - DVD (16:9, 16:27)720 x 576p at 50Hz - EDTV (16:9, 64:45)720 x 576p at 50Hz - EDTV (4:3, 16:15)1280 x 720p at 50Hz - HDTV (16:9, 1:1)1920 x 1080i at 50Hz - HDTV (16:9, 1:1)720 x 576i at 50Hz - Doublescan (4:3, 16:15)720 x 576i at 50Hz - Doublescan (16:9, 64:45)1920 x 1080p at 25Hz - HDTV (16:9, 1:1)1920 x 1080p at 30Hz - HDTV (16:9, 1:1)640 x 480p at 60Hz - Default (4:3, 1:1) | |
| CE audio data (formats supported)LPCM 2-channel, 16/20/24 bit depths at 32/44/48 kHz | |
| CE speaker allocation dataFL/FR |
| EDID Description | |
| 1366x7682CH | Raw data00 FF FF FF FF FF FF 00 06 8C 25 27 01 01 01 01 27 14 01 03 80 00 00 780A A5 DF A2 59 5C 8F 23 DC 50 5E BF EF 80 A9 40 95 00 90 40 81 80 81 0081 FC 61 7C 45 7C 66 21 56 AA 51 00 1E 30 46 8F 33 00 00 00 00 00 00 1E00 00 00 FF 00 52 53 34 31 30 33 39 30 36 35 35 37 0A 00 00 00 FD 00 3278 1F 64 11 00 0A 20 20 20 20 20 20 00 00 00 FC 00 41 54 4C 20 54 56 5758 47 41 32 43 48 01 10 02 03 24 C1 83 01 00 00 65 03 0C 00 10 00 51 0384 05 02 06 07 0E 0F 12 11 13 14 15 16 21 22 01 23 09 07 07 8C 0A D0 8A20 E0 2D 10 10 3E 96 00 00 00 00 00 18 01 1D 00 72 51 D0 1E 20 6E 2855 00 00 00 00 00 1E 01 1D 80 18 71 1C 16 20 58 2C 25 00 00 00 00 0000 9E 8C 0A D0 90 20 40 31 20 0C 40 55 00 00 00 00 00 00 18 01 1D 00 BC52 D0 1E 20 B8 28 55 40 00 00 00 00 1E 00 04 |
| EDID Description | |
| 1080P DVI | Native/preferred timing1920x1080p at 60Hz |
| Standard timings supported720 x 400p at 70Hz - IBM VGA640 x 480p at 60Hz - IBM VGA800 x 600p at 60Hz - VESA1024 x 768p at 60Hz - VESA1280 x 720p at 60Hz - VESA STD1280 x 960p at 60Hz - VESA STD1280 x 1024p at 60Hz - VESA STD1440 x 900p at 60Hz - VESA STD1600 x 1200p at 60Hz - VESA STD1680 x 1050p at 60Hz - VESA STD1920 x 1080p at 60Hz - VESA STD | |
| Raw data00 FF FF FF FF FF FF 00 06 8C 72 29 01 01 01 01 1B 16 01 03 80 33 1D 782A 77 C5 A3 54 4F 9F 27 11 50 54 A1 08 00 81 C0 81 40 81 80 95 00 A9 40B3 00 D1 C0 01 01 02 3A 80 18 71 38 2D 40 58 2C 45 00 FD 1E 11 00 00 1E00 00 00 FD 00 32 4C 18 5E 11 00 0A 20 20 20 20 20 20 20 00 00 FC 00 4154 4C 20 31 30 38 30 50 20 44 56 49 00 00 00 FF 00 33 43 4D 32 32 37 3032 39 53 0A 20 20 00 4A | |
| 1280x800DVI | Native/preferred timing1280x800p at 60Hz |
| Standard timings supported720 x 400p at 70Hz - IBM VGA640 x 480p at 60Hz - IBM VGA640 x 480p at 67Hz - Apple Mac II640 x 480p at 72Hz - VESA640 x 480p at 75Hz - VESA800 x 600p at 56Hz - VESA800 x 600p at 60Hz - VESA800 x 600p at 72Hz - VESA800 x 600p at 75Hz - VESA832 x 624p at 75Hz - Apple Mac II1024 x 768p at 60Hz - VESA1024 x 768p at 70Hz - VESA1024 x 768p at 75Hz - VESA1280 x 1024p at 75Hz - VESA1152 x 870p at 75Hz - Apple Mac II1600 x 1200p at 60Hz - VESA STD1440 x 900p at 60Hz - VESA STD1400 x 1050p at 60Hz - VESA STD1280 x 1024p at 60Hz - VESA STD1280 x 800p at 60Hz - VESA STD1280 x 720p at 120Hz - VESA STD1024 x 768p at 120Hz - VESA STD800 x 600p at 120Hz - VESA STD | |
| Raw data00 FF FF FF FF FF FF 00 06 8C 25 27 01 01 01 01 27 14 01 03 80 00 00 780A A5 DF A2 59 5C 8F 23 DC 50 5E BF EF 80 A9 40 95 00 90 40 81 80 81 0081 FC 61 7C 45 7C 9E 20 00 90 51 20 1F 30 48 80 36 00 00 00 00 00 00 1E00 00 00 FF 00 52 53 34 31 30 33 39 30 36 35 35 37 0A 00 00 00 FD 00 3278 1F 64 11 00 0A 20 20 20 20 20 20 20 00 00 00 FC 00 41 54 4C 20 50 43 5758 47 41 44 56 49 00 24 | |
EDID Description
| 1920x12002CH | Native/preferred timing1920x1200p at 60Hz |
| Standard timings supported720 x 400p at 70Hz - IBM VGA640 x 480p at 60Hz - IBM VGA640 x 480p at 67Hz - Apple Mac II640 x 480p at 72Hz - VESA640 x 480p at 75Hz - VESA800 x 600p at 56Hz - VESA800 x 600p at 60Hz - VESA800 x 600p at 72Hz - VESA800 x 600p at 75Hz - VESA832 x 624p at 75Hz - Apple Mac II1024 x 768p at 60Hz - VESA1024 x 768p at 70Hz - VESA1024 x 768p at 75Hz - VESA1280 x 1024p at 75Hz - VESA1152 x 870p at 75Hz - Apple Mac II1600 x 1200p at 60Hz - VESA STD1440 x 900p at 60Hz - VESA STD1400 x 1050p at 60Hz - VESA STD1280 x 1024p at 60Hz - VESA STD1280 x 800p at 60Hz - VESA STD1280 x 720p at 120Hz - VESA STD1024 x 768p at 120Hz - VESA STD800 x 600p at 120Hz - VESA STD | |
| CE video identifiers (VICs) - timing/formats supported720 x 480p at 60Hz - EDTV (16:9, 32:27)1280 x 720p at 60Hz - HDTV (16:9, 1:1) [Native]1920 x 1080i at 60Hz - HDTV (16:9, 1:1)720 x 480p at 60Hz - EDTV (4:3, 8:9)720 x 480i at 60Hz - Doublescan (4:3, 8:9)720 x 480i at 60Hz - Doublescan (16:9, 32:27)1440 x 480p at 60Hz - DVD (4:3, 4:9)1440 x 480p at 60Hz - DVD (16:9, 16:27)720 x 576p at 50Hz - EDTV (16:9, 64:45)720 x 576p at 50Hz - EDTV (4:3, 16:15)1280 x 720p at 50Hz - HDTV (16:9, 1:1)1920 x 1080i at 50Hz - HDTV (16:9, 1:1)720 x 576i at 50Hz - Doublescan (4:3, 16:15)720 x 576i at 50Hz - Doublescan (16:9, 64:45)1920 x 1080p at 25Hz - HDTV (16:9, 1:1)1920 x 1080p at 30Hz - HDTV (16:9, 1:1)640 x 480p at 60Hz - Default (4:3, 1:1) | |
| CE audio data (formats supported)LPCM 2-channel, 16/20/24 bit depths at 32/44/48 kHzCE speaker allocation dataFL/FR |
EDID Description
| 1920x12002CH | Raw data | |||||||||||||||||||||||
| 00 | FF | FF | FF | FF | FF | FF | 00 | 06 | 8C | 25 | 27 | 01 | 01 | 01 | 01 | 27 | 14 | 01 | 03 | 80 | 00 | 00 | 78 | |
| 0A | A5 | DF | A2 | 59 | 5C | 8F | 23 | DC | 50 | 5E | BF | EF | 80 | A9 | 40 | 95 | 00 | 90 | 40 | 81 | 80 | 81 | 00 | |
| 81 | FC | 61 | 7C | 45 | 7C | 35 | 3C | 80 | A0 | 70 | B0 | 23 | 40 | 30 | 20 | 36 | 00 | 00 | 00 | 00 | 00 | 00 | 1E | |
| 00 | 00 | 00 | FF | 00 | 52 | 53 | 34 | 31 | 30 | 33 | 39 | 30 | 36 | 35 | 35 | 37 | 0A | 00 | 00 | 00 | FD | 00 | 32 | |
| 78 | 1F | 64 | 11 | 00 | 0A | 20 | 20 | 20 | 20 | 20 | 20 | 00 | 00 | 00 | FC | 00 | 41 | 54 | 4C | 20 | 57 | 55 | 58 | |
| 47 | 41 | 32 | 43 | 48 | 0A | 01 | EF | 02 | 03 | 24 | C1 | 83 | 01 | 00 | 00 | 65 | 03 | 0C | 00 | 10 | 00 | 51 | 03 | |
| 84 | 05 | 02 | 06 | 07 | 0E | 0F | 12 | 11 | 13 | 14 | 15 | 16 | 21 | 22 | 01 | 23 | 09 | 07 | 07 | 8C | 0A | D0 | 8A | |
| 20 | E0 | 2D | 10 | 10 | 3E | 96 | 00 | 00 | 00 | 00 | 00 | 00 | 18 | 01 | 1D | 00 | 72 | 51 | D0 | 1E | 20 | 6E | 28 | |
| 55 | 00 | 00 | 00 | 00 | 00 | 00 | 1E | 01 | 1D | 80 | 18 | 71 | 1C | 16 | 20 | 58 | 2C | 25 | 00 | 00 | 00 | 00 | 00 | |
| 00 | 9E | 8C | 0A | D0 | 90 | 20 | 40 | 31 | 20 | 0C | 40 | 55 | 00 | 00 | 00 | 00 | 00 | 00 | 18 | 01 | 1D | 00 | BC | |
| 52 | D0 | 1E | 20 | B8 | 28 | 55 | 40 | 00 | 00 | 00 | 00 | 00 | 1E | 00 | 04 | |||||||||
EDID Description
| 3840x216060 Hz,4:2:0,2CH | Native/preferred timing3840x2160p at 30Hz (16:9) |
| Standard timings supported720 x 400p at 70Hz - IBM VGA640 x 480p at 60Hz - IBM VGA800 x 600p at 60Hz - VESA1024 x 768p at 60Hz - VESA1280 x 1024p at 60Hz - VESA STD1024 x 768p at 60Hz - VESA STD800 x 600p at 60Hz - VESA STD640 x 480p at 60Hz - VESA STD | |
| CE video identifiers (VICs) - timing/formats supported1920 x 1080p at 60Hz - HDTV (16:9, 1:1)1920 x 1080p at 30Hz - HDTV (16:9, 1:1)1920 x 1080p at 24Hz - HDTV (16:9, 1:1)1920 x 1080i at 60Hz - HDTV (16:9, 1:1)1280 x 720p at 60Hz - HDTV (16:9, 1:1) [Native]720 x 480p at 60Hz - EDTV (16:9, 32:27)720 x 480p at 60Hz - EDTV (4:3, 8:9)720 x 480p at 60Hz - EDTV (4:3, 8:9)720 x 480p at 60Hz - EDTV (4:3, 8:9)720 x 480p at 60Hz - EDTV (4:3, 8:9)720 x 480p at 60Hz - EDTV(4:3, 8:9) | |
| CE audio data (Formats supported)LPCM 2-channel, 16/20/24 bit depths at 32/44/48 kHz |
EDID Description
| 3840x216060 Hz,4:2:0,2CH | Raw data | ||||||||||||||||||||||||
| 00 | FF | FF | FF | FF | FF | FF | 00 | 06 | 8C | 11 | 20 | 00 | 00 | 00 | 00 | 14 | 1A | 01 | 03 | 80 | 10 | 09 | 78 | ||
| 0A | EE | 91 | A3 | 54 | 4C | 99 | 26 | 0F | 50 | 54 | A1 | 08 | 00 | 81 | 80 | 61 | 40 | 45 | 40 | 31 | 40 | 01 | 01 | ||
| 01 | 01 | 01 | 01 | 01 | 01 | 04 | 74 | 00 | 30 | F2 | 70 | 5A | 80 | B0 | 58 | 8A | 00 | BA | 88 | 21 | 00 | 00 | 1E | ||
| 02 | 3A | 80 | 18 | 71 | 38 | 2D | 40 | 58 | 2C | 45 | 00 | BA | 88 | 21 | 00 | 00 | 1E | 00 | 00 | 00 | FD | 00 | 17 | ||
| 3D | 0F | 44 | 1E | 00 | 0A | 20 | 20 | 20 | 20 | 20 | 20 | 00 | 00 | 00 | FC | 00 | 41 | 54 | 4C | 20 | 34 | 4B | 34 | ||
| 32 | 30 | 32 | 43 | 48 | 0A | 01 | E8 | 02 | 03 | 32 | F1 | 4B | 10 | 22 | 20 | 05 | 84 | 03 | 02 | 5D | 5F | 5F | 5F | ||
| 23 | 09 | 07 | 07 | 6D | 03 | 0C | 00 | 10 | 00 | B8 | 3C | 2F | 00 | 60 | 01 | 03 | 04 | E3 | 05 | 03 | 01 | E3 | 06 | ||
| 07 | 01 | E7 | 0E | 60 | 61 | 65 | 66 | 6A | 6B | 02 | 3A | 80 | 18 | 71 | 38 | 2D | 40 | 58 | 2C | 45 | 00 | A0 | 5A | ||
| 00 | 00 | 00 | 1E | 01 | 1D | 80 | 18 | 71 | 1C | 16 | 20 | 58 | 2C | 25 | 00 | A0 | 5A | 00 | 00 | 00 | 9E | 01 | 1D | ||
| 00 | 72 | 51 | D0 | 1E | 20 | 6E | 28 | 55 | 00 | A0 | 5A | 00 | 00 | 00 | 1E | 00 | 00 | 00 | 00 | 00 | 00 | 00 | 00 | ||
| 00 | 00 | 00 | 00 | 00 | 00 | 00 | 00 | 00 | 00 | 00 | 00 | 00 | 00 | 00 | 38 | ||||||||||
EDID Description
| 3840x216060 Hz,4:2:0,MCH | Native/preferred timing3840x2160p at 30Hz (16:9)Standard timings supported640 x 480p at 60Hz - IBM VGACE video identifiers (VICs) - timing/formats supported1920 x 1080p at 60Hz - HDTV (16:9, 1:1)1920 x 1080p at 30Hz - HDTV (16:9, 1:1)1920 x 1080p at 24Hz - HDTV (16:9, 1:1)1920 x 1080i at 60Hz - HDTV (16:9, 1:1)1280 x 720p at 60Hz - HDTV (16:9, 1:1) [Native]720 x 480p at 60Hz - EDTV (16:9, 32:27)720 x 480p at 60Hz - EDTV (4:3, 8:9)720 x 480p at 60Hz - EDTV (4:3, 8:9)720 x 480p at 60Hz - EDTV (4:3, 8:9)720 x 480p at 60Hz - EDTV (4:3, 8:9) |
| CE audio data (Formats supported)LPCM 2-channel, 16/20/24 bit depths at 32/44/48/88/96/176/192 kHzLPCM 6-channel, 16/20/24 bit depths at 32/44/48/88/96/176/192 kHzLPCM 8-channel, 16/20/24 bit depths at 32/44/48/88/96/176/192 kHzAC-3 6-channel, 680k max. bit rate at 32/44/48 kHzDTS 6-channel, 1536k max. bit rate at 32/44/48/88/96 kHzDD+ 8-channel at 32/44/48 kHzDVD-A 8-channel at 48/96/192 kHzDTS-HD 8-channel, 16-bit at 44/48/88/96/176/192 kHz | |
| CE speaker allocation dataFL/FR, FLFE, FC, RL/RR, RC, RLC/RRC | |
| EDID Description | |
| 3840x216060 Hz,4:2:0,MCH | Raw data00 FF FF FF FF FF FF 00 06 8C 11 20 00 00 00 01 14 1A 01 03 80 10 09 780A EE 91 A3 54 4C 99 26 0F 50 54 20 00 00 01 01 01 01 01 01 01 01 01 01 01 01 01 01 01 01 01 01 01 01 01 01 01 01 01 01 01 01 01 01 01 01 01 01 |
| 02 3A 80 18 71 38 2D 40 58 2C 45 00 BA 88 21 00 00 1E 00 00 00 FC 00 4154 4C 20 34 4B 34 32 30 4D 43 48 0A 00 00 00 FD 00 17 3D 0F 44 1E 00 0A20 20 20 20 20 20 01 E5 02 03 4B F6 4B 10 22 20 05 84 03 02 5D 5F 5F 5F38 09 7F 07 0D 7F 07 0F 7F 07 15 07 55 3D 1F C0 57 07 00 67 54 00 5F 7E01 83 5F 00 00 6D 03 0C 00 10 00 B8 3C 2F 00 60 01 03 04 E3 05 03 01 E306 07 01 E7 0E 60 61 65 66 6A 6B 02 3A 80 18 71 38 2D 40 58 2C 45 00 A05A 00 00 00 1E 01 1D 00 72 51 D0 1E 20 6E 28 55 00 A0 5A 00 00 1D | |
EDID Description
| 3840x216030 Hz,4:4:4,2CH | Native/preferred timing3840x2160p at 30Hz (16:9) |
| Standard timings supported720 x 400p at 70Hz - IBM VGA640 x 480p at 60Hz - IBM VGA800 x 600p at 60Hz - VESA1024 x 768p at 60Hz - VESA1024 x 768p at 75Hz - VESA1280 x 1024p at 60Hz - VESA STD1024 x 768p at 60Hz - VESA STD800 x 600p at 60Hz - VESA STD640 x 480p at 60Hz - VESA STD1280 x 1024p at 60Hz - VESA STD1600 x 1200p at 60Hz - VESA STD1280 x 1024p at 60Hz - VESA STD1600 x 1200p at 60Hz - VESA STD | |
| CE video identifiers (VICs) - timing/formats supported1920 x 1080p at 60Hz - HDTV (16:9, 1:1)1920 x 1080p at 30Hz - HDTV (16:9, 1:1)1920 x 1080p at 24Hz - HDTV (16:9, 1:1)1920 x 1080i at 60Hz - HDTV (16:9, 1:1)1280 x 720p at 60Hz - HDTV (16:9, 1:1)720 x 480p at 60Hz - EDTV (16:9, 32:27)720 x 480p at 60Hz - EDTV (4:3, 8:9)720 x 480p at 60Hz - EDTV (4:3, 8:9)720 x 480p at 60Hz - EDTV (4:3, 8:9)720 x 480p at 60Hz - EDTV (4:3, 8:9)720 x 480p at 60Hz - EDTV(4:3, 8:9)720 x 480p at 60Hz - EDTV (4:3, 8:9)720 x 480p at 60Hz - EDTV (4:3, 8:9)720 x 576p at 50Hz - EDTV (16:9, 64:45)1280 x 720p at 50Hz - HDTV (16:9, 1:1)1920 x 1080i at 50Hz - HDTV (16:9, 1:1)1920 x 1080p at 50Hz - HDTV (16:9, 1:1)720 x 480i at 60Hz - Doublescan (16:9, 32:27)720 x 480i at 60Hz - Doublescan (16:9, 32:27) | |
| CE audio data (formats supported)LPCM 2-channel, 16/20/24 bit depths at 32/44/48/96/192 kHzLPCM 2-channel, 16/20/24 bit depths at 32/44/48/96/192 kHzLPCM 2-channel, 16/20/24 bit depths at 32/44/48/96/192 kHz |
| EDID Description | |
| 3840x216030 Hz,4:4:4,2CH | Raw data00 FF FF FF FF FF FF 00 06 8C 11 20 00 00 00 01 14 1A 01 03 80 10 09 780A EE 91 A3 54 4C 99 26 0F 50 54 20 00 00 01 01 01 01 01 01 01 01 01 01 01 01 01 01 01 01 01 01 01 01 01 01 01 01 01 01 01 01 01 01 01 01 01 01 |
| 02 3A 80 18 71 38 2D 40 58 2C 45 00 BA 88 21 00 00 1E 00 00 00 FC 00 4154 4C 20 34 4B 34 32 30 4D 43 48 0A 00 00 00 FD 00 17 3D 0F 44 1E 00 0A20 20 20 20 20 20 01 E5 02 03 4B F6 4B 10 22 20 05 84 03 02 5D 5F 5F 5F38 09 7F 07 0D 7F 07 0F 7F 07 15 07 55 3D 1F C0 57 07 00 67 54 00 5F 7E01 83 5F 00 00 6D 03 0C 00 10 00 B8 3C 2F 00 60 01 03 04 E3 05 03 01 E306 07 01 E7 0E 60 61 65 66 6A 6B 02 3A 80 18 71 38 2D 40 58 2C 45 00 A05A 00 00 00 1E 01 1D 00 72 51 D0 1E 20 6E 28 55 00 A0 5A 00 00 1D | |
EDID Description
| 3840x216030 Hz,4:4:4,MCH | Native/preferred timing3840x2160p at 30Hz (16:9) |
| Standard timings supported720 x 400p at 70Hz - IBM VGA640 x 480p at 60Hz - IBM VGA800 x 600p at 60Hz - VESA1024 x 768p at 60Hz - VESA1024 x 768p at 75Hz - VESA1280 x 1024p at 60Hz - VESA STD1024 x 768p at 60Hz - VESA STD800 x 600p at 60Hz - VESA STD640 x 480p at 60Hz - VESA STD1280 x 1024p at 60Hz - VESA STD1600 x 1200p at 60Hz - VESA STD1280 x 1024p at 60Hz - VESA STD1600 x 1200p at 60Hz - VESA STD | |
| CE video identifiers (VICs) - timing/formats supported1920 x 1080p at 60Hz - HDTV (16:9, 1:1)1920 x 1080p at 30Hz - HDTV (16:9, 1:1)1920 x 1080p at 24Hz - HDTV (16:9, 1:1)1920 x 1080i at 60Hz - HDTV (16:9, 1:1)1280 x 720p at 60Hz - HDTV (16:9, 1:1)720 x 480p at 60Hz - EDTV (16:9, 32:27)720 x 480p at 60Hz - EDTV (4:3, 8:9)720 x 480p at 60Hz - EDTV (4:3, 8:9)720 x 480p at 60Hz - EDTV (4:3, 8:9)720 x 480p at 60Hz - EDTV (4:3, 8:9)720 x 480p at 60Hz - EDTV(4:3, 8:9)720 x 480p at 60Hz - EDTV (4:3, 8:9)720 x 576p at 50Hz - EDTV (16:9, 64:45)1280 x 720p at 50Hz - HDTV (16:9, 1:1)1920 x 1080i at 50Hz - HDTV (16:9, 1:1)1920 x 1080p at 50Hz - HDTV (16:9, 1:1)720 x 480i at 60Hz - Doublescan (16:9, 32:27)720 x 480i at 60Hz - Doublescan (16:9, 32:27) | |
| CE audio data (formats supported)LPCM 2-channel, 16/20/24 bit depths at 32/44/48/88/96/176/192 kHzLPCM 6-channel, 16/20/24 bit depths at 32/44/48/88/96/176/192 kHzLPCM 8-channel, 16/20/24 bit depths at 32/44/48/88/96/176/192 kHzAC-3 6-channel, 680k max. bit rate at 32/44/48 kHzDTS 6-channel, 1536k max. bit rate at 32/44/48/88/96 kHzDD+ 8-channel at 32/44/48 kHzDVD-A 8-channel at 48/96/192 kHzDTS-HD 8-channel, 16-bit at 44/48/88/96/176/192 kHz | |
| EDID Description | |
| 3840x216030 Hz,4:4:4,MCH | Raw data00 FF FF FF FF FF FF 00 06 8C 11 20 00 00 00 00 05 1A 01 03 80 10 09 780A EE 91 A3 54 4C 99 26 0F 50 54 A1 0A 00 81 80 61 40 45 40 31 40 81 80A9 40 81 80 A9 40 04 74 00 30 F2 70 5A 80 B0 58 8A 00 BA 88 21 00 00 1E02 3A 80 18 71 38 2D 40 58 2C 45 00 A0 5A 00 00 00 1E 00 00 00 FD 00 173F 0F 52 1E 00 0A 20 20 20 20 20 20 00 00 00 FC 00 41 54 4C 34 4B 5F 4D43 48 34 34 34 0A 01 22 02 03 56 F1 52 10 22 20 05 04 03 02 5D 5F 5F 5F61 12 13 14 1F 07 5F 38 09 7F 07 0D 7F 07 0F 7F 07 15 07 55 3D 1F C0 5707 00 67 54 00 5F 7E 01 6C 03 0C 00 10 00 F8 3C 20 00 40 03 01 67 D8 5DC4 01 78 80 00 E3 05 03 01 E3 06 07 01 E8 0E 60 61 65 66 6A 6B 02 01 1D00 72 51 D0 1E 206E 28 55 00 A0 5A 00 00 00 1E 00 00 00 00 1E 01 1D 00 72 51 D0 1E 20 |
EDID Description
| 4096x216060 Hz,4:2:0,2CH | Native/preferred timing3840x2160p at 30Hz (16:9)Standard timings supported720 x 400p at 70Hz - IBM VGA640 x 480p at 60Hz - IBM VGA800 x 600p at 60Hz - VESA1024 x 768p at 60Hz - VESA1280 x 1024p at 60Hz - VESA STD1024 x 768p at 60Hz - VESA STD800 x 600p at 60Hz - VESA STD640 x 480p at 60Hz - VESA STDCE video identifiers (VICs) - timing/formats supported1920 x 1080p at 60Hz - HDTV (16:9, 1:1)1920 x 1080p at 30Hz - HDTV (16:9, 1:1)1920 x 1080p at 24Hz - HDTV (16:9, 1:1)1920 x 1080i at 60Hz - HDTV (16:9, 1:1)1280 x 720p at 60Hz - HDTV (16:9, 1:1) [Native]720 x 480p at 60Hz - EDTV (16:9, 32:27)720 x 480p at 60Hz - EDTV (4:3, 8:9)720 x 480p at 60Hz - EDTV (4:3, 8:9)720 x 480p at 60Hz - EDTV (4:3, 8:9)720 x 480p at 60Hz - EDTV (4:3, 8:9)720 x 480p at 60Hz - EDTV(4:3, 8:9)CE audio data (formats supported)LPCM 2-channel, 16/20/24 bit depths at 32/44/48 kHzRaw data00 FF FF FF FF FF FF 00 06 8C 11 20 00 00 00 00 14 1A 01 03 80 10 09 780A EE 91 A3 54 4C 99 26 0F 50 54 A1 08 00 81 80 61 40 45 40 31 40 01 0101 01 01 01 01 01 04 74 00 30 F2 70 5A 80 B0 58 8A 00 BA 88 21 00 00 FD 00 1702 3A 80 18 71 38 2D 40 58 2C 45 00 BA 88 21 00 00 1E 00 00 00 FD 00 173D OF 44 1E 00 0A 20 20 20 20 20 20 00 00 FC 00 41 54 4C 20 34 4B 3432 30 32 43 48 0A 01 E8 02 03 32 F1 4B 10 22 20 05 84 03 02 5D 5F 65 6623 09 07 07 6D 03 0C 00 10 00 B8 3C 2F 00 60 01 03 04 E3 05 03 01 E3 0607 01 E7 0E 60 61 65 66 6A 6B 02 3A 80 18 71 38 2D 40 58 2C 45 00 A0 5A 00 00 00 9E 01 1D00 72 51 D0 1E 20 6E 28 55 00 A0 5A 00 00 00 1E 00 00 00 00 00 00 0000 00 00 00 00 00 00 00 00 00 00 00 00 00 00 00 00 00 00 00 00 00 00 00 00 00 00 00 00 00 00 00 00 00 5 |
EDID Description
| 4096x216060 Hz,4:2:0,MCH | Native/preferred timing3840x2160p at 30Hz (16:9) |
| Standard timings supported640 x 480p at 60Hz - IBM VGA | |
| CE video identifiers (VICs) - timing/formats supported1920 x 1080p at 60Hz - HDTV (16:9, 1:1)1920 x 1080p at 30Hz - HDTV (16:9, 1:1)1920 x 1080p at 24Hz - HDTV (16:9, 1:1)1920 x 1080i at 60Hz - HDTV (16:9, 1:1)1280 x 720p at 60Hz - HDTV (16:9, 1:1) [Native]720 x 480p at 60Hz - EDTV (16:9, 32:27)720 x 480p at 60Hz - EDTV (4:3, 8:9)720 x 480p at 60Hz - EDTV (4:3, 8:9)720 x 480p at 60Hz - EDTV (4:3, 8:9)720 x 480p at 60Hz - EDTV (4:3, 8:9) | |
| CE audio data (formats supported)LPCM 2-channel, 16/20/24 bit depths at 32/44/48/88/96/176/192 kHzLPCM 6-channel, 16/20/24 bit depths at 32/44/48/88/96/176/192 kHzLPCM 8-channel, 16/20/24 bit depths at 32/44/48/88/96/176/192 kHzAC-3 6-channel, 680k max. bit rate at 32/44/48 kHzDTS 6-channel, 1536k max. bit rate at 32/44/48/88/96 kHzDD+ 8-channel at 32/44/48 kHzDVD-A 8-channel at 48/96/192 kHzDTS-HD 8-channel, 16-bit at 44/48/88/96/176/192 kHz | |
| CE speaker allocation dataFL/FR, FLFE, FC, RL/RR, RC, RLC/RRC | |
| Raw data00 FF FF FF FF FF FF 00 06 8C 11 20 00 00 00 01 01 15 01 03 80 10 09 780A EE 91 A3 54 4C 99 26 0F 50 54 20 00 00 01 01 01 01 01 01 01 0101 01 01 01 01 01 01 01 04 74 00 30 F2 70 5A 80 B0 58 8A 00 BA 88 21 00 00 1E02 3A 80 18 71 38 2D 40 58 2C 45 00 BA 88 21 00 00 1E 00 00 00 FC 00 4154 4C 20 34 4B 34 32 30 4D 43 48 0A 00 00 00 FD 00 17 3D 0F 44 1E 00 0A20 20 20 20 20 01 FD 02 03 4B F6 4B 10 22 20 05 84 03 02 5D 5F 65 6638 09 7F 07 0D 7F 07 0F 7F 07 15 07 55 3D 1F C0 57 07 00 67 54 00 5F 7E01 83 5F 00 00 6D 03 0C 00 10 00 B8 3C 2F 00 60 01 03 04 E3 05 03 01 E306 07 01 E7 0E 60 61 65 66 6A 6B 02 3A 80 18 71 38 2D 40 58 2C 45 00 A05A 00 00 00 1E 01 1D 80 18 71 1C 16 20 58 2C 25 00 A0 5A 00 00 00 9E 011D 00 72 51 D0 1E 20 6E 28 55 00 A0 5A 00 00 10 |
Updating the Firmware
Updating the firmware can be completed using either the USB interface or the web GUI. Atlona recommends using the web GUI for updating the firmware. However, if a network connection is not available, the AT-HDVS-210U-TX-WP firmware can be updated using a USB-A to USB mini-B cable.
Using the Web GUI
Requirements:
• AT-HDVS-210U-TX-WP
- Firmware file
- Computer
- Connect an Ethernet cable from the computer, containing the firmware, to the same network where the AT-HDVS-210U-TX-WP is connected.
- Go to the System page (page 31) in the web GUI.

- Click the Choose File button, under the Firmware Update section.
- Browse to the location of the firmware file, select it, and click the Open button.
-
Click the Update button, under the Firmware Update section.
-
The following message box will be displayed.

- Click the OK button to begin the firmware update process. Click the Cancel button to cancel the process.
- After the firmware update process is complete, the Login screen will be displayed.

Using USB
Requirements:
• AT-HDVS-210U-TX-WP
- Firmware file
• Computer running Windows
• USB-A to USB mini-B cable
- Disconnect power from the AT-HDVS-210U-TX-WP, by disconnecting the Ethernet cable from the HDBaseT OUT port on the unit.
- Remove the wall plate from the AT-HDVS-210U-TX-WP. Refer to Faceplate Removal and Assembly (page 13) if necessary.
- Locate the firmware port.

Appendix
- Connect the USB-A to USB mini-B cable between the PC and the firmware port on the AT-HDVS-210U-TX-WP. The unit will be powered by the USB cable.
- The USB UPDATE folder will be displayed.
If this folder is not displayed, automatically, select the USB UPDATE drive from Windows Explorer.
- Delete all files from the USB UPDATE drive, if any are present.
- Drag-and-drop the firmware file to the drive.
- After the file has been copied, disconnect the USB cable from both the computer and the AT-HDVS-210U-TX-WP.
- The firmware update process is complete.
- Reconnect the Ethernet cable to the HDBaseT OUT port.
Default Settings
The following tables list the factory-default settings for the AT-HDVS-210U-TX-WP.
| Feature Settings | ||
| A/V Settings Input Selection | Input 1 | |
| Auto Switch Mode | ON | |
| Fallback Port | Previous | |
| Fallback Time | 5 (seconds) | |
| HDCP Setting (Input 1) | ON | |
| HDCP Setting (Input 2) | ON | |
| Audio Output | ON | |
| System Settings Display | Auto Power On | Disabled |
| Display Auto Power Off | Disabled | |
| Lamp Cool Down Timer | 5 (seconds) | |
| Auto Power Off Timer | 15 (seconds) | |
| Power On Delay Timer | 5 (seconds) | |
| Control Type | RS-232 | |
| Feedback Verify | ON | |
| Display Mode | DispSW AVon | |
| IP Mode | Non-Login | |
| IP Address | 255.255.255.255 | |
| Port | 65535 | |
| RS-232 Zone | ||
| Baud rate | 115200 | |
| Data bit | 8 | |
| Parity | None | |
| Stop bit | 1 | |
| TX RS-232 | ||
| Baud rate | 115200 | |
| Data bit | 8 | |
| Parity | None | |
| Stop bit | 1 | |
| RX RS-232 Zone 1 | ||
| Baud rate | 9600 | |
| Data bit | 8 | |
| Parity | None | |
| Stop bit | 1 | |
| EDID Input 1 | Default (1920x1080p @ 60 Hz) | |
| Default (1920x1080p @ 60 Hz) | ||
| --- | ||
| Config Username (default) | root | |
| Alona | ||
| System IP Mode | DHCP | |
| Static IP Address (default) | ||
| Netmask | ||
| Gateway | ||
| Telnet Port | ||
| Telnet Login Mode | ||
| Telnet Timeout | ||
| Broadcast | ||
| Power | ||
Specifications
| Video | ||||
| UHD/HD/SD 4096×2160@24/25 | 30/50*/60Hz*, 3840×2160@24/25/30/50*/60Hz*, 2048×1080p, 1080p@23.98/24/25/29.97/30/50/59.94/60Hz, 1080i@50/59.94/60Hz, 720p@50/59.94/60Hz, 576p, 576i, 480p, 480i | |||
| VESA 2560×2048, 2560×1600, | 2048×1536, 1920×1200, 1680×1050, 1600×1200, 1600×900, 1440×900, 1400×1050, 1366×768, 1360×768, 1280×1024, 1280×800 1280×768, 1152×768, 1024×768, 800×600, 640×480 | |||
| Color Space YUV, RGB | ||||
| Chroma Subsampling 4:4:4, 4:2:2, 4:2:0 | ||||
| Color Depth 8-bit, 10-bit, 12-bit | ||||
| Audio | ||||
| HDMI IN / HDBaseT OUT | PCM 2Ch, LPCM 5.1, LPCM 7.1, Dolby® Digital, DTS® 5.1, Dolby Digital Plus, Dolby TrueHD, DTS-HD Master AudioTM | |||
| Sample Rate 32 kHz, 44.1 kHz, | 48 kHz, 88.2 kHz, 96 kHz, 176.4 kHz, 192 kHz | |||
| Bit Rate 24-bit (max.) | ||||
| Resolution / Distance 4K/UHD - Feet / Meters 1080p - Feet / Meters | ||||
| HDMI IN / OUT 15 5 30 10 | ||||
| CAT-5e / CAT-6 | 230 | 70 | 330 | 100 |
| CAT-6a / CAT-7 | 230 | 70 | 330 | 100 |
| Signal | ||||
| Bandwidth | 10.2 Gbps | |||
| HDMI | 2.0 | |||
| CEC | Yes | |||
| HDCP | 2.2 | |||
| Temperature | Fahrenheit | Celsius | ||
| Operating | 32 to 122 | 0 to 50 | ||
| Storage | -4 to 140 | -20 to 60 | ||
| Humidity (RH) | 20% to 90%, non-condensing | |||
| Dimensions | ||||
| Wall | 1 gang | |||
| Weight | Pounds | Kilograms | ||
| Device | 0.4 lbs | 0.18 kg | ||
| Certification | ||||
| Unit | CE, FCC | |||
Index
A
Audio muting 22
C
CEC 23
Configuration IP. See IP configuration
Connection
diagram 10 instructions 10
Contents package 8
Control type setting 24
Customer support 3
D
Default settings 60
Description front / rear panel 9
E
EDID
presets 29 detailed summary 34 saving 29
F
Faceplate removal and assembly 13
Factory-default setting resetting 16
FCC statement 6
Features 8
Firmware updating using the web GUI 57 using USB 58
H
HDBT testing 33
|
Input selecting 22 Installation 10 IP configuration 14, 31
O
Operating notes 3
P
Panel descriptions 9
Password default 18
PoE compatible receiver 11 power injector 11
R
RS-232 settings 27
S
Safety information 6
Settings auto-switching 22 HDCP 22
Specifications 61
T
Timers auto-power off 24 power-on delay 24 projector lamp cool-down 24
U
Updating firmware 57 Users primary user name
W
Warranty 4 Web GUI accessing 17


- TWO-INPUT WALLPLATE SWITCHER FOR HDMI AND USB-C WITH HDBASET™ OUTPUT
- VERSION INFORMATION
- WELCOME TO ATLONA
- SALES, MARKETING, AND CUSTOMER SUPPORT
- MAIN OFFICE
- INTERNATIONAL HEADQUARTERS
- OPERATING NOTES
- ATLONA, INC. ("ATLONA") LIMITED PRODUCT WARRANTY
- COVERAGE
- OR
- COVERAGE PERIODS
- LIMITED PRODUCT WARRANTY TERMS – NEW PRODUCTS
- LIMITED PRODUCT WARRANTY TERMS - REFURBISHED (B-STOCK) PRODUCTS
- REMEDY
- EXCLUSIONS
- DISCLAIMERS
- LIMITATION ON LIABILITY
- EXCLUSIVE REMEDY
- OTHER CONDITIONS
- IMPORTANT SAFETY INFORMATION
- CAUTION
- FCC STATEMENT
- TABLE OF CONTENTS
- INTRODUCTION
- FEATURES
- PACKAGE CONTENTS
- PANEL DESCRIPTION
- 1 RS-232
- 2 PWR
- 3 LINK
- 4 USB-C
- 5 HDMI
- 6 HDMI
- 7 USB-C
- 8 HDBASET OUT
- INSTALLATION
- RS-232 CONNECTOR
- CONNECTION INSTRUCTIONS
- CONNECTION DIAGRAM
- FACEPLATE REMOVAL AND ASSEMBLY
- IP CONFIGURATION
- SETTING THE IP MODE
- SETTING THE IP ADDRESS USING COMMANDS
- SETTING STATIC IP MODE
- SETTING DHCP MODE
- SETTING THE IP ADDRESS USING THE WEB GUI
- RESETTING TO FACTORY-DEFAULT SETTINGS
- THE WEB GUI
- ACCESSING THE WEB GUI
- MENU BAR
- TOGGLES
- BUTTONS
- INFO PAGE
- SYSTEM INFO
- VIDEO INFO
- MODEL NAME
- SOFTWARE VERSION
- ON-TIME (H-M)
- ACTIVE INPUT
- SIGNAL TYPE
- VIDEO FORMAT
- ASPECT
- COLOR SPACE
- COLOR DEPTH
- A/V SETTINGS PAGE
- INPUT SELECTION
- AUTO SWITCH
- HDCP SETTINGS
- OUTPUT
- DISPLAY PAGE
- CEC
- CEC COMMAND
- SYSTEM SETTINGS
- DISPLAY AUTO POWER ON
- DISPLAY AUTO POWER OFF
- LAMP COOL DOWN TIMER (SEC.)
- AUTO POWER OFF TIMER
- POWER ON DELAY TIMER (SEC.)
- CONTROL TYPE
- FEEDBACK VERIFY
- DISPLAY MODE
- TCP/IP SETTINGS OF CONTROLLED DEVICES
- IP MODE
- IP ADDRESS
- PORT
- USERNAME
- PASSWORD
- SAVE
- RS-232 / IP COMMANDS
- SEND MODE
- ON/OFF/VOLUME+/VOLUME-/MUTE
- SET COMMAND
- FEEDBACK
- CR-LF
- TEST
- RS-232 PAGE
- ZONE
- TX RS-232
- RX RS-232 ZONE 1
- EDID PAGE
- EDID SETTINGS
- EDID SAVED
- CONFIG PAGE
- OLD USERNAME
- OLD PASSWORD
- NEW USERNAME
- NEW PASSWORD
- CONFIRM NEW PASSWORD
- ALL USER LOGIN SETTINGS
- SYSTEM PAGE
- IP
- NETMASK
- GATEWAY
- TELNET PORT
- TELNET LOGIN MODE
- TELNET TIMEOUT
- BROADCAST
- POWER
- RESET TO DEFAULT
- FIRMWARE UPDATE
- HDBT PAGE
- HDBASET ZONE
- START
- TX VERSION
- RX VERSION
- TMDS CLOCK
- CABLE LENGTH (ESTIMATED)
- VIDEO QUALITY (VIDEO BER)
- CABLE QUALITY PAIR (A, B, C, D)
- APPENDIX
- INTERNAL EDID DATA
- EDID DESCRIPTION
- UPDATING THE FIRMWARE
- USING THE WEB GUI
- USING USB
- DEFAULT SETTINGS
- INDEX
- A
- C
- D
- E
- F
- H
- O
- P
- R
- S
- T
- U
- W
Brand : Atlona
Model : AT-HDVS-210U-TX-WP
Category : Hi-Fi System